首頁 » August 13, 2021

Creating Clothing and Accessory in Blender for Character Creator

Creating clothing and accessory in Blender for Character Creator.

Greetings, this is Peter Alexander. I’m a digital freelancer specialized in illustration, graphic design, and 3D modeling.

I’d like to share how I take advantage of Blender’s powerful modeling features in creating clothing and accessories, then send those assets to Character Creator to build up a reusable asset library. Character Creator supports skin weights transfer function and other optimizing tools to make the process easy. 

In this article, I am putting existing assets through the pipeline for refinement, so you will have better ideas about the Character Creator-to-Blender pipeline. I will use a free ‘Blender Auto Setup’ add-on to simply the import and export process. 

If you are interested in how I built up clothing and accessories from scratch in Blender, please check out this full-length video.

*Note: there is no dubbing in this video.

You can walk with me by using the free trial of Character Creator. Let’s start!

Export Clothed Character from Character Creator

Depending on your needs, export either a clothed character or an unclothed character in the pose you plan to work within Blender. If you export with a bind pose, make sure your character is in the same pose when you re-import your clothing and accessories.
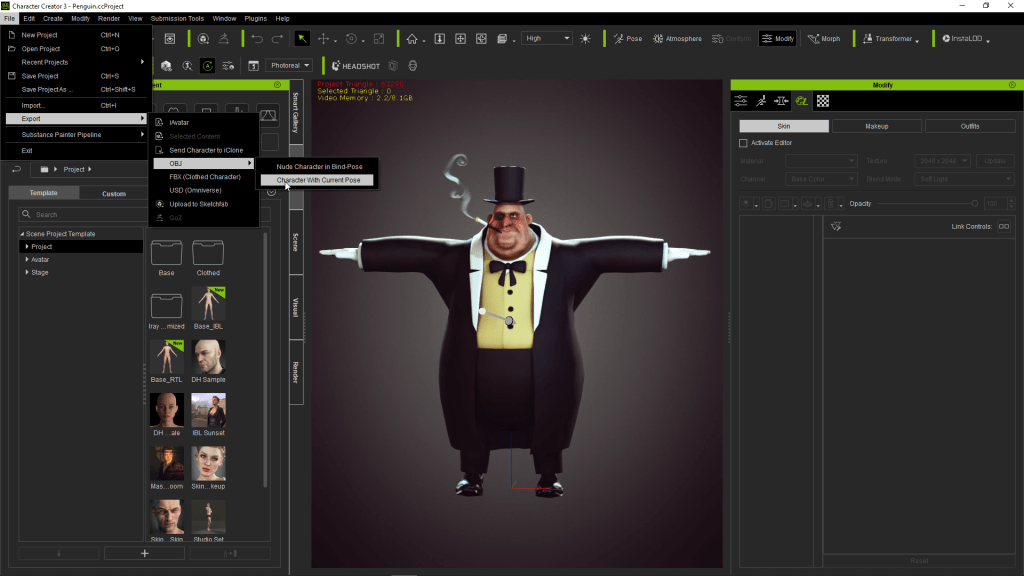
Exporting a clothed character from Character Creator for Blender.

As I was going to be re-importing all of the items I had exported in an optimized state, I deleted his existing clothing after I exported the clothed character.

Unclothed character in Character Creator .

Import Character in Blender via Auto Setup

In Blender, using the CC3 tab provided by the Blender Auto Setup add-on, import your file using the ‘Import for Accessory’ option. This is similar to the other options, but is optimized for asset editing and export.
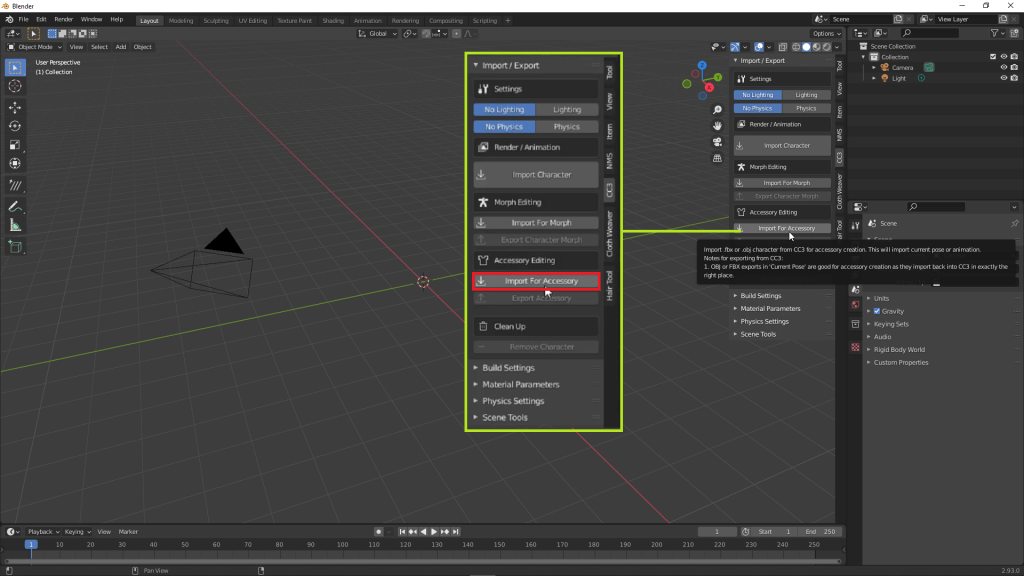
Importing the character into Blender via Auto Setup tool.

Tweak Clothing and Accessories in Blender

Although not necessary, I fixed a few visual settings, such as the opacity blending for the smoke I had previously created. Doing this is good practice, especially if you plan to render within Blender at some point.
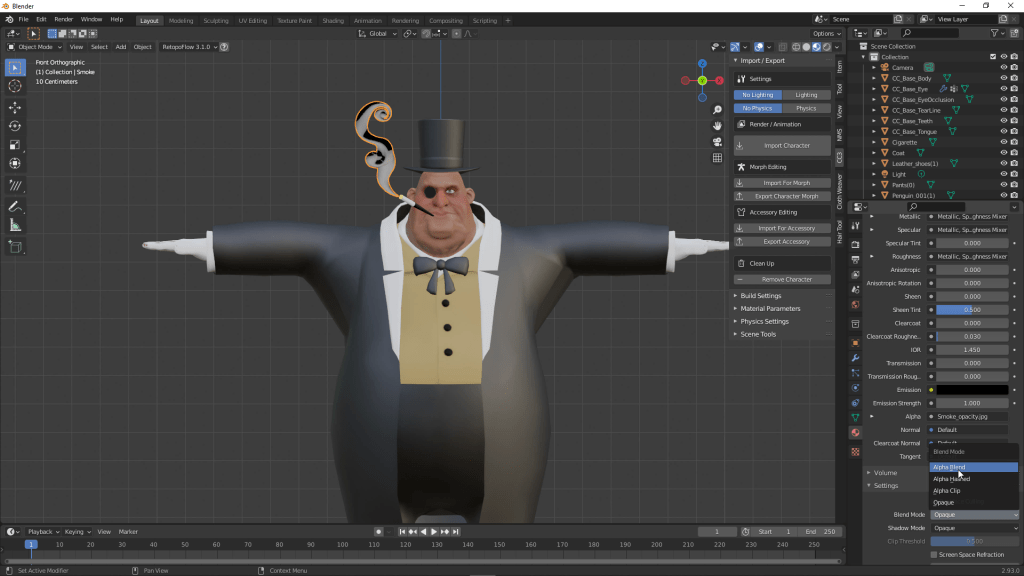
Tweaking clothing and accessories in Blender.

Make any adjustments, edits, or even create new assets from within Blender, depending on your requirements. In my case, I mostly adjusted a few clipping issues and added some edge loops to assist with clothing deformations.

Adding edge-loops to the clothing in Blender for iClone and Character Creator.

Export Clothing and Accessories via Auto Setup

After making the adjustments or creating the digital assets, export the item back through the Blender Auto Setup add-on as an accessory. If you’ve imported the character as an OBJ, you’ll be provided with an OBJ option to export back. I believe if you’ve imported an FBX, that option will be provided.

Exporting clothing and accessories via Auto Setup.

Bring in Assets with Skin Weight presets

Import the items one-by-one through the Create > Accessory option. This will import the item in approximately the same position relative to the posed character as it was created in Blender. Sometimes you will have to do some placement adjustments.

Bringing in assets with skin weight presets for Character Creator.

By default, the item is an accessory (unskinned geometry), and you can part the item to various bones for accessory (such as in the case of this character’s cigarette and smoke, which I parented to the Jaw bone). Clothing should be skinned through the ‘Transfer Skin Weights’ option.
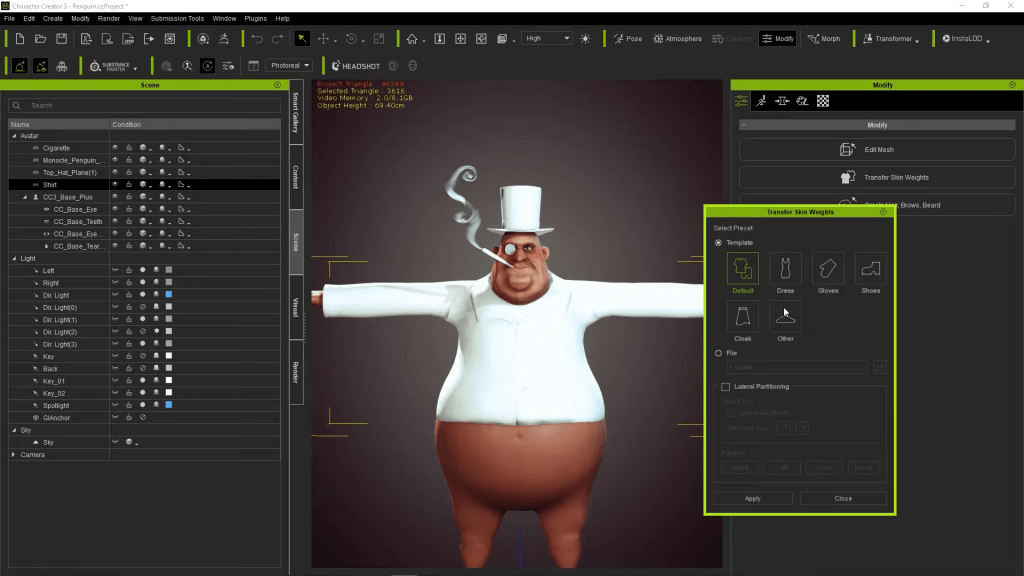
Transfer skin weights tool in Character Creator.

Optimizing the Assets with Hide Mesh Tool and Skin Weight Editing Tool


Clothing that conceals significant geometry should be optimized to auto-hide that geometry when fitted to the character. This can be done in the ‘Hide Body Mesh Tool’. This not only optimizes the visuals during clothing deformation, but it will also allow you the option of deleting hidden mesh automatically during exports into other applications.
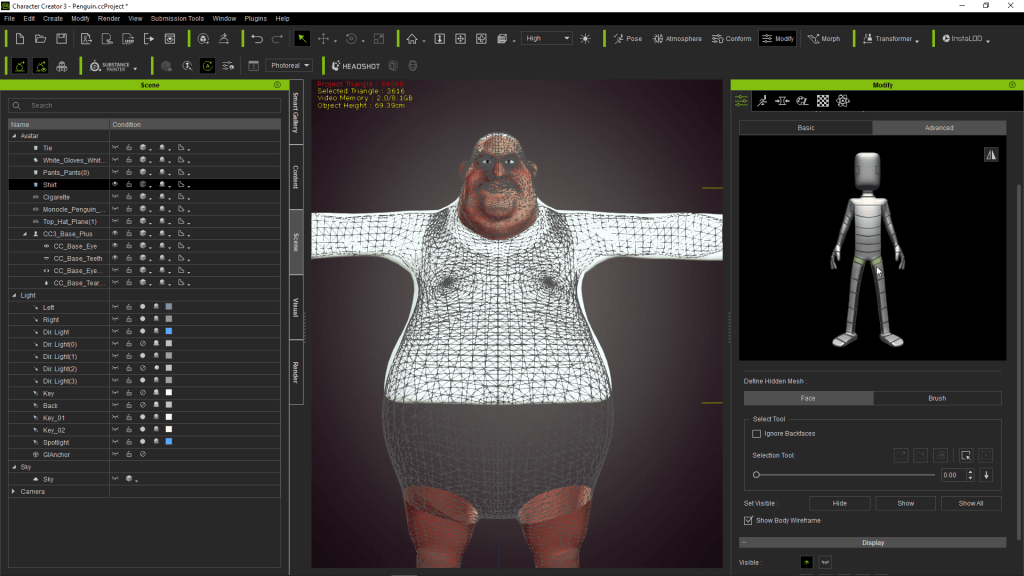
Optimizing the assets with Hide Mesh tool and Skin Weight Editing tool in Character Creator.

Finally, try various poses to see where issues with skinning weights should be adjusted. In my case the clavicle was pulling the collar of the coat too harshly, so I assigned some of the vertex weights to one of the upper spine groups.
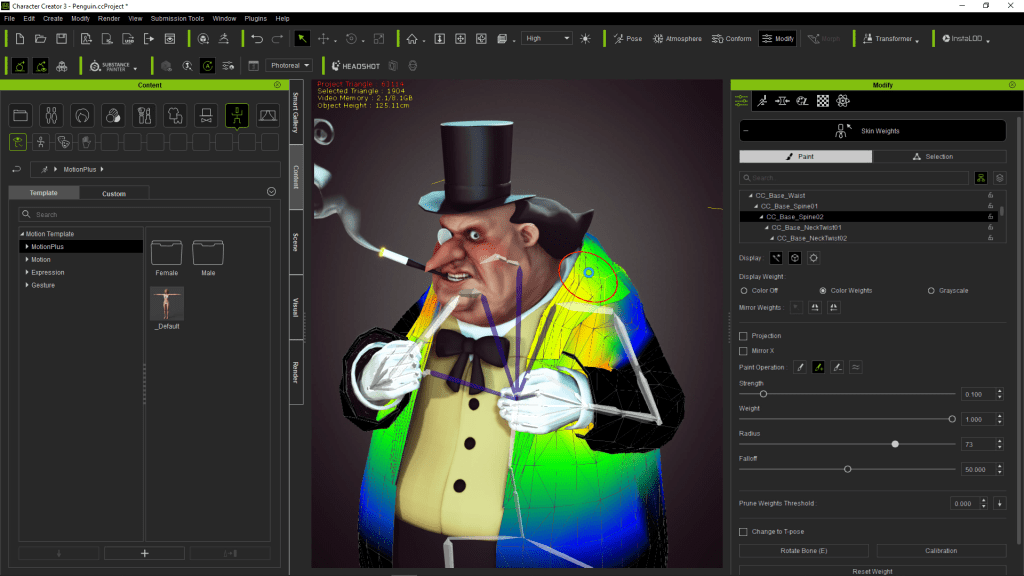
Posing the character in Character Creator.

Send Character Back to Blender for Eevee Render via Auto Setup

If you plan to render out the character using Blender’s Eevee engine, you can export the character with animation or in a pose using the FBX export options. I tried the option to delete the hidden mesh during export. This eliminates the ability to re-import back into Character Creator, lessens the need to adjust the mesh after it’s been imported. 

You can import the FBX file to Blender through the ‘Import Character’ option of Blender Auto Setup add-on, which will automatically translate Reallusion’s Digital Human Shader and parameters to Blender Eevee and Cycle. You can further adjust SSS skin, eyes, teeth, and hair dynamically.
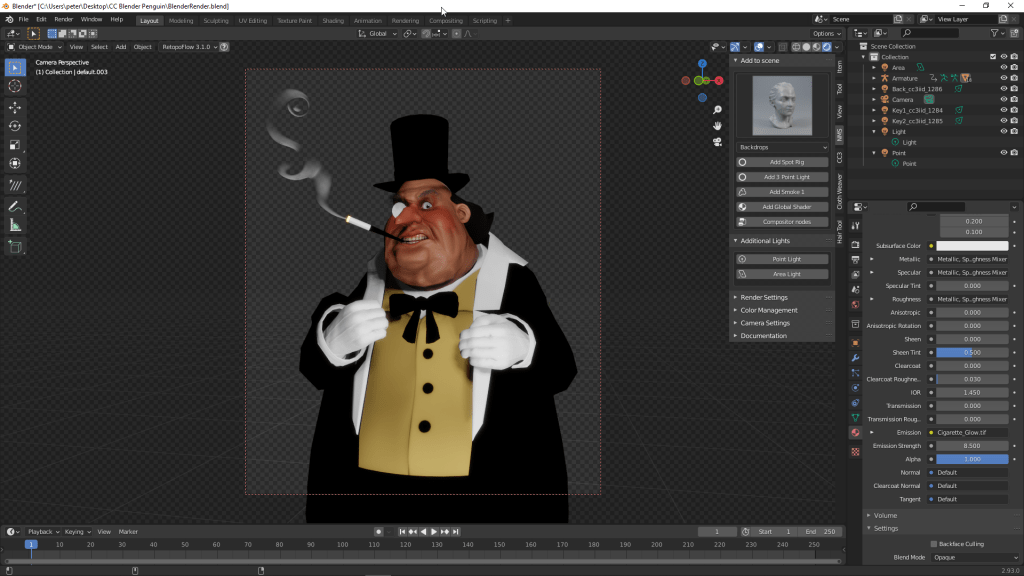
Rendering the character with Blender's Eevee engine.

Max Styling: Innovative CC3 Smart Hair System

Comprehensive 3D Hair and Beard Component-based Design for Any Hairstyle Imaginable.

The embedded Smart Hair system is designed to provide the most realistic, yet performance-friendly hair, brows, and beard for digital humans in games and films. The card-based hair meshes are intricate in detail, economical in texture resolution, and efficient for real-time rendering. The highly flexible color gradients and specular variations are powered by the Smart Hair shader. Design components allow you to freely assemble different custom hair and beard elements into unique hairstyles, while the beard and brows can dynamically conform to any facial movement.

A Plethora of Choices

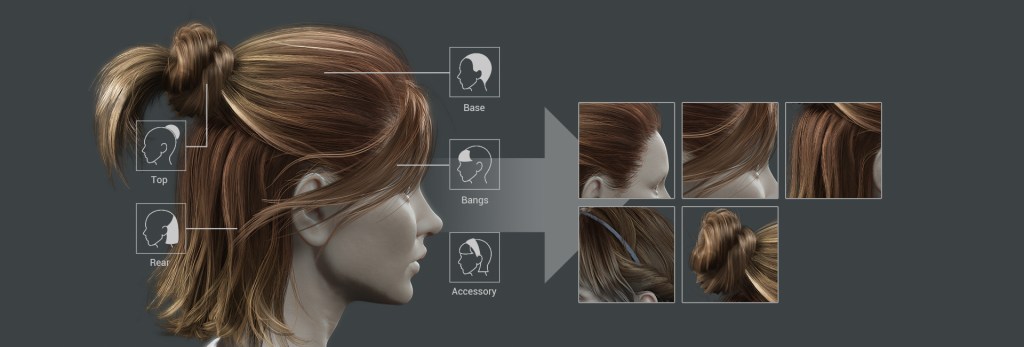
Smart Hair’s component-based design offers an easy and effective way to manage 3D hair, brow and beard assets. Users can add select hair parts and accessories, combine elements into groupings, and compose them together to form a cohesive look. Group and Style items can be replaced with a single click to quickly test out different variations. Imported assets assigned to a corresponding facial area automatically conforms to the underlying surfaces . The beard is composed of mustache, goatee, sideburns, soul patch and other accessories. On the other hand, hair is divided into base, top, rear, bangs and accessory parts for optimal mixing. Use the component design system to alter character hairstyles with different fringes, bodies, and ponytails. You can also fill in tiny hair and wispy fuzz around the hairline and back of the neck.

iClone's Smart Hair is assembled from component-based hair parts

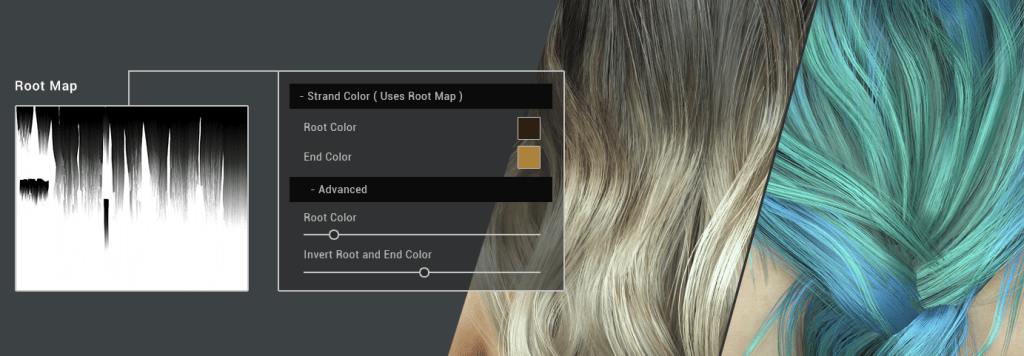
Creating a multitude of natural hair looks is possible with four powerful controls: Ombré (root and end color), Balayage (highlight color), Base Layer (vertex color), and Reflection (flow map). With these potent effects you can easily create chic or stylized hair dye, create silky smooth hair reflections, simulate silver gray, or parched look and feel. Blend with vertex color (predefined in hair meshes) for enhanced depth effect. For natural layer contrast, you can use lighter vertex color on upper layer meshes, and darker vertex color for layers underneath. Create subtle gradual hair color fades using Root and End colors, usually from darker tones at the roots to a lighter tone towards the hair tips for a classic ombré style. The strand color pattern is defined by the grey-scale Root map, and supports different blend modes and strength controls. The Highlight Color effect is the highlighting done with hair dyes that we see in reality; Two highlight colors can be blended to create more natural looks, with the ID texture map controlling the effect. The natural reflections gives hair a healthy lifelike look and feel . One can adjust the Specular strength, alter the Reflection Flow, or disrupt the reflective pattern to emphasize unique hairstyles.

Smart Hair offers several intuitive adjustments such as Ombre and Balayage with the use of effect maps

The Smart Hair system is designed for performance: the card based meshes are small in size, fast to load, and efficient for real-time animation. One complete hair set is merely hundreds or thousands of polygons, while using optimal texture sizes : hair at 2K and beard at 1K. By utilizing minimal resources you can achieve high visual realism with sophisticated coloring, and adjustable reflections using the real-time shader.

The Smart Hair Beard and Brows can perfectly conform to animated facial surfaces during real-time performance. It works in real-time for facial morphs, lip-sync animations, facial motion capture, and intensive expression change with the Face Puppet tool. One can also fine-tune the shape and position of the facial hairs with the Mesh Editor. To top it all off, facial hairs are exportable, at any stage, as FBX blend-shapes for game engines and 3D rendering.

Reallusion’s Smart Hair system is compatible with major 3D hair creators like Ornatrix (for Maya, C4d, Ma, ...), XGen, and Blender hair plugins – as long as they can export card based hair meshes in OBJ or FBX format, and generate the texture maps needed for the shader effects. You can convert existing hair assets as Smart Hair components, or upgrade the rendering with the Smart Hair shader by adding required effect maps. Smart Hair supports direct shader compatibility with Unreal Engine; with one-click you can transfer hair assets through the Auto Setup plugin, while keeping the identical feature adjustments consistent between the two programs. For Unity and other 3D tools, you can choose to bake shader effects to PBR textures for rendering.

Reallusion's Smart Hair system is compatible with major 3D hair design solutions like Ornatrix, XGen, and Blender hair plugins

Smart Hair’s beard and brow elements are designed to move along with their corresponding facial vertices – however when bringing in new items which have vertices detached from the facial surface, users can use the Vertex Assignment tool to define the target following area to avoid mesh stretches, or mesh penetration, when animating the face.

For more information, visit the Smart Hair landing page.

Similar Add-on Packs