Why use Reallusion AutoSetup?
Character Creator (CC), iClone, and ActorCore provide quality rigged characters, animations, and assets for game developers. However, importing characters to Unreal Engine requires heavy and complex rigged character setups, which include creating and assigning shader blueprints for each part of the character. With the help of the Reallusion Auto Setup tool, you can save an enormous amount of the time invested in your project, making the process of Digital Human shader assignment and characterization for Unreal Engine fully automated.

UE5 Lighting System: Lumen
Reallusion AutoSetup 1.23 and later versions guarantee compatibility with Unreal Engine 5 (UE5), allowing your character to be transferred from CC (with optional motion export) to UE5. One of the major updates from UE4 to UE5 is its new lighting system: Lumen. In this article, we will cover how to get the best shader results under a Lumen lighting setup. Epic provides a huge improvement in performance with the new Lumen lighting system compared to the UE4 Standalone Ray Tracing system.

*Using hardware Ray Tracing is down to personal preference, as long as one can balance between performance and visual quality.
UE5 Physics System: Chaos
Another major UE5 update is its physics system: Chaos Physics. Compared to UE4 PhysX, Chaos provides new configurations and settings for more physics possibilities. Hair and clothes can now move more convincingly, given their material nature. At the end of this article, we will cover how to adjust collision shapes, vertex weight painting, and Chaos physics configuration to best optimize the physics simulations.
Reallusion AutoSetup Download and Installation
It is recommended to download and install the newest version of the AutoSetup tool through the RL website – AutoSetup free download page. Best practices are integrated into AutoSetup 1.24, which has fixed most of the shader and physics issues you might have encountered with AutoSetup 1.23 (Please see the installation guide on how to set up your Unreal project with the AutoSetup plugin).
Character Export and Import Options
To get started, you need a character from CC or iClone ready for export. Upon export, please make sure to switch the Target Tool Preset to “Unreal”, and enable Delete Hidden Mesh to prevent mesh clipping between the skin and clothes. Motion export options are also provided for animated characters (Make sure to enable First Frame in Bind-Pose). Upon import, make sure to bring in your CC3+ characters with HQ Shader for the highest quality shading. If you want to include motion in your import, please enable these options: Use T0 As Ref Pose, Import Morph Targets (for facial morph), and Import Animation.

AutoSetup Automatic Shader Assignment
AutoSetup supports automatic shader assignment (automatically create and assign material instances with constructed blueprints). It is recommended to get familiar with the material properties and parameters of each shader, so you can instinctively know which shader and parameters to modify to get the result you are looking for. It can be most useful if your character is under different lighting scenarios and you want a specific shader outcome.


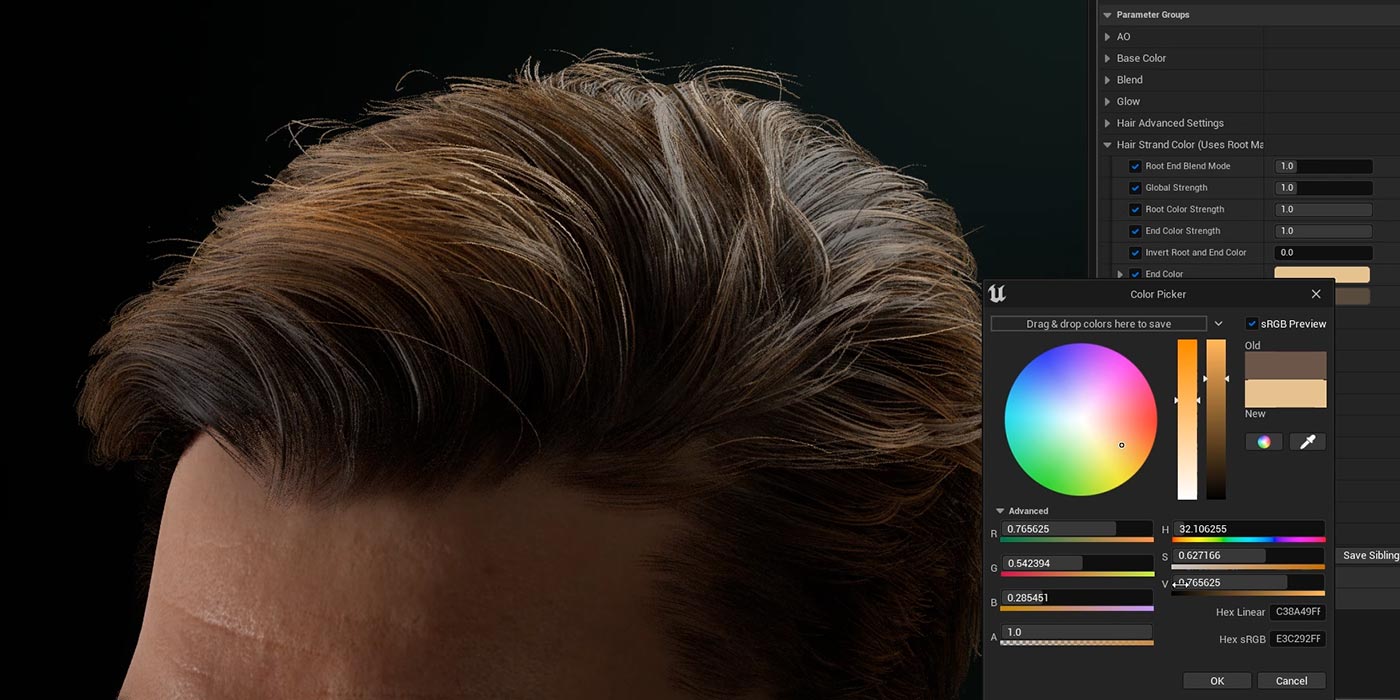
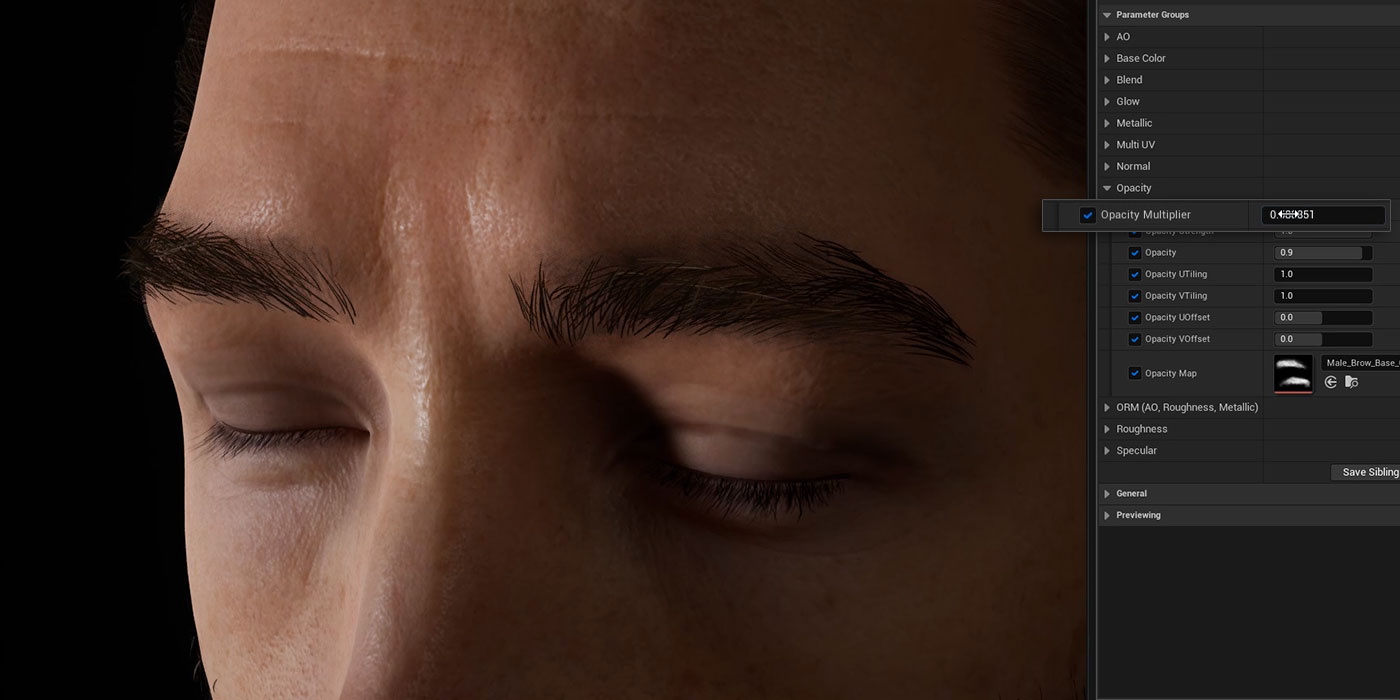
Hair Shader
Auto Setup one-to-one transfers Hair Shader parameters from CC and iClone to Unreal. The shader is set up to easily adjust hair color, highlights, specularity, roughness, thickness, and more. The Hair shader is assigned to the hair, brow, and beard.

Follow the steps below for AutoSetup 1.24 results.
(1) Hair Shader > Roughness and Specular – Adjust hair reflectiveness and glossiness :

(2) Hair Shader > Alpha Settings – Adjust the thickness of the hair (This is important if you want to achieve smooth and silky hair) :

(3) Hair Shader > Color – Adjust the root and tip color of the hair :
(4) Hair Shader > Highlight A and B – Additional highlights on the hair can be added :

(5) Repeat the same process on the eyebrows and beard (they share the same material properties) :


Teeth Shader
Teeth color and brightness can vary based on age, race, gender, and ethnicity. Whether you want your rigged character to have a radiant smile with neat and glistening teeth or a ferocious creature with intimidating and gritty teeth, anything is achievable with the help of the Teeth and Tongue shader. Ambient Occlusion properties are also provided to control shading inside the mouth cavity. Combine these parameters with the use of Character Creator morph sliders to generate variations with the best results.

Follow the steps below for AutoSetup 1.24 results.
(1) Teeth Shader > Normal Strength – It’s advised to tone down the normal strength if it’s too heavy :

(2) Teeth Shader > Teeth Desaturation and Teeth Diffuse Brightness – Adjust the saturation and brightness of teeth :

(3) Teeth Shader > Teeth Front Roughness and Teeth Front Specular – Adjust the reflectiveness and glossiness of teeth :

(4) Teeth Shader > Teeth scatter: Increase the subsurface scattering (SSS) of the teeth.

Eye and Eye Occlusion Shader
Eye Shader consists of different anatomical parts of the eye including the iris, sclera, limbus, and pupil, (each with adjustable features and parameters). You can flexibly change color, brightness, roughness, specular, depth, refraction level, etc. In the Auto Setup 1.24 update, Eye Shader & Eye Occlusion shader blueprints were enhanced to achieve a more realistic look on the eyes. Adjustments were made towards sclera brightness, iris brightness, and eye occlusion shadow.

Follow the steps below for AutoSetup 1.24 results.
(1) Eye Occlusion Shader > Depth Offset – You might have noticed a small mesh that is protruding out from the corner of Kevin’s eyes, use Depth Offset to push it back in:

(2) Eye Occlusion Shader > Shadow 1 and 2 Strength – Decrease shadow strength on Eye Occlusion (both Shadow 1 Strength and Shadow 2 Strength):

(3) Eye Shader > Iris Color and Iris Brightness – Increase the brightness and saturation of the iris:

(4) Eye Shader > Sclera Brightness – Increase brightness on the sclera, and as a bonus adjustment, change Sclera UV Radius to enlarge the eyes:

(5) Eye Occlusion Shader > Bottom Blur Range / Blur Strength / Expand – Adjust Blur Strength to get rid of unwanted gaps:

(6) Eye Shader > Iris UV Radius – Notice there’s an unnatural ring around the iris; adjust Iris UV Radius to fix it:

(7) Eye Shader > Iris Depth Scale – Adjust iris depth:

(8) Eye Shader > Iris Inner Scale – Adjust iris inner color range:

(9) Eye Shader > Lumbus: Adjust the properties of the ring around the iris.
(10) Limbus Dark Scale: Adjust iris outline thickness.
(11) Limbus UV Width Color: Adjust limbus boundary expand and contract.
(12) Limbus UV Width Shading: Adjust light shading to increase and decrease refractiveness.

(13) Eye Shader > Eye Shadow Radius – Adjust from a range of flesh colors for the eye corner:

(14) Eye Shader > Sclera Brightness – Revisit this parameter to tone down the brightness of the sclera:

(15) Eye Shader > Iris Color – Return to tone down the brightness of the iris:

(16) TearLine Shader > Specular and Metallic – Adjust to your liking:

(17) TearLine Shader > Detail Adjustment – Add normals on the tear line to increase detail:

Skin Shader
Get stunning renders for Digital Human skin in UE5 with the Reallusion Auto Setup tool. Digital Human Skin shader is set up to easily adjust subsurface scattering, roughness, specular, and micro-normals for character skin. Parameters on different facial parts can be adjusted separately with the help of RGBA masking.
Skin Shader – optional adjustments: How to get the results you’re looking for.
• Skin Shader > MicroNormal Tiling and MicroNormal Strength – Optional patterned skin micro-normal adjustment:

• Skin Shader > Mirco Roughness – Adjust roughness in different facial areas with the help of RGBA masking:

• Skin Shader > Specular – Adjust skin specular level:

• Skin Shader – Make subsurface scattering and transmission adjustments:

• To get the light transmission to work properly, make sure to switch your light mobility to “movable” and enable transmission:
Ray Traced Shadows
How to turn off Ray Traced shadows – You might come across a weird shadow artifact when using ray tracing, which normally appears on meshes with transparent properties:

Simply follow these steps to turn it off:
- Go to the material instance and browse to its parent shader blueprint.
- Duplicate the blueprint if it is directed to the RL_Standard shader (PBR shader). You do not want to overwrite the original PBR shader otherwise you will turn off Ray Tracing shadows on all the PBR assigned meshes.
- Assign the duplicated material blueprint to the material instance.
- Open up the blueprint and search for “Cast Ray Traced Shadows”.
- Disable “Cast Ray Traced Shadows”.
- Save and let it compile.
Check out the result of Kevin in different lighting scenarios:
Hair Physics
In the Auto Setup 1.24 update, prior physics issues were fixed. Few enhancements were made towards Chaos physics configuration and vertex weight-mapping, which includes a more accurate conversion from CC/IC texture weight map to UE vertex weight map (max distance scale value is set to 15 instead of 100 so the physics calculation is more subdued). Chaos physics configuration is optimized with a set of default values to create the best possible physics calculation. With these improvements, hair now moves more naturally without destroying its intended style.


If you have AutoSetup1.23, simply repeat the following steps for AutoSetup 1.24 results.
(1) Adjust the size of the colliders on your character’s head and shoulders:

(2) Remove weight paint on unwanted areas and smooth out the weights with the smooth tool:

(3) Make Chaos physics configuration adjustments (Please watch the video to see corresponding results for each configuration):
- Subdivision Count (3 or above): calculate physics with subdivision to avoid low-poly edges.
- Anim Drive Stiffness (0.5): Put more stiffness in the calculation, which helps retain its intended style.
- Anim Drive Damping (0.5): More damping and less shaky movement.
- Gravity Scale (0.3): Amount of gravity pull.
- Collision Thickness (0): Thickness of collision shape, larger the number the more distance away from the colliders.

How to add a mask and assign it to a specific configuration (in this case, Anim Drive Stiffness):
- Create a new mask and set the target to Anim Drive Stiffness.
- Enable cloth painting mode.
- Paint the tip of the hair to paint value 100 (vertex color white) and keep the remaining as paint value 0 (vertex color pink).
- Do a simple smooth with the smooth tool.
- Exit cloth painting mode.
- Go to Chaos physics configuration and under Animation Properties, you can find Anim Drive Stiffness. Paint values range from 0 to 100 with 0 for the root of the hair and 100 for the tip of the hair. You should keep the hair root stiffer and the hair tip softer.

Cloth Physics
In the Auto Setup 1.24 update, prior physics issues were fixed. Few enhancements were made towards Chaos physics configuration and vertex weight-mapping, which includes a more accurate conversion from CC/IC texture weight map to UE vertex weight map (Chaos physics configuration is optimized with a set of default values to arrive at the best possible physics calculation). It is suggested to delete unused collision shapes and fine-tune collision size and position to fit mesh boundary. Enable the “Delete hidden mesh” option while exporting to prevent mesh clipping between skin and clothes.

If you have AutoSetup1.23, simply repeat the following steps for AutoSetup 1.24 results.
Adjust collision shapes:
- Delete unused collision shapes to prevent unwanted collision interceptions.
- Scale and move collision shapes to fit more precisely with mesh boundaries (create new collision shapes if necessary). Please avoid oversized collision shapes. It might cause the mesh to bulge.

3. Adjust weight paint – Add weight up to waistband and smooth weight with the smooth tool:

4. Chaos Config > Subdivision – Set to 3 or above and Collision Thickness to 0:

5. Go back and forth to tune the weight paint and collision shapes until you get the best result:


For dynamic demonstration (GIF) of each step, please see Character Creator to UE5 Best Practice (dynamic demo).
Webpage : Auto Setup For Unreal Engine


2 comments
Could use a deep dive video into the process from Character to auto setup export and import in to engine. love the product