首頁

AI Empowers Impressive Crowd Simulation in iClone

Simulating realistic crowds has long been a challenge in game design and character animation. Fortunately, Reallusion has created iClone Crowd Sim, an advanced tool that can handle these complex simulations in a way that is intelligent and consistent with the environment. 

Adding to this great new development are advances in generative artificial intelligence technology, resulting in a truly dynamic solution that, until now, has involved purchasing several additional programs at a very high cost. This tutorial takes you step by step through the creation of crowds using AI to generate textures and the new features in iClone Crowd Sim.  

Step 1: Prepare your base characters  

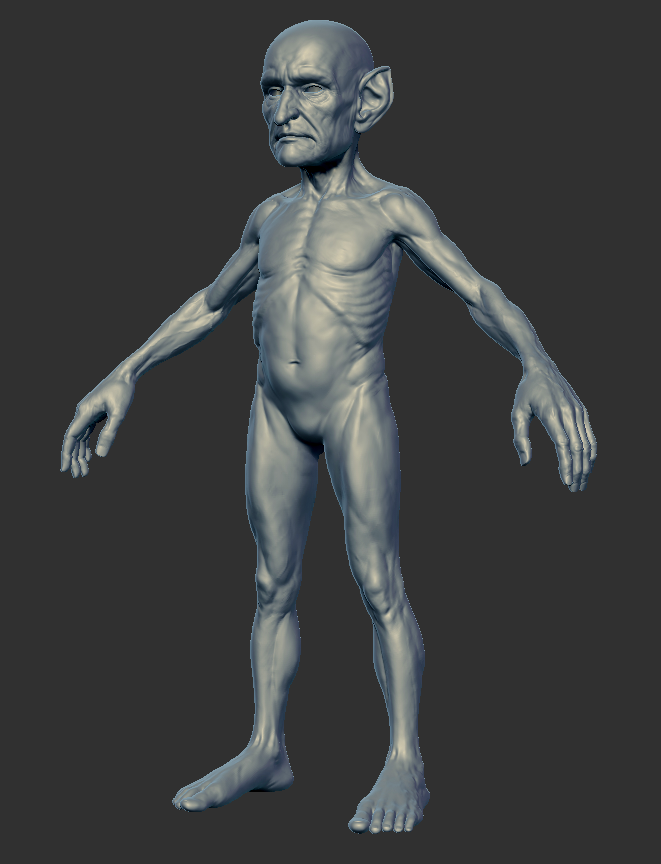
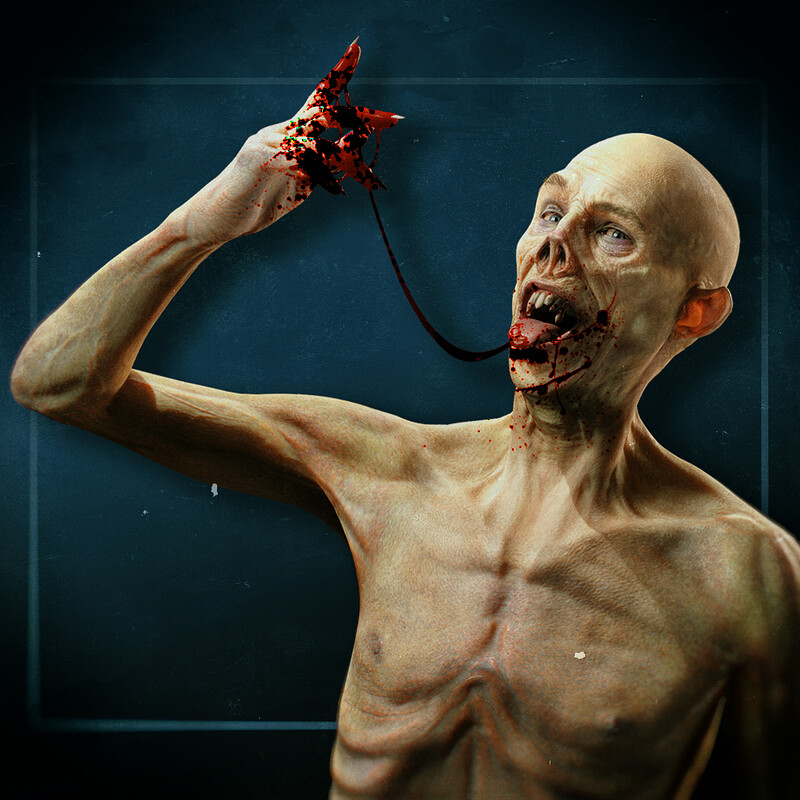
The first step is to choose the base characters you will use to generate variations. You can use hyper-realistic character packs offered by Reallusion for Character Creator (CC) or create your own. It will be enough if you have a few to simulate a large population but to work properly, each one must have unique elements. 

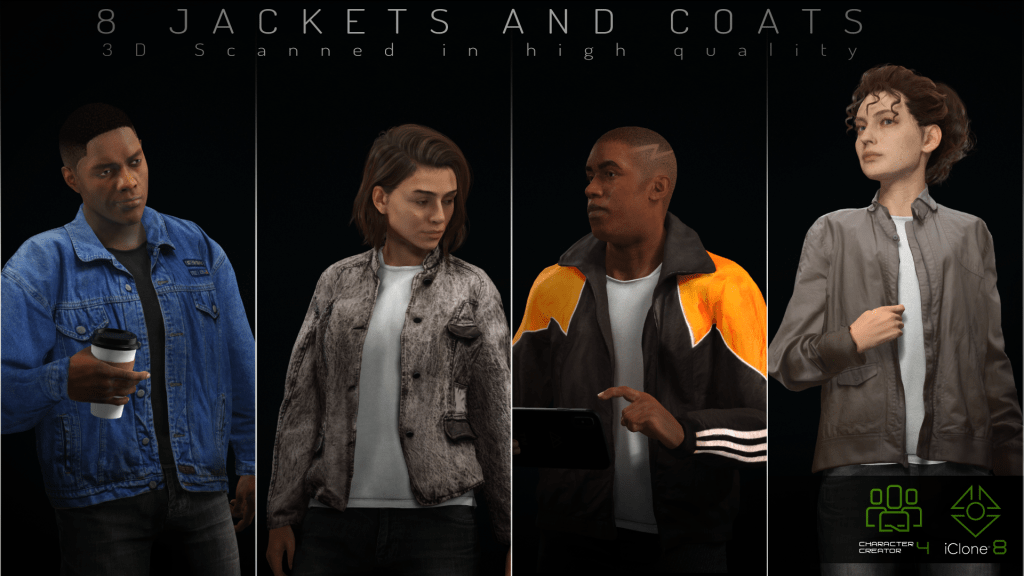
For this, you can use the “Hair Builder 2 – eGirl” package to increase the attractiveness of your characters with a wide variety of high-quality hairstyles. On the other hand, for clothing selection, you can purchase the “Jackets and coats” package to apply directly to your characters. This pack contains up to 8 types of jackets and coats scanned in 3D in high quality with a low poly methodology designed for video games and film productions.  

Step 2: Generate AI facial textures  

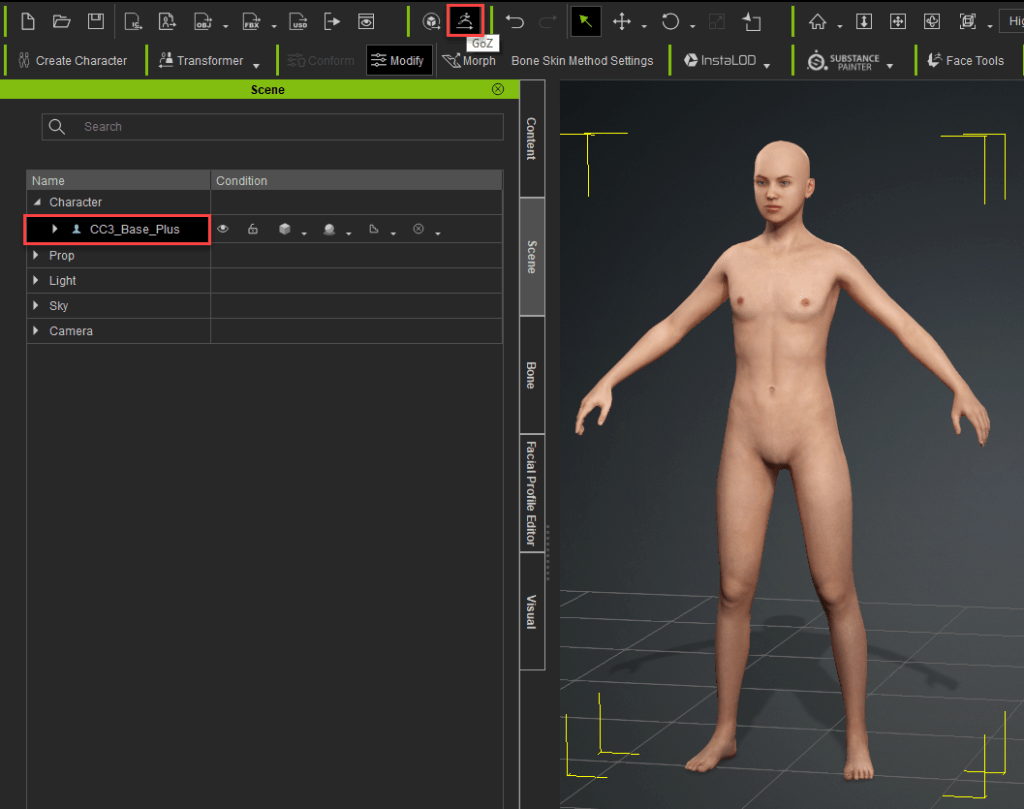
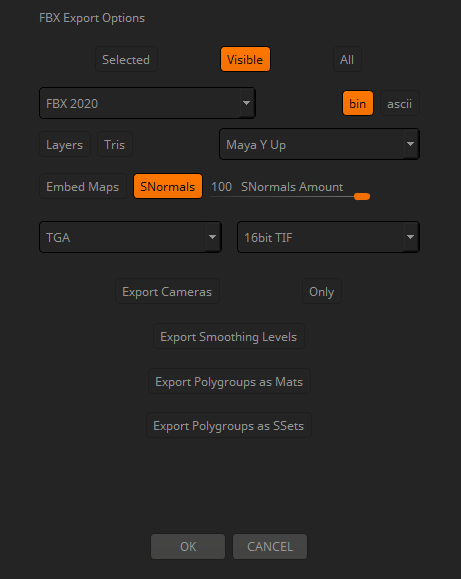
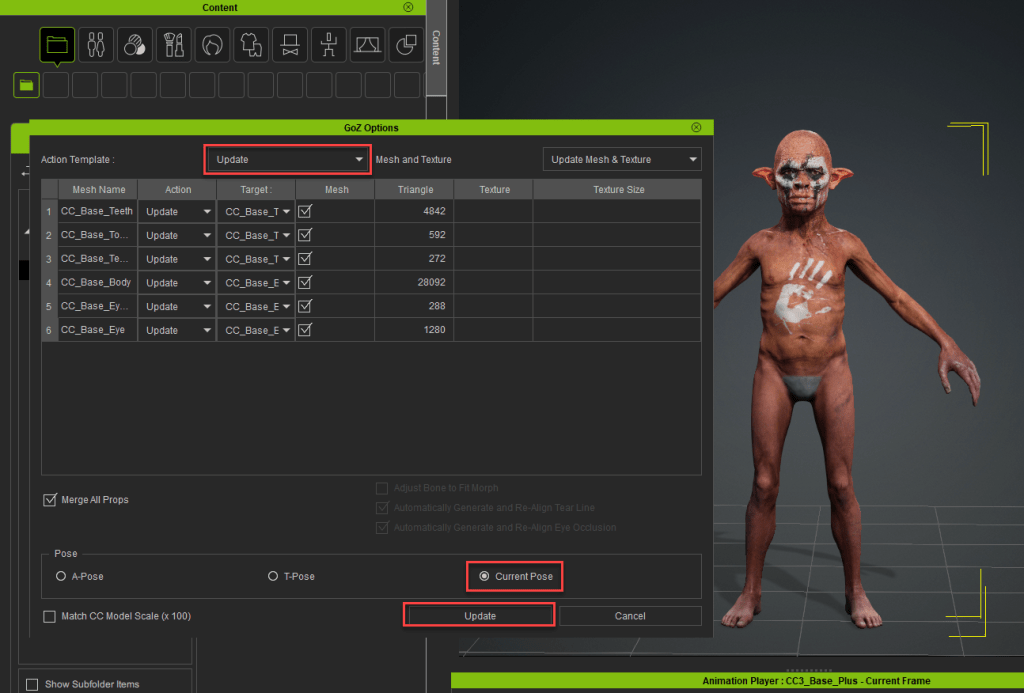
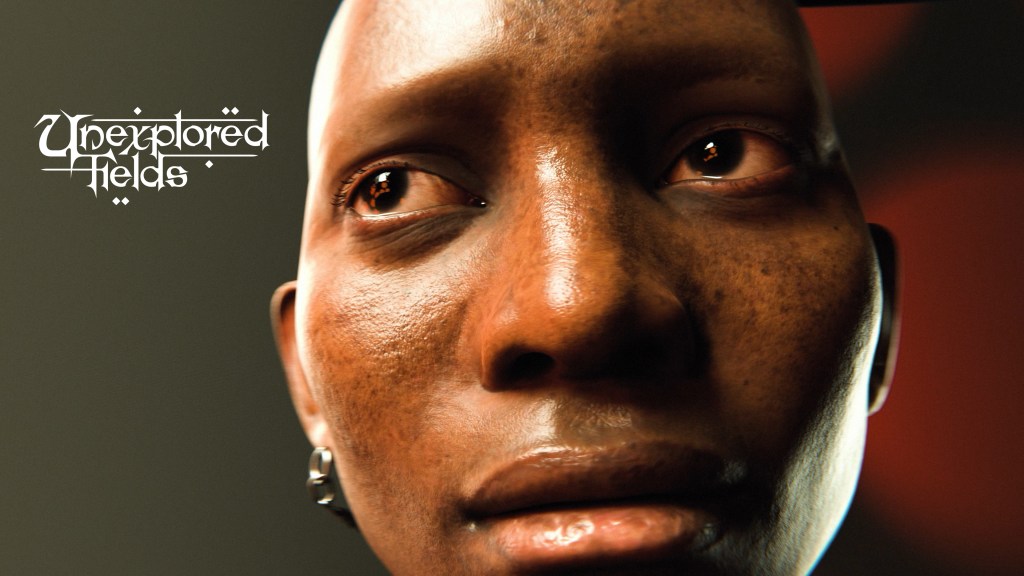
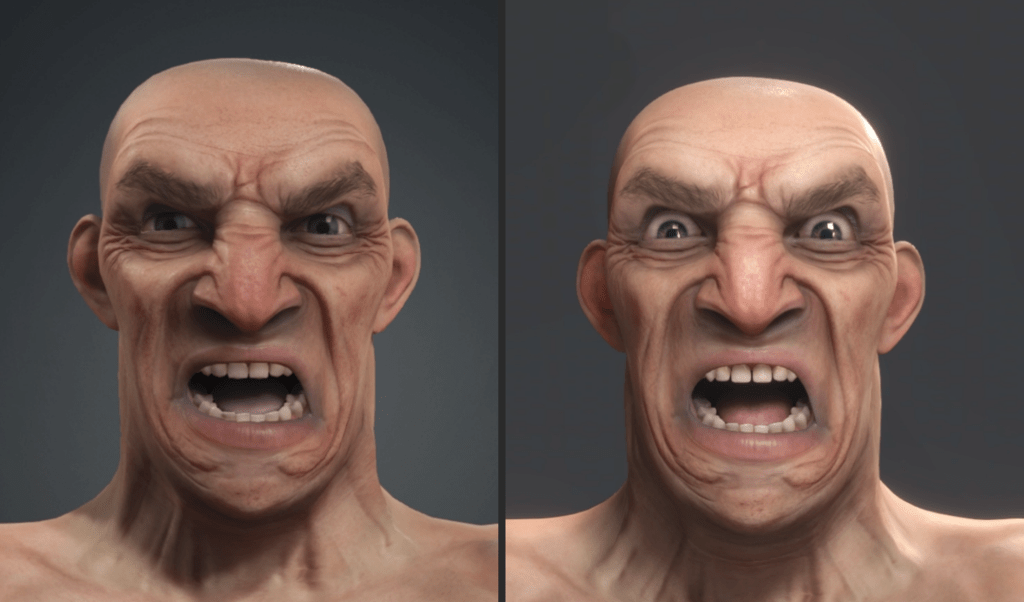
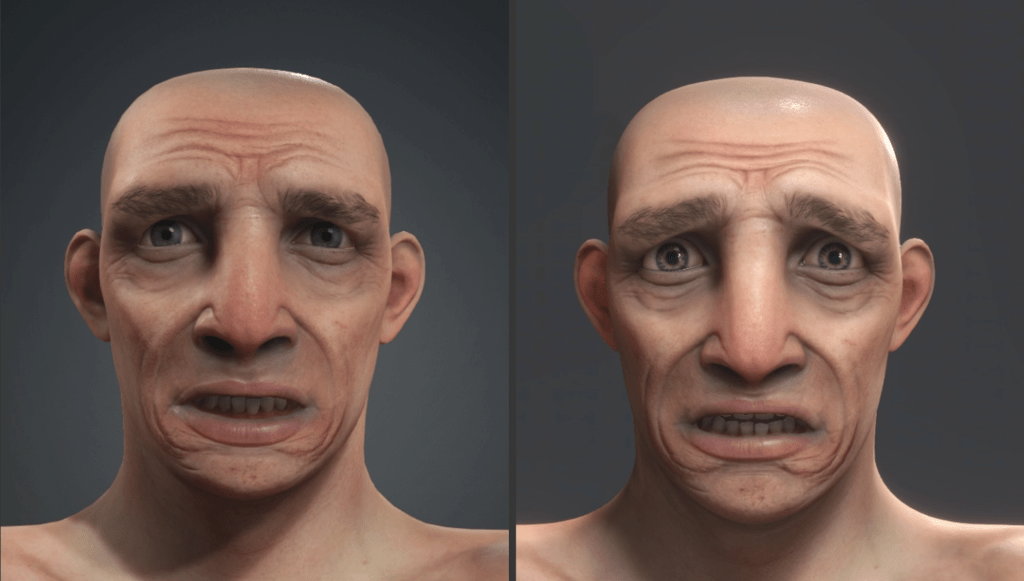
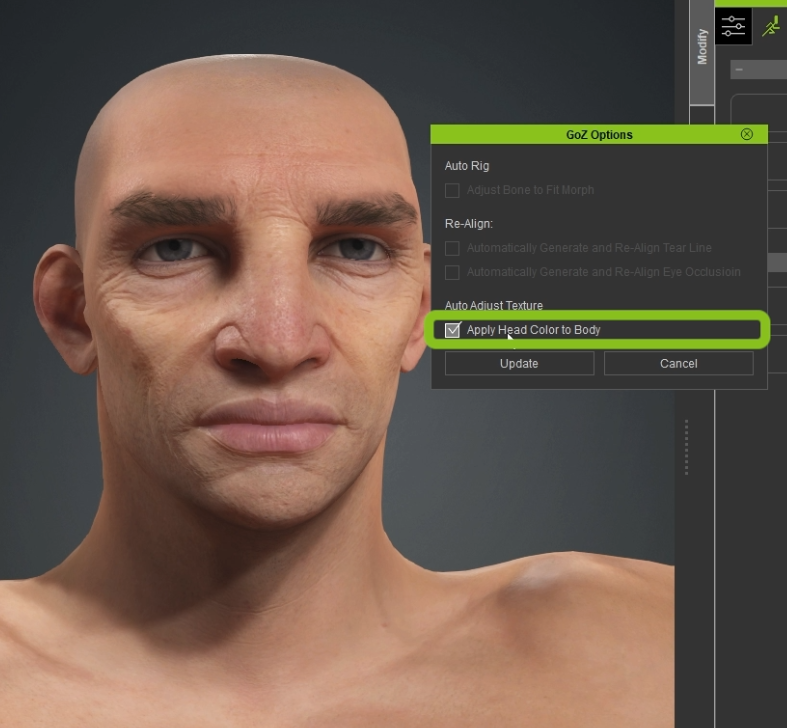
Export the facial texture of the base character you want to modify from Character Creator. To generate realistic facial textures from these textures we will use Stable Diffusion. An open-source diffusion model in which we will install “Mitsua Diffusion One”, an ethically developed model. Find and download the Mitsua Diffusion One model from its official website and place it in the corresponding folder of your Stable Diffusion model. 

Then load the base texture in “Picture to Picture” mode and create a prompt such as: “hyper-realistic facial texture, highly detailed photograph, with very diffuse light”. Generate several images by adjusting the model settings without giving the AI too much creativity until you get satisfactory results.

Currently, it will not be easy for the AI to generate the texture at the resolution and hyper-realistic quality in the details we require. To make up for this we can use Photoaid.com or other similar software to increase the resolution of the generated texture and improve the overall definition.  

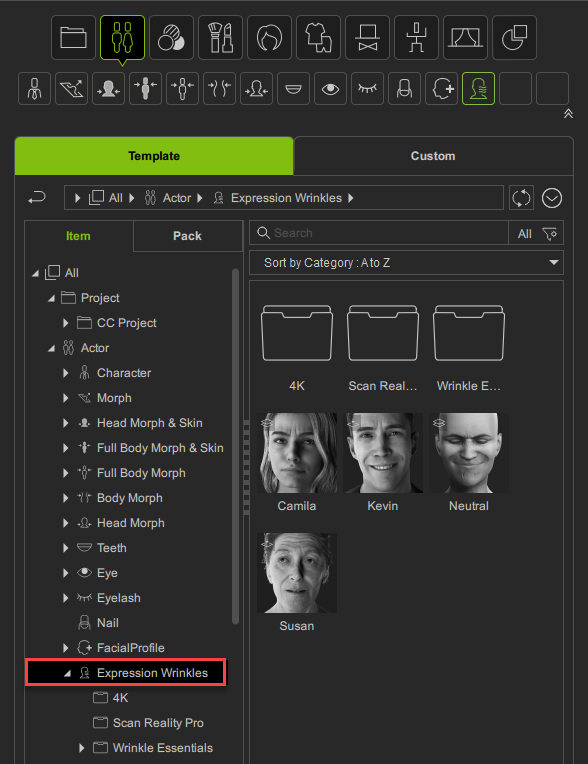
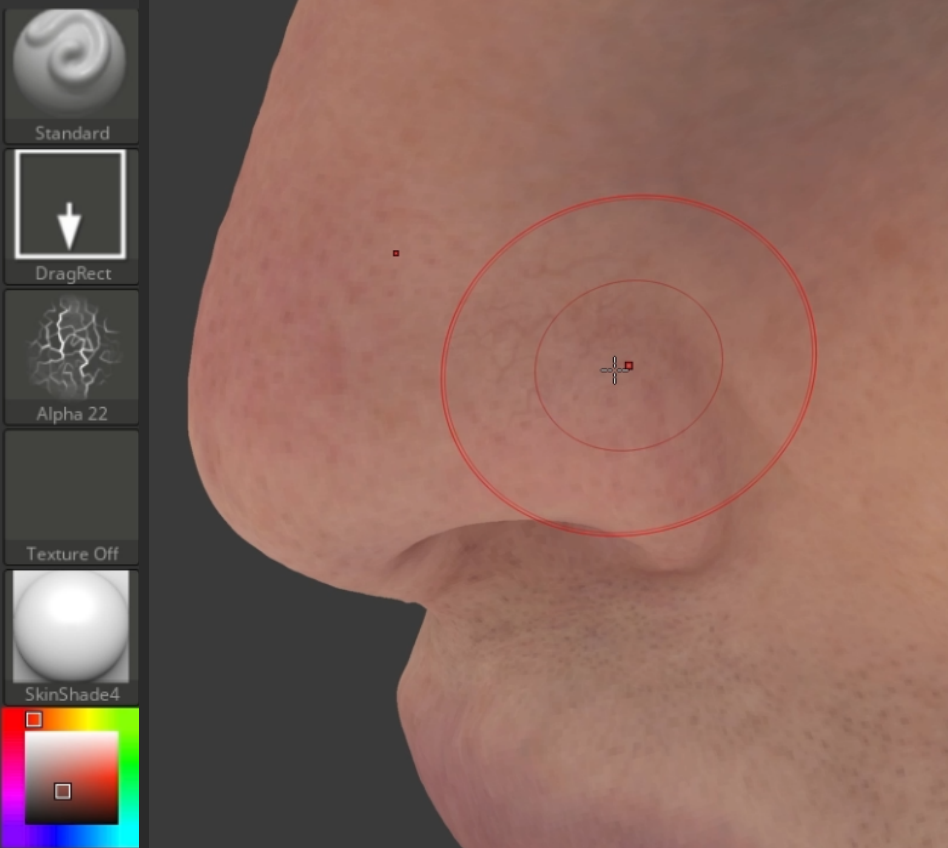
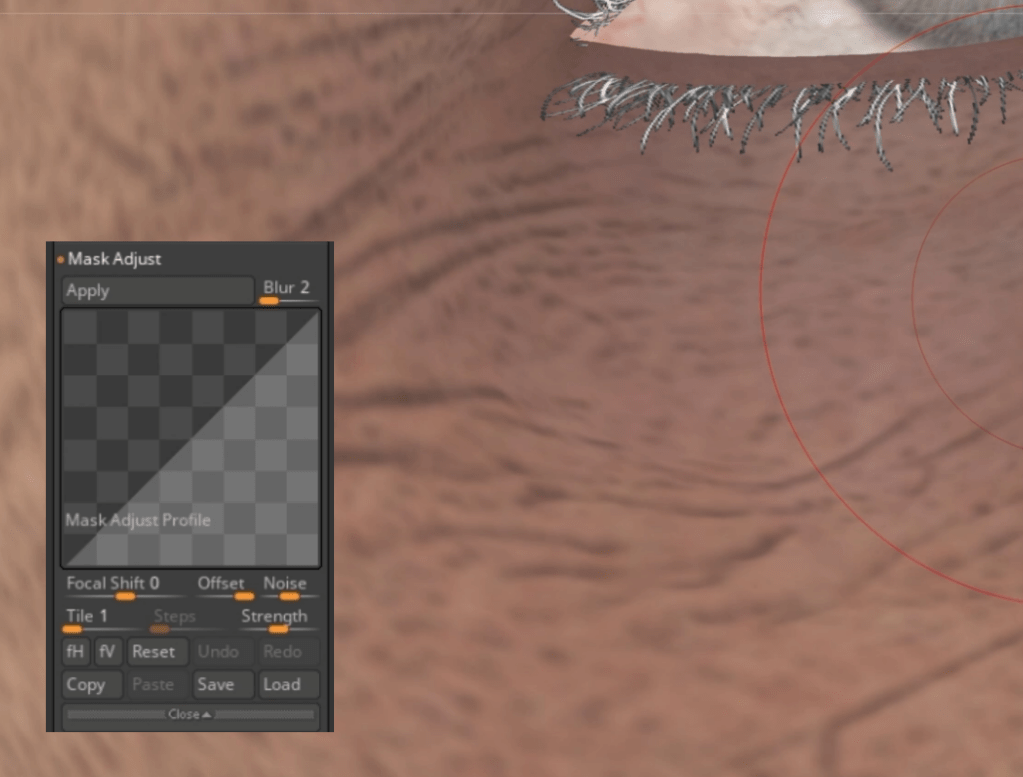
Before applying the texture I recommend taking it to an image editor in which we overlay the original texture and the generated texture. This way we can replace the parts that the AI has not recreated well (such as ears or nostrils) and that might not put the texture back on the 3D model.  

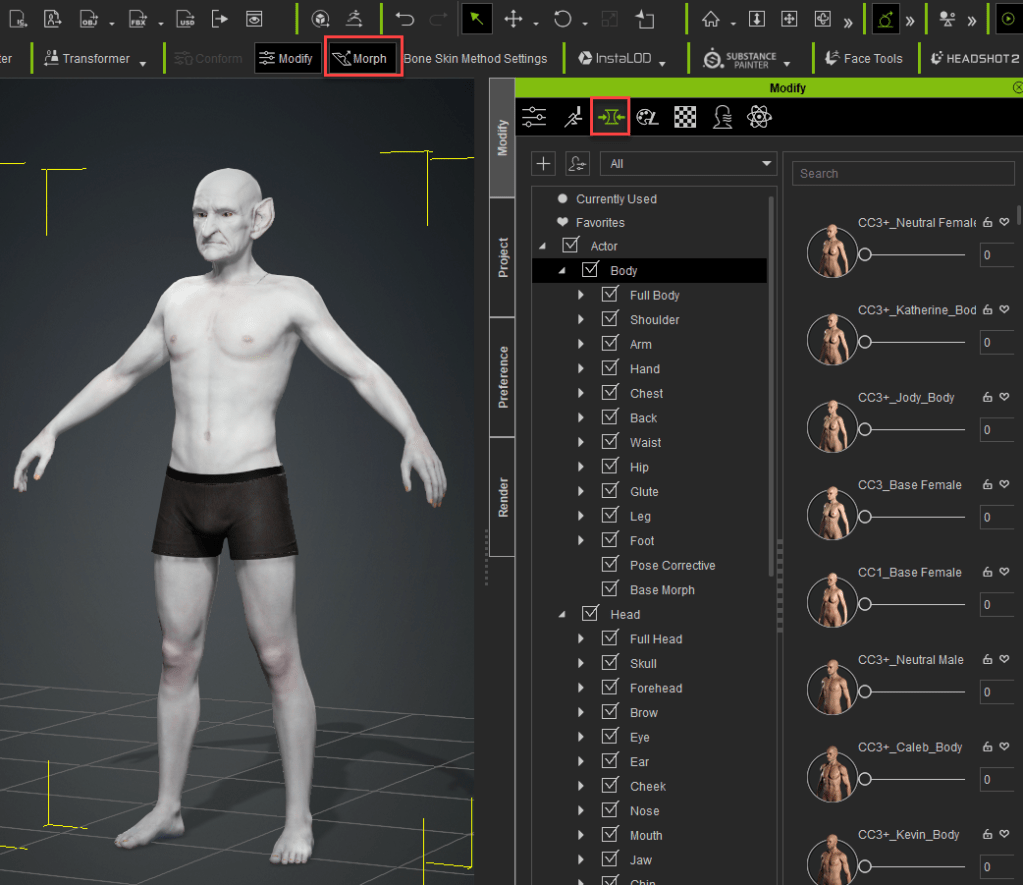
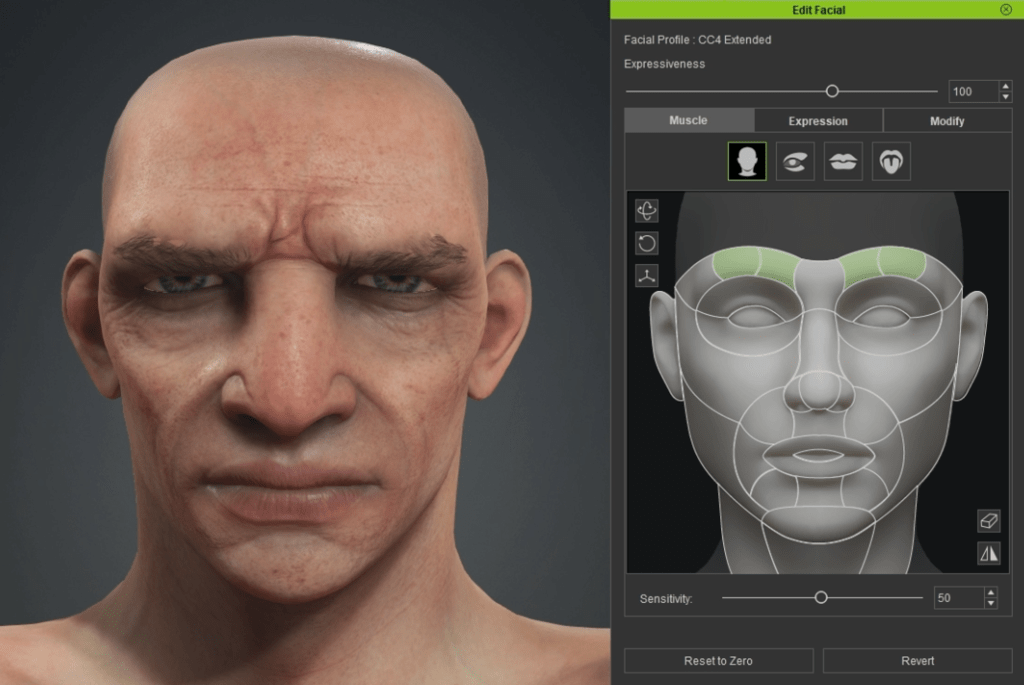
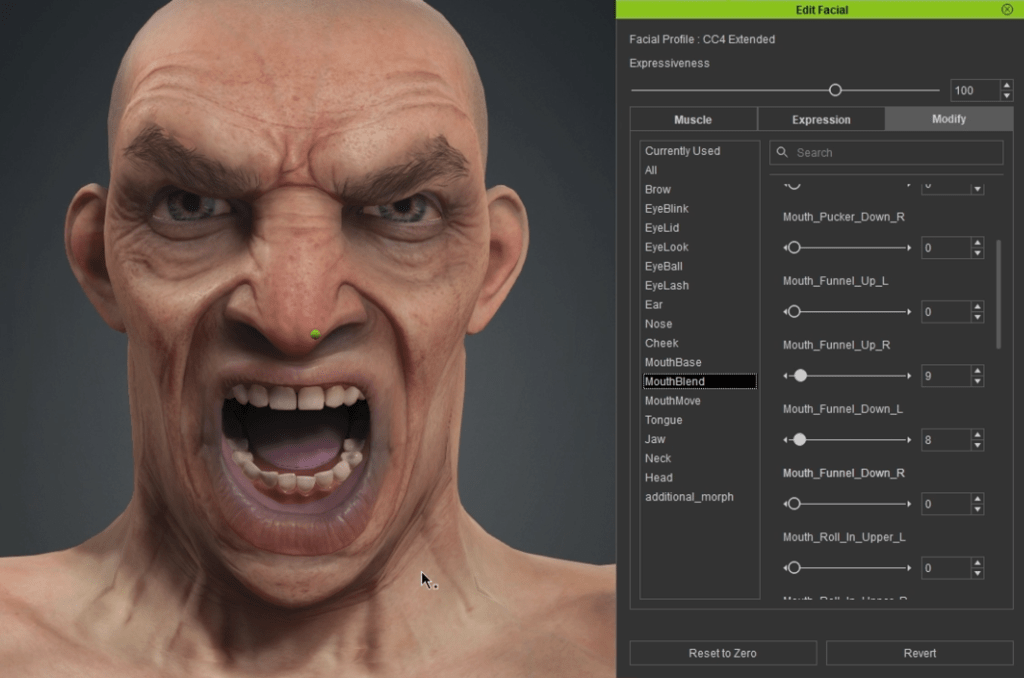
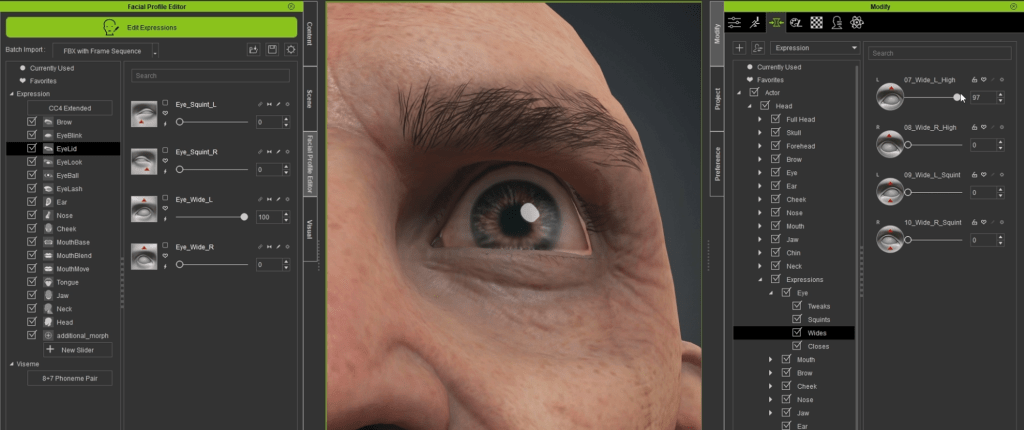
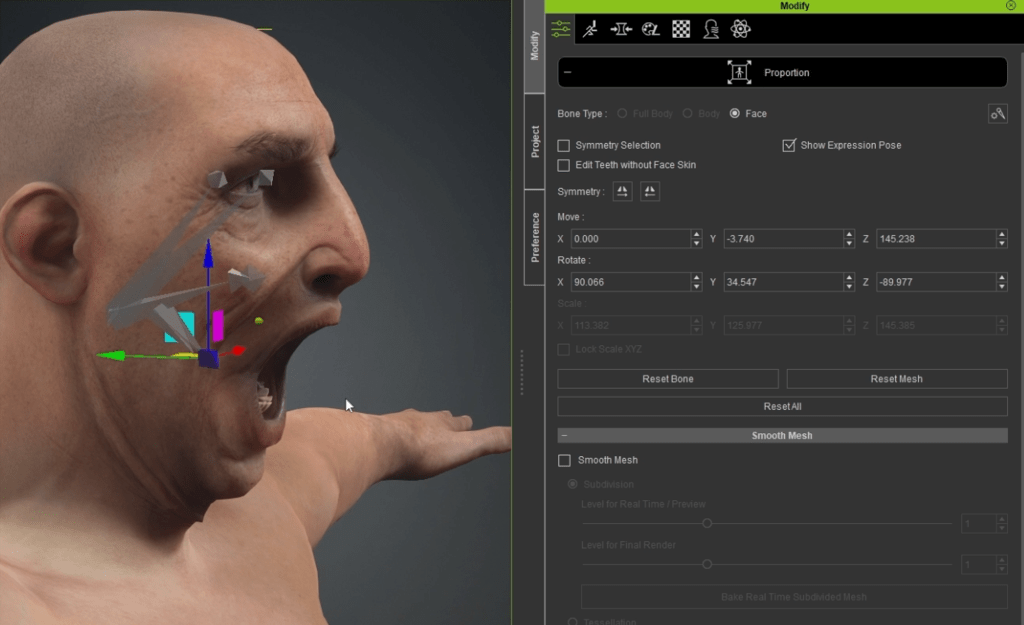
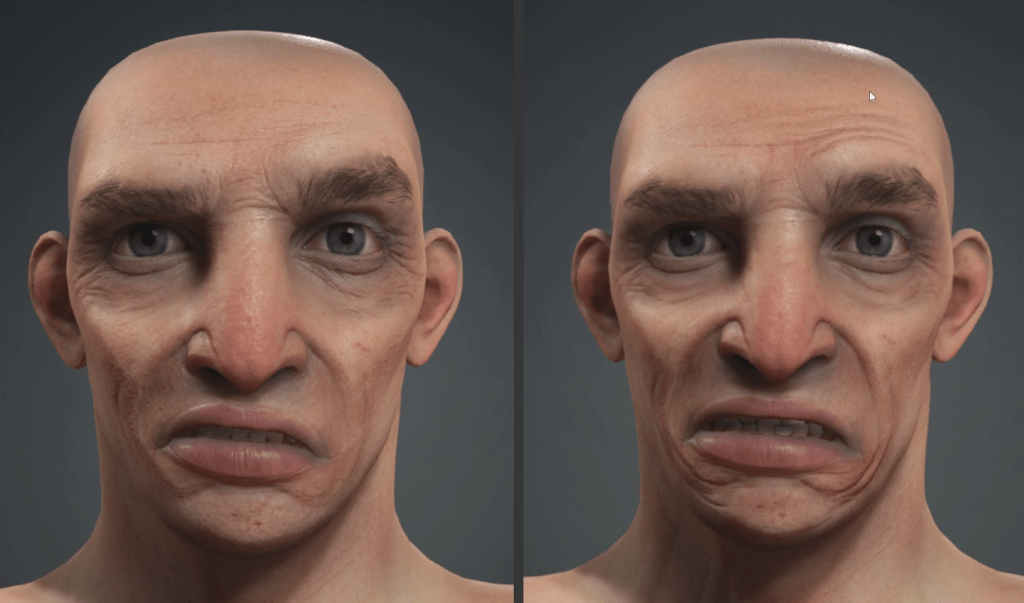
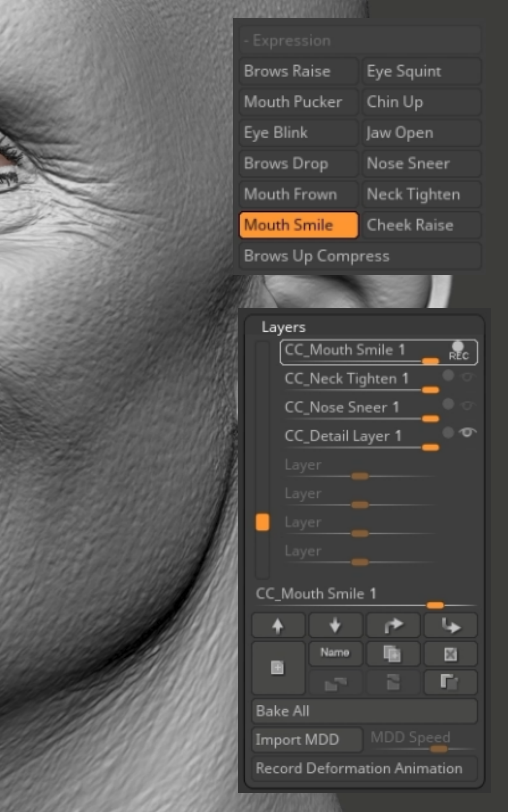
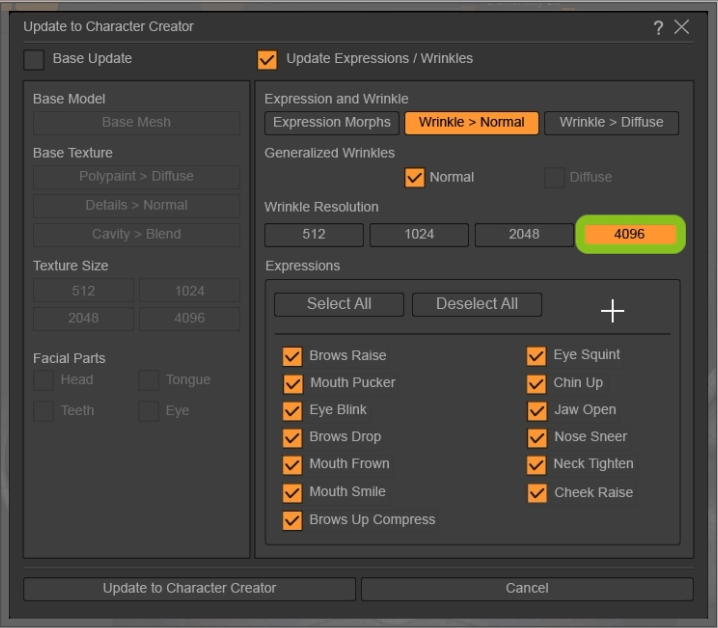
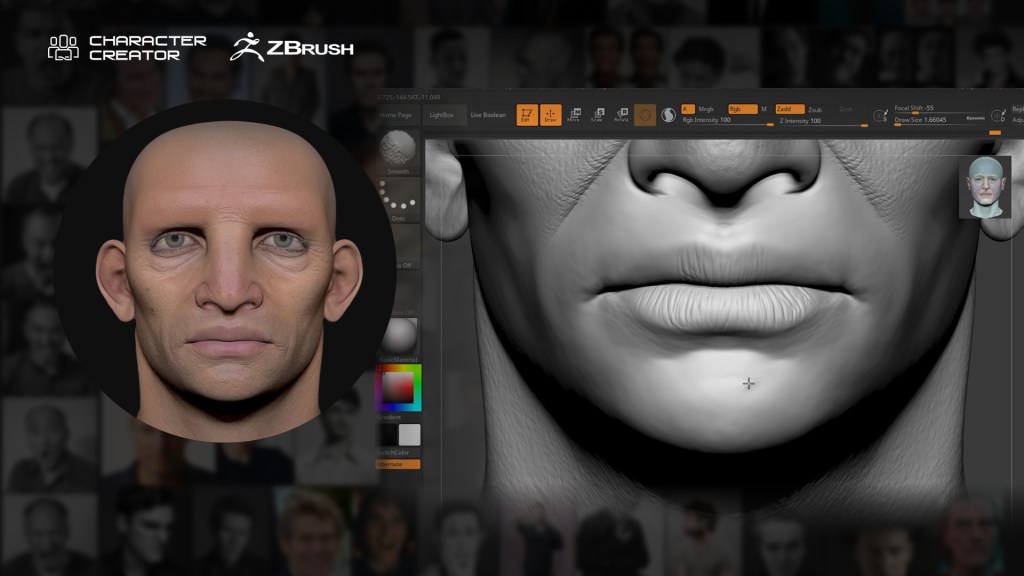
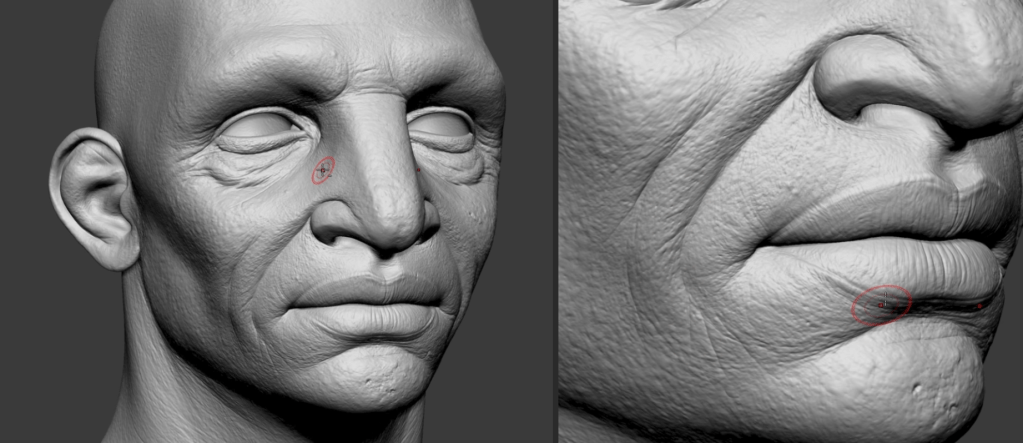
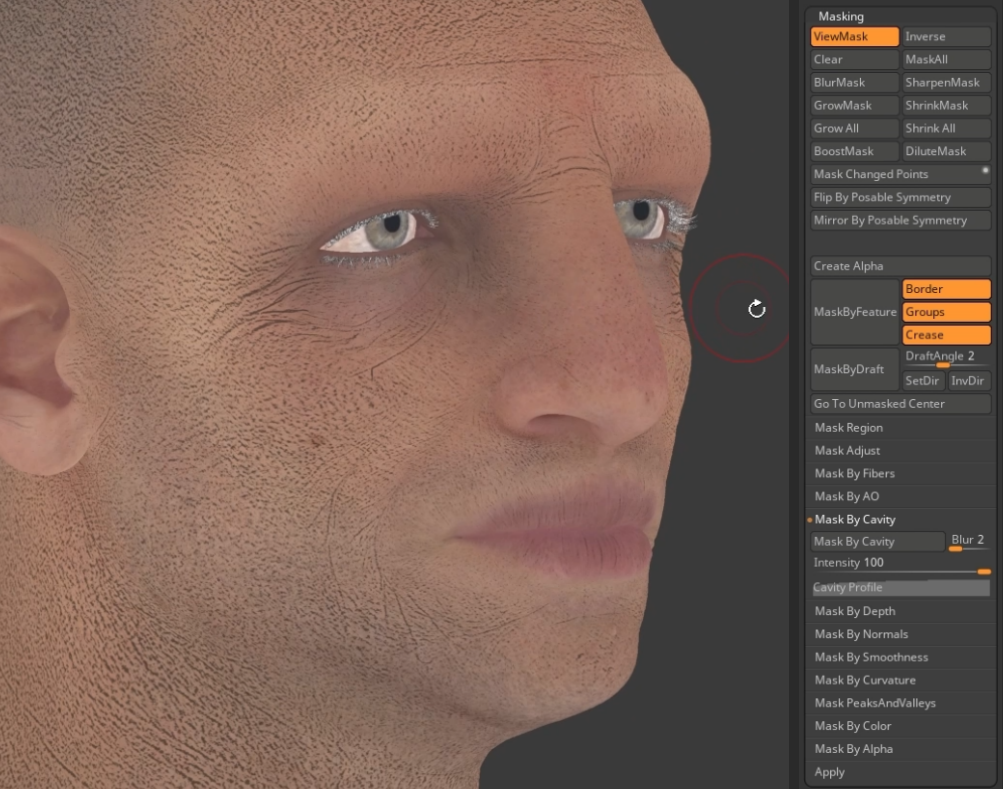
When we apply this texture to the face we will see that the character does not look the same, as we are looking for, but there is still one more step to generate a face different from the original; the texture of normals. To create a normal map taking as a reference our generated diffuse texture we must first convert it to a black and white image. Applying a contrast filter will further improve the result of the reliefs of the face and its definition. Finally, you can use free tools such as SmartNormaps to perform this conversion quickly and at the resolution you want.  

Step 3: Generate textures for clothing 

You can use AI to generate cool designs and patterns for your characters’ clothes. It is best to start with a basic sketch in a square format, in high resolution and light color so that the texture is easy to multiply on top of the clothing texture. It doesn’t have to be very concrete, the important thing is the silhouette and the space it occupies, create a simple sketch of the design you want to generate.  

Generate the image in the same way you generated the face texture and make final adjustments in image editing software if necessary. You can even generate patterns to apply to clothing if your version of Stable Diffusion is available.  

AI generates seamlessly tileable texture patterns for clothing texturing.

Step 4: iClone Crowd Sim  

After preparing the characters for our simulation, we’ll proceed to import the scenario from our Unreal Engine project into iClone, where the crowd will be positioned.

Select the “Generate NavMesh” tool in iClone to define the traffic zones automatically. This intelligent tool delimits the areas where the characters can walk on the 3D mesh and generates the margins to avoid collisions.  

After doing this we can also create paths for the characters to follow using the “Path” tool. This will allow you to control where you want a group of characters to move. 

It deploys the “Generate Crowd” menu to populate specific areas with animated characters. The menu allows us to enter characters from our “Content” menu, on the one hand, and movements for the characters on the other. 

When introducing several groups of people on stage, it may be necessary to use Navmesh barriers. They are useful because they prevent characters from overlapping during their animations and pedestrians can realistically dodge and avoid obstacles.  

Step 5: Export your crowd to Unreal Engine  

Finally, we are going to export, in a simple way, the crowd simulation we just created in iClone to Unreal Engine. My aim here is to render a beautiful animation. To do this you need to have the latest version of Unreal Live Link installed so that importing characters into Unreal Engine is faster and more efficient than ever. Remember that you have several tutorials about this process published by Reallusion. 

I utilize the Unreal Blueprint to implement the random material feature, allowing for the application of AI-generated textures to both clothing and faces in a randomized manner.

To avoid the repetitive appearance of cloned characters in the imported Unreal Engine scene, we can utilize randomized materials in Unreal 5. These materials not only enable us to change clothing colors but also incorporate AI-generated facial and clothing textures.

While creating these textures involves multiple steps too complex to summarize here, I recommend watching the associated tutorial. It provides detailed explanations of the process, explores texture generation methods, and introduces a technique for creating textures tailored for CC characters, utilizing Reallusion’s hyper-realistic materials upon character import.

That is all! I hope you like the final result and that the tutorial has helped you.  

About José Tijerín

José Tijerín is a digital illustrator, 3D sculptor, and creator of video games such as “Dear Althea” available on Steam. His content packs “We’re Besties” and “We’re Homies” are currently for sale in the Reallusion content store

Learn more about iClone Crowd Sim

Related Posts

Turn Head Sculpts into Full CC Characters with Headshot 2

Intro

What if you have an old project that you want to bring to life using Character Creator, but it’s on legacy topology, or even just a sculpted dynamesh sketch in ZBrush. In this workflow, we’ll take an old ZBrush bust sculpt with arbitrary, non-CC topology, use Headshot v2 to update it to CC topology, which you can then decide if you want to go the body refine GoZ route (see the body workflow article) or the Face Tools route (see the Face Tools workflow article) to fine tune and finish out your character.

GoZ Neutral Base for Scale and Positioning

Our old projects might be in a weird location or scale — let’s bring a neutral base into ZBrush so we can use that as a guide for where our ZBrush mesh needs to roughly be placed. In CC, click Load Neutral Base, and GoZ that over to ZBrush. The pose doesn’t really matter, again we’re just going to use this for scale and positioning.

Load Neutral Base
GoZ Neutral Base to ZBrush
GoZ from Character Creator to ZBrush

Scaling and Repositioning Legacy Projects

In ZBrush, import, open, or load your legacy ZBrush sculpt, and append it to your neutral base. In our case, we’re going to move, scale, and rotate our dynamesh ZBrush bust sculpt to roughly match the head scale and position of the CC neutral base.

Moving and scaling your ZBrush sculpt into place

Prepping the Legacy Sculpt and Export

We’re going to animate our character’s expressions, so remove any “built-in” expressions from your ZBrush sculpt. Don’t worry about adding mouth bags or anything like that; Character Creator will add those for us when it converts our legacy sculpt to CC topology. You can go ahead and delete your neutral base subtools that we used for scale reference, and with your now properly scaled and positioned ZBrush mesh selected, choose Tool > Export > FBX.

Tool > Export
Tip – remove expressions from your sculpt before
exporting into CC. We’ll be adding expressions later!

Polycount and Decimation Master

Try and keep your sculpt under 5 million triangles for a more responsive bake in CC later. If needed, go to the ZBrush Plugins menu > Decimation Master, reduce the resolution of your mesh, then export.

FBX Export Options from ZBrush

Importing into Character Creator

Import as Prop

Importing your exported .fbx into Character Creator is super easy; just drag your exported FBX into the CC viewport, and choose the Prop option. Select your prop, and click on the Headshot2 button in your menu toolbar

Launching Headshot 2.0
Align Points placement

Aligning Points

When Headshot v2 launches we’ll automatically be placed into Align Points mode; click the Auto Detection button to automatically place the points from the CC topology head onto your sculpted head. Click and move the points so they correspond to the same areas of the face, matching the placement between the CC head and the sculpted head. If you have shapes that deviate considerably from the base mesh forms, feel free to click to add more points as needed to help the base mesh find your sculpt, such as the exaggerated ears in our case. When you’re done, click on the Head Gen tab at the top of the Headshot v2 interface.

Adding a few more points for extreme shapes

Head Gen

Head Gen – Whole Head option

The Head Gen section allows us to choose what parts of the face or head you want the CC mesh to snap to. If you have a sculpt where only the face is viable, you can choose the face option, or use the Mesh Selection section to fine tune what areas are represented in your sculpt. In our case, since we have an entire bust, we’ll use the whole head.

Refine Mesh

Click on the Refine Mesh tab, and use the “Move”, “Smooth”, “Clone”, and “Project” brushes to match the CC mesh to your sculpt. If your mesh is symmetrical you can use the Symmetry Edit option to speed things up, and you’ll probably want the Conform to Source Mesh checked on, so as you move your mesh, it will snap to your sculpt.

Refine Mesh

Attach to Body

Attach to Body with Source Mesh for our Normal bake

When your meshes match, click the Attach to Body button, and choose the body shape/type that most suits your character. For the texture bake options, we don’t have a polypaint or texture for our sculpt, so we’re going to choose Textureless for diffuse, and From Source Mesh for our normal.

Changing Body Proportions

Right now our character has basic human proportions; let’s make our character a little more unique by using the Morphs tab sliders and/or Morph button in your toolbar to click and pull the proportions of your character around to dial in the exact body you want your character to have.

Using Morphs to change proportions
Attach to body default
Morphs to change proportions

Adding Skin Textures

Since we didn’t have any textures or polypaint to bake to our head, our character is textureless — let’s fix that! In the Content tab, navigate to the skin folder, and double click any of those options to apply a character skin. In our case, we’ll use CC4 Kevin’s textures.

Applying CC4 Kevin’s skin to our character
“Ignore Head Normal Texture” checked on

In the resulting dialog box, use the defaults, but check on Ignore Head Normal Texture; this will keep our baked Headshot normal map instead of replacing it with Kevin’s.

Applying Teeth and Eye Materials

We’ll apply teeth and eye materials in the same way; Navigate to the teeth and eye sections of your content browser, and double click any of them to apply it to your character.

Applying teeth to our textureless
character
Applying eyes to our textureless
character

Expression Wrinkles

At this point, you can also apply the neutral expression wrinkles, Kevin’s expression wrinkles, or wrinkles from the Wrinkle Essentials pack if you have those. You can use these expression wrinkles as-is, or as a base for your Face Tools fine-tuning pass, or get rid of them entirely and sculpt them yourself, again using the Face Tools plugin.

Expression Wrinkles content
Neutral Expression Wrinkles
Kevin Expression Wrinkles
Deep Saggy Wrinkles from Wrinkle Essentials Pack

Finishing Your Character

In conjunction with expression shapes and wrinkles, we also have the body to consider — at this point in the Headshot workflow, you can choose whatever workflow works best for you.

CC Model with skin textures applied
Updated ZBrush head and body sculpt
CC updated with the Substance Painter bake & texture pipeline

“The Goblin Body and Gear” article will walk you through refining the body sculpt and texturing in Substance 3D Painter, and the section just above this one will show you how to take the result of that workflow into Face Tools, where you can then refine the face shapes and expression wrinkles.

Goblin Body & Gear Workflow
Vampire Face Tools Workflow

Or, you can jump right into Face Tools: the “Vampire Face Tools” article will walk you through how to refine your base head, expression shapes, and expression wrinkles, and then show you how to follow back up with a refined body that matches your head.

Either direction you take is completely up to you; Character Creator can support however you like to work, and remember, you can ALWAYS open files, relink, and refine at any point, in any order. Character Creator is the ultimate flexible solution for character creation — the technical heavy lifting is provided by the suite of easy to access, low barrier to entry tool sets, and allows you, the artist, to focus on compelling visual storytelling!

About The Author

Michael Pavlovich earned a Bachelor’s degree in Computer Animation from RSAD in 2005. Initially, he contributed to the development of environment and character art for popular video games such as Madden and NCAA Football. Later, he relocated to Austin to join Daybreak Games, where he worked on the creation of art assets for DC Universe Online.

Presently, Michael holds the position of Director of Character, Weapon, and Vehicle Art at Certain Affinity. His expertise lies in implementing iterative pipelines for Certain Affinity artists helping develop renowned video game franchises, including Halo, Call of Duty, and DOOM. To stay updated on his latest tutorial projects, you can visit Michael’s YouTube or ArtStation page.

Related Posts

Adding Expression & Wrinkle to GoZ Model – ZBrush Face Tools

Intro- Continue the “Goblin” Project with ZBrush Face Tools

This article is a continuation of our “CC Topology GoZ Goblin Body” article. We’ve already sculpted and baked the body and head textures for our goblin, but we only have default face shapes and neutral default expression wrinkles. In this article, we’ll use the powerful ZBrush Face Tools plugin to update our face shapes, eyes, teeth, and tongue, and of course create custom expression wrinkles that match our unique character perfectly.

However, all of these articles have relied on CC topology projects in order to fully utilize the Reallusion suite of character solutions — what if you have an old character project that uses another base mesh, or even just a dynamesh bust sculpt? The last section of this article will cover using Headshot v2 to quickly and easily convert legacy projects to the CC topology, and from there you can decide if you want to use the body workflow shown in this article, or the ZBrush Face Tools workflow found in the previous article.

Customize Expressions & Wrinkles with ZBrush Face Tools

Relinking Filrs with GoZ in ZBrush

We worked on this goblin body project a while ago, so we need to relink them. Open your previous body file in Character Creator, as well as the corresponding ZBrush ZProject (.zpr) file we saved, with all our high-res details and polypaint. With both programs and files open, press the GoZ All button in ZBrush, then press the Update button in Character Creator with Current Pose selected. Your programs and files are now linked.

GoZ All from ZBrush
Update Current Pose in CC to Relink

ZBrush Face Tools

With the character selected in Character Creator, press the Face Tools button in the menu bar, and this time choose None for the expression wrinkles. We’re going to use the character’s existing “memory” face wrinkles, which will be sent over in the Normal Details layer (also checked on in this dialog box), to indicate where our expression wrinkles will end up. In other words, no need to send over neutral expression wrinkles this time, we’ll create our own unique expression wrinkles based on the character’s actual face.

Only Normal Details & shapes being sent over in this scenario – no baked in wrinkle details!

Transferring Base Color Texture to Polypaint with ZBrush Face Tools

Back in ZBrush, turn on the Diffuse button to load up your characters base color texture map, and once again use Tool > Polypaint > Polypaint from Texture to transfer your texture color to your base mesh polypaint. Once this is done, turn OFF the Diffuse button.

Transferring base color texture to polypaint

Sculpting and Polypainting Custom Expressions in Face Tools

Using the Face Tools plugin, click on an expression you want to update, and tweak your shapes, expression wrinkle details, and polypaint for each expression. With our Detail layer on, we’ll see exactly where the face memory wrinkles go when the face moves, and you can use those to inform where you need to enhance the wrinkle details as the skin compresses. You’re not limited to just changing or enhancing wrinkle detail (you can also change the overall shapes for each expression, for example) changing the mouth shape when the jaw opens, or the lip shapes on the mouth pucker!

Selecting Expressions
Default Jaw Open
Custom Jaw Open
Default Mouth Pucker
Custom Mouth Pucker
Default Neck Tighten
Custom Neck Tighten

Update to Character Creator

When you’re done updating expression shapes and wrinkles, hit the Update to Character Creator button in the Face Tools plugin menu. Since we didn’t make any updates to the base head, we can leave the left side unchecked, and check on anything we changed for our Expression Wrinkles side. This will send all of our SDiv 1 shapes back to CC, and any sculptural change / polypaint in SDiv 2-6 will be baked into texture sets and sent back to CC.

Update to Character Creator Expressions / Wrinkles only

Now your CC character will have your unique custom shapes and wrinkles as the character’s face moves during animation or posing.

Updated custom face shapes and expression wrinkles for our character!

Remeber, you can ALWAYS open files, relink, and refine at any point, in any order. Character Creator is the ultimate flexible solution for character creation — the technical heavy lifting is provided by the suite of easy to access, low barrier to entry tool sets, and allows you, the artist, to focus on compelling visual storytelling!

About The Author

Michael Pavlovich earned a Bachelor’s degree in Computer Animation from RSAD in 2005. Initially, he contributed to the development of environment and character art for popular video games such as Madden and NCAA Football. Later, he relocated to Austin to join Daybreak Games, where he worked on the creation of art assets for DC Universe Online.

Presently, Michael holds the position of Director of Character, Weapon, and Vehicle Art at Certain Affinity. His expertise lies in implementing iterative pipelines for Certain Affinity artists helping develop renowned video game franchises, including Halo, Call of Duty, and DOOM. To stay updated on his latest tutorial projects, you can visit Michael’s YouTube or ArtStation page.

Releated Posts

iClone BuildingGen Ushers Intuitive Procedural 3D Building Creation

Gone are the painstaking days of piecemeal 3D building assembly. The iClone BuildingGen plugin empowers architects, professional designers, and hobbyists alike to effortlessly create diverse 3D buildings using procedural Blueprints. This plugin streamlines the entire process by allowing the organization of 3D module collections into effective and cohesive packages.

Visit the official BuildingGen page for detailed features and animated demos. Watch All Tutorials >

Construction styles can be defined using interchangeable components and materials to enjoy maximum design flexibility. Best of all, BuildingGen’s nondestructive workflow ensures that design iterations can be made in confidence, with the integrity of the original design staying intact with impromptu modifications.

The key features of BuildingGen include:

  • Unlimited Architectural Styles: Harness a diverse range of modular components to craft a myriad of housing styles, whether it’s modern, sci-fi, sustainable, cartoonish, and beyond. BuildingGen can perfectly tailor each building to complement your 3D environment.
  • Creative Modification: Effortlessly modify the building structure by adding or removing selected Units, incorporating pillars, fences, or steps to fashion terraces, balconies, or open-air spaces. Watch Tutorial >
  • Adjusting Levels: Add or remove floor levels for the buildings at any moment in production. Or save time by duplicating certain floors and rearranging orders as you see fit. Watch Tutorial >
  • Refine Materials and Elements: Even after a building is constructed, a world of possibilities awaits. From replacing wall and facade materials to swapping out elements like door and window frames, this is where building aesthetics can be enhanced.
  • Smart Rebuild: Modify the entire structure, restyle levels or components while preserving the overall integrity of the building. Make precise changes without starting from scratch, thanks to BuildingGen’s nondestructive building process.
  • One-click Day/Night Switch: Building materials offer day and night modes, enhancing realism with realistic illumination and illuminated windows. Other details can also be added and enhanced such as realistic glass reflection and window dressing.
  • Optimized & Performant: BuildingGen optimizes performance by consolidating repeated textures and models, reducing redundancy. Its modular design allows multiple buildings to share resources, improving efficiency. Enjoy smoother operation and reduced frame rates, enhancing responsiveness while working with crowd simulation.
  • Free Sample Content: Access over 210 free assets, including 10 reconstructable iBuildings and 200+ 3D components and materials. Each building offers four distinct styles for easy customization, allowing users to fully experience all major BuildingGen functions.
  • Creative Expansion: BuildingGen packages streamline building deployment for specific styles, blending seamlessly with any motif. Customize packages by importing external content or incorporating your assets. The intuitive Packager tool assigns roles and materials to building components. Watch Tutorial: Setup >  |  Packager >

BuildingGen is poised to revolutionize the way architects and designers approach 3D architectural design. With its intuitive interface, powerful features, and unmatched flexibility, BuildingGen proves to be an indispensable tool in the arsenal of every 3D designer.

Expansion Pack: French Styles

Introducing “BuildingGen – French Style”, the premiere modular prefab package for constructing commercial, residential, or multifunctional buildings with French flair. Explore 10 premade structures and 8 extensible styles to effortlessly recreate architectural landmarks. Design traditional roofs, balconies, and terraces using over 600 component options. Adjustable day-night material settings enable dynamic window lighting and dressing, giving the impression of genuinely utilized and inhabited buildings.

Other BuildingGen related resources:

3D Virtual Fashion with Character Creator Digital Humans

Creating Ultra Realistic Digital Humans for the 3D Fashion Industry

At its core, Unexplored Fields is a collective of 3D artists who intricately blend art, fashion, and CGI. Specializing in art direction and the production of digital campaigns for the fashion industry, the studio boasts a diverse team skilled in various areas such as art direction, 3D modeling, avatar and environment creation, cloth simulations, material generation, realistic renderings, and sound design.

Through collaborative efforts, they infuse the essence of partnered brands into their visuals like Calvin Klein, Lacoste, Dr. Martens, ADOBE, Golgotha, and more. Their approach involves deliberately blurring the lines between reality and the virtual realm, playing with perception. Ultimately, Unexplored Fields aims to imbue the world of computer graphics with an organic touch, crafting visuals that authentically resonate with their audience.

For this Pitch & Produce session, three designers from Unexplored Fields collaborated together to leverage Character Creator digital human technology with Blender, Clo 3D and Houdini:  Virgile BiosaEtienne Kawczak-Wirz and Ilyès Taïebi

“We found out that Character Creator (CC) offers the smoothest pipeline integration with Blender, but it’s also really easy to combine it with ZBrush and Substance Painter. While solutions like Unreal’s MetaHuman Creator are impressive, Character Creator’s compatibility and efficiency with our existing toolkit made it the optimal choice for our digital fashion creations.”

Virgile Biosa – Art Director / 3D Apparel Designer
Étienne Kawczak-Wirz – Art Director / 3D Generalist / Music Composer

Etienne Kawczak-Wirz introduction : “Étienne Kawczak-Wirz is a French artist who graduated from the Fine Arts in 2016. He juggles multiple activities, each feeding into the other: a personal artistic practice, collective work within Unexplored Fields, and a musical project under the name Zone Minor Modification.

The medium of 3D gradually asserted itself as his principal tool of expression. His influences primarily draw from art history and cinema. The notion of refuge has been irrigating his work for many years, and his ongoing project “Vercors Refuge” is an opportunity for him to address this theme in a more direct manner. Within Unexplored Fields, one of his roles involves leveraging his expertise in artistic direction and technical abilities to serve the major brands collaborating with the studio.

Virgile Biosa – Art Director / 3D Apparel Designer

Virgile Biosa introduction : Virgile Biosa is an Art Director and 3D artist based in Lyon, France. With a background in Fashion Design (Saint-Luc Tournai, Be) and Fine Arts (Ecole Duperré, Paris, Fr), he continues to explore fashion design through digital tools, all the while maintaining a keen eye for artisanal aesthetic.

Inspired by his promenades through natural and urban landscapes, as well as a wide range of art forms, his projects frequently focus on the natural world and the intersection between nature and technology. Virgile Biosa has collaborated with a range of clients, including brands such as Suicoke, Hagel, PAG Neckwear and more… Co-founder of Unexplored Fields, Virgile plays the role of art director and 3d specialist with a focus on fashion. He is also involved in the digital archiving company d_archive.

Ilyès Taïebi – 3D Apparel Designer

Ilyès Taïebi introduction : Ilyès Taïebi is an image creator and 3D designer based in Biarritz, France. With a background in styling (Saint-Luc Tournai, Be) and fashion design (Atelier Chardon Savard, Fr) he now combines his skills in 3D modeling and his passion for design in the search for new ways of creating, designing and communicating through images. Today he creates authentic, narrative digital campaigns, giving free rein to his imagination and exploring the different horizons of his ideas in order to sublimate the appearance of a product, in the environment he chooses according to the story he wants to tell.

Ilyès Taïebi works for brands ranging from ready-to-wear, to sportswear, to luxury, collaborating with the likes of Décathlon, 686, Off-white, Heron Preston, Chloé and more… Also co-founder of Unexplored Fields, Ilyès plays the role of 3D Designer and 3D fashion specialist, creating original and aesthetic designs, while getting involved in the narrative world of the campaigns he creates.

A Veteran 3D Animator Tries 2D – Cartoon Animator

I admit it. I had a deep-rooted, long-embedded phobia of 2D work.

This was due to its complexity early on in my freelance career. Motion Graphics were great, but character-driven 2D animation was time-consuming and tedious. This was long before Adobe bought After Effects. Cell shading was making a retreat as digital art had taken root.

Being as I was a grunt at the bottom of the animation chain, I generally got the jobs that no one else wanted, and that somewhat tainted my view of 2D work.  As strange as this sounds today, back then my experience was that 3D was easier and less stressful than 2D work and I’d rather do that on a regular basis. What I had not counted on was audiences being trained to Pixar-level quality and the “uncanny valley” effect that tanked Polar Express, a project many thought was revolutionary while others couldn’t watch it.

These aren’t even considerations in 2D. Near perfection is not expected in all 2D work like it is in 3D.

Author, animator, and all-around talented artist Anita Bell replied to a post I made in Facebook about trying 2D:

Yeah, 2D is very forgiving. In 3D, everything is so realistic these days, that the slightest glitch of a motion for a fraction of a second, and everybody notices… but in 2D, simplification of motions is expected…

Got foot sliding? Just raise the camera so we can’t see the feet.

Got lighting problems? Ha, no ya don’t there’s no lighting.

Got shadow problems? Nope. Just delete em… assuming you added them as a prop in the first place. Bugs bunny never needed shadows, unless it was to prepare viewers for a gag, where he wouldn’t be touching the ground.

Got cinematic style problems? Nope… any cinematic style can be added as a LUT afterwards.

Anita Bell

Wise words and now I’m starting to think a little differently about this 2D thing. Some of what Anita mentions has caused burnout on more than one occasion for many 3D animators, myself included. Garry Pye replied with an offer of help anytime I needed it. Other users replied with words of encouragement and advice showing Cartoon Animator is just as much a community as iClone is. Having plenty of help was certainly a plus.

There was more of a distinct line between 2D and 3D in the early days. They shared some tools but for the most part, it was different tools and different skills with different groups like fine artists instead of digital artists. I tried Toon Boom and others, but it was very different from 3D and rudimentary in its early release.

Fast forward to today and it is a whole different ballgame in 2D animation.

Without looking at a single tutorial or opening the manual I was able to move around in the Cartoon Animator interface and create some rudimentary animations. Being a long time iCloner the interface was familiar and everything I tried up to this point worked as it would in iClone. From opening the timeline to adding characters and animations it seemed like I had been using Cartoon Animator for years even though this was my first look at it since version one of Crazy Talk Animator thirteen years ago.

Cartoon Animator user Dirk Baeten had told me in the same thread mixing CA 2D and iClone 3D would be a walk in the park with my iClone experience and he was right.

I haven’t produced any jaw-dropping 2D work at this point, but I have produced 2D work in a short time. Lots of it I might add… compared to my previous 2D output. This assignment had changed from a rather begrudging learning of Cartoon Animator into an enjoyable artistic experience as I advanced through the basics quickly.

I don’t know the “rules” of 2D like I do 3D or live-action, but I know I’m not running into the roadblocks and choke points of 3D. This has become a welcome diversion from everything Anita Bell mentioned earlier and has made the experience fun.

PROJECT ONE – Motion Path Animation

My first 2D scene was very rudimentary using the included Tumba character with a four-legged walk motion and a background from the Forest Paths Background pack.  My creation was nothing to brag about, but it was completed quickly and nearly effortlessly. The only snag was turning the character on the zig-zag path. Like the 3D’er I am I overcomplicated it and went off in search of a 2D animation for the turn when all I had to do was flip the character with a button on the top toolbar.

It took a few minutes of searching for a non-existent motion before I realized I just needed to change tactics and flip the character. Could this be? It was too easy! As Anita confirmed… it is acceptable. Maybe in just the right situation but a sudden flip would never be acceptable in 3D. You would jar or worse, lose the audience immediately. There are probably better ways to do the turn than a flip but at least it didn’t stop my progress and dull the creative edge searching for a solution.

Below is that first attempt with Cartoon Animator which also included a path and some scaling from small to large throughout the clip. You’ll see some foot sliding but for a first effort it was incredibly easy and the sliding could be dealt with but I was moving on to another scene.

PROJECT TWO – Talking Animation

The new scene is in a meadow with plant and tree props placed in front of a background image along with an animated Bird silhouette (Puppet & Path) that was duplicated twice after animating it flying across the screen. I used the butterflies from the Puppet & Path pack to learn about the Motion Pilot, moving them across the screen, around the character, and offscreen. The girl was Garry Pye’s School Squad Penny character and I stuck a default tree branch prop in the upper right corner of the screen.

While still short it incorporates a young girl’s voice from Eleven Labs for lip sync and a background sound effect of the outdoors. I also learned how to use the camera during the creation of this scene which pauses at the beginning then follows the butterflies and eventually pulls back to a wider shot.

NOTE: The video below has background audio.

When you click on the 3D view you will see a visual breakdown of the placement of the various plants, trees, and other assets that make up the scene. It might not be necessary to have the layers this far apart, but this provides a better visualization of how the 2D stage works.  The final render will always be the flat view.

Again, no masterpiece but by this time I had already put together several elements of an animated short and I didn’t have to worry about lighting which could tie up a 3D project which pushed me to another test of an underwater scene.

PROJECT THREE – Image & Photo Animation

This type of scene is a bit more difficult to pull off in 3D depending on the VFX and lighting you have available during the project. I knew the scene wouldn’t be hard to do but how would I, as a Cartoon Animator newb, dull the sharpness of the scene to make it look like it was underwater?

Since I didn’t know any better, I used my old standby technique of adding a solid blue image layer (filter) over the top and using its opacity setting to set the final look. This dulled the sharp image and gave it more of an underwater look.

Below are the results:

I used this project to learn more about Motion Pilot as it drives all the animation in the scene. From the coral swaying to the fish swimming Motion Pilot handled the job in less than a minute for each prop not counting experimentation. The blue filter image layer is turned off in the image below.

As to the old-school use of the blue filter, you can see the difference it makes in the image below. This is a personal preference as you may want a sharp, clear look versus the duller, washed-out look I was going for.

RENDERING

This is a question for a lot of would-be Cartoon Animators wanting to know how the render time stacks up against a 3D app like iClone. In my experience, these projects were rendered extremely fast. I couldn’t count as fast as the frames rendered so in this instance rendering time is a non-issue.

SUMMARY

I will be covering Cartoon Animator with more in-depth articles in the future as CA has proven to be an easy-to-use tool that makes me look a lot better than I am and that is a bonus that I will gladly accept. If you have experience with iClone then you’ll recognize the interface and will adapt quickly. Cartoon Animator, like iClone, can work for beginners, amateurs, and professionals and all you have to do is look over this magazine to see proof of that. If my experience so far is any indication of what this learning process will hold then I look forward to the task.

I mean… who doesn’t love cartoons!

MD McCallum - WarLord

MD McCallum – WarLord

Digital Artist MD “Mike” McCallum, aka WarLord, is a longtime iClone user. Having authored free tutorials for iClone in its early years and selected to write the iClone Beginners Guide from Packt Publishing in 2011, he was fortunate enough to meet and exchange tricks and tips with users from all over the world and loves to share this information with other users. He has authored hundreds of articles on iClone and digital art in general while reviewing some of the most popular software and hardware in the world. He has been published in many of the leading 3D online and print magazines while staying true to his biggest passion, 3D animation. For more information click here.

Easy Facial Rig in ZBrush with Face Tools (4/4): Animated Demo

A Step-by-Step Guide from ZBrush Master Pablo Munoz Gomez

The Facial Profile Editor

Alright, to wrap up this in-depth guide to the Face Tools plugin, I want to give you an overview of one of the most powerful features in CC4 when it comes to expressions: The Facial Profile Editor.

With the workflow we’ve been following in this guide, we manage to create an original custom character with its unique set of expressions and of course unique wrinkles. However, all of the custom tweaks we’ve created are being applied to the generic rig in CC4, this means we can definitely generate some really cool and interesting expressions like these 3 main expressions I wanted to achieve:

But what takes this whole process to the next level is the Facial Profile Editor. Since no one set of expressions is the same just like no human is the same, the Facial Profile Editor allows you to tweak the generic rig and truly customise the expressions of any given character.

To illustrate this idea, here are my final expressions for this tutorial. The images on the left-hand side show the custom expression morphs and custom dynamic wrinkles and the images on the right show the exact same expression with the adjusted facial profile for this specific character:

In the ‘evil laugh’ expression for instance, you can also see a massive change on how low the character’s eyebrow can go and how exposed the bottom teeth are as well:

Here is the fear/surprised expression, also with the updated facial profile:

The point is, that the generic rig of CC4 can get you 90% of the way. As soon as you start working with more stylised or custom character, the Facial Editor will help you tweak and adjust all aspects of the morph sliders to creating convincing expressions:

Adjust Expressions in Edit Facial Panel

To get started with the Facial Profile Editor, I like to check my expressions and dynamic wrinkles from the Edit Facial control window. This is probably the easiest way to see how everything works and to spot areas of the expression that could be improved.

From the Edit Facial window, you also have other tabs next to Muscle. For instance, the Expression tab gives you access to a bunch of pre-made expressions that you can use as a starting point. These templates can give you a reference of how much you need to tweak your Facial Profile so you get to a more authentic expression.

The third tab called Modify is actually very useful. It gives you a much more granular control over each portion of the expression. So just as a quick example, here is the same ‘Angry’ Expression from above but with some of the sliders in the Modify tab tweaked (exaggerated opening of the mouth, angled brows, etc).

Now let’s dive into the Facial Profile Editors so we can create more custom expressions for the character.

Create More Custom Expressions in the Facial Profile Editor

From the Modify window, click on the Facial Profile Editor button. The character would go back to a neutral expression:

From the Facial Profile Editor, you’ll see all your morphs to the left of the window. After selecting a morph, you can see the different sliders you have to tweak that part of the expression

In my case, you’ll notice that even with the ‘EyeLid’ selected, pushing my ‘Eye_Wide_L’ slider all the way to a value of 100 doesn’t significantly open the character’s eye (partly due to the exaggerated size of my pupils).

The idea here is to fine-tune this particular slider using the Modify tab. Firstly, from the Morph tab of the Modify window, I located the morph section corresponding to my eyelid:

Then I used the ‘07_Wide_L_high’ to push that top eyelid past the edge of the iris of the character; this is how you can truly customise your expressions.

Now, in order to apply this change to my facial profile, I need to click on the tiny ‘thunderbolt’ icon next to the slider in my Facial Profile. In the pop-up window click on Ok. You can apply it to the current slider or to split part (I prefer to use the current slider and manually mirror the effect).

The mirroring process is just a matter of clicking the ‘mirror’ arrows icon from the opposite slider,  ‘Eye_Wide_R’:

These are the main steps of the process to adjust your expressions in the Facial Profile editor. After you do a couple, it is just rinse and repeat. Here is an example of the exaggerated left eyebrow raised:

Another significant advantage of editing your profile is the ability to adjust the placement of facial elements (such as teeth, eyes, tongue, etc.) based on the expression. For example, when my character opened its mouth, the lower teeth were pushed back too far. To rectify this, you can utilise the Facial Profile Editor by clicking on the Proportion button (the fourth one in the Expression tools section):

This will display the bones associated with the face meshes and you can just click on them and move them around. In my case, I selected the bottom teeth and pushed them forward a bit while the jaw was down. The idea is that after adjusting this, the teeth will slide a tiny bit forward as the character opens the mouth:

That’s it in terms of the Facial Profile Editor. You can spend as much time as you need to in this step to further tweak each expression. But, in general, there will only be a couple very specific sliders that need tweaking, unless you really want to stylise your expressions.

The final aspect I’d like to demonstrate regarding the Facial Profile Editor is the capability to create your own custom sliders and incorporate them into your profile. These sliders could represent the effect of a single area of the face, such as ‘Super High Brow,’ or they could encompass multiple sliders to form a custom slider representing a complete expression.

Here’s a quick example where I utilised several sliders from the facial profile to generate this random expression:

Then, at the bottom of the expression morphs, I clicked on the New Slider button. A window will pop up where you name your slider and save it within a category. I named mine ‘WeirdLook’ (yep, I’m aware of the type-o in the screenshot). You can even upload a bitmap thumbnail with the expression so you know what the slider does.

Once you click OK, you’ll have your new slider in the custom category at the bottom of the expression morphs list:

You can now click on the big Edit Expression green button at the top to get out of the Facial Profile Editor and all your changes will be saved into your character. One last thing I like to do is test the full range of my expressions and dynamic wrinkles after I adjusted my facial profile using the animations that come with CC4.

 From the Animation window, you can click on the Motion dropdown and go to Facial Rig > Extended Linear (or similar) to load an animation to test the expressions:

Here is a snippet of what the animation does for checking the expressions:

And finally with all the tweaks on my Facial Profile, here are my final CC4 renders showing the 3 expressions I set to create with this tutorial series:

About The Author

Pablo Munoz Gomez is a renowned 3D concept and character artist, with a passion for education. 3D sculpting, visual development, and other mixed-media form the pillars of his artistic passion which he channels through the various platforms that he owns, including ZBrush Guides3D Concept Artist Academy, and 3D Snippets Project. Thanks to his vast online following, he is able to reach artists from around the world and help them advance in a variety of 3D-related disciplines.

Read More

Easy Facial Rig in ZBrush with Face Tools (1/4): Concept & Setup 

Easy Facial Rig in ZBrush with Face Tools (2/4): Detailing & Polypaint

Easy Facial Rig in ZBrush with Face Tools (3/4): Expressions & Wrinkles

Easy Facial Rig in ZBrush with Face Tools (3/4): Expressions & Wrinkles

A Step-by-Step Guide from ZBrush Master Pablo Munoz Gomez

Adjusting Expressions with Face Editor in CC

Alright! Time to get into the custom expressions; this is what all the fuss is about!

Up to this point, we’ve refined the base mesh, incorporated basic high-frequency details, and adjusted the textures, resulting in a visually appealing ‘static’ character. However, our goal extends beyond mere aesthetics; we aim to create a character capable of dynamic animation and conveying natural expressions. Hence, the forthcoming stage is dedicated to achieving precisely that.

In CC4, I used the Face Editor to create a quick smiling expression. I just added a bit of squinting, raised the eyebrows a tiny bit and push the corners of the mouth app and here is my smiling character:

Not a bad smile right? but it could definitely be improved… Currently, even though I’m using the default morphs and the sliders I think are involved in the smile, I’m getting more of a ‘nervous smile’ so it doesn’t feel very genuine.

This is where the real power of the ZBrush Face Tools comes into play — the plugin allows us to customise and work on just 13 areas of the face (expression morphs). Based on those, CC4 can create a whole range of expressions for our character.

13 Core Expressions in ZBrush Face Tools

The way the editing expression works in ZBrush is also very simple… form the plugin all you need to do is click on one of the switches containing an expression and edit the range

For instance, let’s begin with ‘Mouth Smile’. This expression typically presents a ‘fake’ or ‘nervous’ smile, which could be attributed to the adjustments made to the head base.

By clicking on the Mouth Smile switch, a distinct sculpting layer is activated within the head subtool in ZBrush. This allows you to focus solely on editing the changes related to the activated areas of the smile.

In fact, there is a pretty cool tool in the plugin called ‘Range’. So after you enable your expression to edit, you can also click on the switch called Range next to Diffuse and this will enable a temporary texture map applied to the head that will show you exactly the areas you can tweak for this specific expression:

Now, when it comes to adjusting expressions, I’d suggest you follow the same workflow we used to edit the base mesh of the character. Basically the rule of thumbs is: to make large proportional changes use the lowest subdivision levels and to sculpt or adjust small things, use the highest subdivision level.

Another useful feature of the plugin is that it sends the character from CC4 with polygroups intact. This enables you to isolate specific areas by holding Ctrl + Shift and clicking on a polygroup. This functionality proves particularly handy, especially when working on intricate areas such as the mouth.

Using the ‘Move Topological’ brush with AccuCurve enabled at subdivision level 1, I refined the corners of the mouth, pushing them upward to craft a more natural smile. Subsequently, I progressed to higher subdivision levels to sculpt the volume around the mouth area.

I also refined the volume around the nasolabial fold and accentuated the fold a bit more since this is an area that will be more prominent with this expression.

Once you are happy with one of the expressions that you tweaked, you can simply click on a new switch and continue with the refinement. If you leave the Range switch on while changing to a new expression, the texture range will be updated and applied automatically.

Modifying the Rest of the Core Expressions in ZBrush Face Tools

Here is a quick reference of what I updated for my Brows Drop morph:

Here is what I adjusted for the Mouth Frown:

And a bit of the Mouth Pucker:

Just like this, you can adjust all 13 expression morphs. Once you are happy with the edits, you can click on the Update to Character Creator button — but this time the selection from the pop-up window is going to be different.

We won’t be altering the texture, base mesh, or details covered in the Base Update section (as those have already been addressed). Our focus now is on updating the expression. Therefore, ensure that you enable the Update Expression / Wrinkle section and disable the Base Update section.

Then, from the expression sections we want to enable only the Expression Morphs switch and select all the expressions that you have updated. you can actually edit and update expressions and wrinkles in a single pass but to keep things organised, we’ll focus only on expressions first.

Back in CC4, I tested the smile expression with the Facial Editor and straightaway the difference between the default expression and the custom one for the smile is significant.

Here are quick expression test involving some of the morphs I changed in ZBrush:

To underscore the significance and effectiveness of this process, here’s a comparison between the default smile expression obtained from CC4 upon designing your base mesh, and the considerably more natural and genuine smile achievable through a straightforward adjustment in your custom expressions:

Sculpting the Dynamic Wrinkles

After completing the core 13 expression morphs, we can move on into adding some details to the expressions with the Dynamic Wrinkles. This feature from CC4 is a very clever way to apply specific details to a section of the face based on the area or ‘muscle’ that is moved.

The idea behind this feature is that there are a bunch of normal maps with detail information for different parts of the face, and when you use the morphs to create an expression, CC4 will blend and display the relevant details or normal maps for that expression.

Here is an example of the same expression before and after adding the dynamic wrinkles:

Creating these wrinkles is as straightforward as the workflow we’ve been using to edit the head shape, texture, and expression morphs. There’s just one small thing I’d like to address, and that is the level of subdivision.

From CC4, when we send the character to ZBrush to create the expression wrinkles, I personally like to send the subdivision level 7 which will produce 4K resolution normal maps when CC4 converts the details. This means that in ZBrush we’ll have lots more polygons to play around with but it will also be heavier than if you send it at subdivision level 6… not a big deal, just something to keep in mind for your project.

Once in ZBrush, the workflow is exactly the same as the previous one to tweak the expression morphs. The main difference is that we’ll spend more time in the heights subdivision level so that we can add those nice wrinkles and details.

So, just as a quick recap, all you need to do is make sure you are at subdiv level 7 and then click on the switch of a specific expression like Mouth Smile. This will obviously show the updates we made to the larger shapes of the ‘smile’ with the expression morphs, so you can start sculpting the crevices that are created naturally as the character smiles.

Another cool tip you can use to see how much the dynamic wrinkles are actually affecting your expression, is to turn off the last layer of the sculpting layers (the Details Layer that has the base details we created a few steps ago). This will show you a very clean base mesh with only the dynamic wrinkles you are adding on the selected expression:

Create Custom Wrinkles for the 13 Core Expressions in ZBrush Face Tools

Once you do one set of wrinkles, the process is pretty much the same for the rest. You can also take advantage of the Range feature from the Face Tools plugin to see how much area will be affected in the selected expression and make your detailing process a bit more accurate.

Make sure you go through all the 13 expression morphs to add your details so that CC4 can then create a full set of expressions with the wrinkles.

Once you’re done with your details, converting those wrinkles into normal maps in CC4 is also straightforward. After clicking on the Update to Character Creator button, ensure that in the pop-up window, the Wrinkle > Normal switch is enabled, the Normal checkbox is ticked, and the resolution is set to the desired size of maps you want to generate (assuming you’ve edited all the expression checkboxes, they should all be selected).

As I mentioned earlier, I wanted to have sharper details and more resolution so I produced 4K maps by selecting the 4096 switch in the Wrinkle Resolution section before updating to CC4:

Once you are back in CC4, if you don’t have the dynamic wrinkles activated you’ll get a pop-up window where you can simply activate Expression Wrinkles:

That’s it! you should have a fully-rigged character with expressions and wrinkles that are displayed as you change your expressions.

I used the Edit Facial window to select some controls, and with the middle mouse button, pushed them around to test the effect of the wrinkles in my expressions. Below you can see how the folds around the bridge of the nose appear with the ‘sneering’ expression:

Here is another one that is pretty obvious with the smile expressions and the wrinkles generated around the corner of the mouth:

About The Author

Pablo Munoz Gomez is a renowned 3D concept and character artist, with a passion for education. 3D sculpting, visual development, and other mixed-media form the pillars of his artistic passion which he channels through the various platforms that he owns, including ZBrush Guides3D Concept Artist Academy, and 3D Snippets Project. Thanks to his vast online following, he is able to reach artists from around the world and help them advance in a variety of 3D-related disciplines.

Read More

Easy Facial Rig in ZBrush with Face Tools (1/4): Concept & Setup 

Easy Facial Rig in ZBrush with Face Tools (2/4): Detailing & Polypaint

Easy Facial Rig in ZBrush with Face Tools (4/4): Animated Demo

Easy Facial Rig in ZBrush with Face Tools (2/4): Detailing & Polypaint

A Step-by-Step Guide from ZBrush Master Pablo Munoz Gomez

Detailing the Skin

One of the biggest advantages of the connection between CC4 and ZBrush is, of course, that you can leverage the ZBrush capabilities and features to sculpt intricate sets of details into your characters.

Gather the Reference of Skin Details

In this next stage, we are going to concentrate on the skin details. One of my favourite resources to study the intricacies of skin patterns is a website by photographer Daniel Boschung: https://www.danielboschung.com/. This website has a bunch of portraits in incredibly high resolution that allows you to zoom in into every single pore and skin imperfection:

Switch one the Detail Layer on ZBrush Face Tools and Start Sculpting

To start with the process of sculpting details in ZBrush, you can utilise the skin details that come from CC4, since we originally brought in the Normal map as details. To visualise the details, make sure you click on the Detail Layer switch in the Face Tools plugin and that you are in the 7th subdivision level (or 6th depending on which one you sent from CC4). This is to ensure the details are nice and crisp.

For my project, I wanted to cover every aspect of the sculpting process; so, I decided to sculpt my own set of skin details. However, I still think that it is very useful to take advantage of the details layer that comes from CC4. So I used smoothing brushes to reduce the influence of the details from CC4 but keeping a tiny bit of the surface deformations.

Since the subdivision level is pretty high and there are lots of polygons, the standard smoothing brush might not give you the result you expect. In the ZBrush Lightbox, you can go to the brushes folder and within ‘smoothing’ brushes, load ‘Smooth Stronger’. This brush will have a much stronger effect and help you to smooth things out at a higher subdivision level.

Although you can use any of the standard brushes in ZBrush to sculpt details, I used a custom set of brushes that I’ve designed specifically to add high-frequency details to any skin type. This is not necessarily a shortcut but it does help to speed up the process and give you control over the placement of certain details.

At the highest subdivision level, I created the base of details which is a combination of a simple skin pattern, bumps and smoothing peaks:

In the custom brushes pack there are various brushes for specific purposes and areas of the face. I used the eyelid pattern for the eyelids and the stretch pores for the areas closer to the nasolabial fold (smile lines):

Ultimately, the process of sculpting details is all about patience and really spending the time to add the right type of pores or details in the right areas.

Update Details from ZBrush to CC

Once you are happy with the base details of the skin you can send them back to CC4 and the plugin will automatically convert those high-frequency details into normal details.

So in this case, after you click the Update to Character Creator button, we only need to select the Details > Normal switch from the pop-up window. This is to transfer all the ZBrush details into a normal map that CC4 can use.

If you encounter an ‘error’ similar to the one depicted in the image below, there’s no need to panic. This occurs when details such as teeth, eyes, or tongue are not included, and the checkboxes in the pop-up window (shown above) are left unticked. Consequently, the plugin attempts to generate a normal map from a high subdivision level, but since these objects lack details in my case, simply click OK to proceed.

That’s about it. Here is a quick comparison of the default details and the custom details I created as a base in ZBrush:

I decided to stylise and exaggerate my details a bit more to make my character look a bit older with some more memory folds and wrinkles. Back in ZBrush, I spend a bit more time working on the custom details until I had this:

Updating the details is another very simple process following the same steps I covered before. However, this time I selected the 4096 switch from the Texture Size section of the pop-up window when sending it back to CC4. This allows me to have a lot more resolution so the details in CC4 will be a lot more crisp and well-defined.

After updating the details map into CC4, here is what my project is looking like:

Keep in mind that we’ve only tweaked two basic things so far: the overall base mesh shape and the details layer. We still need to go through the expressions and Dynamic Wrinkles to create a convincing effect for the deformations of the face.

Texture Polypaint

Another very cool feature of the Face Tool plugin is the texturing portion. I wanted to cover a bit of the texturing process as polypaint to give you some extra tips and tricks before we start with the expressions.

So, within the Face Tools plugin, you can click on the Diffuse switch at the top. This switch will essentially enable the Albedo colour from CC4 as texture in ZBrush:

In order to modify this texture in ZBrush, you need to first convert the information from the texture map into polypaint. This requires you to be at the highest subdivision level so you can capture as much detail as possible from the textures, and then from the Polypaint palette click on the Polypaint From Texture button:

Once you click on the Polypaint From Texture, ZBrush will project the texture map onto all the polygons of your mesh, recreating the texture as vertex colour (or polypaint in ZBrush).

One thing I like to do every now and again when I’m working with textures in ZBrush, is to enable the Flat render type from the Render menu. This is a great way to see a shadeless version of your texture without any information of the material so you can see the true values and hues of your texture:

In terms of the process, the polypainting techniques are pretty similar to the sculpting ones. It is all about subtleties and patience. I like to use the Standard brush (turning ZAdd off and enabling the RGB), with the Stroke set to Colour Spray and using ‘Alpha 08’ that comes with ZBrush.

These simple settings should give you a lot of variation and control:

You can also click and drag from the colour selection in ZBrush to pick up the colour or press the letter C while you hover over the mesh. For my character, I chose a dark desaturated blue colour to add a subtle shade of blue around the eye regions. I also reduced the RGB opacity value to something like 25% so that I have a more gradual transition and ultimately more control over the placement of this new hue.

You can keep tweaking the standard brush to add all sorts of details. For instance, you can change the stroke to ‘DragRect’ and use ‘alpha 22’ (also comes with ZBrush) to add small veins and tiny blood vessels like I’ve done here on the nostrils… they are pretty subtle:

Create Custom Mask & Variate the Albedo Colour

Another of my favourite tricks in ZBrush when it comes to texturing, is to use the masking features in the Masking palette to create custom masks and variate the albedo colour.

For example, you can use the Mask By Cavity button to mask all the deep crevices and details on the surface. This is a great way to also visualise the intensity of some of the wrinkles and details that we manually added:

Not only do you have a ‘one-click-operation’ to mask all your details but you can also use the Adjust Mask section to blur the mask a bit and create a softer transition to the unmasked areas:

The rest is more of the same, I like to invert the mask and hide it and then with a darker red tone, I can highlight some of those deep crevices like the wrinkles around the eyes:

Other masking features I really like are the Mask by PeaksAndValleys. This will give you a more random mask pattern, but it is perfect to generate a subtle variation like ‘sunburn’ patches.


With any mask that you generate, you can also use the Adjust Colours button from the Polypaint palette to adjust the hues, contrast and gamma:

If you use the same tool (adjust colours) without any mask you can totally change the colour palette of your skin. Just for fun, here is a ‘zombie’ version of my skin palette:

I intentionally wanted to make a drastic change of colour, just so that I can show you one of my favourite features of this entire workflow… so here it is:

Let’s say that you are happy with the polypaint and all the colour changes you’ve made. You can go ahead and click the Update to Character Creator button, and from the pop-up window, choose only the Polypaint > Diffuse option. For texture resolution, I chose 4096

The plugin will take care of the rest… it will convert all your changes from the polypaint into new textures and send them to CC4 with one click:

Back in CC4, is where the magic happens… you’ll get a pop-up window and since we are now sending a new texture map to CC4. The Auto Adjust Texture section is available so make sure you tick the Apply Head Colour to Body check box:

Then when you hit ‘update’ CC4 is going to import the new texture (from ZBrush polypaint):

AND, here is why this is so cool… CC4 will match the colour adjustments you did to the head, to the entire body of the character so it feels totally integrated!

At the end, I went back and reverted the ‘zombie’ skin changes and ended up with something like this:

About The Author

Pablo Munoz Gomez is a renowned 3D concept and character artist, with a passion for education. 3D sculpting, visual development, and other mixed-media form the pillars of his artistic passion which he channels through the various platforms that he owns, including ZBrush Guides3D Concept Artist Academy, and 3D Snippets Project. Thanks to his vast online following, he is able to reach artists from around the world and help them advance in a variety of 3D-related disciplines.

Read More

Easy Facial Rig in ZBrush with Face Tools (1/4): Concept & Setup 

Easy Facial Rig in ZBrush with Face Tools (3/4): Expressions & Wrinkles

Easy Facial Rig in ZBrush with Face Tools (4/4): Animated Demo