


Overview
TL;DR: This tutorial walks through the complete ZBrush Face Tools workflow for CC5, covering how to customize all 13 core expressions with dynamic wrinkles on alien characters. Using Character Creator 5‘s updated expression wrinkle system and ZBrush Face Tools, the guide covers preparing the base in CC5, sculpting and polypainting expressions in ZBrush with up to 8K resolution maps, transferring custom expressions and dynamic wrinkles back to CC5 — including the new displacement option — and using expression-triggered Polypaint to add mood-specific visual effects.
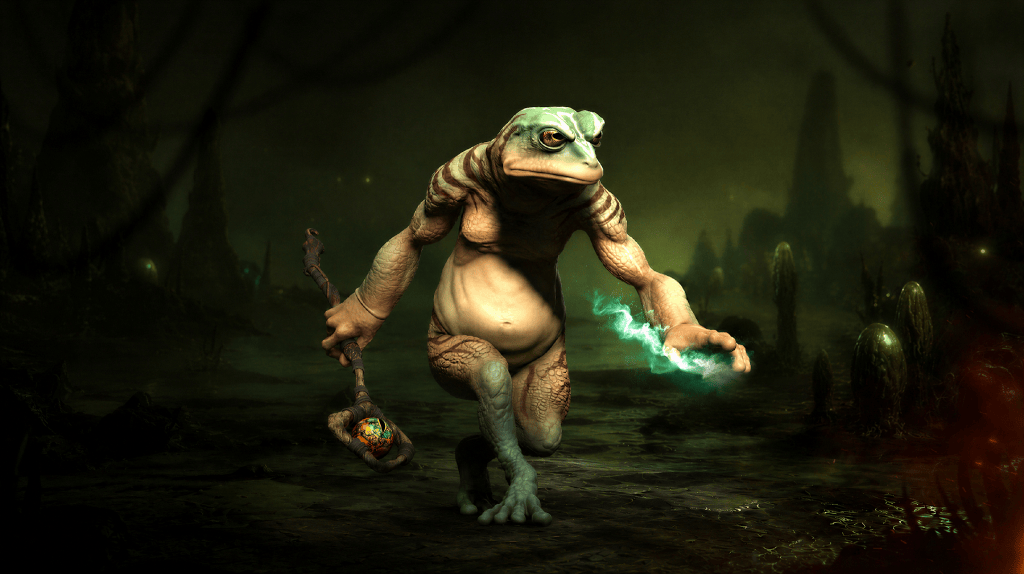
This is the third installment in digital sculptor Óscar Fernández’s alien creature series, building directly on the characters created in the previous two articles. Since the character sculpting and outfit workflows are already covered, this article focuses entirely on facial expressions — the final layer that brings these creatures to life.
All three alien characters are available on the Reallusion Content Store, and ZBrush Face Tools is currently 50% off.
Prepare the Base in CC5
Before jumping into ZBrush, we need to tell Character Creator that this character will use the Dynamic Wrinkle System. To do this, with the character selected (it must be a CC3+ base or later), go to the Modify > Expression Wrinkles > General Setting panel and enable the Activate Expression Wrinkles checkbox. This step is extremely important, as it allows the CC5 engine to manage the normal, displacement, and color maps that we’ll generate later for each expression.
Once the system is activated, click the Face Tools button in the top toolbar of CC. This opens a dialog box that acts as the transfer control center. Here is where we define what information and which expressions the character will have inside the sculpting environment.
In the settings panel, we’ll adjust the parameters so the “canvas” in ZBrush is perfectly prepared:

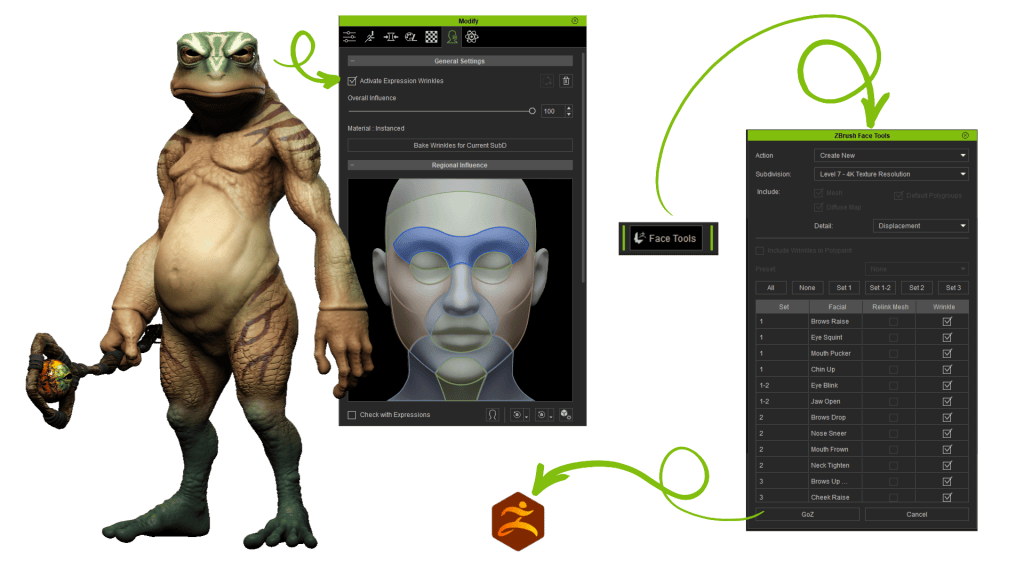
- Action (Create New): We select this option because, although the character is already designed, this is the first time we’ll work on its expressions specifically with this plugin. This creates a new ZBrush project optimized for Face Tools.
- Subdivision (Detail Level): A key technical point is choosing the subdivision level. This new version of Face Tools allows us to generate maps up to 8K resolution, ensuring that even the finest wrinkles are captured with complete sharpness.
- Expression Selection: The plugin supports 13 main expressions that are directly connected to the CC system. We make sure all of them are checked so we have full control over the character’s facial range of motion.
- Include Wrinkles in Polypaint: If the character already has default wrinkles in CC, we would enable this option so they transfer to ZBrush as a base color layer (polypaint), giving us a far more realistic starting point.
Finally, we click GoZ to begin the export process.
Sculpting Custom Expressions in ZBrush
Once our model is opened in ZBrush, we can save the project as a .ZPR file if we plan to work across multiple sessions; this will keep our layers and plugin settings intact.
We then go to Zplugin > ZBrush Face Tools. When opening it, we’ll notice that the plugin has already done the heavy lifting for us: it automatically creates a series of sculpting layers that correspond to the deformations of the different expressions.
Expression Selection: In the Expression section, we select any of the 13 expressions we want to customize, such as Nose Sneer or Brow Raise. When one is selected, the plugin automatically activates recording mode for that specific layer, ensuring that every change we make to the mesh is stored correctly for that gesture.

Using Masks: Before starting to sculpt or paint, we click Wrinkle Mask > Apply Mask. This step is essential because it visually shows us the active area for that expression while protecting the rest of the face. It’s important to remember that only the alterations made within the boundaries defined by this mask will transfer back to Character Creator. For additional visual reference, we can activate the Range Map, which indicates the exact muscle boundaries where we should work.
Sculpting and Detail: This is where we modify the mesh structure or add wrinkle details using ZBrush’s sculpting tools. My personal recommendation is to use basic brushes that displace polygons rather than brushes that “add” material, as this ensures cleaner and more natural deformations in the expressions.
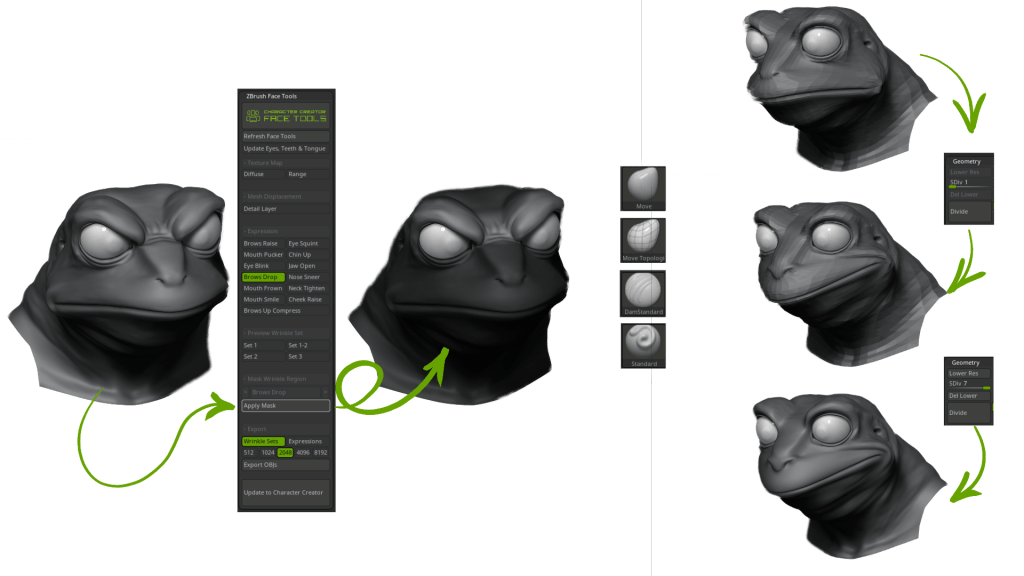
As mentioned earlier, this new version allows us to generate maps up to 8K resolution. Even so, we’ll begin by deforming the region at lower subdivision levels and gradually move up to level 6 or 7 to add the finest details. It’s not advisable to go up to SDiv 8 or higher, since it won’t improve quality in CC and may negatively affect system performance.
We can also use Polypaint to add color variation to the wrinkles, which will create an incredible level of realism once the plugin automatically converts it into the Diffuse map inside CC. We’ll see an example of this later on.
Transferring Expressions Back to CC5
Once we’re satisfied with the sculpting of our expressions in ZBrush, it’s time to “bake” those details so they can work dynamically.
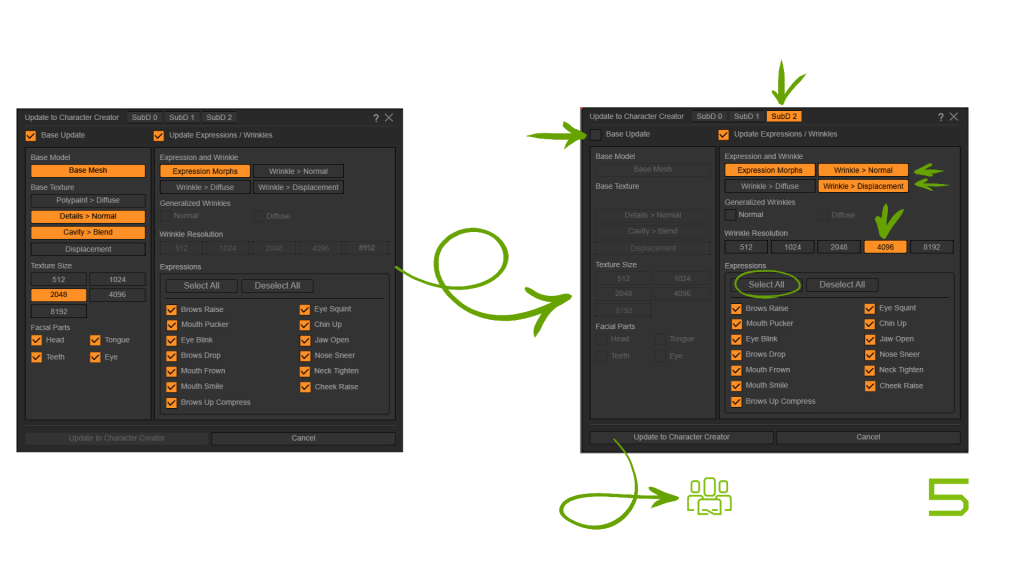
At the bottom of the ZBrush Face Tools panel, we click the Update to Character Creator button. This opens a control window where we decide exactly which information we want to synchronize.
Dialog Box Settings
Since we’re not going to modify anything on the base model, we’ll disable the options on the left and focus exclusively on the Expressions and Wrinkles section.
- Expression Morphs: Inside the Expression and Wrinkle section, we make sure this option is enabled. This tells CC to update the mesh structure for the gestures we’ve just modified.
- Wrinkle > Normal: Since we spent time sculpting deep wrinkles and fine details, we enable this option. The plugin will automatically convert the displacement from the high-subdivision mesh into normal maps for CC’s dynamic wrinkle system. For professional 4K or 8K results, it’s essential to have worked at SDiv 6 or 7.
- Wrinkle > Diffuse: If we applied color using Polypaint to enhance the wrinkles, we enable this option to convert that work into diffuse (color) maps. However, we’ll look at this more specifically later.
- In the latest version of ZBrush Face Tools, the Wrinkle > Displacement option has been added alongside Normal and Diffuse to provide an even higher level of detail. While normal maps simulate depth through lighting effects, the Displacement map captures the actual geometric information of the wrinkles sculpted at higher subdivision levels (SDiv 6 or 7) in ZBrush.
By enabling this option, the plugin processes the physical mesh changes and transfers them into Character Creator, ensuring that wrinkles don’t just appear deep through texture, but retain the exact volume and form of the sculpt.
Time-Saving Tip: A great workflow trick is to review the list of the 13 expressions and select only the ones we actually edited. This drastically reduces transfer time by preventing the system from processing unchanged data.
Finally, we’ll activate the subdivision level for which the maps will be generated, since different maps are created for each subdivision level. In our case, we’ll choose Level 2.
Inspecting and Refining Expressions in CC5
Once the process from ZBrush is complete, we return to Character Creator for the final inspection:
In CC, the GoZBrush dialog box will appear automatically. We simply keep the default settings and click Update. This applies the geometry changes and connects the new texture maps to the expression system. To see our work in motion, we go to Modify > Motion Pose > Motion > Edit Facial. This is the main tool for checking that the transition between the neutral face and the expressions is smooth and natural.
Here, we have three different systems to control and bring our characters’ expressions to life:
- Muscles: This is the most intuitive and visual system. It consists of a facial diagram where we can directly select different muscle regions and, by clicking and dragging with the mouse, deform the mesh in real time. It’s ideal for making quick adjustments and seeing how the dynamic wrinkles react organically.
- Expressions: This system works like a preset library. It provides a series of ready-made expressions that we can apply as a starting point. It’s very useful for establishing a base emotion—such as happiness or sadness—before moving on to more refined adjustments.
- Modify: This is the most technical and precise method. It offers ultra-precise control through a list of sliders that affect highly specific parts of the face. With them, we can exaggerate or soften particular movements, such as raising only the outer edge of an eyebrow or widening the eyelid opening beyond the standard range.
Troubleshooting: If you don’t see the wrinkles while moving the controls, don’t worry—just make sure the Activate Expression Wrinkles checkbox is still enabled in the wrinkle panel’s general settings.

With this, our character now has a completely professional and unique expression system.
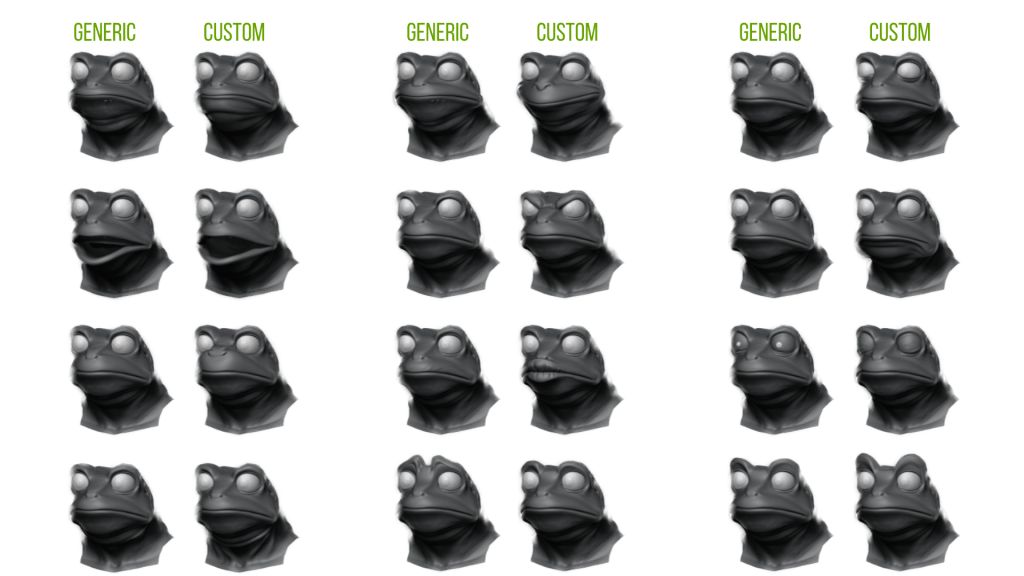
The main differences between the generic version and the customized one lie in the level of authenticity and the control over our character’s specific anatomy. Although Character Creator’s generic rig gets us about 90% of the way there, customization is what truly makes the expression “fit” the design.

Generic expressions can sometimes feel “nervous” or artificial because they don’t take our character’s unique bone structure into account. By customizing them, we achieve gestures—such as smiles—that feel genuine and organic for that specific face.
With the generic rig, some sliders may also feel limited. For example, on a character like this one, the “raise eyebrows” slider at 100% might still not be enough; customization allows us to push those geometric limits much further.

We also notice a major difference in the positioning of the teeth, tongue, and eyes. In a generic “evil laugh” expression, the lower teeth might sit too far back or become misaligned. By customizing the facial profile, we can correct its exact placement so they look natural and believable.
While the generic system relies on standard wrinkle patterns, the customized version displays dynamic wrinkles that originate directly from the sculpting work we created in ZBrush, perfectly matching the skin folds we designed ourselves.


Painting Character Moods with Expression-Triggered Polypaint
If we want to correct any of the expressions, we simply return to ZBrush to make adjustments. To do this, we press the Face Tools button and make sure to enable Relink, since we’ll be working on a model that already contains wrinkle information. In this case, I’m also going to experiment with color, so I make sure the Diffuse Map option is enabled before reconnecting to ZBrush through GoZ.
In ZBrush, we activate the Diffuse button in the panel, which loads the color information as a texture. We also make sure that MRGB is active, along with Colorize inside the Polypaint settings, so we can transfer the diffuse map information to the vertex colors.
I’m going to select the frown expression so that a symbol appears on the character’s forehead whenever the eyebrows are lowered. With the mask enabled—ensuring that we paint only within the limits of the expression—we begin painting the symbol. Once we’re satisfied with the result, we can see that the symbol only appears in that specific expression.
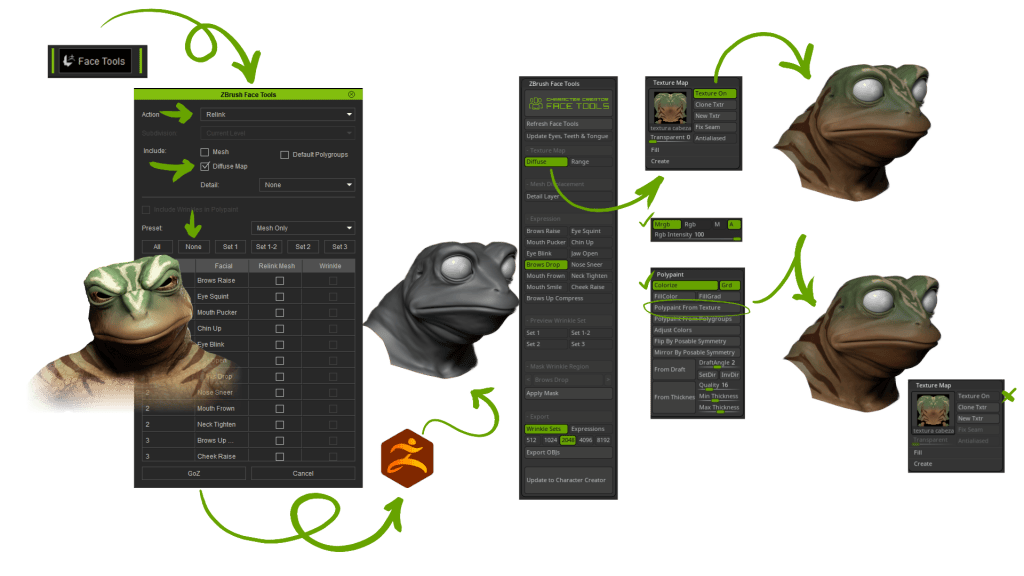
We then press Update to Character Creator, and in the transfer window, we’ll only ask it to update the Diffuse Map, sending only the expression we just modified.
Back in CC5, we can see how the symbol appears only when the character frowns, and it does so gradually depending on the intensity of the expression. This system could also be used to further emphasize wrinkles or give the skin different tones depending on the expression, for example.

Expressing through Postures
As character creators, I’d also like to talk a bit about the importance of the body when conveying an expression. Emotions don’t begin and end in the eyes or the mouth—they are a full-body response.
Before the viewer can even notice the pore detail or the wrinkles we created with Face Tools, their brain has already interpreted the character’s silhouette.
If the silhouette doesn’t tell the story from 10 meters away, then the facial detail we worked so hard to sculpt will lose 80% of its impact. The body sets the stage so the face can deliver the final message.

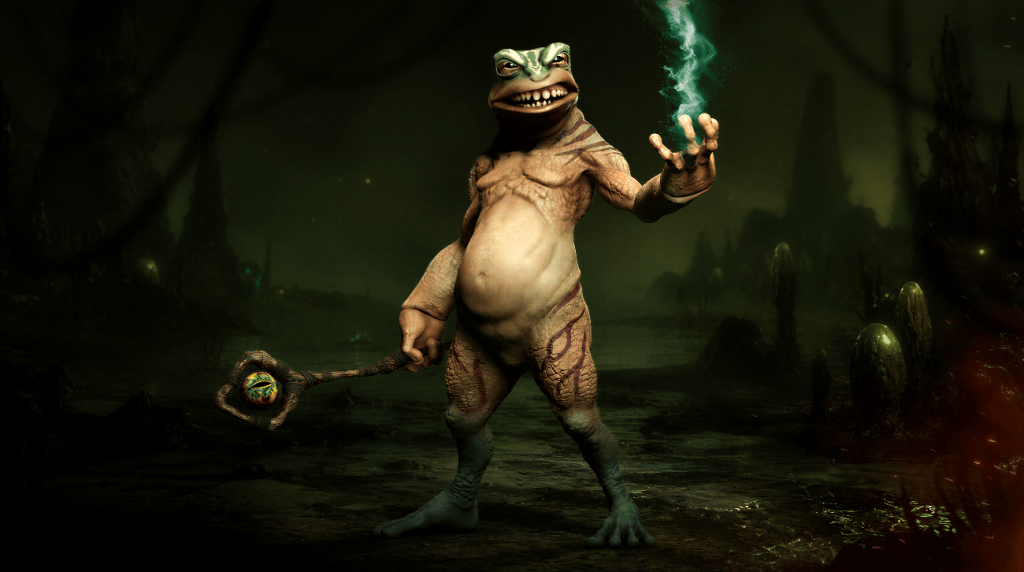
Once we’ve applied our custom expression, CC5 allows us to create the accompanying pose in a very fast and intuitive way.
That speed is what truly gives us creative freedom. Because the process is so direct, we can experiment with different poses until we feel that the body is truly “responding” to what the face is expressing. In this way, we achieve a seamless fusion between facial expression and body language, creating a professional and coherent result almost instantly.
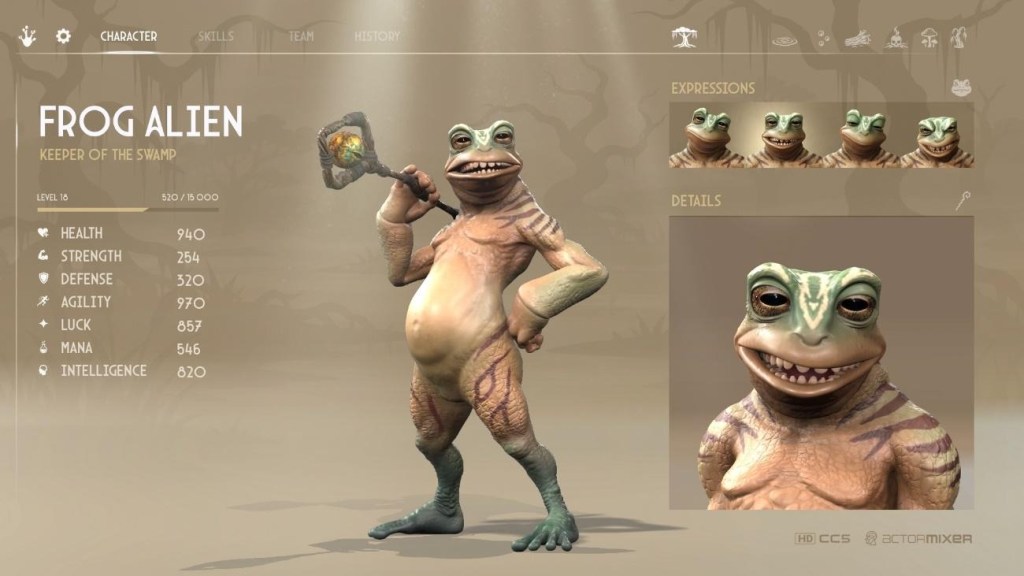
I hope this Character Creator tool helps take your character designs one step further.

Thank you so much for joining me throughout this process, and I’ll see you very soon in the next project. Bye!
Summary
This ZBrush Face Tools workflow for CC5 demonstrates that custom expressions and dynamic wrinkles are accessible even for artists without deep rigging experience. The plugin manages the technical complexity — layer creation, mask boundaries, map baking, and wrinkle synchronization — while the artist focuses on sculpting and painting. Combined with CC5’s Muscles, Expressions, and Modify controls, the result is a character whose facial performance feels authentic to its unique anatomy rather than constrained by generic presets. The alien characters from this series are available on the Reallusion Content Store, and ZBrush Face Tools is currently 50% off.
Key Takeaways
- Enable Activate Expression Wrinkles before launching Face Tools. This step is mandatory — without it, CC5 cannot manage the normal, displacement, and color maps generated for each expression.
- Sculpt at SDiv 6 or 7 for the best quality-to-performance balance. Going to SDiv 8 or higher will not improve results in CC5 and may cause performance issues. The updated Face Tools support map generation up to 8K resolution at these levels.
- Use displacement maps alongside normals for true geometric wrinkle depth. The new Wrinkle > Displacement option in Face Tools captures actual sculpted volume, not just surface lighting simulation — a significant upgrade from normal-only workflows.
- Transfer only the expressions you edited to save time. Selectively updating modified expressions instead of all 13 prevents the system from processing unchanged data, drastically reducing round-trip time.
- Start with professionally built characters to focus on expression work. The HD Alien Character Pack provides fully rigged creatures ready for expression customization, letting you jump straight into Face Tools.
ÓSCAR FERNÁNDEZ / DIGITAL SCULPTOR
Óscar Fernández is a freelance digital sculptor from Spain, specializing in creating figures for 3D printing. With deep expertise in ZBrush, he is known for crafting highly expressive characters that capture both personality and motion. His work stands out through the meticulous attention to facial expression, muscle definition, and dynamic posing, giving each sculpt a strong sense of tension and storytelling power.


FAQs
Can CC5 create custom facial expressions without ZBrush?
Character Creator 5 includes a built-in expression editor with Muscles, Expressions presets, and Modify sliders that offer real-time facial control. However, for high-resolution wrinkle sculpting, custom expression morphs, and expression-triggered color effects, ZBrush Face Tools provides a level of artistic control that CC5’s native tools alone cannot match.
Can CC5 generate 8K dynamic wrinkle maps?
Yes. The latest version of ZBrush Face Tools supports map generation up to 8K resolution when working at subdivision level 6 or 7. This includes normal, diffuse, and the new displacement maps, all of which integrate directly into CC5’s dynamic wrinkle system.
Can CC5 trigger visual effects based on specific expressions?
Yes. Using the Polypaint technique demonstrated in this tutorial, you can paint color information — symbols, skin tone shifts, stylized wrinkle emphasis — that only appears when a specific expression is active. The effect scales dynamically with expression intensity, opening up creative possibilities for both realistic and stylized characters.
Does ZBrush Face Tools work with non-human characters?
Yes. The plugin works with any character built on a CC3+ base or later, regardless of how extreme the proportions are. The 13 core expressions and dynamic wrinkle system function on alien, fantasy, or stylized characters just as they do on realistic human faces — the custom sculpting simply adapts the expressions to fit the unique anatomy.
What version of Character Creator and ZBrush do I need?
This workflow requires Character Creator 5 and ZBrush with the Face Tools plugin installed. The displacement map feature and 8K map support are specific to the latest version of Face Tools. The plugin is currently 50% off.
Related Posts
- From Concept to Motion-Ready Alien Character: ZBrush and CC5 HD Step-by-step Workflow
- Mix Custom Aliens Into Infinite Characters with CC5 ActorMIXER Pro
- ZBrush Face Tools — Complete Head & Body Creation Workflow

