

In today’s visually-driven world, explainer videos have become an essential tool for successful communication. As content creators in the digital landscape, our goal is to produce engaging material that effectively delivers our message. This article aims to provide you with a thorough guide on how to create compelling explainer videos for YouTube utilizing Cartoon Animator (CTA).
1) Anatomy of an Explainer Video
Crafting a compelling explainer video requires careful consideration of multiple elements, each playing a crucial role in its effectiveness. By following these steps, you’ll be able to create an engaging and impactful explainer video.
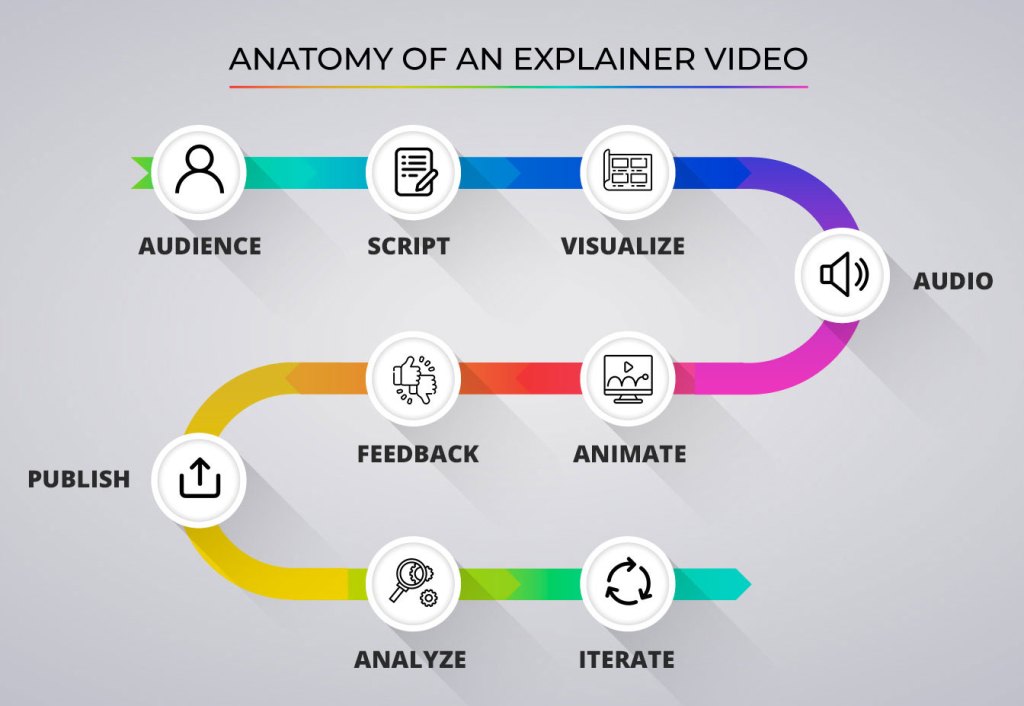
Audience: Your audience is the centerpiece of your video creation process. Understanding who they are, their geographic location, age, gender (Demographics), along with their interests, aspirations, fears, and dreams (psychographics), helps you create content that resonates. The audience-centric approach ensures your video speaks directly to the viewer, enhancing their connection with your content.
Script: A well-crafted script forms the backbone of your explainer video. It’s not merely a narration; it sets the tone, voice, and pace of your video. An engaging, concise, and clear script can turn complex ideas into easily digestible information chunks.
Visualize: Visualizing your video before you start animating is a vital step. Developing a storyboard helps structure your narrative, identify any gaps in the flow, and understand how your script translates visually. It sets the groundwork for the actual 2D animation.
Audio: High-quality audio can significantly enhance your video’s overall quality. A well-recorded, clear voiceover can dramatically impact your video’s effectiveness. Background music, sound effects, and pauses play an equally important role in augmenting your video’s tone and pace.
Animate: With your script, storyboard, and audio ready, you can step into the world of 2D animation. Cartoon Animator offers an intuitive platform to bring your concepts to life, allowing you to create captivating visual narratives with ease.
Feedback: Feedback is a critical aspect of refining your video. Sharing your initial version with a focus group and taking their comments into account allows you to see your work from various perspectives, identify potential improvements, and polish your video.
Publish: Once satisfied with your refined video, publish it on YouTube. The right title, description, keywords, and thumbnails can significantly impact its visibility.
Analyze: Once your video is live, use YouTube analytics to measure its performance. Understand your audience’s engagement and reception, which will feed into future video development.
Iterate: The process of creation is never one-and-done. Analyze your successes and shortcomings to constantly evolve your content. Every video is a stepping stone towards perfection.
2) YouTube Analytics: Decoding Audience Preferences
Audience engagement plays a pivotal role in achieving success on YouTube. The level of engagement directly impacts how widely your video is shown to viewers by the YouTube algorithm. Higher engagement results in greater exposure, while lower engagement limits the video’s reach. It’s essential to bear in mind that YouTube strives to connect your video with the appropriate audience, and its algorithm works diligently to identify and target those individuals.
Now, the question arises: How can you determine the quality of your video?

It’s common to receive polite responses like “That is very nice!” or “Cool presentation! I liked it” when showing your video to others. However, it can be challenging to gauge their true level of enjoyment. Are there parts of the video that were merely “OK,” while others were dull and in need of improvement? To address these uncertainties, YouTube Analytics provides valuable insights through Video Engagement metrics.

To gain a deeper understanding of audience behavior, Derral Eves presents the “YouTube Formula” in his book “The YouTube Formula: How Anyone Can Unlock the Algorithm to Drive Views, Build an Audience, and Grow Revenue.” This formula serves as a reliable roadmap for success, and it can be summarized as follows:
- Try: Create and publish your video content on YouTube.
- Fail: Pay attention to how your video performs and identify areas that may not be meeting audience expectations.
- Analyze: Utilize YouTube Analytics to examine engagement metrics and gain insights into viewer behavior.
- Adjust: Based on the analysis, make necessary improvements and adjustments to enhance audience engagement and overall video quality.
By following this iterative process of trying, failing, analyzing, and adjusting, you can continually improve your videos and better align them with your audience’s preferences.

To analyze your video and understand how your audience received it, there are several factors you should consider. After publishing your video, it typically takes around 48 hours for YouTube to start collecting data. Once you begin getting views, you can access valuable information through a graph. Here’s how you can view audience engagement on your video:
Step 1) Visit your YouTube Channel and click on the “Content” tab located on the left-hand side.

Step 2) Hover your mouse over the video you want to see analytics on, and click on “Analytics”.

Step 3) Click on the “Engagement” tab.
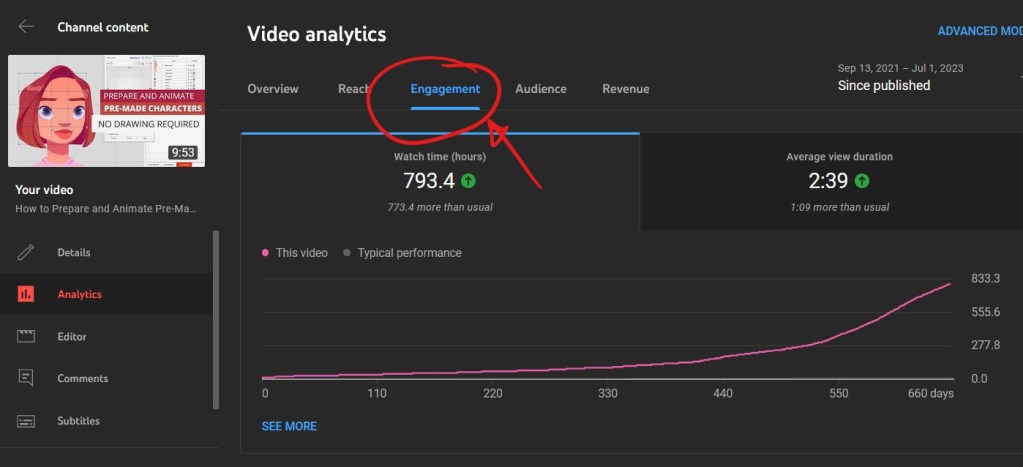
Step 4) Scroll down until you see the video engagement graph.

Here are some metrics to pay attention to:
Engagement: Aim for an Average Percentage Viewed (APV) of 40%. It’s normal for viewers to leave the video midway, but maintaining an APV of 40% ensures a good level of interest and engagement.
Retention: The first 30 seconds of your video are crucial. Aim to retain at least 70% of viewers during this period. This initial engagement is a strong indicator of your video’s overall success.
Dips and Spikes: Review your video’s playback timeline for dips and spikes. These can offer insights into which sections your audience found most engaging (spikes due to rewatching) or least interesting (dips due to skipping).
- If the graph shows too many Dips in your video, it means those sections can be improved.
- If the graph shows Spikes, it means those parts are interesting and you should do more of that.
3) Amplifying Narrative with Animated GIFs
The use of GIFs in your video can significantly increase its visual appeal and engagement. There are various resources where you can find GIFs for almost any concept. Custom GIFs can also be created to align perfectly with your narrative.

The type of GIFs you should probably focus on getting are the ones that have a transparent background, that way they can seamlessly be added to your animated projects without any problems.
Some cool resources to get GIFS are:
- https://furiirakun.com/gif
- https://gifer.com/en/WME8
- https://giphy.com/explore/transparent-background
- https://giphy.com/stickers/
- https://tenor.com/
4) Harnessing the Power of APNGs in Your Presentations
Animated PNGs (APNGs) are another powerful visual tool that can enhance your explainer video.
Freepik.com offers a vast repository of drawings and 2D animation sequences in a single image that can be converted into APNGs using the APNG Assembler. Once ready, they can be easily imported into your CTA project as shown in this tutorial. Images like the following examples from Freepik can be used to create APNGs or Sequences.
Like this sequence of a cat running from Freepik:
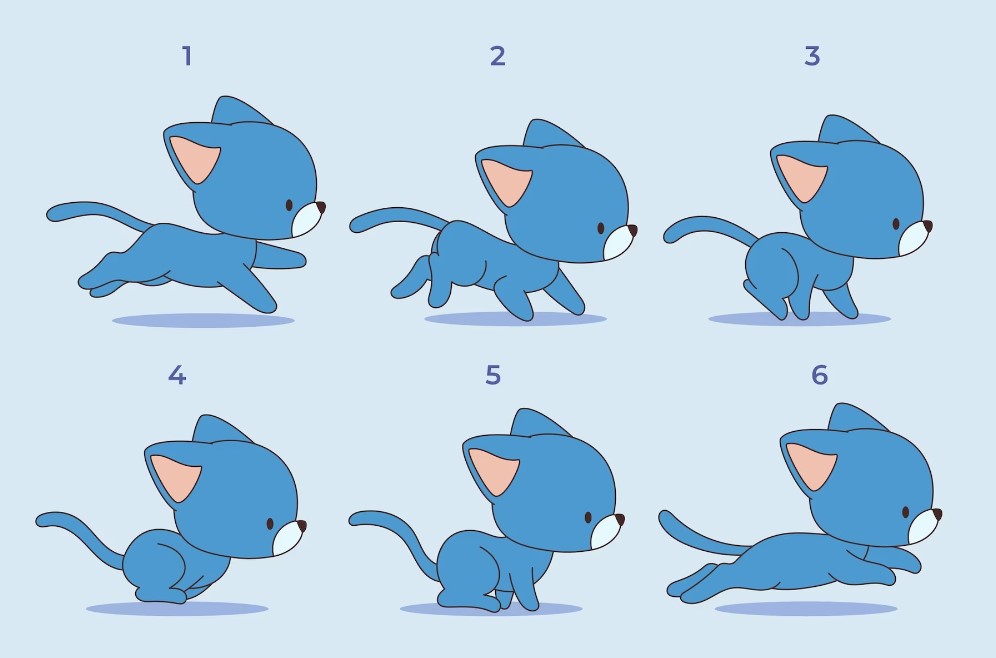
Can be animated when put together into this sequence:


Can be animated to this sequence:

Let’s take the example of the torch.
Once you have the torch elements put together into a single place, you can export each object as a separate PNG so it looks something like this:

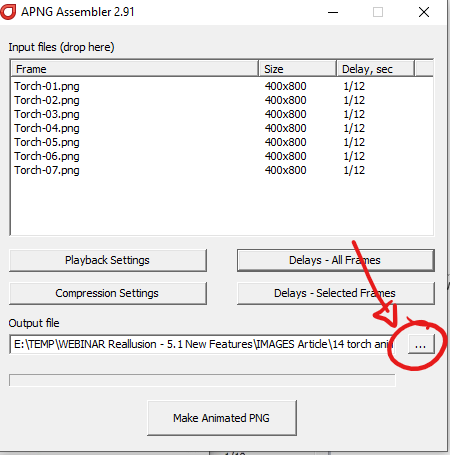
Then you take the FREE little software called APNG Assembler and put those sequences together as an APNG.
Step 1) Click and drag all images into APNG Assembler.

Step 2) Select “Delays – All Frames” to adjust the frames per second (fps). In this example, we’ll use 12 fps, so set the delay to 1/12 seconds. Finally, click on “Set” to confirm the changes.

Step 3) Click on the ellipses “…” to access the output options. Next, select “Make Animated PNG,” and you are done!
Now APNGs can be freely brought into Cartoon Animator 5.
You can learn more about GIFS and APNGS in this video:
5) Mastering Sequence Animations in CTA
Sequence animations are a powerful way to make animated video fluid and dynamic. They allow for the smooth presentation of a series of actions or concepts. Learning to create and utilize sequence animations in CTA can add a new level of professionalism to your videos. This comprehensive guide can help you master sequence animations.
Basically, a 2D animation sequence inside CTA is like having several APNGs or GIFS into a single one that you can swap or switch into with ease. It’s very simple. Once you have a sequence created in vector software like Illustrator, you can take it inside CTA and animate whatever sequence you need. For example, these three sets of explosions were added into a single file:

And in Illustrator, it looks like this:

If you pay attention, the layers show the correct structure you need for sequences created for CTA.

And inside CTA, when exported as an SVG, it looks like this:

An animated sequence that can switch between “boom_1”, “boom_2”, and “boom_3” by just right-clicking on it, selecting “Action Menu”, and then selecting one of the options.
To learn more about how to create image sequences, you can check this tutorial:
Conclusion
Crafting a successful explainer video requires more than just technical knowledge. You can use GIFs, APNGs, and image sequences as much as you want, but if you don’t have the correct storytelling, for the correct audience, you will not be able to create a compelling video.
How do you measure how compelling your video is? By uploading it to YouTube and checking the engagement analytics. If you have above 40% retention rate (Average Percentage Viewed) then that means your video is performing really well. The key is to use technology and the techniques you learned in this video in combination with a good story, animation, and audience understanding. If you are interested in seeing how all of this plays out together, you can check out this Webinar where I explain each step in detail.
Know more:
2D Animation Software for Cartoon Maker | Cartoon Animator
FREE for 30 days plus over 1,700 ready-made assets:
2D Animation Software Download | Cartoon Animator
———————————————————————————————————————————————————————————————————
The original article is written by Mark Diaz and also featured on MakeUseOf.


