Erik Larson (Libertas)

Born in Chicago, Libertas started out with a passion for filmmaking at an early age. Ever since he fell in love with the AAA game Assassin’s Creed, he started making videos about it. You can find more of those videos on his channel Libertas Video. He also creates a series of Assassin’s Creed-inspired micro-short films, like “Modern Assasin Training Session.”
Libertas admits to always dreaming bigger than his shoestring budget could afford. Even still, he loves creating characters and their costumes to see them come alive, especially in his YouTube short films. Outside of his day job as the Director 3D of a creative company. And his is also a sole 3D generalist at his company, Libertas Video. He spends his free time dreaming crafting new characters, costumes, and props for his digital actors.
Challenges I Had To Face Prior to Headshot 2
I am no stranger to creating short films. Whether that involves writing scripts, developing costumes, stepping into characters, or bringing it all together. However, many of my productions were always limited — whether it was the number of people I had access to or the locations where I could shoot. It was disappointing to have an idea of what I wanted to create but be limited by what was available. Now that I have modernized my arsenal of tools, these challenges have become a relic of the past.
My 3D workflow using Headshot 2
3D scanning my own head
The first thing I did was scan my face using the Kiri Engine. I took about 30 photos of myself. They were uploaded and stitched together to create a highly detailed representation of my face. After downloading the high-resolution file created from the scans, I imported it into Blender.

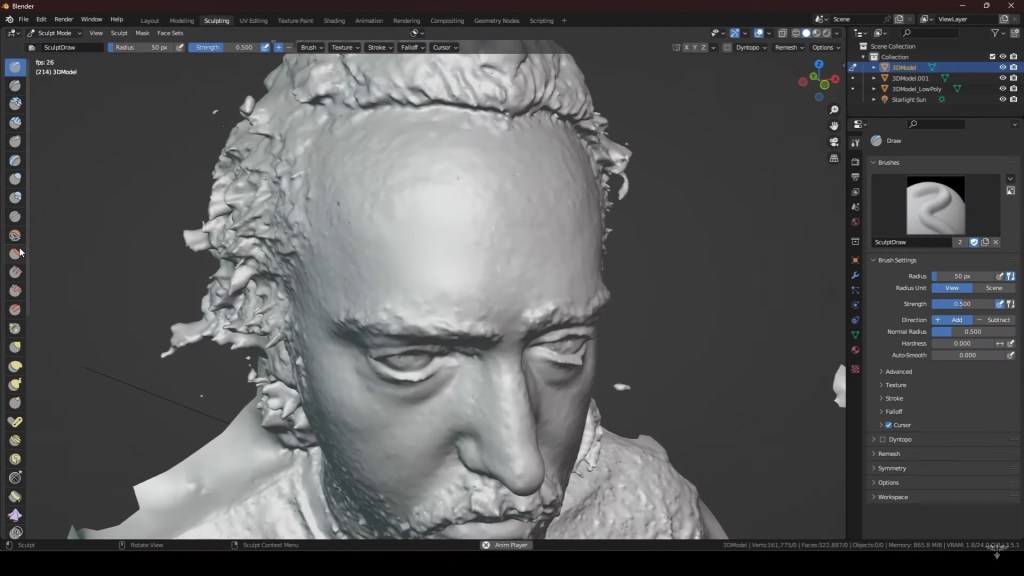
Refining the sculpt in Blender
I had to do some cleanup on this file, so I merged the overlapping vertices and entered “Sculpt Mode”. I primarily used the “Smooth Brush” to remove any odd jagged edges, many of which were caused by the stubbles of my unshaven face. The cleaner we can make this model at this stage, the easier it will be for us later on. After cleaning up the head model, I scaled it down to life-size and exported it as an FBX file.
Importing FBX into Character Creator
I imported the FBX head into Character Creator (CC), ensuring that everything was properly oriented, and linked the diffuse map to the model. Then, I began using Headshot 2. The plugin includes a mesh functionality that requires you to match up predefined points in sequential order on your model, as seen on the Character Creator forehead. You can also add additional points to achieve even more accuracy — to the hairline, for instance. Once this process is complete, I can generate the head and start refining the mesh.
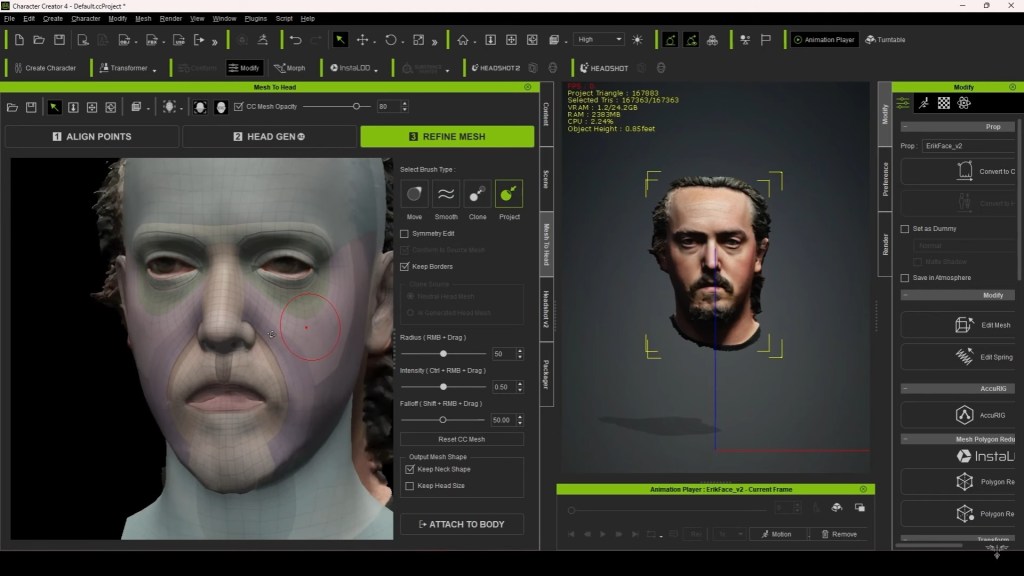
I usually find that the base is good, but when using the “Sculpt” brush, I often need to project or smooth the mesh a little more to increase its accuracy. I also had to work more cautiously on my head sculpt due to some additional challenges stemming from my own face. In particular, the facial hair doesn’t convert well, so I had to use the “Clone” brush to essentially recreate the mouth and the chin. This process took some finesse, but eventually, I achieved something workable. Besides that, the refining phase can take as long or as little time as you want; it all depends on how accurate you want the final result to be. In just a few short minutes, we have a head that is strikingly similar to what was scanned.
Using Headshot 2 and aligning the head morphs
From there, I have a lot of creative control over the face. I like to make a few further refinements using the thousand-plus morphs included with the plugin. Things like fixing my lips and my chin may seem minor, but when it comes to faces, sometimes the smallest details are the most important aspects in achieving a realistic likeness. I then take it a step further by adding hair from the “Hair Builder” content pack, enabling the inclusion of facial hair. Additionally, I enhance the normal maps with the SkinGen Premium plugin for more intricate details. Realistic wrinkle maps from the Dynamic Wrinkles and Wrinkle Essentials extension packs further contribute to lifelike features.
“If you find yourself on the fence as to whether or not you want to buy this plugin I would say go for it — especially if you’re going to be able to utilize that mesh functionality.”
Erik Larson, CEO of Libertas Video
While these are all additional plugins, I find that they significantly enhance your character, taking it to the next level. Personally, I create my own hair in Blender and design the bandana in Marvelous Designer, importing them back into Character Creator 4. The end results are uncanny: It’s enjoyable to witness my family and friends react to the resemblance, which, I believe, opens up numerous opportunities for individuals in the gaming or film industry.

You can add yourself, your spouse, or your friends into a world that you’ve created. For those working on fan projects, odds are there are sculpts of your favorite characters available for import and utilization in Character Creator and iClone. For films, a digital double can perform incredible stunts, and with Headshot, it can all be achieved rapidly.
Fixing the head mesh
After several head scans and testing out this plug-in, you can then attach it to one of the standard Character Creator 4 bodies, or a body already present in your scene. I highly recommend unticking the checkbox for keeping the neck shape, unless you’re working on a more stylized character where the neck’s appearance is crucial. I’ve found that transferring the neck shape can lead to unintended consequences, and it’s relatively easy to reconfigure using morph sliders. Once you’ve selected the body you want, after a short while, you’ll have a complete character. During the process, Character Creator 4 bakes the diffuse map and normal map for use with your character, attempting to match the skin tones as best as it can.
However, based on my experience with the plugin, I discovered that additional refinements are necessary with morph sliders after the creation process. The sculpt on my head created a few issues I’ll delve into shortly. Typically, I’ve noticed that the eyes tend to start a bit small and occasionally at odd angles. It’s also crucial to pay particular attention to how the neck translates. While it may appear fine by itself, in my initial models, I noticed that the neck geometry affected the clothing on the character. For instance, scanned hoodies seemed distorted, giving the impression of a shrunken neck, even if it appeared fine in the viewport.

After I stopped using the option to maintain the neck shape, I haven’t experienced any of these issues. Other than that, the way my face was scanned caused a few problems for this stage of the process. I didn’t scan my face in optimal lighting. All was done in my kitchen at night, resulting in harsh lighting that affected my diffuse map. Additionally, the scan didn’t accurately capture my facial hair, impacting how the normal map was baked. Consequently, I had to rectify these textures in Photoshop by reducing highlights and shadows for a smoother, more even appearance. I also had to smooth out the normal map to diminish the bumpiness on my chin.
Conclusion: My Experience with Headshot 2
After turning myself into a digital avatar, I can fight a ninja. I can be the captain of a pirate ship, or parkour over the rooftops of a medieval city. And all that can be possible with the use of Headshot 2 in Character Creator.

I absolutely recommend this plugin. The original headshot was already a staple asset, but using Headshot 2 takes it to the next level. What would have taken me hours before now only takes minutes. It’s incredible to see those basic models come together so quickly, allowing for a smoother transition to the next step and enabling me to be more creative.

The real treat is taking the models and harnessing all the power that Character Creator 4 offers, from extended facial profiles to dynamic wrinkles. Utilizing SkinGen to add even more details like tattoos or scars gives you an incredible amount of control at your fingertips. So, if you find yourself on the fence as to whether or not you want to buy this plugin I would say go for it — especially if you’re going to be able to utilize that mesh functionality. It will save you a significant amount of time and effort, ultimately leading to better results overall in 3D scanning my head.


