Some of you reading this already know about the power of Character Creator and how it’s improved over time with more features and tools. There are many new users joining our ranks that are not quite sure just what Character Creator is, so for them, I’ll start with a little overview then we will move onto the Headshot 2 Mesh feature that allows anyone to put a custom head on a functioning Character Creator body.
When I first got into creating 3D assets, with Studio Max as it was known then, I purposely avoided creating a particular asset. A 3D mesh character. It wasn’t the making of the mesh that I didn’t like. Rather it was the extensive skinning of the mesh to the bone structure that could consume a day or two very easily with most of that spent on the fingers and other smaller joints.
Anyone who has rigged (skinned) a 3D skeleton knows just how time-consuming it can be and what a creative buzz kill it is. I could turn out a lot of props in the same time it took to skin a character. Even skinned props were much easier unless they had a lot of small bones.
BACKGROUND: Character Creation
Back in the early days rigging was a term used to set up a character with a control panel for animators. Each moving part had to be wired to a panel with controls created out of splines. That wasn’t a bad job compared to skinning but that is how complicated animation used to be. Now rigging has become synonymous with skinning so don’t be confused if you see the terms used in different ways at different times. Control panels have fallen out of favor with modern tools so rigging means skinning to a lot of creators.
To give you an idea of what it was like to create a character 10 to 15 years ago, at least in my pipeline, you have to imagine a long process, days and at times a couple of weeks just to get a character created, rigged, reviewed, and revised to meet the needs of the animators. First was the concept art drawn by a fine artist which was then turned into a T-Posed character mesh. This was sent upline for approval and was revised through a process that eventually created a working character.
After this, at least in my case, the skinned mesh was sent to a texture artist with UVs mapped out. Sometimes the artist would map their own UVs, but it was another layer of the process in the making of a character and turned out some stunning work in the final product. Specialists ruled the day back then completely different than today’s Generalist approach to work where we do just about everything instead of a production pipeline of artists.
I’ve told you all this just to get to this point:
Character Creator 4 does all this work for you.
If you are not new to Character Creator, then you already know the power of the tool but if you are a new user just getting a first look there are some things you need to know. You are provided with male and female base meshes skinned and ready to go. These can be used as a base model to export out in FBX or OBJ to the clothing maker of your choice like Marvelous Designer. The clothes you make are then imported into Character Creator and skinned with a few clicks. It doesn’t have to be a head mesh. You can extract or cut the head off an existing mesh and use the process to transfer it to a working CC character.
ZBrush GoZ is also integrated into Character Creator allowing for a seamless transfer of the base mesh to and from ZBrush. This allows us to harness the power of one of the most creative tools in the industry to re-sculpt the base mesh to fit our needs. You can also create clothing and accessories in ZBrush as well as paint the textures. All this without exporting and importing and these are just a few of the great tools and features available in Character Creator 4.
Making characters is now a pleasant experience with Reallusion taking out the manual skinning. You can still tweak the automatic rigging results with yet another skinning tool that gives bone-by-bone access.
We can all be character developers now. We can use our own concept art, use third-party sources or whatever pops into our head to make unique characters to use in production or sell in the Reallusion Marketplace. In today’s world, with expenses growing, you can leverage your character-creating skills with an extra income stream from the marketplace and you can include props too. So Reallusion isn’t just giving us an opportunity to make our own characters for storytelling but they are providing a method of future income for those that choose to sell assets in the Marketplace.
GETTING STARTED – The Cat Burglar
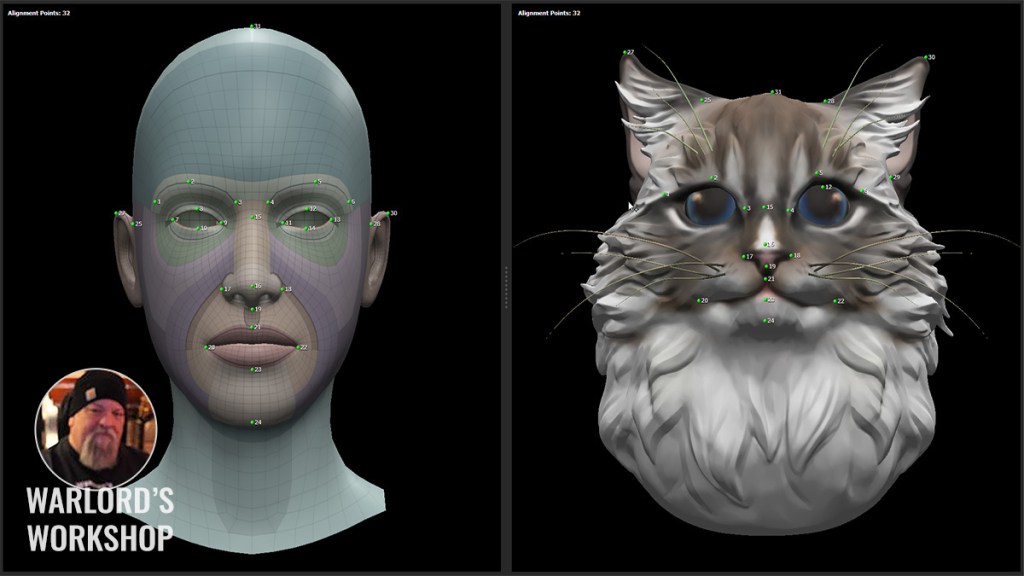
Headshot plug-in version 1 focused on image-to-head technology. Version 2 adds a new mesh tool to the mix that works like a head wrapper that transforms the base mesh shape into the imported head mesh. While the image tool in Headshot is still a go-to tool, the new mesh feature takes the plug-in to another level. In our first example, I downloaded a cat’s head model from Sketchfab by nonlly. After dragging and dropping the head mesh into the Character Creator 4 workspace I centered it in the viewport and started the Headshot mesh plug-in process by clicking the Mesh, Start Head Generation buttons. I had my head meshes already textured before starting this process and bringing them into CC4 Headshot 2.

Once the mesh was loaded up, I manually placed the markers, 32 of them, across the imported mesh while being careful to define the ears. This may sound like a lot of markers but it’s really not and doesn’t take long once you’ve done a few of them. The face itself goes quickly and this head mesh did not need extra markers to delineate a more complex mesh shape. In some cases, I have found that extra markers are needed when the back of the head is a more radical shape than the native mesh.

From here I refined the mesh a bit but not extensively and unchecked the box to retain the original neck shape. I could have spent more time here, but I got great results the first time out. A subsequent Doberman model took a little back and forth to get the mesh shape right. For that model I went back and forth from Align Points to Head Gen a few times to move some markers. There was nothing to it.
In the end it turned out to be a great anthropomorphic Cat character that can wear Character Creator clothing and accessories.

So, this character became, of course, a cat burglar and if you are going to have a cat burglar then we need a Police dog so that was my next objective as I found a nice full body Doberman mesh by InaweofGod on Sketchfab which I took into 3DS Max and removed all but the head and neck of the dog.
CHARACTER 2 – Police Dog

From this point on I followed the same process I used with the Cat head except I had to use more markers. I ended up using 40 to get the results I wanted. This will vary between users and will become even simpler as the community learns and shares more tips and tricks.

Even with the back and forth it only took a matter of minutes to get the results I needed. This looks like a good area for experimentation to see just what can be done with this new tool. Since I’m a notorious iClone asset hoarder I dove into a golden oldie, the Occupations Police Officer, to use the accessories and cap along with stock pants and shirt texture black to match the hat. Before long, my anthropomorphic version of a Police Dog was born.

Below is another example of other characters I created during testing with the Headshot 2 plug-in. They range from ZBrush-created and kitbashed to Sketchfab meshes. All created functioning characters in less than an hour except for the first few attempts. Once I got a few runs under my belt it became much easier and much quicker to turn out a character with this method.

SUMMARY
In future installments, we’ll be taking a look into what is being done with Character Creator. We’ll also look at how users take Headshot to new levels of creativity producing some of the most unique characters in the Reallusion universe.
With Character Creator 4 and Headshot 2 just about anyone can make characters that are not only functional but dynamic and cinematically exciting adding another element to your production or helping you create assets for others to realize their production dreams.

MD McCallum – WarLord
Digital Artist MD “Mike” McCallum, aka WarLord, is a longtime iClone user. Having authored free tutorials for iClone in its early years and selected to write the iClone Beginners Guide from Packt Publishing in 2011, he was fortunate enough to meet and exchange tricks and tips with users from all over the world and loves to share this information with other users. He has authored hundreds of articles on iClone and digital art in general while reviewing some of the most popular software and hardware in the world. He has been published in many of the leading 3D online and print magazines while staying true to his biggest passion, 3D animation. For more information click here.


1 comment