首頁 » Page 48

Create CableLab’s Visionary Video: Real Actors Meet with Virtual Humans

This article demonstrates how production and creative agency The Tomorrow Lab collaborated with First Person to create an engaging film that highlights the Near Future offerings of CableLabs. First Person Inc., which handled the post-production for the film, combined Character Creator and iClone to develop an AI assistant that interacted with real-life actors. The Q&A for this article is conducted by the VFX Supervisor of the project, Geoff Hecht.

Geoff Hecht

Geoff Hecht is an experienced 3D / VFX talent from San Francisco, California. He graduated from the Academy of Art University, majoring in Animation and Visual Effects. His solid academic training and seasoned experience made him a multiple award-winning director of animation and creative director. One of the iconic achievements was winning the Telly Award (Gold), with his team filming the annual corporate campaign video for Oracle in 2019.

Geoff’s talents with people also made him a good supervisor of business management. He founded and co-owned Hectic Digital, an animation and VFX production company for 7 years and then sold it to the renowned media agency IVC. He directed several talented artists, and many of them ended up working at ILM, Weta, MPC, 2K, and other notable studios. He directed a team of 78 people on an animated short, Metro6, which was accepted to almost 70 global film festivals. Making it into the Top 100 Best Animated Shorts in 2020 by FilmAffinity.

Metro6 was extremely ambitious: A short film on the scale of a feature film with over 30+ characters, and full city environment. In 2019, after Geoff completed Metro6, he ran into some Reallusion demos on YouTube. He couldn’t help but think about how Reallusion tools would be applied to his project, and until he saw Martin Klekner using Character Creator and iClone for his project “Heroes of Bronze“, he knew that he wanted to try these tools for himself. The initial tests with Reallusion were impressive! And when the Near Future: Mañana Cabana project came through the door, he knew what they should use. They were ready.
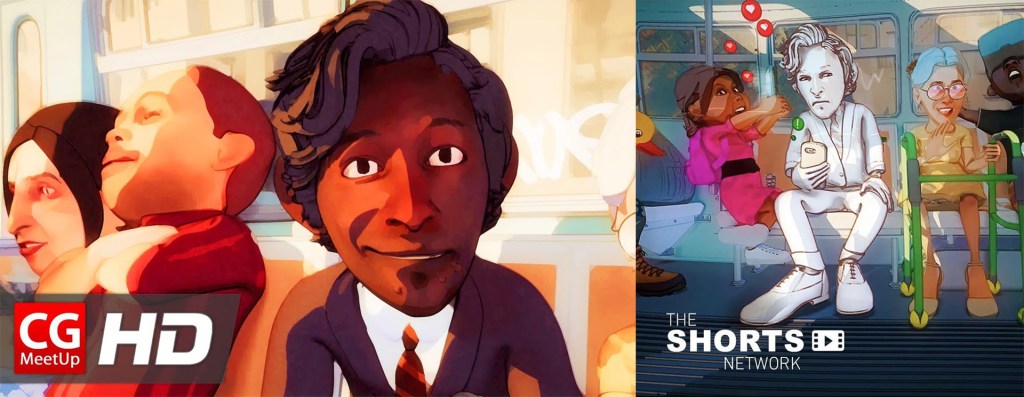
Q: Hello Geoff, and welcome to the Reallusion Magazine! Please tell us about the “Near Future: Mañana Cabana” project, the objectives of the show, and how long it took for the full production.

I’m honored to be here. The Mañana Cabana is part of The Near Future series, showcasing CableLabs’ technology and its offerings. CableLabs pioneers technological solutions for the cable industry. The complete list of Near Future films is available here.

Director David Mackie began crafting these films in 2011 as “A Day Made of Glass.” Initially seeming futuristic, the concepts have become mainstream in the past 12 years. In 2011, I met David Mackie and First Person, which became relevant in 2022 when David Mackie presented The Mañana Cabana project. I instantly wanted to join as Director of Animation at First Person.

The Mañana Cabana introduces the idea of AI assistants with bodies in the near future. Visualizing this in 2022 involved character animation, typically time-consuming. Given a tight 5-week schedule for a 5-minute film, we turned to Reallusion’s Character Creator and iClone tools for a successful approach.

Q: In the Near Future: Manana Cabana film, we have seen two very adorable characters: the little boy and the AI assistant, a rabbit puppet. Can you share with us how these characters were made?

Creating content on YouTube with Reallusion software often leans towards photorealism, but our project aimed for stylized, toon-like characters. Reallusion’s Character Creator offers limitless character styles. Our tight schedule for the Mañana Cabana project demanded efficient decisions, so we researched stock libraries to fill our character slots quickly, an unconventional approach. Though the Louie character could have been made in Character Creator, our situation dictated this method.

Normally, a stock character’s compatibility with animation software matters. However, Reallusion’s tools are platform-agnostic. Character Creator’s iAvatar system provided facial and body controls. Our protagonist, Louie, began as a stock model, later adapted with the GoZ function, ensuring proportion alignment between a ZBrush-shrunk iAvatar model and Louie. The iAvatar version was then used in Character Creator for full facial capabilities. The Bunny Rabbit character’s differing vertices count led us to rig it using the AccuRig system, mapping extra facial controls in Character Creator for speech. Antony Evans of Digital Puppets UK handled both characters’ set-up. This mix of approaches optimized our time and workflow for the project.

Q: Speaking of animation, these characters both have lively facial expressions. What motion-captured tools were used, and what is the trick when making these facial animations?
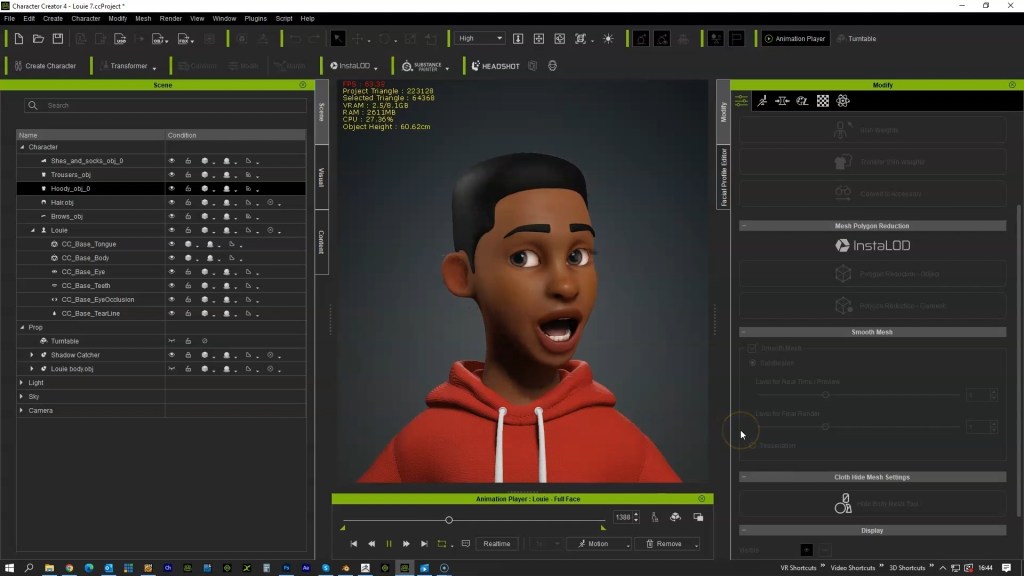
iClone has three great tools for the facial animation of characters, and we used them all for the Mañana Cabana project. We began by using iPhone Live Face, where we can link our animator’s face to control the facial movement of that character. This created a very natural foundation, but we needed an extremely accurate lip sync animation, so our second step was to use the AccuLips feature inside of iClone.

Right out of the box, Acculips does a great job lining up editable keyframes for each mouth shape in the timeline, and most people may even use the default output as-is. We found, however, that if you want to hold a lip pose longer like an “M” or “O” shape, you can stack two of the same shape keys next to each other in the timeline. We felt that this was a more accurate result.

Lastly, the character had to perform to the camera, so with our first two techniques applied, we finished off the animation using the built-in Face Key tool within iClone. This allowed us to specifically point the characters ‘ eyes, eyebrows, face, etc., in whatever direction we felt, making it look more like the actor and characters were interacting with each other. There’s a little-known panel called the “Facial Animation Settings” that allowed us to mix the Viseme Strength (AccuLips) and the Expression Strength (Face Key or Live Face).

Q: Another fun part to watch on these characters is their energetic body animation. How was it done, and how did you find it time-saving compared with traditional workflows?

Yes! I think this was the most fun part! Character animation in traditional pipelines can take 8-hour work days to create 4 seconds of animation.

“Character animation in traditional pipelines can take 8 hour work days to create 4 seconds of animation. But animating in iClone isn’t like animating in any other software I’ve seen. I’ve used Maya, Cinema 4D, and Blender for character animation projects, and started using Autodesk Maya in 2002. Animating in iClone is more like if you combined Adobe Premiere with Maya: You can quickly drop animation clips into your timeline, and your character just comes alive!“

Geoff Hetch | Animation Creative Director / VFX Supervisor

It’s so fast to just try things, and if it doesn’t work out, no big deal, we’ll try something else out 5 minutes later. We don’t have to wait an entire workday to see that something is not working. And I think historically, some people have stayed away from motion capture because it wasn’t easily editable.

I know that there are folks out there who are hesitant to try new things, but I don’t think that most of us joined the industry to set keyframes and adjust tangents in a graph editor (Which you can do in iClone, but don’t have to). It’s great to know those things from a technical level, but those are just an intermediate step to ultimately get where we really want to be… telling impactful stories. iClone just gets you there much faster with more creative freedom than most would anticipate.

“Historically some people have stayed away from motion capture because it wasn’t easily editable. But iClone has the ability to mix and match mocap clips, taking the parts that you like and removing the parts that you don’t as well as adding hand keys. It’s a real hybrid system. We were showing the director Dave Mackie animation progress on the same day that we started animation, which is completely unheard of!“

Geoff Hecht | Animation Creative Director / VFX Supervisor

Q: The entire project is a collaborative result between First Person, Tomorrow Lab, and CableLabs. What is the key to successful communication when working with multiple producing partners?

It all comes down to a combination of communication and trust. CableLabs trusts the Tomorrow Lab because they have CableLabs’ best interests in mind. Together they already have done 5 brand films at such an impressive level. Lisa Tesone is a great Producer who has all the right connections and experience to take any project to the next level (http://lisatesone.com). David Mackie is a great director,and if you go to his website (https://dmackie.com) you’ll be impressed by what he’s accomplished on a film Director level. Dave doesn’t want to do something just because it’s the “cool” thing to do, he does it because it tells a better story and helps connect CableLabs with its customers. But it just happens to look cool, because Dave has a great eye.

First Person has been involved in several incredible works for over 20 years. In the San Francisco Bay Area, they are known by everyone in the industry, and looking at their portfolio it’s not hard to see why. (https://www.firstperson.is)

I met the owners of Drew Fiero, Marcello Grande, and Brandon Grande 12 years ago and have been impressed ever since. Because of conflicting schedules and budgets, we don’t all get to work together all the time, but that doesn’t change how you might feel about a group or a person. David Mackie had a unique problem to solve for the Mañana Cabana project in character animation. He trusts First Person, and I had recently completed a film (Metro6) that had over 30 characters. We at First Person believed in this Reallusion Character Creator and iClone workflow. We were confident we could do the project to the highest of standards, and it all lined up.

Q: We believe the audience will love to see more of your work in the future. Can you share a little of your upcoming plans?

I’m fully freelance for the first time in over 11 years of my career and I’m excited to be forging my own path! It was such a rewarding experience to direct Metro6, but it was so difficult to produce at that scale that I wasn’t sure when I’d work on another film. Turns out that time is “now.” Having had the opportunity to work with Reallusion tools and some other offerings that are available now, it’s so much easier to produce incredible animation than it ever has been before.

I am taking on commissioned work (and you can find my portfolio at https://geoffhecht.com), but when I’m not booked on commissioned projects, I’ll be working away on my next animated film, “Love is a Championship!” This is a project that we’ll look to flex some “Reallusion Muscle”, accomplishing things with tools that many might not have thought possible! More details of this project will be available online in the coming months.

Follow Geoff’s Work

Portfolio of Geoff Hecht

Connect with Geoff on LinkedIn

Learn More about Reallusion Products

Make 3D Facial Animation with iClone

Create Facial Animation with iPhone LIVE FACE Mocap

Get a 30-day Free Trial of iClone

Custom Facial Expressions with Character Creator

Get a 30-day Free Trial of Character Creator

Pitch & Produce: Creating a 2D Animated Series Pilot with Cartoon Animator 5

Chris Meyer-White | 2D Animator, Series Creator, Owner Mixed Up Pixels Studio

Chris Meyer-White

My name is Christopher Meyer-White. I have worked in Home Entertainment for 15+ years, in both the US and the UK, and on projects for Warner Brothers, Disney, BBC, Paramount, and many other studios.

The most time of which being at Abbey Home Media which was the UK’s leading independent home entertainment company for lots of well-known children’s shows, Care Bears, Topsy and Tim, Peter Rabbit, Sooty, Horrid Henry, Fireman Sam and more.

With a background of design, product management of children’s home media brands, and a passion to create series for children, in 2015 I left my job in London and moved to Bristol (which coincidently is one of the leading UK cities for animation).

I now own and run, Mixed up Pixels, an animation studio based in the heart of Bristol, UK, and am working on 2 pilot episodes for my 2D animated series Polly & Parrot, with a view to get these commissioned in 2024, and currently writing a script for a 2D feature, all animated with Cartoon Animator (CTA).

“It looked too good to be true… when I noticed a 2D program called CrazyTalk (later named Cartoon Animator). I knew Reallusion were magic makers, so I tried the software and instantly loving it! – the workflow was so intuitive, and easy. I loved the way you could make your own character within a certain structure, load it into the software and boom, your character is ready to animate. Its super easy, and you can also keyframe too, which really sold it to me. “

Chris Meyer-White | 2D Animator, Series Creator, Owner Mixed Up Pixels Studio

How to Create Engaging Interactive Learning Materials | Cartoon Animator

This article is featured on AWN
Zez Vaz – Director, Animator, and the founder of Toma Creators Studio

About Zez Vaz

Hello everyone! Today’s tutorial dives into crafting an engaging animation intro using Power Tools Vol. 2: Interactive Learning Bundle for 2D Animation – Make Me Actor and Instructional Tools. I’m Zez Vaz from Toma Creators Studio. I had the pleasure of co-directing and animating “Walter Precipitous,” a short film delving into the water cycle, along with numerous educational videos, all brought to life using Cartoon Animator 5.

Interactive Learning Bundle for 2D Animation

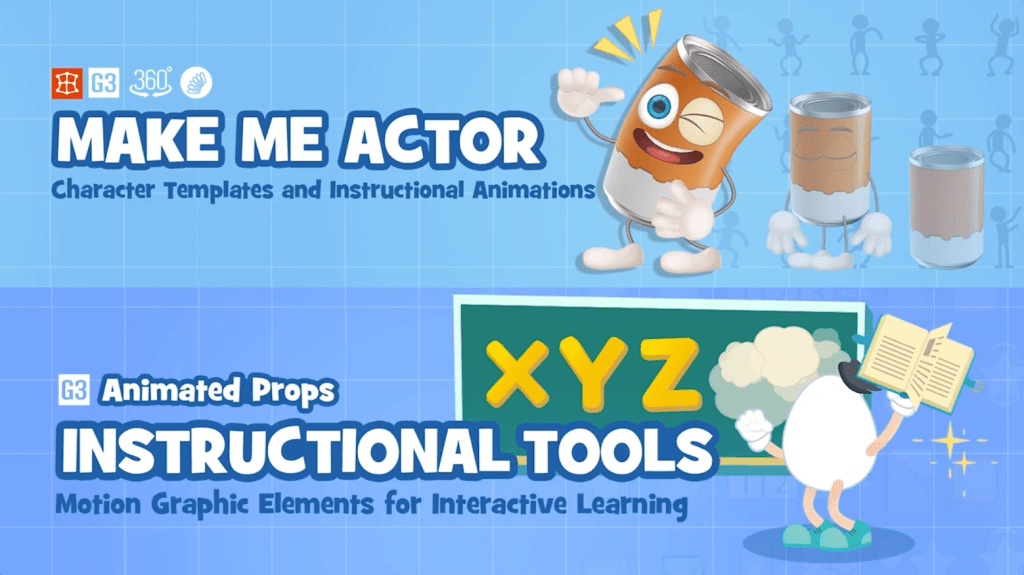
We’ll be delving into the dynamic content pack Make Me Actor and Instructional Tools, specifically how these tools empower you to transform objects and images into speaking actors. You can also customize ready-made actors and infuse vitality into animations using various text motions and animated props that cater to both experienced creators and novices. Make Me Actor boasts a wide array of distinct character templates and offers over 100 facial and body animations – perfect for making talk shows, tutorials, and more. You can alter the text within the props to suit your preferences and seamlessly create e-learning animations and teaching resources by blending cartoon characters with interactive quizzes that make for a fun learning experience.

Trying out the Content Pack

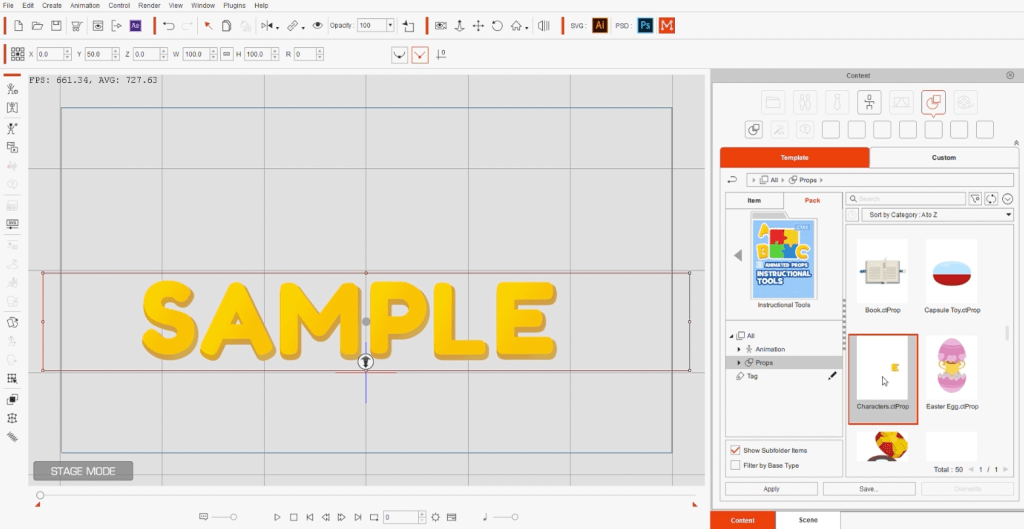
Start from scratch by downloading the pack, then navigate to the ‘Content’ page where you’ll find it. Click on the ‘Instructional Tools’ tab to access a wide array of props and animations at your disposal. I opt for the “Characters” prop, which makes the word “Sample” materialize on the stage. Here, I can select an animation and apply it to the prop.

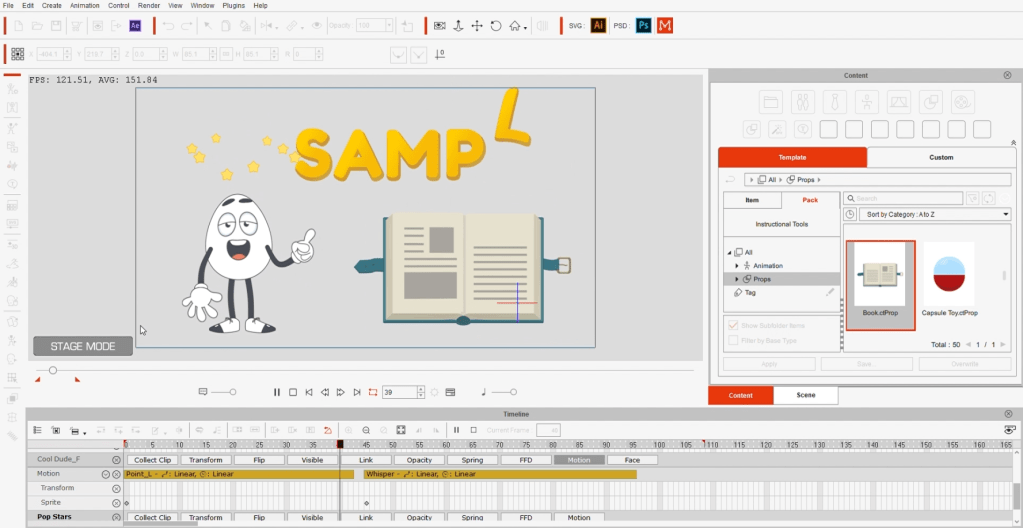
Moving on to the ‘Make Me Actor’ feature, I have the liberty to choose a character and incorporate it into my scene. Navigating to the animation templates, I make a selection from the diverse array available — There are lots of animations, and there is so much you can do with them! 

I decide on one and promptly position the character to point at the text. The animation is visibly represented in the timeline beneath the ‘Motion’ category. Should I desire to layer another animation, I can choose an additional one, and both will seamlessly combine.

Additionally, I introduce the “Pop Stars” prop, accompanied by an array of other props and characters onto the stage. The options are nearly limitless, enabling us to populate the stage with a variety of elements.

Creating a Custom 2D Character Design

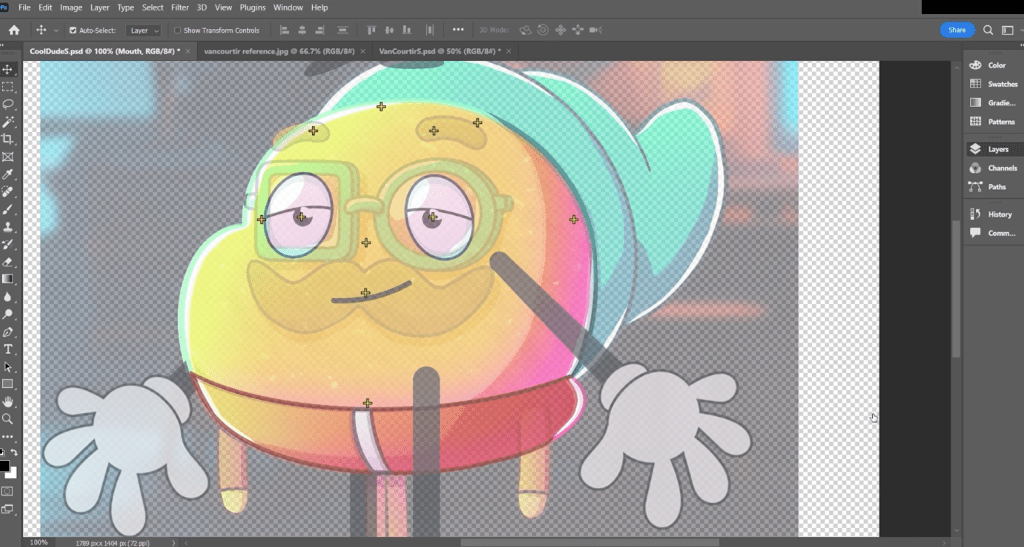
Let’s craft a personalized character puppet. I opt for a Make Me Actor character and enter ‘Composer’ mode. From the left panel, I click on ‘PSD’, launching the character in Photoshop. Here, I fine-tune each layer and the defining points that correspond to the skeletal structure. Leveraging the Van Courtir character, I swap out layers with his images. Using a faintly transparent version of the character as a guide, I meticulously align the bones and substitute layers with appropriate labels. With the edits complete, I save the PSD file and return to Cartoon Animator 5, where the character has seamlessly transformed into the one I just tailored.

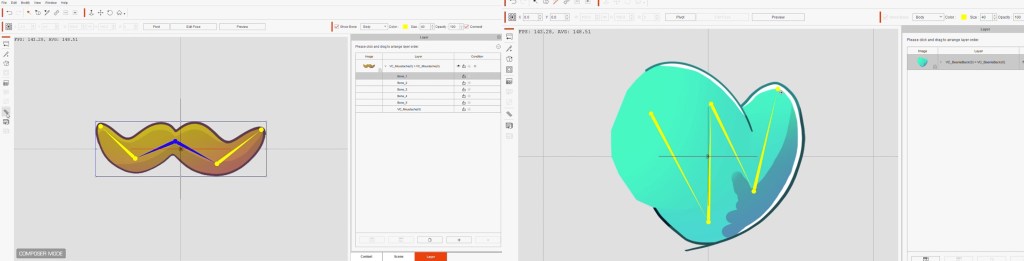
Next, I introduce accessories like a beanie hat, sunglasses, and a mustache, treating them as props within the 2D character design. To infuse vital movements, I apply spring effects to these props. For added control, I integrate bones into the mustache and navigate to ‘Composer’ mode’s left sidebar, where I access the spring dynamics. Switching back to the character, I enter ‘Composer’ mode again and strategically position each custom prop, linking them harmoniously to the puppet’s structure.

Customizing the Text Props

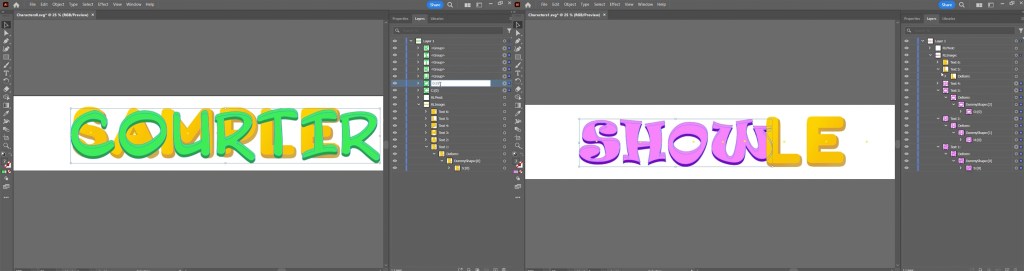
Now, I will personalize the “Characters” prop (found in the Instructional Tools), but this time, we’ll click on ‘SVG’ instead of ‘PSD’. By doing so, the prop opens in Adobe Illustrator, where I’ll choose a font type and proceed to replace each letter with its updated counterpart. The three distinct words I will be work with are “Van”, “Courtir”, and “Show”.

Editing the Animated Cartoon and Exporting the Project

Finally, I include a background picture from Freepik to establish the desired mood. My preferred animation templates feature Van Courtir’s actions, complemented by the addition of the “Pop Stars” prop and a corresponding animation.

Prior to finalizing this animated cartoon, I integrate a music file into the timeline and introduce a subtle camera movement. To achieve this, I access the camera settings, applying a slight zoom on the concluding frame. With the scene now completed, I save the project and export the 2D animation as a video.

I trust you’ll find this content bundle engaging and versatile across various scenarios. Should you encounter any challenges with Cartoon Animator 5, the comprehensive online manual serves as an excellent resource for troubleshooting. Additionally, Reallusion’s YouTube tutorials offer valuable insights.

Happy animating!

Zez Vaz: https://zezvaz.com/ 

Toma Creators: https://www.tomacreators.com/ 

Van Courtir: https://www.instagram.com/vancourtir/ 

Walter’s YouTube: https://www.youtube.com/@walterprecipitous

Know more:

2D Animation Software for Cartoon Maker | Cartoon Animator

FREE for 30 days & get 1,700+ ready-made assets:

2D Animation Software Download | Cartoon Animator

60% Off For Students and Teachers:

https://www.reallusion.com/global-training/educational-licensing.html#for-students-and-teachers-disable-scroll

———————————————————————————————————————————————————————————————————

The original article is written by Zez Vaz and also featured on AWN.

The Making of Bank Heist Mocap Series for Action Films

ActorCore Stages Riveting Blockbuster Productions with Fresh Stunts

Introduction

In the wake of their triumphant debut with the Action Film Series, ActorCore, the foremost online 3D content emporium, has unleashed Bank Heist – a masterpiece of anticipation and adrenaline.

Drawing inspiration from the grandeur of Hollywood’s greatest productions, this kinetic motion pack boasts an impressive array of 61 heart-pounding sequences. Prepare to be transported into a world where audacious criminals storm a bank, taking hostages and cracking open impregnable vaults. Experience the electrifying tension of fierce gun battles, strategic cover tactics, and high-stakes hostage negotiations. Witness the enigmatic robbers make their daring escape, only to find themselves pursued relentlessly by determined law enforcement.

Combine this pack with ActorCore’s 3D characters for diverse bank robbery scenes and Run for Your Life content pack for fleeing crowds to create thrilling cinematic experiences for games, films, and commercials.

Behind the Production

In partnership with Monkey Chow Animation Studios, creators of the Run for Your Life 3D motion pack, all mocap animations have been meticulously performed by professional stunt actors at Motion Capture Orlando’s new studio, equipped with 38 Vicon cameras and run by a rock-solid crew.

Witness the creation of these amazing 3D motions:

Bank Heist includes some of the major story beats of an armed robbery and was inspired by my favorite films like Heat, Inside Man, and The Town. I went a little bit crazy on this one and got to play a filmmaker. We developed a narrative chain of events to get the story rolling!

Jeff Scheetz, Monkey Chow Productions

Sophisticated Motion Editing with iClone

Monkey Chow’s raw data underwent refinement within iClone , a real-time 3D character animation tool. iClone streamlined the process by offering rapid real-time animations, swift motion correction, mocap animation editing, seamless blending, and precise actor-object interactions within the scene.

We edited the clips in iClone. We had to tighten up weapon placement, refine prop interactions, and integrate moving set pieces. The most complicated one was actually the vault. Andress used a roll of tape to enter the combination and pulled a scaffold to open the vault door.

We were able to construct our CGI vault door model to match the measurements of the sets, and we used reach targets to temporarily connect the hand to the dial, so the motions of the hand were driven by the movement of the dial. Additional animation layers compensated for grabs and releases as the combination was entered.

Armed Robbery Motions on Demand

Users have the flexibility to use these 61 motions as they are or enhance them by combining them with other motions using iClone 8’s new motion editing features. All ActorCore motions are completely royalty-free and can be exported as FBX or BVH files for compatibility with major 3D tools like Blender, Maya, 3ds Max, Cinema4D, NVIDIA Omniverse, and real-time game engines such as Unreal and Unity.

Check out Bank Heist 3D motion pack on ActorCore today!

Welcome to WarLord’s Workshop

Tutorials, Tips & Tricks, Interviews, 3D Animation

Hello everyone. I’m M.D. McCallum also known as WarLord, a longtime iCloner dating back to version one. For many years I was one of the few users who produced tutorials on iClone. Mainly the basics and how to get things done quickly with as little effort as possible. Not because I was lazy but because production schedules can be stress-packed with seemingly impossible deadlines requiring shortcuts in the method of production particularly concerning previz.

I retired from full-time animation several years ago but still keep busy with iClone on an almost daily basis when possible as these are exciting times to be an iCloner. Reallusion has always packed a lot into its mid-version updates and even more into their major upgrades. Having been given a small glimpse of their release roadmap, I can safely say that you haven’t seen anything yet.

When I first stumbled upon iClone almost twenty years ago it was a very different product with a simplified interface and no free cameras as they were all preset dolly and pan-type cameras with built-in paths. I saw a few videos, mostly dance videos which I’ll discuss shortly, and it was enough to intrigue me as some users were saying those videos were produced in minutes to hours, not days to weeks or more.

As a 3D digital freelancer, I was always on the lookout for any tool that might help with the tedious nature of animation back then. There was no timeline in version one, but I knew if it could do videos, it could do image renders and I needed custom images for the storyboarding I was doing at the time.

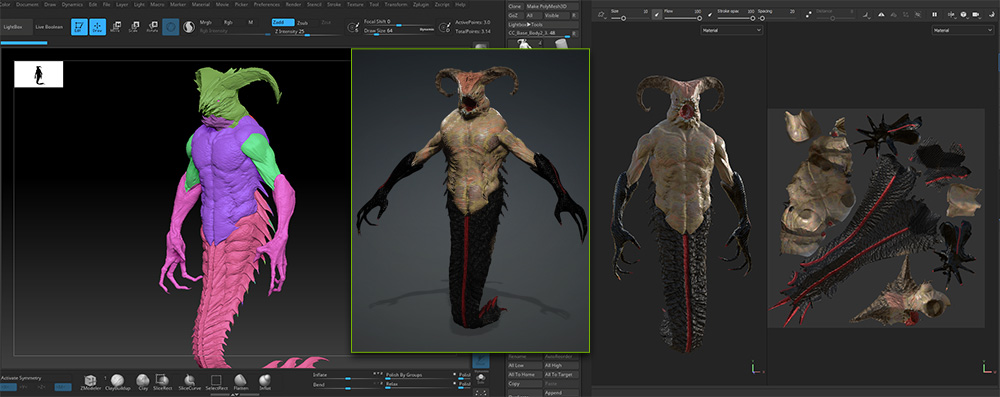
Left: ZBrush KitBashed Mesh, Middle: Character Creator Rigged Mesh, Right: Substance Painter Simple Texturing

iClone was a perfect fit with its premade library of props, motions, cameras, and effects. It wasn’t versatile at all way back then, but it was quick and when you need to turn around a storyboard depicting a revised shot list… you need it as quickly as possible. It became a pro tool for me almost immediately even though it was far removed from today’s version.

One other thing about version one. It had an incredibly powerful image-to-face tool that shaped the head along with mapping the image to the face mesh. Anyone could use this tool even if you had never used an animation tool in your life. Reallusion made it easy.

In fact, Reallusion made it so easy they included a large library of dance moves… hence the early label of dancing video maker, a name that iClone has long since shed but including those dancing motions turned out to be a shrewd move as they started popping up on YouTube and other media hosting sites sparking discussions about iClone and Reallusion.

Yes, as hard as it may be for some of you to believe, without those dance videos, iClone may have never drawn the early user base that it did. They brought attention to the fact that people who had no idea what Maya, 3DS Max or rendering were about had created animated videos in such a short time and… by themselves!

It was low poly and a bit crude compared to today’s iClone, but it was fun!

Left: iClone 8, Right Unreal LIvelink Before Lighting

That’s right… fun. A word not usually associated with computer animation at the time. Challenging, intriguing, experimental but not fun. In fact, back then it could be very tedious. Waiting overnight or days, maybe weeks, to see some rendered work was a normal thing. iClone real-time playback changed all that too. iClone has matured into a powerful animation application over the years. Future upgrades and releases will not disappoint as they provide some very useful and time-saving tools even though iClone is packed with tools and features now. While loaded with features, you don’t have to use everything until you are ready and that is another great aspect of iClone.

It is only as complicated or as simple as you want it to be. You don’t have to use everything until you get more familiar with the tools and concepts as the learning curve lessens. Don’t think of where you are today if you are just starting. Instead think of where you will be 3 months, six months, and a year or more down the road when you do have the skills to use all those tools.

My mission here, my little corner of the Reallusion universe, is to bring the “users’ perspective” along with my years as an animation grunt and project manager to provide you with more information about iClone and Character Creator.

One of my tasks will be to provide reviews of Reallusion products. These reviews usually revolve around some test scenes built for the product in question. These tests will be a lot like what many of us do when we get a new asset, dive right in and start pushing the limits. Maybe this will make the decision easier for some of you when it comes to pulling the trigger on new assets or products.

Left: Simple scene setup in iClone (Beginners Level), Right: Image render from iClone.

While there are a lot of tutorials out there for iClone, many are geared for intermediate to advanced user features leaving more basic features to be explored for those just starting in their animation journey. With this in mind I will be providing more basic tutorials, both written and video depending on the subject, to help less experienced users catch up quickly so they too can enjoy the advanced features and tools in iClone.

Also… and this is a favorite of mine, I get to experiment with iClone and Character Creator to continue to push the boundaries as so many users do. We’ll look at kitbashing, using other tools such as ZBrush and Substance Painter to create models in the millions of polys that we can optimize and bake down for use in iClone. We’ll slice and dice motions, use animation layers and other tools while diving into production pipelines that can lead to professional work or a more polished video.

I’ll also delve into Omniverse and Unreal Engine to achieve more cinematic renders using iClone as the underlying animation tool while off-loading the render work to these applications. All the while trying to keep the tutorials as short and simple as possible.

Twenty years ago, it was paper and electronic notes full of workaround instructions because the 3D apps at the time were lacking in features and tools. These workarounds had to be documented so we could use them in future work and that was very time-consuming. It was a real downer for the creative spirit at times.

Now we just load up iClone and start animating.

Can iClone make just about anyone an animator? Yes, it can. Whether or not you are a good animator is up to you.

Orbit Valley – Using Character Creator, Headshot, and iClone in Blender for Danish Music Video

Phichet S.B | Rasmus Rørbæk – Orbit Valley

Rasmus Rørbæk | Phichet S.B

Orbit Valley was established in March 2023 with the intention of operating as an end-to-end production company. The founders of Orbit Valley initially connected through their shared interest in music. While their respective friend circles were involved in music creation, they took charge of handling the visual aspects. As their friends began collaborating, it naturally brought the founders closer. Recognizing their similar pursuits, despite being in different locations, the decision to collaborate felt organic.

Phichet has an extensive background as a freelancer, primarily specializing as a VJ/3D animator and editor for a production company that emphasized commercials. Rasmus, on the other hand, completed his studies at The National Danish Film School, specializing as a cinematographer. Prior to enrolling in film school, Rasmus worked independently as a director and filmmaker.

Both founders were nurtured in a DIY (do-it-yourself) environment, instilling in them a propensity for versatility. They relish blending various techniques and formats, adhering to the belief that there are no absolute rights or wrongs in their creative process. Their wellspring of inspiration extends to meditation and mindfulness, influencing their aspiration to create from a profound state of consciousness.

For client musicians Emil Lange and Kidd, Orbit Valley innovative vision converged to craft a sensational “smash party” in the hallowed halls of Danish politics, specifically the parliamentary chamber. Armed with their creative tools, including Character Creator 4, its Headshot plugin, iClone 8 and Blender, the team breathed life into their ideas. The result? A transformative fusion of artistic prowess and political backdrop, defying expectations and injecting an electrifying energy into the usually staid atmosphere.
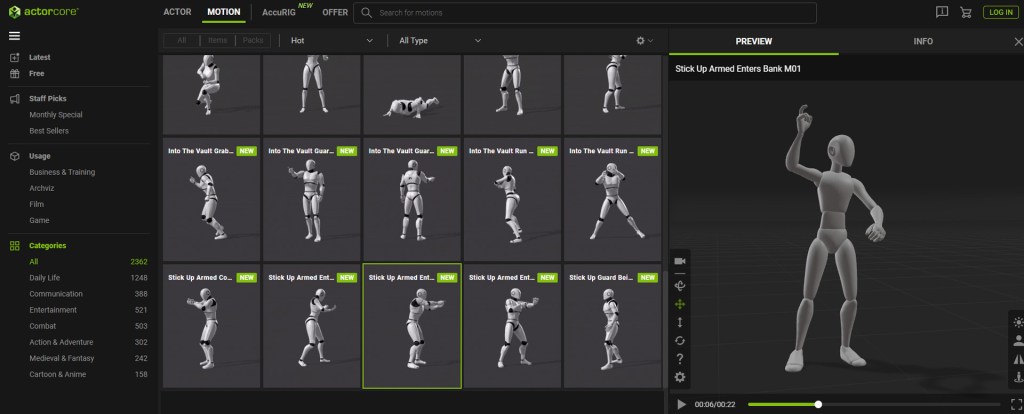
“For us, it has never been a question of saving time – we are not trained in character design and development, so it would never have been possible to create the characters without the tools like Character Creator and iClone ! We received pictures from the artists’ photoshoot and were able to use their faces in the CC Headshot plugin.”

Phichet S.B | Rasmus Rørbæk – Orbit Valley

From Static Head Models to Fully Animated Characters

Headshot 2, the AI-powered add-on for Character Creator, enables advanced 3D real-time human creation from images and 3D models. It excels in model fitting, texture baking, and full-body animation, outperforming rivals. In this tutorial article, Peter Alexander showcases its versatility and discusses why it stands as the prime option for transforming static models into fully-rigged 3D heads.

Introduction

Greetings, this is Peter Alexander. In this video, I’m going to demonstrate how to use Headshot 2 to create two distinctively different stylized characters. I’ll be using assets from the artist, Makar Malicki, and the character Fred, which is based on Makar’s work.

Makar has a wide variety of assets I’d encourage you to explore.

The head I’ll be using is from an asset named “Gustavo”, which can be found on Artstation. Makar provides a bash mesh version and a ZTL file. I’ll be using the ZTL file, as I’ll be transferring the details to Character Creator’s topology.

Choosing a Head Mesh Reference

Preparing your Head Reference

ZTL is a Zbrush format, so I’m now in Zbrush to utilize it. The character has several components, but I’m mostly focused on the base head mesh. Headshot will extrapolate textures for the rest of the body based on the texture map provided for the head; so it’s possible to design the look of the entire character from Headshot.

Optional Polypainting

I’m not going to go crazy with texturing here, as I’m not a great texture artist. In addition, Character Creator provides a lot of additional maps that make materials look nice. So I’m going to add a bit of color for the skin, the nose, the ears, and maybe some shadows based on ambient occlusion values.

Projecting Details and Extracting Normals

After some thinking, I wanted the eyebrows and stylized stubbles to be part of the skin texture and normal maps to be transferred using Headshot. This can be achieved by using the project feature in Zbrush at a high subdivision level.

I hide the meshes I don’t want to be projected onto the head mesh and then use the project feature. After which I will go to the lowest subdivision and bake normal maps.

Transferring to Character Creator

Ideally, the optimal approach would likely involve exporting this using GoZ and then importing it as an accessory. However, due to an oversight, I didn’t follow that process, yet the outcome was still successful. Moreover, I should have ideally adjusted this to match Character Creator’s scale, yet my uncertainty about the initial scale initially hindered this. Nonetheless, this minor detail is inconsequential since you can conveniently adjust the scale using Character Creator’s toolkit.

Scaling Head Mesh

The character I’m commencing with is Fred, who was initially adapted for a Character Creator content pack and draws inspiration from Makar’s design. I’m currently adjusting the head’s scale to a level that I believe will facilitate smoother transfer, requiring the least amount of effort in the later stages.
Consideration for your Source Material

I’ll pause here and say that if you’re going to use another artist’s work for a commercial purpose, you should definitely have the permission of the artist and any necessary licenses. With that said, I’ll start to navigate to the Headshot 2 panel and select the ‘Mesh’ option to initiate a detail transfer.

Assigning Reference Markers

You’ll notice a series of markers, which are designed for an optimal transfer of details. You need to match those markers to get the best results. You can try to auto assign points, and sometimes it works for stylized characters, but in many cases it’s best to do this manually to avoid losing match points in some difficult-to-see area of the mesh.

Sometimes it can be difficult to estimate where a corresponding point should go, but just do your best. The next step can assist you further, as long as you’re close to the mark.

Masking Options

The ‘Effective Area’ in the ‘HEAD GEN’ tab enables you to mask the head in order to emphasize specific details. For the purpose of this tutorial, I won’t be applying any masking adjustments.

The ‘REFINE MESH’ section provides the opportunity to enhance details even further. The closer your mesh aligns with the source, the more effectively the final details will be conveyed. If you find that your tools are causing the mesh to stick to the source too much, you can simply deactivate the ‘Conform to Source Mesh’ option.

The great thing about this addon is that it feels like it’s trying to help you every step of the way. It’s a little more intuitive than Zwrap, which is likely the inspiration for this tool. The focus on the head over the body is going to lead to more successful results, even though having body functionality would be great. Also, the ability to bake details directly from Headshot is a great feature.

Attaching Head to Body

When you’re ready, select ‘Attach To Body’. This will bring up another window, most of which is self-explanatory. I’m baking the normals from the source mesh, along with the normal maps I have provided. Ultimately, I want my maps to be 4096px in resolution.

Regarding the body, I’d like to stick with the current one loaded, which is the Fred character. It has turned out quite well. Although the head is slightly larger than my preference, I can make the necessary adjustments.

Touching up the Head in Zbrush

I’ll need to make some refinements based on my experience. I realize I should have given more attention to the nose during the refining process, which means I’ll need to address it in Zbrush. Apart from that, the outcome is promising. I intend to enhance the details before sending the meshes back to Character Creator.

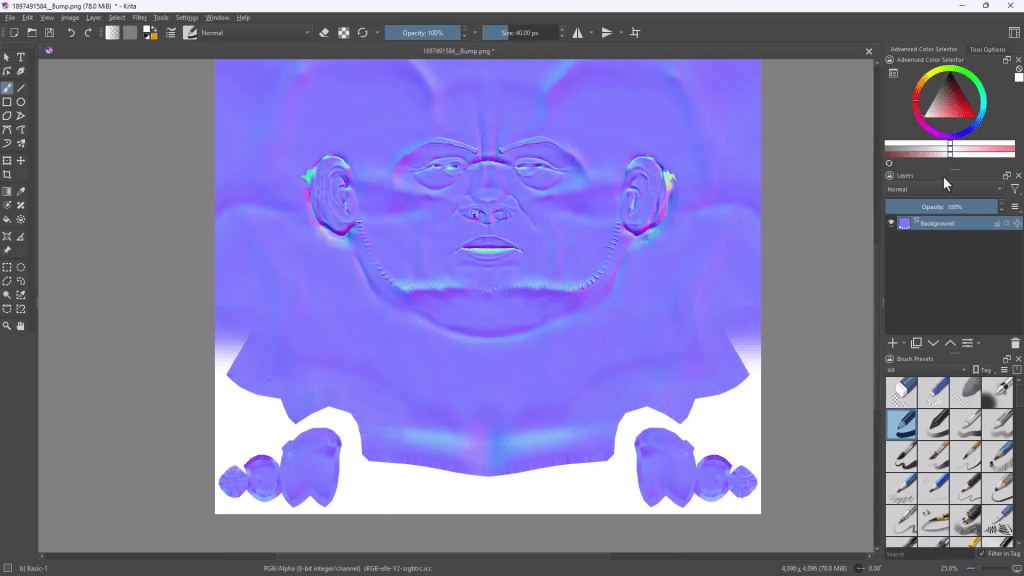
Cleaning Up Normal Map

Now I’m going to clean up the normal maps a bit by sending the head normals to Krita. The base normal map color is (r: 128, g: 128, b: 255). Any distortions can be canceled out using this color.

Adjusting Other Features

And now I’m just going to adjust the eyes using the ‘Proportion Editor’. 

The character is nearly good to go. Let’s put some clothes on him and test him out.

Correcting Clothing (For Stylized Bodies)

Often with highly exaggerated characters, standard clothes don’t fit well. For a character like this, you can try to convert the clothing to its base shape and scale it manually, then reconvert it to clothing. Unfortunately, you’ll lose some of the default settings in the process.

Usually, when an attempt is successful, I’ll save the project file, along with the head and body morph for further mixing.

Second Subject

Now I’m going to do the same thing with one of Makar’s orc models. I’m going to combine it with a Troll model I create for an upcoming content page. 

I’ve only dialed in the body. Due to the exaggerated nature of this model, the body/head separation function leaves some deformation issues. I will see if I can still use it.

As before, I’m using the ZTL file and I’m preparing some very quick texture painting for demo purposes.

Correcting a Starting Body

The body I’m using is far more exaggerated than Fred, and has a significant hunch. So what I’m attempting to do here is use the ‘Proportion Editor’ to adjust some of the issues. Then I’m using the mesh editor to smooth out some of the deformations in the neck. Now I’m ready to initiate Headshot 2.

Using Auto-Detect for Reference Markers

This time I’ll try to auto-detect the markers. And surprisingly it does a decent job.

Headshot 2 does a great job with this character too. I’d probably have picked a more toned down body in retrospect, but I’d say this was a success.

Fixing the Posture of Ultra-Stylized Characters

The current posture and bone alignment challenges stem from the exaggerated proportions of the troll body. Given its default hunched stance, Character Creator attempts to make slight adjustments to rectify the posture.

Adding other Details

Now I’m just adding some additional touches in Zbrush, altering the teeth and more.

As I did with the Fred model, I’m going to use Krita to paint and blend out some of the flaws in the normal map.

Adding Assets

I’m just using some assets I created to finish off the design.

I feel that now he’s sufficiently dressed as an orc. And with that, I will wrap up this article.

In Closing

I hope this demo of Headshot 2 helps in some way. There are limitless possibilities waiting for you.  For digital sculptors, you can now transfer your sculpted details to a clean topology with little effort, and animators can collaborate with other artists more effectively.

Peter Alexander (Mythcons): ArtStation. YouTube. Facebook

Know more:

Character Creator: 3D Character Design Software

FREE for 30 days & get 2,000+ ready-made assets:

3D Character Generator Free Download | Character Creator

Introducing young people to 2D Animation with Cartoon Animator

Kristen Collier | 2D Animator/ Illustrator

Kristen Collier

Creating animated films and educating a younger audience about 2D animation , Kristen Collier needed to find software that was easy to use, yet could produce high quality animated films.

In Cartoon Animator (CTA), Kristen found everything she needed and was quickly able to teach herself and others how to animate, and has even been able to create her own custom actors for her projects. 

” I researched different software during the lockdown, and saw that Cartoon Animator (CTA) had the best ratings of learning curve and for being economical. I love Cartoon Animator, and it’s easy on the surface level, for beginners, and for doing short, simple animations. CTA is my absolute favorite software. When I was working on my feature cartoon, Benny the Barnacle, for months I would work 12 – 16 hour days on the animation, it was so engrossing. I was working non-stop on it, and loving every minute of it. Cartoon Animator is addictive, but in a good, constructive way. “

Kristen Collier | 2D Animator/ Illustrator

Creative Agency leverages Headshot Character Creator to animate Jeff Bezos for Community Campaign

Liam Murphy – Lead 3D Artist, Graphic Designer, 2D/3D Animator, VFX

Liam Murphy

Liam Murphy is a versatile multidisciplinary designer with a career spanning graphic design, 2D and 3D animation, concept art, VFX, Experiential design, Product design, and motion graphics.

He received a strong educational foundation in Art direction  from George Brown college, and has gone on to work for Brands and studios like Tokyo Smoke, Tendril, Momentum and Angry Butterfly. His animation work showcases his ability to infuse cinematic styling into his work in motion design.

As 3D Art became more integral to the Advertising industry, Liam transitioned into this space, using his animation, and design expertise to create awe-inspiring Motion Graphics for his clients. Throughout his career. Liam has pulled inspiration from Movies and Cinematic CG trailers such as the work from Axis Studios and Blur.

Liam is currently working as the 3D and motion design lead at Angry Butterfly, independent creative and strategic consultancy based in Toronto, where he is bringing his skills in house to create a new standard for visual production at advertising agencies.

BILL IT TO BEZOS is a community service campaign for the Jane/Finch Community Centre, where Liam Murphy used Character Creator‘s Headshot plugin to animate a photograph of Amazon founder Jeff Bezos to raise funds for their campaign where they raised more funds in 5 days than in the past 3 years combined.

“Fortunately, my search led me to discover Character Creator 4 and iClone 8, which turned out to be a perfect match for the project. The software’s impressive speed and stability allowed me to keep up with the numerous revisions that came our way, ensuring we were able to make the most out of the resources we had available.”

Liam Murphy – Lead 3D Artist, Graphic Designer, 2D/3D Animator, VFX