
The Making of ‘Fetch’ – Leveling up your Cartoon Animator skills to PRO
Cartoonist and animator Garry Pye achieved a remarkable feat with Cartoon Animator (CTA), producing a full 2D animated film in just two weeks! His primary goal was not merely to use the tools of Cartoon Animator but to leverage them to craft professional-level animation.
Designing and rigging his characters for CTA, this solo animator wrote, animated, edited, and released his short film ‘Fetch’ within a swift 14 days. Join Garry as he shares his incredible journey from concept to the final film.
“I’ve been using Cartoon Animator (CTA) for 2D animation for over a decade now. I stick with CTA because it allows me to create animation quickly, enjoyably, and effortlessly, but still gives me a wealth of powerful tools to help me fine-tune my animations and get the results I want. Its user-friendly functionality means I’m not weighed down by technical details, allowing me to focus on the creative aspect of animation.”
Garry Pye – Illustrator, Cartoonist, 2D Animator, Content Developer
WRITING A STORYLINE
Venturing beyond my usual 20 second animations, I aimed to create a fully animated short with a storyline – a challenge to myself. I’m drawn to characters who persist despite constant setbacks, and found that Klaang from my Alien Squad series was the perfect subject for this animation. In this short, Klaang innocently throws a stick for his pet, only to find it retrieving a stick of dynamite instead. Panic ensues, and Klaang has only seconds to solve the explosive situation.
I prefer writing plot points over storyboarding because it allows me the freedom to explore new directions spontaneously. The thrill of unexpected ideas fuel my creativity, and I like to remain open to the possibility of detouring from a set path. Storyboarding always feels limiting to me.
CHARACTER DESIGN
During my time with Cartoon Animator, I’ve designed and rigged over 500 characters. CTA’s user-friendly templates offer a solid foundation for character building while allowing complete design flexibility. Whether it’s shape or size, the possibilities are endless!
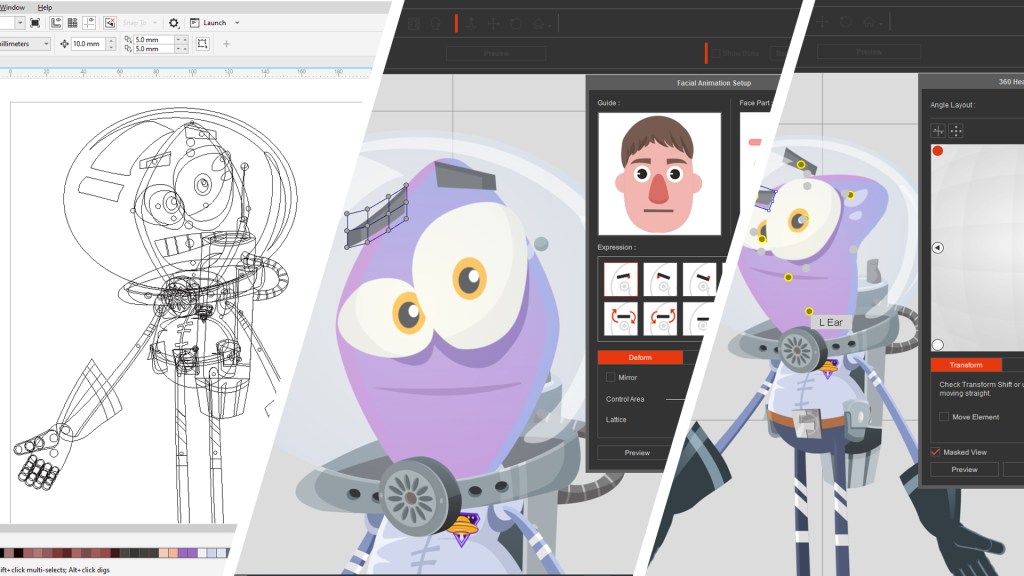
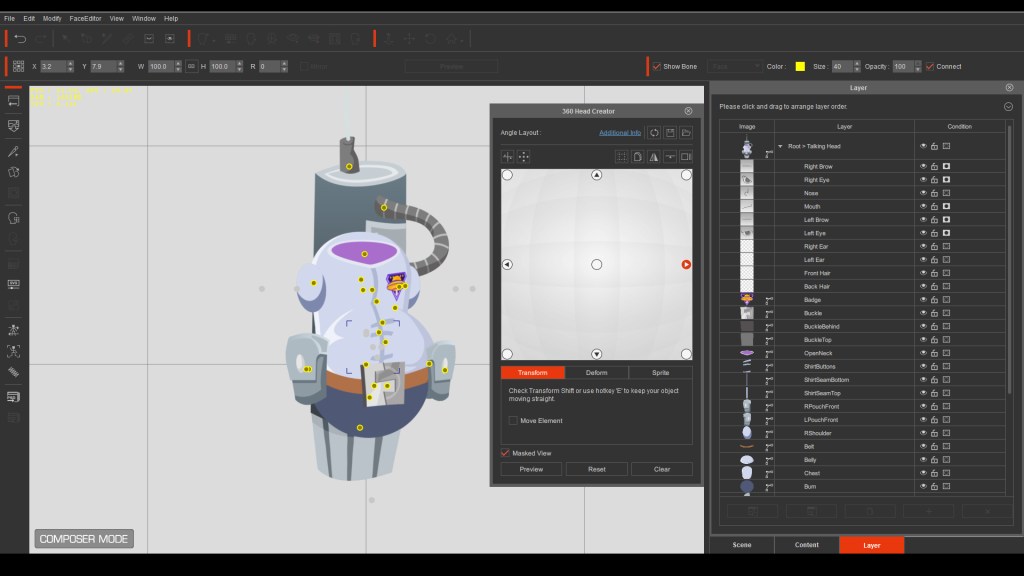
In this project, I was keen to feature one of my favourite characters, Klaang, from the Alien Squad series. Klaang, a G3 vector-based character with a 360 head, offers seamless face rotation for enhanced animation. With Cartoon Animator, I really focussed on customising mouth and eye sprites, designing over 55 mouth shapes and ensuring maximum expressiveness in his character animation.

Klaang’s energetic, dog-like pet was an adaptation of one of my Bonkers characters. By transforming him into a fuzzy ball of fur and removing the arms and legs, I not only achieved the look I wanted but also streamlined the animation process. Less keyframing, more bounce!
THE CONCEPT
When starting a new animation, I always seek challenges to elevate my skills. In ‘Fetch,’ I focussed on two specific targets to push my boundaries and grow as an animator.
For my first challenge in ‘Fetch,’ I aimed for detailed character interactions and prop handling in a single camera shot. The aim here was to show CTA users that by paying attention to small details, the final result will be of a much higher standard. Its easy to use the tools of Cartoon Animator, but they also give you the power to really bring your characters to life.
The story required having the dog retrieve the stick, drop it, and then watch Klaang pick it up seamlessly. The audience needs to believe the stick was genuinely in the dog’s mouth or Klaang’s hand, and not simply pasted on top.
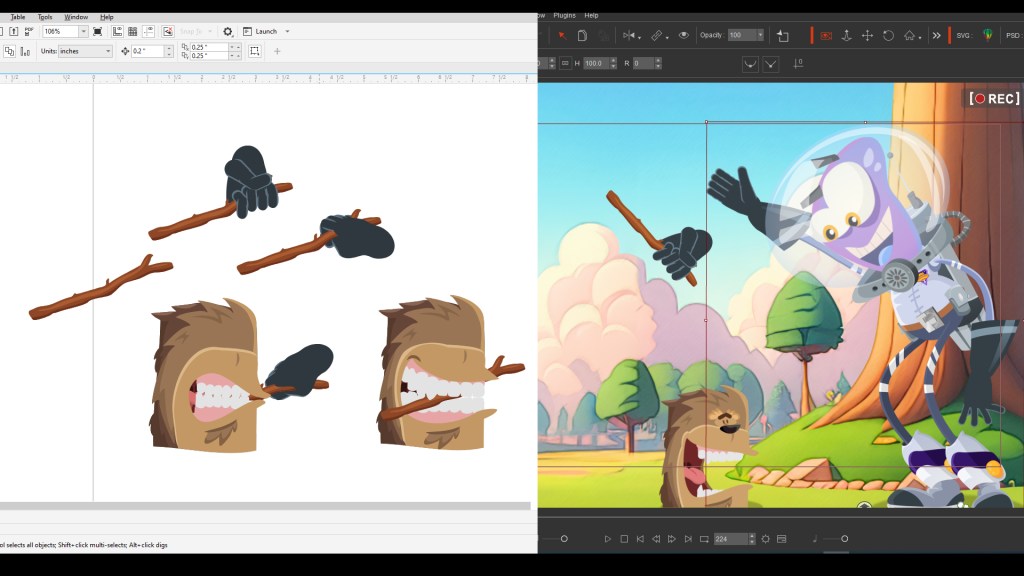
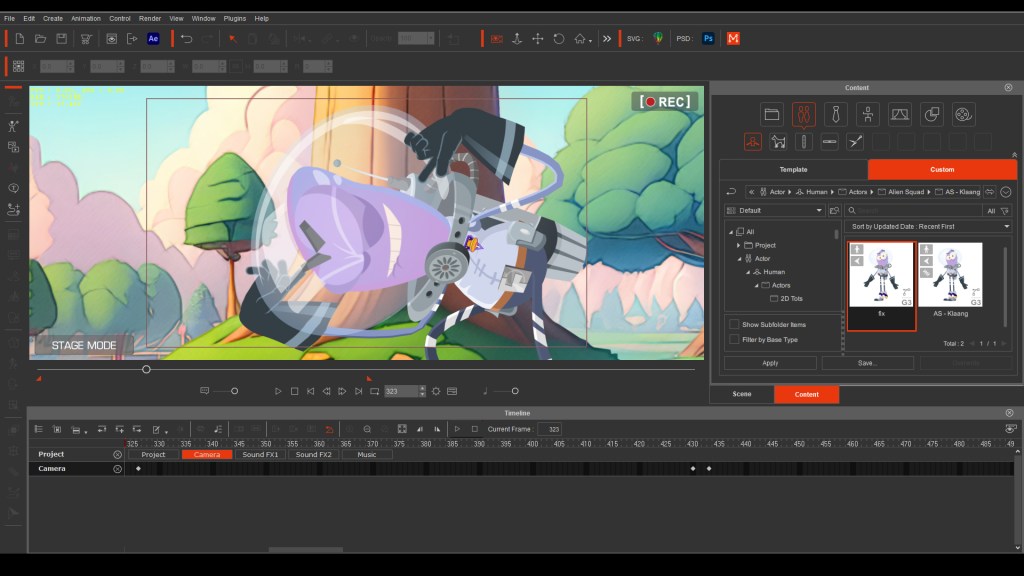
For this animation Klaang was going to have to believably hold the prop in his hand. To achieve this I created a series of individual props of the hand, and then replaced those for the original hand in Cartoon Animator, simply placing the new prop in position on his wrist, linking it to the character and then making the original character hand invisible. Then I was able to switch between hand sprites so Klaan could grab the prop in a convincing way.
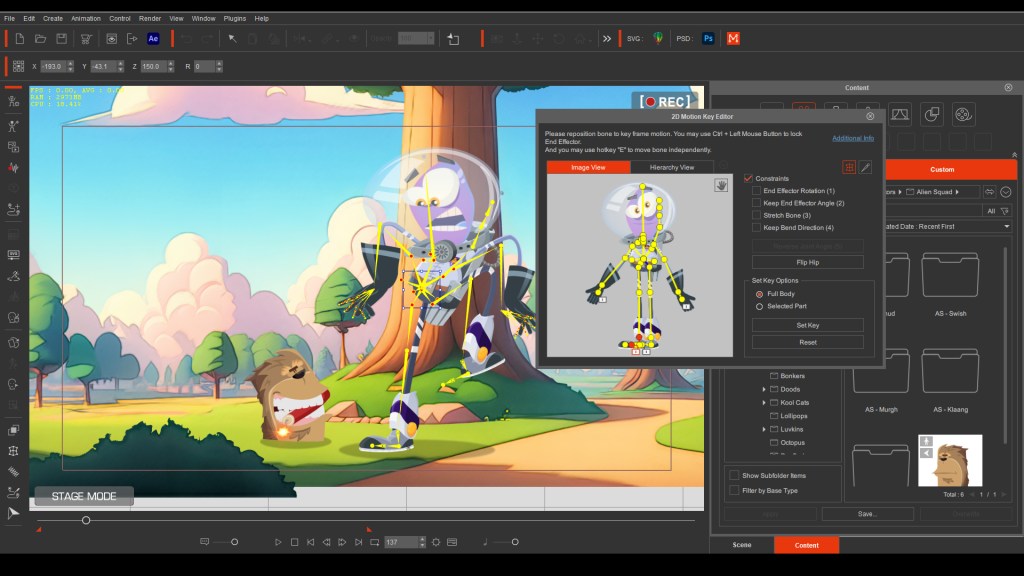
Another challenge in ‘Fetch’ focused on rapid character movements, creating a sense of urgency and panic in Klaang’s actions. This approach was a departure from my usual character animations. Also, rather than using premade motions, this animation required me to keyframe everything except the walk cycle. Swift transitions between full-body keyframes were crucial to maintain clarity in Klaang’s movements. But CTA gives me total control over every body part and keyframe, so that with attention to detail I can produce the results I want.
WHERE TO START?
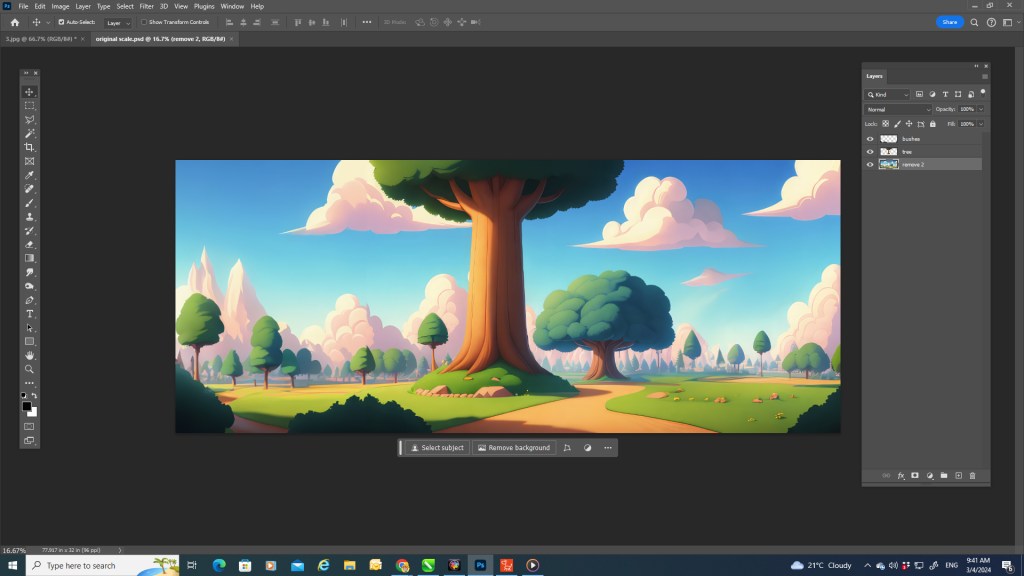
My first step is scene setup. I import fully layered PSD files as scenes, setting the depth of field for each layer to create a parallax effect during camera movement. Next, I position characters within the scene. Importantly, I save this setup as a separate file and then begin animating on a new save, providing a safety net to return to if needed. Another valuable tip is to create multiple versions of the project as you progress. After completing important or challenging animation sequences, I save that at that point and continue on a fresh file. This ensures the ability to backtrack a short distance in case of any issues without losing the entire project.
When starting any new animation, my initial focus is on blocking out basic character motion, with the priority on arms and leg movement, along with the character’s position on screen. What sets Cartoon Animator apart from other animation processes like traditional hand-drawn animation is its flexibility—you don’t need to tackle everything at once. I can lay out a character’s basic movement over 3,000 frames and then return to frame 1 to refine details like hand gestures, eye expressions, and head turns. With CTA, it’s a gradual process of building on a character’s performance, allowing fast and easy adjustments when required.
CHARACTER PERFORMANCE
After blocking out basic character motion, I dive into my favorite part of animating—character animation. The goal now is to meticulously refine every aspect of the character, bringing them to life in a way that gives them believability with the audience. With Cartoon Animator, I enjoy total control over every nuance of character animation, from the subtle turn of the head and focus of their eyes to shaping the mouth and eyebrows. It’s this level of control that allows for a truly immersive and realistic character performance. The more attention to detail, the more convincing the character becomes.
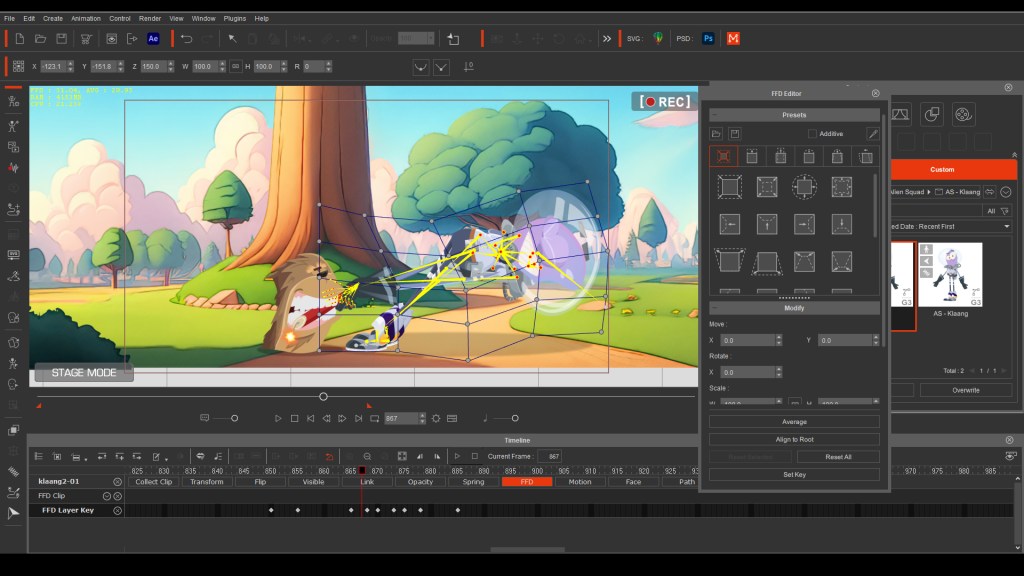
Cartoon Animator operates on a cut-out puppet system for 2D animation, where character parts move around pivot points. However Reallusion provides a wealth of tools and features designed to give these puppets the feeling of traditional hand-drawn cell animation. Tools like Free Form Deformation and Spring Bones play a crucial role in breathing life into characters, creating a smooth and realistic animation experience.
I start every character’s performance by focusing on the 360 Head motion. This feature gives animators the capability to smoothly turn and rotate a character’s head, creating a simulated 3D effect. Creating custom 360 Heads for characters is easy in CTA’s Composer Mode, offering complete control over the design and face animation. To me it feels like crafting a hand puppet.
After blocking out the head motion, I return to frame one to start layering my animation. I focus on individual face parts, employing tools like Transform and Deform to alter their shape and position. The Face Detail Settings come in handy, providing absolute control over nuances such as smooth eye squints for Klaang. Paying particular attention to the finer points of movement enhances the expressiveness of a character’s performance and makes your 2D animation more professional looking.
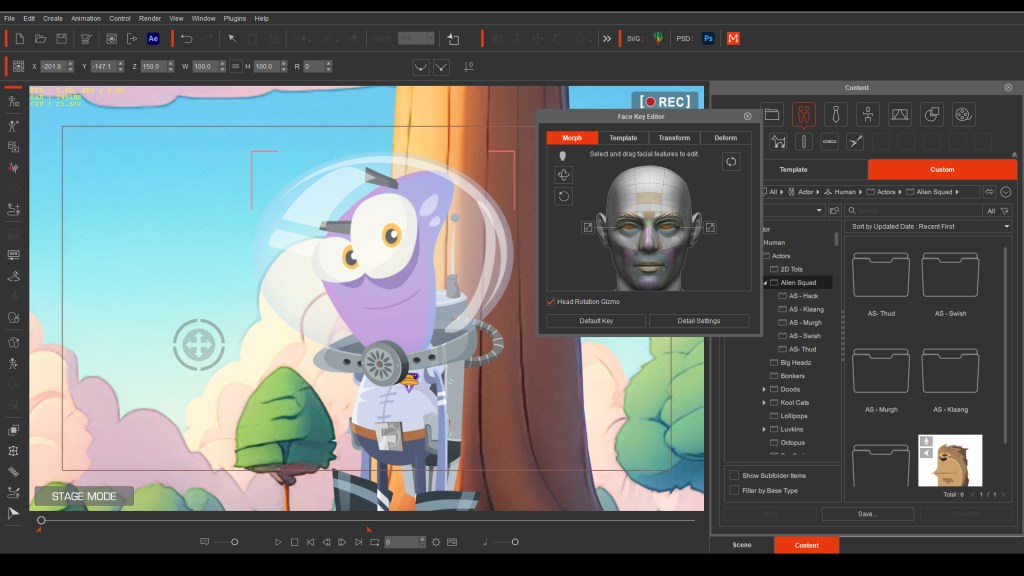
Directing your animated 2D character’s eyes towards specific points enhances believability in their performance, and Cartoon Animator’s Face Puppetry feature provides complete control over the movement of both eyes, whether together or individually. Keyframing eye movement ensures precision, allowing your character to focus exactly where you want. This method of working extends to various eye sprites, enabling quick and effortless expression changes during animation.
My goal is to always maximize the expressiveness of my animated 2D characters. So I aimed to make Klaang’s performance exaggerated and over-the-top. The challenge was to give him quick, smooth changes in his emotions, both with his body and face animation. This is where CTA’s Deform tool proves invaluable as it provided me with total control over shaping Klaang’s body parts like his mouth. The Deform Tool allows seamless blending from one mouth sprite to the next, ensuring fast and smooth transitions in expressions.
A valuable tip for achieving realistic character performance is to keep all parts of the character in motion. While modern animation often focuses on moving only essential body parts for efficiency, I love subtly tweaking every character part. This approach looks closer to traditional cell animation. For instance, when Klaang raises one arm, his shoulder lifts, the torso bends slightly for balance, and the opposing arm lowers to offset the shoulders. It’s about animating the entirety of the character. I even added a subtle wobble to Klaang’s helmet when his head moved quickly.
CHARACTER INTERACTION
One challenge I set for myself in this animation was to incorporate a lot of interaction between the character and prop. Cartoon Animator’s puppet system means that each character and prop are essentially a separate layer. The specific challenge here was figuring out how to convincingly make Klaang holding the stick or dynamite in his hand.
To do this, I created a number of separate images of the hand holding the prop and imported them into Cartoon Animator. Then I simply link the new image to the original hand and make the original hand invisible. This way, when the character moves his arm, the new prop moves with it.
The process for having the dog character carry the stick and dynamite in his mouth followed a similar approach. I created an additional sprite for the character’s mouth and incorporated it into the character rig, enabling seamless switching between the new mouth sprite and the ones already built in to the character. Cartoon Animator allows animators to customise characters in every conceivable way.

I even took the extra step of adding a specific hand prop exclusively for when Klaang pats his dog and ruffles his hair. This custom prop allowed for a more realistic interaction, with Klaang’s fingers convincingly brushing through the dog’s fur. Attention to details like this enhance the overall realism and connection to the animation for an audience.
THE FINAL TOUCH
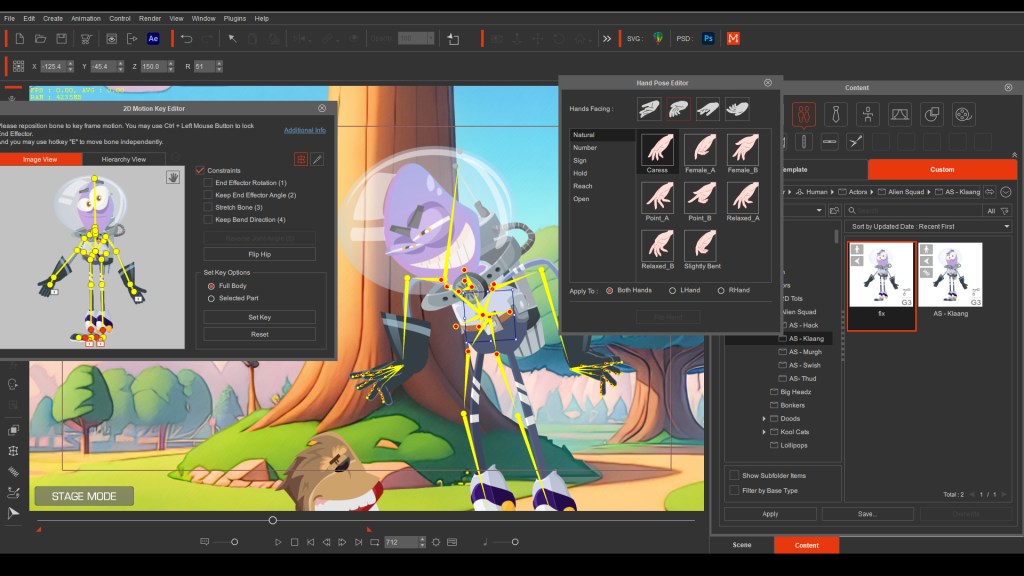
In the final stages of my animations, I set up my actors hand gestures. Cartoon Animator offers characters two hand options. First, sprite hands allow you to seamlessly swap between pre-drawn hand gestures built into your character.
For a more advanced approach to generating hand poses, Cartoon Animator offers Bone Hands. These are fully rigged hands with their own bone structure, allowing for articulation and the creation of hand gestures using preset templates or manual adjustments of each finger bone for precise control. The use of Bone Hands ensures seamless transitions between different hand gestures, providing a high level of smoothness in the animation.
An excellent tip for every Cartoon Animator user, after completing your animation and feeling 100% satisfied, step away and leave it for 24 hours. When you return with fresh eyes, you may spot minor errors or inconsistencies, or notice a part of a character’s motion that needs improving. Taking the time to correct these minor details is crucial—what you notice, your audience might as well. Correcting these details makes the difference between a good animation and a great one.
BREAKING UP THE SCENE
For longer animated films, relying on a single static camera shot may risk losing audience attention. Cartoon Animator provides full camera control, enabling dynamic movements such as panning, zooming, and rotating at any speed. Layering scene elements with varied Z-axis values adds depth to the scene, enhancing the overall viewing experience.
To maintain audience engagement and enhance storytelling, incorporate a variety of camera angles, ranging from wide shots to close-ups, and even use camera tracking in your animated film. The dynamic shifts in perspective will give you a more engaging and visually appealing film.
Camera cuts not only make a story more engaging but also serve as an effective strategy to break a longer animation into smaller files. This practice helps manage overall project size, making it more manageable and allowing for faster work. Keeping separate saves for each camera cut ensures smaller file sizes for efficient editing and reduces the risk of losing the entire project in case of a file error, as you only need to redo a small segment rather than the entire animation.
HELPFUL CARTOON ANIMATOR TOOLS
With the introduction of Cartoon Animator 5, a variety of new tools have elevated 2D animation, making the animating process much more professional. The capability to work with vector files in CTA 5 brings several advantages, such as the ability to zoom in much closer to characters without any loss of quality, blurring, or pixelation. Additionally, this update gives you control over color management, allowing animators to change colors as needed and create entirely new character looks from a single actor.
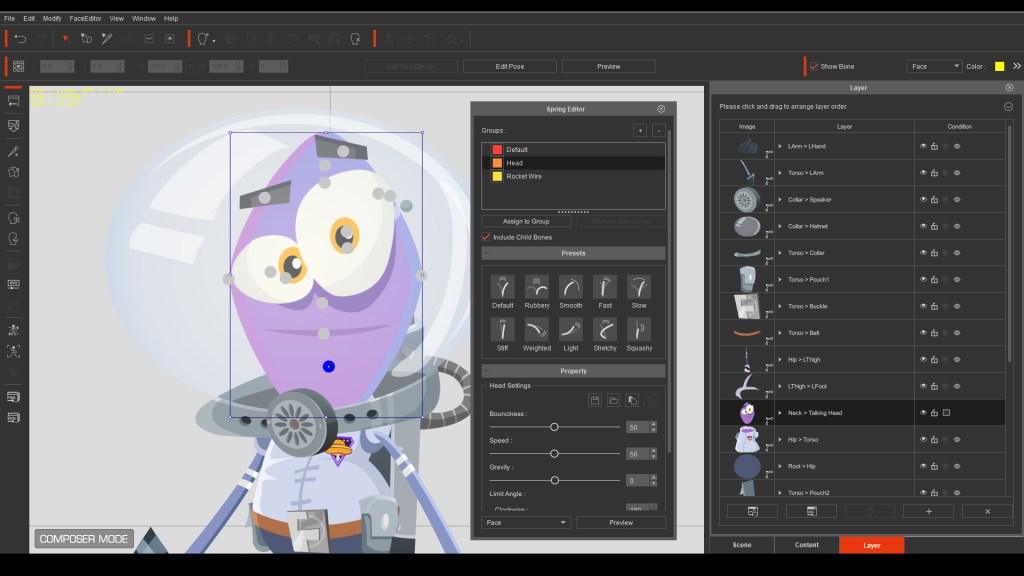
My Klaang character takes advantage of CTA5’s new Spring Bones feature, which gives automated motion to character parts and props. I applied Spring Bones to his head, giving him a jelly-like motion as he moves, and also added them to the antenna on his rocket pack, providing an extra touch of subtle movement. What makes Spring Bones fantastic is their automated motion once applied. Cartoon Animator controls their movement based on parameters you set, and you can effortlessly add Spring Bones to any character or prop yourself. The setup takes only seconds, eliminating the need for tedious keyframing of items like props, hair, and clothing—CTA handles it all for you.
Cartoon Animator 5 introduces another powerful tool – Free Form Deformation. This tool is a game-changer, offering the ability to apply squash and stretch to your entire character. This feature enhances the final 2D animation, making it resemble traditional hand-drawn animation rather than a cut-out puppet. Whether you want subtle motion or wildly exaggerated moves, Free Form Deformation allows you to manually apply squash and stretch to characters and props. You can also leverage one of the many premade templates provided in CTA5. How you use it is up to you, but Free Form Deformation adds that perfect touch to your 2D animation.
THINKING OUTSIDE THE BOX
The key to making your 2D animations more professional is to think outside the box. Take what Cartoon Animator provides and then think about how it can be creatively used. For instance, I had the idea of capturing a quick shot of Klaang turning to the camera with his body following his head. However the character’s body is a flat cut-out puppet, meaning a body turn cannot be accomplished.
So to achieve a turning shot where Klaang’s body follows his head, I approached it by repurposing the 360 Head model. Instead of using it as a head, I transformed it into a body. Setting up the layers for the body, similar to creating a head, ensured that the parts would move into position correctly as the body turned and rotated. The process is very straightforward. I then added a copy of Klaang’s original head on top of the new 360 Body model and linked them together. This allowed me to animate his head turn and synchronize the body turn to match. When the footage was cut together, it seamlessly appeared as if it was the same character throughout the shot.
I applied this same process to create the UFO model. I really wanted the UFO to rock back and forth as the dynamite hit, so I knew I needed a more three-dimensional appearance in its movement. Employing the 360 Head model once again, I transformed it into the UFO. This allowed me to rotate and turn the UFO in any direction, creating the illusion of a 2D prop moving in three-dimensional space.
My advice to fellow CTA users is always, don’t ask, “Can CTA do this?” but rather, think, “How can I make CTA do this?” If you can imagine it, Cartoon Animator can make it happen. Sometimes, a touch of creativity is all you need.
HELP FROM DECLAN WALSH
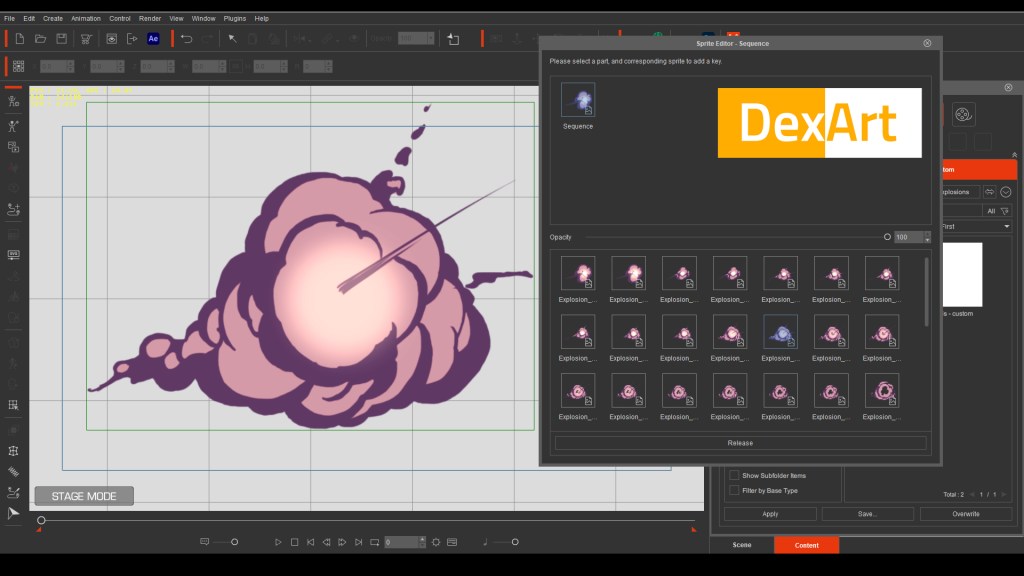
One of my favorite Cartoon Animator developers and animators is Declan Walsh from Dex Art. With a background in traditional 2D animation as a Disney animator, Declan’s animated effects like smoke, water, and fire are unparalleled. For the final UFO explosion, I enlisted Declan’s expertise to achieve a traditional animated effect. Declan rose to the challenge and delivered an incredible frame-by-frame sequence of the UFO exploding. You can use a similar approach in Cartoon Animator by creating your own animated props. Simply import a sequence of frames and using Collect Clip you can animate them at the press of a button.
EDITING AND SOUND
After completing my animation, I exported each individual clip as a 4K MP4 file and then edited them together using my preferred editing software, Pinnacle. However, there are numerous editing software packages available, so you can choose the one that best suits your needs.
For music and sound effects I subscribe to a site called Audio Blocks which has everything I could ever wish for in the way of sound.

CONCLUSIONS
I’ve been using Cartoon Animator for 2D animation for over a decade. I stick with CTA because it allows me to create animation quickly, enjoyably, and effortlessly, but still gives me a wealth of powerful tools to help me fine tune my animation and get the results I want. Its user-friendly functionality means I’m not weighed down by technical details, allowing me to focus on the creative aspect of animation. As a creative individual, I simply want to animate and have fun, and CTA enables just that.
Reallusion consistently adds more tools and features to CTA, with many free updates in each software version. New tools in CT5, such as vector scaling, color management, spring bones, free form deformation, and motion pilot, provide me with greater control over every aspect of animation. In many cases, these tools automate parts of the animation process, speeding up production time and allowing me to concentrate on essential aspects like character animation.
With Cartoon Animator you can level up your 2D animations to a much higher standard.
Discover other 2D animation tutorials from Garry including how Anyone can Create Professional Animations with Cartoon Animator 5.
2D Animation Software for Cartoon Maker | Cartoon Animator
FREE for 30 days & get 1,700+ ready-made assets:
2D Animation Software Download | Cartoon Animator
———————————————————————————————————————————————————
This article is also featured on Cartoon Brew.


