


In Part 3, we focused on building sci-fi armor and hard-surface assets in ZBrush, using masking, extraction, Dynamesh, and clean topology workflows to create modular, production-ready pieces.
For part 4, the focus shifts to preparation and validation inside Character Creator 5. We’ll generate clean UVs using Rizom UV, transfer all assets back to CC5 with GoZ Plus, fix deformations, finalize skin weights, and ensure everything is properly organized and animation-ready before moving into Substance 3D Painter.
Pablo Munoz Gomez
Hello, my name is Pablo Munoz Gomez, and I’m an enthusiastic 3D concept and character artist who is deeply committed to the spread of knowledge. My expertise lies in 3D sculpting, visual development, and engaging in mixed-media projects. I take immense pride in being the creator of Pablander Academy, serving as an outlet for showcasing my work, sharing my workflows, and assisting fellow artists in honing their skills across a wide range of subjects.


Generating Clean UVs with Rizom UV
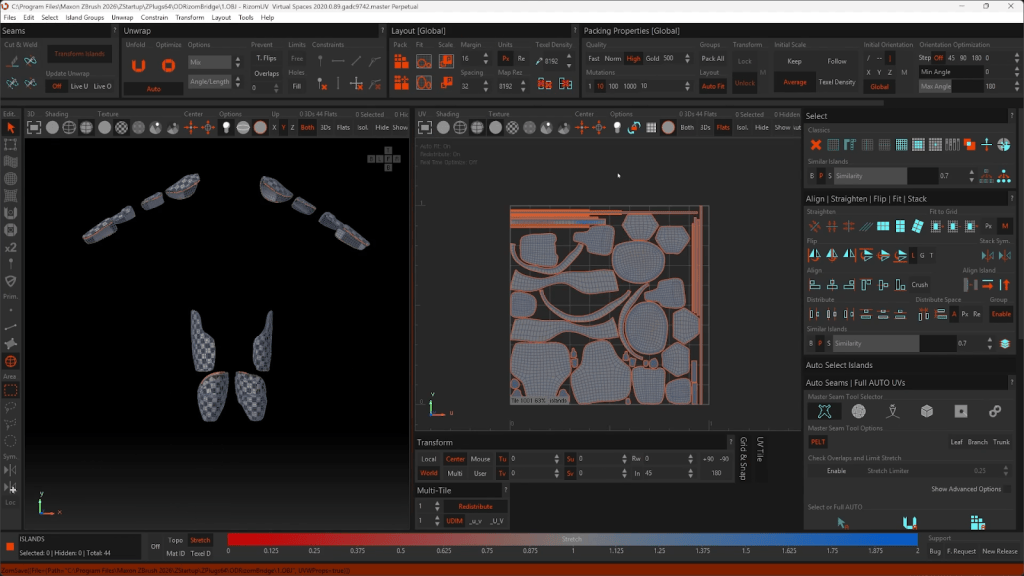
For UV unwrapping, I use Rizom UV because it’s fast, reliable, and integrates smoothly into this pipeline via a free plugin. From ZBrush, select the mesh you want to unwrap (for example, a shoulder pad) and use the plugin button to send it directly into Rizom UV. This avoids unnecessary export steps and keeps iteration fast.


My Rizom UV workflow follows three consistent steps:
- Mark seams: Thanks to the clean topology created earlier, edge loops can be selected quickly. Double-click an edge loop and press C to create precise cuts.
- Straighten UV islands: Single-click straightening is especially important for straps, belts, and elongated armor pieces. Straight UVs ensure patterns and materials read correctly in Painter.
- Pack and optimize: Pack the UVs efficiently while preserving island orientation so fabric patterns and directional details remain consistent across the character.
Once the UVs look correct, send them back to ZBrush through the plugin.
Preparing Assets for Sending Back to CC5
Before sending anything into Character Creator 5, naming consistency is critical. If a mesh originally came from CC5, its name must match exactly. Some tools append suffixes or alter names during export, which can break the automated update process. Take a moment to verify names before transfer. It will save a lot of troubleshooting later.

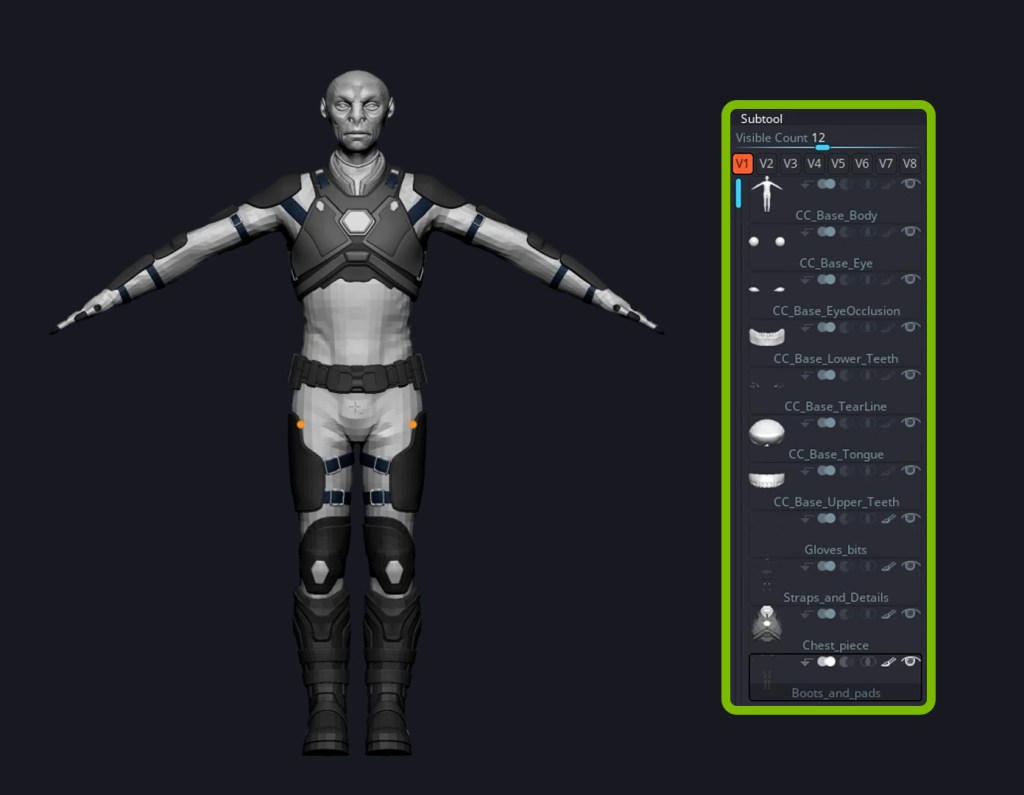

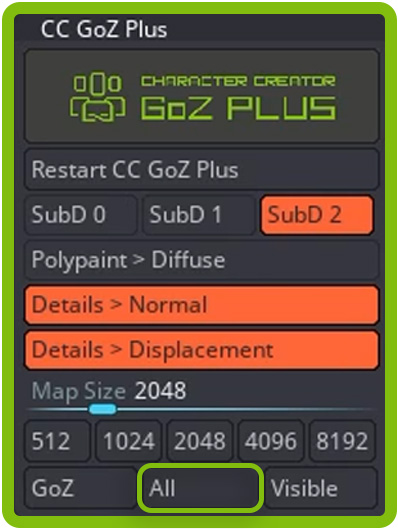
To transfer assets, use GoZ Plus from ZBrush. Instead of sending meshes individually, use the All option to send everything in one pass. This transfers geometry, subdivision levels, and sculpted detail baked into normal maps. Depending on scene complexity, this step may take a few minutes.
Understanding the GoZ Plus Import Options in CC5
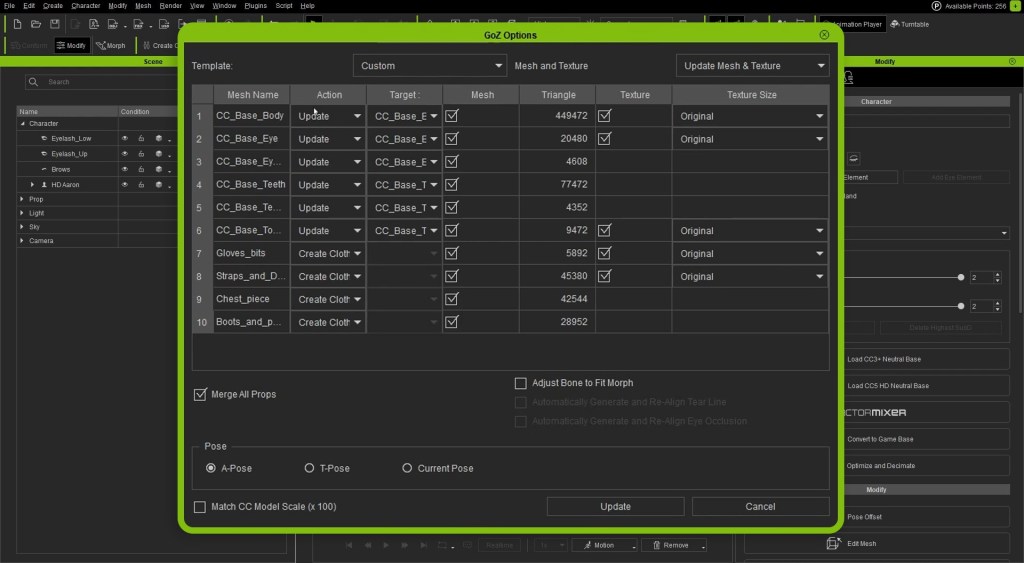
When CC5 receives the data, the GoZ Options window clearly shows what will happen to each mesh.
- Objects with the CC prefix are recognized as original CC5 meshes and set to Update.
- Newly created armor or accessories appear with the action set to Create Cloth.
I keep the default settings, ensure the A-pose is selected (unless sculpted in a different pose), and click Update. CC5 automatically skins all new pieces to the base character. This automation alone removes hours of manual rigging work.

Auto Skinning, Weight Templates, and Validation
Character Creator 5 provides several tools that drastically simplify the setup phase:
- Automatic skinning: New armor and clothing conform to the character immediately upon import.
- Skin weight templates: Ready-made templates allow fast remapping for common items like gloves or boots.
- Skin Weights editor: Lock rigid props to specific bones using simple vertex selection.
- Real-time animation previews: Built-in motion playback lets you validate deformations instantly.
To check deformation quality, I load a simple animation (for example, a walk cycle) from the Motion → Action menu and play it back. For clarity, I temporarily assign mid-gray diffuse colors to new assets so stretching and twisting are easier to spot. These placeholder colors will be replaced during texturing.
Fixing Deformations and Rigid Armor Pieces
Auto skinning is powerful, but CC5 doesn’t always know how a new piece is meant to behave. For example, glove extensions or sleeve elements may appear misaligned. In those cases, select the mesh, open the Settings panel, and use Transfer Skin Weights. Choose the template that best matches the intended region, and CC5 will remap the weights cleanly. For rigid armor pieces like chest plates or neck collars that should not deform at all, I edit skin weights directly:
- Select the mesh.
- Open the Skin Weights tool.
- Select all vertices.
- Assign 100% influence to the appropriate single bone (for example, CC_base_pelvis).
After assigning weights, always replay an animation to confirm the piece remains perfectly locked without warping.
Fixing Deformations and Rigid Armor Pieces
Auto skinning is powerful, but CC5 doesn’t always know how a new piece is meant to behave. For example, glove extensions or sleeve elements may appear misaligned.
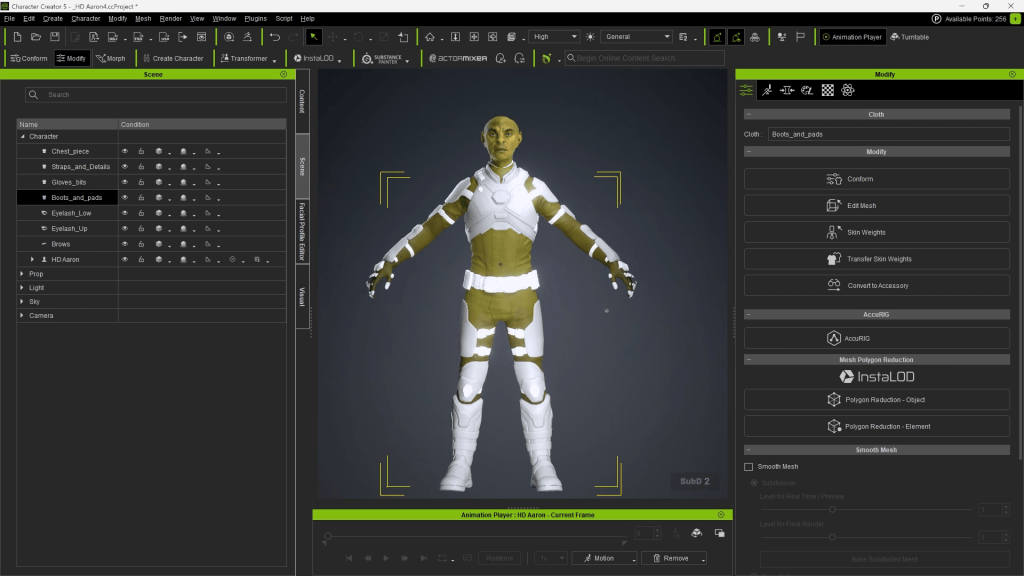
In those cases, select the mesh, open the Settings panel, and use Transfer Skin Weights. Choose the template that best matches the intended region, and CC5 will remap the weights cleanly.


Rig Testing and Visual Validation
To validate skin weights across the character, I run a simple rig test inside Character Creator 5. Set the Motion dropdown to Action, choose a basic animation such as a walk cycle, and play it back to observe how the armor and accessories deform in motion.
For visual clarity during testing, I temporarily change the diffuse color of newly imported pieces to a mid-gray or dark gray. This makes stretching, twisting, and weighting issues much easier to spot compared to using bright or detailed textures. These colors are purely placeholders and will be replaced later when the character is sent to Substance 3D Painter.

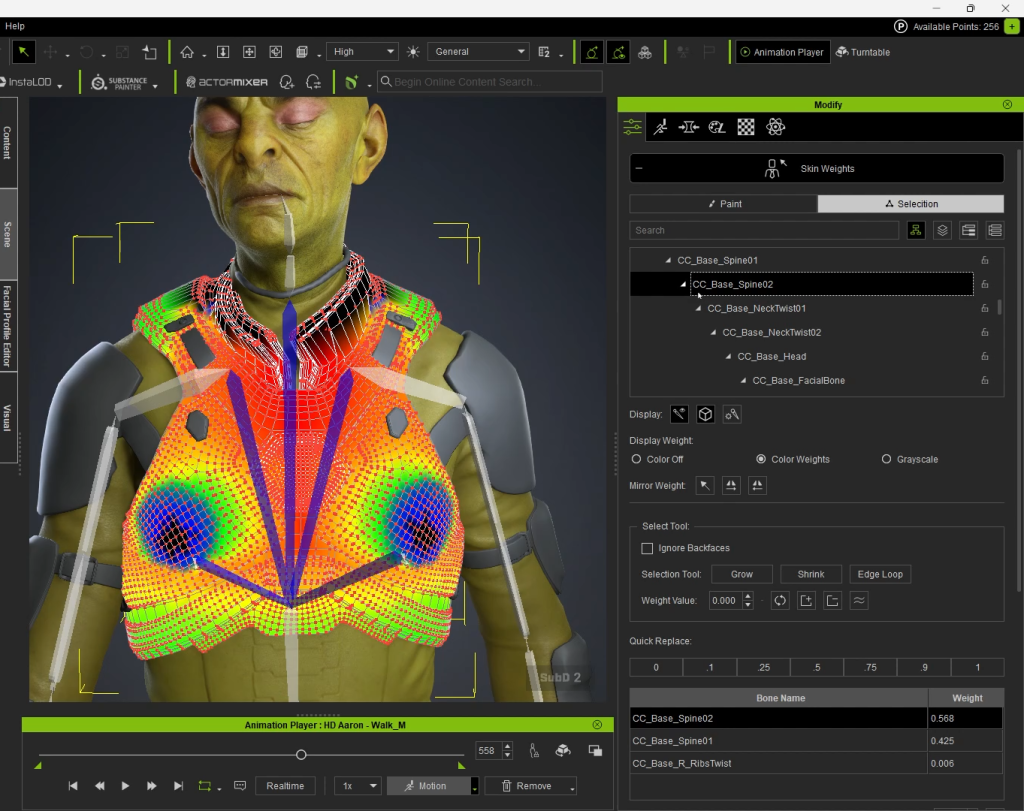
For rigid armor pieces like chest plates or neck collars that should not deform at all, I edit skin weights directly:
- Select the mesh.
- Open the Skin Weights tool.
- Select all vertices.
- Assign 100% influence to the appropriate single bone (for example, CC_base_pelvis).
After assigning weights, always replay an animation to confirm the piece remains perfectly locked without warping.


Final Skin Weight Validation Before Texturing
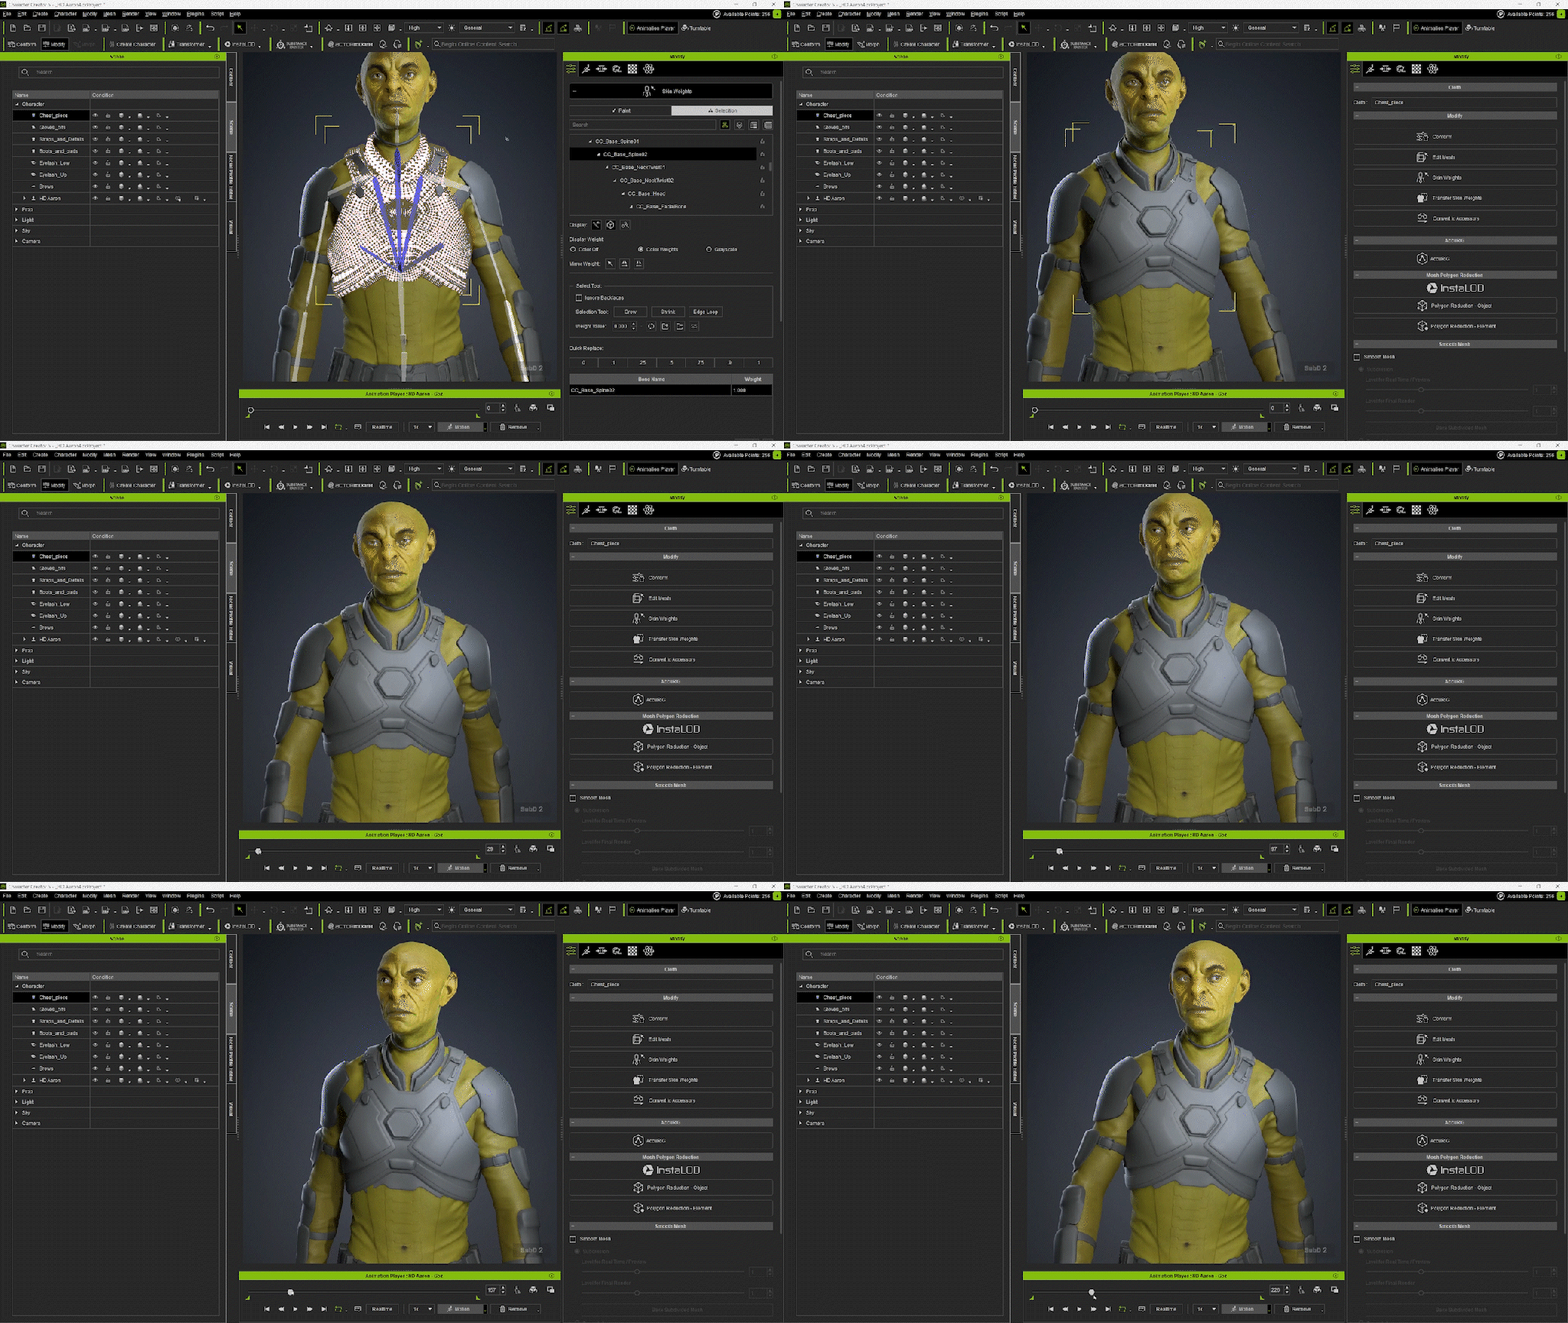
I repeat this process for belts, armor plates, and any other rigid items, assigning them to the appropriate base bone like “CC_base_pelvis”. After these adjustments, the walk cycle shows clean deformation and no unwanted stretching.
Once skinning and weight edits are complete, I save the CC5 project and run a final confirmation pass before exporting to Painter. I ensure every mesh has UVs without exception and verify that normal maps were successfully baked during the transfer. It is also vital to check naming consistency, ensuring CC-prefixed objects update correctly while new items are properly categorized as cloth or props.
After confirming that UV orientation allows for predictable texturing, I perform a motion test to guarantee that deformations won’t cause problematic stretching. With everything organized and verified, the project is ready for Substance 3D Painter; this combination of Rizom UV layouts and CC5’s rigorous validation tools creates a smooth pipeline that minimizes surprises. Simply save the scene, back up your assets, and proceed to the texturing stage with confidence.
Coming Up in Part 5
In the next chapter, we’ll export the character from Character Creator 5 into Substance 3D Painter, focusing on UDIM workflows, baking mesh maps, selective texture reuse, and building clean, non-destructive material layers.
Related Posts
- CC5 x ZBrush: Create a HD Sci-Fi Vanguard (1/7)- Character Base Creation with ActorMIXER
- From Concept to Motion-Ready Alien Character: ZBrush and CC5 HD Step-by-step Workflow
- Building a Custom Vampire Character from Scratch with CC5 and Unreal Engine 5.7

