首頁 » Page 50

Dynamic Character Poses in ZBrush: Evoking Motion and Grace in Fine Art Sculptures

Deryck Pelegrini

Hello! My name is Deryck Pelegrini, and I’m a 3D artist from Brazil. I reside on a small island near Sao Paolo, where I find joy in both creating 3D art and indulging in my passion for surfing the waves.

Professionally, my focus lies in developing 3D characters for games. However, in my personal projects, I enjoy sketching and exploring dynamic poses for moving characters. It brings me great satisfaction to see some of my work featured on ZBrushCentral, and I have had the opportunity to discuss these pieces on ZBrush LIVE a couple of times. I am truly passionate about sculpting and using shape and color to narrate stories through my art. Consequently, I love experimenting with “digital clay” in ZBrush, where I can explore fluid shapes and incorporate new techniques into my projects.

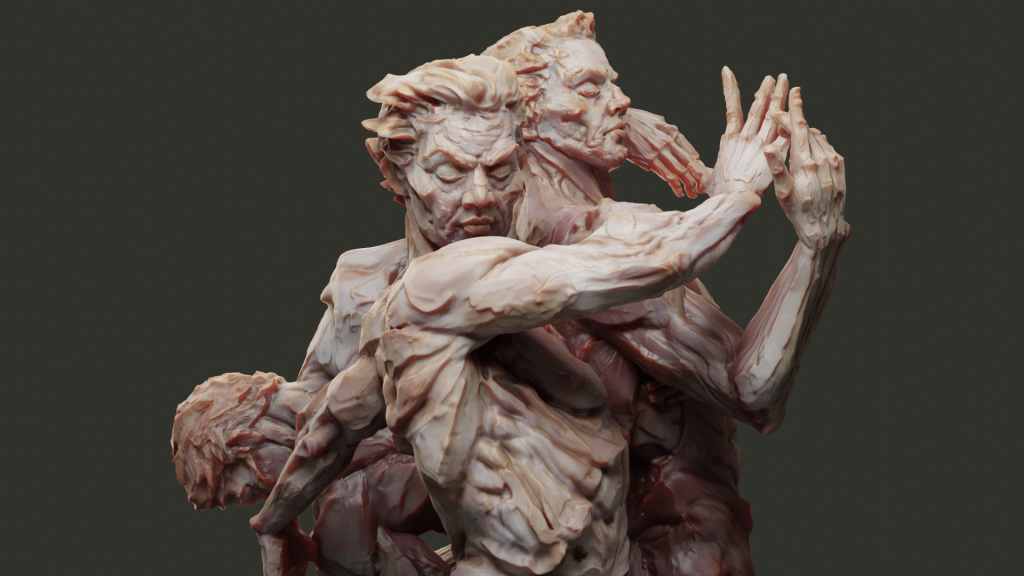
Lately, I have been dedicating a lot of time to practicing with new tools. In this article, I would like to share my latest creation, “The Three Dancers,” and discuss how I utilized the new Pose Tool Plugin for ZBrush, developed by Reallusion, the creators of Character Creator (CC). With this plugin, I was able to create a series of unique poses using a single mesh, and I am excited to share my process with you.

Design Concept

The concept behind my latest piece was to create a visually striking artwork that embodies the essence of a museum exhibit. As a sculptor, I thoroughly enjoy experimenting and pushing the boundaries of my craft by exploring new sculpting and painting techniques. One aspect I particularly love to explore is the pose of the character, as it brings the artwork to life and allows me to envision the character in a pivotal moment of action. I strive to create sculptures that possess a sense of freedom and fluidity, leaving room for the viewer’s imagination to fill in the gaps as they observe the piece. This approach enables a more interactive and engaging experience for the audience.

Pose Tools for ZBrush

The plugin’s name is CC Pose Tools for ZBrush. It is a free plugin that enables you to easily create and switch between various poses for your character with a single click. With Pose Tools, you can seamlessly send your model from ZBrush to Character Creator for rigging and posing through Pose Link.

Additionally, you can take full advantage of the extensive library of motions and poses, effortlessly sending them to ZBrush with just a few simple clicks.

My Sculpting Process

Step 1 – References

When I envision dynamic poses and movement, dance is among the first things that come to mind. The graceful and fluid motions of the human body can make it appear as light as a feather and as flexible as bamboo. Here are a few references that have served as inspiration for this project:

Step 2 – Selecting the Base Mesh

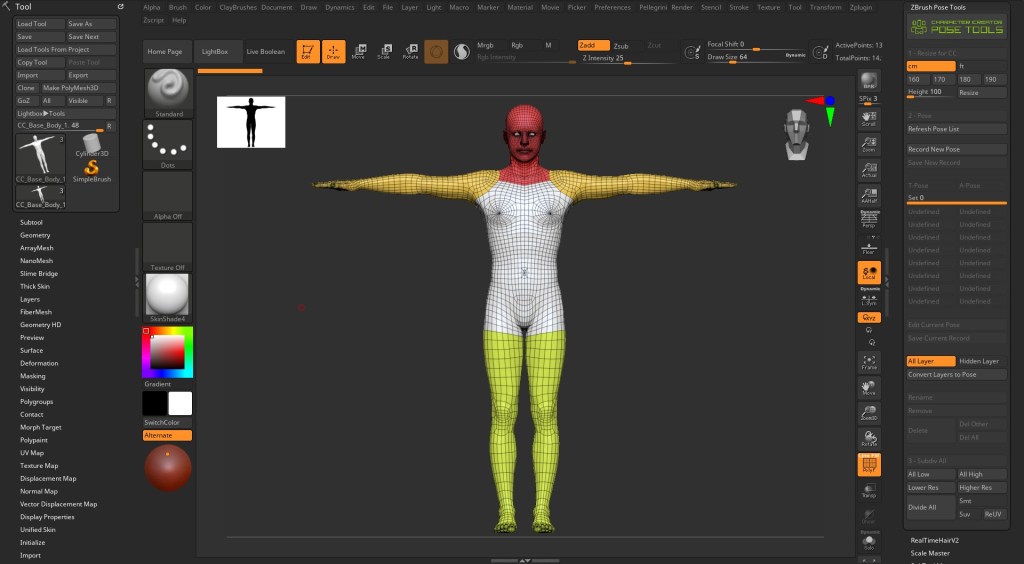
To maximize the potential of your sculpture, it is highly recommended to ensure that the mesh has a well-balanced distribution of polygons. This allows for uniform levels of detail when subdividing the geometry in ZBrush. For this particular project, I will be utilizing the “Male Neutral” base from Character Creator, which features a commendable human topology. The mesh consists entirely of quads, making it ideal for subdivision and achieving high levels of sculpting detail. As a result, the base mesh is already prepared for subdivision, providing an excellent starting point for this project.
Step 3 – Sculpting the Base Mesh
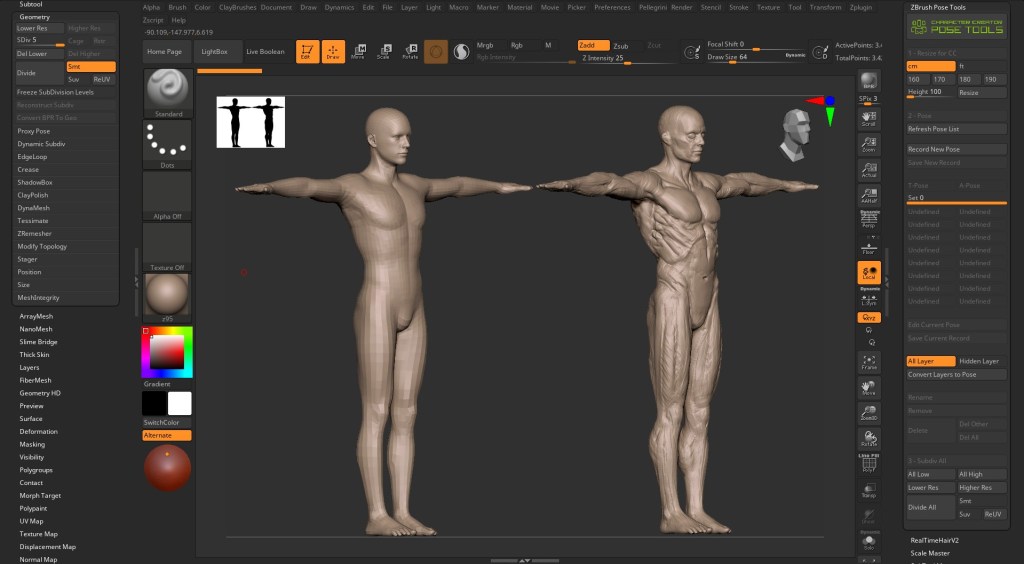
Prior to embarking on our initial pose creation, I will begin with a sculpting pass to establish the bone structures and muscles of my character. This initial layer of sculpting will be fairly rough, serving as the foundation for all subsequent poses to be developed.

Step 4 – Creating the First Pose

To commence, we will utilize the Pose Tools Plugin. In order to create a new pose, we will employ the “Record a New Pose” option.
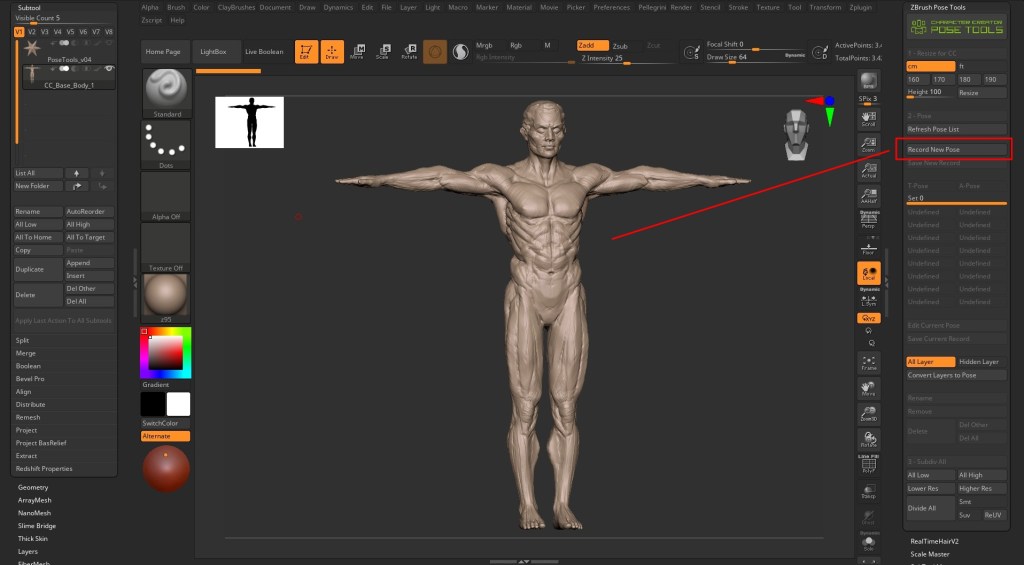
After clicking on the button, we will be asked to name this new pose.

There are various methods available to store your poses using Pose Tools. For this particular project, I utilized Pose Tools in conjunction with the Transpose tool and the Mask Brush to achieve the desired pose.

Once you have moved, rotated, and pulled on the character to achieve the desired pose, it is time to save the pose within Pose Tools. The process is incredibly straightforward, requiring just a simple button press and your pose will be promptly saved in the plugin under the previously chosen name.

To revert back to your base pose, simply deselect the Pose Tools pose slot. By doing so, you will seamlessly return to the original base pose, allowing you to proceed to the next pose with ease.
Step 5 – Editing the Poses

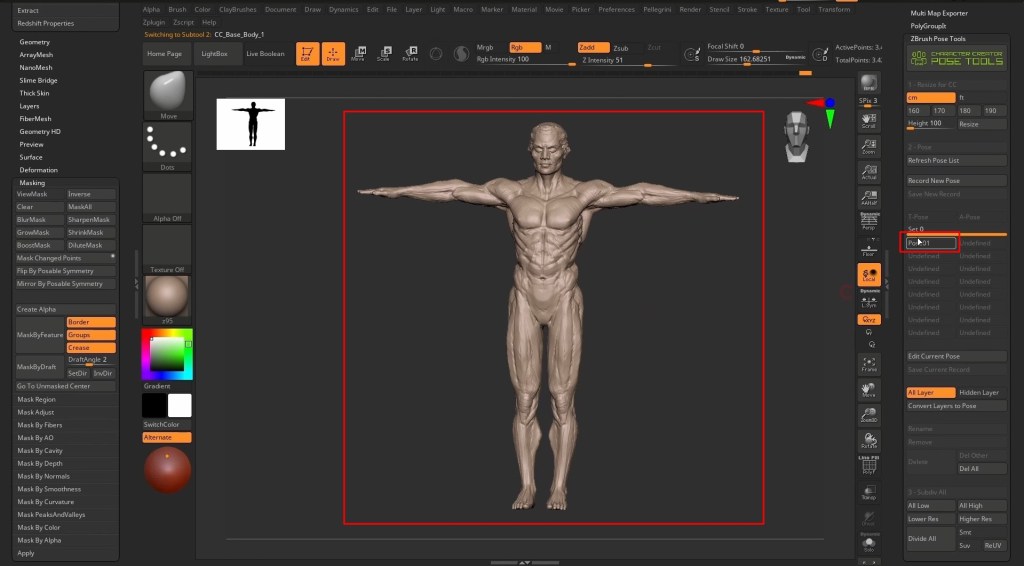
However, my pose was not yet complete. As a result of the movements I made on the character, there were several artifacts present in “Pose01”. Fortunately, Pose Tools offers a straightforward solution to address this issue. By clicking the “Edit Current Pose” button, we gain the ability to re-sculpt and modify our mesh, allowing us to rectify any undesired artifacts.

Now comes the phase of sculpting and refining the sculpture. My objective here was to imbue the model with a unique essence, accentuating the bony landmarks to add a certain allure and ensure a clear definition of the character’s shapes. To achieve a clay-like finish, I employed one of my preferred brushes known as “Clay Layer Strong”, crafted by the talented artist Pablo Munoz Gomez.

Step 6 – Creating the Second Pose

To create “pose 02”, I followed the same steps as before:

1. Begin from the base pose.
2. Choose the “Record New Pose” option.
3. Assign a name to the new pose.
4. Utilize the Transpose and Mask Brush to position the character in the desired pose.
5. Save the new pose.

Once the pose was blocked out, I proceeded to sculpt the model once again using the “Edit Current Pose” feature. This allowed me to rectify any distortions that may have occurred due to the initial pose the character was placed in.

By employing this function, I was able to correct these distortions and finalize the sculpture with the same level of quality achieved in “pose 01”.

Step 7 – Creating the Third Pose

Following the previous steps, I employed Pose Tools once again to create “Pose 03”. I began by establishing a rough initial blockout for the pose.

Afterward, utilizing the “Edit Current Pose” feature, I addressed any imperfections and completed the sculpture in a manner consistent with my approach mentioned before.

Step 8 – Colors

Lately, I’ve developed a strong interest in incorporating color into my sculptures, and this project was no exception. Another exciting capability provided by Pose Tools is the ability to apply different color schemes to the same mesh using PolyPaint for each pose slot in your file.

To achieve this, simply select the desired slot with the corresponding pose, enter “Edit Current Pose” mode, and begin painting the geometry using ZBrush’s PolyPaint feature. By employing this method, I successfully created a series of three poses, each adorned with its unique color scheme, while utilizing the same underlying geometry.

Conclusion

The Pose Tools plugin offers the flexibility to easily manipulate both the pose and color of your model using a shared mesh, allowing for swift changes with just a single click. This highly optimized plugin seamlessly integrates with the ZBrush layer system, delivering exceptional speed, while boasting an intuitive and functional interface. It serves as an excellent tool for generating diverse pose variations of a character and exploring different possibilities within a single piece, all while maintaining editing control. Keep in mind that there are multiple ways to utilize this plugin; the aforementioned approach is just one example. I encourage you to enjoy the creative possibilities it presents!

For a CC-to-ZB Roundtrip Solution

The Character Creator Pose Link is a specialized plugin designed to facilitate the creation of various poses for your characters. With this powerful tool, you can effortlessly switch between different poses with just a single click, streamlining your workflow and saving valuable time.

Pose Tools even offers seamless integration between ZBrush and Character Creator 4 (CC4), allowing you to easily transfer your models back and forth. Furthermore, you can leverage the extensive library of poses available in the CC Pose Library, providing a wealth of options and serving as an excellent foundation for your projects. Transferring these poses from CC4 to ZBrush is a breeze using ZBrush Pose Link. With just a simple click, your selected poses will be stored and easily accessible within Pose Tools.

Follow Deryck

Deryck’s ArtStation|Instagram|YouTube Channel

Learn More

Free Download ZBrush Pose Tools
Pose Link Plugin: Character Creator and ZBrush Roundtrip Workflow
Character Creator Base Mesh
Character Creator

Using Mobile Scanning apps with Character Creator’s Headshot 2.0

Mobile scanning provides a convenient and cost-effective method for creating 3D models. However, unwieldy scanning conditions may result in compromised quality. By selecting the effective surfaces, Character Creator Headshot 2.0 plugin AI can overcome these challenges by seamlessly filling in the missing areas, such as the ears, skull, and neck, ensuring high-quality results.

In the latest Character Creator Headshot 2.0 plugin release, many people have been curious about how Reallusion managed to create the face scan from an iPhone. Here, we would like to share our own experience with a powerful iPhone 3D scanning app we used in this demo.

While there are numerous 3D mobile scanning apps and AI solutions for converting videos to 3D models available in the market, our production process has been made remarkably easier and the results have been highly satisfactory, thanks to the following key features from SCANDY PRO app:

  • Accessibility for iPhone Users: This app is specifically designed for iPhone users, utilizing the iPhone’s depth camera for enhanced model precision. Users can easily access the app as it is standalone. Additionally, the app captures color texture simultaneously with the scanning process, ensuring a comprehensive and accurate result. The affordable pricing makes it accessible to a wide range of users, allowing them to own the app , similar to other Reallusion products.

  • No Cloud Computing Required: Scandy app performs all the necessary calculations solely on the iPhone itself. Users can see the scan mesh progressively being built up in real-time during the capturing process. This eliminates the need to send data to the cloud for computing and wait for results. The real-time feedback provided by the app allows users to confirm the scan results and make necessary corrections with ease. The main challenge lies in ensuring that the subject remains still during the scanning process to obtain an accurate mesh.

  • Seamless File Transfer: After completing the scan, users can easily send the scan file to their PC via email or use Mac Airdrop if they have a Mac device. No additional registration is required, and users can immediately access the 3D model (OBJ) and texture files (around 1.5k * 1.5k) directly from their iPhone. The polygon count/file size is approximately 50K triangles, and while the mesh quality may not be perfect compared to photogrammetry, it is well-suited for Headshot 2.0 purposes. An important benefit is that users have the option to keep their works private without the need for public display, resulting in a fast turnaround time.

  • Mesh and Texture Quality: The app also supports multiple file formats, including OBJ and USDZ. The mesh density and vertex color are optimized to ensure high-quality results. While some limitations may exist, such as potential color banding, the overall mesh and texture quality is satisfactory for most applications.

Download Scandy app:
https://www.scandy.co/

Limited-Time Scandy PRO DISCOUNT CODE – US$25 (normally US$40) for the first year:  
https://apps.apple.com/redeem?ctx=offercodes&id=1388028223&code=HEADSHOT

Learn how to use Headshot 2.0:

More Character Creator Headshot tutorials:
https://courses.reallusion.com/home/character-creator/pipelines-and-render/headshot

AI-Enhanced Dynamic Wrinkles in Disney and Anime Style

José Antonio Tijerín

José Tijerín is a digital illustrator, 3D sculptor, and creator of video games such as “Dear Althea”  available on Steam. His content pack “We’re Besties” and “We’re Homies” are currently for sale in the Reallusion content store.

Hi, I’m José Tijerín, a digital illustrator, 3D sculptor, and videogame developer. You can check out my latest game, “From the Streets to the Script: A Carabanchel Story,” available on Steam. In this article, I will share my method for creating cartoonish wrinkles. >> Download hi-res anatomical textures used in this video

Creating cartoonish wrinkles for 3D characters is a breakthrough that helps bring them to life — and Character Creator’s (CC) Dynamic Wrinkle system enhances this process for both cartoon and realistic characters. Before we begin, read my article ‘Disney 2D Animation Style Remade with Character Creator 4’ (Part1. Part 2) for essential concepts in creating a solid 3D base model that looks professional without technical issues.
To add dynamic wrinkles, ensure your character is based on the CC base topology. Activate the dynamic wrinkles and select an empty layer in the “Texture Settings” section. Clicking “Individualize” generates a texture combining the base and wrinkle textures. Customizing wrinkles is a simple, fast, and visual process that involves replacing images.

Generating Realistic Wrinkles from AI Tools

Creating hyper-realistic dynamic wrinkles can be challenging if drawn by hand. Fortunately, Reallusion provides professional dynamic wrinkle packages — and now enhanced by AI. By capturing the front face of our character and leveraging AI image generation, we can achieve fabulous results.

Left: Original wrinkle in Character Creator . Right: AI-enhanced wrinkle.
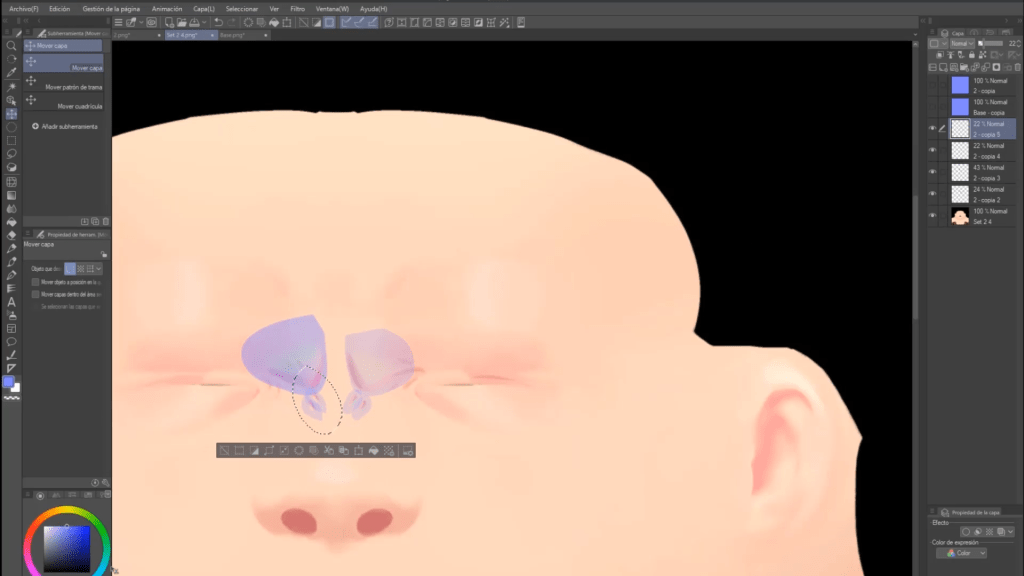
Simply download and edit the desired image (using an image editor, like Clip Studio) to cut out the wrinkle area and paste it into our character’s base texture. We can convert the texture to a normal texture using specialized software, then replace the image in the dynamic wrinkles menu of CC. This straightforward process yields custom-tailored results.

CC provides sculpting tools for adding wrinkles directly onto the facial model. With brushes, we can precisely add wrinkles, adjust intensity and softness, and combine them with dynamic wrinkles for unique outcomes.

It’s crucial to remember that facial wrinkles go beyond expressing emotions, they can also convey moods like optimism and anxiety. By experimenting with various wrinkle-expression combinations, we can create expressive and captivating characters.

Simulating Dynamic Wrinkles for 4 Major Character Types

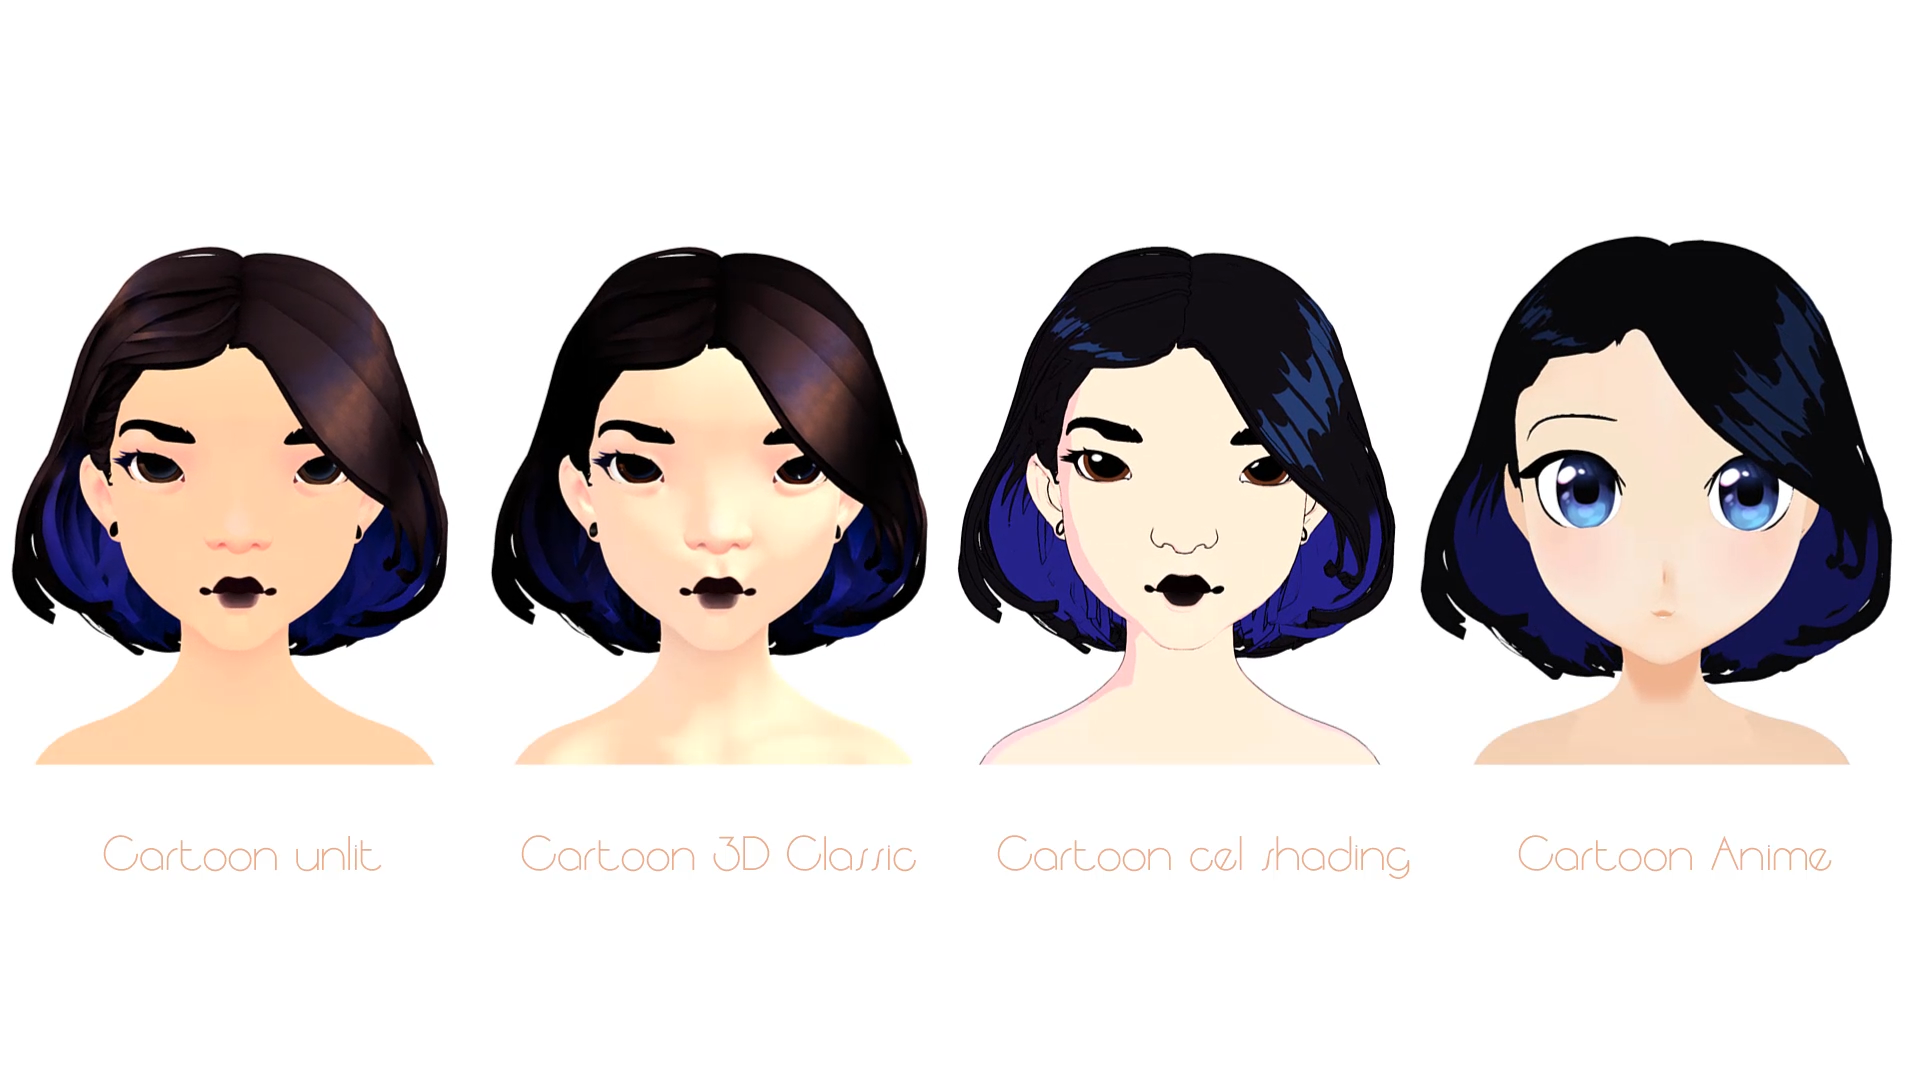
In this video, we will explore four different types of expression wrinkles for cartoon characters, transitioning from 3D to 2D. The four types include unlit 3D, 3D classic, cel shading, and anime styles.

Style 1 : Cartoon Unlit

Let’s create a 3D cartoon style without lights using brushstrokes to add details, resembling a painted look commonly seen in video games. First, create a “model sheets” schematic to define unique wrinkles and expressions for each character, ensuring uniqueness. Export the custom character from CC and import it into a texture creation program like Substance Painter.

In Substance Painter (SP), apply the base texture to the character’s face and paint the wrinkles while considering the lighting. This method is preferable for painting wrinkles directly on the texture, as mesh deformation can make it challenging to predict their appearance when the rest of the face is deformed.

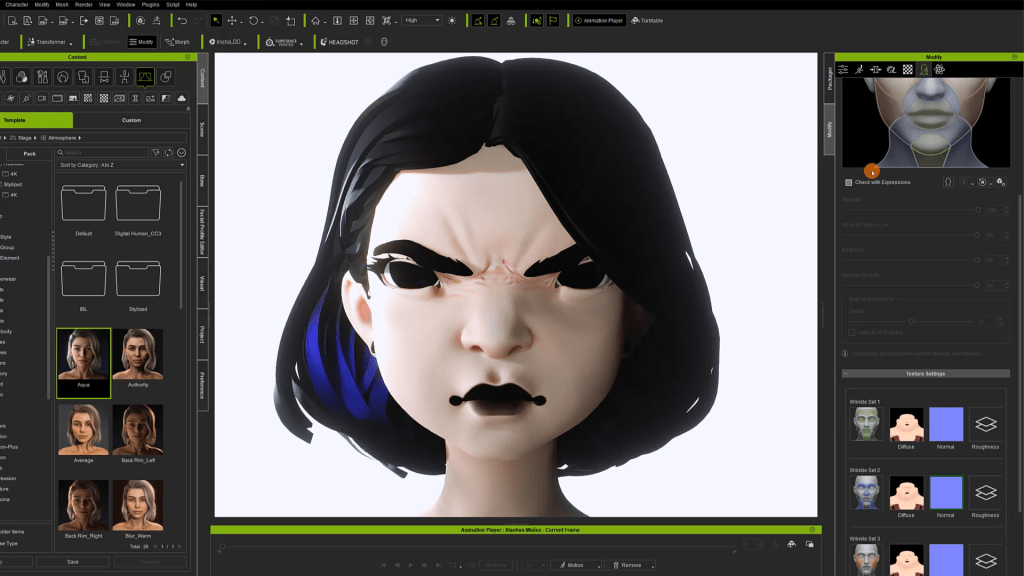
After customizing the wrinkles in SP, load the image into the texture set in CC and activate the Dynamic Wrinkle system. Adjusting the speed at which the wrinkle texture appears with facial deformation enables pronounced and clear expressions for cartoon characters. Utilize CC’s facial profile editing system to fine-tune wrinkle details.

Style 2 : Classic 3D Cartoon

Since cartoon wrinkles have distinct hard lines resembling strokes, it’s important to convey skin elasticity while avoiding excessively large grooves. Reallusion’s “Wrinkle Essentials” package offers high-quality textures for realistic wrinkle and crease visuals. This package is valuable not only for realistic characters but also provides diverse facial wrinkle variations that enhance the unique features of cartoon characters.

For customizing wrinkles, extract the dynamic wrinkle textures and modify them in an image editor. This ensures a professional finish tailored to our character, as we’ve previously discussed with Reallusion’s offerings.

Style 3 : Cel-shaded look

To achieve dynamic facial expressions, lines are commonly used to simulate wrinkles and enhance specific facial cues. However, it’s important to avoid excessive lines that overwhelm the face. Manga provides a good example, where lines on the forehead emphasize anger alongside wrinkles on the nose.

For this style, begin by applying the desired cartoon effect provided by CC. Then, take the diffuse textures from different sets of dynamic wrinkles and draw expression lines on top of them. Drawing inspiration from comic and manga techniques can help create impactful facial expressions.

Style 4 : Anime

In manga, “manpu” symbols are used to express characters’ feelings in a clear and comical manner. These symbols, like sweat drops, striped lines on the face, or anger-induced swollen veins, can be incorporated by modeling the characters’ unused teeth and transforming them into symbols. The intriguing part is that these teeth deformations can be added as custom facial expressions in CC.

By utilizing morphs or facial deformations, lines can be added to enhance existing expressions. This technique enables the adjustment of wrinkle intensity and other facial elements like blushing. When combined with the dynamic wrinkle system, this approach is amplified.

Thank you for reading! I hope you enjoyed this article. For more information, feel free to check out the related video.

Free Download :

• Four hi-res Anatomy Textures used in this video

• Character Creator

• iClone

Learn more :

• Tijerín Art Studio (José Antonio Tijerín): ArtStation. Sketchfab. Instagram

• To delve into the inner workings of José’s manpus, visit the “Tijerín Art Studio” marketplace site to access his anime character, featured in this article.

• Wrinkle Essentials – Expansion for Dynamic Wrinkle Patterns (5 Real, 5 Toon, 48 Morph)

Animating Dialogue-Intensive Asian Characters in Unreal Engine using Character Creator and iClone
Peter Haynes

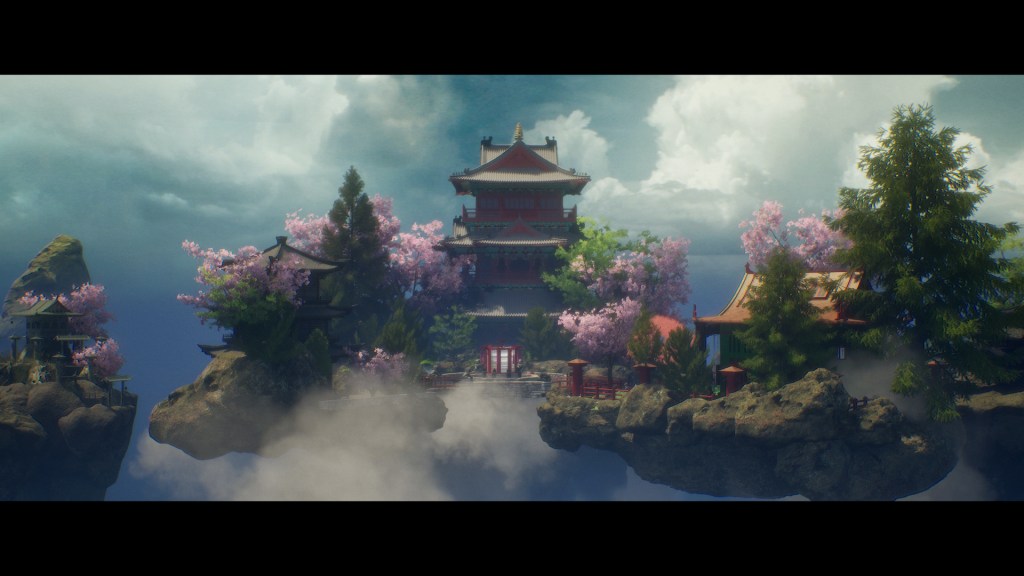
Peter Haynes is a filmmaker based in Auckland, New Zealand. Last year, he and his team were the recipients of an Epic Games film‐making grant, which gave them the budget to create a fully animated short film called “Cheng Beng”, featuring a captivating story with set dressing and characters infused with classic Chinese culture.
There are a couple of unique aspects in the making of this film. Firstly, despite his ample experience in live action filmmaking, Peter had limited experience in the realm of 3D animation. Secondly, the film had a tight deadline imposed by the small budget provided by the fund, necessitating quick turnaround times for the shots. The following content is presented in his own words.

Follow Peter Haynes

Why choose Reallusion tools?

I highly value Reallusion’s software, particularly Character Creator (CC) and iClone. These tools have been indispensable in our production process. The streamlined and intuitive approach of building our actors using Character Creator allowed me to have our entire cast prepared within just a few days, a task that would have been previously impossible given my limited 3D skills.
Quick Start with Character Creator’s Content Ecosystem

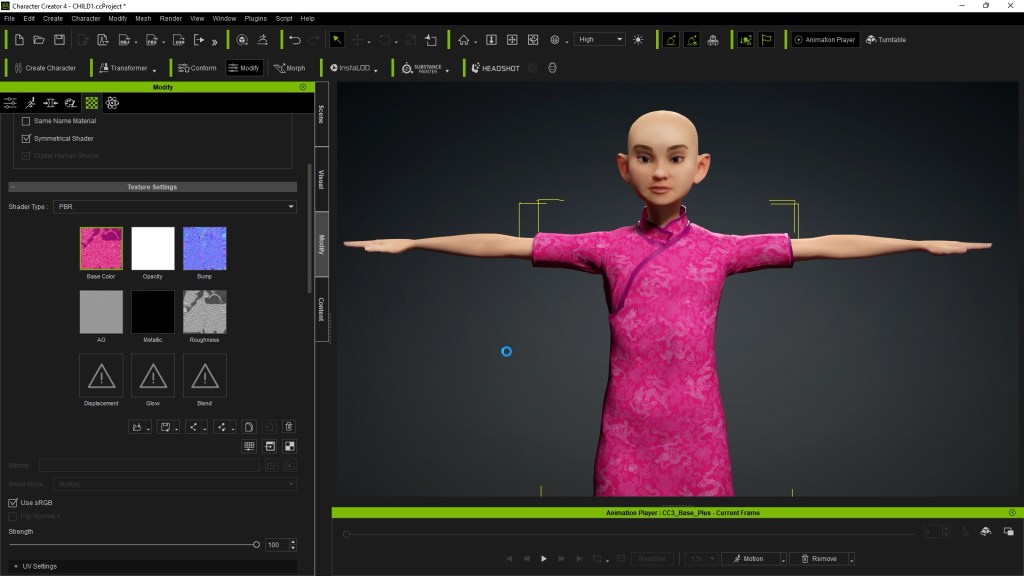
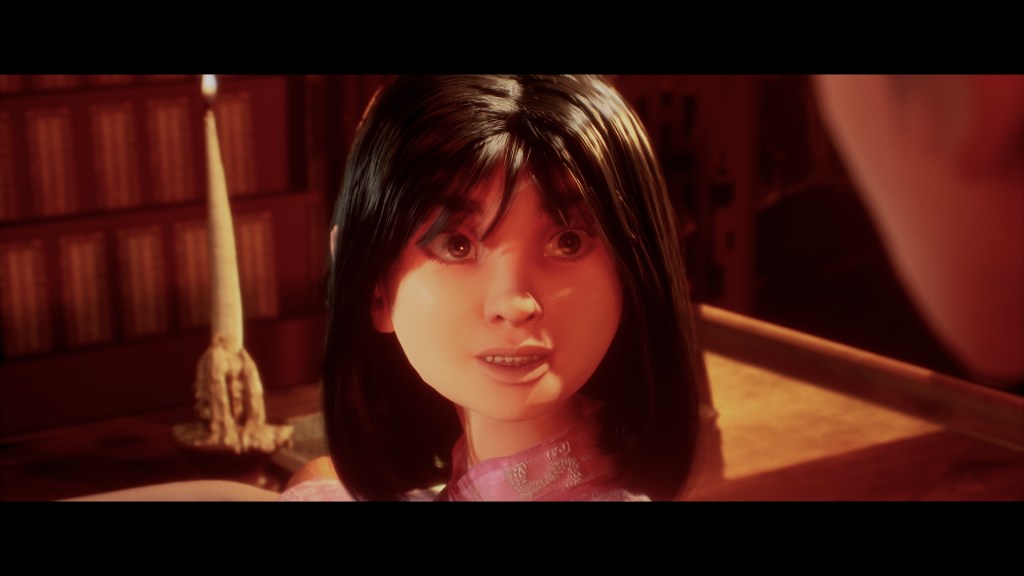
With a total of five characters in the story, it was impractical to create each one from scratch. This was particularly challenging as we aimed to incorporate cultural elements and specific designs, making it difficult to find ready-made CG resources that fit the bill. In particular, during the character-building process, we had a specific vision for our little girl to wear a cheongsam. To our surprise, the Reallusion Content Store offered an extensive selection from various artists, allowing us to find one that suited our needs perfectly. With just a few adjustments in Photoshop to enhance the colors, the dress seamlessly applied to the character with minimal editing required.

Unreal Groom System vs iClone’s Card-Based Hair

To give my little girl character hair in CC, I initially attempted to create separate groom hair for her in Unreal Engine. While grooms can offer visually stunning and dynamically simulated hair, they can be resource-intensive and occasionally yield unpredictable lighting results. I may also have gotten carried away with hair physics, as I had just discovered their exciting capabilities.

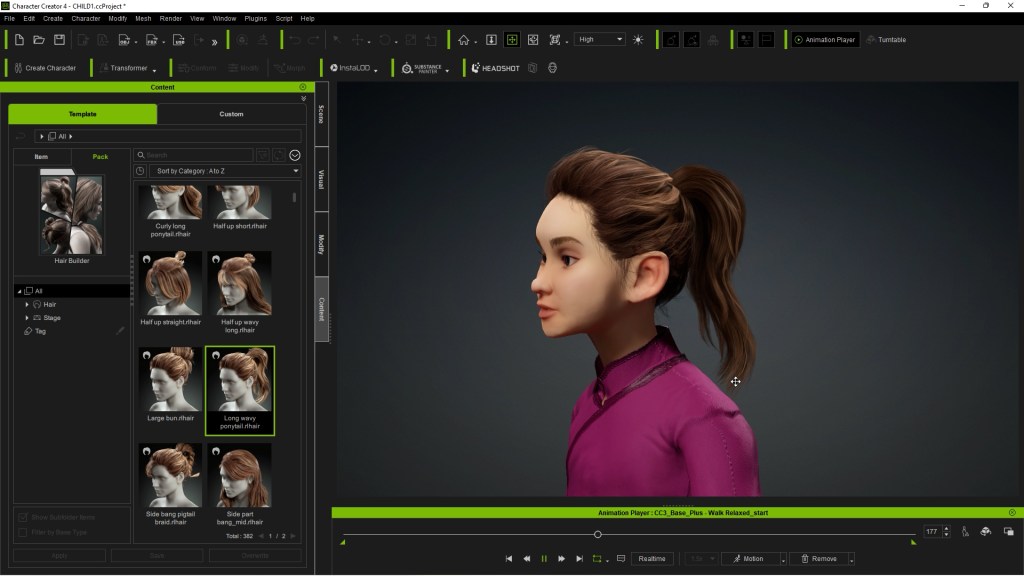
However, if I were to approach the process again, I would consider leveraging CC hair cards to a greater extent. These hair cards can yield similar results while significantly reducing the processor load. Interestingly, all of the characters with short hair in this film utilized hair cards from Smart Hair Systems, and they performed exceptionally well. I have also recently experimented with the new hair builder pack, and I am delighted with the outcomes it has produced.

Finally, the CC Auto Setup Plugin allowed me to import these characters into Unreal with all their textures and costumes intact, the realistic shader look is ready for close-ups.

Creating Authentic Character Animations

In this short film, extensive dialogue and character interactions play a significant role. The animation requirements to support the storyline were daunting, but the following is his account of how he and his team managed to accomplish it within 90 days.

Animating Dialogs in Multiple Languages

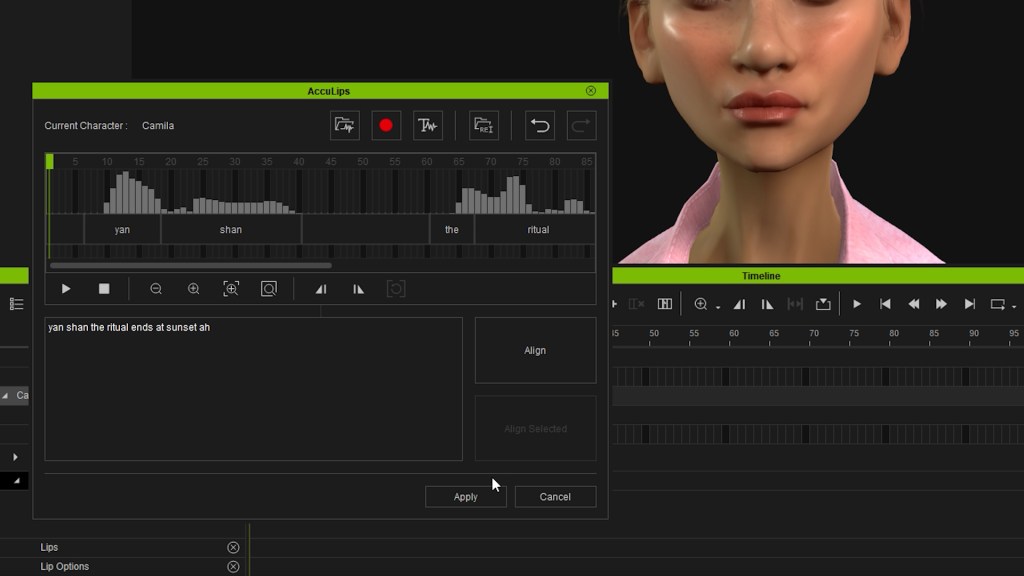
But as brilliant as CC was, the real lifesaver for this dialogue‐heavy short film was the AccuLips feature in iClone. Not only did our film have a lot of dialogue, but it was also spoken in four separate languages, and the AccuLips tool worked brilliantly for all of them.

Because of the way it works, non‐Chinese speakers could simply type in what the words phonetically sounded like, and the results speak for themselves. Once again, the Reallusionsoftware made the impossible possible.

Additional lip sync animation tweaks can be made by the intuitive user interface. 

Making realistic facial performances 

Extra add‐ons tools and content, such as the Digital Soul collection of motion-captured expressions served as excellent base animations, which could then be enhanced through the easy-to-use and very fun face puppet tool. I have also since started capturing facial performances through the iPhone, which also works extremely well.

There is a bunch of stuff that I would do differently on this film now, due to both Reallusioncoming out with cool new features that weren’t available at the time, or me simply not knowing about a feature and only discovering it afterwards. The coolest of the cool new features is the Dynamic Wrinkle pack, which adds so much more subtle expression to characters than was available before. 

Handling Challenging Cases – Walking hand in hand

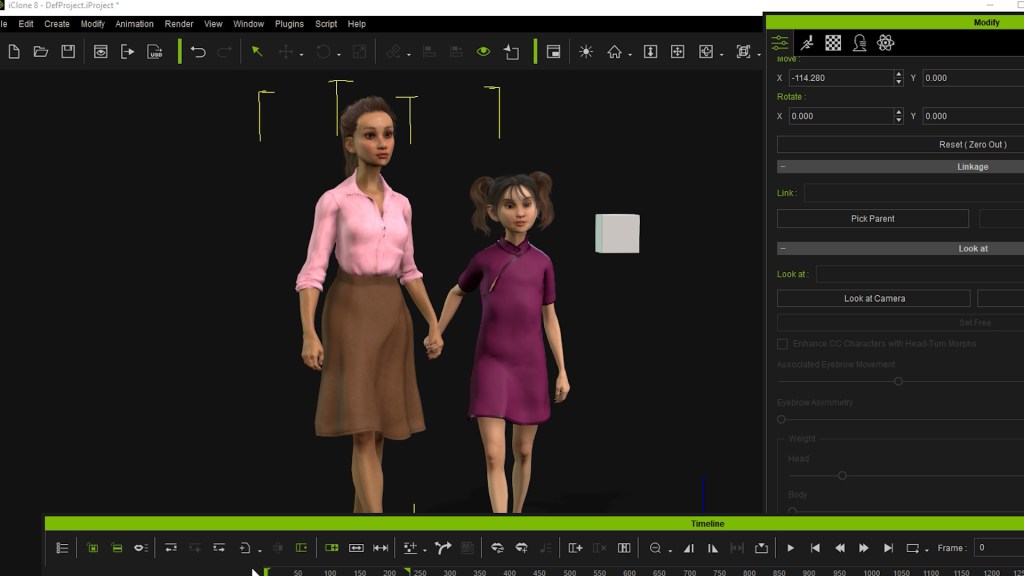
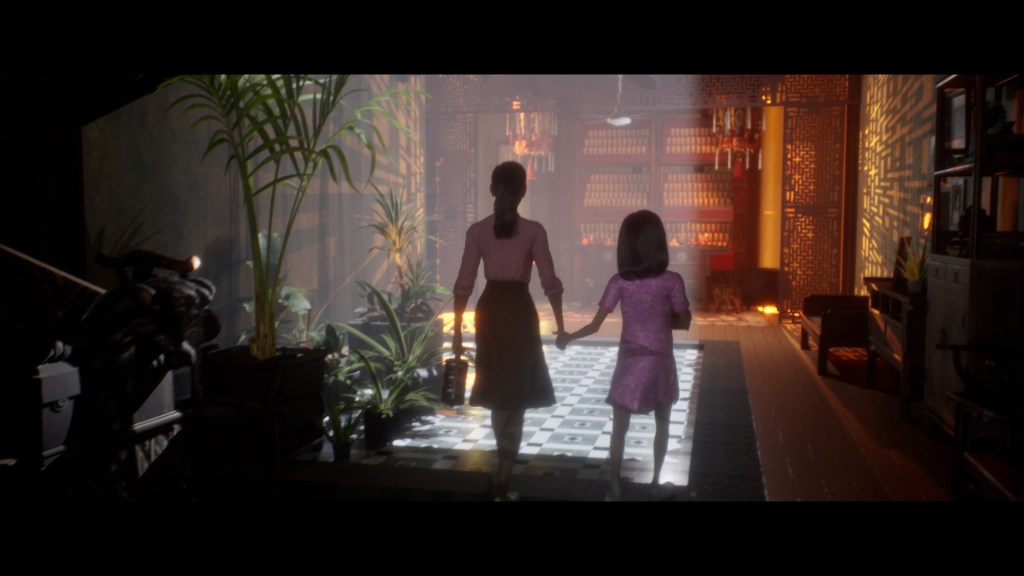
An example of me only discovering a solution to a problem after the film was finished was this shot of our characters holding hands while walking. I spent ages keyframing pretty much every hand position in Unreal, and I still wasn’t happy with the finished product. Only afterwards did I discover the reach target tool. This allowed me to lock one character’s hand onto another and made that entire sequence a breeze. This, combined with the look at features that I also discovered later, are invaluable tools for streamlining and enriching the animation process, and I will certainly be making more use of them moving forward.

As a person who fully admits to being stronger creatively than technically, I’ve found theReallusion software packages really suit my way of working. They are simple to get your head around, intuitive in the way they work, and most importantly, fun. I look forward to using them again with all their newest features for our next short film.

Learn More

iClone Lip-sync Animation:
https://www.reallusion.com/iclone/lipsync-animation.html

Get 36 FREE iClone tutorials for optimized animation editing:
https://www.reallusion.com/iclone/maya-motionbuilder-alternative/mocap-animation-courses.html

Enhance your character’s realism with Dynamic Wrinkle System in Character Creator:
https://www.reallusion.com/character-creator/dynamic-wrinkle.html

Demystifying ZBrush Posing using Character Creator: Insights from Director of Character Art for Certain Affinity

Michael Pavlovich

Michael Pavlovich earned a Bachelor’s degree in Computer Animation from RSAD in 2005. Initially, he contributed to the development of environment and character art for popular video games such as Madden and NCAA Football. Later, he relocated to Austin to join Daybreak Games, where he worked on the creation of art assets for DC Universe Online.

Presently, Michael holds the position of Director of Character, Weapon, and Vehicle Art at Certain Affinity. His expertise lies in implementing iterative pipelines for Certain Affinity artists helping develop renowned video game franchises, including Halo, Call of Duty, and DOOM. To stay updated on his latest tutorial projects, you can visit Michael’s YouTube or ArtStation page.

PART 1 : Using Character Creator with ZBrush Pose Tools Plugin to Create & Organize Poses
ZBrush has been known for its powerful asset creation capabilities, but posing complex high-poly characters has always been a challenge. However, with the introduction of GoZ and the Pose Tools plugin, rigging, animating, and storing poses can now be accomplished in just minutes. The easy-to-use, single-button interface simplifies the process of applying poses to ZBrush characters, opening up a world of possibilities for making your creations come alive. By integrating Character Creator (CC) into their pipelines, artists can further harness the capabilities of this plugin and unlock new possibilities for introducing fresh poses.
Installation

To begin, it is essential to have all the necessary components installed. Follow these steps:

  1. Open the Reallusion Hub and ensure you have the latest version of CC installed.
  2. In the “Add-ons for CC” section, install ZBrush Pose Link.
  3. Next, click on the “Product Home” button for ZBrush Pose Tools. This action will redirect you to a Reallusion download/install page.
  4. On the Reallusion Download & Install page, click the Free Download Button for ZBrush Pose Tools.
  5. After downloading, unzip the files.
  6. Locate and copy the “Data” folder and “PoseTools.zsc” files.
  7. Paste them into the “ZStartup\ZPlugs64” folder, or wherever you have ZBrush installed.

By following these steps, you will have successfully installed ZBrush Pose Tools for CC.

Demo Soldier Setup

Let’s work with the demo soldier character as it is accessible to everyone. Our goal is to cover both rigid binding (accessories or objects bound to a single joint) and soft binding (objects bound to multiple joints in a hierarchy).

Follow these steps:

  1. Separate the “kneeGuard” subtool into right and left subtools. This division will allow us to bind these as accessories inside CC later on.
  2. Ensure that each subtool has a unique and meaningful name. This will facilitate easy selection from a list and minimize errors that may arise from identical names or special characters that could cause issues.

By following these steps, we can effectively work with the demo soldier character, organizing subtools and preparing them for binding as accessories in CC.

Resizing

To facilitate easy access, dock the Pose Tools ZPlugin on the left side of your screen. You can either select a preset or manually enter a size in centimeters or feet. Ensure that the main body of your character subtool is selected, and then click the “Resize” button. This will ensure that your character is scaled to real-world units. This is not only beneficial for compatibility with CC but also for any application that requires your asset to be accurately scaled to a specific unit of measure.

GoZ

Click the “GoZ All” button in ZBrush to launch CC (if it is not already open) and initiate the rigging process by sending over the lowest subdivision versions of your asset.

If you need to configure GoZ, click the “R” button next to it. Additionally, you can access more options by going to “Preferences > GoZ”.

AccuRIG – Skeleton Creation

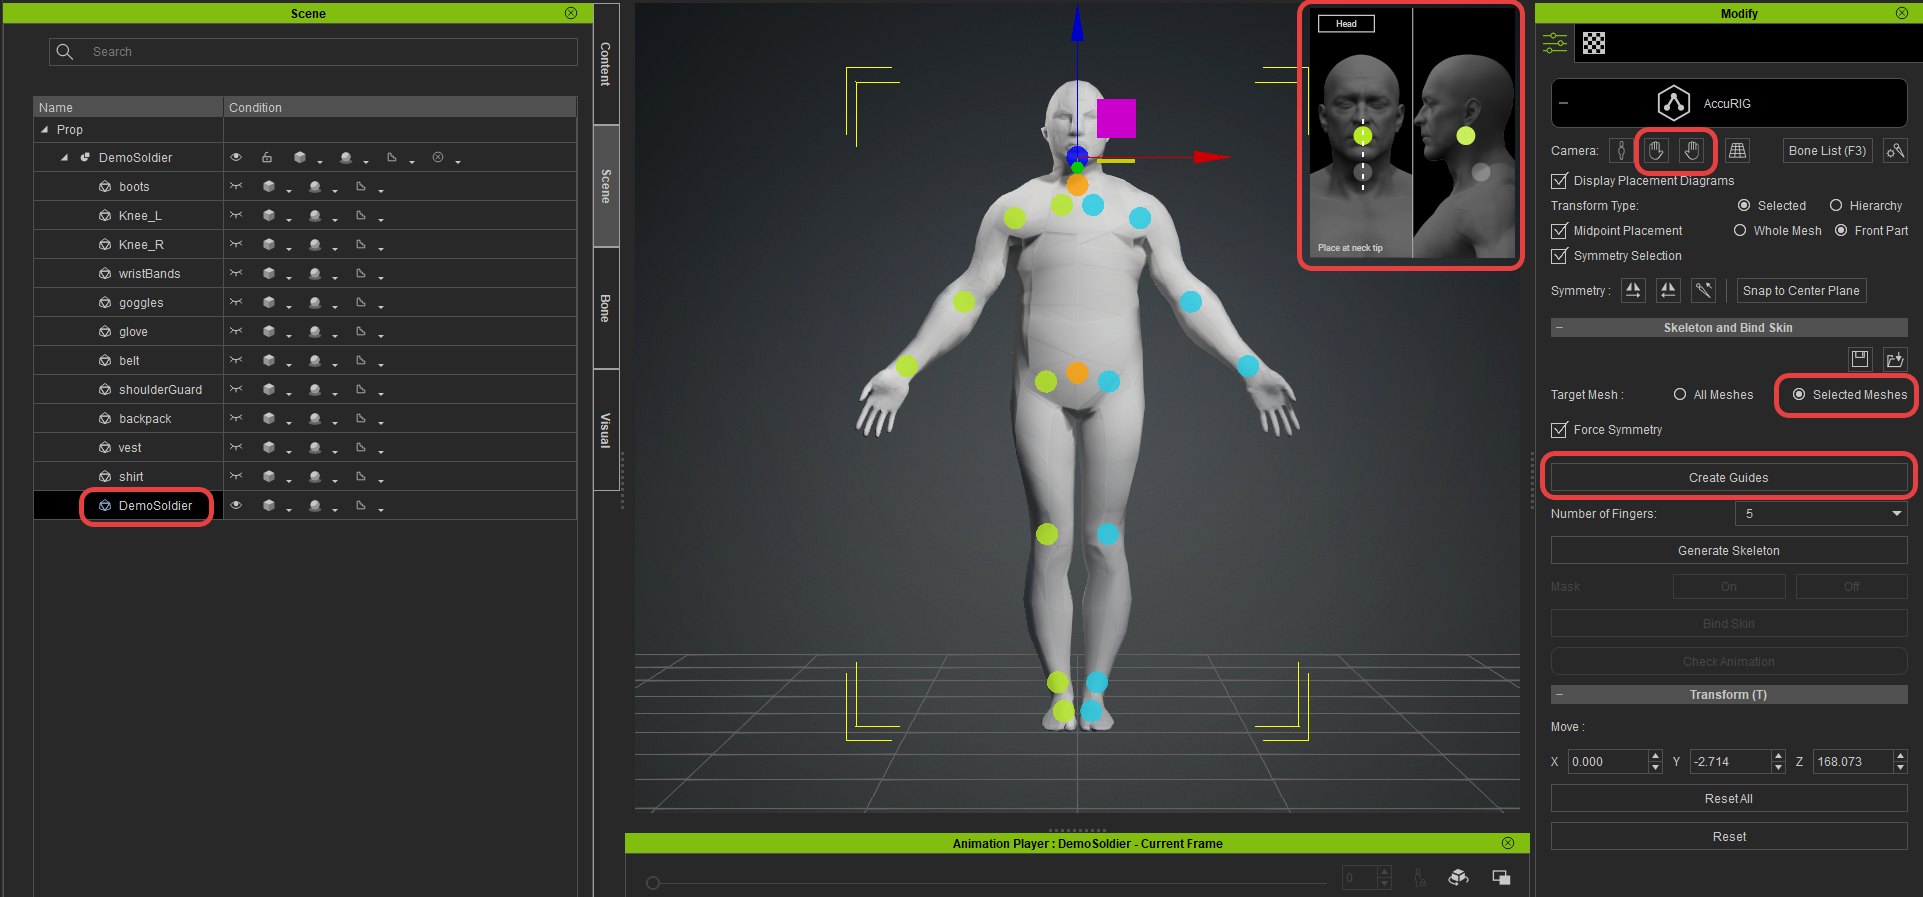
Within CC, click the “Update” button in the GoZ dialog box. This action will import all your subtools as grouped props. To initiate the rigging process, click the AccuRIG button located in the Modify panel. Upon entering AccuRIG mode, you will notice that your model automatically adjusts to position its feet on the ground plane.

To focus on the body, hide all objects except for the body itself. With the “Selected Meshes” option enabled, create guides by clicking the corresponding button. Utilize the placement diagrams to accurately position the guides. Once you have positioned the guides, press the “Generate Skeleton” button.

This step will convert the guides into joints and provide additional guides for the fingers. To position the finger guides, follow the same process as you did for the body guides. You can conveniently navigate to the hand area by clicking the frame buttons, which will swiftly move your camera accordingly.

AccuRig – Bind Skin

Now, make your objects visible again, but this time only select the parts of your character that should deform along with the skeleton. Leave any objects that shouldn’t bend during animation unselected, such as hats, armor, glasses, and similar items. Proceed to click the Bind Skin button.

This action will bind the selected bendable parts to the skeleton, grouping them together. The non-bendable objects will be placed in a separate group above as accessories. To ensure everything is working properly, you can click the “Check Animation” button to test your asset before exiting the AccuRIG mode. Once you are satisfied with the results, click the AccuRIG button again to exit AccuRIG mode.

Relink Your ZBrush File

It’s important to remember that when we entered AccuRIG mode, our character was automatically positioned to stand on the ground plane. Therefore, we need to update our ZBrush model to match this alignment. To do so, select the topmost group object for your character and click the GoZ button located at the top of the interface. In the dialogue box, ensure that “Relink” is automatically chosen for all your objects. Additionally, select “Current Pose” and then click the “GoZ” button. This action will send the vertex positions of your newly bound objects from CC back to ZBrush, updating the character’s location accordingly.

You will also notice that the subdivision history for your subtools in ZBrush remains intact, preserving any high-resolution details you have sculpted. It is recommended to save both your Character Creator and your ZBrush file. You can do this by navigating to “File > Save As” in both applications.

Adding Poses and Animations to Your Character

Back in CC, go to the “Content” tab and include an animation for your character. Explore the timeline to locate the ideal pose, and utilize the “Edit Pose” button in the “Modify > Motion Pose” tab to make precise adjustments. You can also drag a pose onto your character or select an animation from the “Motion” menu in the “Animation Playback” section.

Sending Poses Back to ZBrush

Once you have chosen a pose you like, go to the “Plugins > ZBrush Pose Link” menu. There, you will find options for sending the T/A poses to ZBrush, as well as the option to send the current character pose. Select the option to send your current pose back to ZBrush, which will save the pose data as a layer for each subtool.

Moreover, it will organize the pose into a conveniently selectable button. You can rename a pose by selecting it, and you can easily switch between poses using these buttons.

In subsequent articles, we will explore the remaining features of the Pose Tools plugin. However, what we have covered so far should encompass the majority of what you will need.

PART 2 : Posing a Custom ZBrush Character in CC with custom & library accessories

Now that we are familiar with the fundamental procedure, let’s discuss how you can bring your custom accessories into CC for posing, as well as how to import pre-existing assets from the CC library back into ZBrush. If you’re interested in creating a character of this nature, I have a 12-part series available on ArtStation Learning that you can follow along with. It provides detailed guidance and instructions for the entire process.

Polycount & ZRemesh

One important consideration is the polygon count when sending your model to CC. While you can create highly detailed models with millions of polygons in ZBrush, attempting to pose such a dense mesh would be extremely challenging. Instead, you can utilize ZRemesher and Project functions in ZBrush to generate a lower-density subdivision mesh that can be easily rigged and animated. By projecting your details onto higher-density subdivisions, you can preserve the intricate details without sacrificing performance. The step-by-step process for achieving this is thoroughly explained in the accompanying video.

Transferring Polypaint to Textures

One drawback of transferring a low-resolution mesh is that the quality of your polypaint may appear blurry without the high-resolution vertices to support it. However, this issue can be addressed by transferring the polypaint data (vertex color) from the high- to low-poly geometry. By doing this, your character will maintain its visual appeal during animation in CC. If you don’t mind animating with only the low-poly geometry, you can skip this step as it doesn’t affect functionality but rather just enhances the visuals.

GoZ

The process for transferring the model is similar to the previous setup. Just resize your character using the Pose Tools plugin (be sure to select your body mesh during resizing), and then send it to CC using GoZ. You will observe that the subtools with transferred polypaint as textures will appear as intended. However, objects without textures may lose their color. To address this, you have two options.

First, you can change the geometry display from “Normal” to “Smooth” to visualize the vertex color (polypaint) transferred from ZBrush. Alternatively, you can navigate to the “Modify > Material” tab and select a diffuse color for that specific object to restore its original color.

AccuRIG & Animation

Once again, the process is identical to the one demonstrated with the soldier. Begin by selecting all the objects that will undergo deformation and click on “Bind Skin” in AccuRIG. Make sure to choose “Selected Meshes” to bind only the selected objects.

Objects that should remain rigid, such as glasses, headphones, and the Walkman, should be left unselected. After binding the skin, you can exit AccuRIG and proceed to apply animations or poses to your character without any issues.

Custom Accessories

In ZBrush, append any custom accessories that you wish to pose your character with. Afterward, use the “GoZ All” function to send the entire scene back to CC. The newly appended subtools will automatically be added as accessories. Select them and adjust their pivot points to ensure they align properly with the character’s interaction, such as placing them in the character’s right hand in this case.

Remember to modify the “Attach to” section to the appropriate bone for your character, such as “CC_Base_R_Hand”. Once the accessory positions are adjusted, use the “GoZ” button within CC to relay the updated positions of the accessories back to ZBrush.

Adding CC Accessories

In the “Content” tab of CC, locate the “Accessory” section. From there, you can either drag and drop the desired accessories onto your character or obtain accessories from the Reallusion Content Store. By default, accessories are assigned to joints based on the best guess. For instance, sunglasses and hats are typically attached to the “CC_Base_Head” joint. However, you have the freedom to update the pivot, reposition the objects, and modify their attachments as per your requirements.

Once you have made the necessary adjustments, ensure that all objects in your scene are visible and selected. Then, use the GoZ feature in CC to transfer the updated scene, including the new accessories, back to ZBrush. This way, your ZBrush scene will be seamlessly updated with the newly added accessories.

Posing & Visibility Sets

Similar to the previous article, you can create multiple poses in CC and then send them back to ZBrush for convenient storage and access. To accomplish this, use the option “Send Current Pose to ZBrush Pose Tools” located in the “Plugins > ZBrush Pose Link” menu. This will store your poses and make them easily accessible within ZBrush. Additionally, for each pose, you can assign a “Subtool Visibility Set”, enabling you to show or hide specific subtools associated with that pose.

PART 3 : CC Cloth Simulation, Weight Paint, & ZBrush Cloth Sculpting

In addition to binding objects to a skeleton, we can enhance the CC by incorporating cloth simulation. This means that as our character animates, cloth objects will move and behave realistically, flowing naturally with their movements. If you’re intrigued by the idea of designing such dynamic characters, I invite you to join a series of livestreams where I demonstrate the entire creation process.

UVs for Cloth Objects

This image has an empty alt attribute; its file name is C_02.png

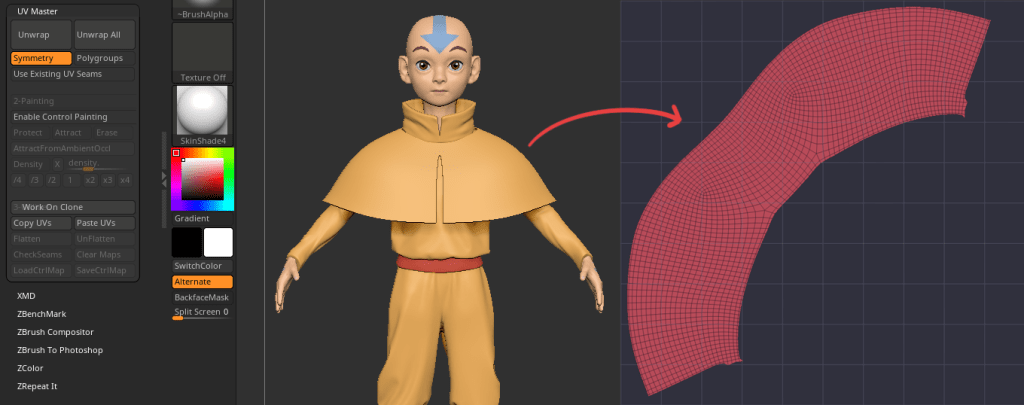
The initial steps for setting up your character will remain the same as demonstrated in the previous tutorial (naming your subtools, ensuring lower subdivisions for GoZ transfer, etc.). However, for the objects intended to be simulated in CC, it’s important to have UVs in place for generating a weight map later on. To expedite the UV creation process, we will employ the UV Master plugin in ZBrush.

Adjusting Weights

Once you have rigged and bound your character, you may encounter a few problematic areas. In our case, the cloth around the character’s neck may exhibit unnatural bending when the head moves, and the cloth cloak might appear as if it’s stuck to the limbs. To address both of these issues, follow these steps:

  1. Select the problematic cloth objects and navigate to the “Modify” panel.
  2. Click on the “Skin Weights” button.
  3. For the neck cloth, use the paint operation to ensure that it stays connected to the “CC_Base_Spine02” bone.
  4. As for the cloak, employ the Selection mode and perform a “Quick Replace” operation on all vertices associated with the cloth. Assign them to the “Spine02” bone.

By executing these steps, you should be able to rectify the bending of the neck cloth and ensure that the cloak follows the movements of the “Spine02” bone without appearing stuck to the character’s limbs.

Collision Shapes

To create the illusion of the cloth coming in contact with the character’s body without incurring the performance cost of using the body geometry itself, we can employ collision shapes. By pressing the “Collision Shape” button, we can add shapes to specific areas of the body where the cloak will interact, such as the chest, shoulders, and arms.

Weight Map

To activate physics for the selected character group, follow these steps:

  1. With the top character group selected, navigate to the “Modify” section.
  2. Click on the “Physics” tab within the “Modify” section.
  3. Check the box labeled “Activate Physics” to enable physics simulations for the character.

Once you activate physics, CC will prompt you to assign a weight map to the materials. In this case, we want to associate the weight map with the “Cloth Cloak” material. However, since we don’t have an image for the weight map yet, we can create one using ZBrush. Here’s how:

  1. Return to ZBrush and polypaint the desired areas of the character where the cloth will be bound, in this case, “Spine02”. This will serve as our weight map.
  2. Transfer the polypaint information to a texture, similar to how we did it with the socks earlier.
  3. Export the texture as our weight map.

Finally, in CC, we can plug the exported weight map into the material assigned to the cloth. The black parts of the weight map will be bound to the “Spine02” object, while the white parts will move freely like cloth, colliding with the collision shapes as the character animates.

Rigid Body, Soft Cloth, & Animation

To achieve the desired effect, follow these steps:

  1. Enable the Rigid Body and Soft Cloth simulation options. You can find them at the top of your menu or by checking the respective boxes in the “Edit > Project Settings” menu.
  2. Additionally, consider turning on the “Bake Animation” option while you’re in the settings menu. This allows you to scrub the timeline smoothly after the cloth simulation is completed.
  3. Now, proceed to add an animation from the “Content” tab. Choose the desired animation that you want to apply to the cloth.
  4. Finally, click the “Play” button in the animation player to start the playback.

Tip: To ensure the cloth reacts appropriately throughout each frame of the animation, change the playback setting from “Realtime” to “ByFrame”. This will provide a frame-by-frame playback, allowing the cloth to respond accurately.

Pose Tools and Editing

As always, follow these steps to utilize the Pose Tools in ZBrush using the “Plugins > ZBrush Pose Link > Send Active Pose” option. This will transmit all the available pose options to ZBrush. After completing this step, click the “Edit Current Pose” button within the ZBrush Pose Tools plugin. This action will activate the REC button for each layer in the pose, enabling you to make sculptural modifications to any subtool.

Once you have finished editing, click the “Save Current Record” button. You can then proceed to edit your next pose or import a new pose from CC into ZBrush Pose Tools.

PART 4 : Pose Tools ZBrush Plugin: Layer & Pose Management with CC

Transpose Master

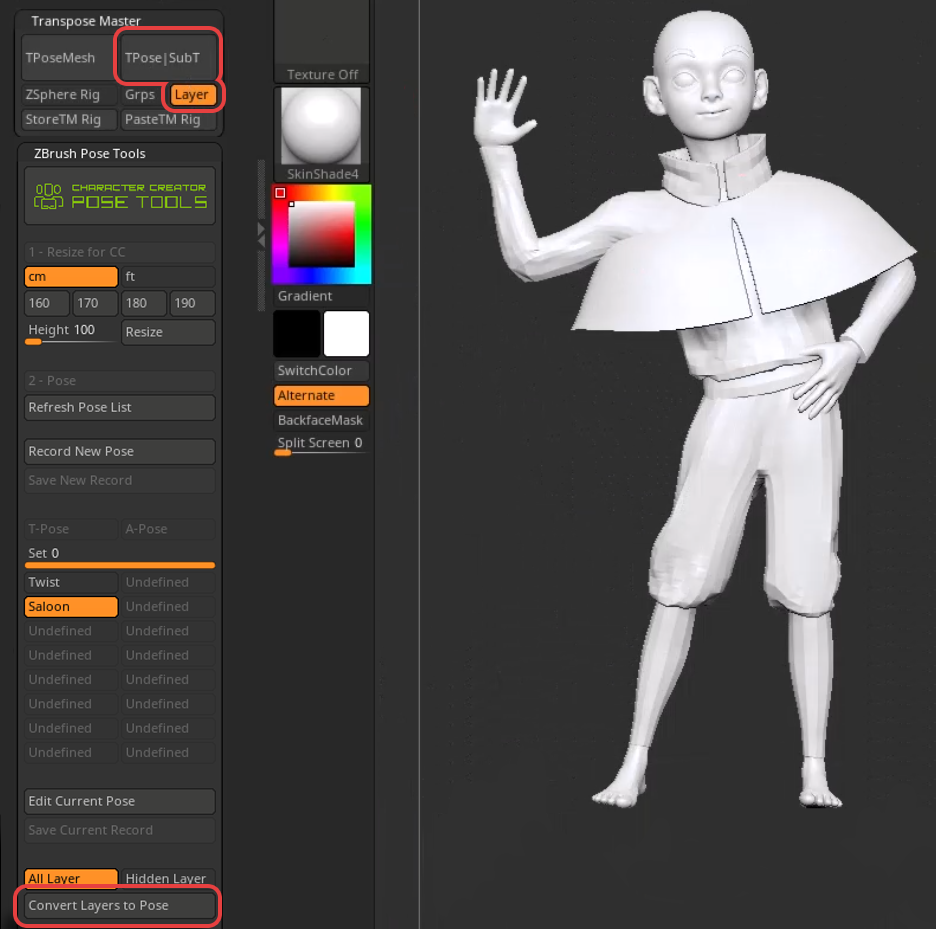
We’ve discussed using CC to create poses, but what about utilizing ZBrush for posing? Have you ever used ZBrush to pose before, perhaps using layers, but now you want to convert them into Pose Tools poses? The process is straightforward.

Here’s what you need to do:

  1. Open ZBrush and navigate to “ZPlugin > Transpose Master”.
  2. Make the desired pose changes using masking and gizmo/transpose lines.
  3. With the Layer activated, press the “TPose | SubT” button. This action will send your Transpose Master changes back to your subtools, storing each change as a generic layer.
  4. To make these layers recognized by Pose Tools, click the “Convert Layers to Pose” button.

By following these steps, you can seamlessly transition your ZBrush layers into Pose Tools poses, making it super easy to work with your desired poses.

Dynamic Cloth Simulation in ZBrush

Notice how we opted not to sculpt our cloak using Transpose Master. Instead, we can achieve the desired effect by following these steps: First, click on “Edit Current Pose” to position the cloth over the character. Then, utilize ZBrush’s dynamic cloth functionality to simulate the cloak over the body.

This feature allows you to apply cloth simulation to your sculpting brushes. For more details and guidance on ZBrush’s dynamic cloth functionality, including using cloth simulation with sculpting brushes, refer to the What’s New – ZBrush 2021 playlist.

Delete vs Remove

If you have a pose selected in the Pose Tools plugin, there are two options to remove it:

  1. Press the “Remove” button: This will remove the pose from the Pose Tools library while keeping the edited layers in the subtools intact.
  2. Use the “Delete” button: This option deletes the layers from the subtools, effectively removing the pose data from both the subtools and the Pose Tools plugin.

Detail Layers

You also have the ability to create new layers for each individual subtool. These layers can be modified independently, allowing you to make specific changes such as applying a weave surface noise. The great thing is that these layers can be toggled on and off for the other posed meshes as well, providing flexibility and control over the modifications across multiple meshes.

In Conclusion

Posing your ZBrush creations in CC is not only easy but also faster, with results that are easily organized using the Pose Tools pose library. With minimal preparation, your creations can achieve more, faster, and with higher quality compared to traditional manual methods. While we’re only beginning to explore the potential of Character Creator in enhancing character pipelines, this is undoubtedly a promising start!

Free Download

• ZBrush Pose Tools

• Character Creator

Learn more

• Michael Pavlovich: ArtStation. YouTube. LinkedIn

• Posing ZBrush Character Effortlessly: CC & ZBrush workflow. ZBrush-only workflow

• CC AccuRIG: Auto Rig Tool (embedded in Character Creator 4)

Reallusion 2023 Animation At Work Competition: Entries close on August 13 PST

About 2023 Animation at Work

Reallusion is hosting its annual 2D competition Animation At Work from now until August 13th, 2023. Participants are encouraged to utilize Cartoon Animator 5’s realtime character creation and 2D motion capture technology to create entries in categories including Business & Commercial, Comic & Art, and Educational Animation. The total prize pool is over USD 15,000 for worldwide contestants, with multiple sponsored prizes from XP-Pen, Magix, and Affinity.

6 categories, 12 winning spots, and MORE!

The contest invites participants to animate reallife projects for business promotions, educational training materials, animated comics, YouTube videos, and more.

Read for more information on each category:

  • Business & Commercial: Create an animated video commercial to promote a reallife or fictional concept, product, or service.
  • Comic & Art: We invite graphic art designers who possess the ability to transform original static drawings, illustrative art, or comic images into captivating animations.
  • Education: Utilize animated videos for educational purposes, including storytelling, kids’ songs, or instructional videos.
  • Best Use of CTA: If you are using Cartoon Animator 5 to compete, try to incorporate secondary animations such as Spring Dynamics and Free Form Deformation.
  • Best Animated Mascot: Promote your brand with your own unique character and demonstrate its animations using Cartoon Animator!
  • Vertical Shorts: Create a mobile friendly vertical 2D short and upload it to YouTube, Instagram, or TikTok. Video length must be 15 seconds above.

The best chance for aspiring artists to enter the contest

Reallusion welcomes worldwide 2D artists to leverage a 2 month free software and free educational resources to participate in this event.

  • Free trial: Don’t have Cartoon Animator to compete? No worries! You can always trial use it for 30 days first from our FREE Trial Page.
  • Free webinars: Hosted by Reallusion’s certified trainers Mark Diaz and GarryPye. This webpage is a place where you can back up your Cartoon Animator knowledge before diving into contest entry production. Mark is the founder of 2D Animation 101 and a TED Talk speaker. Whereas Garry is Reallusion’s Community Manager for CTA  and a CTA veteran. They will guide you on how to get started with Cartoon Animator and master the key skills for the contest.

Learn more

About the Animation at Work Contest: register today! The Reallusion Animation At Work Contest is an event that invites EVERYONE to use their imagination to animate real-life projects like business promotions, educational training materials, how-to videos, animated comics, YouTube news videos, and more. Would-be participants can freely enter any of the four categories to compete with the 2D animation community. 

About Cartoon Animator: Cartoon Animator is a 2D animation software designed for both abilities of entry and productivity. You can turn images into animated characters, control characters with your expressions, generate lip-sync animation from audio, accomplish 3D parallax scenes, produce 2D visual effects, access content resources, and wield a comprehensive Photoshop pipeline to rapidly customize characters and create content. 

About the 2022 Animation At Work winners: see how we promote winners!

The “2022 Animation At Work” contest was a runaway success that consisted of 30 winning submissions, with more creativity and skill in a single contest than we have ever witnessed. Winners not only walked away with big prizes but also got the chance to be featured on the web page and become featured developers on Reallusion content stores.

Using Realistic Humans in Unity – PART 2

Matt Belshaw – Game Developer, Digital Artist, Educator

Matt Belshaw

Matt Belshaw is a British self-taught game developer and digital artist.

’Ello Mate! I’m Matt Belshaw, in this second of a two-part tutorial we’ll Import our character into Unity, use the Auto-import tool to process our clothing, animations, wrinkles and physics and then use the animator and cinemachine to start our cut-scene. (See PART 1)

Thanks to the work of Victor Soupday it’s now easier than ever to use realistic humans and animations created in CC4 and iClone 8 within Unity projects. Because Unity is well optimized and very customizable, being able to leverage the powerful Reallusion tools in synergy with Unity is a huge leap forward in being able to create stunning and diverse games and visuals without needing years of training or a vast budget. If you followed along with the previous tutorial, you have everything you need to follow along with this one. If you haven’t done so already, now is the time to download the Auto Setup addon >> Download Here.

Creating our Project

With Unity hub open, create a new project and ensure that you select 3D (HDRP) as your core type. Set your project name and folder and then click on the Create project button. After a few moments the Unity editor will open.

Installing the Auto-import tool

Click in the Window>Package Manager menu item and the package manager interface will open.

Click on the + dropdown menu in the top left corner and select Add Package from Disk and in the file selector menu, open your downloaded auto-import tool files which your downloaded earlier.

Note that nothing will change in your editor initially. Once you’ve installed the package, you need to save your project and restart the unity editor.

Once it’s been restarted you will see a new Reallusion menu option available on the top bar of the Unity Editor.

Importing our Character

Before we import our character let’s create a separate folder in which to store them. In the Project pane, right click on the assets folder and create>folder and name your new directory.

If you want to keep all your characters in separate folders, you can of course create sub-folders.

It’s time to go back to wherever you saved the exported character files from the previous tutorial.

Copy all the contents from your original export into your Newly created sub-folder within your Unity Project. You should have 4 items to copy, the .json, .fbx, a textures folder and a .fbm folder.

After a few moments your files will be added to your Unity Project.

Now the files are within our project, click in the new Reallusion menu item and select Import Characters

This will open the Unity auto-import window as shown below.

There are many options here but so long as we select the right options in our initial import, we shouldn’t need to use any of the extra functions.       For the purposes of this tutorial, we’ll use the following options in our drop-down menus

  • High Quality Materials
  • Refractive Eyes
  • Two Pass Hair
  • Everything
  • Bake Custom Shaders
  • Bake Separate Prefab

Once you have these selected, Hit the Build Materials button. This will take a minute or so, and when it’s completed Unity will automatically open the file location of the new prefab with the Project browser.

We’re now ready to start animating!

Sorting our animations

In the previous tutorial, we applied all our animations to the iClone timeline in a sequence. We now need to unpack that sequence back into separate animations.

Drag your prefab into the scene and you’ll see that it looks identical to the way it did in Character Creator.

Now navigate back to the original character file which you imported into Unity (as opposed to the prefab)

Within this folder you will see a new icon

This icon represents the animation controller for our new character but just to make sure it’s assigned correctly, drag the animation controller onto the character in the scene window.

Now if we double click on the animation controller, the Animator window will open, showing us the current assigned behaviours for our character when the scene starts.

In the Project pane, select the character file and note that the Inspector window changes. At the top there should be four options, Model, Rig, Animation and Materials. Select Animation.

In the upper half of the Inspector, we can now see our current Clips. There should be one 0_T-pose clip and a *_TempMotion Clip.

As you select each clip note that the preview window at the bottom of the tab reflects the starting frame for that clip.

With the TempMotion clip selected, you can preview the sequence of animations that the character currently has.

Depending on how many animations you added, you will need to repeat the following process for each one.

In the Clips section, select the “+” icon to create a new empty clip and assign it a name that will allow you to recognise which animation it contains.

Now using either the time sliders or entering the frame numbers in the Start and End boxes isolate a single animation from the entire frame sequence.

Don’t forget to check Loop Time if your animation loops.

Note that each Clip you create, adds a new animation to the Character within the Project Pane.

Applying the Animations

Once you have separated out all of the animations, now it’s time to add them to the animation controller.

Reopen the Animator screen by double-clicking the animation controller within the Project Pane.

One of your clips might have been automatically added, but drag the remainder of the new clip files into the animator window.

You can now delete the TempMotion box from this window. It should be the orange box connected to the green Entry box by an arrow.

The green Entry box represents the moment that the character enters the scene.

We can now plot the animations we want to be played from this point onward by right clicking the Entry box and adding a transition to our first animation, you’ll see an arrow line connecting to the animation, now right click that first animation and create a transition to the next and so on until we have a daisy-chain representing our animation sequence.  

For this demonstration I’ve kept it simple with just one animation, but there is nothing to prevent your from stringing together as many as you want. Just remember that if one of the animations has “Loop time” checked, it will continue to loop and not move on to the next animation in the sequence.

Moving the Camera

To animate our camera, we’re going to use the Cinemachine package. Re-open the Package manager from the Window menu.

Make sure that the Packages: Unity Registry option is selected from the second drop-down menu.

In the search bar start typing Cinemachine and once You’ve located it, download and import the package to your project.

Save your project and re-start the editor to make sure all new options are available.

We’re going to use Cinemachine Virtual cameras to tell our scene camera where to be at any given time.

In order to do this we need to add a timeline to our project.

In the Project Hierarchy, right click and add a new Empty Game object and name it “Timeline” or something similar which will tell you what the object is for.

Next we need to open the Timeline window which is located in the top menu under Window>Sequencing.

With our “Timeline” Game object selected in the project Hierarchy, click on the Create button within the timeline window.

You’ll now see that the Timeline window looks a little more like what you would imagine an animation timeline to look like.

Now we’ll create a camera which will be used for our animation, by right-clicking within the Hierarchy tab and Create>Camera

Now it’s time to put our camera in the initial position. Navigate to the position that you want your first camera position. Basically line-up the shot as if the scene window were going to be what the viewer sees.

Making sure that you have the new Camera selected within the Hierarchy tab, press CTRL + Shift + F to align that camera with your viewport.

With the Camera still selected, right-click in the Hierarchy pane once more and select Cinemachine>Virtual Camera

This will add a virtual camera at the exact same position as our Camera. We can now move our scene camera and the Virtual Camera will remain in place as a marker.

You can learn more about using Cinemachine to create more exciting shots, as it’s a powerful cinematic tool. For this demonstration I’ll keep it simple with static shots.

Continue lining up shots, using CTRL+Shift+F to move the Camera and then adding a Virtual camera at that position until you are happy that you have enough camera angles to work with.  

Putting it together

The last piece of the puzzle is to move the virtual cameras onto our timeline and deciding how long we will remain at each shot and in what order we want to change between them. Make sure the timeline window is open and visible.

Drag your first Virtual Camera into the Timeline window and choose between the two options. For this demo we will create a simple Control Track

You will now see that your virtual camera has been added to the timeline and we can now see at which frame we move to this camera position and for how long. You can change these properties by moving the box along the timeline and dragging the edge of the camera’s timeline box to adjust the duration.

From here it’s a simple matter of dragging all your virtual cameras into this control track and deciding what order you want to play the shots in and for how long.

If you place two adjacent camera boxes touching in the timeline, the camera will do a short sweep from one shot to the next.

If you leave a small gap, the Camera will Jump to the next shot instantly instead.

By pressing the Play button in the Timeline window, you will see the Camera move from each assigned position. This is a good way of checking your sequence but the characters within the scene will not animate.

Now to preview our animation all we need to do is hit the main “Play” button in the Unity interface.

At which point our Game window will play our animations and camera movements in their entirety.

From this point it’s a case of tweaking your camera positions, moving your characters and props to make better shots, and applying your post processing volumes to get the desired look and effects. Experiment with different settings until you get something awesome and don’t forget to tag #Reallusion when you upload your projects so that we can see your amazing creations!

Follow Matt Belshaw:

YouTube: Game Developer Training
https://www.youtube.com/@GameDeveloperTraining/featured

Patreon:
https://www.patreon.com/GameDeveloperTraining

Website:

Using Realistic Humans in Unity – PART 1

Matt Belshaw – Game Developer, Digital Artist, Educator

Matt Belshaw

Matt Belshaw is a British self-taught game developer and digital artist.

As a recreational workaholic, when he isn’t in the Gym or creating tutorial content for his popular YouTube channel – Game Developer Training, Matt will be working his full-time job as a teacher or creating content for his own video games

In this two part Unity tutorial series, Matt walks us through how he creates a full-rigged and animatable digital human for use in Unity’s High Definition Render Pipeline (HDRP) using Reallusion’s Character Creator, Auto Setup for Unity script, and iClone animation tools.

’Ello Mate! I’m Matt Belshaw, in this first of a two part tutorial we’ll create a character using Character Creator 4, add animations using iClone 8 and save our project ready for importing into Unity using the HD Render Pipeline extension.

Thanks to the work of Victor Soupday it’s now easier than ever to use realistic humans and animations created in Character Creator 4 and iClone 8 within Unity projects.

Many people want to harness the power of Character Creator, iClone and their many fantastic addons, but don’t have the time or desire to learn an entirely new game engine, which puts those people who have always preferred Unity to Unreal Engine at a disadvantage, until now. Using Victor’s Auto Setup addon, it’s now incredibly easy to get your favourite characters out of iClone, including all animations and use them in Unity.

Before we start working on the Unity side of things though, let’s build ourselves a character that we can use.

In order to follow this first part of the tutorial you don’t need to download any special tools, although I do recommend downloading the Auto Setup addon Download Here.

Also, since we’re downloading stuff, let’s browse the Reallusion Content Store for any skin, hair, clothing and mocap assets that we might want to use now that we can work in Unity.

Creating the Base Character

First things first. We need to create the base character which we’ll then customize. Inside Character Creator, with an empty scene, open the Modify window and click on the load neutral base button.

After a few moments our character will appear (undies added for safety). This androgynous character can now be customized to whatever shape we want using the extensive morphs available in Character creator 4.

Applying Morphs

Whilst still in the Modify window, note at the top a selection of sub-menus.

We’re going to click on the third icon from the left which looks like a square being squished by two arrows.

Ensuring you have the character selected and not one of the items of clothing that you’ve already added for modesty, you will see all the morphs that are currently available to apply to the character.

There are some morphs which apply to the whole body, some which apply to single body parts, all of which use a slider allowing you to apply these morphs to any degree.

Any character presets you own will also be available from this menu. This is your opportunity to get creative and design your character. Don’t expect to create the perfect specimen quickly, these things take time and a lot of fine tuning. Take your time and create the character of your dreams before moving on to the next step.

Applying a new skin

To apply a new skin to our character it’s as simple as double clicking on something!

Open the Content window and with our character still selected, browse to the “Skin” sub-menu.

From here, it’s just a case of browsing to the skin or skin-pack that you want to use and double-clicking on it to apply your choice to your new character.

If you’re happy with the way your realistic human looks, then you’re good to move on, but if you want to tweak the skin colour a bit, then it’s time to re-open the “Modify” window and select the materials sub-menu.

Within this tab we can select all the Digital_Human Skin materials using Shift-Click

Just below this within the materials tab, there will be a section called “Shader Settings”. Open it up and more options will be visible.

Open up the accordion tab for Skin Colour and check the “Activate Skin Colour” box.

Open up the Colour Adjustment tab and Check the “Activate” box

You can now customize the colour of your character using the three colour sliders within this sub-menu.

Once You’re happy with your colour, click on the Bake Skin Colour to Diffuse Map Button. This will make your changes permanent.

Add Clothing and Hair

Using the Content Menu, browse through your library, ensuring your character is still selected in the scene and double click on whatever clothing and hair you wish to add to your character.

Remember that there is no right or wrong thing to do here, what clothing and hair you choose to add is entirely down to your personal preferences. Once your new friend is sporting a nifty new hairdo and sharply dressed, move on to the next step.

Adding Wrinkles (good ones of course).

Back in the “Modify” window with our character selected, select the Expression Wrinkles sub-menu. (The icon that looks like a head with a vent on the side.)

Check the Activate Expression Wrinkles Box

iClone will now apply a default expression facial profile to our character.

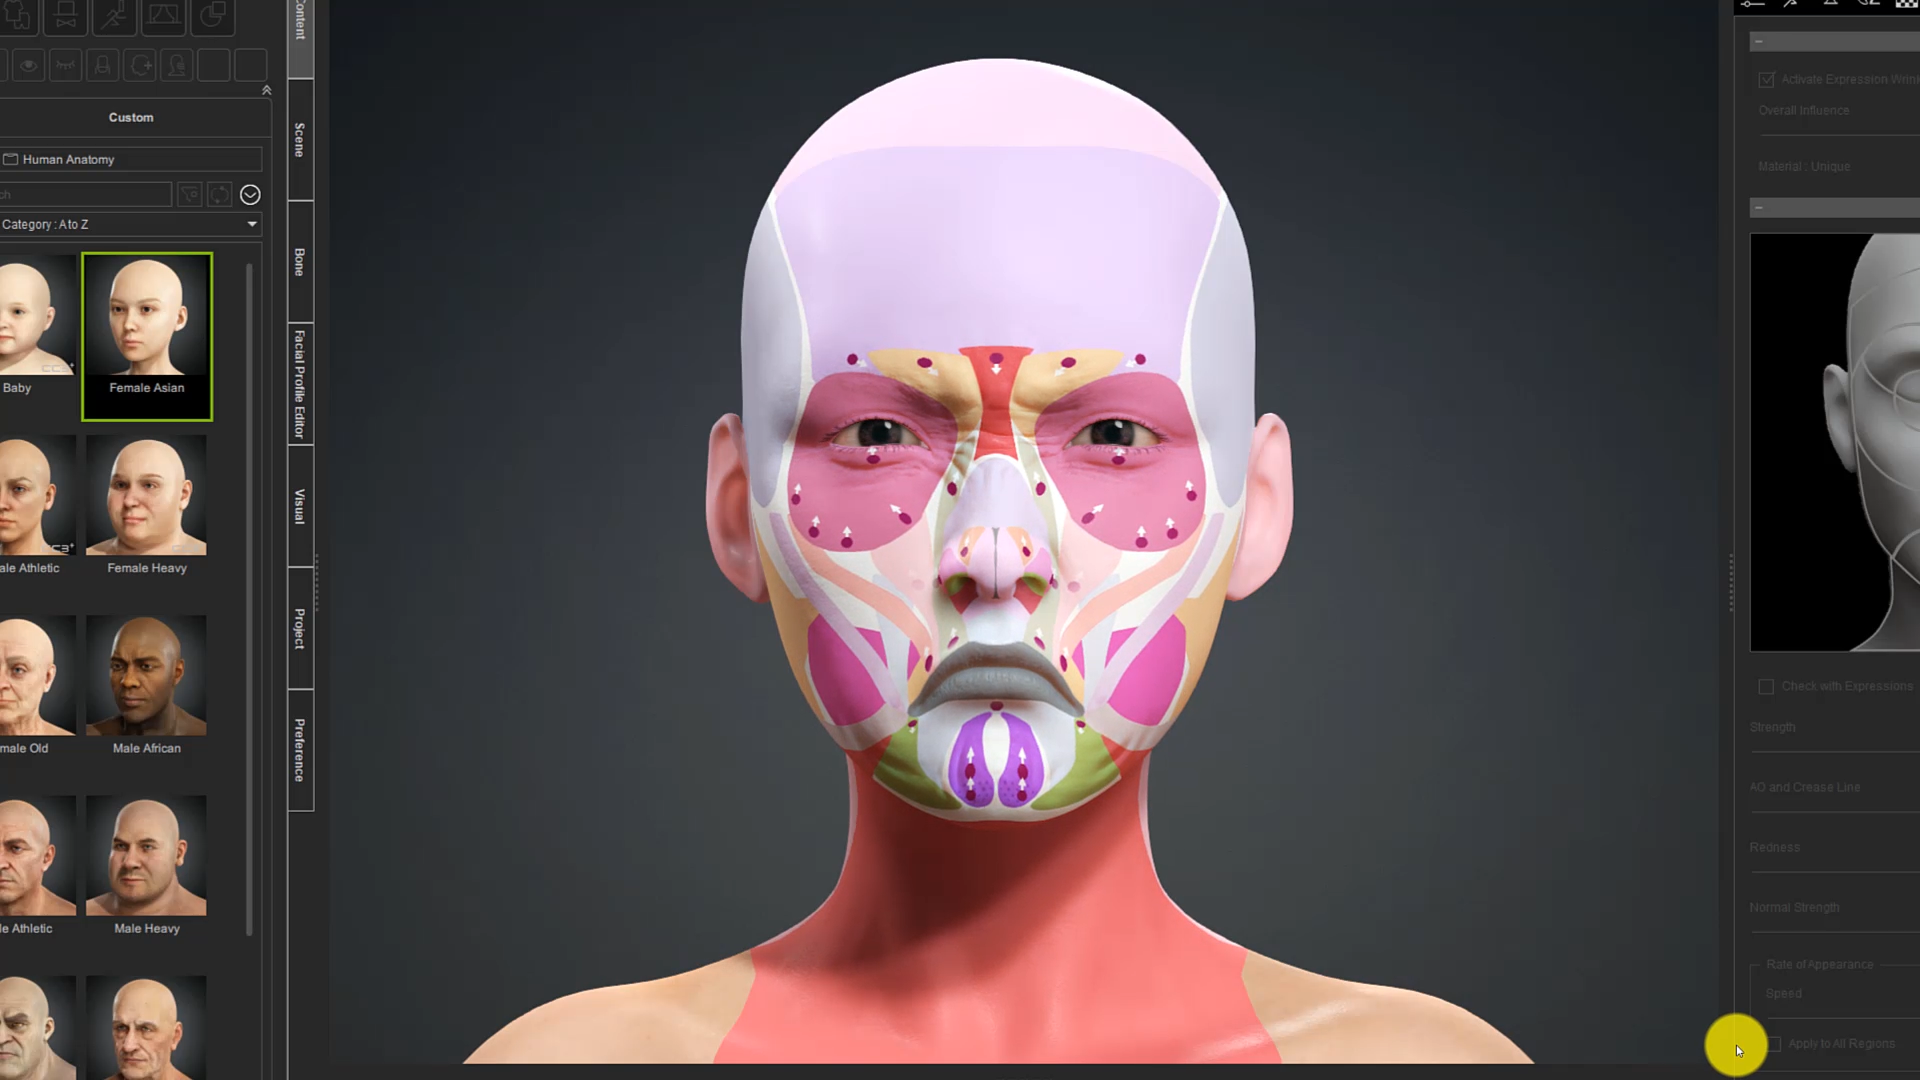
Check the “Check with Expressions” box and double click on any of the facial areas to apply an extreme expression which shows the wrinkles in action, allowing you to tweak the strength, redness etc.

Once you’ve wrinkled / unwrinkled your character the desired amount, export your character as an iAvatar to save your progress and then move on to the next step.

Exporting to iClone

Now it’s time to open iClone. This isn’t mandatory as it should open automatically.

Once iClone is open, click on the “Send to iClone” button

iClone will start importing your character.

Once this has been completed, you can close Character Creator.

Adding our animations

Before we start, I highly recommend having a text document open and ready for you to record the start and end frame numbers for each of our animations, since once we import the character into Unity, we will have to manually chop up the animation into individual parts again.

Make sure the timeline window is open and visible.

Browse through your content library and add any animations that you want the character to be able to use. It’s not completely vital to get them all at this point but it does avoid unnecessary messing about later if you can get all the animations you need in the first place.

As you double-click on an animation you will see it being added to the timeline

Note down the animation start and end frame numbers and of course what the animation is. You can press the play button to see how your character looks doing each animation. This is often a good idea as it can identify any potential clipping that might occur or animations that just don’t suit.

Once you have all the animations that you wish to export added to the timeline, it’s time to move onto the final step!

Exporting our character for Unity

Click the menu option at File > Export > Export FBX…

In the dialogue box that appears, ensure that you choose the Unity 3D Preset. Set your frames per second to Project(60) and make sure that you check the “All” option in the Export Range. Adjust your max Texture size if you wish and then check the “Delete Unused Morphs” and “Delete Hidden Face” checkboxes.

Hit Export and save your character in an empty folder whose location you will be able to find later.

That’s it, you’ve completed this tutorial. In the next stage we’ll import the character into unity using the Auto Setup tool, break the animations up and apply them to our character.

Follow Matt Belshaw:

YouTube:
https://www.youtube.com/@GameDeveloperTraining/featured

Patreon:
https://www.patreon.com/GameDeveloperTraining

Website:
https://gamedevelopertraining.com/


Filmmaker uses Character Creator and iClone to enhance MetaHumans and Unreal environments
Robert Saitzyk – Independent filmmaker, Editor, Post-Production Manager

Robert Saitzyk

Robert is an independent filmmaker as well as an experienced editor and post-production manager who has a passion for not only the creative process but for all things technical.

He has written and directed three feature films. His first film, “After the Flood,” shot in 35mm film, was awarded the Grand Prize for Best Director at the 2002 Rhode Island International Film Festival. “White of Winter,” Robert’s second feature was an official selection to the 2003 Sundance Film Festival, and his third film, “Godspeed” – co-written with Cory Knauf – was awarded the Special Jury Award for Exceptional Artistic Achievement at the 2009 CineVegas Film Festival. The film was subsequently invited to screen at such festivals as the Austin Film Festival, also in competition, and the prestigious Stockholm International Film Festival. “Godspeed” was also awarded The Golden Ring for Best Film at the 2010 Ravenna Nightmare Film Festival in Italy.

Robert’s background also includes producing and editing high profile music videos for such artists as Keith Urban and he has also directed three music videos for singer-songwriter George Adrian. His latest project is entitled “Wicked Flower,” a short film to be made entirely using Unreal Engine, motion capture, and other 3D animation software such as Reallusion’s Character Creator and iClone.

“In addition to how good scenes could look in Unreal, the ease of creating great looking characters, including adding wardrobe and animating them, using Character Creator and iClone, made the whole process possible for someone like me without prior experience or training. The ease of adding, adjusting, and tweaking Character Creator characters in Unreal was also crucial to making the workflow and pipeline one that was both fluid and possible for essentially a beginner into this world.”

Robert Saitzyk – Independent filmmaker, Editor, Post-Production Manager