A Step-by-Step Guide Using Character Creator 4, ZBrush, Substance Painter and Maya

Gerard Martínez Sánchez
I’m Gerard Martínez, a 3D artist from Barcelona specializing in cartoon-style characters. I am also a 3D instructor and teacher. I have the privilege of combining two of my greatest passions: 3D art and teaching.
Currently, I teach at Libel Academy, one of the most recognized online 3D training academies in Latin America, with students from various parts of the world. I also teach 3D arts classes at various universities in Spain.
This year, I also had the opportunity to collaborate with XP-Pen Spain, which allowed me to bring art and technology to a wider audience and share my passion for both worlds.
“Character Creator 4 not only simplifies the technical process but also enhances the artistic aspect, allowing artists to focus on creativity and design. I appreciate how the free Character Base with its optimized topology and full rig, integrates seamlessly with tools like ZBrush and Substance Painter. “
Gerard Martínez Sánchez, Character Modeling Artist
INTRODUCTION
Welcome to the making of Ravenna, a stylized vampire created using tools like Character Creator 4, ZBrush, Substance Painter, and Maya. In this article, we will break down the entire process of creating this character, starting with one of the free bases from Character Creator 4.
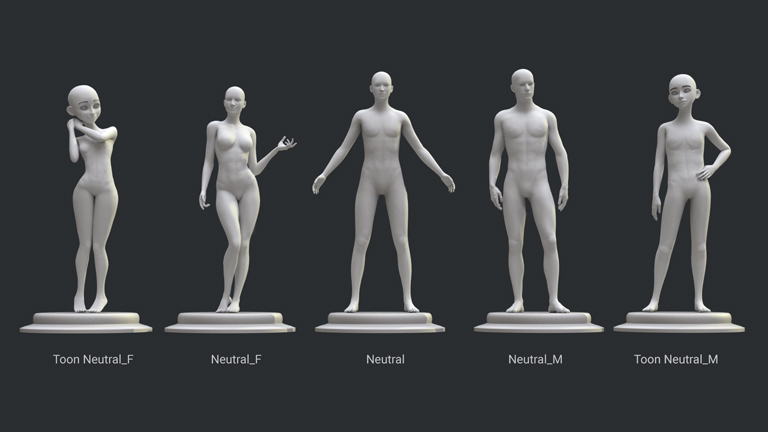
This base provides us with optimal topology and the flexibility needed to sculpt in ZBrush, taking advantage of Reallusion’s excellent morphs and rigging systems to achieve a fully animated character from the start.
We will continue the process by applying stylized and hand-painted textures in Substance Painter, using UDIM texturing capabilities to add more detail and precision.
Next, we will import the textured model back into Character Creator 4, where we will adjust the accessories and create poses to bring Ravenna to life.
Finally, we will create a small environment and render the character in Maya using the Arnold rendering engine, ensuring that every detail and texture stands out on the character.
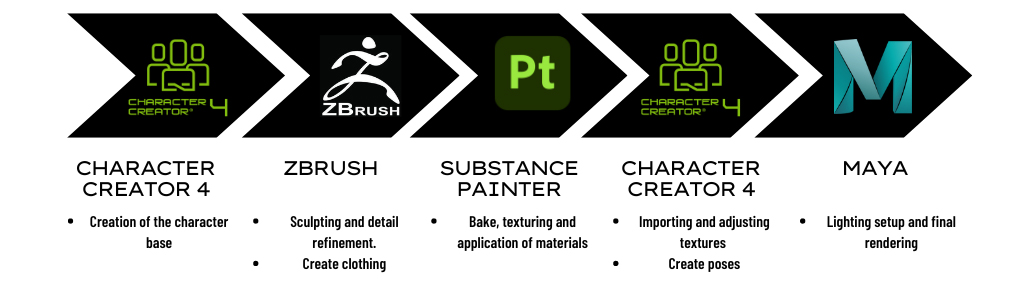
Prepare to discover how a simple idea transforms into a 3D character for animation.
DOWNLOAD your FREE CC Base:
https://www.reallusion.com/character-creator/free-3d-character-base.html
1. REFERENCES
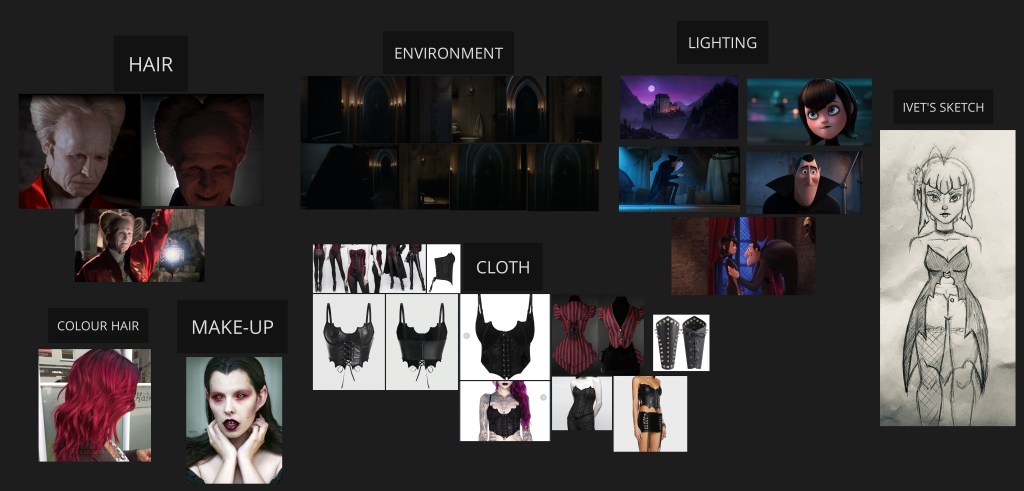
For the creation of Ravenna, having a solid foundation of visual references to guide each stage of the process was crucial. From the beginning, my main goal was to give Ravenna a stylized and animated movie-like touch, as if she had come straight out of a lost castle in Transylvania. I wanted Ravenna to capture the essence of a classic vampire while also having a modern, stylized look that would make her stand out in any visual context.
Here’s how I approached the search and use of references for this project:
- Vampires in Art and Popular Culture: I started by looking for images of vampires in movies, TV series, and concept art. This helped me understand the different styles and common characteristics of vampires, such as pale skin, prominent fangs, and intense gazes.
- Illustrations and Cartoons: I also searched for illustrations and cartoons of vampires to capture a variety of stylized looks, from cartoonish to darker, gothic interpretations.
- Facial Structure and Expressions: To ensure Ravenna had believable anatomy, I researched photos of people with interesting facial features. I focused on images showing expressions that would help convey the character’s psychology.
- Gothic Clothing and Accessories: Clothing is crucial for Ravenna’s character. I looked for references of gothic clothing and accessories like corsets, capes, and jewelry to give her an authentic and fitting touch.
Once I had the images, I started building a visual board in PureRef. PureRef is a program that helps organize and visualize visual references efficiently.
Next, my partner, Ivet Macias, a 3D artist, helped me design a quick sketch of Ravenna’s look. This sketch was incredibly helpful in getting started with the modeling and having a clearer idea of the character.
Here are some of the reference images I used:
2. CHARACTER CREATOR
2.1 Begin with CC4 Base Model for Optimal Sculpting in ZBrush
First, I had to download the free bases. To download:
- Go to the Download page.
- Press the “Download Now” button.
- The file will automatically download to your computer.
- Unzip the contents to your preferred location and let’s explore what we can do!
The mesh of this model provides a universal topology, perfect for animation and sculpting. This base is ideal for Ravenna, as its cartoon and versatile style will allow us to modify and sculpt the stylized and distinctive details we want for the character.
To start, we need to load the base. In this case, I imported version 04_Toon Neutral_F. Start Character Creator by opening Reallusion HUB and then Character Creator 4.
In the File/Import/Import section, or using the shortcut Control+I.
We will import the model from the folder named //CC Character Base\FBX\04_Toon Neutral_F.
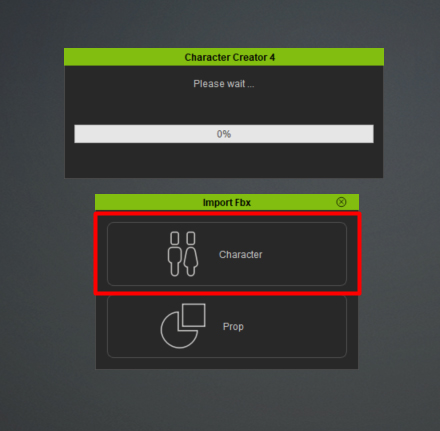
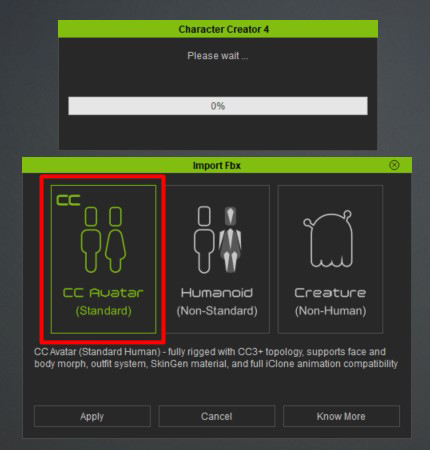
When clicking the import button, two pop-up windows will appear. The first will ask if it’s a character or an accessory. Select the Character option. The second window will allow us to choose the format for our character, with or without rigging. Select CC Avatar (Standard).
Once selected, the model will load into Character Creator 4, ready to be modified and adjusted according to our needs.
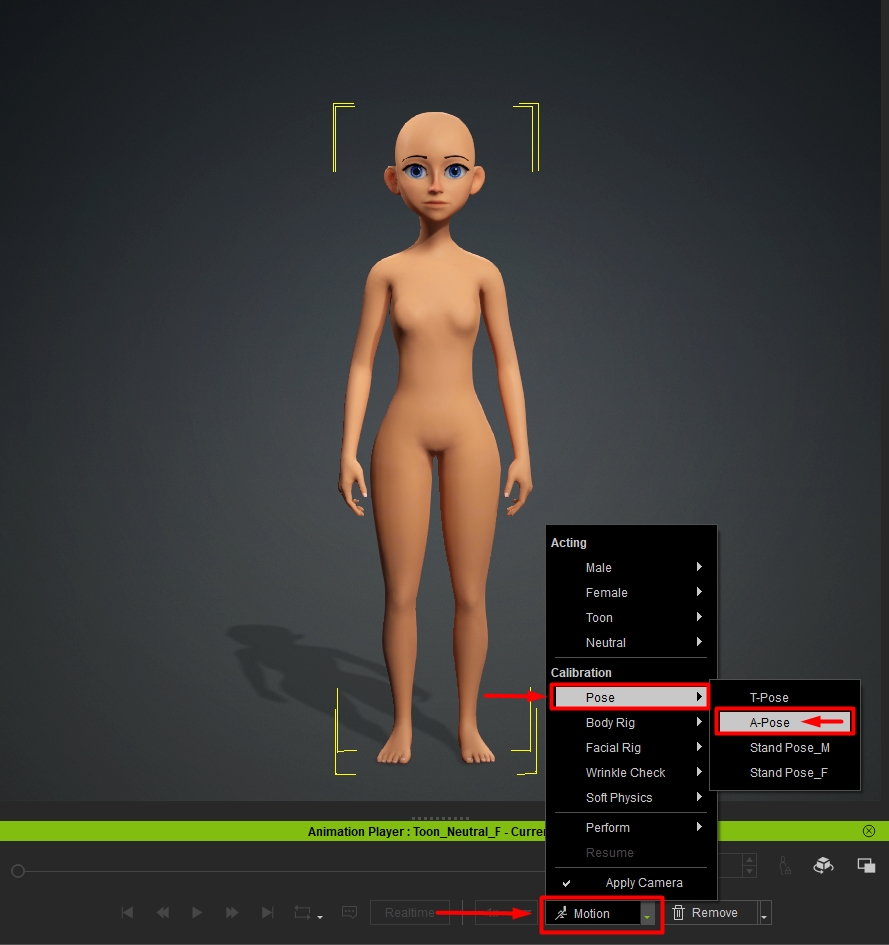
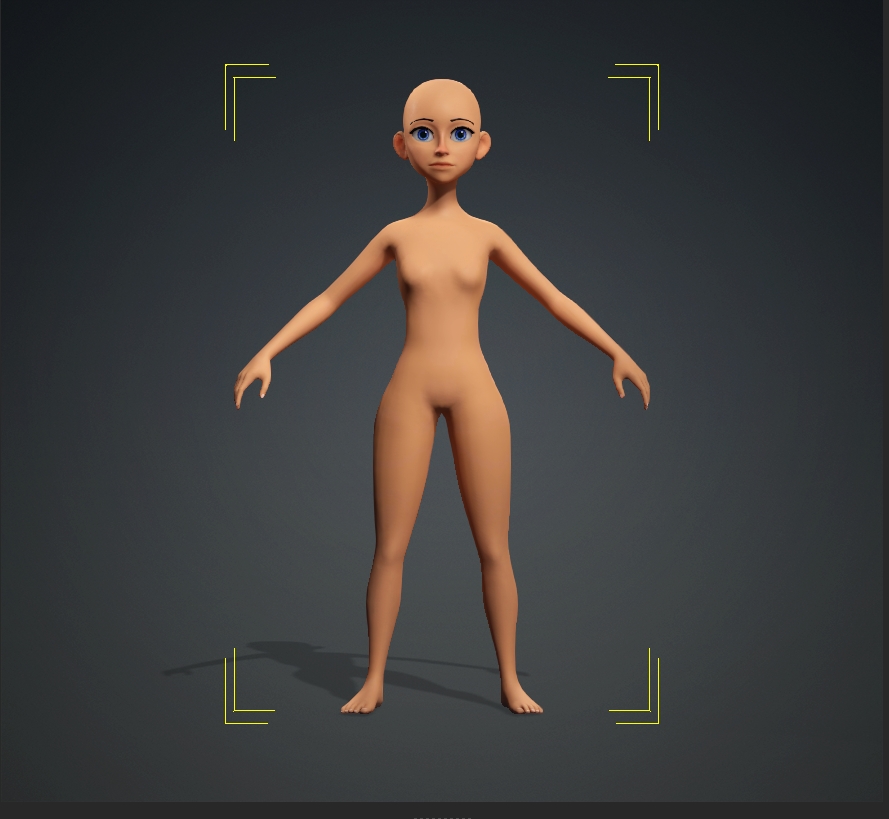
Once the model is loaded, we will place it in A-Pose or T-Pose to facilitate modifying the proportions.
Now, we will select the entire model and go to the Materials tab.
Select all the materials listed in the Material List.
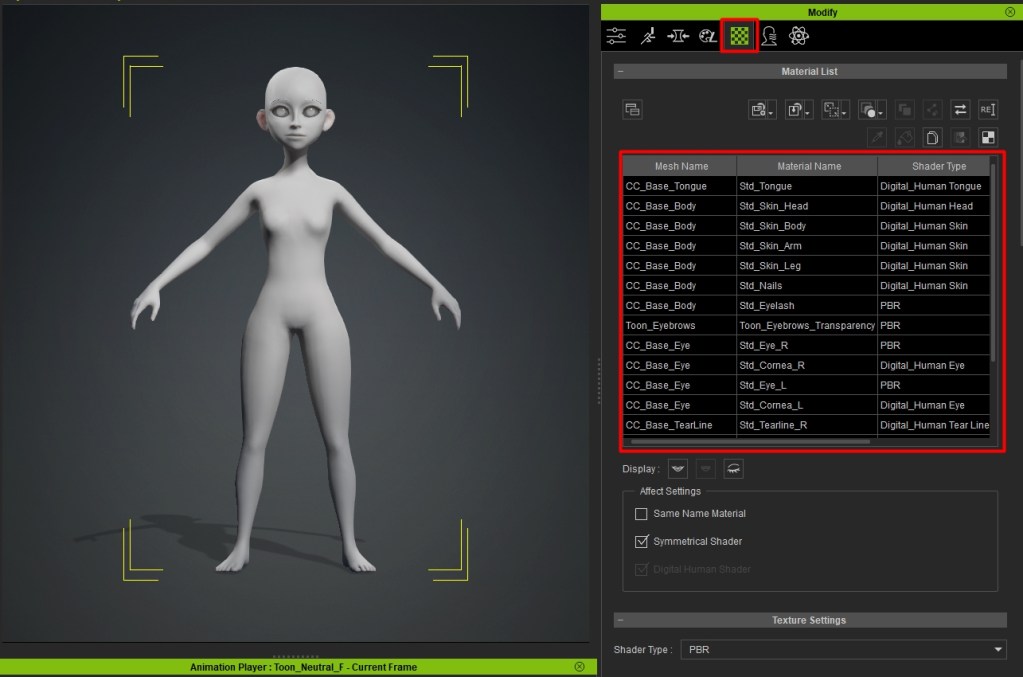
There, we will reduce the texture intensity to zero to focus only on the volumes.
Finally, we will adjust the Diffuse Color to a dark gray to better visualize our character.

Now our character is ready for base modification.
Go to the Morph tab and start working through the list, making large changes initially and then refining with more specific morphs to define the body and head shape.
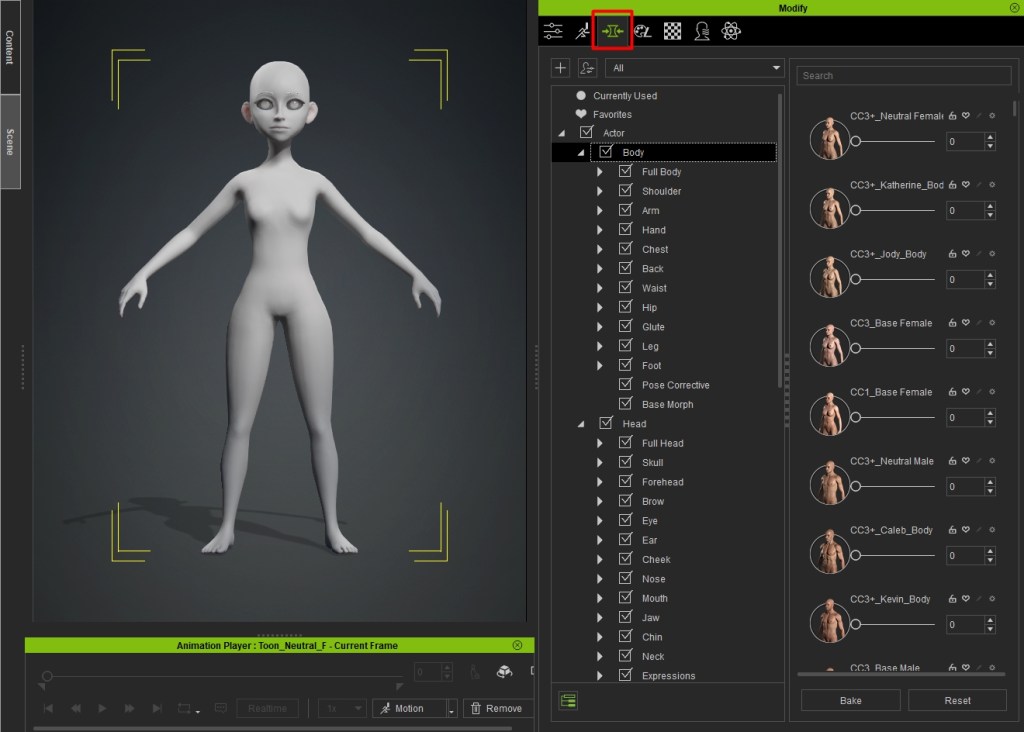
You can use the search bar to quickly find specific options; for example, type “scale” to access scale options for any body part.
In my case, I extensively used the Ultimate Morphs pack, available on the Reallusion Store. The variety of morphs and the nearly infinite combinations allowed me to personalize every detail of Ravenna, from the body structure to facial features, providing total flexibility.

Additionally, you can enable the Morph option in the Menu Bar to unlock morphing in the Viewport. With this option enabled, simply click and drag parts of your character in the viewport to intuitively change the shapes.
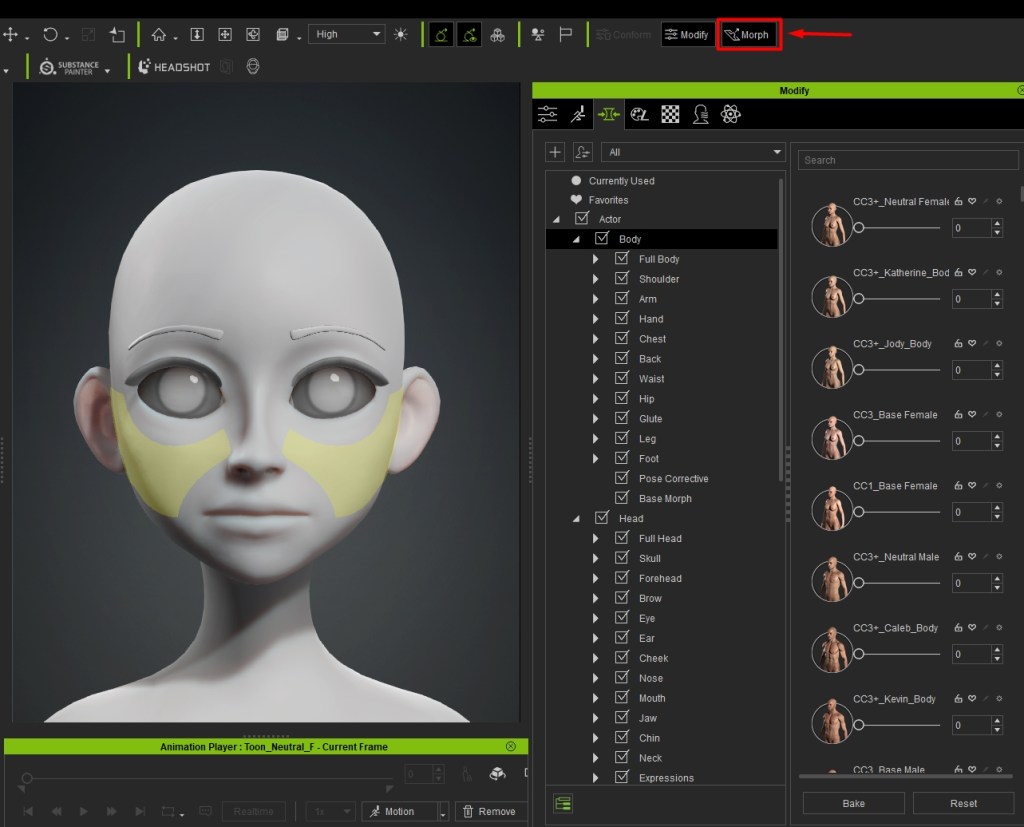
I thoroughly enjoyed this part because Character Creator offers immense versatility.
The ability to make numerous modifications allows for precise adjustments to every detail of the character. It felt like using a video game character editor due to its ease and intuitiveness, making the creative process a pleasure.
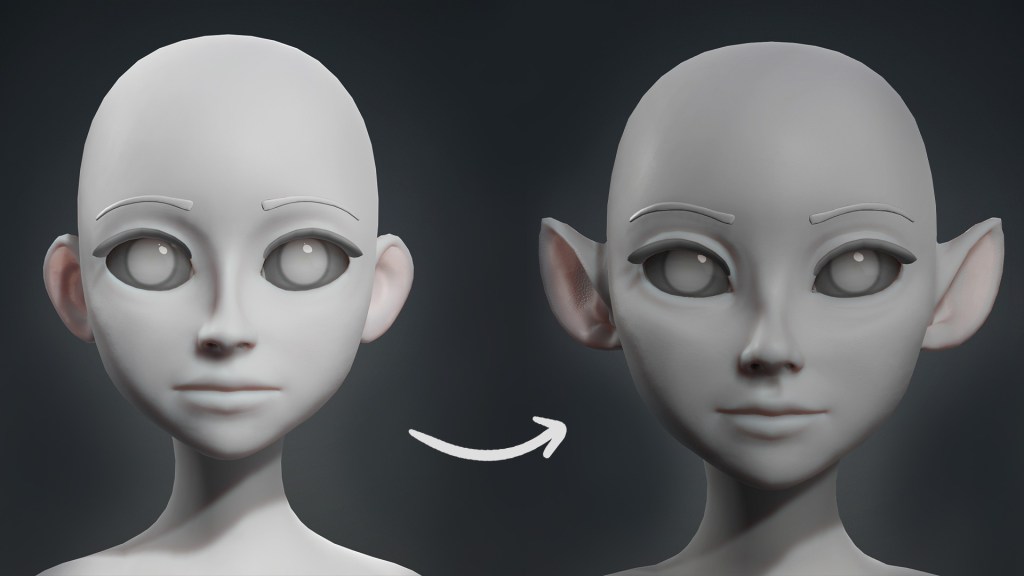
Now, I’ll share the before and after of the head and body starting from the 04_Toon Neutral_F base, using the CC4 sliders.
The visual comparison shows how morphs and adjustments can completely transform the character, highlighting significant changes in Ravenna’s facial and body structure.

2.2 Exporting from Character Creator to ZBrush Using GoZ
One of the moments I enjoy most in my creative process is sculpting in ZBrush. Character Creator 4 (CC4) has an excellent and very flexible connection with ZBrush, making it easy to export characters or props between programs.
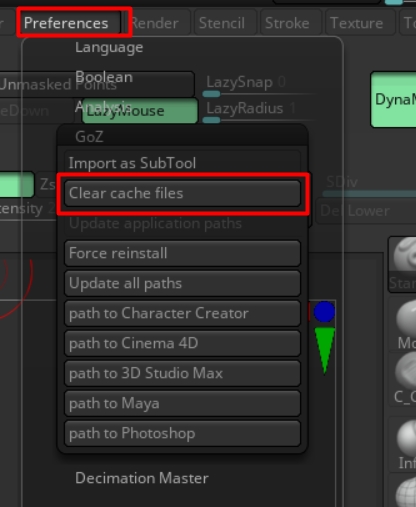
Before exporting, it’s important to create a new document in ZBrush and clear the GoZ cache. To do this, go to Preferences > GoZ > Clear Cache. This ensures a clean and smooth transfer between the programs.
Now it’s time to detail our character in ZBrush using its sculpting tools.
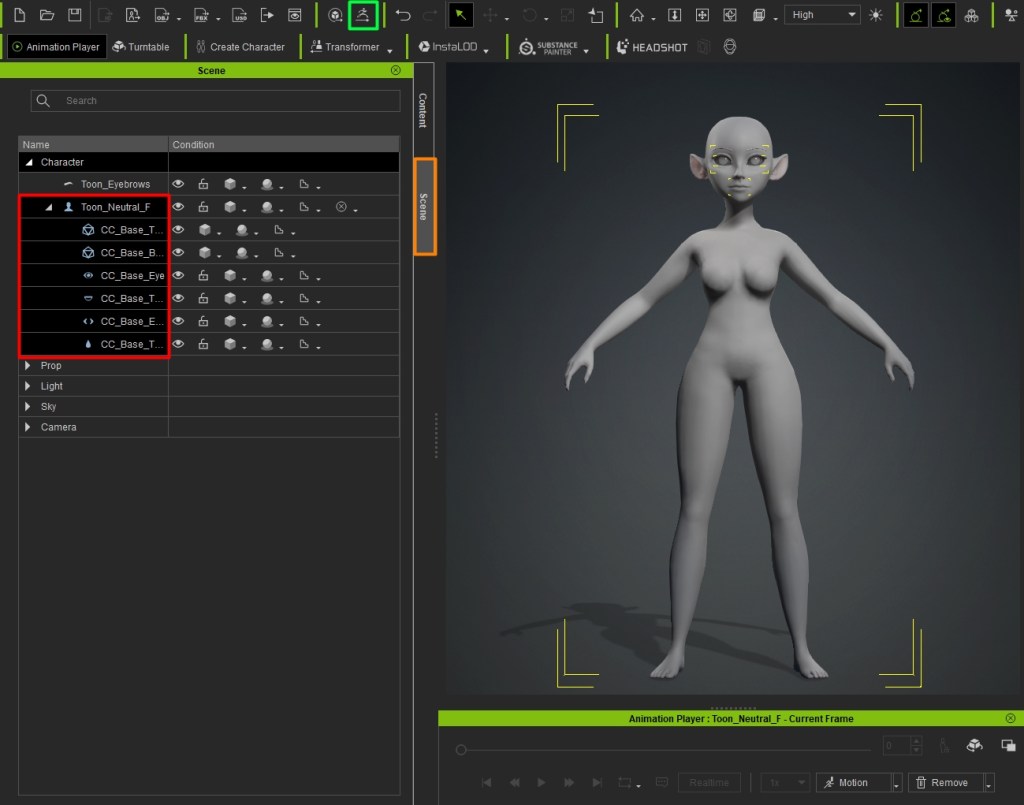
To send our character to ZBrush, follow these steps:
- Go to the Scene tab.
- Select all the character elements by holding down the Shift key.
- Click the GoZ button in the menu bar.
This will transfer your character to ZBrush for detailed sculpting and refinement.
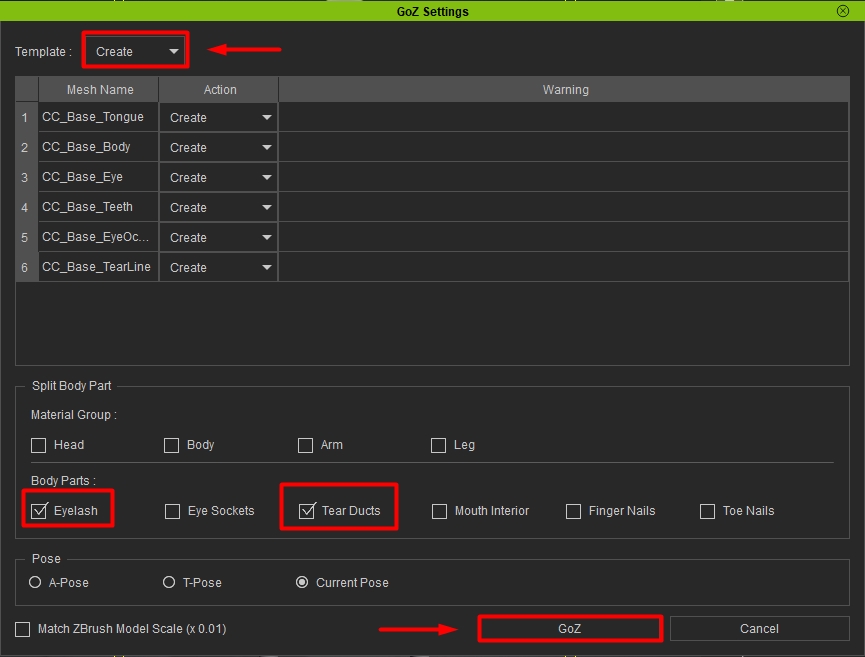
In the GoZ settings panel, ensure the template is set to Create.
I prefer separating the eyelashes and tear ducts to have only the “skin” of the character as a sub-tool while I work, as it makes modifying the face, especially the eyes, much more comfortable.
To do this, in the settings panel, activate the eyelashes and tear ducts in the Split Body Parts section to divide them into their own subtools.
Select Current Pose in the Pose section.
3. ZBRUSH
3.1 Shape Refinement in ZBrush
When I had my character in ZBrush, I selected the “CC_Base_Body” sub-tool and began refining it. I used my favorite brushes to sculpt and adjust the body and face shapes.
First, I worked at subdivision level 1 to achieve the basic shape, using brushes like Move and DamStandard. These brushes allowed me to deform the mesh gradually, always aiming for smooth lines in the topology loops.
I spent a lot of time perfecting the face to ensure that when you see it, you can immediately say, “She’s a vampire!”
It’s crucial to ensure that facial features maintain proper proportions relative to the overall head and body shape. For example, achieving the correct position of the eyes, nose, and mouth helps capture the character’s essence accurately.
Next, the following step involves capturing secondary facial details such as the shape of the eyes, ears, mouth thickness, nose shape, eyebrows, and more.
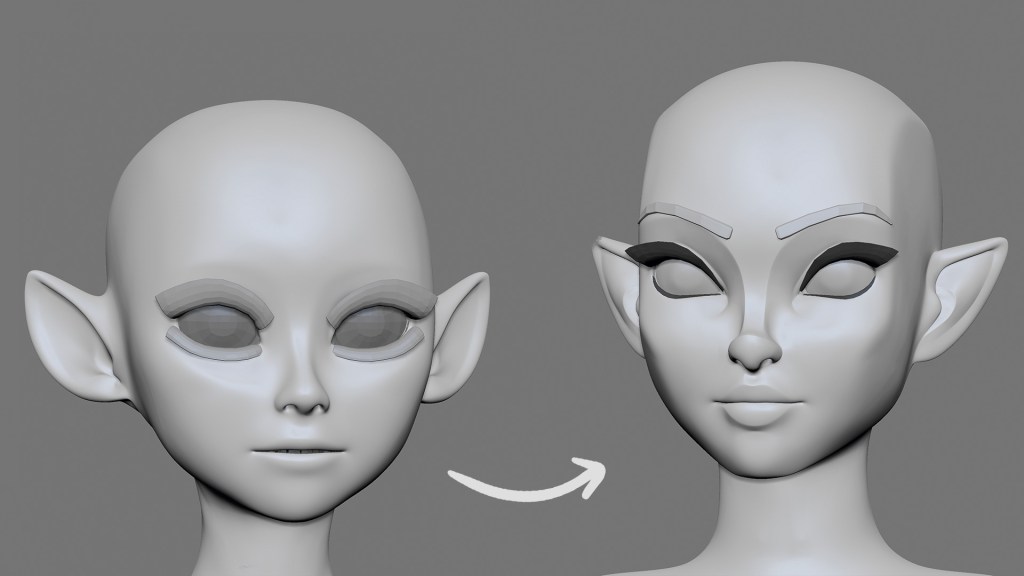
Once I have the head more defined, I paint the iris of the eyes to give it more vitality and expressiveness, providing greater inspiration for the sculpt. I apply the Toy Plastic material to the eyes.
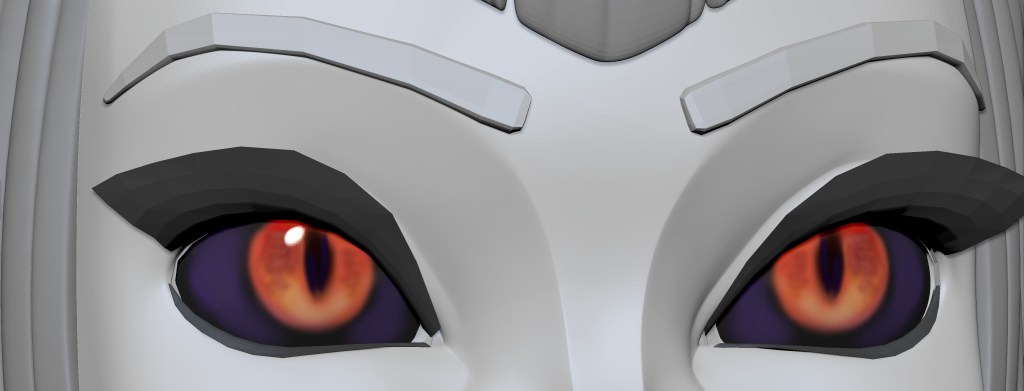
In the Geometry menu, we can find the ClayPolish tool. I use this option frequently to achieve a more defined and polished appearance, especially recommended for cartoon or stylized characters.
For this style, the most important aspect is perfecting the volumes and refining the shapes.

Then, I created an initial block of the hairstyle in ZBrush using a sphere to later place the hair strands and experiment with the shape and silhouette.
I used the most basic ZBrush brushes, such as Move, Smooth, Inflate, and Pinch, for this blockout. To add each hair strand, I utilized different brushes.
It is important to keep the geometry of each strand clean and organized.
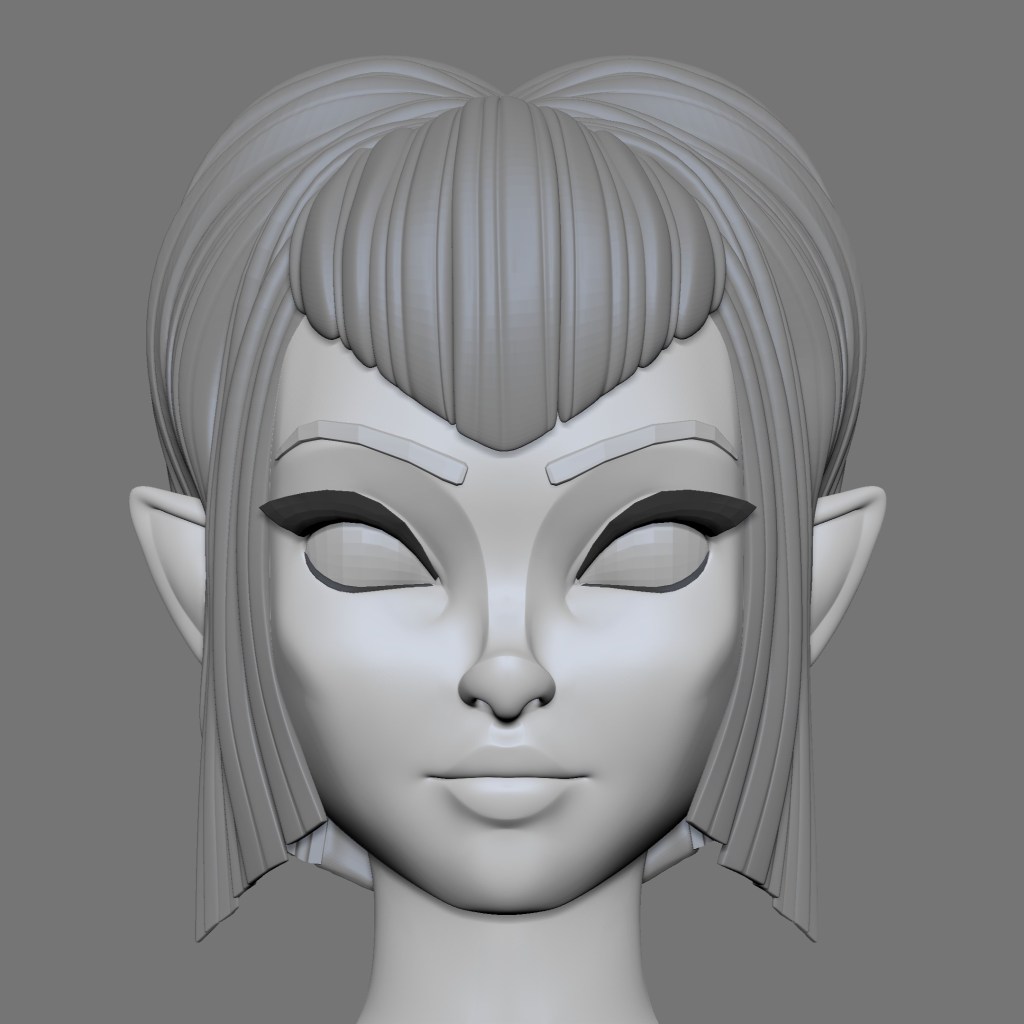
Tips for Creating Hair
- Rotate the Model: Constantly rotate the model, don’t focus on a single angle, and look for irregular or uneven areas.
- Balance the Strands: Find a good balance in the number of strands you create. Too many can make the hair look messy, while too few can make it look simple or incomplete.
- Check Shapes and Silhouettes: When adding strands, review the shapes and silhouettes to ensure they match the concept.
- Add Variation: Working with symmetry is fine, but make sure to add some variation and asymmetry.
- Avoid Duplicates: Don’t duplicate strands side by side, as it often looks fake and unconvincing. This is a common mistake.
- Be Patient: Learning to create hair takes time.
3.3 Creating Stylized Cloth and Accessories
I follow a workflow that combines various tools and techniques to create clothing in ZBrush. Here’s how I do it:
Creating the Base with Extract:
- I use the “Extract” tool in ZBrush. With the help of masks, I can define the areas of the base mesh that will become the clothing. This allows me to sculpt the basic shape of the garment.
- After defining the shape, I perform a Z-Remesher to optimize the geometry.

Adding Thickness and Defining Seams with Panel Loops
In ZBrush, I add thickness and define seams using the Panel Loops function. First, I assign Polygroups where I want to mark the seams.
Below are the values I apply in Panel Loops. In the EdgeLoop sub-palette of the Geometry menu, I set the following adjustments:
- Loops: 3
- Polish: 0
- Bevel: 50
- Elevation: 0

When pressing the Panel Loops button, ZBrush adds thickness to the interior of the mesh, creating a clean loop between the inner and outer panels. Each element gets its own polygroups, which is very useful for organizing the mesh.
Adding Support Loops
To avoid deformations when subdividing the mesh, I add support loops:
- Go to Geometry > Crease > Crease PG.
- This ensures that the edges of the mesh parts remain defined during subdivision.
Complex or More Polygonal Garments
For more elaborate garments like a corset, I prefer modeling them with polygons in Blender. This approach gives me greater control over the topology and design.
Afterward, I import the model into ZBrush to create its high-resolution version and apply detailed sculpting.

These steps allow me to create stylized clothing in ZBrush, combining sculpting and polygonal modeling techniques to achieve the best possible results.
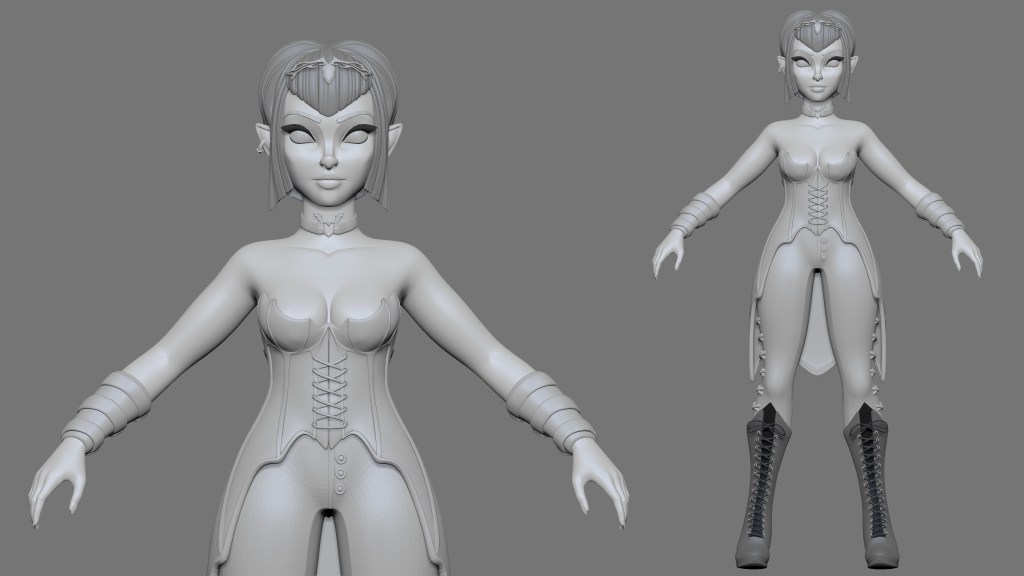
Before exporting all changes to Character Creator 4 (CC4), we need to unwrap the UVs for accessories, clothing, and hair to avoid any complications during texturing.
3.4 Importing Character, Hair, Clothes & Accessories into Character Creator
3.4.1 Importing Character
To minimize errors, we will export the character in parts. First, import the character without hair or clothing. Next, import the hair and match it with the skin. Finally, import the clothing and assign its weights.
Before transferring the character from ZBrush to CC4, ensure the character is selected in CC4. If not selected, it will not update.
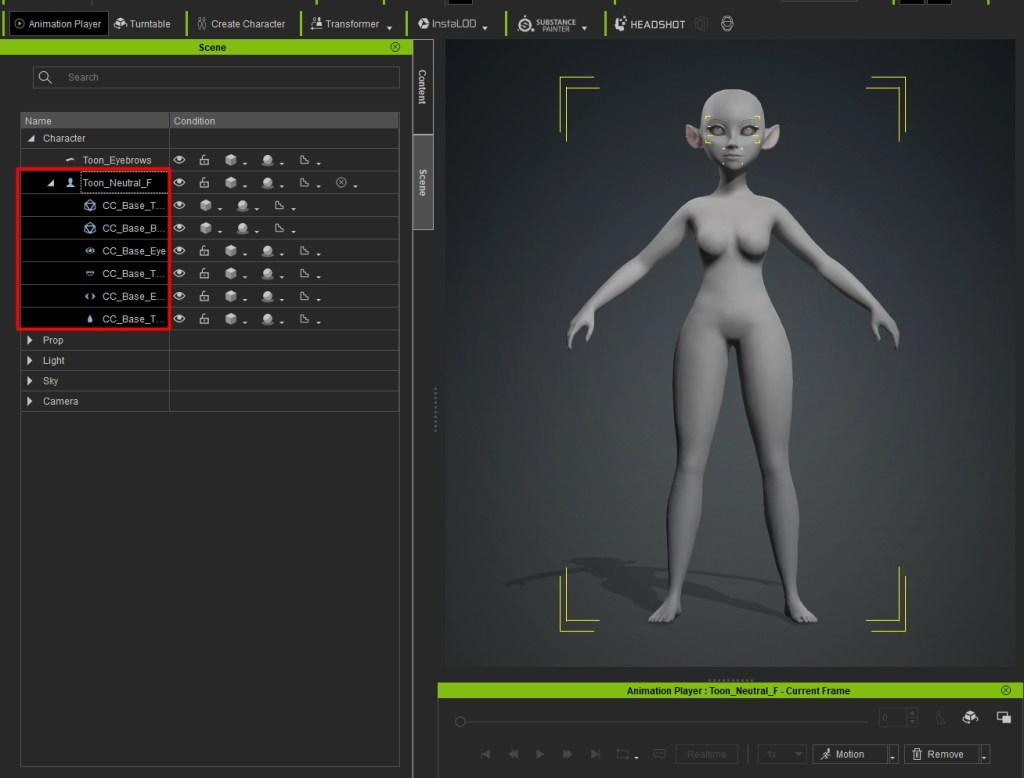
Then, we will hide the clothing and hair, and use GoZ, selecting the option to export only what is visible in the scene by pressing the “Visible” button.
This will automatically reduce your body subtool to SDiv 1 and send the mesh back to Character Creator.
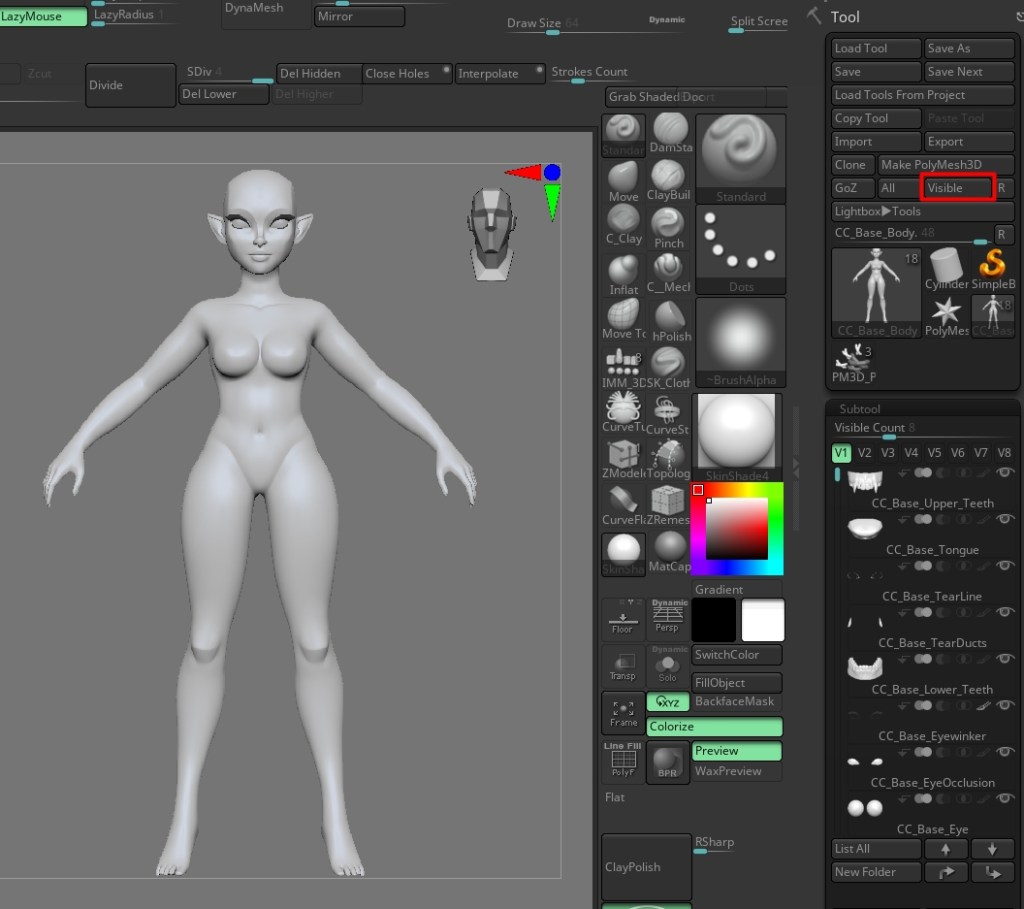
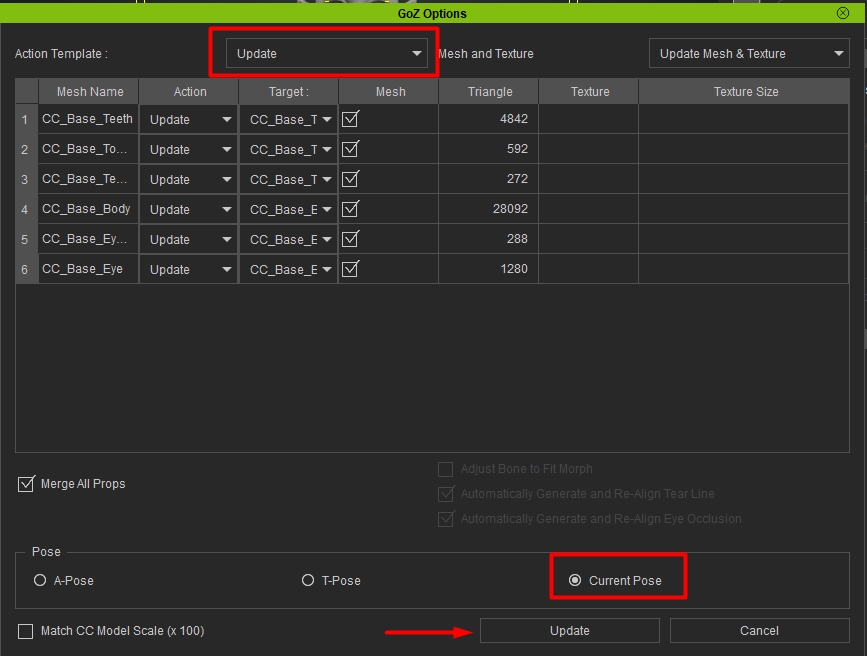
The GoZ options in CC should be set to Update, and we will select Current Pose.
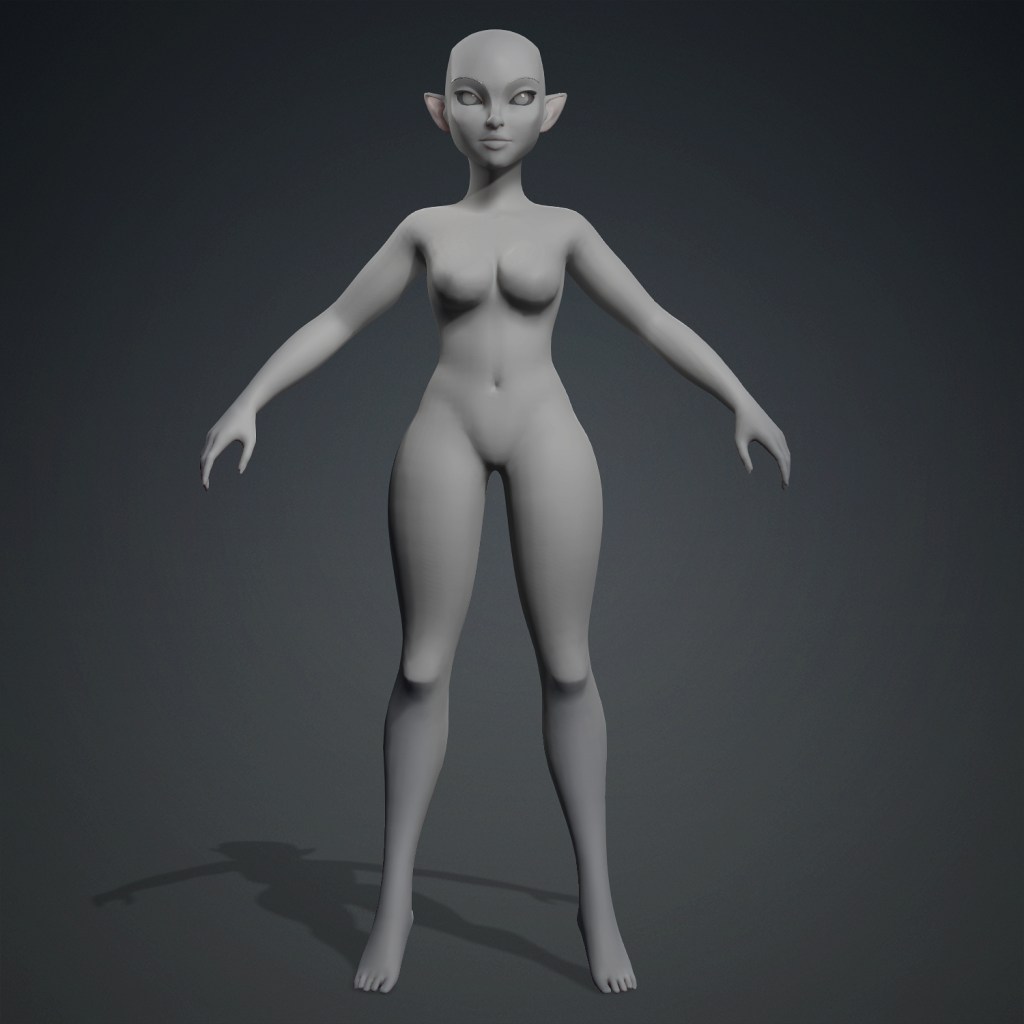
Once the model is in Character Creator, test the animations from the Content tab or Animation Player and use the morph system to make further adjustments. You can go back and forth between CC and ZBrush as many times as needed while perfecting your character.
3.4.2 Importing Hair
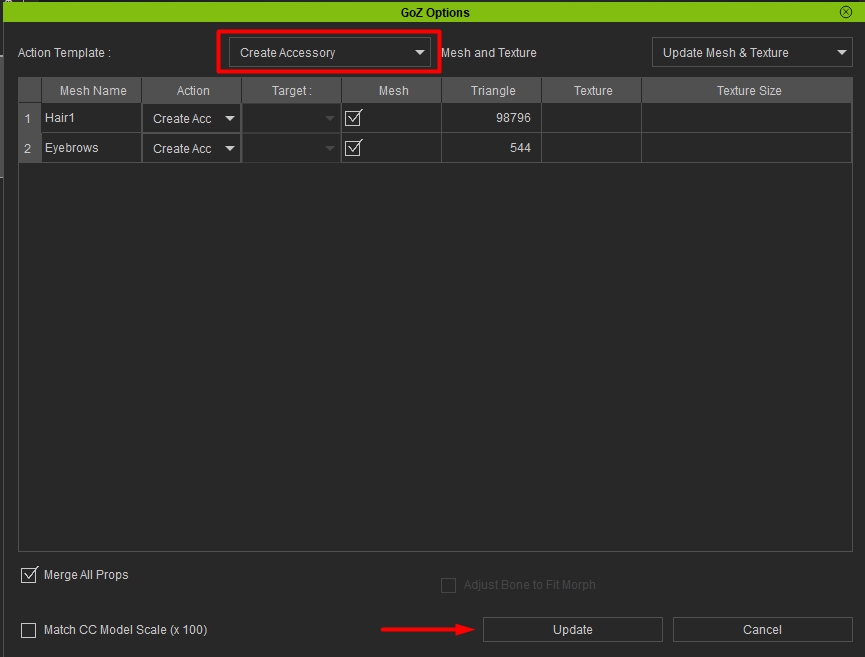
Next, we will send the hair and eyebrows to Character Creator. To do this, hide all the subtools by clicking on the eye icon and then press “Visible” to send them to Character Creator.

In Character Creator, set these parts as Accessories and click Update. You may need to make some position adjustments.
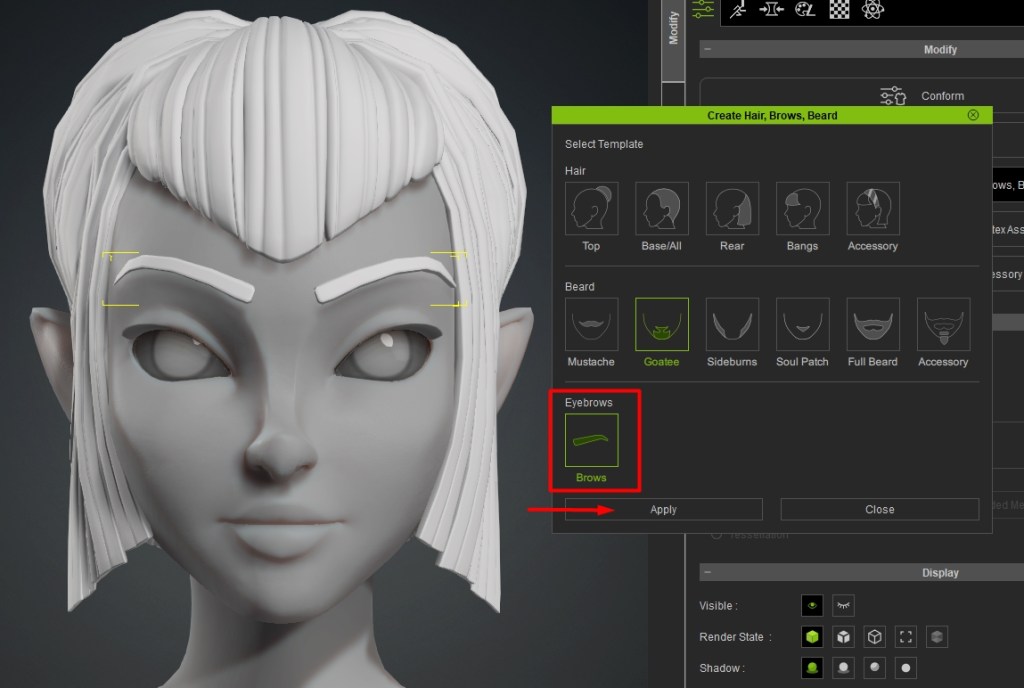
To integrate each of these accessories as part of the character’s face, go to the Attributes panel, click on Create Hair, Eyebrows, Beard, and select the appropriate behavior for each. In this case, select Eyebrows and apply it to Brows.
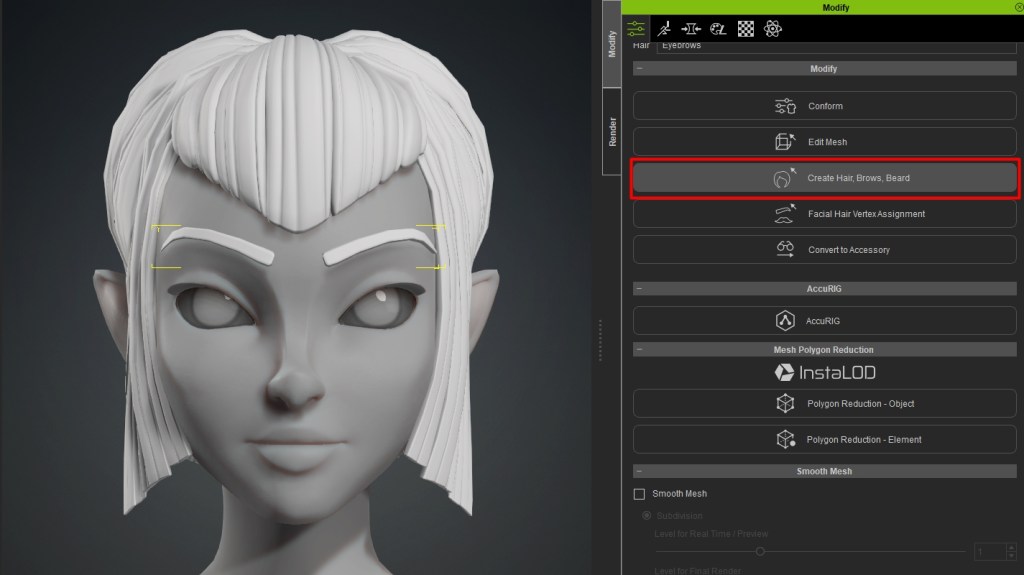
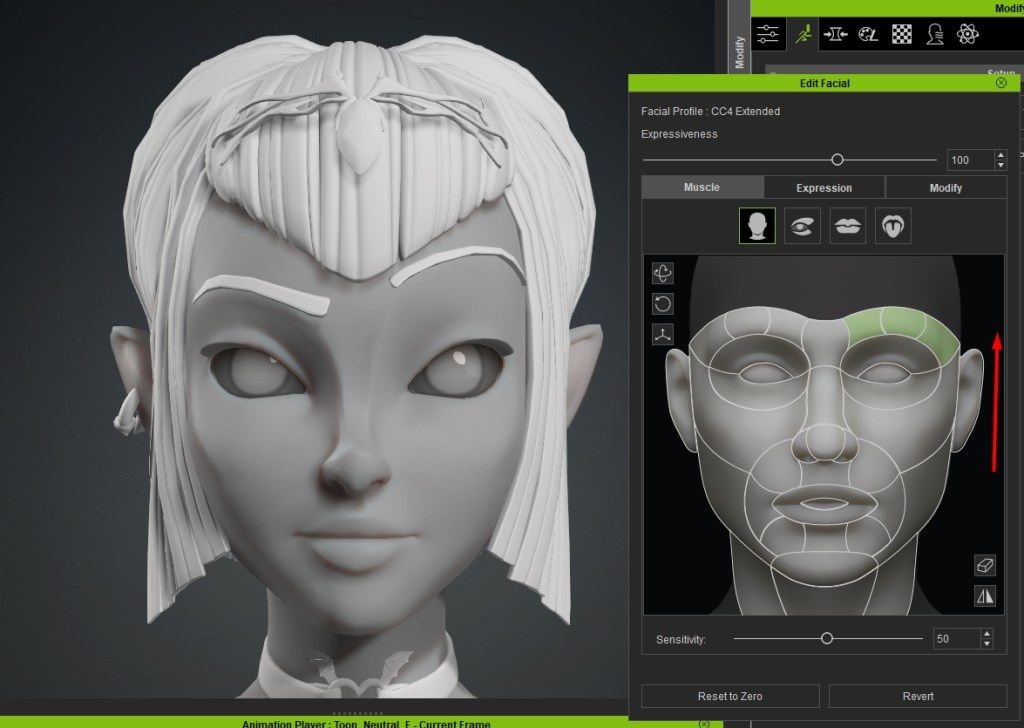
Once configured, we can verify in the Facial Editor that each element behaves as expected.
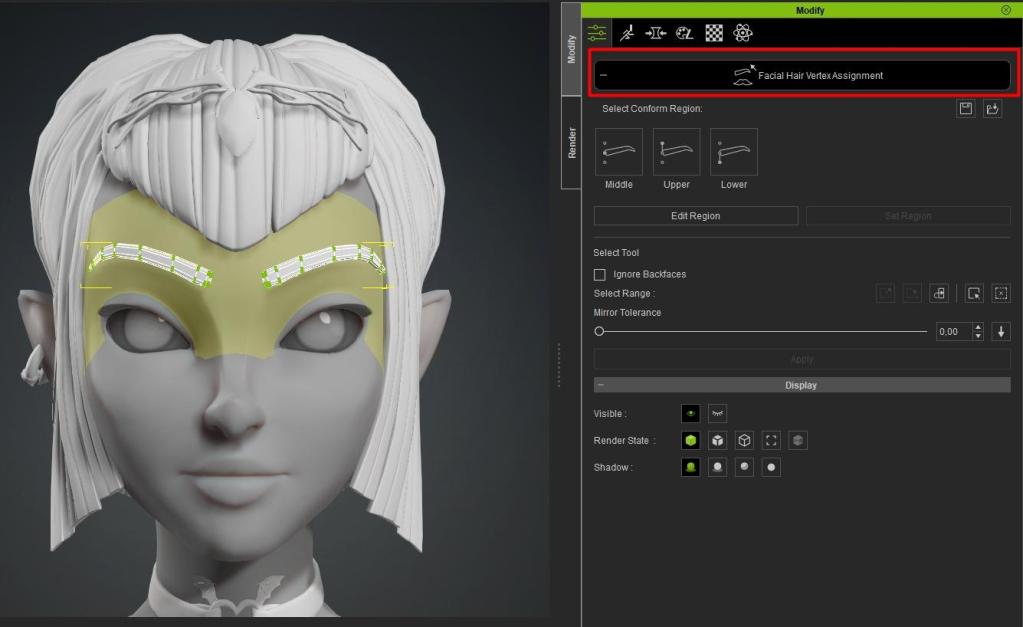
If we want to adjust the weights, we go to “Facial Hair Vertex Assignment.” Here, we define the vertices that will influence each of these elements, allowing us to have complete control over how they deform when modifying the character’s expressions.
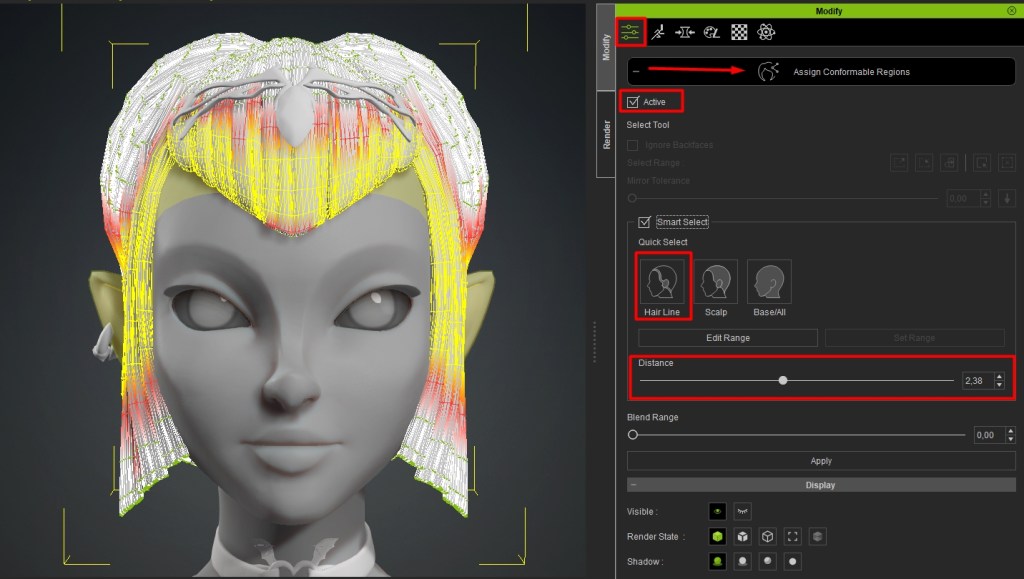
Now we will move on to the hair. For my hairstyle, the best template was Base/all.

Next, I tested the behavior of the hairstyle and had to adjust its weights in “Assign Conformable Regions.” This allowed me to precisely define how the hair deformed during the character’s animations and expressions.
3.4.3 Importing Clothes and Accessories
To import clothing into CC4, follow the same steps as with the hairstyle.
When importing clothing into CC4, import it as Cloth and accessories as Acc.
You may notice that the clothing doesn’t fit the character perfectly. Select all in the Scene tab, press W on your keyboard to activate the gizmo, and move the accessories over your character to position them correctly.

Select only the garment and press the Transfer Weights button. Choose the appropriate template and make any necessary adjustments to the weights. This will ensure that the clothing fits and moves correctly with the character.
Repeat this process for each clothing item.
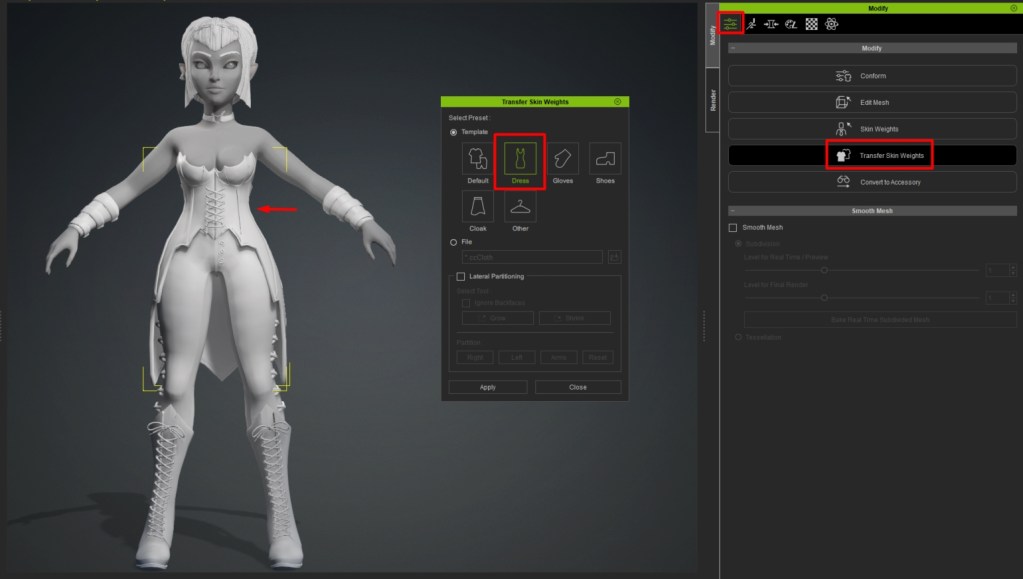
Our character is now complete and ready for animations and final adjustments. This process ensures that every element of the character, from the hairstyle to the clothing, is perfectly integrated and functions smoothly during deformations.
4. ADOBE SUBSTANCE PAINTER
4.1 Export to Substance Painter Low and High Version
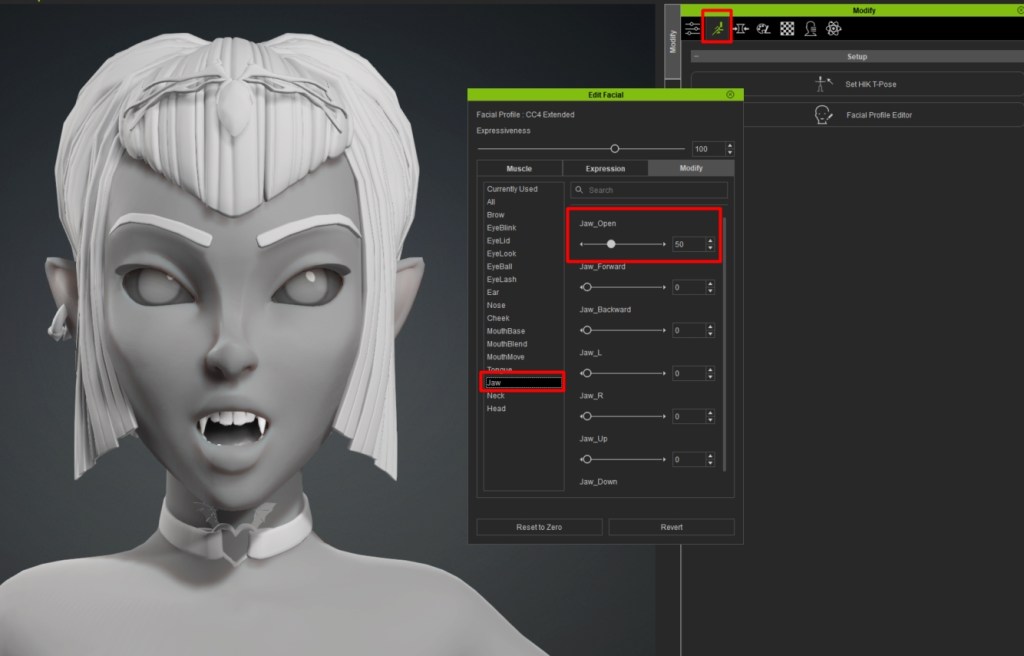
Before exporting to Substance Painter, I opened my character’s mouth to avoid errors during baking. To do this, follow these steps:
- Go to Motion Pose > Edit Facial.
- Then, go to Modify > Jaws.
- Edit the facial expression Jaws and set the value to 50.
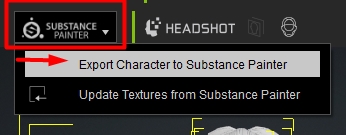
With the character selected in Character Creator, I used the export option to Substance Painter to save an OBJ file in a folder with its respective textures. This low-resolution file will be used later for baking the details.
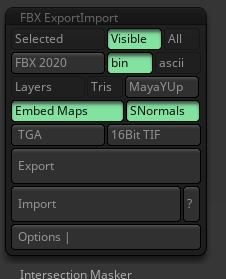
In ZBrush, with the subtools activated and at the highest subdivision level, I exported the high-resolution body as an FBX, making sure to activate the option to export only the visible elements.
4.2 Bake
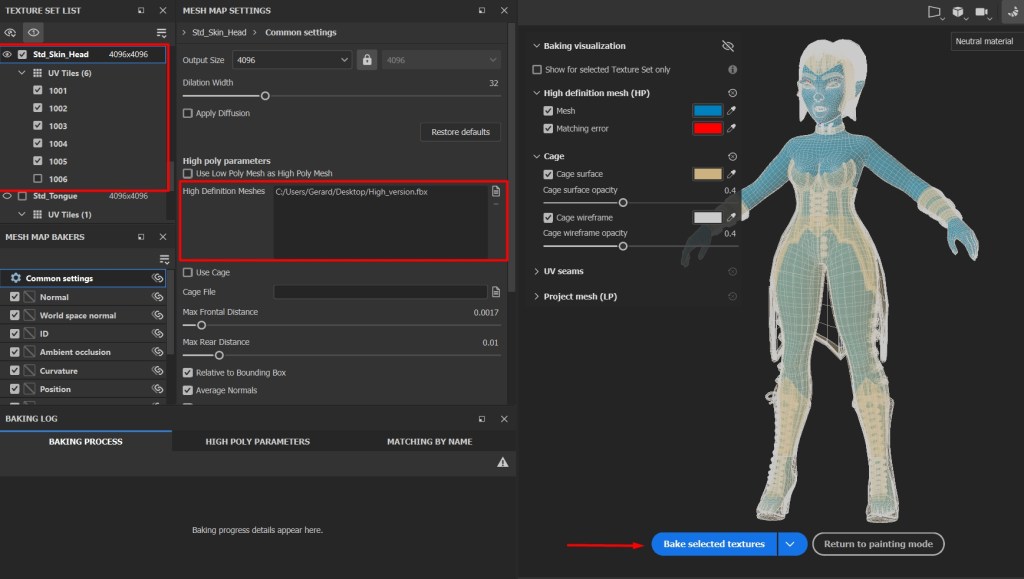
Open Substance 3D Painter and select File > New. Then, press the Select button to import your OBJ file from Character Creator. It is very important to activate the Use UV Tile option before continuing.

Once we have our low-resolution character loaded, go to the Texture tab and scroll down until you find the Bake Mesh Maps button.
Deactivate all objects except Std_Skin_head. In the UV Tiles dropdown menu, uncheck the box for 1006, which corresponds to the eyelashes and does not need to be baked.

4.3 Texturing Skin
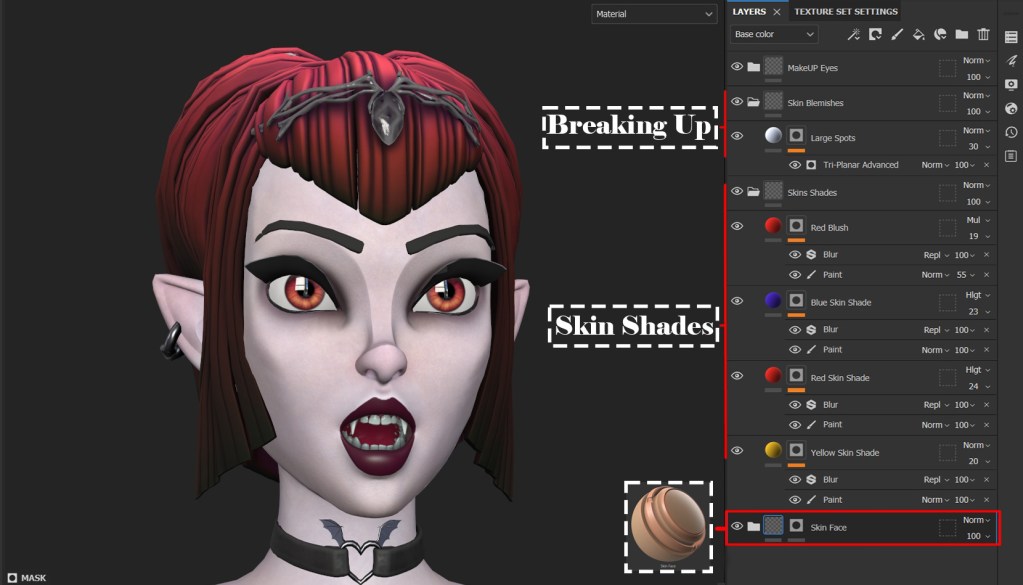
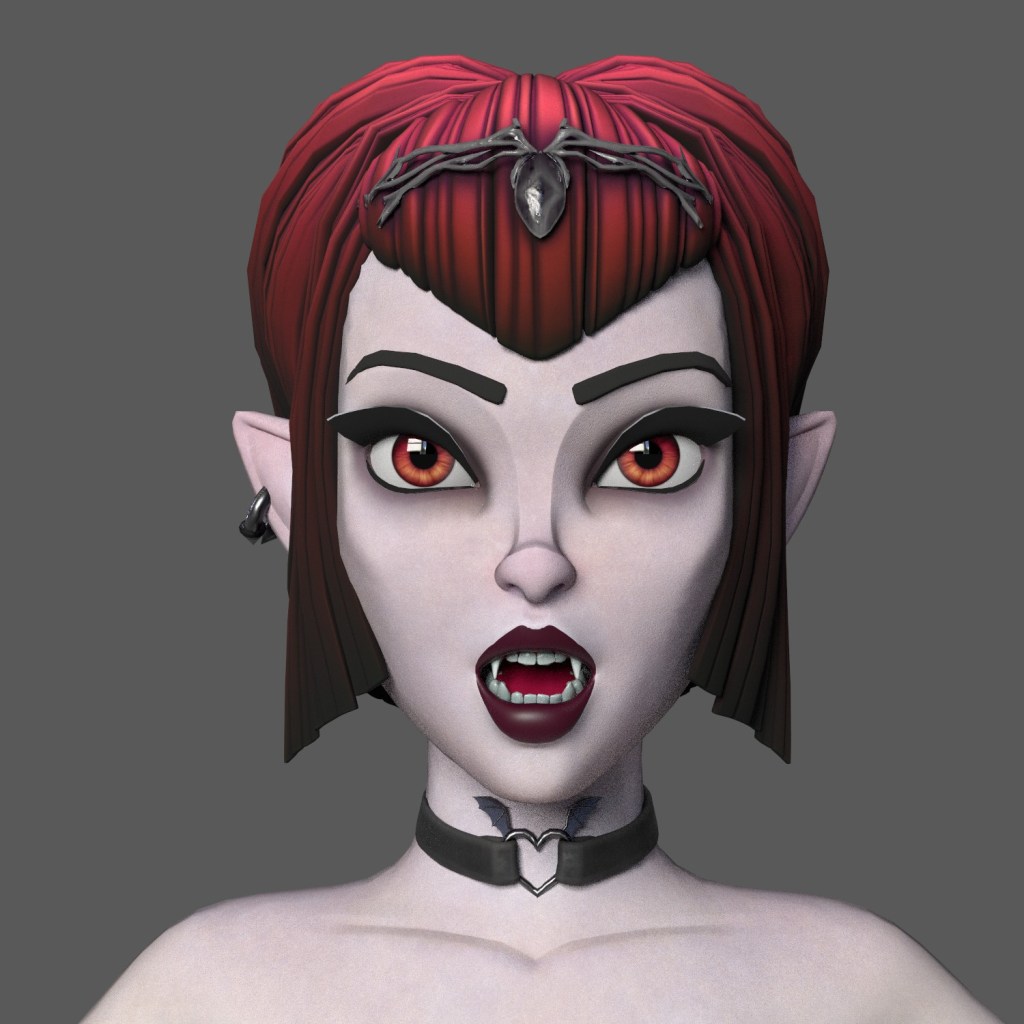
I began texturing Ravenna’s face using the “Skin Face” smart material as a base and made adjustments according to my preferences. The versatility of Smart Materials makes customization easy.
First, I adjusted the Base Skin layer to a paler tone for a vampiric look. Then, I duplicated the Skin Pores layer, modified the pore size using tiling, and strategically distributed them on specific areas of the face with layer masks.
Next, I created a new folder called Skin Shades and added several fill layers to introduce different skin tones. To break up the uniformity, I added a fill layer, applied a black mask, and used a procedural map with “Add Generator”. I chose “Tri-planar Advanced” and applied “BnW Spots 1” to alter the color mask, resulting in a more realistic and detailed skin texture.
4.4 Texturing Eyes
For the eyes, I created a texture in Photoshop and projected it in Substance Painter, setting the Roughness value to 0. This allowed the eyes to have a shiny and realistic appearance.
4.5 Texturing Cloth and Accessories
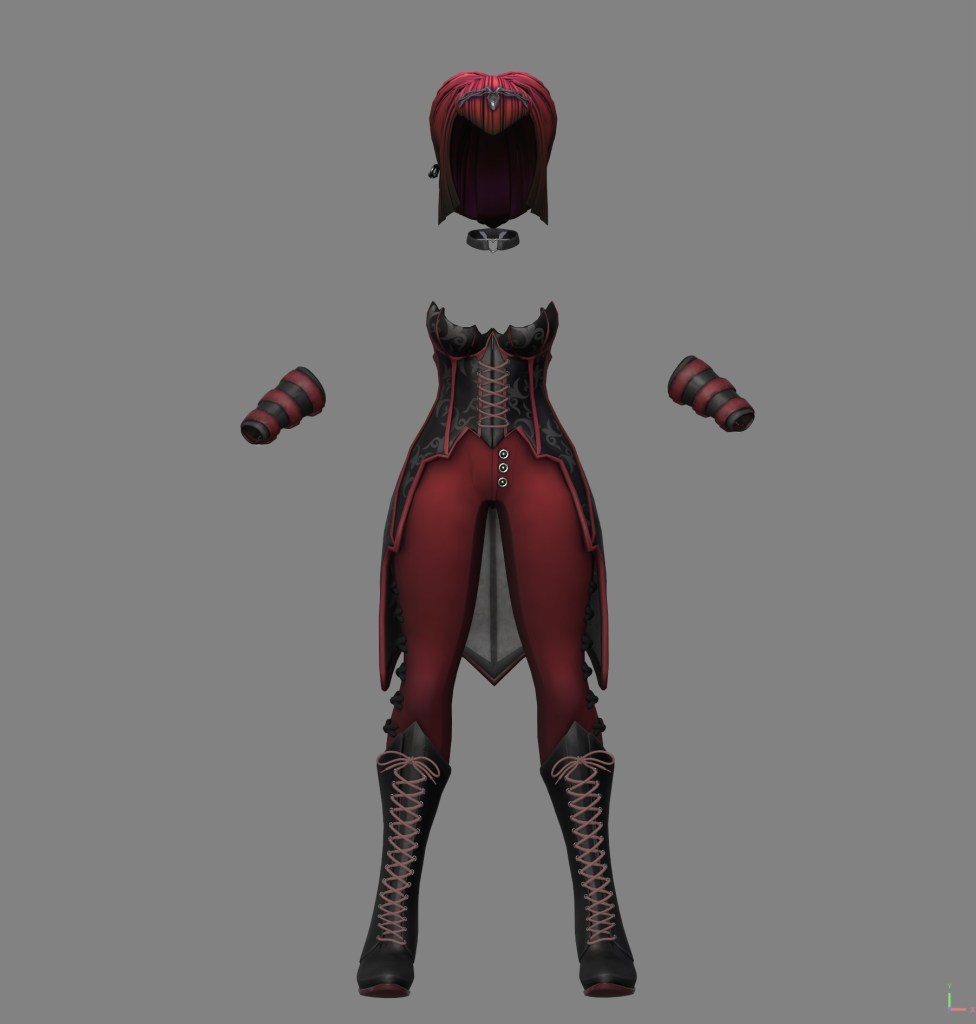
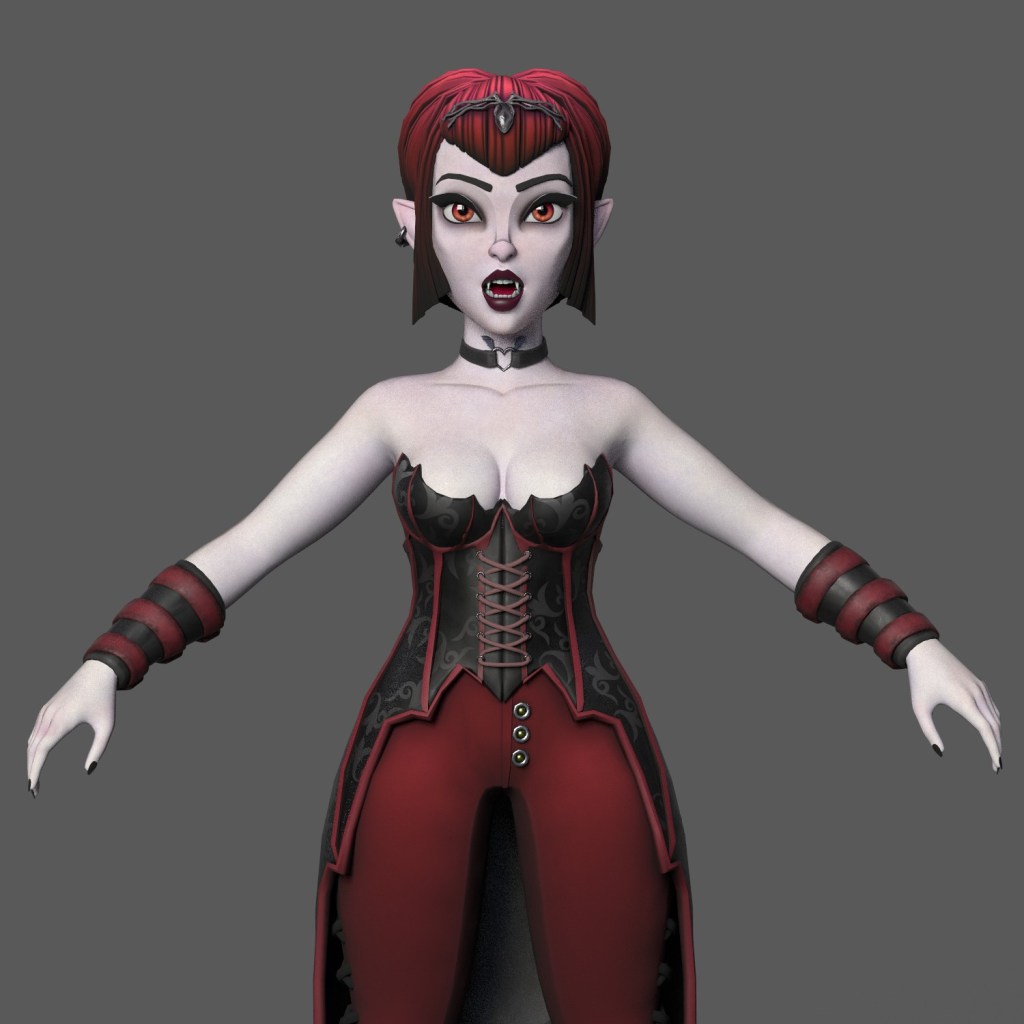
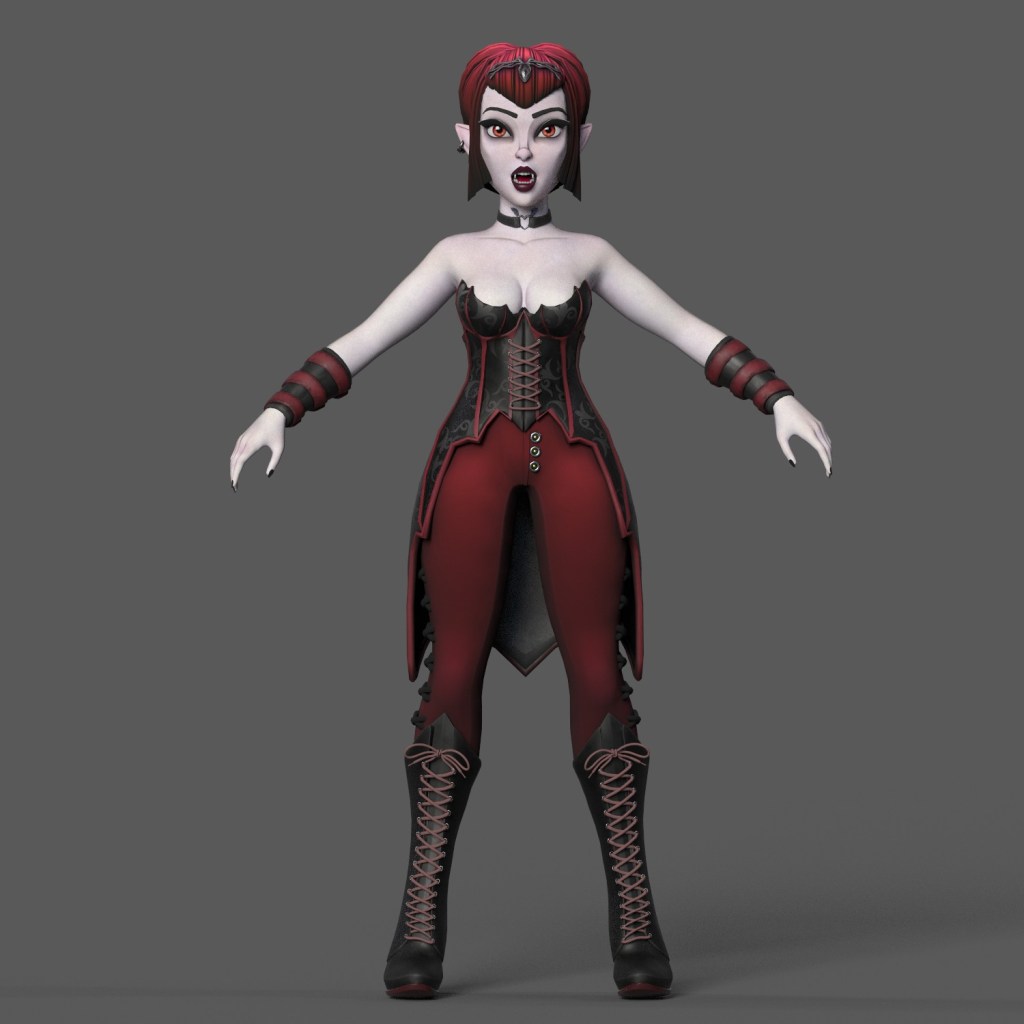
For the clothing and accessories, I used the Leather Stylized smart material, changing the base color and various layers.
For other accessories, I created stylized materials and added color layers for a more hand-painted finish.
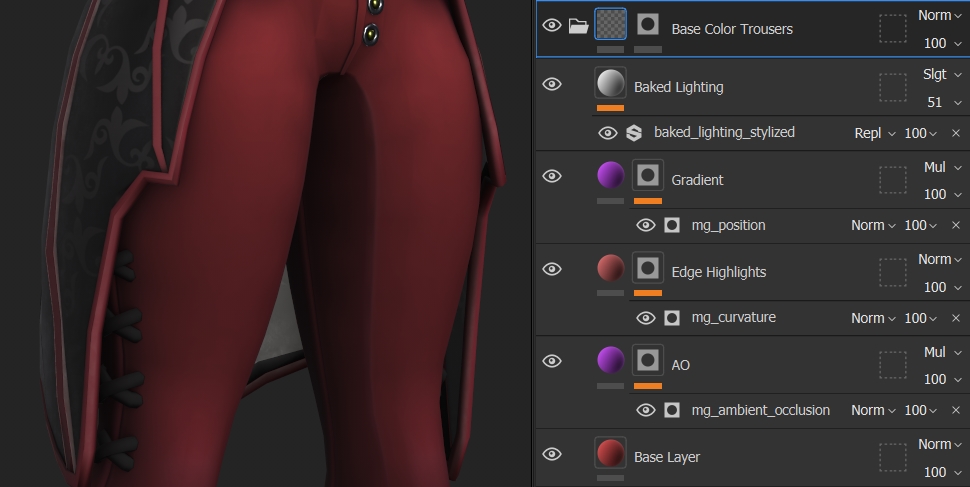
Creating a Stylized Material
- Base Color Layer:
○ Start with a base color layer. - Ambient Occlusion Layer:
○ Add an “Ambient Occlusion” layer with a black mask and inverted generator. Use a dark color in multiply blend mode. - Edge Wear and Highlights:
○ Create an edge wear layer with a curvature generator, adjusting the color and settings. - Color Gradient:
○ Add a gradient layer with a black mask and position generator. Set the blend mode to multiply. - Baked Artificial Lighting:
○ Add a baked stylized lighting filter, adjusting the blend mode to soft light and the sun intensity.
This process creates a solid and stylized base for materials, suitable for a more artistic and detailed finish.
For the hair texturing, I used color layers and details to achieve a stylized finish.
Now, I will share some renders made in Adobe Substance Painter with the finalized textures.
4.6 Export Textures to CC4 and Maya
Exporting for Maya with Arnold
Once I had all the textures for the character, I began the export process. I used the Arnold (Ai Standard) configuration in PNG format with a resolution of 4096.
Exporting for Character Creator 4
- Download the Preset File: [Character_Creator.spexp](C:\Users(User Name)\Documents\Adobe\Adobe Substance 3D Painter\assets\export-presets) and place it in the export-presets directory of Substance Painter.
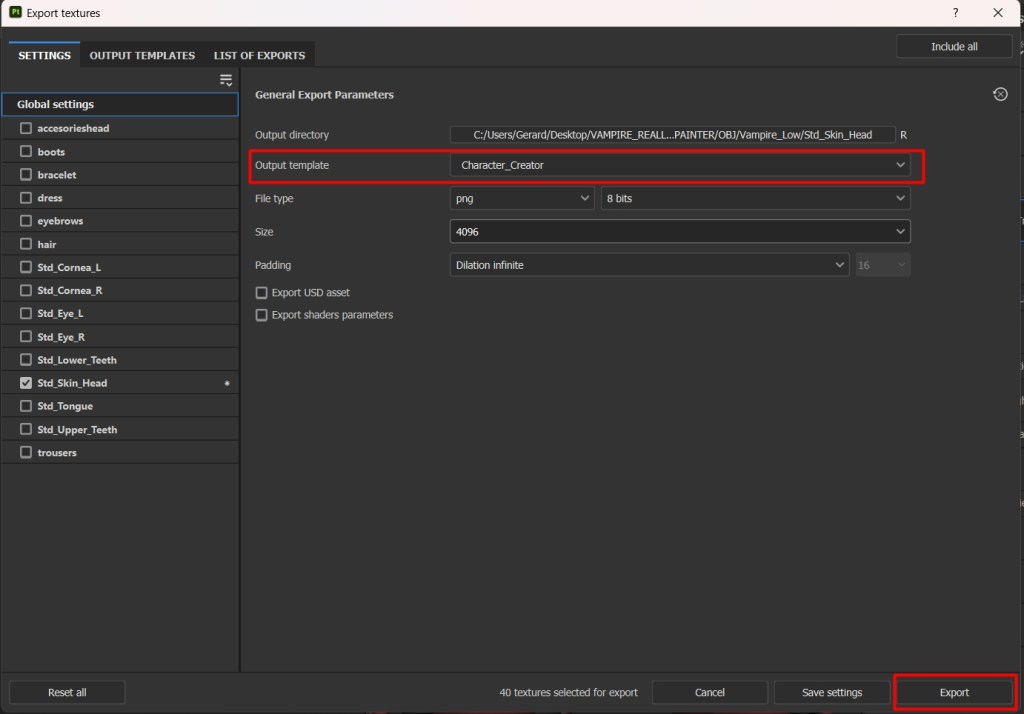
- Configuration in Substance Painter:
○ In the Export Textures panel, select the materials and choose Character Creator as the output template.
○ The structure of the exported textures will match Character Creator’s texture folder. - Export Settings:
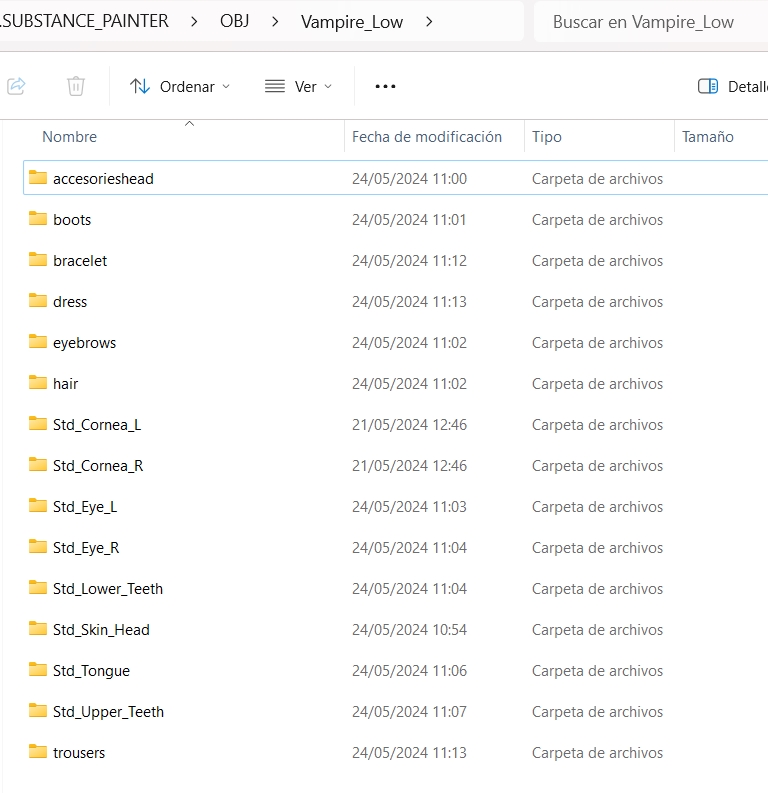
○ Output Directory: Set the output directory where you want to save the textures. I recommend using the organized folder containing the exported textures, where the low-resolution OBJ file is located.
○ Texture Set Selection: Ensure only the necessary texture sets (UDIMs) are selected for export. Uncheck any texture sets that do not need to be updated (e.g., corneas, teeth, tongue).
○ Output Template: Choose the export template that matches Character Creator’s requirements. Use the Character Creator preset file if available.
4.7 Import Textures to CC4
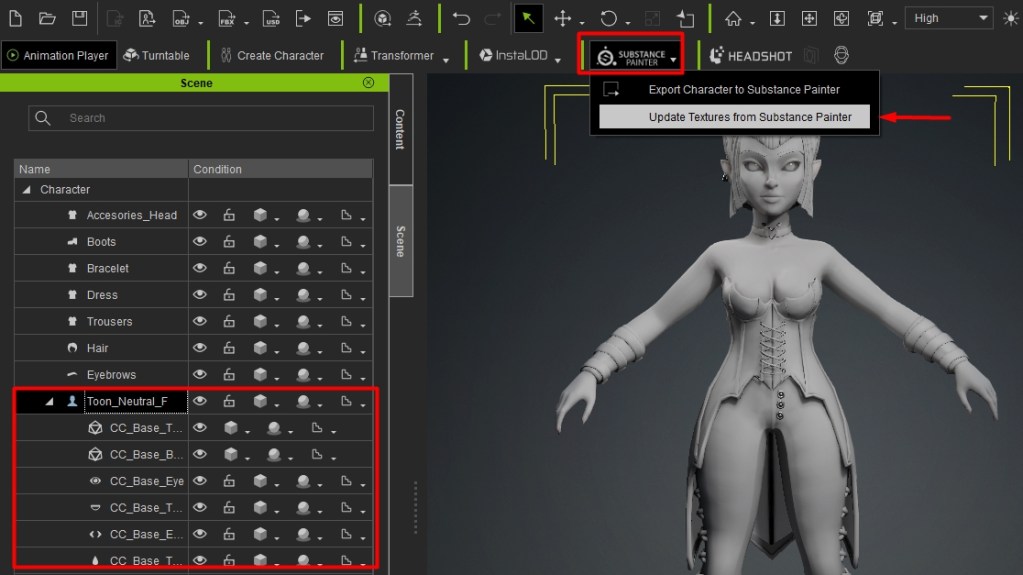
Back in Character Creator, select the character and then choose the Update Textures from Painter option in the Substance Painter dropdown menu.
This will open a file explorer window.
Navigate to the folder that contains the organized folders with your textures. Press Select Folder and Character Creator will automatically update all the body part and clothing materials with your new textures.
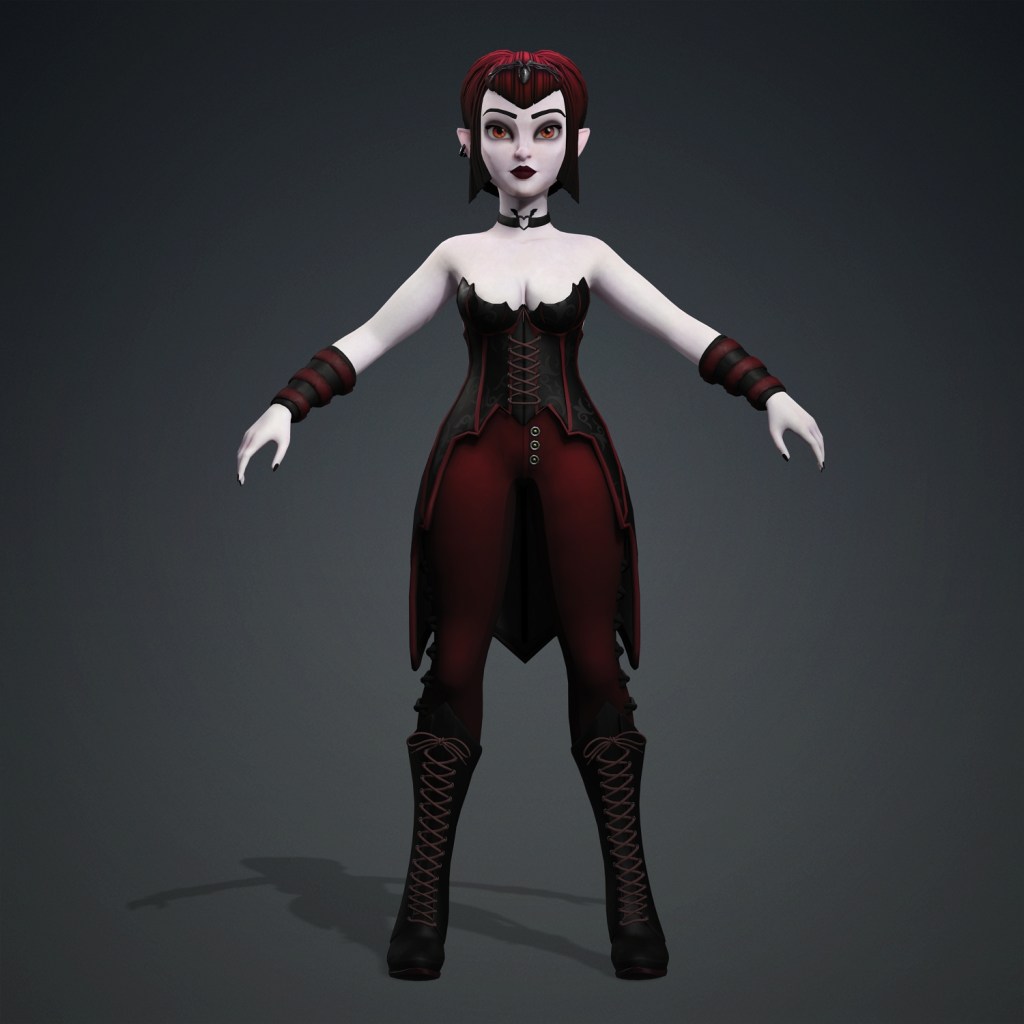
With the textures applied, I recommend posing your character in Character Creator 4 to ensure that the textures maintain their quality and detail in different poses.
Here is a screenshot of how the character looks with the textures applied in CC4:
5. ZBRUSH POSE TOOLS (CC4)
5.1 Introduction
Now that we’ve imported and applied the textures, it’s time to pose Ravenna in Character Creator 4. This step allows us to adjust her facial expressions and body postures for different scenarios.
I must say, bringing my character to life was incredibly fun—I felt like a kid and spent many hours on it. Not because it was complex, but because it’s very easy to pose characters, whether adjusting the body or adding expressions. The possibilities are endless. The only limitations are your creativity, as you can position the character in any way you imagine.
This process allowed me to explore all the ways Ravenna could express and move, making every moment worthwhile.
5.2 Posing and Adjusting the Character
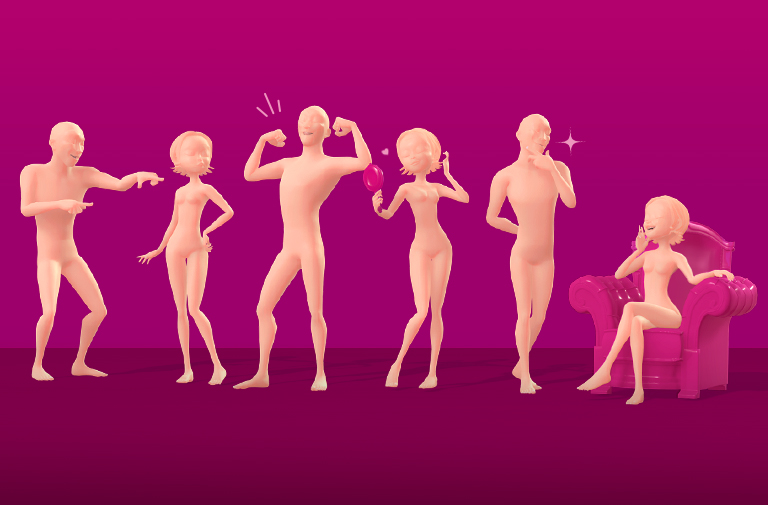
I started the posing process by trying different Motion Packs from the Reallusion Content Store. The ones that suited Ravenna best were “Evil Diva Moves” and “Egocentric Moves.”
These packs contain an extensive library of walk cycles, idle animations, and emotions, perfect for giving Ravenna the attitude I envisioned.
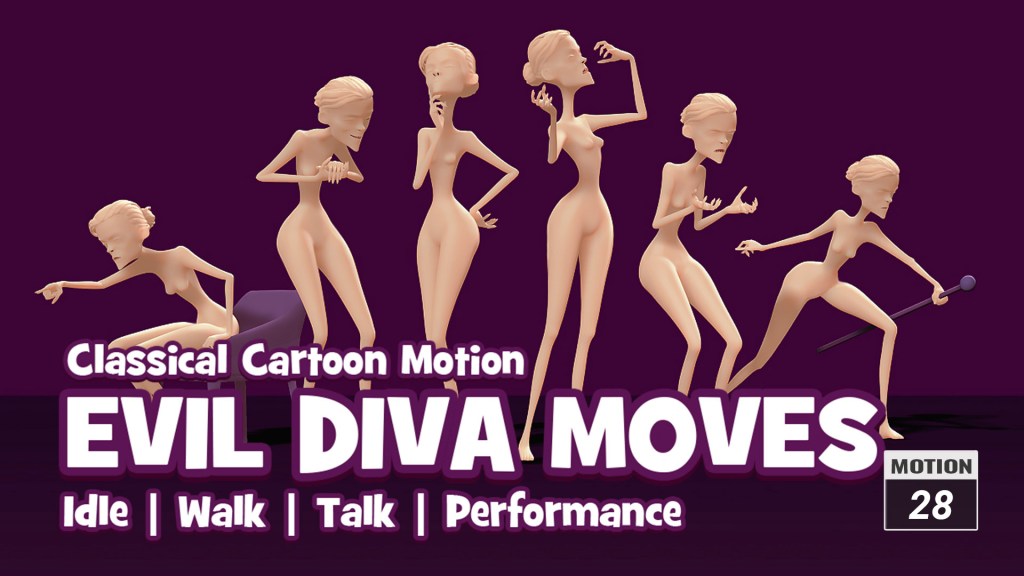
I applied the motion ‘Egocentric_Talk_F‘.”
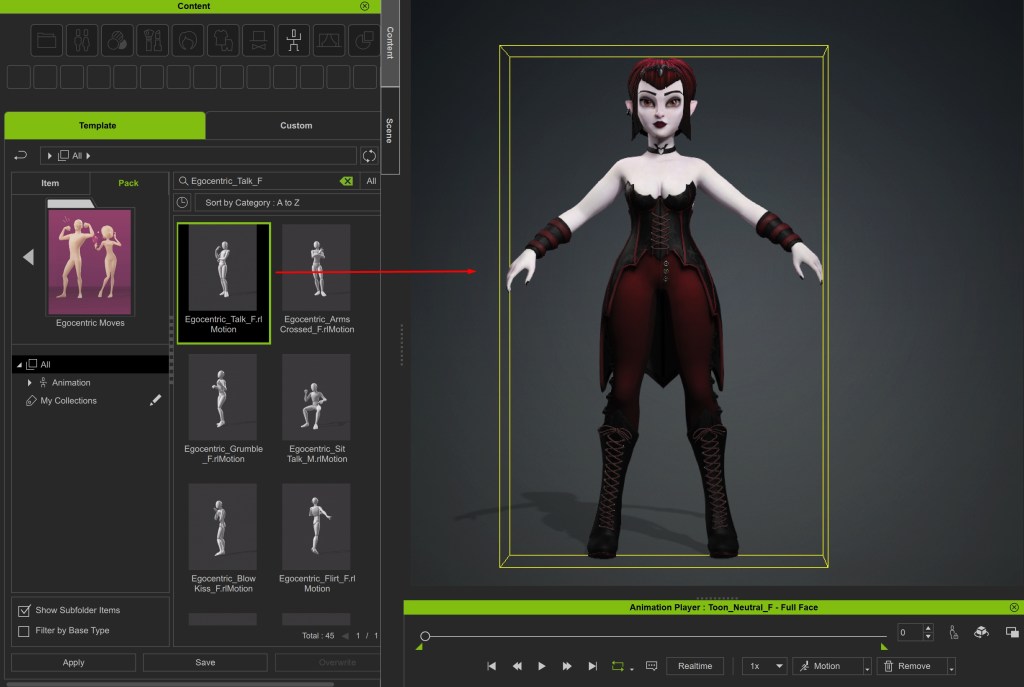
Although the initial pose was quite good, I adjusted it to fit my specific needs.
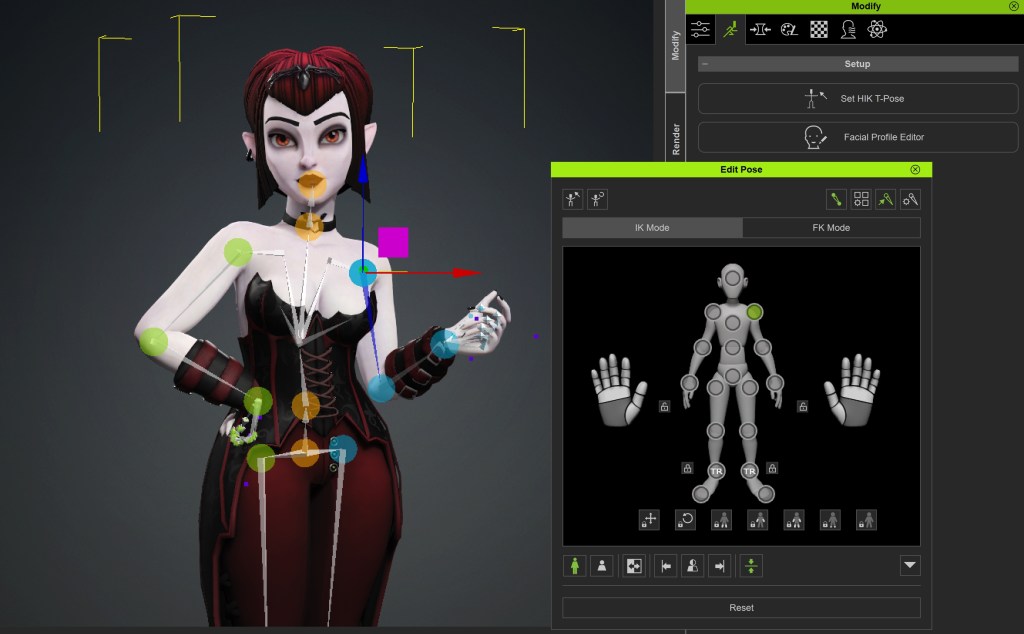
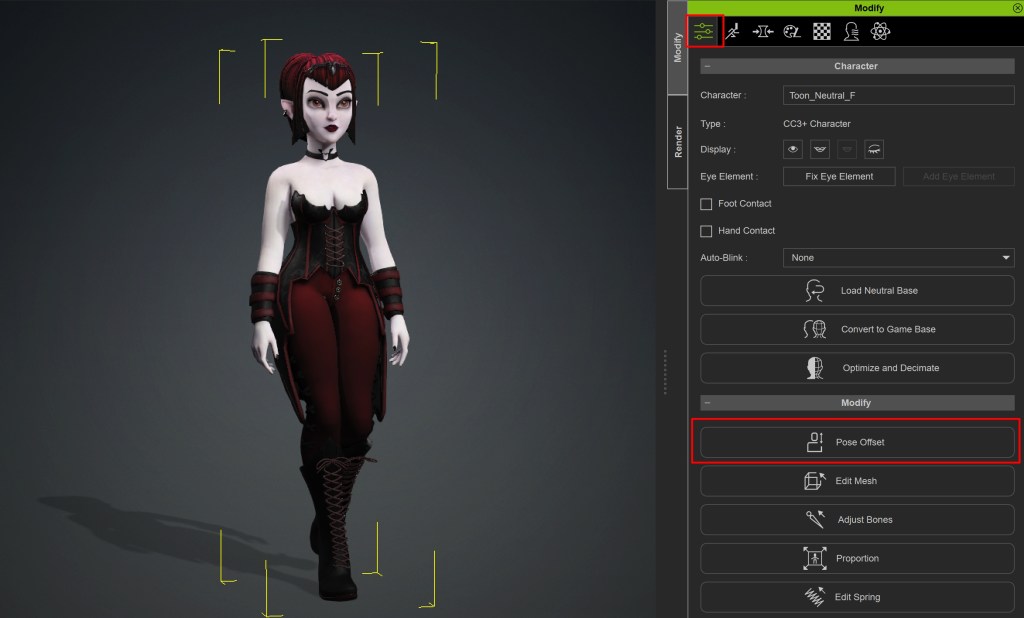
With the character selected, I went to the Motion tab and clicked on Edit Pose. I used the mannequin in IK or FK mode to move and rotate the joints according to my needs.
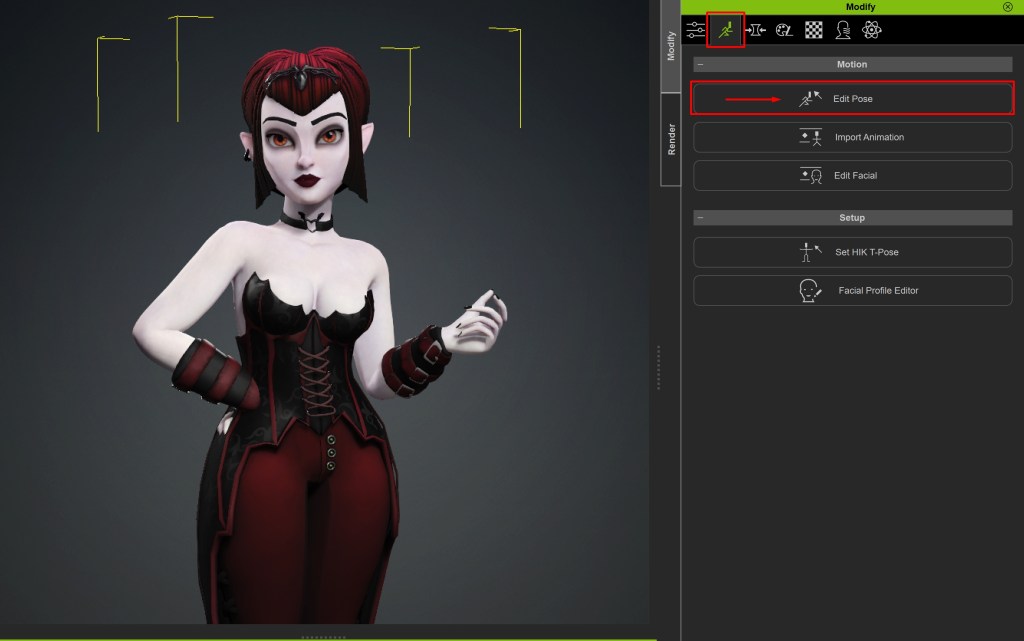
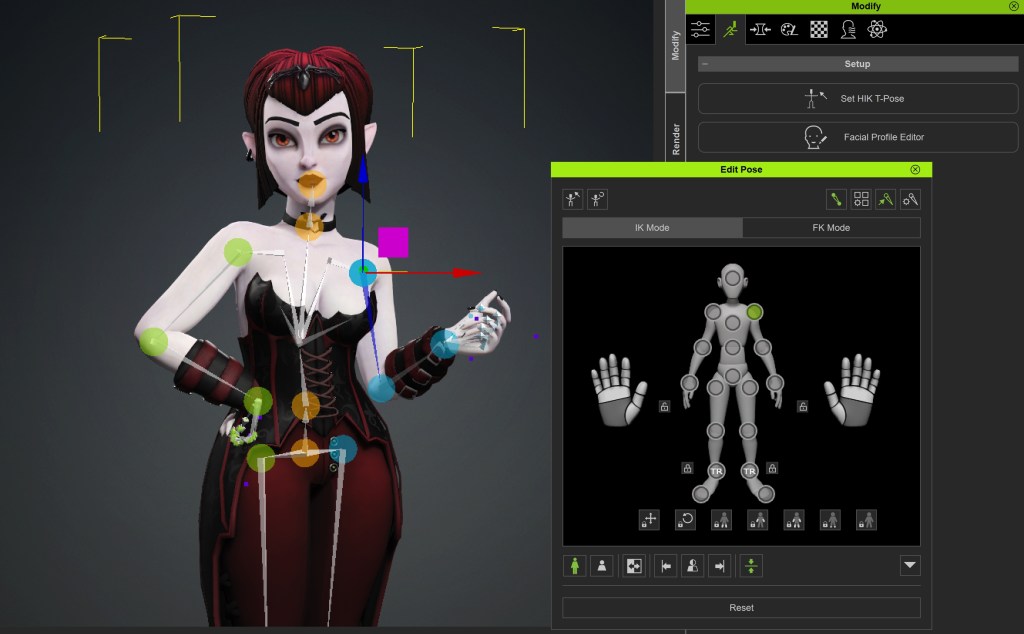
Additionally, you can also navigate to the Poses and/or Gesture section in the Content tab to apply different body poses or hand positions to your character, achieving a more precise and personalized adjustment.

If you wish to modify an animation because some part of the character moves inward or is misplaced, you should go to Pose Offset. This tool will allow you to correct and adjust the movements, ensuring that the animation looks natural and meets your needs.
5.3 Adjusting Facial Expressions
For Ravenna’s facial expression, I aimed to achieve a flirtatious smile with a touch of mystery, intense and challenging gazes, and a confident, self-assured, somewhat arrogant attitude, but with a natural charm that attracts others.
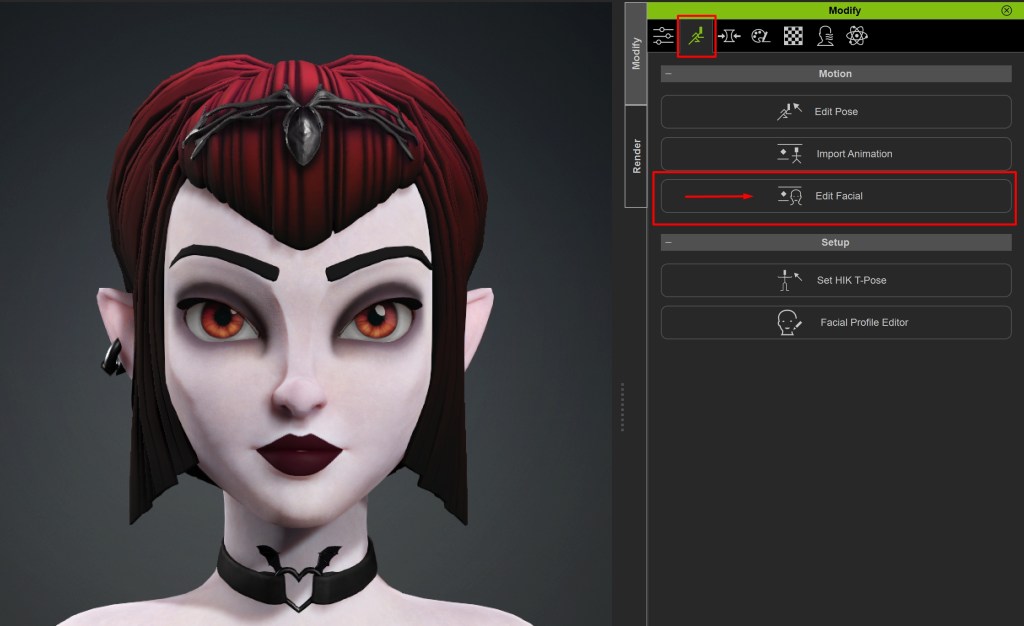
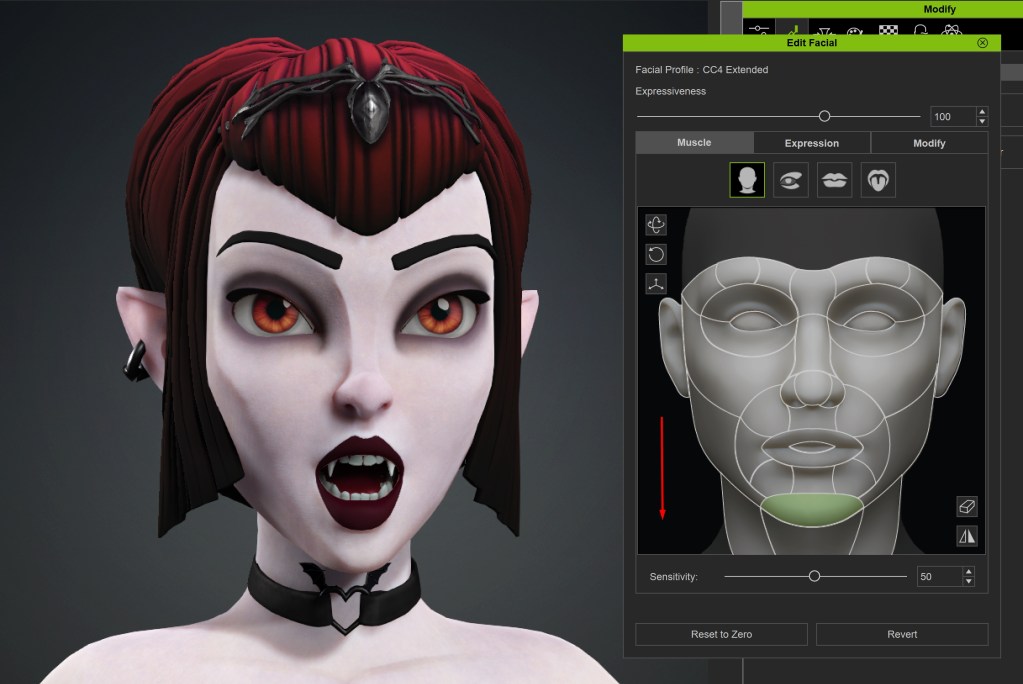
Here are the steps I followed to edit the face:
- Edit Facial Expression: In the Motion tab, I clicked on Edit Facial.
- Muscle Tab: I clicked and dragged on different areas of the face to modify the expression.
- Expressions Tab: I applied an expression from the dropdown list of options.

- Modify Tab: I used the sliders to make precise changes to the character’s facial shapes.
I’m sharing the two poses I finally chose to render later. Each of these poses highlights Ravenna’s personality and character, showcasing her confident and mysterious attitude.
- Pose 1: Ravenna stands with a defiant posture, showcasing her confidence.
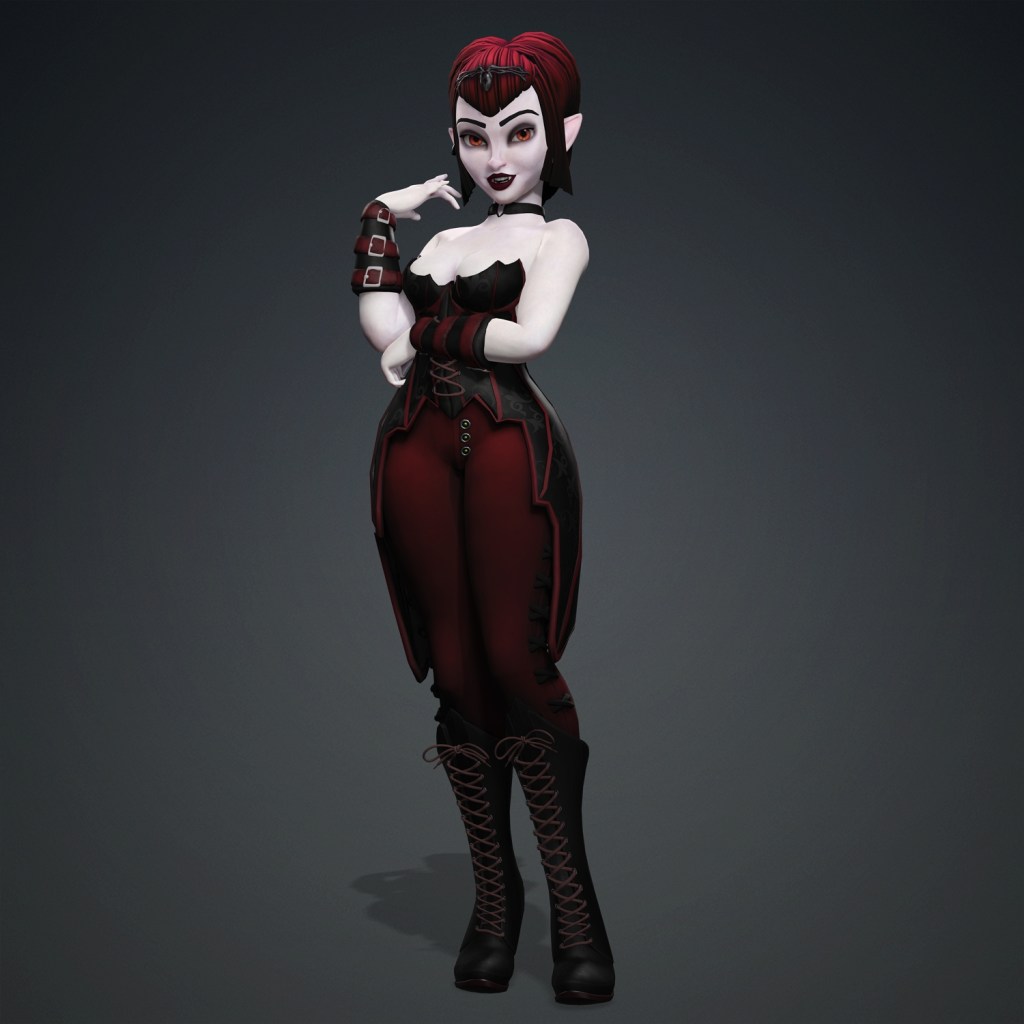
- Pose 2: Ravenna has a more introspective expression, with a touch of mystery and a penetrating gaze.
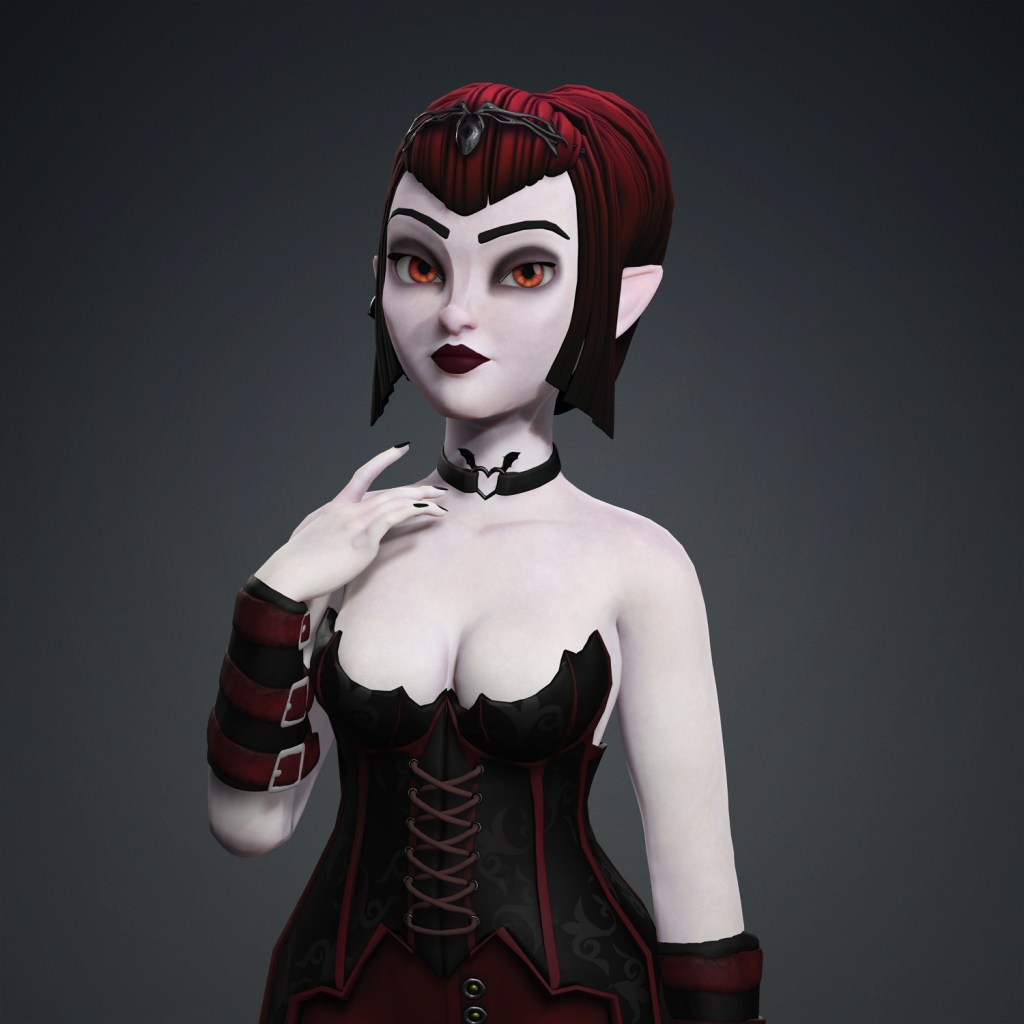
These poses will serve as the foundation for the final renders, where I’ll add an environment to further enhance the character presentation.
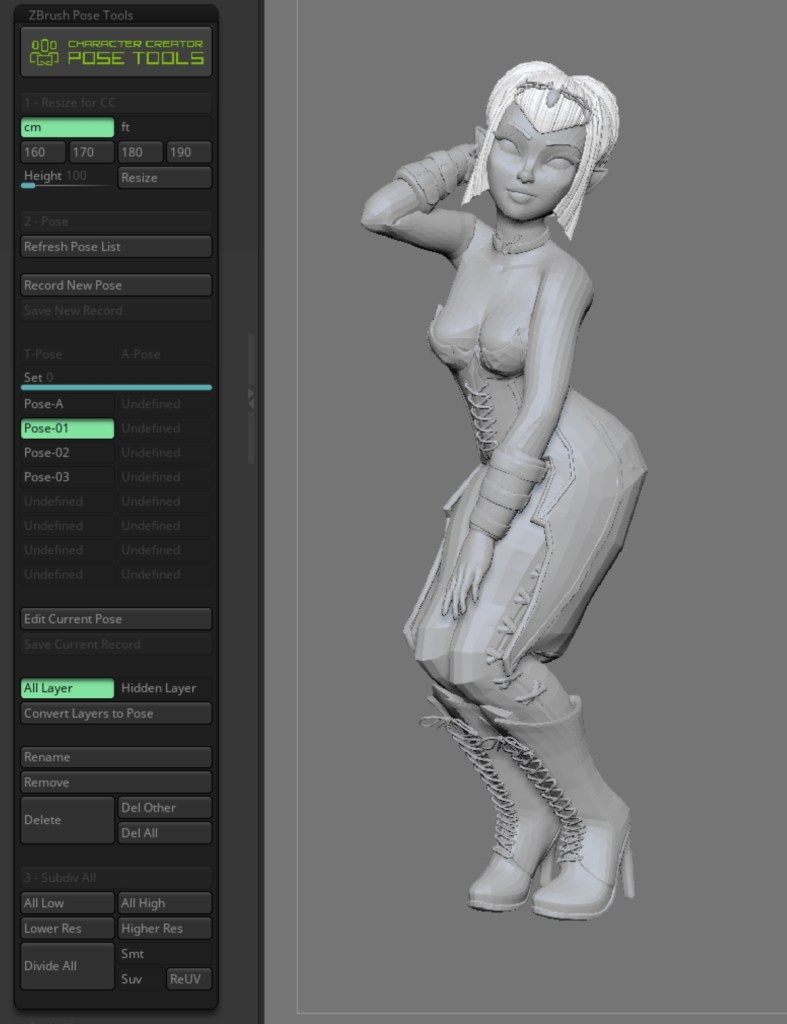
5.4 Transferring the Posed Character to ZBrush with Pose Tools
If you want to apply your pose as a layer, open the ZBrush Pose Tools plugin in ZBrush, click on the Record New Pose button, and then send the character elements from CC using GoZ. Once the changes are updated in ZBrush, click on Save New Record and give it a name. Repeat this process as many times as you like, building a library of poses as you progress.
Honestly, this plugin is amazing because it allows you to access all the poses with a simple click and it’s very organized.
5.5 Export to Maya
To export the character to Maya, follow these steps:
- Select the Character: Make sure the character is selected.
- Export: Go to File > Export > FBX > All (Character/Prop/Camera).
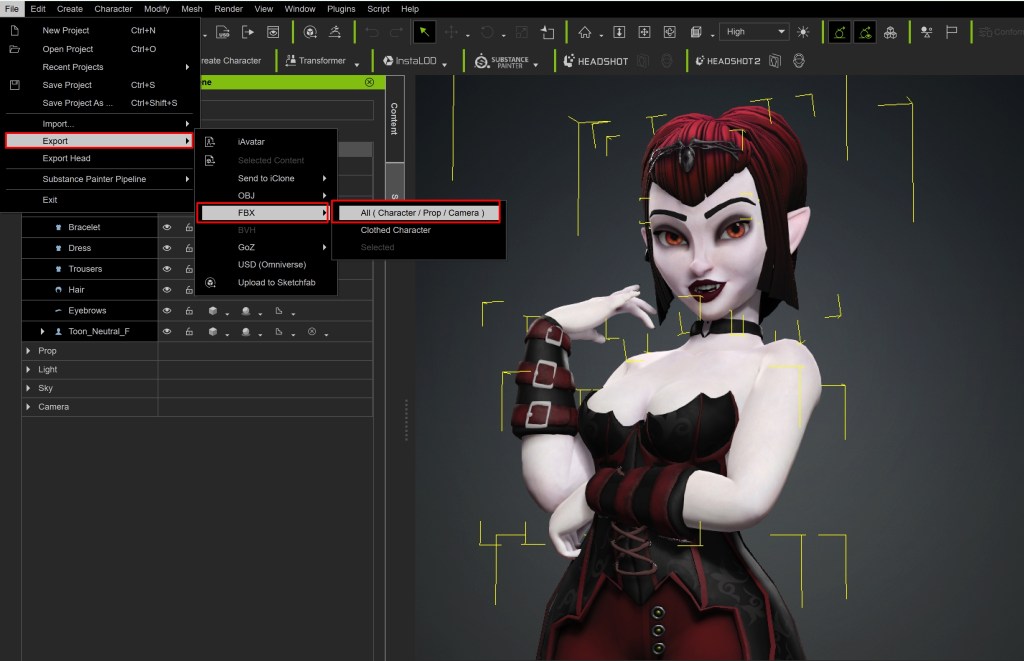
- Export Settings: In the popup window, set the Target Tool Preset to Maya.

This way, when we import the character into Maya, we can proceed with rigging and make any necessary adjustments.
Alternatively, we can also export the character as an OBJ (as we did before for Substance Painter), but this way we will lose the rig.
6. MAYA
6.1 Import Character to Maya
In my case, since I already liked my poses, I imported it as an OBJ to make it less heavy.
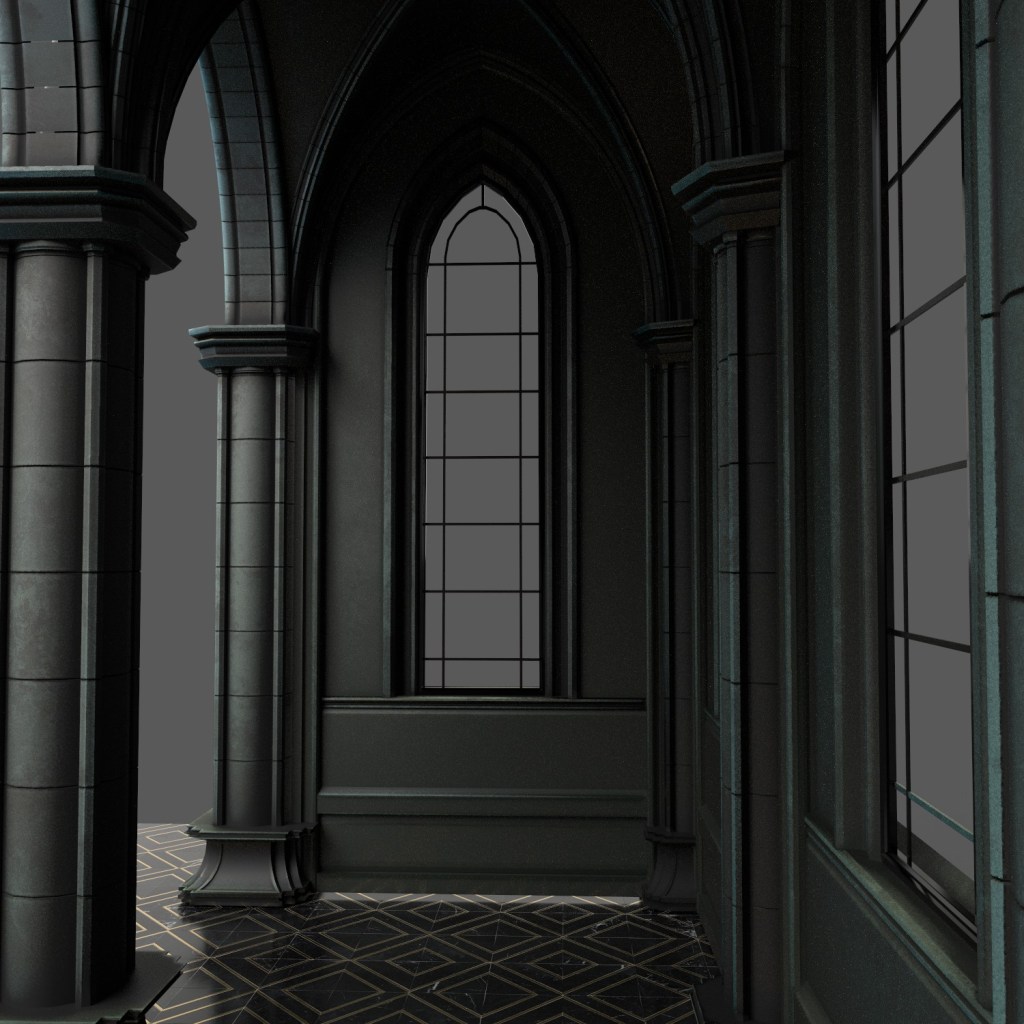
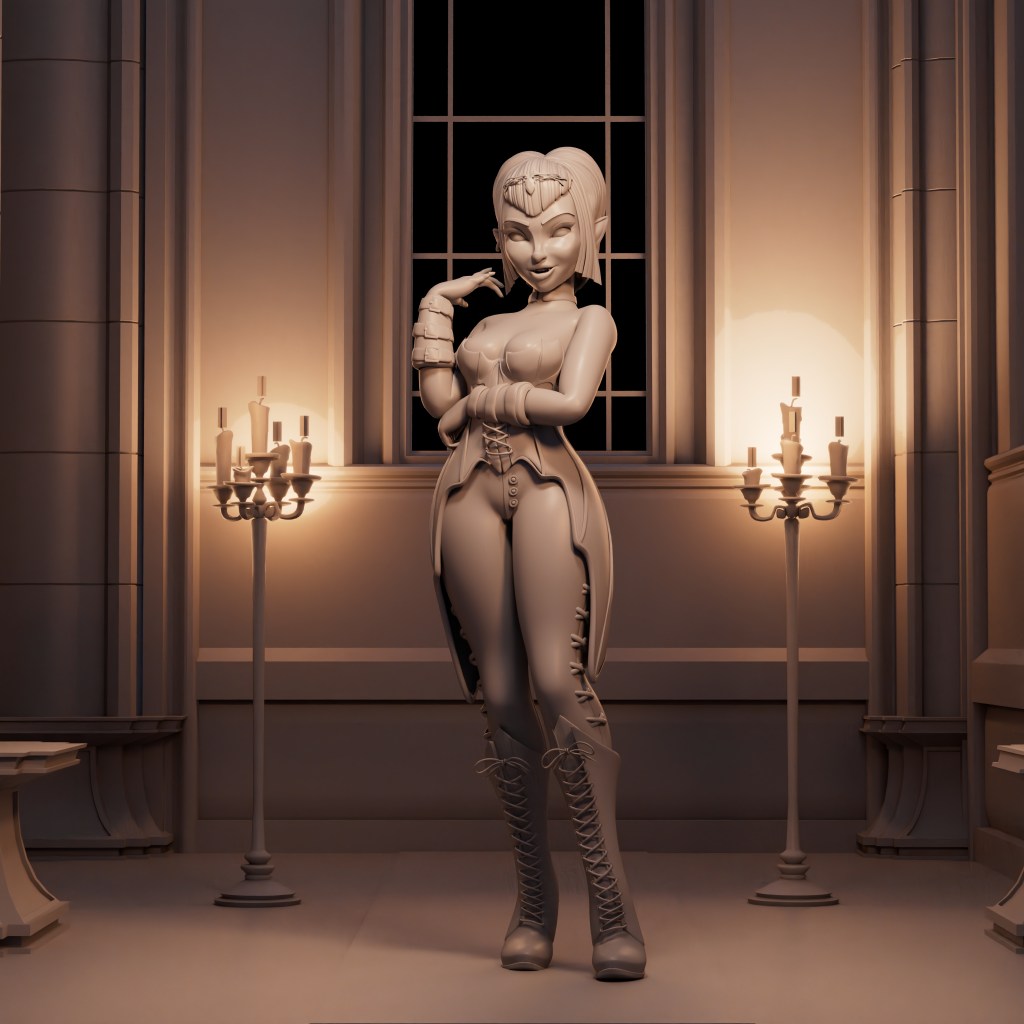
The first thing I did was remodel a small environment I had; I wanted to recreate a small hall in a gothic castle and various props to decorate the scene like chandeliers, a rug, etc.
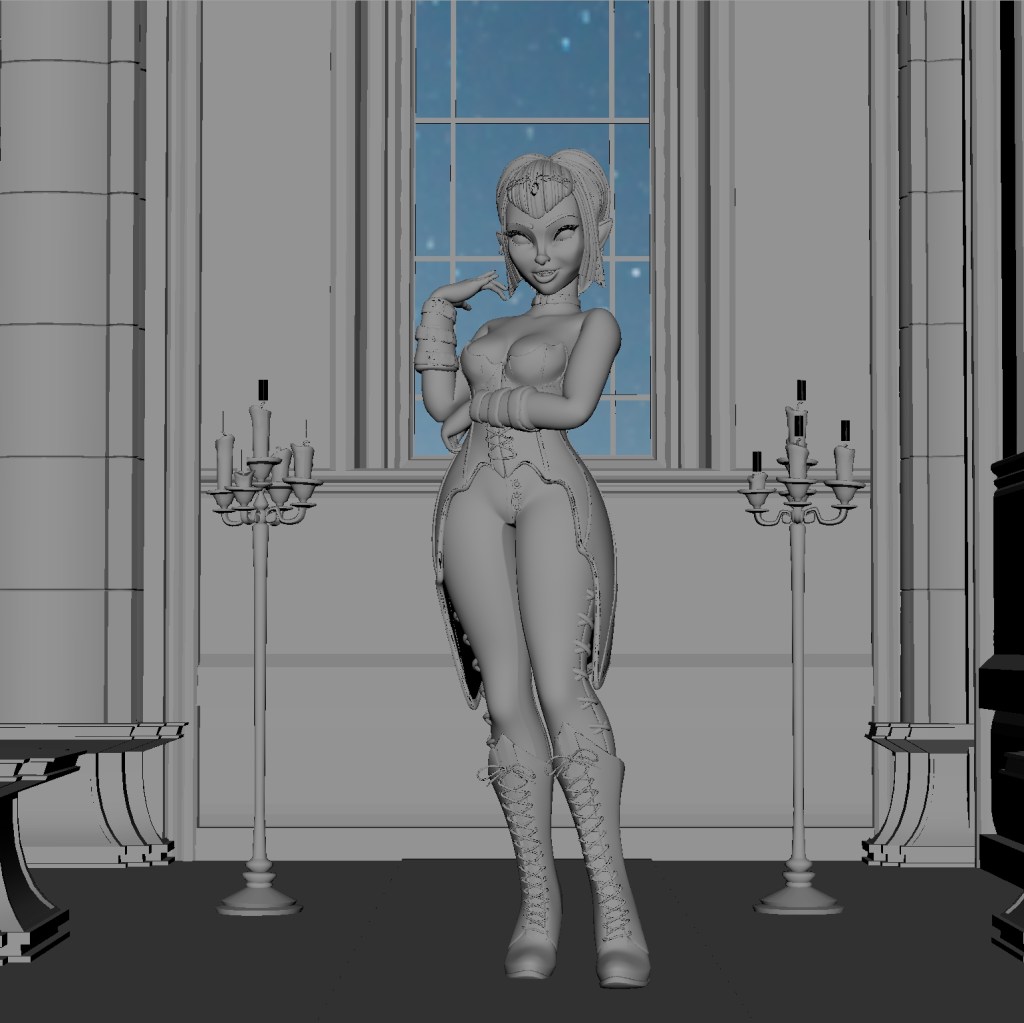
I attach a render from Substance Painter to showcase the texture outcome.
6.2 Lighting
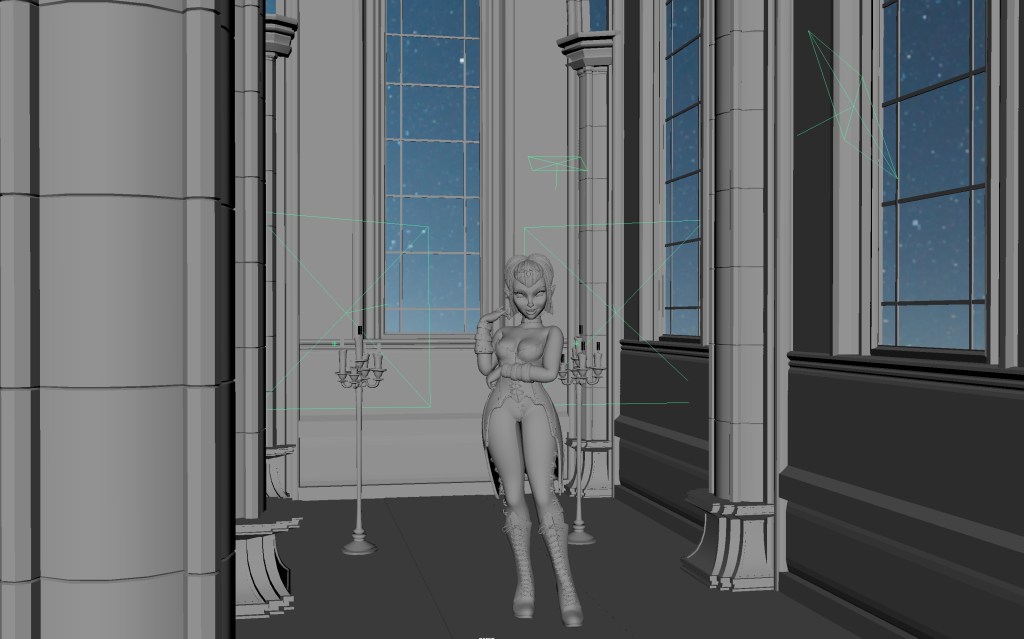
To create Ravenna’s lighting, I opted for a combination of warm and cool tones. I aimed to give her an enigmatic and dramatic appearance by using cool overhead lights to highlight her mystery and a warm light from below to balance the scene.
Villains often have sinister lighting, while good characters benefit from warmer, softer lighting. Proper lighting not only defines the character’s atmosphere but also helps emphasize their role in the narrative and establish an emotional connection with the viewer.
To create Ravenna’s lighting, I incorporated a low-intensity HDRI as the primary light source to achieve subtle reflections. I used HDRI from HDRI Haven.
Next, I added an Area Light as the Key Light to illuminate the character from a specific angle, adjusting the intensity, color, and temperature to achieve the desired mood.
I placed a Fill Light on the opposite side of the Key Light to soften the shadows and balance the lighting.
I added two Rim Lights behind and above Ravenna to create a “glow” around her and simulate candle lighting.
Finally, I used Bounce Light to simulate light bouncing off surfaces and back into the scene, creating a more natural and immersive effect.
6.3 Shading
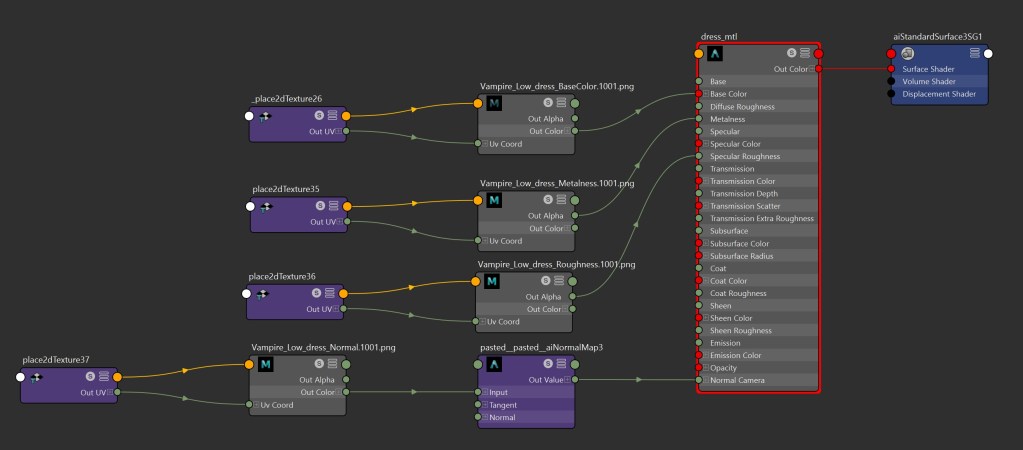
For Ravenna’s shader, I wanted to give it a style similar to that of cartoon animation films, without straying too far from my own style.
At this stage, I typically apply the maps in the aiStandardSurface material of Arnold.
- Base Color: I apply the texture to the base color node and to the Subsurface Color.
- Roughness: I connect the roughness map to control reflectivity.
- Metalness: I apply the metalness map to define metallic properties.
- Normal Map: I connect the normal map to add details and depth to the character’s surface.
This approach allows me to maintain Ravenna’s essence while achieving the desired look.
6.4 Post-production
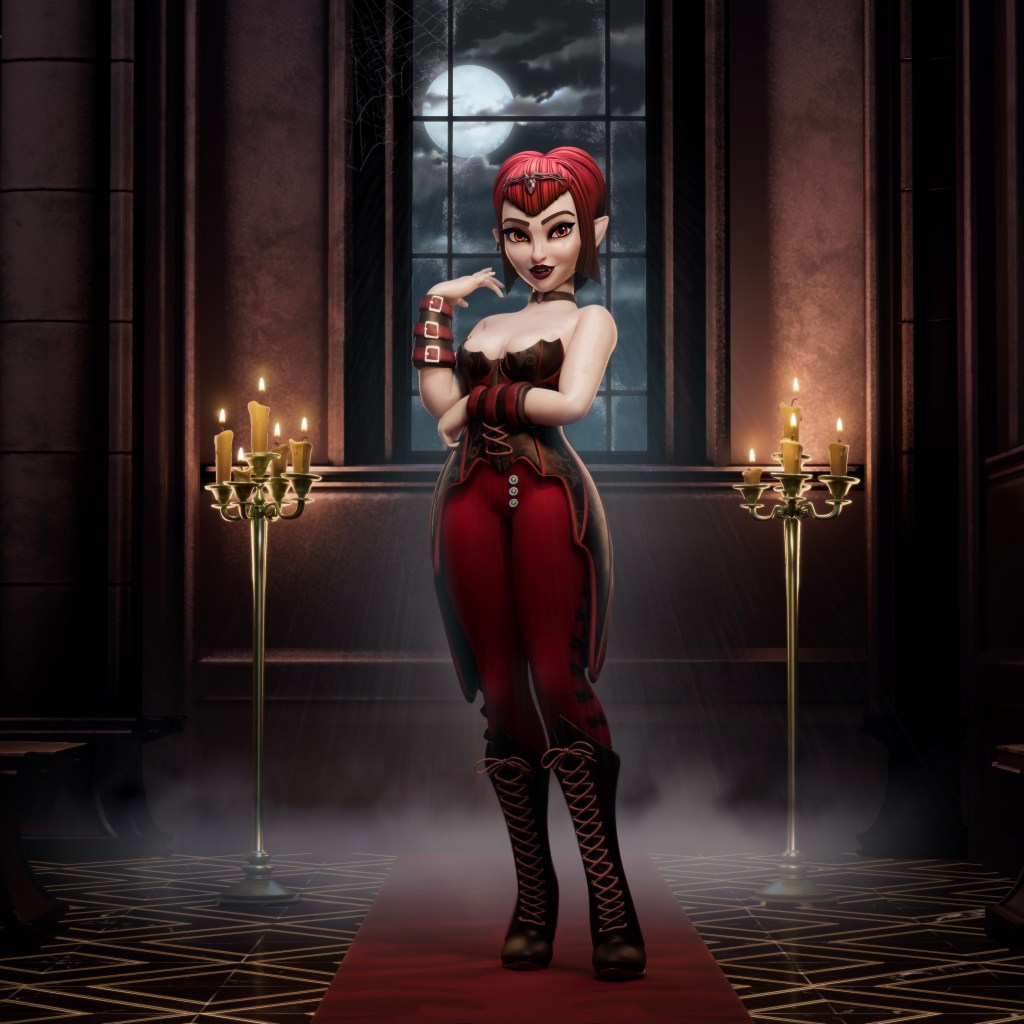
Once I had the Maya render, I immediately moved to Photoshop to add the final details, such as the window background and a bit of mist.
This entire stage was made possible thanks to the help of my great friend Eliant Elias. Thanks to him, I could achieve such an incredible window with those ominous clouds and moon.
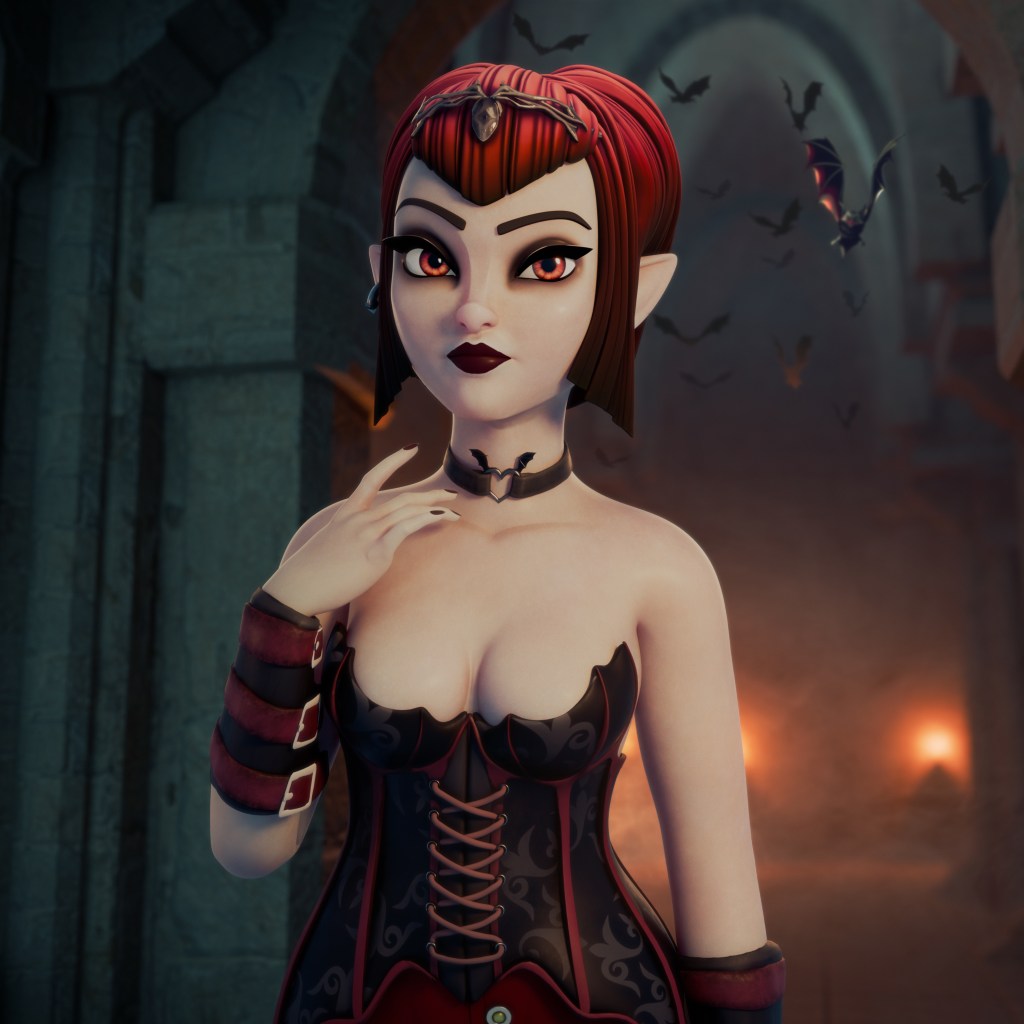
With his collaboration, we added elements that enriched the atmosphere of the final render, bringing Ravenna’s scene to life and achieving an impressive visual finish. And now I share with you the result of the render with the effects applied:
The render of the lighting from Maya.
For the other pose, I made a variation in color for the lighting and background, and this is the result.
Elías also helped me here, ensuring that every detail of the background and tones perfectly complemented Ravenna’s pose and style.
7. CONCLUSIONS
This is the first time I’ve used this workflow to create characters in 3D, and I’m really impressed. I’ve always used Character Creator 4 to rig my characters and then pose them. But now that I’ve created a character from one of its bases, I’m fascinated by the speed and artistic result it provides, as it allows you to skip all the technical aspects like retopology, UV unwrapping, or rigging. The only technical thing I’ve done with this character is unwrap the UVs of the clothing, and that’s it!
Advantages I’ve Seen in Using Character Creator Bases:
- Speed: Character Creator bases allow for quick and efficient character creation, saving time on technical processes.
- Ease of Use: Intuitive tools and morphs make it easy to customize characters.
- Versatility: You can create anything from stylized to realistic characters, leveraging the robust rigging and animation systems.
- Integration: Character Creator seamlessly integrates with tools like ZBrush and Substance Painter, facilitating the workflow.
- Quality: The bases are designed with optimized topology and precise anatomical details, providing an excellent foundation for sculpting and texturing.
Character Creator 4 not only simplifies the technical process but also enhances the artistic aspect, allowing artists to focus on creativity and design.
Acknowledgments:
I want to thank the entire team at Reallusion, especially Enoc Burgos, for giving me the opportunity to showcase my creative process and art.
Additionally, I want to thank my life partner, Ivet Macias, for helping me design Ravenna. Without her, it wouldn’t have turned out so incredible.
And lastly, to Eliant Elías for his magnificent touches in post-production. Without his help, the project wouldn’t have reached the level of quality it achieved.
Thank you all! I hope you enjoyed this making-of. Until next time!
Follow Gerard Martínez Sánchez:
Instagram:
https://www.instagram.com/gms.3dart/
Linkedin:
https://www.linkedin.com/in/gms3dart/
Website:
https://gms3dart.com/
————————————————————————————————————————————————————————————
The original article was written by Gerard Martínez and is also featured on 80 Level.