
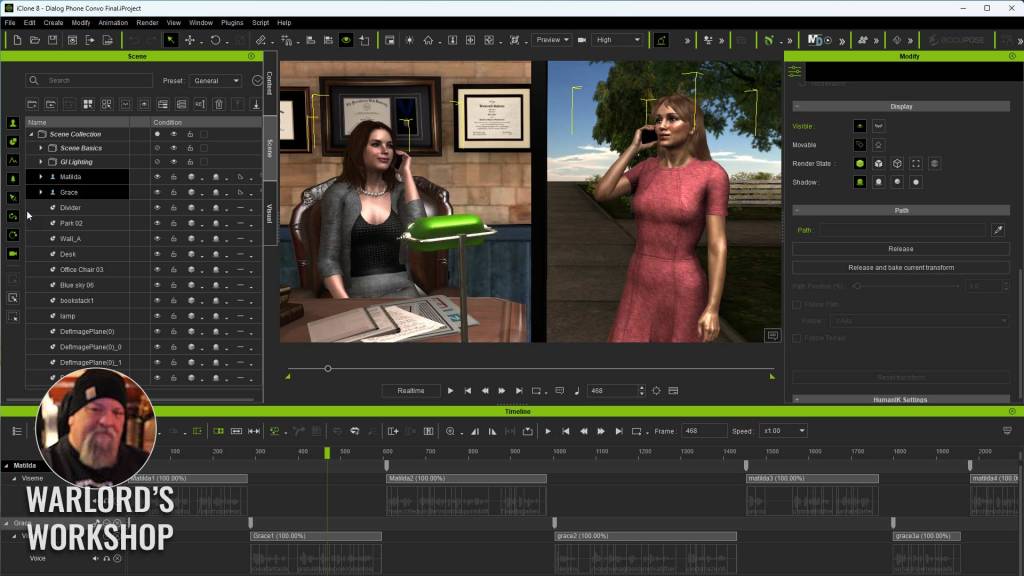
Sooner or later beginners have to tackle one of the most important parts of animation… dialog. And not just an offscreen narrator as that is something generally done in the video editor instead of iClone. While dialog often remains restricted to just a few or couple of characters, there are also scenes where dialog comes from several different directions, both cinematically and literally. Today we are going to keep it simple by focusing on two-person dialog so you can quickly grasp the basics.
At the end of this article, you will find a tutorial using a free account from ElevenLabs for dialog then into iClone to get the dialog associated with a character and lip synced. As a bonus I will show you how to use a single motion for a short dialog even when the motion is too short.
There is also an extensive list of items important to dialog broken down into a bullet list of Do’s and Don’ts. This reference will serve as a great jumping-off point for those new to dialog and animation. I’ll show you the technical aspects of how to use dialog in iClone, and the bullet list will help you improve what you’ve learned.
There are a lot of things that need to be learned over time about effective dialog, but we are going to focus today on the technical aspect of getting dialog into iClone synced to characters with lip sync, letting iClone do all the hard work.
NOTE: You can use a chatbot to write dialog if needed. We are animators but not all of us are script writers.
ElevenLabs
If you have never used ElevenLabs or any AI voice generator don’t be alarmed as they are very simple to use. It is basically a matter of typing or pasting the text dialog to the website app. It also appears that they have apps available for iOS and Android, but we’ll be using the web app which couldn’t be simpler.
The layout is easy on the eyes and navigate as it is a no-nonsense user interface with menu choices on the left, text input areas in the middle-, and a two-tab menu on the right for voice Settings or History. I won’t be covering the various voice settings in this article, but I do advise experimenting with the sliders and models. I never had to alter much dialog coming from ElevenLabs so I’m not all that versed on that aspect.
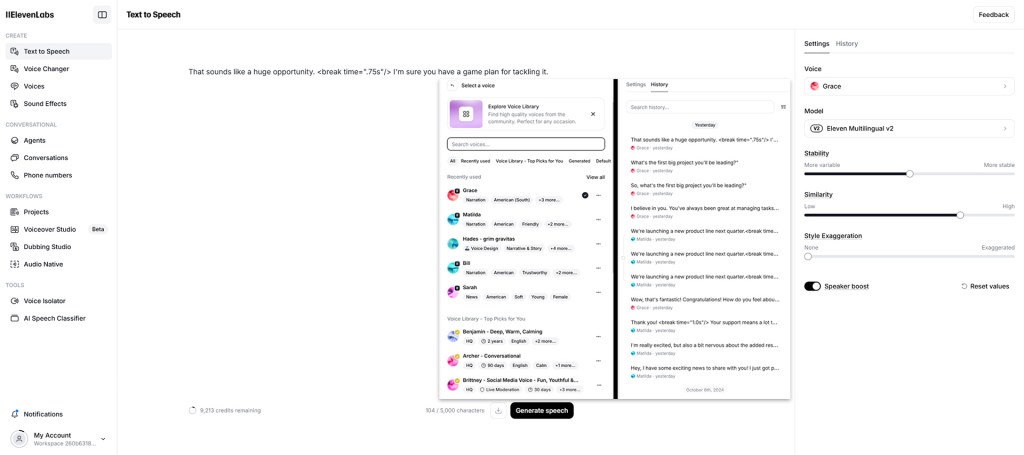
This dialog uses the default settings so you can get an idea of what type of dialog can be produced. Most of the dialog is just fine but there is one that is rather flat of emotion and I’m sure you spot that one.
I also show a basic command of <break time=”1.5s”/> for a pause of one and half seconds.
One thing to keep in mind with dialog is that you can always make it shorter or remove pauses during the edit phase. A longer pause than needed may be preferable in some instances where you aren’t sure of the length yet as this gives you the easier route of just editing the pause instead of inserting a pause.
A free account at ElevenLabs provides 10,000 characters per month and projects like this tutorial use less than 900 words.
There are seven tiers in all
- Free Account – Generate speech in 32 languages using thousands of unique voices
- Translate content with automatic dubbing, create custom synthetic voices, Generate sound effects
- $5 per month for 30K characters – Clone your voice with as little as 1 minute of audio
- Projects to create long form content with multiple speakers, Access to the Dubbing Studio for more control over translation & timing
- $11 per month for 100K character – Access to the Dubbing Studio for more control over translation & timing
- $99 per month for 500K characters – Professional voice cloning to create the most realistic digital replica of your voice. Audio Native to add narration to your website and blogs, Higher quality audio – 192 kbps
- $330 per month for 2M characters
- $1,320 per month for 11M characters
- Custom Pricing for Enterprise
We’re just focusing on the Text to Speech tool but there are many other great tools like the Voice Changer, Sound Effects and others.
The tutorial at the end of this article demonstrates how to use the fundamental tools opening with ElevenLabs Text to Speech basics tutorial then on to using the dialog in iClone
Audio Import
Audio import is straightforward, but you do have to follow a process otherwise it might just become a background sound instead of character dialog.
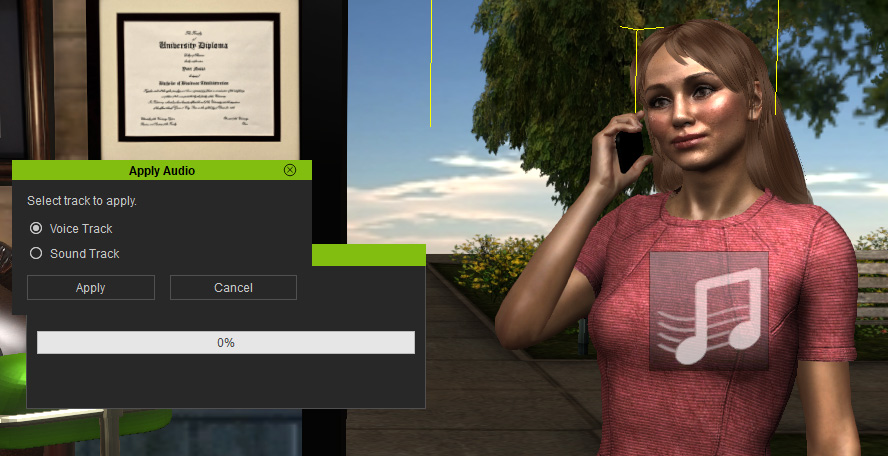
If you drag and drop accidentally to a prop, then it becomes a sound. If you drag and drop your audio onto the character you will be bypassing the AccuLips plugin which is one of the best lip sync tools out there and the legacy lip sync engine will kick in with no intervention on your part.
If you don’t have the AccuLips plugin then I highly recommend getting it. AccuLips has far more advanced AI-driven features than the legacy engine. If you don’t have AccuLips then just drag and drop on the character and the legacy engine will process the lip sync for you.
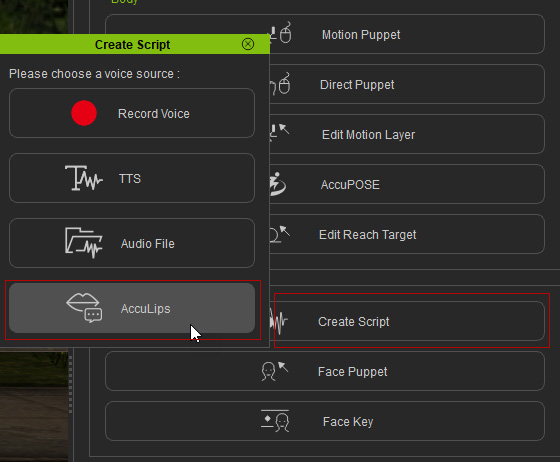
To get to AccuLips, as demonstrated in the tutorial, is to go to the Motion tab, select Create Script the choose AccuLips from the resulting popup menu. This will trigger the AccuLips plugin instead of processing through the legacy lip-sync engine.
Lip Syncing
At one time lip syncing was a tedious task with lots of viseme edits and while we can still edit visemes AccuLips will assist in getting the right visemes in the right place. We can then edit the duration of the viseme or type but that is beyond the scope of this beginner’s article.
That being said, Viseme is a term you need to know so you understand when it is referenced even thought software like iClone does most of the viseme work for us. Below I asked CoPilot to explain Viseme as a dictionary entry and as an explanation.
Viseme (noun)
A specific facial and mouth movement or configuration associated with a particular sound in spoken language, especially in the context of lip-reading.
The visual equivalent of a phoneme in the study of visual speech, important for recognizing and distinguishing speech sounds by sight.
For example, the sounds represented by “p,” “b,” and “m” might share a similar viseme because they all involve the closing of the lips
Let’s break it down in practical terms. Imagine you’re watching someone speak. A viseme is essentially what your eyes see when you look at the movements of their mouth and face. It’s the visual part of speech sounds.
For instance, when someone says the sounds /p/, /b/, or /m/, their lips come together and then part. This mouth movement looks the same for these sounds, even though they produce different noises.
Reference – Copilot
Using AccuLips is a simple process, and you probably should have the dialog in text form readily available for those rare cases where the plugin may struggle with some words or audio. There may be times you’ll need to reference the text for corrections or even paste in the text if a lot of errors pop up. This is rare but poor quality of audio will lead to problems so try to keep it as clean as possible with text handy as reference or to copy and paste corrections.
Correcting mistakes is a simple process as any words not recognized are highlighted in red for your correction and then you can press the Align button to realign the visemes.
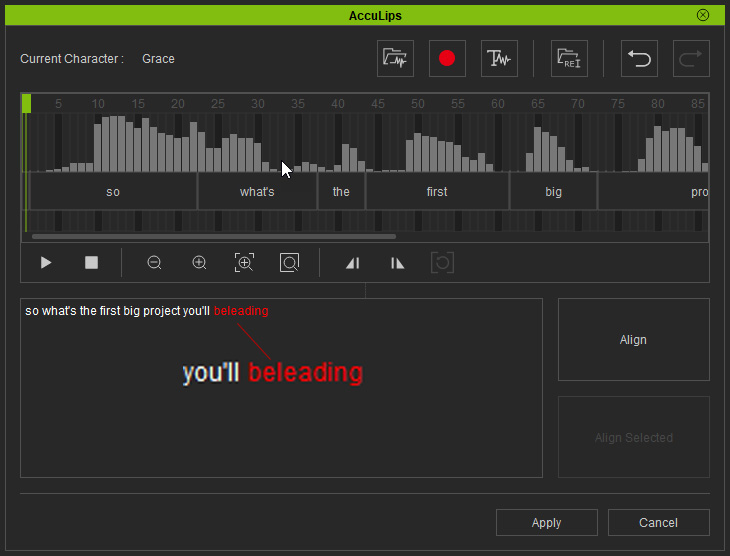
Just like the previous steps, this is all explained in the iClone portion of the video tutorial below after the ElevenLabs segment.
Pace and Timing
Pace and timing are critical whether it be drama or comedy, timing can make or break an animation. Just like poor animation, bad timing throws off the audience expectations or train of thought leading to viewers questioning the bad timing and losing focus on the story. Bad animation can sink a production while good animation can salvage a bad story in some cases and the same holds true for bad pacing and timing.
The sad part is that pace and timing are not things that can be taught so much as it is based on a “feeling” that you have. Most of us can spot bad timing right away, but what does it take to have good timing?
Experience… and I don’t mean production experience so much as I mean viewing experience.
We watch a lot of movies and weekly shows and therefore have been trained to what is good and bad in a movie. Pace and timing are foremost. It is true we are all critics, but it is true because of our viewing experience over our lifetimes to this point. We know what we like and don’t like so if you have a bad feeling about the timing and pace of a particular interaction it probably is BAD.
Listen to your hard-earned intuition and keep moving that dialog and those animations until the timing does “feel” right. If you don’t like it, you won’t be the only one so build off that feeling and keep going until you are comfortable with it.
We cannot brute force timing and pace nor can we ignore its effects. I can’t offer you any real solutions, but I can, at least, make you aware of its implications.
We need to be our own worst critic and NEVER assume it is a masterpiece just because we animated it. Always look at timing and pace with a critical eye.
Summary
The act of getting recorded dialog into iClone is not difficult by any means and may be one of the simplest animation tasks in a lot of projects. Using an AI service like ElevenLabs is almost the same as having a voice-over studio in your workspace. You have control over scripting, voice selection and fine tuning.
In the future we will take a look at other aspects of dialog including facial expressions which are almost as important as the dialog itself. Until then I will leave you with a list of Do’s and Don’ts after the tutorial that hopefully help shape your future projects or provide ideas for further research.
Camera Do’s and Don’ts
For this list I queried the various chatbots (ChatGPT, Gemini, Perplexity and Claude) for a bullet list of do’s and don’ts concerning use of the camera.
I then fed all of those bullet points into CoPilot and had it compile a reference list of what basically best camera practices.
Do’s:
- Fluid and Smooth Movements: Use ease-in and ease-out curves for transitions to avoid jarring effects.
- Experiment with Angles: Utilize various angles (low, high, Dutch tilt) to enhance visual storytelling.
- Optimize Framing and Composition: Follow the rule of thirds, golden ratio, and ensure depth with foreground, midground, and background elements.
- Plan with Storyboards: Outline key camera movements, positions, and shot compositions beforehand.
- Consistent Lighting: Ensure balanced lighting without overexposed areas.
- Consider Perspective and Emotion: Position the camera to reflect characters’ emotional states and provide impactful perspectives.
- Strategic Use of Shots: Use a variety of wide and close shots to emphasize action or emotion.
- Maintain Clarity: Keep the subject clear, avoiding clutter and distractions.
- Incorporate Realistic Imperfections: Slight camera shakes, subtle focus adjustments for a more organic feel.
Don’ts:
- Neglect Backgrounds: Ensure the background complements the scene and doesn’t detract from the focus.
- Overcomplicated Movements: Avoid excessive pans, zooms, and rotations which can confuse viewers.
- Abrupt or Jerky Movements: Prevent disorienting transitions and ensure smooth camera actions.
- Static Shots for Long Periods: Keep the animation dynamic with occasional camera movements.
- Excessive Cuts: Avoid overusing camera cuts to maintain narrative flow.
- Neglect Scale and FOV: Ensure proper scaling of the camera and realistic field of view settings.
- Predictable Movements: Introduce subtle variations to keep the viewer engaged.
Dialog Do’s and Don’ts
Once again, I queried the various chatbots (ChatGPT, Claude, Gemini and Perplexity) for bullet lists of do’s and don’ts. I then fed all of those bullet lists into CoPilot and asked for a summarized list for reference.
Some of you will consider these rules and yes, we all know rules are made to be broken so that is completely your call, but I provide it as future reference material, so you don’t have to waste time looking it up or cross examining and double checking multiple chatbots. These bullet points work for animation and live action.
Do’s
- Use the 180-Degree Rule: Maintains spatial orientation and prevents audience confusion.
- Capture Reactions: Enhances emotional depth by showing characters’ reactions.
- Monitor Audio Levels: Clear audio is crucial for a professional scene.
- Use a Variety of Shots: Incorporating different shot types (close-ups, medium shots, over-the-shoulder) adds visual interest.
- Plan Your Shots: Storyboarding and planning help streamline the filming process.
- Consider Lighting: Proper lighting sets the mood and enhances the visual quality of the scene.
- Maintain Continuity: Ensures consistency in props, costumes, and actions across shots.
- Utilize Over-the-Shoulder Shots: Establishes perspective and connection between characters.
- Frame Your Shots Thoughtfully: Use composition techniques like the rule of thirds for visually appealing scenes.
- Natural Movement and Blocking: Characters should move naturally to maintain realism.
Don’ts
- Avoid Over-Directing: Allow actors some freedom for natural performances.
- Avoid Crossing the 180-Degree Line: Keeps spatial orientation clear.
- Avoid Distracting Backgrounds: Ensures the focus remains on the characters.
- Don’t Ignore Audio Quality: Poor audio can distract from the scene.
- Avoid Flat Lighting: Good lighting adds depth and dimension.
- Don’t Overcomplicate Shots: Keep it simple to avoid unnecessary distractions.
- Don’t Overuse Special Effects or Cutaways: These should be used sparingly to keep the focus on the dialogue.
- Avoid Jump Cuts: Unless intentional, jump cuts can disrupt the flow.
- Avoid Inconsistent Audio Levels: Maintain steady dialogue volume.
- Don’t Neglect Pacing: The scene should flow naturally without rushing or dragging.

MD McCallum – WarLord
Digital Artist MD “Mike” McCallum, aka WarLord, is a longtime iClone user. Having authored free tutorials for iClone in its early years and selected to write the iClone Beginners Guide from Packt Publishing in 2011, he was fortunate enough to meet and exchange tricks and tips with users from all over the world and loves to share this information with other users. He has authored hundreds of articles on iClone and digital art in general while reviewing some of the most popular software and hardware in the world. He has been published in many of the leading 3D online and print magazines while staying true to his biggest passion, 3D animation. For more information click here.





1 comment
Thank you for creating this – very helpful!