TL;DR: This tutorial walks through a complete Headshot 3 stylized image to 3D pipeline, turning a single piece of front-facing bodybuilder caricature art into a fully rigged, sculpt-ready CC5 character. You will generate a side-profile reference with AI, reshape the fitting splines to capture exaggerated proportions, sculpt the muscle groups in Blender as a non-destructive morph, then realign textures in Krita before finishing back in Character Creator.
Caricature and stylized concept work live or die on their silhouette, which is exactly where standard photo-to-3D tools tend to struggle. The trick is to let Headshot 3 and Character Creator 5 handle the tedious base-mesh and alignment work, so your energy goes into the parts that actually define the character: the anatomy, the exaggeration, and the texture styling. The workflow below uses an extreme bodybuilder caricature as the test case, but it applies to almost any stylized 2D concept you want to bring into 3D.
Step 1: Generating the Side Profile for Your Stylized Image to 3D Conversion
Load your single, front-facing caricature concept into Headshot 3’s Image workflow. Stylized and caricature work demands a sharp silhouette, but a front view alone gives the AI no depth information for the profile. Use the AI Image Generator to produce a matching side-profile reference image: it analyzes the facial features in your front art and generates a complementary profile view that feeds the image-to-3D reconstruction, so you get profile depth without drawing a second angle by hand.
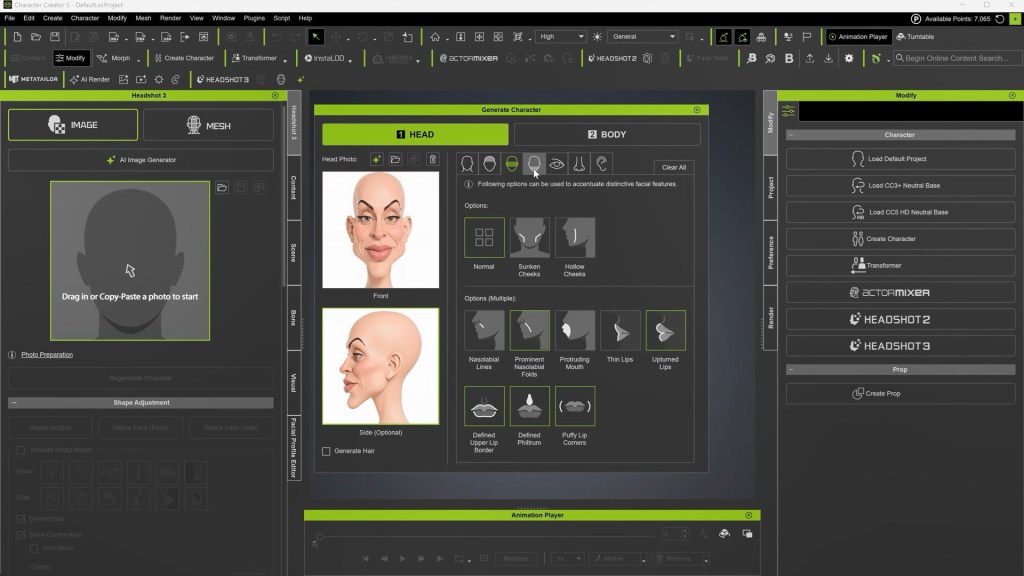
Pro Tip: AI Image Generation in Headshot 3 is powered by Google Nano Banana and consumes credits per generation, so generate your profile reference once and reuse it rather than regenerating on every iteration.
Step 2: Reshaping the Splines to Fit Exaggerated Proportions
Headshot 3’s automated fitting is trained on standard human anatomy, so on a caricature it will initially pull in toward “normal” proportions and clip exaggerated features like the bodybuilder’s oversized jaw and chin. Move into the spline-based head shaping stage and manually drag the guide-curve nodes outward until they fully encompass the true structural borders of your concept art. You are telling the fitting system where the real edges of this face are, rather than letting it default to anatomical averages.
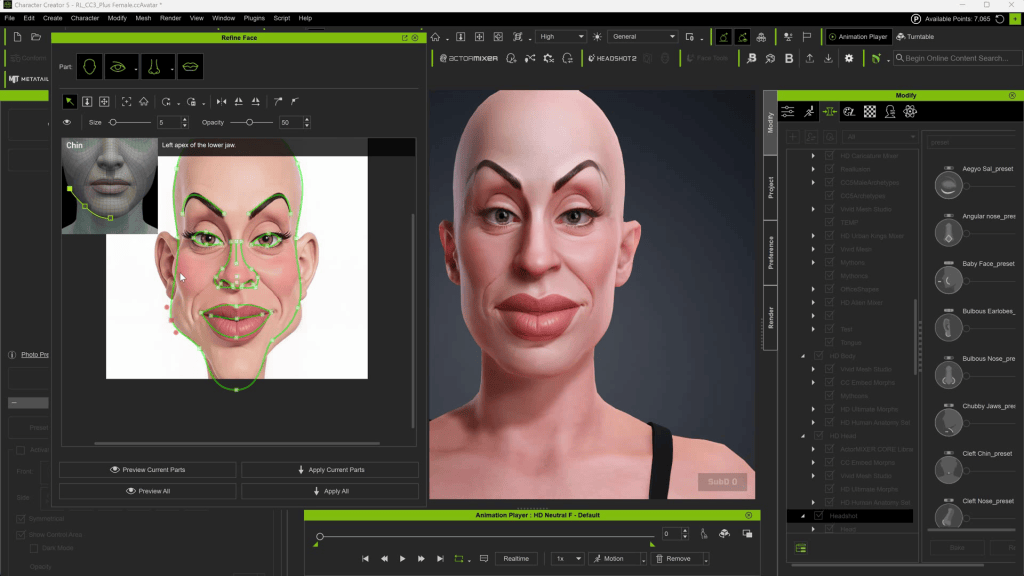
Note: Push the splines all the way to the outer silhouette of the concept, even if it looks extreme on screen. Under-fitting an exaggerated feature here is much harder to recover later in the sculpt.
Step 3: Refining Forms in Character Creator Edit Mode
Switch into Edit Mode inside Character Creator and use the sculpt morph tools with a wide soft-selection falloff to pull and mold the primary facial forms directly over the background image plates. Mirror your adjustments across the axis to keep both sides consistent, and blend them with the built-in sculpt morph sliders to cement the underlying depth before you ever leave Character Creator.
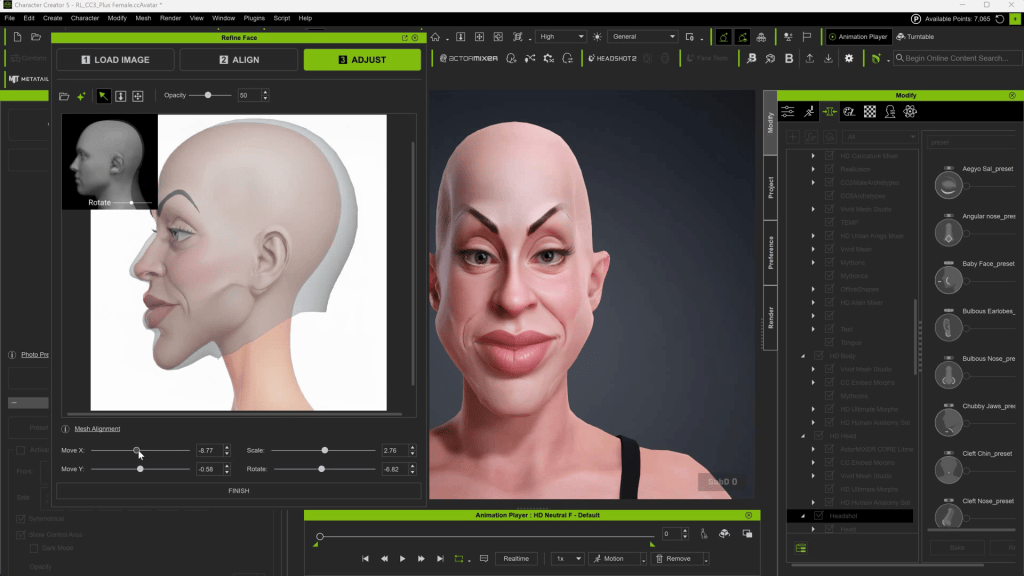
The cardinal rule: Never change or scale the character’s overall head size using standard viewport transform tools at this stage. Headshot locks the mesh to the photo layer based on the analyzed camera lens, so scaling the head breaks that camera projection alignment and ruins your texture matching. If head size genuinely needs to change, handle it inside the Headshot 3 dialog so the projection stays intact.
Step 4: Sculpting the Muscle Groups in Blender as a Morph
Send the character to Blender through Blender Auto Setup, exporting as a morph rather than a full avatar replacement. This keeps the pipeline non-destructive: you alter only the physical shapes while the rigging and bone weights stay perfectly intact, and the result comes back into CC5 as an editable Character Morph.
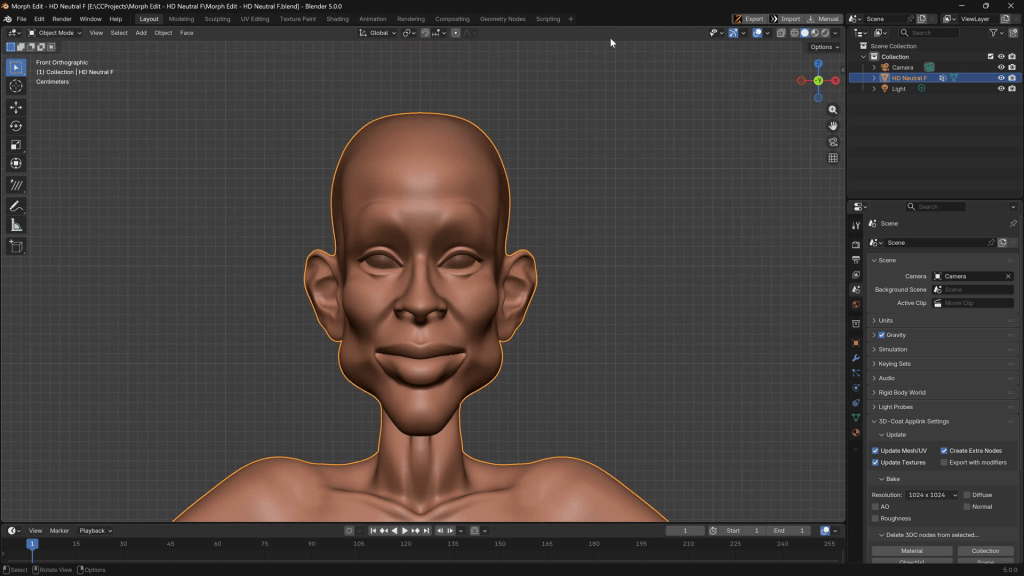
Focus your sculpting at Subdivision Level 2 (SubD2). That resolution gives you enough clean geometric density to carve out the heavy muscle groups of a bodybuilder without wrecking viewport performance or creating messy topology. Ignore micro-detail like pores for now; you are blocking anatomy, not skin.
Step 5: Realigning the Warped Textures in Krita
Because the mesh was heavily distorted during fitting and sculpting, the originally projected textures will be pulled out of place. Export the diffuse map to Krita at 2K resolution. Then export the model’s 3D UV layout, invert its color, and lock it on an overhead layer set to Multiply so it acts as a positional roadmap over your texture.
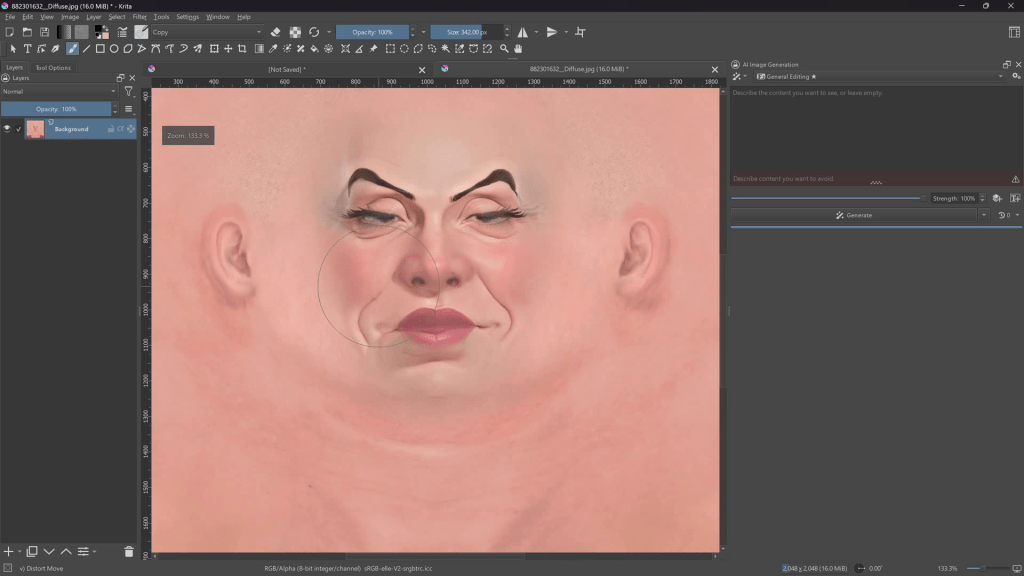
Using Krita’s warp and push tools, slide the texture details (lips, eyes, nostrils) back onto their correct 3D coordinates, guided by the UV roadmap. Finish with soft airbrushes to erase any seams left behind by the warping.
Step 6: Resetting Normal Map Artifacts with Neutral Blue
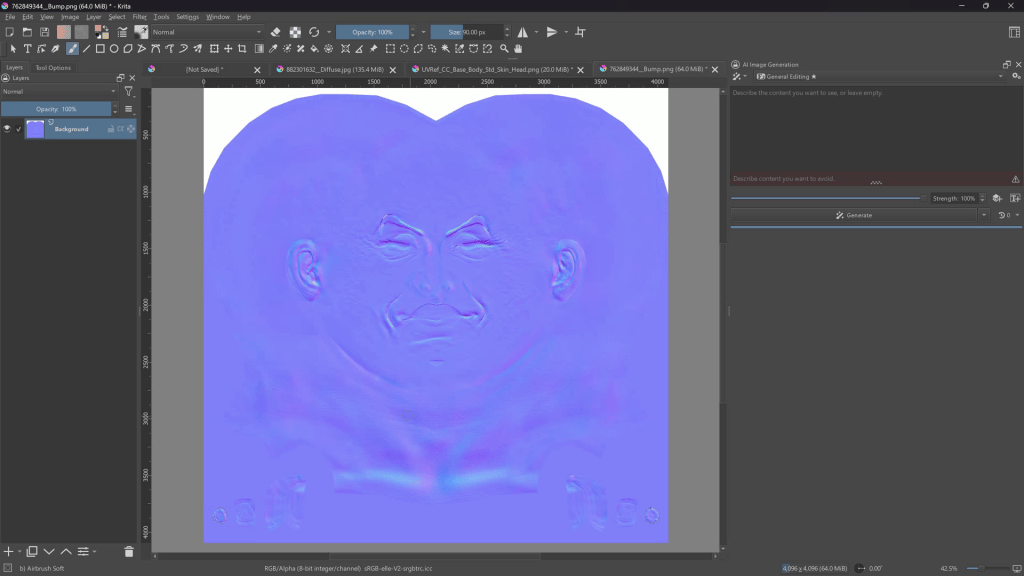
If your texture bakes leave messy artifacts or unwanted structural wrinkles, you cannot paint over them with skin-tone color, because a normal map encodes surface direction, not appearance. Sample the exact neutral value of the normal map (RGB 128, 128, 255) and paint over the problem areas with that single hue. This flattens the surface vectors in those spots and resets them to a clean, smooth baseline without disturbing the rest of the map.
Summary
The full Headshot 3 stylized image to 3D pipeline runs front art to AI side profile, spline fitting, Edit Mode refinement, a Blender morph sculpt, and finally texture realignment in Krita. Bring the refined textures and Blender morphs back into Character Creator, then add hair with Smart Hair, build a high-contrast studio lighting rig, and drop the character into dramatic poses to stress-test the deformation. By offloading base-mesh modeling and profile setup to Headshot 3, you skip the most tedious phase entirely and spend your time on anatomy, styling, and performance.
Key Takeaways
- Generate the missing profile with AI before fitting. A side-profile reference from the AI Image Generator gives Headshot 3 the depth cues a single front view cannot, which matters most on exaggerated stylized concepts.
- Push the fitting splines past “normal” anatomy. Automated fitting averages toward standard faces, so manually drag the guide curves out to the true silhouette of your caricature.
- Never scale head size with viewport transforms. Doing so breaks Headshot’s camera projection lock and destroys texture alignment; resize only inside the Headshot 3 dialog.
- Round-trip to Blender as a morph, not a replacement. Exporting as a morph keeps rigging and weights intact and returns your sculpt as an editable CC5 Character Morph.
- Reset normal-map artifacts with neutral blue (128, 128, 255). Painting the neutral normal value flattens surface vectors and clears baked artifacts without touching the diffuse.
Mythcons
Greetings, my name is Peter Alexander. In this demonstration, I’m going to walk you through how you can leverage Character Creator 5‘s new ActorMIXER as a powerful stepping stone to create unique, stylized characters. We’ll use the CC Base Mesh as our foundation, and ActorMixer will provide the next layer from which to build, making professional character creation that much easier. For this demo, I’ll be creating a stylized version of Arnold, using the Blender Auto Setup pipeline, which is both cost-effective and efficient for creating characters and assets.

FAQs
Can I use this stylized image-to-3D workflow for any concept art, not just caricatures?
Yes. The bodybuilder caricature is just an extreme test case. The same pipeline (AI profile generation, spline reshaping, Blender morph sculpting, texture realignment) works for any stylized 2D concept, and the more exaggerated the proportions, the more the manual spline and sculpt steps matter.
Does the AI Image Generator in Headshot 3 cost credits?
The core 3D head generation in Headshot 3 is free, but the AI Image Generator, which produces the side-profile and reference images, is powered by Google Nano Banana and consumes credits per generation. Generate your profile reference once and reuse it.
Do I need Blender and Krita, or can I stay inside Character Creator?
You can take a stylized character a long way using only Headshot 3 and Character Creator’s sculpt morph tools. Blender is used here for heavy anatomical muscle sculpting at SubD2, and Krita for precise texture realignment after large mesh distortion. Both are optional refinements layered on top of the core Reallusion workflow.
What is the difference between Headshot 3’s Image and Mesh workflows?
The Image workflow generates a rigged 3D head from a 2D photo or concept, which is what this tutorial uses. The Mesh workflow converts an existing static 3D model into a fully rigged CC character. For 2D caricature art, the Image workflow is the right entry point.
Related Posts
- Reallusion Redefines Digital Double Creation with the Launch of Headshot 3 for Character Creator 5
- Creating a Stylized Arnold Schwarzenegger 3D Caricature with CC5, ActorMIXER & Blender
- Create Your Own Stylized Character – An Easter Bunny: Character Creator to Blender Workflow