
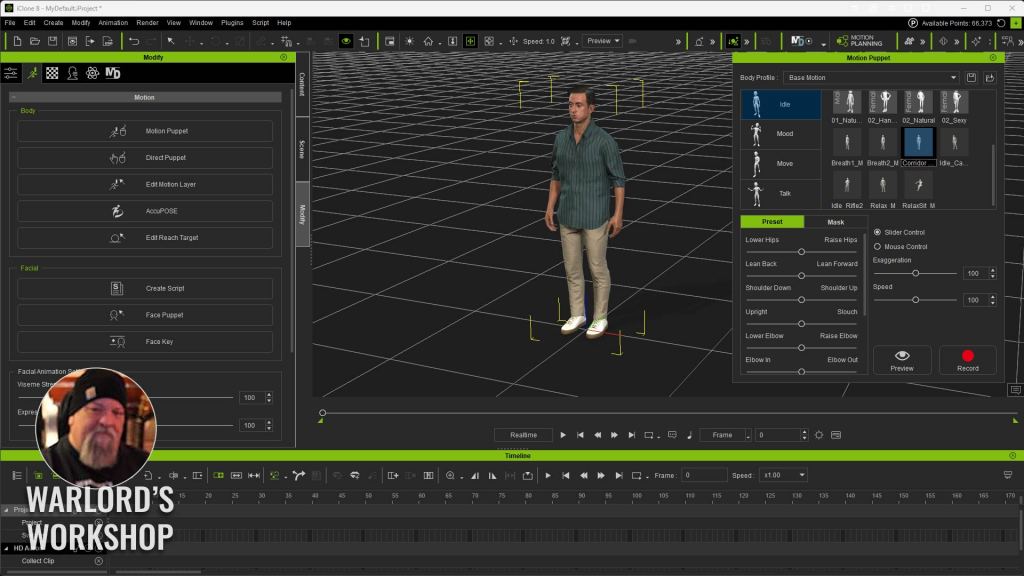
Motion Puppet has long been a feature of iClone and is a great tool for creating animations fast without knowing how to animate at all. It’s a time saver for easy filler motions for more advanced users and an introduction into timing, masking, and layering for beginners, which are all concepts important to improving as an animator.
The Motion Puppet is simple in use and easy to grasp for most beginning iCloners. Part of its power is in the built-in Preview system that allows you to see the motion in action before committing to it. If the motion wasn’t what you wanted during the preview, you just stop the preview, and it all reverts back to the state it was in before you previewed.
The Motion Puppet Popup
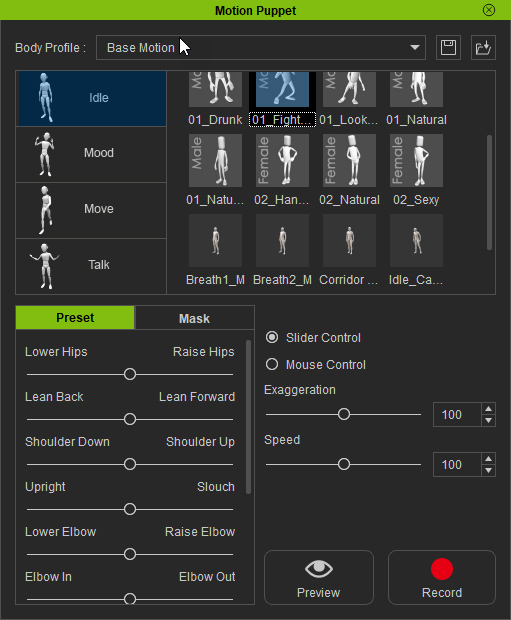
The pop-up contains a simple interface with three main sections: the type of motion (Idle, Mood, Move, Talk), the available motions in each type, and the slider controls for Exaggeration and Speed, or you can use a mouse to control the Exaggeration of the movements.
Next up is the Preset and Masking control area on the bottom left of the popup. Masking is a very important feature and the main reason to use the puppet. The masking, if you are not familiar with it, allows us to layer in animations by masking out or freezing limbs during animation runs with the puppet. This means we can work with only the legs in one run and the arms, head, and/or torso in another run or a combination of runs, creating a custom animation out of all those layers. More on this later.
The last buttons on the right side of the pop-up, Preview and Record, allow you to preview the motions before committing, which is a great idea for beginners, as after the preview is over, everything will return to the state it was in before the preview and at the exact keyframe position too.
Masking
Now comes the fun part of Motion Puppet… masking.
In iClone 8’s Motion Puppet, Body Part Masking lets you decide which parts of the character will be affected by the puppet performance and which parts will be left alone. Think of it as a selective “apply motion here” filter. You can include only the upper body for gestures, only the lower body for locomotion, or isolate a single arm for a quick pointing or waving pass while everything else stays as-is.
Masking becomes especially powerful when you’re layering motions, as mentioned earlier. If you already have a walk cycle recorded, you can select the torso, arms, and head using Motion Puppet to record a new upper‑body performance, like talking with hands, reacting, or carrying something, without overwriting the footwork. This makes it easy to build up an animation in passes, keeping the parts you like and only replacing what needs improvement.
Select the body part or parts, then use Preview to test the result. If the motion isn’t behaving the way you expect, maybe the shoulders are moving too much, or the hips are being influenced. Stop the preview, make your adjustments, and preview again until it’s clean. Once it looks right, hit Record to commit the motion, and only the enabled body parts will receive new motions.
With a little practice, Body Part Masking turns Motion Puppet from a one‑click motion generator into a flexible performance tool, letting you combine multiple puppet recordings into one more polished animation.
Previewing
Even though we just discussed it in the previous section, let’s discuss how Previewing enables creative freedom at the beginner’s level. One of the worst things an animator can face is destructive editing. The type of editing where the only way to recover from a mistake is to reload the file and start again. A lot of animation tools have this destructive editing, but the Preview mode removes all of that by NOT making any edits at all until you record it.
It takes a deliberate act of pressing Record to get started, and by then, you will have already previewed and adjusted as many times as it takes to get the quality of work you want without losing the starting place of the motion. Most of us go through some version of putting in a lot of work just for something to hiccup along the way and cause irreversible changes that require the reload. Previewing eliminates this entirely.
If the scene isn’t working as you want it to, you can keep changing it until it does with no destructive edits at all. On the downside, this sometimes gives us too much creative freedom as we can get stuck on minutia, bogging down the project, so this is a tool to use wisely, as they say, else you will find yourself running endless edits.
The Benefit of Layering Motions
Combined with masking, this is the ultimate beginner’s tool. To keep this simple for your first attempt:
- record a base animation with no masking the first time. If you are not familiar with Motion Puppet and Masking, check out the online manual section about it here.
- After you record the base motion, select another motion and go to the Masking Tab on the lower left of the Motion Puppet popup. Click on the legs or other limbs to mask them out so they retain the original motion. Preview and Record that motion.
- Select another motion and mask out everything EXCEPT the head so only the head is affected. This can be any limb or any combination of limbs. Preview and Record the motion
You have just layered motions on top of a base motion, but they will be treated as one motion in the timeline should you need to edit it.
Adding New Motions to Motion Puppet
It wasn’t really a well-publicized feature, but it has always been possible to add more motions to the Motion Puppet. Adding them to existing folders already in the Motion Puppet library is easy and should be crash-proof.
This first step can be the toughest part of this whole thing if you do not understand file location. If so, this will be a little tricky and may be a showstopper. This is just a warning, as we will be adding items to the installed program, not the custom asset locations.
Search for the MotionPuppetPreset folder in your iClone installation to determine its location on your system.
NOTE: The Motion Puppet now uses the iMotion format. You can load other motions like rlMotion into a character, then right-click on the motion in the timeline and select Save with Motion, choose the iMotion file suffix in the dropdown menu, and save. This is demonstrated in the tutorial below.
- Locate the directory that the Motion Puppet motions are in. This will be a TEMPLATE motion, not a CUSTOM MOTION. This is a rare time that we actually add files to the template instead of Custom location. In my case, iClone is installed on another drive in a custom location under the following path convention: /iClone 8\Program\Assets\iClone\MotionPuppetPreset\Base Motion
- Locate the motion file that you want to copy. In iClone, you can right-click on the motion icon in the Content Manager and select Find File, but remember to convert it to iMotion as shown in the tutorial below, which saves the iMotion to the Motion Puppet location.
- Copy the iMotion file to one of the four folders already in the Motion Puppet, then copy and paste any one of the ini files and rename the ini file to the exact name of the iMotion file. It has to be the exact same name, including spaces and underscores. A thumbnail will be generated in the Motion Puppet and is easily recognizable from the original
I used the Idle folder in my example, but you can use any one of the four existing folders. They don’t have to be the kind of motion listed in the folder either. This is just a quick start to show you how to get the motions in the right location so the Motion Puppet can see them.
Managing the Added Motions
With this simple method, there is no easy or good way to manage them. As simple as it is, you might just want to delete the ones you don’t use very often and add them back when you need them. You’ll soon figure out your own system.
So far, the motions I have added are always at the bottom of the existing stock motions that come with Motion Puppet, as the stock motions had numbers in the name, like 01_Natural, which keeps them at the top unless you use numbers on your added files. By not using numbers, those files will be at the bottom as mentioned earlier in alphabetical order based on the filename. The iClone-generated thumbnail is another identifier.
ADVANCED – Creating a New Folder at the Base Motions Level
This is up to you whether you want to go this far, and I’m not going to cover it in this article, but I have dug up some links to some old tutorials from users on this, so you can educate yourself on the ins and outs of that method. If you make a mistake like a missing icon when you make a new higher-level folder, then iClone can crash, so that is why we will not get into it in this beginner’s guide.
NOTE: BE WARNED, if you choose to go the advanced route and make a mistake, iClone can crash so understand what you are going to do before you attempt it. Just following the steps can work, but can also lead to an unstable installation if errors are made.
Summary
I didn’t find anything new when I was researching information, nor did I find any recent tutorials other than the ones I mentioned in the Advanced section. If you are confused by anything I wrote in that section, then don’t go that route until you do understand.
The Motion Puppet has been a feature for a long time, as I mentioned earlier, and it deserves a lot more attention with the powerful masking feature, considering how simple it is to use. Considering that beginning animators have a lot to learn, a tool like the Motion Puppet is almost like throwing a life preserver to an animator drowning in informational overload. No need to know what keyframes and curves are at this basic level, as the Motion Puppet takes care of all the necessary technicalities in the background.
Even if you are a Pro and have never gone this route, then give it a try, as you might just find out mixing and layering motions with the Motion Puppet can create a lot of filler action and up close to the camera motions with little tweaking.
At the end of the day, Motion Puppet is a tool that empowers beginners by allowing them to create easy animations early on without having to spend months or years learning the software. That builds confidence, which leads to a more productive learning experience and avoids burning out from frustration with advanced techniques.
Older Tutorials on Adding Motions to the Motion Puppet
Rampa Tinling YouTube Channel – Adding Motion Puppet Motions in iClone 8 (Nov 12, 2022) Explains the advanced method.
Hayz TV YouTube Channel – New Way to add Motion Puppet to iClone 8 (June 15, 2022)

MD McCallum – WarLord
Digital Artist MD “Mike” McCallum, aka WarLord, is a longtime iClone user. Having authored free tutorials for iClone in its early years and selected to write the iClone Beginners Guide from Packt Publishing in 2011, he was fortunate enough to meet and exchange tricks and tips with users from all over the world and loves to share this information with other users. He has authored hundreds of articles on iClone and digital art in general while reviewing some of the most popular software and hardware in the world. He has been published in many of the leading 3D online and print magazines while staying true to his biggest passion, 3D animation. For more information, click here.




1 comment
What a nice explanation. I don’t use this tool often but this will help. I hope to see more tips and tricks of the basics of animation because new features are coming in such speed that I can’t follow it anymore and need to go back to basics!