首頁 » Page 61

The Making of Ancestories XR Cinematic Game Trailer

Giving life to characters with Digital Soul

José Antonio Tijerín

José Tijerín is a digital illustrator, 3D sculptor, and creator of video games such as “Dear Althea”  available on Steam. His content pack “We’re Besties” is currently for sale in the Reallusion content store.

In this tutorial, Tijerín explains how Character Creator (CC) and iClone helped to make a fund-seeking cinematic trailer for the Ancestories XR video game. Read on to discover the possibilities of Reallusion software to attain professional and industry-standard results sans expensive equipment and enormous financial support.

The Ancestories XR Project

José Tijerín: This promotional trailer was made to bring awareness to AncestoriesXR.com. We are telling stories about American history and stories of individual families. We are building a company that uses narrative video game techniques to create connections between younger and ‘digital-first’ generations to their family history and their combined legacy to American history. Millions of Americans can trace their family history back to the time of the Civil War, and this promotional video makes that history come alive. We don’t stop at animation; we also add interactivity so people can learn and explore via modern game techniques.  

Planning the Project

The first thing to do, in a really big project like this, was to spend weeks visualizing the result. Then we developed a plan that would allow us to get there in the most efficient way possible, to not waste time and resources.

The most important aspect was to define a storyboard and main character according to the narrative and audio files provided to us. In order to emphasize the aim of the project, it was decided that an old family photograph was to come to life to tell a story—specifically, an old African-American Union soldier in army uniform.

Creating the Character

To create the central character, I used Character Creator 4 together with Reallusion’s Human Anatomy pack, and after modifying the base character to resemble the references that I have gathered, I took it to Zbrush for retouching until I achieved the desired look. When sculpting, I usually do so without perspective in order to keep all polygons in sight, as lens distortions can augment the actual shape of the character. Modeling should not be approached in the same fashion as drawing: It’s important to constantly check all angles of the character and the shadows that form on its 3D face.

After that, I got to work on the character’s add-ons, most importantly, his beard. This element will be responsible for giving shape to his face and personality, so it was crucial that it was exactly the beard I had in mind.

For this, I chose one of the beards that comes with a mustache which was also offered as a base in Character Creator, and took it into Zbrush for reshaping. Even then I added more hair cards with transparent textures of thick and kinky hair for a more fluffy and realistic look. 

You can see the beard layers that were progressively applied in the image below. And thanks to Character Creator’s efficient system, the beard automatically adopts the weight maps of the 3D face (when the program is kept open). If we close Character Creator during this procedure, then we’ll have to manually synchronize the morphs of the face and beard when it comes time to animate facial expressions and perform lip-sync. It’s also important to test out 3D character animations, and in this case, we had to make sure the beard didn’t deform, due to its length, while the animated character turns his head. 

To make the clothes and objects of the scene, I had to do a lot of research and ask for help from historian Retha Hill of the AncestoriesXR group. I usually use, as was this case, Maya and Zbrush for modeling and Substance Painter for texturing. While Character Creator makes clothing setup fast and adaptable, we still had to make sure the clothes were error-free while the animated character moves about. 

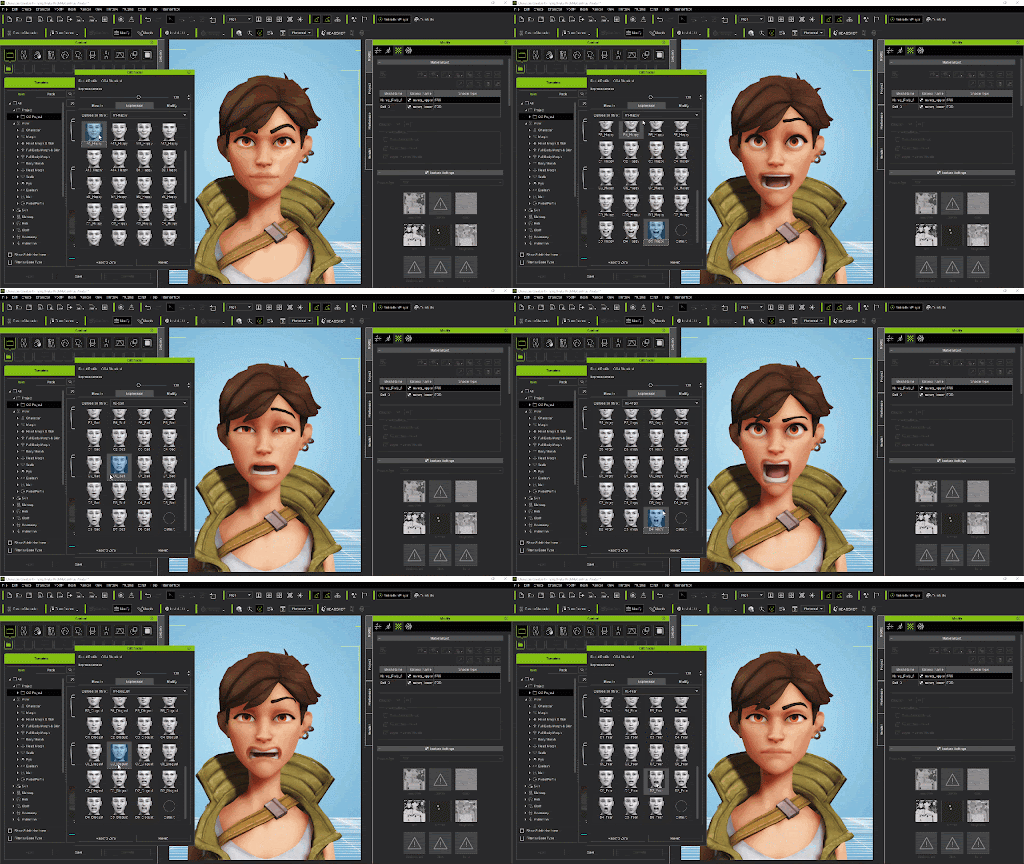
CC 4 lets us apply an animation test to check for possible errors with clothing and accessories, and allows us to correct them and prevent further complications later down the road. In the same way, it is now also possible to test, modify, and add facial expressions.

Animating the Character

After having done all of the necessary checks, including correcting the position of the teeth and tongue—which is often overlooked—it’s time to export the character for animation in iClone, and after having set up the scene with props, I then applied lip-syncing. Adding audio to the character as the base for the rest of the 3D character animation made the most sense, as it gave us a clear guide to match the voice actor’s performance with the character’s movements and, ultimately, a much more realistic animation.

iClone also offers manual and easy ways to correct the lip-sync and match them to the words pronounced by the character, as well as intensity and emphasis of the syllables, which helped to get the animation just right.
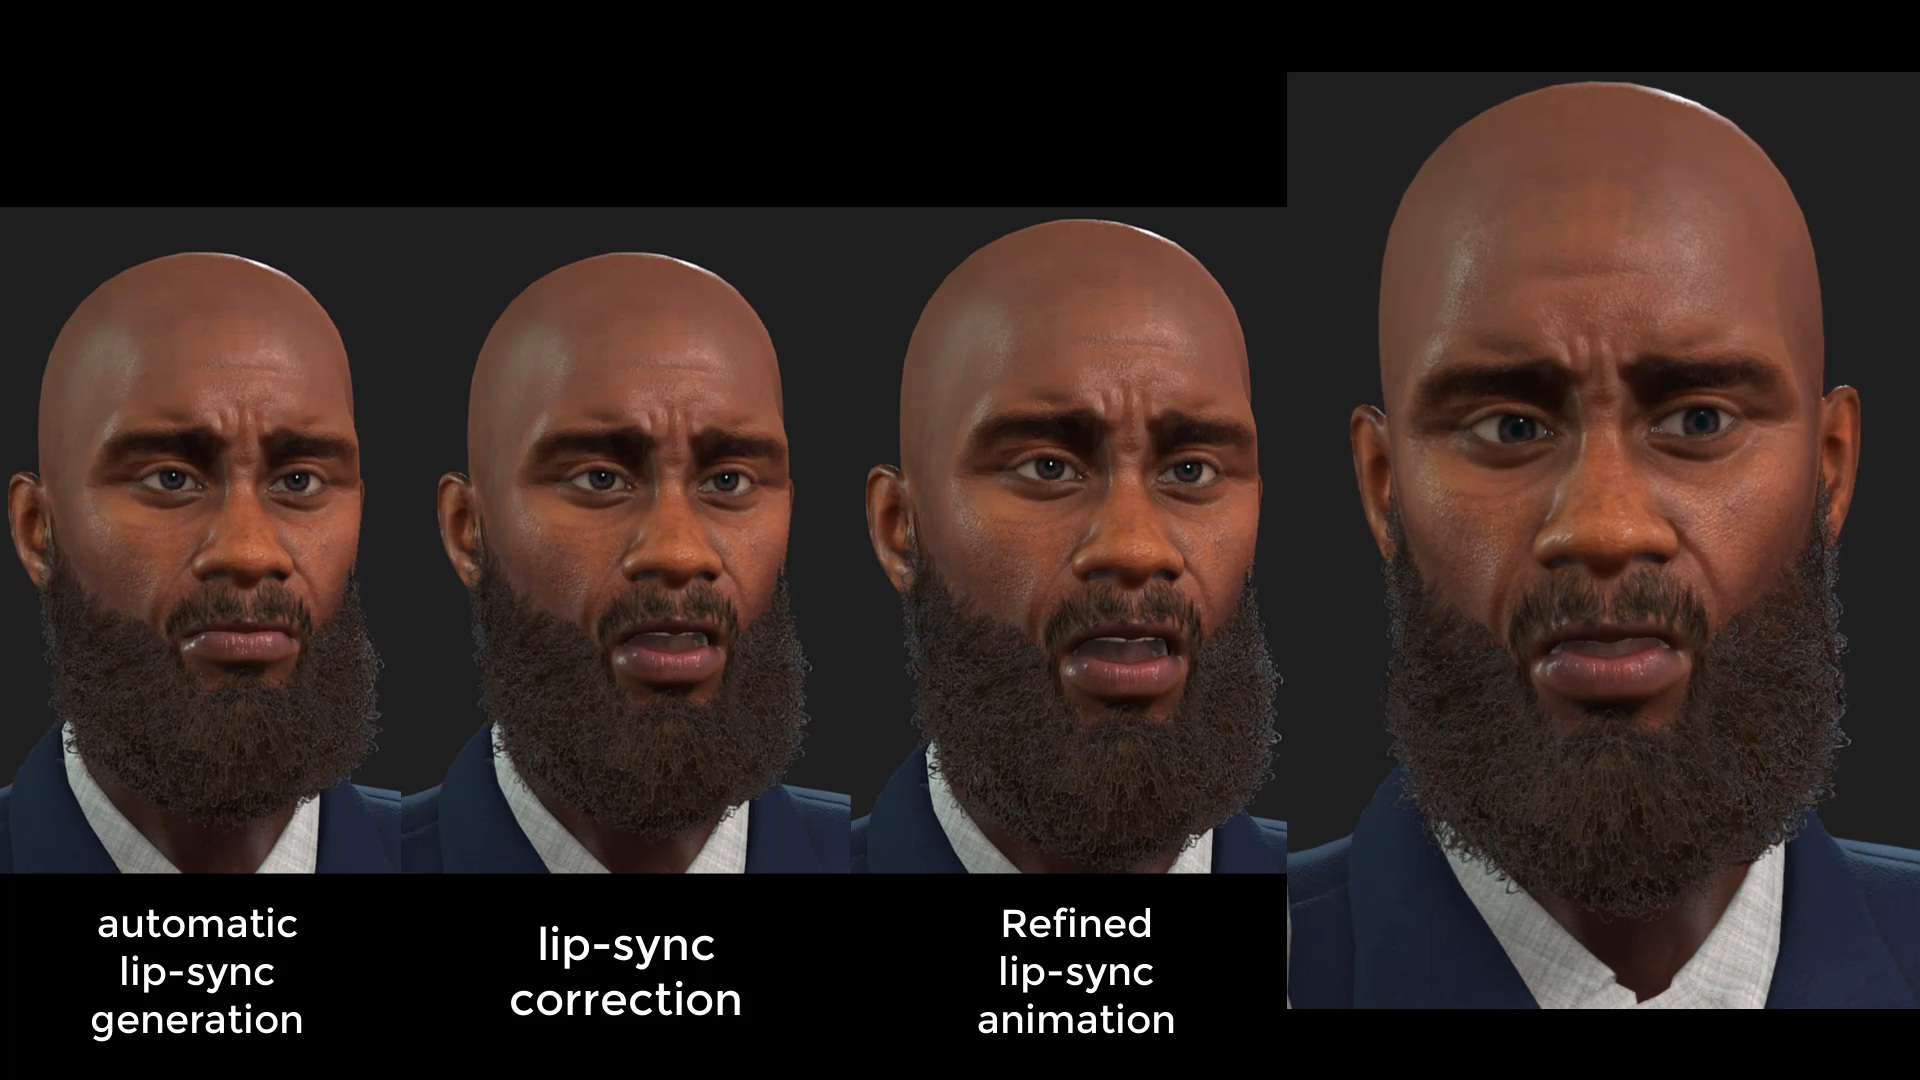
After having completed this process, it was time to use the revolutionary Digital Soul content pack available in the latest version of iClone. With this tool, we were able to apply subtle facial animations that contributed to the ‘presence’ of the character and enhanced his performance with the lip-sync already applied. 

Simply by adding one of the many animations available in the package, the character came to life in a solidly realistic way with subtle and natural movements that made the character feel more human. This became a great base animation, on top of which, we applied additional motion keys with tools such as the real-time Face Key and Face Puppet tools, to perfect and customize the performance until we had what we were looking for. We were also able to layer on additional animations from Digital Soul without a loss in animation quality. It’s important to keep trying out several options and retouching the final animation, to give the performance a ‘genuine’ touch, fitted for the specific scenario.

After having defined the facial expressions, it was necessary to add an animation to the body to enhance the performance of the character. This should be done even if the camera shots do not capture the character completely, for example, even if the character’s hips are not shown, their movement will  inevitably affect the head and make their movement less stiff and more natural.

Fortunately one of iClone’s default animations worked perfectly for this task and only a couple of adjustments had to be made with the Edit Motion Layer window to make the character fit the chair. While applying this animation, I noticed that there was a moment when the character changed his posture and raised his hand. Combining these movements with a change in the voice acting gave intention to the character and made more sense and gave more power to the performance.

Exporting work to Omniverse

After having made sure the whole cinematic sequence looked exactly as planned with camera animation which were mostly still-shots, we finished the project in iClone and exported it to Omniverse for final rendering.

It’s a good idea to leave the scene lighting to Omniverse and check the result in RTX Path-Traced mode. Otherwise, the lighting can give unpredictable results in the final render, if we don’t preview the light bounces.

As shown in the image above, there was a general light thanks to the HDR image that encompassed the entire scene (not visible in the shot). Another two sets of lights were placed to illuminate the 3D face. I then added a cube as a back-wall that created soft-shadows on the entire character and darker shadows for the lower parts of the character. In my opinion, this created a more intimate effect for the scene. Finally, I placed a yellowish cloth to bounce lighting onto the opposite side of the character’s face. 

Now that everything was complete, the only remaining step was to configure the Movie Capture window and render for as many hours as necessary. In this case, rendering at 4K in RTX Path-Traced mode with 60 frames per second on my computer took more than 40 hours. After assembling the video together with the music and audio, I was able to deliver the Ancestories XR cinematic advert to the team, which was then used to promote the project. Remember to visit ancestoriesxr.com to support the project and I recommend you to watch more related videos of this article on the official Reallusion Youtube channel.

Learn more :

——————————————————————————————————————————————————————————————————

This article is also featured on Creative Bloq.

Fastest Turnaround from Static Mesh to Fully Animated Character

Blender to Character Creator 4 – Humanoid Pipeline

This article is featured on BlenderNation and BlenderArtist.

Greetings,
My name is Peter Alexander, I’m a 3D Generalist and Character Artist who specializes in Reallusion-related workflows. In this video, I’m going to demonstrate how to take a ready-made 3D character model, rig it in Blender, and import it into Character Creator 4 (CC4) to make it compatible with Reallusion’s 3D facial animation standards. 

INTRO: Select a 3D character model of your choice

For this demonstration I’m going to be using a model purchased from the 3D artist, Makar Malicki, whose assets can be seen on Artstation.

I’m going to start by opening a Blender file that I previously set up by separating the mesh into sections. This may not be necessary for you, but it helps me in the weight mapping process. Also, keeping the body separate from the hair, eyes, teeth, and accessories also helps to apply a degree of symmetry when doing facial expression editing.

STEP 1: Blender Character Rigging

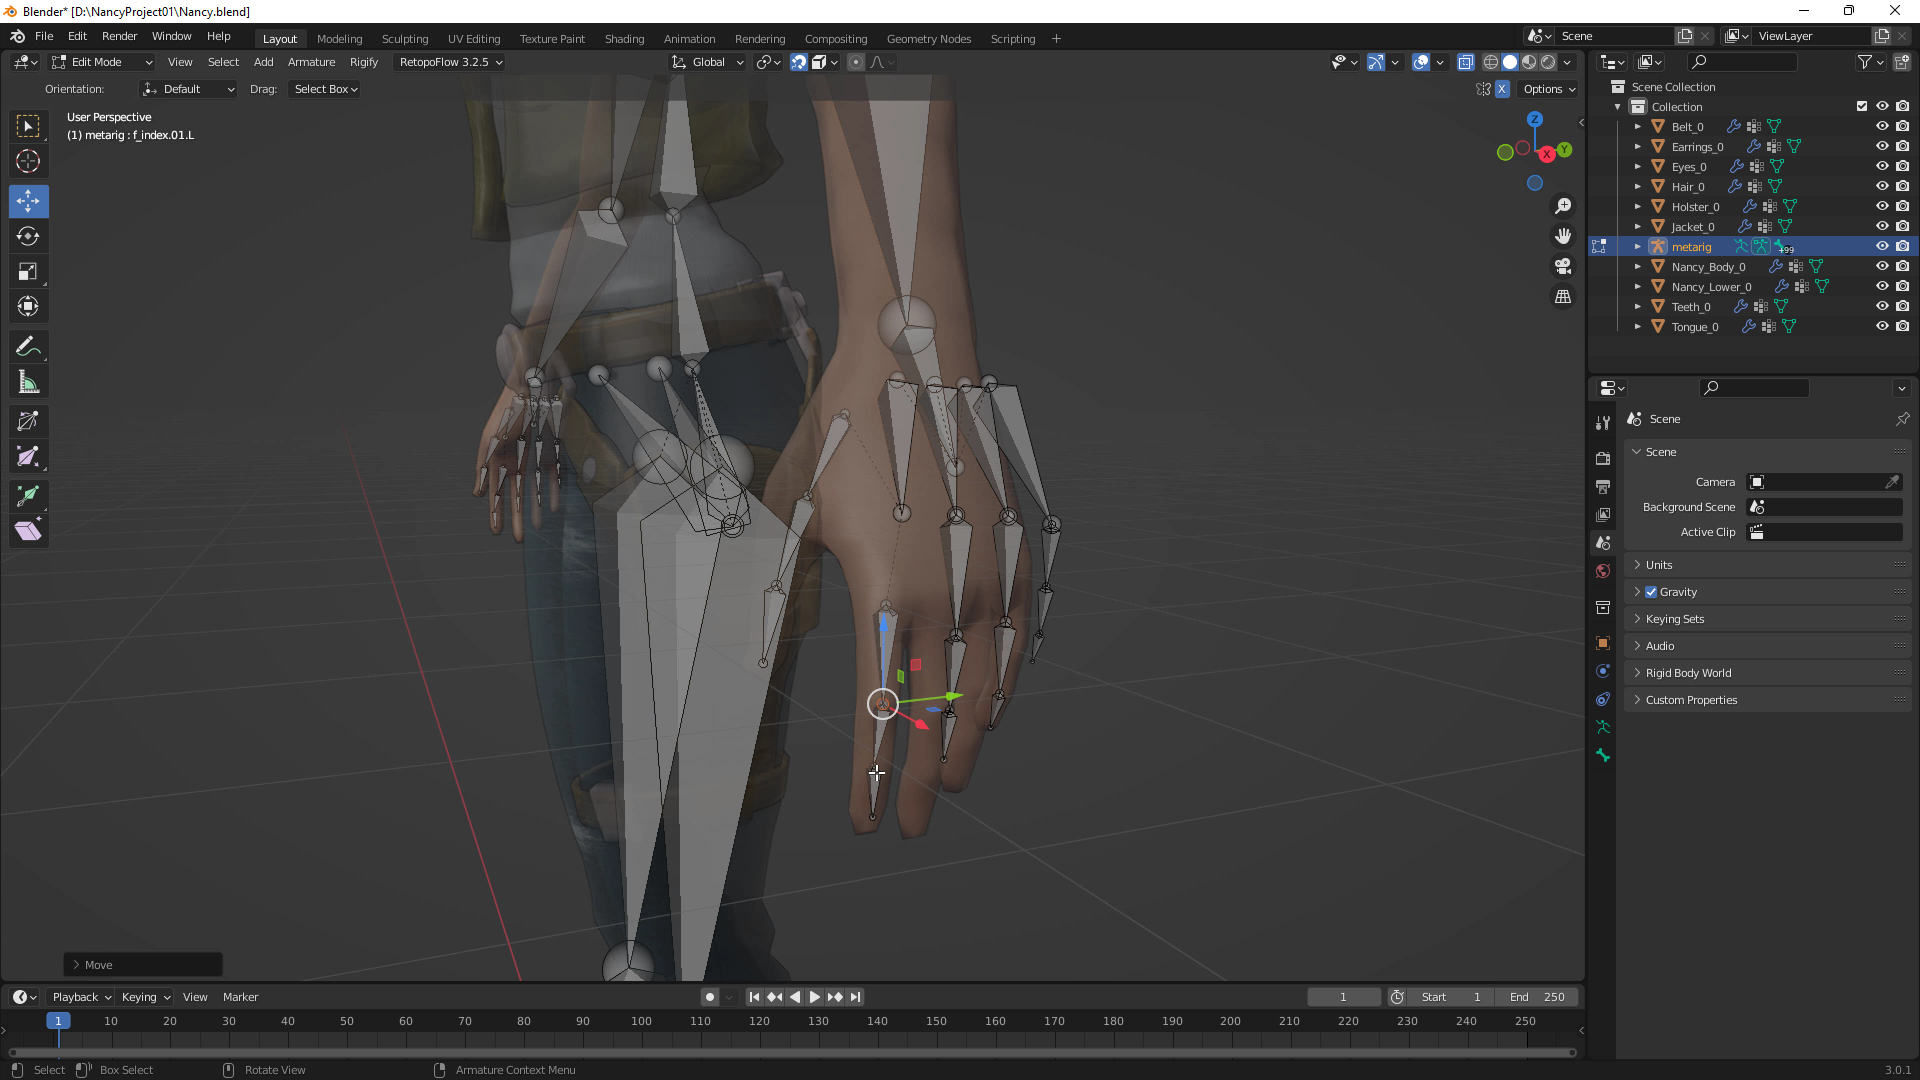
For rigging, I use the Human Meta-Rig located in the Armature section under Add. After adding the Meta-Rig, I scale it down and align the bones to the model as best I can. It can be difficult to align bones in three-dimensional space, so I turn on the Snap > Volume > Center option for some bones, especially the fingers. 

I deleted most of the facial bones, as morphs will control much of the expression system. Technically you can leave them, or apply weight maps to assist in the facial setup process in Character Creator 4, but my preferred method is to leverage morphs.

I add a bone for the jaw, three bones for the tongue, and I give the top and bottom teeth a bone each. Your setup doesn’t have to follow this precisely, although you’ll probably want at least a jaw bone, as well as bones for the eyes. While your face setup can be different, try to keep the rest of the bones consistent with the Human Meta-Rig. These names will be used in a script within Character Creator that will automatically identify the Meta-Rig setup.

Once the bones are aligned, select all the meshes and bind them to the armature. Weight mapping will almost always require adjusting. The trickiest parts tend to be the jaw for me—although getting bulkier clothing to deform properly can be problematic as well.

You’ll want to thoroughly test your weight maps before the next stage. Character Creator does have a system that allows you to edit weight maps, though it’s not as robust as Blender’s. Using Blender’s pose functions can allow you to see which aspects of your character need to be touched up.

STEP 2: Auto Import Meta-Rigged Character to Character Creator 4

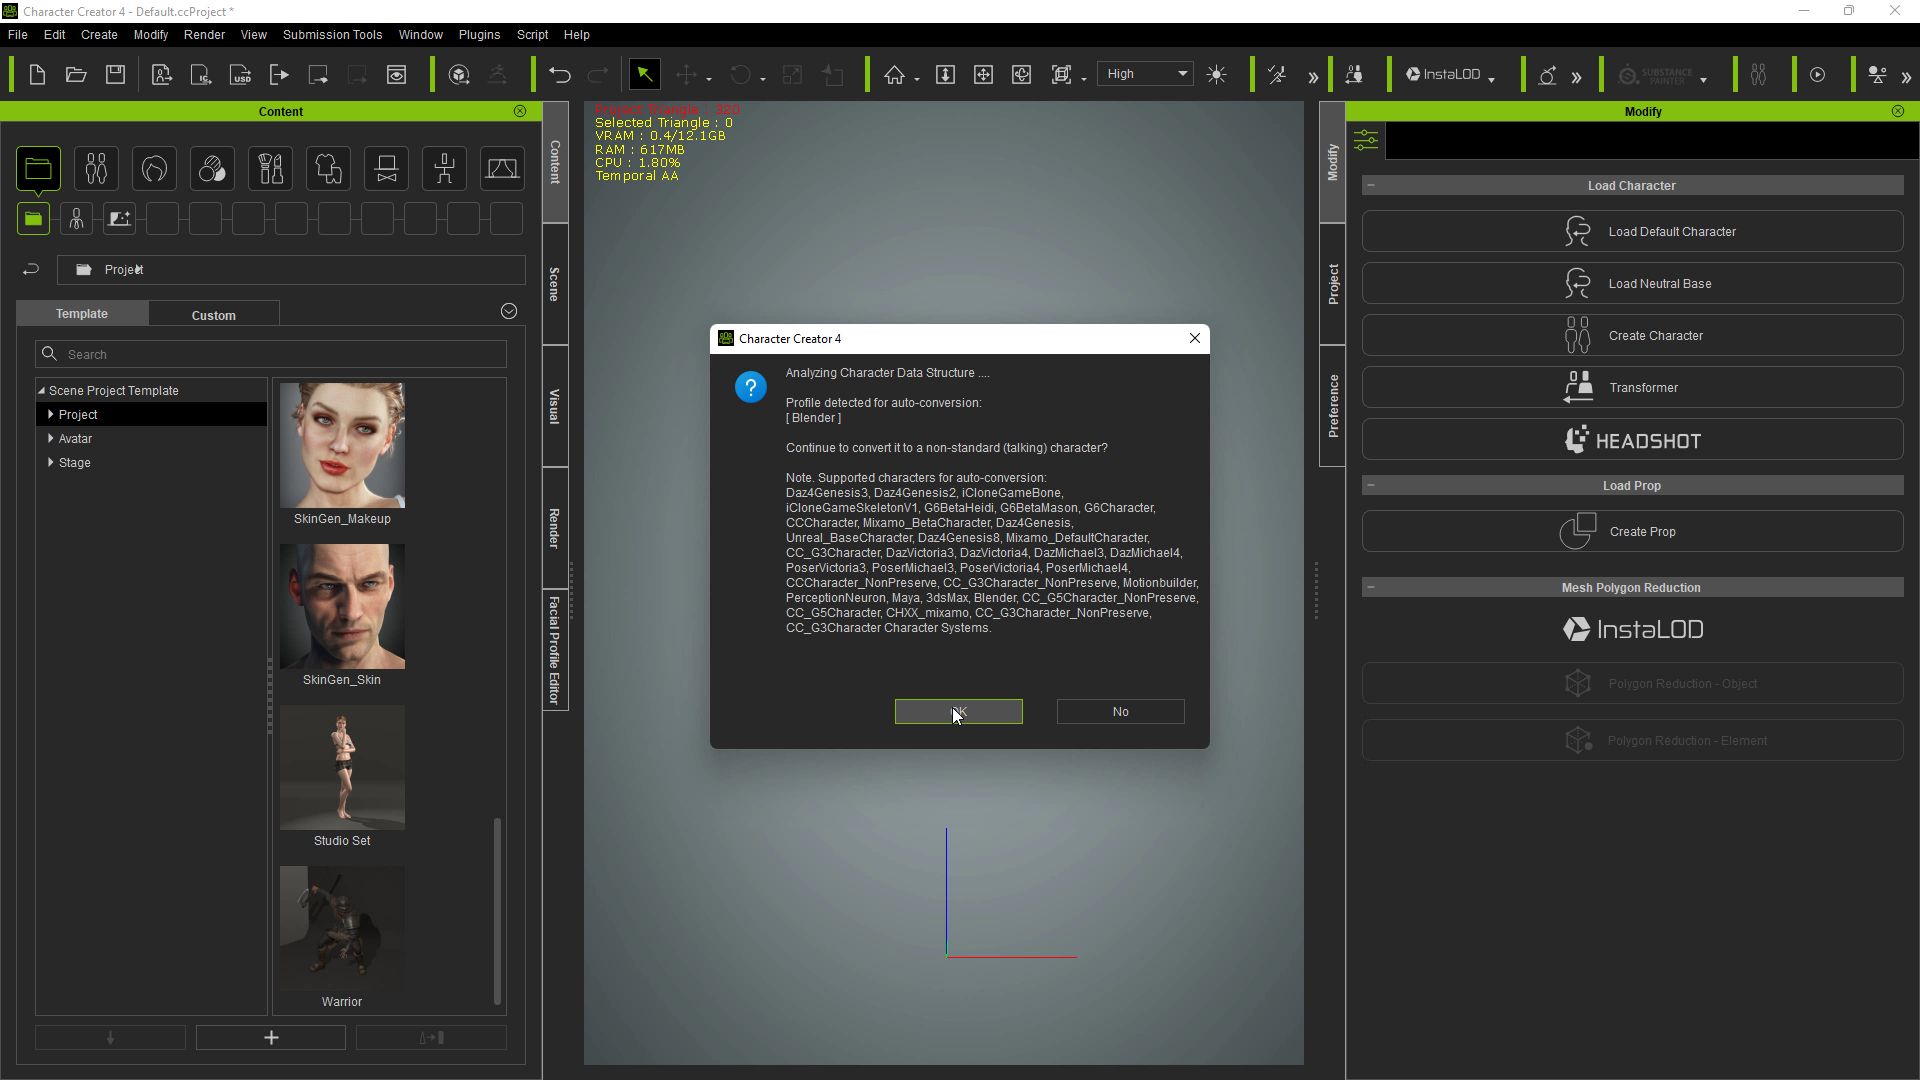
With the rig finished, export to FBX (uncheck Add Leaf Bones), then import into Character Creator 4. You can do this by dragging the FBX into CC4, or opening up the Import dialog and selecting the file.

Unless you’ve changed the bone names, the script should detect Blender’s Meta-Rig, if you use that rigging for your character. If not you’ll have to manually assign the bones using the bone assignment menu.

Reallusion’s motion library will be largely compatible with your imported character; although due to the proportion difference of stylized characters, you’ll notice some of the poses and animations need to be adjusted.

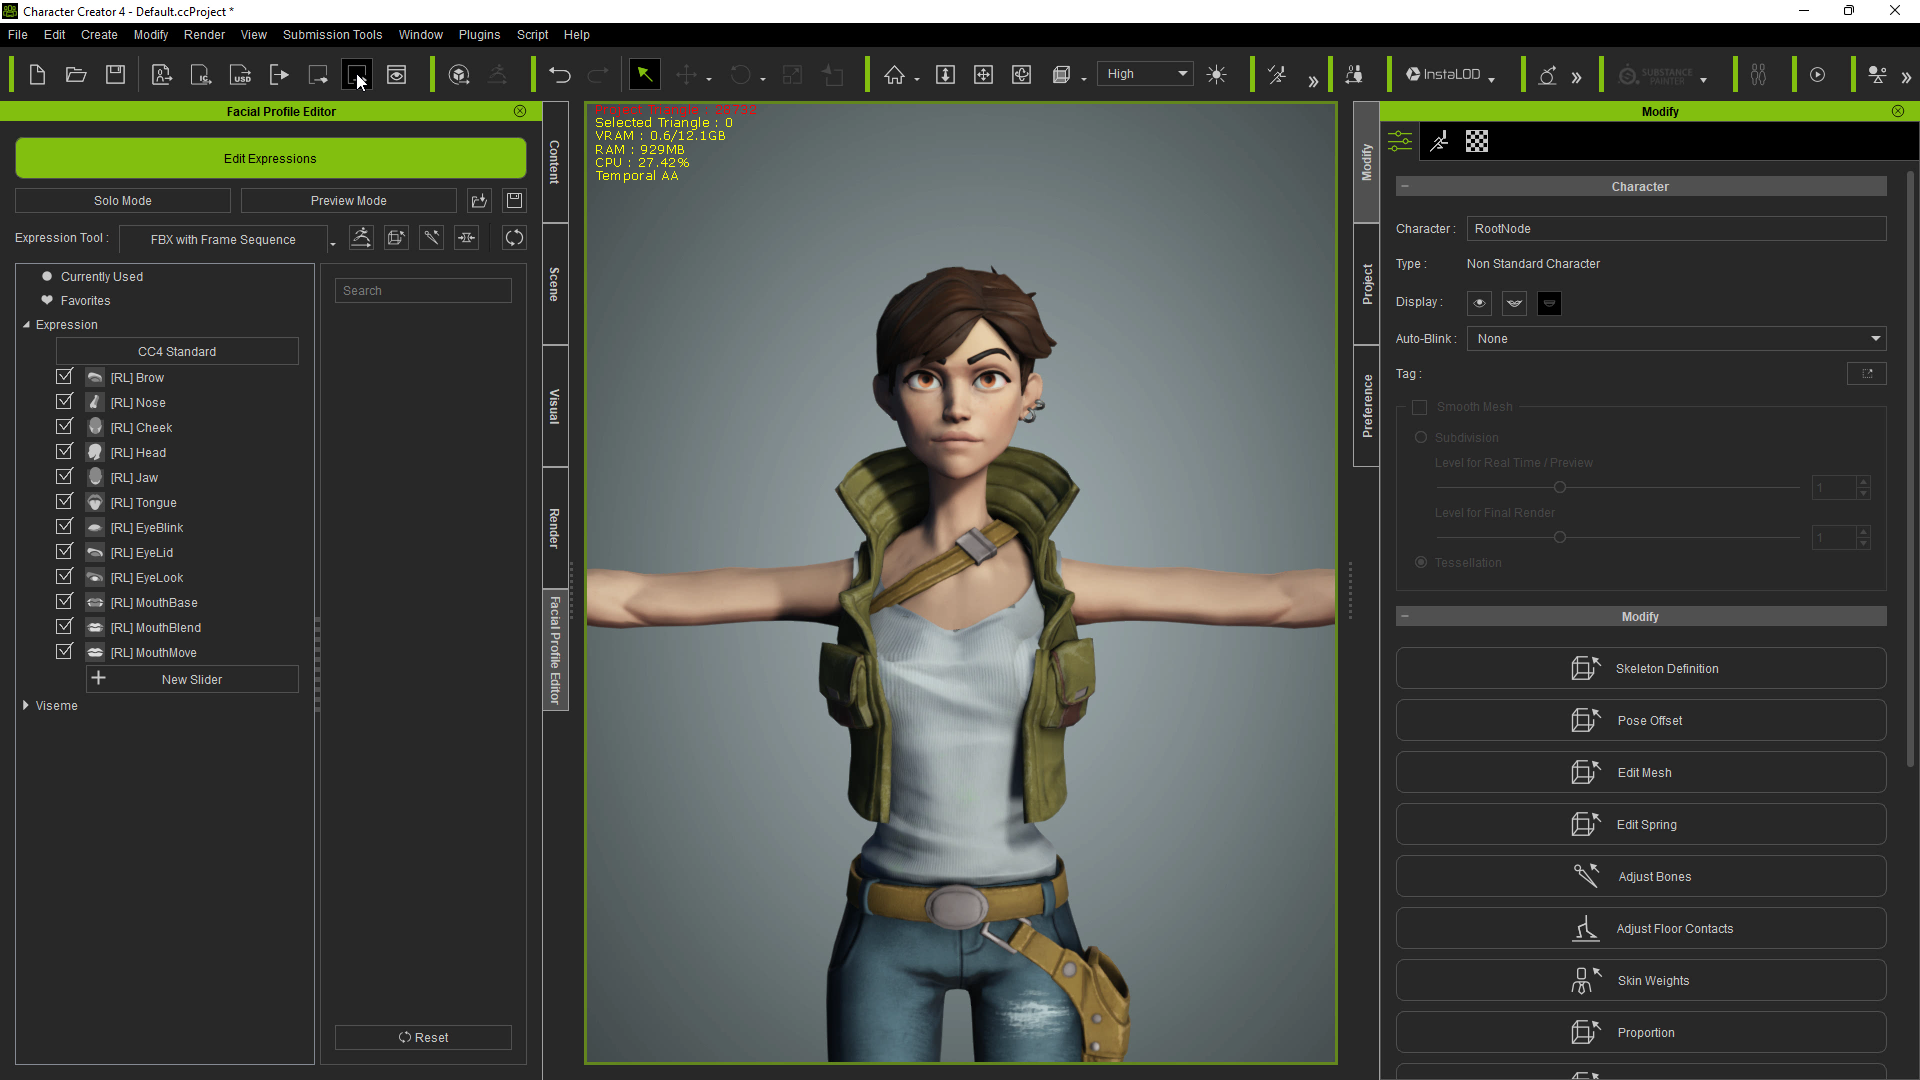
The Facial Profile Editor allows you to insert morph data into named slots that will be used to give the character facial animation and lip-sync compatibility. For a custom character outside of Character Creator, these slots will be empty by default. Depending on how you’ve rigged your character, you’ll need to export the model to a 3D application that allows for manipulating OBJ and/or  FBX files to efficiently create morphs. Zbrush’s GoZ is built into the pipeline, but an FBX can be exported into Blender, or similar software, just as easily.

STEP 3: Adding Facial Rigs in Character Creator 4

Each expression has a thumbnail that visually conveys the intended morph for that slot, often with little red arrows for additional assistance. This eliminates a lot of the guesswork involved and makes the process attainable for many skill levels.

STEP 4: Batch Import Facial Morphs from Blender FBX

Character Creator 4 has an additional FBX export option, which is optimized for exporting FBX data for the Facial Profile pipeline, with presets for most industry-standard software. Blender is my software of choice, so I select that option and choose ‘FBX and Expression Sequence’.

Pro Tip:

From the FBX export panel, please make sure to check “Mesh and Expression Sequence” options so the FBX file will include empty morph entries for Blender designers to easily fill in additional morph data.

Morphs for Blender are located in the Shape Keys section. Character Creator 4 has populated the slots with empty names, making this process much easier than if you had to manually insert the names.

Blender character creation has many tools for sculpting expressions efficiently. I use a combination of the sculpting tools and the Edit Mesh tools. Also, Blender has a feature called Blend from Shape Key, which allows you to select aspects of your model and add or subtract other shape key data. It’s very useful for this process and in general.

When you’re finished editing, export as an FBX back to CC4. Uncheck Add Leaf Bones before you finish the export.

STEP 5: Check Animation in Character Creator and iClone

In CC4, go back to the Facial Profile Editor and import ‘FBX with Frame Sequence’, choosing the file you just saved from Blender.

The morph data should now be populated with the data you exported from Blender. This pipeline allows you to efficiently switch between Character Creator 4 and your 3D software of choice, allowing for easy adjustments for each morph data slot.

In addition to the morph preset slots and categories, you can add your unique expressions and categories, allowing for nearly limitless expressions full of personality. From an artist’s perspective, this adds a new dimension to 3D art that was previously limited to professional animators.

Another benefit to CC4’s facial expression pipeline is that it is extremely well organized. If you want to dial in a specific feature, you don’t have to stumble around looking for it. Everything is categorized, there’s a search menu, and you can see which morphs you’ve dialed in by going to the Currently Used section at the top of the categories.

You can check your expression work by going through all presets in the facial editing menu. If your expression looks mostly like the ones visualized in the icons, you’re in good shape in terms of expression compatibility.

With the character mostly set up, I’ve imported her into iClone 8 for a quick animation demonstration. The iClone Face Puppet and LiveFace features are fully compatible with every aspect of your custom character, just as they would be with a Character Creator avatar.

The Face Puppet menu allows you to manipulate aspects of your character’s expression using a wide array of programmed presets, with the ability to implement your own presets if needed.

Certainly, you can use iClone’s timeline to fully animate Nancy by blending motion clips, changing curves, or setting motion layer keys.

In Conclusion

To sum up, my experience with using CC4 to add a personality to this character is a very positive one. Traditionally, adding this level of complexity to a character is beyond the scope of artists who specialize in areas of 3D outside of rigging and animation. Character Creator 4 opens up a new avenue for artists to bring life to their creations, giving smaller studios access to tools and pipelines that are extremely easy and efficient to use.

I am not a professional rigging artist, and my experience in this area is limited at best. However, with modest familiarity with Blender character creation tools, I was able to successfully take this static character, rig it in Blender, and endow it with full personality using the new features in Character Creator 4 and using Blender for the morph target pipeline.

In brief, my main takeaways are:

  • Due to its speed and ease of use, Character Creator 4 is the ultimate tool for bringing life to rigged characters.
  • Blender (my software of choice) is an excellent choice for getting a character prepared for the Character Creator 4 pipeline. In addition, the facial morph pipeline is very Blender-friendly.
  • While I am not a trained animator, iClone 8 is easier to use than ever. Applying, cutting, and blending motion clips makes the process of animation quite enjoyable.

Learn more :

• Peter Alexander (Mythcons) https://www.artstation.com/mythcons 

• Blender-Character Animation Pipeline https://www.reallusion.com/character-creator/blender.html

• Character Creator https://www.reallusion.com/character-creator/

• iClone https://www.reallusion.com/iclone/default.html

• Reallusion https://www.reallusion.com/

Aesir Interactive Studios talks about Procedural NPCs in Police Simulator using Character Creator

Aesir Interactive is an independent development company with an emphasis on high quality video games. Their ambitious and motivated team is located in Munich, Germany. With much passion and devotion they have one common goal – developing games with long-lasting gaming fun and long term life cycles.

Aesir Interactive creates diversified, and demanding games by combining gaming technologies with industry applications and standards. Their game POLICE SIMULATOR: PATROL OFFICERS includes a dynamic traffic system that organically creates traffic flow and car accidents, as well as emergency situations that can randomly pop up during your shift as a patrol officer. In the open world of Brighton players will be able to choose different neighborhoods for patrols, making sure to keep them safe. You can patrol through three unique districts with several neighborhoods each. Every single one has a distinct flair, from the high rises of Downtown to the historical buildings of Brickston.

Additionally the team at Aesir Interactive has looked to create procedurally generated non-playable characters (NPCs) by using Reallusion’s Character Creator, Headshot and SkinGen plugins, in combination with Blender and Unreal Engine.

The Citizens of Brighton – Procedural NPCs in Police Simulator: Patrol Officers

Crafting Realistic 3D Infant for Series on Netflix with Character Creator

Reallusion tools help bring 2049 TV drama to the Netflix streaming platform

Bruce Yao, Supervisor at Xanthus Animation Studio

Xanthus Animation Studio

Established in 2004 in Taiwan, Xanthus Animation Studio focuses on making high-quality film and TV content production worldwide. Led by Bruce Yao, the supervisor of Xanthus, the team is capable of both animation conceptualization and execution and has quickly become the leading animation studio in Taiwan.

Xanthus’ core business includes original animation development, high-end quality animation, and VFX production. Their contracted project “All is Love” won the Golden Bell Awards in 2017, which is the finest award for a Taiwanese television production crew. Besides developing their original IP animation project “Yameme”, Xanthus also delivered several iconic projects, including 2049, 2049+ Voice of Rebirth, and crafting an animated mascot for the 2017 Taipei Summer Universiade.

About 2049

2049: The Fortune Telling is a Taiwanese, made-for-Netflix, science fiction thriller series. The story centers on a family in 2049 whose mundane existence is disrupted by sudden pregnancy. In this future setting, big data is used to predict one’s fate, and by this, the unborn child was predicted to have a high probability of becoming a criminal, leading to a series of dramatic events. Besides the VFX used in the scene, the series’ crew tried for the first time to use Reallusion’s Character Creator (CC) and iClone (IC) 3D character animation software to quickly create high-quality animation for the main character Xiao Xu. In this article, we will talk about the overcoming of various obstacles by the production team, and share some of their production secrets.

3D digital humans help filmmakers break the limits of reality

For productions large and small, such as shorts and feature-length films, there’s often the need to express surreal, larger-than-life concepts. Yet, perhaps due to the age or personality of the characters, challenges come from translating the spirit of the script or realizing the screenwriter’s vision. Even so, it’s no longer a feat to create realistic virtual 3D character animations with the latest advancements in animation software. Reallusion continues to innovate ways to create intuitive and high-quality real-time character animation; and to this day, has been the prime choice for several professional animation studios. Reallusion’s 3D character animation software helps to bring screenplays to life by removing roadblocks and saving precious time in production. A perfect example is 2049: The Fortune Telling, a Netflix series based on a high-quality script. Read on to find out more about Reallusion’s solution for creating the show’s virtual actor.

Q: Hello Bruce, and welcome to our Reallusion Feature Stories. Kindly tell us about Xanthus Animation Studio and the 2049 TV Series on Netflix.

We are Xanthus Animation Studio, and we have been in operation for 15 years, specializing in the production and development of 3D animation, with contributions to many films and TV shows. It’s been 6 years since we started working with Reallusion, and lately, we’ve benefited most from using CC to quickly create virtual actors along with motion capture technology to achieve realistic film-quality special effects.

In the course of our partnership, Reallusion has helped us become an outsource for Japanese animation, produce our very own animated series, and create virtual characters. In the Netflix series 2049, we created Xiao Xu, the digital infant using textures from Character Creator’s SkinGen plugin and various modeling tools and features.

“In the process, we’ve shortened the production period and delivered a product that was more pleasing to our client. We’d like to share our experience making 2049: The Fortune Telling and how the 3D virtual infant and star of the show was made.”

Bruce Yao, Supervisor at Xanthus Animation Studio

Q: Why was it necessary to use a 3D virtual infant to act out the scenes?

Casting children has many pain points, especially prevalent in Hollywood, where 90 to 95 percent of the work for children is given to twins and triplets. Making 2049 was particularly problematic as it was nearly impossible to have a child act out a scene with a pair of scissors in a safe manner. Furthermore, the story required the parent to physically abuse the child in a fit of rage. It’s obviously not feasible to put children in danger, so we had to rely on CGI to create these shots.

Besides this, we had to consider that a child actor is limited in acting skills, and 2049’s script called for scenes that may be too difficult to perform for an eight-month-old child, like having Xiao Xu standing up to kiss his older sister. Instead of using a real child, we needed to create a 3D virtual infant to ease and round out the production process.

Q: How did the production team use Character Creator to make Xiao Xu?

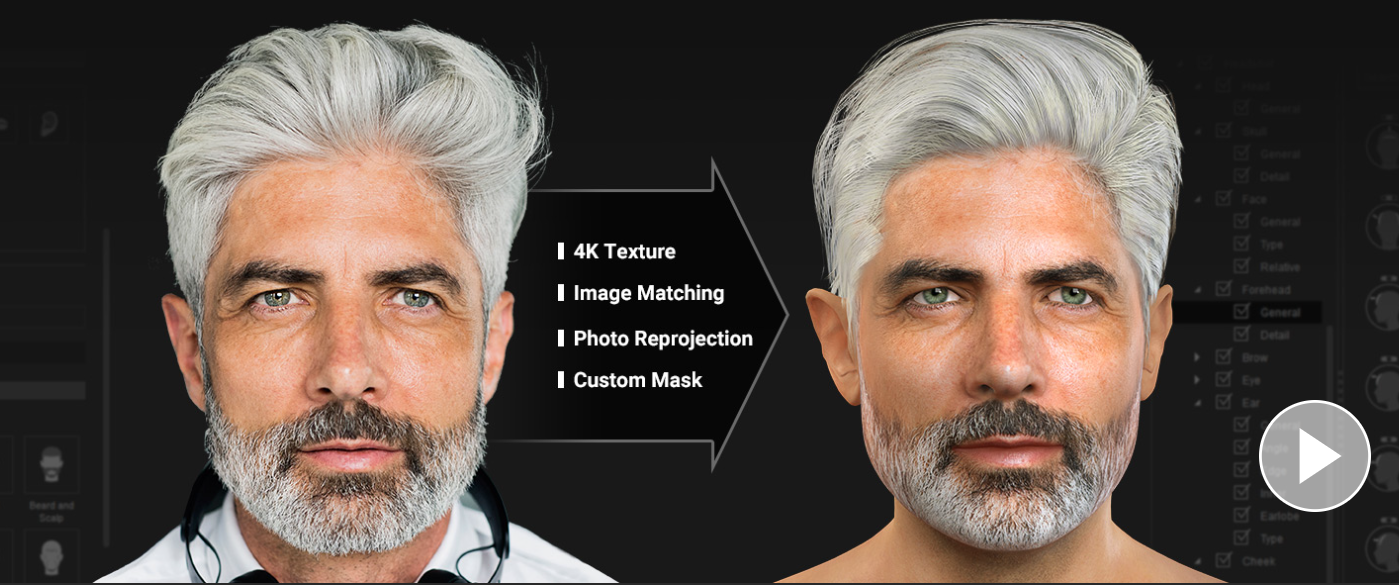
We used the Headshot plugin in CC to quickly create Xiao Xu’s digital double from photographs, giving us more time to work on the character’s silhouette and appeal—which is severalfold better than modeling from scratch!

While sculpting the digital double, we were able to preview various motions, performances, and expressions thanks to the non-destructive workflow of the Headshot face maker tool and the subsequent preservation of the animated character’s bones and realistic skin textures. The finished CC character can be used directly in iClone without the need to transfer files or adjust the materials. All we had to do was apply mo-capped expressions to the animated character to get a performance! This saved us a lot of time and effort.

Headshot face maker tool.

Q: Once the rigged character is finished, how do you go about making him move naturally with iClone?

In preparation for the rigged character’s final performance, we’ve had to bind the character to an entire skeletal system, create a complete set of facial expressions, and so on.

Once we had the 3D model ready, we sent Xiao Xu directly into iClone and used the Face Puppet tool to drive the expressions and create realistic facial animations. In combination with the Motion Live plugin and iPhone’s facial mo-cap hardware, we received instant feedback from our live performances—again, saving us a lot of time in production.

Feedback from the production house – Greener Grass Production

Here at Green Grass Production, we were very happy with the finished product once we were able to review it—the results were much better than expected! The virtual infant was our biggest concern; whether or not it would look realistic or too animated. In the end, we were pleasantly surprised that every little detail was crafted with great care.

The use of new body and facial animation technologies this time around has been a learning process and a breakthrough for us. Now inspired by this experience, we look forward to using more real-time techniques to unravel further possibilities during production.

Follow the Artists

Xanthus Animation Studio

Greener Grass Production on Cinando

Greener Grass Production

Fully Animatable 3D ActorCore People for ArchViz, Engineering, and Automation

The original article was written by Ronen Bekerman, and featured on Ronen Bekerman Archviz Hub.

Introduction

The offering of quality 3D people for crowd simulation is somewhat limited in the Architectural Visualization segment, and I can see that we reuse the same assets repeatedly. When it comes to 3D people, you can get away with having the same 3D actor in the scene if only you have more motions to apply. ActorCore comes at the right time to offer high-quality 3D asset libraries for mocap motions and animated 3D people for crowd rendering. I find the introduction of thousands of 3D motion options designed for ARCHVIZ projects most interesting.

Behind the Scenes

Paco Barruguer is a 3D Architectural Visualization artist using Blender as his main application. In the video, you’ll see the entire process starting in ActorCore, setting up character and 3D motion, exporting it, installing the ActorCore add-on for Blender, and getting the data into it for the 3D animation.

With the help from the free Blender Auto Setup Tools, it’s never been easier to auto import ActorCore characters with full material setting, making Blender a powerful tool for ActorCore character blendshape design. Add-on tools also include Blender Auto-Rig Pro preset and RIGIMAP tool, saving time from complicated and routine procedures.

ActorCore + iClone bridges that gap for you, and you don’t need extensive knowledge about character creation or animation. This software makes it very easy to create animations and unique motions.

Paco Barruguer – Freelancer 3D Artist. Archviz. Design

To know more about Paco’s process using ActorCore, iClone and Blender to create an archviz project, read the complete article on Ronen Bekerman architecture visualization hub. or visit the dedicated Guide for using ActorCore with Blender. Experience the accelerated 3D animation pipeline and get inspiration for ArchViz, game development, film production, and more.

In Memory of Mike Sherwood (3Dtest)

The Reallusion team is saddened to announce the death of our great colleague, Mike Sherwood, (3Dtest) who passed away on June 19, 2022, at the age of 56 in his residence due to heart disease. Mike joined Reallusion in 2017 and participated in the development of major features in Reallusion software including CC3 new base, iClone facial expression system, lip-sync, and facial mo-cap profiles. Whether it’s product development, content design, or tutorial videos, Mike always gave his all to empower and improve user experience. Steadfast and persistent in his ideals, one could always count on Mike for giving deep discussions, fresh ideas, persuasive arguments, and encouragement to fellow teammates. Ultimately, driven as he was, he had become the engine that pushed us courageously forward.

Mike had always desired to become a developer and finally, he was able to realize his dream by working with us from across the globe. His bereaved family has also expressed their gratitude to us for having allowed Mike to work a fulfilling job; likewise, it had been a pleasure for us all along.

See some of Mike Sherwood’s greatest contributions to the 3D industry by watching the following videos and clicking on the image links:

In May 2022, Mike made some video tutorials demonstrating iClone 8’s extended facial controls for Face Edit and Face Puppet. The design of which was mostly led by Mike as he worked closely with Taipei R&D team members until all features were thoroughly polished prior to release.

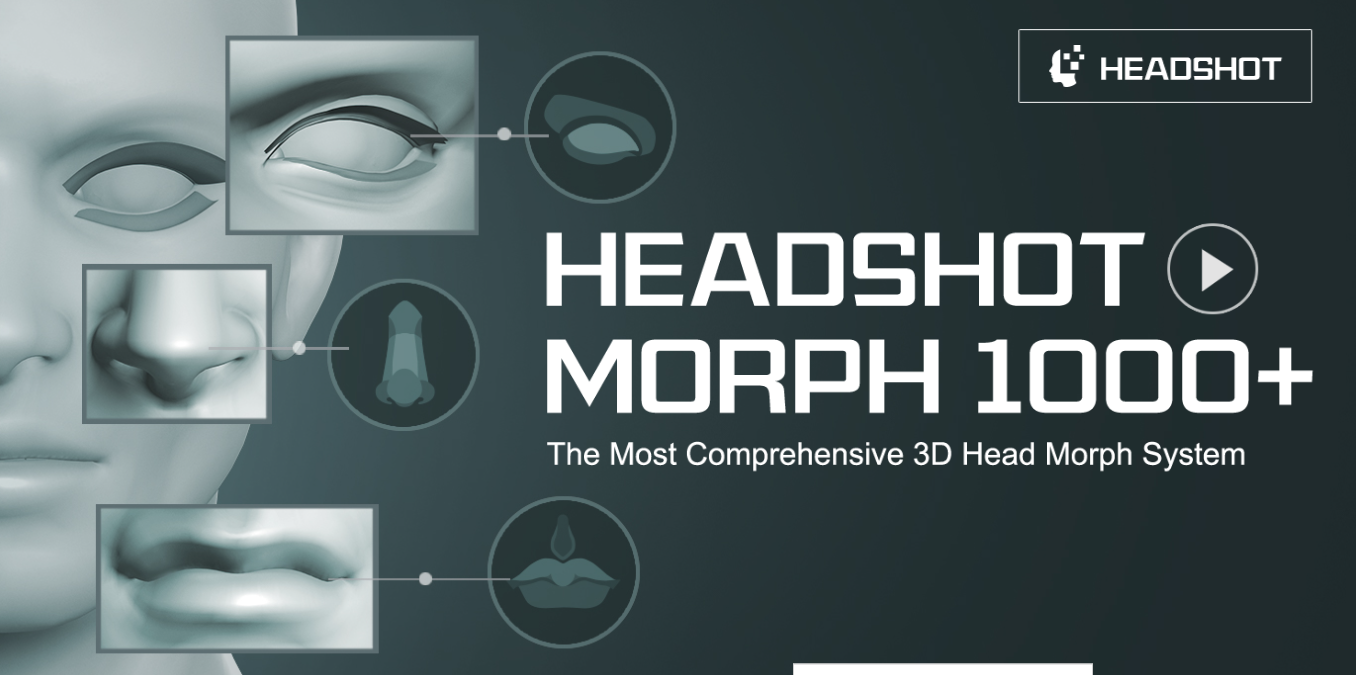
In 2019, Mike innovated on Headshot, which is a best-selling, AI-based, photo to 3D head creation plugin for Character Creator. Apart from designing this product, he also created iconic visuals to exemplify its full potential.

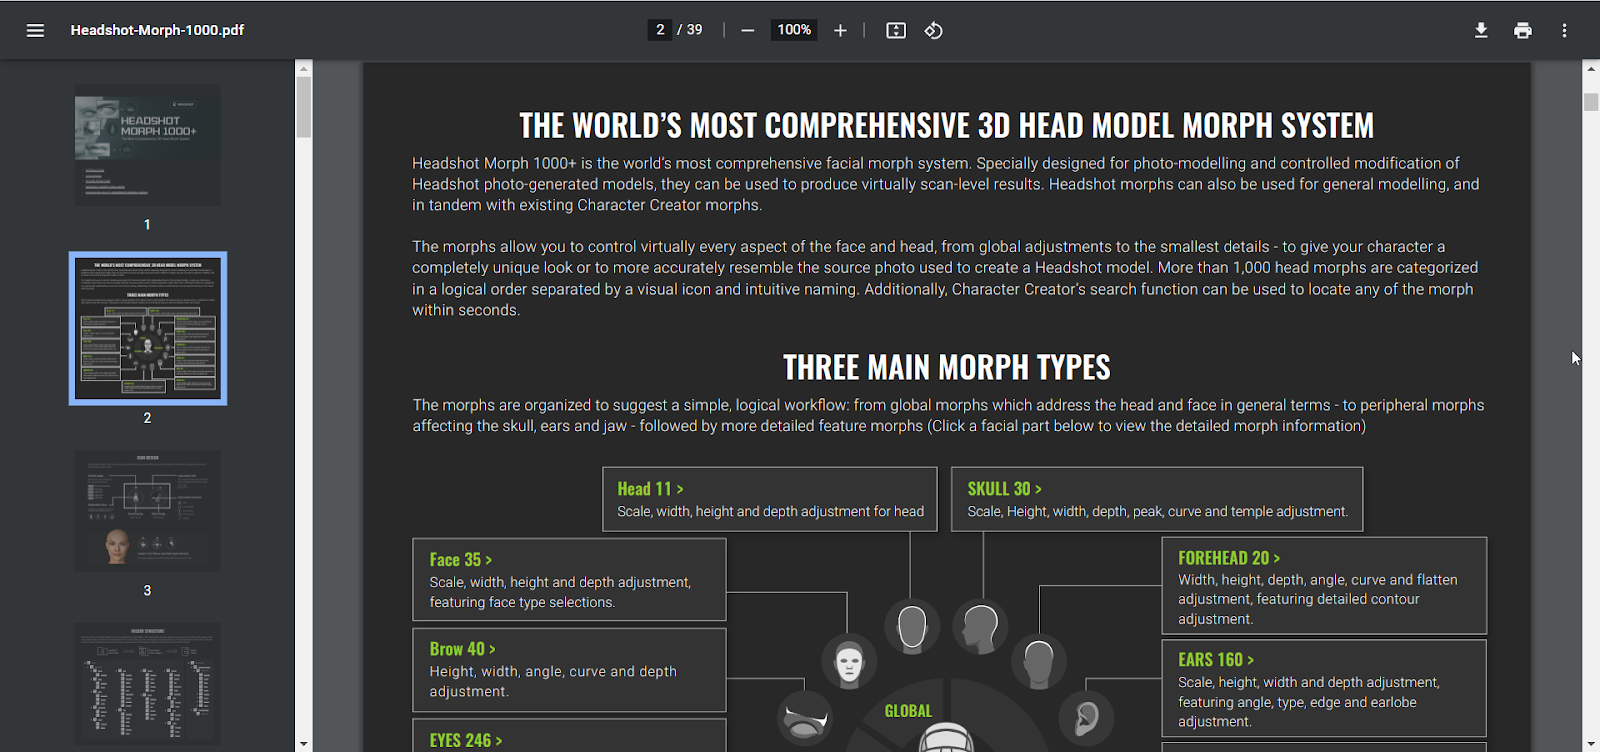
In addition to Headshot, Mike had also personally crafted incredible facial morph systems with the ability to approximate any resemblance using over a thousand morph sliders.

See how Mike turned the art of facial creation into science by referencing true-to-life facial anatomy.

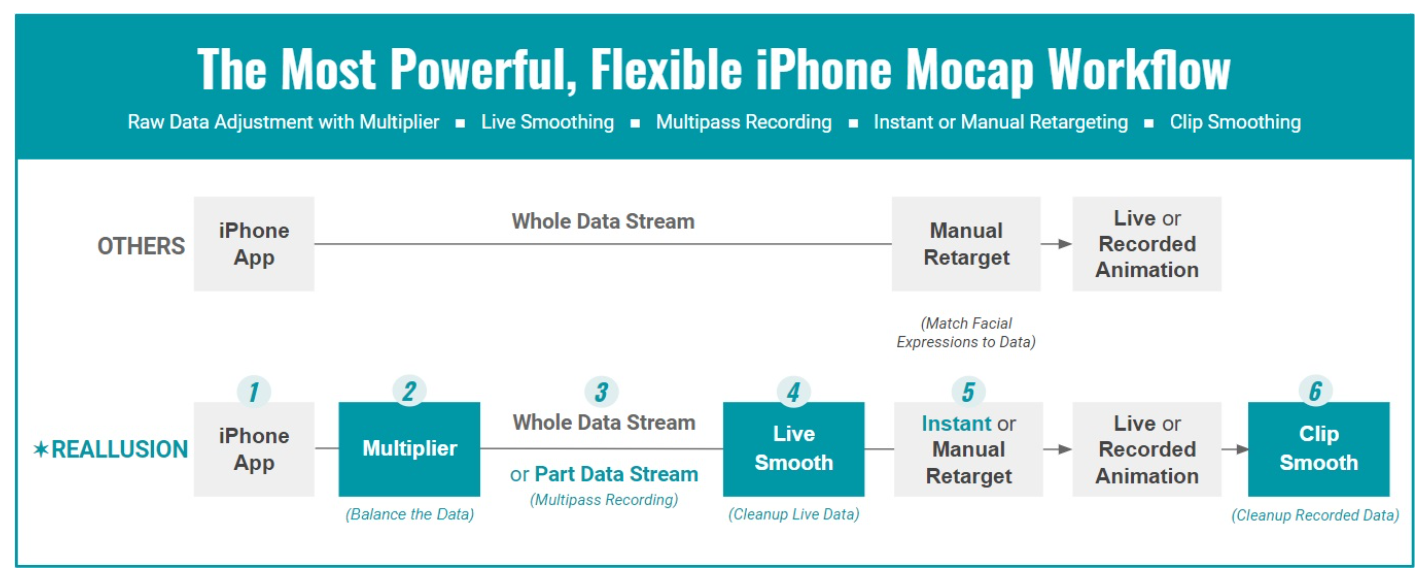
Mike volunteered to design an advanced facial mocap process with the addition of multiplier and smooth passes. In turn, making the facial capture workflow manageable and equipt to producing quality animation data.

Mike was the absolute best facial performer Reallusion had ever worked with. So much so that we often refer to him as a living FACS machine due to his ability to activate any muscle group in his face beyond the ability of most people. His theatrical abilities were especially handy in the demonstration of the iPhone facial tracking system.

This was the first webinar that Mike hosted for Reallusion in 2017, after the debut of Reallusion’s Motion LIVE facial capture technology.

Mike Sherwood will be dearly missed by his family at Reallusion, however, his spirit of innovation will live on, and we will continue to chart new and exciting courses for Reallusion products.

Condolences from the Taipei office

No one could compare to Mike Sherwood when it came to his passion for Reallusion and drive to bring 3D characters to life. His depth of knowledge, logical thinking, artistic skill, hands-on expertise, and tireless encouragement won the respect of the entire team. His inspiring spirit and dogmatic insistence had transformed our routine Wednesday meetings into a “Cult of Creativity” which elevated all members who were fortunate enough to be on the same adventure.

Charles Chen, CEO

No one will ever be like Mike to Reallusion. Without Mike, Reallusion won’t be the same as we are today. A true, genuine friend. His integrity, his passions, and the nonstop demand for perfection were revealed in our product design to overwhelming market applause. We have been so fortunate to have Mike over the last five years unselfishly sharing his great vision with us and delivering great results—Mike was a true Reallusioner. We all felt so honored to co-work with him, a great team member from the UK, so close to the team here in Taipei and so familiar, and yet, never having met him in person. It’s our great loss and I believe Mike will carry on his next journey to the wonderland. Mike, rest in peace, and a salute to you!

Jackie, Sales Director

Even though Mike wasn’t acquainted with me, I have learned so much from him ever since Headshot plugin and Character Creator v3.3 and the latest v4.0. Especially the way he strove for greatness and set up the highest verification standards for the RL team. I even told my colleagues that Mike was my invisible mentor because I was able to spot critical issues that would affect the quality of our applications with his help. I was shocked to hear about this bad news, but Mike’s legacy will remain and his spirit will stay with Reallusion. I hope he has a good time on the other side and continue to make the impossible possible with his infinite creativity!

Calvin, QA Team

I wish Mike all the best in heaven. He may be long gone now, but his spirit will be with us forever. This has been an amazing journey ever since 2016, when the team at Reallusion was really lucky to have Mike as a close teammate and supervisor. He would always share his knowledge, logical analysis, and clear methodology for every research project. Furthermore, I regarded him as our spiritual mentor, always inspiring us to face the challenges while keeping faith in difficult times. His continuous dedication brought new meaning to Reallusion products.

Jonathan, Head of  Content Team

iClone 8 User Tutorial : Creating Interior Visuals with Volumetric Lighting

Final scene render by Benjamin Sokomba Dazhi
Benjamin Sokomba Dazhi – Professional iClone Animator

Hi, I’m Benjamin Sokomba Dazhi and I want to welcome you to this iClone 8 (iC8) tutorial. As you all know I am an animator and my major 3D tool is iClone. I’m so excited to bring you this tutorial, as we all know that iClone 8 was just launched and it came with a lot of features that we are going to explore.

So for today’s tutorial, we are going to see how we can enhance the visuals in our iC8 projects. We are going to start with the volumetric lighting, which is nice and really good for enhancing any scene, making it look more organic and atmospheric.

Let’s get started.

I have a scene that I already prepared with no 3D lighting. It’s just dark. So we are going to light it up and see how the volumetric lighting will make it look more visually appealing. The first thing we are going to do is make sure that we turn on Global illumination. (Fig 1.0) We check it, and make sure it’s on. Usually, at the default setting, everything works well.

Fig 1.0

The next thing we are going to do is create our Point Light.

Fig 2.0

What we are going to do here is to give a subtle ambiance to the 3D scene. (Fig 2.1)

Fig 2.1
Fig 2.2

Now let’s choose a Color for this 3D lighting. (Fig 3.0) Use something cool like blue or you may opt for anything bluish.

Fig 3.0

Then we are going to strategically place the 3D lighting in the scene. To achieve this, we are going to click on Edit and then duplicate as shown below. (Fig 4.0) We are going to duplicate more of the lights.

Don’t forget that we are using Point Light in this 3D scene. The point light here is casting very hard shadows and this is not really good for this type of project.

Fig 4.0

So when the point light is causing a lot of hard shadows, you come to Modify and you switch off the Shadow as shown in Fig 5.0.

And now, you only see the light source.

Fig 5.0

Keep duplicating as shown below. The control for duplicating is Ctrl+Shift+D. (Fig 6.0)

Fig 6.0

We continue to duplicate.

Fig 6.2

Our purpose here is to try and lighten up the scene with all the ambiance, in order to give it a nice subtle look as shown in the scene below. (Fig 6.3)

Fig 6.3

So that’s it for the ambiance. Now, we are going to the main thing which is creating Volumetric Lighting.

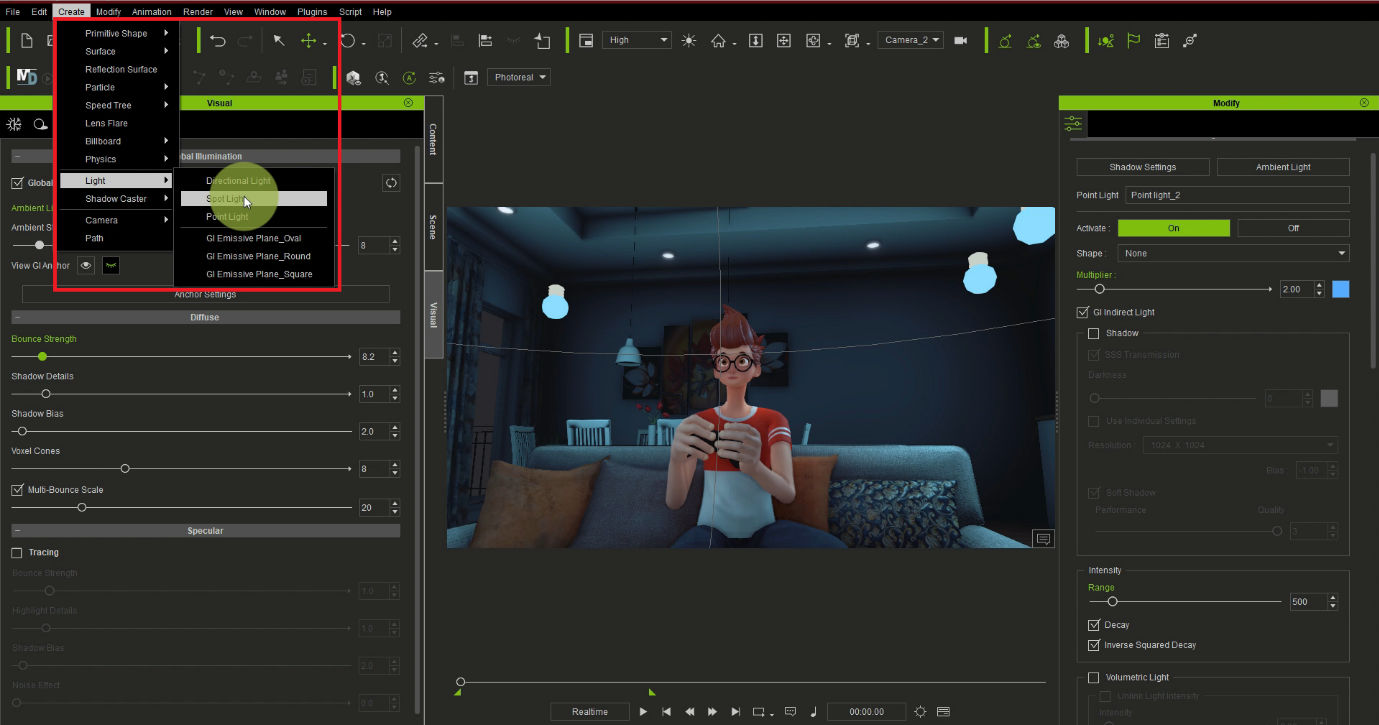
We are trying to get the Volumetric Lighting from the window in the 3D scene. To achieve that, we are first going to create a Spot Light, not a pointlight. (Fig 7.0)

Fig 7.0

We carefully place the light here. We love it at that position close to the window as shown in Fig 8.0 below. That is where we want to bring in our volumetric effect.

Fig 8.0

Next, you come to the Modify panel and enable Volumetric Light. (Fig 9.0)

Fig 9.0

Switch it on. You can see it’s already showing here below.

Fig 10.0

Play with the parameters, especially the medium density multiplier which is what we are going to work with. (Fig 11.0)

Fig 11.0

When you move the slider forward you can see that it could be too harsh, or it could be subtle.(Fig 12.0)

Fig 12.0

It just depends on what you’re trying to achieve.

Fig 12.1

So you can carefully place it here as shown below in Fig 13.0.

   Fig 13.0

Next let’s change the color. (Fig 14.0) It is called scatter color and I changed it to blue.

Fig 14.0

Or you can simply go to the light source multiplier and change the color there as well. (Fig 15.0)

Fig 15.0

Let’s choose a cool color like blue as shown below.

Fig 16.0

You can now see how subtle it is and how it’s giving the scene more depth. (Fig 17.0)

Fig 17.0

The next thing we’re going to do is to create a light source here and bring this volumetric light here too as shown below.

Fig 18.0

Now we are going to create another spotlight and place it directly under this lamp shown in Fig 19.0

Fig 19.0

We’ve now placed our spotlight inside the lamp.

Fig 20.0

A side note: The models that are used in this scene are from the Reallusion Content Store. They have beautiful and well-modeled props and assets that you can use for your projects and this is one of them. The content store or the Marketplace.

Now let’s change the color to a warmer color.

Fig 21.0

Let’s use this Golden Yellow color.

Fig 22.0

Scroll down under modify and go to the volumetric light to activate it. (Fig 23.0)

Fig 23.0

You can play with the medium-density multiplier.  And you can see the light is now more obvious as shown below.

Fig 24.0

See that the spotlight beam is going out of place. We can modify it as shown in Fig 25.0.

Fig 25.0

If you don’t want the angle to be out of place, you can also realign it, let’s say to the arrowed direction a little.

Fig 26.0

We can scroll to view from different angles to ensure that everything is properly aligned.  Just click on the beam and take it a little lower to the point as shown in Fig 27.0. It is important to note that when aligning what really matters is the angle from which the camera is capturing the scene.

Fig 27.0

If in some cases you see that the light beam is too narrow at the top and you want it to fill, you click on modify then you click on start. You can just increase the number by say two places up. This is shown in Fig 28.0.

Fig 28.0

This is how to get the light beam to become less narrow.

Fig 29.0

You can raise the beam and re-align it as many times as you would want. So let’s say this looks good for now (Fig 30.0) but you can keep playing around with it till you get exactly what you’re looking for.

Fig 30.0

Next, let’s duplicate the light again.

Fig 31.0

We place the duplicated light here as shown below.

Fig 32.0

Make sure the light is placed inside the lamp and not on top of the lamp.

Fig 33.0

You can take your time and re-adjust the volumetric light until you get what you are looking for. You can keep tweaking it if you have a lot of time and patience to get the desired result.

Fig 34.0

You can also work on the angle. (Fig. 35.0)

Fig 35.0

Keep aligning it until you get the desired result you’re looking for. You can also add the volumetric lighting here too.

Fig 36.0

Now let’s look at it from the frame so you can see that the volumetric lighting is there and it’s subtle. (Fig 37.0)

Fig 37.0

Always remember that it depends on the angle of your camera. It may not look well placed from the preview camera but that doesn’t matter. What matters is the final frame you’re trying to capture.

Fig 38.0

So to give this place more atmosphere, showing that light source,

Fig 39.0

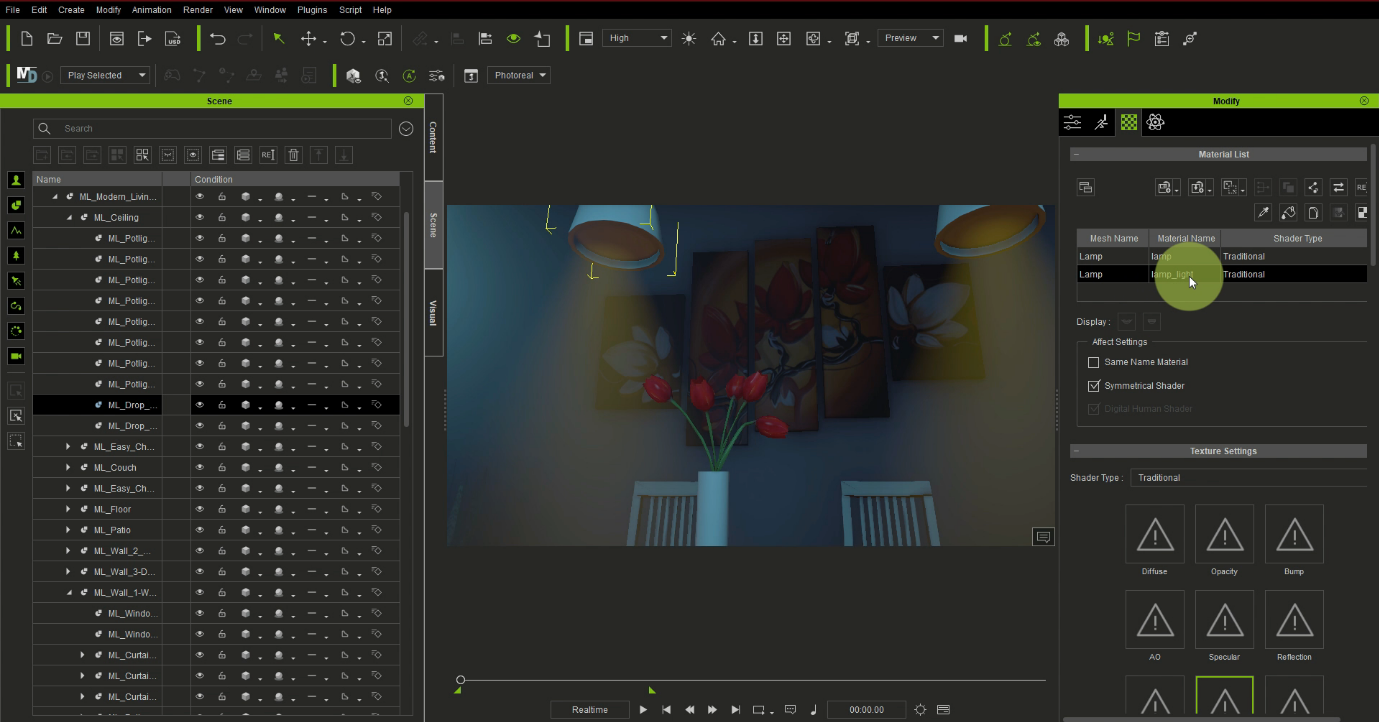
We click on the material name ‘lamp_light’ under the Material list under Modify.

Fig 40.0

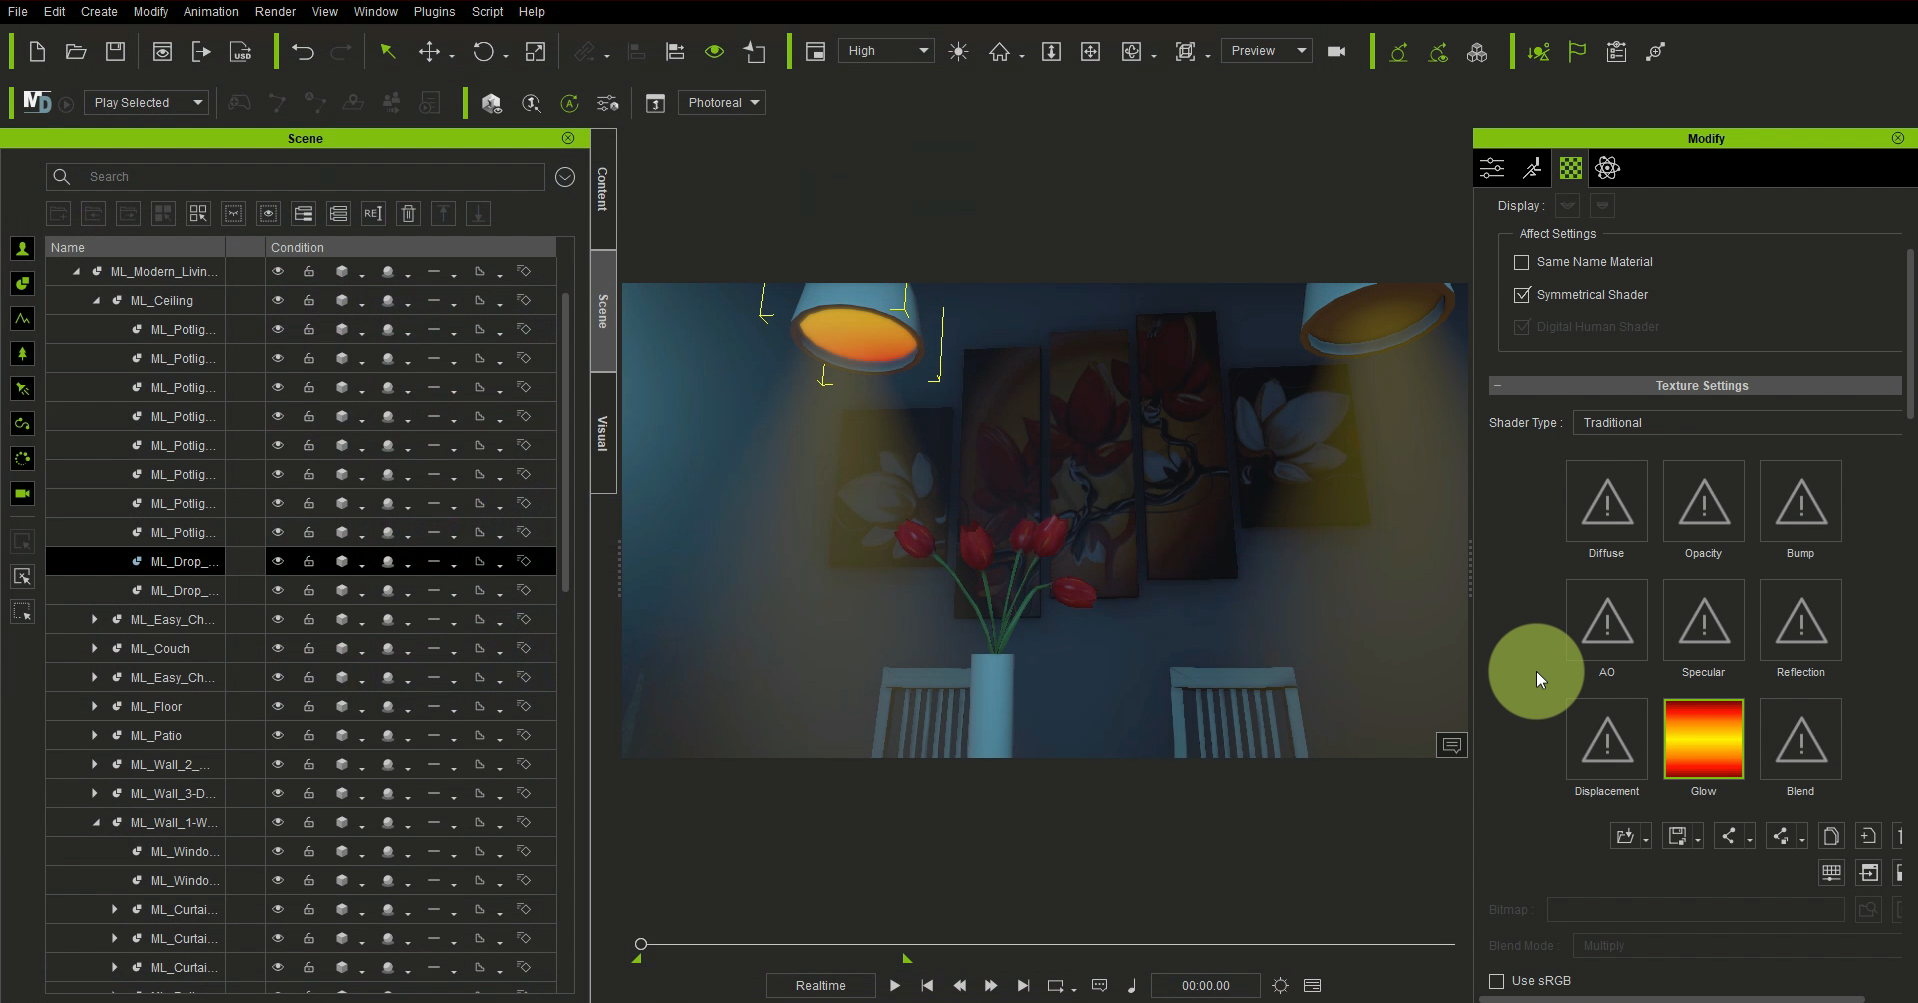
Next, we click on Glow under Texture settings.

Fig 41.0

This gives it a nice warm effect.

Fig 42.0

You may have your own custom textures but this is just what I’m working with now. Do the same process for the other lamp light. Apply a glow texture to it as well. Again you can use or create your own textures and work with them. I’m only working with what is available right now.

Fig 43.0

Now we still have other places we want to put our volumetric lighting.

Let’s duplicate.

Fig 44.0

Let’s click and drag to move it around.

Fig 45.0

You can decide to put it at the door, as that will be cool too. It just depends on the look you’re trying to achieve. But for this, let’s just place it at this window as shown below so that we can have the volumetric effect at the window too. (Fig 46.0)

Fig 46.0

Like what I said earlier it depends on the angle of your capture. Where you’re trying to capture is what will determine your light placement, not the angle from the preview camera.

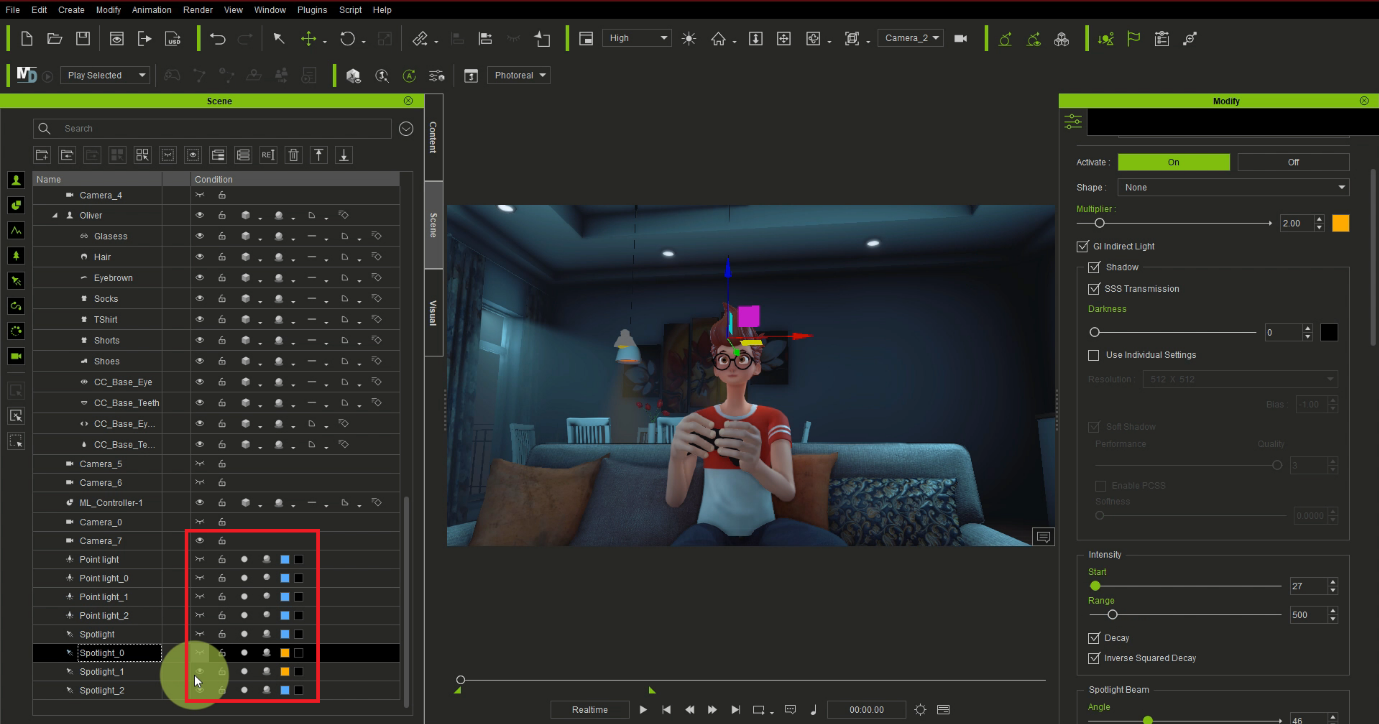
Now, I’m trying to realign the added light. First you can switch off all the light in the scene if you want to so that you can see the scene really well without any obstructions. How to do this is shown below.

Fig 47.0

We can see the volumetric light from this window and from this selected lamp in the scene .

Fig 48.0

There’s something I want to do. I noticed that this wall shown in the scene is looking very boring. I need it to have depth and be more interesting.

So let’s create a point light. (Fig 49.0)

Fig 49.0

Let’s place it here as shown below.

Fig 50.0

Note that the light I am putting here isn’t volumetric light but it’s just part of things I do, tips or techniques that you can use to give a scene a nicer look and depth.

Fig 50.1

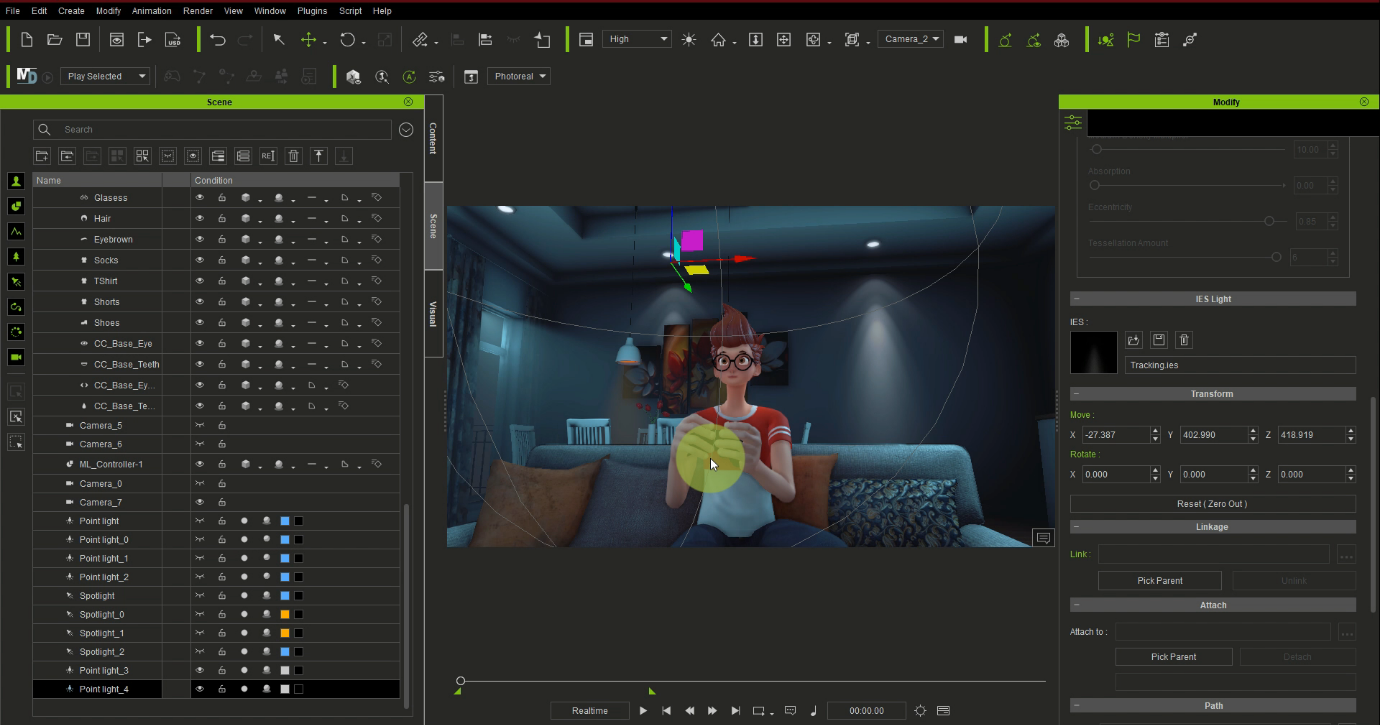
So I’m going to go to the modify panel under this point light and put a texture. (Fig 51.0)

Fig 51.0

This is the IES. There are a lot of textures here.

Fig 52.0

Let’s go with tracking.

Fig 53.0

So what I’m trying to do here is to make it look like this spot light is illuminating this part of the wall.

Fig 54.0

Next, let’s duplicate it and put in the other light from the ceiling as seen in Fig 55.0

Fig 55.0

You can see how it’s giving the scene a nice and interesting feel, instead of just a boring plain wall without anything happening.

Fig. 55.1

Let’s try it for a different angle. I’m still going to use the same techniques. I feel this wall is too plain. Let’s create a point light here also and give it that same texture. (Fig 56.0)

Fig 56.0

To do this, like before, click on modify and then IES.

Fig 57.0

Let’s go with tracking as well. Don’t forget that there are lots of textures that you can use, but I’m just working with the tracking effect for this one. (Fig 58.0)

Fig 58.0

Mind you, the effect will not show until the light is close to and casting on a surface. It just depends on how you want to show it.

Fig 59.0

So now, let us duplicate this also and put one here as seen below. You can see how nice it makes the wall look.

Fig 60.0

And so here you have it ! 😊

This is how you can enhance your visual scene in iClone 8 using the volumetric effect, lights and different textures on the light for more depth. This makes your scenes more interesting and takes them from plain and boring to something superb.

Fig 61.0

I hope you have enjoyed this tutorial and I hope you start making wonderful projects with the new iClone 8 and while exploring these new features to enhance your projects.

Thank you for having me.

One Man’s journey to entertain with 2D Animation

Ed Konyha – Cartoonist, 2D Animator, Comedian, Writer

Ed Konyha

Like many talented cartoonists, Ed Konyha also had a passion to bring his creations to life via 2D animation.

The chance to give motion and voices to his characters led him on the path to Cartoon Animator, a journey which would eventually see his animated short “Aussie Tale” selected in the AniMate Australian Film Festival.

.

” Making cartoons is my passion, alongside my other passion which is stand-up comedy. I like working alone for the bulk of the creative process and Cartoon Animator allows me to do just that. “

Ed Konyha – Cartoonist, 2D Animator

Building Immersive Flight Simulations with ActorCore Characters and Motions

Alessandro Cucinotta – CEO at Simultech Sagl

Alessandro Cucinotta

My name is Alessandro Cucinotta. I am from Italy but based in Switzerland now. My career began in Turin at a service company at IBM Group. Since then, I’ve always been passionate about motorsport and aviation. Eventually, I started developing graphics and software for flight simulation as a hobby.

In 2004 I left IBM to embark on a professional adventure in the flight simulation sector, developing airports and airplanes in 3D. I collaborated with Microsoft on developing the 3D Virtual Cockpit of the military Jet F18.

To easily populate our worlds we have been using Reallusion’s ActorCore characters and motions, along with iClone to make our airports more immersive with fantastic results.

Q: Hello Alessandro, and welcome to the Reallusion Magazine! Kindly tell us about your story at Simultech.

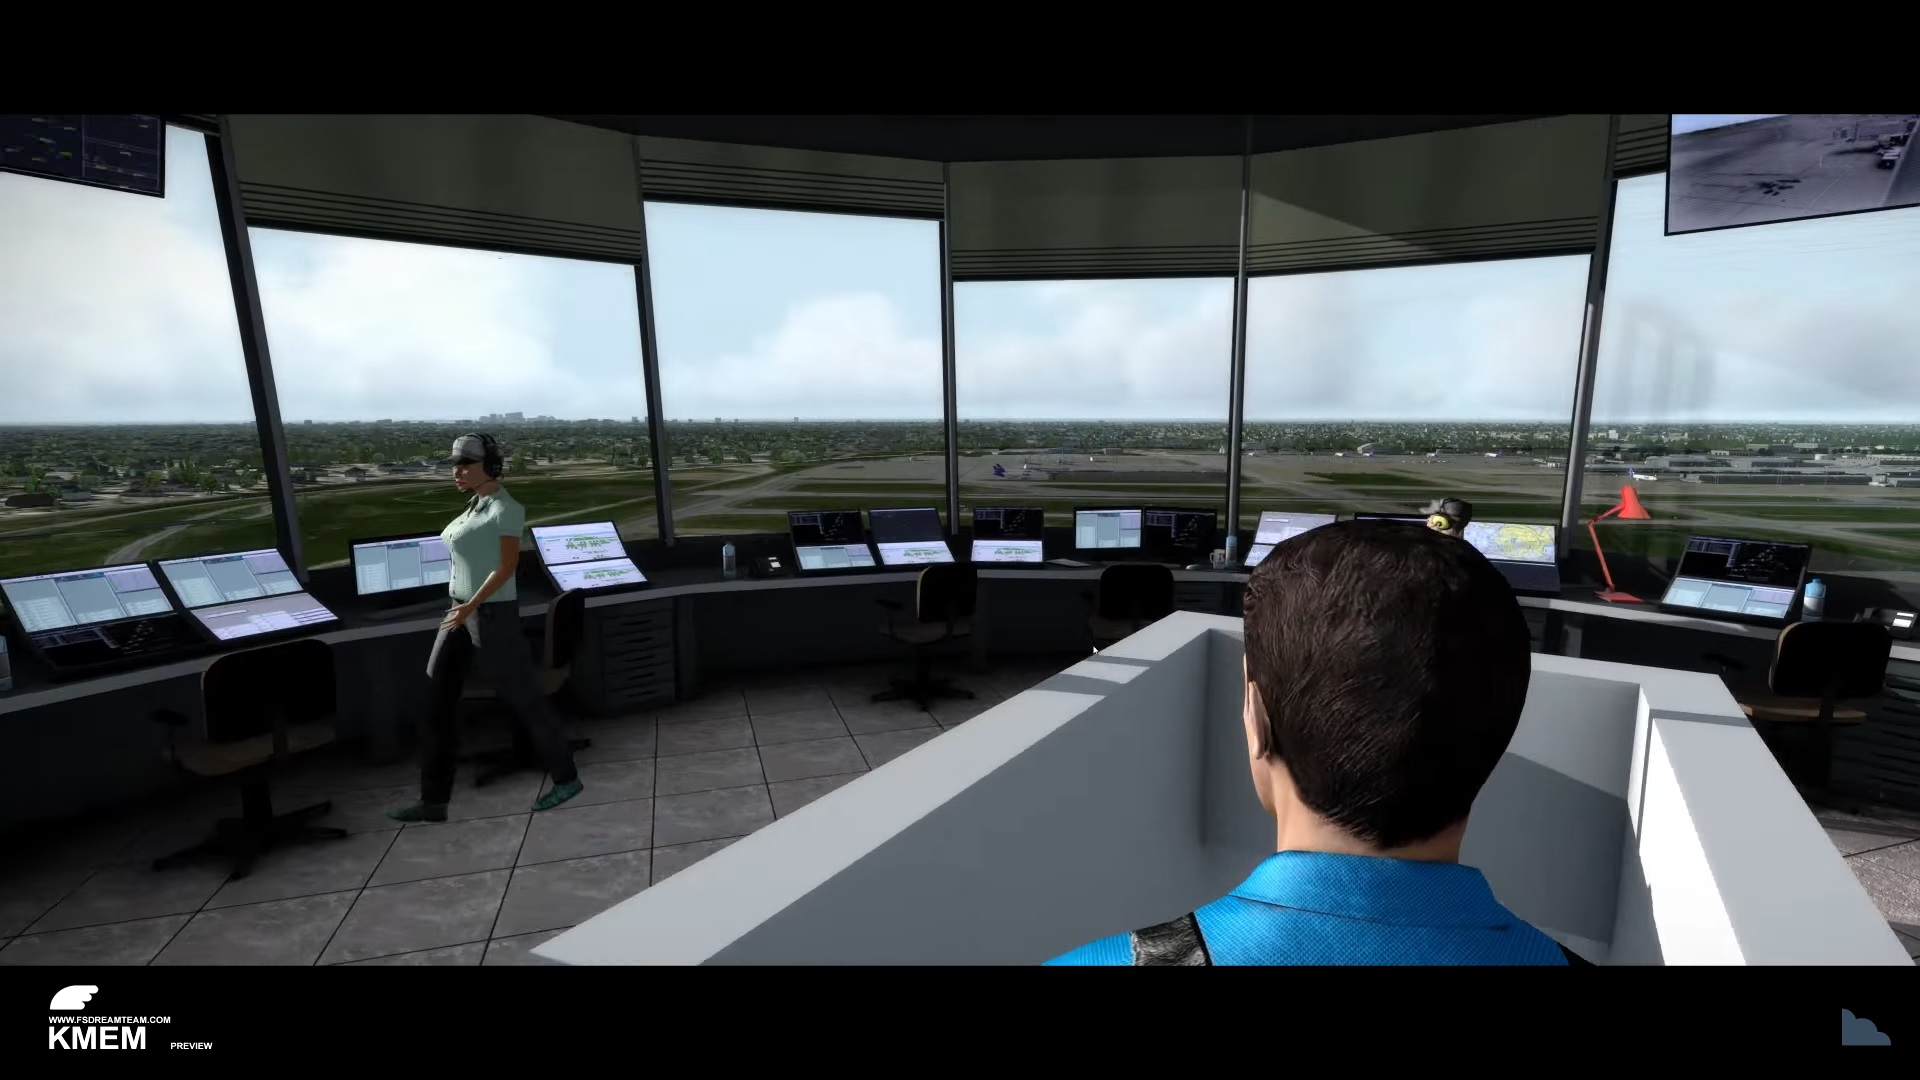
In 2016, I moved to Lugano, Switzerland. There I founded my first company, Simultech. At that time, I released my first video and simulation of the Memphis International Airport (KMEM). Not only did I simulate the airport apron, but I also imported several ground control avatars inside my other renders to give the audience a realistic walkthrough experience at the airport tower. Our company specializes in add-on production for the renowned Microsoft Flight Simulator. Simultech cooperates with FSDreamTeam since its foundation, and its popular packs include airport packs such as JFK or LAX or the last Kord V2, or even GSX level 2.

Today, we develop airports and software products for Flight Simulator 2020 with a few collaborators. We are among the first ones to include animating human characters in the world of flight simulation, making the ground environments more alive and immersive.

Q: How long did it take for you to familiarize yourself with iClone, Character Creator, and ActorCore? Any suggestions for beginners?

I started using iClone and Character Creator about one year ago. I was looking for a product that could help me create characters optimized for a real-time in-flight simulation world. After some quick comparison, I discovered that Character Creator was the best tool for me. The possibility to vary morphology and characters’ accessories with tools for the reduction of polygons makes this software a must for time optimization.

In my workflow, iClone represents the main actor. With it, we create 3D animation cycles utilized in real-time in the simulator. The ease of creating 3D animations and the possibility of exporting on my platform, allowed me to realize my ideas with efficiency and in a reasonable amount of time, without relying on expensive motion-capture tools.

Finally, ActorCore just gave developers like me the freedom to preview the final result on the cloud, and I can quickly save tons of time by purchasing the right motion content. Surely I suggest Reallusion’s suite to beginners: they will find everything they need to be immediately productive.

Q: What matters the most when selecting 3D content for simulation games? And what value did you find in Reallusion content and mocap animation?

In the flight simulation industry, it is important to maintain high frame rates, and the ActorCore actors are created with this in mind. The animated human characters are the right balance between performance and graphics fidelity, perfect for real-time applications. For my company, ActorCore represents an impressive time-saving solution for creating characters.

“Luckily with the launch of Reallusion’s ActorCore line, we now have a library of actors developed specifically dedicated for real-time simulations that are incredibly realistic with optimized textures.”

Alessandro Cucinotta – CEO at Simultech Sagl

Q: We love the way you utilize ActorCore and Character Creator in your Flight Simulation add-ons. Would you tell us a bit about what will be expected in 2022?

The success of the Microsoft Flight Simulator has attracted many new content companies, raising the level of content. Our studio put a lot into the graphic representation of characters to make more credible and real the interaction between the pilot and his surroundings. With our latest Replacement Assistance Trucks add-on, we used a lot of characters intended to carry out normal ground operations, which took place at the departure and arrival of the aircraft.

For the next couple of months, we are planning to develop boarding and deboarding of passengers. We plan to use ActorCore heavily, so we can simulate a deboarding of 500 passengers in real-time from a 747!

Follow Simultech:

Website:
https://simultech.ch/

Instagram:
https://www.instagram.com/simultech.ch/

Facebook:
https://www.facebook.com/simultech.ch

YouTube:
https://www.youtube.com/channel/UCZQbzGrrxVu-dnfl76a85hQ