首頁 » Page 60

ActorCore AccuRIG Rigging just got a whole lot easier! – 3D Special FX artist | AMIRULER

Amirul Afiq bin Hussain – 3D SFX Artist

Amirul Afiq bin Hussain (AMIRULER)

Amirul Afiq bin Hussain or more commonly known as Amiruler began his career as a wedding videographer at the age of 18 and is currently running his own company, Spektrum Cahaya Production Filmmaking) and Rakan Animations (3D Animation and VFX).

Despite his love of drawing, and creating artworks since childhood, Amiruler has never considered pursuing it as a career. However, he still does it as a hobby. In his previous role as the Lead of Shared Services department at a local Malaysian TV station (TVS), he shared his knowledge and grew the 3D/VFX community in his area, hoping that more and more people would grow to know the capabilities of the local 3D artists.

Amirul creates 3D Characters, 3D Environments, Visual Effects and 3D animation for his projects and sells them on online marketplaces such as Sketchfab. He uses Autodesk Maya primarily for modeling and texturing.

ActorCore’s AccuRIG has made his work 10 x easier and faster. Previously, all his characters on the marketplace were not rigged. But with the ability to upload his characters directly from AccuRIG to Sketchfab, he mentions that he may be able to sell rigged and animated characters in the future. The video below shows how easy it is for him to use AccuRIG on the characters he makes, and how he directly sells them on Sketchfab.

Steps on how to use AccuRIG by ActorCore:

1 – LOAD MESH

First of all, a humanoid character need to be loaded on AccuRIG to start the character rigging process. The best pose to start with is of course the T-pose or A-pose. It should always be the default pose whenever a character is created. But AccuRIG can also rig certain other poses as well, including models with accessories or multi-Meshes too. Just drag and drop the OBJ or FBX files here or a selection of models can browse through, which is available for download at Sketchfab. Once you have done this, give it time to load the model, and it will bring it in.

2 – CHECK MODEL

Once the model has been loaded, a vertical line will appear. Most of the time, the software detects correctly where the center of the model is. In cases that it does not, the vertical line can be adjusted manually, so make sure the line is in the middle of the hips. Rotate character button is also available, so it is possible to rotate them to check on all sides. Click “Rig Body” to move on to the next step.

3 – CHARACTER RIGGING

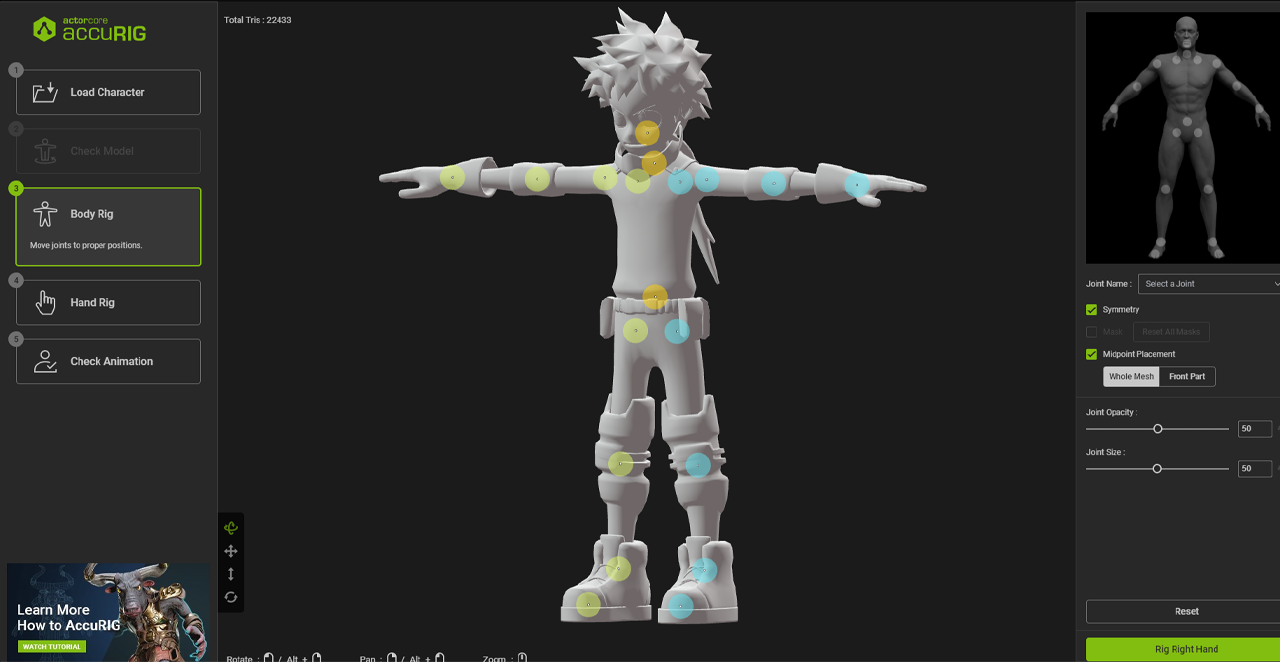
Joints are automatically placed on the 3D model after processing. Minor tweaks can be done to make sure the points are exactly where it is supposed to be. By hovering at the points, there is a reference on the right-side of the screen, on where the point is best placed at, and by referring to that reference, the points can be adjusted simply by dragging them. There is also a symmetry check box, to make the opposing joints move simultaneously and make the process easier and faster. Click “Rig Hand” at the bottom right-side of the screen to proceed.
4 – HAND RIG

This is one of the major advantage of AccuRIG compared to Mixamo, is that the ability to rig the hands. The number of fingers can be changed on the right-side of the screen. For the most part, the joints are placed correctly, but also there is a freedom to adjust them manually, in cases that it does not. Also make sure the cone on the thumb is pointing to the right direction, as referred to the reference image. Proceed by clicking “Rig Left Hand”. Similar with the right hand, check for the placement of the joints and the direction of the cone on the thumb. If all is good, proceed to “Finalize Character”. It will take a few minutes to rig the 3D model.

5 – CHECK ANIMATION

The 3D model should be already moving in “idle” position once the processing is done. Check the models to see if it is moving and bending correctly by going through the preview motion library that is located at the top-right of the screen. It is also possible to add more mocap animations here by clicking the “+” sign, and it will be directed to the website library. If there are certain poses that needs to be tweaked, it can be done so in the “Pose offset” menu.

6 – EXPORT

Once everything is done, click export to any format that is desired, as it supports most major software that is available today.

With the ActorCore AccuRIG tool, it had become easier to rig and animate 3d models more accurately. From previous experience with Mixamo, there we’re a few downsides to it such as, the character not deforming correctly…. especially the models with extra accessories, and the inability to rig the hands which makes the model seem incomplete in a way.

With AccuRIG , it is as easy as clicking a few buttons to get a 3D model with rig and mocap animation ready, which can be an added advantage to the Sketchfab marketplace sellers to sell their creations with better rigs and animations at a much higher price allowing customers to get more value for their purchase. In addition, it is a totally free software for anyone to use!

You can check it out at https://actorcore.reallusion.com/auto-rig and try it

And also, don’t forget to visit my store and many of my items at Skethfab https://sketchfab.com/amiruler

The Easy Way to Create a Populated Park Scene

Learn how to generate an animated pedestrian scene using ActorCore, iClone & Omniverse

Pekka Varis is a cinematographer, 3D animator from Finland, and the official NVIDIA Omniverse Ambassador.  He is also the CEO of an Omniverse-based startup called Cineshare.

In this tutorial, Pekka Varis shares his ways of enlivening large-scale exterior settings by filling a 3D park with animated people using iClone and Omniverse Machinima with ActorCore 3D characters and mocap animations.

3D-Ready Content on ActorCore Asset Store

Hi, my name is Pekka. I started this journey with Brownstone City (a free asset from Omniverse), then I actively browsed the ActorCore website to download all kinds of character and motion packs to fill a busy commonplace street with kids, workers, police officers, and citizens.

The ActorCore asset store is the secret to my success with 3D works. I find the motion library super inspirational and useful for all sorts of projects and genres like fantasy, commercials, and even dramas! I begin by building my storyboards based on stock motions, then I fine-tune them if needed. In addition, the provided lightweight content for 3D people and mocap animations are extremely important⁠—even more so because they come fully rigged from head to toe!

ActorCore interactive 3D people for crowds usage.

Import to iClone for Animation

After selectively exporting the crude street geometry of Brownstone City from Omniverse to iClone in FBX format, I deployed all the 3D characters and dropped their idle motions, then applied some paired motions, e.g., people having a conversation.

The Digital Souls content pack is crafted to meet real-world needs, especially for jack-of-all-trades like myself, or what I like to call “modern-day Da Vincis” who don’t have the ample time to manually animate facial expressions. Digital Souls has distilled the process down to simple drag-and-drops! I can easily apply believable facial animations to all digital actors with subtle and natural facial performances that can truly engage the audience.

The Pedestrian Actions content pack is ideal for populating any 3D scene with busy streets that call for a variety of natural, autonomous background characters. With fourteen walking styles and eleven idle poses, Pedestrian Actions is a genius concept and I had fun directing all the city people around the park.

Pedestrian Actions used inside iClone.

Walking Around with Motion Director

With idle motions setting the mood and the city as the staging area, I began to direct all the pedestrians while making sure they don’t cross paths and crash into one another. The entire process was a game-like experience for me and, in the end, I had over fifty animated people walking about. 

Using alt+click in Motion Director gave me all I needed to move characters around—a method that I applied one by one to every pedestrian until the streets were roused with activity. I enjoyed building the look and feel of my city which resembled a hodgepodge of ‘80s fashion mixed with present-day aesthetics. Finally, exporting the scene in USD format from iClone took a bit of time, so naturally, I fetched another cup of tea.

Using Motion Director to navigate characters in the scene.

Prop & Camera Movements inside Omniverse

In Omniverse Machinima, I animated my camera and added free props found in NVIDIA’s massive asset store. Following the path of the camera, I focused on decorating parts of the street that needed some extra characters to keep the entire scene reasonably light. As a finishing step, I added flowing water and rendered everything in Path Traced mode which gave the movie the final touch that I wanted.

Decorating the scene with props inside Omniverse.

Best 3D Content and Tools for Crowd Simulation

I have been making videos all my life starting from twelve years old—back in the days of Commodore 64. Lights, camerawork, and timing are my strongest skills, but now with tools like iClone and Omniverse Machinima, I can perform miracles!

In a nutshell, the combination of iClone and Omniverse offers a powerful, fast, and intuitive way to create large-scale outdoor renders. Combining characters, natural motions from ActorCore’s asset store, and content from Pedestrian Actions is a powerful way to “colorize” and customize your cityscapes.

For free ActorCore 3D characters and mocap animations, visit here.

For a free trial version of iClone , visit here. 

For more info about Pekka Varis and Cineshare, visit here.

iClone 8 User Tutorial : Using Lens Flares to enhance real-time animation visuals

Final scene render by Benjamin Sokomba Dazhi
Benjamin Sokomba Dazhi – Professional iClone Animator

Hi, I’m Benjamin Sokomba Dazhi and I want to welcome you to this iClone 8 (iC8) tutorial. As you all know I am an animator and my major 3D tool is iClone . I’m so excited to bring you this next tutorial.

This time around, we will still be talking about how to enhance the visuals in our projects on iClone 8 for a captivating and alluring finish.

We are going to talk about lens flare. How to optimize your scene and make your scene look aesthetically appealing using lens flare.

LuckyPlanet_Cover

Transforming Science Podcasts into Engaging 2D Edutainment Series

The “Winner Tips & Tricks ” series covers practical workflows and techniques shared by winners from the “2022 Animation At Work Contest”. To let users see the full spectrum of the Cartoon Animator pipeline, we are introducing projects that received attention and credit from the community. Let’s now take a look at LuckyPlanet’s: “The Secret of Figs”, and see how he works his magic with Reallusion Cartoon Animator (CTA).

About Lucky Planet

Hi, I’m LuckyOne and LuckyPlanet is my YouTube channel. LuckyOne is an alias I use along with a voxel rabbit as my avatar. In the past, I worked as a 3D animator for over seven years before starting this project. I have created several short films which were awarded and nominated in animation festivals like Annecy, SIGGRAPH, and Hiroshima Animation Fest. Unexpectedly, my career prospects took a turn for the worse when I lost 20% of my vision due to eye surgery. That was reason enough to put me off using 3D software because the interface became too complicated and difficult for me to read. I was still able to work as a producer and director for a while, however, I very much miss creating my own shows.

After a long hiatus from animation, I began searching for alternative 2D animation software with a clean UI that is simple and easy to use. I happened to find Cartoon Animator 4 (CTA4), through which, only took me a week to start my first animation project after watching numerous informative tutorials on YouTube.

Although it’s never easy to gather funding for an animation project, I stepped into the world of NFTs in 2021 with a project called “LuckyPlanet”. It had a clear roadmap for financing an animated series and creating an intellectual property business. Cardano—being one of the most eco-friendly blockchains—had a community that welcomed me with open arms. Thanks to them, I finally had enough funding to launch the shows on my own with twenty episodes on the way.

Why choose this entry topic? 

Dr. Tanthai Prasertkul and Linina Phuttitarn, good friends of mine, have produced thousands of hours of science podcasts. We believe it’s possible to create a fancy animated series with these amazing stories. “Scientific thinking” is what we want to convey through our show. Being rational, curious, open-minded, and eager to learn, are the basic skill sets that can help us overcome many of the challenges of the modern world.

Why choose Cartoon Animator?

Pre-rigged characters and facial animations are, in my opinion, the two crucial areas that CTA dominates. As a 3D animator, I can confidently say that these aforementioned facets take a lot of time in production. CTA makes the turnaround twice as fast with results that can compete with other 2D animation software. User-friendliness and large, clear user interfaces are a must for me, and CTA provides it in spades.

How I did it with CTA

Step 1: Script and voice acting

Since each episode of the original podcast is longer than an hour, they need to be cut into two to five-minute shorts (so it doesn’t take years to complete production). This was done by removing several jokes and extraneous information, then having the entire script rewritten to add cohesion. After the script was finalized, we forwarded a copy to our talented voice actors.

Step 2: Character Creation & Rigging

I collaborated with a friend who is a 2D character designer to finalize the main characters’ looks. We iterated on the designs until we had the look and feel that fit the story well and played nicely with the animation style. Thanks to the premade rigs in CTA4, we were able to take two character templates from the library and replace them with our 2D character designs in Photoshop.

Step 3: Character Customization & Animation

360 Head Creator is a very powerful tool in my arsenal; By which, took a week to set up all the facial expressions and provide the ability to make head turns, but it made it much easier and faster to animate the characters. With all the options out there, especially with the motion library at hand, I chose a straightforward process of animating each bone one by one because I wanted to build up a collection of custom motions. In keeping down this path, I should have made enough movement to create the entire series within four to five episodes.

Step 4: Scenes creation & composition & Camera setting

There isn’t much camera work here since the video is focused on narration. In addition, there are only a few layers applied in Adobe After Effects.

Step 5: Composition in After Effects

The characters are composed of basic flat colors. Adding several additional layers in Adobe After Effects can give them more volume and let them stand out from the background.

I sincerely hope you enjoyed our show and would appreciate it if you could subscribe to our YouTube channel and leave some comments!

Related Posts

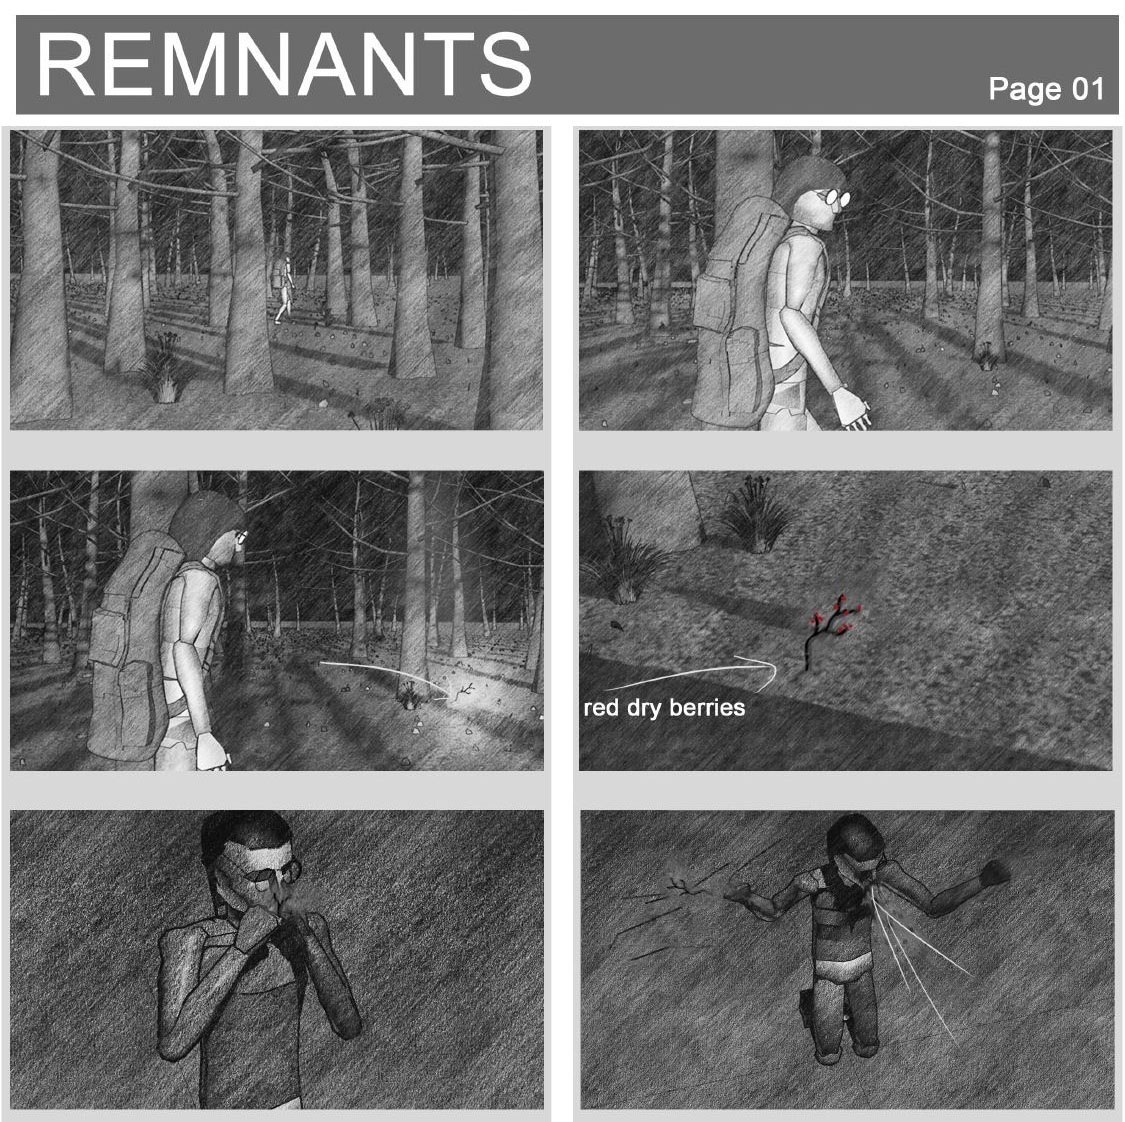
Pitch & Produce | Remnants: Post Apocalyptic Short with iClone, Character Creator & Unreal Engine 5

This article is featured on 80 Level

Stanislav Petruk

My name is Stanislav (but I prefer Stan). I am a self-taught artist working in the game-dev industry. I started as a motion designer in a small Siberian town and eventually moved to a bigger city chasing my goal to make games. The first job I landed was a startup mobile game, and I think it was a perfect project that helped me to make a transition from video production to a real-time environment. My next job was at a company called Sperasoft, it’s a big outsourcing company that co-developed a lot of great AAA games. I started as a VFX artist and worked on several big titles there – WWE immortals (mobile), Mortal Kombat (mobile), Agents of Mayhem, Overkill’s the walking dead, and Saints Row. It was a great time and it helped me to grow a lot as a professional artist.

After over 4 years at Sperasoft, it was time to move on and in 2019 I moved to Poland. I spent almost 2 years working at Techland Warsaw. In 2021 I moved once again, this time to Stockholm, and currently work at Avalanche studios as a senior VFX artist.

“In iClone 8 I was able to do all the mocap clean-up, previously done in MotionBuilder, but without the complexity or higher cost. Inertial sensors of Xsens understand the movement well but have no idea where they are really located in 3D space.“

Stan Petruk – Senior VFX Artist from Avalache Studios

About the Remnants Project

Besides making games, I love films and parallel to my real-time VFX career I am trying to develop myself as a filmmaker. I attended several filmmaking courses, the most recent one was a short online course from Vancouver film school. I am also learning from books and trying to break down the films I watch. But it was all a theory and at some point, I realized that I need to get my hands dirty and make my first film. So, it is when I started to develop an idea for a short film with a simple story. I also explored a similar theme in my previous project, which was a VFX contest two years ago – But it was not a film yet.

The production of the Remnants started maybe a year ago, but in the beginning, it was mostly research and development. I took a pack of sticky notes and started to break down the project into small elements, first breaking it into the story structure acts, adding events in between, and making a list of what software and techniques I must learn to make the project come to life. Everything was glued to the wall and visually looked like there is no way I could make it alone with the skills I currently have. At the same time, I didn’t want the production to turn into only a technical presentation, my goal here was to make a film and the main focus should be exactly film direction.

So, I started to dig into how I can optimize my work. The real-time approach in all possible ways was something obvious. Merging my two passions – gamedev and films – into one was the core idea to get production going.

Discovering the Reallusion Tools

I was very concerned about having characters in my film, they are very important and they must look alive, it must be possible to empathize with them. So, I googled how I can make a character without being a Character Artist, and after some research, Reallusion products seemed like a perfect solution. Simple to use and with some basic knowledge of CG you can get an awesome result from it.

Reallusion software works very well with other programs, especially with Unreal Engine. All file formats I needed are supported, and export presets are there, too. You just use it as a part of a solid pipeline. It simply does the job and helps to save a massive amount of time.

The creation process in Character Creator is as simple as it can be, you just pull the slides and get the shapes you want. But if you want to get the result you must understand what exactly you need. So, I made a virtual film casting. I found some AI that generated a bunch of photos and just chose the ones I liked best. After that maybe an hour per person and you are ready for the next production stages.

Clothes and Hair

I did not want the clothes on the characters to look like a standard game asset, where they are a part of the skeleton. So, I decided to use Marvelous Designer and simulate the clothes as a separate element. The pipeline was the following:

  • Export an animated character from Unreal Engine
  • Import it into Marvelous Designer
  • Create a 3D model of clothes in Marvelous Designer
  • Add UV and textures
  • Simulate the clothes on top of the animated character
  • Export as alembic
  • Import into Unreal Engine as a 3ds Max preset with skeleton

Eventually, I used a mix of simulated clothes and 3D model skinning to save some time.

Hair was a tricky part, mostly because I wanted to use UE hair and fur. A lot of hair is also added to the character’s clothes, there are reasons for it – it looks great and hides imperfections of simulated cloth. Here is the pipeline:

  • Export character (or clothes) from Unreal
  • Adding particle hair in Blender. Blender has a lot of great tools to style hair.
  • Export hair as an alembic file (only the first frame, not a whole simulation)
  • (It is an extra stage which is necessary only if the fur in UE is not binding to mesh correctly, I used it only for clothes). Export the first frame of the mesh as alembic and import as a skeletal mesh in UE
  • Import fur into Unreal Engine
  • Create hair binding (use additionally exported mesh as a source skeletal mesh if required)
  • Add the groom component to a mesh

The real problem with the hair – it is not always sorting correctly, and if for example there is a transparent particle in front of fur, the fur will be rendered on top anyway. So, I had to remove or tweak somehow a lot of smoke and fog because of that.

Creating Animation in iClone

Before making the final animations, I made the whole film as a simplified cinematic. I used a mannequin in UE and was just moving it in the scene, all cameras were also there as well. Thus, I had a very good plan, I knew what animations I need and even how much time should every movement last (roughly of course). In the final version, a lot was changed but the core idea was from the initial cinematic. For the motion capture, I used Xsens, which is really great but requires a bit of cleanup and tweaking anyway.

In iClone I was able to fix most of such issues and also fix some of the mistakes I made during the pre-production stage. The most complicated scenes were the ones with interaction involved. Especially because I had to be both characters at the same time. Such things required a lot of manual fixing, e.g., there is a scene where one character takes a cigarette from the other, or throws and catches a potato, all of that originally was not moving correctly. I didn’t have access to finger tracking so it was made in iClone.

For facial mocap I used an iPhone that also required a bit of tweaking later, e.g., chewing the potato was done manually as tracking was not able to understand the recorded movement. I also used a bridge to export characters to Unreal and it is very simple and smooth, with just a click of a button. The animations were imported manually because I needed to clean up and fix the movements before using them in production.

VFX used in Remnants

All of the effects are animated flipbooks, they are mostly fire and smoke. It was the simplest part for me because I am a VFX artist. The pipeline is standard, make a simulation in Houdini, render it as a flipbook, and make a particle effect in Niagara.

Conclusion

The production started quite a long time ago (over a year ago), mostly because it was a research and development for me in the beginning. So, you could understand better the last 5 minutes of the film were made during maybe a couple of months. So, when I developed a good pipeline, made all preproduction, and had a good plan, the production started to go very fast. So, you basically have a scene set up, add the lights, drop characters to the scene and roll the camera. I really loved this approach, because it actually simulates the film production and shifts most of your attention to actual filmmaking.
I think with a traditional approach I would most likely never make it alone. Now with all the knowledge I have, I started a new short animated film with a bit more complicated story. Currently, it is in preproduction, but soon I will be able to share more information about it.

Follow Stan

ArtStation:
https://www.artstation.com/illusorisch

Youtube:
https://www.youtube.com/user/stas170187/videos

LinkedIN:
https://www.linkedin.com/in/stanislav-petruk-13624868/


This article is also featured on 80 Level.

Want accurate auto-rigging for characters? Try AccuRIG

This article is featured on Creativebloq

Free application for quickly transforming static models into moving characters.

Ever lament the substantial time and energy spent on rigging your favorite characters? Do you desire a one-click solution to streamline the entire rigging process? Look no further – a brand-new solution is in town, namely Reallusion’s AccuRIG! 

Presented by the makers of iClone and Character Creator, AccuRIG has direct access to character content on Sketchfab and 3D motions on ActorCore. Not only does it convert static models into rigged and animated characters, AccuRIG also automates tedious and repetitive tasks – all for free!

AccuRIG: A better alternative to Mixamo

Easy steps for character rigging.

As a free auto-rig tool, AccuRIG is available for download from ActorCore online store. The program is designed for fast, easy, and accurate character rigging.  Whether you have models in A-, T-, or scan-poses, with low, high, or multiple meshes, you can complete the rigging in five steps. 

You can export the rigged FBX file directly to any major 3D tool such as Unreal Engine, Blender, Unity, and C4D, or upload it to ActorCore where you can try out thousands of 3D motions.

Body and hand rigging can be manually refined.

What is amazing about this application is that it also allows you to manually refine the body and hand rigging – with quite impressive results. With manual joint definition, rigging can be customized to match models with different shapes, looks, and scales. The skin weight is optimized for all joints, from the neck, shoulders, elbows, and knees, to detailed finger joints. The volumes for the head, body, and accessories are well-preserved using the AccuRIG rigging technology.

Use Post Offset to correct the avatar posture.

Pose offset is another excellent feature in AccuRIG. It helps correct pose problems such as arm penetration or leg distance when applying animation data to characters with different body scales. It can also generate stylized performances for cartoonish figures. 

Enliven unrigged models on Sketchfab

Search ‘AccuRIG’ in Sketchfab and find compatible models to choose (Image credit: Sketchfab)

Online asset stores, such as Sketchfab, offer hundreds of character models for download, paid or free. Many of these assets require further rigging, and the time and effort to complete the rigging process can be a real obstacle for users.

Without the lengthy rigging process, users can take advantage of the large content library in Sketchfab, use AccuRIG to turn unrigged models into animated avatars and bring them to production, quickly and easily.  

When searching AccuRIG in Sketchfab, users can find a selection of models designed by different artists that are ready for use. There is also access to the recommended 3D characters, directly from the tool, making it very convenient for users to pick and choose desired models from Sketchfab.

Value-added for model artists 

Character artists can benefit from AccuRIG simply because it is free, fast, and offers accurate results. No more hours of manual rigging to make the static creation perfectly fitted for animations. Artists can display their newly rigged models in different poses and increase the asset value in 3D stores like Sketchfab. 

“All that can be said about AccuRig is that it’s definitely a game changer and definitely a big upgrade from similar tools like Mixamo,” says Roumen Filipov, senior 3D character artist at Chief Rebel. “The easy and fast workflow combined with a high-quality result is surely a must for character artists wanting to take their models to the next level.” 

Thousands of production-ready mocap animations

ActorCore asset store with a variety of 3D motions.

Nowhere to find suitable motions or poses for your newly rigged character? Just upload it from AccuRIG to ActorCore online asset store. Explore over 1,700 well-themed, professionally produced 3D motions in the real-time interactive viewport. Download and retarget character animations from ActorCore to use with all major 3D tools for game, film, arch-viz, and interactive projects.

Download and try it yourself

AccuRIG offers many powerful functions, similar to those found in Maya Quick Rig or Blender Auto-Rig Pro. But AccuRIG is TOTALLY FREE, making it an option that is head and shoulders above the competition. 

You can download AccuRIG from ActorCore website and try it with complementary Sketchfab models to experience this new 3D production tool. Tutorials are available for getting started with AccuRIG. Visit the Reallusion Courses website and try them for yourself.

Learn from Winners : K-style game character created by undergraduate student.


Go Eun Kim

Hello, my name is Go Eun Kim, a college student majoring in computer engineering, and I am from South Korea.

Since my hobby was playing games and drawing pictures, I naturally became interested in a job related to my hobby and had a dream of becoming a 3D modeler who can implement realistic characters in games. However, graphic classes in college were not what I expected, and I felt the need to study 3D modeling separately to ensure a clear path for my career. So I decided to take a year off from college in 2021.

That year, I started studying character modeling through a graphics academy. At first, I studied using 3ds Max and gradually studied how to model characters using programs such as ZBrush, Substance painter, and Unreal Engine. And by participating in a contest held in Korea, I could learn how to easily implement high-quality characters using Character Creator. Learning various programs was not an easy process, but visible results are satisfying and fun to me. Also, I was able to concentrate on studying 3D modeling with passion because I always get excited when I imagine people playing future game characters that I have made. It was very valuable that I studied 3D modeling for a year. This year, I am studying my major and 3D modeling together because I am attending college.

Part I. Winner Entry Workflow

Step 1. Character Concept

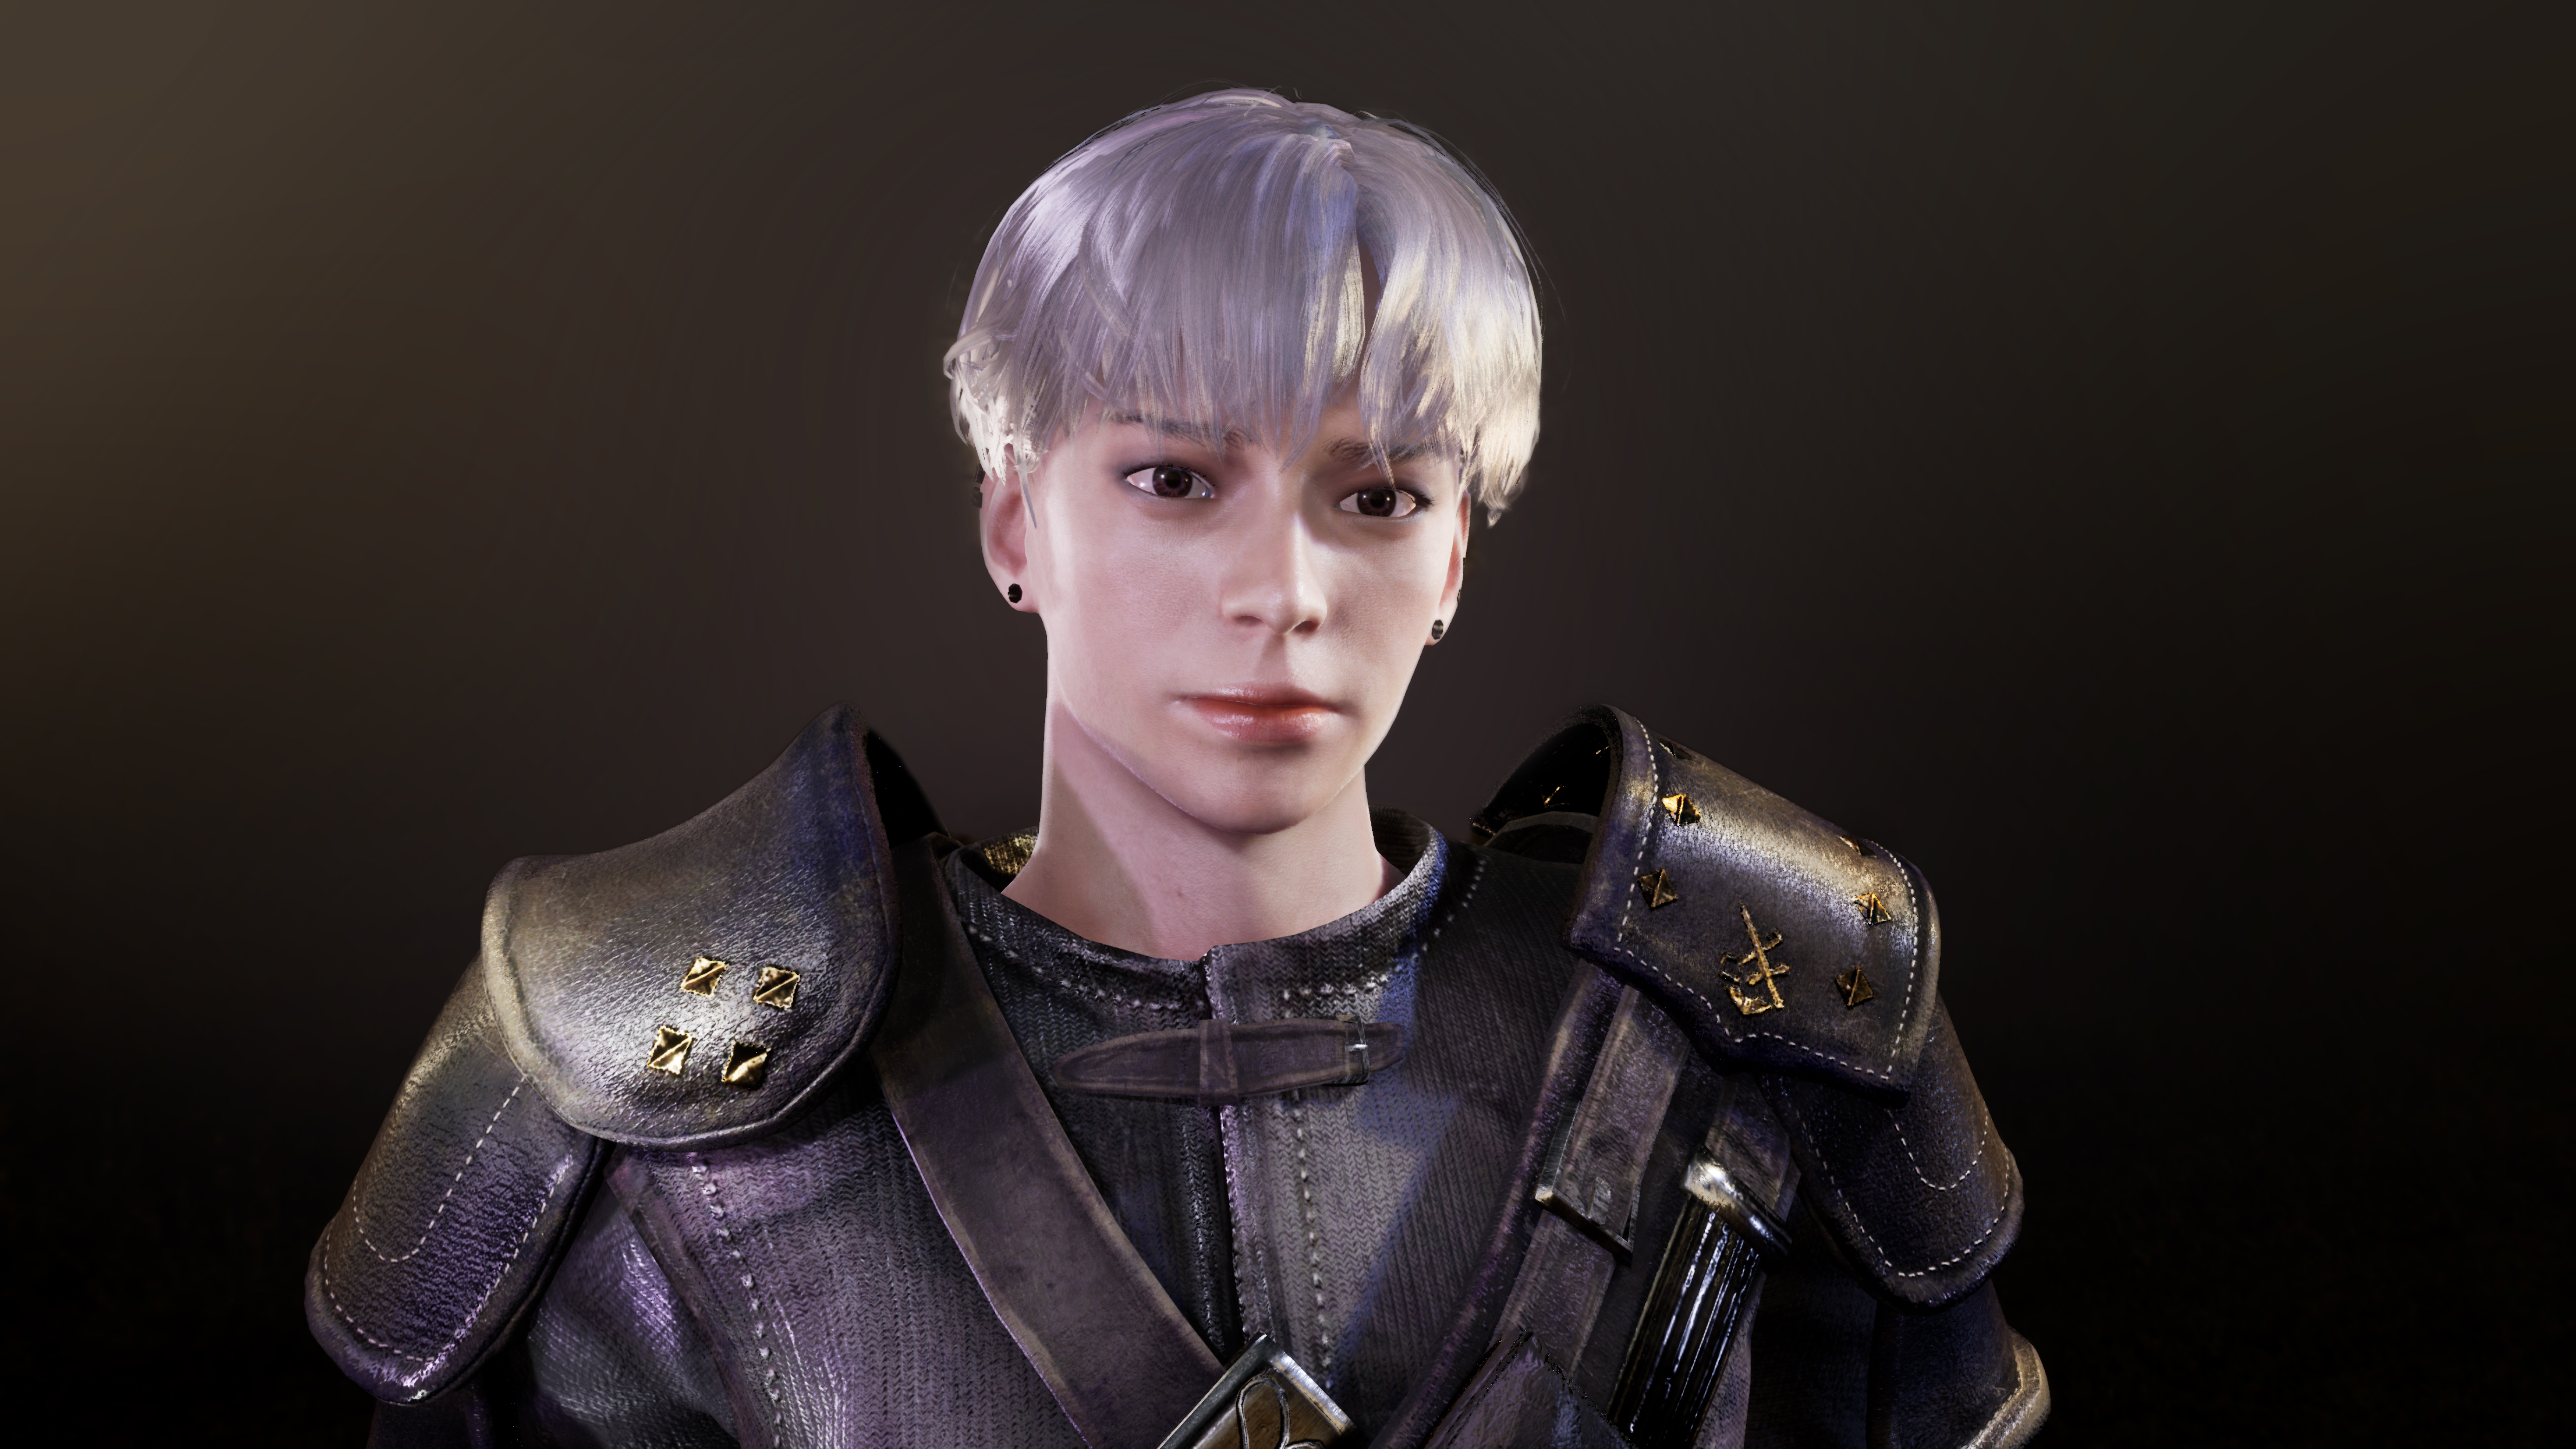
I found various references to make characters that would appear in the game and decided to make characters with the concept of “Adventurer”. 


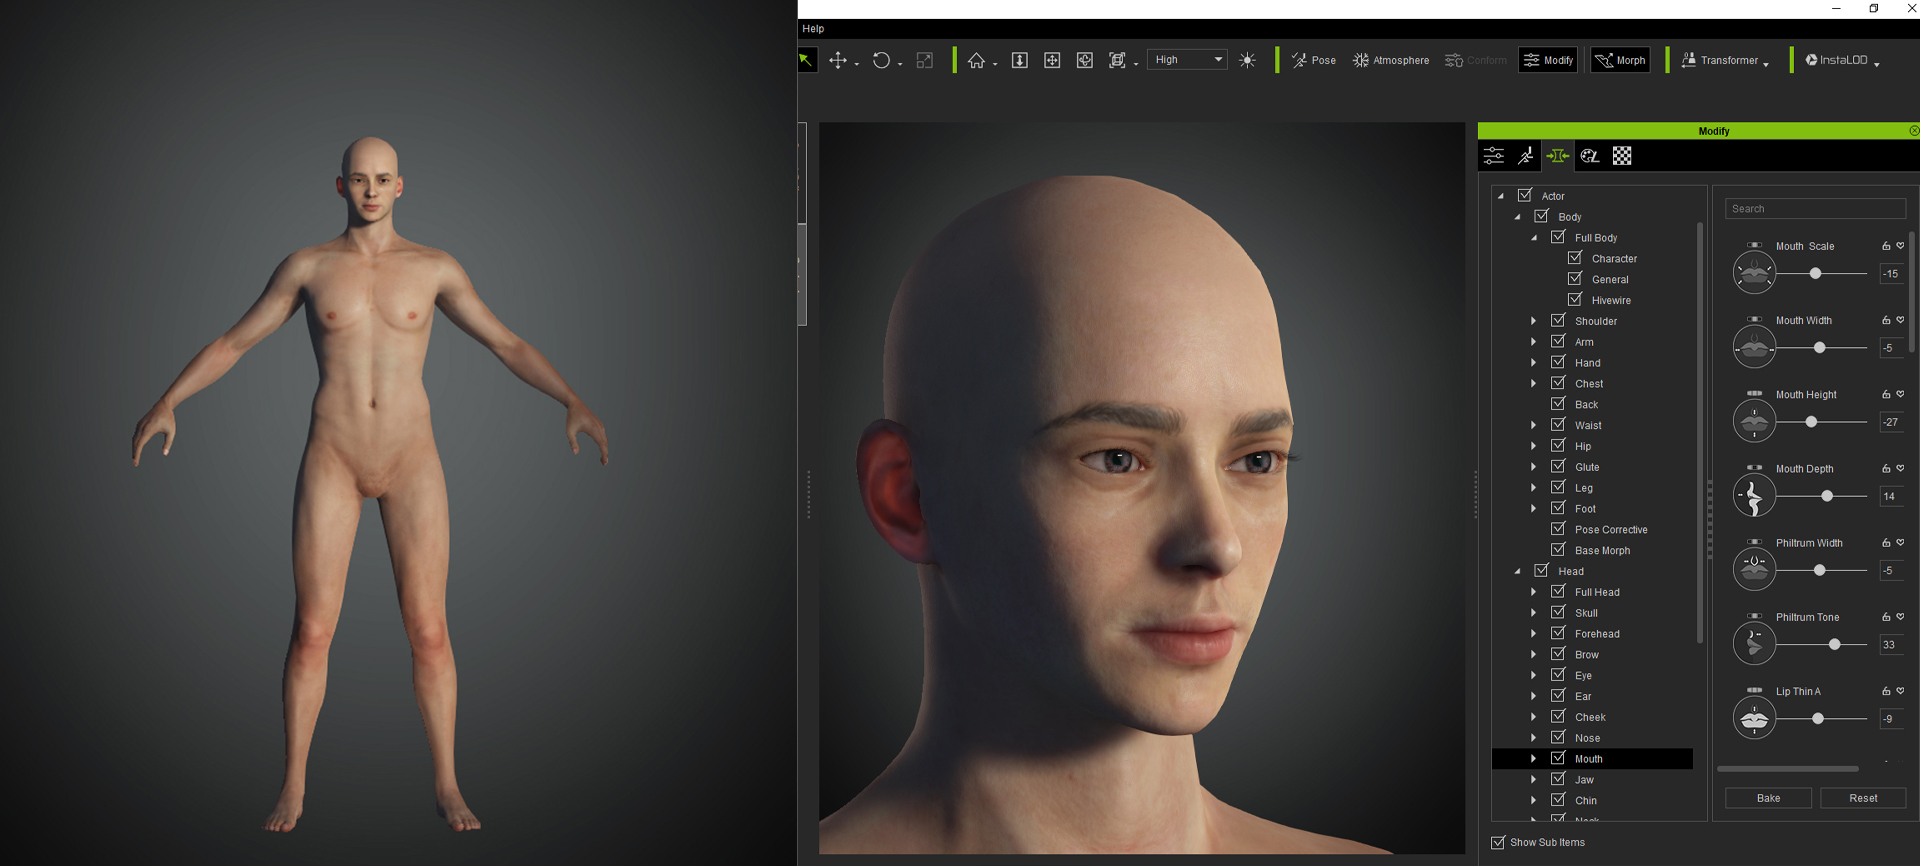
Character Creator 3 provides various types of modeling, and the sliders can be used to modify the body shape and appearance so that the desired character’s appearance can be made high-quality and easy. It also provides texture maps such as base colors, normals, etc., which helped to shorten the working time very much.

Step 2: Additional Software

Take the model from the Character Creator to the Z-Brush and make a simple clothing shape to see if it matches the character. Then, make low poly and high poly using 3ds Max and Z-Brush (or Marvelous Designer if necessary) and bake the normal map.

Take the baked normal map to Substance Painter, apply it to the model, and create a texture map to complete the clothes.

Additionally, the face texture map provided by Character Creator 3 changes the appearance by modifying the digital human skin details and makeup in Photoshop and Substance Painter.

For the hair, use the hair cards in 3ds Max to create a hairstyle that fits the character. And make a hair texture using Z-Brush‘s Fiber mesh and apply it to the hair cards.

Step 3: Pose and Lighting

Move the character’s bones and pose according to the character’s concept in 3ds Max. Adjust the skin value using the weight tool to make it look smooth and not awkward. 

Then export it and take it to Unreal Engine 4 (UE4). Apply all the texture maps created in step 2 to the material node in UE4.


In the case of the background, it has a solid color or gradation plane to give a lighting effect, or it adds various brightness and colors to the set downloaded free of charge from Unreal Engine to make the character look the prettiest and “coolest”. If you apply lighting effects to the character, you can create various moods.

Step 4: Character Animation with iClone

Export the action of applying facial expression change to the animation provided by iClone and take it to UE4. As in step 3, add a lighting effect to the animation and add camera movement to make it look more dynamic. Then take a screenshot and record a video to complete all the work.

In Conclusion

After going through the steps above, all the work is done and the character is completed. Character Creator 3 makes the process of modeling the basic appearance easy and fast, helping to reduce working time and making the work fun. Thank you for viewing my workflow.

Part II. Feature story

Q : Hi Go Eun, thank you very much for sharing the workflow with us. First of all, congratulations on winning the contest!

There are two scenes of your entry Adventurer: one in the spaceship and the other in the canyon. Can you elaborate more about the stories behind this Adventurer?

What’s the fun part and the biggest challenge of creating this character?

Hello, thank you for congratulating me on winning the award! I was worried about choosing a background that would make the character of “Adventurer” stand out. To maintain the concept, I thought I shouldn’t bring the character to any background. So I chose two backgrounds because I wanted to give the character a feeling of exploring a place. It’s like an NPC waiting for a user on a hunting ground or a dungeon in an RPG game.

The biggest challenge in creating characters was the clothes modeling process. Because it was my first time making clothes using Marvelous Designer, but I think it is a good experience. The greatest fun in creating characters is in the process of using Substance Painter. I think adding color to low poly mesh and detail using textures is the most fun work because it feels like instilling vitality in the character.

Q : How did you learn Character Creator (CC)? In your experience, what are the merits and drawbacks of using CC to design characters? Have you ever tried the GoZ function to sculpt your characters in ZBrush and CC at the same time?

What are your favorite features of CC 4 / iClone 8?

I got to know CC through a 3D character production contest hosted in Korea, and I used the GOZ function by making the appearance of the character using CC, modifying it in ZBrush, and bringing it back to CC to check. I think the advantage of CC is that it not only provides realistic and high-quality character models but also provides various textures and facial animations, so it saves working time.

However, I think it was regrettable that I had to install and use various software to use the animation function. And among the newly added features of CC 4 / iClone 8, I am looking forward to using the physics and animation player functions for my new project.

Q : Because of your great passion for creating games, you have even decided to pause one year from college and learned 3D modeling by yourself. Do you have any role models whose works keep motivating you to pursue this goal?

As you’ve returned to the campus this year to continue your studies in Computer Engineering, I wonder if you see any potential to combine your passions with your major studies? Or say, has the knowledge of Computer Engineering ever helped you to create something different from the past year?

I don’t have a role model, but I always try to do my best in a given task because I believe that if I do my best, I can be the best. And the project I did my best is the motivation for the next project. Currently, my major is different from studying 3D modeling, but I continue to study them together because I think that knowledge of computer science can help me communicate with other departments when I produce games later.

Q : The Mechanic Girl has a similar style to that of the Adventurer, but with more interesting accessories from her hairstyle and weapons to her bag. Do you usually design unique props for your characters? Could you share more of your artistic ideas on this Mechanic Girl?

How did you achieve your character design and character animation by using Character Creator, ZBrush, 3ds Max, iClone, and Unreal Engine? In your opinion, what are the merits and shortcomings of using iClone Unreal Live Link?

Mechanic Girl was my first project to create after seeing the concept art of characters drawn by others. The design looked unique, so I thought it would be fun, and I chose this character because there were many things that I could try, such as skirts, weapons, and accessories. And the body and appearance of this character I modeled using 3ds Max and Zbrush, so it takes a relatively long time and there are some awkward parts, but I was able to learn how to make a body mesh and how to make a digital human face; I think it helped me understand character modeling.

And I planted the bones in 3ds Max and rotated them directly to make the character take the attack pose. I then modified the face model and created a facial animations that matches the attack posture to complete the character animation. I think the advantage of iClone Unreal Live Link is that it works with iClone and Unreal Engine in real time without having to export and import FBX.

Q : Please share with us three things (e.g., website, books, podcast, music, games, sports, etc.) that inspire you most when you start a new project.

When starting a new project, the most inspiring things are games, ArtStation, and animated movies. Because I think these inspirations come from the desire to challenge, starting from the curiosity of “how did you make this?” when I see things that I have never made. 

For more of Kim’s work, check out her ArtStation page.

Made with Cartoon Animator: The 2022 Animation at Work Contest Winners!

After two months, the 2022 ‘Animation At Work’ Contest for Cartoon Animator (CTA) has come to a close. Reallusion would like to thank all of its wonderful sponsors including XPPen, Affinity, Magix, and ASIFA. Overall, the event received 169 global entries, each with their work-in-progress videos among five categories: Business & Commercial, Comics & Art, Education, Vertical Shorts, and VLOG & VTuber.

A total of 26 winners, from different backgrounds, were selected with different levels of skills and experience. Additionally, a wide array of styles and topics were created, proving that Cartoon Animator is streamlined for creative diversity. Several newcomers who were first-time CTA users, were even able to use their newly acquired techniques to combine other software pipelines for amazing submissions. Click here to see the full list of winners with their respective judges’ comments.

Business & Commercial Animation — 1st Prize

Songrea Travels TVC by Onome Egba (Nigeria)

Onome Egba and his thoughts:

“Cartoon Animator excels at simplifying a lot of complex processes naturally associated with character animation. The rigging tools and animation presets are especially good at helping you get your characters moving in no time. Real-time playback is also something you’ll quickly take for granted when using the software. No ramp previews, pre-render, or 1/4 resolutions are needed to actually see what you’re working on which really helps with iterations.”

Judges comments:

Congratulations to Onome Egba! This is a delicate 2D production that all judges immediately pictured seeing as a TV or YouTube ad. The voice acting, characters, and body motions were all well balanced, and we also loved the scene and camera changes. Well done!

Comics & Art Animation — 1st Prize

Godly Princess by Eon De Bruin (South Africa)

Eon De Bruin and his thoughts:

“I have been working with Cartoon Animator 4 since 2017 and it has opened up a whole new world of possibilities for me. Today I have my own streaming platform where I create numerous animation shows for kids, and CTA4 is my software of choice because it is so easy to work with, fast to create animations, and integrates well with Clip Studio Paint. I don’t think I will be able to create as many animated shows for my platform if I were to use another software. I love Cartoon Animator!”

Judges comments:

Our seasoned CTA user Eon De Bruin impressed us again with his entry and WIP Video. He took a chance to have the 2D princess interact with 3D people – and it all paid off! Congratulations Eon!

Education Animation — 1st Prize

The Secret of Figs by LuckyPlanet (Thailand)

LuckyPlanet and his thoughts:

“Cartoon Animator allows me to produce my animated series more quickly and easily. These animation tools make me feel like an actor myself.”

Judges comments:

A 10 out of 10 winning entry for the Education category! We were very impressed with the final quality, and we cannot wait for more educational Cartoon Animator videos created by LuckyPlanet!

Vertical Shorts — Winners

Guard Duty by Jeremy Fisher (Canada)

The Sisters AR by Kirill Klochkov (Russia)

VLOG & VTuber — Winner

Approaching “Global Warming” What measures can you take? by Hiromi Yamamoto (Japan)

Student Animation — Winner

The U.S. Declaration Of Independence by Andre Luiz Siqueira Alencar (Brazil)

As the contest ended, Reallusion was also pleased to announce the coming of Cartoon Animator 5. In this forthcoming release, we are fulfilling the groundwork of animation productions and also elevating Cartoon Animators’s unique techniques. In the new version, secondary animations will be automatically created with simple keys, squash-and-stretch motions can be deformed freely, and vector graphics are supported for infinite resolution. Take a sneak peek at what’s inside Cartoon Animator 5!

Pitch & Produce | Raise Ravens: Reanimating loved ones in virtual reality with Character Creator

Raqi Sayed – Senior Lecturer | School of Design Innovation – Programme Director, ICT Graduate School | Victoria University of Wellington

Raqi Syed

Raqi Syed is an artist, visual effects designer, researcher, and lecturer at Victoria University of Wellington. She is the co-director of MINIMUM MASS.

Her practice and teaching focus on the materiality of light, hybrid forms of documentary and fiction storytelling, and using media archeology and software studies methodologies to better understand contemporary practices in visual effects.

Raqi has worked as a visual effects artist on a bunch of feature films. In 2020, her VR work was exhibited at the Tribeca, Cannes, Annecy, and Venice International Film Festivals. She is a 2018 Sundance and Turner Fellow, and a 2020 Ucross Fellow. In 2017, The Los Angeles Times pegged Raqi for a list of 100 people who can help solve Hollywood’s diversity problem. She holds an MFA from the USC School of Cinematic Arts and an MA from the VUW Institute of Modern Letters.

Raqi Sayed created an animated docu-memoir (Raise Ravens) where she digitally resurrected her deceased father in virtual reality with the help of Character Creator in order to lay his ghost, and generations of family hauntings to rest.

” I’ve been using Reallusion software for 5 years. I find the tools flexible and responsive to the different needs of storytelling in both my own work and teaching students the principles of character-centric visual effects.”

Raqi Sayed – Artist, Visual Effects Designer, Researcher, Lecturer