Welcome to this 4-Part mini series on how to develop content for Reallusion Stores, ActorCore, and Marketplace.
In this 4th and last tutorial, we will guide you through the process of packaging and publishing your design in Character Creator for the Reallusion Marketplace! This strategy will enable you to monetize your projects and become a Reallusion content developer.
To illustrate this process, we will use “Chad” as our example character.
- Make sure that all the pieces of your character’s outfit are included in the Content Panel. Organize each piece into its corresponding category, such as shoes, sweaters, pants, eyebrows, and hair. I recommend recording the complete avatar under the “actor” category.

- Open the packaging panel by going to the top Windows menu and activating the “Packager” option. Right-click on an empty space and select “Create Pack” and assign a name.

- Double-click on the package file and start including all the elements one by one.

- Organize hair, clothing, and accessories into categories. Create a folder next to the character and name it according to your brand or username. This way, all assets will be organized in the user’s content library who purchases the products

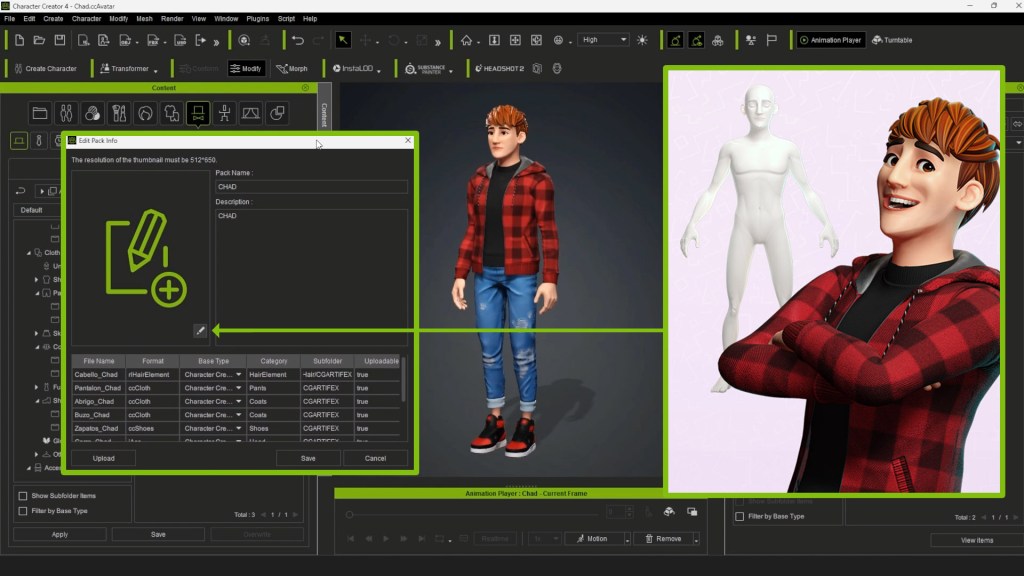
- Once you have organized all the elements, go to the main folder of the package file, right-click on it, and select “Edit Package Info.” In the popup window, you can modify the name and description of the asset. Make sure all files are in “True” status so they can be uploaded to the server

- You can also add a thumbnail to the package. Activate the editing option and search for an image on your computer. The thumbnail image should have a resolution of 512 × 650 pixels. I recommend creating different types of renders in Character Creator to showcase your character attractively.

- To get an appealing image, generate an eye-catching pose using the pose editor, use the facial editor to create captivating expressions. From the Render panel, change the format to PNG and increase the quality by setting the samples to 3X. You can create several images to showcase the full avatar, different hair angles, full-body morph from different angles, accessories, clothing, and various expressions

- Go to the package window and right-click on the “Upload Pack” option. In the pop-up window, verify that the avatar is loaded without errors and then select “Upload.”

- Head to the Content panel and activate the dropdown menu next to the search bar. Select “Reallusion Marketplace.” This will take you to the Reallusion website linked to your account. Make sure you are logged into your Reallusion profile.

- Click on your profile and select “Manage Backend.” This interface will allow you to add information about your content. Activate the editing option, then select the package entries, type, category, version (actor), and project. Add more categories to classify your character, indicate if it is compatible with iClone, and assign the gender.

- Assign the package name and make sure all assets are present. Then, assign a point value to your character (I recommend reviewing the points conversion policies according to the guidelines published on the website, developer.reallusion.com.) Add a description that includes keywords and mentions compatibility with other projects in the store. Add all the images you created earlier at the bottom. Select the compatibility version of the project and save the changes.

- Finally, click on the package thumbnail. You will now see your product published in the Reallusion Marketplace. For more information, go to the product marketing section, where you can download the marketing guide and marketing templates to enhance the look of your assets. With these simple steps, you have published your content on the Reallusion Marketplace and can start benefiting while still having fun creating new content


