
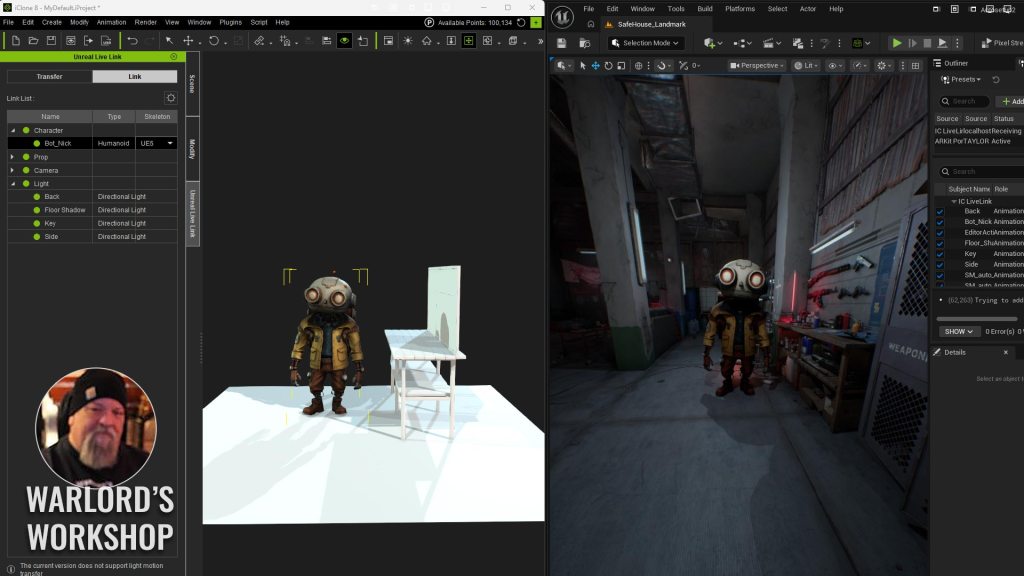
For many beginning animators, the thought of using Unreal Engine is more than a bit scary, and it used to be for very good reason… it was difficult in its first incarnation. The problem for beginners was not so much using Unreal as most things were done with iClone via LiveLink, but setting up that link was a problem if you had little technical knowledge or skill with the engine and learning iClone at the same time.
Not so anymore with Reallusion’s latest free Unreal Auto Setup (All-in-One) installer. This new method installs everything needed, including LiveLink, to get our iClone to Unreal connection up and running.
New to Unreal Engine?
As a beginner learning how to link the two together to get a project running properly will open the door to you learning more about Unreal if that is one of your goals. This way, you can learn iClone and, in the process, get a grip on Unreal Engine basics to get closer to your goal of learning both apps.
With the New AutoSetup (All-in-One) installer, it has never been easier.
All-in-one Package Installation
We used to install what we needed from different locations, as Auto Setup was accessed via iClone, while LiveLink was installed via the Reallusion Hub application. This was simplified to a single downloadable package, which you can get access to from the Reallusion Hub. This consolidates everything you need to get LiveLink and the proper high-quality shaders via AutoSetup using one installation file.
The link in the Hub will take you to the All-in-One plugin page and a link to download a simple installer. Reallusion has already provided a great tutorial on the process, and the tutorial will follow below.
Relax… It’s easy, and the video below will start on that topic.
Manual Copying of the Content and Plugin Folders
This is confusing to a lot of first-time users, so you are in good company if you don’t understand the process. The installer package we just covered only installs the necessary files for AutoSetup and LiveLink. We still have to copy these files to Unreal Projects because they are project-dependent.
Your Unreal Project files will already have a content folder, so anything copied will be added to that folder. This manual copying, demonstrated in the tutorial below, will also create a Plugin folder with the LiveLink Plugin. This consolidates copy and paste functions we had to perform in the past, before the All-in-One installer was released. The video below starts at this topic.
FBX Export/Import
Exporting the file is the manual way to export and import your iClone characters, lights, or props. This is the original method before LiveLink was released and provides manual control over the export-import process. It has its pros and cons, like all things, and Reallusion gives us a choice of this or Transfer by LiveLink.
A plus of using the manual method is that you get an option to automatically create an Unreal Control Rig upon import to Unreal, so we don’t have to do this later in the process. This is not a big deal, as you can select the character, right-click, and run AutoSetup, and it will create the Control Rig. Please note that this Control is not necessary at the basic level of animation and can be considered an intermediate to advanced rig, so if it confuses you, just leave it alone until you have more time to learn why you may need it as your skills advance and improve.
This is demonstrated in the Reallusion tutorial that starts at that section:
Hooking up LiveLink
Now that the LiveLink plugin is installed, we need to activate it within iClone using the LiveLink panel, and we need to add it as a source to Unreal Engine and activate it. This is another very simple process.
The short video below shows how to bring up the LiveLink panel if it’s not visible and then the simple process of selecting LiveLink as a source, as demonstrated in the video.
Transfer by LiveLink
This has not changed, and once the link is established, it should operate as it has in the past. If you have never used LiveLink, you use the transfer tab in iClone to transfer select objects, and you use the Link tab to turn LiveLink control on or off on objects.
NOTE: Using LiveLink to transfer is easier for beginners, as there is no need to match the names of the transferred object or character in both applications. This method is basically selecting the object or character to be transferred in the LiveLink panel and clicking the transfer button. Multiple items can be selected and transferred at one time.
UE Control Rig
The iClone Unreal Engine Control Rig is a dedicated animation system developed by Reallusion to bring advanced character animation capabilities from iClone and Character Creator into Unreal Engine. This Control Rig enables users to animate both body and facial features with high precision, leveraging Unreal Engine’s native rigging and animation tools. It supports a wide range of character types, including realistic humans, stylized toons, and even non-human bipeds.
The system is designed to be compatible with Unreal’s MetaHuman framework, allowing for seamless integration and enhanced animation control. With the Control Rig, users can take advantage of features like full-body IK/FK switching, squash and stretch, twistable bones, and detailed facial morph sliders, all accessible directly within Unreal Engine’s animation environment. This makes it possible to refine and polish animations without needing to return to the original authoring tools.
Another key feature of the iClone Unreal Engine Control Rig is its focus on workflow efficiency and reusability. Animators can save and reuse facial and body poses, apply them to different characters, and make use of animation layer editing for both facial and body movements.
The Auto Setup tool further simplifies the process by automating shader assignments and skeleton mapping, ensuring that characters are ready for animation and motion retargeting as soon as they are imported into Unreal Engine.
Landmarks
Matching up the iClone and Unreal Engine 3D workspaces can be somewhat confusing, particularly if you are learning iClone and Unreal at the same time. I am going to show you the simple landmark method of “lining up” point A in iClone to point A in Unreal Engine.
This bears repeating. Landmarks are necessary to match your locations in both the iClone and Unreal 3D workspaces. This allows you to move and work in iClone and have it match the location in Unreal Engine. You don’t want to set a drink on a table in iClone only to find that drink floating in the air at a different location in Unreal.
For a beginner to get oriented, I recommend loading your character or prop into iClone normally. Go to Unreal Engine, select the landmark object, right-click, and choose transfer to iClone. This will transfer a simplified, untextured version of the selected object (prop) from Unreal to iClone. You can use as many landmarks as you need.
In iClone, select the character you loaded earlier, then link it to the landmark prop you just transferred. Since that prop is not on screen, you will have to use the Scene Manager to link the object. Open the selection box in the link section of iClone, select the Position radio button, and select OK.
This will position the character onto the transferred Unreal prop, after which you can then unlink the character and, with it still selected, hit the home button to take your view to the location. You now have locations matched in both apps. This is demonstrated in the video below.
Add any additional props you need to orient yourself in both workspaces, but you don’t have to load all of them if there are more than a few. You will soon work out your own method for this.
Check out the video below to see how to use Landmarks in iClone LiveLink:
iClone Origin
This is a useful tool for a lot of things, like placement of Actor Groups and matching locations from iClone to Unreal, but it generates a lot of confusion from beginners. This is why I focused on the landmark method first, and it’s also what I am accustomed to using.
It’s been my experience that beginners, having a lot to take in with LiveLink and Unreal in general, get caught up in the iClone Origin being more complicated than it is. Just add the origin to the Unreal project first. It’s basically a tool to line up the two 3D spaces by allowing us to move all our transferred iClone assets that are then parented under the iClone Origin point. This allows us to move everything we transferred from iClone to the proper location in Unreal using just the iClone Origin as the movement point instead of each asset.
To recap: iClone Origin works by defining a reference point for the characters, props, or groups you transfer from iClone with LiveLink into Unreal Engine. That reference point gives both iClone and Unreal a predictable place to measure from, which makes it easier to match positions between the two applications.
Watch the video below that briefly demonstrates how it works:
Summary
Reallusion’s Unreal Auto Setup (All-in-One) takes care of the technical aspects of getting Auto Setup and LiveLink installed with minimum intervention from the user. It takes a more complicated process and boils it down to a simple installation file instead of installing from the Hub and other places.
While Unreal Engine is not exactly beginner-level, it never hurts to start experimenting with it to gain the advantage of its fantastic rendering as soon as possible. You can learn iClone for animation and Unreal for production if that is what you are looking for. This method maintains extremely high, cinematic visual quality while keeping the animation process simple via iClone.
While the task of taking on Unreal Engine and iClone used to be a bit daunting, Reallusion simplified the process with this new all-in-one installer. Like most Reallusion applications, you can use as much or as little of all these tools as you need, but the sooner you can learn to install and hook up Auto Setup and LiveLink, the sooner you are on your way to improving your skillset even more.
The combination of iClone and Unreal Engine opens the door to new opportunities to tell your stories while getting the production value of a Pixar or DreamWorks studio on a budget. Besides… It’s free and so is Unreal Engine! What are you waiting for?

MD McCallum – WarLord
Digital Artist MD “Mike” McCallum, aka WarLord, is a longtime iClone user. Having authored free tutorials for iClone in its early years and selected to write the iClone Beginners Guide from Packt Publishing in 2011, he was fortunate enough to meet and exchange tricks and tips with users from all over the world and loves to share this information with other users. He has authored hundreds of articles on iClone and digital art in general while reviewing some of the most popular software and hardware in the world. He has been published in many of the leading 3D online and print magazines while staying true to his biggest passion, 3D animation. For more information, click here.




1 comment
This guide is GOLD, and not just for beginners. THANK YOU!!!!!!!