首頁 » Page 2

Easy Facial Rig in ZBrush with Face Tools (4/4): Animated Demo

A Step-by-Step Guide from ZBrush Master Pablo Munoz Gomez

The Facial Profile Editor

Alright, to wrap up this in-depth guide to the Face Tools plugin, I want to give you an overview of one of the most powerful features in CC4 when it comes to expressions: The Facial Profile Editor.

With the workflow we’ve been following in this guide, we manage to create an original custom character with its unique set of expressions and of course unique wrinkles. However, all of the custom tweaks we’ve created are being applied to the generic rig in CC4, this means we can definitely generate some really cool and interesting expressions like these 3 main expressions I wanted to achieve:

But what takes this whole process to the next level is the Facial Profile Editor. Since no one set of expressions is the same just like no human is the same, the Facial Profile Editor allows you to tweak the generic rig and truly customise the expressions of any given character.

To illustrate this idea, here are my final expressions for this tutorial. The images on the left-hand side show the custom expression morphs and custom dynamic wrinkles and the images on the right show the exact same expression with the adjusted facial profile for this specific character:
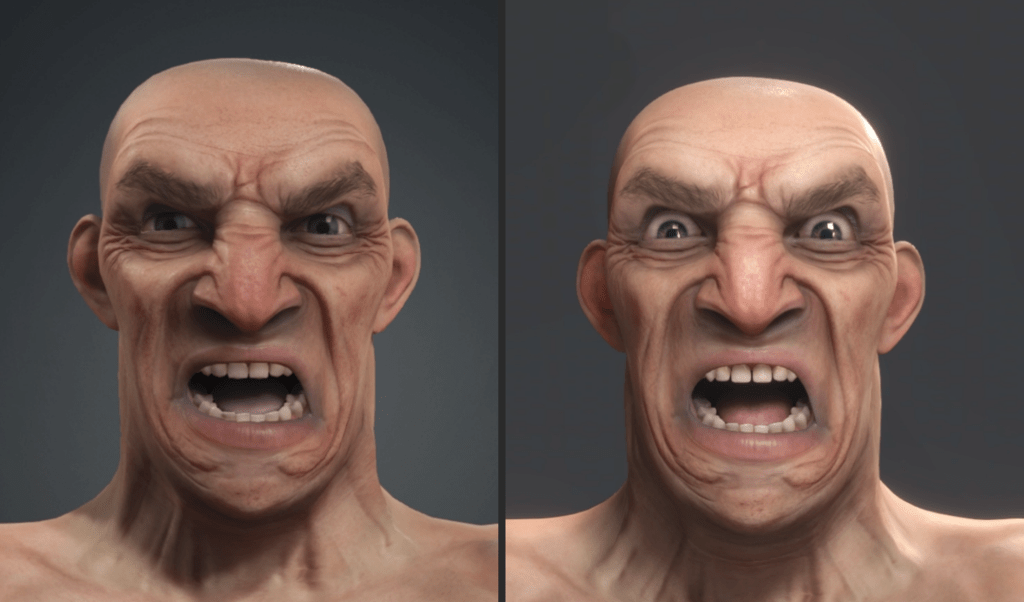
In the ‘evil laugh’ expression for instance, you can also see a massive change on how low the character’s eyebrow can go and how exposed the bottom teeth are as well:

Here is the fear/surprised expression, also with the updated facial profile:
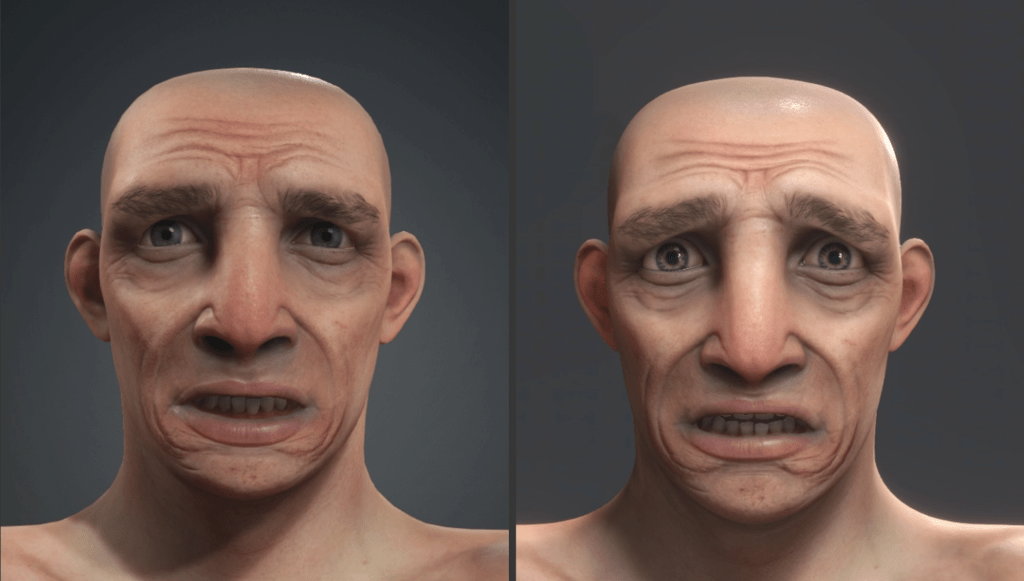
The point is, that the generic rig of CC4 can get you 90% of the way. As soon as you start working with more stylised or custom character, the Facial Editor will help you tweak and adjust all aspects of the morph sliders to creating convincing expressions:

Adjust Expressions in Edit Facial Panel

To get started with the Facial Profile Editor, I like to check my expressions and dynamic wrinkles from the Edit Facial control window. This is probably the easiest way to see how everything works and to spot areas of the expression that could be improved.
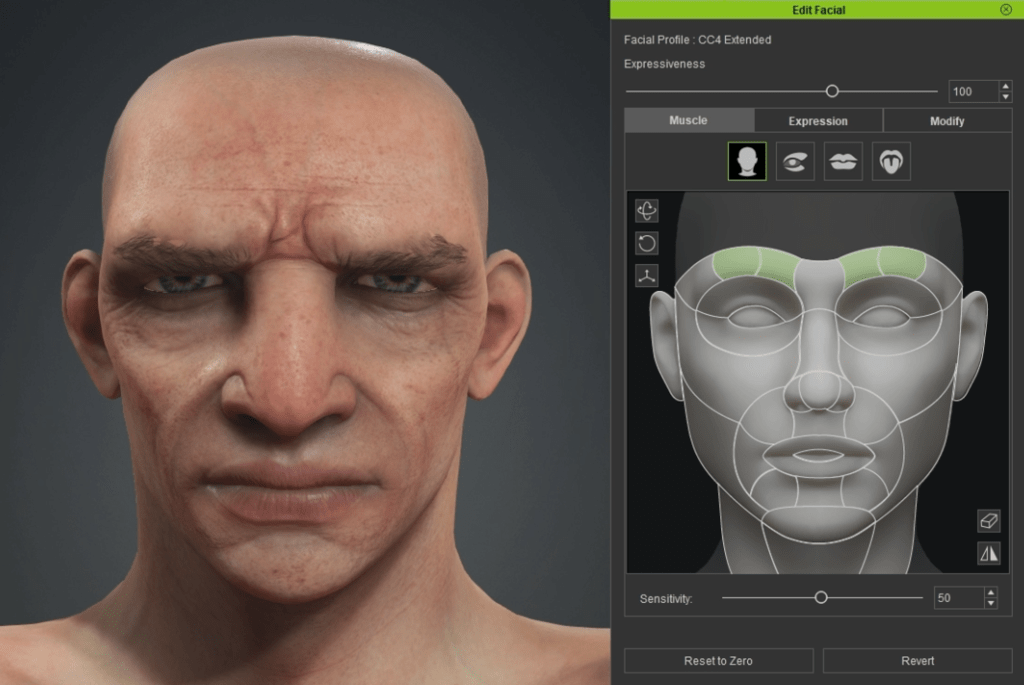
From the Edit Facial window, you also have other tabs next to Muscle. For instance, the Expression tab gives you access to a bunch of pre-made expressions that you can use as a starting point. These templates can give you a reference of how much you need to tweak your Facial Profile so you get to a more authentic expression.

The third tab called Modify is actually very useful. It gives you a much more granular control over each portion of the expression. So just as a quick example, here is the same ‘Angry’ Expression from above but with some of the sliders in the Modify tab tweaked (exaggerated opening of the mouth, angled brows, etc).
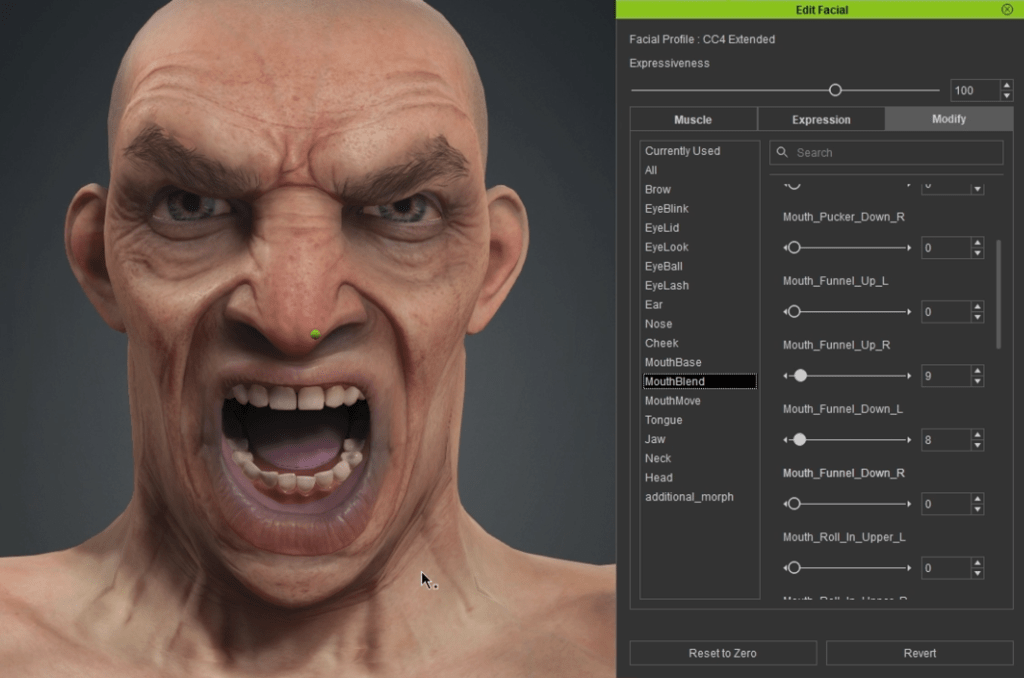
Now let’s dive into the Facial Profile Editors so we can create more custom expressions for the character.

Create More Custom Expressions in the Facial Profile Editor

From the Modify window, click on the Facial Profile Editor button. The character would go back to a neutral expression:

From the Facial Profile Editor, you’ll see all your morphs to the left of the window. After selecting a morph, you can see the different sliders you have to tweak that part of the expression
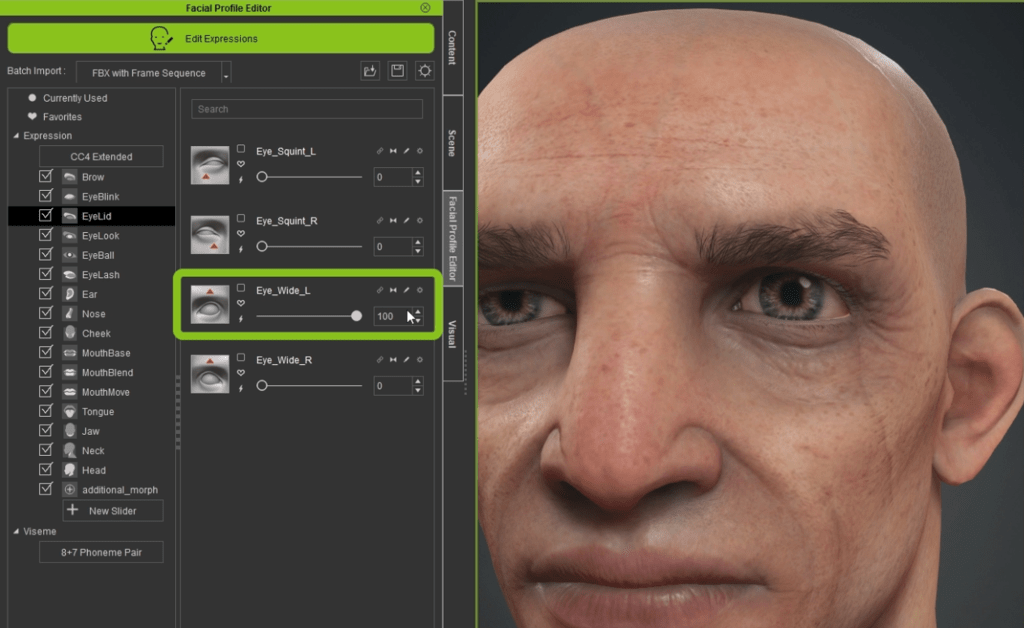
In my case, you’ll notice that even with the ‘EyeLid’ selected, pushing my ‘Eye_Wide_L’ slider all the way to a value of 100 doesn’t significantly open the character’s eye (partly due to the exaggerated size of my pupils).

The idea here is to fine-tune this particular slider using the Modify tab. Firstly, from the Morph tab of the Modify window, I located the morph section corresponding to my eyelid:
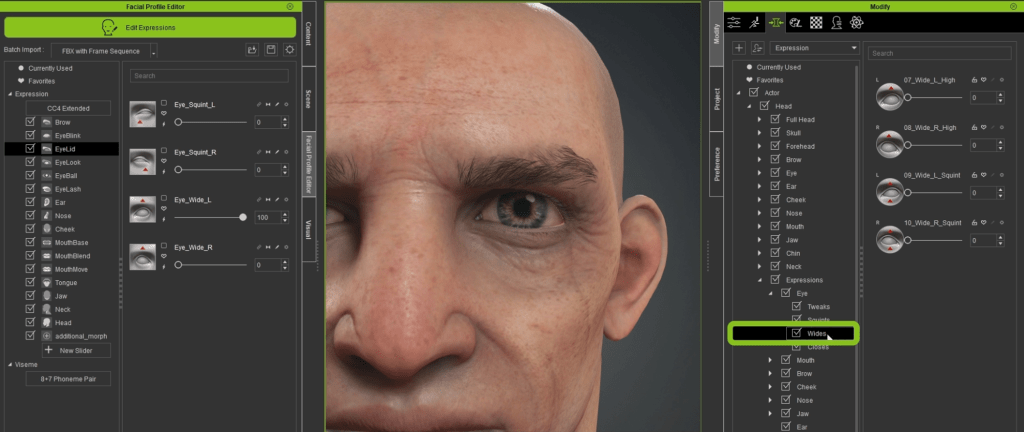
Then I used the ‘07_Wide_L_high’ to push that top eyelid past the edge of the iris of the character; this is how you can truly customise your expressions.
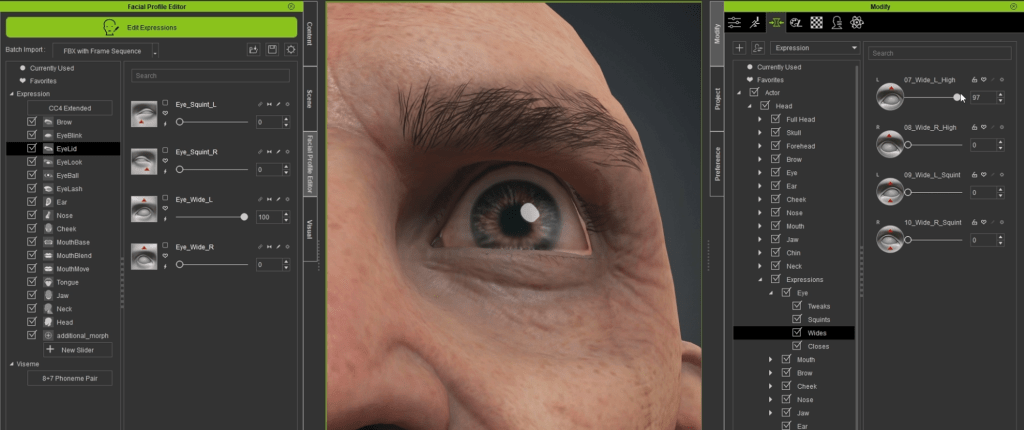
Now, in order to apply this change to my facial profile, I need to click on the tiny ‘thunderbolt’ icon next to the slider in my Facial Profile. In the pop-up window click on Ok. You can apply it to the current slider or to split part (I prefer to use the current slider and manually mirror the effect).

The mirroring process is just a matter of clicking the ‘mirror’ arrows icon from the opposite slider,  ‘Eye_Wide_R’:

These are the main steps of the process to adjust your expressions in the Facial Profile editor. After you do a couple, it is just rinse and repeat. Here is an example of the exaggerated left eyebrow raised:

Another significant advantage of editing your profile is the ability to adjust the placement of facial elements (such as teeth, eyes, tongue, etc.) based on the expression. For example, when my character opened its mouth, the lower teeth were pushed back too far. To rectify this, you can utilise the Facial Profile Editor by clicking on the Proportion button (the fourth one in the Expression tools section):

This will display the bones associated with the face meshes and you can just click on them and move them around. In my case, I selected the bottom teeth and pushed them forward a bit while the jaw was down. The idea is that after adjusting this, the teeth will slide a tiny bit forward as the character opens the mouth:
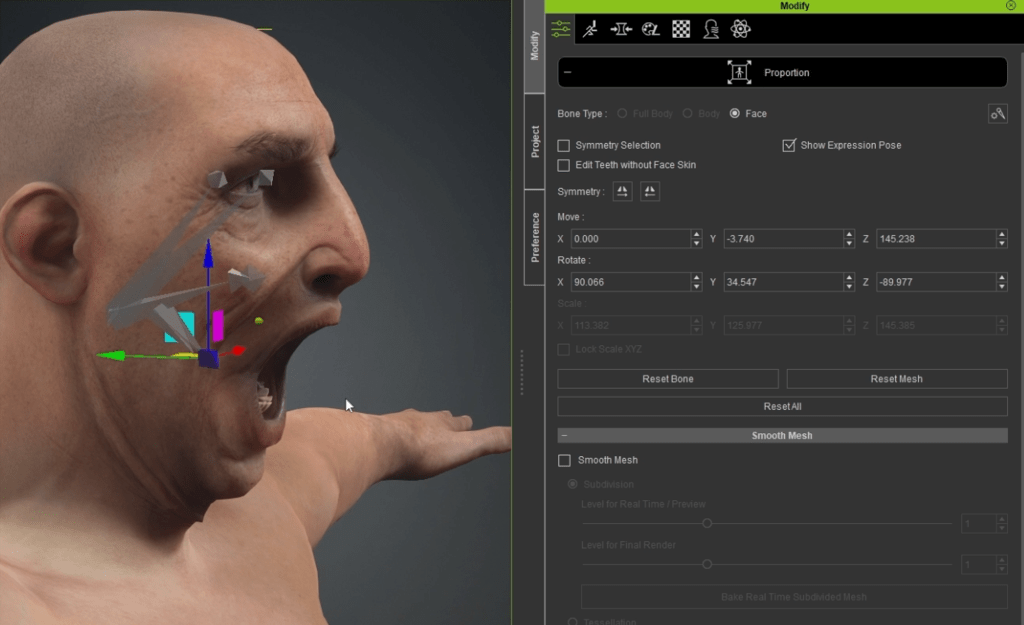
That’s it in terms of the Facial Profile Editor. You can spend as much time as you need to in this step to further tweak each expression. But, in general, there will only be a couple very specific sliders that need tweaking, unless you really want to stylise your expressions.

The final aspect I’d like to demonstrate regarding the Facial Profile Editor is the capability to create your own custom sliders and incorporate them into your profile. These sliders could represent the effect of a single area of the face, such as ‘Super High Brow,’ or they could encompass multiple sliders to form a custom slider representing a complete expression.

Here’s a quick example where I utilised several sliders from the facial profile to generate this random expression:

Then, at the bottom of the expression morphs, I clicked on the New Slider button. A window will pop up where you name your slider and save it within a category. I named mine ‘WeirdLook’ (yep, I’m aware of the type-o in the screenshot). You can even upload a bitmap thumbnail with the expression so you know what the slider does.

Once you click OK, you’ll have your new slider in the custom category at the bottom of the expression morphs list:

You can now click on the big Edit Expression green button at the top to get out of the Facial Profile Editor and all your changes will be saved into your character. One last thing I like to do is test the full range of my expressions and dynamic wrinkles after I adjusted my facial profile using the animations that come with CC4.

 From the Animation window, you can click on the Motion dropdown and go to Facial Rig > Extended Linear (or similar) to load an animation to test the expressions:

Here is a snippet of what the animation does for checking the expressions:

And finally with all the tweaks on my Facial Profile, here are my final CC4 renders showing the 3 expressions I set to create with this tutorial series:

About The Author

Pablo Munoz Gomez is a renowned 3D concept and character artist, with a passion for education. 3D sculpting, visual development, and other mixed-media form the pillars of his artistic passion which he channels through the various platforms that he owns, including ZBrush Guides3D Concept Artist Academy, and 3D Snippets Project. Thanks to his vast online following, he is able to reach artists from around the world and help them advance in a variety of 3D-related disciplines.

Read More

Easy Facial Rig in ZBrush with Face Tools (1/4): Concept & Setup 

Easy Facial Rig in ZBrush with Face Tools (2/4): Detailing & Polypaint

Easy Facial Rig in ZBrush with Face Tools (3/4): Expressions & Wrinkles

Easy Facial Rig in ZBrush with Face Tools (3/4): Expressions & Wrinkles

A Step-by-Step Guide from ZBrush Master Pablo Munoz Gomez

Adjusting Expressions with Face Editor in CC

Alright! Time to get into the custom expressions; this is what all the fuss is about!

Up to this point, we’ve refined the base mesh, incorporated basic high-frequency details, and adjusted the textures, resulting in a visually appealing ‘static’ character. However, our goal extends beyond mere aesthetics; we aim to create a character capable of dynamic animation and conveying natural expressions. Hence, the forthcoming stage is dedicated to achieving precisely that.

In CC4, I used the Face Editor to create a quick smiling expression. I just added a bit of squinting, raised the eyebrows a tiny bit and push the corners of the mouth app and here is my smiling character:

Not a bad smile right? but it could definitely be improved… Currently, even though I’m using the default morphs and the sliders I think are involved in the smile, I’m getting more of a ‘nervous smile’ so it doesn’t feel very genuine.

This is where the real power of the ZBrush Face Tools comes into play — the plugin allows us to customise and work on just 13 areas of the face (expression morphs). Based on those, CC4 can create a whole range of expressions for our character.

13 Core Expressions in ZBrush Face Tools

The way the editing expression works in ZBrush is also very simple… form the plugin all you need to do is click on one of the switches containing an expression and edit the range

For instance, let’s begin with ‘Mouth Smile’. This expression typically presents a ‘fake’ or ‘nervous’ smile, which could be attributed to the adjustments made to the head base.

By clicking on the Mouth Smile switch, a distinct sculpting layer is activated within the head subtool in ZBrush. This allows you to focus solely on editing the changes related to the activated areas of the smile.

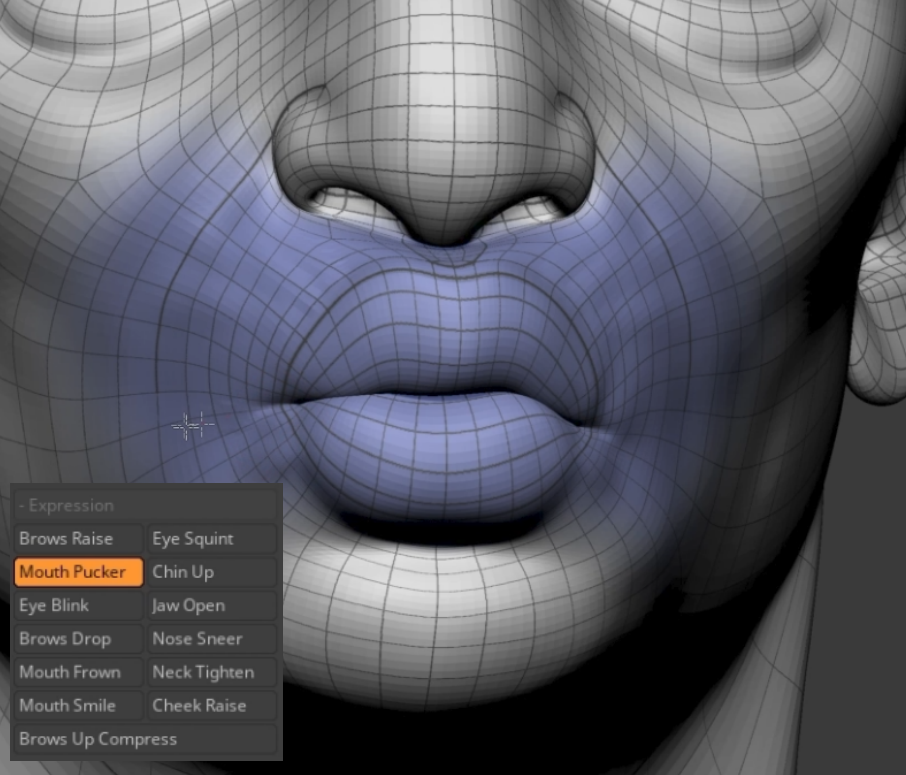
In fact, there is a pretty cool tool in the plugin called ‘Range’. So after you enable your expression to edit, you can also click on the switch called Range next to Diffuse and this will enable a temporary texture map applied to the head that will show you exactly the areas you can tweak for this specific expression:

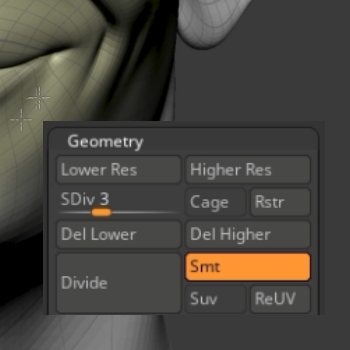
Now, when it comes to adjusting expressions, I’d suggest you follow the same workflow we used to edit the base mesh of the character. Basically the rule of thumbs is: to make large proportional changes use the lowest subdivision levels and to sculpt or adjust small things, use the highest subdivision level.

Another useful feature of the plugin is that it sends the character from CC4 with polygroups intact. This enables you to isolate specific areas by holding Ctrl + Shift and clicking on a polygroup. This functionality proves particularly handy, especially when working on intricate areas such as the mouth.

Using the ‘Move Topological’ brush with AccuCurve enabled at subdivision level 1, I refined the corners of the mouth, pushing them upward to craft a more natural smile. Subsequently, I progressed to higher subdivision levels to sculpt the volume around the mouth area.

I also refined the volume around the nasolabial fold and accentuated the fold a bit more since this is an area that will be more prominent with this expression.

Once you are happy with one of the expressions that you tweaked, you can simply click on a new switch and continue with the refinement. If you leave the Range switch on while changing to a new expression, the texture range will be updated and applied automatically.

Modifying the Rest of the Core Expressions in ZBrush Face Tools

Here is a quick reference of what I updated for my Brows Drop morph:

Here is what I adjusted for the Mouth Frown:

And a bit of the Mouth Pucker:

Just like this, you can adjust all 13 expression morphs. Once you are happy with the edits, you can click on the Update to Character Creator button — but this time the selection from the pop-up window is going to be different.

We won’t be altering the texture, base mesh, or details covered in the Base Update section (as those have already been addressed). Our focus now is on updating the expression. Therefore, ensure that you enable the Update Expression / Wrinkle section and disable the Base Update section.

Then, from the expression sections we want to enable only the Expression Morphs switch and select all the expressions that you have updated. you can actually edit and update expressions and wrinkles in a single pass but to keep things organised, we’ll focus only on expressions first.

Back in CC4, I tested the smile expression with the Facial Editor and straightaway the difference between the default expression and the custom one for the smile is significant.

Here are quick expression test involving some of the morphs I changed in ZBrush:

To underscore the significance and effectiveness of this process, here’s a comparison between the default smile expression obtained from CC4 upon designing your base mesh, and the considerably more natural and genuine smile achievable through a straightforward adjustment in your custom expressions:

Sculpting the Dynamic Wrinkles

After completing the core 13 expression morphs, we can move on into adding some details to the expressions with the Dynamic Wrinkles. This feature from CC4 is a very clever way to apply specific details to a section of the face based on the area or ‘muscle’ that is moved.

The idea behind this feature is that there are a bunch of normal maps with detail information for different parts of the face, and when you use the morphs to create an expression, CC4 will blend and display the relevant details or normal maps for that expression.

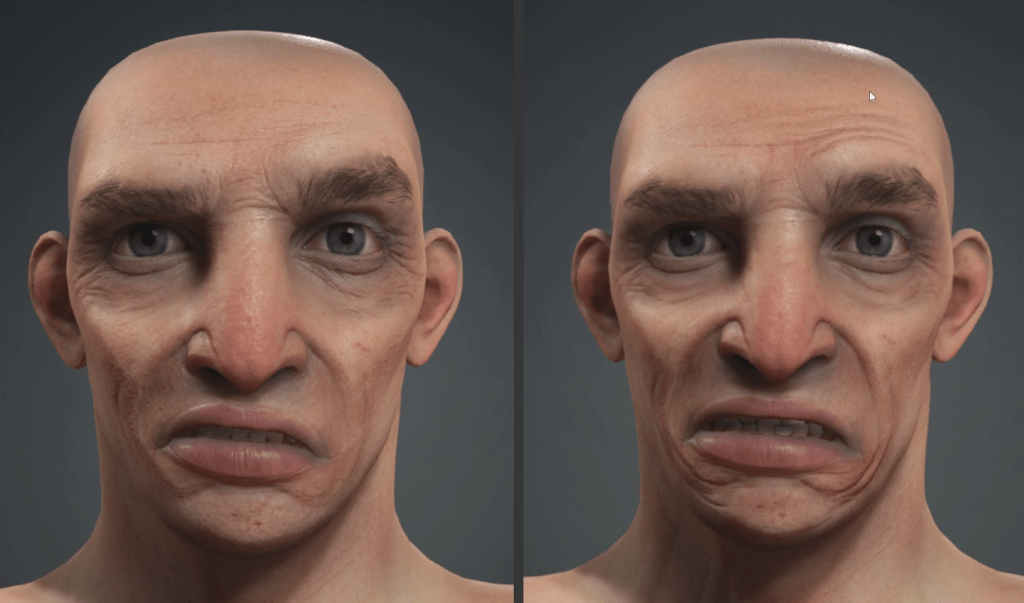
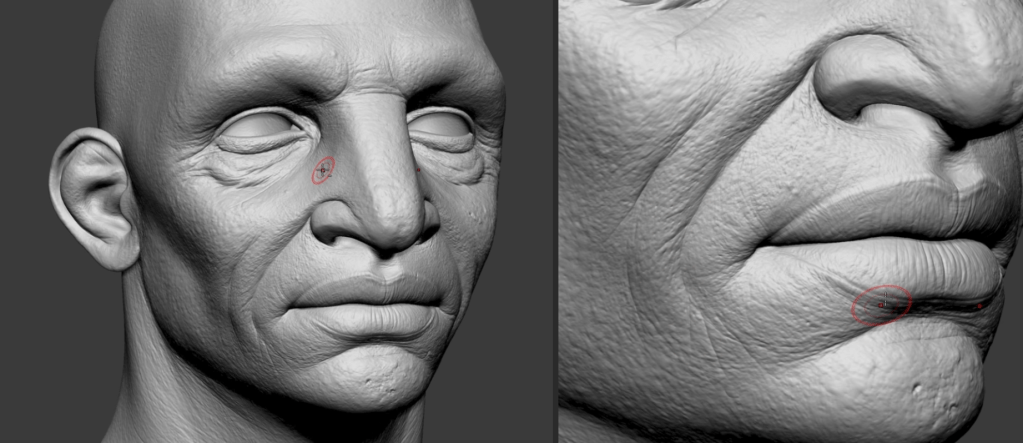
Here is an example of the same expression before and after adding the dynamic wrinkles:

Creating these wrinkles is as straightforward as the workflow we’ve been using to edit the head shape, texture, and expression morphs. There’s just one small thing I’d like to address, and that is the level of subdivision.

From CC4, when we send the character to ZBrush to create the expression wrinkles, I personally like to send the subdivision level 7 which will produce 4K resolution normal maps when CC4 converts the details. This means that in ZBrush we’ll have lots more polygons to play around with but it will also be heavier than if you send it at subdivision level 6… not a big deal, just something to keep in mind for your project.

Once in ZBrush, the workflow is exactly the same as the previous one to tweak the expression morphs. The main difference is that we’ll spend more time in the heights subdivision level so that we can add those nice wrinkles and details.

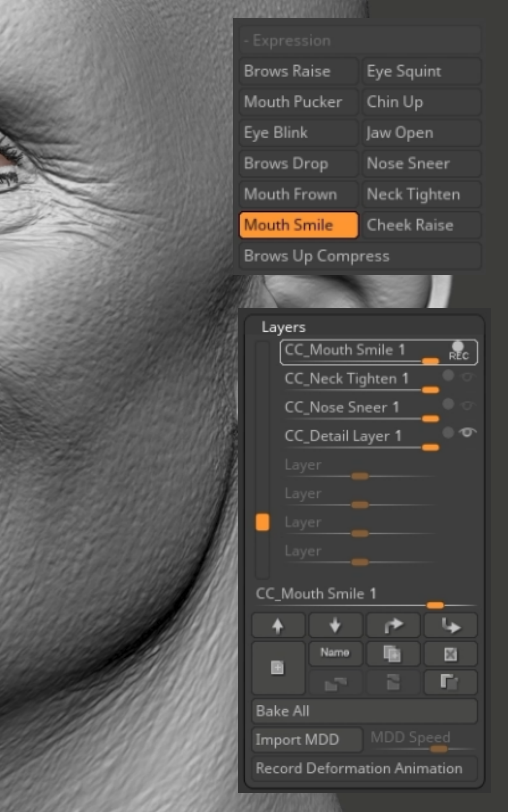
So, just as a quick recap, all you need to do is make sure you are at subdiv level 7 and then click on the switch of a specific expression like Mouth Smile. This will obviously show the updates we made to the larger shapes of the ‘smile’ with the expression morphs, so you can start sculpting the crevices that are created naturally as the character smiles.

Another cool tip you can use to see how much the dynamic wrinkles are actually affecting your expression, is to turn off the last layer of the sculpting layers (the Details Layer that has the base details we created a few steps ago). This will show you a very clean base mesh with only the dynamic wrinkles you are adding on the selected expression:

Create Custom Wrinkles for the 13 Core Expressions in ZBrush Face Tools

Once you do one set of wrinkles, the process is pretty much the same for the rest. You can also take advantage of the Range feature from the Face Tools plugin to see how much area will be affected in the selected expression and make your detailing process a bit more accurate.

Make sure you go through all the 13 expression morphs to add your details so that CC4 can then create a full set of expressions with the wrinkles.

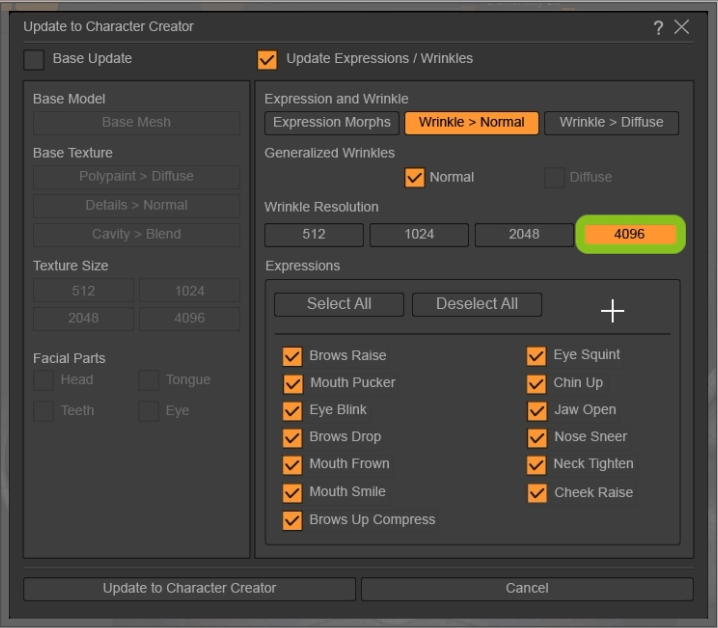
Once you’re done with your details, converting those wrinkles into normal maps in CC4 is also straightforward. After clicking on the Update to Character Creator button, ensure that in the pop-up window, the Wrinkle > Normal switch is enabled, the Normal checkbox is ticked, and the resolution is set to the desired size of maps you want to generate (assuming you’ve edited all the expression checkboxes, they should all be selected).

As I mentioned earlier, I wanted to have sharper details and more resolution so I produced 4K maps by selecting the 4096 switch in the Wrinkle Resolution section before updating to CC4:

Once you are back in CC4, if you don’t have the dynamic wrinkles activated you’ll get a pop-up window where you can simply activate Expression Wrinkles:

That’s it! you should have a fully-rigged character with expressions and wrinkles that are displayed as you change your expressions.

I used the Edit Facial window to select some controls, and with the middle mouse button, pushed them around to test the effect of the wrinkles in my expressions. Below you can see how the folds around the bridge of the nose appear with the ‘sneering’ expression:

Here is another one that is pretty obvious with the smile expressions and the wrinkles generated around the corner of the mouth:

About The Author

Pablo Munoz Gomez is a renowned 3D concept and character artist, with a passion for education. 3D sculpting, visual development, and other mixed-media form the pillars of his artistic passion which he channels through the various platforms that he owns, including ZBrush Guides3D Concept Artist Academy, and 3D Snippets Project. Thanks to his vast online following, he is able to reach artists from around the world and help them advance in a variety of 3D-related disciplines.

Read More

Easy Facial Rig in ZBrush with Face Tools (1/4): Concept & Setup 

Easy Facial Rig in ZBrush with Face Tools (2/4): Detailing & Polypaint

Easy Facial Rig in ZBrush with Face Tools (4/4): Animated Demo

Easy Facial Rig in ZBrush with Face Tools (2/4): Detailing & Polypaint

A Step-by-Step Guide from ZBrush Master Pablo Munoz Gomez

Detailing the Skin

One of the biggest advantages of the connection between CC4 and ZBrush is, of course, that you can leverage the ZBrush capabilities and features to sculpt intricate sets of details into your characters.

Gather the Reference of Skin Details

In this next stage, we are going to concentrate on the skin details. One of my favourite resources to study the intricacies of skin patterns is a website by photographer Daniel Boschung: https://www.danielboschung.com/. This website has a bunch of portraits in incredibly high resolution that allows you to zoom in into every single pore and skin imperfection:

Switch one the Detail Layer on ZBrush Face Tools and Start Sculpting

To start with the process of sculpting details in ZBrush, you can utilise the skin details that come from CC4, since we originally brought in the Normal map as details. To visualise the details, make sure you click on the Detail Layer switch in the Face Tools plugin and that you are in the 7th subdivision level (or 6th depending on which one you sent from CC4). This is to ensure the details are nice and crisp.

For my project, I wanted to cover every aspect of the sculpting process; so, I decided to sculpt my own set of skin details. However, I still think that it is very useful to take advantage of the details layer that comes from CC4. So I used smoothing brushes to reduce the influence of the details from CC4 but keeping a tiny bit of the surface deformations.

Since the subdivision level is pretty high and there are lots of polygons, the standard smoothing brush might not give you the result you expect. In the ZBrush Lightbox, you can go to the brushes folder and within ‘smoothing’ brushes, load ‘Smooth Stronger’. This brush will have a much stronger effect and help you to smooth things out at a higher subdivision level.

Although you can use any of the standard brushes in ZBrush to sculpt details, I used a custom set of brushes that I’ve designed specifically to add high-frequency details to any skin type. This is not necessarily a shortcut but it does help to speed up the process and give you control over the placement of certain details.

At the highest subdivision level, I created the base of details which is a combination of a simple skin pattern, bumps and smoothing peaks:

In the custom brushes pack there are various brushes for specific purposes and areas of the face. I used the eyelid pattern for the eyelids and the stretch pores for the areas closer to the nasolabial fold (smile lines):

Ultimately, the process of sculpting details is all about patience and really spending the time to add the right type of pores or details in the right areas.

Update Details from ZBrush to CC

Once you are happy with the base details of the skin you can send them back to CC4 and the plugin will automatically convert those high-frequency details into normal details.

So in this case, after you click the Update to Character Creator button, we only need to select the Details > Normal switch from the pop-up window. This is to transfer all the ZBrush details into a normal map that CC4 can use.

If you encounter an ‘error’ similar to the one depicted in the image below, there’s no need to panic. This occurs when details such as teeth, eyes, or tongue are not included, and the checkboxes in the pop-up window (shown above) are left unticked. Consequently, the plugin attempts to generate a normal map from a high subdivision level, but since these objects lack details in my case, simply click OK to proceed.

That’s about it. Here is a quick comparison of the default details and the custom details I created as a base in ZBrush:

I decided to stylise and exaggerate my details a bit more to make my character look a bit older with some more memory folds and wrinkles. Back in ZBrush, I spend a bit more time working on the custom details until I had this:

Updating the details is another very simple process following the same steps I covered before. However, this time I selected the 4096 switch from the Texture Size section of the pop-up window when sending it back to CC4. This allows me to have a lot more resolution so the details in CC4 will be a lot more crisp and well-defined.

After updating the details map into CC4, here is what my project is looking like:

Keep in mind that we’ve only tweaked two basic things so far: the overall base mesh shape and the details layer. We still need to go through the expressions and Dynamic Wrinkles to create a convincing effect for the deformations of the face.

Texture Polypaint

Another very cool feature of the Face Tool plugin is the texturing portion. I wanted to cover a bit of the texturing process as polypaint to give you some extra tips and tricks before we start with the expressions.

So, within the Face Tools plugin, you can click on the Diffuse switch at the top. This switch will essentially enable the Albedo colour from CC4 as texture in ZBrush:

In order to modify this texture in ZBrush, you need to first convert the information from the texture map into polypaint. This requires you to be at the highest subdivision level so you can capture as much detail as possible from the textures, and then from the Polypaint palette click on the Polypaint From Texture button:

Once you click on the Polypaint From Texture, ZBrush will project the texture map onto all the polygons of your mesh, recreating the texture as vertex colour (or polypaint in ZBrush).

One thing I like to do every now and again when I’m working with textures in ZBrush, is to enable the Flat render type from the Render menu. This is a great way to see a shadeless version of your texture without any information of the material so you can see the true values and hues of your texture:

In terms of the process, the polypainting techniques are pretty similar to the sculpting ones. It is all about subtleties and patience. I like to use the Standard brush (turning ZAdd off and enabling the RGB), with the Stroke set to Colour Spray and using ‘Alpha 08’ that comes with ZBrush.

These simple settings should give you a lot of variation and control:

You can also click and drag from the colour selection in ZBrush to pick up the colour or press the letter C while you hover over the mesh. For my character, I chose a dark desaturated blue colour to add a subtle shade of blue around the eye regions. I also reduced the RGB opacity value to something like 25% so that I have a more gradual transition and ultimately more control over the placement of this new hue.

You can keep tweaking the standard brush to add all sorts of details. For instance, you can change the stroke to ‘DragRect’ and use ‘alpha 22’ (also comes with ZBrush) to add small veins and tiny blood vessels like I’ve done here on the nostrils… they are pretty subtle:

Create Custom Mask & Variate the Albedo Colour

Another of my favourite tricks in ZBrush when it comes to texturing, is to use the masking features in the Masking palette to create custom masks and variate the albedo colour.

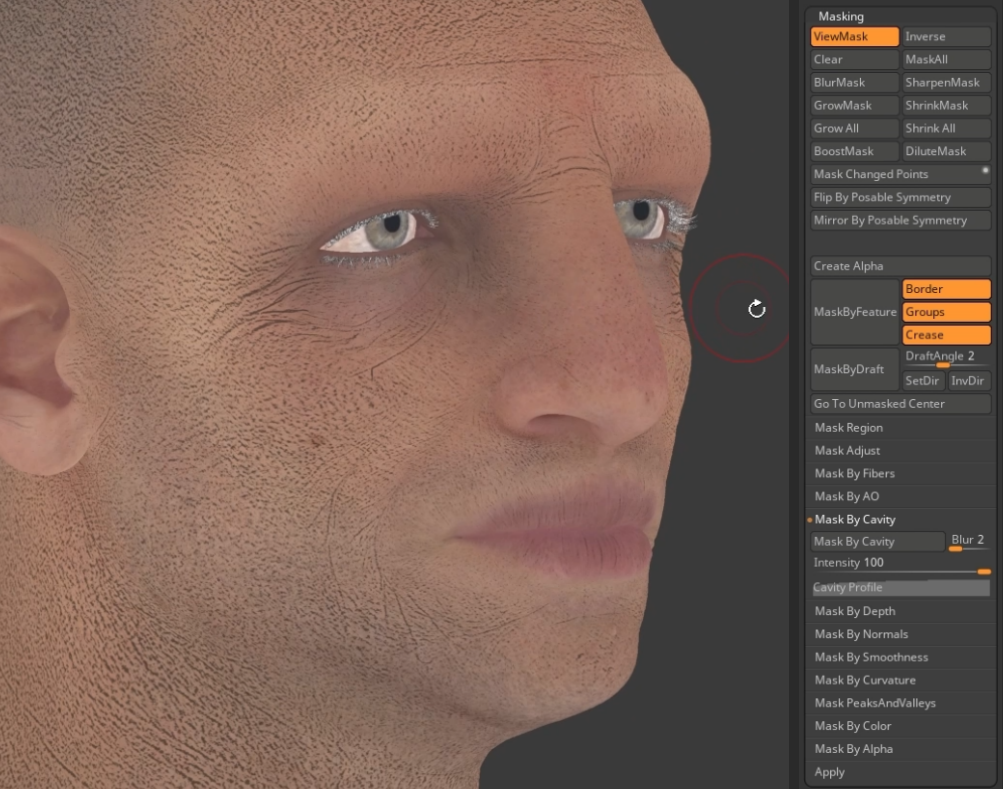
For example, you can use the Mask By Cavity button to mask all the deep crevices and details on the surface. This is a great way to also visualise the intensity of some of the wrinkles and details that we manually added:

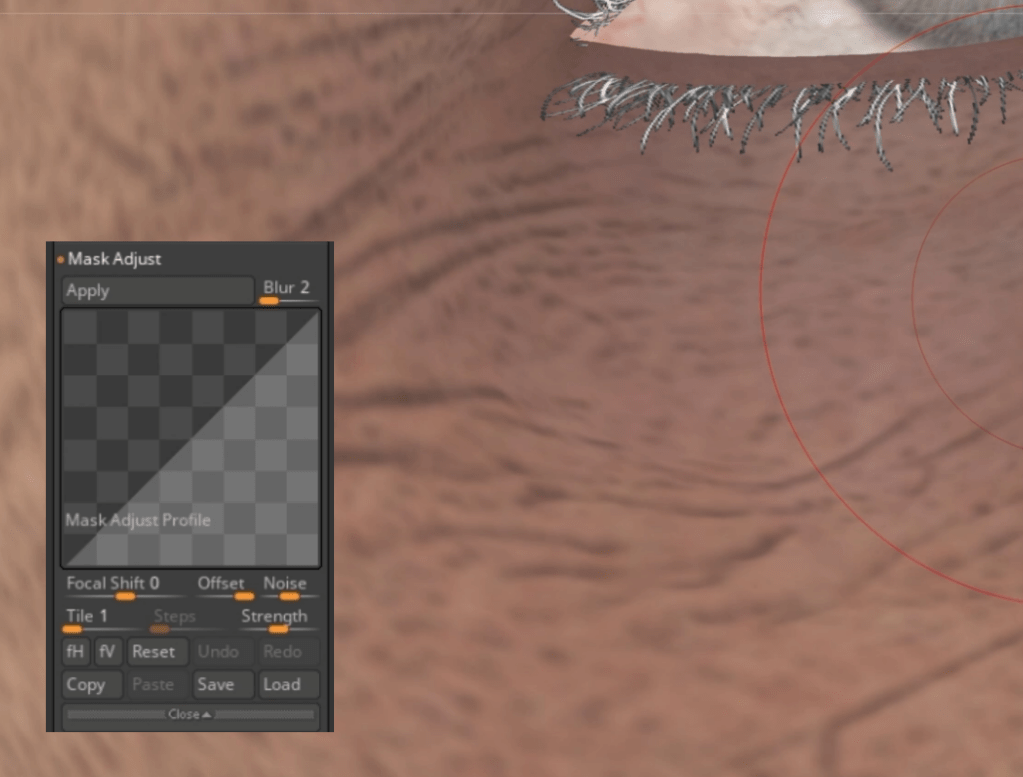
Not only do you have a ‘one-click-operation’ to mask all your details but you can also use the Adjust Mask section to blur the mask a bit and create a softer transition to the unmasked areas:

The rest is more of the same, I like to invert the mask and hide it and then with a darker red tone, I can highlight some of those deep crevices like the wrinkles around the eyes:

Other masking features I really like are the Mask by PeaksAndValleys. This will give you a more random mask pattern, but it is perfect to generate a subtle variation like ‘sunburn’ patches.


With any mask that you generate, you can also use the Adjust Colours button from the Polypaint palette to adjust the hues, contrast and gamma:

If you use the same tool (adjust colours) without any mask you can totally change the colour palette of your skin. Just for fun, here is a ‘zombie’ version of my skin palette:

I intentionally wanted to make a drastic change of colour, just so that I can show you one of my favourite features of this entire workflow… so here it is:

Let’s say that you are happy with the polypaint and all the colour changes you’ve made. You can go ahead and click the Update to Character Creator button, and from the pop-up window, choose only the Polypaint > Diffuse option. For texture resolution, I chose 4096

The plugin will take care of the rest… it will convert all your changes from the polypaint into new textures and send them to CC4 with one click:

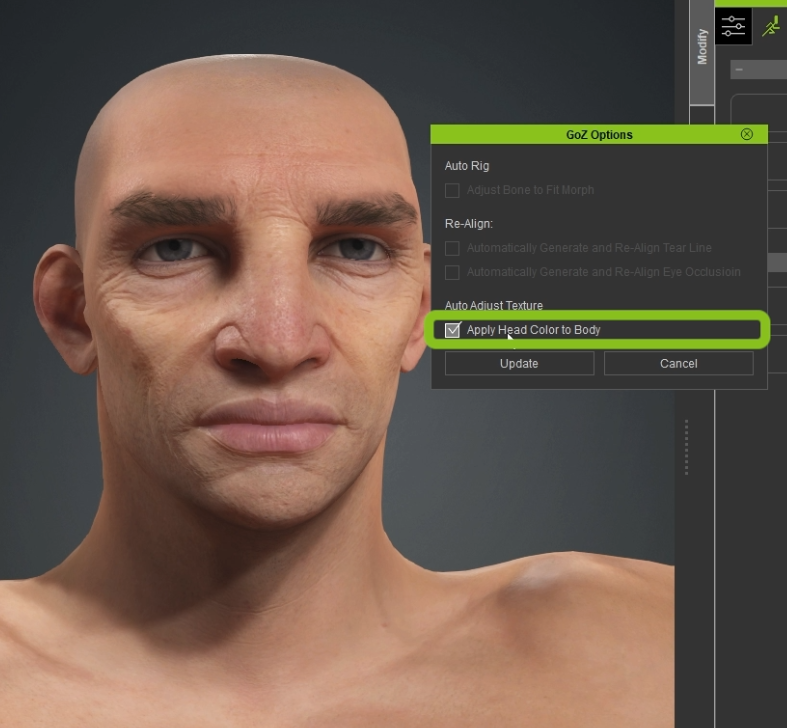
Back in CC4, is where the magic happens… you’ll get a pop-up window and since we are now sending a new texture map to CC4. The Auto Adjust Texture section is available so make sure you tick the Apply Head Colour to Body check box:

Then when you hit ‘update’ CC4 is going to import the new texture (from ZBrush polypaint):

AND, here is why this is so cool… CC4 will match the colour adjustments you did to the head, to the entire body of the character so it feels totally integrated!

At the end, I went back and reverted the ‘zombie’ skin changes and ended up with something like this:

About The Author

Pablo Munoz Gomez is a renowned 3D concept and character artist, with a passion for education. 3D sculpting, visual development, and other mixed-media form the pillars of his artistic passion which he channels through the various platforms that he owns, including ZBrush Guides3D Concept Artist Academy, and 3D Snippets Project. Thanks to his vast online following, he is able to reach artists from around the world and help them advance in a variety of 3D-related disciplines.

Read More

Easy Facial Rig in ZBrush with Face Tools (1/4): Concept & Setup 

Easy Facial Rig in ZBrush with Face Tools (3/4): Expressions & Wrinkles

Easy Facial Rig in ZBrush with Face Tools (4/4): Animated Demo

Easy Facial Rig in ZBrush with Face Tools (1/4): Concept & Setup 

A Step-by-Step Guide from ZBrush Master Pablo Munoz Gomez

Concept and introduction of ZBrush Face Tools

This comprehensive tutorial dives into the world of expression creation and dynamic wrinkles using Character Creator 4, ZBrush, and the Face Tools plugin. Learn how to leverage this powerful combination to create facial rig and breathe life into your characters.

Before we get started with the step-by-step process of how you can create custom expressions for your characters, let’s take a look at an important stage of the process that is sometimes overlooked: The planning stage.

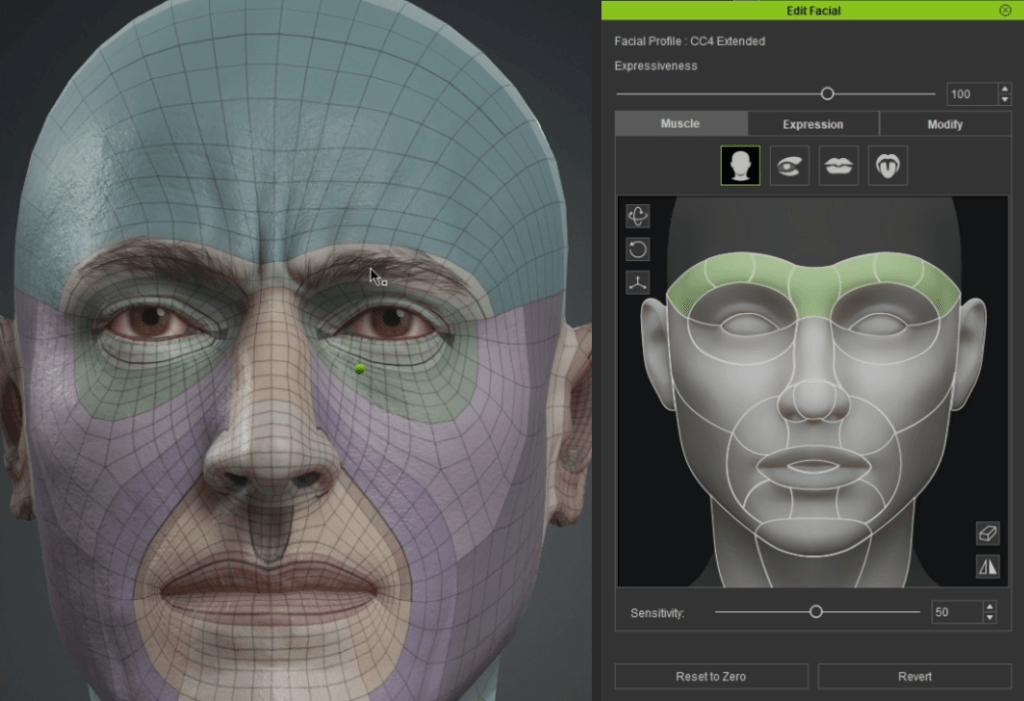
The planning for this project is fairly simple but it is quite important. It is also an opportunity to understand how the meshes from CC4 work and how the expressions and wrinkles are applied so that you can make the most out of it. Here is a simple head project with a texture overlay showing important areas of the face and the clean topology that is used:

These colourful textures are a great way to understand the range of motions and areas where the dynamic wrinkles are applied to create custom expressions. In this case for instance, I’m using the Facial Editor to pull the eyebrows down and towards the centre to produce this ‘frown’ expression:

Using the ZBrush Face Tools plugin, I can easily send the entire head from CC4 to ZBrush and make further adjustments… we’ll get to that in the next section, but here is an example of how simple this workflow is and how well it translates to ZBrush:

Collect the expression reference before using Face Tools

Building a solid reference library is crucial for capturing nuanced expressions in your character, especially during the planning stage. While individual experiences shape unique smiles, the core elements of happiness often involve common muscle movements like raising the corners of the mouth, engaging the zygomaticus major, and potentially crinkling the eyes with orbicularis oculi activation. 

Consider gathering high-resolution photos or video clips showcasing diverse individuals expressing happiness, alongside anatomical studies to understand the underlying musculature. This way, you can reference both the commonalities and variations within the expression, ultimately breathing life into your character’s emotions.

To keep things simple but effective, I like to use Pinterest to find my references simply because the algorithm that this platform uses to suggest similar images is fantastic. This is the top results I got from typing ‘Expressions’ in the search bar:

I personally also like to use PureRef to collect all my inspiration and references in one place. So I usually place the browser on one side of my screen and fill the other side with the PureRef board so I can simply drag and drop images from Pinterest into PureRef:

After a few minutes of collecting references, here is what my inspiration board looks like:

I tend to collect a lot more images than what I might actually use as reference — but it never hurts to have more! However, it is important that you filter down your images to just a few that are of high-resolution and that will actually help you to create the expressions.

Set the iconic expression for your character

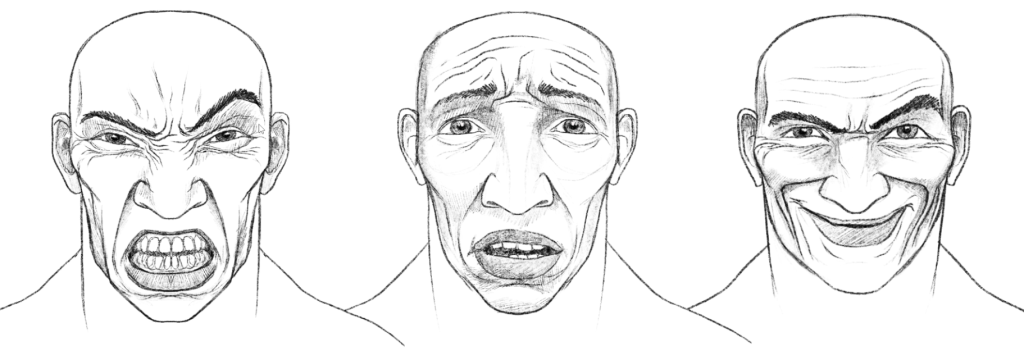
For this project, I decided to focus on three main expressions. Therefore, I create three small clusters of expressions including ‘anger’, ‘surprise/fear’ and ‘evil laugh’:

Another thing that could be very beneficial is to generate some quick sketches of the expressions you are trying to achieve. This might not be 100% exactly what you will end up with, but it will give you a target to hit and keep your project moving in one direction:

An extra step that I find particularly useful, is to do a paint over using your preferred reference image and the expressions range to figure out how you can adjust the CC4 base to match a reference.

I like to emulate a quick expression using the generic project, in this case, a simple smile:

Here is a comparison of the neutral expression and the simple smile:

After selecting one of my reference images, I utilised Photoshop to overlay the colour distribution onto the photo, examining how I could enhance the base mesh. In the image below, observe the subtle light pink hues denoting the cheeks and the nearly absent red shading defining the upper lip. These visual indicators are crucial focal points I would meticulously attend to when recreating this specific expression with a similar customised character (thin and elderly):

Project setup in Character Creator

To start with the practical steps, let’s set up the project first and get our base mesh ready before we add any expressions or wrinkles.


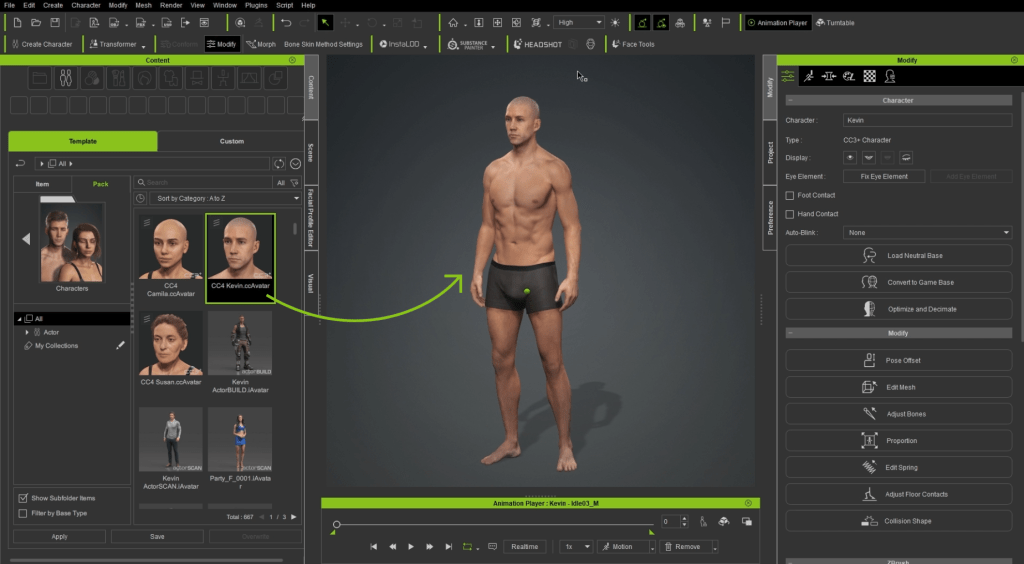
In CC4, I used Kevin, one of the male default projects. You can use any character from CC4 but I like Kevin as a base because it is a scanned human figure that provides some extra nice details.

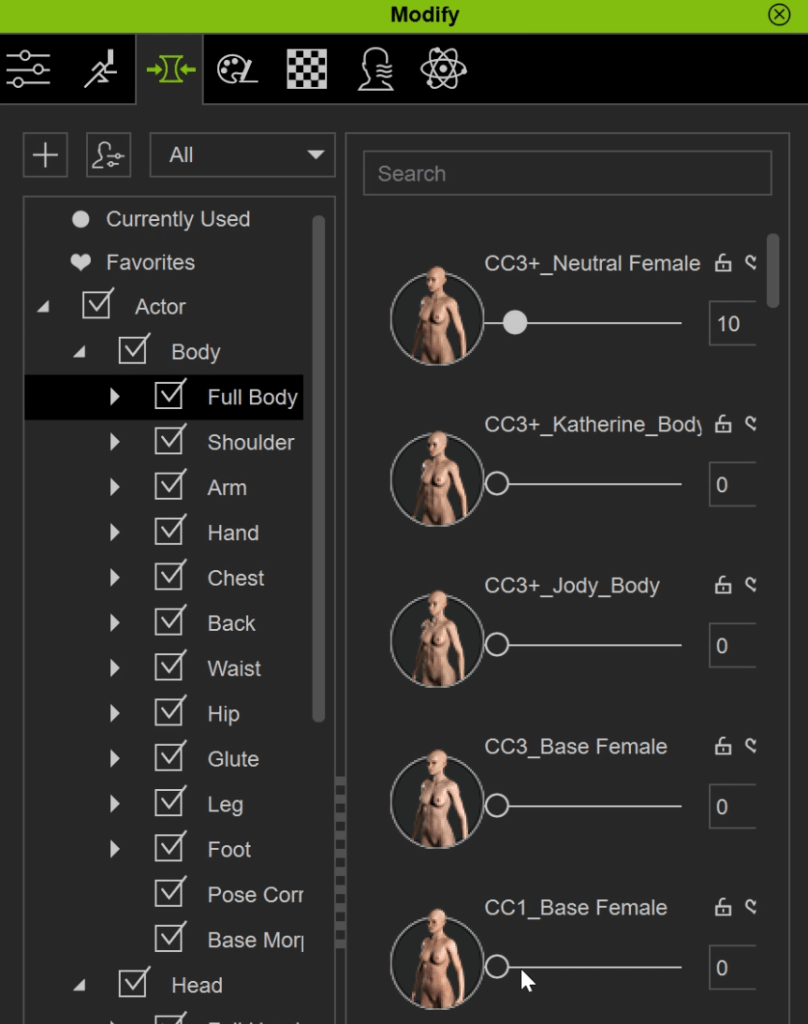
With the character selected, you can use the Modify tab to morph the head and body into the shape that you want for your character. You can be very precise and adjust a lot of very specific parts of the body and face:

I wanted something quite different to the default project, so I exaggerated the proportions and facial features. I also like to temporarily turn off the body textures so I can have a better read of the volumes I’m changing.

From the texture tab of the modify window, you can Shift + Click select all the textures of the body and turn them off at once:

If the skin looks too white or overexposed, you can change the Diffuse colour to a darker grey using the swatches from the Material Settings section:

After a few minutes of tweaking (playing with morphs sliders), I landed on this shape for the head of character:

However, I wanted more control over the shapes, and ZBrush makes that pretty easy. Plus, if you decide you don’t want to stick with a human character and fancy turning it into an elf with pointy ears or something, ZBrush is great for those kinds of adjustments.

This step of adjusting the base mesh in ZBrush is really easy. In CC4, you can go to Plugins > ZBrush Face Tools > Face Tools:

Then, select Base Model Only form the pop up window and hit OK.

The next pop-up window allows you to specify some of the parameters to send to ZBrush. In this case, I set the Action to ‘Create New’ so that CC4 creates a new project with the character in ZBrush, then set the subdivision to ‘Level 6’ and finally made sure that the Normal Details checkbox was ticked:

That’s about all you need to do. The Face Tools plugin will take care of the rest and set up the project in ZBrush using the Normal map from CC4 as the details in the highest subdivision levels in ZBrush.

To visualise the normal details that are sent from CC4 to ZBrush you can click on the Detail Layer switch from the ZBrush Face Tools panel (in the Plugins palette). Make sure you are in the highest subdivision level so you can see all the nice details:

In ZBrush you can use the move, standard and smooth brushes to refine the look of your character. In my case, I wanted a flatter head with a shorter forehead and thicker nose so I adjusted the head in the lowest subdivision level to make the process easier.

The advantage of having the multiple subdivision levels in the model, is that you can go back and forth between higher and lower subdivision levels to adjust either large portions of the mesh (at level 1) and define folds and crevices on a higher level (at level 4 o higher):

After a bit of tweaking of the base mesh, this is the character I ended up with:

Once you are finished with the edits to the base of your character, you can simply click on the Update to Character Creator button (at the bottom of the ZBrush Face Tools plugin), and ZBrush will send everything back to CC4.

From the pop-up window, you just need to make sure that the Base Mesh switch is enabled so that ZBrush knows that we want to update just the base model at this stage.

Back in CC4, you’ll get another pop-up window; make sure all checkboxes are ticked (except Texture which should be greyed out since we didn’t tweak the texture yet).

At this point we’ve only updated the base model to make it a bit more interesting. I like to test a couple of expressions on this updated model to make sure the range is good and there are no weird artefacts.

Using the Facial Editor you can just select areas of the face and pull them around to see the effect in real-time.

So to wrap up this first stage of the process, here is a comparison between what we setup in CC4 and what we ended up with after the adjustments in ZBrush:

About The Author

Pablo Munoz Gomez is a renowned 3D concept and character artist, with a passion for education. 3D sculpting, visual development, and other mixed-media form the pillars of his artistic passion which he channels through the various platforms that he owns, including ZBrush Guides3D Concept Artist Academy, and 3D Snippets Project. Thanks to his vast online following, he is able to reach artists from around the world and help them advance in a variety of 3D-related disciplines.

Read More

Easy Facial Rig in ZBrush with Face Tools (2/4): Detailing & Polypaint

Easy Facial Rig in ZBrush with Face Tools (3/4): Expressions & Wrinkles

Easy Facial Rig in ZBrush with Face Tools (4/4): Animated Demo

The Stone – Animated Short with iClone, ActorCore, Unreal Engine

The Stone" is a 3D animated short film
The Stone is a 3D animated short film
Dom Fred – Director / Producer / Editor / 3D Animator

Dom Fred

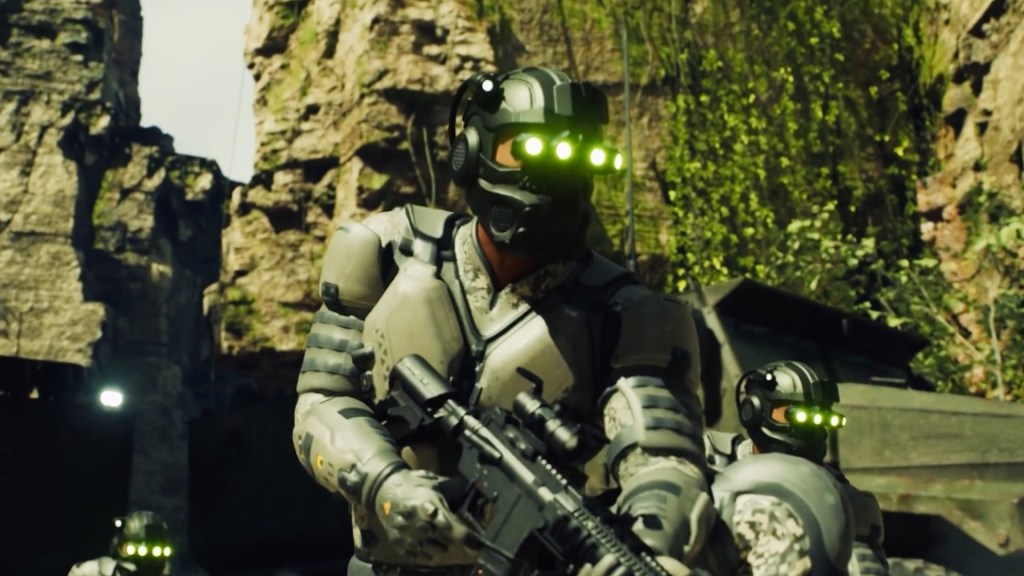
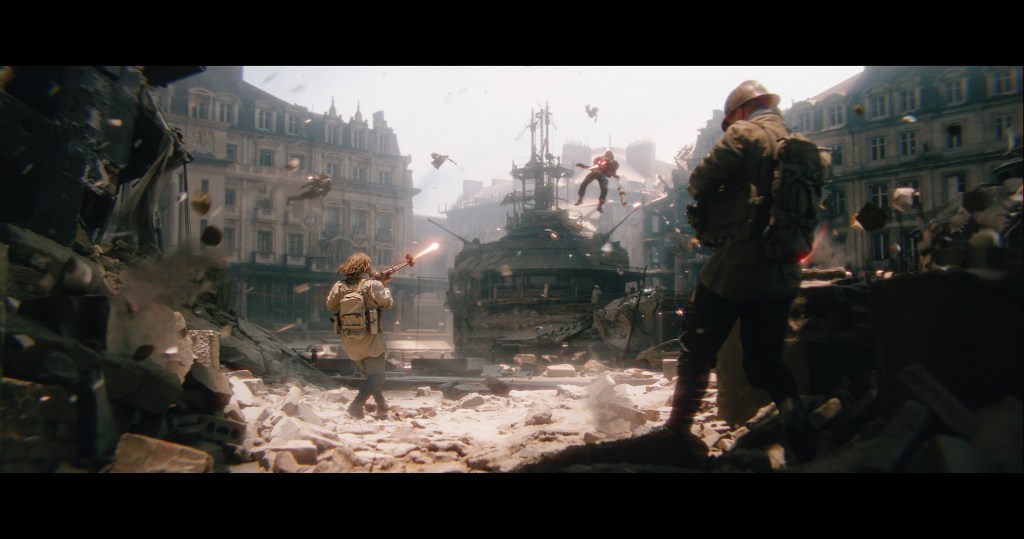
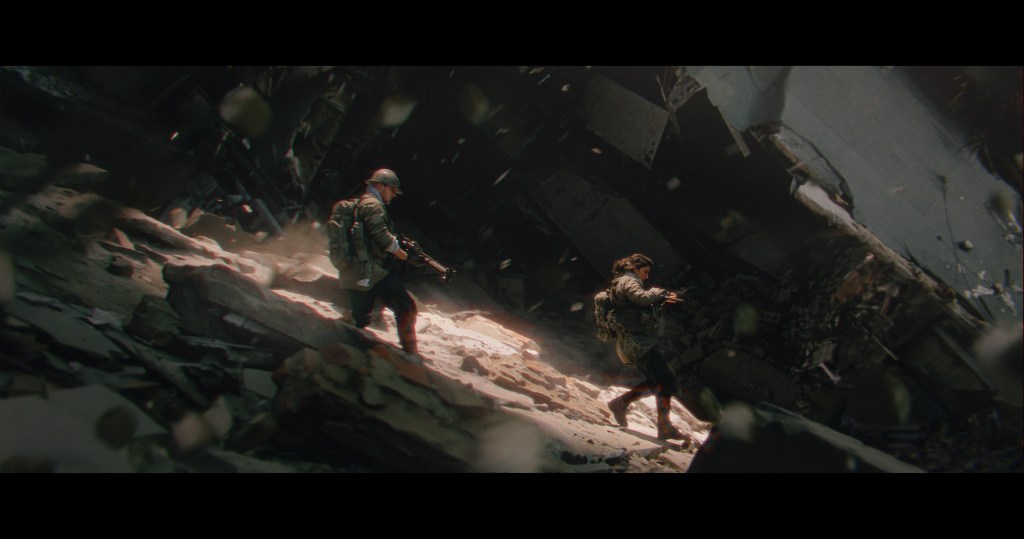
“The Stone” is a 3D animated short film, by Maya animator and director Dom Fred, showcasing action cinema techniques, featuring a formidable stone monster under attack by a military team.

Leveraging ActorCore’s motion capture library, Dom and team achieves exceptionally realistic body movements, enhancing the authenticity of live combat sequences.

With a focus on realism, the project seamlessly integrated iClone, ActorCore, and Unreal Engine to produce a cinematic short, boasting detailed rendering of colors and an ultra-realistic environments.

Follow Dom Fred:

LinkedIn:
https://www.linkedin.com/in/freddy-lounana-41015991/
https://www.linkedin.com/in/dom-fred-films-81904194/

YouTube:
https://www.youtube.com/channel/UCaEVZPzkWUsg9Wti9Cao4Vw

Facebook:
https://www.facebook.com/profile.php?id=100063571358642

Vimeo:
https://vimeo.com/823861782

Rapid 3D World Building made Possible with iCone 8 Crowd Sim Innovations

This article is featured on Creative Boom

Crafting an entire 3D cityscape bustling with animated characters engaging in daily activities was a formidable undertaking that consumed months of effort to accomplish. New technological advancements paired with the right tools paint a new and better picture — Today, such a feat can be achieved with spare minutes to the hour.

What is also a boon to the movie and gaming industry represents a paradigm shift in how individual artists express themselves: By harnessing software such as iClone 8 and its newly introduced Crowd Simulator, any enthusiast — regardless of their skill level — can swiftly prototype and execute massive animated crowd scenes. 

iClone 8 Crowd Simulator was designed with the removal of restraints in mind, both in terms of reducing technical complexity and refining user experience. The freedom to bring vibrant worlds to fruition for an individual artist, as opposed to a large production team with extensive time and budget, marks a new era of self-expression that Reallusion is actively encouraging.

Shaking Up the Movie and Video Game Industry

In both the movie and video game industries, the creation of dynamic and populated environments plays a vital role in storytelling and building immersive experiences. Traditionally, this task required extensive work from large teams of highly skilled artists and significant time investments. However, with iClone 8 Crowd Simulator, this laborious process is reduced to mere minutes, empowering a single visionary armed with nothing more than enthusiasm.

The accelerated production times made possible by iClone 8 also open new possibilities for indie game developers and small studios, enabling them to craft rich and vibrant worlds that can rival those created by larger entities. By increasing efficiency, artists can focus on what matters most: bringing their unique visions to life and captivating their fanbase with awe and excitement.

Empowering Indie Creators – like Yourself

But all these pie-in-the-sky concepts mean nothing if individual artists aren’t positioned at the forefront. After all, it’s about basics and practical steps that give results. It is the same practicality that enabled Indie Developer Zeng Xiancheng to create all assets for his video game in just two months — and that was before iClone 8 Crowd Simulation even existed. Just imagine what you can do now.

So, how can creators like you practically utilize iClone 8 Crowd Generation? What better way to learn than through a tailored tutorial by none other than our featured recurring artist and instructor, Mark Diaz.

Crash Tutorial on iClone 8 Crowd Generation

Hey there! I’m Mark Diaz, but let’s fast forward the formalities and dive right in. My mission? To show you the fastest route from zero to hero with iClone 8 Crowd Generation features.

Step 1: Instant City Creation

Alright, so we’re kicking things off with building your very own 3D city in iClone 8, and guess what? You’ve got options! Whether you’re all about getting straight to the fun part or you’re the hands-on, do-it-from-scratch type, there’s a path for you.

Quick and Easy: Grab a City Off the Shelf

So, you’re excited to jump right into animating and not so keen on spending months on modeling and texturing, right? Well, iClone 8’s got your back with a super shortcut. Pop over to the Reallusion Content Store by going to Help menu > Reallusion Content Store.

Go to search, make sure you have iClone selected, and type “Modern City” in the search bar, and boom, you’ll see a bunch of ready-made cities just waiting for you.

There’s this cool one called “Modern City New” that’s just perfect for what we need. It’s $30, but think about it — it’s like skipping ahead two or three months of hardcore city-building work. Just click, drag, and drop, and you’ve got yourself a slick cityscape ready to roll. How awesome is that?

On a Budget? No Worries, We’ve Got You.

Now, if you’re watching those pennies or you’re all about that DIY life, there’s a totally free way to get your city started too. Dive into the Content panel, and follow the breadcrumb trail: Template > Item > Stage > 3D Scenes > Mesh_Medium. Look for “iPlaza_noneCG” — it’s a solid base for practicing crowd simulation and getting the feel of urban design.

Click and drag it to the scene, and you have got a plaza to practice with.

This route might take a bit more time and elbow grease, but hey, it’s all about the journey, right? Plus, it’s a great way to learn the ins and outs of city crafting without spending a dime.

No matter which path you pick, iClone 8 is here to make sure your city-building adventure is a blast. Ready to get started? Let’s dive in.

Step 2: Path Creation for Characters

Before we dive into path creation, a quick pro tip: make sure your cursor is parked on frame zero. Trust me, it’s a small step that makes a big difference. 

Now, ready to roll out some paths for our animated friends? 
Just head over to the Create menu > Path, and click away in the scene to map out your route.

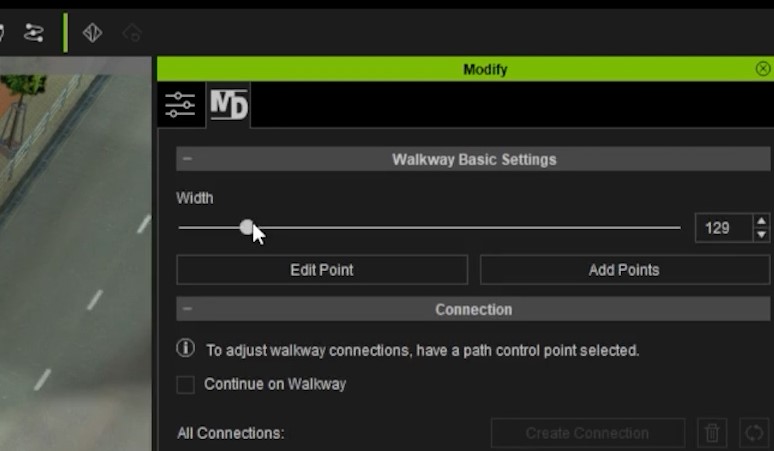
Need to adjust the width? The Modify panel has got you covered with the ‘MD’ option for that perfect fit. 

And don’t forget to generate that NavMesh — it’s crucial for keeping our characters on track. Just go to Create menu > Generate NavMesh.

You can adjust some settings if you want, and once you are ready, click Generate.

Step 3: Populating the City with Walkers

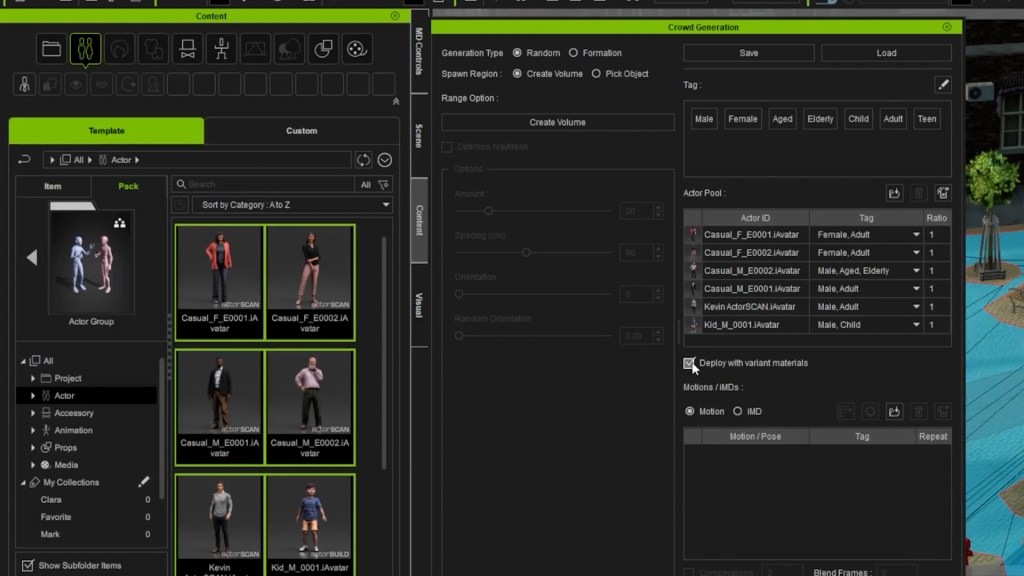
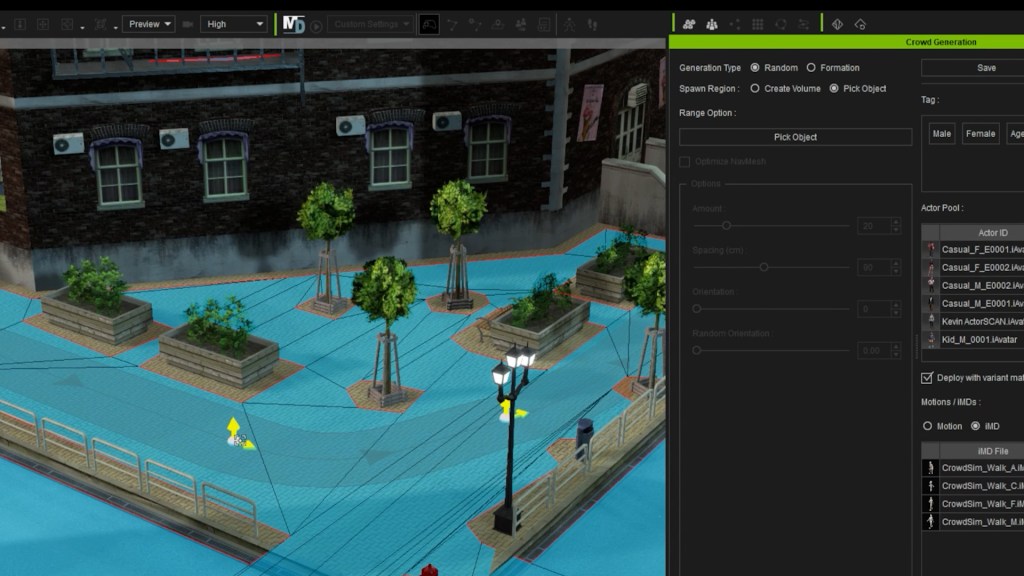
With the paths set, we populate them using the Crowd Generator tool. Just go to Create menu > Scatter > Generate Crowd.

Then in the crowd generation box, we can click and drag characters that you want to set as the crowd from the Content panel. And if you want to repeat some characters but have them with different colors for the clothes, make sure you check the option “Deploy with variant materials”.

The actors selected for this tutorial are all the characters from the pack “Actor Group”.

Then for the animation, I use the Motion Director feature, by going to the “Motions / iMDs” section, and selecting “iMD.” Then click and drag some Motion Director clips from the Content panel that you would like your characters to be animated with when they walk.

The ones I used for this tutorial are:

  • CrowdSim_Walk_A.iMD
  • CrowdSim_Walk_C.iMD
  • CrowdSim_Walk_F.iMD
  • CrowdSim_Walk_M.iMD

Then, for these characters to walk on the path we created in the last step, we just have Generation Type as Random, Spawn Region as Pick Object, and then we click on Pick Object, and select the path in the scene.

You can tweak some options. I like to have Optimize NavMesh activated, have 14 actors, and have the Direction Ratio set in the middle.

Then you just click Deploy Actors, wait for iClone to process the characters, and there, you have characters ready to be animated.

Step 4: Adding Idle Characters

Animating the inhabitants of our digital city comes with options, each offering a different balance of time investment, cost, and variety. Let’s explore the three ways to bring those idle moments to life, making your city not just a backdrop but a living, breathing world.

DIY Animation: The first route is the most hands-on, animating each character one by one. While this method offers the most control over individual movements, it’s a real time sink. Perfect for those who love to dive deep into every detail, but be warned, it’s a lengthy process that can extend to weeks or months.

Utilizing Motion Clips: A quicker alternative involves using pre-existing motion clips designed for idle characters. This method speeds things up and keeps things simple. However, the downside is a potential lack of variety, with characters possibly repeating the same few animations.

Investing in City Life: For those looking to combine speed with diversity, the “City Life” pack is a game-changer. Priced at $99, it’s particularly suited for game creators or anyone aiming to animate a city with a dynamic, natural feel quickly. The pack offers a wide range of idle animations, from folks chatting on their phones to others enjoying a quiet moment on a bench, bringing an authentic vibe to your urban scene.

For our tutorial, we opted for the “City Life” pack to ensure our city felt as real and vibrant as possible. The diverse animations provided by the pack allowed us to populate our streets with characters engaged in various idle activities, effortlessly adding depth and realism to the urban landscape.

With that in mind, we are ready to use the Crowd Simulator tool again, but here we change from IMD to Motion, then for this tutorial, we pick clips from “City Life” to add a natural variety of personalities.

Now with the settings on random, and spawn region on volume, I click create volume, then click and drag on the scene to create an area with these characters.

Then I set the random orientation all the way to 1. I keep pressing generate placement until I’m satisfied with the positions. And then deploy actors.

Done! If you want, you can reposition some of those actors easily in the scene, by moving and rotating them.

Step 5: Camera Animation

The hardest part is OVER. Now we finish with the last 3 quick steps.

First I position the Preview camera in place, then go to Create menu, Camera > Orbit Camera.

Then I move forward in the timeline and then set the second position of the camera.

Done. The camera animation is ready. You will notice the 2 keyframes of the camera in the Timeline.

You can do some quick adjustments and then we’re on the next step.

Step 6: Add Sky and Sunlight

For the sky, I go to Content panel > Template > Set > Sky, change to Item, And select the “SunsetSky”.

Then just click and drag to the scene.

Then I add a lens flare by going to the Create menu, lens flare. And just position it behind that building near the back.

And just like that, you now have a sky and a beautiful sunset.

Step 7: Add HDR Effects

Finally, you can get some finishing touches by going to the Visual panel, which if you don’t have it you can go to Window menu > Visual Settings.
Then go to the first setting, the Atmosphere, scroll down and activate the HDR effect.

Then quickly play with the settings, and you are done!

The HDR effects add a bloom effect to your scene. Here is a comparison (see if you can spot the difference in the bloom effect):

Conclusion

Through this tutorial, we’ve demonstrated how iClone 8 and the Crowd Simulator feature can revolutionize content creation, making it accessible, fast, and efficient. This process opens up new horizons for creators across industries, enabling them to bring their visions to life with speed and ease previously unimaginable.

Learn more about iClone Crowd Sim

————————————————————————————————————————————————————————————

The original article was written by Tom May and featured on Creative Boom.

Take On Any 3D Animation Challenge with iClone and Character Creator

Every 3D animation contest presents its own set of unique challenges. In addition to pushing the boundaries of artistry, participants have to adhere to strict deadlines for submitting their final renders. Let’s explore notable entries from three prominent competitions:

  • “ROKOKO TV” Intergalactic Animation Challenge
  • Pwnisher Endless Engines Challenge
  • Pwnisher Eternal Ascent Challenge

The following entries highlight the emergence of exceptional artists and their personal techniques. Their high-quality craftsmanship and ingenuity in character animation are clear roadmaps to transcending the limits of conventional methods.

Advanced Facial Animation Capture with AccuFace

Florian Salvesberger’s “Kiss The Cook” 👨‍🍳”

Florian Salvesberger’s submission to the “ROKOKO TV” Intergalactic Animation Challenge stood out for its innovative approach. In his cooking show entry, Florian introduced a captivating twist by showcasing a flying chef bot alongside a meticulously crafted mechanical cook, replete with intricate details. Notably, Florian utilized Character Creator for the creation of the cook character, leveraging its versatile capabilities that seamlessly integrate into his character workflow, whether for conceptualizing art or directly generating 3D models.

To infuse the character with even more vitality, Florian ventured into the realm of AccuFACE Mocap for the first time, and the outcome exceeded all expectations. The ability to receive live feedback in real-time, directly onto the character mesh within iClone, was akin to every CG artist’s dream — a flawless 10/10 experience. After experimenting with various equipment, Florian settled on recording the final performance using the front camera of an iPhone 12 Pro, as it provided superior performance capture data compared to his slightly older webcam.

Following the recording, the character mesh seamlessly transitioned into Blender using the CC Blender Auto Setup plugin, effortlessly integrating with the rest of the scene. Rendering everything in Blender Cycles, Florian meticulously crafted the final composition, incorporating a medley of sound effects recorded within his own kitchen. The culmination of these efforts resulted in a delectable video submission, inviting viewers to indulge in a culinary journey. To that, we say “Bon appétit!”.

Trained and studied in Austria, Florian is a freelance 3d artist with a focus on Environmental Design, Worldbuilding, Matte Painting, and 3D Modeling. For more artwork of Florian, follow his Instagram @salve.vision.

ZBrush sculpting combined with iClone animation

Varuna Darensbourg’s “Void Detectives”

Varuna Darensbourg participated in the “ROKOKO TV” Intergalactic Animation Challenge, submitting the entry titled “Void Detectives”. This entry features a black female detective in the lead role, supported by several robots. Leveraging extensive experience with ZBrush Character Sculpt, Varuna utilized the tool to seamlessly incorporate customized sculpting onto the main character.

As the deadline loomed, COVID-19 unexpectedly impacted Varuna, causing him to be sidelined for the final weeks of the competition. However, he persevered and accomplished a significant amount of work in the last two days of the challenge. This attributed his success to the seamless real-time character workflow. Varuna expressed satisfaction in seeing his efforts through to completion despite the challenges he faced. The native render in iClone8 (using the native engine) stood out. And it also showed how Varuna excelled in crafting the character’s appearance and expressions.

Varuna Darensbourg, based in Toronto, Canada, boasts an impressive portfolio with contributions to several Hollywood blockbusters. His credit can be seen in “Shang-Chi and the Legend of the Ten Rings” and “Alita: Battle Angel.” For those interested in connecting with Varuna, they can follow his work on ArtStation under the handle @aria_redux.

Seamless workflow with Unreal Engine

Mohammad Khalikh’s “Auto Rickshaw’s Action”

This entry, created by Mohammad Khalikh, was submitted to the Pwnisher Endless Engines Challenge in 2023. Adorned with motion blur effects, the video has the audience immersed in a high-intensity car chase and gunfight sequence. Despite the challenge’s requirement for animating using the provided sequence image, the artist retained the freedom to customize it. And that includes characters, textures, lighting, and applying VFX to enhance the scene. Utilizing seamless integration with Unreal Engine, iClone, and the Character Creator, Mohammad opted to incorporate the car chase characters in this entry, showcasing a seamless blend of creativity and technical skill.

Mohammad Khalikh, trained and educated in India, is a skilled previz artist renowned for his contributions to both live-action and animation projects. His clientele boasts prestigious names such as Lenovo India and Xolair, with one of his previz works notably featured in a war movie available on Amazon Prime Video India. For those interested in exploring more of Mohammad’s artwork, they can follow his portfolio on ArtStation under the username @grizzlyartist.

Ro-Bob Ross teaches AI-generated Art

Nick Shaheen’s “Ro-Bob Ross Teaches AI Generated Art”

Artist Nick Shaheen submitted this entry to the “ROKOKO TV” Intergalactic Animation Challenge. Reflecting on his upbringing when cable or satellite television was not widely available, Nick had a memory of one scene. He recalls the simplicity of Saturday afternoon programming, which often featured bowling or the painting show hosted by Bob Ross. Inspired by Bob Ross teaching text to AI-generated images, Nick whimsically decided to depict him as a cyborg. Embracing the philosophy that in his world, there are no mistakes, only happy accidents. Nick transformed this concept into a 7-second video for the competition.

Using Rokoko suit for Bob’s body animation

Beginning with Character Creator in conjunction with ZBrush and Substance Painter, Nick successfully achieved the desired sci-fi appearance for the character. Following the completion of the body mocap session using Rokoko, he further refined the body animation utilizing iClone motion layer editing tools. The execution of the concept was commendable, resulting in a final outcome that is both impressive and gratifying.

Nick is a versatile professional, serving as a writer, director, freelance motion designer, and VFX  artist. His portfolio includes the award-winning short film “Honey Romance” and the sci-fi-comedy M.A.R.C. For those wishing to connect with Nick, they can reach out to him via his Instagram account @nickhshaheen.

Best character pipeline for Blender

Jasper Hesseling’s “Ascending from the ashes”

Artist Jasper Hesseling interpreted the theme of “Eternal Ascent” for the Pwnisher contest by portraying a phoenix-inspired transformation. In his submission, the princess ascends from a shattered castle, her dress burnt, symbolizing her rebirth with newfound strength. Jasper utilized his trusted tools from Reallusion – Character Creator and iClone – along with ZBrush and Substance Painter, to sculpt and texture the character. Furthermore, he employed Marvelous Designer for dress simulation and integrated Megascans assets to enhance the depth and visual appeal of the project. Due to the article layout, watch the full version of the entry here.

Jasper’s primary goal was to expand his skill set in Blender, and he is thrilled with the outcomes achieved. The CC Blender Auto Setup plugin played a crucial role in seamlessly transferring CC shader and PBR data to Blender, streamlining his character workflow within the software. Jasper takes particular pride in the lighting and eerie atmosphere of his piece, along with the meticulous attention to detail throughout. The depiction of clouds and fire, generated using imported OpenVDB volume data files, put significant strain on his computer, resulting in frequent crashes during rendering with Blender. However, Jasper found the render manager B-Renderon to be an invaluable tool for managing these challenges and ultimately achieving the desired final outcome.

Jasper Hesseling, based in Utrecht, Netherlands, is a freelance 3D artist specializing in character art and various other 3D creations. For those interested in contacting Jasper, they can send him a private message via his ArtStation profile under the username @mastajappa.

Try the tools that these artists have used

If you’re interested in exploring the software and tools mentioned, you can visit the following product links to learn more about these solutions. All Reallusion products offer a 30-day free trial upon registration, with no credit card required. Feel free to test them out before making a purchase. Happy animating!

iClone – Character animation made easy

Rokoko Body Mocap

AccuFace Facial Mocap

Character Creator – Universal 3D Character System

ZBrush Face Tools Plugin: Empower Fully Expressive 3D Facial Animation

Boosting Concept Art Workflow Efficiency for Blender

Concept artist Jakub Kaźmierczak harnesses synergistic workflow in the creation of his “Battlefield” concept series

Jakub Kaźmierczak

Hello, I’m Jakub Kaźmierczak, a concept artist specializing in environments concept art and key frames. Today, I’m excited to share my workflow that enables you to swiftly create high-quality characters for your concepts. With the combination of Character Creator and KeenTools for Blender, crafting realistic characters has never been easier. This streamlined process not only ensures realism but also simplifies character posing.

Check on Jakub’s Artstation

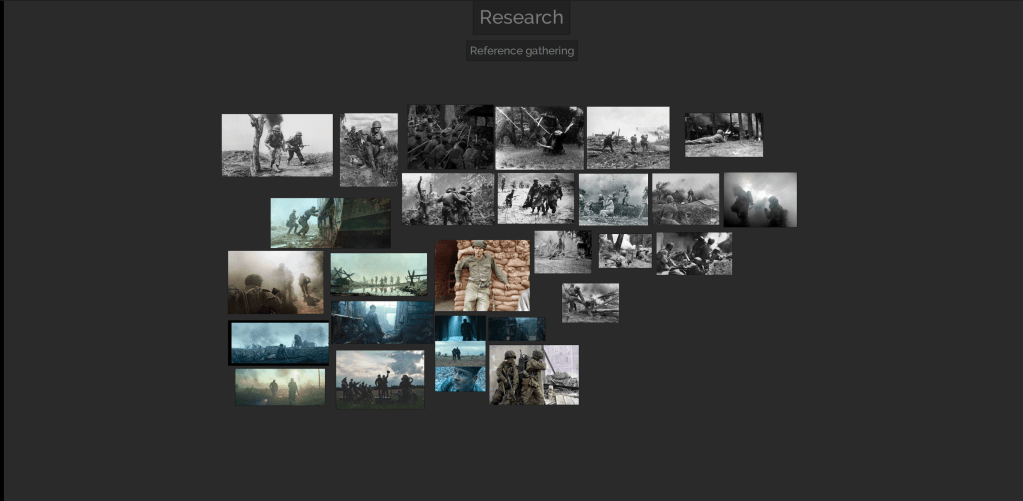
Prior to concept design: gathering ideas & references

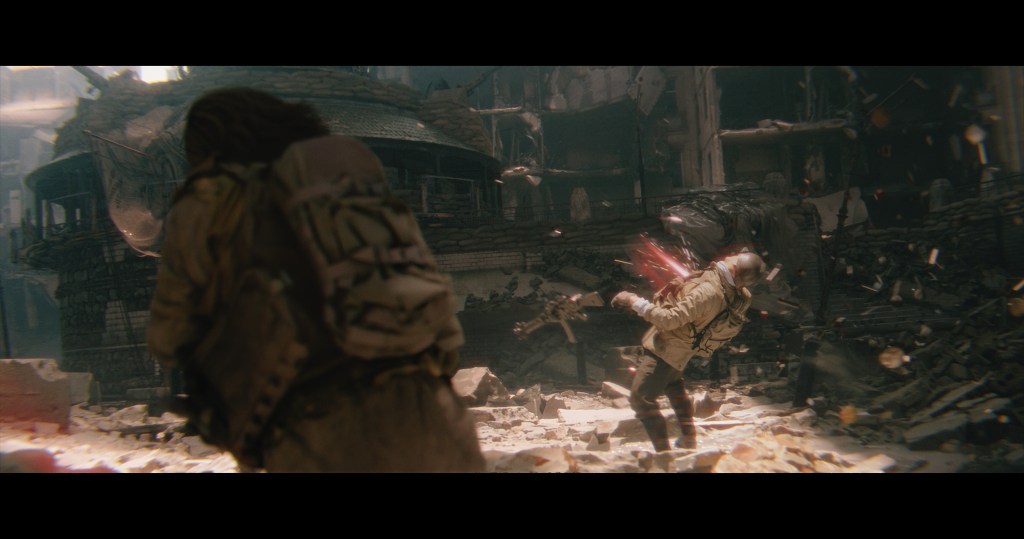
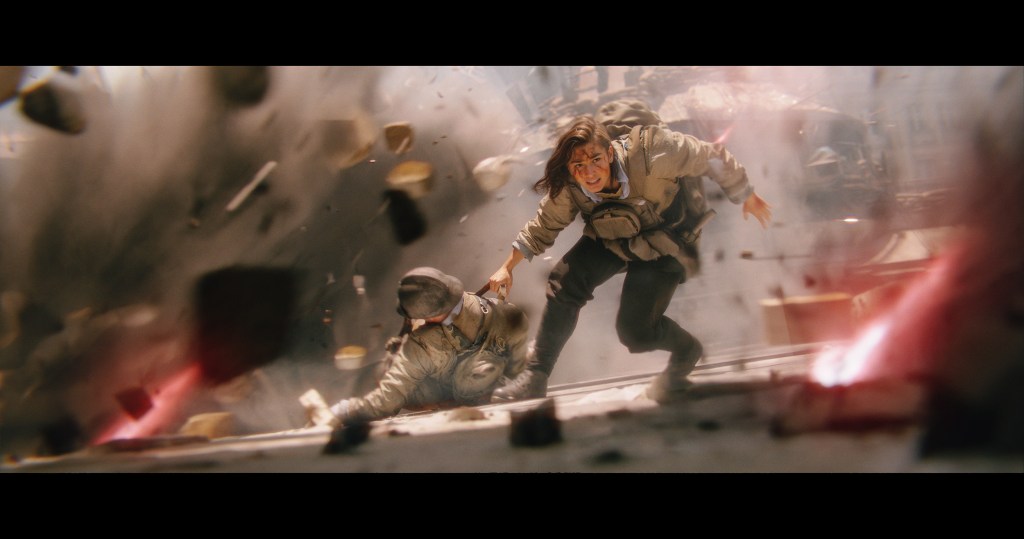
In selecting the theme, I opted for a warzone scene, drawn to its potential for dynamic and action-packed compositions, which I thoroughly enjoy crafting. My process invariably begins with gathering references. 

gathering ideas & references for concept art

For this project, I scoured archival photos for pose inspiration and film stills for insights into color palettes and mood. I typically utilize search engines like Bing and platforms like ShotDeck to curate a diverse array of images. These references serve as invaluable resources, providing answers to questions regarding materials, lighting, and design that may arise during the creative process.

Crafting a character for your concept art using KeenTools Face Builder

I will now demonstrate my process for creating a character for my concept art from scratch. 

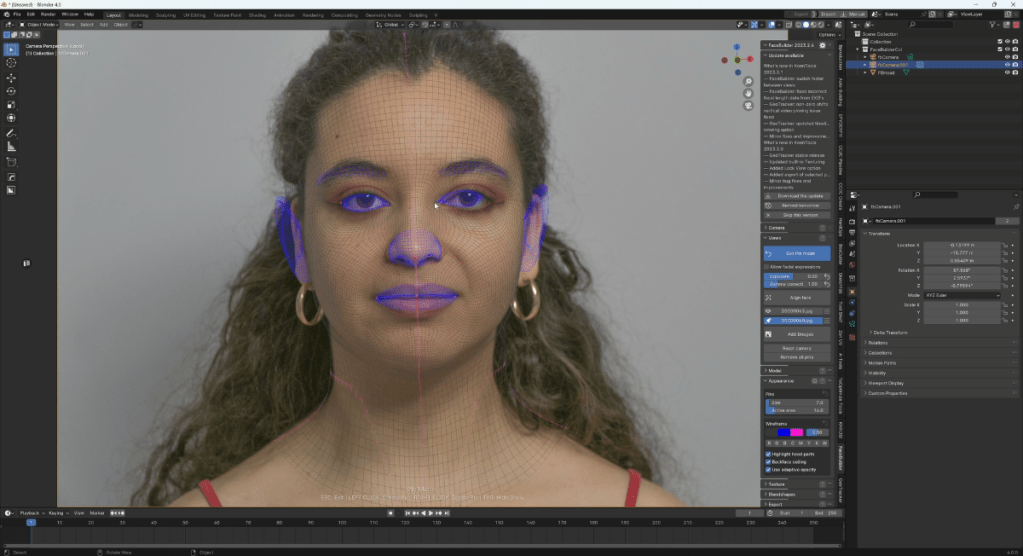
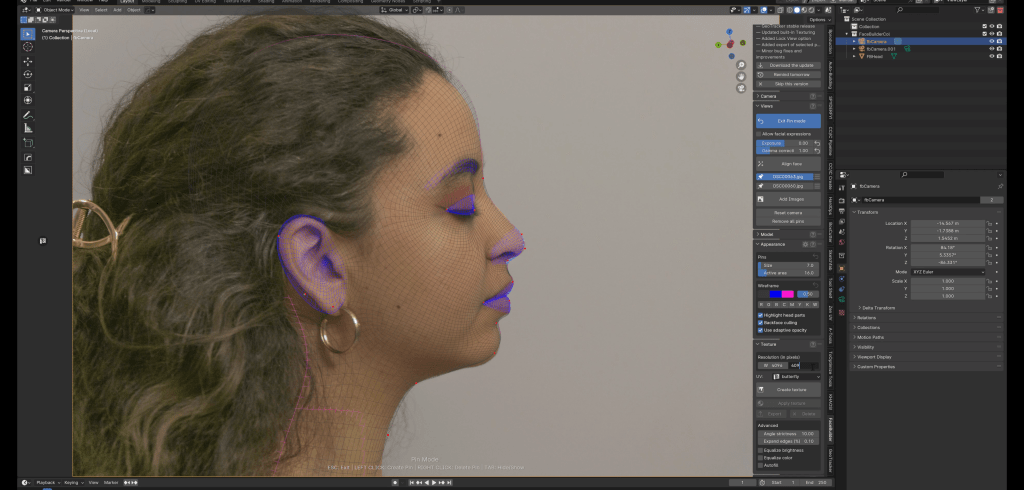
We’ll begin in Blender, where I’ll demonstrate how to utilize KeenTools to align the mesh with reference photos and sculpt a face for our character. This intuitive process involves seamlessly integrating parts of the mesh with the reference images, ensuring accuracy and detail.

KeenTools Facebuilder for Character Creator

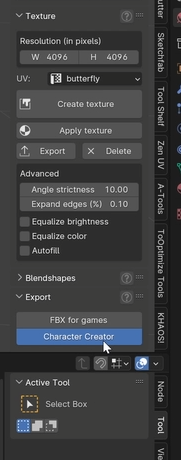
Once the sculpting is complete, we’ll generate the texture and export it to Character Creator to finalize our character. 

KeenTools Facebuilder for Character Creator

When we have it all done, we can create the texture. I just have to set the desired resolution and pick how many photos we want to use in the process.

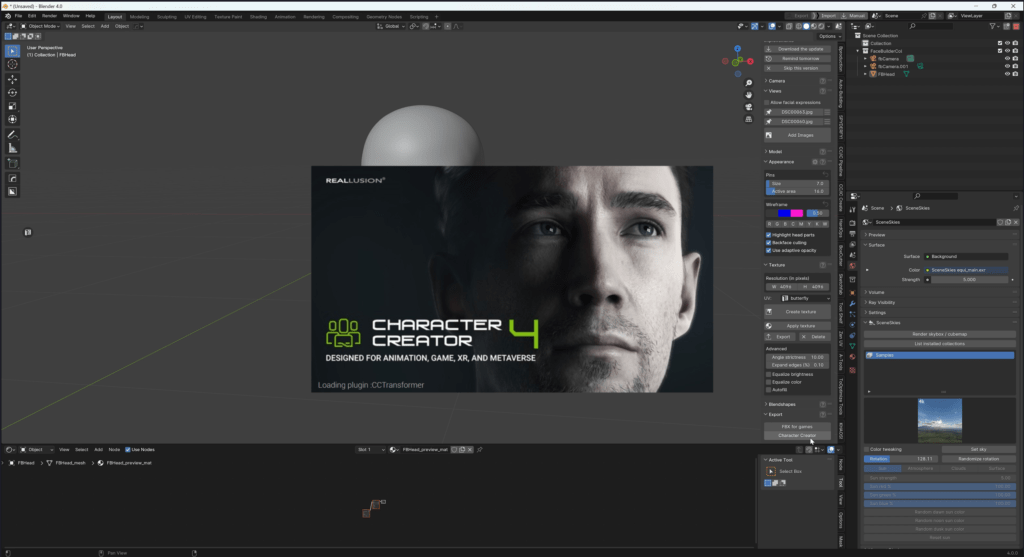
KeenTools offers a dedicated option to seamlessly transfer your head model directly into Character Creator, which is really convenient.

KeenTools Facebuilder export to Character Creator

Exporting it to Character Creator and making the model for the concept art

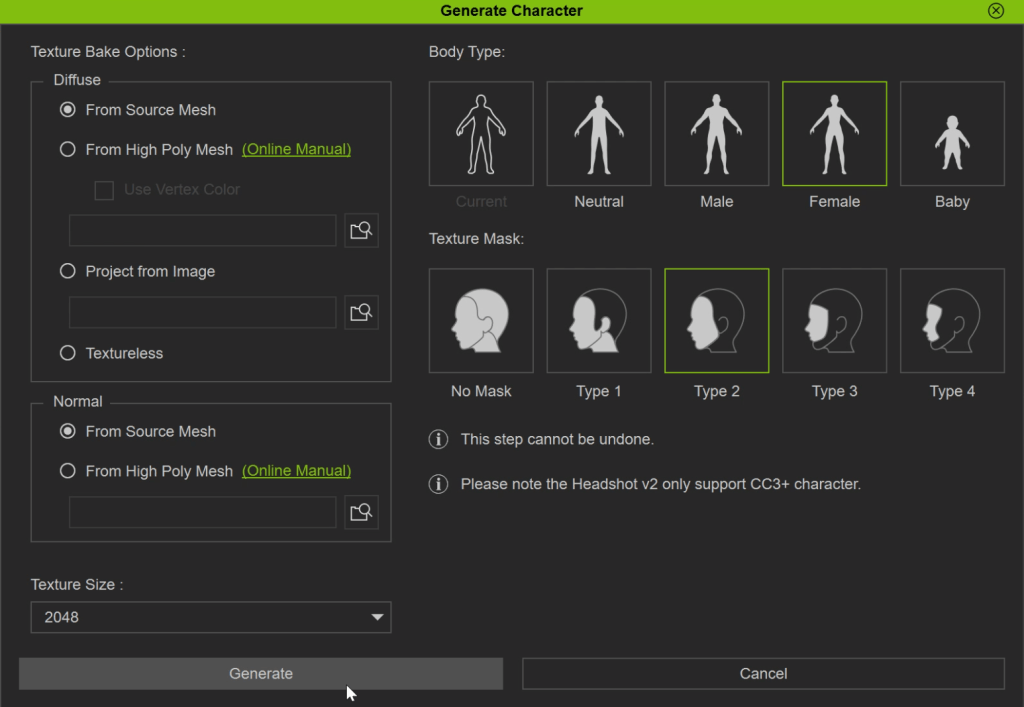
After a quick import I clean the mesh if some things are still not aligned and attach the head to the body. In my case, I use the “Female” Body Type and “Type 2” Texture Mask.

Female” Body Type and “Type 2” Texture Mask

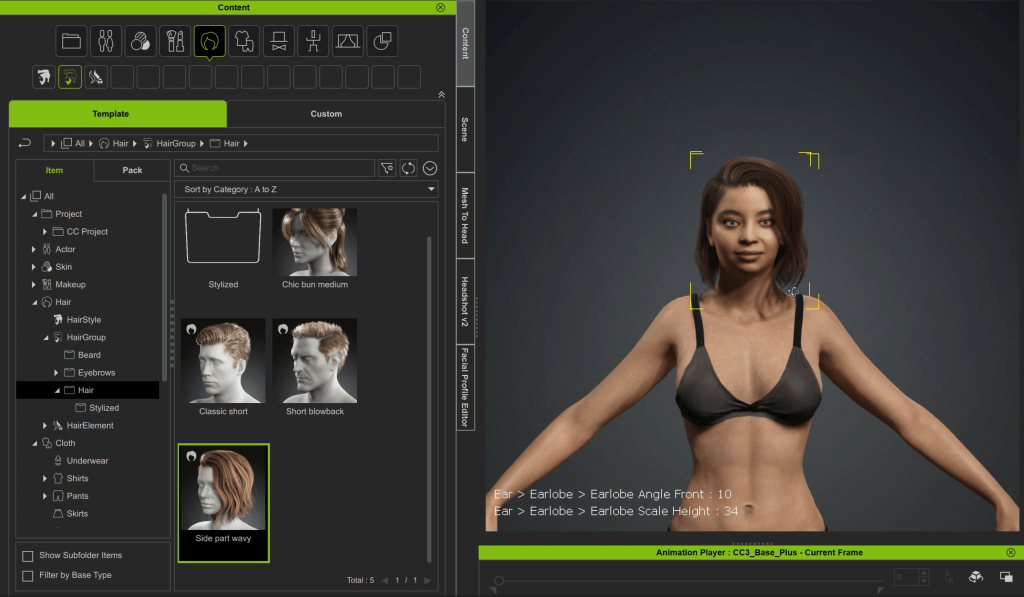
To further refine the character’s appearance, I employ the morph function to fine-tune each facial feature and add additional details to the head.

morph function in CC

Thankfully, Character Creator offers a wide range of elements such as hair, eyebrows, wrinkles, and normal maps to enhance facial detailing. This is where I experiment with various options to achieve the desired look in the concept art.

Character Creator offers a wide range of elements such as hair, eyebrows, wrinkles, and normal maps to enhance facial detailing

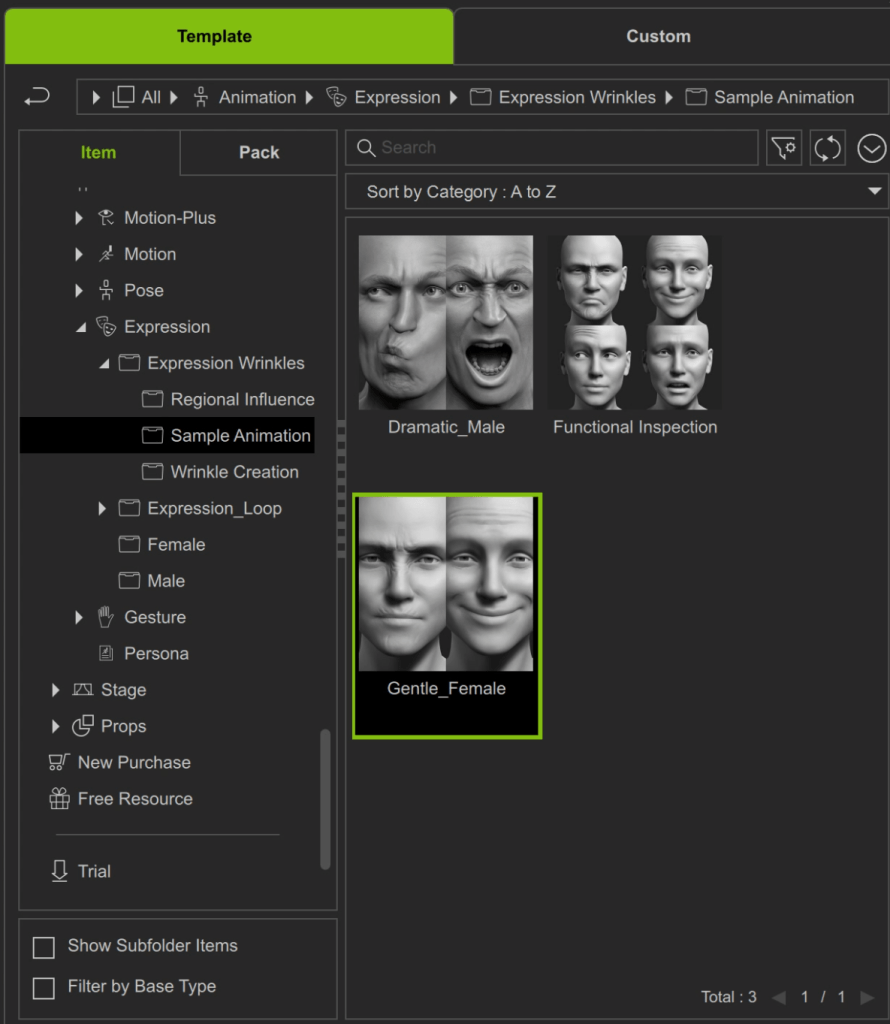
Furthermore, I take advantage of the expression wrinkles feature of the latest release, which proves invaluable in conveying emotions and laying the groundwork for photobashing if needed.
expression wrinkles in CC

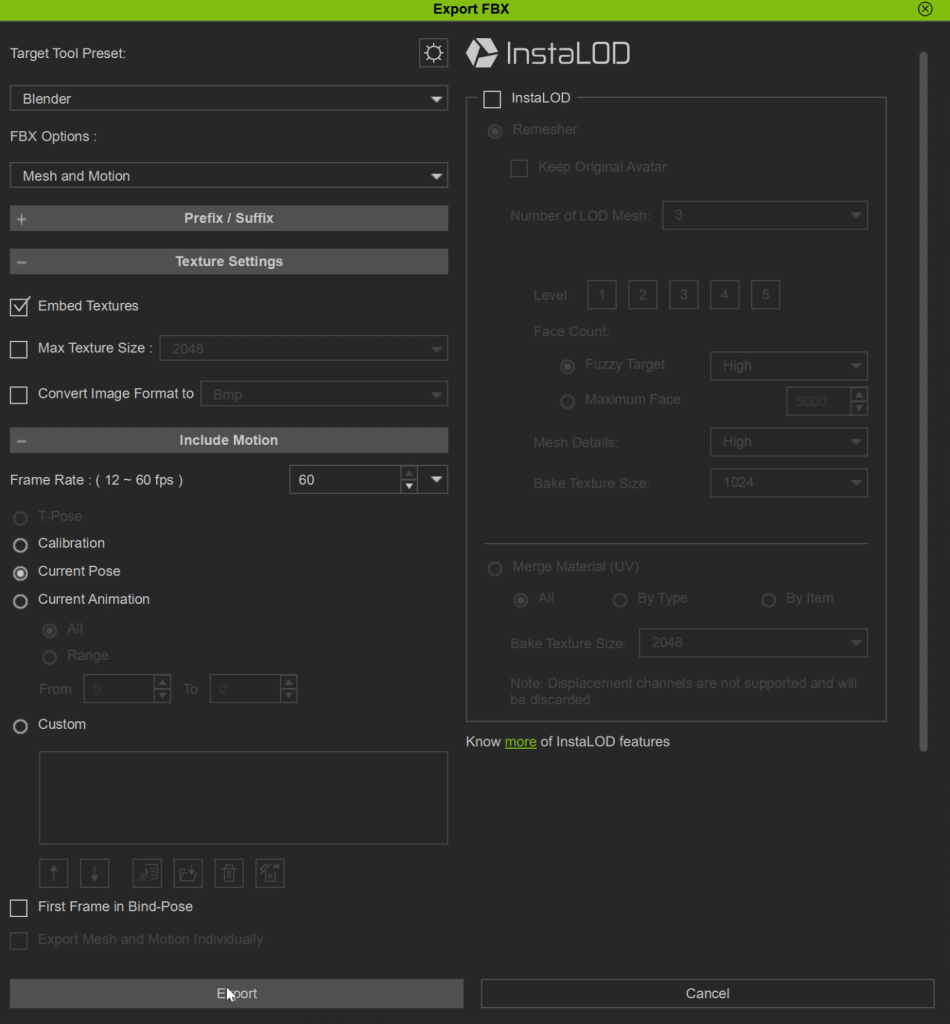
Once satisfied with the model, I export it back to Blender via the menu command: File > Export > FBX > Cloth Character.

Export FBX

Reallusion Addon: Blender Auto Setup

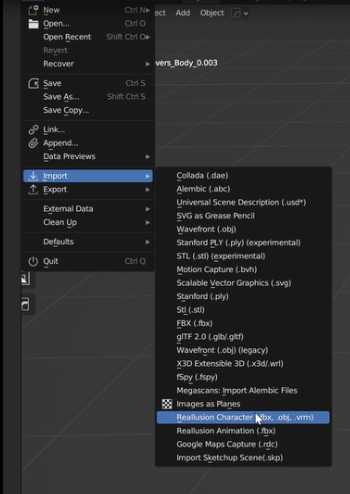
For seamless character transfer, an official auto-setup add-on is provided for Blender, accessible via the Reallusion forums. Within Blender, we simply navigate to the Import menu and select Reallusion Character. Once imported, we have the flexibility to fine-tune various parameters directly from the addon tab. This includes adjustments for roughness, subsurface scattering, color, and an array of other options to achieve the desired appearance.

Blender auto setup

Creating Clothing in Blender

With the character now in Blender, it’s time to give her an outfit. Previously, I relied on exporting outfits from Marvelous Designer. However, for efficiency’s sake, I’ve transitioned to dressing the character directly in Blender. It’s akin to dressing up an action figure. Whether modeling custom outfits in Marvelous Designer, sourcing models from online platforms, or even utilizing 3D-scanned clothing items, the objective remains the same: achieving the desired effect promptly.

Creating Clothing in Blender

With this approach, I dress the character, ensuring proper fit with adjustments when needed. When I’m done, I export the entire ensemble as an FBX file.

Importing Clothes into Character Creator

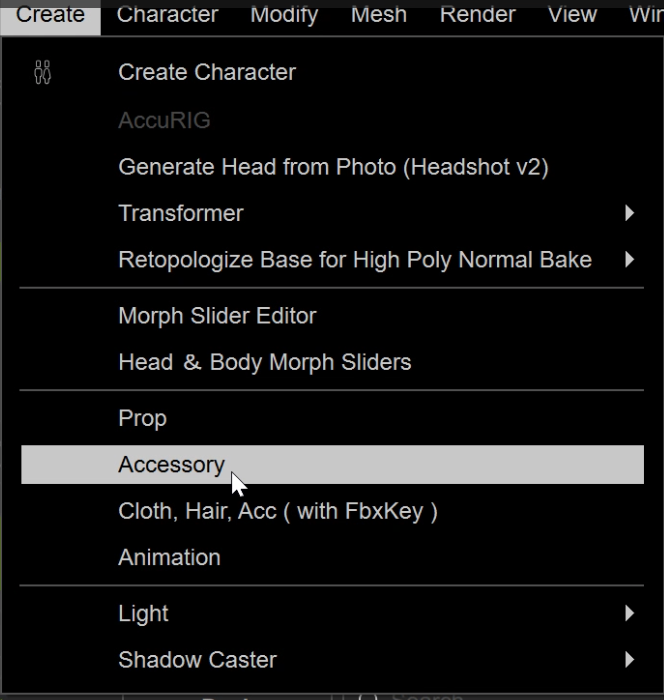
Once that’s completed, I return to Character Creator. To import clothes and attach them to our character, I navigate to Create > Accessory > FBX.

Importing Clothes into Character Creator

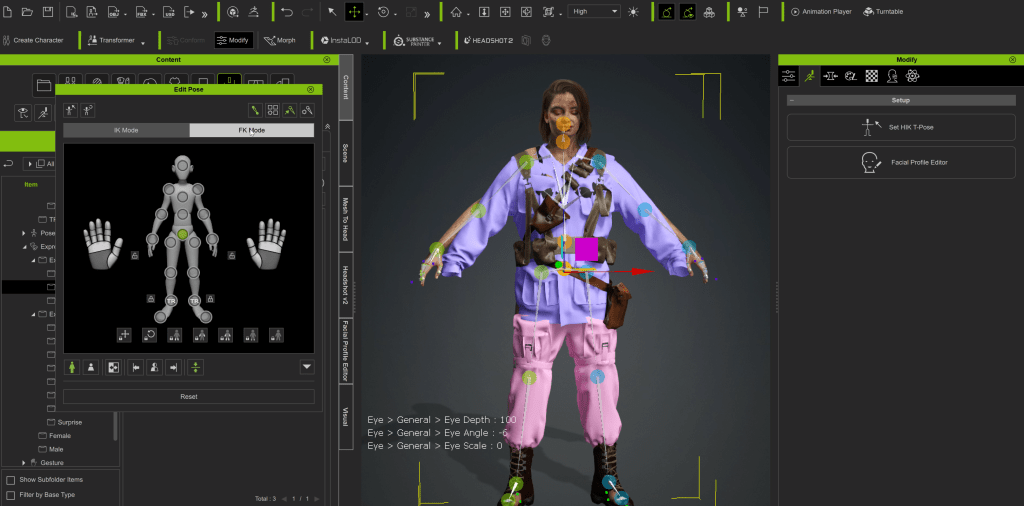
After a quick pose adjustment to ensure the outfit aligns the character properly, we proceed to make the clothes adhere to the character.

A quick pose adjustment to ensure the outfit aligns the character properly

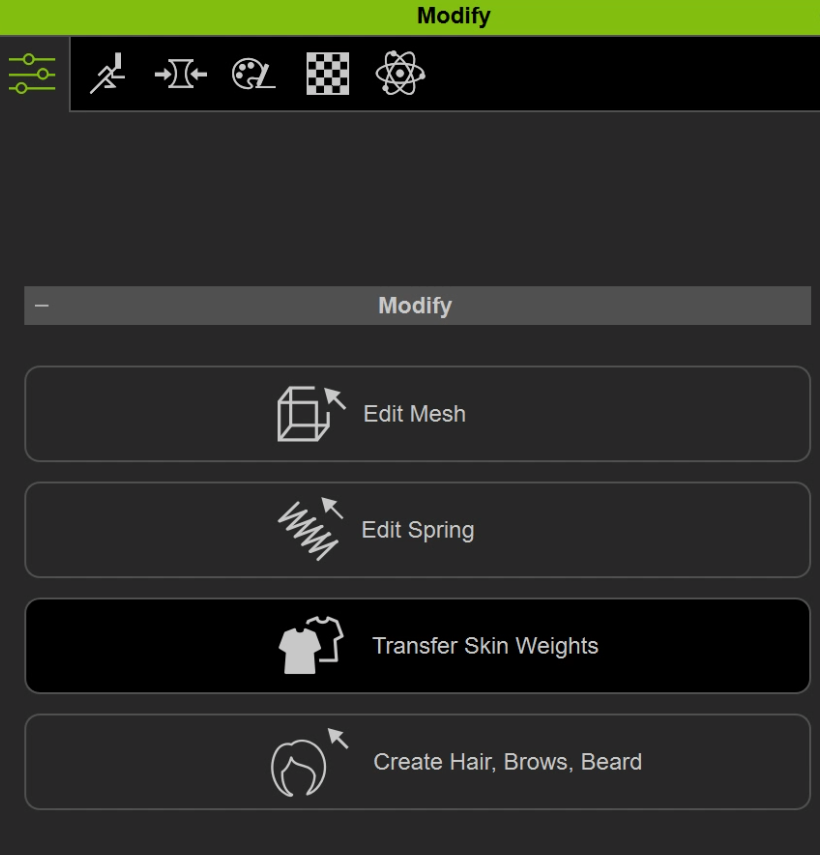
To achieve this, we select the clothing element, such as shoes, navigate to the Modify tab, and transfer skin weights. We repeat this process for each piece of clothing.

transfer skin weight
choose different template for each piece of clothing.

For those seeking a comprehensive guide, Michael Pavlovich has an excellent tutorial detailing the entire process in depth.

Bringing ActorCore Motion & Poses into Blender

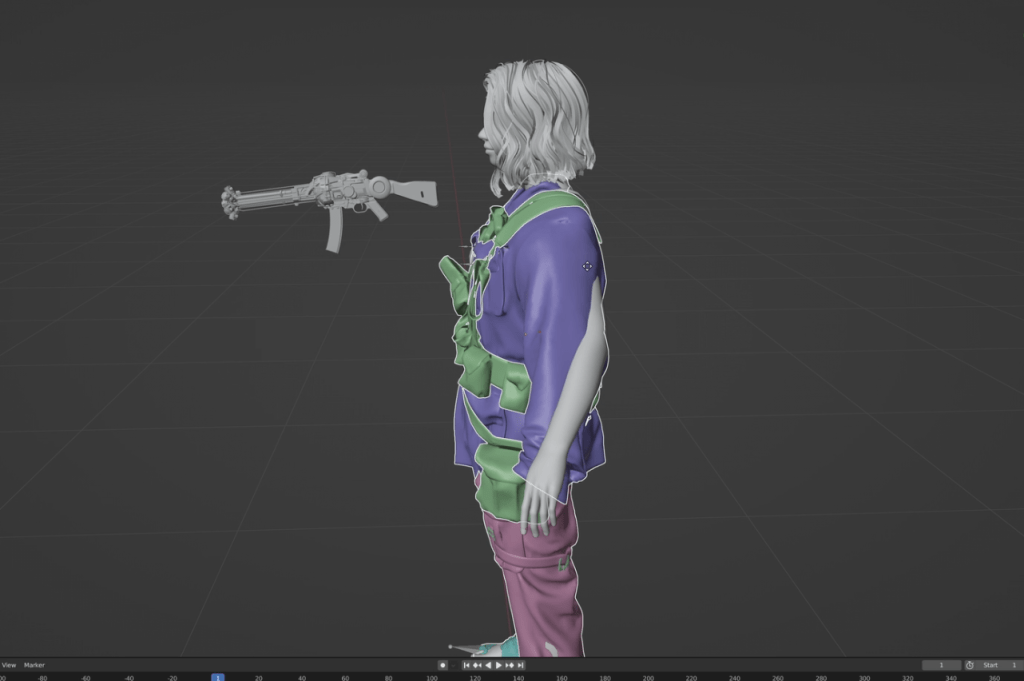
Now, it’s time to reintroduce the fully clothed character back into Blender. If you wish to attach additional elements, such as a backpack or gun, simply navigate to edit mode on the skeleton. Duplicate the bone you wish to use, select the desired element, and with Ctrl+P, set the parent to the bone. To ensure the clothes adhere properly to the mesh, I utilize the sculpt tool in Blender.

Bringing ActorCore Motion

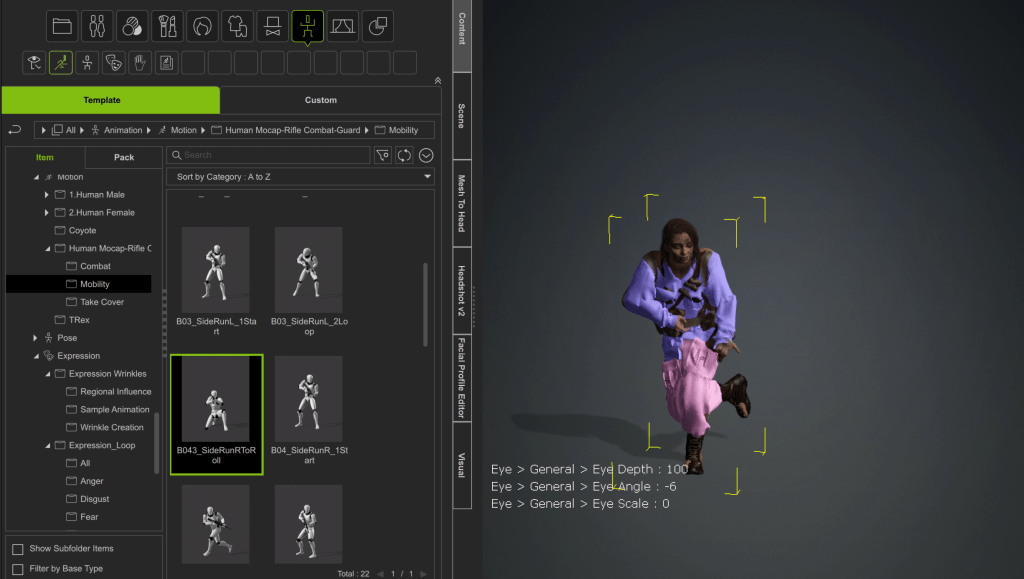
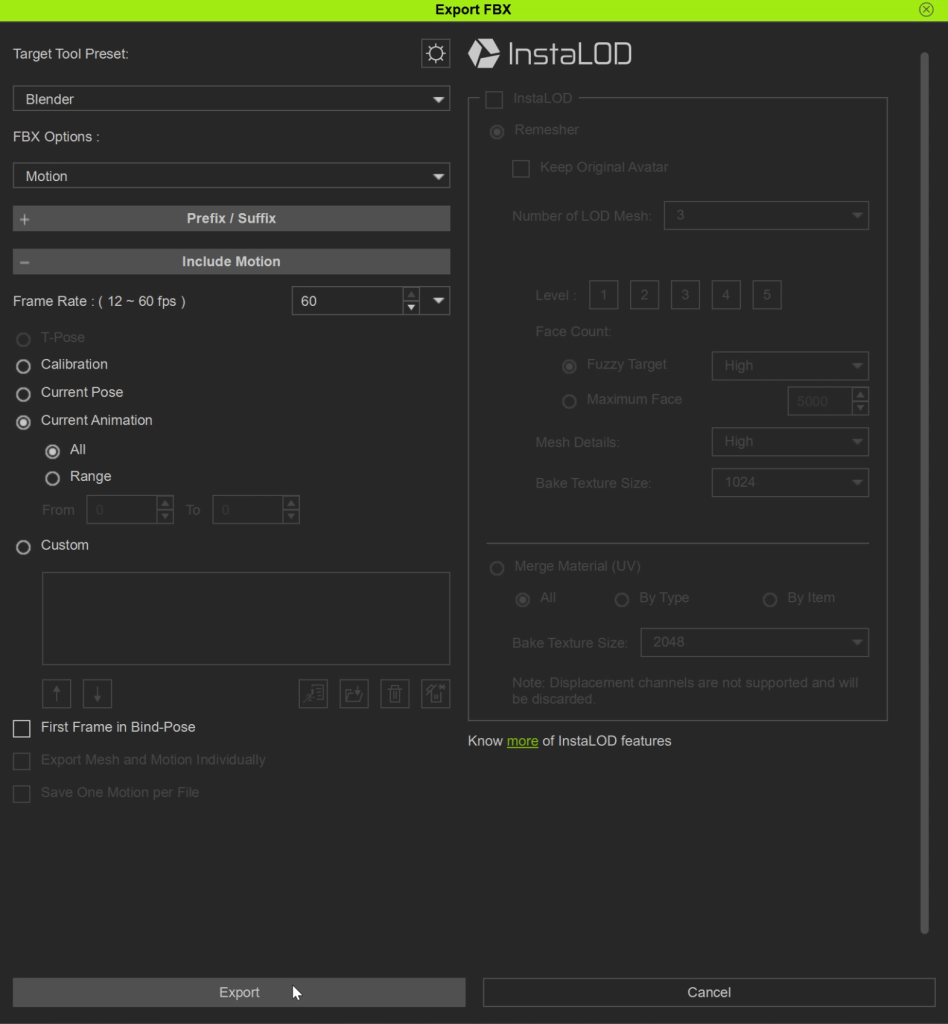
Importing animations into Blender is straightforward. In Character Creator, within the Motion tab, select the desired animation. Then, navigate to export and choose Motion and Current Animation.

export to Blender

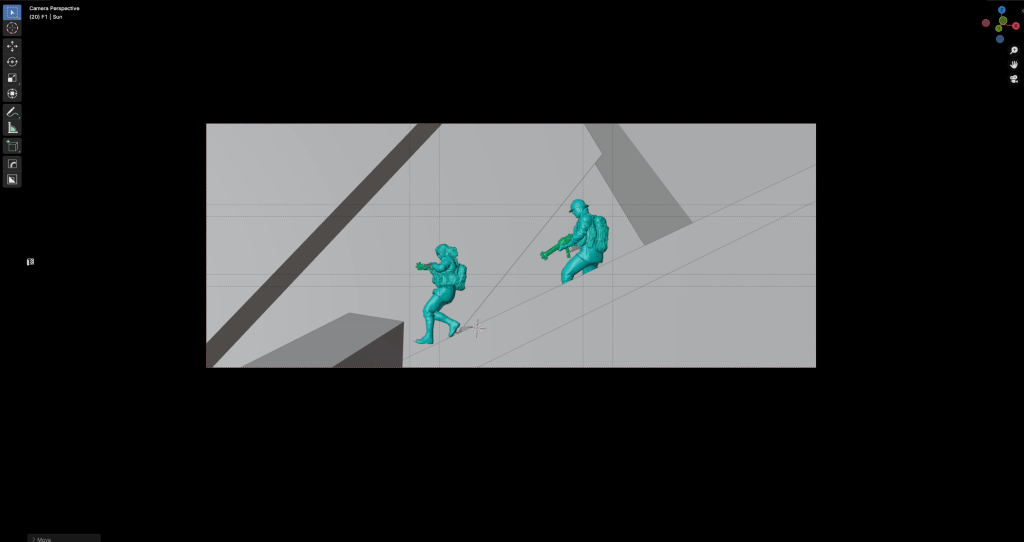
In Blender, choose Import Animation. To transfer the desired pose, select the skeleton with animation, move the cursor over the timeline, and press G. This allows you to play the animation by moving the mouse. Once you’ve found the pose you like, switch to pose mode and copy the pose. Next, enter pose mode on our character, right-click, and paste the pose.

Poses into Blender

Blockout Phase

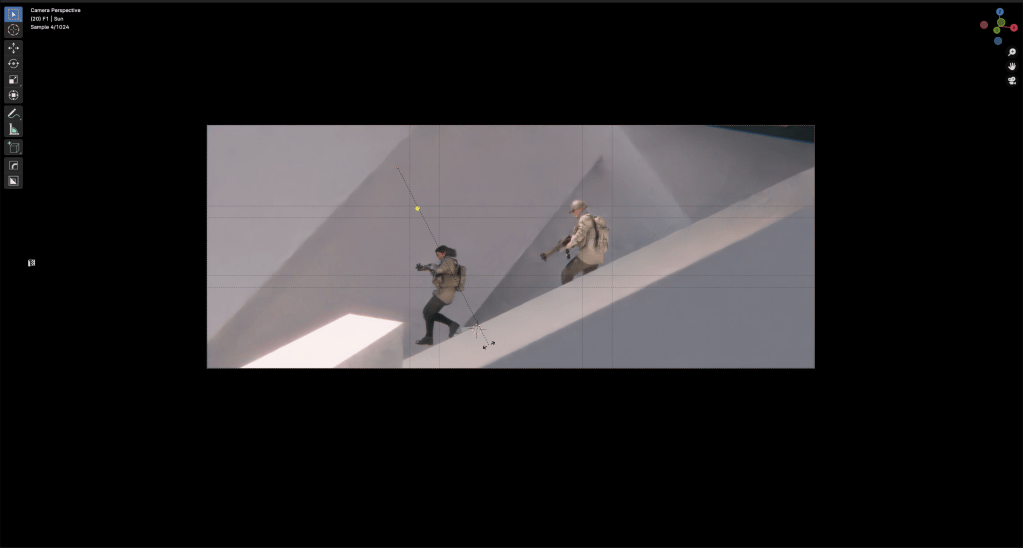
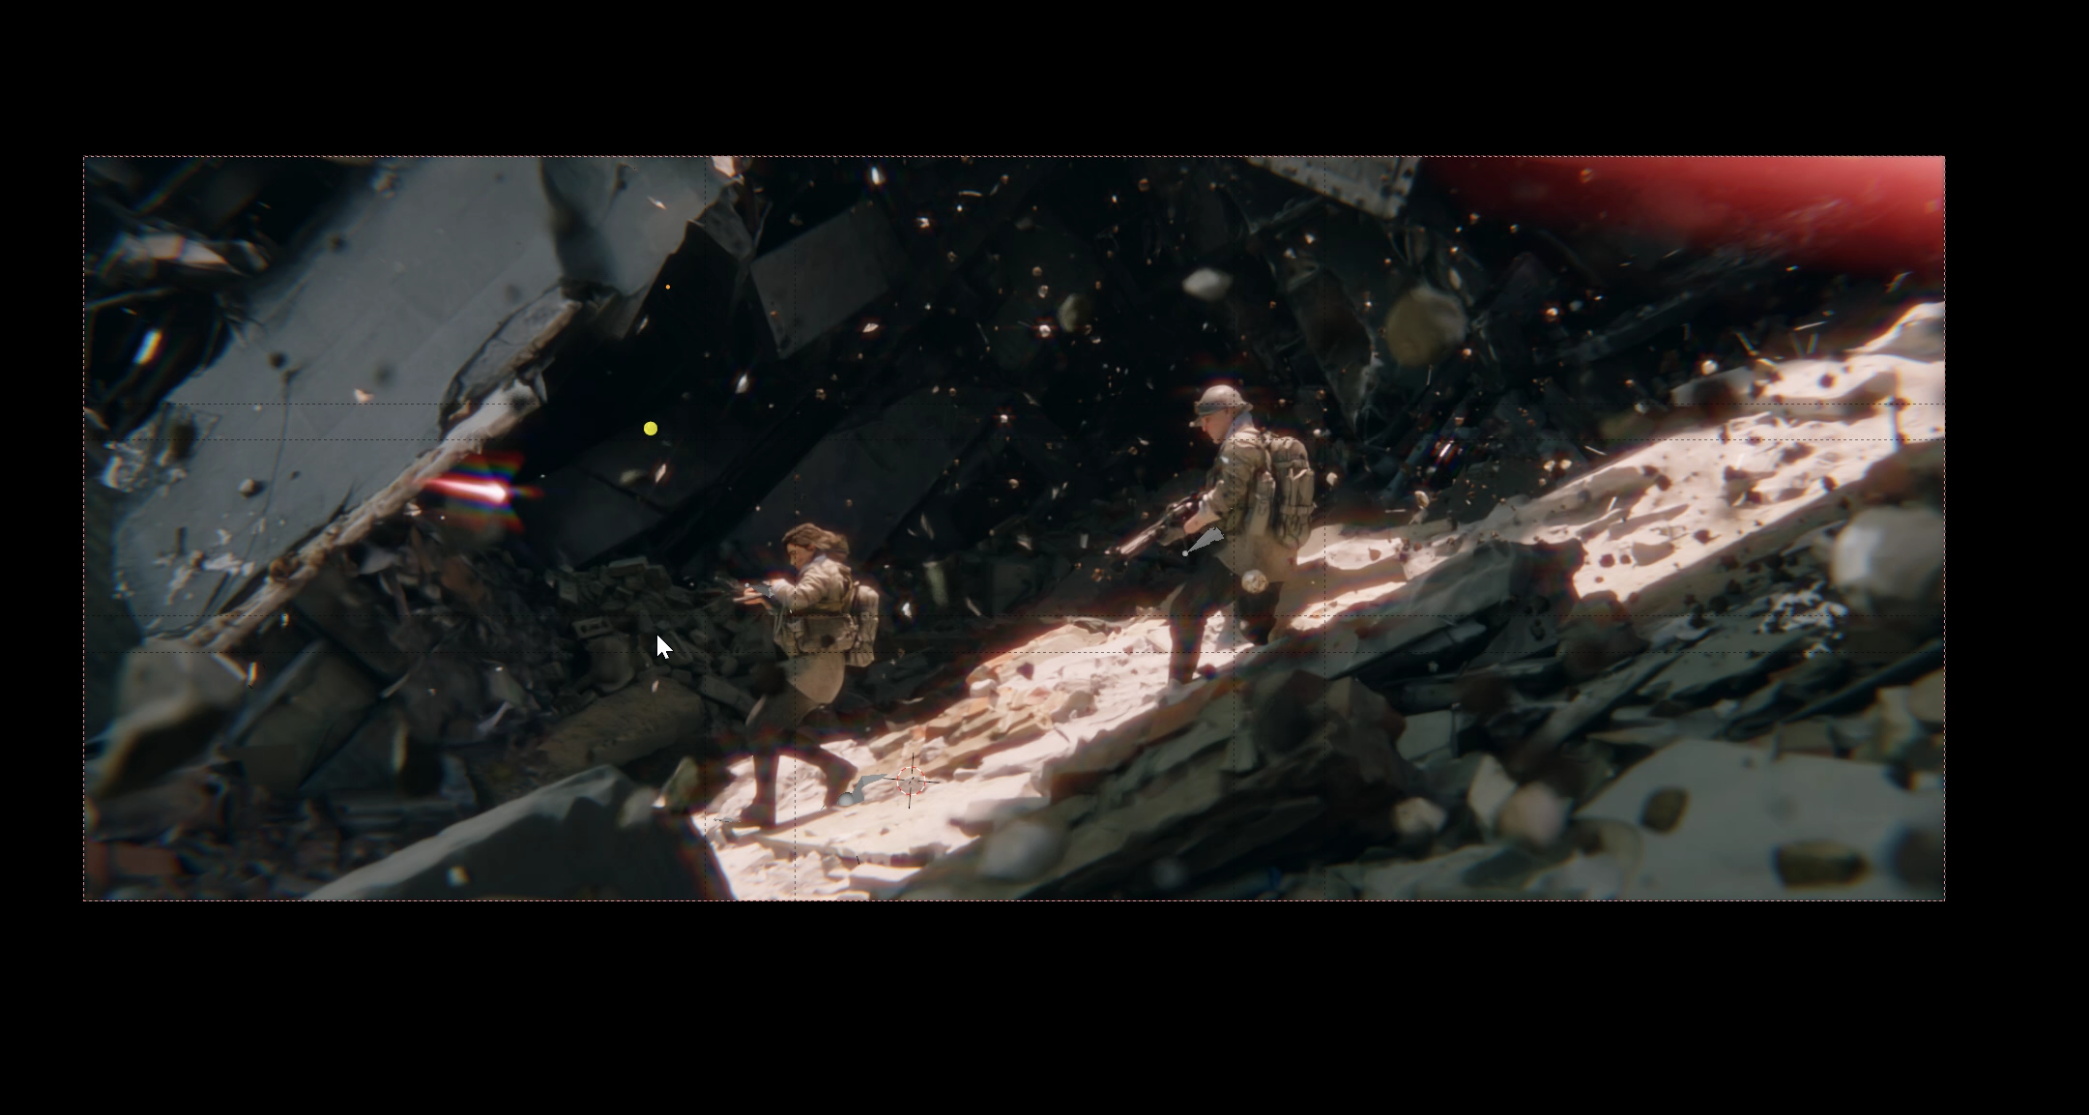
Upon reviewing the references, I commence with a rough blockout of my scene. My aim is to establish the composition and initial lighting. During this stage, I alternate between Blender and Photoshop to overlay and quickly iterate on the initial concept.

Once I’ve completed the blockouts for all the shots I intend to create, I populate the scene with assets and incorporate particles and atmospheric elements.

Blockout Phase

Expression

One of the most useful features for me are expression wrinkles that I exported from Character Creator.

expression wrinkles

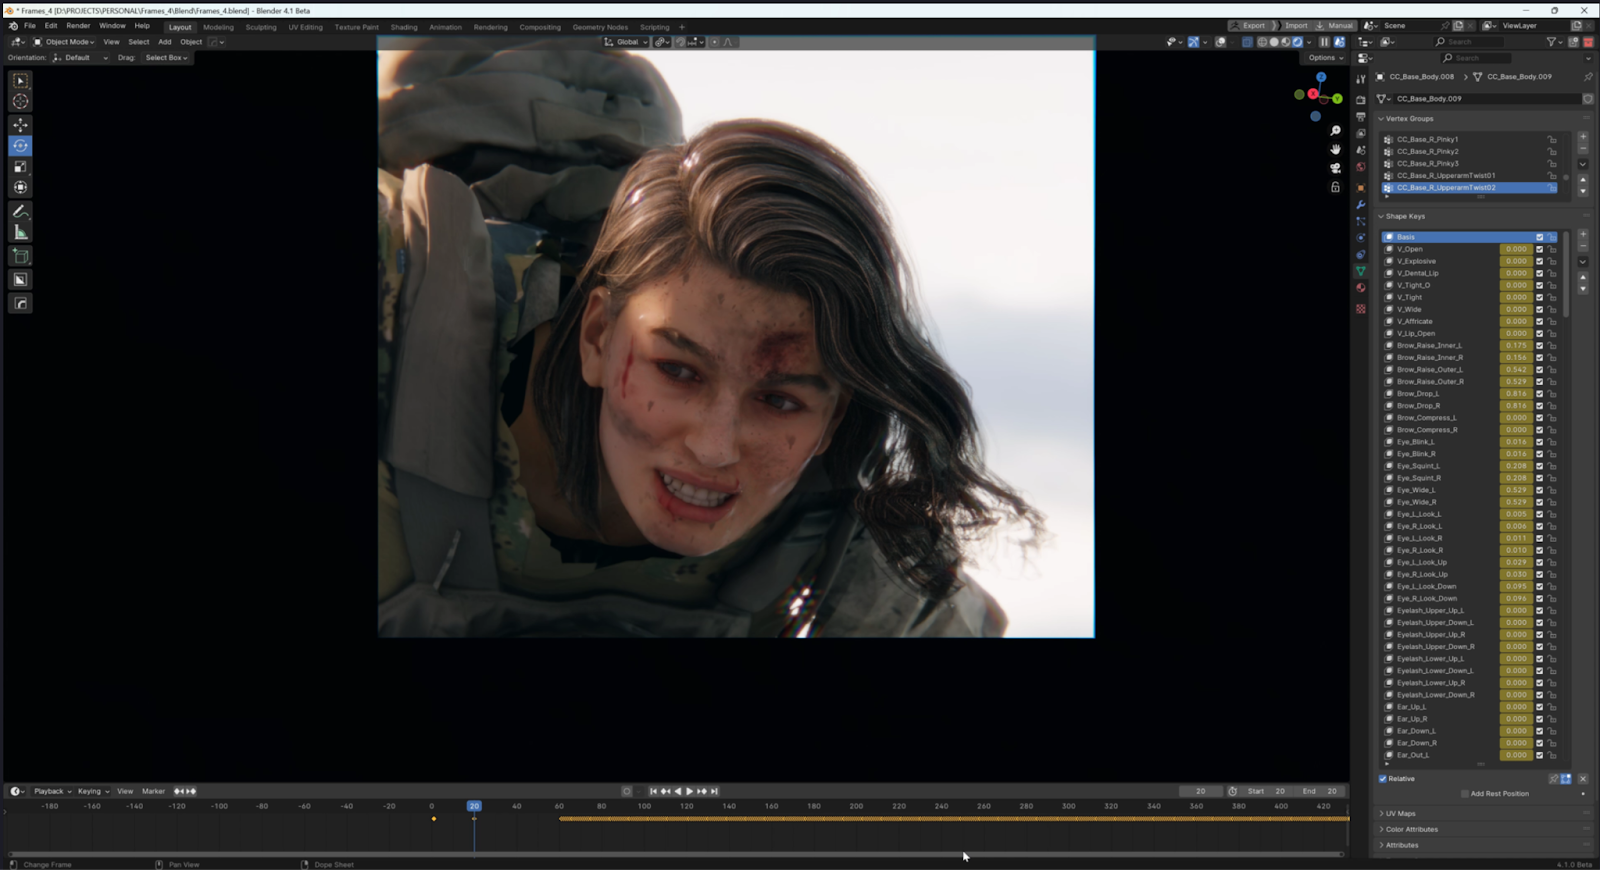
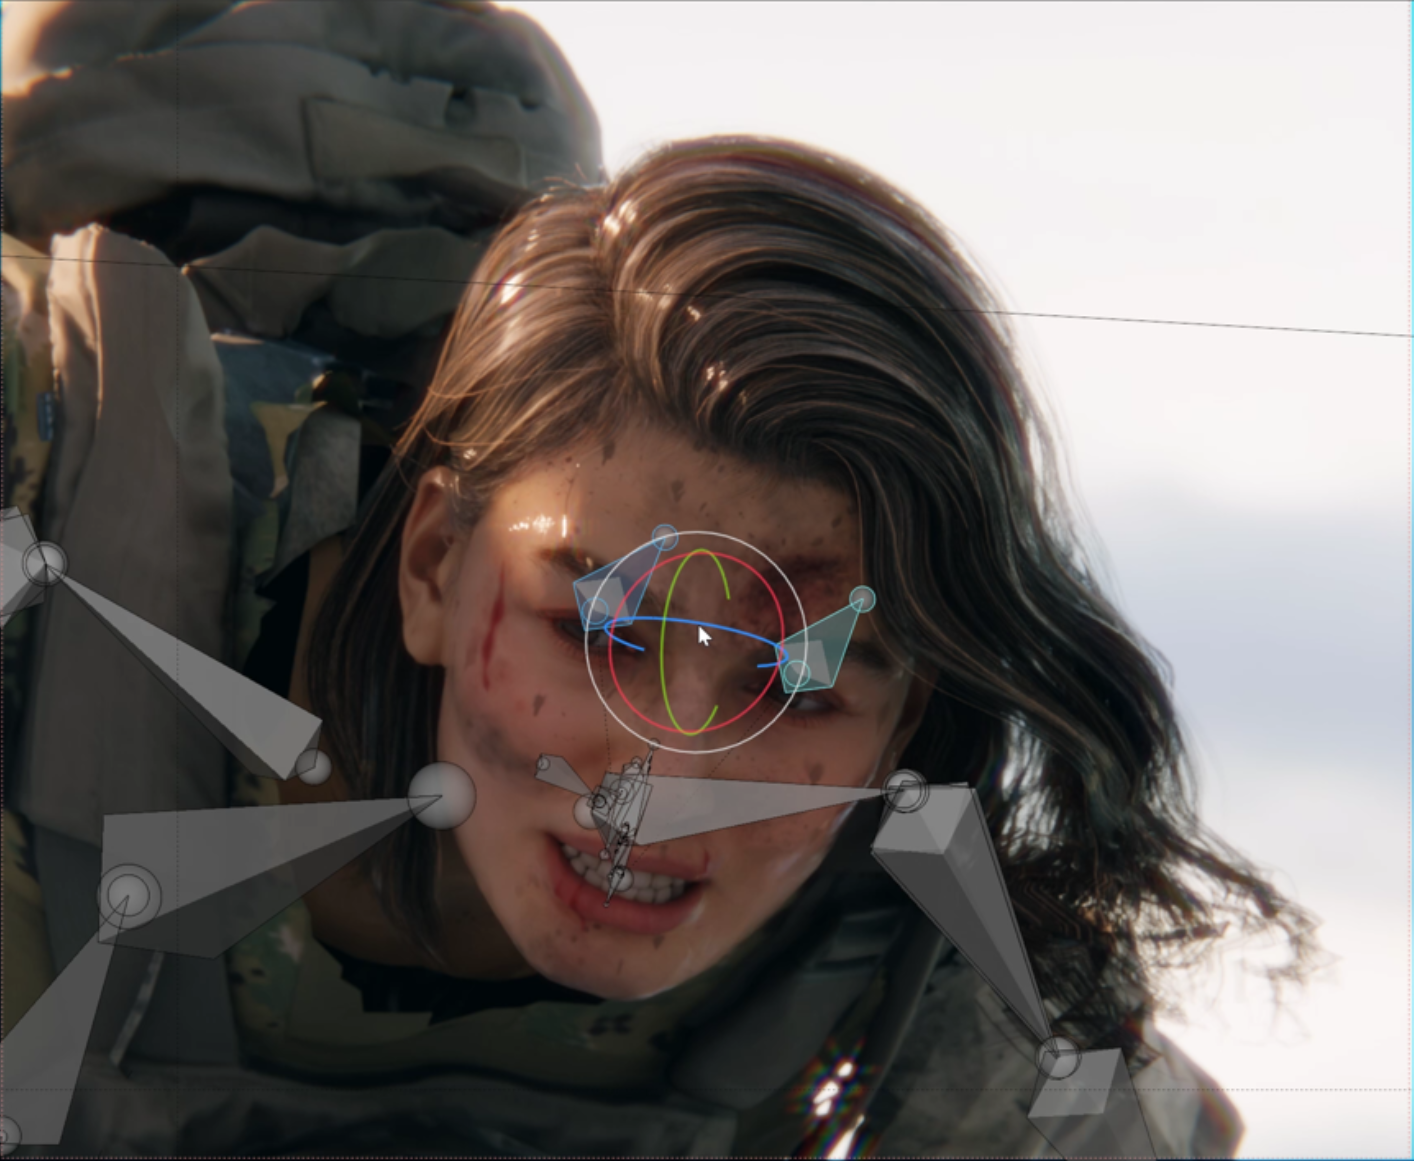
In Blender, I can choose from the expression that is the closest to the one i want by moving my cursor over the timeline and planting animation. When I find something that I like I use shape keys to get precisely what I want.

I use shape keys to get precisely what I want.

As for hair, I just simply modify them in Edit mode.

As for hair, I just simply modify them in Edit mode.

After finalizing the scene, I transitioned to Photoshop for the final photobashing and color grading process.

photobashing and color grading process.

In Conclusion

The workflow outlined here provides a comprehensive and efficient approach to crafting high-quality characters for concept art. Through the utilization of tools such as Character Creator and KeenTools for Blender, the process is significantly streamlined, enabling rapid and realistic character creation with effortless posing.

Throughout the process, a delicate balance between speed and quality should be upheld, with continuous iterations and refinements to attain the desired outcomes. This workflow seamlessly integrates 3D modeling, texturing, and posing, delivering both flexibility and efficiency in character creation for concept art design.

Professional Handkey Animations for Toon Characters – Exclusive on ActorCore

Stylized motions that add zest to 3D cartoon productions

Anyone familiar with keyframe animation understands the immense skills involved, even for seemingly basic tasks like animating a walk cycle. While keyframe animation grants artists full control to meticulously craft animations to realize their original vision, the process of creating pose-to-pose animations and then refining the in-between poses with precise timing and pacing is undeniably laborious.

To circumvent this challenge, some animators opt for motion capture animation for stylized characters. While effective mocap animations can seamlessly animate a human model into a dynamic actor within the scene, this approach falls short with stylized characters. Translating human movements onto cartoonish characters dilutes their unique personalities, as their exaggerated actions and reactions lack authenticity, resulting in awkward visuals.

Classic cartoon motions await on ActorCore

Image: Hundreds of cartoon motions available on ActorCore.

While desirable, toon motions can still be challenging to create. ActorCore, the asset store for 3D productions, offers hundreds of ready-made handkey animations. These animations save artists a significant amount of time and effort while ensuring high-quality, realistic cartoon movements. 

ActorCore also provides dedicated categories, allowing users to easily find ideal moves for their stylized actors for a wide range of scenarios. All motions are crafted with seamless transitions between poses, enabling effortless switching of different sequences.

Handkey animations chock-full of personality

Image: ActorCore handkey motions are catered to match different toon personas.

Handkey animations on ActorCore are crafted to accommodate a diverse range of stylized characters, providing unique animation styles suited to various body scales and personalities. Whether it’s a male, female, child, or a character with a robust or slender physique, ActorCore offers specialized motions for all cartoonish performances.

Currently there are over 500 handkey motions available in the ActorCore motion store, from general movements such as walk, talk, run, to paired motions and interactions. Any motion that showcases unique cartoon personalities can be found, including playful, hefty, clumsy, cowardly, and more.

One example is “Clumsy Moves”, is a handkey motion pack designed to infuse uproarious fun and slapstick humor. When applied, the characters come alive and engage in a variety of negligent behaviors resulting in slips, falls, and tumbles. 

The “Chubby Moves” packs offer a range of lively performance animations tailored specifically for plus-sized characters. By incorporating compatible animations (like “Sit Chair” and “Sit Sofa”) across both the “Chubby Moves – Playful” and “Chubby Moves – Bulky” packs, motions can transition from one theme to another, to transcend the performance. By extending this integration to include “Playful Stand” and “Bulky Stand”, different performances can be connected into one dynamically cohesive scene.

Easily find and export the best content to your favorite platforms

3D motions on ActorCore can be conveniently accessed via web browsers and mobile devices. Enhanced interactive 3D viewing experiences are available, accompanied by swift search functionalities and categorical exploration based on keywords and phrases.

All ActorCore 3D motions seamlessly integrate with leading 3D software such as Unreal Engine, Unity, Blender, Omniverse, iClone, 3ds Max, Maya, MotionBuilder, and Cinema 4D. Comprehensive step-by-step guides and tutorials tailored to each program are provided, alongside optimized Auto Setup plugins and import presets to streamline workflow processes. The use of ActorCore assets can benefit both newcomers to the 3D field and industry veterans with their established pipelines and arsenal of tools.

Image: Select “Handkey” to see cartoon motions designed for stylized characters.

Visit ActorCore Handkey Motion Store today and explore the fine collections of toon motions.