首頁 » Page 20

Reviving Ancient Rome with Character Creator & iClone

Luis Cerezo – Writer / Filmmaker / Director

Luis Cerezo

Luis Cerezo, a seasoned creator with extensive experience in advertising, television, music videos, documentaries, and independent films, has embarked on a captivating journey to bring history to life through the lens of digital storytelling.

At the age of 15, Luis began an early career as a jazz drummer. As a filmmaker, he founded Cinelibre, an alternative production platform inspired by guerrilla filmmaking. His works have been premiered in Madrid, Montreal, Bogota, Warsaw and Shanghai. In 2015, his first novel “Eo” was published by Suma Letras. (www.luiscerezo.net)

His latest project recreates the awe-inspiring atmosphere of Mérida, known in antiquity as Emerita Augusta—a city that flourished nearly 2,000 years ago as a major capital of the Roman Empire. This ambitious endeavor not only revives the architectural grandeur of the era but also highlights the poignant story of Eulalia, a 13-year-old girl whose bravery and defiance made her a timeless symbol of freedom and faith.

To authentically represent Eulalia’s character and her world, Cerezo collaborated with a global team of artists, historians, and archaeologists. Beginning with traditional sketches and children’s historical recreations of the saint, the team utilized Character Creator to design detailed 3D models of characters, while costumes were crafted with input from experts in ancient Roman fashion. The city itself was meticulously reconstructed using topographic studies and archaeological data, blending realism with artistic interpretation.

Animations were developed using iClone, with its native files seamlessly integrated into Unreal Engine for rendering. This workflow allowed the team to create dynamic and emotionally resonant scenes efficiently. Cerezo credits Reallusion’s software suite for transforming complex production into an enjoyable and time-effective process, pushing the boundaries of digital artistry while honoring an enduring cultural legacy.

How Luis Cerezo Revived Ancient Mérida and the Story of Eulalia with iClone, Character Creator, and Unreal Engine

Q: Hello Luis. Welcome to our Feature Stories. Kindly share with us what inspired you to focus on Eulalia’s story and the recreation of ancient Mérida for this project?

From the moment a friend shared Eulalia’s story with me, a seed was planted that grew little by little. Initially, I never thought I could write it due to its magnitude, but it emerged spontaneously as part of a novel draft. Another factor was walking through the ruins of the present-day city, imagining it as it once was, and asking myself, “Why not see it as it used to be?”

But the most important aspect is the underlying theme of the struggle of that young girl.

Eulalia is about free will and standing firm in one’s convictions—a concept that made her a spiritual cornerstone of the Hispanic world and the West, as free will is what defines us as human beings.

Q: How did you collaborate with historians and archaeologists to ensure historical accuracy in the character designs and environments?

I’ve noticed that major productions, such as The Fall of the Roman Empire (Anthony Mann, 1964) or Shōgun (Hulu & Disney+, 2024), often lack historical rigor.

While taking natural narrative liberties, I felt it was essential to depict things as they truly were. From Late Empire clothing, to streets and textures, everything has been cross-referenced with excellent researchers actively working on excavations.

Under the guidance of Miguel Alba, who accompanied me step by step through the reconstructed areas, every detail was verified alongside various specialists. The Consorcio Mérida Ciudad Monumental was pivotal to this process. It’s composed of enthusiastic archaeologists and historians with a strong reputation for their restoration work.

A great advantage is that Mérida has remarkably well-preserved sites—from the theater to the stunning Temple of Diana and the ancient circus. Much of their structure remains intact, serving as a basis for reconstructing what time has erased.

Q: Could you explain how you used Character Creator to design the characters, from sketches to final models?

First, I sought visual references for each character, much like I do for my novels: creating a conceptual foundation. For a character venerated by millions, this required special care and reflection. Early sketches using AI didn’t convince me, so I turned to Yan Rodríguez, an artist and excellent anatomist, who crafted traditional sketches on paper.

People often underestimate the importance of anatomy, but those who study it deeply understand how facial muscles and bones shape a character’s essence.

The challenge was to stylize the characters enough to avoid the “uncanny valley” effect but not excessively so. This process took considerable time.

Fortunately, once a strong initial concept was established, Character Creator provided all the necessary and highly flexible tools.

“Once a strong initial concept was established, Character Creator provided all the necessary and highly flexible tools. The workflow was smooth, as the software allows for intuitive manipulation of ideas—a quality I find fascinating.”

Luis Cerezo – Writer / Filmmaker / Director

I even think I could use Character Creator to design faces for my novels, visualizing characters as I write.

Q: How did you integrate iClone animations into Unreal Engine, and what benefits did this workflow provide for rendering the final scenes?

The story of Eulalia spans a dramatic moment with significant social weight. Therefore, the approach couldn’t be excessively realistic, in contrast with the scenery.

iClone is an incredibly intuitive system for animation, reminiscent of music composition in software like Logic or Cubase—you can layer, speed up, and amplify tracks. Being a first step, I conducted numerous tests and discovered that iClone allows blending MOCAP, manual animations, and library assets. The possibilities within iClone’s ecosystem are vast, and this experience has left me eager to explore further.

As for integration with Unreal Engine, iClone LIVE LINK worked seamlessly, enabling the use of Unreal’s lighting, scenery, and rendering capabilities, which dramatically enhanced the scenes.

“Reallusion has gained a devoted fan in me since day one, and I’ll rely on their tools for my next project, which takes place between interstellar space and a neighborhood market.”

Luis Cerezo – Writer / Filmmaker / Director

Follow Luiz Cerezo

Related Posts

MetaTailor Plug-in for Character Creator 4 

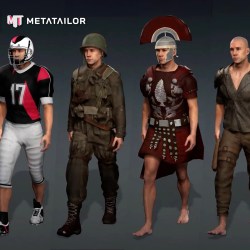
A fresh way to style Character Creator clothing and wardrobes with MetaTailor

A fresh new way to dress up your Character Creator 4 (CC4) avatars is here! The MetaTailor Plug-in introduces a fast and seamless workflow: with just one click, send your character to MetaTailor, style them with outfits, and bring them back — no tedious exports, no manual adjustments.

What is MetaTailor?

METATAILOR is an interactive, real-time content creation tool designed for virtual fashion enthusiasts, game developers, and 3D artists. It empowers users to design outfits and dress 3D avatars with ease, offering a wide range of tools for creating unique outfits and accessories. It offers an extensive library of ready-made 3D garments and also supports importing your own designs.

Thanks to MetaTailor’s self-adaptive technology, each clothing item fits and conforms to your character’s body automatically in real time, letting you focus purely on creativity.

Whether you’re layering outfits, swapping styles, or fine-tuning the fit, MetaTailor removes the technical burden and speeds up the styling process for 3D artists of all levels.

Solution for Artists, Indies, & Studios

Whether you’re a hobbyist or part of a large team, the MetaTailor Plug-in amplifies your productivity. Here’s how it empowers creators at every level:

  • Game Artists: Rapidly prototype and iterate character outfits for different worlds and genres. Populate your game with diverse character wardrobes in a fraction of the time.
  • Indie Creators: Achieve AAA-quality character costumes without a large art team. MetaTailor gives a solo developer or small studio the power to dress characters with professional flair and minimal effort.
  • Studios: Streamline your production pipeline by eliminating tedious cloth-fitting tasks. Artists can swap and tweak outfits on the fly, making last-minute client changes or creative adjustments painless and fast.

Built for Character Creator 4 (CC4) Pipelines

The MetaTailor Plug-in is specifically designed to work seamlessly within the Character Creator ecosystem. It’s fully compatible with CC3+ base characters, and supports the iAvatar format.

You can send any Character Creator 3+ or 4 character to MetaTailor without re-rigging or conversion — the mesh, rig, and skin weights all transfer flawlessly.

After dressing your character in MetaTailor, simply send them back to CC4, ready for animation, posing, or export to platforms like iClone, Unreal Engine, and Unity. It’s a seamless extension of your existing CC4 workflow that feels natural and integrated.

What Are the Benefits of Using MetaTailor?

One-Click Integration: Send, Dress, Return

Say goodbye to tedious exports and file juggling.
MetaTailor Plug-in introduces a one-click send-and-return workflow between CC4 and MetaTailor.

  • Send your CC4 avatar directly to MetaTailor with a single click.
  • Dress up your character in MetaTailor’s intuitive environment.
  • One more click, and the fully dressed character — complete with all clothing and accessories — returns to CC4, ready for use.

This hassle-free round trip keeps you in the creative flow without technical interruptions, just like CC4’s other one-click integrations.

Instant Dressing with Smart Fitting

Drag, drop, and dress — in seconds.
MetaTailor offers a fast and intuitive way to outfit your characters.

  • Choose from a wide library of ready-made 3D garments or import your own designs.
  • Self-adaptive fitting ensures that each outfit automatically conforms to your character’s proportions in real time.
  • Layer multiple outfits, swap styles instantly, and fine-tune fittings with minimal effort.

Thanks to MetaTailor’s smart technology, you can say goodbye to painstaking manual adjustments and hello to effortless wardrobe creation.

Mesh Extractor: Build Your Ultimate Wardrobe

Unlock the full potential of your wardrobe with Mesh Extractor.

  • Pull existing outfits off any CC4 character and turn them into reusable clothing assets.
  • Reuse your favorite jackets, armor sets, or costumes by extracting them with a click and applying them to other characters.
  • Mix and match clothing pieces from different avatars to create entirely new looks.

Every character you dress can now help expand your outfit library — supercharging your workflow with limitless costume possibilities.

Getting Started

Ready to revolutionize your character creation workflow?
The MetaTailor Plug-in for CC4 is available as a free add-on for all Character Creator 4 users with an active MetaTailor Pro membership.

  • Download and install the plug-in easily through the Reallusion Hub.
  • Connect with MetaTailor to start dressing your characters effortlessly.

More Resource

Check out the MetaTialor Website

Check out Character Creator 4

Please feel free to leave any questions in the RL Forum’s MetaTailor subcategory

Riyad Rahman won the 2024 Animation at Work Contest. Learn how he creates a concise car insurance commercial with Cartoon Animator.

Winner Spotlight: Making a Concise Car Insurance Commercial with Cartoon Animator

For the Reallusion 2024 Animation at Work Contest, artist Riyad Rahman won second place in the “Business & Commercial” category. In this article, he walks us through the workflow behind his winning entry, 2D Explainer Video for Car Insurance.

Riyad Rahman

Hello, I’m Riyad Rahman, a Cartoon Animator and Motion Graphics Designer with five years of experience. I specialize in creating 2D explainer videos, business promos, and animated content that captivates audiences and simplifies complex ideas. My passion lies in bringing concepts to life through engaging visuals.

With expertise in character animation, motion design, and storytelling, I craft high-quality animations that help brands and businesses connect with their audience. Whether it’s an explainer video, a commercial, or social media content, I focus on delivering creativity, clarity, and impact.

Follow Riyad’s LinkedIn / Facebook

My Experience with Cartoon Animator

I’ve been using Cartoon Animator since 2021 and have worked on commercial projects with it. For this contest entry, it took me approximately 2 weeks to plan, design, and animate the video. The process involved storyboarding, character design, animation, and final edit to make it smooth and engaging. Using Cartoon Animator makes this process smooth and efficient!

  • Easy Character Rigging: This allows me to quickly turn any image into an animated character and apply smooth movements.
  • Motion Capture & Facial Animation: Let me bring characters to life with natural expressions and movements.
  • Smart IK Animation: I like using the 2D Motion Key Editor to flexibly pose the characters and make their motions more realistic.

“Cartoon Animator makes animation easy and fun! Its powerful tools, like motion capture and Smart IK, help bring ideas to life quickly and smoothly. Whether for business, education, or storytelling, it’s my go-to software for creating professional 2D animations.”

Riyad Rahman, Motion Graphics Designer

Story Background & Concept

I chose a car insurance commercial for my entry because it’s a practical and relatable topic that many people need to better understand. My goal was to create a clear, engaging, and visually appealing explainer video that simplifies the concept and makes it easy for viewers to grasp. Using Cartoon Animator, I was able to add fun visuals and smooth animations, transforming a complex subject into something simple and interesting. Here are some key tips I consider important when making a car insurance explainer video. Using Cartoon Animator makes this process smooth and efficient!

  • Keep It Simple – Use clear visuals and easy-to-understand language to explain key points.
  • Use Engaging Characters Animated characters can make the topic more relatable and fun.
  • Smooth Motion & Transitions – Utilize CTA 5 features like 2D Motion Key Editor, SVG Color Adjustment, Spring Editor, etc, to make the animation feel professional.
  • Add Visual Storytelling – Use scenes and props that show real-life situations, like accidents, claims, or benefits, to make the message stronger.
  • Keep It Short – A 1–2 minute video works best to keep viewers engaged.

Character Design

I chose the Content Store for characters because it easily combines with other G3 characters, allowing you to mix and match clothes to create your own unique styles. The benefits of choosing G3 characters are clear.

I can easily switch clothes for different styles using the included AI files. By showing and hiding layers, I can create different fashions, and adding props is simple—these can be created in Illustrator and exported back into Cartoon Animator.

I use the swapping technique to customize the character, making it look more unique and distinct. By simply exchanging the eyes, brows, mouth, and adjusting the hair and skin color, I can create a more personalized appearance.

Character Animation & Scene Animation

I spent around 14 Days on character animation, focusing on smooth movements, expressions, and natural interactions. By using Cartoon Animator’s tools like IK animation and face key editor, I was able to speed up the process.

Next, I plan with a storyboard and sketch out key scenes to maintain a clear and structured flow. After that, I focused on character design and background scenes. Then, I animate scene by scene using CTA features. I also applied the 12 principles of animation to ensure the scenes were clear and smooth.

VFX and Video Editing

To create a smoke effect, I use a particle playground, gaussian blur effects and wiggle expression.

By using the default parameters in After Effects, I created car movement, transitions, and so on. In Adobe Premiere, I added all the SFX, the scenes, voices, transitions, and more.

Closing Thoughts

This competition was an incredible experience that challenged me to enhance my storytelling and animation skills. Winning Second Place was an honor, and I gained valuable insights from seeing the work of other talented creators. For future contestants, my advice would be as follows.

Tell a clear story by mastering the basics, and focusing on smooth movements, expressions, and timing. Take full advantage of Cartoon Animator’s features to save time and improve quality. Lastly, experiment with new styles and effects to make your work stand out.

Related Posts

Click the banner to learn more about the winners’ portfolios and judge comments

iClone 8.53: Advanced Sync For Professional Mocap Workflows

Timecode Sync and Vicon Compatibility Now Available in iClone

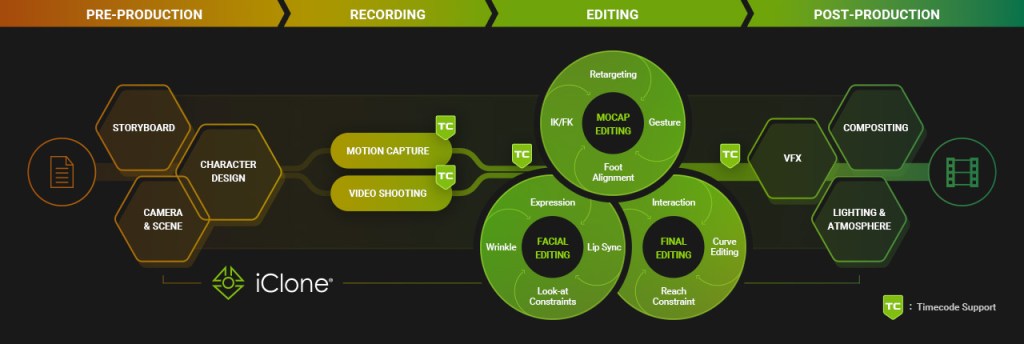
For full-body motion capture or multiple character performances, data drift and synchronization issues are major hurdles. They’re time-consuming and costly and can delay production workflows. That’s why in iClone 8.53, we’ve brought FBX timecode support front and center, introducing powerful new features that automatically sync data from multiple sources with precision. With practical tools designed to simplify your workflow, we’re making sure you spend less time fixing and more time creating — because creativity always comes first.

Key New Features:

Overview of iClone 8.53 New Features

FBX Timecode Synchronization

Animators, filmmakers, and mocap professionals have long battled the headache of managing multi-source animation data. Timecode sync has helped bring order to the madness — but constant file exchanges, software incompatibility, and team misalignment still slow everything down.

It now ends with the new Timecode Plugin — the solution for seamless synchronization across animation, mocap, and real-time production. No more drifting data. No more tedious syncing. No more back-and-forth between pipelines.

Synchronized Motion Capture

Timecode is fully integrated into Motion LIVE(the iClone built-in motion capture feature), embedding sync data directly into live mocap recordings. Capture multiple devices (face, body, hand) and actors at once, with the option to choose your preferred timecode source for accurate, real-time synchronization.

  • Multiple Device Capture: Connect and sync various mocap devices — body suits, facial trackers, hand sensors — into one seamless performance pipeline.
  • Multiple Actor Capture: Record multiple performers simultaneously, with all data precisely aligned for clean playback and streamlined editing.
  • Multiple Media Source: Integrate video, audio, and mocap — all synced to the same timecode for a unified production timeline.
  • Director Quad View: View live feeds from multiple perspectives — mocap data, virtual scene, camera angles, and talent — all in real time, all in sync.

Director Quad View lets you view multiple perspectives in real-time, including mocap data, virtual scenes, camera angles, and talent, all in sync for better monitoring and decision-making.

Check out the demo on the product page

Powerful Timecode Editing

The Timecode Plugin makes editing intuitive and effortless, starting with the ability to import FBX, video, and audio with embedded timecode, making timecode visible directly on the timeline. Snap clips to embedded timecode with a single click, ensuring everything stays perfectly in sync. Finally, custom options and Unreal Live Link support allow for exporting files with timecode embedded, providing a seamless workflow from start to finish.

  • Import Timecode: Easily bring in timecode data from FBX, video, and audio, ensuring precise synchronization across all media sources.
  • Switch to Timecode Mode: Customize time units and match frame rates for accurate, project-wide synchronization in iClone timeline.
  • Auto Align to Timecode: Instantly align animation files using embedded timecode or define a custom start frame for precise timing.
  • Native Timecode Support in iClone Motion Formats
    • iTalk (facial, audio, lip sync)
    • iMotion (body)
    • iMotionPlus (facial, body, expression, lip sync)
    • iProject (characters, motions, lighting, camera, audio)
  • Save & Export Timecode(Add timecode to Non-timecoded data): Maintain accurate sync while seamlessly integrating both custom and purchased motion assets across your production pipeline.

Check out the demo on the product page

Bidirectional Timecode Pipeline

Transmit and adapt timecode in both directions for a streamlined workflow. Seamlessly integrate with MotionBuilder, Maya, and Unreal Engine for smooth editing, rendering, and real-time production, enhancing efficiency and collaboration within existing workflows.

Check out the demo on the product page

Coordinate With Burn-In Data

Overlay timecode, take, date, camera, frame, and more — with multiple display and layout options to suit any workflow. Display in the viewport or final render using fully customizable burn-in settings for clear, production-ready visuals.

Check out the demo on the product page

Previz Compositing

Integrate mocap seamlessly into previz using iClone’s lighting and post-effects tools. The Timecode Plug-in enables smooth blending for a more immersive and production-ready preview.

Check out the latest offer for the Timecode Plugin

Perfect Combo for Professional Mocap: iClone and Vicon

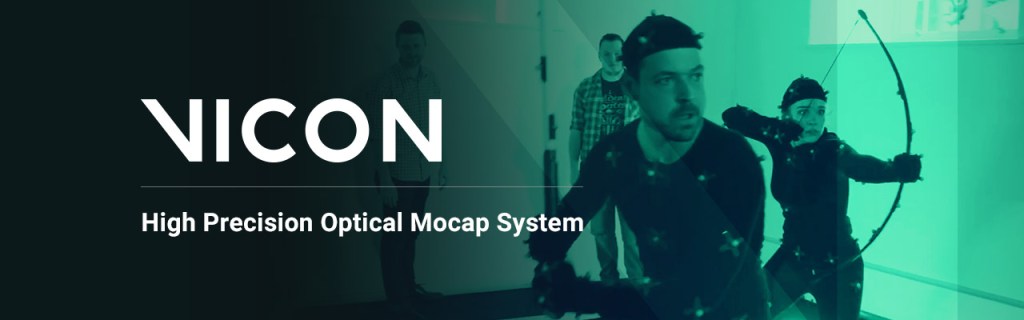
Partnering with Vicon, the new Vicon Profile in Motion LIVE allows seamless connection of Vicon mocap systems to iClone for real-time animation. It offers a unified, high-precision workflow for animating animation-ready characters from Character Creator. More importantly, Vicon can now capture both full-body and facial movements simultaneously through Motion LIVE.

The Vicon integration is fully compatible with iClone’s Timecode, enabling accurate multi-device sync, time-aligned recording, and smooth integration into virtual production pipelines.

With full compatibility, users can leverage both iClone and Shogun’s mocap editing capabilities, combining the strengths of both software for optimal results.

Check out the latest offer for Vicon Profile

Other New Updates

AI Search Premium Motions

Deep Search is an AI-powered tool that simplifies finding digital assets in the Reallusion ecosystem using natural language queries, category filtering, and image uploads. The new Motion Deep Search feature lets users search for ActorCore motion assets in the same intuitive way. Simply describe the motion, and the tool provides relevant results with an option to find similar motions, making it easier to locate the perfect animation for any project.

New Lip-Sync Animation Workflow

The latest update gives users the flexibility to refine lip-sync animations with AccuLIPS without being forced to do so during the initial audio import. This allows for a more streamlined workflow, letting users focus on other aspects before fine-tuning the lip-syncing later.

Related Sources

Learn more about Timecode Plugin features

Learn more about Vicon Profile

Timecode Tutorials

iClone 8.53 release note

Learn more about iClone 8

Online Manual

FAQ

Concept artist and 3D generalist Florian Salvesberger reveals how iClone’s Motion Director and MD Prop Interaction tools brought his medieval siege camp to life with fluid, game-like character control and dynamic crowd simulation.

Miniature Medieval Crowds in Action: 3D Prop Animation with iClone, ActorCore and Blender

Florian Salvesberger

Hi, my name is Florian Salvesberger. I’m a concept artist, 3D designer, and visual artist based in Vienna, Austria. My focus is developing concept artwork for characters, set designs, environments, props, and vehicles. I’m also a 3D generalist for hard surface modeling, 3d animation, and motion capture. Furthermore, I’m a tutor for CGI at the Werbeakademie Vienna.

Throughout my career, I’ve collaborated with diverse teams, including producers, game designers, and movie directors. By actively engaging in discussions and incorporating feedback, I am able to ensure that my work aligns with the overall artistic vision and project requirements. I’m driven by a passion for trying out different workflows and to simply create new things – I’d describe it as “Die Freude am Schaffen”, like “the joy of creating”. I constantly push my creative limits and embrace new technologies to stay at the forefront of CGI. Salve.vision is where I showcase my unique vision and how I deliver engaging experiences.

Follow Florian’s Instagram / ArtStation

iClone Motion Director and Prop Interaction

As a freelance concept artist and 3D animator, I’m always on the lookout for tools that streamline my workflow and enhance the quality of my projects. Over the years, I’ve had the chance to experiment with various software solutions, and one that has truly stood out is Reallusion Motion Director and Prop Interaction for iClone.

Whether it’s for film, gaming, or virtual production, iClone provides a real-time animation experience that is both intuitive and powerful. Recently, I set out to create a medieval siege camp. My work features a scene bustling with activity, from soldiers sitting around campfires to knights engaging in a training duel. The challenge? Making the characters move and interact naturally while keeping the animation process efficient. This is where Motion Director and MD Prop Interaction came in handy. It allowed me to create such a complex scene in a very streamlined workflow. I took the soldiers from ActorCore, and with a little customization, now it looks different but unique.

Getting Started with iClone and Motion Director

For those unfamiliar with iClone, it’s a comprehensive 3D animation software that simplifies complex animation tasks. The Motion Director tool, in particular, allows for a game-like approach to animating characters. By using a game controller or even a mouse, you can pilot your 3D characters, making the animation process much more interactive.

For those who prefer automation, the crowd scatter system handles autonomous behaviors, adding realism to character movement with minimal effort. Seriously, I was completely stunned the first time I used it! To set up my scene, I started with a character asset from Reallusion’s library—specifically, a Royal Guard model. Placing animations onto the character was as simple as dragging and dropping pre-made motion clips onto the model. From there, I could tweak animations using the Motion Layer Editor, adjusting joints and fine-tuning keyframes for precise movements.

Making Interactions Seamless with MD Prop Interaction

One of the standout features of iClone’s Motion Director is its seamless integration with props. For instance, in my scene, I needed a knight to walk over to a chair and sit down. With MD Prop Interaction, this was incredibly easy—I simply dragged the MD prop into the scene, positioned it correctly, and selected the interaction type. The knight smoothly walked to the chair and sat down, with natural transitions and fluid movement. Additional animations, like glancing around or adjusting posture, could be layered on to make the scene feel even more lifelike. Imagine you‘re playing The Sims, but it’s like a “3D Artist expansion pack“ edition that is easy to use, fast and optimized for your 3D software of choice. 

Beyond sitting, I used MD Prop Interaction for a variety of actions: soldiers inspecting a trebuchet, collecting firewood, and pushing carts filled with siege equipment. These small details added a sense of realism to the medieval environment

Bringing Crowds to Life with Motion Director’s Crowd Simulation

A siege camp wouldn’t feel complete without a bustling crowd, and manually animating every background character would be an overwhelming task — which can be fun of course — but, why make things more complicated than they already are, right? Fortunately, Motion Director’s crowd simulation tool made this process effortless.

Using the Crowd Scatter Tool, I was able to populate the camp with characters who navigated the scene realistically—avoiding obstacles, reacting to props, and moving dynamically. By setting up a NavMesh, I ensured that the crowd moved only within specific areas, avoiding walking over tents or other restricted spaces. For variation, the tool allowed me to randomize character appearances and behaviors, making the scene feel organic rather than repetitive.

Seamless Integration with Motion Capture and Blender

One of my favorite aspects of iClone is its ability to integrate with motion capture systems. If I wanted to refine character movements, I could easily apply mocap data and further tweak it using the Motion Layer Editor, saving time and ensuring realistic animation without the need for excessive post-processing.

I‘ve used my trustworthy Smartsuit Pro II from Rokoko, captured a few specific movements, retargeted them onto my knight characters — and done! It just works.

Once the character animations and interactions were complete, I exported the scene as an FBX file for further refinement in Blender. iClone’s export settings allowed me to customize the resolution and frame range, ensuring the right level of detail for both close-up shots and wide-angle scenes.

Final Thoughts

Reallusion’s Motion Director and Prop Interaction have revolutionized how I approach 3D animation. The ability to direct characters in real-time, automate complex movements, and seamlessly integrate with other tools has significantly improved my workflow.

Whether you’re an aspiring animator or a seasoned professional, these advancements offer an intuitive and powerful way to bring your projects to life. If you’re interested in exploring these features further, I highly recommend diving into Reallusion’s community and tutorials. It’s time to experiment, create, and push the boundaries of what’s possible in your 3D animations. Stay creative!

Related Posts

Francis Bon Vun Hong won the 2024 Animation at Work Contest. Learn how he creates captivating 2d storytelling with Cartoon Animator and XPPen.

Winner Spotlight: Vestiges of Humanity within Spirited Automatons made with Cartoon Animator and XPPen

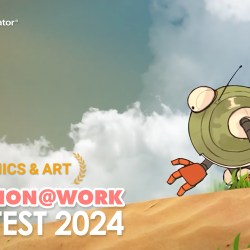
In the Reallusion 2024 Animation at Work Contest, artist Francis Bon Vun Hong secures first place in the “Comic & Arts” category. In this article, he guides us through the creative process that brought life to his winning entry, “The Horizon”.

Francis Bong Vun Hong

Hello, I’m Francis, a recent graduate with a Bachelor of Arts with Honors in Creative Digital Media, completed over three and a half years. My journey into the 3D industry began during my studies, where I discovered a passion for animation, character design, and digital storytelling.

In September 2023, I joined Betapuru Digital Studio as an intern, immersing myself in a professional environment to hone my skills and gain hands-on experience. Now, I am continuing to build my career in 3D and animation, aiming to create visually captivating content.

Francis’ YouTube Channel

Transitioning from 3D to 2D

I think my 3D animation background helped a lot! The principles of animation—like timing, posing, and movement—are more or less the same, so it was more about getting used to a different workflow. The best trick up my sleeve was focusing on rigging and motion editing right away. Since I was already familiar with Reallusion’s tools from my 3D work, picking up Cartoon Animator felt pretty natural. I also watched how the pros used it and just kept experimenting until things clicked. In addition, I made use of parallax, camera tricks, and depth—just like I would in a 3D workflow—in order to make my 2D animations feel more dynamic. That crossover knowledge made for a way faster learning process!

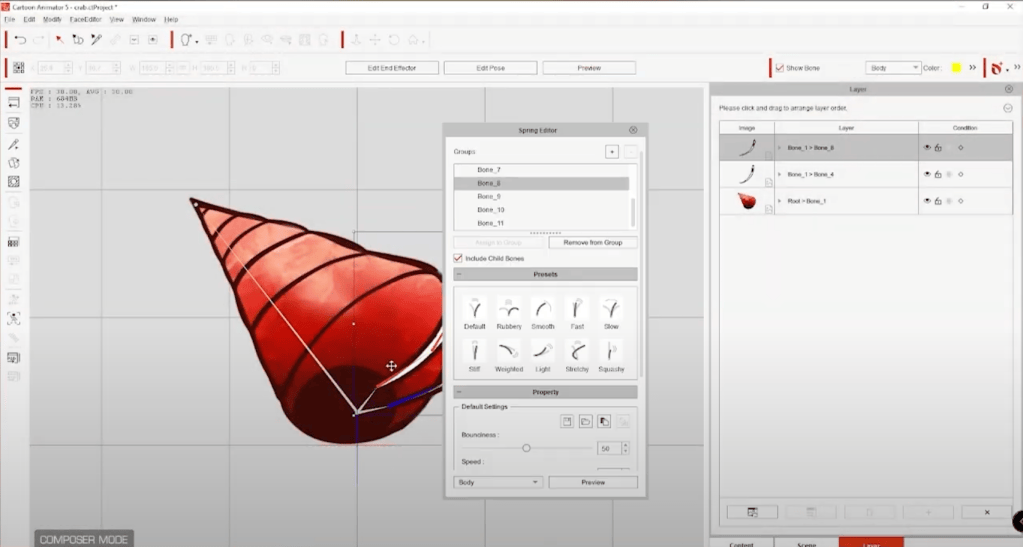
I really enjoy using the Spring Editor, which adds natural wiggle effects to body parts. It creates smooth, fluid animation without the extra effort of manually keyframing the character.

Most importantly, the built-in assets and animations significantly sped up my workflow. Instead of animating characters from scratch, I could simply drag and drop assets from the content browser to bring them to life! Another major advantage was the rigging system. Unlike traditional frame-by-frame animation, it works similarly to 3D: once a character is rigged, I can create a series of animations with ease. It’s an absolute game-changer!

Story Background & Concept

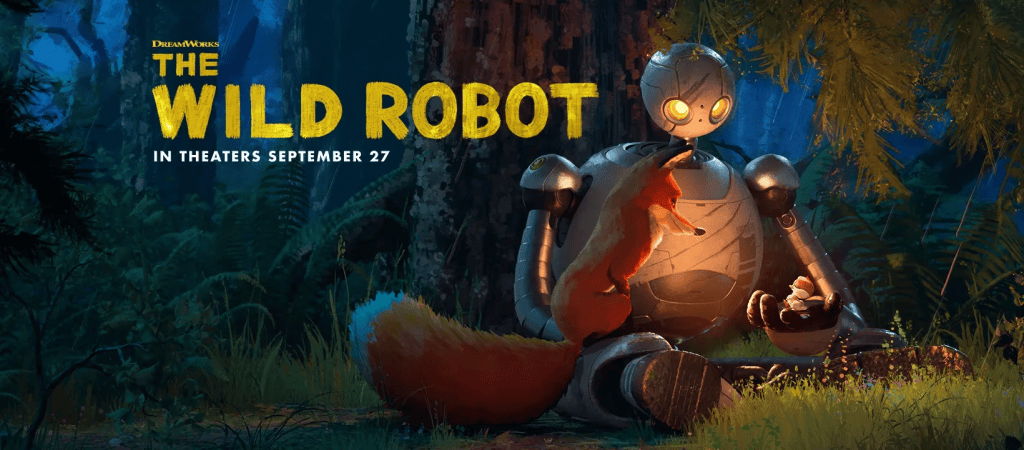
My character was inspired by The Wild Robot. I loved the film’s plot and contrast. Spoiler: The robot was programmed to follow orders but eventually broke the rules and acted on her own. In my story, however, the robot is tasked with rebuilding his civilization elsewhere after his home is invaded and destroyed. The entire production took over a month, though Cartoon Animator significantly sped up the process.

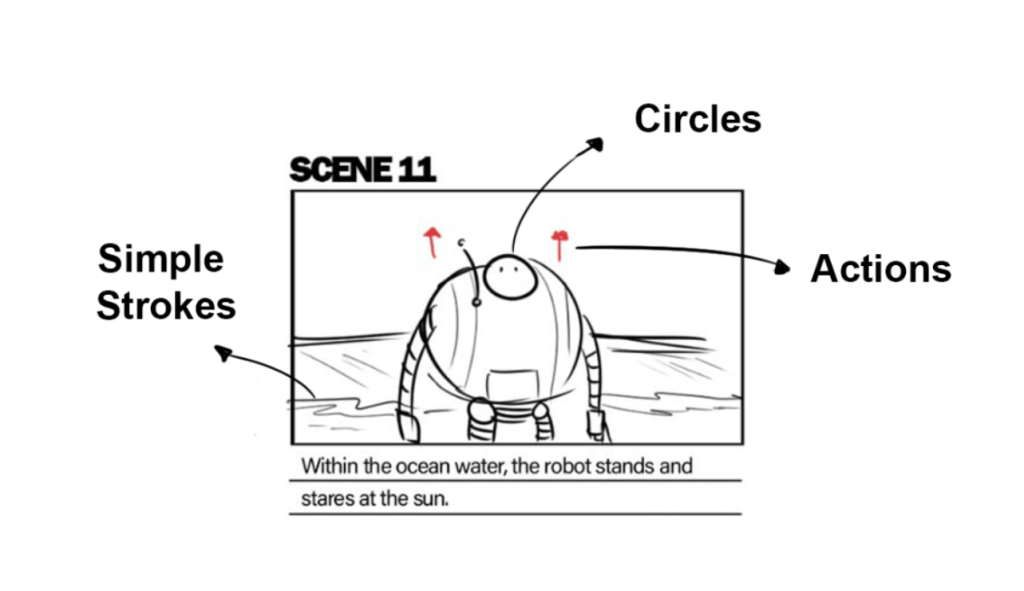
Before moving into the production stage, I needed to establish a solid plot to guide the process. Therefore, storyboards played a crucial role in ensuring a smooth workflow. Creating the storyboard typically took a few days, and it wasn’t as difficult as it might have seemed. They were simple, serving as a visual guide for how each scene was set. Using basic shapes and strokes was an effective way to create a strong storyboard. I didn’t hesitate to be bold with my strokes—there was no need to perfect every line. Adding arrows also helped show the direction of actions or camera angles. In short, I kept storyboards simple and focused; they were just guidelines for the production.

Character Design with XPPen Tablet

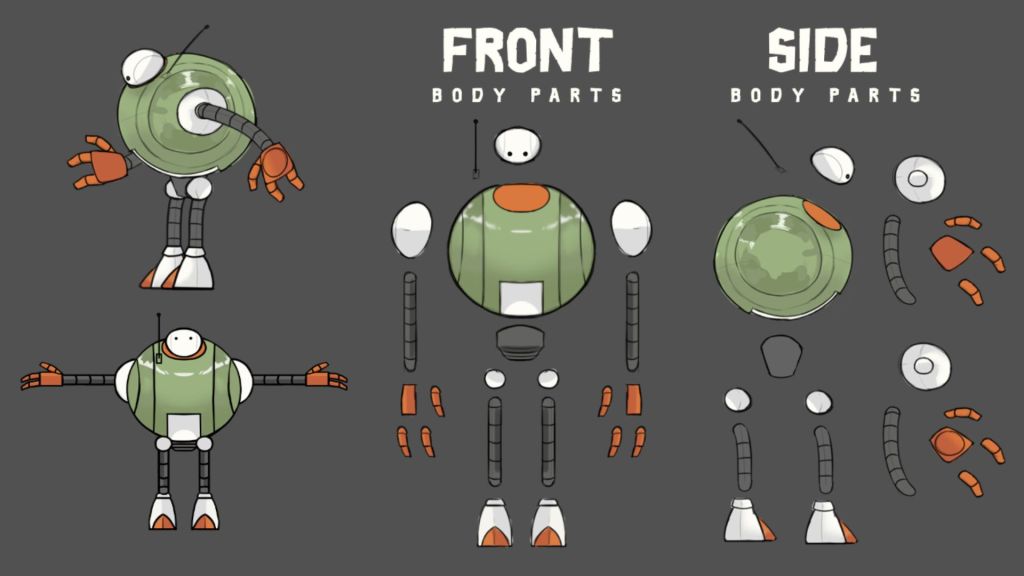
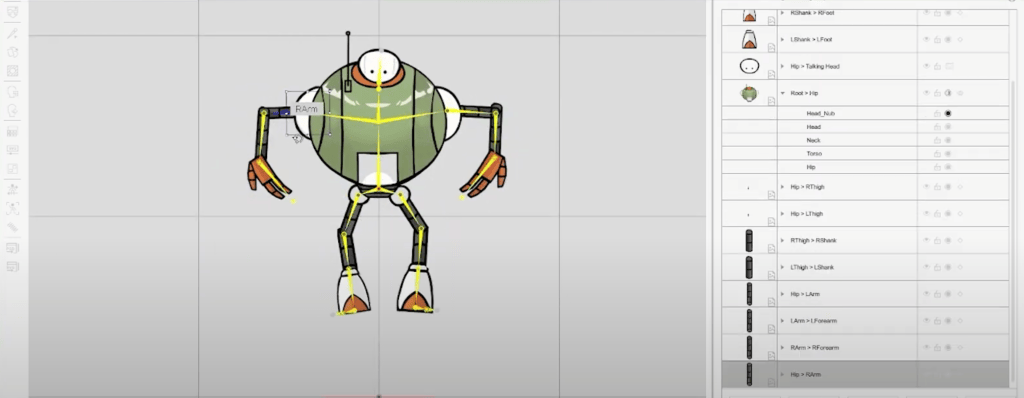
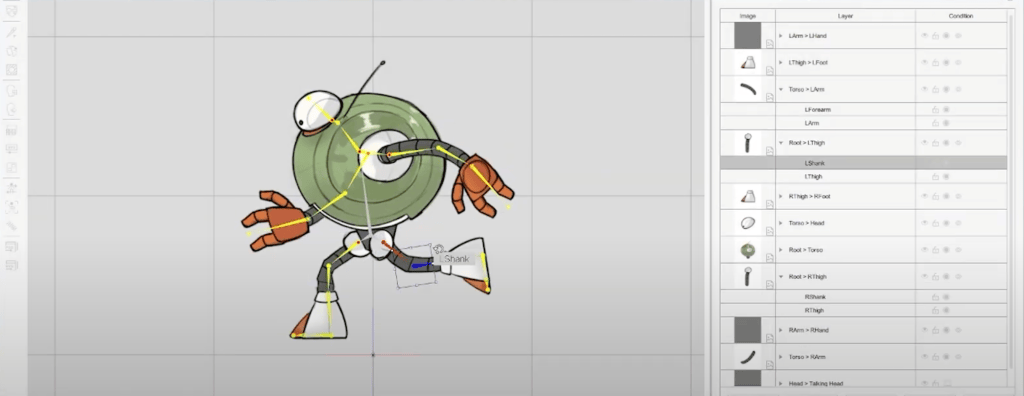
The character was drawn in Photoshop using an XPPen tablet. To animate the character in Cartoon Animator, it had to be separated into parts, as shown in the image below. These separated parts enabled efficient rigging in Cartoon Animator, with each bone attached to specific body parts. The rigging process for the character is broken down in the images below.

I then imported the base, which was the body with the combined parts. Next, I created the skeleton based on the character’s base. After that, I assigned the different parts of the body to the skeleton. Finally, I deleted the base of the character, and that was it—simple as that.

Character and Scene Animation

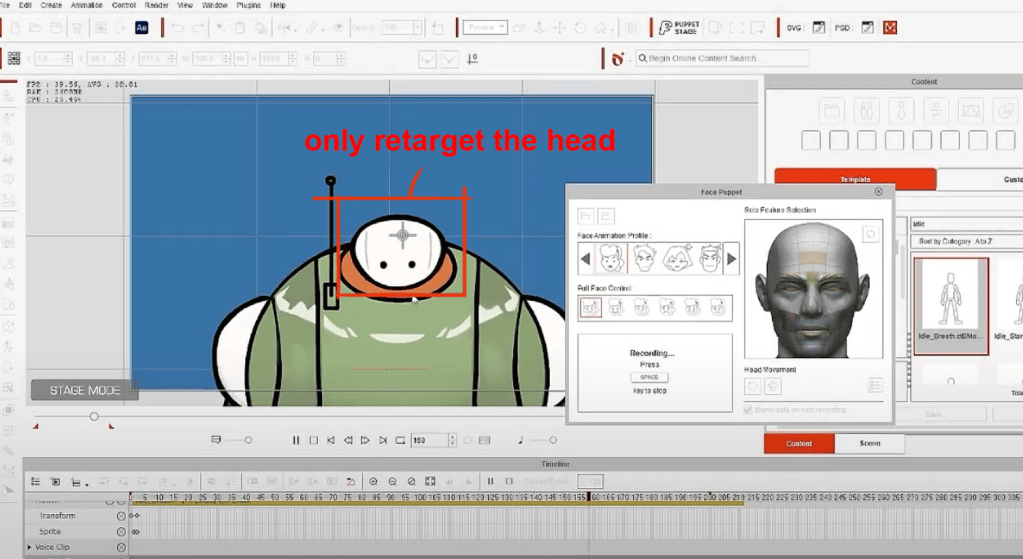
I utilized the 360 Heads in Cartoon Animator to allow slight turns of the character’s head. It was not perfect since the head is not exactly humanoid. The robot’s eyes are actually not of the human eye proportion and there are no mouths involved, so the only way to do it is to retarget only the head without separating the eyes.

As mentioned before, the motions of the characters were mostly from the available assets in Cartoon Animator. Only a few required hands-on animating, which greatly reduced the work time. Another great thing about Cartoon Animator was that those motions can be blended with each other, creating a series of smooth movements.

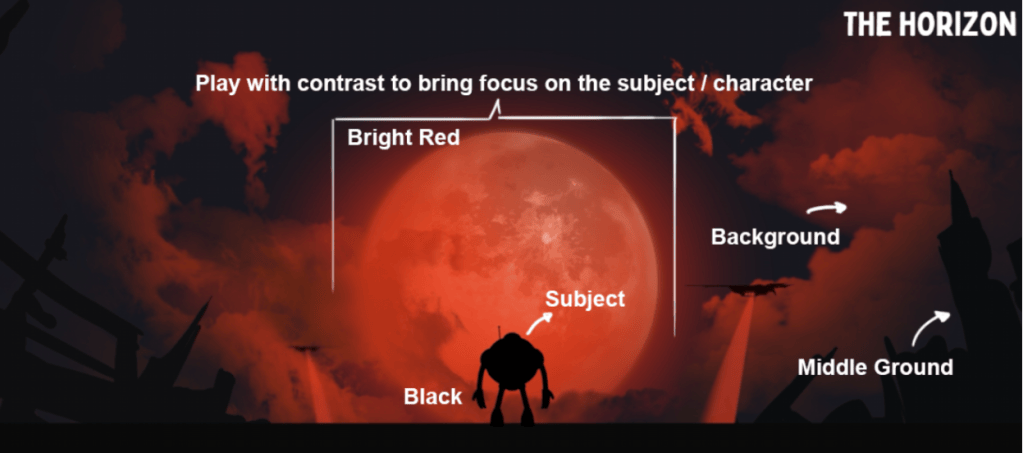
I always focus on making 2D scenes feel more alive and dynamic. Adding depth, camera movement, and parallax can take things to the next level. Use contrast to grab the audience’s attention. In my opinion, don’t just animate characters; instead, animate the whole scene. Use foreground and background elements, play with lighting, and add small details that make the world feel real.

VFX and Extras

Camera shakes can enhance the actions of the character. For example, aggressive shakes are used during the running scene to give a sense of panicking and the feeling of the character running with full effort. It can be simply achieved in After Effects by doing this:

ALT + Left click on the “Orientation” key of the camera and type in “wiggle(A,B)”. Wiggle means shaking while A means how many times the wiggle happens while B means the level of wiggles. Higher value in A makes more wiggle per seconds, while higher value in B makes bigger movements.

The light rays, or the so-called volumetric lights, are pretty straightforward. It is just a simple light ray PNG image that is added in during the post-production stage. During the final editing in Premiere Pro or After Effects, drop in this PNG while changing the opacity mode to “screen” and it’s all done.

Closing Thoughts

This competition was an awesome experience! Seeing so many creative entries really pushed me to bring my best. It also showed how powerful a Cartoon Animator can be when you push its limits. I’m grateful for the opportunity and the recognition!

Advice for Future Contestants

Go beyond just animating characters; think about the entire scene. Try to experiment with camera movements, lighting, and effects to add more depth. Use colors and contrast to effectively bring out the moods and emotions. Most importantly, every project is a chance to grow, keep learning, and have fun!

Click the banner to learn more about the winners’ portfolios and judge comments

How ActorCore & iClone Power Animated Short: Agent EVA

Alejandro de Pasquale – Motion Graphic Artist / 3D Animator / Filmmaker / Content Creator

Alejandro de Pasquale

Since the age of 9, Alejandro de Pasquale embarked on a creative journey, crafting his first rudimentary comics and discovering his fervent passion for storytelling. With each passing year, Alejandro honed his creativity, delving into diverse tools and skills to encapsulate narratives across a spectrum of challenges.

From scripting movies to producing motion graphics for various enterprises, Alejandro explored the avenues of storytelling, eventually finding his true calling in breathing life into characters and immersive 3D worlds.

Lately Alejandro has been creating episodes for his EVA Project, which is an animated series using Unreal Engine and Reallusion tools like ActorCore,  iClone and Character Creator (CC).

The EVA Project is about a character who awakens to find herself and others in a mysterious high-security complex, with fragmented memories hinting at a destroyed Earth. As she explores the surface, she seeks answers about the past and the technology that keeps them confined. The project combines digital storytelling with motion capture and shares its development process through online tutorials​

Agent EVA is a short film Alerender created as an exercise in integrating ActorCore packages—primarily the Lady Agent pack—into a workflow combining Reallusion tools and Unreal Engine. The project also served as an opportunity to experiment with camera work and lighting, pushing creative boundaries through the development of animated scenes.

The process presented challenges that go beyond simply following tutorials, providing valuable hands-on experience in storytelling and technical execution. The workflow demonstrated how filmmaking is achievable even as a solo creator, thanks to the accessibility and versatility of these tools. Agent EVA showcases how animation can bring cinematic ideas to life, regardless of the size of the production team.

To create Agent EVA, a short film designed to hone animation and filmmaking techniques, several tools and features were utilized to integrate diverse elements seamlessly. Here’s a breakdown of the tools and methods used:

Tools and Workflow

iClone, Character Creator, ActorCore, Perception Neuron, and Unreal Engine: These tools formed the backbone of the production pipeline. iClone enabled animation refinement and integration, while Character Creator provided the character-building foundation. ActorCore offered ready-made animations, Perception Neuron facilitated motion capture, and Unreal Engine served as the final platform for composing scenes.

Key Techniques and Features

Motion Direction Control (iClone)

  • This iClone feature was instrumental in combining multiple animations into one seamless sequence.
  • Example: EVA’s walk down the hallway was created by merging four animations from the Lady Agent package into a continuous linear animation.
  • The feature was also used to mix:
    • Animations captured with the Perception Neuron suit.
    • Mixamo animations (e.g., the robot’s reactions to being hit by bullets were a blend of suit-captured motions and Mixamo’s falling animations).
    • This avoided risks of damaging sensors during motion capture for complex movements, like falls.

ActorCore Animation Packages

  • Specific animations from the Hand to Hand Combat package were purchased individually, along with their corresponding opponent animations.
  • Advantage: ActorCore allows previewing and purchasing only the animations needed, making it an efficient and cost-effective solution, particularly for fight scenes.

Facial Expressions and Animation

  • Digital Soul, Face Puppets, and Face Key (iClone): These tools brought EVA’s facial expressions to life, especially during fight sequences.
  • Digital Soul: Provided presets for a range of facial expressions, simplifying the process of adding emotional depth to EVA’s character.

Voice Work and Lip Syncing

  • ElevenLabs: AI-generated voices were used as a budget-friendly alternative to hiring a voice actor, as this was a practice project.
  • AccuLips (iClone): Automated the generation of mouth animations based on imported audio from ElevenLabs, ensuring realistic lip-syncing for EVA’s lines.
  • Sound Effects: ElevenLabs also provided robotic voices in a fictional language, supplementing the library of effects.

Scene Composition in Unreal Engine

  • Unreal Engine enabled the creation of scenes without a detailed storyboard.
  • Benefits:
    • Experimentation with camera angles and lighting in real-time.
    • Immediate visual feedback eliminated the need for rendering at every step, streamlining the workflow.

Takeaways from the Project

  • Focus on Practice: The production of Agent EVA emphasized accumulating hands-on experience in using tools, software, and cinematic concepts.
  • Solo Workflow: This short film demonstrated how a one-person studio could achieve a professional result using accessible tools like ActorCore, iClone, and Unreal Engine.
  • Experimentation: The project provided a platform to tackle challenges, such as integrating motion capture, blending animations, and testing real-time visuals.

With Agent EVA, Alerender’s goal was not only to produce a cohesive animation but also to explore and refine a workflow that bridges technical expertise with creative storytelling. This continuous practice reinforces the belief that filmmaking is achievable for solo creators, thanks to the powerful tools available today.

Follow Alejandro de Pasquale

https://www.youtube.com/user/alerendersoc

https://www.facebook.com/aleRENDER

https://www.instagram.com/alerender_ae

https://www.artstation.com/alerender

Related Posts

Reallusion Announces Character Creator 5: The Next Evolution of Real-Time 3D Character Creation Software

Reallusion is set to redefine real-time 3D character creation with the upcoming launch of Character Creator 5 (CC5) in Summer of 2025. 

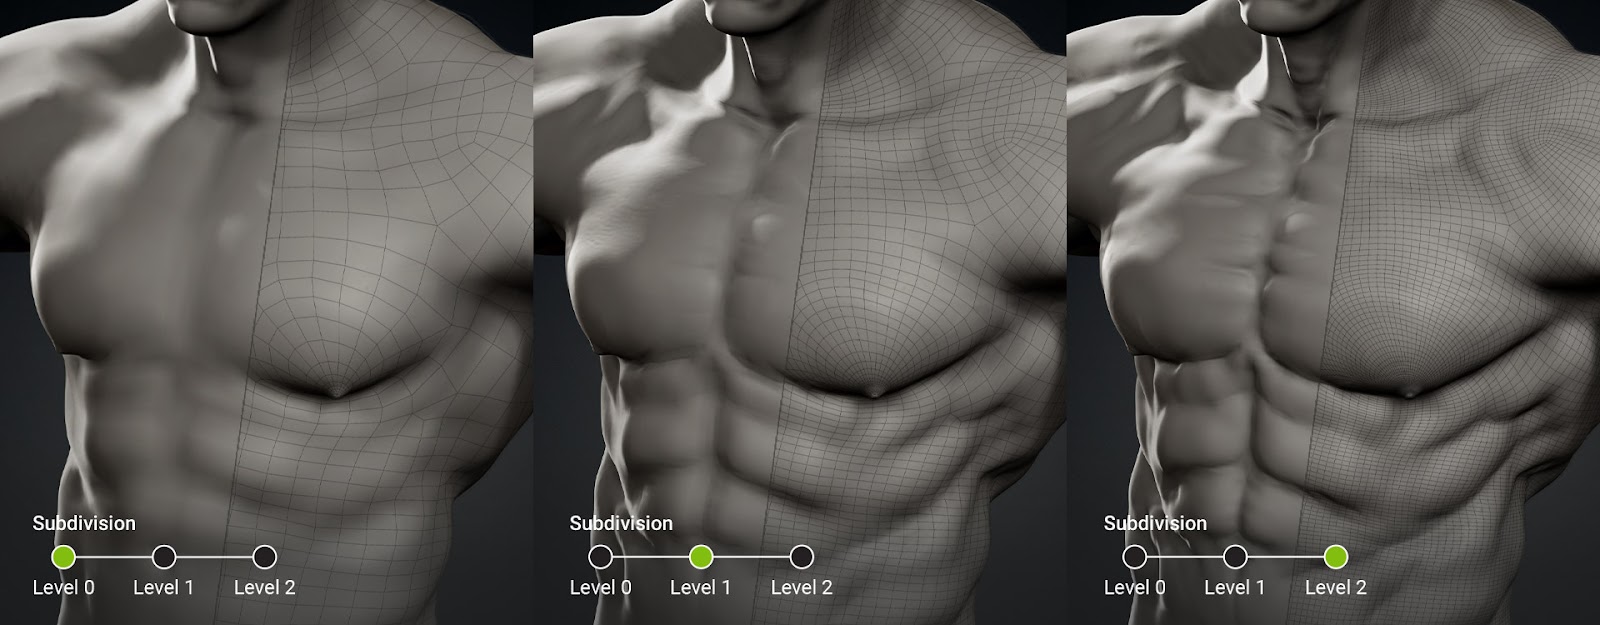
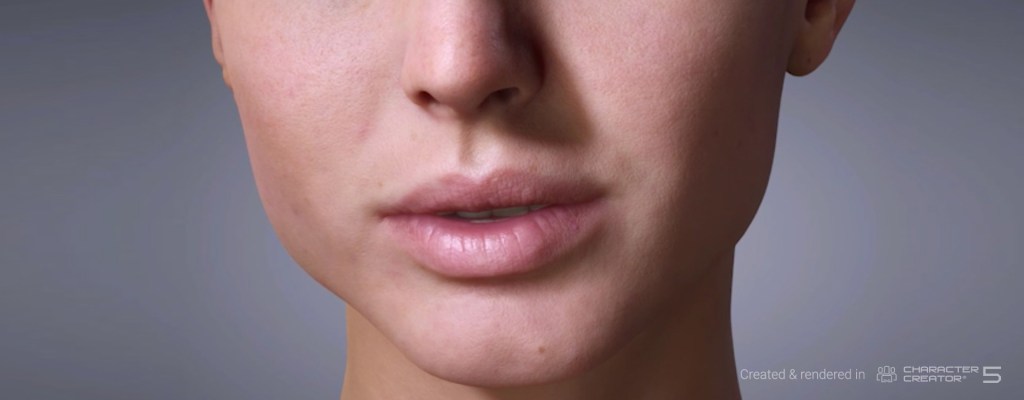
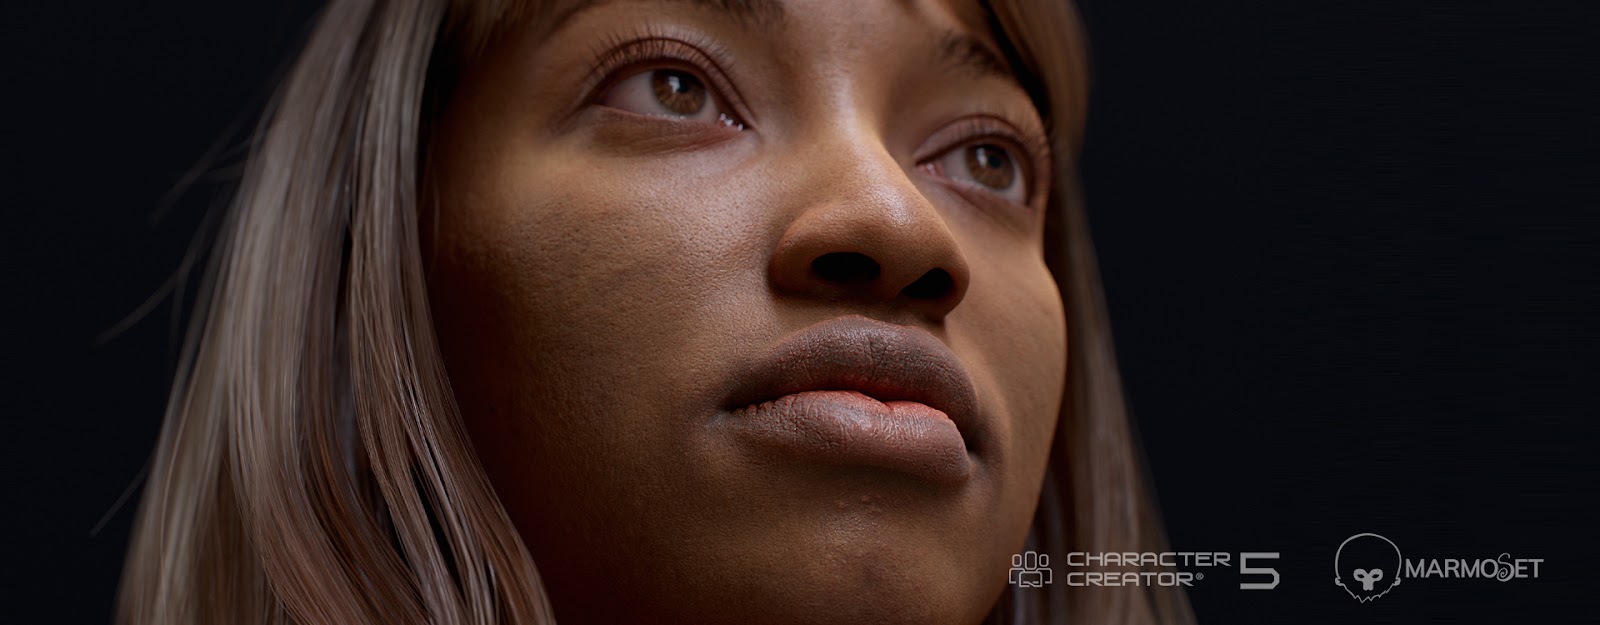
Packed with groundbreaking upgrades, CC5 introduces HD character bases with subdivision support, advanced shaders, and a next-gen facial animation system. Complete with an Auto Setup tool for effortless integration, it expands pipelines to include Maya and Marmoset Toolbag.

To celebrate this milestone, Reallusion has launched an exclusive prelaunch offer: From now until the CC5 official release (tentatively scheduled for July, 2025), customers who spend $399 or more on a single order at the Reallusion Software or Content Store will receive CC5 for free upon release! Plus, the first 1,000 participants will earn an additional $50 in Bonus Points for future purchases.

Continuing the Legacy of Character Creator

Since its debut in 2015, Character Creator has been widely embraced across industries and has grown into one of the most powerful 3D character creation tools on the market. As we mark its 10th anniversary, the launch of CC5, Reallusion continues its commitment to delivering higher-quality, more versatile character solutions, helping artists enhance their creative efficiency and elevate production standards.

“Our mission with CC5 is to empower artists with unparalleled character customization and the highest real-time visual fidelity. With this release, we are expanding into more mainstream 3D software and making Hollywood-level character creation accessible to a broader audience.”

Charles Chen, CEO of Reallusion

Unparalleled Real-Time HD Characters

Compared to CC4, CC5 HD characters offer up to 16 times more mesh detail with two more subdivision levels, providing greater flexibility in showcasing a wide range of character types and making them ideal for close-up renders in film and television production. 

Flexible HD subdivision level 0-2

For games and real-time applications that require lower mesh density, artists can easily pair down the subdivision levels to suit their needs. In turn, CC will automatically preserve visual quality even at lower polygon counts by baking textures for diffuse, normal, ambient occlusion, and cavity maps.

With the all-new HD Morph system, revamped legacy characters are brought to the fore again, while newly built characters support the morphing of highly detailed anatomical features, reaching fidelity suitable for 3D printing. 

For ZBrush professionals, the new GoZ plugin enables one-to-one subdivision transfers for CC5 characters (from subdivision 0 to 2), significantly improving the non-destructive sculpt-to-animation workflow.

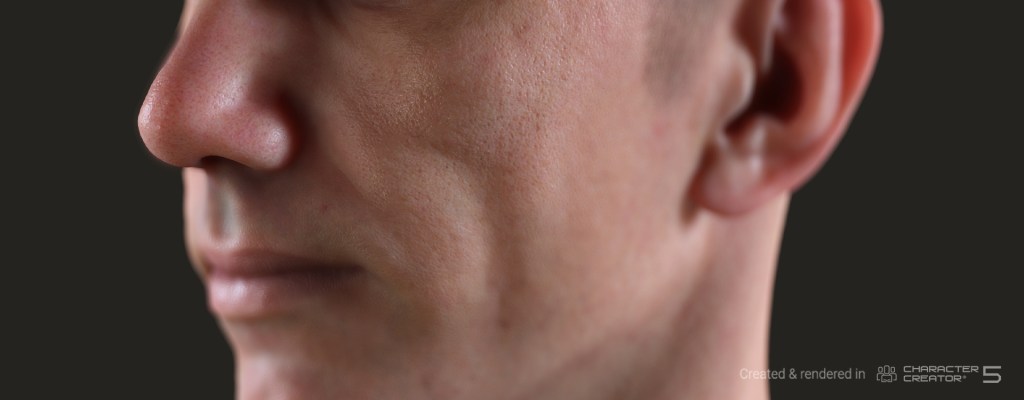
The upgraded eye structure, including high-resolution tear ducts, attachable eyelashes, and a refined shader system, delivers photorealistic results that are enhanced by subsurface scattering, translucency, and natural light reflections. 

Enhanced eye shader

The skin shader is also upgraded with support for cavity maps, adding another level of realism, especially for pore and wrinkle details. 

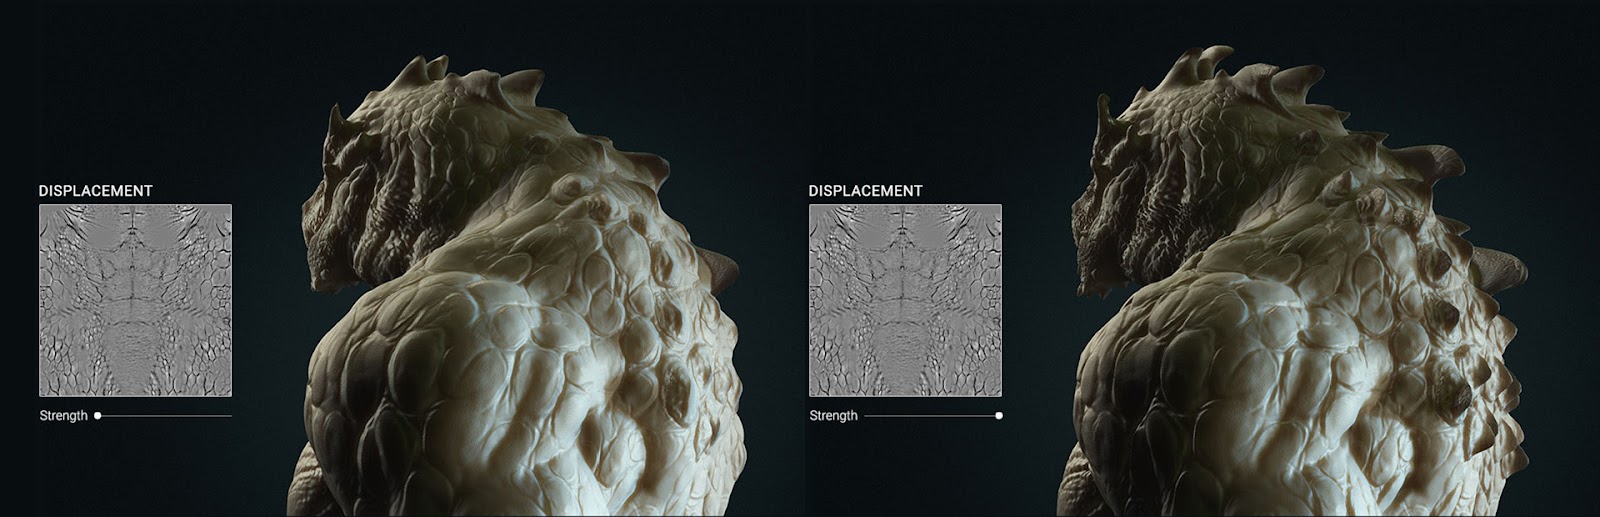
CC5 also introduces full displacement map support, a first for the series. Unlike traditional normal maps, displacement maps provide true depth and high-precision sculpted details, preserving incredible realism even during real-time editing. These advancements position CC5 as the ideal hub for a network of third-party applications like Blender and Maya, along with their respective render engines.

Displacement map

Next-Gen Facial Animation for True-to-Life Expressions

Facial expressions are at the core of effective acting, and CC5 takes facial animation to the next level with a revamped HD Expression Profile. With each expression now driving a greater number of facial morphs, CC5 enables artists to achieve more refined micro-expressions that capture the nuances of the character’s emotions.

The all-new HD Expression Profile brings enhanced mouth detail and delivers more precise facial animation.
HD expression morphs deliver unique, highly expressive facial performances—bringing even cartoon characters to life like never before.

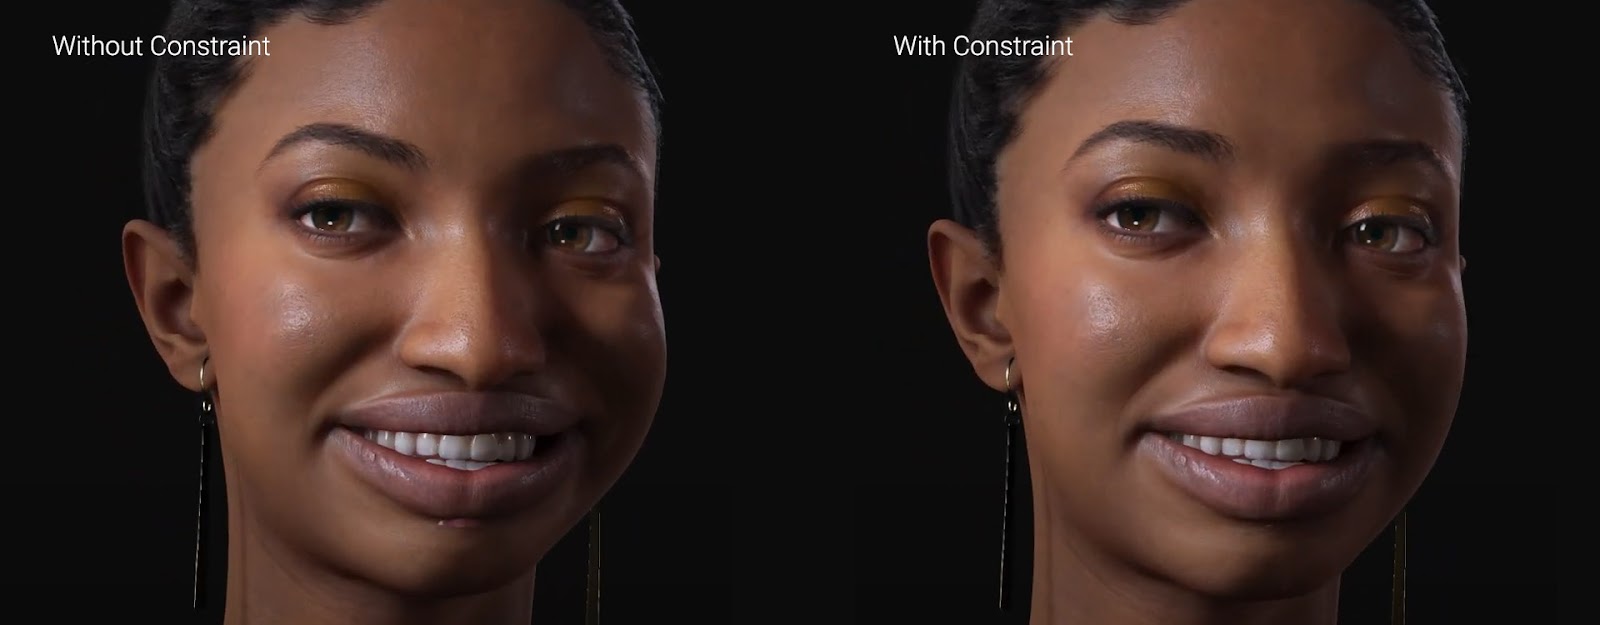
With the new Constraint System, expressions are intelligently moderated to remain within anatomically plausible ranges, preventing distortion and preserving the underlying facial structure.

Additionally, CC5 introduces non-linear facial animation capabilities through advanced curve-based motions and mesh elasticity that play a big role in animating the sticking of lips, the furrow of brows, and expressive squints.

The entire CC5 facial morph and animation system will receive full support in iClone, along with facial mocap tools, through a series of free updates following CC5’s release.

Expanded Pipeline Support: Maya & Marmoset Auto Setup

In conjunction with the release of Character Creator 5, Reallusion introduces Auto Setup tools for Maya and Marmoset Toolbag to streamline workflows for film, animation, and game studios. With just a few clicks, artists can seamlessly import CC5 characters into these industry-standard platforms, bypassing the need for manual shader setup and complex material adjustments.  Full facial rigs are also provided for Maya users wishing to edit and tweak animations in their familiar environment.

CC5 AutoSetup for Marmoset Toolbag ray tracing render
CC5 AutoSetup for Maya Arnold render
CC5 AutoSetup for Blender Cycle render

In addition, both Unreal Engine and Blender integrations will be upgraded alongside CC5 to fully support the new expression system and constraint technology, giving creators even greater flexibility across their preferred tools. This new feature ensures faster production turnaround and effortless integration with their preferred pipelines.

As part of Reallusion’s commitment to broader industry integration, additional pipeline features will be revealed over time.

CC5 Prelaunch Offer – Get CC5 for Free!

To mark this major release, Reallusion is offering an exclusive CC5 Prelaunch Offer. Until CC5’s official release, customers who spend $399 or more in a single order at the Reallusion Software or Content Store will receive CC5 ($299 value) for free upon launch. Additionally, the first 1,000 participants will receive an extra $50 in Bonus Points that goes toward future purchases.

With CC5 set to launch this summer, now is the perfect time to lock in this limited-time prelaunch reward and prepare for the next generation of real-time 3D character creation. Even better, all existing CC4  plugins and content will remain fully compatible with CC5, ensuring a smooth upgrade for current users.

For more details, visit

Winner Spotlight: Incisive and Engaging Service Promo Made with Cartoon Animator

In the Reallusion 2024 Animation at Work Contest, artist Stephen Townsend takes first place in the “Business & Commercials” category. In this article, he shares the workflow behind his winning entry, Ambrosi Air Drone Delivery Commercial.

Stephen Townsend

Hello, I’m Stephen Townsend. With over 15 years of experience in illustration, 3D modeling, and design, I bring a deep passion for creativity and a versatile skill set to every project. My work spans a wide range of mediums, including 3D modeling, texturing, illustration, and graphic design, and I strive to deliver high-quality, visually compelling results that resonate with audiences.

In addition to my creative work, I spent 5 years as a tutor at the TRUEMAX Academy of Visual Arts in Copenhagen, Denmark, where I taught 3D modeling and texturing using Maya and ZBrush. This experience not only refined my technical expertise but also allowed me to mentor and inspire the next generation of artists, fostering a collaborative and growth-oriented mindset. I am constantly exploring new tools and techniques to push the boundaries of my craft, and I take pride in creating work that is both innovative and meaningful.

Stephen Townsend’s YouTube

Cartoon Animator 5 and Why I Use It

I’ve been learning and working with Cartoon Animator 5 for about a year now, and it has completely transformed my approach to animation. What initially drew me to the software was my desire to bring my characters to life through animation. However, I quickly realized that traditional animation methods require a significant amount of time, study, and technical skill, which made progress feel slow and overwhelming at times.

When I discovered Cartoon Animator 5, it instantly caught my attention because it streamlined so much of the animation process. The software takes care of a lot of the heavy lifting when it comes to rigging characters, creating smooth movements, and managing complex timelines. This allowed me to focus more on the creative aspects of my work, like storytelling, character design, and scene composition. Its user-friendly interface and powerful tools made it accessible even for those without extensive animation experience. For someone like me who often works alone, this is incredibly beneficial; It saves time and energy while still delivering professional quality results.

“Using Cartoon Animator 5 has not only sped up my workflow but also reignited my passion for creating animation. It’s a tool that empowers me to bring my ideas to life more efficiently, and I’m excited to continue exploring its potential in my future projects.”

Stephen Townsend – Animator

Story Background and Concept

To begin any animation project, I always start with storyboarding. This is a crucial first step because it allows me to flesh out my ideas and give structure to the story. It helps me to map out key scenes, transitions, and the overall flow of the narrative. Creating a rough storyboard early on ensures that I have a clear direction before diving into the more detailed aspects of animation. By visualizing the story, I can identify potential challenges, refine the pacing, and make creative decisions that enhance the final product.

Storyboarding also allows me to communicate my vision effectively, whether I’m working alone or collaborating with others. It’s a foundational step that sets the tone for the entire project and ensures that every element of the animation aligns with my story goals.

Establishing Theme and Tone

The art concept for this project revolves around a modern, tech-driven world where convenience and innovation are at the forefront. I aimed to create a tone that is both relatable and aspirational, striking a balance between the chaotic, fast-paced environment of a busy office and the seamless efficiency of a futuristic drone delivery service.

This contrast highlights the transformative power of technology in simplifying everyday life, making the story engaging and relevant to the audience.

Music and Sound Design

To complement the visuals, I chose bossa nova music for its sophisticated, upbeat, and smooth vibe. The rhythm and melody of the music help drive the narrative forward, making the message more compelling and enjoyable for the viewer. Additionally, I incorporated sound effects (SFX) to enhance realism and immerse the audience in the world I created. These SFX were carefully selected to emphasize key moments, such as the drone’s movements and the office worker’s reactions, helping to sell the vision and make it feel tangible.

Key Visual Elements

The bustling city and office environment was a big part of the animation. The setting features a vibrant, fast-paced cityscape and a busy office filled with cluttered desks, stressed workers, and a sense of urgency. This chaotic backdrop serves as the perfect contrast to the calm efficiency of the drone delivery service.

The drone’s sleek design and making it move smoothly is a fun challenge. The drone is designed to look sleek, futuristic, and approachable. Its smooth, precise movements emphasize the advanced technology behind it, creating a sense of reliability and innovation. The climax of the story is the moment when the female office worker receives her meal. Her transition from stress to relief and joy is a key emotional beat, showcasing how the drone service brings not just convenience but also a moment of happiness and ease to her hectic day.

Character Design with Wacom Stylus

I designed the female office worker to be a relatable, everyday professional who embodies the challenges and triumphs of modern work life. Her character design features business casual attire, a blazer and a blouse to reflect her professional environment, while subtle details like slightly disheveled hair and a tired expression convey the stress of her busy day.

In my script, the main character had her ups and downs. So her facial expressions play a key role in telling the story. She was stressed in the beginning, so I furrowed her brows, added a tense shoulder for her, and made her movements hurried to show her overwhelmed state. She is hardworking, resourceful, and resilient, representing the everyday hero who navigates the chaos of a demanding job. Her journey from stress to satisfaction is central to the narrative, making her a character the audience can connect with and root for.

And because the story has a happy ending, she has a visible shift in her demeanor. Her expression was relaxed with joy. With Cartoon Animator’s Motion and Face key Editor Feature, I was able to modify her expressions and body motions with ease and tell the story that I wanted. Her relaxed shoulders, warm smile, and spark of happiness, as a reaction to receiving her meal, highlight the transformative impact of the drone delivery service.

Flying Drone Design

I wanted the drone design to be personable and futuristic in style. It features smooth edges, a minimalist design, and a friendly color scheme to make it look high-tech without being intimidating. The goal was to create a device that feels innovative yet accessible, blending seamlessly into the modern world of the story.

To emphasize its advanced technology, the drone includes subtle animations such as blinking lights, rotating propellers, and smooth, precise movements. These details not only enhance its visual appeal but also reinforce its role as a reliable and efficient solution to the office worker’s needs.

Character and Scene Animation

Using Motion Pilot and Path Animation in CTA5

  1. Motion Pilot: One of the standout features I utilized in CTA5 is the Motion Pilot, which made animating complex scenes both efficient and enjoyable. For the drone flight over the city, I used the Transform and Motion sections in the Motion Pilot menu to create smooth, precise movements. This allowed me to control the drone’s position, rotation, and scale with ease, ensuring it navigated the cityscape realistically and dynamically. The ability to keyframe and adjust the drone’s path in real-time was incredibly intuitive, saving me hours of manual animation work.

    One of the standout features I utilized in CTA5 is Motion Pilot, which made animating complex scenes both efficient and enjoyable. For the drone flight over the city, I used the Transform and Motion sections in the Motion Pilot menu to create smooth, precise movements. This allowed me to control the drone’s position, rotation, and scale with ease, ensuring it navigated the cityscape realistically and dynamically. The ability to keyframe and adjust the drone’s path in real-time was incredibly intuitive, saving me hours of manual animation work.
  2. Path Animation: For the busy city roads, I relied on CTA5’s Path Animation feature to animate the cars seamlessly. This tool allowed me to draw custom paths for each vehicle, ensuring they followed realistic routes through the city. I could easily adjust the speed, direction, and spacing of the cars, creating a sense of traffic flow and movement that felt authentic.

    What made Path Animation particularly powerful was its simplicity; I could focus on the creative aspects of the scene without getting bogged down by technical challenges. The ability to animate multiple cars on different paths simultaneously was a game-changer, making it easy- to-create a bustling, dynamic city environment.

Both Motion Pilot and Path Animation are incredibly versatile and user-friendly, allowing me to tackle complex animations with confidence and efficiency. These tools not only saved time but also made the process enjoyable, enabling me to focus on storytelling and creativity. Whether it was the drone’s smooth flight, the lively background shapes, or the bustling city traffic, CTA5’s features made it possible to bring my vision to life with precision and flair.

Character Animation

To effectively convey her emotional journey, I designed the female office worker’s movements to reflect a stark contrast between her stressful moments and her eventual relief and joy. Her movements are quick, frustrated, and jerky, emphasizing the chaos of her busy day. I incorporated visual cues like icons of time (clocks), filing, and phone calls to highlight her multitasking and overwhelming workload. These elements work together to create a sense of urgency and tension.

Relief & Joy

As she takes control of her situation, her movements become slower, more fluid, and deliberate. This shift begins when she decides to calm the chaos by calling Ambrosi-Air. The animation shows her picking up her phone with purpose, leading to the moment she receives her meal. Finally, her movements become relaxed and joyful as she takes the time to enjoy her food, symbolizing a well-deserved break and the value of time-saving solutions.

Drone Animation / Storytelling Through Design

The drone’s movements are smooth and precise, emphasizing its advanced technology. Subtle details like tilts and adjustments as it navigates the city and office space add realism and showcase its ability to handle complex environments with ease.

The drone’s landing is designed to be careful and gentle, conveying a sense of care and completion. This thoughtful touch reinforces the idea that the service is not just efficient but also considerate, enhancing the emotional impact of the moment.

The art direction and character design work hand in hand to tell a relatable story about modern life and the value of time-saving solutions. By blending the chaotic office environment with the seamless efficiency of the drone delivery service, the animation highlights how technology can transform stress into satisfaction.

Every element from the character’s expressions and movements to the drone’s design and functionality was carefully crafted to create a narrative that resonates with viewers and underscores the importance of innovation in everyday life.

Closing Thoughts

Participating in this competition has been an incredibly rewarding experience. It challenged me to push my creative boundaries, refine my technical skills, and think critically about how to tell a compelling story through animation. The process of bringing my vision to life—from concept to execution—was both demanding and fulfilling, and I’m proud of the work I’ve produced.

What stood out to me most was the opportunity to explore new tools and techniques, such as Cartoon Animator 5’s Motion Pilot and Path Animation features, which streamlined my workflow and allowed me to focus on the artistic aspects of the project. The competition also reminded me of the importance of storytelling, attention to detail, and the power of animation to connect with audiences on an emotional level.

Suggestions for Future Contestants

  1. Plan Thoroughly: Spend time developing a strong concept and storyboard before diving into production. A clear vision will guide your work and keep you on track.
  2. Leverage Technology: Take advantage of tools like Motion Pilot and Path Animation to simplify complex tasks and focus on creativity.
  3. Focus on Storytelling: No matter how impressive the technical execution, a compelling story is what resonates with viewers. Make sure your animation has emotional depth and a clear narrative.
  4. Pay Attention to Details: Small touches, like realistic movements, subtle sound effects, or thoughtful character expressions, can elevate your work and make it stand out.
  5. Stay Passionate: Animation can be challenging, but passion and perseverance will keep you motivated. Enjoy the process and let your creativity shine
Watch the WIP video from Stephen’s Entry

Related Posts

Click the banner to learn more about the winners’ portfolios and judge comments