首頁 » Page 46

WarLord’s Workshop: Unique Characters with Hide Body Mesh Tool

One of the great things about Character Creator 4 is its ability to reuse assets from previously built characters to make new characters. Since CC4 clothing is interchangeable with other CC4 characters it allows us to mix and match previously made or purchased assets for an entirely different character. This is a boon for filling scenes with extras and works for leading characters as well.

An example would be a Jack Lantern character I recently made while experimenting with ZBrush and the new CC4 head mesh wrapper in Headshot 2. This incredibly powerful plug-in now allows us to use either an image or a head mesh to create a compatible CC4 character and I took advantage of that to create the pumpkin head.

It became apparent after this that I could also make a Headless Horseman type of character for Halloween using two characters. One character for the body and one for the head. This has long been an experimental way to combine character parts when iClone was less powerful. As you can imagine, it requires the Head to be attached to the Neck of the second character. A proper attachment point is important for motion if you are mimicking one character.

THE FIRST CHARACTER – JACK LANTERN

My Jack Lantern Test Character using Headshot 2 mesh.

The Jack Lantern character is one of my experimental characters that has evolved over the years. I use it for experimentation since it’s kind of a benchmark as the clothing and accessories are low poly, so they don’t tax the engine and will work for stylized or cartoon-type characters. It’s my go-to model for this sort of thing.

I used ZBrush to make the pumpkin head, but you can use a head mesh of your choice. ZBrush was easy because it let me use GoZ to jump back and forth between Character Creator 4 and ZBrush with no importing or exporting.

Hiding the Body

I removed the clothing from the character except for the Tie which was originally an accessory but I skinned it with the Transfer Skin Weights tool so I could use it as a cloth to hide the rest of the body. As an accessory, the Hide Body Mesh tool is not available.

Left: The full character with only the bowtie. Middle and Right: Using the tie to hide the body parts with the Hide Body Mesh tool.

Why the tie? Because it looks good and can be used with the head if needed. It became a convenient cloth to use for hiding the mesh that is available should the need arise.

Leave the upper part of the neck. Do not hide this or you will have to deal with the big slit in the bottom of the head mesh this leaves.  It is much easier to scale it down and radically shorten the neck (with sliders).  Manually input the negative numbers to go past the 100 percent stop if needed.

Now all I had to do was turn the opacity of the bowtie down to zero or use a black texture in the opacity channel to make the tie disappear. Out of sight, out of mind… until you need it.

Working with the Head only:

Scale the neck to very thin and very short to pull it up into the head mesh. Otherwise, you will have a large open spot where the neck attaches that goes across the bottom of the head or a neck sticking out from the head mesh.

Character Creator 4

Scaling Down the Remaining Neck

Scale down the circumference of the neck to very thin and short with the CC4 sliders. Input the numbers manually in the box to go past the one hundred percent limit. If done properly the neck should be up inside the head mesh leaving a small hole. You could use the Mesh tool to select the neck at the vertices level then scale down and/or push it up into the head mesh but this risks topology distortion in the mesh if you aren’t careful.  

Left: Original shape with neck scaled down and pushed up into the mesh. Middle: Shaped more like a pumpkin
instead of the back of a skull in ZBrush with GoZ. Right: Bottom of head showing small hole after scaling down neck.

OPTIONAL: Reshape the Back of the Head

If you have a 3D program capable of sculpting, then you can alter the skull-like pumpkin head mesh to look more like a pumpkin. If no other tool is available, then the original mesh will work just fine. You can always hide the skull shape with lighting, props, camera angle, or a cloth if it bothers you. I used the original skull shape in the final image render.

How to make the eyes black:

  • Select eye parts with Digital Human Skin and change their shaders to PBR.
  • Select all eye properties and load a solid black image in the diffuse channel (note: you will not see the final all-black result until you set the shader to PBR.
Character Creator 4

The Headless Body Character

My favorite and easiest part is making up the body of the character. I already had a premade character in mind. My budget character set, the Masked Swordsman. The clothing could fit the period in question, and it was already black. From reference pictures, it ticked off a lot of the important parts like boots, bell sleeves, tucked-in pants, and many other aspects of those times.

Plus, it had a mask that I could use just like I used the bowtie earlier. The mask would be my on/off switch for the body and lower neck. This was convenient just like the Jack Lantern bowtie.

I was going to use a muffler or scarf to cover the top of the character’s neck so the big hole wouldn’t show where the head is supposed to be.  While there are neck mufflers and scarves available, I decided to jump into Marvelous Designer and just throw a single piece of cloth over it and see how it draped. I was lucky as it did just what I needed it to do on the first attempt.

Left: Original Character. Right: New cloth draped, and mask with hide head mesh invoked. Right: Mask hidden with its opacity setting.

HIDING THE HEAD

Using the same method as I did earlier with the Pumpkinhead, I used the mask as the cloth that hides the head and upper neck. After this, I hid the mask with opacity which can be one with the slider or using a black image in the opacity channel.

Next, I added, skinned, and textured the shoulder wrap I made in Marvelous Designer to cover the open neck. If you don’t have any kind of wrap that works, then alter a muffler with the mesh tool as all I was trying to do was cover the bare flesh of the original character’s chest. You could also resort to texturing the character’s chest black since it wouldn’t affect the character any further.

Headless Horseman Pesade Image

I was working with two characters for the Horseman and another for the horse. To do the Pesade with the horse I loaded the Pesade motion from the Horse and Tack Theme Pack into the horse while using the corresponding Rider Pesade for the headless body. In this case, I can go a step further and add the Rider Pesade to the head, or I can use another motion, keyframing, or puppetry.

This makes three distinct characters that can be animated in a scene. The horse is the Farm Horse from the Horse and Tack Theme Pack and is actually an avatar instead of a prop. There is a lot more going on in this scene than it looks like at first glance.

The background is AI-generated so there are only the three characters and the background image plus the camera and a blue image overlay to cut down on the contrast between the background image and the 3D characters.

The Headless Horseman

Versatile Setup

If you are using something like this for a video, then the head will talk, and it also has dynamic expressions since I activated the wrinkle system so it can have a fiery conversation or tell a Halloween tale with enthusiasm and passion.

As I mentioned earlier you can also link the two characters together but be careful to link to the proper neck bone on the body character for motions to work properly if you are mimicking the actual full character. In this scene the head is linked to the hand.

Also, keep in mind that the linked “character” is in reality two characters that will require two different actions for loading or creating motions. If you want the head to use the same motion as the body, then you will have to load that motion into each character.

It can and does get a bit confusing when you first work with a combined character like which character am I on, wait… I loaded that… oh, not for this character but it also creates a character with a lot of possibilities.

Using AccuRIG to Mask Unused Bones

On a closing note, and I tested this, you can run the characterized head character through AccuRIG, being sure to preserve the existing facial bone structure when asked, and then use the masking tool to completely mask out the body or head so no motion will be accepted. This does replace the characterized skeleton and I haven’t tested it enough to know of any pros and cons. It seems to work fine and completely immobilize the unused, hidden parts of the character.

Keep an Open Mind

One thing about this animation journey is to always think outside the box when it comes to problem-solving or innovation in animation. While this sounds like corporate speak it is true because as easy as animation is getting there is still not an easy button for everything. Don’t let the lack of a documented method keep you from experimenting to see what can be done.


MD McCallum – WarLord

Digital Artist MD “Mike” McCallum, aka WarLord, is a longtime iClone user. Having authored free tutorials for iClone in its early years and selected to write the iClone Beginners Guide from Packt Publishing in 2011, he was fortunate enough to meet and exchange tricks and tips with users from all over the world and loves to share this information with other users. He has authored hundreds of articles on iClone and digital art in general while reviewing some of the most popular software and hardware in the world. He has been published in many of the leading 3D online and print magazines while staying true to his biggest passion, 3D animation. For more information click here.


Jose Cuervo Tequila enters the Metaverse with Character Creator, iClone, and Unreal Engine

Bringing Jose Cuervo tequila to the Metaverse with Character Creator, iClone, and Unreal Engine

Alex Kong

I’m Alex Kong, a 3D artist with a journey spanning 17 years in the animation industry. Throughout my career, I’ve collaborated with industry giants like Sony Imageworks, Animal Logic, and Squeeze Animation, contributing my artistry to captivating animated series, movies, and AAA games.

Today, I’m excited to dive into a unique chapter of my journey. This chapter revolves around a singular ambitious project that has led me to push the boundaries of animation. In this endeavor, I’m thrilled to harness the power of Reallusion’s iClone 8, Character Creator 4 and Unreal Engine!

You can read my original article on my website Alex Kong.

A Daring Challenge from the Metaverse:

When ACHE Agency presented an opportunity to breathe life into the Metaverse experience that they created in Decentraland for Tequila Cuervo, I saw the chance to not only embrace an audacious challenge but also to harness the combined power of Reallusion tools with Unreal Engine in the process.

The project came with a tight one-month deadline, a feat that might have appeared insurmountable at first glance. However, armed with the incredible capabilities of Reallusion and Unreal Engine, I took the plunge into what would become a transformative journey.

Jose Cuervo is bringing tequila to the metaverse

This project was undeniably multifaceted, demanding not only the creation of multiple characters but also intricate animations on uneven terrain. After all, it required a substantial amount of lighting and rendering work to bring the vision to life.

Discovering Reallusion and unreal: A Fresh Perspective on Creativity

With the versatile Character Creator tool from Reallusion and a wealth of assets available from the Reallusion marketplace, I eagerly accepted the challenge. Basically, I managed to produce over 25 beautifully designed characters in just one week! This alone was a true game-changer. Without these innovative tools, achieving such a feat within a traditional workflow would have taken several months.

Moreover, considering the project’s budget constraints, this rapid character creation was nothing short of a miracle. Reallusion’s tools not only met but exceeded expectations, making the seemingly impossible not only possible but also practical.

Animating with Finesse: From Actors to Xsens Magic!

Once the characters were ready,  they needed movement and life. Using the extensive motion capture animation collection from the ActorCore library , I was able to find what I needed.

I was able to do the body animation for all these characters and then using the Facial animations from the Digital Soul pack their faces came to life instantly!

For more specific actions, I turned to the Xsens suit, seamlessly capturing the necessary motions and applying them to my main characters. Drawing from my prior experience with MotionBuilder for AAA projects, I can unequivocally attest to iClone’s suite of tools for motion capture editing as simply amazing!

You can blend, loop, and align clips, stretch and contract them, polish the curves, and control all your characters from a simple UI. But where iClone truly shines is in its seamless, no-hassle retargeting from various motion capture solutions.

The hand and feet stabilization features, hand puppets, premade hand poses, and the AccuLIPS tool for automatic lipsync made animation a breeze. And the Motion Director tool, which allows you to control characters like a video game, was the cherry on top.

Above all, the Motion Director tool stands out as a remarkable asset. With ease, you can connect a gamepad and maneuver not just one character, but an entire crowd, akin to playing a video game! As you record the motion, it’s as simple as that – BOOM, it’s completed! And to add the final touch, it includes uneven terrain detection, acting as a true savior in challenging situations.

Basically, mocap editing and animation become a breeze thanks to iClone’s highly intuitive tools!

A Brilliant Finish: Lighting and Rendering with Unreal Engine:

As the project approached its climax, the need for lighting and rendering became increasingly essential. This was where Unreal Engine’s real-time rendering capabilities truly shone. Moreover, Reallusion’s seamless integration with Unreal proved to be a lifesaver. It facilitated the smooth transfer of characters, crowds, animations, and cameras, streamlining the workflow. The addition of the Unreal LIVE LINK tool further simplified the process, ultimately saving me precious time and enhancing efficiency.

Reallusion has truly put a lot of effort into making this transition smooth, and it showed in the results.

Navigating Learning: Reallusion’s Rich Tutorial Goldmine

I’d be remiss not to mention Reallusion’s tutorials. A true treasure trove of knowledge, these tutorials were my guiding stars whenever I hit a roadblock. From their website to YouTube, Reallusion has invested thoughtfully in nurturing artists with the skills needed to navigate their pipeline effectively.

Reallusion and Unreal, a tale of triumph: Achieving Realistic Success

Fast forward four weeks, and there it was – I had accomplished what seemed like a monumental task. In just a month, the project, with all its intricacies and challenges, had transformed from a concept into a tangible success story.

But the real star of this narrative? The unsung hero was none other than the Reallusion pipeline itself. This real-world account highlights the significance of innovative tools. It showcases how a well-crafted pipeline, like Reallusion’s, can weave its magic and make a palpable impact on the creative process.

It’s stories like these – grounded, authentic experiences – that truly exemplify how innovation can turn challenges into accomplishments.

In Conclusion

As I stand here, with the project finally wrapped up, I can’t help but feel a surge of excitement for what lies ahead. Despite its imperfections, that very imperfection fuels my enthusiasm. Moreover, if I could achieve this mostly on my own within such a tight timeframe, just imagine the potential we could unlock with a small, dedicated team and a bit more time on our side.

I’m confident that this project is merely a stepping stone. The Reallusion pipeline has unlocked a realm of fresh possibilities, and my curiosity is piqued about the future of animation.

Navigating this solo endeavor over four intense weeks wasn’t a cakewalk. However, amidst the whirlwind, one element stood out as a guiding star: the Reallusion pipeline. It wasn’t merely a sidekick; rather, it served as the true powerhouse behind this remarkable accomplishment. Acting as my secret weapon, it effortlessly infused innovation into each stride, helping me surmount every challenge that came my way.

Indeed, projects and challenges like these serve as poignant reminders of how technology can not only magnify creativity but also breathe life into ideas, transforming them into tangible achievements.

So here’s to the project’s triumphant culmination, celebrating the transformative tools that fueled it, and raising a toast to the exciting horizons that await. Cheers to the boundless possibilities of animation, as we continue to explore, innovate, and create!

Join us on an incredible animation journey!

Credits

Project comissioned by Ache Agency to promote the Metaverse Experience that they did for Tequila Cuervo in Decentraland
https://www.ache.ooo/

Mocap editing
Alex Kong
Peter Podesser –
https://www.youtube.com/@iclonevuze7777

Crowds optimization
Peter Alexander – https://www.artstation.com/mythcons
Alex Kong

Lighting
Alex Kong
Alex Chavez –
https://www.artstation.com/lexkan

Environment creation
https://rojkindarquitectos.com/

Lighting
Bernabe Guerrerop Guzman

All else
Alex Kong

Created with Reallusion’s iClone, Character Creator, Unreal Engine 5, Reallusion and Actorcore Marketplace’s assets and Xsens Technology

Kitbashing in CC4

WarLord’s Workshop: Kitbashing a Character in CC4

Kitbashing in CC4

BACKGROUND 

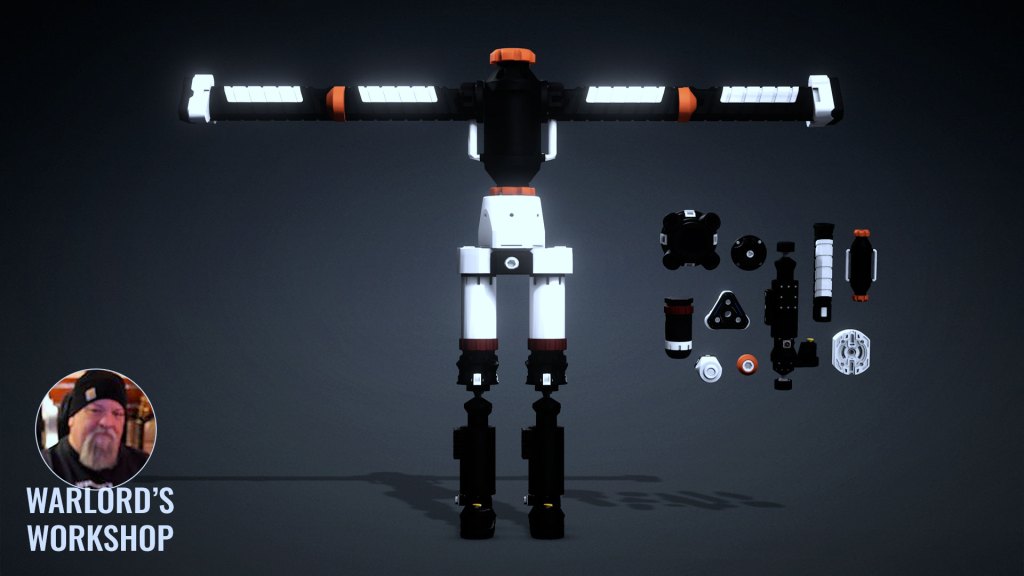
Kitbashing, putting something unique together from a kit or parts, has been around in various forms in movies and television for a long time. The current, digital version of kitbashing includes free and commercial kits of parts that look like something out of a Popular Mechanics magazine, or an industrial warehouse or garage. This depends on the type of kit you are looking for, but general science fiction-based kits are clamps, frames, pulleys, hydraulic cylinders, and similar industrial-style parts. 

Some people can just look at a pile of parts and see a robotic character or tool. This type of asset creation is usually done with apps like Blender, 3DS Max, Maya, and Cinema 4D but it can also be kitbashed together in Character Creator and then rigged for animation in iClone. 

BREAKING OUT THE KITBASH PARTS

A video tutorial that explains this written overview in detail is located at the bottom of this article. It is broken down into several parts with timestamps available in the description. There is also a 4X speed clip of the kitbashing process towards the end of the video.

One of the biggest problems facing a new kitbasher is the fact that a lot of these assets come placed in one FBX or OBJ file and at times one combined object. Some must be broken out at the vertex level while others, as in this case, just have to be detached to be used. They are also usually high poly and that is the case with the kit I’ll be using in today’s example of kitbashing a simple robot together. We’ll lower that count in CC4 later in the tutorial so as to not make the body-building segment any longer than it needs to be.  

The Kitbash Kit from Enrique Bono. Link at the bottom of this article.

Kitbashing might be a very misunderstood approach by those new to the nuts and bolts of character creation. In this example I build an entire robot body and rig it, also showing how to mask unused bones, but most of you will catch on quickly. There is also a 4X clip of the body build towards the end of the animation for those who just want to see the process. 

I try not to create video tutorials over twenty minutes which is about five minutes longer than my attention span when I’m looking for tutorials, but I shaped it in such a way that you don’t have to watch all of it. Once you see a few body parts put together you can skip around or view the 4X Speed Clip to get an idea of what is going on. If the concept baffles don’t be worried, you are not alone. 

TUTORIAL BREAKDOWN 

The tutorial is broken down into the following parts: 

Part 1 – Kitbashing the Body 

Part 2 – Optimizing the Body Parts 

Part 3 – Rigging with Character Creator 4 

Part 4 – Optional – 4X Speed Clip of Body Build  

GETTING STARTED 

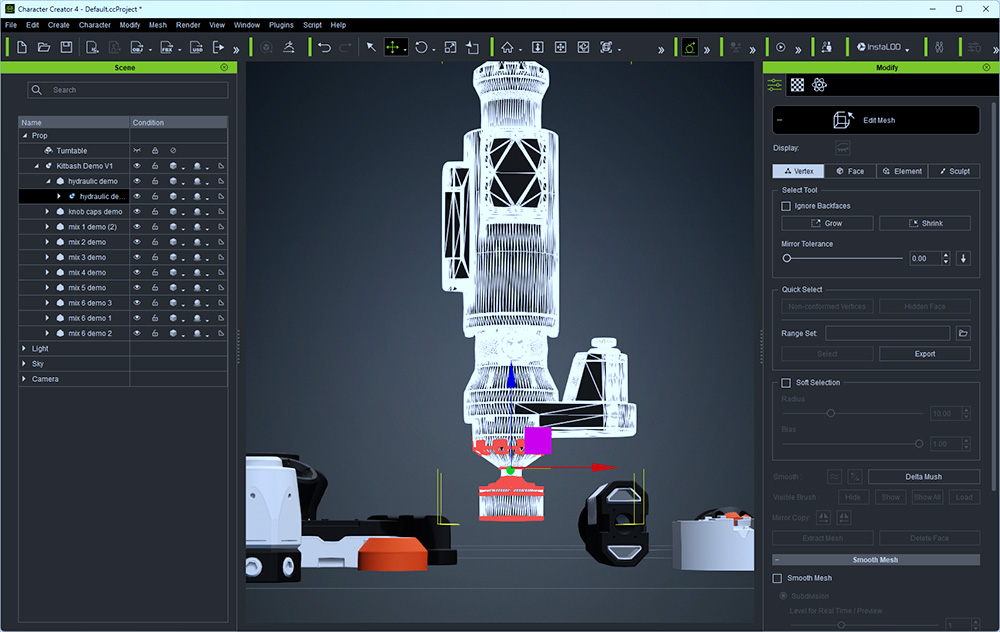
I will drag and drop the kitbash assets, FBX in this case, into the CC4 workspace. Next will be to detach the actual meshes from the dummies and delete them to clean things up a bit. After that, I’ll jump right and start with the leg and how to alter it a bit if it does not fit your needs. 

ALTERING MESH AT VERTEX LEVEL 

With the Mesh tool, we can alter one particular piece to make it the lower leg. At the vertex level, I will grab all the mesh I can get sticking out from the flat surface of what we will use as a lower leg and foot. I push the pogo stick-looking bottom piece up into the “foot” mesh and scale it back, so it won’t poke through the outer mesh. 

Starting the process of using the Edit Mesh push the unwanted vertices up into the “foot” and then scaled down to not poke through.

After this, still at the vertex level, I will carefully grab what looks like the front of the lower foot and stretch it out to resemble a foot. Character Creator 4 gives us a good Mesh tool so let’s not just relegate it to minor shaping and flaw fixing.  

For this character, we won’t be altering any more mesh, but this demonstrates what can be done with the Mesh tool when needed. You control the scene assets, don’t let the scene assets control you or your vision of what you are producing unless it just can’t be helped otherwise.  

BUILDING THE LEG(S) AND PELVIS 

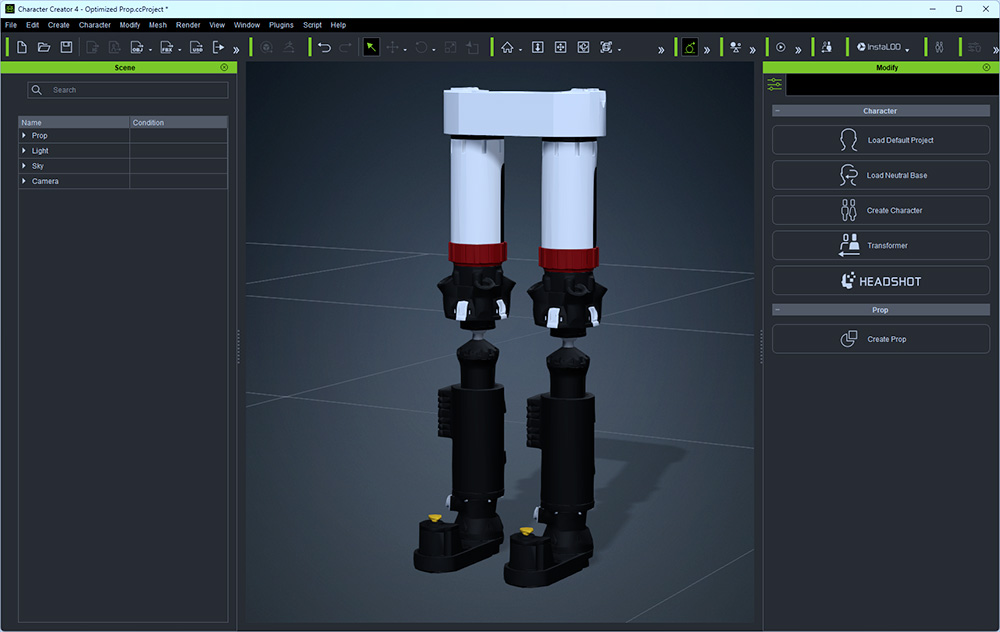
As you can see, I’m starting with one leg, mainly because I could easily visualize that leg from the pile of parts. I built the leg up with a “knee” and an “upper leg” attached the Upper Leg and Knee to the Lower leg, then scaled them to suit my needs. 

From there I added a simple, one-piece pelvis and scaled it. I then duplicated the “leg” and moved it into place. Later, when we optimize, I’ll delete that duplicated leg and an arm, so we don’t have to optimize them twice. I then will duplicate the optimized leg and arm and move it into position just as I did when I was building the body.  

Pieced together one leg then duplicated for the other leg while using one scaled-up piece for the pelvis.

This is where you will notice that when you duplicate the leg, the dial on the ankle will be on the same side of both legs. You might be able to push the dial into the mesh and scale it back with the mesh tool at the vertex level if you want to hide it but I just left it like it was.  

The LOWER, UPPER TORSO & ARMS 

The lower torso and upper torso are one-piece objects each making that a quick and easy attachment that only needed to be tweaked in scale to your personal preference. 

The kitbashed body is ready to be optimized. You can optimize as you build or after building but each piece must be run through InstantLOD to optimize.

The arms were built out and duplicated then moved into place just as the legs were. They were attached to each other as one unit just like the legs. 

CENTERING AND SCALING UP 

This was a ZBrush-based kit, as many are, so it was at a much smaller scale than we work at in Character Creator or iClone. With this in mind, I built the body first and scaled up later when needed. You may choose to scale up the parts to start but I found this to be a simpler method as I can just scale the kitbashed body to match an iClone character which you can add to the scene then delete after scaling up. 

Added a male character for scale then repositioned and scaled up the body mesh to match the male character. The male character is deleted afterward.

AccuRIG – THE EASIEST PART 

Since we will be using AccuRIG to skin the robot body, I decided to experiment a bit and try not to change any markers from their initial placement by the plug-in unless I had to. In the video, you will notice that I had to lower the top of the leg markers as they had settled on the pelvis which would make the pelvis twist with movement. I lowered these markers to just below the pelvis on the top of each leg. Everything else stayed in its original location. 

Left: I only moved the selected markers (with symmetry) so the pelvis wouldn’t twist. Middle: Unused bones masked out. Right: Final skeleton before skinning.

I then set the rig up for zero fingers and let it create the skeleton. After this I let Character Creator 4 AccuRIG do the skinning and had a very usable kitbashed animated robot body. 

WHY JUST THE BODY? 

To give you as the user an opportunity to finish out the character with a head and hands that you can make, kitbash, or get from SketchFab. A quick search for “robot head” and “robot hands” will yield some nice results. Take the finished character into AccuRIG again to rig the new parts.  

We can also rig partial robot characters like a walking set of legs or a functional upper body complete with a head. You could then link and unlink those characters for some unusual results. The same should hold true for a “Headless Horseman” type character.  

Now I want to stop working on this article and make a Headless Horseman but that is just how a good piece of software can creatively inspire you so I will push on to finish this up. 

SUMMARY 

There was a lot to pack into this tutorial, but kitbashing is something almost anyone should be able to do. At this level, it is not advanced by any means. The body could have been rigged better or shaped better in the shoulders for a more squared-off result, but the tutorial was already going to run long so I just moved on. Besides, that can be tweaked with Character Creator 4’s Proportion or Pose Offset tools. 

Kitbashing is like gluing together a model in your bedroom as a kid like some of us did back in the old pre-digital days. Except without the screaming, cursing, and general throwing of tantrums when things didn’t fit or look as good as the box did! For the rest of you who have no clue what “gluing together a model is” then you might consider kitbashing to be the equivalent for your generation. 

And of course, I would never suggest, over a 3D model, that any of us would scream, curse, or throw a tantrum today…  

…unless… maybe… we knew no one was around. 

Thanks for stopping by. Hope to see you next time! 


Kitbash Kit used in this tutorial: 

Hard Surface Kitbash Demo Kit: 

https://cubebrush.co/enriquebono/products/vgtqq/kitbash-hard-surface-demo-v1


MD McCallum – WarLord

Digital Artist MD “Mike” McCallum, aka WarLord, is a longtime iClone user. Having authored free tutorials for iClone in its early years and selected to write the iClone Beginners Guide from Packt Publishing in 2011, he was fortunate enough to meet and exchange tricks and tips with users from all over the world and loves to share this information with other users. He has authored hundreds of articles on iClone and digital art in general while reviewing some of the most popular software and hardware in the world. He has been published in many of the leading 3D online and print magazines while staying true to his biggest passion, 3D animation. For more information click here.

Reallusion Releases ActorCore Mobile View & Web Embed for the Best Interactive Online Presentations

Embed Animated 3D Characters into Websites and Easily Share them using Mobile Devices.

Reallusion is delighted to unveil exciting enhancements to its acclaimed free auto-rig application, ActorCore AccuRIG. Designers can now effortlessly share their 3D rigged characters using ActorCore’s interactive 3D viewer, guaranteeing dynamic presentations on websites and mobile devices, catering to both personal and professional needs.

What’s New with AccuRIG

AccuRIG has been a trusted tool for tens of thousands of 3D users, thanks to its intuitive interface that delivers precise full-body rigging and boosted productivity. In addition to its compatibility with all major 3D platforms, artists can seamlessly upload their rigged models to the ActorCore online platform. Here, they gain access to an extensive library of over 2,400 mocap animations, all meticulously crafted to guarantee the highest quality and practicality for 3D productions.

With ActorCore’s latest features, mobile view and web embed, anyone can effortlessly showcase their rigged models by generating simple web embed codes, thereby creating interactive character displays on their chosen websites. Furthermore, they can readily share these creations with any mobile device using a QR code or web link. Whether it’s for personal sharing with friends and family, collaborative team projects, or for product presentations and marketing endeavors, ActorCore offers the perfect solution to exhibit creative work online and on the go.

Customizable Character Display

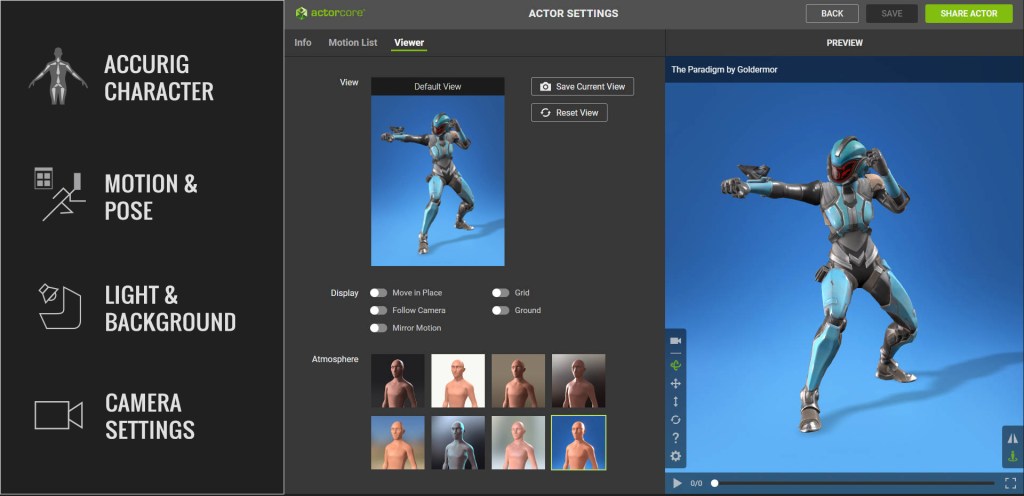
ActorCore lets you share animated 3D characters and tailor them to your liking. Using the 3D viewer, which provides real-time feedback, designers can effortlessly fine-tune various aspects including lighting, background, atmosphere, camera angles, and select their preferred thumbnails for the perfect presentation. Additionally, they can curate their own motion list from ActorCore’s extensive collection of high-quality mocap animations. This level of customization enables users to showcase their models with distinct characteristics and aesthetics, ensuring they stand out when shared across social media, websites, and mobile platforms.

For Web Embed & Mobile View

Designers can take their customization a step further by adjusting settings such as background transparency, screen size, camera lock, and other display details before embedding the character on a website. By simply scanning the QR code or clicking the web link provided in an email or instant messaging, viewers gain instant access to the 3D model, complete with the personalized settings, on any mobile device. This not only facilitates interaction with the character in multiple ways but also elevates the overall presentation to deliver a highly engaging and immersive experience.

Web developers can easily adjust the viewer dimensions, background transparency and interface visibility; or even dive into the underlying code for granular control.

Share by generating convenient QR codes for mobile scanning or shortened URL links for instant messaging.

Immersive Experience

3D modelers now have the ability to embed their creations on blogs or personal websites, enabling others to not only view but also interact with their pieces. For businesses, incorporating these 3D models into their websites offers visually captivating elements that help sustain customer interest. Marketing professionals can embed 3D mascots on a variety of websites and easily share them with mobile devices, thereby boosting sales, product visibility, and brand awareness. The potential for ActorCore Mobile View & Web Embed is truly boundless. Visit the Samples & Tips page for inspiration and discover the limitless possibilities.

Try It for Yourself

Download AccuRIG, the free auto-rigging tool, today and experience firsthand how you can captivate your audience with ActorCore Mobile View & Web Embed. Also, check out the Sandbox to gain hands-on experience and explore the remarkable capabilities of this innovative tool. Don’t miss out on the opportunity to leave a lasting impression on your audience — get started now!

Animating Lewis Capaldi’s Someone You Loved with Character Creator Headshot and iClone for TikTok

DIGITAL PUPPETS UK

In the world of animation and virtual avatars, creating realistic and stylized characters is an essential skill. I am Antony Evans, the co-founder of Digital Puppets, an animation studio in the UK specializing in character design, animation, and virtual avatars. I have worked as character designer for many years for studios such as Disney, Warner Bros, and the BBC.

Today we will take you through the process of creating Lil Lewis Capaldi for TikTok social media content. In Part 1, we’ll demonstrate how to build the character using Character Creator 4, and in Part 2, we’ll delve into the animation workflow we employed in iClone 8.

TikTok original – https://www.tiktok.com/@lillewiscapaldi/video/7243822710558657819

Part 1 – Creating the rigged Lewis Capaldi 3D model

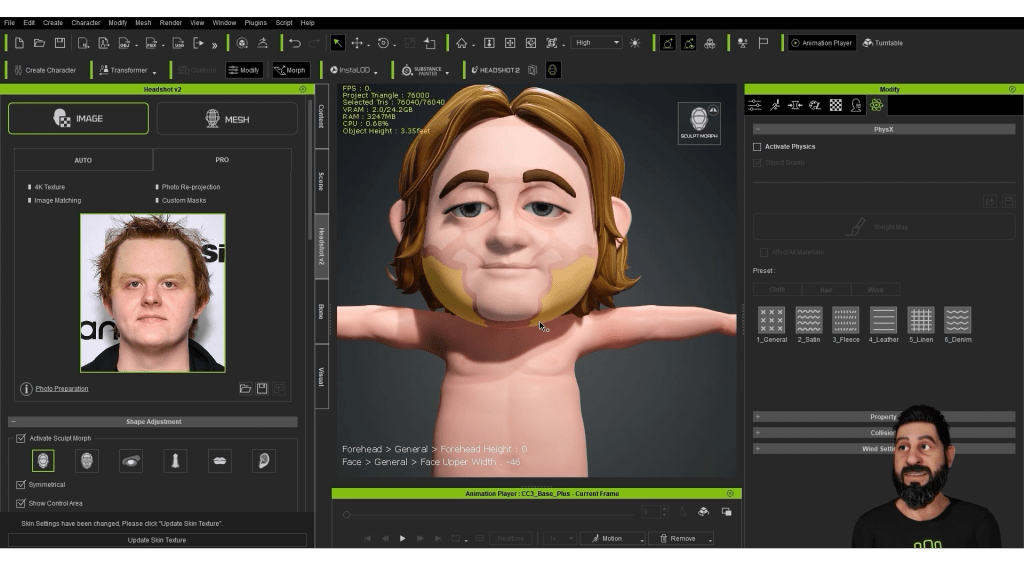
In this video, we will guide you through the stages of transforming the character into a more cartoony style by adjusting proportions and features. Using the tools available in Character Creator 4 (CC4) , we can easily transform the base mesh into a custom design, and still retain the facial expression and animation rig.

Headshot AI plugin for Character Creator 4

To begin, we utilized an online image of Lewis Capaldi and imported it into Headshot, the ai face creation plugin for Character Creator 4. When working with Headshot, it’s essential to use a high-resolution image with even lighting. Occasionally, adjustments may be necessary for the image, and you can use Photoshop to address issues, as we did in this case (involving the removal of the fringe).

Headshot is a great way to create a likeness from a photo, it does a good job of matching the proportions and gives a great base for creating your character. We are looking forward to working with Headshot in our upcoming projects and having the ability to work with scanned 3D heads, especially now that there are some great apps you can use on your phone to get impressive scans.

Headshot, the ai face creation plugin for Character Creator

ZBrush and GoZ

We’ve found that the Character Creator GoZ feature is particularly helpful for rapidly making mesh changes and sending the model back and forth. This allows us to test out the overall look of the character before getting into the finer details. The same result can be achieved using the edit mesh and morph tools in Character Creator 4, so it does come down to personally preference. We have been working with ZBrush for many years now, so this workflow works best for us, but that’s one of the things we love about Character Creator is that it can fit into a workflow that works best for you.

Hair and Clothing

We wanted to keep this video short so we didn’t go into SkinGen and adding clothing as there are already detailed videos out there on how this works and is also very easy to use. But SkinGen is another powerful skin texture plugin for Character Creator 4, it is a great tool we use all the time to add those final subtle details, adding elements like pores and blemishes to the skin really help to give your character more life. Also, with the hair and clothing we worked with the default items from the Reallusion content library to add a simple t-shirt and jeans to the model. For the hair and eyebrows we used Luis Duarte’s La Familia Content pack.

Hair and clothing from the Reallusion content library including Luis Duarte’s La Familia content pack.

Final Design

In this 1st tutorial, we will conclude by loading the original model we created. The model in the video will eventually match the previous one but requires repeating the steps previously shown in the video, tweaking proportions in ZBrush, and using the Edit Expressions sliders until it precisely resembles the original. We didn’t want to go through all the steps in getting to that original design as it is just a case of repeating the back and forth to ZBrush.

Using the Facial Profile Editor in Character Creator to edit and limit the character expressions to best fit its persona.

Part 2 – Animating Face and Body of Lewis Capaldi 3D Model with iClone

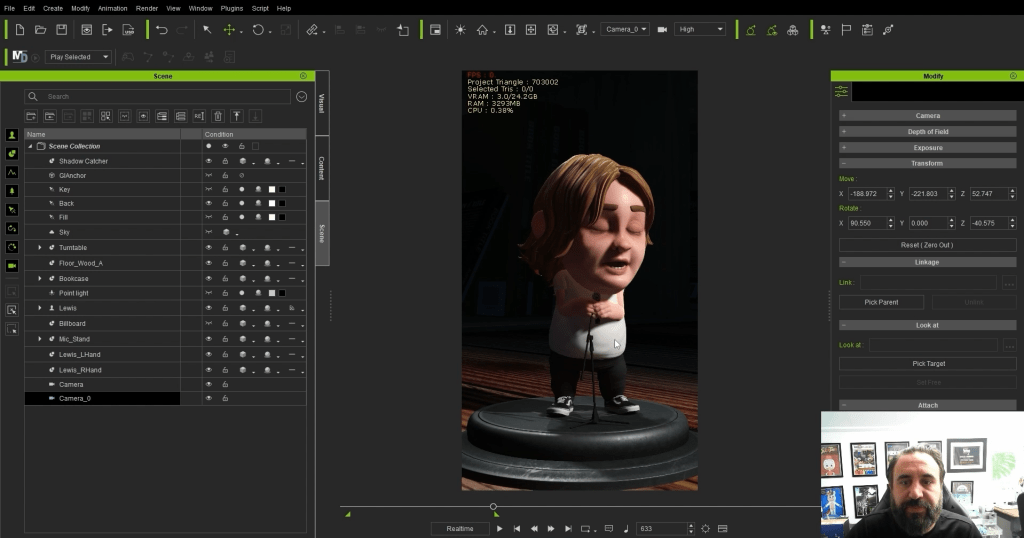
In Part 2, we will break down how we animated the original video. We’ve set up the scene as a template, allowing us to create new videos swiftly. Once the character is rigged and configured, we can effortlessly insert a new song and matching animation—ideal for generating content for platforms like TikTok and YouTube Shorts.

Facial Capture

For facial expressions and lip sync, we choose to utilize the iPhone and LIVE FACE plugin for iClone. While AccuLIPs can be used with an audio track with only vocals, we’ve found it quicker to sync the lip movements in real time with the song. If you’re familiar with the entire song, it makes the process even easier. However, we work line by line, recording each line separately and then merging them together. This method works exceptionally well for syncing with rap music.

Utilize the iPhone and LIVE FACE plugin for iClone
For the song lyrics, we work line by line, recording each line separately and then merging the lip-syncs together

Body Animation

The animation’s motion is relatively simple, as it primarily involves the character singing in one spot. We work a lot with the preset animations and motions we find on the ActorCore website. In this video we just wanted to add an idle animation to bring some life to the character, so he was just stood still on the spot, so we used the breath animation that comes included in iClone. We then show how we added reach targets to attach the hands to the microphone, which allowed us to animate the hands and arms moving by moving the microphone around. The reach tool is a very powerful tool when working with characters interacting with objects.

Using the iClone Edit Motion layer to quickly adjust and customize any kind of animation

Lighting

When setting up lighting in iClone we always start out by trying all the preset lights, once we have one that looks good or close to what we are after we can then teak by adding or removing the lights until we get what we are after. We also like to add in some volumetric lighting, as this really adds to the atmosphere of the scene.

Cameras

In this video we have kept the camera work pretty simple, you can get some great results with just a couple of cameras and well timed camera cuts. When working with a music track we try and time the camera cuts to the changes in the song. You can add lots or cameras and interesting shots, but with this particular video we wanted to keep the focus on the character and keep a slower pace.

Final Thoughts

The video hopefully shows a workflow that demonstrates how quickly you can create a custom character and animated content. With platforms like TikTok and YouTube Shorts demanding rapid content creation, this method has proven effective for us.

Once the template is set up, you can allocate time each day to create a new video or spend a day crafting multiple videos for scheduled releases. Character Creator and iClone features, such as Goz, LIVE FACE and preset animation content can really speed up your production, which allows you more time to make more content.

Learn more about Digital Puppets at https://digitalpuppets.co.uk and check out our YouTube channel https://www.youtube.com/@DigitalPuppets.

Join our Discord channel at https://discord.gg/28DNM9A94P if you’re an iClone, Unreal Engine, Character Animator, LIVE2D user, seeking advice, or wanting to share your work. We hope to build an active community and welcome animators of all kinds to join us, share your preferred programs, and foster a learning environment for everyone.

Made with Cartoon Animator: The 2023 Animation at Work Contest Winners!

After two months of creativity, the 2023 ‘Animation At Work’ Contest for Cartoon Animator (CTA) has come to a close. Reallusion would like to thank all of its wonderful sponsors including XPPen, Affinity, and Magix. Overall, the event received 132 global entries, each with their work-in-progress videos among five categories: Business & Commercial, Comics & Art, Education, Vertical Shorts, Best Use of Cartoon Animator 5, and Best Mascot Animation. 

A total of 33 outstanding works have been selected from 39 countries, all with varying levels of skills and experience. Additionally, a wide array of styles and topics were created, proving that the Cartoon Animator is streamlined for creative diversity. Several newcomers who were first-time Cartoon Animator users were even able to use their newly acquired techniques, combining other pipelines for excellent submissions.  See the 2023 Animation at Work Winners.

Business & Commercial Animation  — 1st Prize

BRINGING TO LIFE  by Nandor Toth (Hungary)

Nandor Toth shares his thoughts on winning the contest:

“ As I started using it in March 2023, I consider myself a newcomer to CTA. I’ve never come across such good animation software that moves characters in such a professional way: I can save the movements and add new movements made by others so easily, and even edit them afterward. And that’s the most important benefit of the program! “

Judges comments:

“Nandor cleverly combines stock videos with his own characters. Viewers can quickly understand the key features of Cartoon Animator 5 in 2 minutes. We also enjoyed watching his drawings in his WIP video. Lots of details are added to make his Superman mascot pop out. Well done!”

Comics & Art Animation — 1st Prize

Valiant Seven by Astrovique (Australia)

Astrovique shares her thoughts on winning the contest:

“As a new user to the program, it was a very simple software to pick up and learn with all the resources and tutorials available to help you learn. I was only really able to learn the very basics of the software, but knowing that it has the ability to motion capture your mouth for lip sync and body animations for 2D characters is such a cool feature to have. “

Judges comments:

“Webtoon artist Astrovique successfully animated his hand drawings with Cartoon Animator. This entry and WIP video show the potential of how to make manga art with Cartoon Animator 5. We hope to inspire more XPPen artists to leverage our tools for films and video production!”

Education Animation — 1st Prize

How the Human Body Protects Us from Viruses by Prosenjit Biswas (India)

Prosenjit shares his thoughts on winning the contest:

“Cartoon Animator stands out as one of the few software that enables you to create a full animation in just a week without a large team. Its extensive resource library is always beneficial, and the vast 2D and 3D motion libraries are instrumental in saving a significant amount of time. Cartoon Animator’s interface is exceptionally user-friendly, making it both clean and accessible for beginners.”

Judges comments:

“An informative explainer video made by Prosenjit Biswas. With fluent narrating, we were impressed to see how contextual the animation was showing great potential for the author to make educational videos! Finally, check on his WIP video and learn how he did it in Cartoon Animator 5!”

Vertical Shorts — Winners

Grovely and The Unicorn by Anita Bell (Australia)

Best Use of Cartoon Animator 5 —  Winners

Time Travelling Timmy by Warwick Hays (Australia) & Declan Walsh (Ireland)
MAGIC PENCIL by Farid Muminov (Russia)

Student Animation — Winner

PROFESSOR EXPLAINS | Types of blood groups by ABHINAV P M (India)

Just as the contest ended, Reallusion was pleased to announce the Cartoon Animator 5.2 update. This version introduces two major highlights: Motion Pilot and Motion Path Animation, a natural evolution of contemporary puppetry. Motion Pilot is the first significant feature allowing users to animate characters and props instantaneously, significantly reducing production time. The other eagerly awaited feature is Motion Path Animation. This enhanced path editing tool is exceptionally practical for creating precise animations across various applications. Take advantage of the 30-day Free Trial to experience these amazing features in Cartoon Animator!

WarLord’s Workshop: Beginners Guide – AccuRIG Versus Characterization

New Character Creator users may have a question or two about the difference in using AccuRIG versus Characterization. While they do achieve close to the same result, they are not the same tool and can serve different purposes.  

THE SHORT EXPLANATION 

Characterization preserves an existing bone structure where AccuRIG replaces any existing bones with a new bone structure. If the model you are working with has an extended or more extensively rigged bone structure (extra bones) then Characterization is an option that will preserve those extra bones for animation.  

If you have no idea what I am talking about then use AccuRIG to get the job done until you do understand the concept of extra bones. It’s nothing to be concerned or embarrassed about, most of us have been there. Until you have the need for extra bones, the concept can be a bit fuzzy or downright confusing. When you come across a character with something like a tail, that you want to animate, and realize there aren’t any selectable bones there, it becomes easier to understand.  

EXAMPLE 

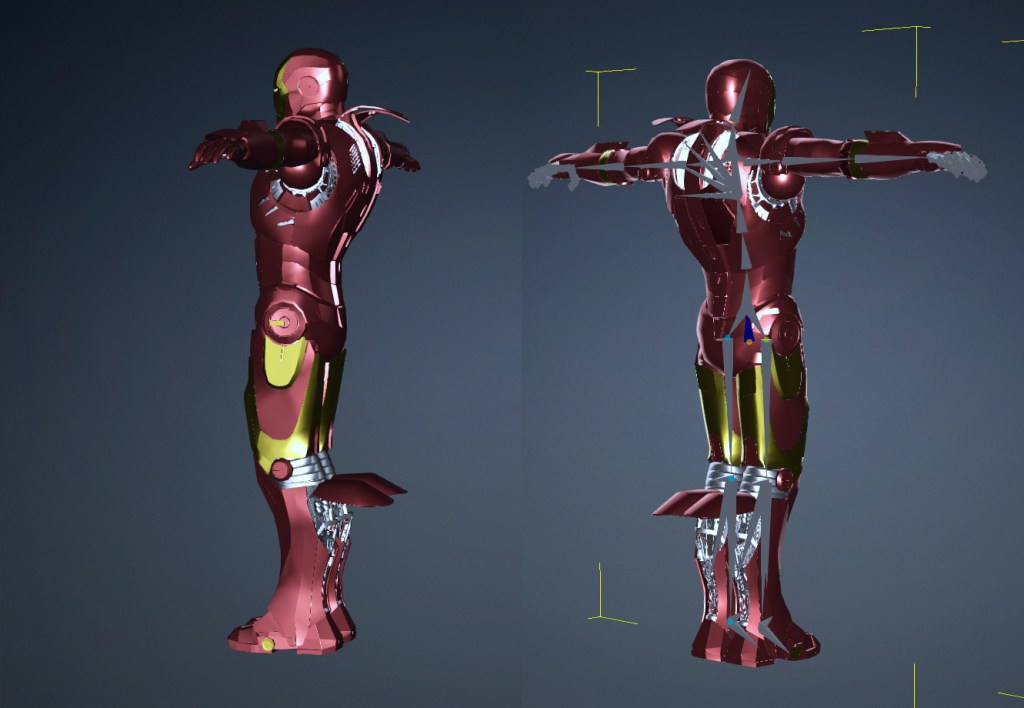
A prime example of using Characterization over AccuRig is an Ironman pre-rigged character over at Free3D.com. Pre-rigged is important here. There must be an existing bone structure. Characterization does not create bones.  

This character was made and rigged in 3DS Max but has an FBX option available for download. If you have Max, then download the source if nothing else to look at it. You will see an example of suit surfaces that are rigged to old-fashioned spline controllers.  

Ironman Model by deadcode3 at free3d.com

These controllers allow the animator to move the surface plates in multiple directions. The good news is if we characterize, we get to keep those controllers as bones that can be manipulated via the Edit Pose or Bone Menus. This character has some extended rigging as the model has various stabilizers that move up and down. If you characterize instead of AccuRIG you have these stabilizers available to you.  

THE PROCESS SHORT OVERVIEW 

  1. I dropped the FBX file into the workspace as a Character, Humanoid. 
  1. I used the Characterization button in the Modify menu. 
  1. Matched the obvious bones until the Active button became available. 
  1. Mapped the hand bones using the “Auto Assign Symmetrical Bones” and “Auto Assign Child Fingers” (so you only have to click one bone on each finger and the other hand is mapped too). 
  1. Press the green Active Button (if it’s not green you haven’t mapped enough bones on the main body). 
  1. Close the Characterization menu to complete the process. 

The first time you start matching bones might take a while if you have no experience with it. It is not complicated and moves along quickly once you get started. It is just as it seems, you match bone to bone until the ACTIVE button becomes available, then you have mapped enough bones to continue. There are not that many bones to match up concerning the body.


TIP: When matching bones, if a symmetry option is available then use it, when possible, to not have to rig a pair of items like legs or arms when one can be mirrored to the other instead.

Below you find a tutorial covering the characterization process:

On the other hand, if you want a quick and easy way to use the character without the extra bones then AccuRIG is your best choice. Even better if the character is in a TPOSE.  

If the character mesh is not in a TPOSE and the character mesh has a skeleton, you can use the EDIT ANIMATION LAYER tool (since it’s a prop at this point) to set the prop Character mesh to a TPOSE. Now go to AccuRIG and start the rigging process. If you somehow end up in Characterization, then just close that part and go to AccuRIG. 

You must go to the FK Mode tab within the Edit Motion Layer popup window to use the extra bones as they won’t be available in IK Mode. 

WHICH IS IT – CHARACTER OR PROP? 

It can be either but if you want a quick path to characterization then drag and drop as a Character, Humanoid to start the process. Character Creator 4 takes you straight into the Characterization tool. If you wish to go to AccuRIG instead then close the Characterization menu and go directly to AccuRIG. 

Your first choice after dragging and dropping the character mesh into the workspace.

The next popup after choosing Character:

Once you are into the Characterization tool you start matching bone to bone as mentioned earlier until the Active button becomes available.  

TIP: You must go to the FK Mode tab within the Edit Motion popup window as the extra bones will not be available in IK Mode.

The FK Mode button and selection popup.

There are not really pros and cons to each tool so much as it is a different tool filling a different need. The fingers are easily set up in Characterization using the child finger hierarchy option where we only have to select one bone in an obvious chain of bones to automatically include the rest of the bones on that finger. AccuRIG can do an excellent job of preliminary bone placement on the fingers but sometimes refinement is needed which is an easy enough task to accomplish. 

As I wrote earlier, AccuRIG is much simpler as moving the initial markers seems to be more intuitive to a lot of the new users instead of matching bones. It just boils down to what your personal preferences are. I do not have a problem using either as both are about the same as far as time spent and necessary steps. 

Extra bones move the stabilizers and other flaps.

The above GIF demonstrates some of the extra bones with the stabilizers opening and then taking off. The scene is set up with the default iClone 8 Toon Renderer and worked well with this character. 

NOTE: If you want to rig this particular mesh for yourself then you will need another tool like Blender or 3DS Max to prep it by removing the spline controls (just select and delete is all it took in 3DS Max) otherwise they will be visible outside the character mesh. 

In recap the deciding factor to which tool to use is the presence of extra bones. If you have these extra bones and want to use them then you will need to use Characterization and match bone to bone. Long-time iCloners have been doing this since 3DXchange was released years ago. And even though I am belaboring this point, you must use the FKMODE TAB in the dialog to find and use these bones. 


Model:

https://free3d.com/3d-model/ironman-rigged-original-model–98611.html 

MD McCallum - WarLord

MD McCallum – WarLord

Digital Artist MD “Mike” McCallum, aka WarLord, is a longtime iClone user. Having authored free tutorials for iClone in its early years and selected to write the iClone Beginners Guide from Packt Publishing in 2011, he was fortunate enough to meet and exchange tricks and tips with users from all over the world and loves to share this information with other users. He has authored hundreds of articles on iClone and digital art in general while reviewing some of the most popular software and hardware in the world. He has been published in many of the leading 3D online and print magazines while staying true to his biggest passion, 3D animation. For more information click here

WarLord’s Workshop: Rolling Backdrops for Short Scenes

Backdrops were a boon to early theatre starting with static painted backdrops and then moving onto the rolling backdrops for early movies that simulated movement, generally while driving, that allowed the automobile or plane cockpit and actors to remain stationary while performing or filming.

Backdrops are certainly nothing new, having been used in film and television since its early years. The usage was very prevalent in the United States black and white TV era with police serials and early superhero TV shows. It’s been a running gag since its inception with outtakes of actors exiting “moving cars” on a soundstage setup.

This technique, though ancient in terms of visual effects, is still used in modern production. The old-school backdrops are giving way to digital work environments that can project any world, stationery or animated into the background of a production. The Mandalorian is a prime example of using digital background screens on stage as the modern equivalent of the painted theatrical backdrop or green screening (chroma keying).

BACKDROPS IN iCLONE

Backdrops are also possible in iClone. We just don’t use that terminology. With proper camera positioning and lighting, we can use a video backdrop in iClone either as the workspace background or on a plane (a genuine backdrop in this case) for more control over the look of the video. These shots are generally limited in time, usually one minute to as short as fifteen seconds. Generally used as filler or transitional shots.

The main point of using this type of backdrop in a digital workspace like iClone is to convey a more complex scene than is actually being animated. This saves on computing resources while combining to make the scene much more cinematic. Video games have long used static backgrounds to push the scene past the 3D assets used in the foreground.

We can create a landscape, city, or other scene in iClone just for the background. Video and images rendered from that scene can be used as the backdrop for a master scene with props up close to the camera.  Adding in the element of a moving, animated background can make a scene seem much more in-depth and alive.

In this first instance, the rolling backdrop was made in Unreal Engine, but you can make them iClone too, it just depends on what fits your needs or your tools.  

A large-scale landscape was set up in Unreal Engine. I then used a cinematic camera running parallel to the hills and mesa in the background. Scene lighting was also done in Unreal as well as atmospheric composition (fog, clouds, etc.). This was rendered as a video and then used as the background in the iClone project.

This iClone project itself couldn’t be any simpler. This is beginner-level animation. The only thing moving will be the steering wheel and the actor. The steering wheel will drive the arms via Reach Target dummies.

CREATING THE SCENE

In this case, we can set up the scene in iClone and then drag and drop the video onto the background, particularly if the video slows your computer down during playback. If your computer can handle the video then drag and drop it onto the workspace background at any time.

From here we will need at least one character for the driver and some type of automobile. Preferably with moving wheels that can be animated if you want to show them in the camera shot. This shot is a great example of how simple or how complicated you want iClone to be. A closeup camera angle will eliminate the need for animating the wheels or you can pull the camera back to show more of the vehicle.

STEP 1:   Link the driver to the vehicle in a sitting position with legs extending out but not through the vehicle body in case you want to do a wider shot.

Character linked to the vehicle in a sitting position.

STEP 2:  Use Reach Target Dummies to position the hands on the steering wheel.

STEP 3: Animate the steering wheel by moving down the timeline and stopping at different intervals while slightly rotating the steering wheel back and forth to simulate driving. This creates keyframes in the timeline. After you do a few of these keyframes you can then copy those frames and paste them repeated down the timeline at varying intervals.

Note the position of the hands on the wheel and on the timeline. You can also see the repeating copy and pasted keyframes.
As in the preceding image, note the position of the hands and the keyframe on the timeline.

OPTIONAL STEP

Just as we did with the steering wheel, with the vehicle selected you can move up and down the timeline at varying intervals moving the vehicle up and down to simulate a rough ride. I have exaggerated the movement somewhat so you might want to be more subtle with your movements. We want a rough ride, not a rollercoaster.

It helps to blend the sharpness of iClone with the different look from the background video. The simplest way is as old school as it gets and still works… a colored image overlay like brown, blue or whatever matches the scene, setting the image to low opacity.

This is the epitome of quick and dirty, but it used to be a major method of toning down contrasts between assets, like a dull background and a bright foreground before digital color matching became a thing. If you don’t happen to have color-matching software or something like After Effects or Hitfilm you can use this method. It helps to knock down the contrast between differing elements such as the video backdrop and the foreground objects since an image layer is first in the composition.

A view of the Image Layer which also frames the shot.

A short, animated GIF demonstration of the final output using this simple backdrop method:

CREATING BACKDROP IN iCLONE

As I mentioned earlier you can also create rolling backgrounds in iClone to be used in the same backdrop method as above. Layout a landscape scene and use a dummy and camera combo or just a camera to roll along the landscape from left to right or right to left. In the early days of iClone 7, I created a tutorial that showed just how to create such a rolling background with a dummy and a camera. It still works in iClone 8 and provides a more thorough step-by-step guide.

Why use the dummy when I could just animate a camera? For me it’s habit and it gives me a much larger visual reference for the camera movement when I am looking at the scene from a long distance during set up.

iClone 7 tutorial explaining how to create a rolling background in iClone. You can then render the video out for use as the background or backdrop.

I also mentioned another method, using a plane instead of the workspace background. This achieves the same result but gives a little more control over placement of the backdrop in relation to foreground props.

Right Click, note that is RIGHT-CLICK not left-click the video when dragging and dropping to get this menu:

This right click method can also be used for images as well as videos. After this just resize and position the plane to your needs.

Left: Using image plane instead of workspace background. Right: Framed shot from camera in left image.

This gives us control over opacity, self-illumination and diffuse color that otherwise would not be available if we used it as the workspace background.

SUMMARY

While these are all beginner-level techniques, they still go a long way to getting the job done in the right circumstances. Using backdrops adds more eye candy without bringing your computer to a standstill or slugging along making edits difficult. It makes the scene more complex and interesting to the viewer when used properly. Lighting and blending go a long ways toward making various 3D elements blend together in a more seamless manner.

I hope this helps!


USING IMAGES TUTORIAL

There is another iClone 7 tutorial that still holds true today about using images, image layers, and image planes in general with iClone to produce a more robust filler scene with little overhead. It’s worth a look if you aren’t familiar with the technique and the video also has other helpful tips that you can use on other projects. I will be adding more up-to-date tutorials for future articles but for now, this will explain the concept of images in a more detailed manner.

MD McCallum - WarLord

MD McCallum – WarLord

Digital Artist MD “Mike” McCallum, aka WarLord, is a longtime iClone user. Having authored free tutorials for iClone in its early years and selected to write the iClone Beginners Guide from Packt Publishing in 2011, he was fortunate enough to meet and exchange tricks and tips with users from all over the world and loves to share this information with other users. He has authored hundreds of articles on iClone and digital art in general while reviewing some of the most popular software and hardware in the world. He has been published in many of the leading 3D online and print magazines while staying true to his biggest passion, 3D animation. For more information click here

WarLord’s Workshop: A Look at the Headshot 2 Mesh Feature

Some of you reading this already know about the power of Character Creator and how it’s improved over time with more features and tools. There are many new users joining our ranks that are not quite sure just what Character Creator is, so for them, I’ll start with a little overview then we will move onto the Headshot 2 Mesh feature that allows anyone to put a custom head on a functioning Character Creator body.

When I first got into creating 3D assets, with Studio Max as it was known then, I purposely avoided creating a particular asset. A 3D mesh character. It wasn’t the making of the mesh that I didn’t like. Rather it was the extensive skinning of the mesh to the bone structure that could consume a day or two very easily with most of that spent on the fingers and other smaller joints.

Anyone who has rigged (skinned) a 3D skeleton knows just how time-consuming it can be and what a creative buzz kill it is. I could turn out a lot of props in the same time it took to skin a character.   Even skinned props were much easier unless they had a lot of small bones.

BACKGROUND: Character Creation

Back in the early days rigging was a term used to set up a character with a control panel for animators. Each moving part had to be wired to a panel with controls created out of splines. That wasn’t a bad job compared to skinning but that is how complicated animation used to be. Now rigging has become synonymous with skinning so don’t be confused if you see the terms used in different ways at different times. Control panels have fallen out of favor with modern tools so rigging means skinning to a lot of creators.

To give you an idea of what it was like to create a character 10 to 15 years ago, at least in my pipeline, you have to imagine a long process, days and at times a couple of weeks just to get a character created, rigged, reviewed, and revised to meet the needs of the animators. First was the concept art drawn by a fine artist which was then turned into a T-Posed character mesh. This was sent upline for approval and was revised through a process that eventually created a working character.

After this, at least in my case, the skinned mesh was sent to a texture artist with UVs mapped out. Sometimes the artist would map their own UVs, but it was another layer of the process in the making of a character and turned out some stunning work in the final product. Specialists ruled the day back then completely different than today’s Generalist approach to work where we do just about everything instead of a production pipeline of artists.

I’ve told you all this just to get to this point:

Character Creator 4 does all this work for you.

If you are not new to Character Creator, then you already know the power of the tool but if you are a new user just getting a first look there are some things you need to know. You are provided with male and female base meshes skinned and ready to go. These can be used as a base model to export out in FBX or OBJ to the clothing maker of your choice like Marvelous Designer. The clothes you make are then imported into Character Creator and skinned with a few clicks. It doesn’t have to be a head mesh. You can extract or cut the head off an existing mesh and use the process to transfer it to a working CC character.

ZBrush GoZ is also integrated into Character Creator allowing for a seamless transfer of the base mesh to and from ZBrush. This allows us to harness the power of one of the most creative tools in the industry to re-sculpt the base mesh to fit our needs. You can also create clothing and accessories in ZBrush as well as paint the textures. All this without exporting and importing and these are just a few of the great tools and features available in Character Creator 4.

Making characters is now a pleasant experience with Reallusion taking out the manual skinning. You can still tweak the automatic rigging results with yet another skinning tool that gives bone-by-bone access.

We can all be character developers now. We can use our own concept art, use third-party sources or whatever pops into our head to make unique characters to use in production or sell in the Reallusion Marketplace. In today’s world, with expenses growing, you can leverage your character-creating skills with an extra income stream from the marketplace and you can include props too. So Reallusion isn’t just giving us an opportunity to make our own characters for storytelling but they are providing a method of future income for those that choose to sell assets in the Marketplace.

GETTING STARTED – The Cat Burglar

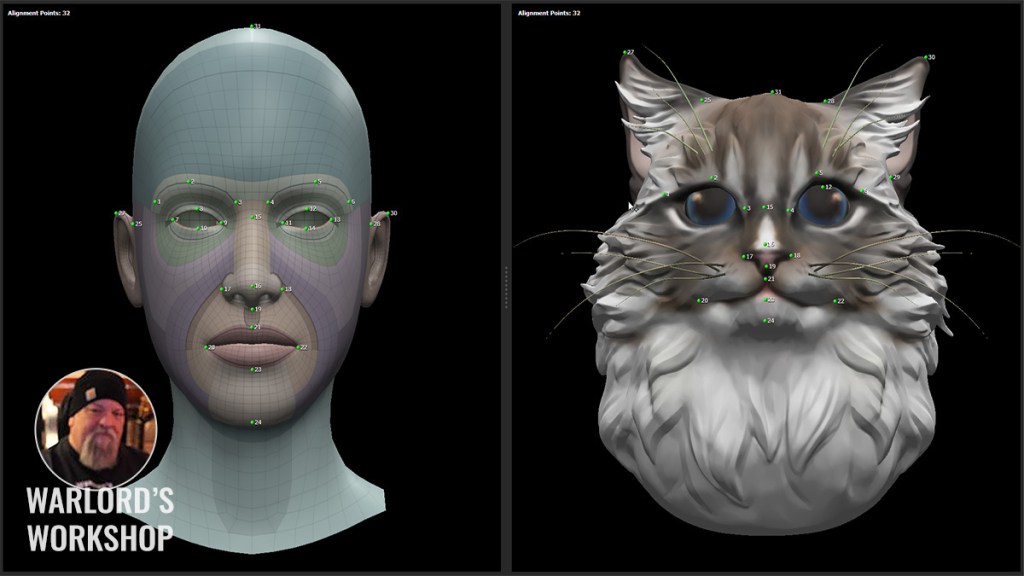
Headshot plug-in version 1 focused on image-to-head technology. Version 2 adds a new mesh tool to the mix that works like a head wrapper that transforms the base mesh shape into the imported head mesh. While the image tool in Headshot is still a go-to tool, the new mesh feature takes the plug-in to another level. In our first example, I downloaded a cat’s head model from Sketchfab by nonlly. After dragging and dropping the head mesh into the Character Creator 4 workspace I centered it in the viewport and started the Headshot mesh plug-in process by clicking the Mesh, Start Head Generation buttons. I had my head meshes already textured before starting this process and bringing them into CC4 Headshot 2.

“Imagine cat” (https://skfb.ly/6R6Qv) by nonlly is licensed under Creative Commons Attribution (http://creativecommons.org/licenses/by/4.0/).

Once the mesh was loaded up, I manually placed the markers, 32 of them, across the imported mesh while being careful to define the ears. This may sound like a lot of markers but it’s really not and doesn’t take long once you’ve done a few of them. The face itself goes quickly and this head mesh did not need extra markers to delineate a more complex mesh shape. In some cases, I have found that extra markers are needed when the back of the head is a more radical shape than the native mesh.

Take care to mark non-human ears to better shape the mesh during the process.

From here I refined the mesh a bit but not extensively and unchecked the box to retain the original neck shape. I could have spent more time here, but I got great results the first time out. A subsequent Doberman model took a little back and forth to get the mesh shape right. For that model I went back and forth from Align Points to Head Gen a few times to move some markers. There was nothing to it.

In the end it turned out to be a great anthropomorphic Cat character that can wear Character Creator clothing and accessories.

The Cat Burglar Character

So, this character became, of course, a cat burglar and if you are going to have a cat burglar then we need a Police dog so that was my next objective as I found a nice full body Doberman mesh by InaweofGod on Sketchfab which I took into 3DS Max and removed all but the head and neck of the dog.

CHARACTER 2 – Police Dog

“Doberman” (https://skfb.ly/6UZPt) by InaweofGod is licensed under Creative Commons Attribution (http://creativecommons.org/licenses/by/4.0/).

From this point on I followed the same process I used with the Cat head except I had to use more markers. I ended up using 40 to get the results I wanted. This will vary between users and will become even simpler as the community learns and shares more tips and tricks.

Showing some of the 40 Markers used with the extra marker defining the back of the head and neck.

Even with the back and forth it only took a matter of minutes to get the results I needed. This looks like a good area for experimentation to see just what can be done with this new tool. Since I’m a notorious iClone asset hoarder I dove into a golden oldie, the Occupations Police Officer, to use the accessories and cap along with stock pants and shirt texture black to match the hat. Before long, my anthropomorphic version of a Police Dog was born.

The Doberman Police Dog character in Uniform and Casual. I even gave him a muffler for that long neck on cold days.

Below is another example of other characters I created during testing with the Headshot 2 plug-in.  They range from ZBrush-created and kitbashed to Sketchfab meshes. All created functioning characters in less than an hour except for the first few attempts. Once I got a few runs under my belt it became much easier and much quicker to turn out a character with this method.

Other characters created during testing using the mesh feature.

SUMMARY

In future installments, we’ll be taking a look into what is being done with Character Creator. We’ll also look at how users take Headshot to new levels of creativity producing some of the most unique characters in the Reallusion universe.  

With Character Creator 4 and Headshot 2 just about anyone can make characters that are not only functional but dynamic and cinematically exciting adding another element to your production or helping you create assets for others to realize their production dreams.

MD McCallum - WarLord

MD McCallum – WarLord

Digital Artist MD “Mike” McCallum, aka WarLord, is a longtime iClone user. Having authored free tutorials for iClone in its early years and selected to write the iClone Beginners Guide from Packt Publishing in 2011, he was fortunate enough to meet and exchange tricks and tips with users from all over the world and loves to share this information with other users. He has authored hundreds of articles on iClone and digital art in general while reviewing some of the most popular software and hardware in the world. He has been published in many of the leading 3D online and print magazines while staying true to his biggest passion, 3D animation. For more information click here