Relative.berlin started, like many successful studios, as a collective of friendly freelancers working together out of someone’s living room. Over the years these friends have gotten closer, welcoming new additions to their team, in an effort to create a wholesome company with a passion for creative output at a high aesthetic standard. In less than 10 years, the team created video productions for global brands such as Universal Music, Mercedes, Honda, McDonald’s, and Kinder.
The relative.berlin’s core family consists of 10 creatives. The perfect mix of aesthetically minded pixel pushers and playful tech nerds, who challenge each other to stay up to date with the latest looks, trends, and tech innovations. Building on the foundation of motion graphics and 3D animations, relative. berlin has evolved to apply its expertise in photogrammetry, body motion capture, and facial motion capture to real-time animations, VR/AR, digital fashion, and pretty much anything CGI.
Q: Greetings Anders, and welcome to our Reallusion Feature stories. Please introduce yourself, relative.berlin, and your music project.
Hello, we are a creative studio in the heart of Berlin, so rave culture is part of our DNA. During the pandemic, lockdown required isolation, which was very problematic for everyone. Those working in art and culture were faced with profound existential fears. As a studio, we were very fortunate to have had the opportunity to continue working on projects through those hard times and we felt like we wanted to give something back to the community.
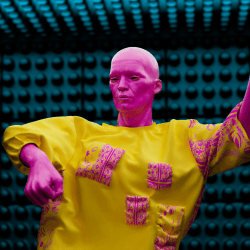
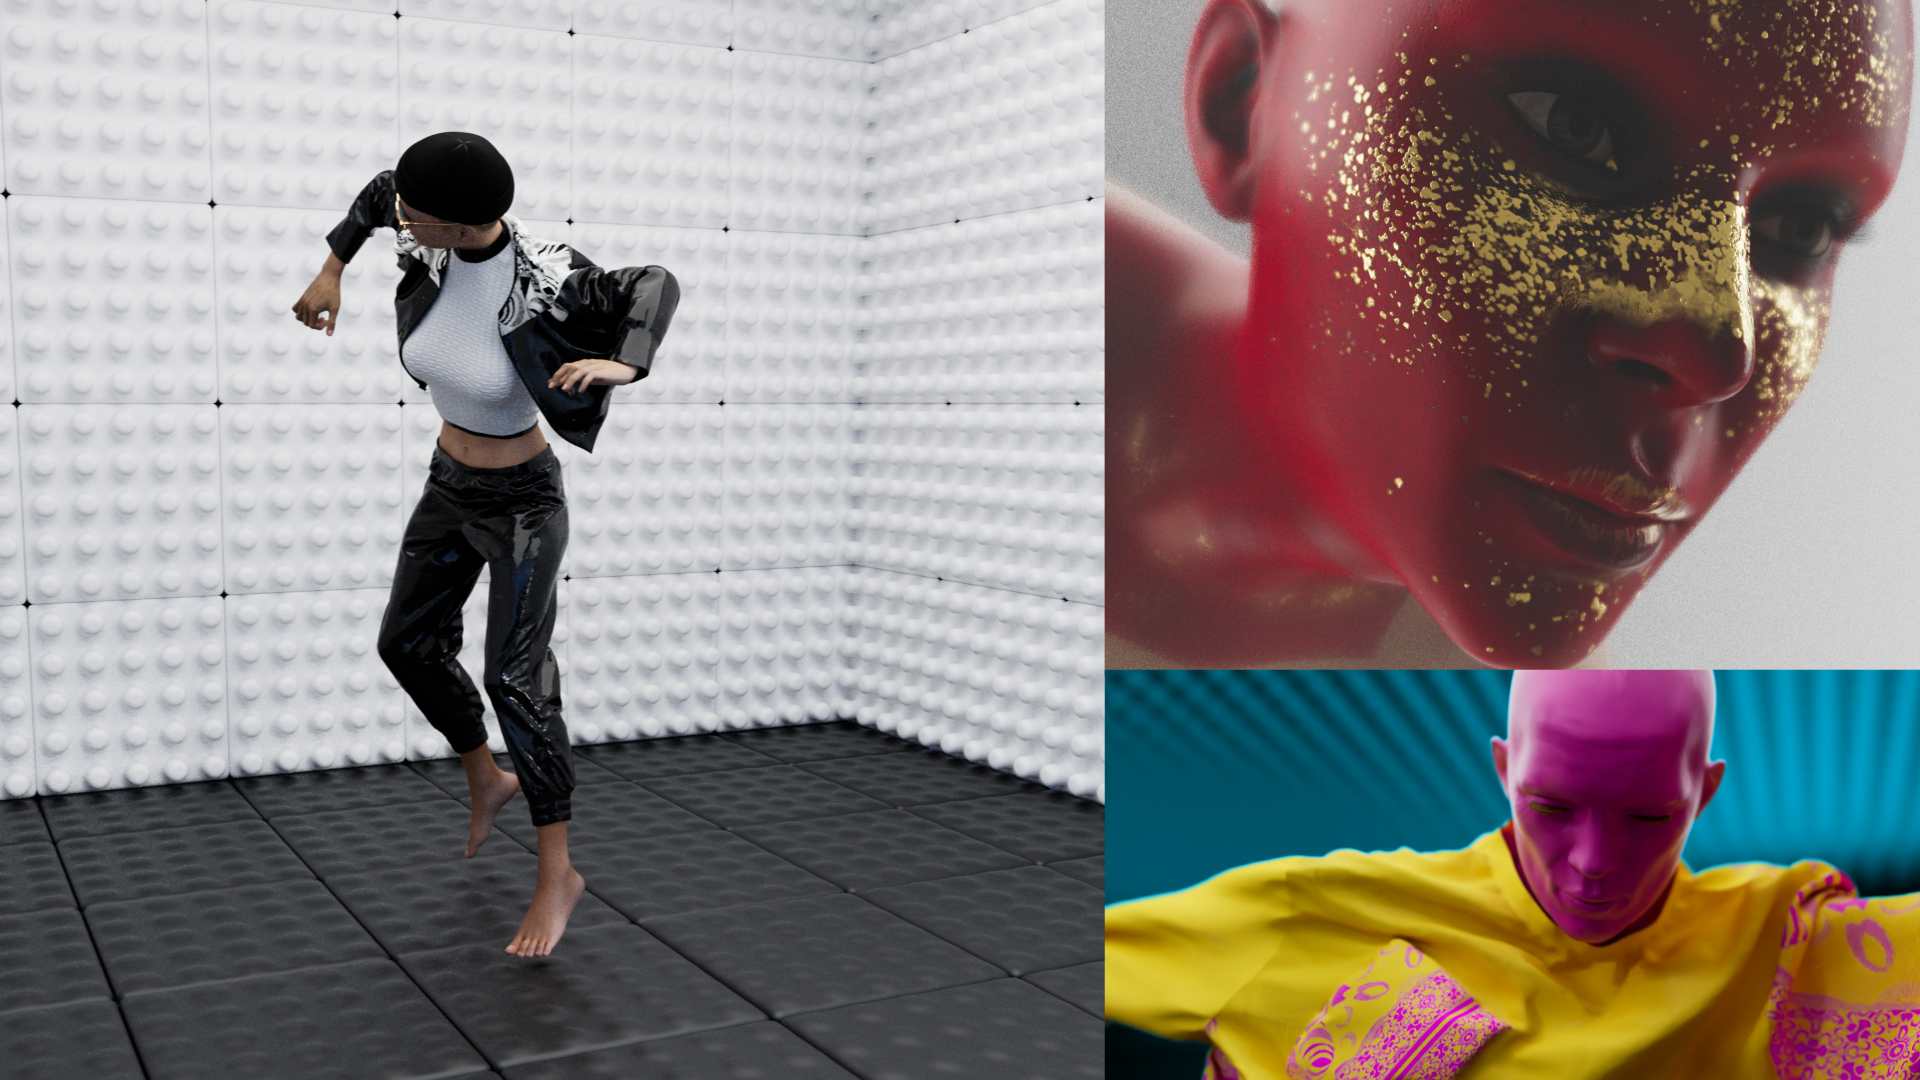
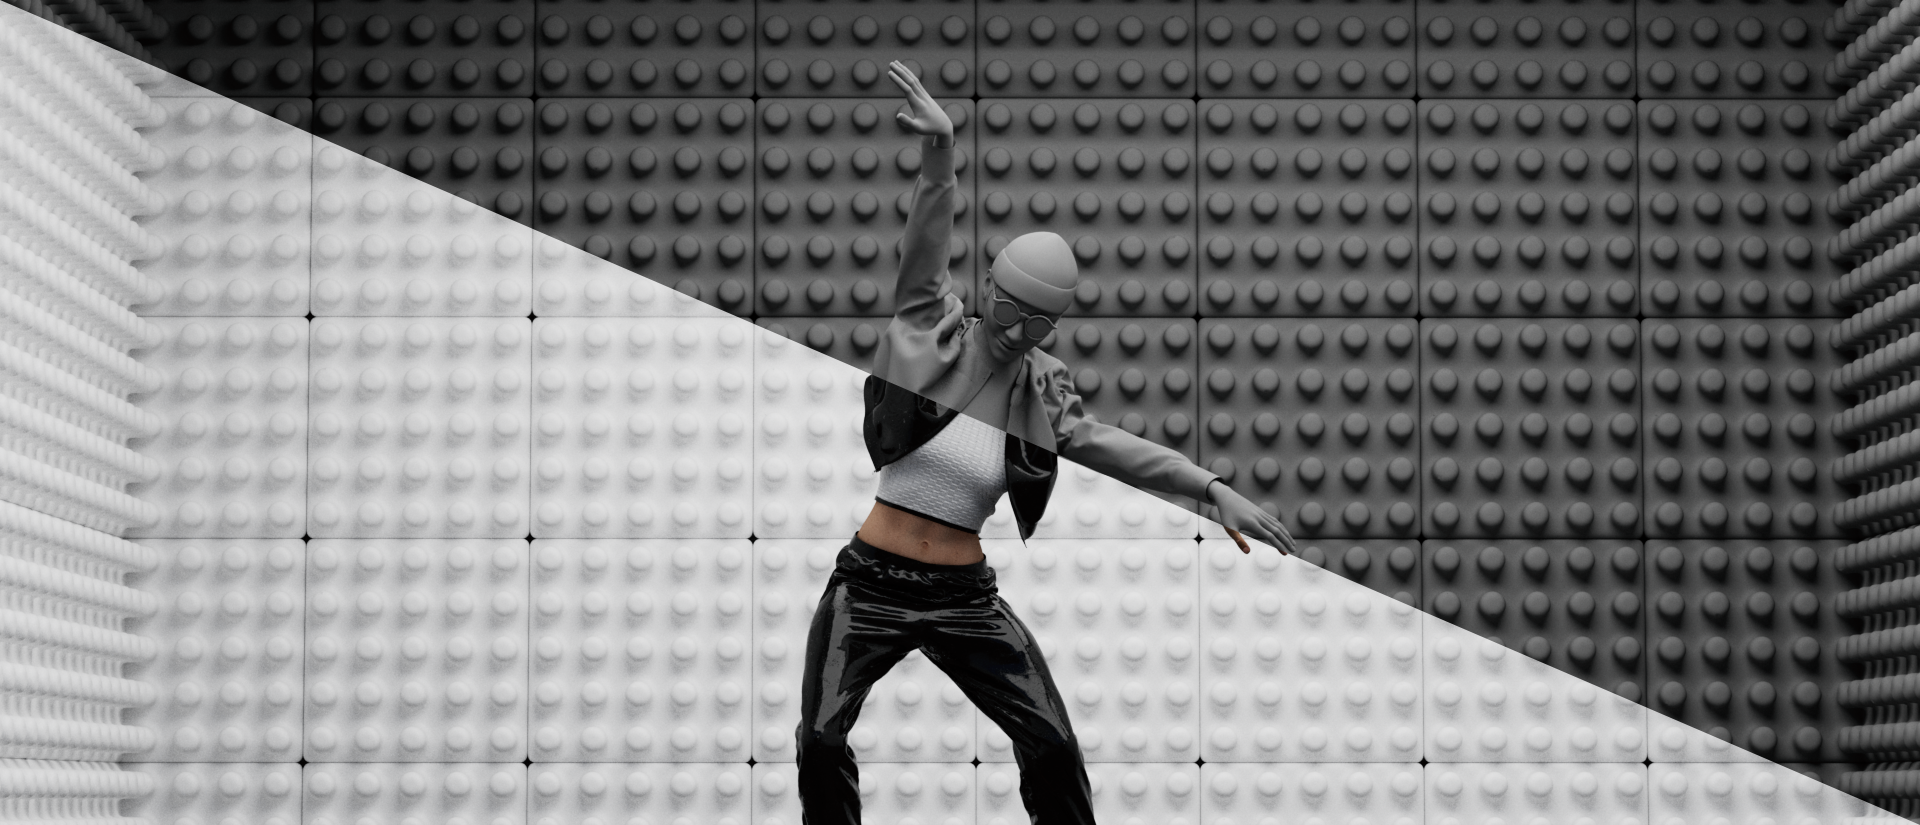
So it was an exhilarating pleasure to make a music video for our good friend DJ Taube and his song “Where To Go?”. The video shows a madman raving in a padded cell while imagining being on stage in front of thousands, and a lonely dancer expressing their feelings through movement in undefined confined spaces. It is an expression of our collective feelings about the lockdowns of the past few years, and it was a therapeutic exercise to turn those feelings into art.
Q: There is a lot of software being used and integrated. Can you tell us how long it took for your team to familiarize themselves with iClone, and Character Creator, and figure out the whole 3D animation pipeline?
We began our journey with Character Creator (CC4) in 2021 and afterward started combining it with iClone (iC8). As we come from a traditional 3D animation pipeline we knew we had some challenges we would have to solve in terms of developing a pipeline for this project. We needed both flexible and fast tools for the character animation, as we would have approximately 4 minutes of motion-captured data. After some days of trial-and-error, we found multiple ways we could integrate both Character Creator and iClone into our pipeline with great effect.
Q: Can you share some of the latest iClone features used inside Taube’s ‘Where-to-go’ music video?
Sure! There are several features that we found powerful during the production process. First, we used Character Creator to build the model that fit our photoshoot dancer. This also made it a lot easier for us to begin the next step in our pipeline, applying the movements in iClone.
“We have previously tested other software for cleaning Motion Capture data, but in this case, it would not have be an option because of the complexity of this project. The biggest value we found in the Reallusion tools was the capability and variety of options to clean motion-captured data in real-time software.”
Anders Mortensen | 3D/2D Generalist in relative.berlin
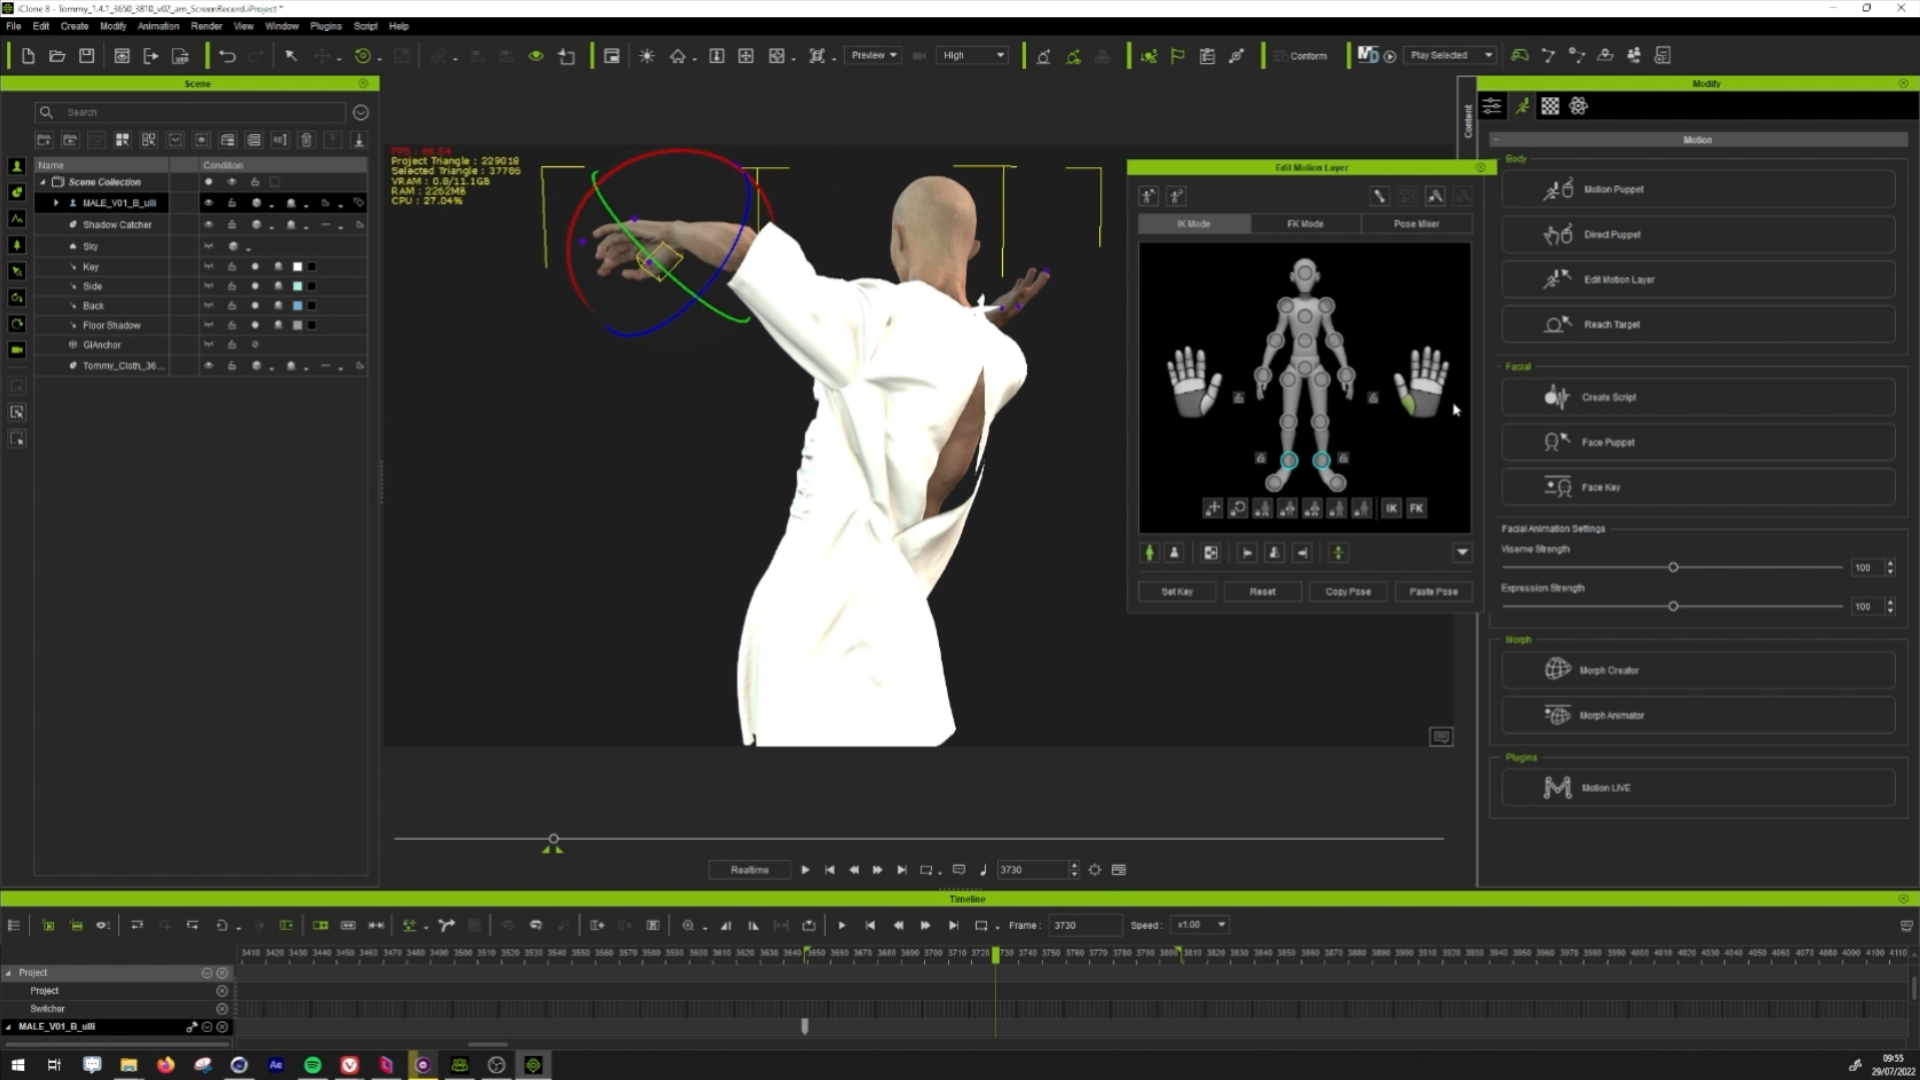
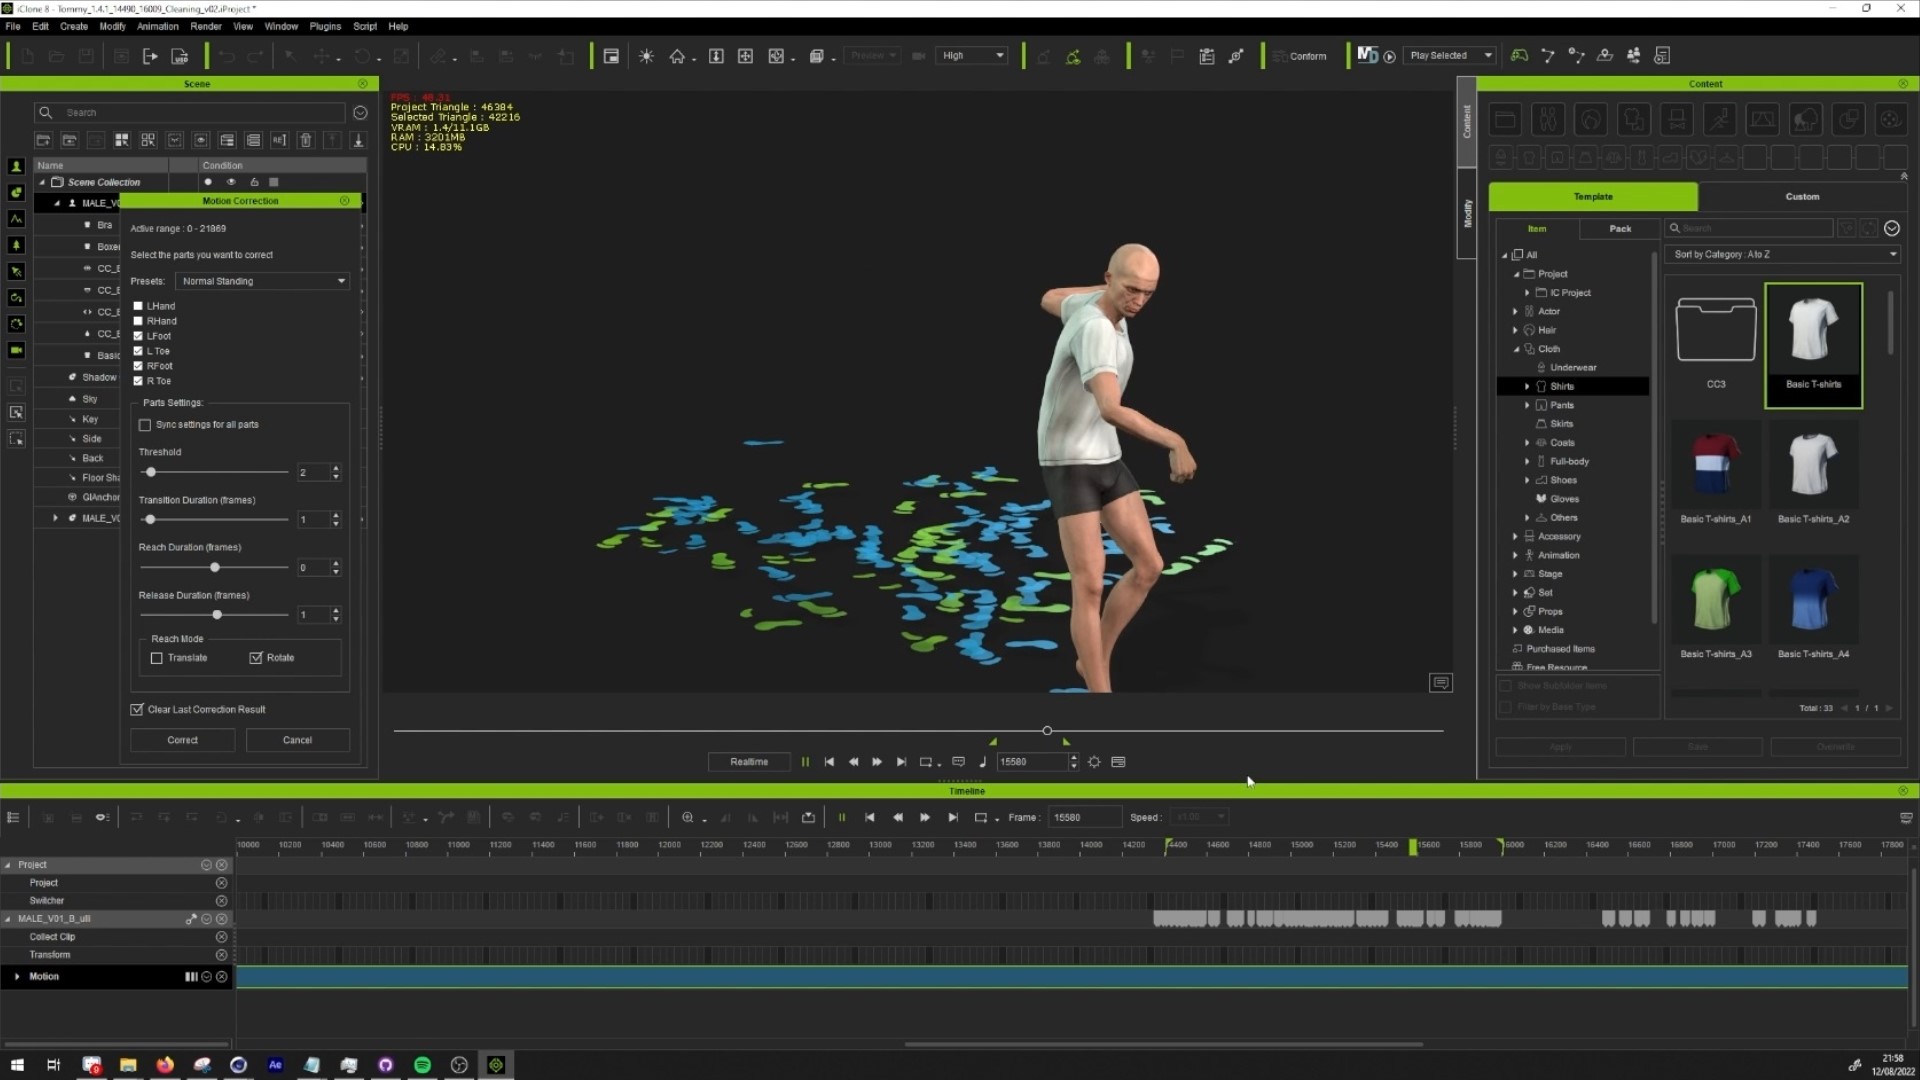
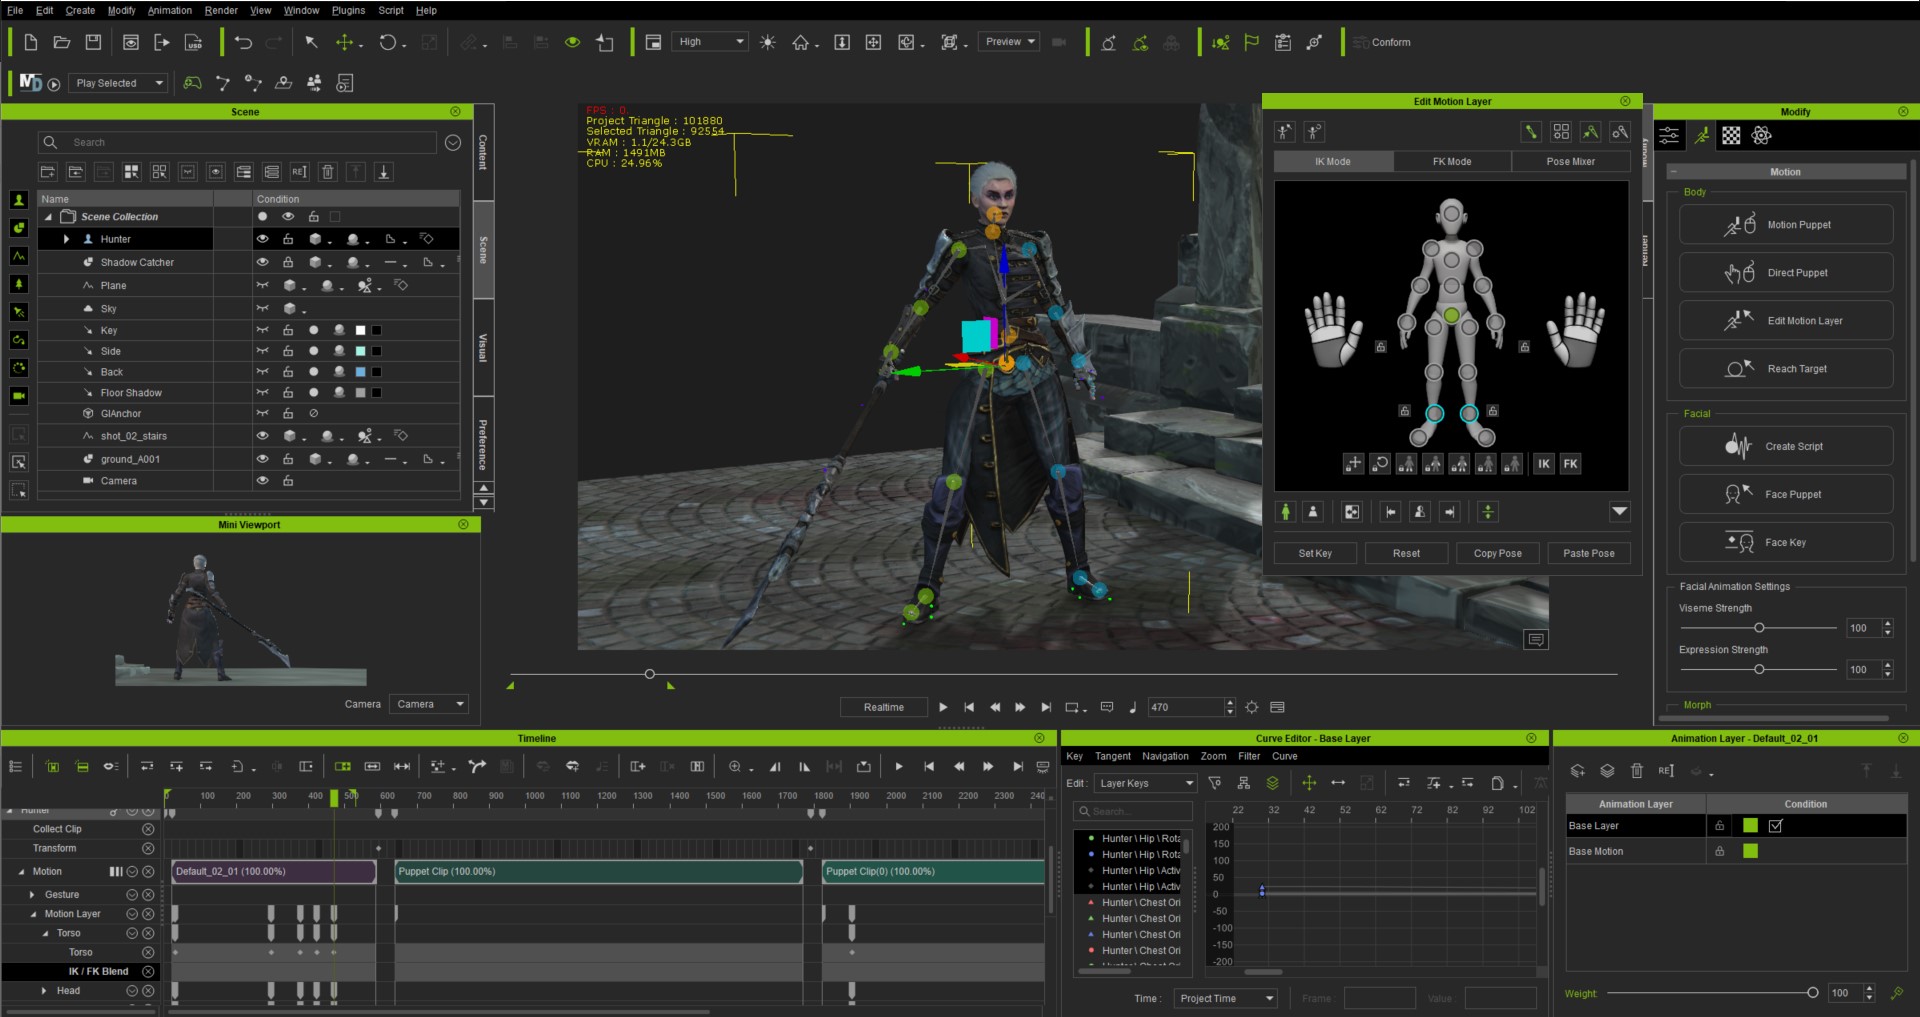
For doing the motion clean-up and preparation, we used several new features from iClone 8 such as motion correction, foot contact, flexible frame rate, and other different cleanup tools. This was super useful in order to make sure we could maintain a fast character animation working pipeline without losing too much time on preparing the motions for the later steps of the pipeline.
Motion Layer System
What came in super useful for us was the newly added feature of accessing our recorded data at both the part level and bone level, this way we could correct even the smallest things on all bones. And it made it possible for us to quickly ensure high-quality cleaning in our pipeline.
Reach Target Integration: foot contact and correction
As we had a lot of shots that included feet interacting with the floor, this became an essential and stable feature during production compared to manually having to correct this. There was a lot of floor stomping inside this project, so this feature really helped us to fine-tune the movements of the madmen.
Flexible frame rate features
As flexible frame rate was introduced in iClone 8 we were sure it would be a perfect match for our pipeline, as we could now combine assets from different parts of the pipeline in one place instead of having to convert to each asset. Especially, the recorded motion capture data and cloth simulations we now could handle without any big hassle and even see in real-time if there were mistakes.
Q: The clothing of the characters played a big part in this project. Can you share what value you found in Reallusion tools?
Importing cloth simulations to check for possible mistakes before sending them to the next step in the pipeline saved us a huge chunk of time, as we could combine everything in one place. By using this part of the workflow we were able to also adjust the motion data to give better and more interesting cloth simulation results. By seeing where there was an opportunity to get an extra “swing” or create room for the simulation to give extra details.
Another big point was utilizing the Smart Gallery so the people working in this step of the pipeline could easily share and update files without losing time on import/export.
Q: We love the way you create. Would you tell us a bit about what we can expect from you in the near future?
In the future we see ourselves working in many different areas of the animation/media industry. As we gain more and more experience with character animation and motion capture, we feel confident to take an even bigger step in that direction. We believe that the development of the Metaverse will bring a high demand in character development for avatars and fields like digital fashion.
Currently, we are in collaboration with a big game company, providing high-quality animated characters for their products. As we are constantly walking the line between aesthetics and new tech, we are sure we will stay relevant and challenge the limits of what is possible in these exciting times.
Born in Chicago, Libertas started out with a passion for filmmaking at an early age, and since he’s had a desire to tell grand and fantastical stories featuring brave heroes on epic quests in lush and vibrant worlds, much like his Assassin’s Creed-inspired micro-short film “Modern Assassin Training Session”.
Libertas admits to always dreaming bigger than his shoestring budget could afford. Even still, he loves creating characters and their costumes to see them come alive, especially in his Youtube short films. Outside of his day job as the Manager of Videography and sole 3D generalist at his company, he spends his free time, once again, dreaming big and crafting new characters, costumes, and props for his digital actors who are instrumental in bringing his epic stories to life for the audience community and not just himself.
When I saw the trailer for Character Creator 4 (CC4), I immediately wanted to see just how good the new extended facial profile was going to be. Having worked as a videographer in a marketing department for over a decade, I have to say, I am suspicious whenever I see such impressive new features promoted in new products. I knew Reallusion was going to showcase this new extended facial profile on their best models, but I wanted to see how good it would work on a character I had already made in CC3. So I chose Ashley, one of my digital actors that has been featured in several of my previous videos.
To start, I wanted to set a baseline. I used the face calibration animation in CC4 on Reallusion’s character avatar Camila—who you have probably seen in the trailers. I was immediately blown away by the details in the eyes and slight variations in the face. To me, these subtleties brought the character to life. This showed me what was possible. But, could I get as good of results with my animated 3D character?
I then created a new scene and imported Ashely. And as an additional baseline, I wanted to use her original facial profile, which is now called “Traditional”. This would allow me to see how much the “traditional” profile varies from the “extended facial profile.”
One of the amazing things about using this facial calibration animation is it allows you to see where your character may need to adjust their profile to account for what I call “facial anomalies.” For instance, Ashley’s eyes never closed all the way. I just worked around this in the past, but with CC4 I can update the facial profile using the Facial Profile Editor.
After converting Ashely to utilize the CC4 Extended Facial Profile, I opened up the editor and looked for the eye blink sliders. Using the available expression tools, I was able to modify this morph to adjust for the anomaly. I then saved these changes and my animated 3D character no longer had issues blinking her eyes.
With the changes made to the profile, I again ran the calibration test and reviewed the results.
I feel that while the differences can be subtle, they provide a big overall improvement.
The human face is so difficult to animate, because of the small subtleties that we see daily and take for granted. And when they aren’t in the animations, we instinctively know something looks wrong. And that is why I like this new extended profile, because these improved and expanded morphs aim to capture those subtleties, therefore, they add additional realism to the character.
My only caution would be that the neck now has morph shapes, so you will need to be cautious about how the neck interacts with clothing items such as turtlenecks, as those are rigged to the armature and not the morph shapes.
Since my test showed such great improvements, I wanted to take it to the next level and test out theDigital Souls Pack which has been developed by Reallusion to fully utilize this new extended profile.
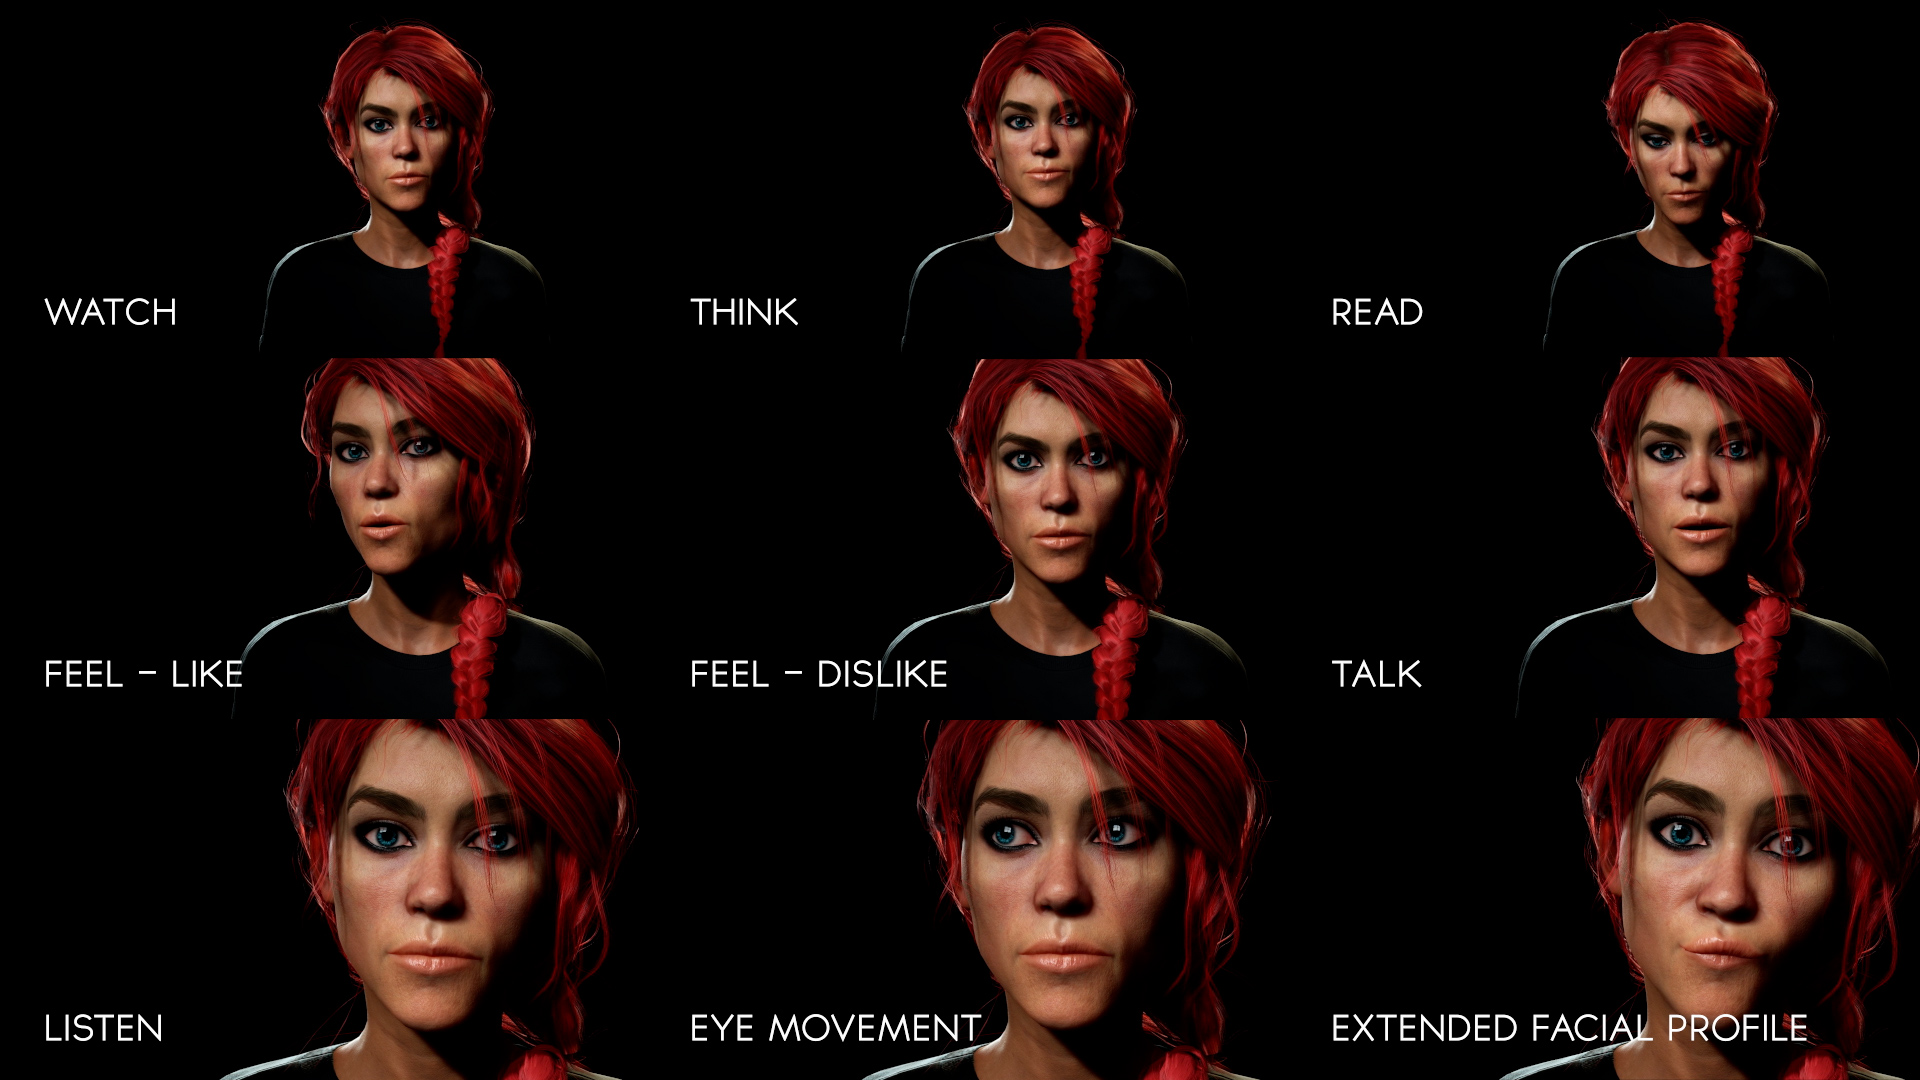
If you haven’t heard of this pack, Digital Soul is a set of facial animations focusing on character expressions. Usable in both iClone 8 and Character Creator 4, it comes with over 140 subtle animations across nine different categories.
What I love about all these are the subtle eye movements and expressions that bring your characters to life. I fully believe it is one of those “must-have” packs because it has so many applications.
For me, I use facial animation to tell visual stories. My characters are my digital actors. Therefore, I can see these expressions being perfect for reaction shots in my videos. Or, with the nice eye movements, they can easily be used as a base for a lip sync animation. Then you can further build upon them with the Face Key or Face Puppet tools, and in the end make a truly unique performance.
This can also save you a lot of time with background characters. Instead of manually animating every background character (which let’s be honest, isn’t really your top priority), just add a few of these animations on the timeline and your background characters are now telling a little story of their own.
In the end, this pack does take advantage of the new extended facial profile and I see it being such a useful and versatile tool to have in your animation pipeline. If you would like to learn more about it, check out this link to get a deeper insight into the animations it provides.
Free Auto Rig Program Delivers Exceptional Results for All Platforms
Original character from Tom Breuer
Reallusion, the developer of Character Creator and iClone animation software and the leader in real-time digital human creation, has launched AccuRIG, a free brand-new software application that takes 3D character auto rig experience to the next level.
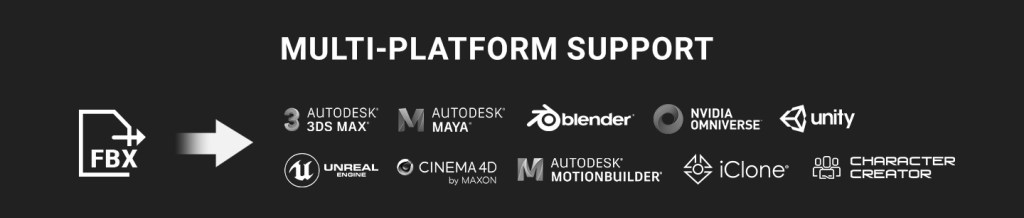
Aiming to reduce production effort for model artists, AccuRIG is an application designed for fast and accurate character rigging, allowing users to automatically turn their static models into 3D animatable characters with simple steps, making them ready for export to industry major platforms including Unreal Engine, Unity, Blender, iClone, Omniverse, Maya, 3ds Max, MotionBuilder, and Cinema 4D.
Character rigging is a painstaking process that requires a lot of effort yet often ends up with unsatisfactory outcomes. Embedded with our advanced character rigging technology, the intuitiveness of AccuRIG enables anyone to rig characters with professional results, through automation and simplicity, saving users time and toil thus allowing them to focus on the creative part of production.
Charles Chen, CEO, Reallusion, Inc.
Now Anyone Can Rig
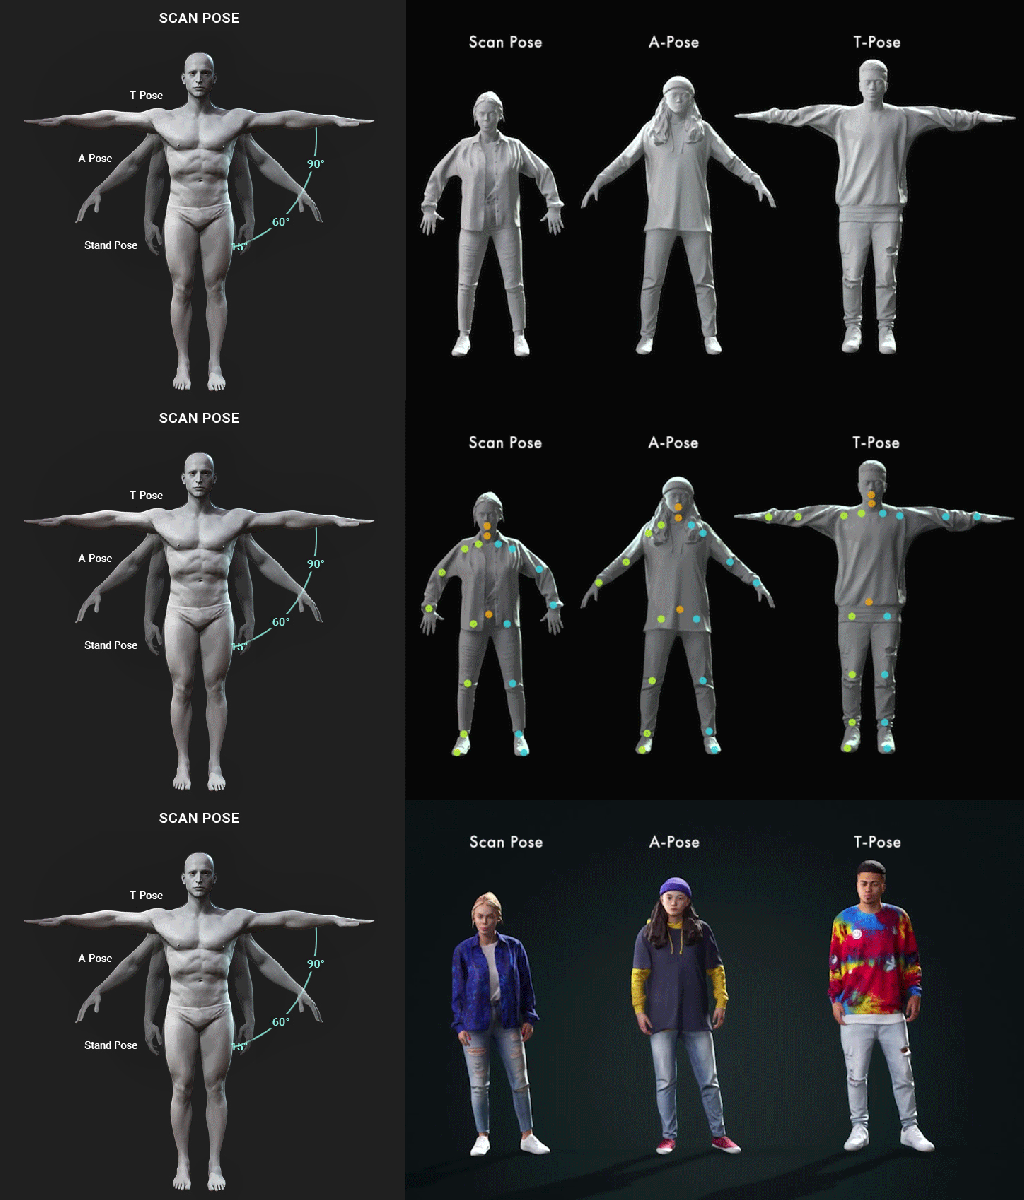
Whether the model is in a T- or A-pose, take it to AccuRIG and follow its easy steps to auto-rig right away. The program also provides handy functions to manually finetune body and hand rigging, with a variety of preset motions to check final results.
Users have the option to export the model to the animation-ready format including FBX, USD, and iAvatar, or upload the newly rigged character to ActorCore’s online content store to real-time preview thousands of 3D motions with the uploaded character.
Rig Humanoid Models of All Kinds
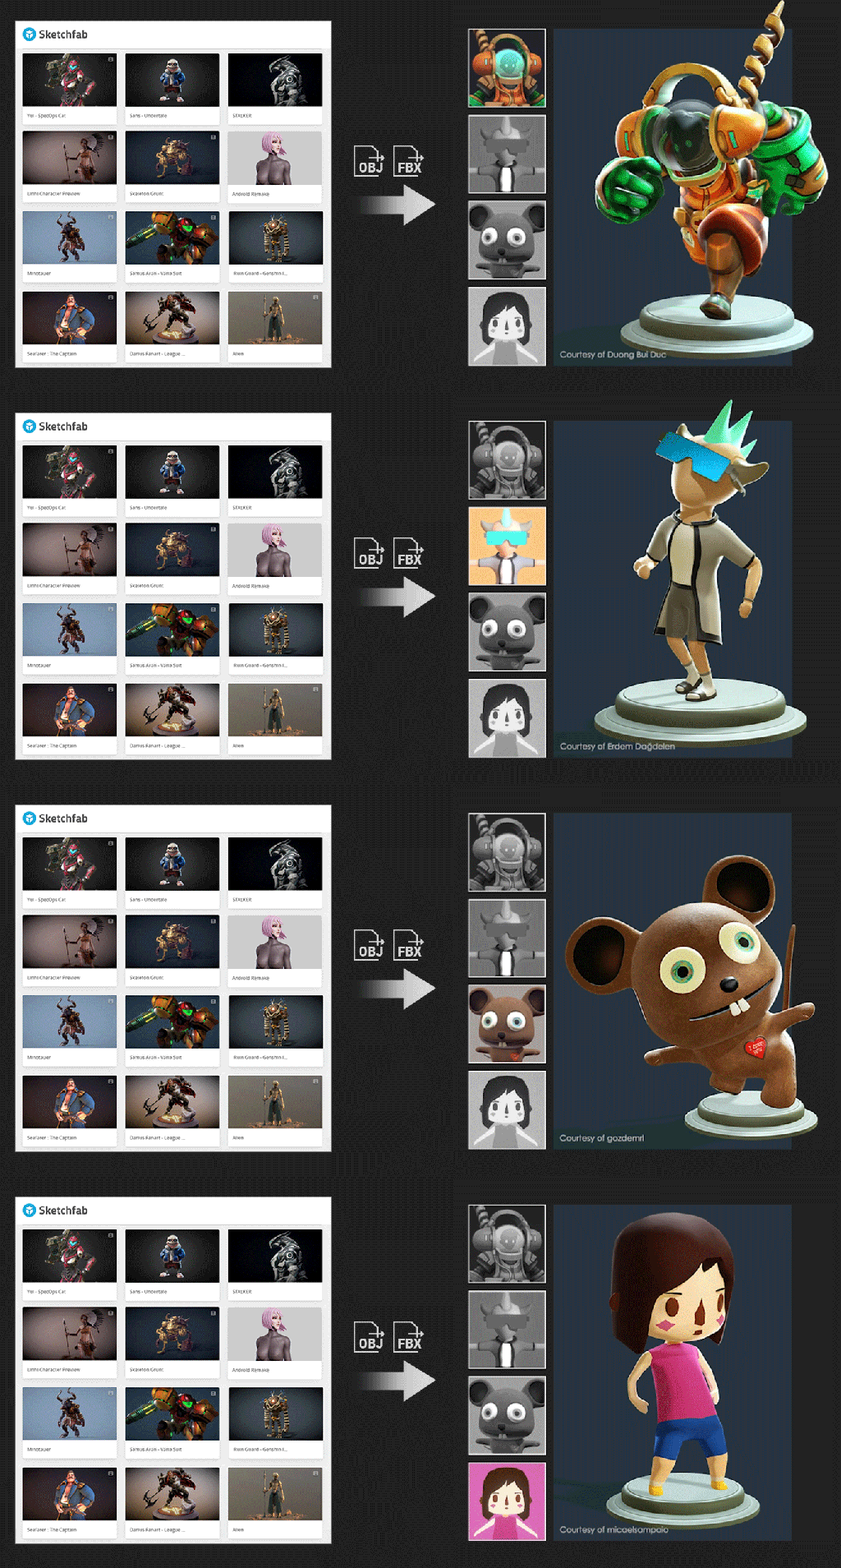
3D users can now take advantage of hundreds of characters available for download on online asset stores such as Sketchfab, easily turning un-rigged models into animated characters. Artists can transform their own creations into rigged characters, immediately increasing their asset value in the marketplace.
Concept artists can benefit from the AccuRIG free auto-rigging tool by quickly changing their models created with ZBrush or Blender into professionally rigged characters, enabling them to display creations with a variety of poses and accelerating the process from sculpting to animation for 3D productions.
With AccuRIG, a scan studio can release staff from repetitive manual processes and automatically turn 3D scanned people into high quality, rigged characters – saving a tremendous amount of labor costs, which is particularly crucial for large projects.
Next Generation Auto Rigging Technology
The free AccuRIG application has empowered users with Reallusion’s advanced character rigging technology. The program can deal with mesh types with hundreds, to hundreds of thousands of polygons, and also all kinds of spread poses as it emphasizes on many crucial details that often fail with standard auto-rigging tools:
Workable with multiple-mesh models with cloth and accessories.
Automatic axis correction for models with different palm facing and arm raising angles, highly optimized for 3D scan people.
Intelligent skin-weight that preserves volume for head, body and accessories.
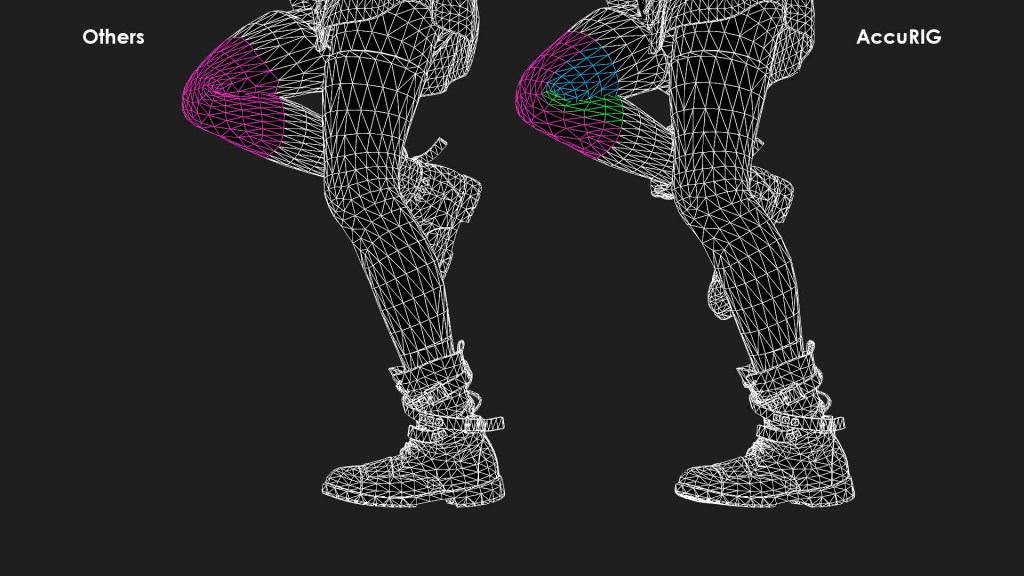
Bending joint optimization for natural bend shape – knees, wrists, elbows and fingers.
Accurate finger rigging, even for models with less than 5 fingers.
Twist bone rig for smooth wrist and heel rotation.
Manual joint definition for optimal skin-weight calculation.
Joint masking for arbitrary pose rigs, such as models with hands in the pockets.
Pose offset for posture correction.
These technology advancements allow AccuRIG to achieve superior results while keeping simplicity and automation for production efficiency.
Partitioned skin-weight for natural joint bending
Enjoy Thousands of 3D Motions on ActorCore
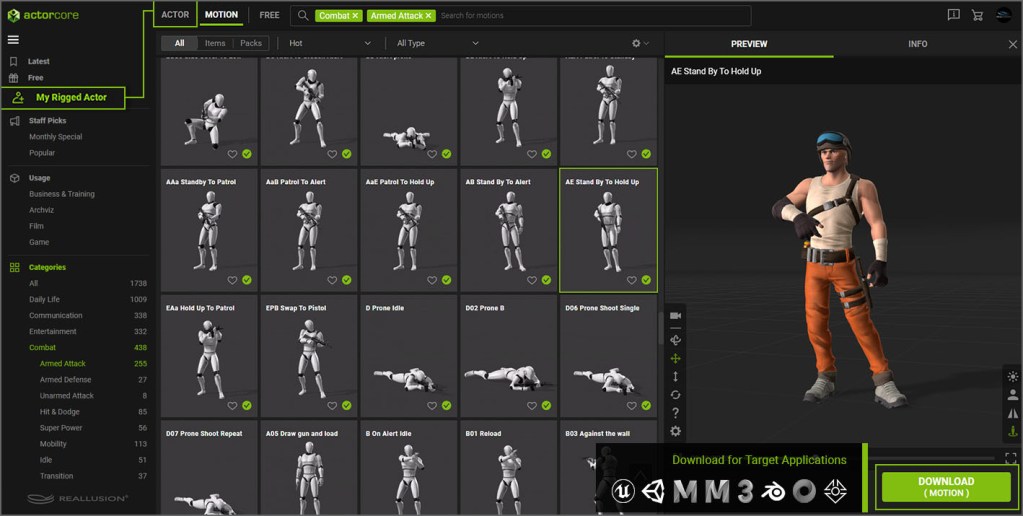
In AccuRIG, rigged-ready models can be directly exported to most 3D platforms, or uploaded to ActorCore, the 3D asset marketplace for real-time animation. There users can explore an extensive library of mocap animations professionally produced to ensure the best quality and practicality. All ActorCore 3D motions are in well-planned themes designed for game, film, interactive projects, archviz, training, simulation, digital twins and more.
Quick Search and Easy Export for Animation
The ActorCore online asset store gives users an interactive 3D viewing experience for their models with available motions. Users can also quickly search and explore related contents using category and keyword. All ActorCore motions are in FBX file format compatible with major 3D programs.
FREE Download: AccuRIG Application, 3D Motions, 3D Characters
AccuRIG is a free program offered on ActorCore, designed to give users a full experience of high quality auto rigging with the best results. ActorCore also provides users with freely downloadable 3D characters and mocap animations. Simply become an ActorCore member to access these free resources. Sign up now!
Varuna Darensbourg is a traditional and digital artist with a deep passion for video games as a storytelling medium. Growing up, he drew comics and made movies and animation with anything he could get his hands on. He studied Art & Animation in college at LCAD and has been working in the film industry at SDFX Studios as a compositing artist and supervisor on films such as Avengers, Mad Max and Blade Runner. In his spare time, Varuna has been working with his wife, Michelle, to develop an original video game using Reallusion’s tools and Unreal Engine.
Q: Hi Varuna, welcome to our Feature Story series. First of all, congratulations for another DreamWork animation film, The Bad Guys, which just came out in 2022.
Apart from being a Digital Compositing Supervisor, fewer people know that you are a developer on your indie game project.
Could you give us a brief intro of your artistic path as a character/game artist and what pushed you to start developing your own games?
Thank you! I am extremely proud to be a part of bringing The Bad Guys to theaters. The crew I worked with did an incredible job converting the entire movie into 3D.
My artistic path began at an early age. My imagination was creatively spurred on by comics, animation and video games. I was obsessed with the idea of creating these amazing things! I sketched and drew comics a lot growing up and always envisioned bringing my characters to life.
As an artist, I find the digital tools available these days immensely exciting, especially the ability they have to enable a solo artist to develop their concepts into fully animated, talking characters and interactive environments. I approach digital art with a tremendous love for traditional art and a respect for the limitations that artists faced before computers became such powerful conduits for creative expression.
Demon Girl (created and rendered in Character Creator 4 with additional tools such as Substance Painter, ZBrush)
Working in the industry has been both challenging and immensely rewarding. I work on big projects, but my field of work on those projects does not actually involve any of my interests in animation, storytelling, or character design. As an artist & storyteller, that passion and need to create never stops. Over the years, I have explored many tools for creating my own projects and in 2019, I began to narrow my personal creative passions on game development.
For me, video games are an incredible medium for storytelling and the tools currently available are unbelievable. Character Creator (CC) has given me a lot of control over creating the sort of characters I want in my project. The animated characters I have created so far have me beyond excited and confident that a Reallusion pipeline will allow me to produce the character quantity and quality I am seeking to achieve as my project progresses.
Symphony of Demons
Q: The ongoing Symphony of Demons game project has very unique design for each demon.
Could you share with us your artistic concept of this game, from character, music, and sound design to the worldview of this game?
This project has several underlying concepts that are driving the overall aesthetic. It is a story-driven action-adventure based around a young demon girl learning new things about herself and the unique world around her. Many of the core concepts will be left for the player to unravel, but I want the art to support a sense that characters and environments all have a sense of history behind them.
For both the animated characters and environments I am aiming for a sweet spot between stylized and realistic. I love art that has a balance of bold shapes and select detail. As this project progresses this will become more prevalent. Everything from the visual art to the sound is based on contrasting themes like old and new, strange and familiar; much like the work of Guillermo del Toro and Studio Ghibli, but with a Dune and Fifth Element twist.
For Symphony of Demons we are doing more planning than usual in regards to writing music. I tend to compose music based on a feeling I am trying to capture. This works well for ambient soundscapes that instill a feeling of mystery and intrigue. For this project however, I am collaborating with Michelle for vocals and to write some more intentional music. This is new territory for us, but we are beyond excited about it.
Like many artists, I pull inspiration from sources like Animation and Comics, however, a key factor in my approach to world building stems from nature and growing up in the Sierra Nevada mountains; surrounded by forests, fields and creeks. Having a familiarity with different environments can enhance your approach to many things on a creative level. Comics like Elf Quest, Jeff Smith’s Bone and every Studio Ghibli movie are prime examples of worlds where the environments solidify your connection and understanding of the characters that exist within them. My goal is to capture a similar connection in Symphony of Demons.
Q: Why does it have to be a game, instead of other mediums like an animation film?
There are several reasons this project must be a game. Video Games are an incredible and versatile storytelling medium. They have evolved into a wonderful, interactive, sensory experience that can meld so many different art forms together and immerse the player in incredible ways. Basically, the platform is helping me focus all of my interests into a single project and collaborate with my wife to breathe life into a world of strange characters. I won’t lie, it’s all very daunting, but I am extremely driven to do it.
Q: How Reallusion tools help you achieve such goals?
When my wife and I worked on the Reallusion 2021 Lip sync contest, we ended up re-writing and re-doing all the dialog in the last four days leading up to the deadline. We had a new idea and acted on it. iClone’s Lip Sync tools made that decision possible and also helped us develop a pipeline that easily translated into our game project.
One of the most important yet challenging components to character dialogue is facial expression and lip sync. Even in AAA games they will often bypass having to include these elements to reduce time and cost. Reallusion’s tools actually make including high-qualitylip sync and natural expressions a possibility for smaller developers. The base CC characters all have fully functioning face rigs and morph systems which allow for many different, modular approaches to using them.
For me, theiClone Acculips and Animation layering system changed everything. After a few tests, I knew I had a pipeline that would enable me to achieve the results I was seeking. The best part of it all, is that compared to doing it all from scratch… it’s fast. Crazy fast!
Create the detective’s lip-sync animation in iClone 8.
Additionally CC and iClone provide me with a level of sanity. Any motions, characters, clothing or morphs I create or purchase are all organized and quickly accessible in a shared library. This allows me to find, test and re-use anything on new or existing characters, or create new content based off of items in my library by using the GoZ pipeline. Having this hub for my character development has helped reduce the overwhelming nature of game development and in a way, separate the character development into a department that I can visit any time and easily bridge to Unreal when needed.
Q: We’ve known Varuna since your first game project Salvage in 2019. At that time, you still use ‘iC7+CC3+UE4’ pipeline, instead of the current ‘iC8+CC4+UE5’ pipeline for Symphony of Demons.
Either the game concept or the upgrade of software, how do you see the change of yourself through these 2+ years?
Over the past two years, my goals evolved as my skills grew. The more I worked with Character Creator and expanded additional skills, the more potential I saw to tell a more character driven game than I originally envisioned. Now with the release of CC4, iC8 and UE5, the possibilities are unbelievable. Switching to the new updates has been intuitive and very inspiring. These updates certainly injected fresh energy into the project.
CC4 alone immediately improved my workflow.There are many things I can list, but the ability to quickly create and map custom expression morphs using GoZ is incredible. Additionally the ability to test your characters at any time with animation and lip sync presets without leaving CC4 is a massive workflow improvement. Combining CC4s improved facial profiles with iClone 8 also gave me an immense sense of reassurance that I could produce thesubtle character performancesmy project required.
Q: Many character artists are familiar with ZBrush and Substance Painter, but don’t really know how to turn their characters into a game character that is ready for animation.
Could you share your experiences on using the GoZ pipeline with Character Creator and iCone?
While working on Salvage, my 3D sculpting and modeling skills were extremely limited, but I still built many fun, original game characters using the deep morph system inside CC. When I joined reallusion’s character design contest in 2020, I was really impressed with the content other artists were creating by combining CC with tools like ZBrush or Blender. I was intimidated, yet inspired. Sculpting and modeling skills are not required to utilize Reallusion’s tools, but if you do have additional 3D skills, especially sculpting, you can really maximize the full potential of the software.
The competition showed me this, so I took the time I needed to develop those skills. For me, learning the basics of ZBrush took some time, but the Character Creator GoZ pipeline is so fast, powerful and intuitive, it’s beyond worth it! For anybody already familiar with ZBrush and Substance, adopting Character Creator is one of the fastest ways to get your custom characters up and running in a game engine and still have the ability to quickly test and update things.
Create Creepy Detective with GoZ pipeline.
Q: Also, as your self-taught testing result on UE5 has successfully WOW the audience,
what would be your advice to learn the mechanism of a game engine (UE or Unity) from scratch? What could they start from?
For anybody new to Game engines like Unity or Unreal Engine, my advice would be to look at the engine as a studio that has different departments that all handle different tasks. E.g. Animation, Level Design, Game mechanics. Break it down in a way that makes sense to you. If you just jump into the programs and try to make a game, it can be very overwhelming. If you pick a department to start in, it’s far less challenging. Pick something that you have the most interest or existing skills in. Focus on your strengths and ease yourself into the things that intimidate you.
If you are excited about environments and world building, it is entirely possible to spend months just focused on the world building tools inside a game engine. While doing that, you will not only learn the interface, but you will begin to learn about other things that tie into other departments.
In Unreal, for example, iClone & CC make it very easy to get your custom characters into the engine, but you will still need to understand how the Blueprint and material systems function. Youtube is filled to the brim with tutorials for any game engine, but it still helps to break your focus down into digestible blocks or departments and chart out your tutorial choices based on your initial focus.
Additionally, the Unity and Unreal markets are loaded with many amazing things, but even the best assets will require you to understand how they work inside the engines. I have no programming skills, so for me, it is very important to know what assets will help me achieve my goals. For me, it helped to learn some of the engine basics with some free content and then I was able to understand the true value of the marketplace items and what tools and plug-ins would benefit my project.
Q: Metaverse, XR, NFT, the technologies become more and more accessible to everyone.
As a Digital Compositing Supervisor for almost a decade, how do you see the development of Animation / Film / Game industries for indie developers and pro studios in the next 5 years?
From my experience, current technologies have already shifted industries. The use of Virtual sets is becoming more common and has reduced the need for some forms of compositing in both film and streaming content. Advances in real-time engines have started to change the landscape for both large and small studios and I believe it’s going to change rapidly moving forward.
Reallusion and Unreal Engine are already on the forefront of this, with real time tools pushing all of the visual mediums to new heights as well as allowing smaller studios to produce more complex projects, create unique gameplay and tell stories in new ways. Over the next few years, I don’t believe tech will fully erase practical sets and VFX though. Instead, it will allow teams to work more efficiently and put more funding into necessary areas, while reducing time and money spent in others.
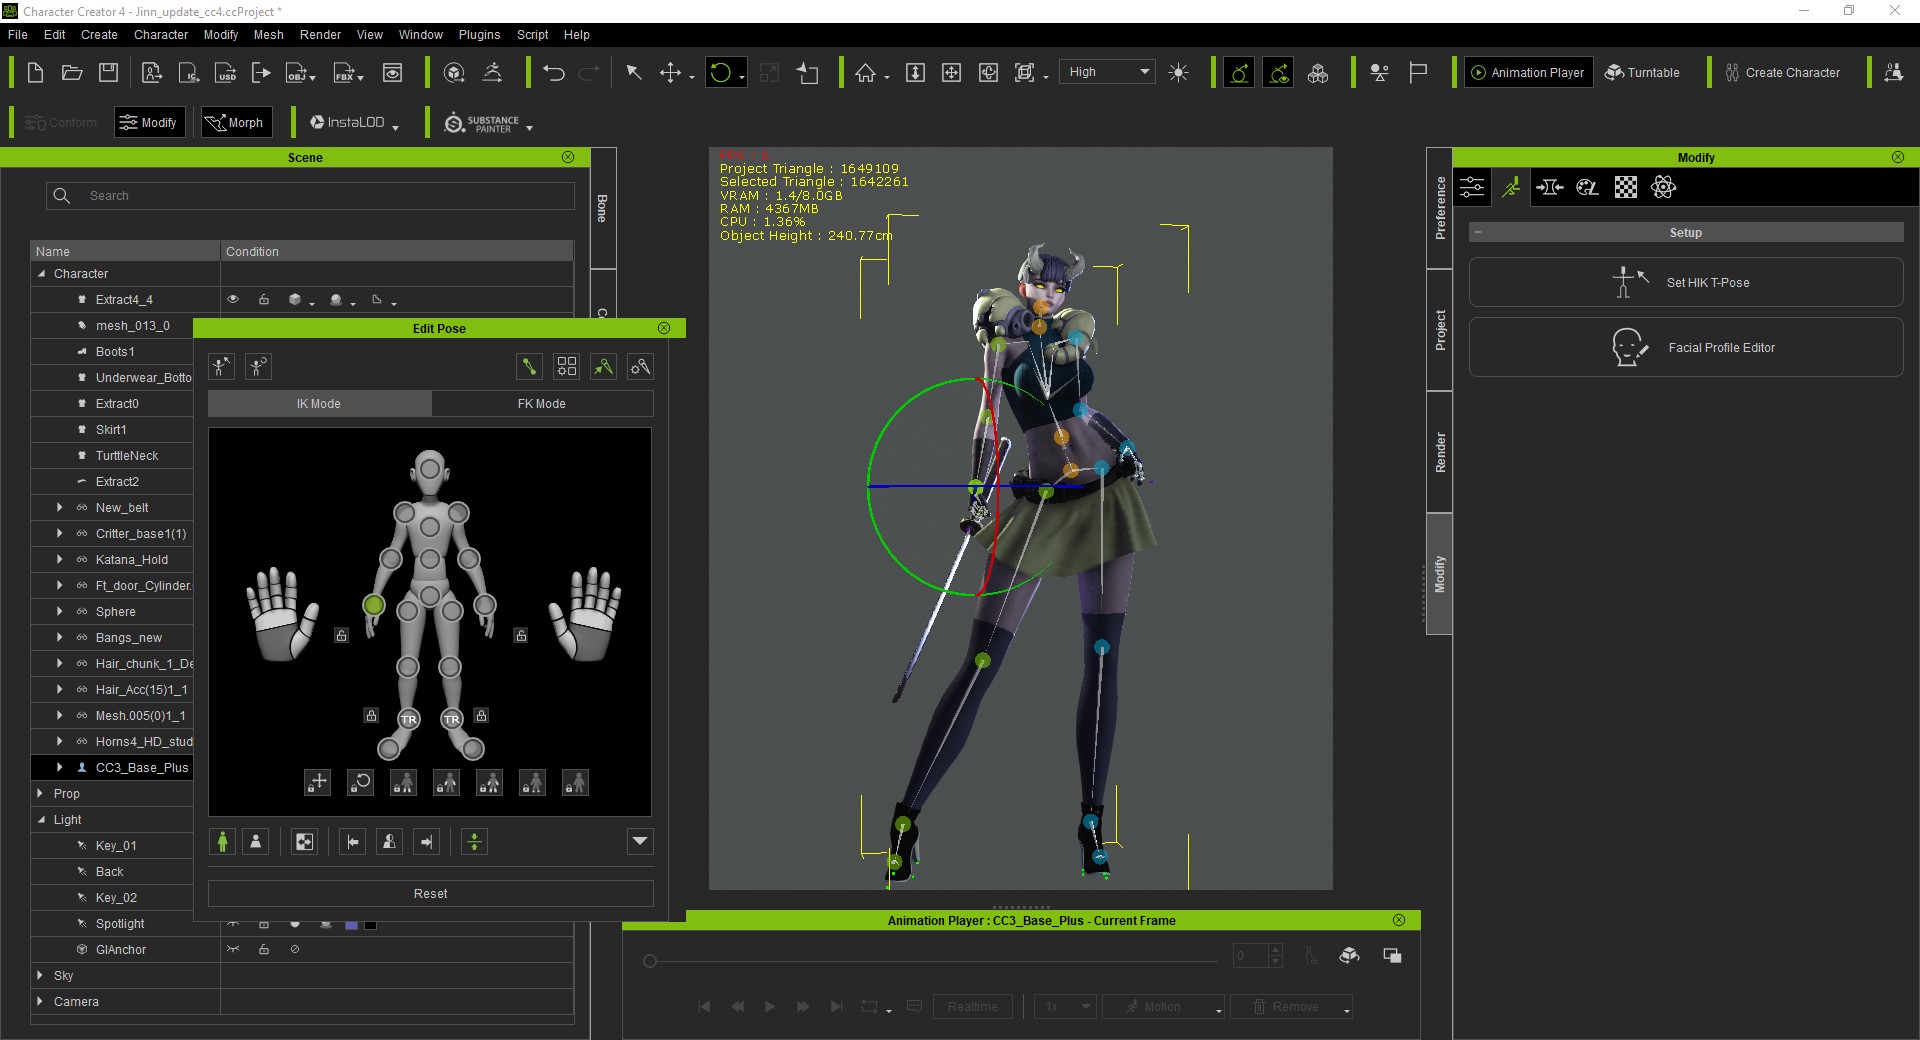
Editing Demon Girl’s poses in Character Creator 4.
I’m not sure where Metaverse and XR are headed, but I’m sure AI will impact those things in many ways. In the next 5 years, I believe AI generated art will have a massive impact on both pro and indie studios. Currently there seems to be a lot of fear that AI is going to steal something from artists, but like all digital tools, it can be used to enhance one’s existing skills as well as a studio’s pipeline.
AI generated art is already pretty crazy, exciting and a little scary. What really matters though, is what people do with the technology and the creativity individuals and studios apply to it to bring their ideas to life.
Q: Also, how do you balance between the mainstream commercial demands and your own artistic ambitions?
I will admit, I am still working on a healthy balance between my day job and my personal projects. The industry hours can get very long and I have a bad habit of finishing my day job and then jumping right back into working on my own stuff. It’s good to be driven and focused on goals, but it can help you avoid creative burnout if you just detach from your tech and get outside for a little while. Maybe to walk or just to view the landscape and recharge your spirit. For me, this also helps me return to my art with a fresh perspective, and new ideas.
Demon Girl in sci-fi scene (part of costumes from ‘Rugged and Trendy Collection’).
Q: Could you share 3 things that inspire you most when you start a new project?
For inspiration, I have a few sites I visit regularly when starting or continuing on a project:
Pinterest is handy for just creating boards that represent a feeling you are seeking. I tend to make a few boards that I look at as a wall of thumbnails that immediately give me a sense of an overall aesthetic I am interested in.
Artstation can be overwhelming. The talent posting there is insane! But I have learned to look at it and feel recharged and inspired to push my skills and creativity further.
Games that inspire me tend to be character and story driven. I love Uncharted, A Plague Tale, NieR:Automata, and the The Last of Us series. But I also love games like Dark Souls that are a bit vague on story, yet they weave elaborate clues throughout the world and have a great sense of history and discovery.
Additional YouTube channels that I have found inspiring and immensely supportive:
Cartoon Animator (CTA) is used by animators and media presenters for a wide range of practical uses, from storytelling to explainer videos. Vincent LoGiudice from Squashed Bug Games is taking Cartoon Animator even further and using it to create a side scrolling console game targeted for home arcade consoles.
Vincent has used Cartoon Animator to create game character animations, along with power-ups like mech suits and in his interview with Reallusion, he talks about…
“I found Cartoon Animator while doing research. I tried the program out and found the user experience to be perfect for what I’d be using it for. Things like cut scenes, character animations and even simple poses. Cartoon Animator allows me to draw the character once, and endlessly animate them. Perfect!”
Vincent LoGiudice – Game Developer, Animator
Q: Hi Vincent. Thank you for sharing your project with us. Gaming is such a great opportunity for using Cartoon Animator. When did you come up with the idea of making a console game, and how did you discover Cartoon Animator?
Cartoon Animator has been an instrumental piece to our game Heavy Metal Titans. When I first started Heavy Metal Titans(HMT) in college, I knew I wanted to make a 2D Character/3D Background, linear side scroller game (Metroidvania) like Contra and Metal Slug, since I grew up playing those games in the arcade. I started the project solo and wore all the hats on this project, so I needed a time hack; an excellent tool to boost animation speed, while keeping the game quality maximized.
I found Cartoon Animator while doing research. I tried the program out and found the user experience to be perfect for what I’d be using it for. Things like cut scenes, character animations and even simple poses. Cartoon Animator allows me to draw the character once, and endlessly animate them. Perfect!
Q: You knew you wanted to create your own console game, but how did you settle on the idea of Heavy Metal Titans?
My favorite genre is retro styled games with a modern touch. When creating my own concepts, I am always inspired by older games like Streets of Rage 4. Games with high resolution artwork, high frame and rate smooth graphics. Beyond that, I think I’ve created a bit of an original style of my own.
I played a lot of Metal Slug when I was younger, so when I was brain storming this project; I thought to myself, this game, even though it’s older, is still so impressive and has a lot of re-playability. It was so thoughtfully detailed in quirkiness, art, and comedy. I loved how smoothly it played and required a bit of strategic thinking to be successful, especially with the bosses. You needed to figure out the pattern in which to fight them, and quickly. Bosses I think were one of the coolest aspects of the game with all the individual mechanical moving parts and pieces.
I then thought, how can I make something like this, that can target the newer and older generations gamers while promoting art and 2D animation with 3D backgrounds, because I personally really appreciate 2 dimensional artwork, but can appreciate some depth to the playing field. So I added a 3D background similar to other games in the 90s like Paper Mario.
In addition to Metal Slug, I really love Heavy Metal Music and instantly thought of television cartoon series Metapocalypse; so my art style was really influenced by that show, along with some of the 2D character designs; hence, the game has a lot of metal music (all licensed of course) to keep the vibe very metal.
Q: Has Cartoon Animator made the process of creating characters and game elements easier for you?
It has. Cartoon Animator has streamlined the character creation and 2D animation process greatly. CTA is not the only Reallusion tool I use though! iClone and Character Creator have both also helped me create poses to generate characters, monsters, and other animated props used in Heavy Metal Titans
Cartoon Animator’s ability to streamline workflow, its use of templates, and wide range of animations tools are terrific, but the greatest advantage I can say CTA has is saving time while adding quality to your project.
I use Character Creator to prototype a character, to get their build, clothes; for creatures, I’ll do the same. This specially in my game so I can create poses. I’ll then use those poses with Adobe Photoshop to create my own versions of them, referencing those poses I created in Character Creator. I then make components of these characters and import them into Cartoon Animator.
For some creatures, I use iClone. I did this with our Phoenix boss, and the Cerberos boss. I’ll animate them as needed. Most of the animations that the content creators used for them are already really perfect for what I need them for, so I only make subtle changes for specific things needed. I then render them and import them to Unreal Engine. This is only for place holders though during the design and experimentation phase of my work. Later I will hand draw these creatures and use Cartoon Animator to render them and finally import to Unreal Engine. So I basically use iClone and Character Creator for Proof of Concept during the alpha stage of our game. It’s quick, effective, and allows me to focus on coding the mechanics during development since we’re such a small team.
Q: Having worked with Cartoon Animator now on this project, what features and tools did you find most useful?
I love that I can simply create a new project, import a template character, and replace its components with my own. This process takes me all of 5 minutes tops, and that’s with small tweaks here and there. After that, I can use almost any premade motion as a template and modify it to make it appropriate for the action like shooting, walking with or without a weapon, idle, etc. and change it, making them unique and interesting. Creating and animating a character by hand would takes weeks, if not months, but with Cartoon Animator, it takes me a day or two. This is taking into account that each 2D character design has at least 20 unique animations each.
I can even create animated components for certain bosses/enemies, like having weapons and robot arms/legs separated, so the player can shoot them off as they progress in the battle. It’s super easy and fast to accomplish with Cartoon Animator.
In addition, when I export the animation, it’s simple to export at a specific resolution, which I appreciate, because I need to use a power of 2 due to graphics rendering in Unreal Engine (same goes for other rendering engines but Unreal Engine is my tool of choice).
Q: As someone who took Cartoon Animator and really thought outside the box with it, what advice would you have for anyone looking to get started with CTA?
Jump in head first, it’s a great tool. You’re not going to find anything better, more powerful and affordable. Your return on investment will be very much worth it. I only use it for a small fraction of what it’s capable of and it’s paid off.
Q: So what now? What lies ahead for you in the way of future projects?
In the past I worked on a short Point and Click game called Steve’s Indubitably Awesome Arcade Adventure; however Heavy Metal Titans has far more work put in. I’m very proud of the work we’ve put into HMT and just can’t share it enough; things picked up even faster after I added Chris Williams, my game designer to the team. He’s really added focus to the project and can’t thank him enough for all he’s contributed.
Right now, Heavy Metal Titans is my focal point as it is my most current Cartoon Animator project. It’s been in the works for over a year one of the greatest features in the game, is the work done with CTA.
I’ve thought of other games that can take advantage but it’s really too early to say until I start. Once Heavy Metal Titans is released on all the platforms I’m planning for (iircade, Polycade, Atari VCS, Steam Deck, and Switch) then I’ll have a better idea. The quick answer is Beat Em’ Up games, throwing tribute to Teenage Mutant Ninja Turtles, Golden Axe, and Streets of Rage.
Born in Chicago, Libertas started out with a passion for filmmaking at an early age, and since he’s had a desire to tell grand and fantastical stories featuring brave heroes on epic quests in lush and vibrant worlds, much like his Assassin’s Creed-inspired micro-short film “Modern Assassin Training Session”.
Libertas admits to always dreaming bigger than his shoestring budget could afford. Even still, he loves creating characters and their costumes to see them come alive, especially in his Youtube short films. Outside of his day job as the Manager of Videography and sole 3D generalist at his company, he spends his free time, once again, dreaming big and crafting new characters, costumes, and props for his digital actors who are instrumental in bringing his epic stories to life for the audience community and not just himself.
Over the past few years, I have been using Character Creator 3 to create digital actors for my various micro-short films and reviews. It has made the character creation process not only fast but also so much more fun for me as well. I feel like I have everything at my disposal to create the characters for the type of movies I have always wanted to make. Needless to say, I was very excited when Character Creator 4 was announced, and once available, I immediately jumped in! From my initial tests, these are five of my favorite features that stood out to me right away.
1. Shaders
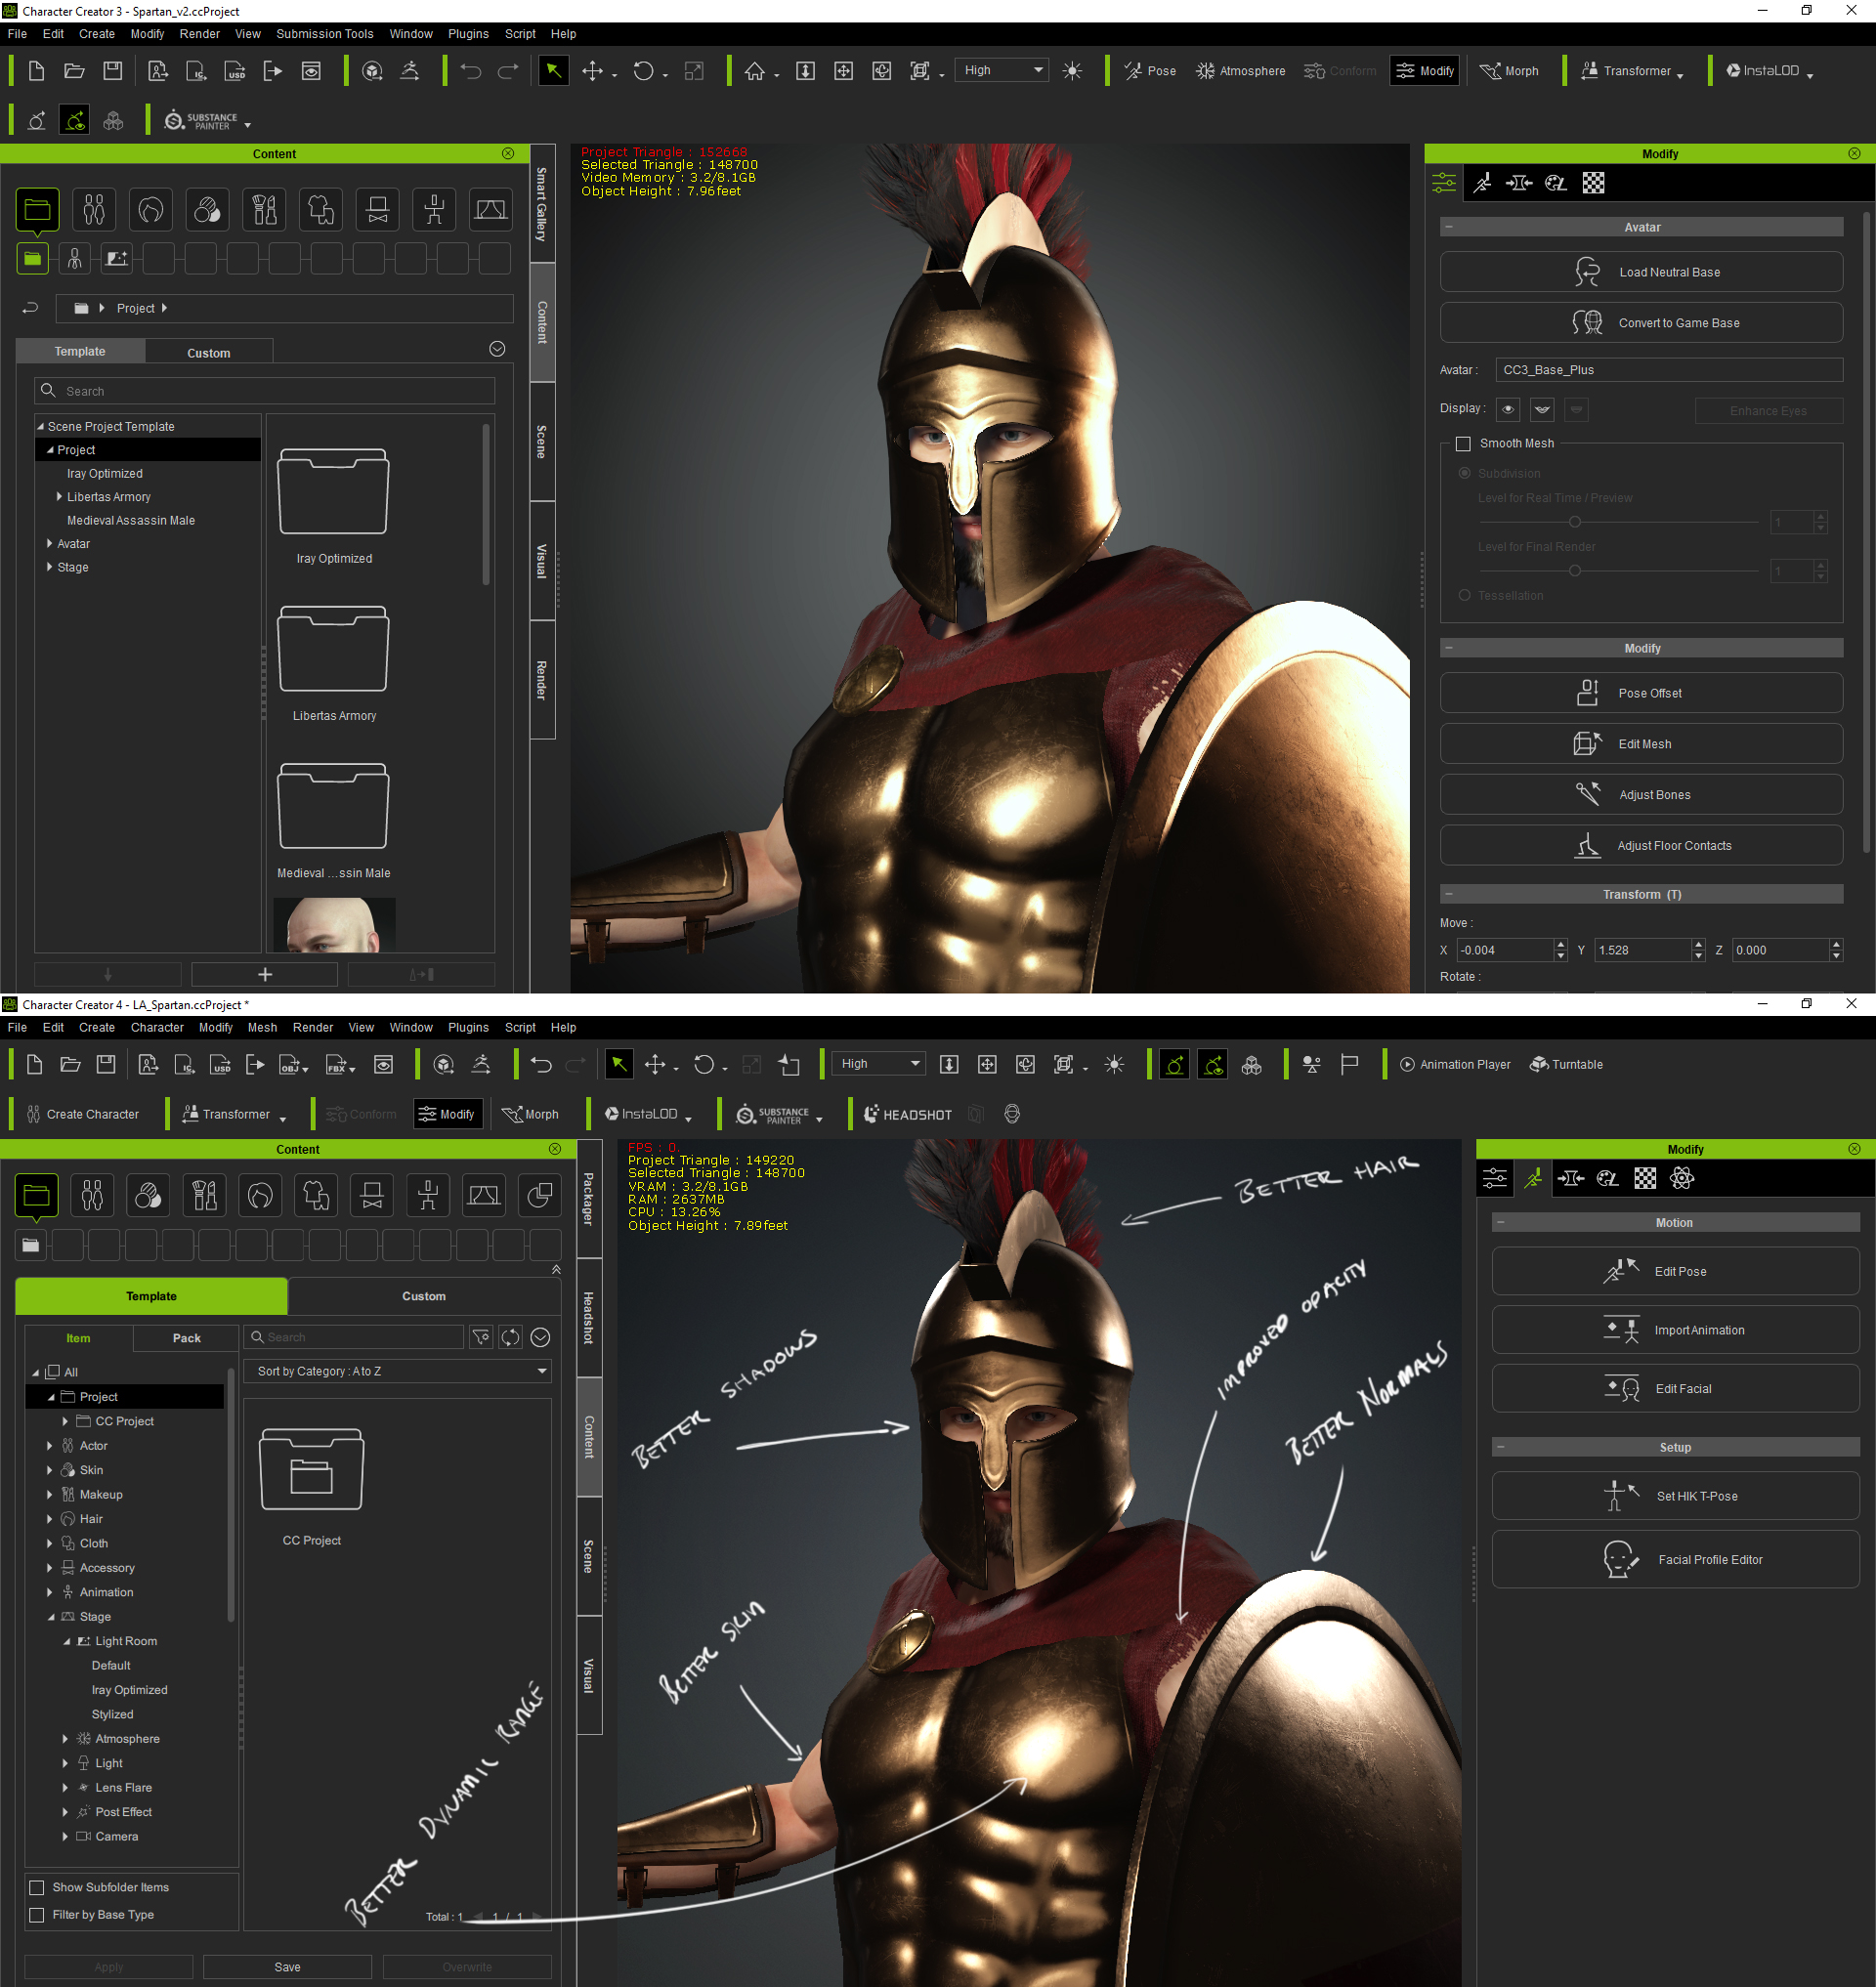
First off, CC4 has noticeably boosted the speed and responsiveness of the program, allowing creators to work faster and more efficiently. But this is complemented by what I feel are better-looking visuals. Mainly, the shaders and default lighting make your characters look so good. The lighting is less contrasty and the shaders provide more fidelity.
The hair and skin aren’t the only things that have improved visuals; Character’s clothing looks more accurate as well.
I say this because I texture my character’s clothing inSubstance Painter. While clothing components look good in Substance painter and then eventually in Blender (where I render most of my projects), I felt like the clothing looked a bit flat in CC3. This was just something I had to work around in the past. But now, I feel like I get a much more accurate representation of my character directly in the viewport, meaning I am more confident with the look of my character at the outset, resulting in less back-and-forth program hopping in the later stages of production.
Shader comparison – CC3 (upper) vs CC4 (down)
2. Extended Facial Profile
Another feature that stood out right away was the extended facial profile. With over 140 morphs, we now have even more control over our character’s facial expressions. This extended range provided by the morphs brings an extra level of realism to the already beautiful characters.
I did a quick test with one of the previous characters I had created in CC3. After converting her to utilize the new extended facial profile, I was able to put the results back-to-back with the traditional facial profile to see how much of a change there was.
The differences are certainly noticeable, if somewhat subtle. Nevertheless, it is the subtleties that make the characters much more engaging and less robotic. In short, the subtleties are what are needed to breathe life into the character.
If you want to see the full range of the new extended facial profile in action, I would recommend checking out Reallusion’sDigital Soul Pack to see all the possibilities this advancement brings.
Of course, one of the benefits of having this facial profile and the ability to test it directly in CC4 using calibration animations is the opportunity to make adjustments to each character’s facial profile.
For instance, I use the plugin Headshot to give foundation to my character’s appearance, making further adjustments with morph sliders. However, this sometimes results in my characters having clipping issues on some of their facial features like the teeth, or in my case, the character’s eyes not fully closing when blinking.
This is something I just had to work around in the past, but now I can modify the character’s facial profile directly in CC4. Using a variety of tools such as the mesh adjustment or the morph sliders, you can update the profile to accommodate any facial anomalies that are present.
This means you are not just in full control of what your character looks like, but you also have control over how their facial performance is driven. In my opinion, you can leverage this feature to give even more personality to your characters, even if it is by simply modifying the subtle way in which they smile.
3. Animation
You can now apply animations to your characters directly inside of Character Creator 4. This is great because you can now test your facial rig and make adjustments. You also now have the ability to see your characters come to life without having to send them to iClone.
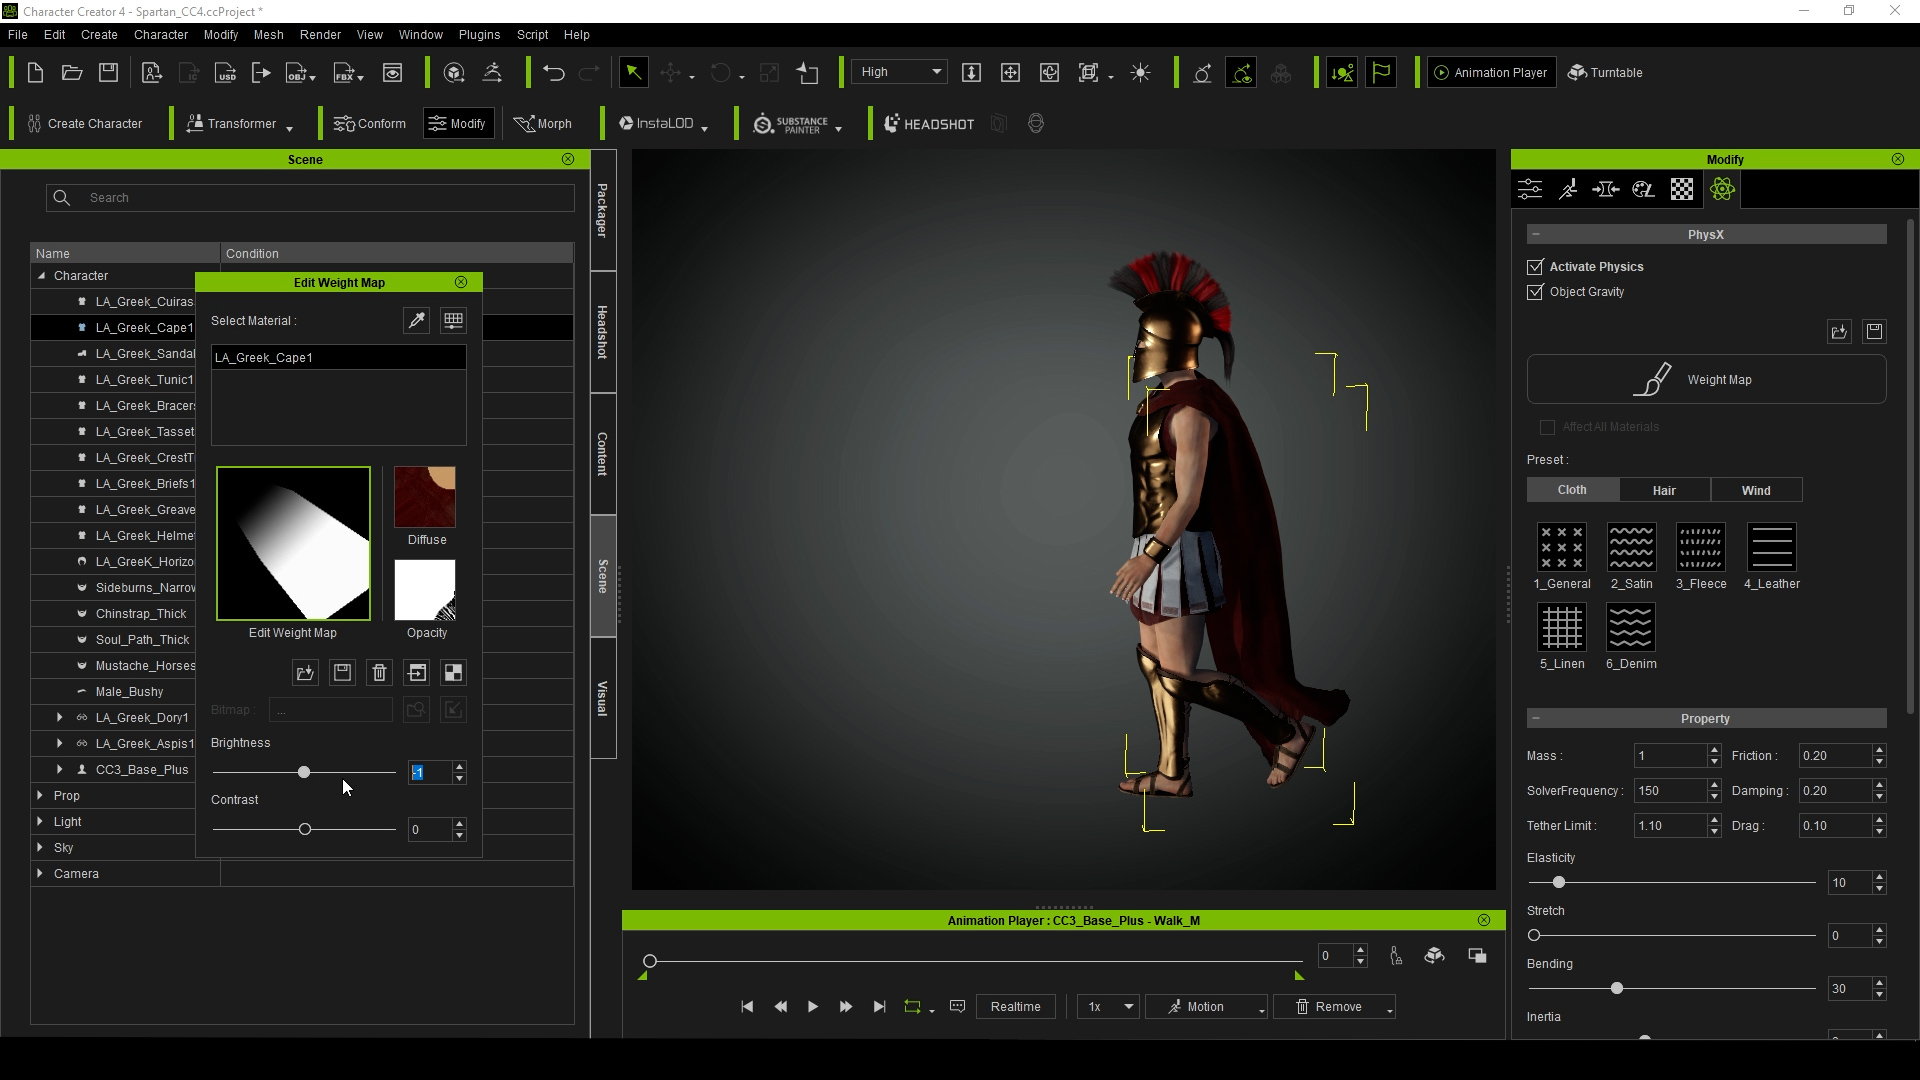
You can also make adjustments to spring settings and collision shapes, directly within CC4, and see their effect right away. Again, you can do all of this without leaving the program.
Character Collision Shape Editor in CC4
4. Soft-Cloth Physics
Along with animation, soft-cloth physics are also active in Character Creator 4.
Personally, I make a lot of my own clothing for my characters. My characters usually have long, flowing garments, which means I need to add and test my weight-maps, often spending lots of time refining and perfecting them.
In the past, I would have to set up my character in CC3, send it to iClone 7, and then do my tests and refinements. Once happy with my results, I would then need to import those final weight-maps back into CC3. This saves me from that extra step.
And while not everyone makes their own clothing, the tools are there for you to even take pre-built clothes, make the necessary refinements, and tailor them to your specific character.
5. Turntable
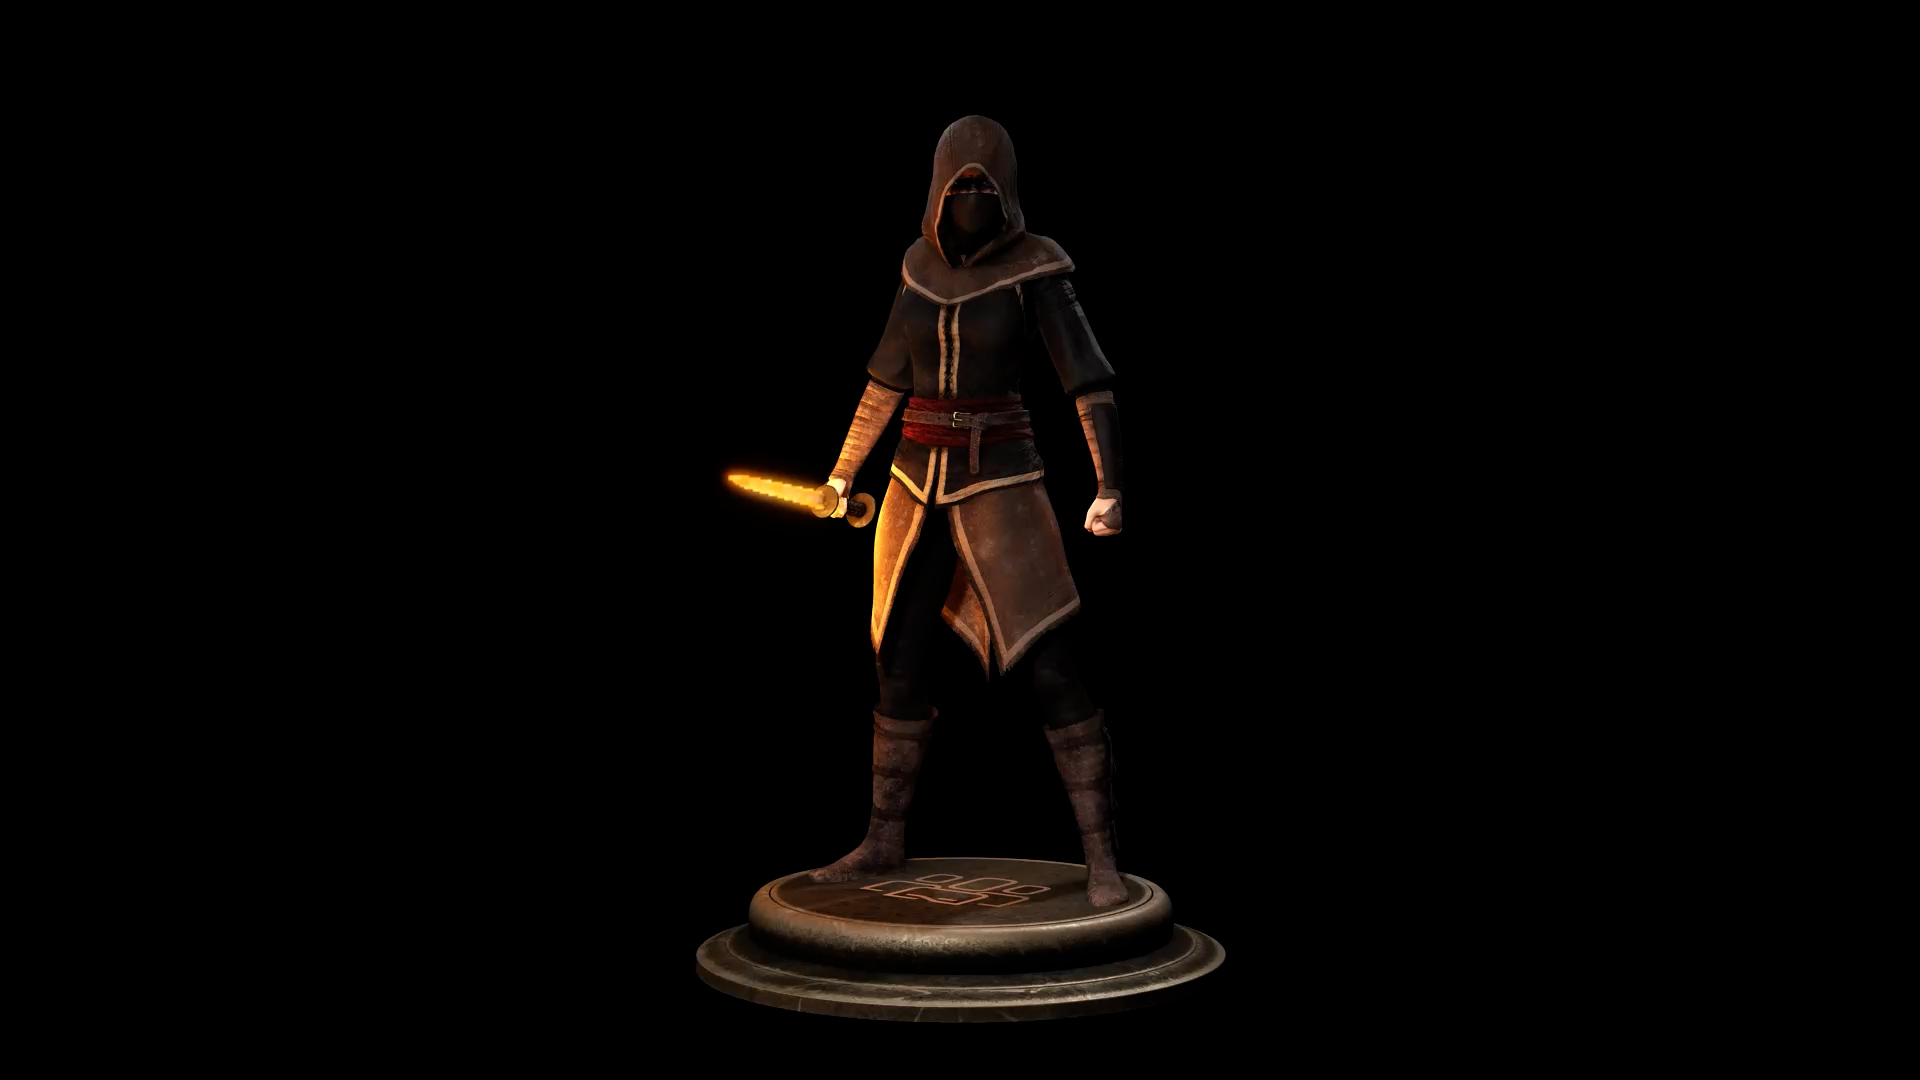
Finally, when you have completed your digital character, you can show them off with style thanks to the new Turntable feature. Using either a static pose or an animated motion, your character will spin around in a 360-degree loop.
The loop can be modified, adjusting the speed of the rotation and even the items that are rotated. Then using the Light Room presets you can quickly set the mood with various lighting setups. Of course, these are also customizable to suit your showcase.
So if you’re proud of your work, and can’t wait to show it off, having this feature is a convenient addition.
Final Thoughts
Of course, there is a lot more to be excited about than just these five features, but in the end, the five I have highlighted boil down to two benefits: That you can make your characters much more realistic and with a higher level of confidence. This confidence leads to increased speed and higher quality characters that will help you tell your next story.
So if you have found yourself on the fence as to whether or not it is worth it to upgrade, I would encourage you to go for it. It is extremely satisfying to have a program that has improved so much that it makes you wonder how you ever used the previous version.
Character Creator (CC), iClone, and ActorCore provide quality rigged characters, animations, and assets for game developers. However, importing characters to Unreal Engine requires heavy and complex rigged character setups, which include creating and assigning shader blueprints for each part of the character. With the help of the Reallusion Auto Setup tool, you can save an enormous amount of the time invested in your project, making the process of Digital Human shader assignment and characterization for Unreal Engine fully automated.
UE5 Lighting System: Lumen
Reallusion Auto Setup 1.23 and later versions guarantee compatibility with Unreal Engine 5 (UE5), allowing your character to be transferred from CC (with optional motion export) to UE5. One of the major updates from UE4 to UE5 is its new lighting system: Lumen. In this article, we will cover how to get the best shader results under a Lumen lighting setup. Epic provides a huge improvement in performance with the new Lumen lighting system compared to the UE4 Standalone Ray Tracing system.
*Using hardware Ray Tracing is down to personal preference, as long as one can balance between performance and visual quality.
UE5 Physics System: Chaos
Another major UE5 update is its physics system: Chaos Physics. Compared to UE4 PhysX, Chaos provides new configurations and settings for more physics possibilities. Hair and clothes can now move more convincingly, given their material nature. At the end of this article, we will cover how to adjust collision shapes, vertex weight painting, and Chaos physics configuration to best optimize the physics simulations.
Reallusion Auto Setup Download and Installation
It is recommended to download and install the newest version of the Auto Setup tool through the RL website – Auto Setup free download page. Best practices are integrated into Auto Setup 1.24, which has fixed most of the shader and physics issues you might have encountered with Auto Setup 1.23 (Please see the installation guide on how to set up your Unreal project with the Auto Setup plugin).
Character Export and Import Options
To get started, you need a character from CC or iClone ready for export. Upon export, please make sure to switch the Target Tool Preset to “Unreal”, and enable Delete Hidden Mesh to prevent mesh clipping between the skin and clothes. Motion export options are also provided for animated characters (Make sure to enable First Frame in Bind-Pose). Upon import, make sure to bring in your CC3+ characters with HQ Shader for the highest quality shading. If you want to include motion in your import, please enable these options: Use T0 As Ref Pose, Import Morph Targets (for facial morph), andImport Animation.
Auto Setup Automatic Shader Assignment
Auto Setup supports automatic shader assignment (automatically create and assign material instances with constructed blueprints). It is recommended to get familiar with the material properties and parameters of each shader, so you can instinctively know which shader and parameters to modify to get the result you are looking for. It can be most useful if your character is under different lighting scenarios and you want a specific shader outcome.
Overall shader comparison between Auto Setup 1.23 and Auto Setup 1.24 with minor adjustments.
Hair Shader
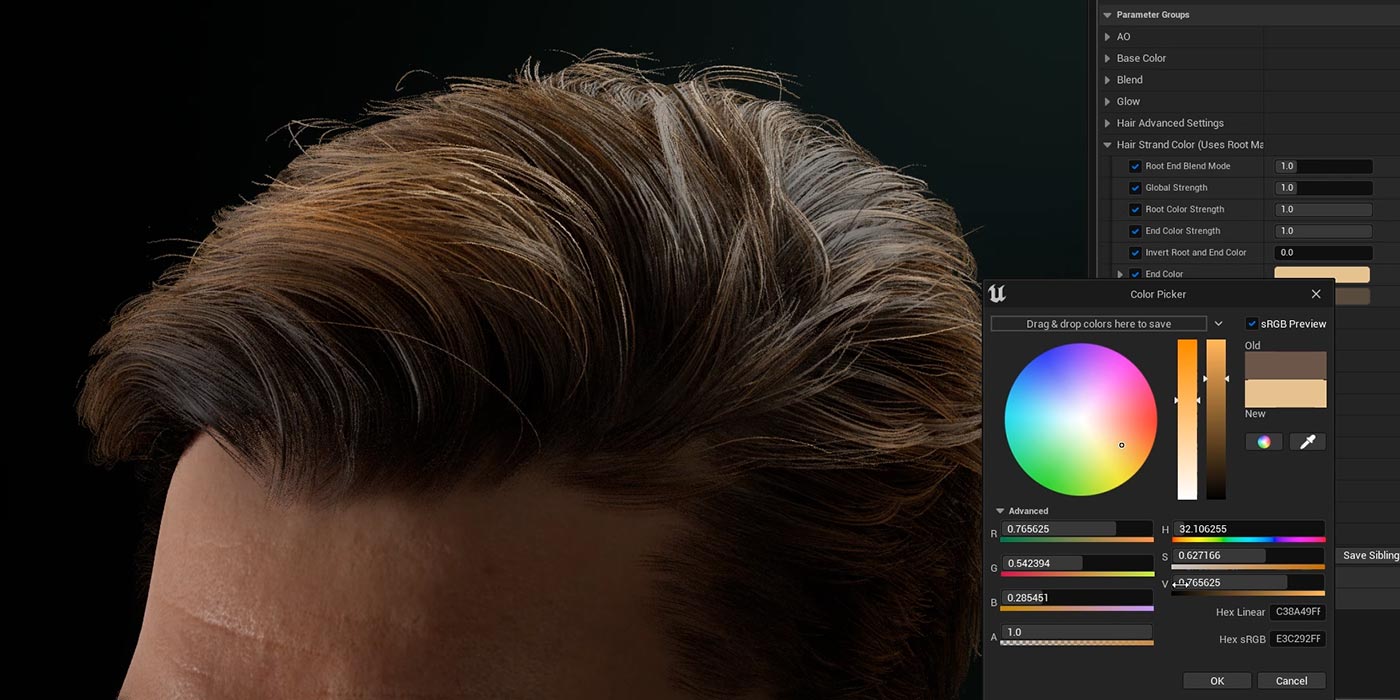
Auto Setup one-to-one transfers Hair Shader parameters from CC and iClone to Unreal. The shader is set up to easily adjust hair color, highlights, specularity, roughness, thickness, and more. The Hair shader is assigned to the hair, brow, and beard.
Hair Shader comparison between Auto Setup 1.23 and Auto Setup 1.24 with minor adjustments.
Follow the steps below for Auto Setup 1.24 results.
(1) Hair Shader > Roughness and Specular – Adjust hair reflectiveness and glossiness :
(2) Hair Shader > Alpha Settings – Adjust the thickness of the hair (This is important if you want to achieve smooth and silky hair) :
(3) Hair Shader > Color – Adjust the root and tip color of the hair :
(4) Hair Shader > Highlight A and B – Additional highlights on the hair can be added :
(5) Repeat the same process on the eyebrows and beard (they share the same material properties) :
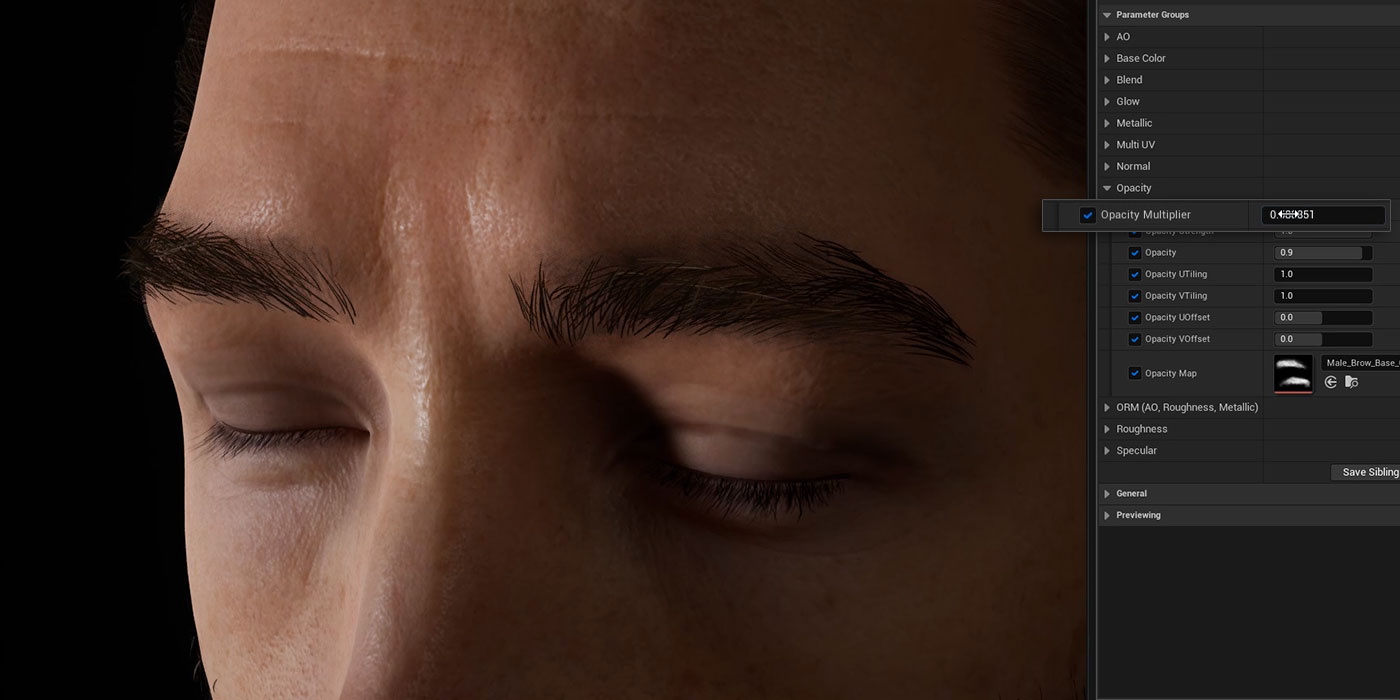
Brow Shader comparison between Auto Setup 1.23 and Auto Setup 1.24 with minor adjustments.Additional opacity adjustment on brow base (PBR) is advised to tone down the heavy shading on the brows.Beard Shader comparison between Auto Setup 1.23 and Auto Setup 1.24 with minor adjustments.
Teeth Shader
Teeth color and brightness can vary based on age, race, gender, and ethnicity. Whether you want your rigged character to have a radiant smile with neat and glistening teeth or a ferocious creature with intimidating and gritty teeth, anything is achievable with the help of the Teeth and Tongue shader. Ambient Occlusion properties are also provided to control shading inside the mouth cavity. Combine these parameters with the use of Character Creator morph sliders to generate variations with the best results.
Teeth shader comparison between Auto Setup 1.23 and Auto Setup 1.24 with minor adjustments.
Follow the steps below for Auto Setup 1.24 results.
(1) Teeth Shader > Normal Strength – It’s advised to tone down the normal strength if it’s too heavy :
(2) Teeth Shader > Teeth Desaturation and Teeth Diffuse Brightness – Adjust the saturation and brightness of teeth :
(3) Teeth Shader > Teeth Front Roughness and Teeth Front Specular – Adjust the reflectiveness and glossiness of teeth :
(4) Teeth Shader > Teeth scatter: Increase the subsurface scattering (SSS) of the teeth.
Eye and Eye Occlusion Shader
Eye Shader consists of different anatomical parts of the eye including the iris, sclera, limbus, and pupil, (each with adjustable features and parameters). You can flexibly change color, brightness, roughness, specular, depth, refraction level, etc. In the Auto Setup 1.24 update, Eye Shader & Eye Occlusion shader blueprints were enhanced to achieve a more realistic look on the eyes. Adjustments were made towards sclera brightness, iris brightness, and eye occlusion shadow.
Eye and Eye Occlusion Shader comparison between Auto Setup 1.23 and Auto Setup 1.24 with minor adjustments.
Follow the steps below for Auto Setup 1.24 results.
(1) Eye Occlusion Shader > Depth Offset – You might have noticed a small mesh that is protruding out from the corner of Kevin’s eyes, use Depth Offset to push it back in:
(2) Eye Occlusion Shader > Shadow 1 and 2 Strength – Decrease shadow strength on Eye Occlusion (both Shadow 1 Strength and Shadow 2 Strength):
(3) Eye Shader > Iris Color and Iris Brightness – Increase the brightness and saturation of the iris:
(4) Eye Shader > Sclera Brightness – Increase brightness on the sclera, and as a bonus adjustment, change Sclera UV Radius to enlarge the eyes:
(5) Eye Occlusion Shader > Bottom Blur Range / Blur Strength / Expand – Adjust Blur Strength to get rid of unwanted gaps:
(6) Eye Shader > Iris UV Radius – Notice there’s an unnatural ring around the iris; adjust Iris UV Radius to fix it:
(12) Limbus UV Width Shading: Adjust light shading to increase and decrease refractiveness.
(13) Eye Shader > Eye Shadow Radius – Adjust from a range of flesh colors for the eye corner:
(14) Eye Shader > Sclera Brightness – Revisit this parameter to tone down the brightness of the sclera:
(15) Eye Shader > Iris Color – Return to tone down the brightness of the iris:
(16) TearLine Shader > Specular and Metallic – Adjust to your liking:
(17) TearLine Shader > Detail Adjustment – Add normals on the tear line to increase detail:
Skin Shader
Get stunning renders for Digital Human skin in UE5 with the Reallusion Auto Setup tool. Digital Human Skin shader is set up to easily adjust subsurface scattering, roughness, specular, and micro-normals for character skin. Parameters on different facial parts can be adjusted separately with the help of RGBA masking.
Skin Shader – optional adjustments: How to get the results you’re looking for.
• Skin Shader – Make subsurface scattering and transmission adjustments:
• To get the light transmission to work properly, make sure to switch your light mobility to “movable” and enable transmission:
Ray Traced Shadows
How to turn off Ray Traced shadows – You might come across a weird shadow artifact when using ray tracing, which normally appears on meshes with transparent properties:
Simply follow these steps to turn it off:
Go to the material instance and browse to its parent shader blueprint.
Duplicate the blueprint if it is directed to the RL_Standard shader (PBR shader). You do not want to overwrite the original PBR shader otherwise you will turn off Ray Tracing shadows on all the PBR assigned meshes.
Assign the duplicated material blueprint to the material instance.
Open up the blueprint and search for “Cast Ray Traced Shadows”.
Disable “Cast Ray Traced Shadows”.
Save and let it compile.
Check out the result of Kevin in different lighting scenarios:
Hair Physics
In the Auto Setup 1.24 update, prior physics issues were fixed. Few enhancements were made towards Chaos physics configuration and vertex weight-mapping, which includes a more accurate conversion from CC/IC texture weight map to UE vertex weight map (max distance scale value is set to 15 instead of 100 so the physics calculation is more subdued). Chaos physics configuration is optimized with a set of default values to create the best possible physics calculation. With these improvements, hair now moves more naturally without destroying its intended style.
CC texture weight map converted to UE vertex weight map.Collision shape one-to-one transfer from CC to UE.Hair physics comparison.
If you have Auto Setup 1.23, simply repeat the following steps for Auto Setup 1.24 results.
(1) Adjust the size of the colliders on your character’s head and shoulders:
(2) Remove weight paint on unwanted areas and smooth out the weights with the smooth tool:
(3) Make Chaos physics configuration adjustments (Please watch the video to see corresponding results for each configuration):
Subdivision Count (3 or above): calculate physics with subdivision to avoid low-poly edges.
Anim Drive Stiffness (0.5): Put more stiffness in the calculation, which helps retain its intended style.
Anim Drive Damping (0.5): More damping and less shaky movement.
Gravity Scale (0.3): Amount of gravity pull.
Collision Thickness (0): Thickness of collision shape, larger the number the more distance away from the colliders.
How to add a mask and assign it to a specific configuration (in this case, Anim Drive Stiffness):
Create a new mask and set the target to Anim Drive Stiffness.
Enable cloth painting mode.
Paint the tip of the hair to paint value 100 (vertex color white) and keep the remaining as paint value 0 (vertex color pink).
Do a simple smooth with the smooth tool.
Exit cloth painting mode.
Go to Chaos physics configuration and under Animation Properties, you can find Anim Drive Stiffness. Paint values range from 0 to 100 with 0 for the root of the hair and 100 for the tip of the hair. You should keep the hair root stiffer and the hair tip softer.
Cloth Physics
In the Auto Setup 1.24 update, prior physics issues were fixed. Few enhancements were made towards Chaos physics configuration and vertex weight-mapping, which includes a more accurate conversion from CC/IC texture weight map to UE vertex weight map (Chaos physics configuration is optimized with a set of default values to arrive at the best possible physics calculation). It is suggested to delete unused collision shapes and fine-tune collision size and position to fit mesh boundary. Enable the “Delete hidden mesh” option while exporting to prevent mesh clipping between skin and clothes.
Cloth physics comparison.
If you have Auto Setup 1.23, simply repeat the following steps for Auto Setup 1.24 results.
Adjust collision shapes:
Delete unused collision shapes to prevent unwanted collision interceptions.
Scale and move collision shapes to fit more precisely with mesh boundaries (create new collision shapes if necessary). Please avoid oversized collision shapes. It might cause the mesh to bulge.
3. Adjust weight paint – Add weight up to waistband and smooth weight with the smooth tool:
4. Chaos Config > Subdivision – Set to 3 or above and Collision Thickness to 0:
5. Go back and forth to tune the weight paint and collision shapes until you get the best result:
Reallusion, a platform for digital human character creativity and animation, joined forces with 3Dconnexion, a German manufacturer of human interface devices, to accelerate 3D real-time workflows on camera directing, character animation, and sequence editing. All iClone features can be accessed using the 3Dconnexion SpaceMouse®.
iClone is a fast real-time 3D character animation software for professional use in films, previz, animation, apps, and games; as its user-friendly environment blends facial performance, humanoid body animation, mocap production, scene design, and cinematic storytelling.
Voted as the top device request in iClone users’ wishlist, iClone’s latest version 8 has refreshed its software architecture, opening it up to freedom of customization with SpaceMouse through hotkey and device mapping to more than 700 iClone features.
“3Dconnexion’s SpaceMouse brings joy and sensitivity to 3D creation with iClone 8, allowing for unprecedented agility for animating, directing, timeline editing and live recording.”
Charles Chen, Founder & CEO of Reallusion
“It has been a great pleasure for us to collaborate with the Reallusion team on this integration. We believe this will let our joint users experience 3D like never before, while adding more speed and enjoyment to their workflow.”
Antonio Pascucci, CEO of 3Dconnexion
Powerful Real-time Production Workflows
Three specially designed SpaceMouse presets have been optimized for Animation Editing, Object Transformation, and Light Arrangement.
In addition to camera navigation, SpaceMouse has been highly optimized for Animation Editing that requires quick collaboration between view angles, joint traversal, posing, and lots of manipulation through left-hand control.
The handy timeline scrubbing function simulates jog dialing by using the 6DoF sensor so that users can easily search target frames by manipulating scroll, zoom speed, break clips, and copy/paste keyframes. The context-sensitive design will control cameras and objects while in the 3D viewport, but will also work as an animation sequencer when focused on the Timeline.
Freely Download Presets
To make the most of the SpaceMouse with iClone’s real-time production, users can freely download three SpaceMouse hotkey presets to work with different design purposes. iClone 8 users just need to easily switch to the desired profile via 3Dconnexion’s driver, 3DxWare 10.
The latest iClone 8 Profiles can be downloaded here.
Hi, I’m Loïc Bramoullé, an art & film director from France. When Dream Harvest asked me to produce a cinematic teaser in March 2022 for the visual development of a new project, I knew there would be many different technical challenges to tackle on my own, mostly under a tight two-month schedule.
Luckily enough, I have learned how to use iClone and Character Creator through the lip-sync animation contest. With Reallusion’s special help on the beta programs of iClone 8 and Character Creator 4, I could overcome these challenges and speed things up, thanks to the multitude of features these programs offer. So here I will break down how I approached the Nightmare Hunter short film production.
Pre-production:
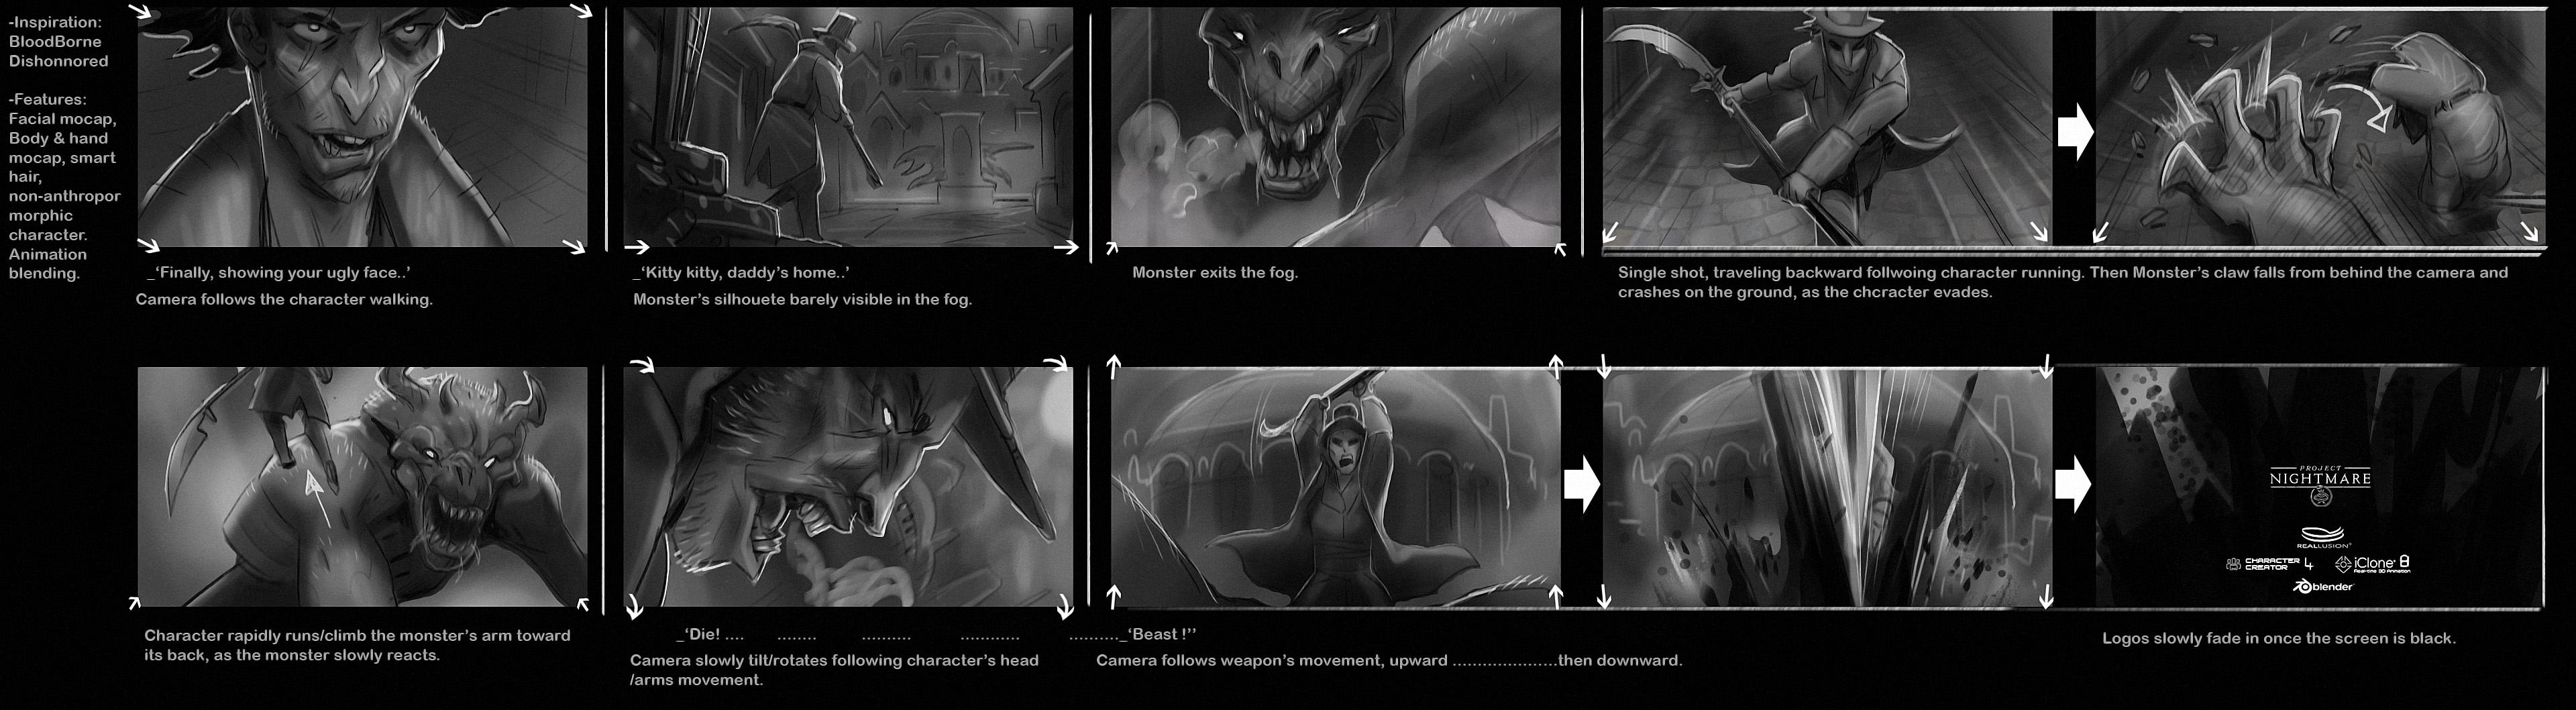
The first step was to quickly explore a few different options directly with storyboards, as it’s a simple way to define nearly all aspects of a film at once, the narration, setting, characters, action, lighting, mood, etc. This is the most critical part as these little sketches made in a few minutes will determine the whole film produced over the course of a couple of months.
So after testing a few different settings and combining them, we locked on a Victorian setting with a hunter and its monstrous prey. My idea was to challenge myself and see how far a character from CC4 could be pushed, toward a nearly non-anthropomorphic one with a long face, and still be able to receive facial motion capture from iClone 8.
The second step for pre-production was getting a more precise idea of the final look and style of characters and environment. I did these two characters to have some elements to play with and ended up mixing them to keep the most interesting parts.
Background Settings
At that stage, I had already done some tests directly in 3D for the environment, because I needed to find a technical solution to produce it fast, so I couldn’t rely on designing everything from scratch in 2d. I bought some assets online that I painted over directly in 3D, and modified some free PBR textures in photoshop and Blender, to merge everything in a similar graphic novel style.
To create the characters I started from basic ones in the Character Creator, tweaking the base anatomy thanks to the morph bank, and adding some basic reference clothes.
Building the Character in Character Creator
I used the headshot plugin and more precise concept art to create the first version of the face, I then exported it to Blender thanks to the Character Creator addon. I also used 3DCoat to model and texture the clothes and weapons. To export back your character, check that all custom objects that you created are correctly skinned onto your armature. You can then select the armature and click Export in the Blender addon.
In Character Creator, instead of the usual import, you can go to plugins, Blender Auto Setup, and import from the Blender. You will be able to check if each object is recognized correctly, and change its type if it’s not. If some custom materials you added are missing some textures, you can simply select the mesh, go into the material tab, and fix any issue quickly.
Animation Production
In iClone, I used the Motion LIVE plugin to connect to Noitom’s Perception Neuron 3 mocap suit and recorded the motion capture directly on the characters.
Implementing 3D Mouse, Motion editing, and Motion Control
The first thing you might want to do is create a follow camera. I’m using a SpaceMouse so I’m able to animate the camera directly in 3D, without touching the keyboard or mouse.
The majority of the work is then to edit and polish this capture with the iClone toolset to make it match exactly our needs. A good example of that is the second shot of the film, where I could not match the 3D stairs during motion capture in my living room, so I edited them in thanks to the “Motion Direction Control”, and “animation layers”, and “motion correction.”
“Motion Direction Control” can be accessed by right-clicking on a clip, or via the toolbar on the timeline. You can then place your animation in the 3D space, and break your clip to assign a different direction on each part. iClone 8 features a new bidirectional fade between clips, allowing for a smooth and natural transition between them.
Motion correction on the character
Another handy new feature of iClone 8 is the “Motion Correction” that allows you to select some limbs, and “print” their contact points in the 3D space, so you can then transform, move and rotate, these footprints, to adjust the exact location where the contact happens with the ground. Pay attention to the threshold setting, higher values will detect more contacts, and lock the contacts for longer. But you can always access the timing of these contacts in the reach target section of your character animation in the timeline. Clicking on each tip allows activating a fade in or out, for the snapping to be smoother.
The “Motion Modifier” function just below the two others in right-clicking the menu, allows to shift the overall posture of the clip.
For shot 04, I was able to quickly mock up the action using pre-made motion-capture clips from ActorCore that features a wide range of commonly useful and high-quality motions from ActorCore. The ability in iClone 8 with “Motion Direction Control” to transform a whole character animation clip in relation to other ones is also really handy to quickly assemble a custom sequence of actions. You can automatically assign a limb that will be snapped onto its position in the previous clip so they blend perfectly, or adjust its orientation to suit your environment, etc…
Creating believable facial expressions
This process also allowed me to work on the body and facial animations independently. Once the body animations were complete, I used an Ipad and MotionLive to motion capture a facial performance with lip-sync while listening to the voice to be synchronized.
Editing the keyframes
I polished this mocap with the same method as the body, sampling the captured clip to access all the keyframes in the curve editor, smoothing some parts that were jittering. I then Flatten the clip again to be solid, which allows me to add keyframes non-destructively on a layer on top of the motion capture.
To edit the facial animation, you can open the Face Key menu here. Controls are separated into different categories: Face, where you can edit the head rotation, and have overall control over the expression. Then you have eyes, mouth, and tongue, where you can have much finer control over precise morphs. For example, changing the eye’s direction. But the most important thing here is to polish the lip synch from the motion capture, with the jaw control here, and the mouth open and close just below. The objective here is to accentuate and add character to the performance, so we can listen to the recorded voice, and detect the moments where the lips should be closed, where specific mouth shapes should be more accentuated like on the O and M sounds, that we can produce by selecting the corresponding mouth type here, and then moving the lips into that shape. Breaking the symmetry with the split lips option can go a long way to break the uncanny valley and add something more imperfect and human to the character’s expression.
Setting the lights and VFX
Once the animation was mostly there, I started to light the scenes to see how the final film would look. The main light source is a powerful moonlight, with cloud shadows that I painted as vertex colors on a plane in the sky, so I was able to very precisely paint where the light would hit the character or not, to improve the readability and add depth to the mood. The secondary lights are the fire burning in the environment, which allowed me to add a strong warm spotlight to contrast with the cold moonlight and strongly isolate the character from the background.
Post-production:
Once the first shots were lit, I started to prepare the scenes for rendering, adding a duplicated linked scene for each shot to render volumetrics with EEVEE, while the main scene was rendering in Cycles, all passes including cryptomatte & denoise data into two EXR sequence, that I then denoised in another scene. This reduces render times dramatically as the GPU does not have to wait for the CPU to denoise, and the denoise is not done on the final image as this adds a lot of blurs, but on each render pass that’s used to re-composite the beauty render. So I can start the compositing in After Effects from the same image that I see in Blender, except it was rendered much faster as even with low sample counts the passes denoising manages to get a crisp final composite. Some shots were only 14 seconds per frame. I also rendered everything only in 1920×1080, as I would be upscaling with AI to 4k thanks to Topaz Video at the very end after the compositing.
One thing adding a lot to the overall impression in compositing is exporting the 3D camera and some empty/null objects from Blender with the export .jsx addon, and importing that with file>run script in AE, to then be able to add the 3D plane of a painted cloud of fog, masked with the Z-Depth. This allows to improve readability to control where the eye should look, and adds a lot of mood and style as there is not only 3D volumetric fog but then also a hand-painted one, that can be animated to simulate wind. Finally, I did another scene for each shot in my Blender files, where I linked the characters and a few objects around them, so I could simulate rain drops in particles, setting the collection with all the scene objects in a holdout, so only the raindrops were visible.
Final thoughts:
Character Creator 4 and iClone 8 revealed themselves as great additions to my pipeline for their flexibility and ease of use. From helping with previsualization by being able to create a wide variety of body shapes, and bashing animation and motion capture clips together, without the usual hassle of retargeting different animation sources that are at different positions in the 3D world. To speed up greatly final character creation by skipping a lot of repetitive technical tasks, like topology, UVs, armature, skinning, and facial blendshape sculpting, while still being able to fully customize all this with traditional, industry-standard tools, to keep full control over the design and art direction of your project.
The new features of the Character Creator will be a big help in streamlining facial expression customization for anthropomorphic characters. The increased number of morphs compatible with facial motion capture is definitely adding a level of fidelity and control to character expression. For the body animation, the new features of iClone 8 allow you to more comfortably reach what you need by blending clips and animating over the result non-destructively thanks to animation layers.
Finally, the added support for the space mouse is great news for anyone wanting to speed up their workflow, as moving around in 3D can be really important during animation, so the 6 degrees of freedom of the space mouse gives you the feeling of being physically present inside the 3D scene as you move around effortlessly.