We are going to take a look at an easy-to-miss feature of Character Creator 4, the Extract Mesh tool. This tool is in CC4 instead of iClone which might keep it off the radar for some new users. Extract Mesh allows us to do several things from extracting bodysuits and armor to reworking props for animation purposes including being able to rotate the wheels of a car prop that was one piece upon download.
One of the biggest obstacles for beginners, especially on a budget as so many of us are these days, is the lack of props to use in production or learning. There are plenty of free props available and we’ll use one today from Sketchfab, but you need to understand that when you download free props and other free 3D assets from the internet they might not be licensed for commercial use or your intended use.
These free props are great to learn with or demo with, but it would be a real disaster to create a viral hit that could not be monetized due to copyright infringement because of improper licensing. Even using Sketchfab content you need to be aware and knowledgeable of the type of Creative Commons licenses appropriate for the situation.
To be safe for a final, commercial, widely distributed project you might want to stick to 3d assets of your creation or assets purchased from a reputable marketplace with clear licensing policies like the Reallusion Content store or Marketplace. It’s best to learn of these things now because they can lead to real problems with real consequences for your project.
With that said, I rely on free assets for tutorials so anyone who wants to follow along can do so but I would not include these assets in a commercial project without proper licensing and very good reason to do so.
THE SKETCHFAB MODEL
In this case, we are using a Fortnight plane, “biplane Fortnite vehicle” by that kid is licensed under Creative Commons Attribution, which has an internal skeleton but you’ll soon see why it can be a bit difficult to use. With this in mind, I will extract the propeller and wheels as separate objects so we can easily animate (spin)them.

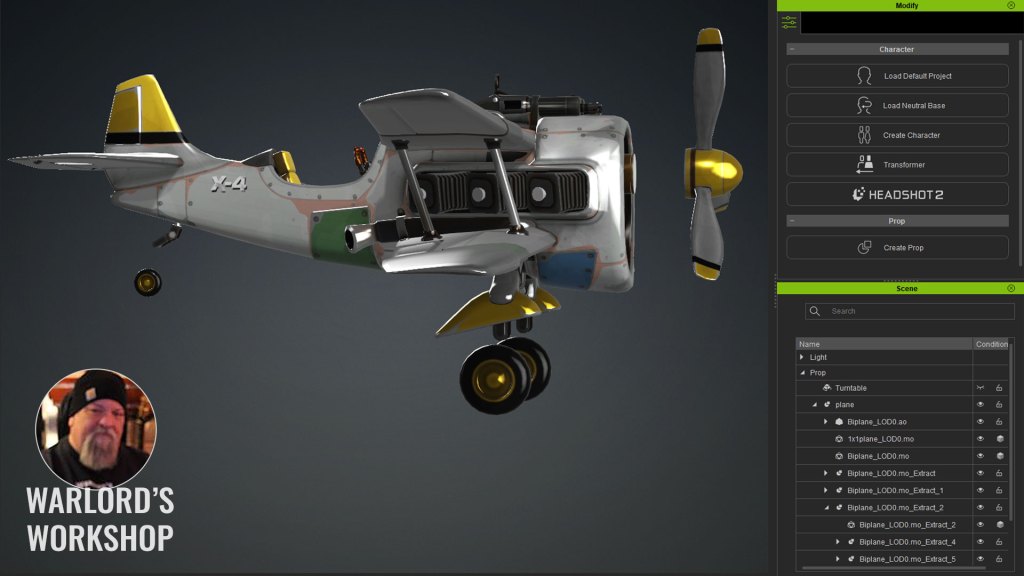
This is an excellent model that weighs in at a little over 25K triangle count in Character Creator 4. It is lightweight, nicely textured and has an internal skeleton that can be used for animation. The problem is that there are so many bones, some seemingly going to no mesh, that it is a visual mess.
You can drill down using the search function but even then, you have to play around with different parts to find out which one actually moves the part in question. I would guess there were a lot of dummies used in the making of this model and they didn’t import well into FBX format or CC4.

As you can see from the above image (CC4) the rigging is an absolute nightmare. A convoluted hot mess that may hurt the eyes with prolonged exposure! Seriously though, this happens with models, particularly those with a lot of moving parts for animation. Where this all went wrong is anyone’s guess but probably in the export phase. Or it may be the way CC4 sees it after import, but it can make life difficult, and animation has enough of these difficult moments without creating more of them.
So, what we are going to do is forget about all those bones and simply extract the meshes we want to animate, in this case, the tires and propeller.
THERE IS A SHORT VIDEO TUTORIAL AT THE END OF THIS OVERVIEW.
EXTRACTION
The first step is to select the plane mesh and then select Edit Mesh from the CC4 Modify menu. From there select the Element tab (which allows us to select entire sections of a model depending on how it was built) and click on the propeller Nose Cone.
As mentioned in the video tutorial for this article, this plane has a strange problem that makes it difficult to center the prop blades as the one-click matrix on the pivot menu panel will not bring the pivot to the true center. For anything to rotate properly, the pivot must be at its true center otherwise it will wobble around instead of spin. For this reason, I am extracting the nose cone first then the blades.

Press the Extract Mesh button to extract the propeller nose cone from the rest of the mesh. The nose cone has a properly centered pivot so it will rotate easily. We will use this later to connect the blades, which will then rotate properly around the center pivot. Close Edit Mesh, then select the extracted mesh in the Scene Manager and press the Convert to Sub-item button on the modify menu.

Next up select the mesh and go to Element again then select one of the prop blades the extract that selection.

HIERARCHY – THE PROCESS OF ATTACHING
Next, we need to DETACH the nose cone from the plane mesh. Select the nose cone and press the DETACH button on the Modify menu. Do the same for the propeller blades, DETACH them from the plane. If we did not detach the nose cone first then we could not have parented the blades to it because any item attached will not show up in an attachment panel, only the bones will show up.
By attaching the BLADES to the NOSE CONE in the next step we have parented the blades to the nose cone which means the blades inherit the characteristics of the nose cone like the properly centered pivot for smooth rotation. Now we attach the NOSE CONE to the plane, and you have just established a simple hierarchy of two objects with the cone being the parent. There is more about this in the video tutorial.
THE WHEELS – TWO EXTRACTIONS
The front wheels need to be extracted in one step while the tail dragger wheel is extracted in another step. The main front wheels have a proper pivot centered between both wheels so we do not need to extract each wheel individually as we can rotate them as one object. The tail wheel will be extracted separately using the same method as the nose cone or blades above. Select the mesh, extract the mesh, and Convert to Sub-item just like in the earlier steps.
FINAL RESULTS
By now you should have the blades and nose cone as one prop, the main landing gear as one prop and the tail dragger as one prop. These can be easily animated on the timeline rotating the propeller or wheels between two keyframes. As I wrote earlier, see the accompanying video tutorial for a more in-depth step-by-step guide.

MD McCallum – WarLord
Digital Artist MD “Mike” McCallum, aka WarLord, is a longtime iClone user. Having authored free tutorials for iClone in its early years and selected to write the iClone Beginners Guide from Packt Publishing in 2011, he was fortunate enough to meet and exchange tricks and tips with users from all over the world and loves to share this information with other users. He has authored hundreds of articles on iClone and digital art in general while reviewing some of the most popular software and hardware in the world. He has been published in many of the leading 3D online and print magazines while staying true to his biggest passion, 3D animation. For more information click here.