Intro– Create Accessories in ZBrush for Your Animated Characters
We can’t leave our character naked, so let’s talk about accessories and clothing. Figure out what kinds of things your character needs — horns, loincloths, pants, boots, wraps, weapons, etc… and we’ll discuss in the following sections how to create them in ZBrush, texture them, get them into Character Creator, and attach them to your character.
- Part 1. Create Clothing and Accessories in ZBrush
- Part 2. Texturing Armor, Clothing, & Accessories
- Part 3. Importing Clothing & Accessories from ZBrush to CC

Part 1- Create Cloth and Accessory in ZBrush
Modeling High Res Clothing & Accessories
The in-depth creation techniques for the clothing and accessories shown here go beyond the scope of this article. However, please watch this livestream for more information on how to create high-res assets in ZBrush for use in Character Creator.
Export High & Low Meshes
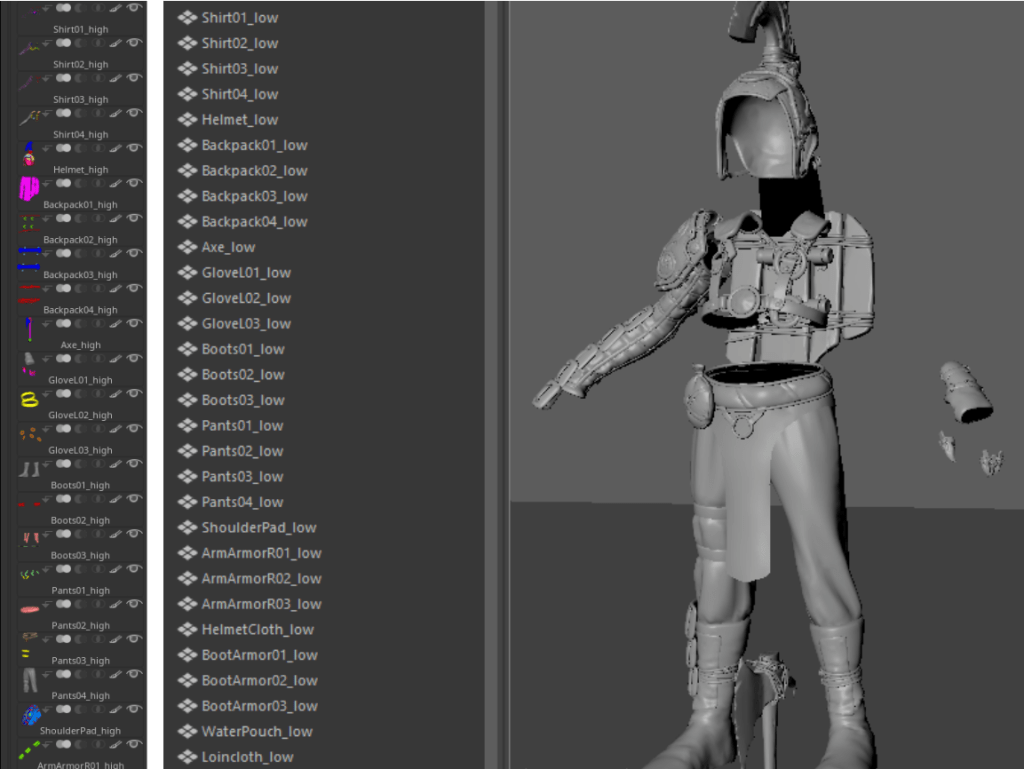
Once you have your high-res meshes modeled, export them as an .fbx, with “<object_name>_high” as the subtool name, so you can bake later in Substance 3D Painter using namespaces. Create a corresponding low-res for each high-res asset, and again, export your low-res as an .fbx. Don’t forget to UV your assets, and name each object with “<object_name>_low” to match the naming of your high-res .fbx file. Keep in mind there’s a 300k quads (600k tris) limit per character in Character Creator — that’s a lot of triangles, so you shouldn’t have to go crazy with optimization, but optimize it enough to keep your character under that poly budget!
Part 2- Texturing Armor, Clothing, & Accessories in Substance Painter
Baking Accessories and Clothing
Just like we did with our body, we’ll launch Substance 3D Painter, go to File > New, select your “_low.fbx”, then go to the Texture Set Settings tab and click Bake Mesh Maps. Load up your high-res mesh, remember to change your Material ID to “Vertex Color” so we can bake our polypaint to selectable masks, and press the Bake selected textures button. When your objects are done baking, press Return to painting mode.

Texturing Accessories and Clothes
Just like we did with our body, drag and drop materials from the material library, create your own materials using fill layers, mix and match and blend materials together using masks, add generators like dirt and edge wear to do some visual storytelling, splash on some blood splatter and mud, whatever you’d like in order to make your accessories and clothing look like they’re made of the correct type of material, and are worn and “lived in” to add some realism to convince your audience this is a real character.

Exporting Textures
This is pretty simple — go to File > Export textures, choose “PBR Metallic Roughness” for your Output template, make your Output Directory wherever makes sense for your textures to be exported to, and hit the Export button.

Part 3- Importing Clothing & Accessories from ZBrush to CC
Importing Clothes & Accessories into Character Creator
Now that we have our clothing and accessories textured, let’s get them into Character Creator. In CC, go to Create > Accessory, and import your low-res file. When it asks you if you’d like to merge all, choose Cancel. You’ll see the accessories don’t fit the character perfectly; Select them all in the Scene tab, press W on your keyboard to bring up the gizmo, and move your accessories onto your character so they’re placed appropriately.

Converting Accessories into Clothing
We’re going to skip objects that could be bound to a single joint, like armor, pouches, backpacks, and weapons for now. Instead, select an accessory mesh that will bend with multiple joints across the body, for example: shirts, pants, or boots. Press the Transfer Skin Weights button in the Modify panel Attributes tab.


Choose the appropriate template for the type of asset. If it’s a shirt or pants, choose “Default”; if it’s gloves or boots, choose the appropriate template. Do this for the rest of your clothing type assets.
Binding Accessories to the Correct Joints
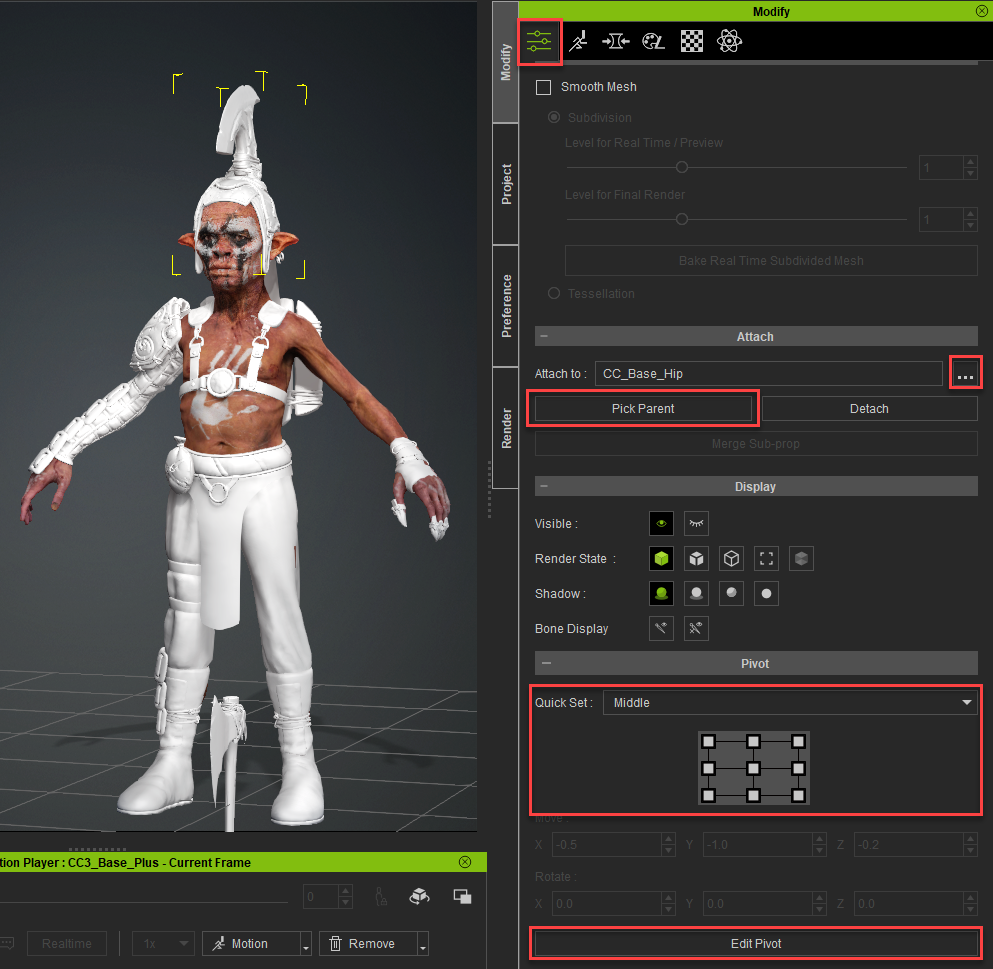
After we’ve converted the appropriate objects to clothing, all we have left are objects that can be “rigid bound”. In other words, objects like helmets or shoulder pads that can rotate along with a single joint, NOT deform across multiple joints. You don’t want your metal helmet bending and stretching when your character’s head moves. For the remaining accessories (again, objects attached to just one joint), select the one you want to modify, then scroll down toward the bottom of the Attributes tab and use Pick Parent and/or Attach to: to update the bones associated with your accessory.
Setting your Accessories Pivot Point
After attaching, continue scrolling down the Attributes tab and use the Quick Set panel to quickly set your accessories pivot, and/or use the Edit Pivot button to finetune pivot placement for your accessory.
Materials
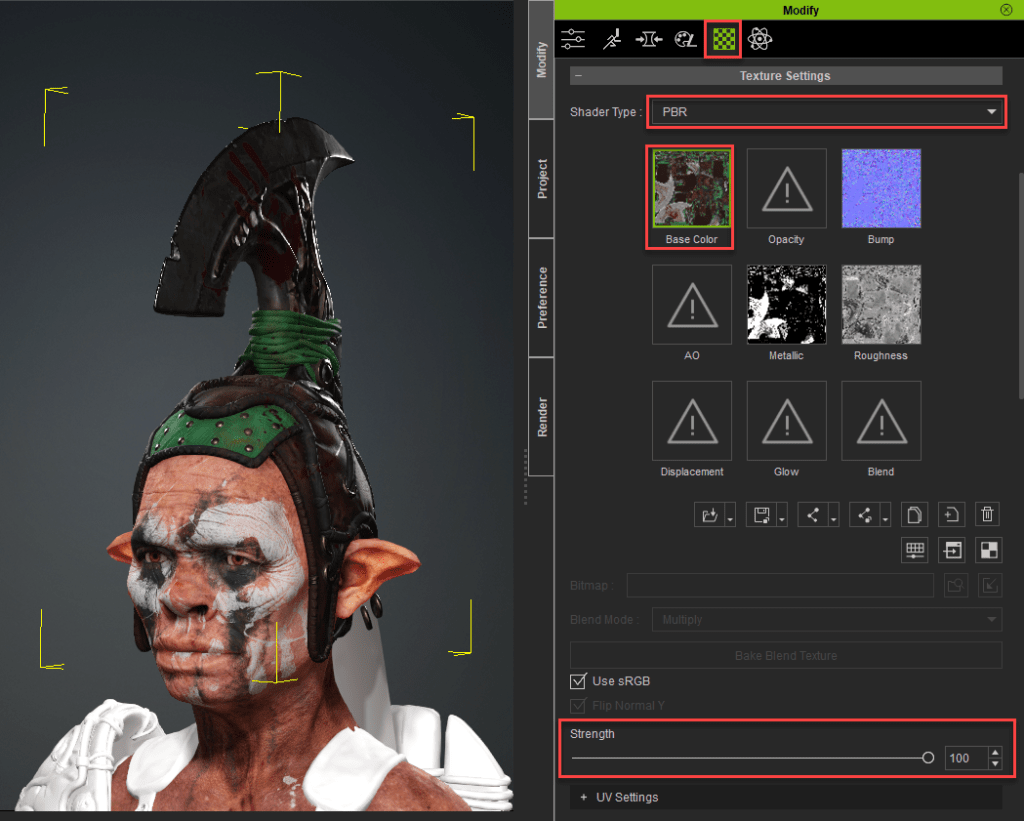
In Substance Painter, we exported our textures using the PBR metallic/roughness preset, giving us base color, metallic, normal, and roughness textures. In Character Creator, select an accessory, go to the Material tab, switch the Shader Type to PBR, and double click the preview swatches to load in all of your textures. For your base color, you may have to increase theStrength of the Base Color from 80 to 100, and for your normal map, you may have to Flip the Y channel to get it to appear correctly.

Cloth Simulation
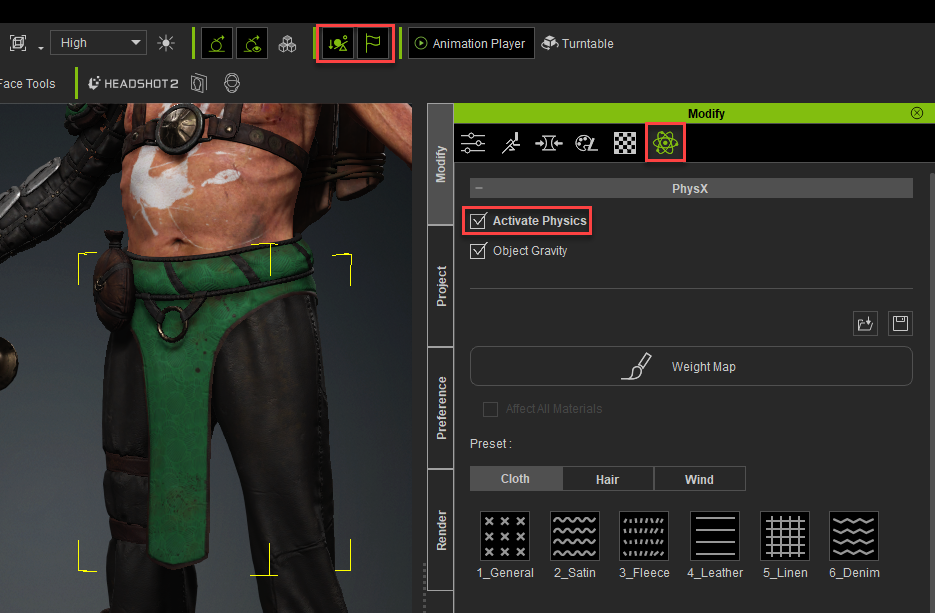
If you have clothing that needs to swish and flip around while the character moves, we’ll need to do some extra steps. Select your cloth object, and in the Menu Bar, turn on Rigid Body Simulation and Soft Cloth Simulation. Then, go to the Physics tab, and turn on Activate Physics. While still in the Physics tab, plug in a weight map, where the black areas of the map are parts of your mesh you want skinned to the body weights, and the white areas are where you want physics to take over in regards to how your mesh reacts to movement.

Collision Capsules
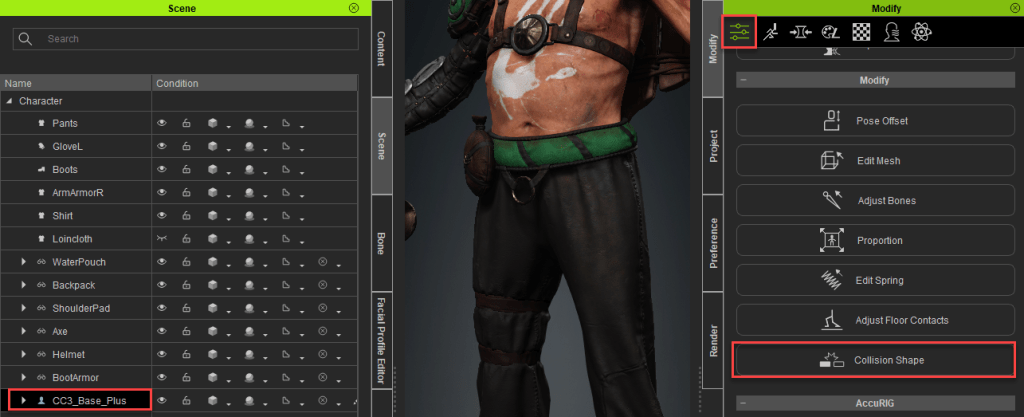
The physics-driven parts of our meshes won’t actually collide with the body, accessory, or clothing assets in Character Creator. Instead, they will collide with invisible capsules. To adjust these, turn off your cloth object, select your “CC3_Base_Plus” group in your Scene tab, and press the Collision Shape button. In the Character Collision Shape Editor, make sure Collision On is checked, then click on the various parts of the dummy to modify, delete, or add capsules to your character body.
In the case of the loincloth, you’ll see we only need capsules turned on for the thighs, so we just need to activate those capsules, and modify them so they’re representative of our character’s thigh volumes.

Testing Your Physics
In the Animation Player, click on the motion button and choose a walk or dance animation, where you can see your now physics-enhanced asset interacting realistically with your character. To ensure the cloth is being simulated correctly, you can switch the Animation Player from Realtime to By Frame.


If you want to scrub the simulation, go to Edit > Project Settings, and enable Bake Animation. That way, when you do your initial playthrough of your character’s animation, it will cache the physics movement, allowing you to scrub your animation with the cloth behaving as expected.
Saving Clothing and Accessories
It’s often useful to re-use clothing and accessories for other characters. In CC, select the asset you want to save (shirt, shoes, etc…), navigate to the Custom tab in the Content browser, going to the folder you expect the asset to be located (Accessory > Head for example, or Cloth > Pants). Then simply hit the Save button. The resulting dialogue box might choose the correct asset type, but if not, simply choose it from the dropdown menu. Do this for all the clothing and accessories for your character that you might want to share later.


About The Author

Michael Pavlovich earned a Bachelor’s degree in Computer Animation from RSAD in 2005. Initially, he contributed to the development of environment and character art for popular video games such as Madden and NCAA Football. Later, he relocated to Austin to join Daybreak Games, where he worked on the creation of art assets for DC Universe Online.
Presently, Michael holds the position of Director of Character, Weapon, and Vehicle Art at Certain Affinity. His expertise lies in implementing iterative pipelines for Certain Affinity artists helping develop renowned video game franchises, including Halo, Call of Duty, and DOOM. To stay updated on his latest tutorial projects, you can visit Michael’s YouTube or ArtStation page.
Read More
PavMike’s CC to ZBrush Workflow Tutorial (1/3): Base to Texturing
PavMike CC to ZBrush Workflow Tutorial (3/3): Posing & Animation
See More Tutorial in “ZBrush Master Class”