首頁 » Page 66

Quick & Easy Roundtrip Character Workflow with Blender & Character Creator

This article is featured on BlenderNation.

With these plugins, you can import both the texture and the mesh back to Character Creator with just one click!

INTRODUCTION

Russell Midfield is a freelance artist who enjoys making tutorials on YouTube around the 3D character development process, with a particular focus on Blender. With Reallusion’s commitment to developing their Blender Character Pipeline and the introduction of the Blender Auto Setup addon with CC3Python plugin, Russell decided to see how one may create their own character quickly using these very tools. Do the plugins work as advertised? Is it really that quick & easy? What would it be like to create your own character with this workflow? Well, there was only one way to find out. 

For this character, Russell makes use of a Character Creator / Blender “roundtrip” workflow, through the use of the Blender Auto Setup addon and CC3 Python plugin as touched upon above. The workflow would be as follows:

1. Start with a model generated in Character Creator 3 (CC3).

2. Import the CC3 model into Blender through the use of the Blender Auto Setup addon, to make some customization.

3. Import back into CC3 through the use of the CC3 Python plugin, for rigging and weighting. 

If one wished to add animation, a simple transfer to Character Creator’s companion software, iClone, is just one click away. 
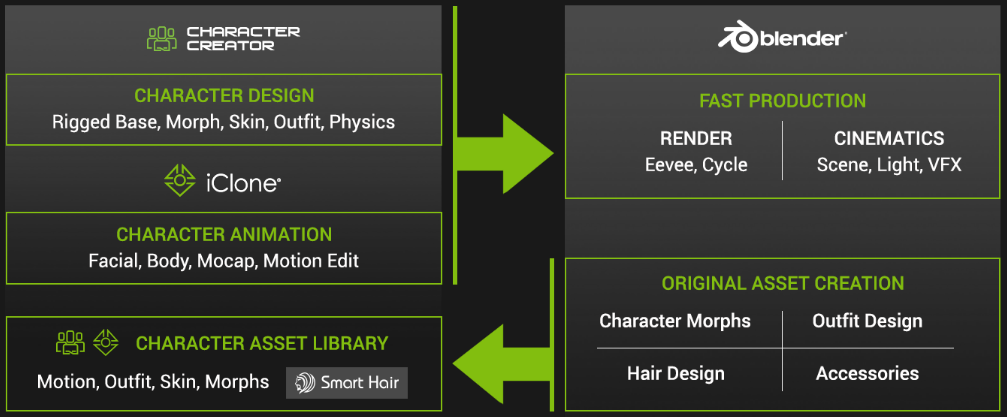
Complementary Workflow between Blender, iClone and Character Creator

STEP #1: GENERATE A MODEL IN CHARACTER CREATOR 3

The first step of the process would be to generate a character model in Character Creator 3. There are a number of different options available in CC3 that make this task rather simple: 

• Morph sliders allow one to modify the size, shape, and rotation of every part of the body;

• Content galleries allow one to quickly add basic clothing, hair, armor, and accessories; and

• The SkinGen plugin allows one to easily add micro-details such as wrinkles, veins, moles, and pores. 
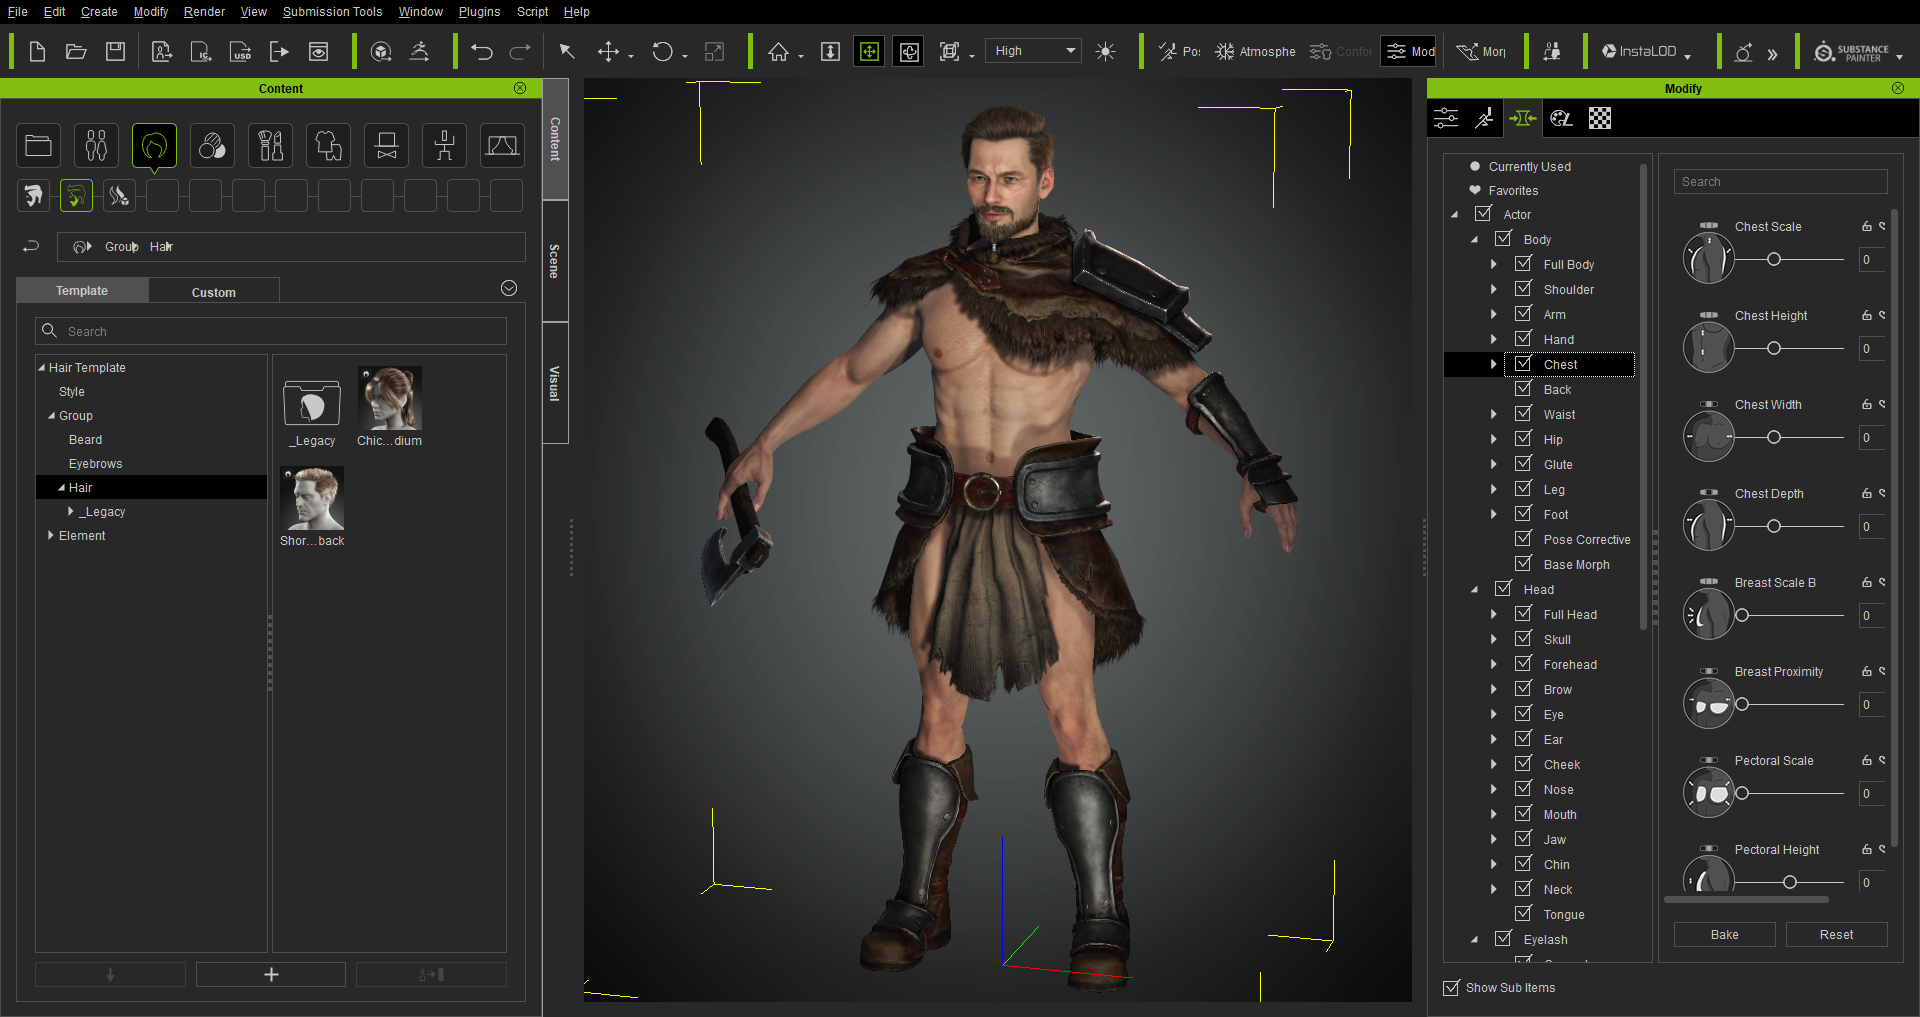
CC3 comes equipped with several tools to make Blender character creation quick and easy

Once the character model was complete, it was then time to export to FBX for further customization in Blender. CC3 has advanced FBX export options such as software presets, mesh and motion, texture embedding, and texture baking that make this transition easier. 

Important note! Ensure that you select the Mesh Only option at this stage of the process, and not the Mesh+Motion option. This ensures that the correct FBX key information is brought into Blender and is paramount to this roundtrip workflow working as intended!

Advanced FBX Export options available in CC3

STEP #2: CUSTOMIZE THE MODEL IN BLENDER

Blender comes fitted with a number of tools that allow the user to sculpt, model, and texture paint. It’s these tools that one can employ to further customize a model and add their own unique art style to a piece. 

With the newly created FBX, the first plug-in of the round-trip workflow could be put to the test, the Blender Auto Setup addon. To use the addon it is quite easy, after you have installed the plugin, just press “N” on your keyboard for the Side Toolbar in the 3D viewport, and you will see a tab called “CC3”. Open it up and there will be a button labeled “Import Character”. Select your FBX file and the rest is taken care of. 

If you would like more information on the installation method you can check out the Reallusion Forum Thread (by Victor.Soupday) or my video at the 4:56 timestamp.
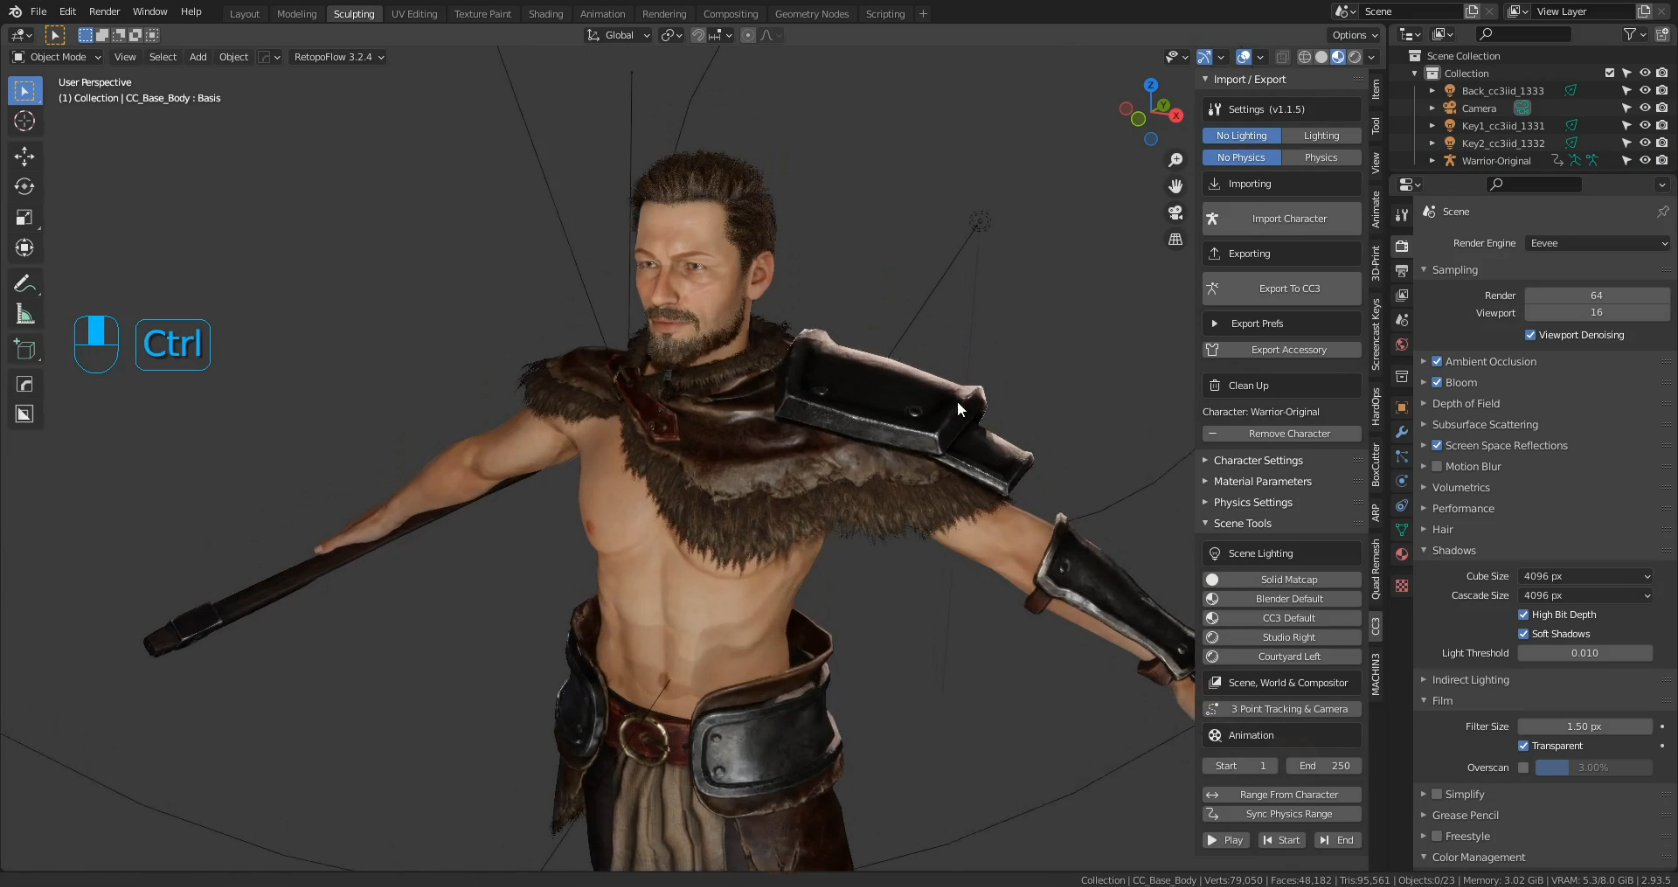
Blender Auto Setup Addon in Blender 3D Viewport

Below you can see the difference between making use of the Blender Auto Setup addon and the default FBX import option in Blender’s File menu. The materials compile perfectly with the addon whereas some adjustments would be required under the default method. Both models are under the same lighting conditions.

Comparison of Auto Setup addon and regular FBX import

With the model successfully imported into Blender, now it was time to add some customization. Russell sculpted in some more stylized shapes around the face, hands, and feet to make the character align more with his own art style.

Blender’s sculpting tools allow you to add your own unique art style

Once the sculpting was done, some adjustments to the clothing and armor were required. This was done through a mixture of modeling and sculpting tools in Blender.

Adjusting clothing through the use of Blender’s modeling and sculpting tools

Russell also made use of the existing topology of the clothing and armor to make his own, custom armor by duplicating select portions and moving them around. This is a quick and easy approach to making your own Blender character creation with the help of CC3. Using an approach like this could allow you to make several different iterations of a soldier very quickly for a large army scene for example.

Duplicating existing topology allows you to quickly build custom clothing and armor configurations

CC3 uses a hair card system, which means that in Blender, Russell was able to shape his own beard and hairstyles by duplicating and transforming the hair cards.
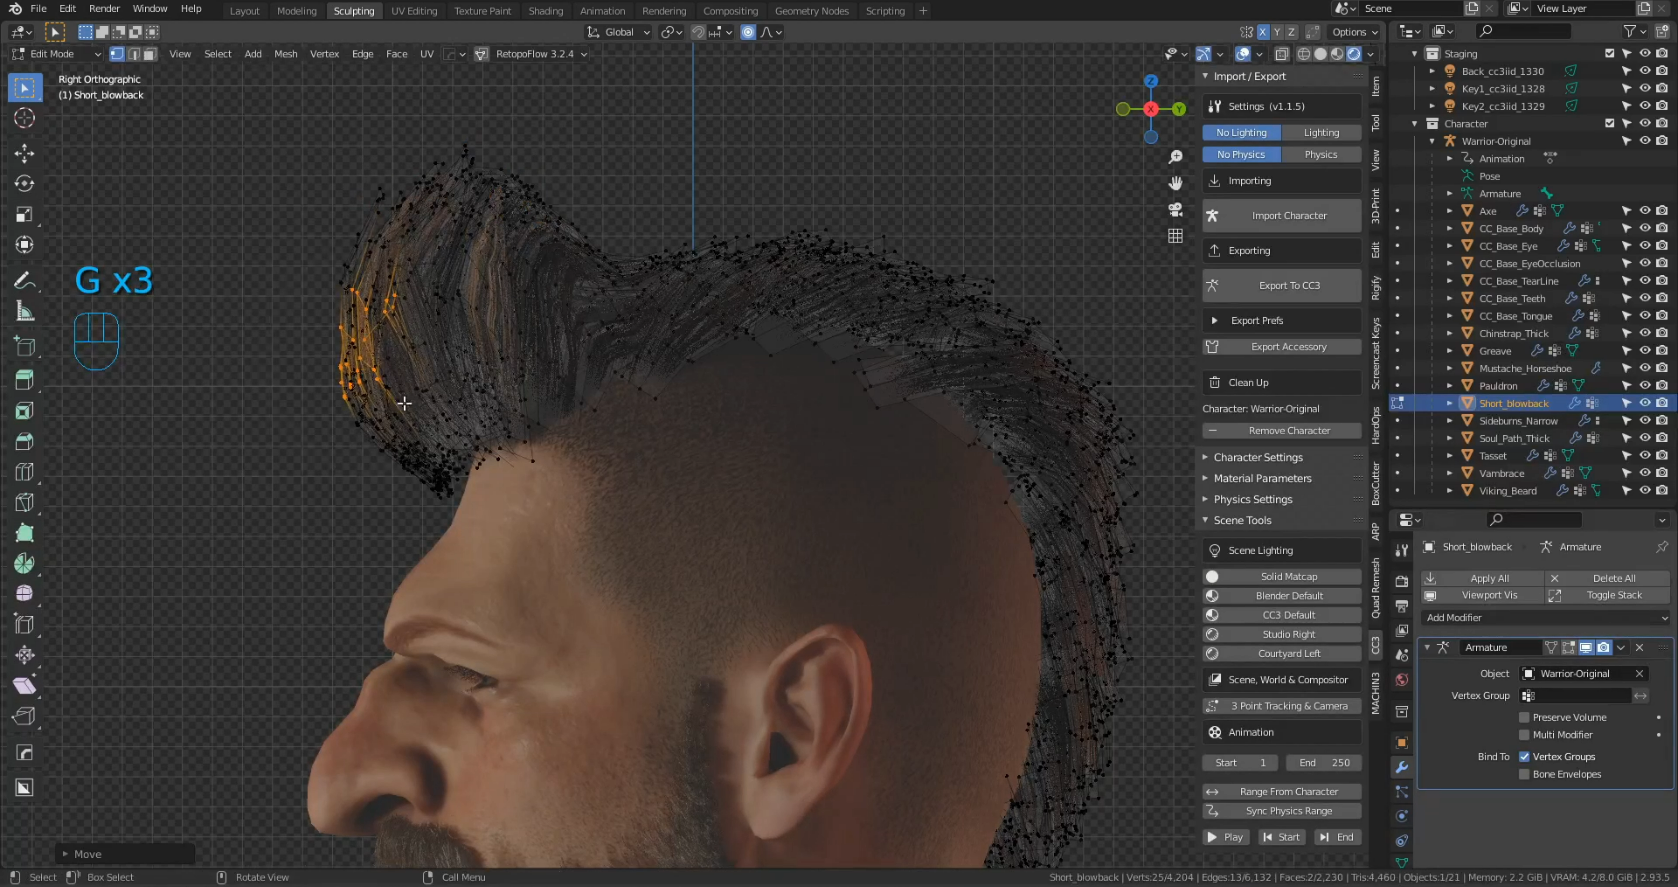
Create your own custom hair styles in Blender using CC3’s hair card system 

Utilizing Blender’s texture painting tools, Russell was able to add some custom skin textures and designs.

Create your own character hairstyles in Blender using CC3’s hair card system 

With all of the customizations complete, it was then time to export back out to FBX again. With the Blender Auto Setup addon it is incredibly easy, just select all the components of your model and go over to your Blender Auto Setup tab on the right, and click Export to CC3.
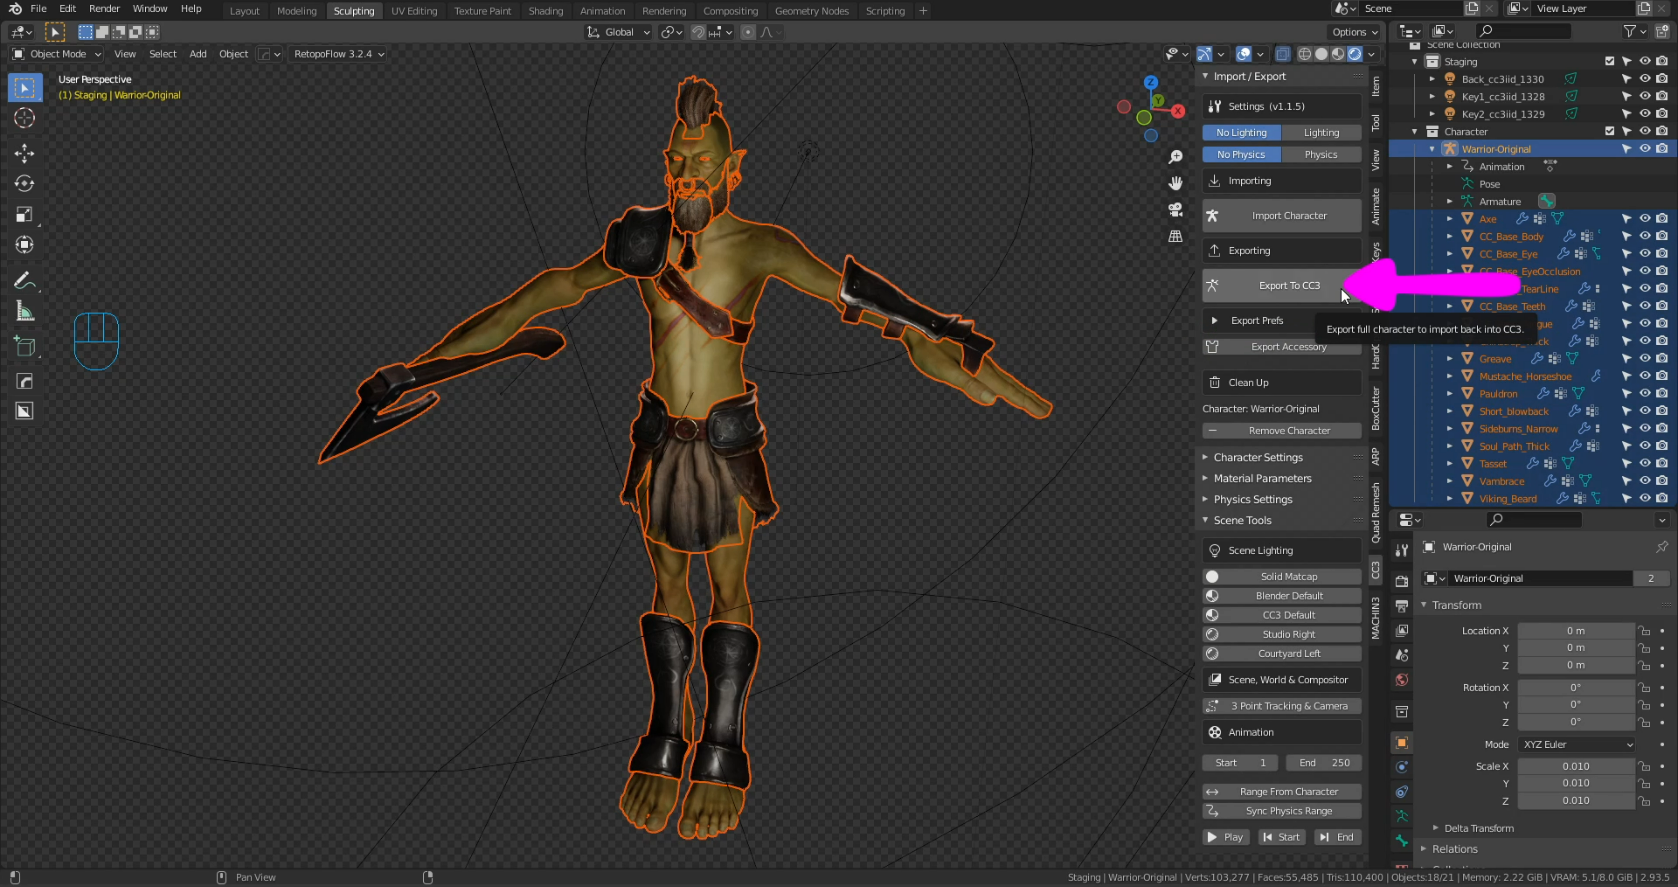
Easy one-click export to FBX with the Blender Auto Setup addon

STEP #3: RIG & WEIGHT PAINT IN CHARACTER CREATOR 3

And so to complete the roundtrip, we are back in CC3. It was now time to call into action the second plugin, the CC3 Python Plugin. Similar to the Blender Auto Setup addon, this one is incredibly easy to use, once installed just go up to your Plugins menu in CC3 and select Blender Auto Setup, Import from Blender, and select your FBX. The rest is taken care of automatically. All of the materials are automatically configured for you with no extra work required.

Easy one-click FBX import into CC3 from Blender with the CC3 Python Plugin

Below is a comparison between the CC3 Python Plugin and the default FBX import option through CC3’s File menu. The materials compile perfectly with the addon whereas none of the materials compile properly under the default method, manual adjustment is required. Again, both models are under the same lighting conditions.

Comparison between default FBX import and CC3 Python Plugin

Just a note, if you have changed the body of your character significantly, you can adjust the bones to match the body better by going up to the Modify menu here, Adjust Bones, and Auto-Position. This makes apply skin weights to your customized model more accurate, which in turn makes animation and posing much easier.

Adjust the bones of the CC3 armature quickly and easily with the Auto-Position feature 

Now if one wished, you could adjust skin weights for posing here in CC3. Or, you could also transfer to CC3’s companion software, iClone, for animation and rendering.

Pose your character in CC3 quickly using the poses included in the Content Gallery

Animate your character in CC3’s companion software, iClone

The verdict is in: the Blender Auto Setup addon and CC3 Python plugin work perfectly and make the integration of Blender and Character Creator quick and seamless!

Stay tuned because Reallusion will be releasing more Work-In-Progress videos for their new software, Character Creator 4 & iClone 8 from January. Check out Reallusion’s website, YouTube channel, and other social media for all the latest news! Expect much more to come this year in 2022 as well as Reallusion is really making strides to connect with the Blender community, joining the Blender Development Fund and becoming a Corporate Silver Partner in January! Some links below for more information :

• Blender Auto Setup Addon: https://bit.ly/3K6sORZ

• CC3 Python plugin: https://github.com/soupday/CC3-Blender-Tools-Plugin 

• Character Creator 4: https://bit.ly/344MWV5

• Reallusion: https://bit.ly/3C4iE1g

Character Creator 4 – Elevating Digital Humans

Work in Progress: Part Two 

In WIP I, we demonstrated the huge potential future of inclusive 3D character creation by unveiling Character Creator 4’s capability to enliven any character and animate any rig.

In WIP II, we’d like to emphasize the freedom of Scalable Expression Editing with the help of 60 to 140 morphs. One such feature is to offer 140 morphs to help create convincing details on digital humans in real time. Meanwhile, providing 60 morphs for users to easily adapt mo-cap data with optimal files, making Character Creator 4 a complete pipeline for major 3D platforms.

With the real-time Smart Skin Shader, the skin regions of characters can be identified automatically for quick color adjustment. Not only can skin color be adapted to avatars of any ethnicity with ease, but also high-fidelity digital humans can be efficiently created from scratch to make your own characters.

Scalable Expression Editing : 60 to 140 Morphs

In Character Creator 4, Standard level (60+) and Extended level (140+) are provided to help users edit expressions with adjustable morphs. The 60+ morphs in the Standard level are compatible with major 3D software supporting ARKit, while the 140+ morphs enable fine control over the nuances of the character’s expressions.

• Standard level: 60+ morphs

Covering 11 main facial features for the 3d head in the Standard level : Brow, Eye Blink, Eyelid, Eye Look, Nose, Cheek, Mouth Base, Mouth Blend, Jaw, Tongue, and Head.

• Extended level: 140+ morphs

Other than the additional sliders added to the 11 features of the Standard level, the Extended level has 4 extra features (Eye Lash, Eye Ball (pupil), Neck and Ear) for adding nuances.

• Flexibly upgrade to Extended level or downgrade to Standard level with a single click.

Smart Skin Shader: Fast Color Alteration 

The world comprises a variety of ethnic groups, and we believe that should be represented in the digital world as well. To faithfully reflect the diversity of human beings, Character Creator 4 provides four color bases: black, red, yellow, and white to speed up the process of creating different ethnicity at the beginning.

Users can quickly switch between different color bases to customize their own characters by adjusting luminosity, or blending with other colors of the skin. In addition, by directly choosing the desired colors, users can enjoy creating new skin colors for the characters they dream up – recreating the Hulk or The Mask, for example.

Non-skin areas will be automatically detected and excluded while adjusting the skin tone.

Smart Skin Shader: Solid Skin

By adjusting the Blend Strength slider, users can change skin colors while maintaining the original details of the characters. One can optimize the skin textures either by altering the Color Tones or importing different Blendmaps. Furthermore, thanks to the real-time skin shader design, users can instantly change the character’s skin tone across four hi-res skin materials (face, body, hands, and legs) all at once.

Smart Skin Shader: Skin Optimization

(for Headshot plugin)

For Headshot plugin users, the Solid Skin feature can easily de-noise the excessive details, and neutralize the deviation of the front and the side textures to derive the most life-like skin. In effect, helping to create more natural 3D heads with high fidelity and refined appearances that can be appreciated on close-up and from afar.

Bake shader color to texture

Once users finish their customized design, they can easily bake the shader color to the skin texture by clicking the Bake Skin Color to Diffuse Map button, which is exportable and ready for Live Link.

You can check the 3D Character Creation & Animation webpage for more information about the free upgrade offer, feature comparison, and FAQs. If you’re interested in the Character Creator 4 motto of “Enlivening any Character” and “Animating any Rig”, you can refer to the article ‘Working in Progress: Part One‘. For more technical details, please have a look at our latest New Features Introduction, which will be updated continuously in the coming months.

If you have further questions, please contact our Support Team, or join the discussion at Reallusion Forum.

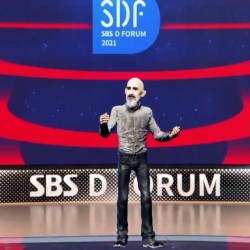
New York Times bestselling author and Hugo Award winner Neal Stephenson becomes a Metaverse Avatar with Reallusion at Korea’s SBS D Forum

Discover how Reallusion brought the author of Snow Crash to the forum as a 3D character.

(Image credit: SBS / Reallusion)

The Seoul Broadcasting System’s SBS D Forum is one of South Korea’s most important annual forums for discussions on the future of tech. In 2021 it had a special guest speaker: Neal Stephenson, the bestselling author of speculative fiction such as Snow Crash and creator of the terms ‘metaverse,’ and ‘avatar’. Neal would be appearing remotely for his talk and video interview for the D forum from his hotel in San Francisco, but the team at SBS wanted to do something a little bit more special. 

Early in October, producer Jun Park contacted the 2D and 3D character creation and animation software developer Reallusion to discuss creating a special experience for the guest speaker. Park wanted to create a metaverse avatar of Neal to deliver the first segment of his appearance.  The D Forum was to take place barely a month after on November 18. Neal was put in touch with Reallusion and the work began.

The work to create the 3D avatar animation and voice began with Neal providing video of him making his introduction so that his voice and facial gestures could be used as a reference to create a stylized character and animation.  The performance was captured with Xsens Awinda, iPhone for Face with iCloneAccuLips lip-sync animation, and iClone Motion Live. With that material banked, Reallusion took care of the character design, teaming up with Actor Capture for the motion capture and character animation. 

Neal Stephenson’s novel Snow Crash first introduced the concept of Metaverse and 3D Avatar in 1992. (Image credit: Random House)

The metaverse avatars were made with Character Creator and the character animations were made with iClone. James Martin, Max Thomas, and Joel Mack from Actor Capture took the characters and generated the audio, lip-sync animation, and mo-cap for the final performance. Epic Games generated the environments and surrounded Neal’s 3D avatar and the stage with virtual world landscapes for a unique experience and a fitting tribute to Stephenson’s work and future scapes.

JuJun Park, Chong AE Lee and Neal Stephenson (Image credit: SBS / Reallusion)

“When Neal Stephenson’ took the stage as a digital human it was so incredible, obviously a big moment for the broadcasting industry and SBS D Forum.”

Jun Park | SBS News

John Martin, vice president at Reallusion, said: “Neal’s cooperation on the project brought a real-world literary hero into our work and we are honored and grateful to partner with SBS and with such a visionary like Mr. Stephenson.”

You can see a full recording of Stephenson’s appearance at the SBS D Forum on YouTube.

Illustrator and Cartoon Animator content developer turns hobby into extra income

MAXIM

A lot of illustrators and animators find the 2D Marketplace a wonderful source of income from their hobby, including Maxim, who has created a side business for himself creating characters, backgrounds, props and more which can be used by individuals and companies looking to create professional explainer videos, 2D animated projects and print media.

In this interview Maxim talks about his influences, why he chose Cartoon Animator (CTA) as his preferred 2D animation software and how he hopes one day to turn his hobby into a full time job.

” Cartoon Animator is the best program for quick animation creation right now. Creating characters is an easy process thanks to the templates available inside. It was a good opportunity to expand my opportunity to sell my art, and I am pleased I made the decision. “

MAXIM – Illustrator / 2D Content Developer

PROXi Virtual Production empowers Action Design with Character Creator, iClone, and Unreal Engine.

EPIC GAMES VIRTUAL PRODUCTION WEEK GOES BEHIND THE SCENES WITH PROXI

Epic Games Virtual Production Week spotlighted a behind the scenes of stunt legends, Proxi Virtual Production. Guy Norris and Harrison Norris speak about the filmmaking process for action design and the workflow. The array of footage showcases Reallusion Character Creator digital human actors in many scenes.  Watch the video to see the action with Unreal Engine and read on for more about how Character Creator and iClone helped populate and animate Proxi’s action design scenes seen in the video. 

Following the filming of The Suicide Squad (2021), Proxi founders Guy Norris and Harrison Norris gave some insight as to how the Reallusion character and animation pipeline fit into their workflow. Proxi is behind the stunts and techviz for action design on movies like The Suicide Squad, Mad Max: Fury Road, X-Men: Dark Phoenix, Netflix’s Triple Frontier, Disney+ The Mandalorian, and more. 

from Action Design in Unreal – PROXi Virtual Production | Unreal Engine

PROXi’s Guy Norris and Harrison Norris on incorporating the Reallusion Pipeline and Unreal Engine

“Virtual production is a fast-paced workflow requiring tools that add speed to creativity and integrate effectively with our Unreal Engine pipeline.  Character Creator 3 and iClone’s Live Face from Reallusion provide us the speed to create 3D likenesses of the production’s actors, while iClone’s facial animation brings performances to life. Facial mocap with the iPhone using Motion Live allows us to perform and instantly capture face and voice; edit the capture, or punch-in changes on-the-fly. “ 

“Before Live Face we used very little facial mocap, due to lengthy turnaround times, increased cost, and/or a reliance on external service teams. But thanks to the Reallusion software’s rapid turnaround and ease of use, facial has become a standard part of our toolkit, and will continue to be for all productions in the foreseeable future”

from Action Design in Unreal – PROXi Virtual Production | Unreal Engine

Virtual Production Collaboration and Reallusion

“Virtual Production goes far and away beyond traditional previz, as we empower a creative sandbox approach that’s entirely new. Using Unreal as a backbone, we create entire sequences in 3D space as an unbroken piece of action, that can be adjusted or re-lensed at any time. This sandbox allows the Director, DP, Production Designer, Costume, Editor and all other key-creatives that wish to be involved, to communicate, collaborate and experiment with an evolving version of the sequence to a point of practical refinement, before a single dollar is spent in production. Incorporating the character creation and facial capture suites from Reallusion has allowed us to provide additional creative offerings within this sandbox, while conclusively saving both time and money as an organization.”

from Action Design in Unreal – PROXi Virtual Production | Unreal Engine

Evolving Digital Human Actors with Character Creator and Headshot

“Beginning with our work on Xmen: Dark Phoenix, Character Creator 3 has evolved the way we build our digital actors. With real-time tools and a rigged character base that gives us animation ready models.  Prior to Character Creator we worked with sculpting artists and much longer production times, now with Character Creator we can generate all the characters we need, dress them with a wardrobe system and send them directly to Unreal Engine.”

from Action Design in Unreal – PROXi Virtual Production | Unreal Engine

“Being the first studio to pilot the artificial intelligence behind Character Creator 3’s new ‘Headshot’ tool, gave our team a fascinating exploration into producing digital likenesses of our cast from a single photo.  Anytime we can combine speed with quality it’s the perfect match for virtual production, and Character Creator 3 is a solution that rapidly populates our scenes with faces and characters, helping the production visualize key moments, well before costly principal photography even begins.” 

Animator Lets 3D Characters Get Their Groove on With NVIDIA Omniverse and Reallusion

This article is written by NVIDIA, and it’s featured on NVIDIA Omniverse Blog.

Nigeria-based Benny Dee makes animated music videos, short films and more with NVIDIA Omniverse and Reallusion’s iClone and Character Creator.

Benjamin Sokomba Dazhi, aka Benny Dee, has learned the ins and outs of the entertainment industry from many angles — first as a rapper, then as a music video director and now as a full-time animator.

After eight years of self-teaching, Dazhi has mastered the art of animation — landing roles as head animator for the film The Legend of Oronpoto, and as creator and director of the Cartoon Network Africa Dance Challenge, a series of dance-along animations that teaches children African-inspired choreography.

Based in north-central Nigeria, Dazhi is building a team for his indie animation studio, JUST ART, which creates animation films focused on action, sci-fi, horror and humor.

Dazhi uses NVIDIA Omniverse — a physically accurate 3D design collaboration platform available with RTX-powered GPUs and part of the NVIDIA Studio suite of tools for creators — with Reallusion’s iClone and Character Creator to supercharge his artistic workflow.

He uses Omniverse Connectors for Reallusion apps for character and prop creation and animation, set dressing and cinematics.

Music, Movies and Masterful Rendering

From animated music videos to clips for action films, Dazhi has a multitude of projects — and accompanying deadlines.

“The main challenges I faced when trying to meet deadlines were long render times and difficulties with software compatibility, but using an Omniverse Connector for iClone app has been game-changing for my workflow.”

Benjamin Sokomba Dazhi (Benny Dee) | Founder of Just Art Animation Studios

Using Omniverse, Dazhi accomplishes lighting and materials setup, rendering, simulation and post-production processes.

With these tools, it took Dazhi just four minutes to render this clip of a flying car — a task, he said, that would have otherwise taken hours.

“The rendering speed and photorealistic output quality of Omniverse is a breakthrough — and Omniverse apps like Create and Machinima are very user-friendly,”

Benjamin Sokomba Dazhi (Benny Dee) | Founder of Just Art Animation Studios

Such 3D graphics tools are especially important for the development of indie artists, Dazhi added.

“In Nigeria, there are very few animation studios, but we are beginning to grow in number thanks to easy-to-use tools like iClone, which is the main animation software I use.”

Benjamin Sokomba Dazhi (Benny Dee) | Founder of Just Art Animation Studios

Dazhi plans to soon expand his studio, working with other indie artists via Omniverse’s real-time collaboration feature. Through his films, he hopes to show viewers “that it’s more than possible to make high-end content as an indie artist or small company.”

See Dazhi’s work in the NVIDIA Omniverse Gallery, and hear more about his creative workflow live during a Twitch stream on Jan. 26 at 11 a.m. Pacific.

Related Links:

NVIDIA Omniverse Blog: https://blogs.nvidia.com/blog/2022/01/25/omniverse-creator-benny-dee/

Just Art Animation Studios: https://www.youtube.com/channel/UCJ8aa9y8s52q90DvV3yI1OA/

The Legend of Oronpoto: https://youtu.be/aKN7VmHuSWM

Cartoon Network Africa Dance Challenge: https://www.cartoonnetworkhq.com/show/cndancechallenge

Animated Video Company uses Cartoon Animator to Speed Up Production

Saxon Rix | Head of Animation & Tech – Stada Media

Saxon Rix

Saxon Rix heads up the animation department of a video production company and discusses how Cartoon Animator (CTA) is his 2D animation software of choice when he needs to meet tight deadlines for clients.

Cartoon Animator’s power and flexibility allow Saxon and his team to rig and animate custom characters in record time, saving valuable time and money. In this interview, Saxon also gives advice to other artists, animators and developers who work with or are considering Cartoon Animator for their business projects.

.

“Cartoon Animator gives us the freedom to create our own characters and animations from scratch, all within a streamlined workflow.”

Saxon Rix | Head of Animation & Tech – Stada Media

Winning Tips & Tricks: The Making of Jason Taylor’s “Animal Farm” Showcase

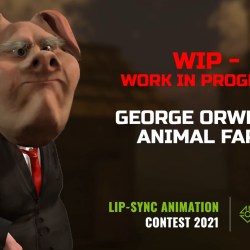
The “Winning Tips & Tricks” series covers practical workflows and techniques shared by winners from the “2021 iClone Lip Sync Animation Contest”. To let users see the full spectrum of the iClone facial animation pipeline, we are introducing projects that are rendered with different 3D engines including; Unreal, Unity, iClone, Blender, and Cinema4D.  Let’s now take a look at Jason Taylor’s: “Animal Farm”, combining Character Creator (CC3) / iClone workflow and Unity render.

Jason Taylor

My name is Jason Taylor. I’m a filmmaker and multimedia artist, running my own digital media studio, Jumping Guy Productions in Ontario, Canada.

I’m the creator and producer of a puppet-based video series for kids which I created using real-life puppets in a 3D animated world via Unity in 2016. Since then I have been working on developing professional 3D character animation skills in an effort to diversify my skillset and tell stories that I couldn’t with puppets. Reallusion’s Character Creator and iClone have been a real game-changer for me in this regard.

Why I created this showcase 

Working part-time over a few evenings or so, I was able to bring a scene from Animal Farm to life. The story needed a variety of characters from talking pig characters, a talking horse to a variety of rough-looking farmers. With relatively little effort I was able to create eleven original AAA characters for my video in a matter of hours using Character Creator. From there, once I exported the characters over to iClone, I was able to easily add facial expressions, animate the head and easily add high-quality lip-syncing to my characters before I exported them over to Unity for composition and final render.

How I do it with iClone

Step 1: Building Five Animal Characters

To create the characters I started with CC3 compatible base characters from the Reallusion Marketplace and content stores. Rather than reinventing the wheel, I was able to take a simple clean looking pig character and add facial hair, eyebrows, clothing and morph the facial features to create the human-like pigs that the story called for.

Step 2: Building Five Human Characters

The process for creating the human characters was similar to the pigs. I started with simple base characters similar to what I had in mind for the story and then I morphed their faces, added facial hair and unique hairstyles and the proper clothing. For one of the characters, a farmer character, I was even able to add dirt on his face like he just came in from working in the field.

Step 3: Morphing Horse Character from Deer

Blender helped with pretty much everything else. Using simple shapes, I was able to sculpt them into jewelry, pants and even a braid-looking thing. And Blender has for the creation of the horse character — this one stumped me at first as I couldn’t find the style of horse I was looking for in any of the Reallusion stores. I had a specific style in mind and my horse also needed to be compatible with CC3’s facial morphs system for animating the mouth using AccuLips. My solution was to purchase a compatible deer model that came with an isolated head model that I was able to stretch and morph and shape into the horse base that I had in mind. I then added custom textures/materials that I photoshopped together from an actual image of a horse. For the final touch, I added some stylish hair that I purchased from the marketplace.

Step 4: Animating the Body and Hair

The facial emotions and lip-syncing abilities, paired with the live facial mocap abilities with LIVE FACE the iPhone mocap plugin for iClone 7 have really blown me away and have allowed me to take my animations to the next level, imbuing my characters with personality and emotion. As a general rule for myself, I start with lip-syncing and then add emotions afterward. To create the lip-syncing, I simply import the audio of my character speaking as well as the text to go along with the audio and iClone’s AccuLips give me a solid starting point that I am able to tweak to my liking, adding more or less jaw motion, more or less lip motion and the ability to add, remove or move details. There are also presets I can use like “Singing” or “Whispering”, that I can use as-is or tweak to my heart’s desire.

Step 5: Mocap and Facial Expression

The scenes I picked to recreate in 3D had little to no character animation. Nevertheless, I took advantage of the Motion Puppet tool to create some simple movements and avoid having the character stand in place like a statue the whole time. In the first sequence, for example, I positioned his hands above his head and once I am committed to the finalized result of the lip-sync, I’ll add emotions using iClone’s library of emotion, e.g., “Happy” or “Sad” or “Angry” etc. I can keyframe these emotions in, blend them together from one to the other, adjust the intensity in terms of how happy or how sad, and so on, to bring my character and story to life.

On top of my keyframed emotions and lip-syncing from AccuLips, I like to add facial mocap data to the mix to give things a more human-like realistic look and feel. I go subtle here though. Using my iPhone connected to LIVE FACE in iClone, I can add a layer of head rotations and another layer of facial expressions from the mocap data that is blended together with the original.

Step 6: Animate the Head

For this project, in addition to the head movements from the mocap data, I also animated some of the larger head movements using the “Look at” option in iClone. This allowed me to give the character something to look at directly, which in the end gave the character more of a believable performance. To do this, I animated a cube to the various points I wanted my character to be looking at. I then tweaked and keyframed the options of how much the character’s eyes were looking at the cube without the neck and head moving versus how much the character turned his full head to look at the object.

Final Step: Tips to do Composition in Unity

And finally, it was time to add all the cool effects, such as smoke, lighting, magical butterflies, and of course, floating dust particles. I had already bought as a Unity user, I was happy with how great the characters looked in Unity once I exported them from CC3 and imported them into Unity. I used the Unity / CC3 Auto Setup Addon which helped to give me good results on the materials in Unity HDRP shader mode. After I did a bit of custom tweaking to the materials and hair and I was off to the races. If something came up in Unity with one of the characters that I wasn’t happy with given how my scene was building out, e.g., a character’s nose, head shape, eyes or arms, etc. It was no trouble to re-export the character from CC3 and then re-import to Unity without losing references to 3D character animations etc. The same went for the facial animation and lip-syncing. Once I saw things come to life in Unity, I was able to go back to iClone, make some adjustments accordingly to timing and expressions and lip-syncing and I could re-import things back into Unity seamlessly.

Final Thoughts and Conclusions

Working with 11 different characters on a 30-second clip, this process could have taken me weeks or months to do. And, it’s not a stretch to think that this would be the kind of endeavor that a studio team would take on. But no, I was able to do this on my own in a very timely manner, working part-time in between my main project. Overall, I’m glad I gave this project a shot and I’m happy it was even possible thanks to Reallusion’s professional tools. I’m excited to see what comes next from Reallusion!

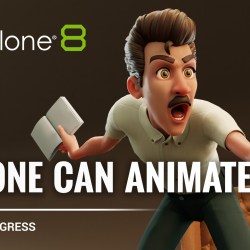
iClone 8 – Now Anyone Can Animate

Work in Progress : Part Two

In the prior WIP I, we envisioned a future of efficient and enjoyable process of 3D character animation, beginning with the unveiling of Motion Director and cutting-edge interactive motion editing functionalities. 

For WIP II, we’d like to highlight newer features built into iClone 8 that will help pro studios and indie developers maximize their productivity. Not only are these time-saving features essential to producing high-quality 3D character animations, but they can also greatly reduce the cost of production.

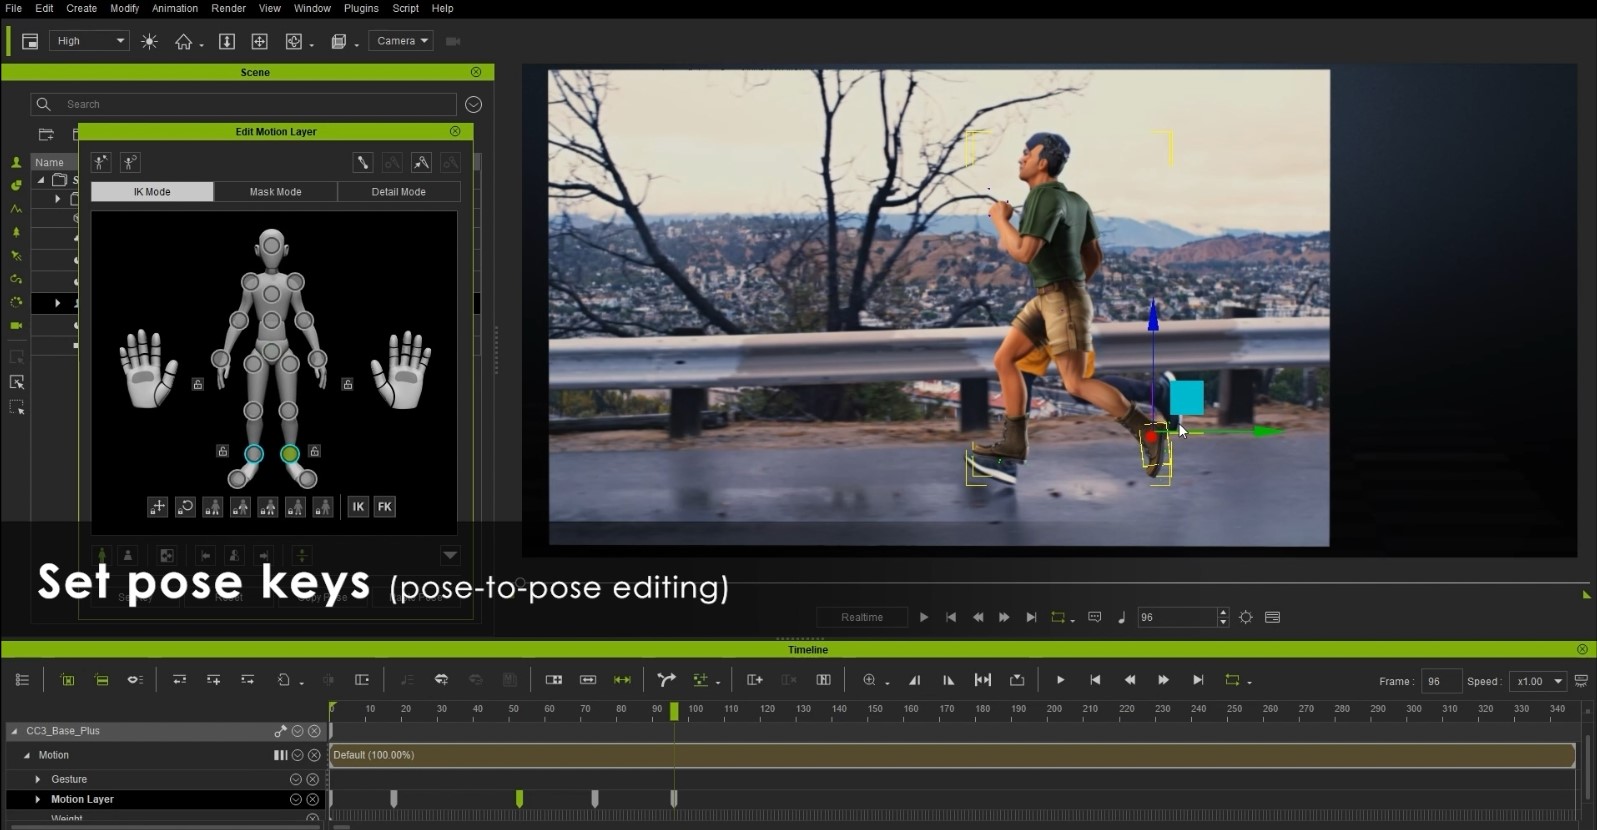
Rotoscope : pose-to-pose editing

Rotoscope is the easiest way to start learning pose-to-pose 3D character animation. Anyone can find video references to set keyframes and repeat this process to complete whole motion cycles. 

• Apply live-action footage (MP4) for reference to a 3D plane, and pose your character accordingly.

• Set 5 keys for half of the animated sequences. Copy them and click ’Full body mirror’ to flip the poses.

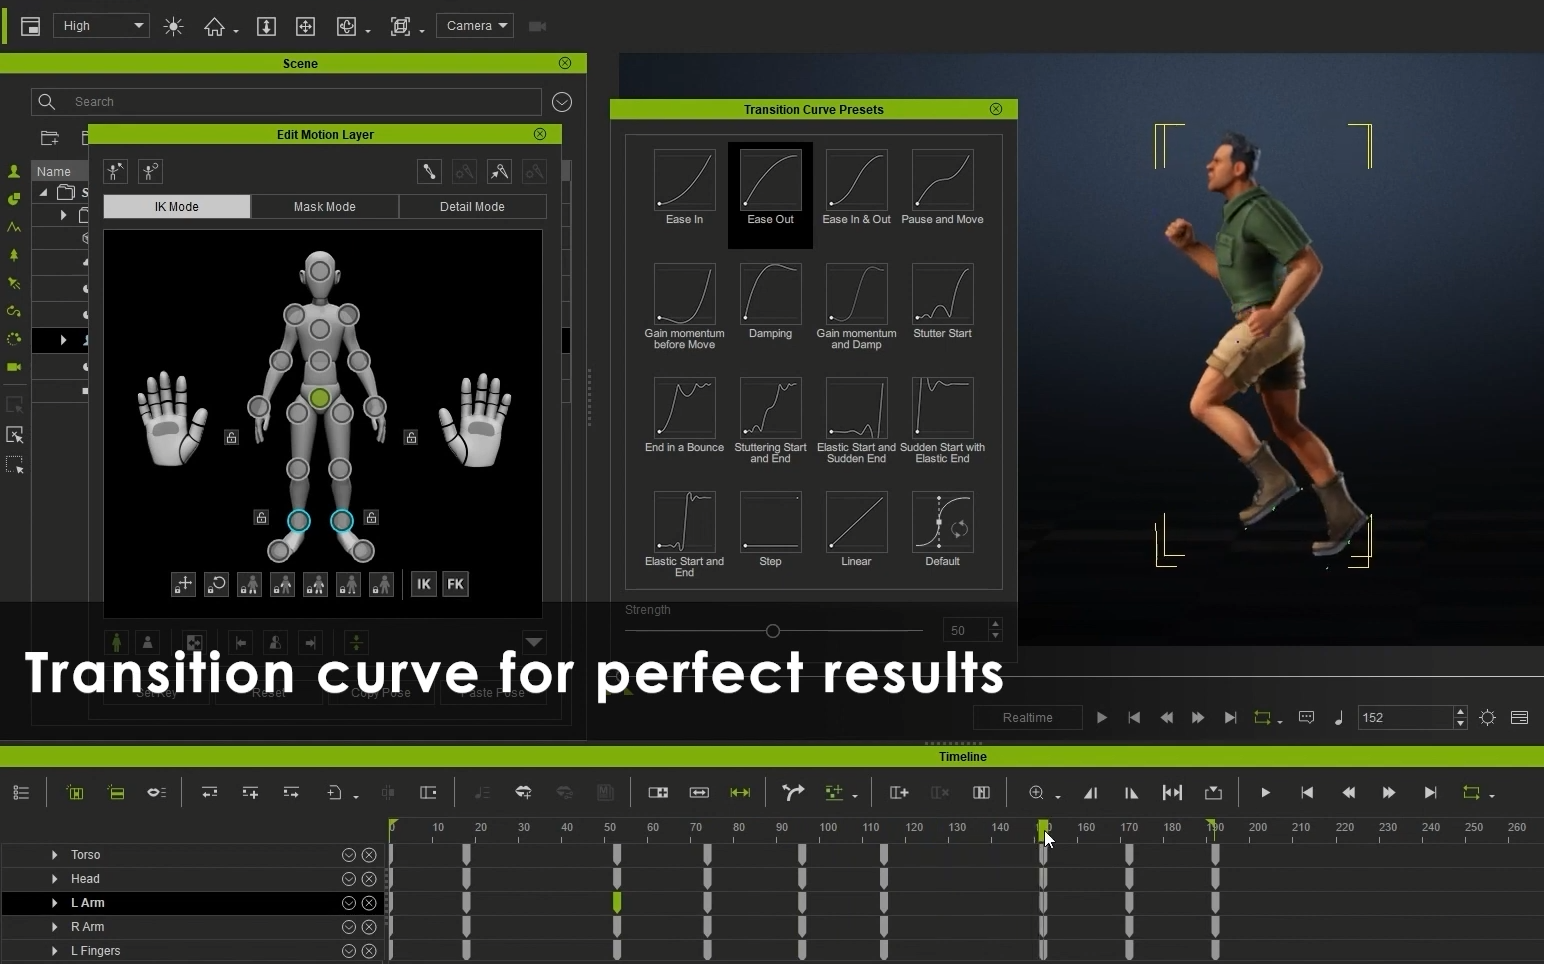
• Use offset keys to create an overlapping effect, and use Transition Curve to refine the timing, as shown below.

Pose Mixer : pose-driven motion synthesis

Pose Mixer is a handy tool that generates new poses from existing sources with just a few clicks: select a source pose, define the mixing area (from the body mask), and mix with the target pose.

• Replace selected body parts with other poses you like and mix them in different ways.

  • Choose the body parts which you like to Flip Directions, Mirror Copy, or build Symmetrical Poses.

Mix-and-matching motions can be a brilliant way to come up with new ideas and happen upon creative possibilities. You can think of this method of working like the cut-up technique employed by Dadaist poets to the songwriting of David Bowie, where “happy accidents” are left to flourish.

Expandable Character-centric Timeline

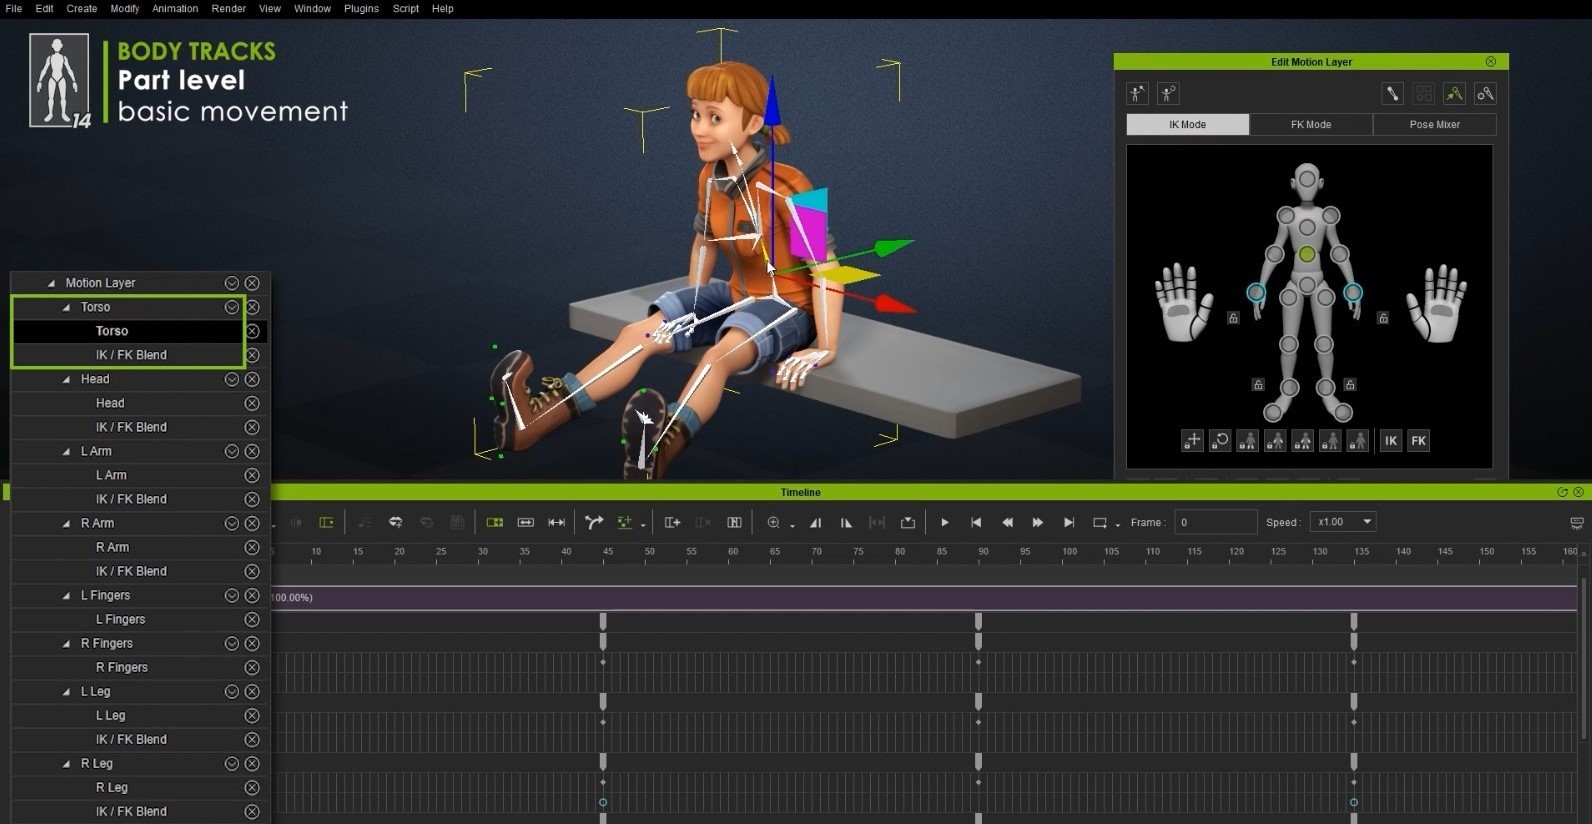
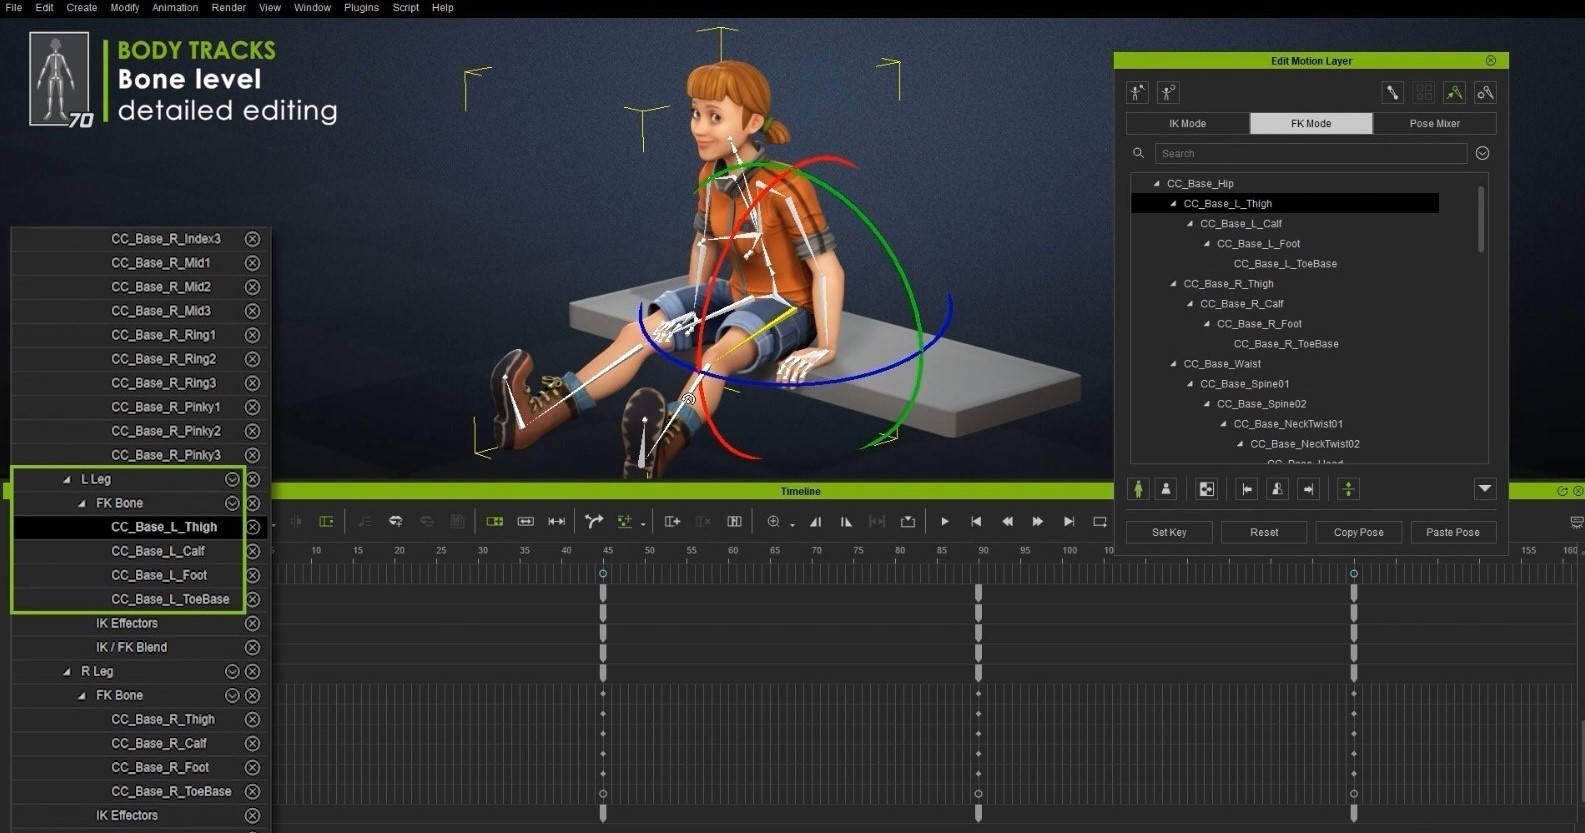
Most 3D tools provide timeline controls for character bones and blendshapes, but the sheer number of tracks can make editing stunningly hard. iClone 8 introduced Expandable Tracks on both body motions (2 levels) and facial expressions (3 levels), which allows creators to focus at primary editing first, and later use the advanced timeline controls for the details of the facial and body animation.

• Body-Motion Tracks (2 levels):

Part level can be used intuitively by selecting general body parts to edit.

Bone level provides advanced editing to all body bones and all the way to fingers.

Users can fully control the interpolation between FK/IK through the FK/IK Blend track. 

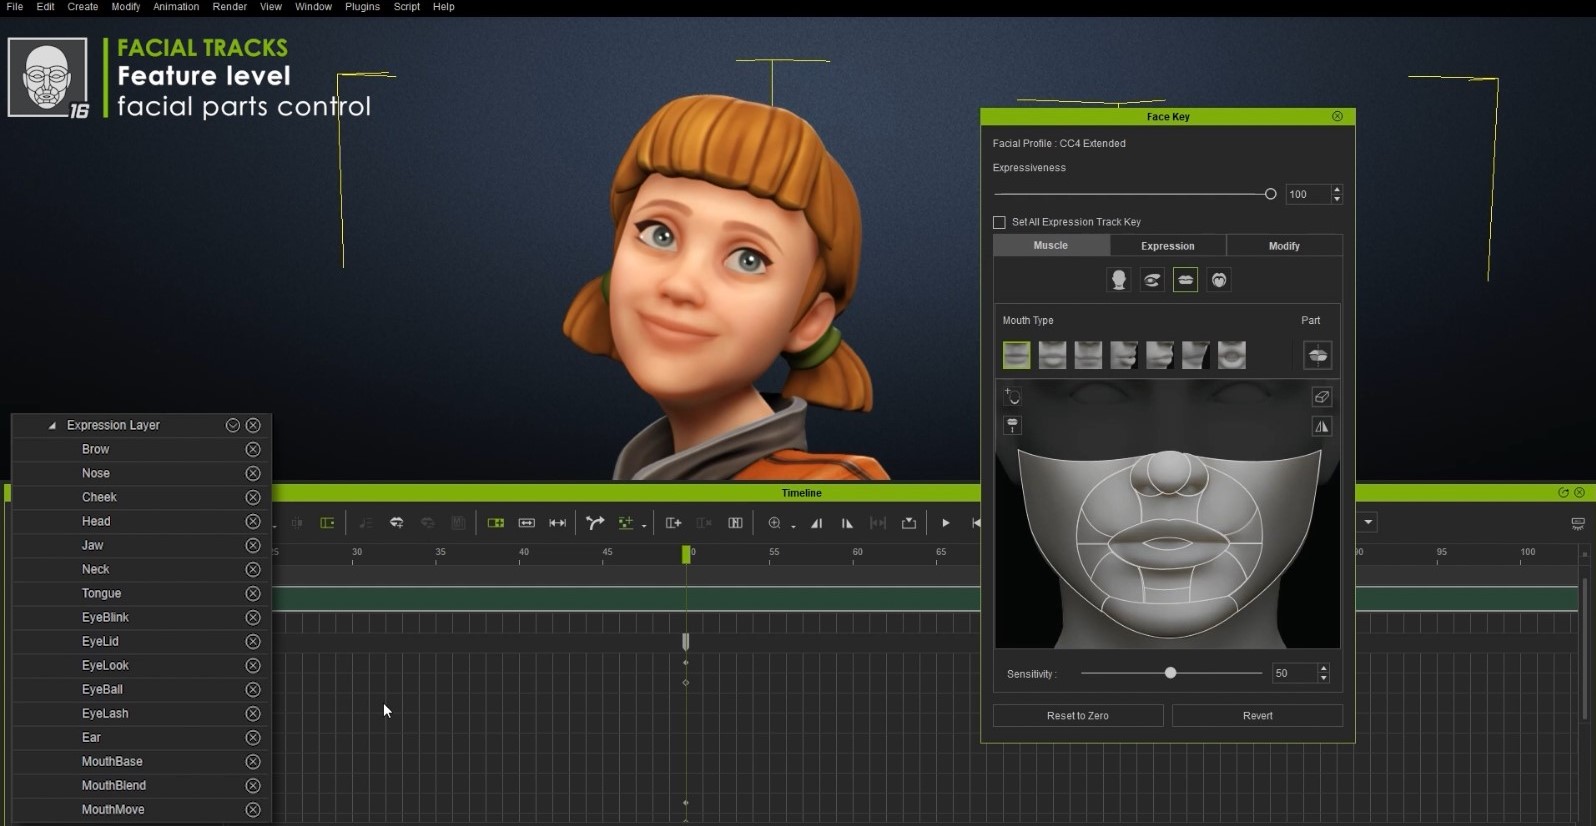
• Facial-Expression Tracks (3 levels):

❶ Basic : Eyeblink track is freshly added, in addition to pre-existing Muscles, Eye and Head tracks.

❷ Feature: Access 16 prominent facial feature groups from the brow, jaw to ear.

❸ Morph: 60 to 140 morphs are provided to refine the expression details, the blendshape number is determined by the selected level of expression profile (Standard or Extended).

Curve Editor : Professional Cartoon Performances

The Curve Editor is now built seamlessly into iClone 8 with no additional purchases necessary! In addition to bone and blendshape support, iClone 8’s Curve Editor comes with FK/IK effector controls and body/facial 3D animation curve tools.

• Greatly reduce time and effort to create Cartoon Performances.

• Create curve animation for Arcs, Follow Through, Exaggeration, and sudden movement with Steps.

You can check the 3D Character Creation & Animation webpage for more information about the free upgrade offer, feature comparison, and FAQs. If you’re interested in the Play-to-Animate feature of the Motion Director system, you can refer to the article ‘Working in Progress: Part One‘. For more technical detail, please have a look at our latest New Features Introduction, which will be updated continuously in the coming months.

If you have further questions, please contact our Support Team, or join the discussion at Reallusion Forum.