首頁 » Page 66

Winning Tips & Tricks: The Making of Jason Taylor’s “Animal Farm” Showcase

The “Winning Tips & Tricks” series covers practical workflows and techniques shared by winners from the “2021 iClone Lip Sync Animation Contest”. To let users see the full spectrum of the iClone facial animation pipeline, we are introducing projects that are rendered with different 3D engines including; Unreal, Unity, iClone, Blender, and Cinema4D.  Let’s now take a look at Jason Taylor’s: “Animal Farm”, combining Character Creator (CC3) / iClone workflow and Unity render.

Jason Taylor

My name is Jason Taylor. I’m a filmmaker and multimedia artist, running my own digital media studio, Jumping Guy Productions in Ontario, Canada.

I’m the creator and producer of a puppet-based video series for kids which I created using real-life puppets in a 3D animated world via Unity in 2016. Since then I have been working on developing professional 3D character animation skills in an effort to diversify my skillset and tell stories that I couldn’t with puppets. Reallusion’s Character Creator and iClone have been a real game-changer for me in this regard.

Why I created this showcase 

Working part-time over a few evenings or so, I was able to bring a scene from Animal Farm to life. The story needed a variety of characters from talking pig characters, a talking horse to a variety of rough-looking farmers. With relatively little effort I was able to create eleven original AAA characters for my video in a matter of hours using Character Creator. From there, once I exported the characters over to iClone, I was able to easily add facial expressions, animate the head and easily add high-quality lip-syncing to my characters before I exported them over to Unity for composition and final render.

How I do it with iClone

Step 1: Building Five Animal Characters

To create the characters I started with CC3 compatible base characters from the Reallusion Marketplace and content stores. Rather than reinventing the wheel, I was able to take a simple clean looking pig character and add facial hair, eyebrows, clothing and morph the facial features to create the human-like pigs that the story called for.

Step 2: Building Five Human Characters

The process for creating the human characters was similar to the pigs. I started with simple base characters similar to what I had in mind for the story and then I morphed their faces, added facial hair and unique hairstyles and the proper clothing. For one of the characters, a farmer character, I was even able to add dirt on his face like he just came in from working in the field.

Step 3: Morphing Horse Character from Deer

Blender helped with pretty much everything else. Using simple shapes, I was able to sculpt them into jewelry, pants and even a braid-looking thing. And Blender has for the creation of the horse character — this one stumped me at first as I couldn’t find the style of horse I was looking for in any of the Reallusion stores. I had a specific style in mind and my horse also needed to be compatible with CC3’s facial morphs system for animating the mouth using AccuLips. My solution was to purchase a compatible deer model that came with an isolated head model that I was able to stretch and morph and shape into the horse base that I had in mind. I then added custom textures/materials that I photoshopped together from an actual image of a horse. For the final touch, I added some stylish hair that I purchased from the marketplace.

Step 4: Animating the Body and Hair

The facial emotions and lip-syncing abilities, paired with the live facial mocap abilities with LIVE FACE the iPhone mocap plugin for iClone 7 have really blown me away and have allowed me to take my animations to the next level, imbuing my characters with personality and emotion. As a general rule for myself, I start with lip-syncing and then add emotions afterward. To create the lip-syncing, I simply import the audio of my character speaking as well as the text to go along with the audio and iClone’s AccuLips give me a solid starting point that I am able to tweak to my liking, adding more or less jaw motion, more or less lip motion and the ability to add, remove or move details. There are also presets I can use like “Singing” or “Whispering”, that I can use as-is or tweak to my heart’s desire.

Step 5: Mocap and Facial Expression

The scenes I picked to recreate in 3D had little to no character animation. Nevertheless, I took advantage of the Motion Puppet tool to create some simple movements and avoid having the character stand in place like a statue the whole time. In the first sequence, for example, I positioned his hands above his head and once I am committed to the finalized result of the lip-sync, I’ll add emotions using iClone’s library of emotion, e.g., “Happy” or “Sad” or “Angry” etc. I can keyframe these emotions in, blend them together from one to the other, adjust the intensity in terms of how happy or how sad, and so on, to bring my character and story to life.

On top of my keyframed emotions and lip-syncing from AccuLips, I like to add facial mocap data to the mix to give things a more human-like realistic look and feel. I go subtle here though. Using my iPhone connected to LIVE FACE in iClone, I can add a layer of head rotations and another layer of facial expressions from the mocap data that is blended together with the original.

Step 6: Animate the Head

For this project, in addition to the head movements from the mocap data, I also animated some of the larger head movements using the “Look at” option in iClone. This allowed me to give the character something to look at directly, which in the end gave the character more of a believable performance. To do this, I animated a cube to the various points I wanted my character to be looking at. I then tweaked and keyframed the options of how much the character’s eyes were looking at the cube without the neck and head moving versus how much the character turned his full head to look at the object.

Final Step: Tips to do Composition in Unity

And finally, it was time to add all the cool effects, such as smoke, lighting, magical butterflies, and of course, floating dust particles. I had already bought as a Unity user, I was happy with how great the characters looked in Unity once I exported them from CC3 and imported them into Unity. I used the Unity / CC3 Auto Setup Addon which helped to give me good results on the materials in Unity HDRP shader mode. After I did a bit of custom tweaking to the materials and hair and I was off to the races. If something came up in Unity with one of the characters that I wasn’t happy with given how my scene was building out, e.g., a character’s nose, head shape, eyes or arms, etc. It was no trouble to re-export the character from CC3 and then re-import to Unity without losing references to 3D character animations etc. The same went for the facial animation and lip-syncing. Once I saw things come to life in Unity, I was able to go back to iClone, make some adjustments accordingly to timing and expressions and lip-syncing and I could re-import things back into Unity seamlessly.

Final Thoughts and Conclusions

Working with 11 different characters on a 30-second clip, this process could have taken me weeks or months to do. And, it’s not a stretch to think that this would be the kind of endeavor that a studio team would take on. But no, I was able to do this on my own in a very timely manner, working part-time in between my main project. Overall, I’m glad I gave this project a shot and I’m happy it was even possible thanks to Reallusion’s professional tools. I’m excited to see what comes next from Reallusion!
iClone 8 – Now Anyone Can Animate

Work in Progress : Part Two

In the prior WIP I, we envisioned a future of efficient and enjoyable process of 3D character animation, beginning with the unveiling of Motion Director and cutting-edge interactive motion editing functionalities. 

For WIP II, we’d like to highlight newer features built into iClone 8 that will help pro studios and indie developers maximize their productivity. Not only are these time-saving features essential to producing high-quality 3D character animations, but they can also greatly reduce the cost of production.

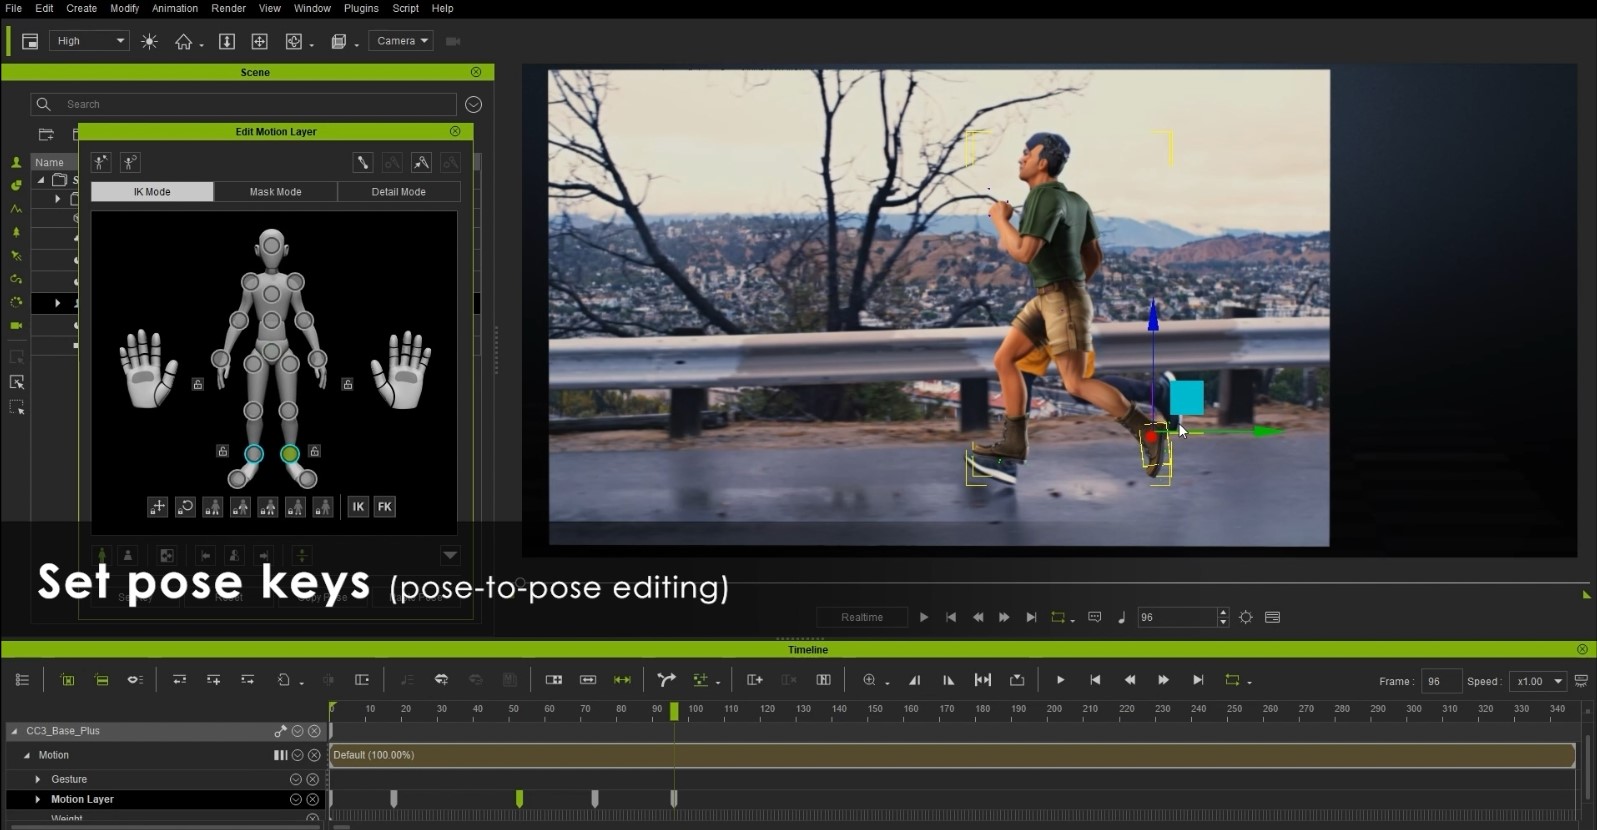
Rotoscope : pose-to-pose editing

Rotoscope is the easiest way to start learning pose-to-pose 3D character animation. Anyone can find video references to set keyframes and repeat this process to complete whole motion cycles. 

• Apply live-action footage (MP4) for reference to a 3D plane, and pose your character accordingly.

• Set 5 keys for half of the animated sequences. Copy them and click ’Full body mirror’ to flip the poses.

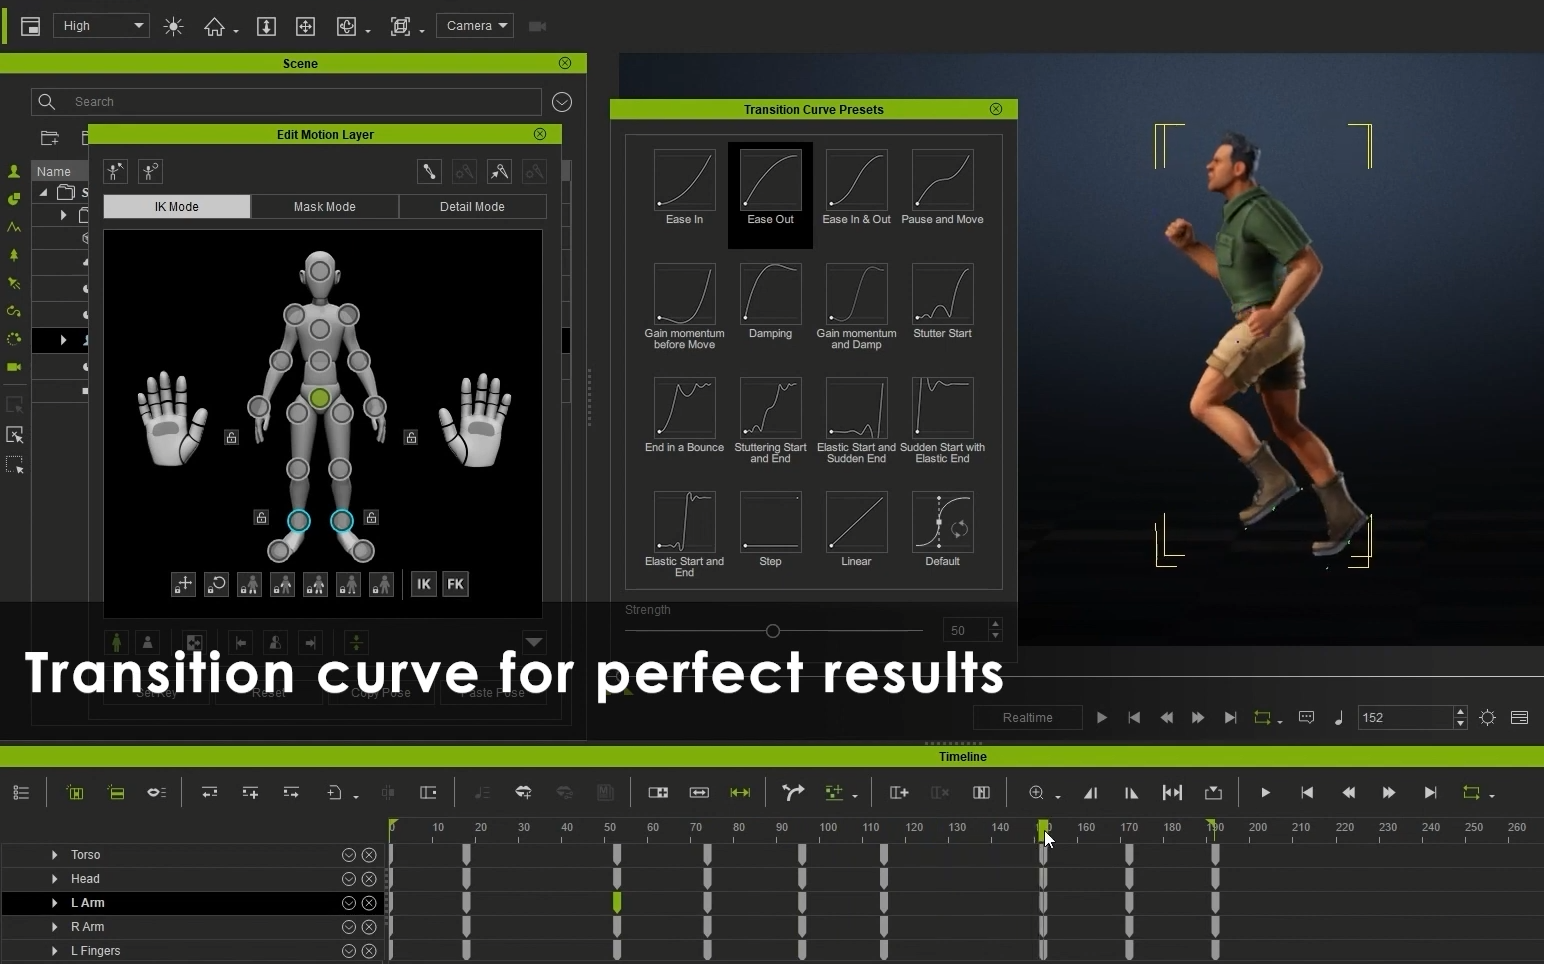
• Use offset keys to create an overlapping effect, and use Transition Curve to refine the timing, as shown below.

Pose Mixer : pose-driven motion synthesis

Pose Mixer is a handy tool that generates new poses from existing sources with just a few clicks: select a source pose, define the mixing area (from the body mask), and mix with the target pose.

Replace selected body parts with other poses you like and mix them in different ways.

  • Choose the body parts which you like to Flip Directions, Mirror Copy, or build Symmetrical Poses.

Mix-and-matching motions can be a brilliant way to come up with new ideas and happen upon creative possibilities. You can think of this method of working like the cut-up technique employed by Dadaist poets to the songwriting of David Bowie, where “happy accidents” are left to flourish.

Expandable Character-centric Timeline

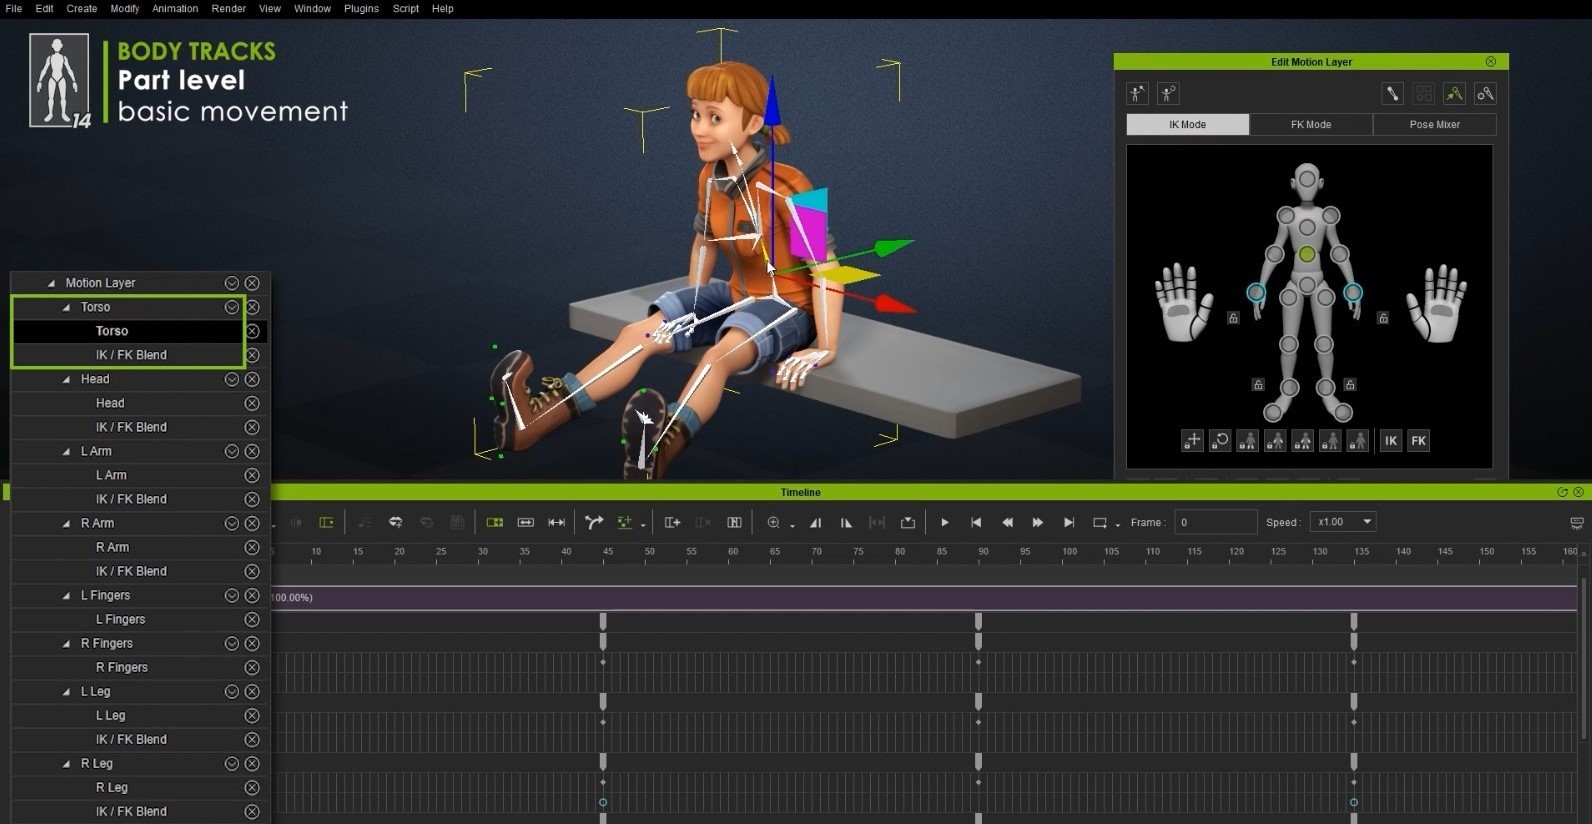
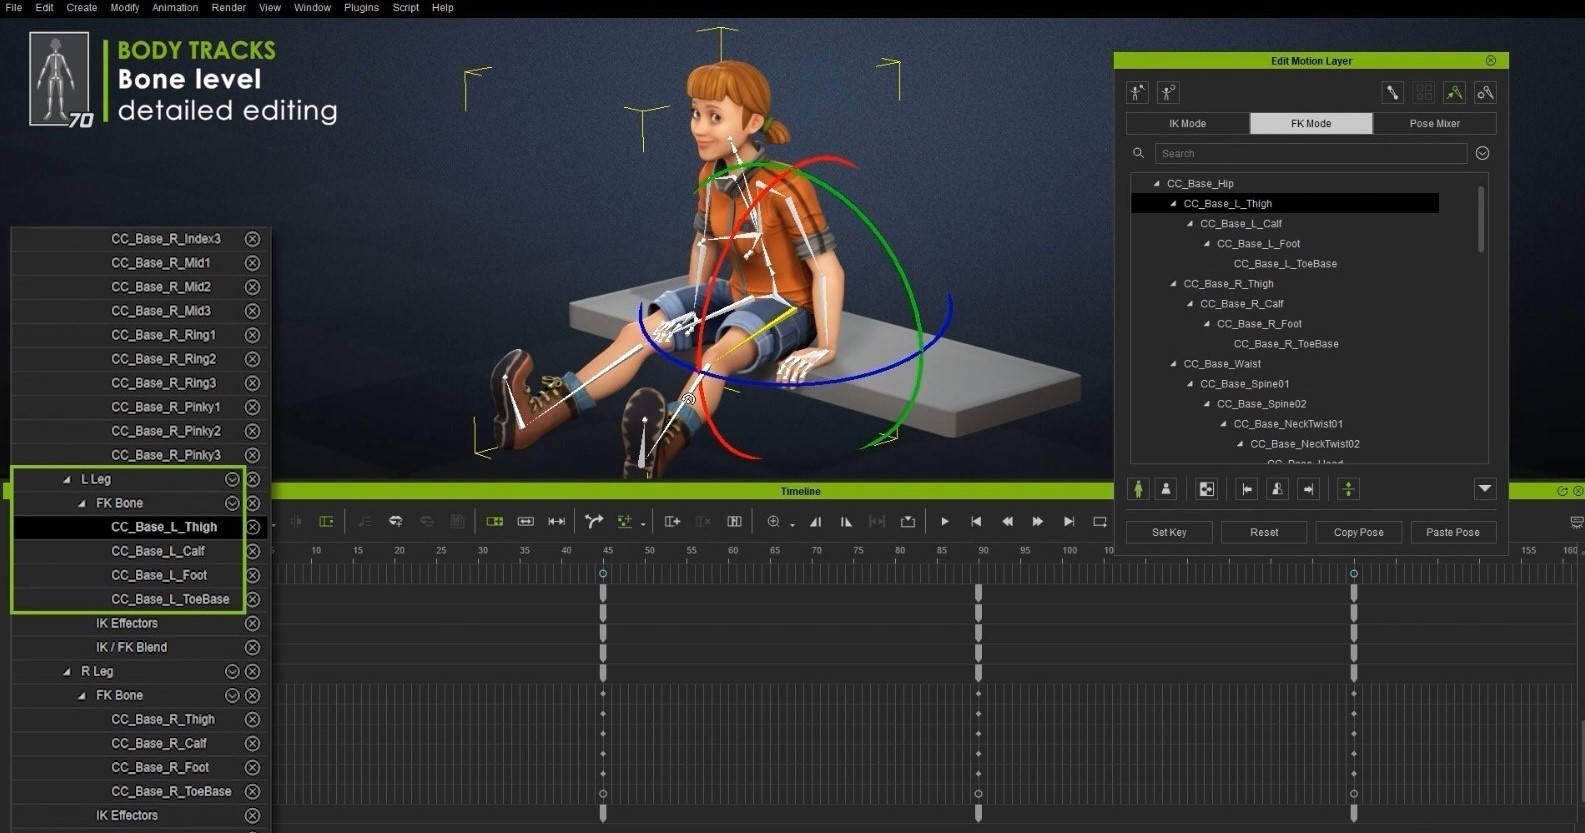
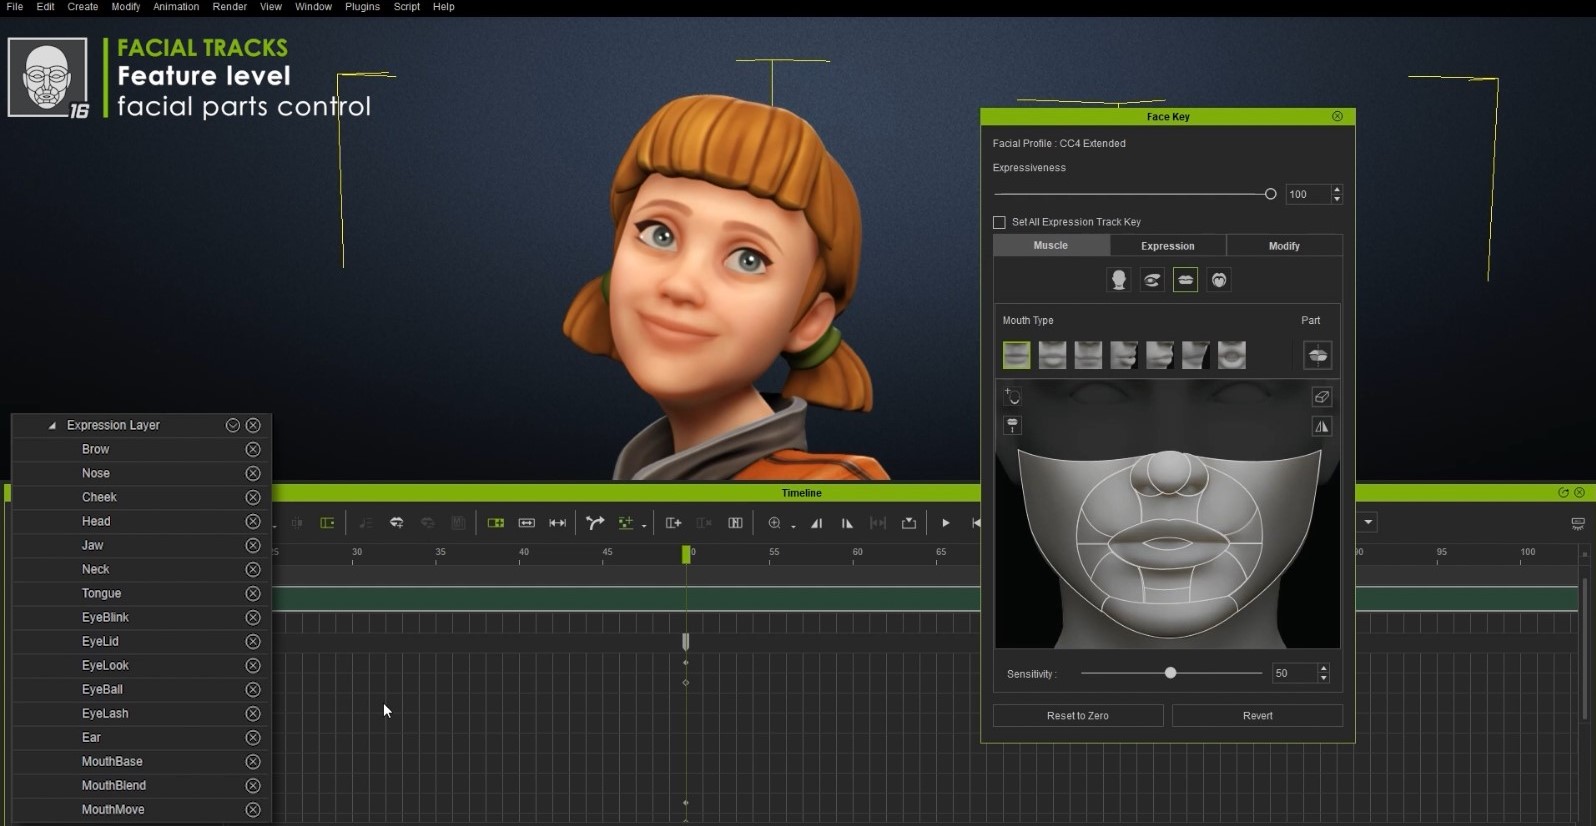
Most 3D tools provide timeline controls for character bones and blendshapes, but the sheer number of tracks can make editing stunningly hard. iClone 8 introduced Expandable Tracks on both body motions (2 levels) and facial expressions (3 levels), which allows creators to focus at primary editing first, and later use the advanced timeline controls for the details of the facial and body animation.

Body-Motion Tracks (2 levels):

Part level can be used intuitively by selecting general body parts to edit.

Bone level provides advanced editing to all body bones and all the way to fingers.

Users can fully control the interpolation between FK/IK through the FK/IK Blend track. 

Facial-Expression Tracks (3 levels):

Basic : Eyeblink track is freshly added, in addition to pre-existing Muscles, Eye and Head tracks.

Feature: Access 16 prominent facial feature groups from the brow, jaw to ear.

Morph: 60 to 140 morphs are provided to refine the expression details, the blendshape number is determined by the selected level of expression profile (Standard or Extended).

Curve Editor : Professional Cartoon Performances

The Curve Editor is now built seamlessly into iClone 8 with no additional purchases necessary! In addition to bone and blendshape support, iClone 8’s Curve Editor comes with FK/IK effector controls and body/facial 3D animation curve tools.

• Greatly reduce time and effort to create Cartoon Performances.

• Create curve animation for Arcs, Follow Through, Exaggeration, and sudden movement with Steps.

You can check the 3D Character Creation & Animation webpage for more information about the free upgrade offer, feature comparison, and FAQs. If you’re interested in the Play-to-Animate feature of the Motion Director system, you can refer to the article ‘Working in Progress: Part One. For more technical detail, please have a look at our latest New Features Introduction, which will be updated continuously in the coming months.

If you have further questions, please contact our Support Team, or join the discussion at Reallusion Forum.

Can Cartoon Animation Be Performed By Live Humans?

This article is featured on Cartoon Brew.

Animation production as we know it — the type practiced by Hollywood studios — is a laborious process. But with the help of the latest animation technology from Character Creator 4 and iClone 8, a good performer can now create professional-quality animation in a fraction of the time, thanks to real-time animation.

A good example comes from Enoc Burgos, the Director of Partnership Marketing at Reallusion, who was invited by the art team to test out the new character setup for the upcoming Character Creator 4. His spontaneous performance ended up getting more than 400,000 views on his personal LinkedIn account, with more than 17,000 likes and 500 shares.

Read on to understand the workflow behind creating and animating a coyote character using Character Creator 4 and iClone 8.

Step 1: Set up characters the way a concept artist usually does


The process starts with a character expression sheet for style setup.

Step 2: Streamline process to customize facial expressions

A base character in Character Creator supports 70-plus facial expression templates and 100-plus custom templates. Users can choose to customize partial blendshapes or replace all blendshapes at once.

Character Creator 4 includes a GoZ function that lets the user send a character to ZBrush to sculpt expressions in an intuitive and efficient way. To present iconic expressions for this coyote, a total of 114 blendshapes were customized.

Once sculpted, users can update the results to Character Creator 4 by filling in the target expressions into the expression templates.

Step 3: Test perform using face key / puppet

To review the results, animators can use the Face Key editor in Character Creator 4, or send the character to iClone 8 to test facial animations with the Face Puppet tool.

Step 4: Live perform using iPhone

iClone 8 is compatible with several mocap devices, including an iPhone as the character blendshapes have already been one-to-one mapped to the iPhone ARKit signals for precise results.

In this particular case, a Reallusion artist converted a basic-rigged coyote, purchased from Sketchfab, into a mocap performance-ready character. This greatly simplified process proves to be at least five times faster than any custom facial rig, which usually requires a team of artists with different skill sets for modeling, rigging, animation, and more.  

The Character Creator 4 Work in Progress video highlights the complete process from characterizing any character rig by mapping bones to a HIK system, to customizing the facial rig. This makes characters fully compatible with iClone for lip-syncing, facial/body animation, and ActorCore mocap animations to save time in production.

Try It Out For Yourself

Character Creator 4 and iClone 8 are scheduled to be launched in the spring of 2022. Artists who haven’t had the chance to use Character Creator and iClone before can try then now: 30-day trials are available for Character Creator 3 and iClone 7 with over 1,000 ready-made content assets (click links for more information).

Reallusion provides free upgrade offers and combo specials for Character Creator 4 and iClone 8. See the 3D Character Creation & Animation webpage for more information.

The Building of Reallusion’s NVIDIA Omniverse Connector

This article is featured on NVIDIA Omniverse medium.

Character creation and animation are two distinct disciplines that demand the skill of well-trained artists with specialized background knowledge. These domains can be difficult and frustrating for artists who come from non-related backgrounds with different skill sets, and it’s a pain point that Character Creator and iClone were specifically created to resolve.

Furthermore, Character Creator is well-positioned as the go-to solution for creating realistic and stylized characters with robust pipelines for mainstream tools like ZBrush, Substance, and Blender. Combined with the ability to export FBX with LODs (levels of detail), digital human shaders, and a rich collection of motion assets, iClone stands out as an animation editor without a steep learning curve. 

The launch of NVIDIA Omniverse in 2020 was a momentous occasion that attracted our attention. Omniverse represents the next-generation 3D virtual collaboration and real-time simulation platform that connects people and applications for broad-based collaboration. Reallusion software suite combined with a massive library of high-quality character assets and motions would play a crucial role in this ecosystem, while Omniverse provides the path-traced rendering and AI technology that makes for a powerful synergy.

Where to start?

To build the connector, we start by referencing the “Connector Sample code” available for download on the NVIDIA launcher application.

On the Omniverse Youtube channel, there is a great beginner tutorial on how to “Create an Omniverse USD App from the Connect Sample“.

Scene and Character Animation

iClone and Character Creator’s 3D scene consists of nodes with basic transforms consisting of translation, rotation, and scale values. Characters, meshes, lights and cameras are all attached under these nodes. Furthermore, the bones of a character skeleton are also represented by these nodes. Nodes that only represent transforms are exported as USD Xform and nodes that represent the body and facial bones are exported as USD skeleton joints. Additional bones and skinning are added to accessory nodes that are attached to bones before converting to USD format. 

Scene graph of transforms (Xforms) and joints

USD Xform scaling works in fundamentally different ways to iClone. In iClone, a node can be made to inherit or ignore the parent scale, whereas, in Omniverse, the node scale is always inherited from its parent node. Under such conditions, bone node scale inheritance must be removed with its values reset before exporting to Omniverse, in order for the scale values to match. 

Most of iClone’s facial expressions are composed of morph animations which are exported as USD blend-shapes. In contrast to FBX blend-shapes which are stored in local-space positions, USD blend-shapes store positional offsets.  Since iClone also stores positional offsets (in combination with strength multipliers), it is completely compatible with Omniverse, allowing for direct conversion to USD format. It should be noted that Omniverse requires a skeleton root for props with blend-shapes attached and additional processing may be required. 

Material Conversion

The following section contains MDL code excerpts for iClone’s USD exporter. Refer to https://developer.nvidia.com/usd/mdlschema for more information.

Within the USD file, MDLs are specified using info:mdl:sourceAsset with info:mdl:sourceAsset:subIdentifier as the entry function. The new subIndentifier attribute was introduced by NVIDIA and PIXAR. input: is later called to feed the texture and material parameters. OmniPBR.mdl and OmniSurface(Base).mdl provided with Omniverse were used as starting points.

OmniPBR.mdl was chosen from the start because it works well in both RTX Real-time and RTX Path-traced mode, on the other hand, OmniSurface and OmniHair are photo-realistic MDLs for RTX Path-traced mode. The existing PBR, Skin, Head, and SSS shaders were then rewritten from HLSL to MDL. 

Flowing water in the swimming pool is another good example, it’s simply:

float2 inputs:texture_translate.timeSamples = {
0: (0, 0),
4000: (4, 8),
}

Besides the above mentioned built-in MDLs, there is also a base.mdl on GITHUB with some reusable functions that can be deployed in a jiffy.

Light Conversion

Point lights and spotlights use UsdLuxSphereLight with adjusted cone angles. Tube and rectangle lights use UsdLuxCylinderLight and UsdLuxRectLight respectively. Light IES profile file is also one of the shaping attributes. Light intensity in USD is similar to Luminous intensity per unit surface area. The USD intensity of a spherical light with radius (r in meters) can be approximated with  the following formula:

USD intensity = candela * 1000 * / (4PI r*r)

The following formula is used when radius is in centimeters:

USD intensity = candela * 1000 / (4PI(0.01r)*(0.01r))

Radius is a significant attribute in Omniverse Renderer. We impose a minimum radius of 2 cm as suggested by NVIDIA. See our lighting tutorial for more examples.

What’s next

A prototype of a one-way live sync connector is under development. Since iClone’s undo/redo system is similar to the memento pattern, a table for keeping track of live objects with universal IDs is used. This table will update after performing an undo and redo function.

Check out our character creation and character animation solution, or you can watch our 2021 GTC Fall session video recording to get an overview of how this solution works. 

For more information and to join the discussion, visit the NVIDIA Omniverse forum and NVIDIA Omniverse Discord Channel. For more resources on USD, refer to USD GITHUB and prebuilt Lib/Tool by NVIDIA

_______________________________________________________________________________________

About the Author

Weien Chen is a senior software engineer on the Graphics team at Reallusion. He participated in shipping iClone 7/Character Creator 3 and their Omniverse Connector. He also worked on Reallusion PopVideo enhancement, VXGI and PopcornFX integration and Reallusion skin, SSS, and hair shader development.

Indie Animator reaches Global Network Heights with iClone & Character Creator Real-time Software

Benjamin Sokomba Dazhi (Benny Dee) – Founder of Just Art Animation Studios

Benjamin Sokomba Dazhi

Benjamin Sokomba Dazhi (Benny Dee) is a renowned Nigerian animator, film producer and director. He hails from the north-central Nigeria, Niger state. Benjamin started his artistic craft as a rapper back in the Federal University of Technology, Minna as part of a hip-hop duo called “Hot Mics”.

Following his love for video production, Benjamin gradually ventured into the production of music videos for artists. In 2014 during a year long academic staff strike, Benjamin decided to improve his skills in 3D cartoon animation. He found his breakthrough in animation by establishing his own Nigerian animation company, then called Night Light 3D Works and now renamed Just Art Animation Studios that specializes in character modeling, character animation, music video producing and special effects.

In late 2020, Benny was approached by the team at Turner Media to help create a series of dance animation challenges – CN Dance Challenge, for Cartoon Network Africa where Benny used iClone 8, Character Creator 4 and Rokoko SmartSuit PRO motion capture suits. Benjamin was recently announced as the African Head Animator of a Cartoon Network dance instructional series, “Dance Challenge”. This deal according to Cartoon Network is to reiterate Cartoon Network’s commitment to creating contents that will make its African audience feel at home.

“Reallusion’s iClone and Character Creator are breakthrough solutions for the animation industry, as they have brought convenience for network studios and small companies to bring their ideas to life in the most professional way. Reallusion simplifies professional tools for even novice users trying to pursue a career in animation. “

Benjamin Sokomba Dazhi (Benny Dee) | Founder of Just Art Animation Studios

Reallusion officially joins the Blender Development Fund to pioneer the next wave of Character innovation

Founded in 2000, Reallusion software simplifies character creation and animation like nothing before. Major products include Character Creator (CC) for character creation, iClone (iC) for facial and body animation, and ActorCore an asset store dedicated to scan-quality characters and AAA mocap animations.

In early 2021, Reallusion introduced the Blender Character Pipeline, a streamlined workflow between iClone, Character Creator and Blender. Now, Reallusion is commiting to the Blender Development Fund and becoming a Corporate Silver partner while planning a string of new features that will harness the best of both programs to unlock entire new synergies. 

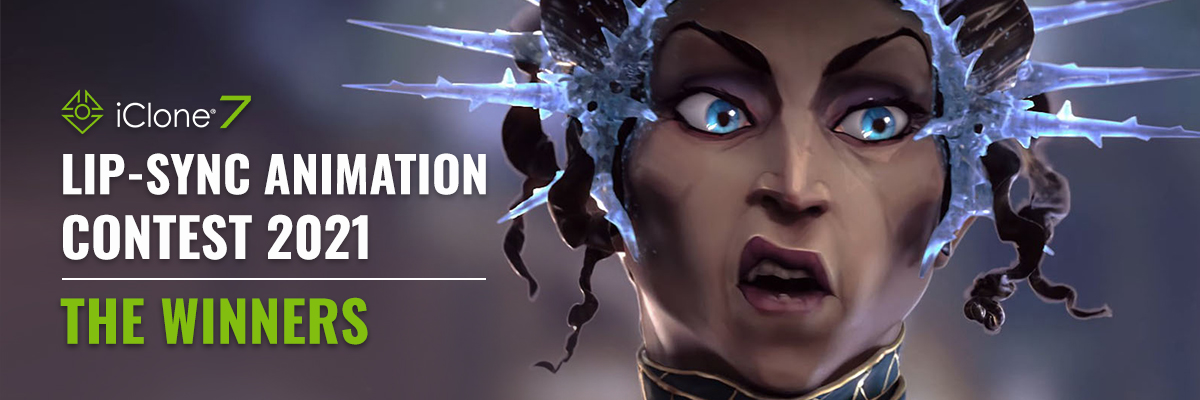
Reallusion’s 2021 iClone Lip Sync Animation Contest – Meet the winners!

Reallusion’s 2021 iClone Lip Sync Animation Contest launched in July 2021 with the aim of delivering the best 30-second talking animations that showcase lip-sync, facial animation, and great characters. Within 3 months, there were 468 submissions documented among 60 countries. Contestants were inspired by comedy, movies, music videos, storytelling and remaking them into detailed talking animation performances. Besides using iClone and Character Creator software, the contest also welcomed diverse entries using different renders and engines including Blender, Cinema4D, Unreal, Unity, and more.

The final result exemplified iClone’s game-changing facial animation workflow for accurate voice lip-sync, puppet emotive expressions, muscle-based face key editing, and professional iPhone facial data capturing. A third of submissions using Blender and MetaHuman demonstrated that iClone is a highly compatible facial animation pipeline tool used by Unreal MetaHuman and Blender users, along with Replica’s AI-voice plugin that made talking animations easier than ever.

“At Reallusion we are proud to see an influx of high-level artists that are adopting Character Creator and iClone into their pipelines. The contest proved the viability of using iClone’s powerful lip-syncing and facial animation tools in professional production, when time and budget are of the essence. We congratulate all who participated, and look forward to bringing more innovations to the industry.”

– Enoc Burgos, Reallusion Director of Partnership Marketing

The 2021 iClone Lip Sync Animation Contest was hosted by Reallusion and sponsored by industry leaders including; NVIDIA, Epic Games, Noitom, Rokoko, Replica Studios, Pixologic, CLO Virtual Fashion Inc, FXHome, Boris FX, and Razer. Through this contest, iClone and Character Creator prove to be one of the most powerful facial and body animation pipelines for all animators.

Watch Overview Video:

WINNERS

The iClone Lip-Sync Animation Contest 2021 offered cash and prizes valued at over USD $40,000 thanks to A-list sponsors that partnered with Reallusion.

BEST CHARACTER DESIGN CATEGORY

1st Place: Ice Queen

By Loic Bramoulle, Cinematics for indies and AA studios. Render: Blender

See their process>

“I used an iPhone XR for capturing a base performance, while simultaneously speaking over the audio clip, and video capturing my face, which allowed me to manually polish the expressions more easily while aiming for hand-animated, keyframed facial animations. The process was pleasingly fast, as the motion capture was essentially used as an animation blocking, but without all the manual work. Polishing it by hand wasn’t as fast, but it seems much more efficient overall than animating from scratch.” – Loic Bramoulle

2nd Place: Do Right, Jessica Rabbit

By Jasper Hesseling, Story loving, professional 3D Artist. Render: iClone

See their process>

“I had a blast working on this piece with the lip-sync tools in iClone. I have still much to discover but I already learned a lot.” – Jasper Hesseling

3rd Place: Love, Rosie

By Petar Puljiz, Unreal 3D Artist. Render: Unreal

See their process>

“Thank Heaven for these animation tools, which you need to have in your pipeline, no matter if you are a professional or a beginner.” – Petar Puljiz

BEST CHARACTER DESIGN CATEGORY

Characters that showcased exceptional character design, character-setting, and voice matching.

1st Place: The Pumpkin Cave

By Varuna Darensbourg, Artist & Game Developer. Render: Unreal 

See their process>

“Using Reallusion’s tools to breathe life into my characters has been a thrilling experience. They can save time, which is a huge boon, but they work so well that it makes daunting tasks enjoyable. Using iClone AccuLips for the 2021 contest was incredible! The accuracy blew my mind and combining it with iClone Motion LIVE and the Live Face iPhone app for layering allowed me to do far more than I expected.” – Varuna Darensbourg

2nd Place: Judar

By Gergana Hristova, Freelance 3D Artist. Render: iClone

See their process>

“I never knew that animating in 3D will turn out to be more enjoyable and quick, thanks to Iclone!” – Gergana Hristova

3rd Place: Animal Farm

By Jason Taylor, Videographer and Director. Render: Unity

See their process>

“iClone has been a game-changer for me. I love the ease of use for lip-syncing and the ability to fine-tune facial animations using facial keys and facial mocap. Amazing stuff. Thank you.” – Jason Taylor

SPECIAL AWARDS & HONORABLE MENTIONS

The judging process for the Lip-Sync Animation Contest 2021 proved to be quite difficult and took many hours of deliberation. Besides the top 3 placements from Best Character Animation & Best Character Design, Reallusion also selected 41 winners for special awards and honourable mentions. See the Winner Page for winner details and showcases.

How to animate 3D characters as a music video audience

This article is featured on Creative Bloq

Discover how director Solomon Jagwe transformed ActorCore’s 3D people into an all-singing and dancing music video audience.

(Image credit: Solomon Jagwe)

Solomon W. Jagwe is the co-Founder of Sowl Studios and the creator and director of The Adventures of Nzoka and Nankya, an app and animated series that helps children and adults learn Luganda and other Ugandan Languages. Jagwe has a passion for writing stories and creating 3D animated short films and cinematics, with his most recent endeavours seeing him use Unreal Engine and iClone to create his content. 

Jagwe latest project saw him transform ActorCore’s 3D people into an all-singing and dancing crowd animation for a music concert. Here he reveals how…

The challenge

“I was super excited when Reallusion released the first batch of the ActorCore Characters, mainly because I had this vision of creating a music video featuring a MetaHuman lead singer with a fun audience dancing to the song he was performing.”

“My idea was inspired by the Bob Marley track, No Woman No Cry. I wanted the video to feature a group of Non-MetaHuman characters attending a concert, with a song encouraging them not to worry or cry because they weren’t MetaHumans. So I wanted to play on that idea, and have fun with the line, “No Metahuman, No Cry”.” 

The final result

Before we get into how Jagwe created the video, let’s take a look at the final result showing ActorCore characters as a 3D audience:

The characters that you see in the background are all from the ActorCore series, animated in iClone, using ActorCore mocap, Perception Neuron Studio mocap suit data and rendered in the Unreal Engine.

Creating the song

“The first step to creating the final video (above), was to come up with the ‘No MetaHuman, No Cry’ reggae song. At first I tried to create the song myself, but it didn’t have quite the sound I was going for. 

“So I partnered with a very talented Ugandan artist, Andereya Baguma, whose awesome music I chanced upon when doing some research on YouTube. I wrote the lyrics, and then sent him a recording of myself doing a rough beatboxing version so he could understand the idea. He did such an awesome job with the production, creating an unbelievably cool track where he sang the lyrics and matched them up perfectly.

“Once the song was finished, I was able to turn my attention to bringing the music to life. The time had come to create a 3D audience – and that’s where the ActorCore characters came in.”

Creating the 3D audience

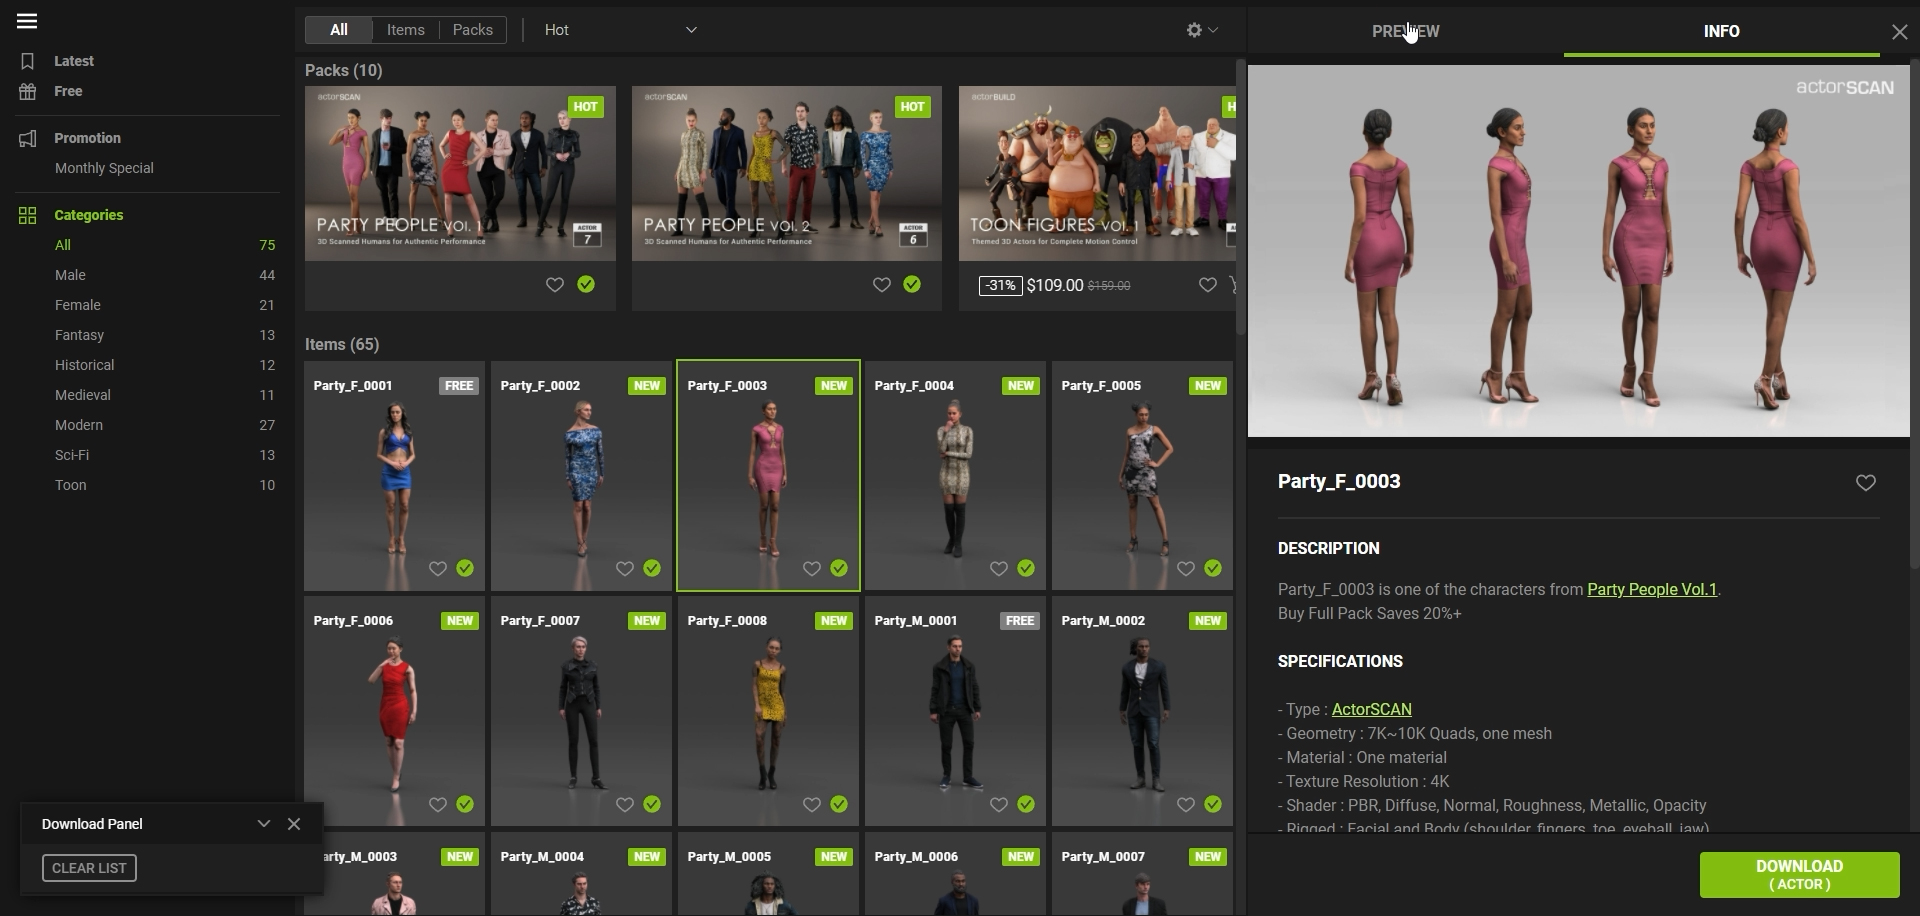
“To gather the characters for the music video audience, I first logged into my Reallusion account. This then automatically logged me into the ActorCore catalogue, after typing in the ActorCore website in my browser. This is a key step if you want to browse and purchase the ActorCore characters. 

“The ActorCore catalogue offers a wide range of beautifully diverse, textured and fully rigged characters. I started by choosing the Party People Vol. 1 and 2 and the Casual People Vol. 1 packs.

“Probably the coolest thing about ActorCore is it allows you to select characters you like, and then preview it and test the different mocap animation files on the ActorCore catalog, right there in the browser. You can also download the characters in several file formats.”

“In the top right-hand corner of the ActorCore interface, there is an Info tab, which, when selected, shows more details about the character chosen. The ActorCore photo scanned characters are between 7K-10K polygons, which makes them perfect for a crowd animation setting. I was so relieved when I saw that because I needed my audience to have at least 30 characters. 

“Another really important vision for my video was the characters being able to sing along to the ‘No MetaHuman, No Cry’ song. So I was pleasantly surprised to find out that the ActorCore characters were already prepared and rigged for facial animation.

“My plan was to edit the body and facial animation of the character in iClone, so chose the iClone download option for all the characters I needed. The iClone option makes it possible to download your character selection into your Smart Gallery.”

“Once downloaded, the characters become available for pulling into the iClone interface for facial and body animation, so I went ahead and loaded all of the ones I wanted.”

Animating the characters’ bodies

“I needed some of the characters in the audience to dance in rhythm to the song, and for that I turned to my Perception Neuron Mocap suit. I suited up, played the song, and acted out the full song while recording in Axis Studio. I did multiple takes so I could have some variation of the background characters waving their arms in the air.

(Image credit: Solomon Jagwe)

“For the foreground ActorCore characters, I relied on the ActorCore mocap pack of the nightlife. The files are nicely looped, which works very well during the playback in Unreal Engine. After I created the mocap animation files in Axis Studio, I recorded the motion capture to a stand-in character in iClone, using Motion Live and the Perception Neuron plugin.”

I saved the iClone mocap files from the Perception Neuron Suit session, into the Motion folder so I could repurpose them and apply them to each character. I then created an entire scene, setup to mimic what the set was going to look like in the Unreal Engine, and applied mocap data to each character.”

I was also able to take advantage of the 3D animation tools in iClone to adjust the Perception Neuron data. This gave me the ability to alter the height and spacing of the mocap data of the characters waving in the air.

Animating the characters’ faces

For the facial animation, I used an iPhone X, together with the Live Face plugin in Motion Live to record myself singing the ‘No MetaHuman, No Cry’ song from beginning to end. 

“I played back the stand-in character with the dancing mocap while I was recording the facial motion capture. Now I have to use the Default Facial profile instead of the Artkit version as ActorCore characters, however, Reallusion said they will make them available in early 2022.”

I saved the edited facial motion capture along with the body into the MotionPlus folder, so I could use it on all the other characters in the audience.

Sending the ActorCore Characters to Unreal Engine

After perfecting the crowd’s 3D animation of the ActorCore characters in iClone, I proceeded to export all them all as FBX files with animation enabled, covering the full range of the timeline.

I made sure I had the CC Setup/Autoconvert plugin installed in Unreal Engine, so the materials and character rigs could be imported and formatted properly once imported into the software.

(Image credit: Solomon Jagwe)

“After successfully importing all the characters into Unreal Engine, I moved them into their different locations to face the main MetaHuman lead singer on the stage. I then created a level sequence and dragged all the characters onto the timeline so they could line up with the sound track.

“All the animations were tested to make sure they were working properly in Unreal Engine 4.26. I then moved to Unreal Engine 5 as I wanted to take advantage of the beautiful lighting offered by Lumen in the software”. 

(Image credit: Solomon Jagwe)

“After setting up all the lighting in the scene, I was able to do a test to see if the animation was still working. When I saw the ActorCore audience dancing away in realtime in front of the MetaHuman lead singer, I was super-thrilled! All my hard work had paid off.

“The ActorCore characters looked awesome in the Lumen lighting, and the facial and full-body animation worked very well while the song was playing in Unreal Engine. I was really impressed to see all this come together from ActorCore, to iClone, and then to Unreal Engine.”

(Image credit: Solomon Jagwe)

The final render

“Once happy with the entire animation, I added the sequence to the Movie Render Queue and rendered out the final animation at 1920×1080.  The render speed blew my mind and the final result speaks for itself.”

(Image credit: Solomon Jagwe)

“I am extremely grateful to Reallusion for creating a brilliant library of low polygon yet fully rigged ActorCore characters. It means filmmakers and storytellers like myself have access to an awesome resource for easily creating background characters for our projects.

“I highly recommend the ActorCore characters for any artist working on similar projects. So go ahead and give them a try. Reallusion offers a number of free versions for you to try before you buy. Check out the amazing new characters and mocap files from the ActorCore Library here

————————————————————————————————————————————————————————————

This article is also featured on Creative Bloq.

Filmmaker Producer combines Character Creator and iClone pipelines with Houdini and Redshift

Eric Andresen – Cinematographer | Producer | Writer | Owner of Gypsy Productions

Eric Andresen

Eric Andresen is the owner of Gypsy Productions where he creates narrative content, commercials, and corporate videos for small businesses and Fortune 500 Companies.

Eric has been involved in filmmaking from a young age, starting out in the 1970’s on his father’s Super 8 Camera. He received his BA in Cinematography from Eldorado College in 1985. He mentored under Andrew Jackson ASC (Rockford Files, Columbo, M.A.S.H. et al).

Eric’s production company moved into the creation of 3D digital content several years ago.  The Reallusion pipeline of Character Creator, iClone, and 3DXchange has allowed Gypsy Productions to elevate the level of their production quality while maintaining tight deadlines.

“Reallusion Software has given Gypsy Productions the tools necessary to achieve high level animations in a short time frame.  We have been able to concentrate on the story and product rather than focus manpower, time and money on activities that, in the past, were very time consuming.  The ability to jump right in and start creating with a seamless workflow was a huge benefit. The user interface, available documentation, and numerous tutorials answered any initial questions. The Reallusion team has also been very approachable, responsive and professional, just like their products.” 

Eric Andresen – Cinematographer | Producer | Writer | Owner of Gypsy Productions

Q: Greetings Eric, and thank you for being part of the Reallusion Feature Stories. Kindly introduce Gypsy Productions and the animated web series for – Red Hand Whiskey.

Gypsy Productions is a small video production company based in the US that focusses on branded content, commercials, and corporate videos for major spirit manufacturers, heavy industry, and electrical utilities.

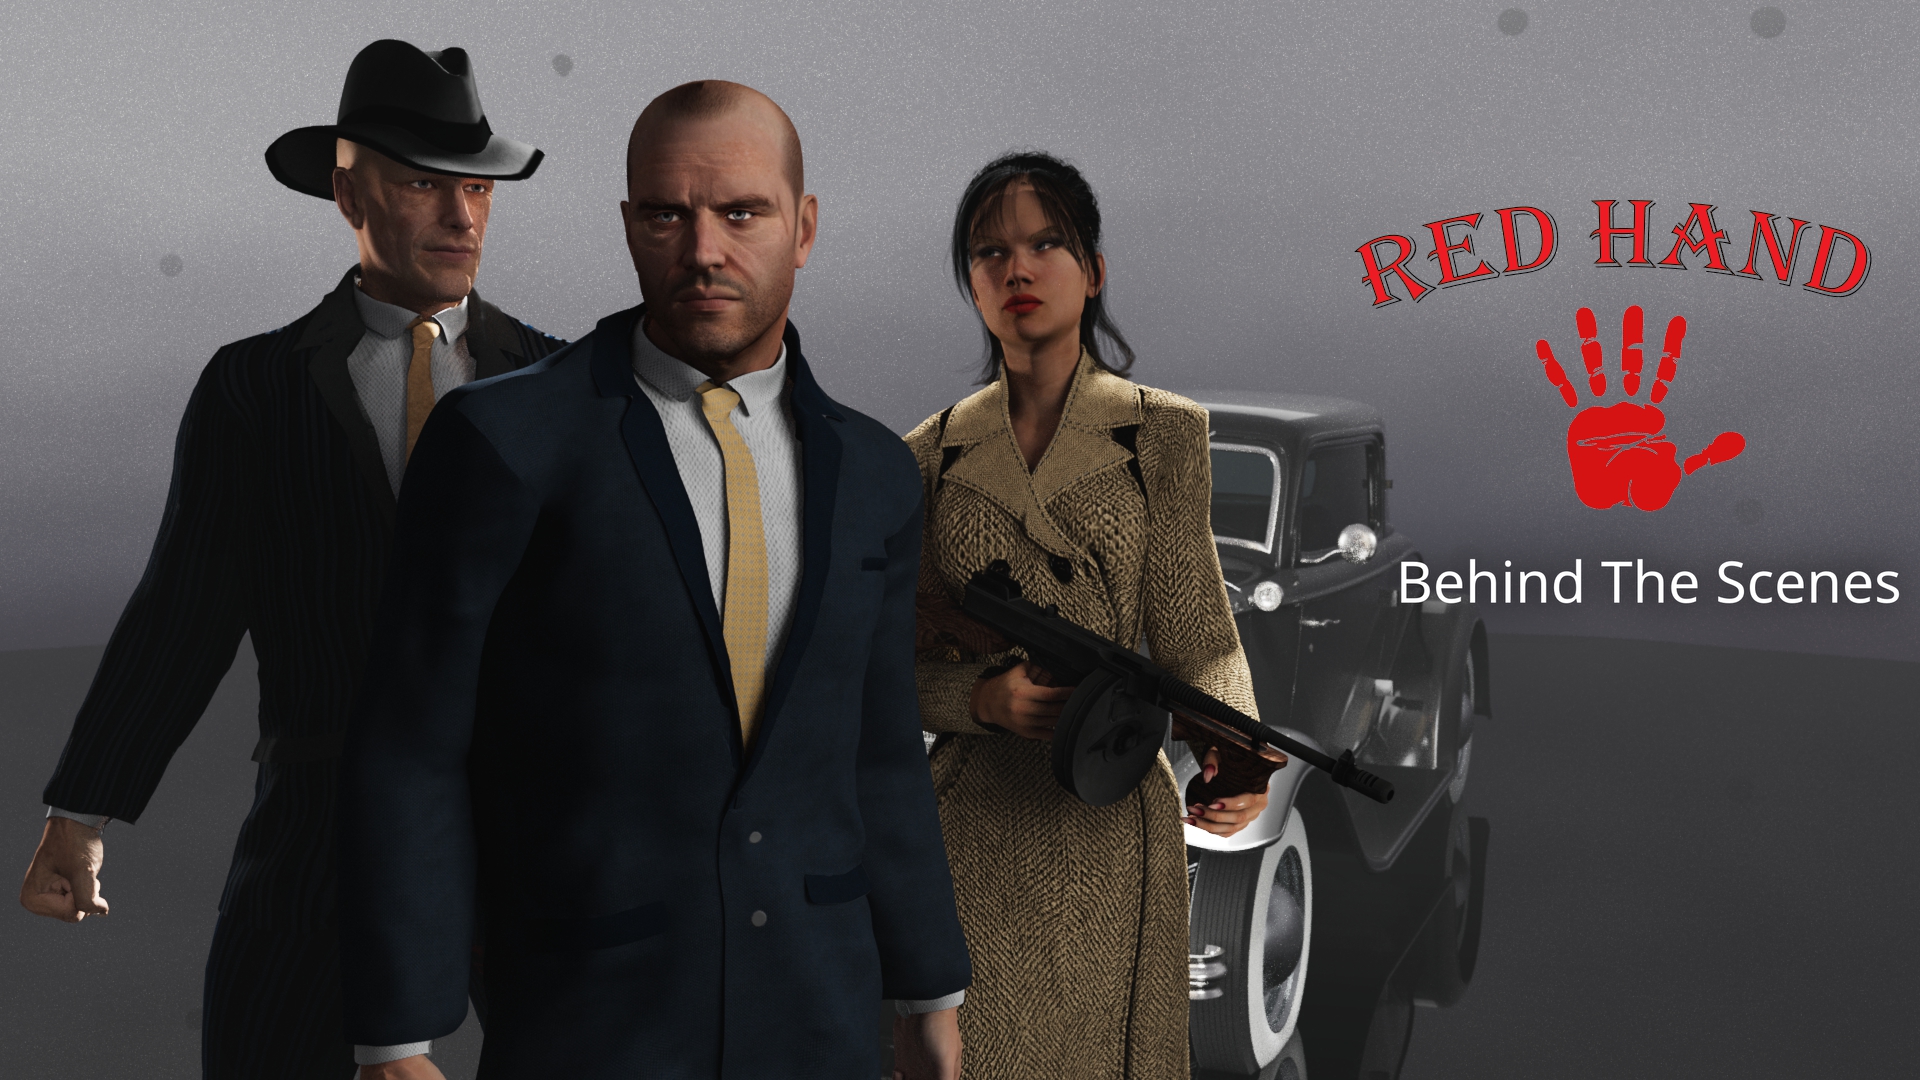
“Red Hand” is our latest creation for a spirit manufacturer in Ireland. It is a short form, animated web series (3-5 minutes per episode) that throws the viewer instantly into 1932 when America was “alcohol free” during prohibition. Red Hand follows the journey of private detective Charlie O’Malley in Boston, MA as he finds himself in the middle of a mob war that centers on the control and distribution of alcohol, namely Red Hand Irish Whiskey.

Q: How and when did you first start working with Reallusion tools? What are the advantages of using CG Animations over traditional film shooting?

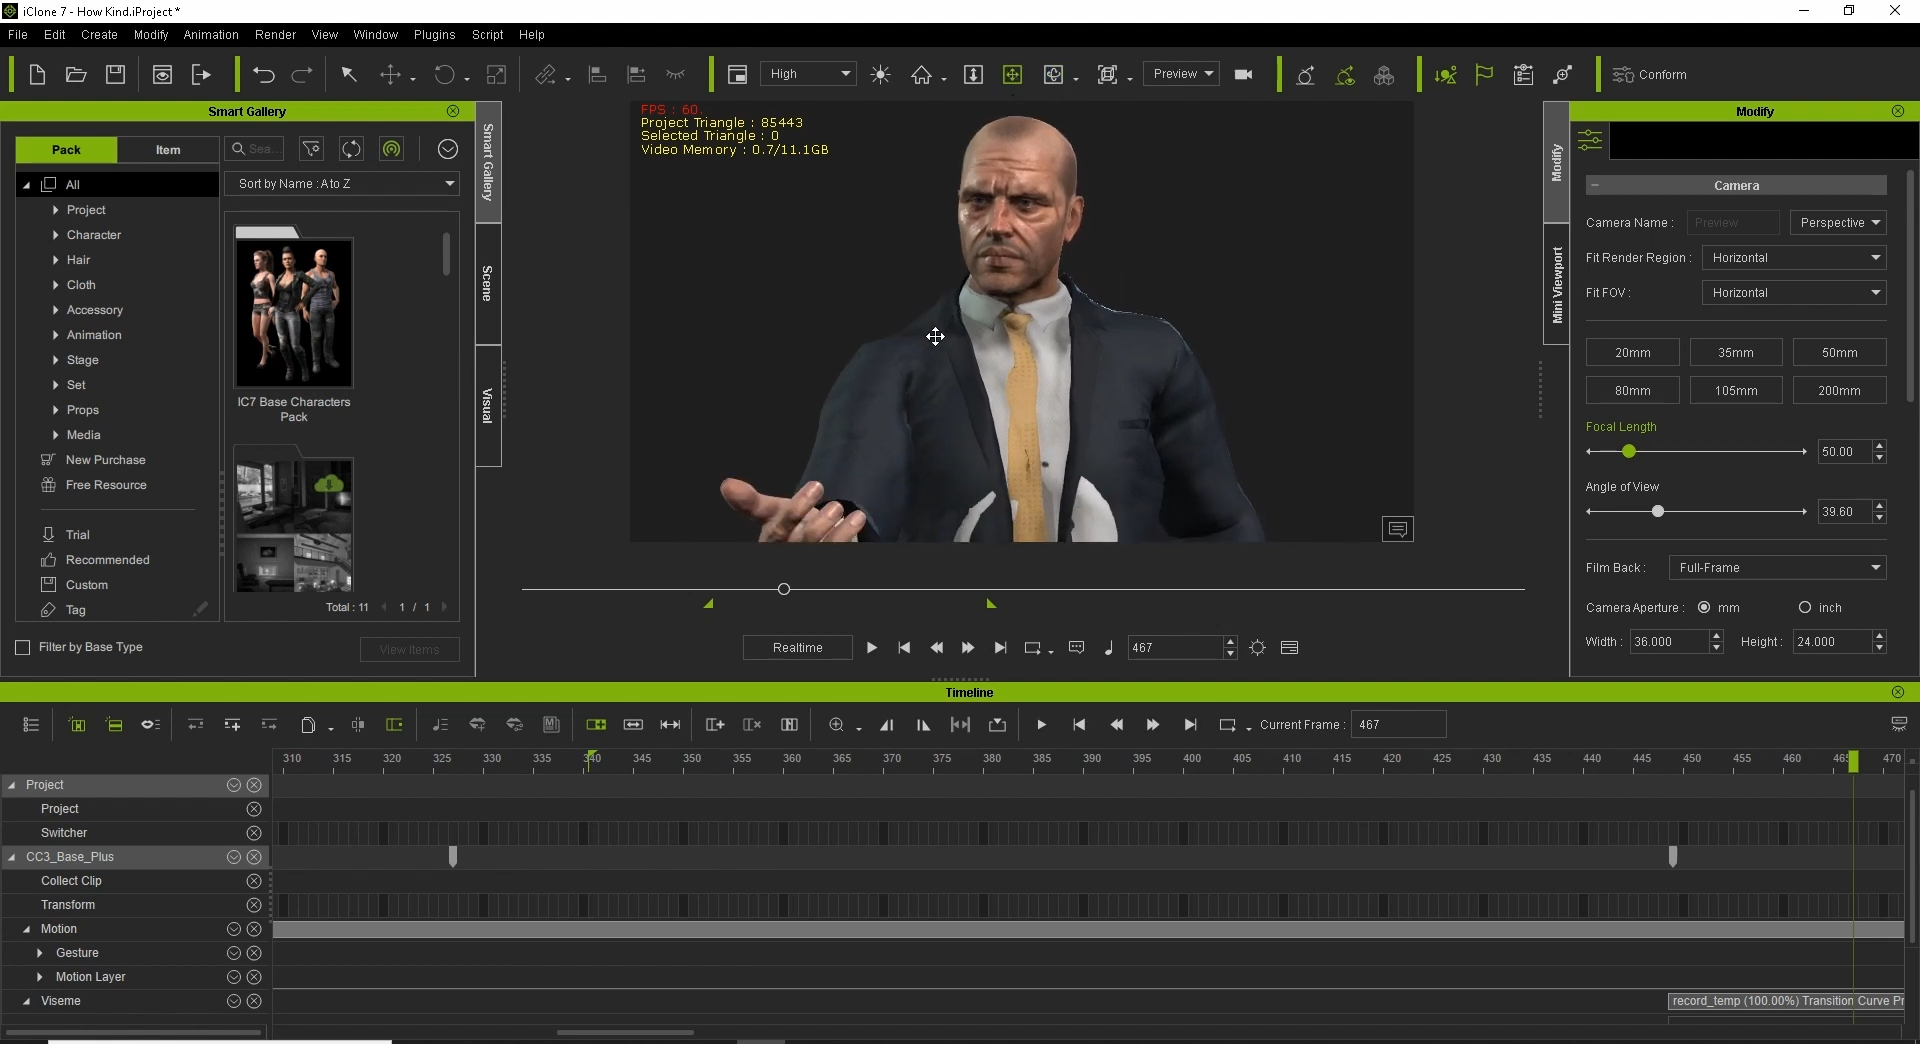
We started using Reallusion’s tools when our client decided that they want a real “Hollywood”, big picture look that is character driven. Character Creator, iClone, and 3DXchange gave us a very straight forward workflow. When looking at the various methods to achieve our goals, we ranked all available software based on speed of work, complexity, and final render quality. Reallusion came out on top as we were able to immediately start creating and never lose focus on the story by being bogged down in the technical aspects

“When looking at the various methods to achieve our goals, we ranked all available software based on speed of work, complexity, and final render quality. Reallusion came out on top as we were able to immediately start creating and never lose focus on the story by being bogged down in the technical aspects.”

Eric Andresen – Cinematographer | Producer | Writer | Owner of Gypsy Productions

CG has given us complete control over every aspect versus traditional shooting. We can create a period piece easily without the headaches traditionally associated with the complexities of wardrobe and locations. The look and feel of Red Hand that the client is looking for would break the budget if we shot traditionally. With CG, anything can be done with the right people and resources.

Eric Andresen – Filmmaker / Producer

Q: When creating a new character, what is the first step? Do you consider personality when working on facial features? What is your typical process when starting with Character Creator?

Our first step is to completely define each character in writing. Who are they? What are their flaws? Etc. We then asked, “Who would we cast if we could have any A list actor?” Once this was agreed upon, we designed unique characters, based on A list actors. Charlie O’Malley is based on Jason Statham for example. We would design 3 or 4 versions of each character and then ask the client for input.

We always started with body type, then face, unique features based on the story, then wardrobe.

Q: You used iClone’s 3D animation tools and AccuLips with some great voice actors. What was it like using iClone, and ActorCore in this production?

Using iClone with Acculips took the mystery out of lip sync animation. The entire process is painless! It was the one thing that we initially thought would be the stumbling block when our client decided they wanted dialogue between characters versus voice over. To our surprise, this has been one of the easiest parts of the process. Combined with ActorCore for some key lip sync animations, the production could remain focused on the artistic side versus becoming bogged down in time consuming technical problems.

https://actorcore.reallusion.com/https://actorcore.reallusion.com/

Actor Tommie Grabiec is the voice actor for Charlie O’Malley. I have worked with him on numerous projects previously, none being 3D animation however. He has a VO studio at this home and he would record 4 or 5 iterations of each line and send them to me. We picked the best and simply applied this with iClone’s AccuLips.

Q: Please share with us how you worked the scenes, the props and the final steps when exporting to Houdini.

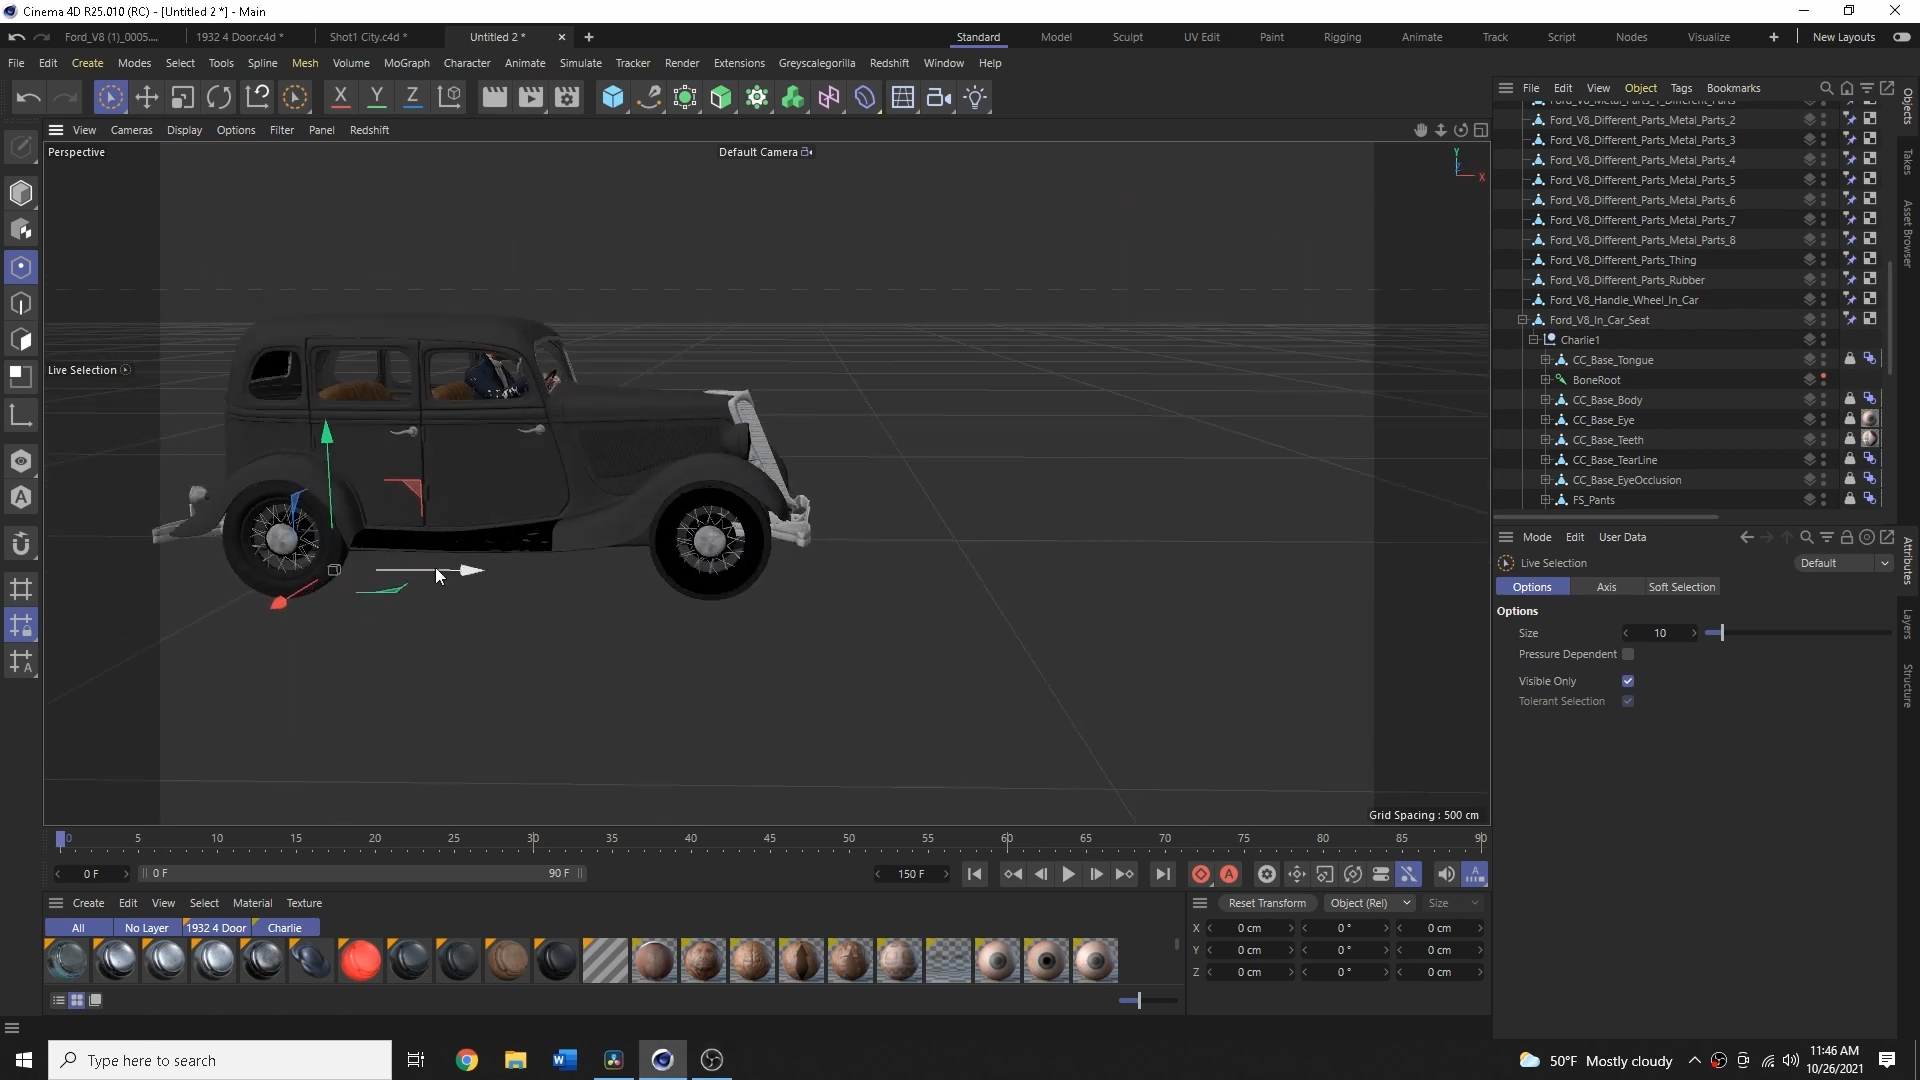
Once the characters were created we moved on to locations and props. The modeling of the props and rigging of the vehicles was done inside of Cinema 4D. These were exported as either OBJ or FBX for use inside of Houdini. Some of the sets, or locations, were built inside of C4D as well and exported as USD to Houdini.

The City of Boston was created inside of Houdini via OSM (open street maps) and we used buildings from Kitbash 3D to populate the area of the city we need for the first episode. We chose Houdini for the first episode because of our familiarity with it as well as Redshift. Moving forward, Unreal Engine will become the final DCC. Any specialized destruction, fluid effects, or volumes will still be done inside of Houdini.

Texturing inside of Unreal is much faster and more flexible for our workflow, especially with large scale environments and landscapes. Quixel Mixer allows us to easily place textures and decals (such as city streets) versus doing this in Redshift.

Q: Could you share some final tips for beginners afraid of getting started with 3D? What advice would you give when final rendering? 

My advice is to just jump in and do it! The worlds that open up to you as filmmaker inside of 3D are limitless. Don’t be afraid of roadblocks because every 3D artist hits some sort of wall on every project. One of the key things for any aspiring 3D artist to keep in mind is that the 3D/VFX community is very welcoming. I have met more artists that are willing to help me solve problems or give advice on better/easier ways of doing things.

YouTube is a fantastic asset for all 3D artists. There is some sort of tutorial for just about every aspect. My first project inside of Houdini was an ocean based flip sim. Not exactly the easiest thing to start off with but I met some fantastic people from all over the world that helped me without reservation. One such artist told me that “one day you will be working inside of Houdini and all of the sudden, everything will just click”. He was correct! Don’t give up because things appear to be overwhelming or complicated.

Our workflow is to export out of Houdini as EXR, composite in Fusion with color grading, sound design and final render in Davinci Resolve. We render one or two frames from each shot prior to any final rendering in Redshift. These are then placed on a white board and the shots are critiqued and examined for both quality and context prior to the final render. It is much easier and more cost effective to make any changes or corrections before, rather than after.

Follow Gypsy Productions:

Website:
https://www.gypsyproductions.biz/

YouTube:
https://www.youtube.com/channel/UCztC6ag1DhlNVKYDx_yFPww

Vimeo:
https://vimeo.com/user60077966

Instagram:
https://www.instagram.com/eric.andresen.526/

Facebook:
https://www.facebook.com/eric.andresen.526/