Alejandro de Pasquale – Motion Graphic Artist / 3D Animator / Filmmaker / Content Creator
Alejandro de Pasquale
Since the age of 9, Alejandro de Pasquale has been weaving stories across various mediums—from comics to motion graphics, filmmaking, and now immersive 3D animation.
Today, Alejandro leads his sci-fi series, The EVA Project, built in Unreal Engine and powered by Reallusion tools like iClone, Character Creator, and ActorCore.
His latest video review shines a spotlight on one game-changing feature that 3D animators, content creators, and indie filmmakers shouldn’t overlook—Smart Search.
What Is Smart Search in iClone & Character Creator?
Reallusion’s Smart Search feature, recently upgraded, bridges the gap between creative vision and production efficiency. Available directly within iClone and Character Creator, Smart Search lets users instantly preview and test thousands of assets from:
You can search via keywords or even images, then preview assets on your character before buying. It’s a huge leap from the days of static thumbnails and blind purchases.
“What it lets you do is visualize all the content from the Reallusion Marketplace right inside the program—either in iClone or in Character Creator.”
Alejandro de Pasquale
Visualize Before You Buy: Why It Matters
One of the biggest frustrations in 3D content shopping is asset mismatch. What looks great in a promo render may not work in your scene or fit your character.
Smart Search Solves This
✅ Real-Time Previews: Try before you buy directly inside your project
✅ Visual Matching: Match textures, colors, and styles with your existing scene
✅ Filter by Compatibility: See what works with your base mesh or rig
“You don’t know if what you’re seeing in a photo will actually look good on your character… this approach solves that.”
Alejandro de Pasquale
Reallusion’s Return of iContent—Up to 70% Off
Another big announcement Alejandro covers is the return of iContent at massive discounts—up to 70% off.
If you’re someone who mainly renders inside iClone, this file format makes sense. Unlike FBX or USD formats for export, iContent is:
🚀 Optimized for in-app use
💰 More affordable
🔄 Integrated into Reallusion’s content ecosystem
“For people who are just using iClone and don’t need to export stuff—it’s super convenient.”
Alejandro de Pasquale
ActorCore Integration = Smarter Motion
Alejandro highlights that Smart Search isn’t just for assets like clothing or props—it also extends to animations from ActorCore, Reallusion’s vast motion library.
Search and test motions instantly
Preview how ActorCore moves look on your character
Drag and drop into your iClone timeline
“I didn’t even need to buy it right away. I could test everything first.”
Alejandro de Pasquale
Enhancing Indie Filmmaking Workflows
Alejandro, known for creating cinematic scenes on limited budgets, is the perfect use case. In his EVA Project, Reallusion’s Smart Search and affordable .iContent gave him the flexibility to:
Build character wardrobes quickly
Customize and test assets in context
Save time on rigging and compatibility fixes
Seamlessly blend into Unreal Engine via CC/iClone-to-Unreal pipeline
Tools Mentioned in the Review
✅ iClone 8
✅ Character Creator 4
✅ ActorCore
✅ Reallusion Marketplace
✅ Reallusion Content Store
✅ MetaHuman (considered, but opted against)
✅ Unreal Engine (for final production)
Who Should Care About Smart Search?
This workflow benefits:
🎞️ Filmmakers creating pre-viz or final renders
🧑🎨 3D artists who need fast iteration
💼 Studios looking to reduce pipeline bottlenecks
🧪 Indie creators juggling limited budgets and tight timelines
Alejandro’s own creative journey—from no-budget shorts to building the EVA universe—demonstrates how powerful tools like Smart Search and .iContent can be leveraged for high-end results.
Conclusion
Alejandro de Pasquale’s review reveals how Reallusion’s Smart Search is more than just a new feature—it’s a workflow revolution for 3D creators. From easy content previews to discounted iContent, Reallusion continues to lower the barriers for professional-grade animation and indie filmmaking.
Whether you’re working in Unreal, iClone, or Blender, Smart Search helps you make faster, smarter creative decisions.
Explore Smart Search for yourself in iClone or Character Creator, and transform how you find, test, and use 3D assets. Visit Reallusion Marketplace and try it out today.
Industry Pros Explore Next-Gen AI Rendering Pipeline with iClone
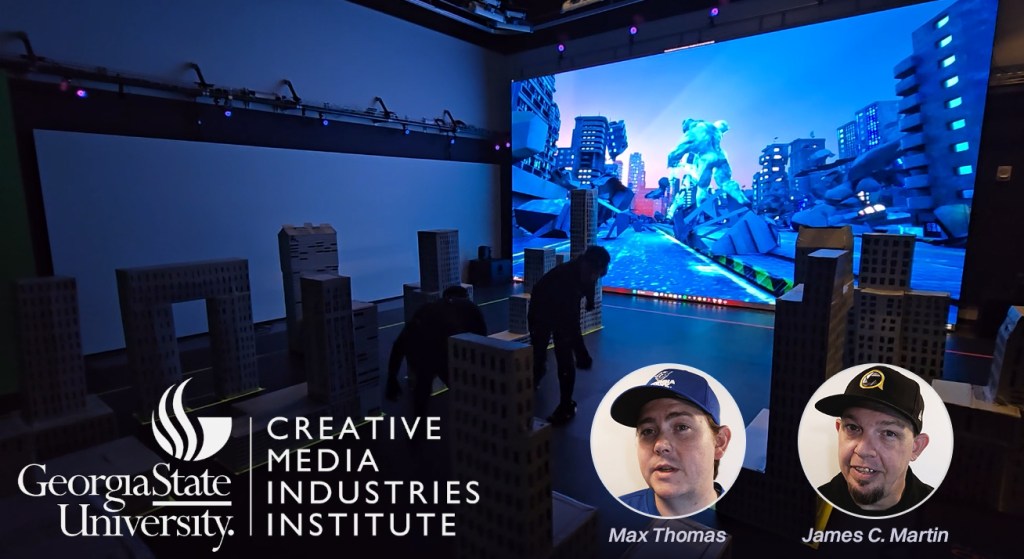
Max Thomas and James Martin from Georgia State University’s Creative Media Industries Institute (CMII)—both faculty members and active industry professionals—have been working with Reallusion to develop advanced AI production workflows. Their latest focus is theAI Render plugin for iClone and Character Creator, which integrates seamlessly with powerful AI generation in ComfyUI.
In their early experiments, they built custom workflows using high-end models like Flux1Dev and FusionX. By incorporating structured 3D inputs—lighting, animation, posing, and camera angles—they achieved far greater control over AI output. Moving beyond prompt-only workflows, their goal is to bring AI image generation closer to the precision and reliability expected in professional animation production.
FREE AI Render Webinar on Aug 22 — Learn more & register HERE
From Film Sets to AI Pipelines
Based at CMII in Atlanta, Georgia, Max and James stand out for bringing real-world production experience into their academic roles. Their expertise stems from their work with Actor Capture Studio, where they’ve collaborated with Hollywood-caliber productions and gained valuable industry insight.
Their experience includes work on The Electric State (Netflix), Lyle, Lyle, Crocodile (Sony Pictures), The Suicide Squad (Warner Bros.), and Replicas (Entertainment Pictures). Beyond film, their work has also played a key role in viral media—most notably Cardi Tries, featuring Cardi B and Offset, which has amassed over 6.8 million views.
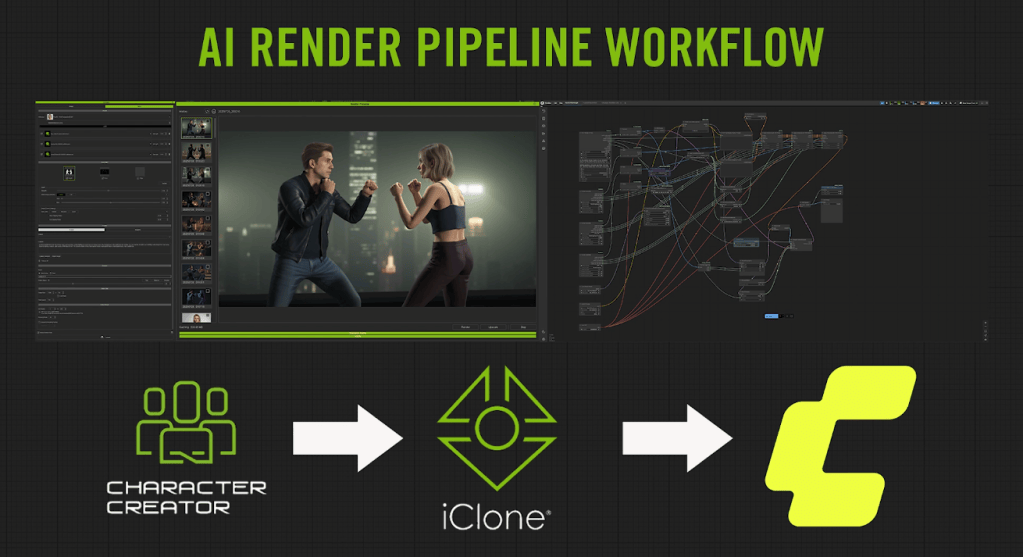
Now, the duo is leading Actor Capture’s exploration into AI-assisted production, developing new workflows that combine real-time CG tools like iClone and Character Creator with generative AI platforms such as ComfyUI, Flux, and RunPod. Their long-term goal is to make AI generation viable for live performance capture in a way that is accurate, directable and scalable.
Seamless Integration of 3D Guidance into ComfyUI
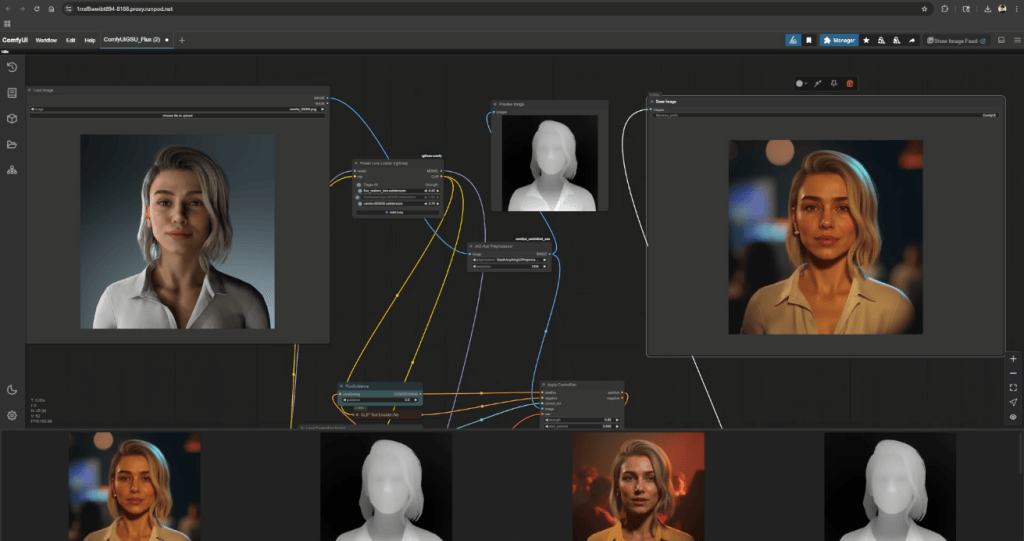
Under the hood of AI Render, Reallusion’s custom nodes in ComfyUI handle the heavy lifting. They create a direct link between the 3D scene in iClone or Character Creator and the AI render setup in ComfyUI. These nodes ensure that every element of the scene, including animated characters, lighting, camera angles, and even facial expressions, is accurately translated into the final AI-generated image.
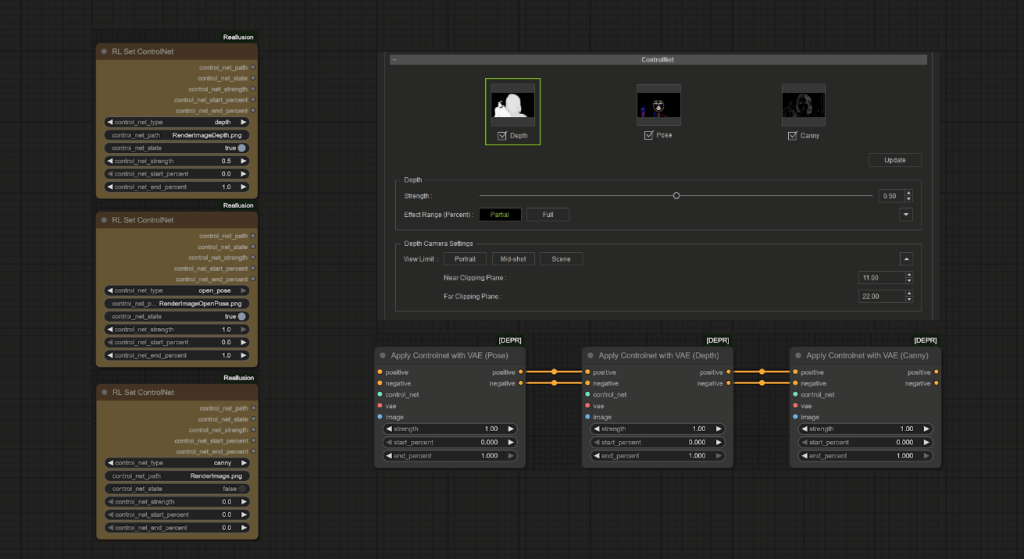
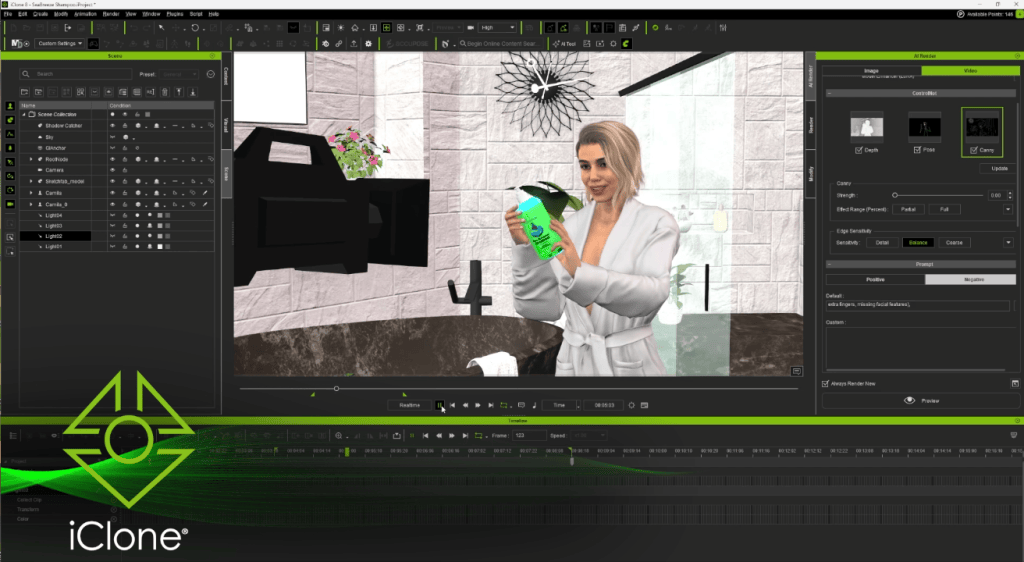
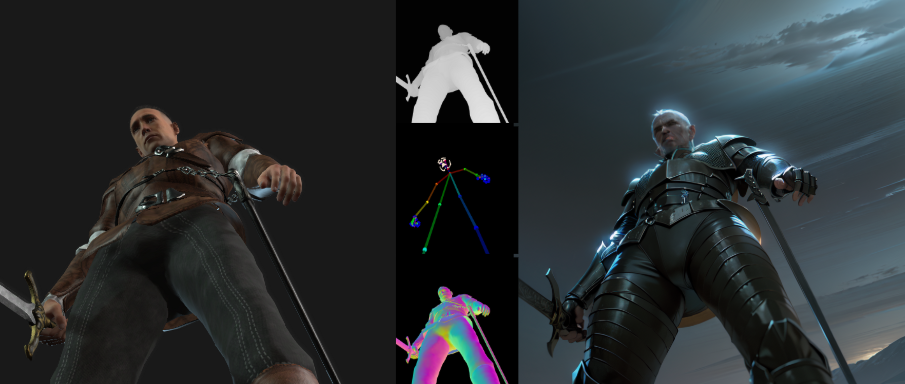
Using the AI Render Panel, creators can export key data for AI processing (such as depth, pose, canny, and normal maps) from the 3D viewport. These maps are then passed to Reallusion’s custom nodes in ComfyUI, providing the generative AI with structured visual input. This helps reduce hallucinations and improves accuracy and consistency in the final image output.
“You’re not just describing a scene in words anymore, you’re staging it in CG—and seeing that flow directly into your AI output.”
Max Thomas, AI Specialist / Creative Technologist
Auto-Generate LoRA Datasets for Character Consistency
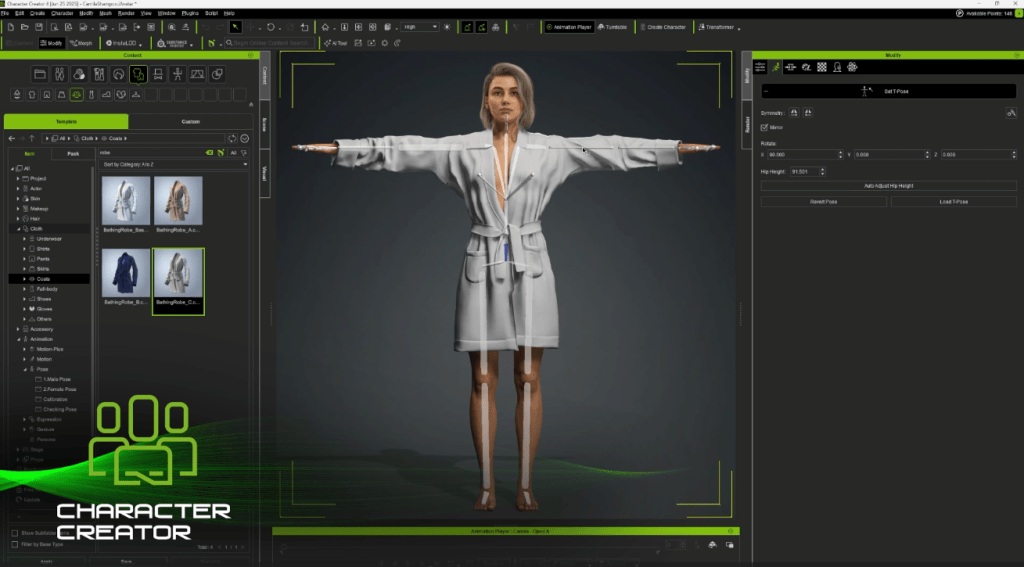
Character Creator has long been the perfect environment for building IP characters—offering simple yet powerful tools to design unique faces, outfits, and personalities. Now, those same characters can be brought to life as realistic actors for AI-generated films or commercials.
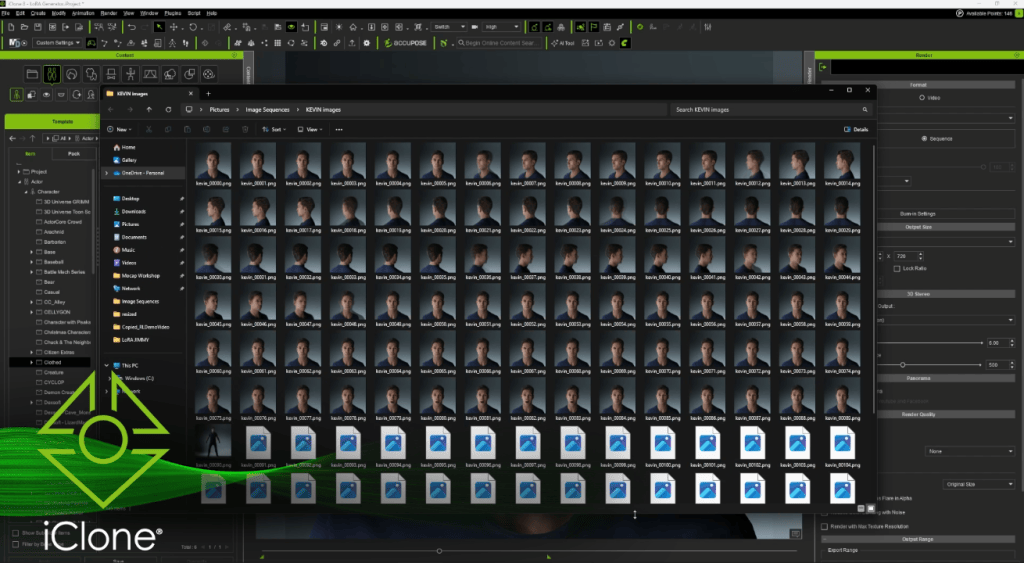
To ensure they keep their signature look across different scenes, styles, and outputs, the best approach is LoRA (Low-Rank Adaptation) training. Max and James use iClone to generate clean, structured training datasets tailored to each character’s design, enabling LoRAs to accurately replicate key visual details—such as facial features, expressions, and costumes—across varied AI-generated images.
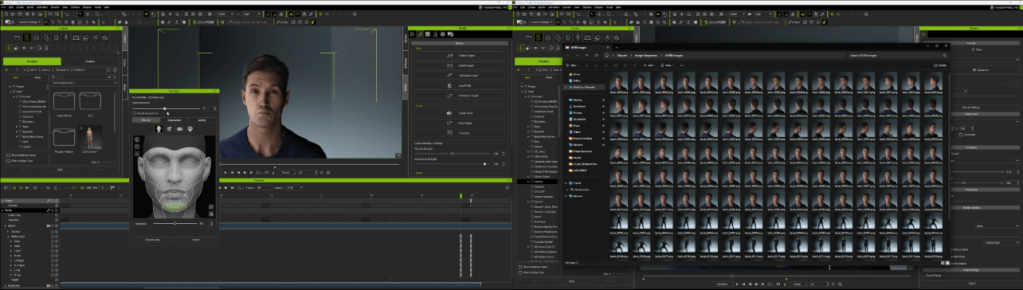
This is done by exporting a custom set of 26 staged images per character, capturing various angles, lighting conditions, expressions, and costumes, all rendered directly from their 3D scenes.
These images are then captioned using ChatGPT for clear, descriptive metadata, and trained via FluxGym on RunPod. The result is a lightweight, reusable LoRA that maintains identity, style, and facial structure across varied prompts.
Guide AI Through Real-Time Scene Direction
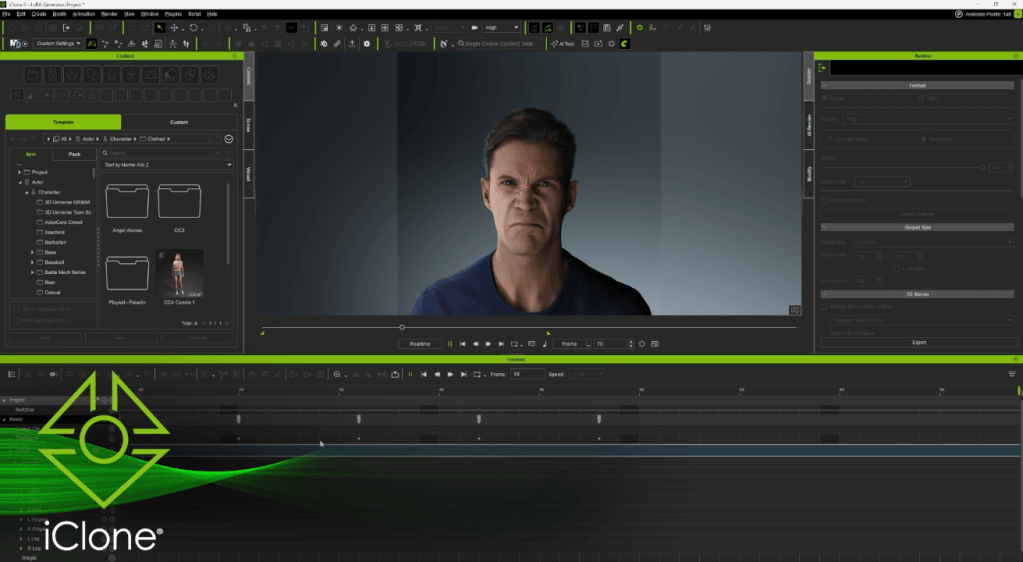
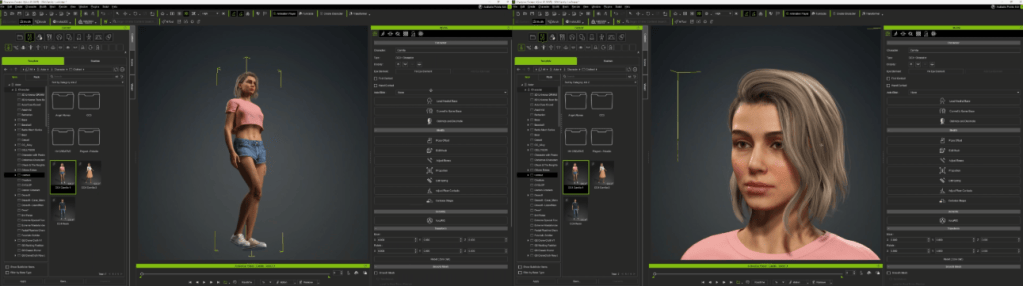
In one of the team’s showcase tests, a character named Camila is created entirely from scratch in Character Creator (including facial structure and wardrobe to skin texture and hairstyle). She is then animated in iClone, where the team sets up the scene with lighting, props, camera angles, and motion.
Once the shot is ready, it flows directly into ComfyUI through Reallusion’s AI Render plugin, which injects a structured prompt stack and layered ControlNet maps (depth, canny, pose) to guide the final AI output in Flux1Dev.
The result is a cinematic-quality render in the form of a hero frame that captures the artist’s original vision without relying on traditional rendering pipelines. Naturally, this structured approach is already proving valuable for pitch decks, content branding, product visualization, and any workflow that demands high-quality concept frames with quick turnaround.
Precise Interaction Powered by a Massive Motion Library
Multi-character interactions have traditionally been difficult to achieve using prompts alone. To address this challenge, the Actor Capture team leveraged detailed imaging data with WAN FusionX to enable consistent AI video generation.
The process began by blocking out the scene in iClone, animating each actor with motions from ActorCore’s library of tens of thousands of animations. Users can simply drag and drop these motions onto characters, making it fast and easy to stage complex interactions. Once animated, the team exported synchronized poses and depth maps for multiple characters—ensuring clear interactive motion, controlled silhouettes, and precise facial expressions in the final AI-generated output.
Maintaining consistency in identity, pose, and spatial coherence across frames has long been a challenge for traditional prompt-based generation. To address this, the team generated short-form cinematic sequences that preserve structure throughout, achieving a level of continuity that overcomes these common limitations.
Flexible Deployment: Local and Cloud Ready
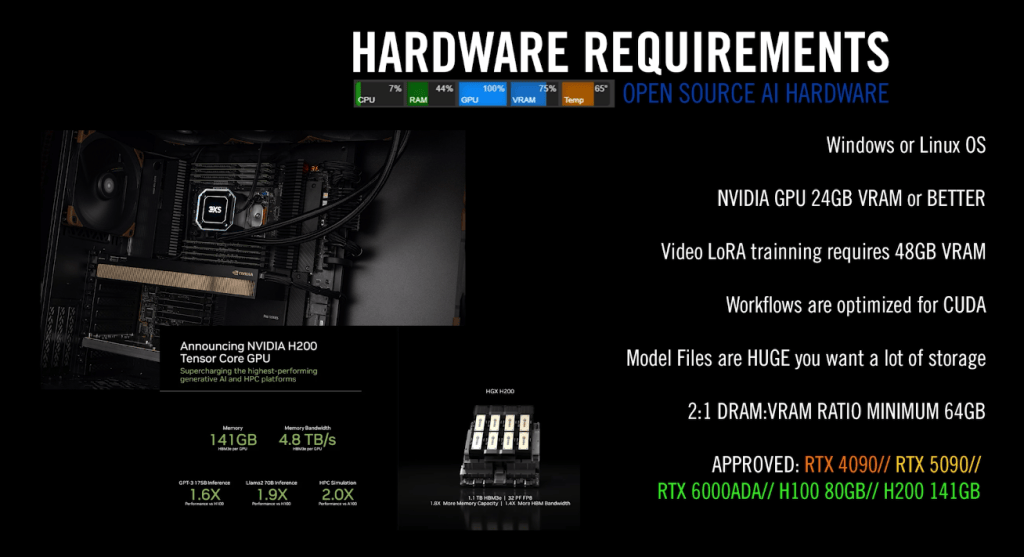
The Actor Capture team found it effective to use NVIDIA RTX 4090 GPUs for testing, previewing, and small batch rendering. Once a test shot is finalized, they offload the video rendering tasks to cloud-based compute farms like RunPod to achieve faster turnaround times.
The size and complexity of a project determine the kind of computer power needed. For example, creating detailed high-resolution images, long video clips, or training AI models like LoRA requires a lot of memory and processing ability. Cloud-based services with specialized graphics processors available online have large memory capacities that can handle these demanding tasks better than typical local computers. This allows them to run advanced AI tools like Flux Realism and WAN FusionX smoothly, with fewer slowdowns or errors.
Shape the Future: Join AI Render Beta
Reallusion is inviting CG creatives from all industries to try AI Render through an open beta program. Whether you’re a professional or an avid dabbler, this is a unique opportunity to provide valuable feedback that will help shape AI Render’s development. Our goal is to create a tool that’s not just cutting-edge, but also a true extension of your creative expression.
What’s more, Max Thomas and James Martin will be hosting a series of live Reallusion webinars on advanced AI-integrated workflows, with the first session kicking off on August 22.
Registration is now open for our first AI Render webinar, happening Aug 22, 2025 (PST/PDT)! In this session, we’ll show you how to set up Flux 1 Dev oncloud GPU and connect it with iClone, unlocking production-level AI image generation with precise 3D guidance. Learn more & register HERE .
Upcoming Webinar Topics
Image Generation Workflows
Learn how to build structured pipelines in ComfyUI using Reallusion’s custom nodes, ControlNet, and LoRA for precise image generation.
LoRA Training Workflow
Explore how to create training datasets in Character Creator and iClone, then train identity-consistent LoRAs using RunPod.
Video Generation Workflows
Discover how to build structured AI video pipelines in ComfyUI, using motion, depth, and pose data from iClone for multi-character control.
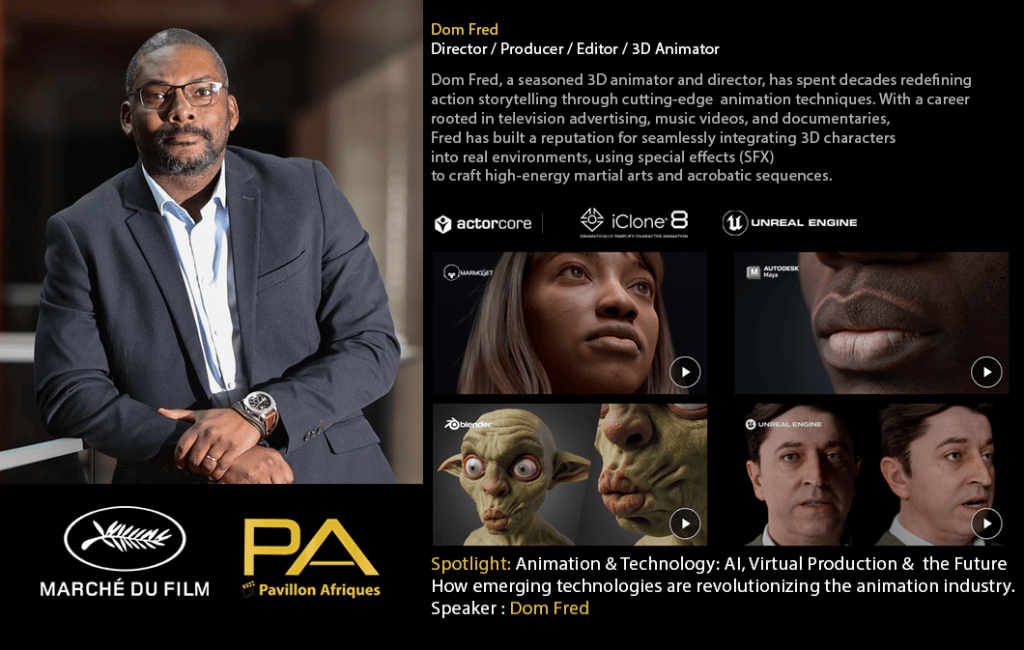
A Visionary in Action: Dom Fred at Cannes Film Festival
Dom Fred – Director / Producer / Editor / 3D Animator / Martial Artist
Dom Fred, a seasoned 3D animator, director, and producer, continues to reshape the future of digital storytelling. With deep roots in television advertising, music videos, and action-packed documentaries, Fred has forged a career out of fusing technical excellence with creative boldness. This year, his innovative spirit was spotlighted at the Cannes Film Festival, where the Africa Pavilion hosted ANIMATION DAY, a special digital focus session highlighting the convergence of animation and emerging technologies.
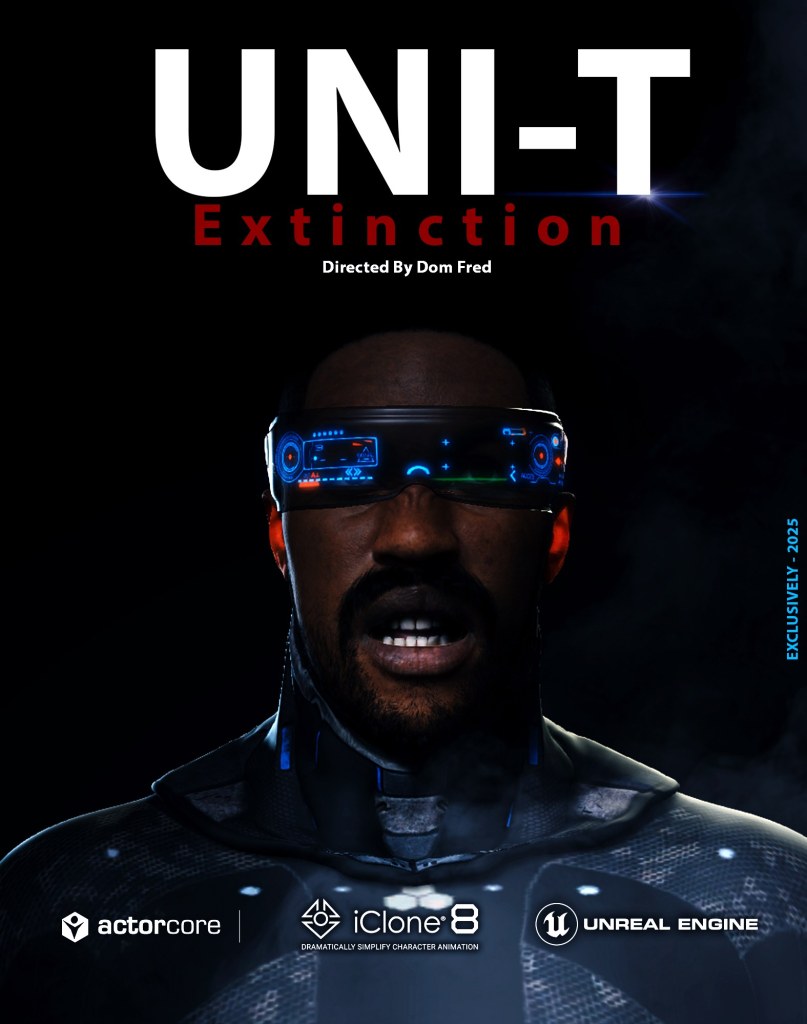
Invited to speak and present his latest short film, UNI-T Extinction, Fred took the stage to share insights on virtual production, AI in animation, and real-time workflows. The event, themed Animation & Technology: AI, Virtual Production & the Future, celebrated voices like Fred’s who are redefining how stories are told in the age of intelligent tools and real-time rendering.
From showcasing cinematic fight scenes built in MAYA to integrating Reallusion’s Character Creator, iClone 8, and ActorCore 3D motion packs, Dom Fred’s approach demonstrates what’s now possible for today’s character designer or independent studio.
“We are at the heart of technological innovation. These Reallusion tools don’t just help us animate—they help us imagine bigger.”
Dom Fred – Director / Producer / Editor / 3D Animator / Martial Artist
How Dom Fred Leverages New-Age 3D Animation Software
Fred’s DOM ANIMATION STUDIO has built a reputation around blending traditional storytelling with cutting-edge 3D animation software. Whether you’re looking to create your own character from scratch or need a human creator solution that integrates seamlessly into Unreal Engine, Fred’s workflow is a blueprint for success.
For UNI-T Extinction, Fred leaned heavily on Reallusion’s ecosystem:
ActorCore motion packs, such as martial arts and SWAT stunts, streamlined high-energy combat choreography.
Character Creator helped establish a realistic character base, enabling detailed avatars ready for real-time animation.
iClone 8 powered the animation pipeline with precision controls and facial animation tools, ideal for lip sync animation.
These tools allowed Fred to complete a 9-minute action short in record time—without sacrificing quality. He demonstrated how this production model reduces overhead and increases creative flexibility, making it a powerful case study for indie creators and larger studios alike.
Spotlight on UNI-T Extinction: Real-Time Production in Action
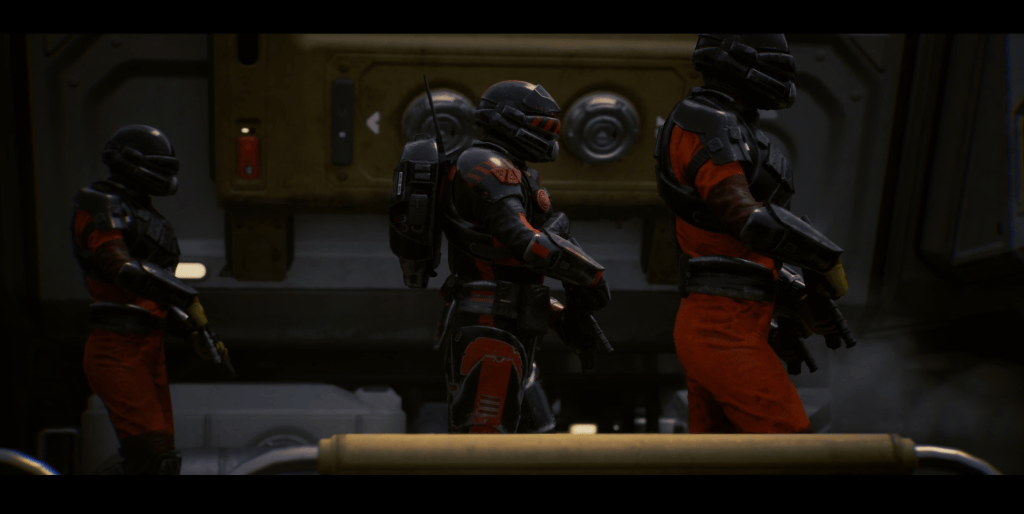
The star of Dom Fred’s Cannes presentation, UNI-T Extinction, is an experimental animated short blending action, sci-fi, and futurism. The film was met with enthusiastic reception during its screening at the Cannes Film Market and Africa Pavilion.
Using real-time workflows from Character Creator to Unreal Engine, Fred’s team achieved:
Accurate lip sync animation using facial mocap and AI-driven dialogue tools.
Fast pre-visualization with realistic characters and environments.
Dynamic camera work traditionally seen in high-budget productions.
The entire project illustrates how today’s 3D character animation is no longer limited by render farms or outdated pipelines. Instead, artists now wield tools that empower them to iterate, test, and deliver cinematic-quality animations faster than ever before.
Why Reallusion Tools Are Revolutionizing the Character Designer Workflow
One of the highlights of Fred’s panel was his demonstration of how Reallusion tools elevate the work of any character designer. With Character Creator, users can design detailed humanoid avatars with intuitive sliders and customization options. These characters can then be rigged, animated, and exported directly into iClone or Unreal Engine, forming a streamlined workflow.
The addition of ActorCore’s motion packs allows for plug-and-play action sequences—saving time and money without compromising realism.
Fred emphasized that this model is perfect for creators who want to:
Build a character base that’s reusable across projects.
Rapidly create your own character for games, films, or VR experiences.
Integrate mocap and lip sync animation tools into a real-time production pipeline.
Empowering the Next Generation of Digital Storytellers
Fred’s message at Cannes resonated with creators from across Africa and beyond. His ability to merge storytelling with technology serves as an inspiring reminder that with the right tools and vision, global filmmakers can stand alongside major studios on prestigious stages like the Cannes Film Festival.
His session concluded with a heartfelt thanks to Karine Barclais, Reallusion’s Director of Partnerships Enoc Burgos, co-producer and screenwriter Alick Macaire, and the many technicians who support DOM ANIMATION STUDIO’s ambitious projects.
As Fred put it: “We are at the heart of technological innovation. These tools don’t just help us animate—they help us imagine bigger.”
Conclusion: A New Era for 3D Character Animation
Dom Fred’s Cannes appearance signals a broader shift in the animation world—where artists equipped with 3D animation software and innovative workflows can achieve world-class results. His use of tools like Character Creator, iClone, and ActorCore exemplifies how modern filmmakers can create their own characters, control their production pipeline, and deliver content ready for the global stage.
As Fred continues to champion this movement, one thing is clear: The future of digital storytelling is here—and it’s powered by creators like him.
Reallusion proudly marks its 25th anniversary with a transformative leap into the future of animation, launching a wave of new innovations and policies that empower creators like never before. From pioneering 3D animation to leading AI-enhanced storytelling, Reallusion has spent the past quarter-century redefining how artists and studios bring stories to life—and the next chapter is unfolding at lightning speed.
3D Innovation to AI Acceleration
Since its founding, Reallusion has helped millions of creators animate faster, design smarter, and push the boundaries of real-time 3D. Now, the company is ushering in a new era of AI-accelerated animation—seamlessly blending its robust real-time tools like iClone and Character Creator with enhanced AI rendering, search, and storytelling capabilities.
“Our commitment to creators has always been rooted in giving them the power to move fast and tell stories with precision and heart. The future is AI integrating into deep layers of our pipeline—from scene control and camera animation to character casting and deep asset search. We’re not just evolving—we’re giving every artist the force of a full studio, accelerated by AI, and guided by human creativity.”
John Martin II, VP of Marketing at Reallusion
New Content Policy: Freedom, Flexibility, and Control
To coincide with its anniversary, Reallusion introduces a major update to its Content Policy, giving creators unprecedented freedom to export and reuse assets across platforms.
Liberalizing the Standard License — No More Extended License
The new Standard License now allows unrestricted use of purchased content in Unreal Engine, Unity, Maya, Blender, and more—eliminating the need for extended licensing and unlocking a seamless cross-platform workflow.
All Extended License privileges are now fully integrated into the Standard License. This change allows creators to freely export content to third-party applications while enjoying these benefits:
Distribute assets as images or videos, in games or XR projects at scale.
Export content to any third-party platform, software, tool, or engine
Reuse purchased characters and assets across unlimited projects
Expand your content library without restrictions or confusing rules
Cost-Saving iContent for Internal Workflow
For internal teams, students, and concept artists, Reallusion’s new iContent License offers a cost-effective solution for working entirely within the Reallusion ecosystem—priced at just 30% of the Standard License while providing access to the same high-quality content.
Choose iContent when:
Looking to leverage convenient in-app purchasing
Rendering directly in iClone or Character Creator
Saving and sharing projects exclusively within iClone or Character Creator
Building scenes for previsualization or storyboarding
Export to third-party workflows or cross-platform deployment is not required
AI innovation continues with the launch of AI Deep Search—a powerful new feature in the Reallusion Asset Store that uses natural language input and visual search to describe your creative goals, and our AI will surface highly relevant characters, clothing, motions, props, and more.
Combined with new trial access to all store assets, creators can now test before they buy in iClone or Character Creator, streamlining the creative process from idea to execution.
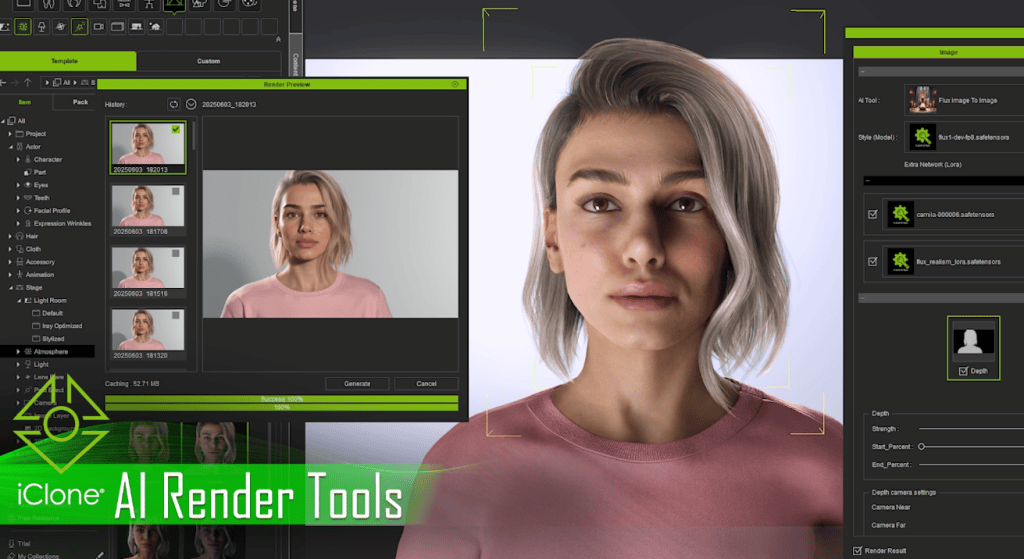
Reallusion introduces AI Render, a powerful new plugin built on the ComfyUI ecosystem that fuses the precision of 3D with the creativity of AI image generation. This innovative tool enables the re-visualization of characters and scenes through a streamlined pipeline that supports both rapid visual exploration and consistent AI-driven re-imaging for stills and video production.
AI Render allows creators to render 3D characters and environments with AI while maintaining complete control of animation, lighting, and cameras through iClone and Character Creator.
As Reallusion celebrates this milestone, it invites creators around the world to step into a new era of storytelling—where 3D innovation meets AI acceleration, and creative freedom knows no bounds.
The company’s vision remains clear: AI breakthroughs are designed not to replace, but to empower artists—turning their vision into reality, faster than ever before.
“The human is elemental to AI generating compelling content. That’s why our AI breakthroughs are designed not to replace, but to empower artists—to turn their vision into reality, faster than ever before.”
I am a 3D Artist and Animator with experience in various Digital Content Creation tools.
My work includes environment and character production using software such as Blender, ZBrush, Maya, Substance Painter, Marvelous Designer, Cinema 4D, Character Creator, iClone, Cascadeur, and others.
I build levels/scenes in Unreal Engine or in Maya and render characters and animations within detailed environments.
Production with Director’s Vision
In the age of Artificial Intelligence (AI), while AI excels at creating concepts, consistent character production across multiple shots with a directed vision remains crucial. Creating animatable characters in DCC applications (Maya, 3ds Max, Cinema 4D, Blender, Houdini) is a lengthy process. Reallusion’s Character Creator and iClone apps significantly speed up this process, working in tandem with ZBrush, Blender, and Marvelous Designer to shape characters, create accessories and clothing.
The Main Reallusion Tools
Character Creator
Character Creator offers a CC3+ template to start with, optimized for real-time production but can be subdivided as required for cinematics. Character Creator features traditional polygon editing and brush tools, but it can seamlessly integrate with ZBrush and Blender as well. Typically, exchanging characters between applications involves lengthy processes like setting up textures, shading, and facial blend shapes. A single character can have over 60 textures (diffuse, bump or normal, transparency, roughness) for body parts, accessories, and clothing.
Character Creator or iClone can automatically transfer models, textures, blend shapes, and setup shading with Auto Setup tools for ZBrush, Blender, Substance Painter, 3ds Max, Maya, Unreal Engine, Unity, and Omniverse. This allows fine-tuning the look in the target applications with details, skin pores (micro details), and wrinkles. The approach allows round trips to update characters and animations. These Reallusion tools are among the most user-friendly tools in the 3D production pipeline.
iClone
iClone combines some of the best animation capabilities developed over decades by many applications. Though some traditional animation tools have disappeared, critical features have been reborn and evolved in iClone:
Softimage, Face Robot features were reborn and enhanced in Character Creator Facial Profile Editor and in iClone’s AccuLips to create facial and speech animation with dynamic facial wrinkles.
Maya and ZBrush blend shape system live in Character Creator Facial Profile Editor. Characters can be seamlessly transferred to iClone for body and face animation or back to Character Creator for update.
Motion Builder and Maya’s non-linear animation system for motion clips and motion capture have been reimagined in iClone’s Motion Clip System.
Motion Builder and Maya characterization system lives in Character Creator and iClone Motion Layer Editor, this allows creating control rigs on most of the major character bone structures, (Maya, Motion Builder, Mixamo Bone System, etc.)
Motion Builder and Maya Human IK system lives in iClone’s Motion Layer Editor
Maya Animation Layer system lives in iClone Animation Layer Editor.
Maya Animation Curve editing lives in iClone’s Curve Editor and in Motion Trail system to edit function curves, and to edit bone motion trail in the viewport.
Motion Bulder’s Constraint system lives in iClone’s Reach Target system with similar non-linear editing capabilities.
Unreal Engine’s interactive character control lives in iClone’s Motion Director Control system for interactively triggering and recording movement direction, jumps, etc.
3ds Max CAT Footprint is mirrored in iClone’s Motion Corrector’s Editor.
Mixamo style auto rigging and skinning are available in Character Creator’s AccuRIG, or in the standalone AccuRIG application, with roundtrip transfers to iClone for animation
iClone is also highly compatible with other animation production pipelines. With a few clicks, it can send animations to Cascadeur for fine-tuning with Auto Physics, and returning the animation as a motion clip for non-linear editing. iClone also offers “characterization” to create character controls for AI based motion capture rigs, such as Cascadeur, Motion LIVE, Meshcapade, etc.
iClone can hand over animation for cinematic rendering to many applications via Auto Setups, Live Links, or by exporting FBX, USD, and Alembic file formats. It creates camera sequences and shot clips for rendering in Unreal Engine.
Reallusion Ecosystem
The Reallusion ecosystem offers a character template (CC3+) as a starting point, which can be sculpted into unique humanoid characters. The template is ready for facial animation even after sculpting the character. Blend shapes are automatically adjusted to the new shape if the base polygon topology kept intact.
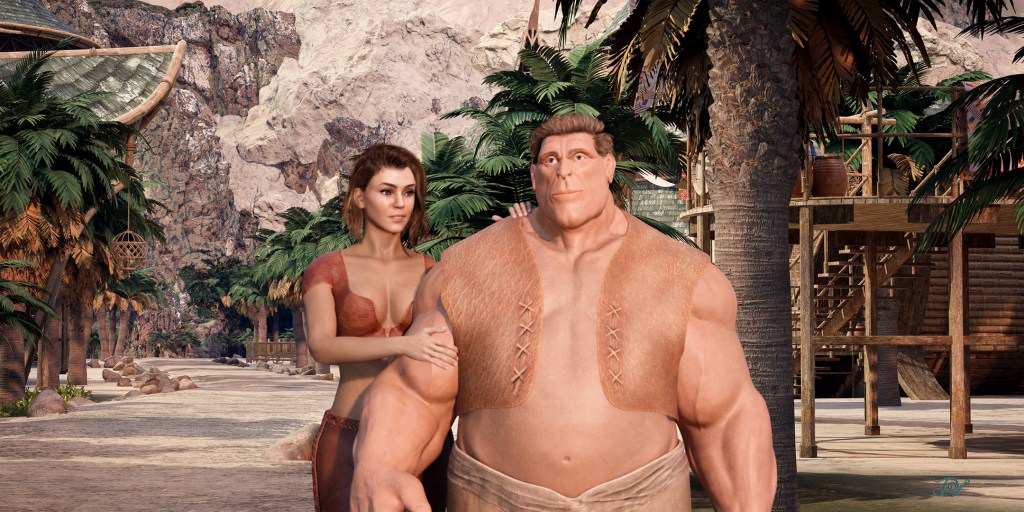
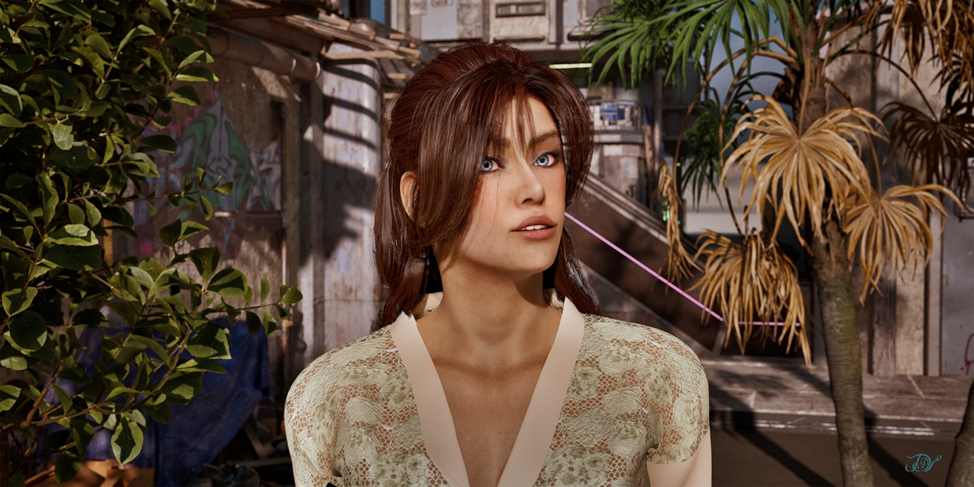
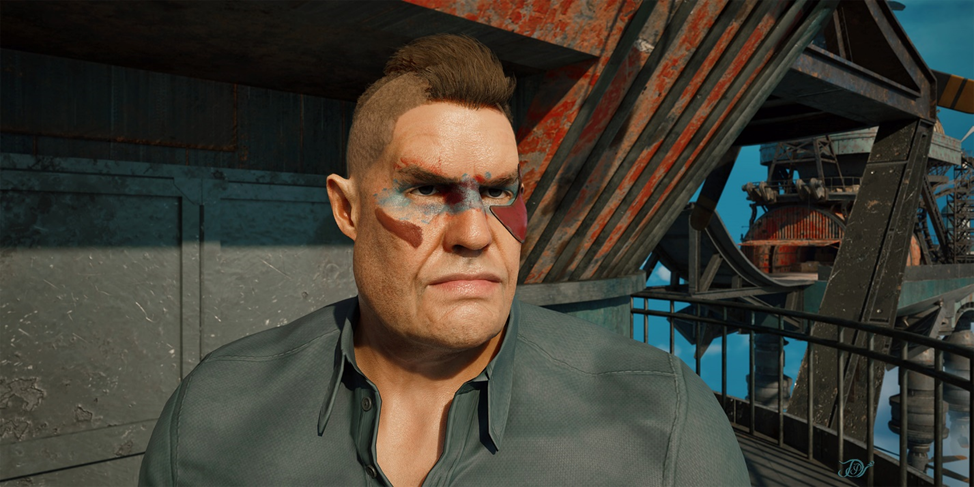
Such characters can be used in cinematics but are not permitted for AI training or as characters in games. Reallusion tools support custom topology characters with manual blend shape creation, without the use limitations. Character Creator provides roundtrip connection with ZBrush or Blender to create the facial blend shapes. In the following image, the female character was sculpted from the Reallusion CC3+ template, while the sturdy male character has custom polygon topology and his facial blend shapes were created in ZBrush for facial and speech animation. Both of the characters’ facial animation were created with AccuLips:
The following is an example of iClone’s Motion Director Control system for interactively triggering walk and jump, recoded into a motion clip for further mixing:
There are many outstanding tutorials on these tools on the Reallusion’s YouTube channel. I would like to highlight the features that are particularly valuable for cinematic production.
Character Face Creation
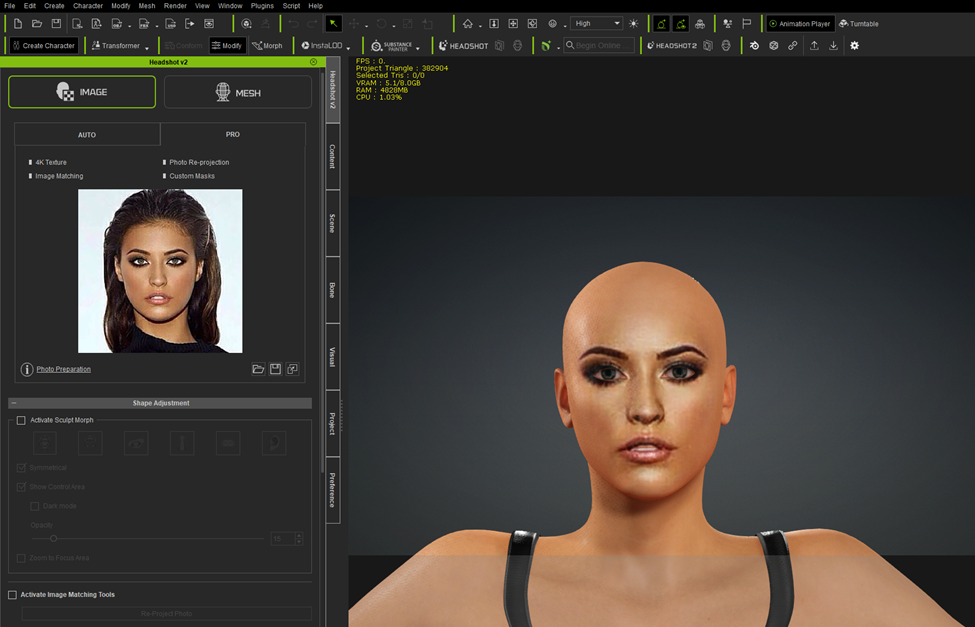
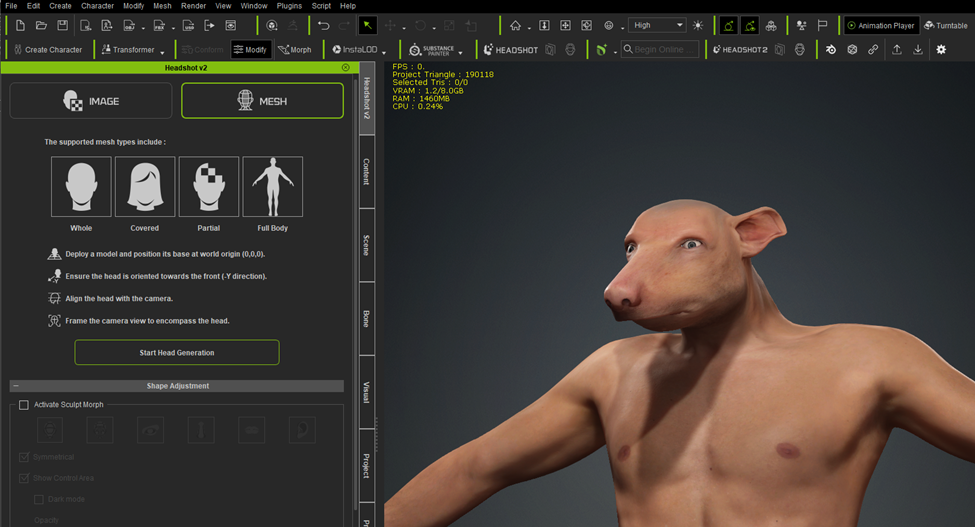
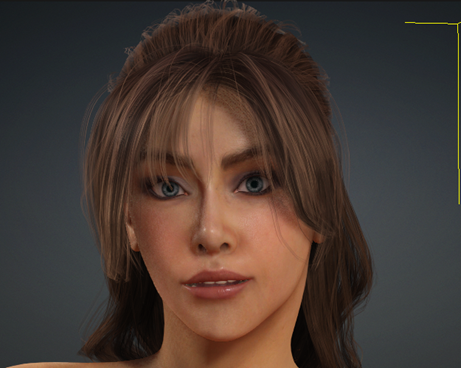
Artists can efficiently create characters using the Reallusion CC3+ template by reshaping it or importing custom models, benefiting from auto blend shape adjustments and an automated Substance Painter workflow. They can use Headshot 2 Image or Mesh modes for quick head shape creation, and the legacy Image Pro mode allows for initial shape generation from an image, which can then be adjusted for a 3D illustration style.
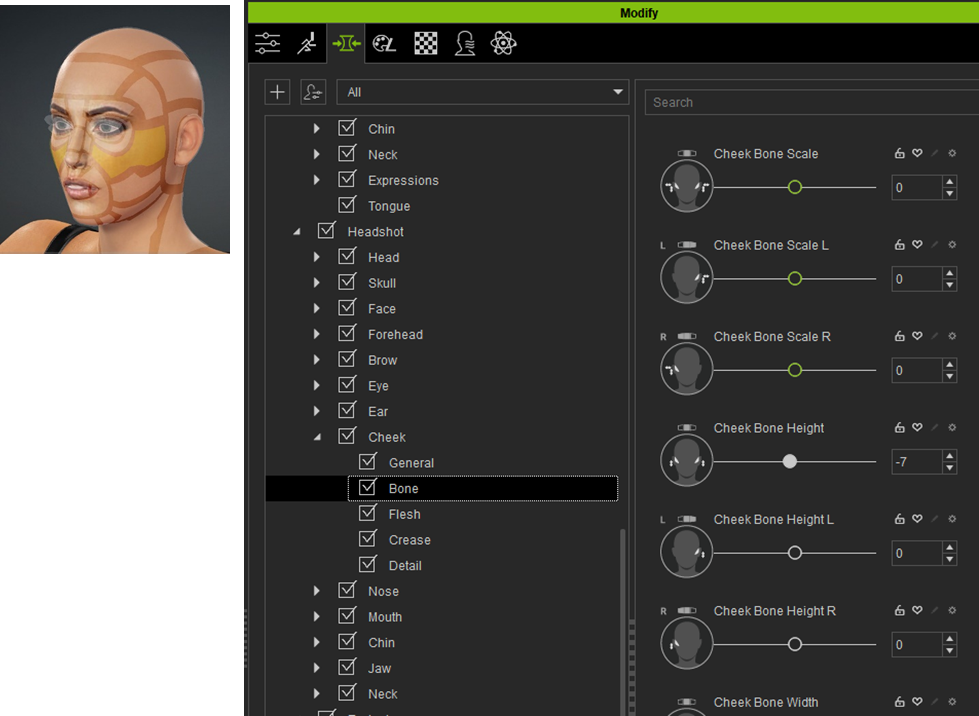
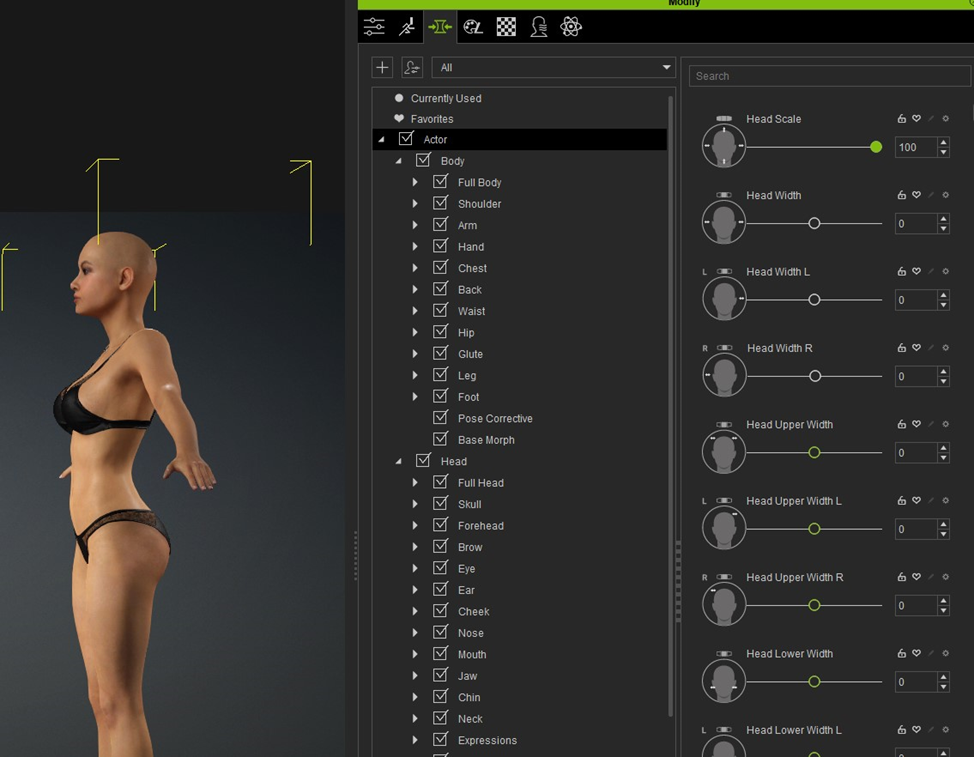
In general, the face projects well for the front view but need shaping the face for the desired facial profile, as seen from the side. Character Creator has face shaping mode to improve the shape. Artists can also use Modify panel’s Headshot morph sliders. When you select a region, the related morph sliders get in focus on the right. This allows you to adjust the shape by dragging in the viewport or adjusting the morph sliders:
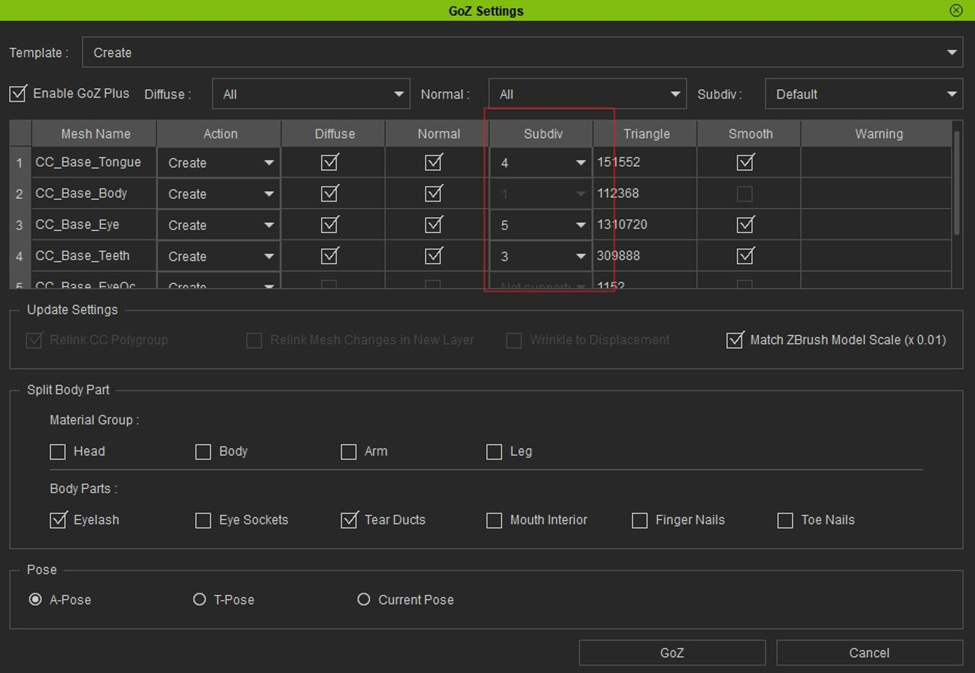
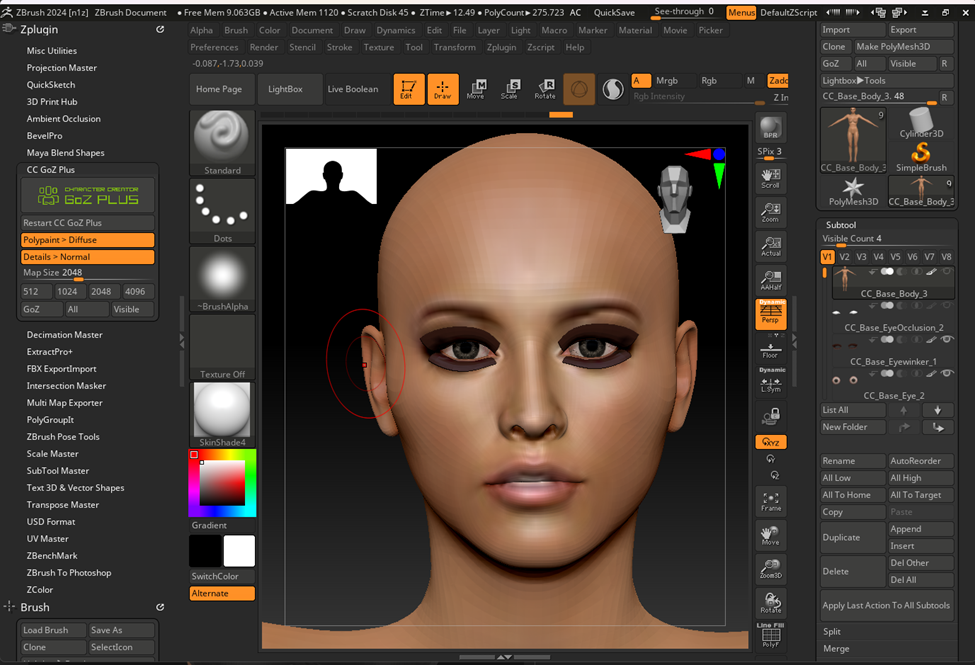
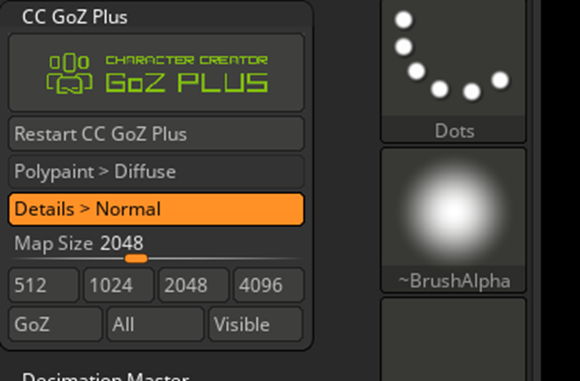
The face can be reshaped and fine-tuned in ZBrush. The recent update to GoZ Plus, makes the ZBrush workflow very versatile. As with other tools’ GoZ workflow, you can adjust the base shape. With the Reallusion GoZ Plus solution, you can regenerate higher ZBrush subdivision levels from the character’s normal map from Character Creator. On the way back, the sculpted higher subdivision levels can be automatically baked back to normal maps. Before sending the characters to ZBrush, you can define the desired subdivision level:
In the GoZ Setting panel, I prefer setting “Match ZBrush Model Scale” to ON to ensure ZBrush uses common brush sizing:
After sculpting the face, you may want to sculpt the body then send it back to Character Creator as described in the next section.
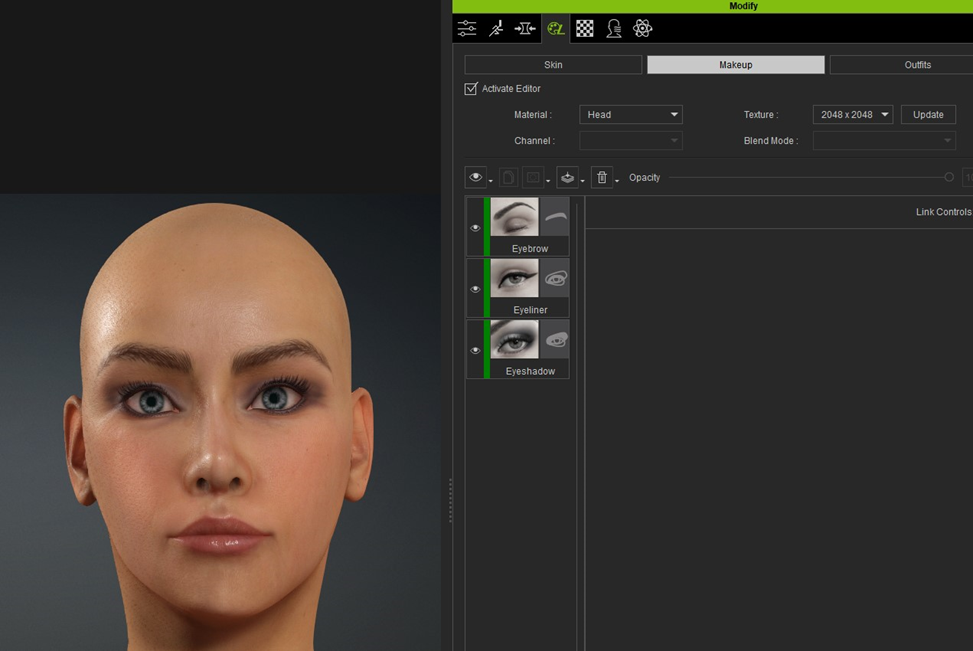
To improve texture projection problems from the image, you can edit the projected texture in Photoshop or edit the head diffuse texture with ZBrush Polypaint tool. However, I used Reallusion’s SkinGen to recreate skin details, pores, and makeups.
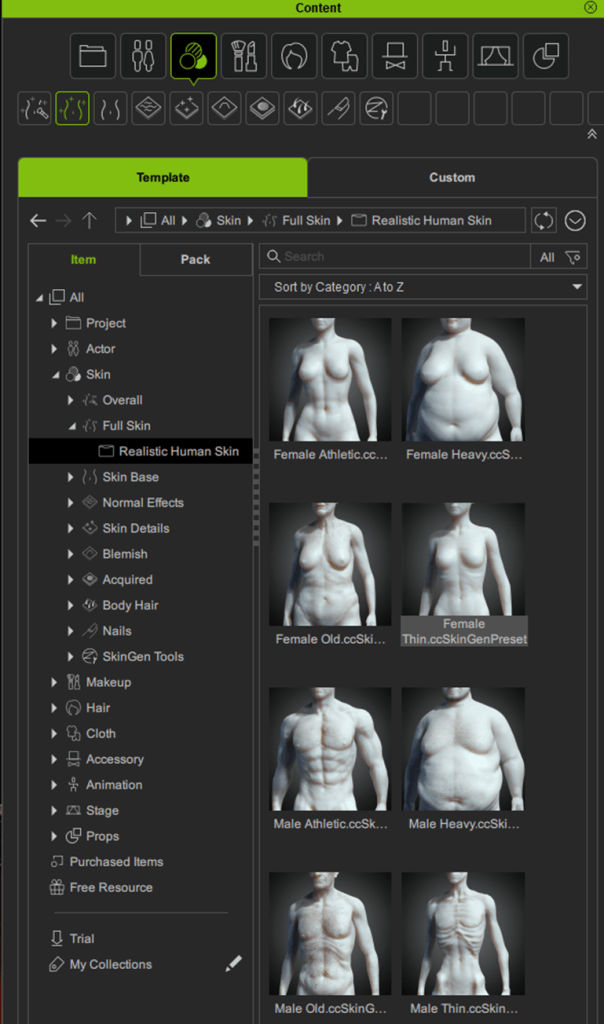
This method eliminates lighting effects baked into the facial image, allowing for high-quality camera close-ups in different lighting conditions. For this model, the best starting skin template was the Skin tab \ Full Skin tab \ Realistic Human Skin \ Female Thin preset:
After that, I added makeup:
If you already have a 3D head model or a bust created In ZBrush, you can wrap the default template around it to create extreme humanoid shapes in HeadShot 2 Mesh mode:
Character Body Creation
You can shape the body in Character Creator’s Modify Editor:
You can fine-tune the body shape with GoZ Plus, similar to how you would with the face:
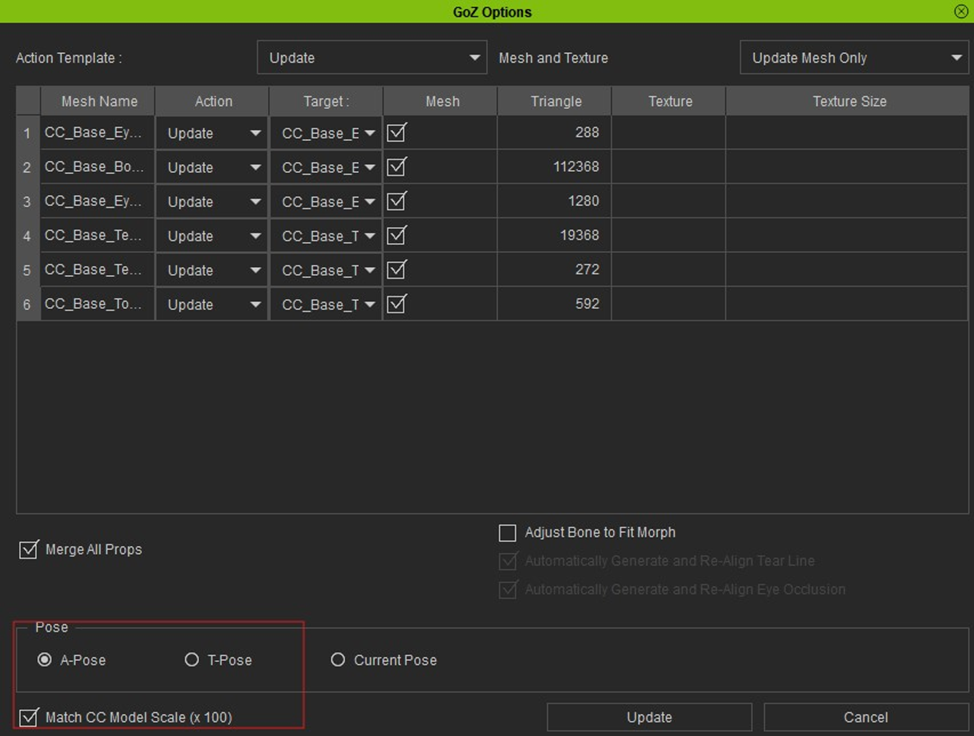
When you send the character back, you can set whether you want to return the model with Polypaint as a Diffuse texture or if you want to project higher subdivision details back to the normal map. You can also define the texture resolution. Use the “All” button to send it back:
On the Character Creator side, you need to verify the receiving data and set whether you want to update the body parts. If you matched the scale for ZBrush on the way out, make sure to activate “Match CC Model Scale (x 100)” option on the receiving side to keep the correct character size:
Hair Creation
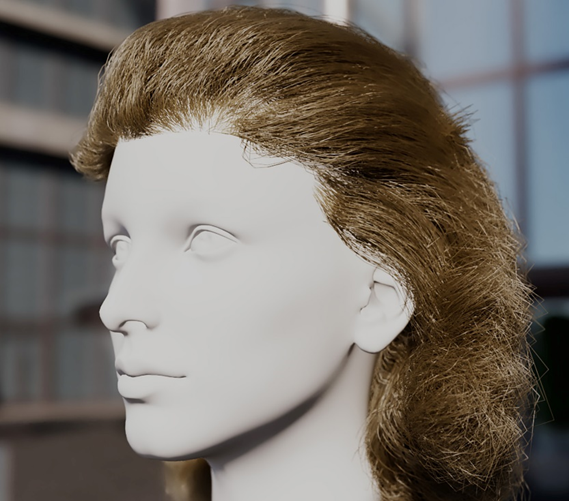
Reallusion offers various hairstyles in hair card formats, which you can quickly apply to the character from the Content Browser. An artist can create custom hair cards in Blender. The card’s transparent texture makes the cards look like hair:
Optionally, you can create strand-based hair in Maya XGen, render it in V-Ray, or export it to Unreal Engine as Alembic curves for rendering:
Clothing Creation
Reallusion has clothing library, which is automatically fitted to the shaped character. Artist can create clothing in other applications and import them as Accessories, then convert them to skin weighted clothing.
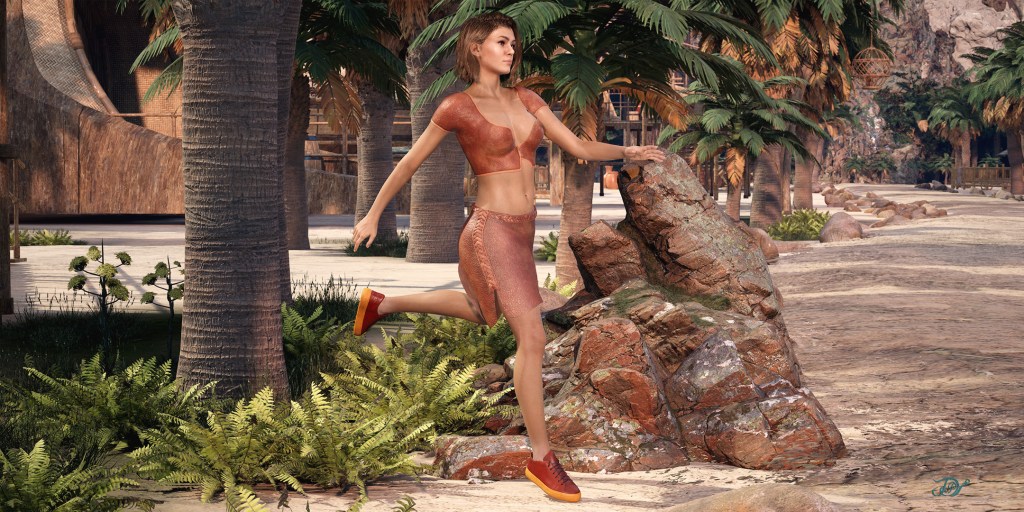
For example, the male clothing was applied from the Reallusion library, while the female clothing was created in ZBrush and Substance painter and transferred to Character Creator with the GoZ and Substance workflow:
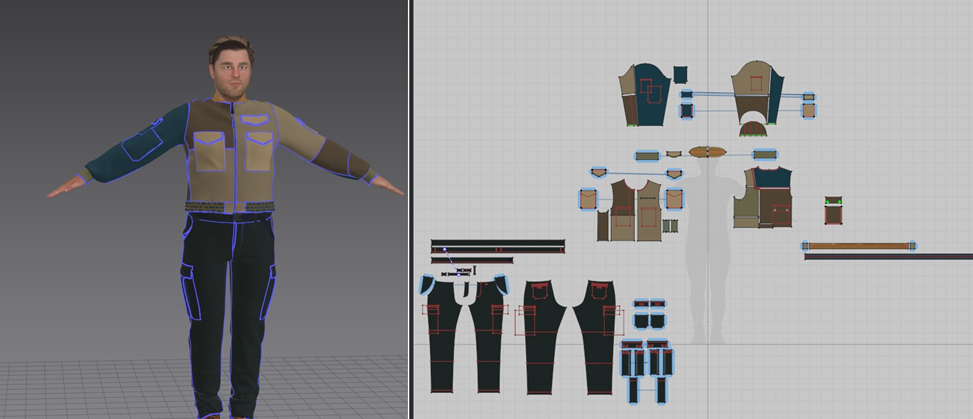
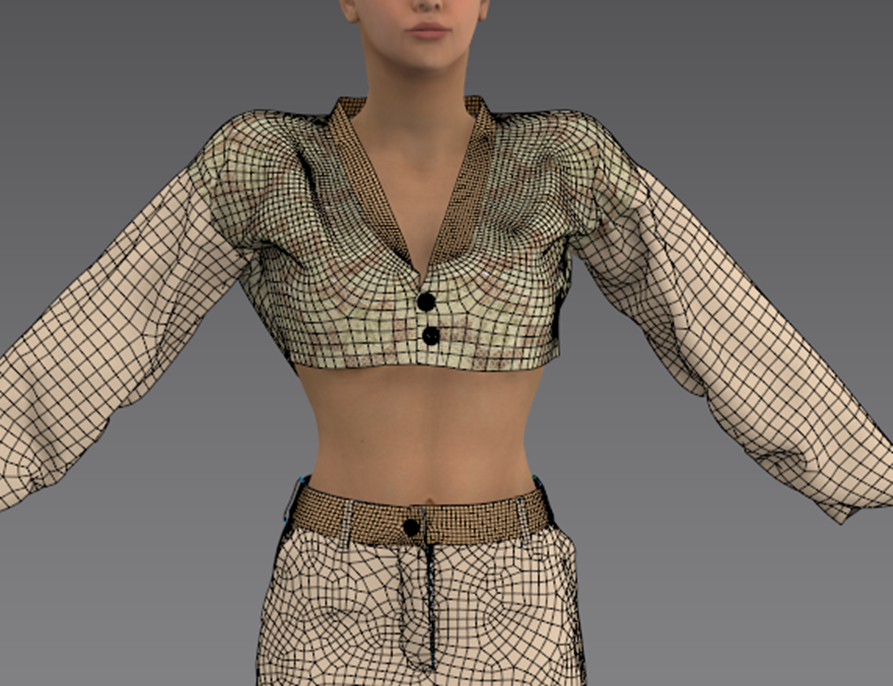
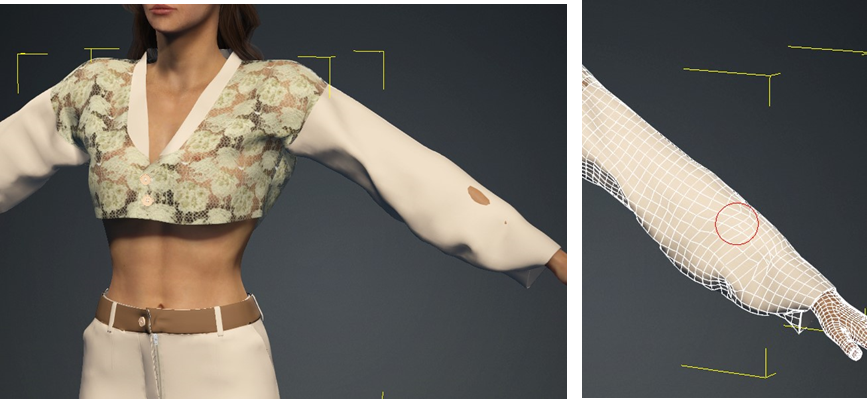
The Reallusion’s Character Creator also works well with Marvelous Designer to create clothing. Marvelous Designer has a patterned-based clothing design. The clothing may have multiple layers for packets, buttons, and decoration. Stitches can be maintained as another geometry layer or normal texture, which helps the cloth simulation process:
Characters with Marvelous Designer’s clothing can be posed, animated and rendered with this Reallusion-focused pipeline along with detailed environments:
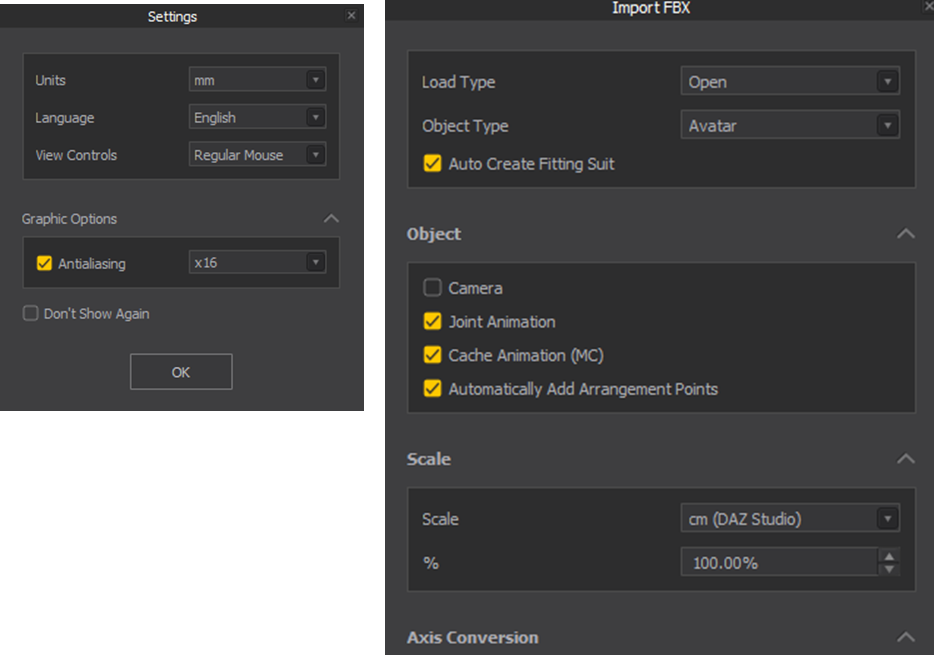
When using Marvelous Designer and exporting from Character Creator, export the character in Maya FBX format. When importing into Marvelous Designer, select the “cm DAZ Studio” scale setting. Ensure that Marvelous Designer is opened with the default ‘mm’ unit.:
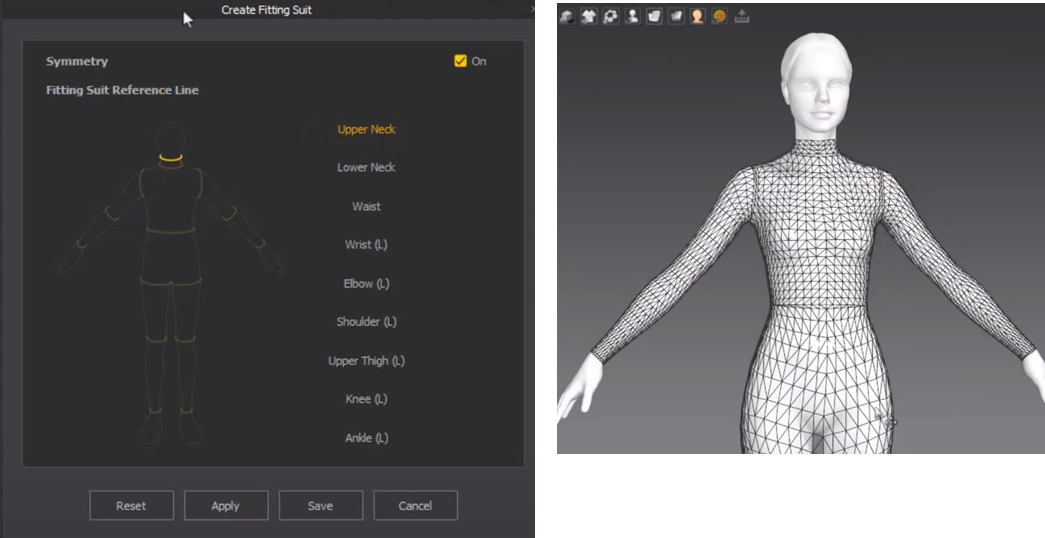
In Marvelous Designer, you can use its fairly new Auto Fitting feature to fit existing clothing to the imported custom character and quickly fit multi-layered clothing patterns. This involves creating a tight fitted suit from which Marvelous Designer can recalculate pattern placement automatically for various sized custom characters:
You can set the cloth polygon resolution at any stage within the Marvelous Designer session and use polygon quads. Character Creator or iClone can further subdivide this and hand over for rendering to get smooth folds:
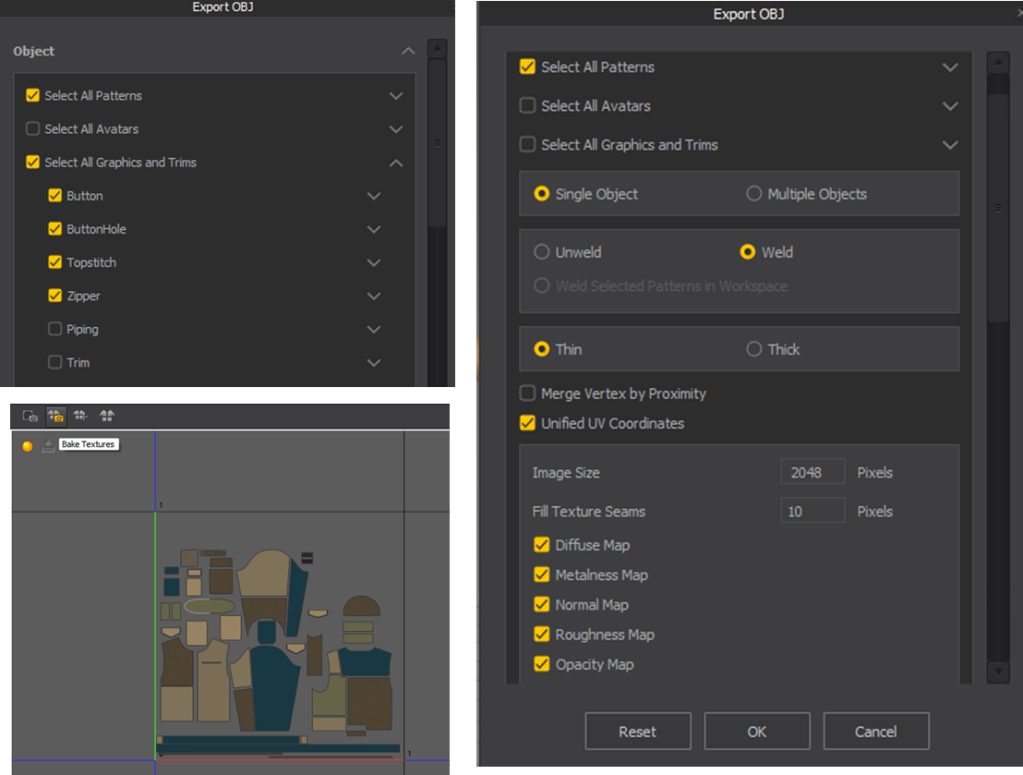
Clothing can contain of multiple items such as tops, pants, etc. To maximize the texture space for each clothing item within the first UV quadrant, it is advisable to export each item individually. This approach allows a single item (shirt, pants, etc.) to utilize the full UV space, which is ideal for cinematic applications.
For cloth simulation, using a thin version of the garment is more practical. A thick version can be created in Blender from the thin version. Then the thin version simulation can drive the thick version. Alternatively, you can simulate a thick like version by retaining the edge but removing the back side:
The most common Marvelous Designer export setting is activating Zipper if you have one, setting “Unified UV Coordinates” to ON to create the pattern’s UV in the first quadrant.
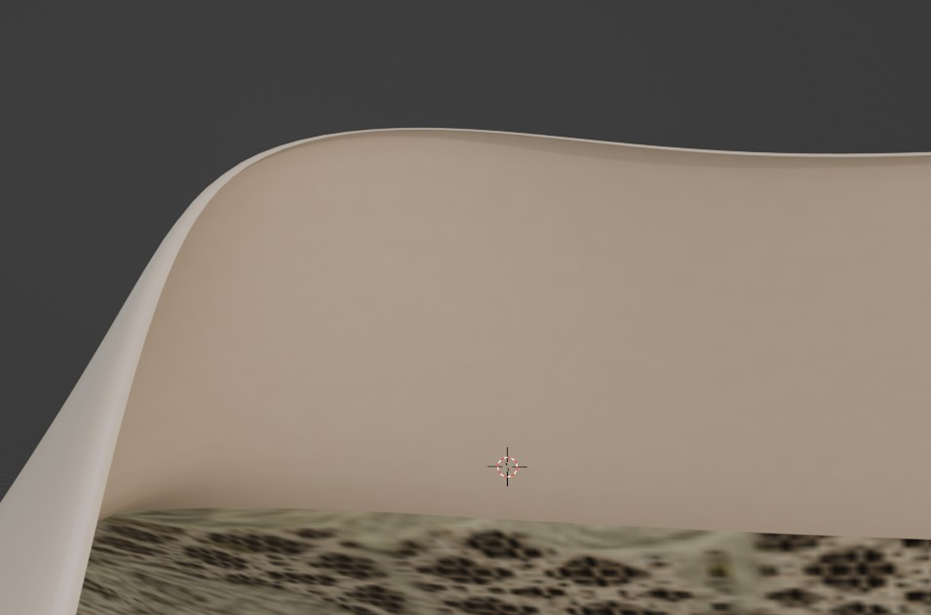
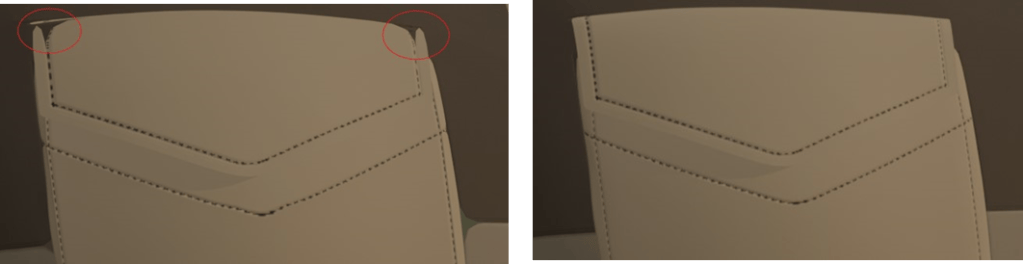
Even if Weld option set to on, some patterns remain detached, which could cause visual separation problem when subdividing later in the pipeline. This can be easily corrected in Blender by merging close vertices. Select all the faces in Edit Mode and press M and select By Distance. Set the last digit of the distance value to 5 (0.0005). After this, you can use Subdivision in the pipeline.
The first image shows the separation after subdivision, while the second image shows the corrected subdivided object ready for cinematic presentation:
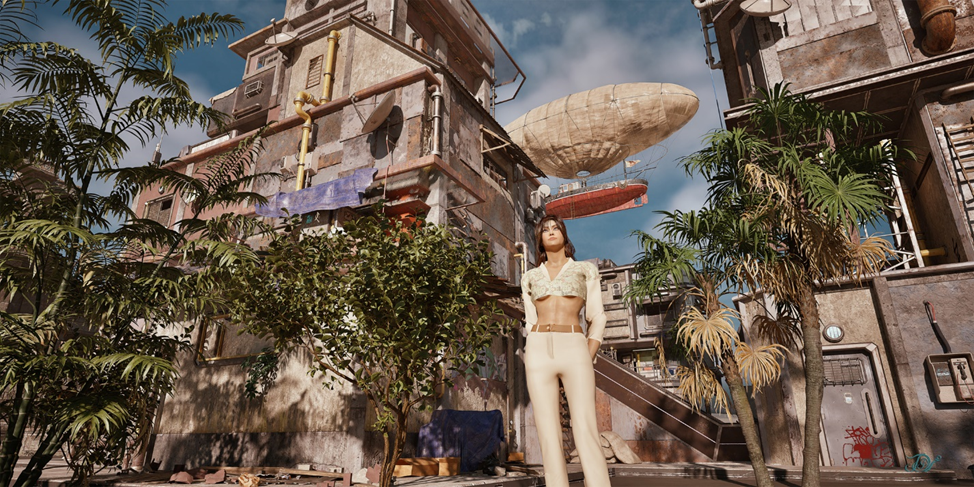
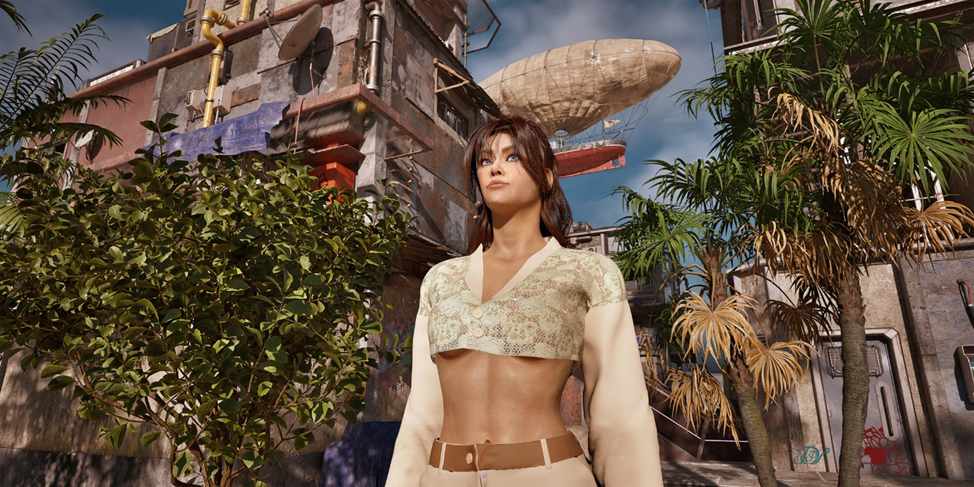
Examples of clothing and character rendering in detailed environment:
Shading and Rendering Setup for Multiple Applications
Artists have several options to rendering character in any environments. Reallusion offers Auto Setup (Blender, Unreal Engine, Unity, 3ds Max, Maya in progress, Omniverse via USD) to set up shader network and Live Links tools (Unreal Engine) to send out to render or receive models for location reference. Common exchange formats (FBX, Alembic) are also provided.
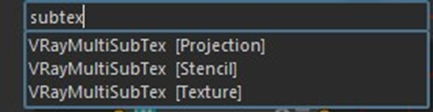
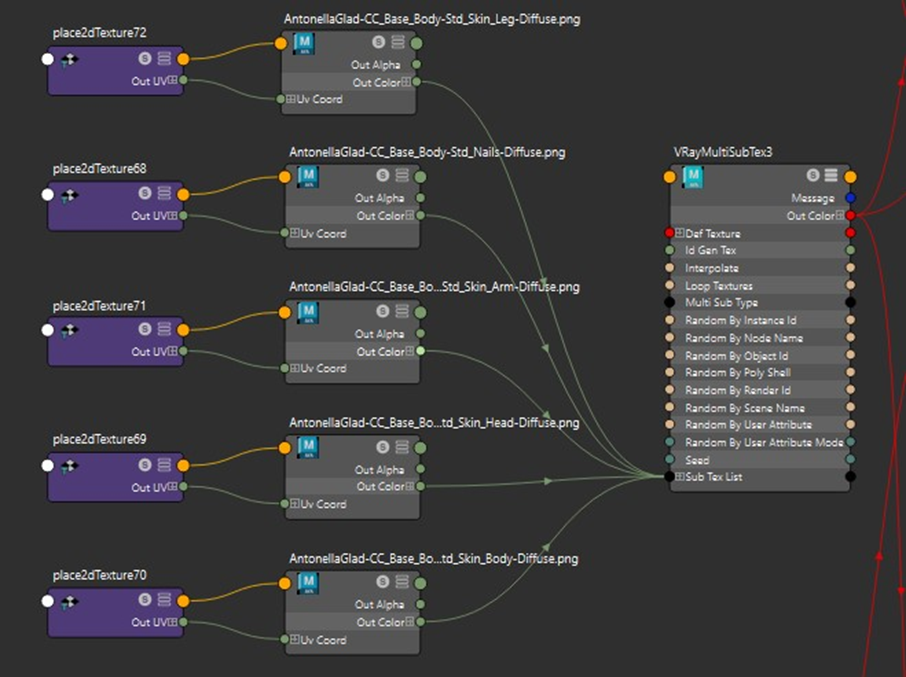
At the time of this article Auto Setup for Maya was not available, the shading setup was done manually. A Reallusion CC3+ character has separated body parts with their own UV space for high quality presentations. These parts include the head, body, arms, legs and nails. The head, body, arms, and legs skin textures need to seamlessly blend, requiring synchronized color and texture settings. V-Ray offers a VRayMultSubTex node to collect all textures and output them as if they were a single object texture. When processing this output for further tuning, all body parts are treated the same way:
The diffuse textures are collected via VRayMultSubTex node:
Body parts can be identified by an assigned ID in the VRayMultSubTex node (Head = 1., Body = 2, Arm = 3 Legs 4 and Nails = 5):
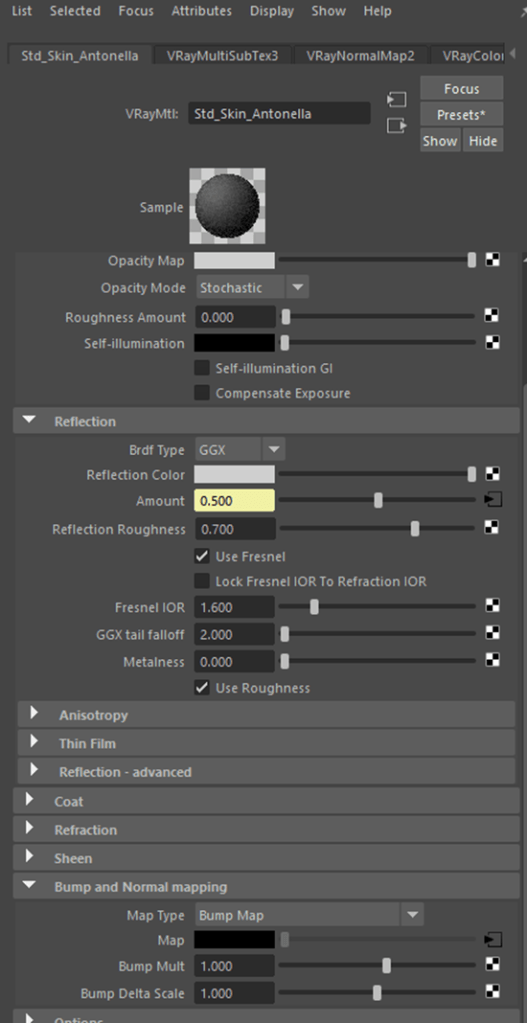
Similarly, you can collect the Roughness and Normal maps with the same ID in separate VRayMultSubTex nodes so that, for example, the head’s normal map will be tied to head diffuse map with the same ID = 1. Then connect the VRayMultSubTex’s Out Color to the appropriate material slot (Diffuse, Roughness Amount, Normal Map inputs):
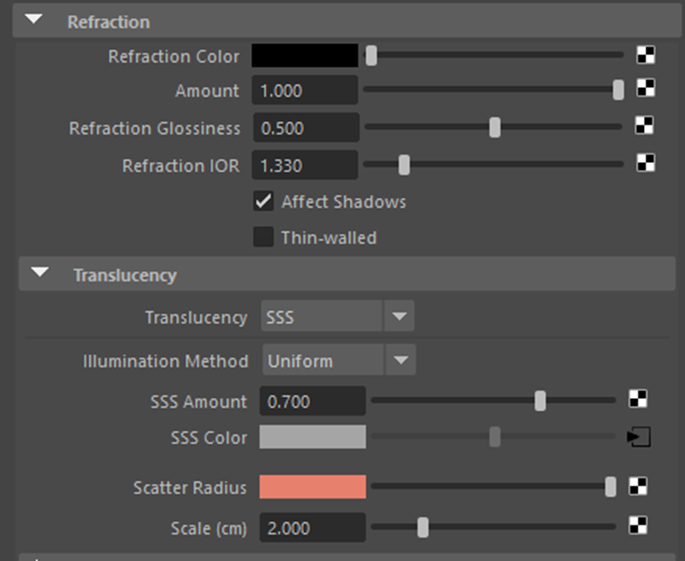
To set skin’s subsurface scatter, adjust the material’s Refraction and Translucency channels. When connecting the collection of Diffuse to the SSS Color, you may use VRayColorCorrection node first to adjust subsurface color then output that to the material node’s SSS Color input:
As a result, V-Ray allows reference quality rendering with detailed environmentReallusion pipeline allows transferring character with auto shading setup into 3ds Max
While traditional DCC application rendering can take some time (many minutes), FlexRap (Flexible Rapid) rendering workflow takes advantage of Unreal Engine and V-Ray capabilities to render character with complex environment, typically under 10 second. It took 5 second to render the following image:
Posing and Animating Characters
iClone offers non-linear animation of motion capture files, similar to Motion Builder. In addition, it provides keyframe animation. The recently introduced AccuPose feature offers AI assisted posing and animation, trained on Reallusion’s vast library of motion capture files, the ActorCore library.
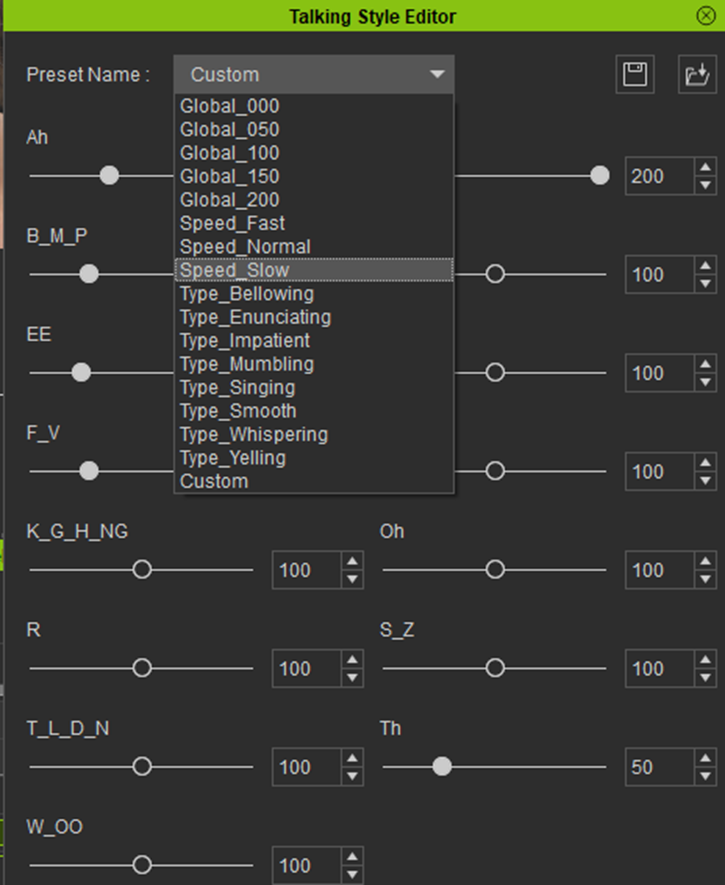
iClone also offers AI assisted, text or voice to lip-sync speech animation. What differentiate iClone from some other tools is that it allows editing viseme timing and strength, or allows changing speaking style for narrative to drama, or singing:
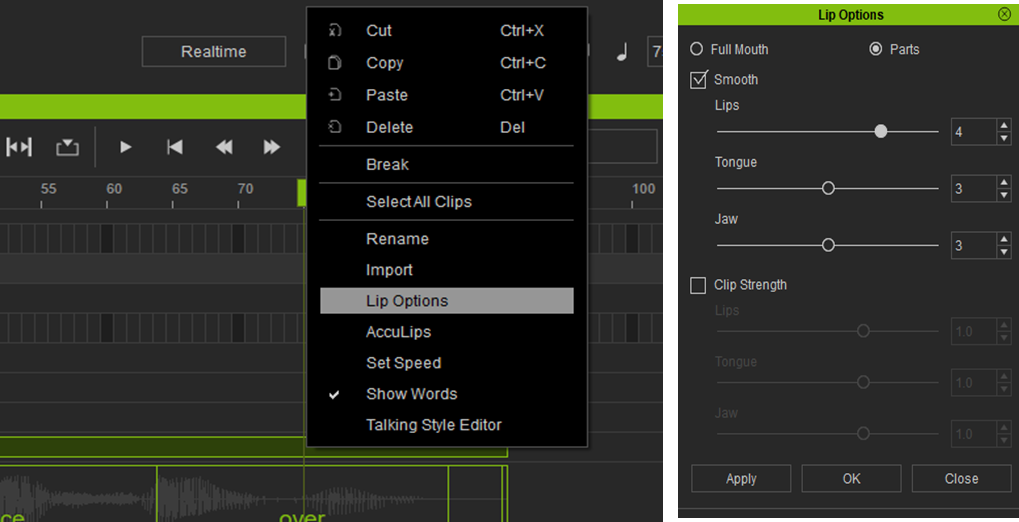
iClone allows smoothing out mouth and jaw movement to make it look more natural:
AccuLips animates the jaw, mouth, teeth and tongue. Additional facial emotional expressions need to be superposed for the rest of the face. Head movement and expressions can be keyframed or added from Digital Soul library. These expression clips can be cut and blended the same way as motion capture clips.
iClone also offers facial control from video or live camera via iPhone facial motion tracking.
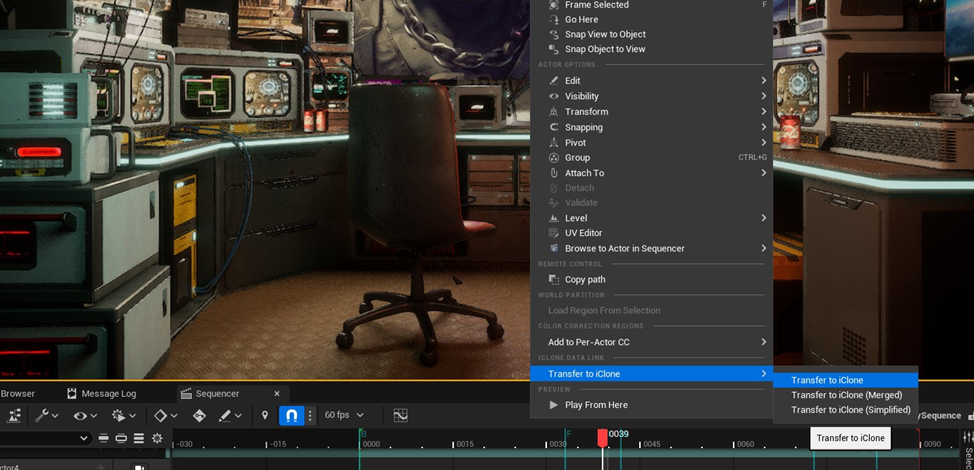
With the Unreal Engine workflow, iClone offers two-way data transfer. For example, an artist can export a chair or a room at certain location from an Unreal Engine scene into iClone. (R-click select Transfer to iClone / Transfer to iClone):
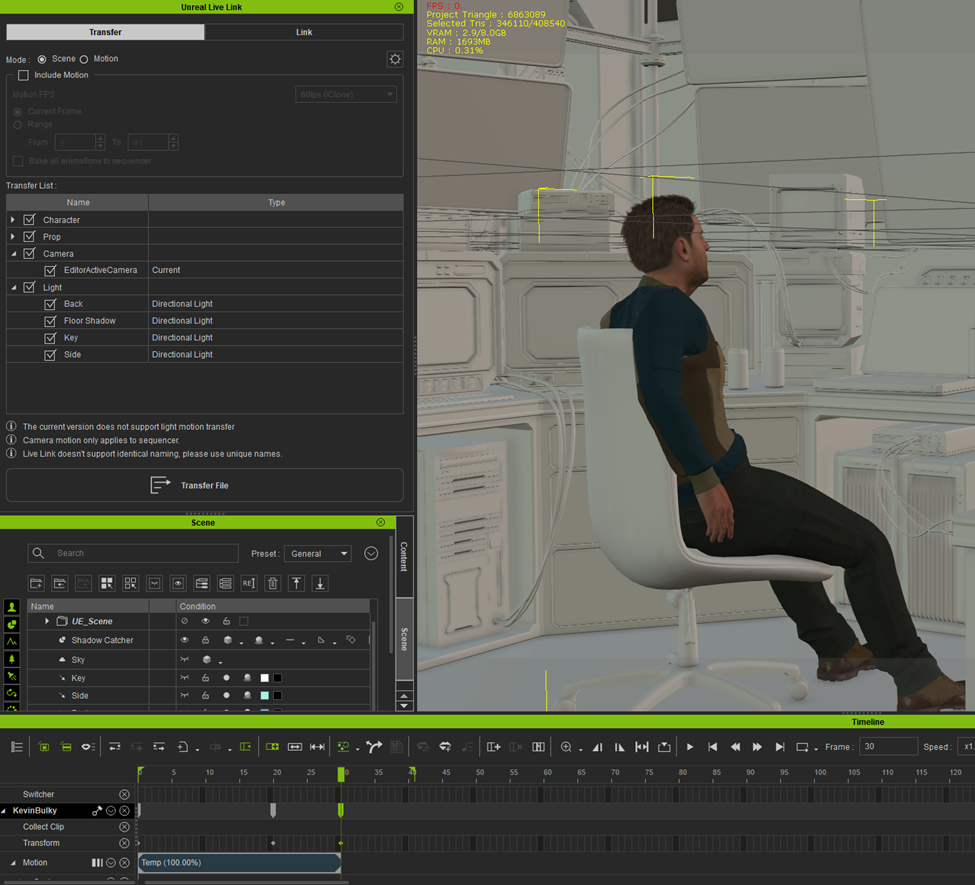
Then the artist can position, pose and animate the character on that chair, at the exact location, in iClone. The reference objects come in without textured shading to preserve iClone’s real-time animation ability, while the character to be animated remains textured:
Then the artist can send the animated character into Unreal Engine’s sequencer at the correct location to sit on the desired chair at the reference location.
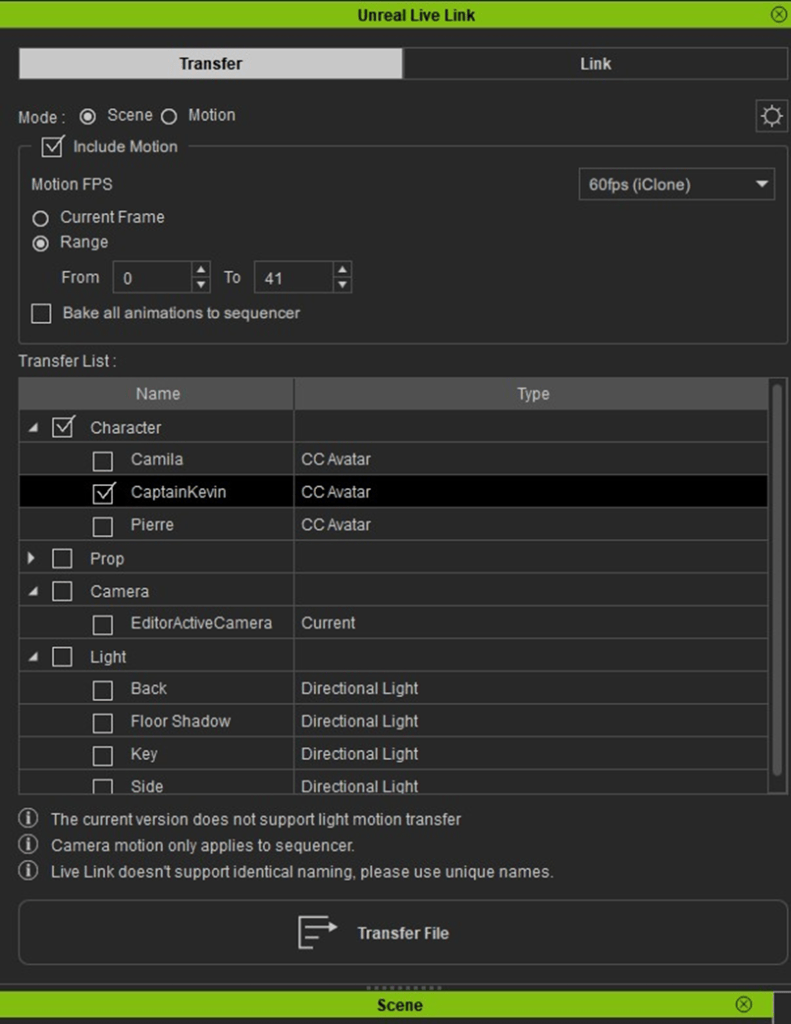
In the Unreal Live Link panel, you can select the character to send over by activating the appropriate checkmarks. You can also choose to send the character with animation within the defined time range:
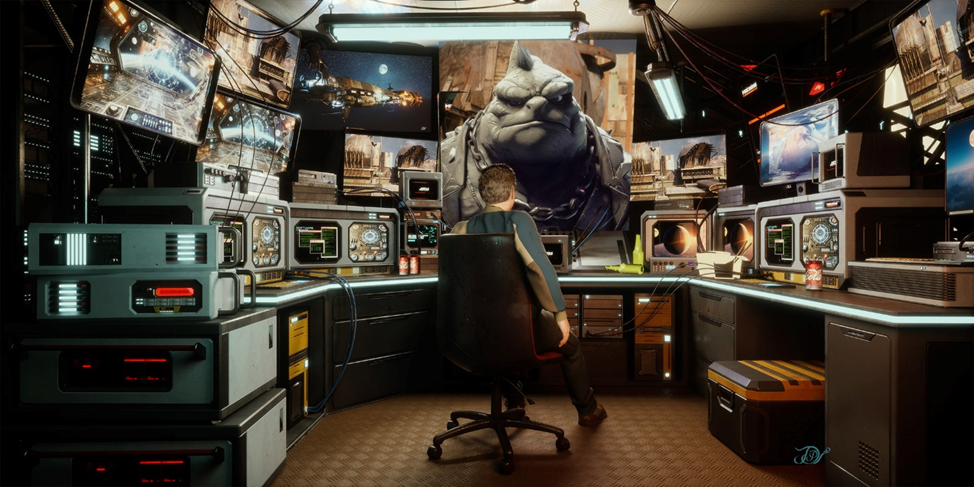
iClone’s pipeline friendliness allows setting up quickly, and rendering the scene with exceptional speed (5 second) and quality via the FlexRap Rendering workflow. In the image below, the larger displays screens act as light sources projecting and illuminating the scene with their screen images’ luminance. It renders hair, skin subsurface scatter, detailed clothing, many light sources and a complex environment, while keeping the dark regions relatively noise-free:
The followings are more examples with FlexRap rendering workflow. The characters were transferred into a complex environment using iClone’s Live Link:
With such a flexible workflow, the sunlight source can be unlinked and more intricate lighting can be linked with the character, refining micro details, such as pores:
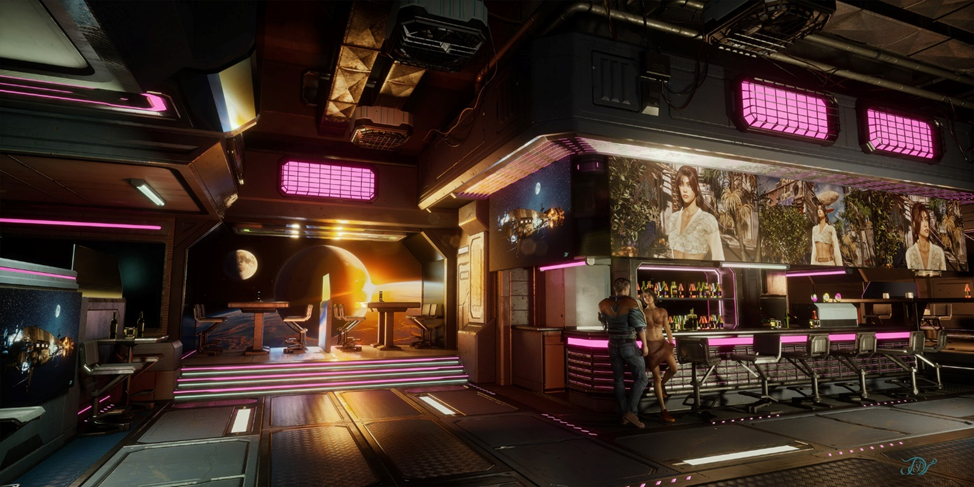
The following is a cinematic Sci-Fi environment with many light sources and with characters created using the Reallusion focused pipeline:
Advantages of Such Workflow
The Reallusion focused pipeline presents significant time-saving advantages over the traditional DCC application pipeline:
Character Creator offers a CC3+ template to start with, optimized for real-time production but can be subdivided as required for cinematics. Unlike other DCC applications, it does not lock down polygon vertices upon skin weighting and blend shape creation. This flexibility allows setting subdivisions during the rendering phase while maintaining optimal resolution for real-time animation.
It is inevitable to use multiple applications for modeling, texturing, rigging, clothing and hair design and rendering in a cinematic production pipeline. A single character can have 60 or more textures. Moving those within applications can take some time to setup. The Reallusion Auto Setup tools, GoZ Plus, and Substance Painter Auto Texture Pickup features significantly speed up this process.
When using the Reallusion CC3+ character template for cinematic applications and shaping characters, the blend shapes are automatically adjusted for the new character design. This is significant time saver during production. At the same time, Character Creator can work with custom polygon topology and helps creating custom blend shapes for facial animation.
During character production with clothing, it is common to experience clothing penetration into the body toward the end of the production pipeline. This may be due to applications calculating skin weighting and deformation differently, or it can be caused by different polygon resolution of the body and clothing above it. The traditional DCC applications lock vertices after skin weighting, requiring substantial rework to fix clothing penetration problems. With Character Creator, you can paint over the cloth to pull it out in the Modify panel, with the Edit Mesh brush tool, even after skin weighting or at any time during the animation. This preserves the polygon face offset throughout the animation. (Character Creator also allows hiding the mesh below clothing, but this may cause problems if you simulate and calculate cloth collision in an external application.):
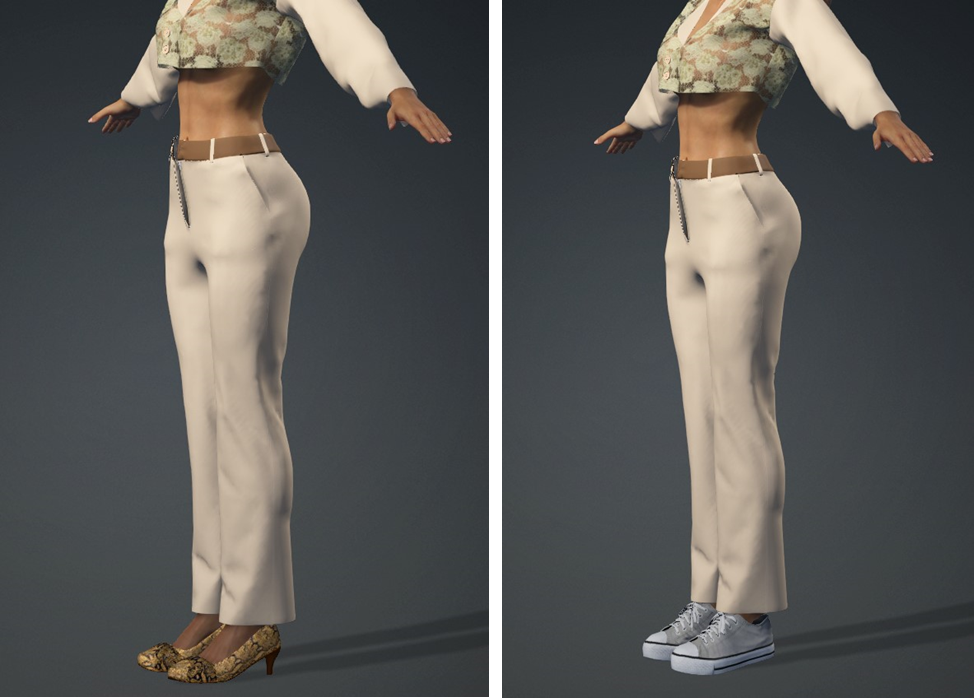
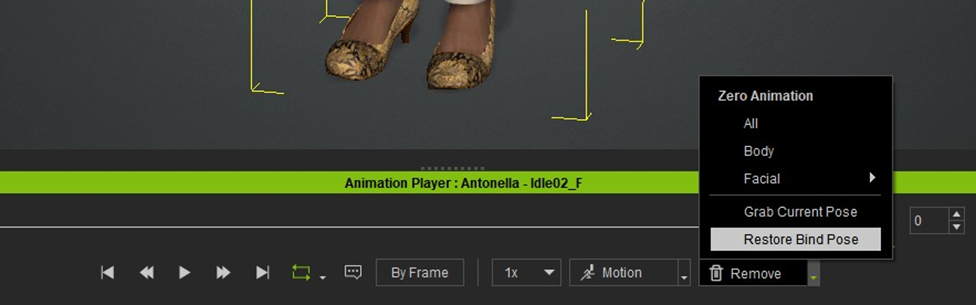
Changing the shoe height after skin binding and cloth fitting with the traditional DCC applications can cause problems. With Character Creator, you can freely change shoe sizes if you set your character into the bind pose:
Pipeline friendly with the ability to collaborate with most other tools.
Fast speech animation, which would normally take a long time to keyframe. The AI assistant solution speeds up this process, while giving option to edit visemes and speaking style.
The Unreal Live link round trip feature allows matching animation position to a specific location in the scene when using multiple apps.
Global illumination (GI) and mesh-based lighting is an underrated and easy to use lighting source for beginners. Most quickly grasp the main lighting tools like the Directional light, Spotlight and Point light. Mesh lighting has similar qualities but requires Global Illumination (GI) to be enabled before they cast any light.
Global Illumination is not a replacement for standard lighting but rather a companion to it in most cases. While we can light a scene with only GI, its main usage would fall into the hybrid category of complimenting or otherwise working with standard lighting. This is not always the case as it just depends on your needs.
Let’s take a look at some of the stock projects that come with iClone and how they work. We’ll also look at some custom projects to see how mesh-based lighting works in general.
Videos as Light Source
Project 3. Self-illumination TV If you do not see this project in the Content Manager, you need to go to the Pack tab and search for the Project Part 3 pack and install the pack.
Videos can generally be dragged and dropped onto almost any surface. I say generally, because some surfaces aren’t mapped properly, and wont display the video in the right manner even though you can drop it onto it. In a lot of cases, flat surfaces are mapped right and provide a great place to put videos to add more motion or lighting to your scene.
With Global Illumination turned on and some glow or self-illumination added, any video can project light just like your television or monitor does. The light will dance on the walls and other objects, flicker, go on and off, fade in and out depending on the video source and project the effects of the video on the surrounding environment.
This is a very simple but important method for beginners to level up on their production quality leveraging iClone’s ability to do most of the work while making the us and our production look good at the same time.
As in most tasks involving Global Illumination, there are very few things to do and only a slider to adjust the intensity. Placement is critical for good lighting and so is common sense to check out as many placement positions as possible but in some cases like the scenario below… it’s easy to home in on the TV as a single light source.
There is only one intensity slider since it is associated with the video simplifying the process.
Particle Effect as Light Source
Project 4. Particle_02 If you do not see this project in the Content Manager, you need to go to the Pack tab and search for the Project Part 3 pack and install the pack.
This project demonstrates lighting the entire scene with a particle effect (Torch Fire in the Scene Manager) and the Illumination intensity strength slider located in the GI Settings section of the Modify tab. These two items combine to create the effect of the torch fire particle giving off light.
With Global Illumination off the scene goes black but when turned on the particle lights the room to varying degrees depending on the setting of the Illumination intensity slider. There are no other lights in the scene except the flickering torch particle.
Props as Lights
Custom Project. Props as Lights
Any prop in iClone can become a light source with Global Illumination. Just like videos the prop needs to be UV mapped properly or the entire light mesh like a lamp will glow instead of just the area of illumination where a bulb or candle would be. A lot of modern props are broken down into different texture maps that include a Glow map. This map only shows the section of the texture that would be used to generate light versus the entire prop.
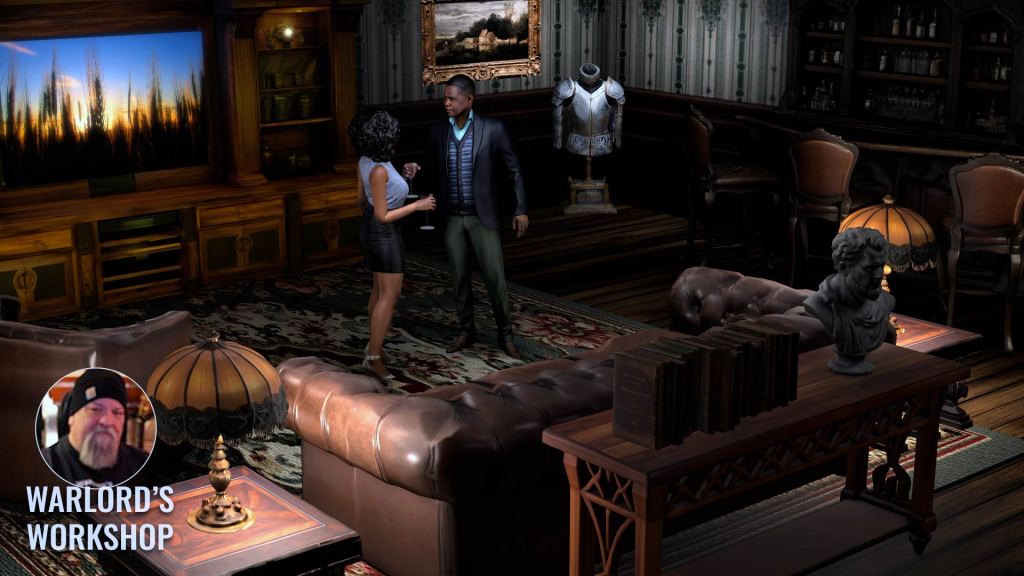
In the example below I used several different methods of Global Illumination using mesh-based props. The table lamps were Meshy AI generated and had horrible UV maps making it impossible to use them for glow maps so I added a sphere primitive under the lamp shade using Global Illumination to turn the spheres into “lightbulbs” which I could then control via the texture illumination slider under GI Settings.
The entertainment center at the back uses a glow map for the lamp glows on both sides and Self Illumination for the lighting. The flat screen television is actually a wall prop fit into the screen area of the entertainment center and mapped with a video to project light. The light intensity is controlled by the wall prop’s texture Self Illumination slider in this case. As is the case with GI props you can use the GI Intensity slider too.
The standing lamp uses only the Self Illumination with GI to project the light under and around the lamp. These props combine to light the scene without any physical lights or IBL lighting. The Tone Map is in use, but the white slider is toned down to where the effect darkens instead of lightens the entire scene.
Take a look at the video below for more information on this process. Keep in mind that we can use the Self Illumination slider or the GI Illumination sliders to mimic light or actually cast light. The tutorial uses both methods.
Passive Lighting
Project 3. Self-illumination If you do not see this project in the Content Manager, you need to go to the Pack tab and search for the Project Part 3 pack and install the pack.
Passive lighting is another form for using props, but they are usually hidden from the main view and provide basic lighting for the scene. It does not involve using things like lamp props for lamps but rather focuses on using props like floors or walls to passively light a scene.
This can be a main source of lighting or complement other lighting. Sometimes it can take a little time to drill down to the proper light source in scenes merged into one prop but it is possible as shown below using the texture channels and associated light settings.
Ready to Use Stock Mesh-Based Lights
Not only can any prop be used as a light source, iClone also provides three basic GI mesh props already set up as lights. GI Emissive Plane Oval, GI Emissive Plane Round and GI Emissive Plane Square are located in the Create -> Light submenu. See the video below for more details.
Be sure to set them as dummies or keep them out of sight of the camera as you don’t want these lighting props to show up in the render. Think of these props as just what they are… an alternative lighting system to the standard lights and a system that compliment standard lighting in the same scene. It is not unusual, and in fact is common, to use both of these lighting methods in the same scene.
NOTE: Setting these props to dummies only works for these particular stock props.
These mesh light props make it simple to add more lighting without wasting a lot of time as they can be deployed directly from the menu to the scene via clicking the item in the Create->Lights submenu. All we need to do after that is set the color and intensity.
Just make sure to have Global Illumination turned on to see the lighting effect. It’s easy for beginners to forget this when first using the props. If you see nothing happening, then check to make sure GI is on.
Attaching Mesh Lights
There comes a time when we need a light to follow along with a character or prop. Just like the standard lights we can attach mesh-based light props to these objects but even better we can attach the light to the camera, so it moves with the camera.
By attaching the mesh light to the camera, we don’t have to set up as many lights and we get the effect of the light moving in and out of the darkness as in the case of a flashlight or torch. Attaching can also be used to keep a certain highlighted or shadowed look to a character as it moves along.
Keeping the range of the light to a minimum will help facilitate this effect so the extra “hidden” light won’t show up on other objects. I also encourage you to experiment with attaching lights to the camera. This particularly works well when mapping out a project or quick proof of concept.
Try This – Turn Off ALL Lighting
This is a simple enough thing to do when starting but often overlooked. Once your scene is laid out and you know where things are…TURN OFF ALL THE LIGHTS in the scene. Especially if you are still in iClone default lighting as it is set up more for seeing the workspace then cinematic lighting.
Now start lighting by loading one light, global illumination mesh-based or standard and see how it affects the area it’s in and the immediate vicinity around it. This is not something you have to do but how can you really know how lights will affect a scene if you don’t start from scratch or at least do some tests first? This eliminates any confusion or accidentally leaving behind any of the default iClone lighting.
No… don’t delete the existing lights to do this! Just turn them off and try a few tests or start lighting from darkness then delete the pre-existing lights after you are satisfied with the results. You can keep these lights, if you wish, to help you light the scene more CLEARLY for working on or replacing something, but do not forget to turn them OFF when finished.
Summary
There can never be enough said about lighting… of any kind. Lighting will make or break a scene or project if not given careful consideration and given enough time to experiment and try out different ways of lighting that scene. Don’t be timid here. Experiment!
This is particularly true of mesh-based lighting that, like standard lighting, can stand on its own or be a hybrid use of both lighting types which is more common. There are about as many ways to light a scene as there are animators so you can only pick one that works for you or your client.
There is one thing to keep in mind about mesh-based lighting before we close this out and that is the fact that you have to be creative to use it because the light’s itself will render out. Unlike the stock GI props discussed earlier, if you set them as dummies the light will turn off. It’s not nearly as bad as it sounds though.
After a short time working with them you become adept at hiding them out of camera site or integrating them into the environment in ways that mask their presence while still emitting the light you. You have seen some of that in action in the short tutorials embedded into this article.
So, let’s not get in a hurry when it comes to lighting. Patience is key and experience builds with every new scene we light.
Digital Artist MD “Mike” McCallum, aka WarLord, is a longtime iClone user. Having authored free tutorials for iClone in its early years and selected to write the iClone Beginners Guide from Packt Publishing in 2011, he was fortunate enough to meet and exchange tricks and tips with users from all over the world and loves to share this information with other users. He has authored hundreds of articles on iClone and digital art in general while reviewing some of the most popular software and hardware in the world. He has been published in many of the leading 3D online and print magazines while staying true to his biggest passion, 3D animation. For more information click here.
School of Motion: Elevating the Art of Motion Design
School of Motion has long been a trusted authority in digital creativity, known for transforming how artists learn motion design and animation tools. Founded by Joey Korenman, the platform was created to cut through the noise of YouTube tutorials and bring foundational, career-level training to aspiring and professional creatives alike. From After Effects and Cinema 4D to Photoshop and 3D workflows, School of Motion’s mission is simple: break down the barriers to learning, mastering, and working in motion design.
In a recent Motion Mondays episode, the team gave a first-look reaction to AccuRIG 2, the latest upgrade to Reallusion’s free auto-rigging tool. What caught the attention of School of Motion? A powerful, user-friendly rigging tool that not only rivals Mixamo—but actually surpasses it in key ways.
Let’s unpack what makes AccuRIG 2 a standout option for 3D animators and motion designers.
What Is AccuRIG 2?
AccuRIG 2 is Reallusion’s upgraded character auto-rigging solution designed to provide fast, intuitive rigging for static 3D models. Think of it as a smarter Mixamo alternative—with modern features tailored to today’s animation pipelines.
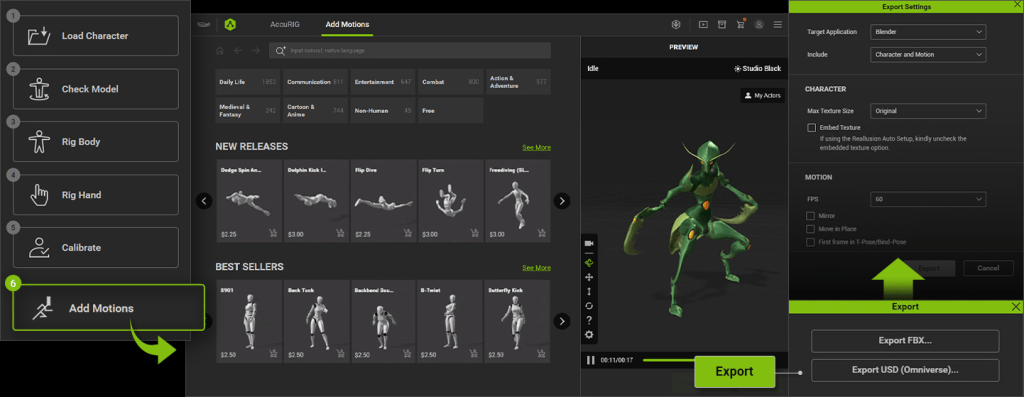
According to the review, AccuRIG 2 builds upon the core auto-rigging tech of its predecessor, but now integrates deeply with Reallusion’s ActorCore motion library—enabling creators to quickly rig characters and preview animation packs before exporting.
Key Features of AccuRIG 2
1. ActorCore Motion Integration
One of the headline features is direct integration with Reallusion’s ActorCore, a massive library of professionally captured animations.
“It adds the ability to apply animations from their ActorCore motion library to your rigged characters.”
EJ Hassenfratz | Creative Director @ School of Motion
This allows you to preview, test, and apply motion clips to your characters—no export/import hoops required.
2. Group Motion Support
AccuRIG 2 supports group animations, allowing users to assign synchronized motion clips to multiple characters in the same scene. This is a big win for game developers and filmmakers working with ensemble scenes.
“One thing that AccuRIG 2 adds is group motion support for animations involving multiple characters.”
EJ Hassenfratz | Creative Director @ School of Motion
3. Natural Language Search
Finding the right animation is often a time sink. AccuRIG 2 solves this with natural language search, letting you type “run forward,” “jump and land,” or “angry walk” and immediately find matching clips.
This feature isn’t just convenient—it’s workflow-transforming for teams with tight deadlines.
4. DCC Export Presets
AccuRIG 2 supports custom export presets for nearly every major DCC platform:
Blender
Cinema 4D
Unreal Engine
Maya
3ds Max
Unity
No more fidgeting with export settings or retargeting rigs post-import. AccuRIG does the work for you.
“Export presets for pretty much every major DCC software like Blender, Cinema 4D, Unreal… you name it.”
EJ Hassenfratz | Creative Director @ School of Motion
Why It Beats Mixamo
While Mixamo has long been a staple for beginner rigging and mocap, its development has stalled, and the toolset hasn’t seen meaningful updates in years.
Here’s how AccuRIG 2 compares:
Feature
AccuRIG 2
Mixamo
ActorCore motion integration
✅ Yes
❌ No
Group animation support
✅ Yes
❌ No
Natural language search
✅ Yes
❌ No
Active development
✅ Frequent updates
❌ Rare updates
DCC-specific export
✅ Presets for Blender, UE, etc.
⚠️ Basic FBX export
Price
✅ Free
✅ Free
“It’s definitely worth checking out—especially if you need more power and more recent updates than Mixamo provides.”
EJ Hassenfratz | Creative Director @ School of Motion
Ideal for Indie Filmmakers, Game Devs & Studios
Whether you’re an indie developer working solo or a team of animators building cinematic sequences, AccuRIG 2 offers a significant productivity boost:
🚀 Previz Pipelines – Quickly rig characters and test animation packs
🎮 Game Development – Use ActorCore motions and group syncing in Unity or Unreal
🎥 Virtual Production – Export to DCCs like C4D or Blender for final animation
💼 Studios – Integrate seamlessly with production tools via FBX, USD, or native formats
Free to Use, Easy to Learn
One of the most impressive aspects is the pricing: AccuRIG 2 is completely free. You can download it now without any licensing fees. While ActorCore animations come in both free and premium options, the rigging software itself doesn’t cost a thing.
This makes it an ideal choice for:
Indie studios
Students
Freelancers
Educators
Conclusion: A Smarter Rigging Alternative Is Here
Reallusion’s AccuRIG 2 is more than a Mixamo competitor—it’s a next-gen auto-rigging tool built for today’s fast-paced creative pipelines. With ActorCore integration, natural language search, multi-character animation, and DCC-ready exports, it solves the common pain points 3D artists face when rigging and animating characters.
For 3D animators, game devs, and content creators, this tool isn’t just worth checking out—it’s worth integrating into your daily workflow.
Discover how AI is used to reimagine 3D visuals, and how you can win a FREE CC5!
We’re excited to launch the Open Beta of AI Renderplugin, a powerful and completely free tool that bridges real-time 3D animation with AI-powered rendering, seamlessly integrated into the ComfyUI workflow.
Whether you want to explore creative, stylized AI generations or need consistent, frame-accurate results for production, AI Render is built to deliver both. It’s a flexible, scalable solution designed to meet the full range of creator needs — from fast, artistic exploration to precise, professional fine-grain control.
ComfyUI + Reallusion = Speed, Accessibility, and Ease
The ComfyUI workflow is a powerhouse in the AI art community, known for its flexible, node-based system that supports ControlNet, LoRA, and fully customizable pipelines. Combined with Reallusion’s fast, beginner-friendly tools like Character Creator and iClone — which offer intuitive slider-based design, drag-and-drop assets, and real-time scene editing. To make this integration possible,AI Renderuses custom nodes that connect Reallusion’s 3D environments directly into the ComfyUI ecosystem.
For Reallusion users, AI Render works seamlessly within familiar tools — no ComfyUI experience needed. For ComfyUI users, it enables precise 3D-guided generation and full freedom to build custom workflows with added control and consistency.
22 Style Presets, Endless Possibilities
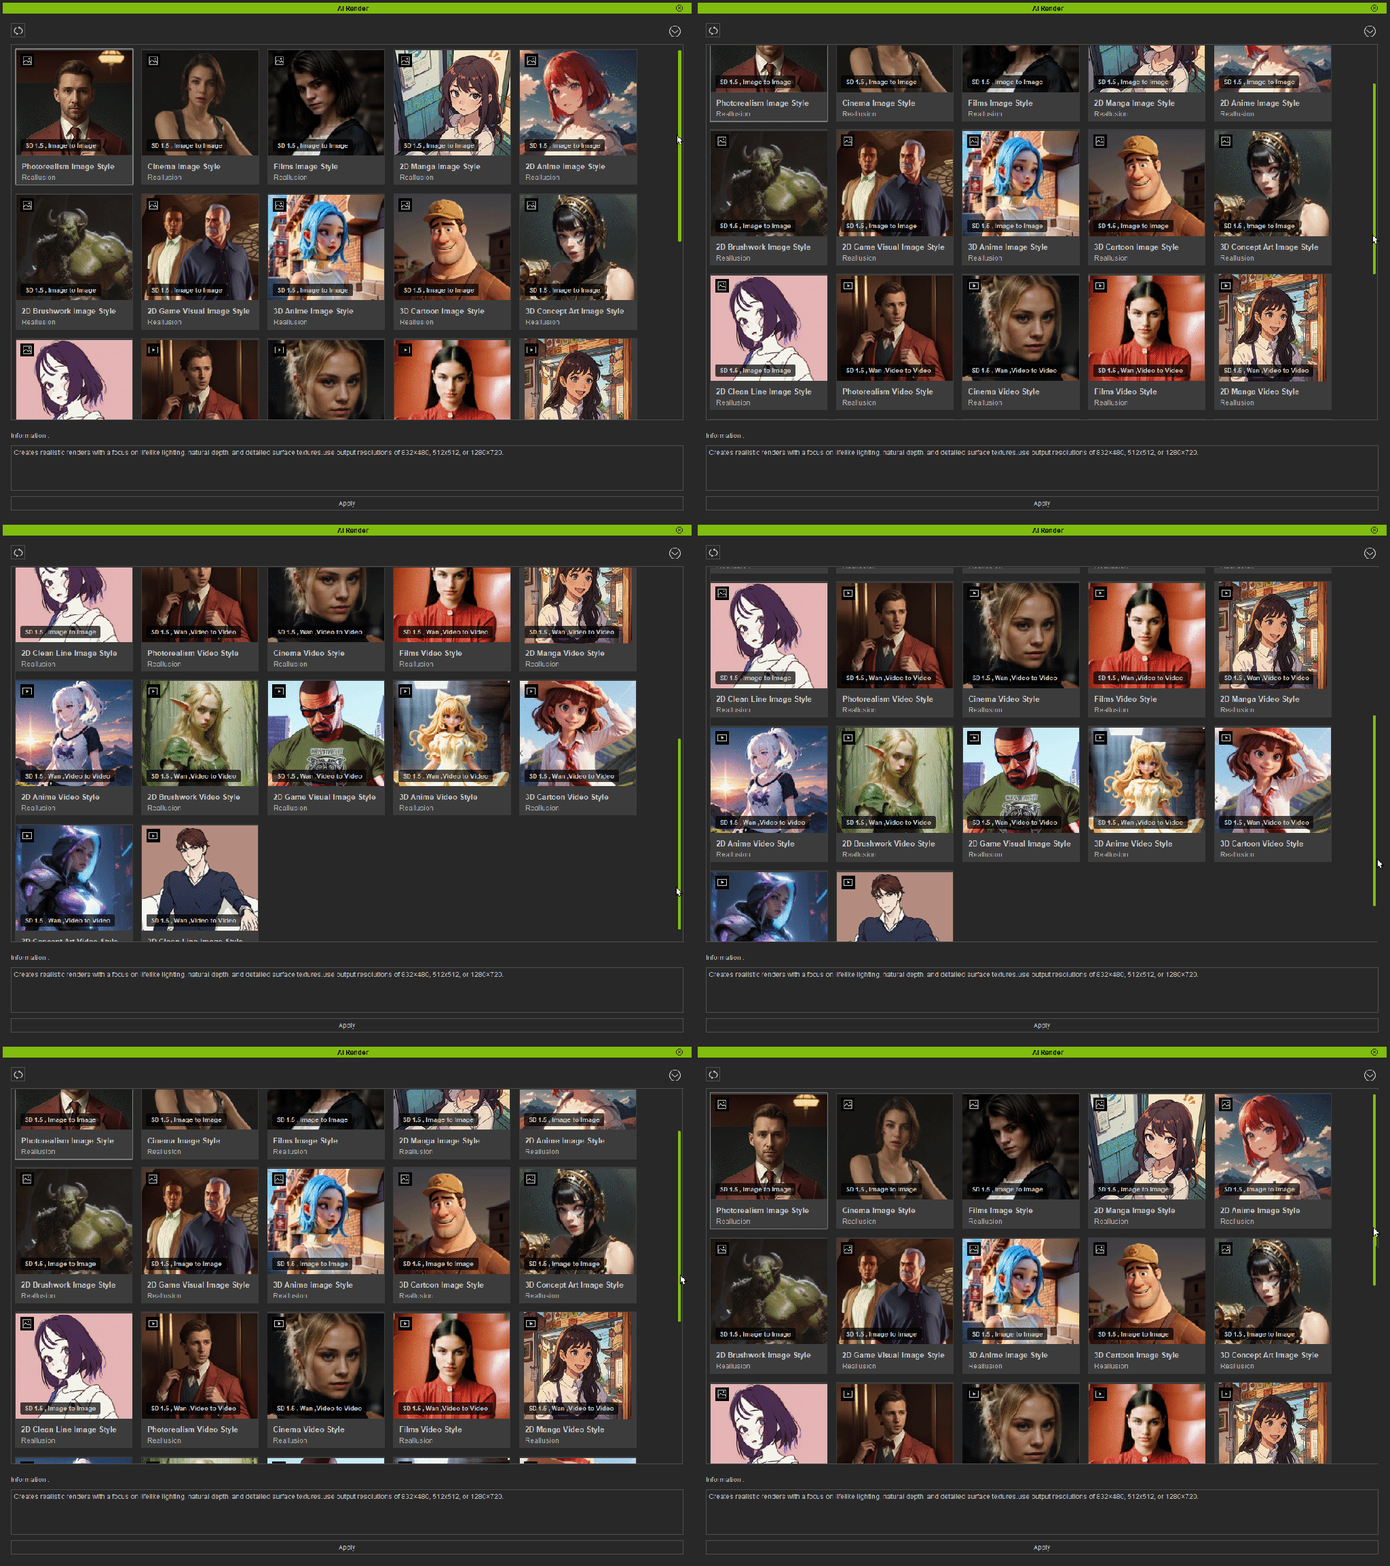
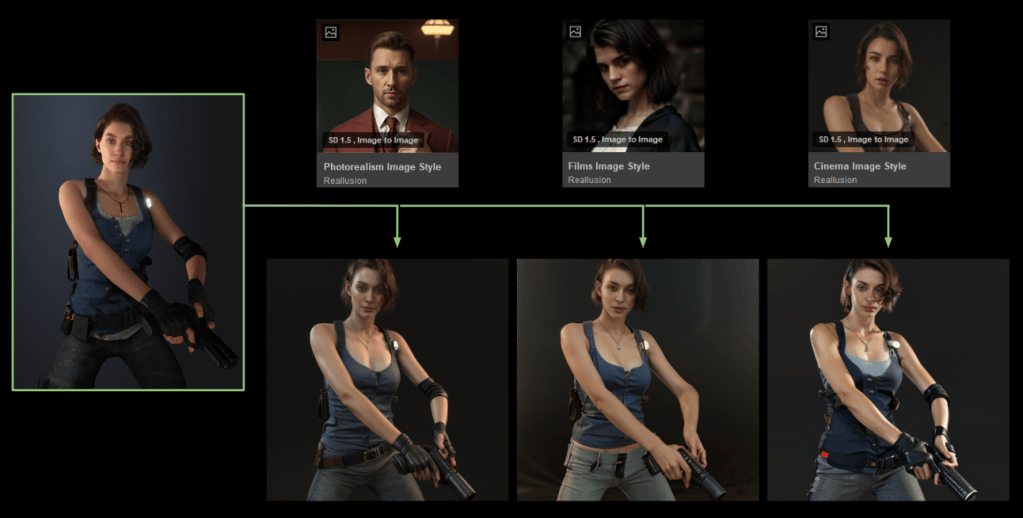
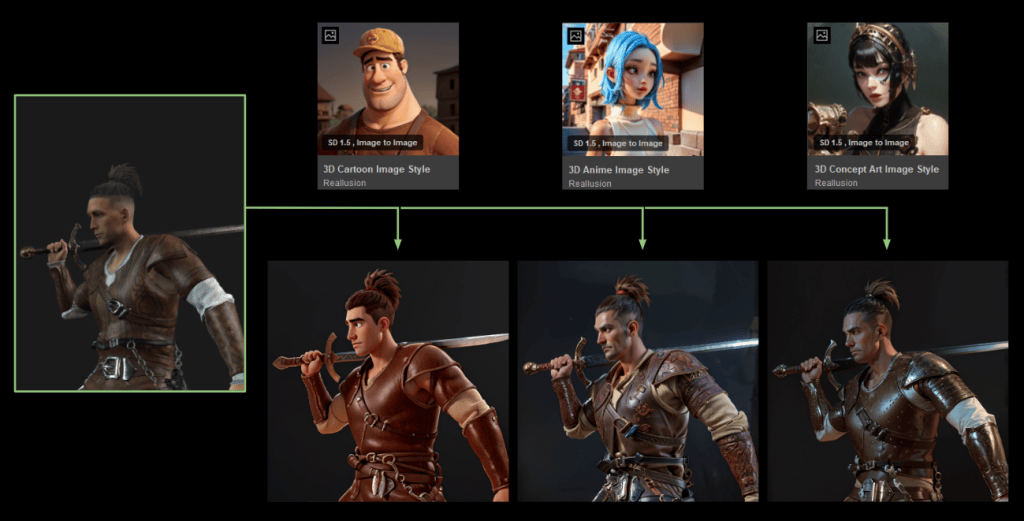
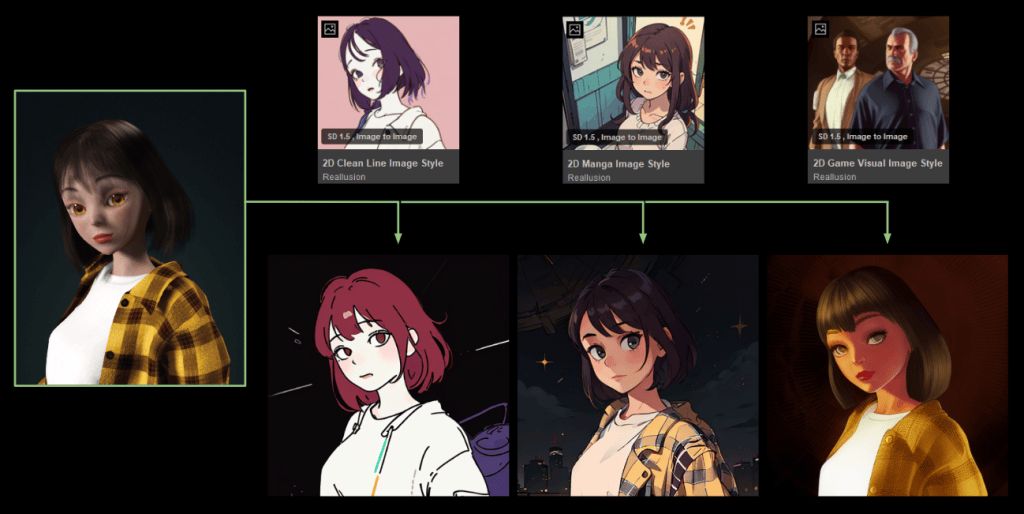
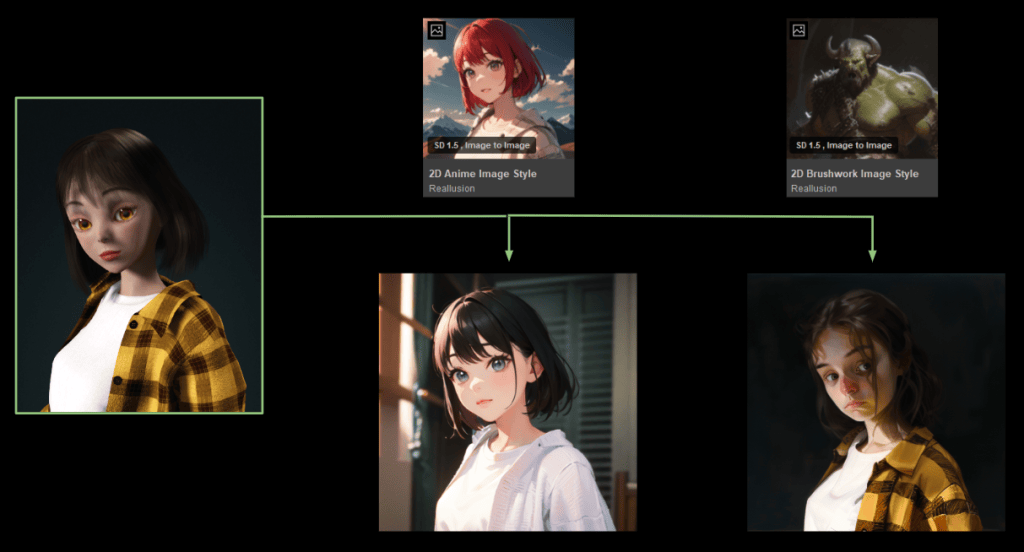
AI Render includes 22 professionally tuned style presets across three types: Realistic, 3D, and 2D.
It offers 11 AI Image Generation models for still renders and 11 AI Video Generation models optimized for consistent frame-by-frame results, giving you a quick, creative head start for both image and video projects.
For users seeking more advanced or cinematic results, AI Render also supports third-party high-end models such as Flux, HiDream, and FusionX. These require significantly more GPU power or access to a cloud GPU platform like RunPod or RunComfy.More details are available on the [official forum].
Prompt to Precision: Fine-Tune AI Gen with Text
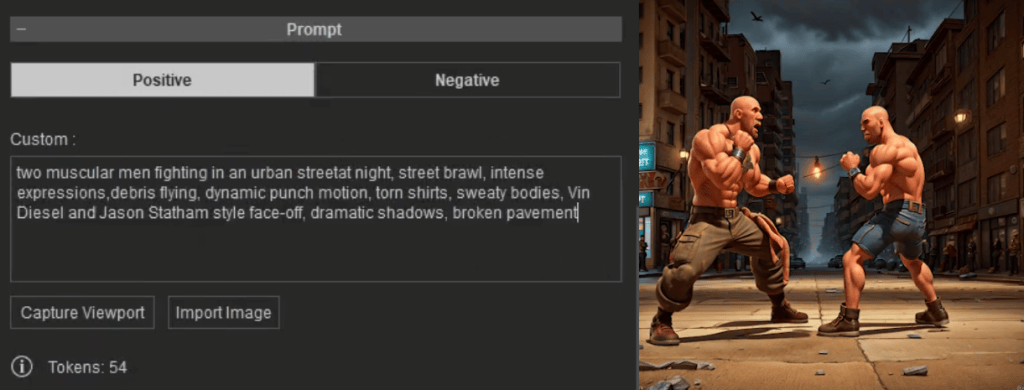
You can further customize your results using text prompts, which offer more detailed control. Use positive prompts to guide the AI toward desired styles and features, and negative prompts to filter out unwanted elements or distortions.
Style It with a Reference: Customization Using IP Adapter
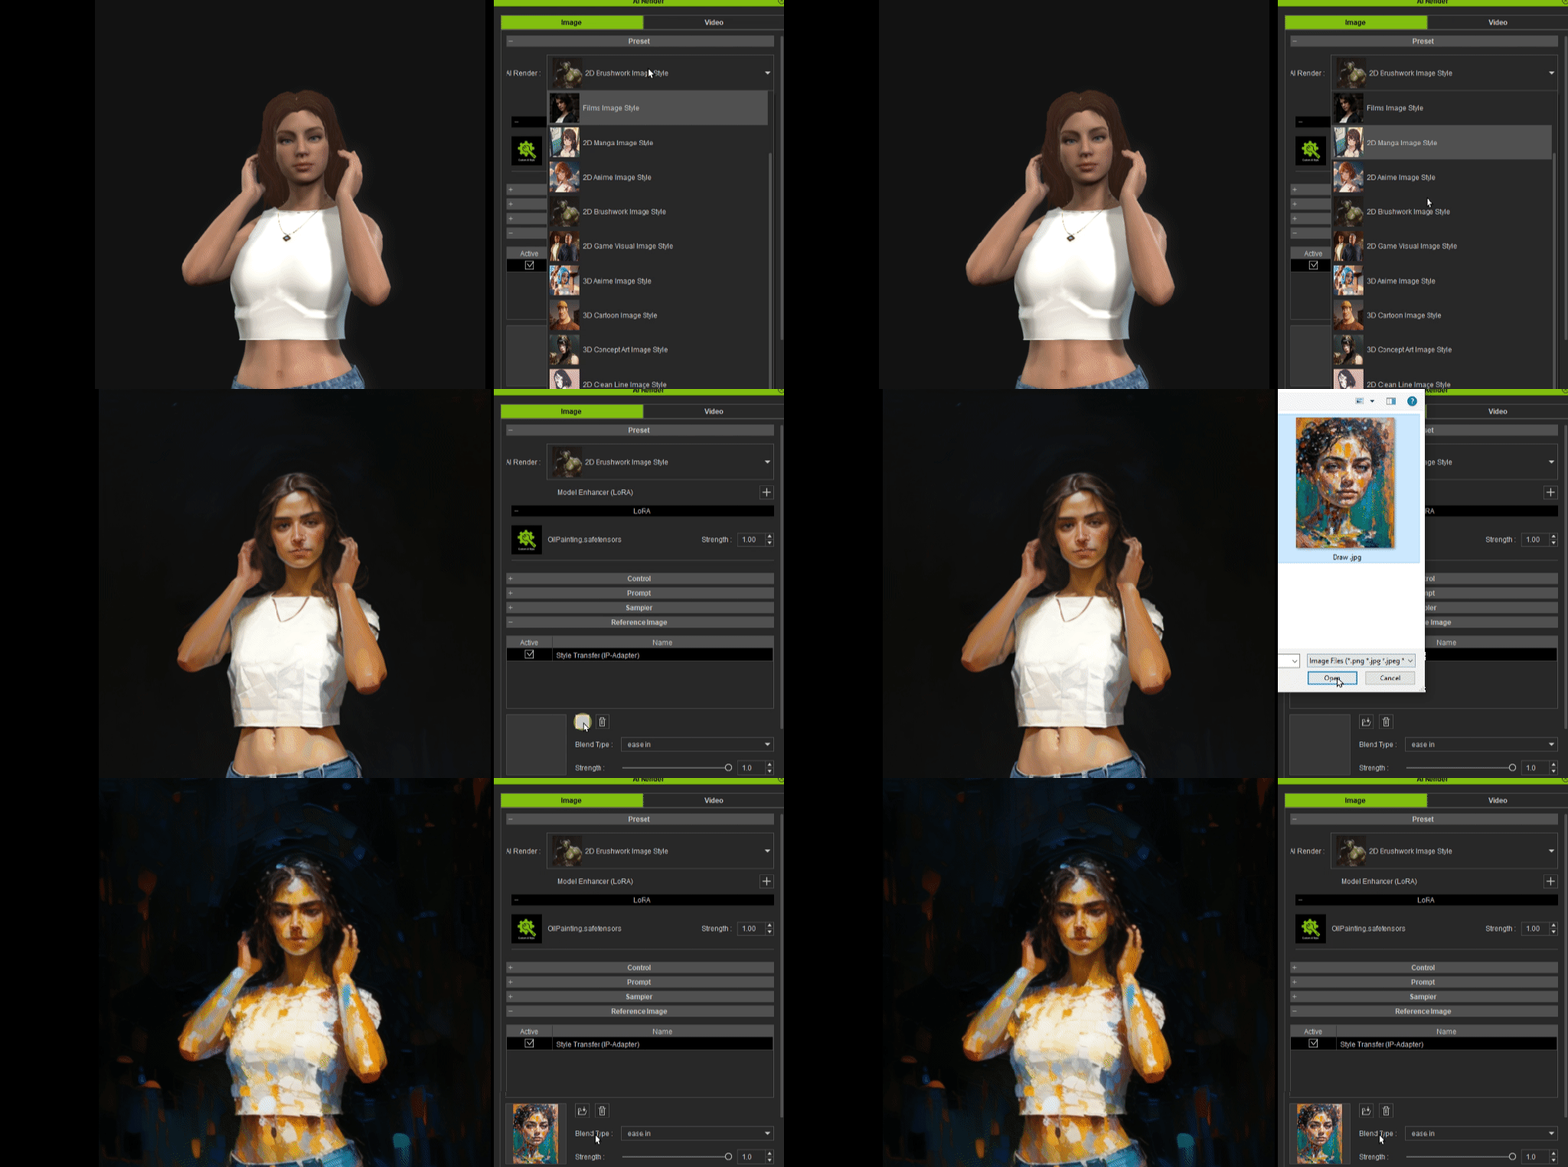
If you struggle to find the exact style you want or find prompting difficult, AI Render supports reference-based generation with the use of IP Adapters. This feature lets you upload an image, and the AI will follow its style, lighting, and tone — delivering consistent visual results without the need for perfect prompt wording.
Beyond Pixel Control: Precision with 3D-Generated ControlNet
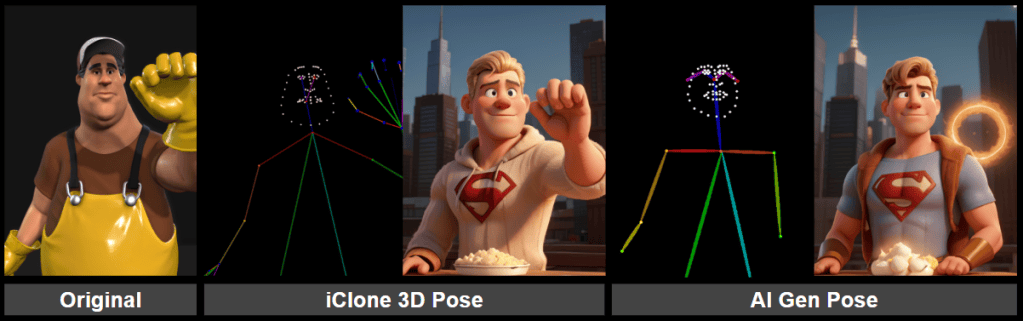
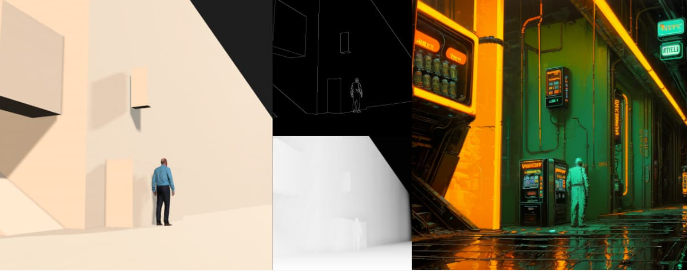
ControlNet guides AI generation using structural inputs in addition to prompts. With AI Render, these inputs are generated directly from your 3D environment in iClone and Character Creator, including characters, scene layout, camera framing, and lighting. This delivers accurate, frame-by-frame guidance the AI can follow, without relying on error-prone 2D estimations.
With a massive asset library in the Reallusion ecosystem — featuring drag-and-drop characters, motions, props, and environments — all easily searchable with Deep Search directly in the software, it’s quick and effortless to build a strong foundation for generating high-quality ControlNet inputs.
ControlNet Modes Supported in AI Render
Depth — Spatial layering and facial accuracy
Depth maps from 3D data ensure stable shot distance and accurate layering across frames. Unlike 2D-estimated maps, 3D depth can be manually adjusted for close-ups or wide shots, maintaining correct focus and detail — essential for consistent facial expression control at any distance.
Pose — Reliable skeletal tracking, even with occlusion
2D OpenPose often fails when faces or limbs are obscured or off-frame. 3D OpenPose maintains accurate skeletal tracking throughout, even in complex scenes with multiple interacting characters, ensuring precise timing and body alignment from frame to frame.
Normal — Surface lighting and shading
3D normals offer smooth surface angles for stable lighting and consistent shading. Combined with iClone and Character Creator’s lighting tools, you get clean forms, cinematic highlights, and professional visual quality every frame.
Edge (Canny) — Clean outlines for stylized renders
3D-generated canny edges produce clean, geometry-based outlines — perfect for stylized renders like anime, ink, or line art. When paired with 3D depth, they provide strong compositional control for layered characters and environments.
Prompt: Oil Painting,Bearly,masterpiece, best quality, cyberpunk alley, glowing neon signs, wet floor, vending machines, old pipes, rusty walls, robot citizens, futuristic graffiti, orange and teal lighting, cinematic atmosphere, high detail
Multi-Inputs + Camera Control
You can combine multiple ControlNet inputs for stronger character and scene control. Each input is adjustable via threshold sliders, giving you precision over structure, influence, and visual style.
Pair this with iClone’s powerful camera tools — including lens control, framing, and automated paths — to shape your AI compositions with cinematic perspective and storytelling precision.
Create, Own, and Scale: Build Your Own IP and LoRAs
With Character Creator and iClone, you can create fully rigged, original characters ready for games, animation, virtual production, merchandise, and more. These are professional assets you own and can use across all industries.
Now, with AI Render, your original characters can easily step into AI-powered storytelling to star in AI-generated movies, commercials, and creative projects. By bringing your 3D characters into the ComfyUI workflow, AI Render enables fast, stylized video generation that maintains consistency and gives you full creative control.
Your characters don’t just look good — they behave with the consistency, emotion, and presence of a real person, making them ready for any story you want to tell.
To achieve this high-quality, consistent result in AI generation, LoRA (Low-Rank Adaptation) training is essential. LoRAs are lightweight AI models that preserve your character’s unique look and style across frames, scenes, and creative variations.
With batch rendering, pose libraries, and automated camera paths in iClone, you can quickly build LoRA training datasets from multiple angles and motions.
Whether you’re creating one character or an entire IP universe, Character Creator, iClone, and AI Render provide a creator-owned pipeline.
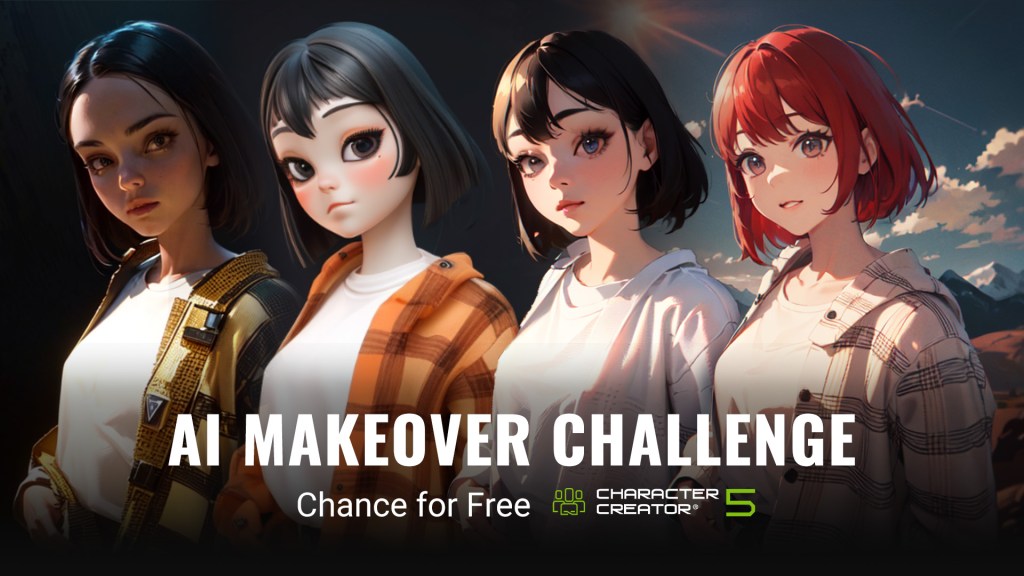
🎉 AI Makeover Challenge: Chance for Free CC5!
To celebrate the arrival of the AI Render Plugin, we’re launching a special community challenge from July 28th to August 29th!
This is your chance to recreate your favorite CC4 characters using AI Render — give them a fresh look, a new style, or a completely reimagined story through AI-powered generation.
How to Participate
Let your creativity fly as you reimagine your CC4 character with AI Render in the form of an image or video.
We’ll randomly select one winner each week to receive a free copy of CC5.
Winners will be announced on August 11th, 18th, 25th, and September 1st via the official forum thread and Reallusion’s Instagram account.
1st Entry Window: Jul 28 – Aug 8, the winner will be announced on Aug 11
2nd Entry Window: Aug 8 – Aug 15, the winner will be announced on Aug 18
3rd Entry Window: Aug 15 – Aug. 22, the winner will be announced on Aug 25
4th Entry Window: Aug 22 – Aug 29, winner will be announced on Sep 1
The first entry window lasts two weeks to give everyone time to get familiar with the plugin.
Submitting to both channels earns you two entries total — one from the forum, and one bonus from Instagram. Each person can only win once and will be excluded from future draws.
Connect with fellow creators in the growing AI Render community
Looking to explore the Open Beta or join the community challenge? The Reallusion forum is your gateway to it all. Join us and help shape the future of AI-powered 3D creation with the full force of the ComfyUI integration.
Over six months ago Reallusion released AI Smart Search for its users. AI Smart Search is a tool that changed the way we searched the Content Store, ActorCore and the Marketplace inventory for project assets. This included what we had already purchased. It is a quick and easy way to find the assets we need without wasting time with long and sometimes fruitless old school search methods.
A lot has happened behind the scenes since then with Smart Search, Trial content and the introduction of iContent with a HUGE discount. Let that sink in… HUGE DISCOUNT so read on as it is covered later in this article along with One Click purchasing and a recap of Keyword and Deep Search features.
Try Before You Buy
Reallusion is well aware of Buyer’s Remorse as mentioned on their website and they want users to be happy with what they purchase. They know what it’s like to buy something only to find out, for whatever reason, it doesn’t exactly fit all aspects of a project. They are working actively to reduce this extremely frustrating experience with Trial content.
It’s not just the Trial content but the simple methods devised to test the Trial content and if needed, to purchase it quickly and directly to keep moving on without having to stop and jump through some hoops then get back to work.
This includes over 130,000 premium 3D assets to cover just about any situation or genre. By being able to download and test (with a watermark) the assets you can make a better decision as to how and if it fits your project needs.
You can test content from the Reallusion Content Store, ActorCore and Marketplace for worry free purchases. We can use AI Smart Search to look for individual items or packs tailored to our specific needs.
Once you have decided on what trial assets you wish to purchase you can do so in app without the hassle of jumping through several hoops to get back to those items, cart them and checkout.
As an added bonus if you are subscribed to PRIME you can try out ten times more items simultaneously.
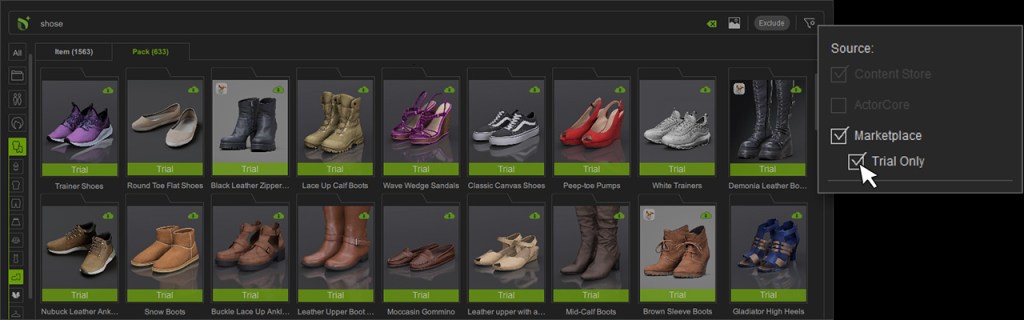
When searching we can also use the filters provided to show trial content only to speed testing up and eliminate clutter that wastes our creative time.
Trial content is easy to download and evaluate by clicking the item or pack thumbnail which downloads and installs the trial content. It is as simple as that. We can build our entire project and animate it with trial content then purchase what we need to keep as we cannot render trial content in image or video form and the purchase will remove the watermark.
There is little reason now to be hesitant about 3D asset purchases from Reallusion when so much content is available for free download and testing with the trial program.
For more information, this video will start with this topic.
3D iContent License – 70% Savings
This new license is a boon for users that work and render it within iClone or Character Creator. It does not support third-party tools like game engines or 3D Software like Blender, Maya and 3DS Max.
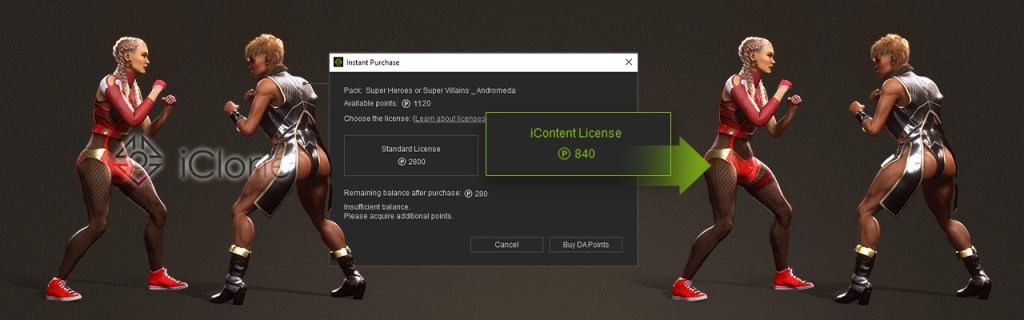
The big feature is the significant price reduction costing only 30 percent of the standard license. You read that right. It’s a whopping 70 percent discount! Below is a summary of the information available regarding iContent.
NOTE: It is important to note that that iContent is for mesh content only, like models, hair, shoes, etc. Motions are excluded from iContent.
Assets purchased with an iContent license are limited to rendering-only use, meaning they can only be used to create still images or videos within the Reallusion software ecosystem. Users cannot export these assets to third-party applications such as Unreal Engine, incorporate them into games or real-time content, or utilize them for 3D printing purposes.
For users who later need expanded functionality, an upgrade option is available that allows conversion to a standard license by paying only the price difference between the two license types. These iContent assets are conveniently accessible through the AI Smart Search feature integrated into both iClone and Character Creator, enabling users to browse and trial assets directly within the applications.
Learn more information about this topic in the video.
One-Click Purchase
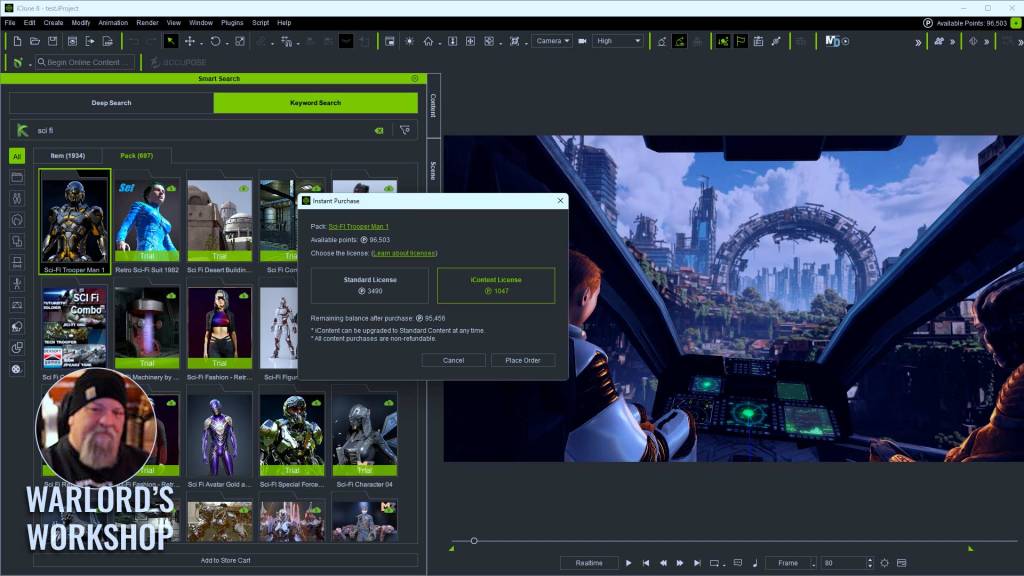
One-Click/Instant Purchase allows users to right-click on a desired asset in iClone or Character Creator and choose an instant purchase option. We do not have to leave the application to hunt down the asset and add it to our cart.
It’s easy, convenient and less intrusive, allowing you or your team to focus on the work at hand and not get sidetracked hunting down assets again just to purchase.
Select the items to purchase. right click and choose Instant Purchase. We are now almost finished completing the transaction and removing the watermark.
On the right is the menu that pops up next for completing the purchase. You can see the iContent option if available for that particular item.
For more information, the video will start with this topic.
License
For clarity here is a breakdown of Reallusion’s new iContent license compared to the Standard License:
iContent License
Format: Proprietary, used exclusively within iClone and Character Creator.
Availability: Only accessible via Smart Search inside Reallusion apps—not through the Marketplace or Content Store.
Usage Rights:
Can be used for image and video creation within Reallusion software.
Cannot be exported to third-party 3D tools.
Pricing: Costs only 30% off the Standard License, making it a budget-friendly option.
Upgrade Path: You can upgrade to a Standard License by paying the price difference if export is needed later.
Standard License
Format: Exportable content usable in Reallusion tools and third-party software like Blender, Unreal Engine, Maya and 3D Max.
Permits rendering for images and videos.
Allows export for use in games, apps, and AR/VR projects (with some restrictions on CC components).
For commercial use of one specific character, the Standard License is sufficient. For mass character deployment, an Extended License is required.
Deep Search and Keyword Search
It has been several months since AI Search was initially released, and many users are becoming accustomed to its AI-powered search abilities which continue to improve.
Deep Search relies on AI training to create an intuitive method of searching that saves time searching only for the items you are looking for based on your input. No need for remembering names or other info as AI helps power the results without the need to remember such details.
Deep Search analyzes the meaning of your text query or the visual features of an image to find similar assets even if the keywords or tags are not present. It not only supports many languages it also takes the frustration and anxiety out of not knowing exactly what to search for or what phrase will help you stumble across the item you are looking for.
The video on the right provides a comprehensive demo.
Deep Search also has Find Similar which can open up even more opportunities to easily search similar assets. This tool alone can save a lot of time and cut non-animating to a minimum. A detailed walkthrough is also presented in the video, starting at 3:14.
Deep Search excels at finding content you may have never thought of to search for. Even then we may not have phrased the keyword search right. So many places to go wrong that are completely eliminated by Deep Search.
Keyword Search is familiar to most of us as we have all used keywords or phrases in various ways to achieve things ranging from internet search to finding items on our own computer.
Like any search engine input, we can search with words or simple phrases but since this is a dedicated search feature we can also search by Name, Tag or Author.
Deep Search Features:
Natural Language with over 100 languages
Intuitive AI-powered search function
AI-powered semantic and visual matching
Multilingual support (100+ Languages)
Image-Based Search supported
Find Similar Content support
Advanced Category filtering
Best for Discovery, visual similarity, flexible queries
Keyword Search Features:
Fast for known exact terms
Standard familiar search methods
Basic category filtering
Text, English only
No Multilingual support
No Image-Based search
No Find Similar Content
Best for known asset names and or tags
Let’s Not Forget Cartoon Animator!
I’ve almost done it again by forgetting to include iClone’s close cousin in the 2D world, Cartoon Animator! While I’m a huge fan of Cartoon Animator and 2D work in general, I’m not an expert on it but rest assured these AI-powered search features are available there too. Just like iClone, the stores are full of Cartoon Animator-related content just waiting to make your next 2D masterpiece and Smart Search along with Trial content is there to help you find and evaluate those 2D assets.
Summary
With over 130,000 trial assets in the Content Store, ActorCore and Marketplace it is simply impossible to search the entirety of the combined stores effectively without Smart Search and in particular, Deep Search. I’ve often wondered how many times I have missed great assets in the past due to the explosion of iClone and Character Creator content in the last ten years or so.
The Content Store, ActorCore and the Marketplace contain thousands of items that would be difficult to search for unless you know the tags or keywords associated with them which are next to impossible for most of us to remember without extensive notes.
With all this content and in particular Trial content which any iClone or Character Creator user can try out for free on their own system or in their custom project… legacy search simply isn’t enough at times and those times are becoming more frequent.
If you have never tried out iClone, Character Creator and Cartoon Animator… now might be the time to give the free trials a try and take a dip into the Reallusion animation ecosphere where simplicity and continued development are guiding factors bringing you the most intuitive and simple to use animation tools in 2D and 3D.
Digital Artist MD “Mike” McCallum, aka WarLord, is a longtime iClone user. Having authored free tutorials for iClone in its early years and selected to write the iClone Beginners Guide from Packt Publishing in 2011, he was fortunate enough to meet and exchange tricks and tips with users from all over the world and loves to share this information with other users. He has authored hundreds of articles on iClone and digital art in general while reviewing some of the most popular software and hardware in the world. He has been published in many of the leading 3D online and print magazines while staying true to his biggest passion, 3D animation. For more information click here.