After two months of creativity, the 2023 ‘Animation At Work’ Contest for Cartoon Animator (CTA) has come to a close. Reallusion would like to thank all of its wonderful sponsors including XPPen, Affinity, and Magix. Overall, the event received 132 global entries, each with their work-in-progress videos among five categories: Business & Commercial, Comics & Art, Education, Vertical Shorts, Best Use of Cartoon Animator 5, and Best Mascot Animation.
A total of 33 outstanding works have been selected from 39 countries, all with varying levels of skills and experience. Additionally, a wide array of styles and topics were created, proving that the Cartoon Animator is streamlined for creative diversity. Several newcomers who were first-time Cartoon Animator users were even able to use their newly acquired techniques, combining other pipelines for excellent submissions. See the 2023 Animation at Work Winners.
Business & Commercial Animation — 1st Prize
BRINGING TO LIFE by Nandor Toth (Hungary)
Nandor Toth shares his thoughts on winning the contest:
“ As I started using it in March 2023, I consider myself a newcomer to CTA. I’ve never come across such good animation software that moves characters in such a professional way: I can save the movements and add new movements made by others so easily, and even edit them afterward. And that’s the most important benefit of the program! “
Judges comments:
“Nandor cleverly combines stock videos with his own characters. Viewers can quickly understand the key features of Cartoon Animator 5 in 2 minutes. We also enjoyed watching his drawings in his WIP video. Lots of details are added to make his Superman mascot pop out. Well done!”
Comics & Art Animation — 1st Prize
Valiant Seven by Astrovique (Australia)
Astrovique shares her thoughts on winning the contest:
“As a new user to the program, it was a very simple software to pick up and learn with all the resources and tutorials available to help you learn. I was only really able to learn the very basics of the software, but knowing that it has the ability to motion capture your mouth for lip sync and body animations for 2D characters is such a cool feature to have. “
Judges comments:
“Webtoon artist Astrovique successfully animated his hand drawings with Cartoon Animator. This entry and WIP video show the potential of how to make manga art with Cartoon Animator 5. We hope to inspire more XPPen artists to leverage our tools for films and video production!”
Education Animation — 1st Prize
How the Human Body Protects Us from Viruses by Prosenjit Biswas (India)
Prosenjit shares his thoughts on winning the contest:
“Cartoon Animator stands out as one of the few software that enables you to create a full animation in just a week without a large team. Its extensive resource library is always beneficial, and the vast 2D and 3D motion libraries are instrumental in saving a significant amount of time. Cartoon Animator’s interface is exceptionally user-friendly, making it both clean and accessible for beginners.”
Judges comments:
“An informative explainer video made by Prosenjit Biswas. With fluent narrating, we were impressed to see how contextual the animation was showing great potential for the author to make educational videos! Finally, check on his WIP video and learn how he did it in Cartoon Animator 5!”
Just as the contest ended, Reallusion was pleased to announce the Cartoon Animator 5.2 update. This version introduces two major highlights: Motion Pilot and Motion Path Animation, a natural evolution of contemporary puppetry. Motion Pilot is the first significant feature allowing users to animate characters and props instantaneously, significantly reducing production time. The other eagerly awaited feature is Motion Path Animation. This enhanced path editing tool is exceptionally practical for creating precise animations across various applications. Take advantage of the 30-day Free Trial to experience these amazing features in Cartoon Animator!
New Character Creator users may have a question or two about the difference in using AccuRIG versus Characterization. While they do achieve close to the same result, they are not the same tool and can serve different purposes.
THE SHORT EXPLANATION
Characterization preserves an existing bone structure where AccuRIG replaces any existing bones with a new bone structure. If the model you are working with has an extended or more extensively rigged bone structure (extra bones) then Characterization is an option that will preserve those extra bones for animation.
If you have no idea what I am talking about then use AccuRIG to get the job done until you do understand the concept of extra bones. It’s nothing to be concerned or embarrassed about, most of us have been there. Until you have the need for extra bones, the concept can be a bit fuzzy or downright confusing. When you come across a character with something like a tail, that you want to animate, and realize there aren’t any selectable bones there, it becomes easier to understand.
EXAMPLE
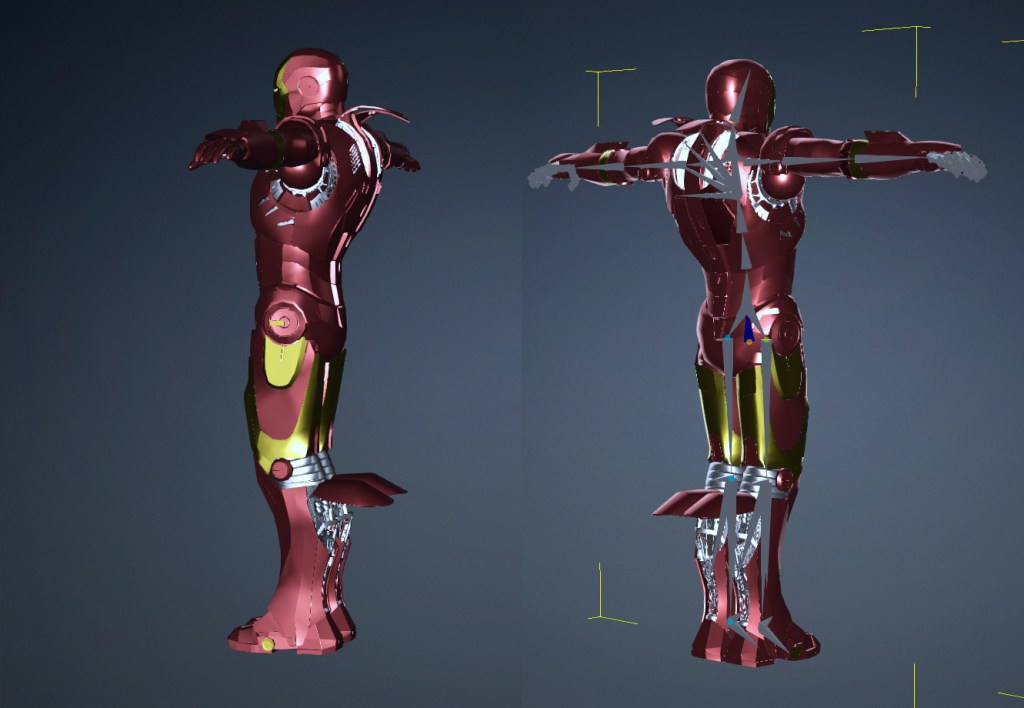
A prime example of using Characterization over AccuRig is an Ironman pre-rigged character over at Free3D.com. Pre-rigged is important here. There must be an existing bone structure. Characterization does not create bones.
This character was made and rigged in 3DS Max but has an FBX option available for download. If you have Max, then download the source if nothing else to look at it. You will see an example of suit surfaces that are rigged to old-fashioned spline controllers.
Ironman Model by deadcode3 at free3d.com
These controllers allow the animator to move the surface plates in multiple directions. The good news is if we characterize, we get to keep those controllers as bones that can be manipulated via the Edit Pose or Bone Menus. This character has some extended rigging as the model has various stabilizers that move up and down. If you characterize instead of AccuRIG you have these stabilizers available to you.
THE PROCESS SHORT OVERVIEW
I dropped the FBX file into the workspace as a Character, Humanoid.
I used the Characterization button in the Modify menu.
Matched the obvious bones until the Active button became available.
Mapped the hand bones using the “Auto Assign Symmetrical Bones” and “Auto Assign Child Fingers” (so you only have to click one bone on each finger and the other hand is mapped too).
Press the green Active Button (if it’s not green you haven’t mapped enough bones on the main body).
Close the Characterization menu to complete the process.
The first time you start matching bones might take a while if you have no experience with it. It is not complicated and moves along quickly once you get started. It is just as it seems, you match bone to bone until the ACTIVE button becomes available, then you have mapped enough bones to continue. There are not that many bones to match up concerning the body.
TIP: When matching bones, if a symmetry option is available then use it, when possible, to not have to rig a pair of items like legs or arms when one can be mirrored to the other instead.
Below you find a tutorial covering the characterization process:
On the other hand, if you want a quick and easy way to use the character without the extra bones then AccuRIG is your best choice. Even better if the character is in a TPOSE.
If the character mesh is not in a TPOSE and the character mesh has a skeleton, you can use the EDIT ANIMATION LAYER tool (since it’s a prop at this point) to set the prop Character mesh to a TPOSE. Now go to AccuRIG and start the rigging process. If you somehow end up in Characterization, then just close that part and go to AccuRIG.
You must go to the FK Mode tab within the Edit Motion Layer popup window to use the extra bones as they won’t be available in IK Mode.
WHICH IS IT – CHARACTER OR PROP?
It can be either but if you want a quick path to characterization then drag and drop as a Character, Humanoid to start the process. Character Creator 4 takes you straight into the Characterization tool. If you wish to go to AccuRIG instead then close the Characterization menu and go directly to AccuRIG.
Your first choice after dragging and dropping the character mesh into the workspace.
The next popup after choosing Character:
Once you are into the Characterization tool you start matching bone to bone as mentioned earlier until the Active button becomes available.
TIP: You must go to the FK Mode tab within the Edit Motion popup window as the extra bones will not be available in IK Mode.
The FK Mode button and selection popup.
There are not really pros and cons to each tool so much as it is a different tool filling a different need. The fingers are easily set up in Characterization using the child finger hierarchy option where we only have to select one bone in an obvious chain of bones to automatically include the rest of the bones on that finger. AccuRIG can do an excellent job of preliminary bone placement on the fingers but sometimes refinement is needed which is an easy enough task to accomplish.
As I wrote earlier, AccuRIG is much simpler as moving the initial markers seems to be more intuitive to a lot of the new users instead of matching bones. It just boils down to what your personal preferences are. I do not have a problem using either as both are about the same as far as time spent and necessary steps.
Extra bones move the stabilizers and other flaps.
The above GIF demonstrates some of the extra bones with the stabilizers opening and then taking off. The scene is set up with the default iClone 8 Toon Renderer and worked well with this character.
NOTE: If you want to rig this particular mesh for yourself then you will need another tool like Blender or 3DS Max to prep it by removing the spline controls (just select and delete is all it took in 3DS Max) otherwise they will be visible outside the character mesh.
In recap the deciding factor to which tool to use is the presence of extra bones. If you have these extra bones and want to use them then you will need to use Characterization and match bone to bone. Long-time iCloners have been doing this since 3DXchange was released years ago. And even though I am belaboring this point, you must use the FKMODE TAB in the dialog to find and use these bones.
Digital Artist MD “Mike” McCallum, aka WarLord, is a longtime iClone user. Having authored free tutorials for iClone in its early years and selected to write the iClone Beginners Guide from Packt Publishing in 2011, he was fortunate enough to meet and exchange tricks and tips with users from all over the world and loves to share this information with other users. He has authored hundreds of articles on iClone and digital art in general while reviewing some of the most popular software and hardware in the world. He has been published in many of the leading 3D online and print magazines while staying true to his biggest passion, 3D animation. For more information click here.
Backdrops were a boon to early theatre starting with static painted backdrops and then moving onto the rolling backdrops for early movies that simulated movement, generally while driving, that allowed the automobile or plane cockpit and actors to remain stationary while performing or filming.
Backdrops are certainly nothing new, having been used in film and television since its early years. The usage was very prevalent in the United States black and white TV era with police serials and early superhero TV shows. It’s been a running gag since its inception with outtakes of actors exiting “moving cars” on a soundstage setup.
This technique, though ancient in terms of visual effects, is still used in modern production. The old-school backdrops are giving way to digital work environments that can project any world, stationery or animated into the background of a production. The Mandalorian is a prime example of using digital background screens on stage as the modern equivalent of the painted theatrical backdrop or green screening (chroma keying).
BACKDROPS IN iCLONE
Backdrops are also possible in iClone. We just don’t use that terminology. With proper camera positioning and lighting, we can use a video backdrop in iClone either as the workspace background or on a plane (a genuine backdrop in this case) for more control over the look of the video. These shots are generally limited in time, usually one minute to as short as fifteen seconds. Generally used as filler or transitional shots.
The main point of using this type of backdrop in a digital workspace like iClone is to convey a more complex scene than is actually being animated. This saves on computing resources while combining to make the scene much more cinematic. Video games have long used static backgrounds to push the scene past the 3D assets used in the foreground.
We can create a landscape, city, or other scene in iClone just for the background. Video and images rendered from that scene can be used as the backdrop for a master scene with props up close to the camera. Adding in the element of a moving, animated background can make a scene seem much more in-depth and alive.
In this first instance, the rolling backdrop was made in Unreal Engine, but you can make them iClone too, it just depends on what fits your needs or your tools.
A large-scale landscape was set up in Unreal Engine. I then used a cinematic camera running parallel to the hills and mesa in the background. Scene lighting was also done in Unreal as well as atmospheric composition (fog, clouds, etc.). This was rendered as a video and then used as the background in the iClone project.
This iClone project itself couldn’t be any simpler. This is beginner-level animation. The only thing moving will be the steering wheel and the actor. The steering wheel will drive the arms via Reach Target dummies.
CREATING THE SCENE
In this case, we can set up the scene in iClone and then drag and drop the video onto the background, particularly if the video slows your computer down during playback. If your computer can handle the video then drag and drop it onto the workspace background at any time.
From here we will need at least one character for the driver and some type of automobile. Preferably with moving wheels that can be animated if you want to show them in the camera shot. This shot is a great example of how simple or how complicated you want iClone to be. A closeup camera angle will eliminate the need for animating the wheels or you can pull the camera back to show more of the vehicle.
STEP 1: Link the driver to the vehicle in a sitting position with legs extending out but not through the vehicle body in case you want to do a wider shot.
Character linked to the vehicle in a sitting position.
STEP 2: Use Reach Target Dummies to position the hands on the steering wheel.
STEP 3: Animate the steering wheel by moving down the timeline and stopping at different intervals while slightly rotating the steering wheel back and forth to simulate driving. This creates keyframes in the timeline. After you do a few of these keyframes you can then copy those frames and paste them repeated down the timeline at varying intervals.
Note the position of the hands on the wheel and on the timeline. You can also see the repeating copy and pasted keyframes.
As in the preceding image, note the position of the hands and the keyframe on the timeline.
OPTIONAL STEP
Just as we did with the steering wheel, with the vehicle selected you can move up and down the timeline at varying intervals moving the vehicle up and down to simulate a rough ride. I have exaggerated the movement somewhat so you might want to be more subtle with your movements. We want a rough ride, not a rollercoaster.
It helps to blend the sharpness of iClone with the different look from the background video. The simplest way is as old school as it gets and still works… a colored image overlay like brown, blue or whatever matches the scene, setting the image to low opacity.
This is the epitome of quick and dirty, but it used to be a major method of toning down contrasts between assets, like a dull background and a bright foreground before digital color matching became a thing. If you don’t happen to have color-matching software or something like After Effects or Hitfilm you can use this method. It helps to knock down the contrast between differing elements such as the video backdrop and the foreground objects since an image layer is first in the composition.
A view of the Image Layer which also frames the shot.
A short, animated GIF demonstration of the final output using this simple backdrop method:
CREATING BACKDROP IN iCLONE
As I mentioned earlier you can also create rolling backgrounds in iClone to be used in the same backdrop method as above. Layout a landscape scene and use a dummy and camera combo or just a camera to roll along the landscape from left to right or right to left. In the early days of iClone 7, I created a tutorial that showed just how to create such a rolling background with a dummy and a camera. It still works in iClone 8 and provides a more thorough step-by-step guide.
Why use the dummy when I could just animate a camera? For me it’s habit and it gives me a much larger visual reference for the camera movement when I am looking at the scene from a long distance during set up.
iClone 7 tutorial explaining how to create a rolling background in iClone. You can then render the video out for use as the background or backdrop.
I also mentioned another method, using a plane instead of the workspace background. This achieves the same result but gives a little more control over placement of the backdrop in relation to foreground props.
Right Click, note that is RIGHT-CLICK not left-click the video when dragging and dropping to get this menu:
This right click method can also be used for images as well as videos. After this just resize and position the plane to your needs.
Left: Using image plane instead of workspace background. Right: Framed shot from camera in left image.
This gives us control over opacity, self-illumination and diffuse color that otherwise would not be available if we used it as the workspace background.
SUMMARY
While these are all beginner-level techniques, they still go a long way to getting the job done in the right circumstances. Using backdrops adds more eye candy without bringing your computer to a standstill or slugging along making edits difficult. It makes the scene more complex and interesting to the viewer when used properly. Lighting and blending go a long ways toward making various 3D elements blend together in a more seamless manner.
I hope this helps!
USING IMAGES TUTORIAL
There is another iClone 7 tutorial that still holds true today about using images, image layers, and image planes in general with iClone to produce a more robust filler scene with little overhead. It’s worth a look if you aren’t familiar with the technique and the video also has other helpful tips that you can use on other projects. I will be adding more up-to-date tutorials for future articles but for now, this will explain the concept of images in a more detailed manner.
MD McCallum – WarLord
Digital Artist MD “Mike” McCallum, aka WarLord, is a longtime iClone user. Having authored free tutorials for iClone in its early years and selected to write the iClone Beginners Guide from Packt Publishing in 2011, he was fortunate enough to meet and exchange tricks and tips with users from all over the world and loves to share this information with other users. He has authored hundreds of articles on iClone and digital art in general while reviewing some of the most popular software and hardware in the world. He has been published in many of the leading 3D online and print magazines while staying true to his biggest passion, 3D animation. For more information click here.
Some of you reading this already know about the power of Character Creator and how it’s improved over time with more features and tools. There are many new users joining our ranks that are not quite sure just what Character Creator is, so for them, I’ll start with a little overview then we will move onto the Headshot 2 Mesh feature that allows anyone to put a custom head on a functioning Character Creator body.
When I first got into creating 3D assets, with Studio Max as it was known then, I purposely avoided creating a particular asset. A 3D mesh character. It wasn’t the making of the mesh that I didn’t like. Rather it was the extensive skinning of the mesh to the bone structure that could consume a day or two very easily with most of that spent on the fingers and other smaller joints.
Anyone who has rigged (skinned) a 3D skeleton knows just how time-consuming it can be and what a creative buzz kill it is. I could turn out a lot of props in the same time it took to skin a character. Even skinned props were much easier unless they had a lot of small bones.
BACKGROUND: Character Creation
Back in the early days rigging was a term used to set up a character with a control panel for animators. Each moving part had to be wired to a panel with controls created out of splines. That wasn’t a bad job compared to skinning but that is how complicated animation used to be. Now rigging has become synonymous with skinning so don’t be confused if you see the terms used in different ways at different times. Control panels have fallen out of favor with modern tools so rigging means skinning to a lot of creators.
To give you an idea of what it was like to create a character 10 to 15 years ago, at least in my pipeline, you have to imagine a long process, days and at times a couple of weeks just to get a character created, rigged, reviewed, and revised to meet the needs of the animators. First was the concept art drawn by a fine artist which was then turned into a T-Posed character mesh. This was sent upline for approval and was revised through a process that eventually created a working character.
After this, at least in my case, the skinned mesh was sent to a texture artist with UVs mapped out. Sometimes the artist would map their own UVs, but it was another layer of the process in the making of a character and turned out some stunning work in the final product. Specialists ruled the day back then completely different than today’s Generalist approach to work where we do just about everything instead of a production pipeline of artists.
I’ve told you all this just to get to this point:
Character Creator 4 does all this work for you.
If you are not new to Character Creator, then you already know the power of the tool but if you are a new user just getting a first look there are some things you need to know. You are provided with male and female base meshes skinned and ready to go. These can be used as a base model to export out in FBX or OBJ to the clothing maker of your choice like Marvelous Designer. The clothes you make are then imported into Character Creator and skinned with a few clicks. It doesn’t have to be a head mesh. You can extract or cut the head off an existing mesh and use the process to transfer it to a working CC character.
ZBrush GoZ is also integrated into Character Creator allowing for a seamless transfer of the base mesh to and from ZBrush. This allows us to harness the power of one of the most creative tools in the industry to re-sculpt the base mesh to fit our needs. You can also create clothing and accessories in ZBrush as well as paint the textures. All this without exporting and importing and these are just a few of the great tools and features available in Character Creator 4.
Making characters is now a pleasant experience with Reallusion taking out the manual skinning. You can still tweak the automatic rigging results with yet another skinning tool that gives bone-by-bone access.
We can all be character developers now. We can use our own concept art, use third-party sources or whatever pops into our head to make unique characters to use in production or sell in the Reallusion Marketplace. In today’s world, with expenses growing, you can leverage your character-creating skills with an extra income stream from the marketplace and you can include props too. So Reallusion isn’t just giving us an opportunity to make our own characters for storytelling but they are providing a method of future income for those that choose to sell assets in the Marketplace.
GETTING STARTED – The Cat Burglar
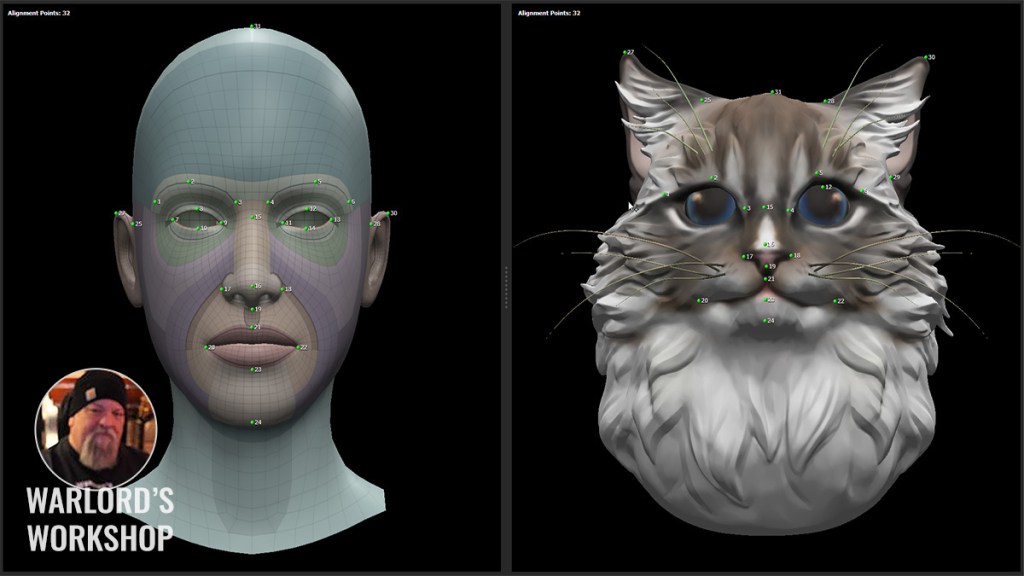
Headshot plug-in version 1 focused on image-to-head technology. Version 2 adds a new mesh tool to the mix that works like a head wrapper that transforms the base mesh shape into the imported head mesh. While the image tool in Headshot is still a go-to tool, the new mesh feature takes the plug-in to another level. In our first example, I downloaded a cat’s head model from Sketchfab by nonlly. After dragging and dropping the head mesh into the Character Creator 4 workspace I centered it in the viewport and started the Headshot mesh plug-in process by clicking the Mesh, Start Head Generation buttons. I had my head meshes already textured before starting this process and bringing them into CC4 Headshot 2.
Once the mesh was loaded up, I manually placed the markers, 32 of them, across the imported mesh while being careful to define the ears. This may sound like a lot of markers but it’s really not and doesn’t take long once you’ve done a few of them. The face itself goes quickly and this head mesh did not need extra markers to delineate a more complex mesh shape. In some cases, I have found that extra markers are needed when the back of the head is a more radical shape than the native mesh.
Take care to mark non-human ears to better shape the mesh during the process.
From here I refined the mesh a bit but not extensively and unchecked the box to retain the original neck shape. I could have spent more time here, but I got great results the first time out. A subsequent Doberman model took a little back and forth to get the mesh shape right. For that model I went back and forth from Align Points to Head Gen a few times to move some markers. There was nothing to it.
In the end it turned out to be a great anthropomorphic Cat character that can wear Character Creator clothing and accessories.
The Cat Burglar Character
So, this character became, of course, a cat burglar and if you are going to have a cat burglar then we need a Police dog so that was my next objective as I found a nice full body Doberman mesh by InaweofGod on Sketchfab which I took into 3DS Max and removed all but the head and neck of the dog.
From this point on I followed the same process I used with the Cat head except I had to use more markers. I ended up using 40 to get the results I wanted. This will vary between users and will become even simpler as the community learns and shares more tips and tricks.
Showing some of the 40 Markers used with the extra marker defining the back of the head and neck.
Even with the back and forth it only took a matter of minutes to get the results I needed. This looks like a good area for experimentation to see just what can be done with this new tool. Since I’m a notorious iClone asset hoarder I dove into a golden oldie, the Occupations Police Officer, to use the accessories and cap along with stock pants and shirt texture black to match the hat. Before long, my anthropomorphic version of a Police Dog was born.
The Doberman Police Dog character in Uniform and Casual. I even gave him a muffler for that long neck on cold days.
Below is another example of other characters I created during testing with the Headshot 2 plug-in. They range from ZBrush-created and kitbashed to Sketchfab meshes. All created functioning characters in less than an hour except for the first few attempts. Once I got a few runs under my belt it became much easier and much quicker to turn out a character with this method.
Other characters created during testing using the mesh feature.
SUMMARY
In future installments, we’ll be taking a look into what is being done with Character Creator. We’ll also look at how users take Headshot to new levels of creativity producing some of the most unique characters in the Reallusion universe.
With Character Creator 4 and Headshot 2 just about anyone can make characters that are not only functional but dynamic and cinematically exciting adding another element to your production or helping you create assets for others to realize their production dreams.
MD McCallum – WarLord
Digital Artist MD “Mike” McCallum, aka WarLord, is a longtime iClone user. Having authored free tutorials for iClone in its early years and selected to write the iClone Beginners Guide from Packt Publishing in 2011, he was fortunate enough to meet and exchange tricks and tips with users from all over the world and loves to share this information with other users. He has authored hundreds of articles on iClone and digital art in general while reviewing some of the most popular software and hardware in the world. He has been published in many of the leading 3D online and print magazines while staying true to his biggest passion, 3D animation. For more information click here.
Are you a seasoned 2D animator looking to take your animation skills to the next level? Or perhaps you’re just starting out and wondering how you can achieve organic motion in seconds? Look no further! We’re excited to introduce Motion Pilot, a revolutionary tool that combines secondary animation with virtual puppetry, giving you the ability to create stunning and dynamic animations with ease.
With Motion Pilot, the possibilities are endless. Imagine being able to create 10 animation variations in just 3 minutes, achieving results that will leave your audience in awe. It’s all about an “iterative design flow,” where you simply try out different puppet presets and watch your productivity soar tenfold. You can also transform your puppet trails into editable paths in an instant and refine their shape as you please. It’s like having a magic wand for animation! And if you thought that was impressive, you can use Motion Pilot to simulate emergent behaviors like leaves rolling in the wind and even the flocking of birds.
See the latest updates in CTA 5.2:
Motion Pilot — Next-Level Puppetry
Motion Pilot empowers the effortless animation of characters and props with the precision of mouse movements. By simply manipulating the cursor’s speed, orchestrating rhythm, utilizing button functionalities, and taking advantage of the innovative lazy mouse feature, you can breathe life into your creative ideas and produce fluid animations that were previously unattainable through traditional methods. Moreover, Cartoon Animator’s intuitive interface and real-time animation, combined with seamless keyframe editing, enable you to generate 2D animations in mere seconds.
*Manipulating the cursor’s speed, orchestrating rhythm, and utilizing button functionalities and the lazy mouse feature.
*Synchronous playing & recording
*Simulating natural flocking behavior and controlling the animation tempo.
New Key Features:
Instant Animation Recording: Record puppeting sessions and create animated videos without grappling with the timeline interface. Simply press the record button and direct the motion with your mouse.
Transform with Precision: Precisely guide objects along the XYZ axis, control rotations, and easily adjust their size. Objects can also be passively oriented using automated flips and turns.
Enhanced Wave Effects: Customize 2D animations with precision by choosing amplitude, frequency, and random options, tailoring your animation effects to perfection with dedicated parameters.
Diverse Motion Options: Expand creative possibilities with four distinct types of motions: from character, prop, and elastic motion to free-form deformation. Trigger these motions effortlessly using mouse movements or clicks for quick application.
Collective Control with Flock: Seamlessly manage and customize multiple objects with ease. Choose from different delay types to achieve emergent behaviors for a dynamic and mesmerizing effect.
Users can easily generate a path by either plotting Bézier points or converting it from cursor movements and puppet animations. They can switch between three modes – Bézier, Linear, or Smooth – and refine the path with intuitive handle controls.
*Create a path by drawing Bézier points or converting it from cursor movements and puppet animations.
*Universal Path Application
New Key Features:
Assign objects to paths and easily control their speed and progression.
Adjust the orientation and distance offset of an object from the path.
Share a single motion path and save the movement pattern for multiple objects.
Recommended Assets
To unlock the full potential of CTA 5.2, delve into the myriad possibilities offered by the content packs below.
Reallusion proudly sponsors the ZBrush Summit 2023, presenting its groundbreaking animation solutions including Character Creator and iClone. The seamless integration of Character Creator’s GoZ pipeline and Pose Tools with ZBrush redefines artistic possibilities, enabling dynamic posing and character animation breakthroughs.
As a collective force at the ZBrush Summit, the Reallusion artist workshop will demonstrate the pipeline and combined features to help artists connect Character Creator Pose Tools and the Reallusion pipeline to ZBrush.
Don’t miss the workshops held in the renowned Gnomon School located in Hollywood, CA, Users can acquire hands-on experience from the powerful character workflow, with the guidance of ZBrush experts.
CONCEPT SCULPTING IN ZBRUSH FOR COMIC-STYLE ILLUSTRATION
Join Pablo Munoz Gomez as he takes you on a step-by-step journey through his entire workflow to create an awesome ‘comic style’ illustration using ZBrush. You’ll explore ways for developing tools, materials, brushes and meshes while taking advantage of various features in ZBrush to speed up the process!
By the end of the workshop, you’ll be rocking the ‘comic style’ illustration game and have some epic pieces to add to your portfolio. It’s a chance to meet other awesome artists, share ideas, and learn from each other. There will also be some cool surprises!
BRINGING YOUR ZBRUSH CREATIONS TO LIFE USING CHARACTER CREATOR
Ride along with Michael as he walks the class through creating a custom character using Character Creator and ZBrush. Workflow and processes will include facial expressions, applying wrinkle maps, creating custom clothing and accessories along creating variants of a character! Michael will also highlight procedures for modifying expression shapes in both Character Creator and ZBrush.
We will also be using custom clothing and accessory creations with a variety of characters, cleaning up weights, and finally using Headshot 2.0 to take legacy ZBrush sculpts further while ensuring compatibility with the Character Creator system. You’ll have everything you need to easily bring all your character work to life!
This article demonstrates how production and creative agency, The Tomorrow Lab, collaborated with First Person to create an engaging film highlighting the Near Future offerings of CableLabs. First Person, whom handled the post-production for the film, combined Character Creatorand iClone for the creation of an AI assistant to interact with real-life actors. Q&A for this article are handled from the Vfx Supervisor of this project, Geoff Hecht.
Q: Hello Geoff, and welcome to the Reallusion Magazine! Please tell us about the “Near Future: Mañana Cabana” project, the objectives of the show, and how long it took for the full production.
A: I’m honored to be here. The Mañana Cabana is part of The Near Future series, showcasing CableLabs’ technology and its offerings. CableLabs pioneers technological solutions for the cable industry. The complete list of Near Future films is available here.
Director David Mackie began crafting these films in 2011 as “A Day Made of Glass.” Initially seeming futuristic, the concepts have become mainstream in the past 12 years. In 2011, I met David Mackie and First Person, which became relevant in 2022 when David Mackie presented The Mañana Cabana project. I instantly wanted to join as Director of Animation at First Person.
The Mañana Cabana introduces the idea of AI assistants with bodies in the near future. Visualizing this in 2022 involved character animation, typically time-consuming. Given a tight 5-week schedule for a 5-minute film, we turned to Reallusion’s Character Creator and iClone tools for a successful approach.
Q: In the Near Future: Manana Cabana film, we have seen two very adorable characters: the little boy and the AI assistant: a rabbit puppet. Can you share with us how was these characters made?
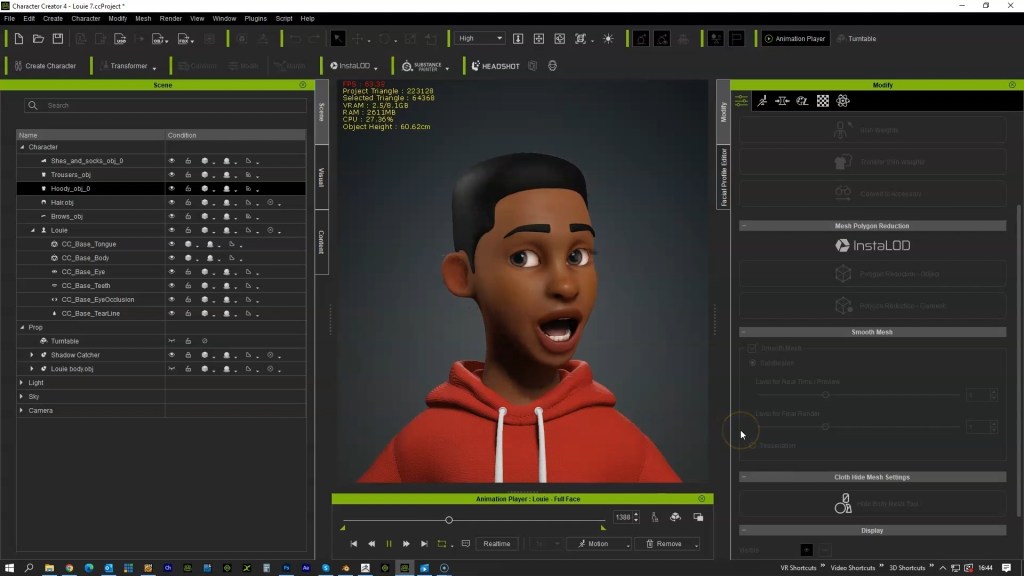
A: Creating content on YouTube with Reallusion software often leans towards photorealism, but our project aimed for stylized, toon-like characters. Reallusion’s Character Creator offers limitless character styles. Our tight schedule for the Mañana Cabana project demanded efficient decisions, so we researched stock libraries to fill our character slots quickly, an unconventional approach. Though the Louie character could have been made in Character Creator, our situation dictated this method.
Normally, a stock character’s compatibility with animation software matters. However, Reallusion’s tools are platform-agnostic.Character Creator’s iAvatar system provided facial and body controls. Our protagonist, Louie, began as a stock model, later adapted with the GoZ function, ensuring proportion alignment between a ZBrush-shrunk iAvatar model and Louie. The iAvatar version was then used in Character Creator for full facial capabilities. The Bunny Rabbit character’s differing vertices count led us to rig it using the AccuRig system, mapping extra facial controls in Character Creator for speech. Antony Evans of Digital Puppets UK handled both characters’ set-up. This mix of approaches optimized our time and workflow for the project.
Q: Speaking of animation, these characters both have lively facial expressions. What motion-captured tools were used, and what is the trick when making these facial animations?
A: iClone has three great tools for the facial animation of characters, and we used them all for the Mañana Cabana project. We began by usingiPhone Live Face where we can link our animator’s face to control the facial movement of that character. This created a very natural foundation, but we needed an extremely accurate lip sync animation, so our second step was to use the AccuLips feature inside of iClone. Right out of the box, Acculips does a great job lining up editable keyframes for each mouth shape in the timeline, and most people may even use the default output as-is. We found, however, that if you want to hold a lip pose longer like an “M” or “O” shape, you can stack two of the same shape keys next to each other in the timeline. We felt that this was a more accurate result.
Lastly, the character had to perform to the camera, so with our first two techniques applied, we finished off the animation using the built-in Face Key tool within iClone. This allowed us to specifically point the characters, eyes, eyebrows, face, etc. in whatever direction we felt making it look more like the actor and characters were interacting with each other. There’s a little-known panel called the “Facial Animation Settings” that allowed us to mix the Viseme Strength (AccuLips) and the Expression Strength (Face Key or Live Face).
Q: Another fun part to watch on these characters is their energetic body animation. How was it done, and how did you find it time-saving compared with traditional workflows?
A: Yes! I think this was the most fun part! Character animation in traditional pipelines can take 8-hour work days to create 4 seconds of animation. But animating in iClone isn’t like animating in any other software I’ve seen. I’ve used Maya, Cinema 4D, and Blender for character animation projects, and started using Autodesk Maya in 2002. Animating in iClone is more like if you combined Adobe Premiere with Maya: You can quickly drop animation clips into your timeline, and your character just comes alive.
“ Character animation in traditional pipelines can take 8 hour work days to create 4 seconds of animation. But animating in iClone isn’t like animating in any other software I’ve seen. I’ve used Maya, Cinema 4D, and Blender for character animation projects, and started using Autodesk Maya in 2002. Animating in iClone is more like if you combined Adobe Premiere with Maya: You can quickly drop animation clips into your timeline, and your character just comes alive! “
Geoff Hetch | Animation Creative Director / VFX Supervisor
It’s so fast to just try things, and if it doesn’t work out, no big deal, we’ll try something else out 5 minutes later. We don’t have to wait an entire workday to see that something is not working. And I think historically some people have stayed away from motion capture because it wasn’t easily editable. But iClone has the ability to mix and match mocap clips, taking the parts that you like and removing the parts that you don’t as well as adding hand keys. It’s a real hybrid system. We were showing the director Dave Mackie’s animation progress on the same day that we started animation, which is completely unheard of!
I know that there are folks out there who are hesitant to try new things, but I don’t think that most of us joined the industry to set keyframes and adjust tangents in a graph editor (Which you can do in iClone, but don’t have to). It’s great to know those things from a technical level, but those are just an intermediate step to ultimately get where we really want to be… telling impactful stories. iClone just gets you there much faster with more creative freedom than most would anticipate.
“ Historically some people have stayed away from motion capture because it wasn’t easily editable. But iClone has the ability to mix and match mocap clips, taking the parts that you like and removing the parts that you don’t as well as adding hand keys. It’s a real hybrid system. We were showing the director Dave Mackie animation progress on the same day that we started animation, which is completely unheard of!“
Geoff Hecht | Animation Creative Director / VFX Supervisor
Q: The entire project is a collaborative result between First Person, Tomorrow Lab, and CableLabs. What is the key to successful communication when working with multiple producing partners?
A: It all comes down to a combination of communication and trust. CableLabs trusts the Tomorrow Lab because they have CableLabs’ best interests in mind. Together they already have done 5 brand films at such an impressive level. Lisa Tesone is a great Producer who has all the right connections and experience to take any project to the next level (http://lisatesone.com). David Mackie is a great director,and if you go to his website (https://dmackie.com) you’ll be impressed by what he’s accomplished on a film Director level. Dave doesn’t want to do something just because it’s the “cool” thing to do, he does it because it tells a better story and helps connect CableLabs with its customers. But it just happens to look cool, because Dave has a great eye.
First Person has been involved in several incredible works for over 20 years. In the San Francisco Bay Area, they are known by everyone in the industry, and looking at their portfolio it’s not hard to see why. (https://www.firstperson.is.)
I met the owners of Drew Fiero, Marcello Grande, and Brandon Grande 12 years ago and have been impressed ever since. Because of conflicting schedules and budgets, we don’t all get to work together all the time, but that doesn’t change how you might feel about a group or a person. David Mackie had a unique problem to solve for the Mañana Cabana project in the character animation. He trusts First Person, and I had recently completed a film (Metro6) that had over 30 characters. We at First Person believed in this Reallusion Character Creator and iClone workflow. We were confident we could do the project to the highest of standards, and it all lined up.
Q: We believe the audience will love to see more of your work in the future. Can you share a little of your upcoming plans?
A: I’m fully freelance for the first time in over 11 years of my career and I’m excited to be forging my own path! It was such a rewarding experience to direct Metro6, but it was so difficult to produce at that scale that I wasn’t sure when I’d work on another film. Turns out that time is “now.” Having had the opportunity to work with Reallusion tools, and some other offerings that are available now, it’s so much easier to produce incredible animation than it ever has been before.
I am taking on commissioned work (and you can find my portfolio at https://geoffhecht.com), but when I’m not booked on commissioned projects, I’ll be working away on my next animated film “Love is a Championship!” This is a project that we’ll look to flex some 💪 Reallusion Muscle 💪 accomplishing things with tools that many might have not thought possible! More details of this project will be available online in the coming months.
About the Author
Geoff Hecht is an experienced 3D / VFX talent from San Francisco, California. He graduated from the Academy of Art University, majoring in Animation and Visual Effects. His solid academic training and seasoned experience made him a multiple award-winning director of animation and creative director. One of the iconic achievements was the winning of the Telly Award (Gold), with his team filming the annual corporate campaign video for Oracle in 2019.
Geoff’s talents with people also made him a good supervisor of business management. He founded and co-owned Hectic Digital, an animation and VFX production company for 7 years and then sold it to the renowned media agency IVC. He directed several talented artists, and many of them ended up working at ILM, Weta, MPC, 2K, and other notable studios. He directed a team of 78 people on an animated short, Metro6, which was accepted to almost 70 global film festivals. Making it into the Top 100 Best Animated Shorts in 2020 by FilmAffinity.
Metro6 was extremely ambitious: A short film on the scale of a feature film with over 30+ characters, and full city environment. In 2019 after Geoff completed Metro6, he ran into some Reallusion demos on YouTube. He couldn’t help but think how Reallusion tools would be applied to his project, and until he saw Martin Klekner using Character Creator and iClone for his project “Heroes of Bronze“, he knew that he wanted to try these tools for himself. The initial tests with Reallusion were impressive! And when the Near Future: Mañana Cabana project came through the door, he knew what they should use. They were ready.
Chris Meyer-White | 2D Animator, Series Creator, Owner Mixed Up Pixels Studio
Chris Meyer-White
My name is Christopher Meyer-White. I have worked in Home Entertainment for 15+ years, in both the US and the UK, and on projects for Warner Brothers, Disney, BBC, Paramount, and many other studios.
The most time of which being at Abbey Home Media which was the UK’s leading independent home entertainment company for lots of well-known children’s shows, Care Bears, Topsy and Tim, Peter Rabbit, Sooty, Horrid Henry, Fireman Sam and more.
With a background of design, product management of children’s home media brands, and a passion to create series for children, in 2015 I left my job in London and moved to Bristol (which coincidently is one of the leading UK cities for animation).
I now own and run, Mixed up Pixels, an animation studio based in the heart of Bristol, UK, and am working on 2 pilot episodes for my 2D animated series Polly & Parrot, with a view to get these commissioned in 2024, and currently writing a script for a 2D feature, all animated with Cartoon Animator (CTA).
“It looked too good to be true… when I noticed a 2D program called CrazyTalk (later named Cartoon Animator). I knew Reallusion were magic makers, so I tried the software and instantly loving it! – the workflow was so intuitive, and easy. I loved the way you could make your own character within a certain structure, load it into the software and boom, your character is ready to animate. Its super easy, and you can also keyframe too, which really sold it to me. “
Chris Meyer-White | 2D Animator, Series Creator, Owner Mixed Up Pixels Studio
Zez Vaz – Director, Animator, and the founder of Toma Creators Studio
About Zez Vaz
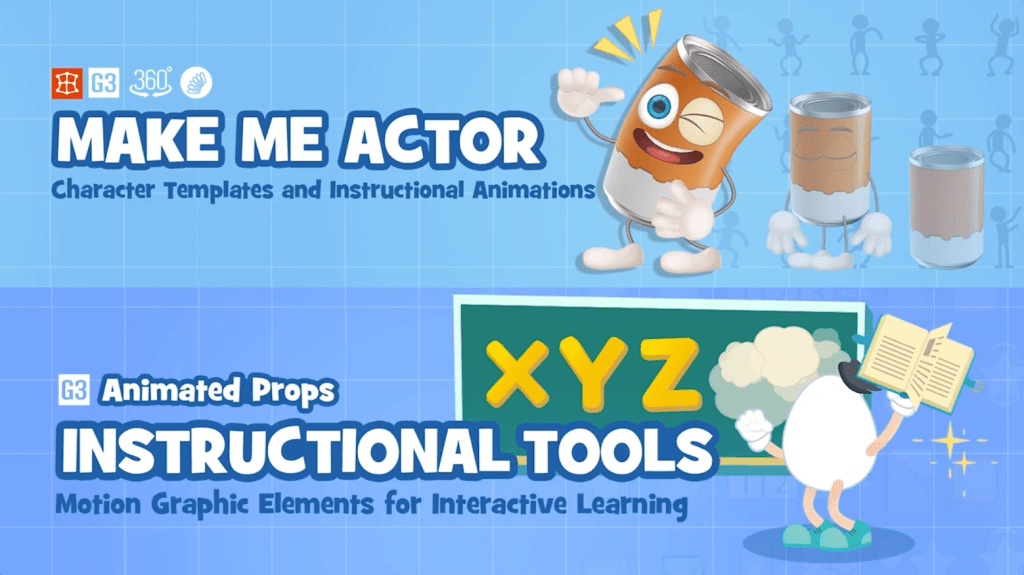
Hello everyone! Today’s tutorial dives into crafting an engaging animation intro using Power Tools Vol. 2: Interactive Learning Bundle for 2D Animation – Make Me Actor and Instructional Tools. I’m Zez Vaz from Toma Creators Studio. I had the pleasure of co-directing and animating “Walter Precipitous,” a short film delving into the water cycle, along with numerous educational videos, all brought to life using Cartoon Animator 5.
Interactive Learning Bundle for 2D Animation
We’ll be delving into the dynamic content pack Make Me Actor and Instructional Tools, specifically how these tools empower you to transform objects and images into speaking actors. You can also customize ready-made actors and infuse vitality into animations using various text motions and animated props that cater to both experienced creators and novices. Make Me Actor boasts a wide array of distinct character templates and offers over 100 facial and body animations – perfect for making talk shows, tutorials, and more. You can alter the text within the props to suit your preferences and seamlessly create e-learning animations and teaching resources by blending cartoon characters with interactive quizzes that make for a fun learning experience.
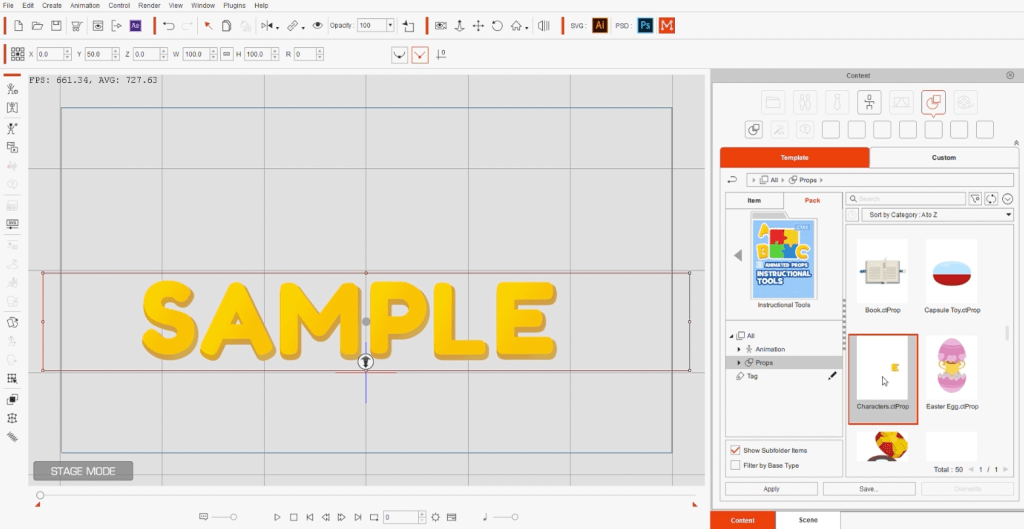
Trying out the Content Pack
Start from scratch by downloading the pack, then navigate to the ‘Content’ page where you’ll find it. Click on the ‘Instructional Tools’ tab to access a wide array of props and animations at your disposal. I opt for the “Characters” prop, which makes the word “Sample” materialize on the stage. Here, I can select an animation and apply it to the prop.
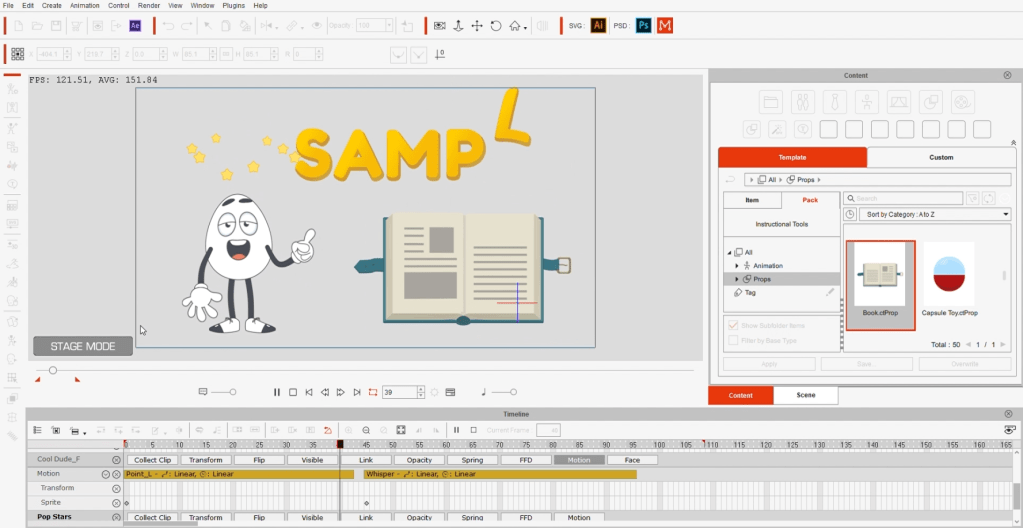
Moving on to the ‘Make Me Actor’ feature, I have the liberty to choose a character and incorporate it into my scene. Navigating to the animation templates, I make a selection from the diverse array available — There are lots of animations, and there is so much you can do with them!
I decide on one and promptly position the character to point at the text. The animation is visibly represented in the timeline beneath the ‘Motion’ category. Should I desire to layer another animation, I can choose an additional one, and both will seamlessly combine.
Additionally, I introduce the “Pop Stars” prop, accompanied by an array of other props and characters onto the stage. The options are nearly limitless, enabling us to populate the stage with a variety of elements.
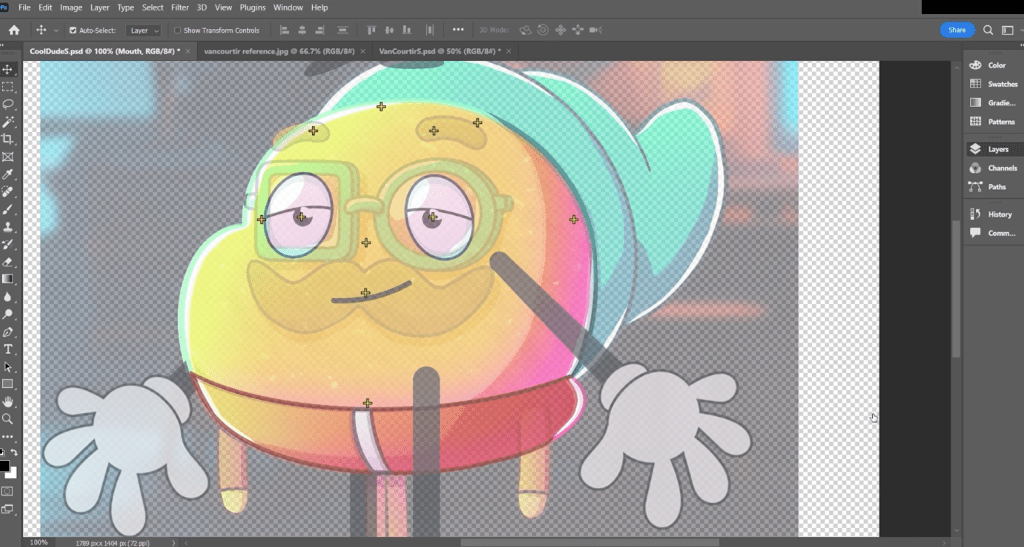
Creating a Custom 2D Character Design
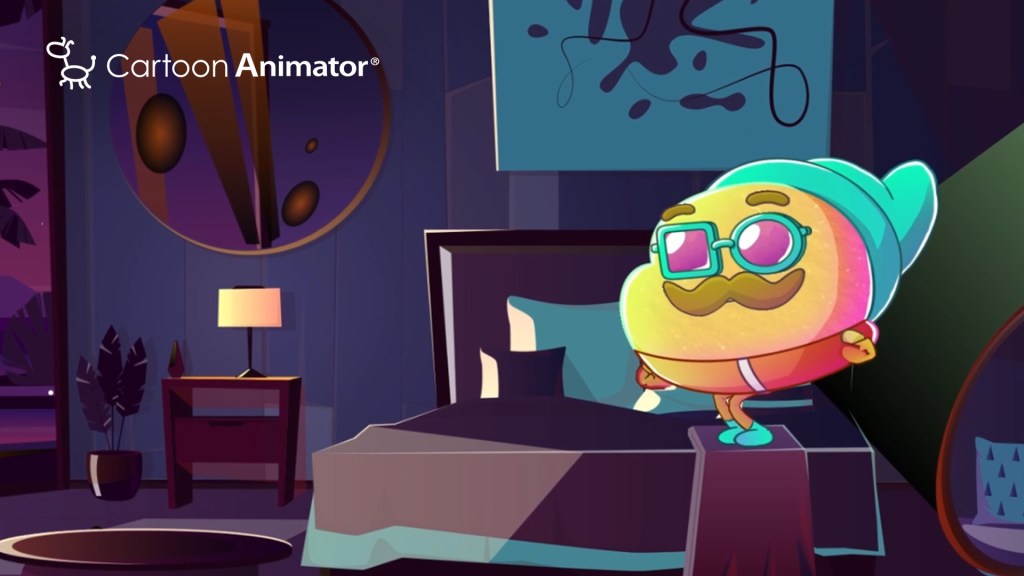
Let’s craft a personalized character puppet. I opt for a Make Me Actor character and enter ‘Composer’ mode. From the left panel, I click on ‘PSD’, launching the character in Photoshop. Here, I fine-tune each layer and the defining points that correspond to the skeletal structure. Leveraging the Van Courtir character, I swap out layers with his images. Using a faintly transparent version of the character as a guide, I meticulously align the bones and substitute layers with appropriate labels. With the edits complete, I save the PSD file and return to Cartoon Animator 5, where the character has seamlessly transformed into the one I just tailored.
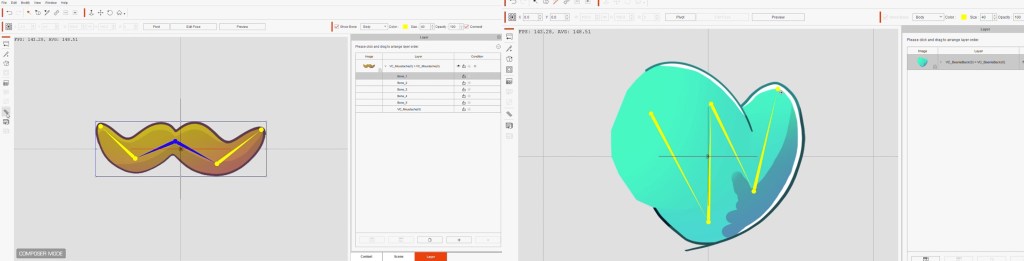
Next, I introduce accessories like a beanie hat, sunglasses, and a mustache, treating them as props within the 2D character design. To infuse vital movements, I apply spring effects to these props. For added control, I integrate bones into the mustache and navigate to ‘Composer’ mode’s left sidebar, where I access the spring dynamics. Switching back to the character, I enter ‘Composer’ mode again and strategically position each custom prop, linking them harmoniously to the puppet’s structure.
Customizing the Text Props
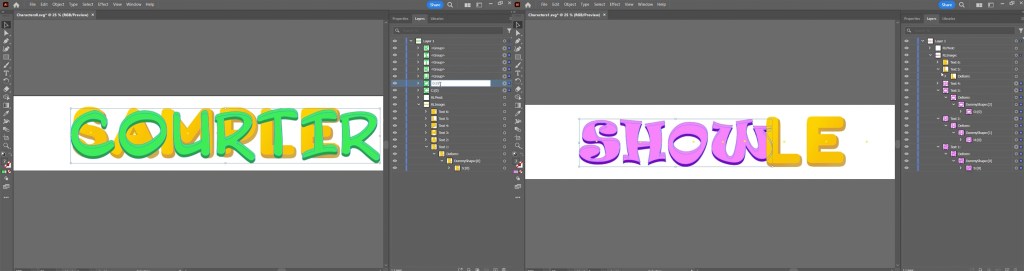
Now, I will personalize the “Characters” prop (found in the Instructional Tools), but this time, we’ll click on ‘SVG’ instead of ‘PSD’. By doing so, the prop opens in Adobe Illustrator, where I’ll choose a font type and proceed to replace each letter with its updated counterpart. The three distinct words I will be work with are “Van”, “Courtir”, and “Show”.
Editing the Animated Cartoon and Exporting the Project
Finally, I include a background picture from Freepik to establish the desired mood. My preferred animation templates feature Van Courtir’s actions, complemented by the addition of the “Pop Stars” prop and a corresponding animation.
Prior to finalizing this animated cartoon, I integrate a music file into the timeline and introduce a subtle camera movement. To achieve this, I access the camera settings, applying a slight zoom on the concluding frame. With the scene now completed, I save the project and export the 2D animation as a video.
I trust you’ll find this content bundle engaging and versatile across various scenarios. Should you encounter any challenges with Cartoon Animator 5, the comprehensive online manual serves as an excellent resource for troubleshooting. Additionally, Reallusion’s YouTube tutorials offer valuable insights.