In this installment of the Beginners Guide, I am going to demonstrate how easy it is to incorporate AI tools into your workflow so you can leverage both the timesaving aspect of AI and the creative tools of iClone and Character Creator 4 (CC4) to make a simple but effective scene.
I’ll be focusing on iClone and CC4 while making use of the free-tier AI services relevant to this type of work.
Specifically, I’ll use:
– Leonardo AI (free tier) to generate a headshot image.
– Bing Create (free) for the Headshot 2 image.
– ChatGPT 3 (free tier) for dialog and scene-setting ideas.
– Eleven Labs (free tier) AI-powered voice generation for the character.
Below is an image of what we will end up with. A pleasant and hopefully somewhat charming female host in a 3D cartoon environment of a bedroom doing a podcast. The headshot, (the AI-generated image) and voice are important to adding any factor like charm to a character. I picked Eleven Labs for their ability to make a voice emote instead of a monotone or rhythmic recitation. Leonardo AI is an excellent image generator for my tastes. There are many of these AI tools to choose from.
VIDEO TUTORIALS:
I have created two short YouTube tutorials that are near the end of this article that cover both character creation and scene creation along with using AI-generated dialog. It also shows how to enlarge the mesh for big cartoon-type eyes in Character Creator 4.

Below is the setup view with the background turned off.
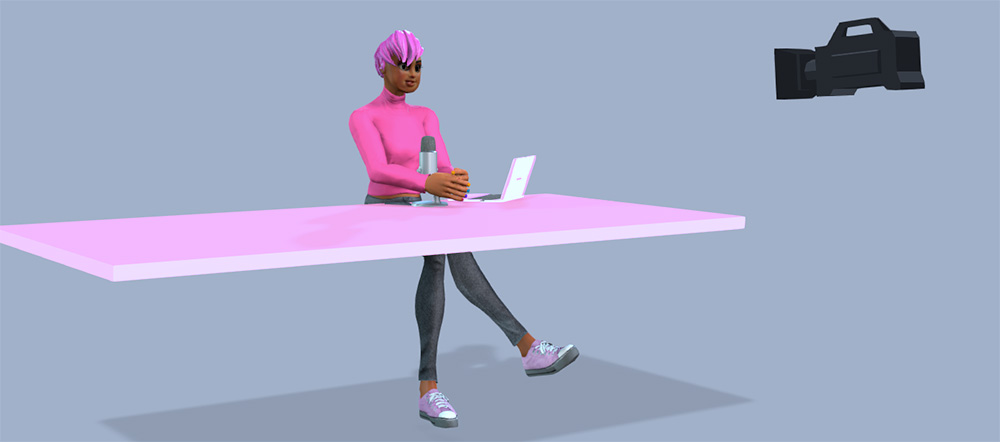
As you can see in the image above the scene is extremely simple when you leave out the AI-generated background image. The “desk” is the Door prop that comes with iClone and I didn’t bother with a chair either. It would be simple enough to add one if you desire to do so. You could also dress up the desktop a little more with other objects as I did in a later render with the headshot image on the desk.
You could also put a plant prop in the foreground at the side of the desk to add more 3D depth to the scene as it goes into the 2D background. A proper combination of image in the background and props in the foreground or intermediate space can help to blend the 2D background image into the scene eliminating some of the contrast between the flat image and the 3D objects.
CHATGPT 3
The first thing I did was go over to ChatGPT 3 at chat.openai.com at ask it to write a dialog for “a fan talking to the camera about how much she loves Taylor Swift”. I received the following response:
INT. BEDROOM - NIGHT
A young woman, LILY (early 20s), sits comfortably in her bedroom, surrounded by Taylor Swift posters and memorabilia. She adjusts the camera in front of her, excitement evident in her eyes.

LILY (looking at the camera) Hey, Swifties! It's Lily, and I just need to talk about the queen herself, Taylor Swift. I mean, where do I even begin?

(leans in closer to the camera) I remember the first time I heard Taylor's music. It was like she reached into my soul and put my feelings into words. I instantly felt this connection, you know? Like, she was telling my own story.

(points to a poster on the wall) And can we talk about her lyrics? They're like poetry. I can't tell you how many times I've been sitting in my room, listening to a song, and thinking, "Taylor gets me."

(grins) And the way she's evolved over the years! From country sweetheart to pop sensation to folklore and evermore vibes. It's like she's a musical chameleon, always surprising us and keeping things fresh.

(picks up a Taylor Swift album) I collect all her albums. It's like a timeline of my life. Each one represents a different chapter, a different emotion. I've laughed with her, cried with her, danced with her – all in the comfort of my bedroom.

(sincerely) And the way she connects with her fans, it's incredible. Whether it's through social media or secret sessions, Taylor makes us feel like we're part of this massive, glittery family.

(leans back) I've been to her concerts, and let me tell you, it's a spiritual experience. The lights, the confetti, the energy in the crowd – it's like a Taylor Swift-themed Disneyland. You can't help but feel alive.

(smiles) So, yeah, I might be a little obsessed, but who wouldn't be? Taylor Swift isn't just a singer; she's a storyteller, a friend, a confidante. And to every Swiftie out there, keep on rocking because we're all in this together.

(blows a kiss to the camera) Love you, Taylor! You're the best.
I didn’t follow the script at all in terms of direction because that wasn’t the creative direction I was looking for. I wanted to keep this a simple scene with a simple character, so I used the Podcast concept from the bedroom. The dialog was all I was interested in.
ELEVEN LABS – VOICE GENERATION
For this, I went over to ElevenLabs.io and used the free tier (requires signup) to create the dialog. Like most tasks of this nature, it took longer to decide on a voice from the voice library than it did to copy and paste the text into the dialog box, process, and download the audio file.
At first, I did a sentence or two of dialog with the voice I had selected to find out how it interprets the text and how pauses and other formatting worked. It was much easier than expected. Commas and the “…” created different timing and pauses in the audio. Using two blank lines between paragraphs seemed to work to keep the paragraphs from running together when spoken.
Now, of course, this Is where I pushed the envelope too far in terms of how much of the script dialog I sent into the speech generator at a time. After a couple of small tests with just a line or two at a time, I proceeded to dump all of the remaining text into the voice generator.
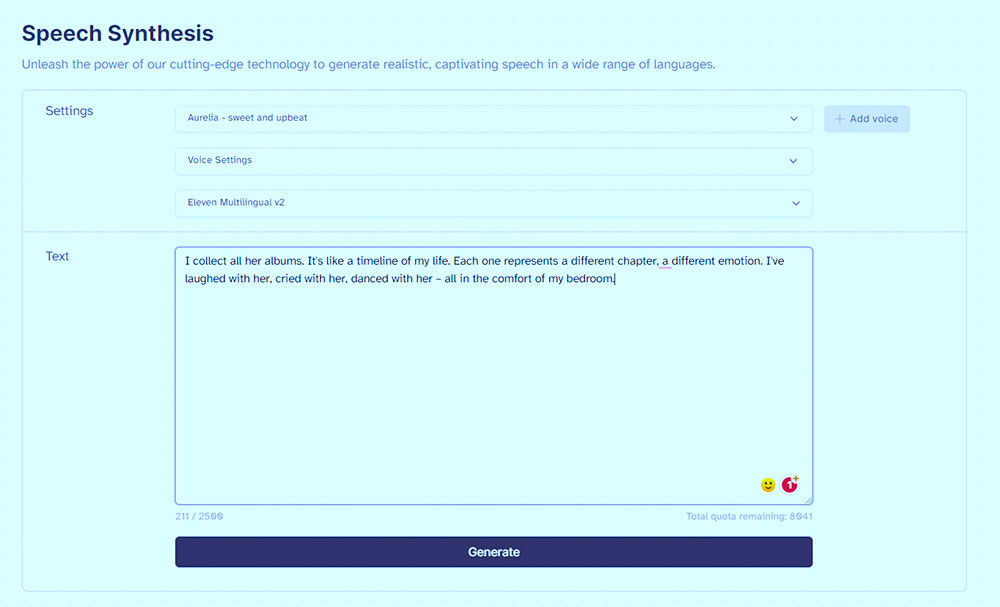
It worked but had some pronunciation errors that would require correcting and running through the AI again. This burns up credits in an extremely wasteful manner as you get 10,000 characters on the free tier. Not words, characters. If I had done it a sentence or two at a time, I wouldn’t have burned so many credits.
In this case, it didn’t matter as I wasn’t going to use it all anyway in the final render. I just needed enough to do a good demonstration.
Creating the dialog from Eleven Labs to iClone was easy. It was only a matter of minutes to copy, paste, process, download, import into iClone, and have the entire script’s audio lip-synched and loaded into the character. I also copied the dialog into the clipboard so I could paste it into AccuLips to go along with the audio file for near-perfect lip-synching with no intervention on my part. I’m not doing anything advanced, and I think you’ll be surprised at the final product.
TIP: When generating audio from text think about how to write out the text. If you want a character to say iClone then write it out as “eye Clone”. “AI” is another stumper for generated speech. If you leave them as AI, you’ll probably get an “aye” so write it out as A I with a space in the middle. You may have to phonetically spell some words to get the desired results.
LEONARDO AI
I couldn’t get the face image I wanted out of Leonardo, but it was a snap getting the background image of the bedroom. Feel free to use the image in your own project but it is low resolution for the purpose of this article to not take up too many resources.

BING CREATE
I used Bing Create to generate the character head image to use with Headshot 2 (or Headshot 1). I tried Leonardo and got some great-looking images but few that faced forward like I needed. So, I cruised over to Bing Create and used the prompt:
Portrait of a bald, Pacific Islander cartoon girl with no hair, facing the camera, white background
I got several good images from Bing and was actually very pleased with the outcome. I had already spent a frustrating time with Leonardo without the desired results so when Bing Create immediately started returning usable results, I was surprised, to say the least.

It didn’t take me long to choose a good headshot image and I was off to CC4 to create the character. I already knew there was going to be a problem with the large eyes in the image, but I decided to “brute force” my way through that by pushing the eye and eyeball sliders way past the intended maximum. I love this feature about the slider. If you go to the end and it doesn’t do enough… just type in a number in the input box and press enter. If 100 or –100 isn’t enough, then type in 200 or –200.
TIP: The input boxes do not stop at the end of the slider. You can manually enter 200 (or any number) in the input box if the slider only goes to 100. This can be a very powerful feature pushing intended use past the boundaries and experienced users know how helpful it can be.
CHARACTER CREATOR 4
The AI work was very enjoyable, and I looked forward to putting it all together but I still had to make the character and it needed some personality. The Bing Create image certainly helped in that department.
I needed a stylized female body to further enhance the cartoon effect. You could load the free Alika character that comes with iClone and CC4, but I chose to load a neutral base and then use the Alika slider in the slider section to morph the body to a more cartoonish shape. I also used the Alika head morph.
HEADSHOT 2
Next up was jumping over Headshot 2 to wrap the head to the character. Since I’m talking basics here I will only use the Image, Auto feature, and a little bit of sculpting around the eyes. Since I used the Auto feature it also created some hair which I discarded so I could use the Alika cartoonish hair instead.
Now we see some freaky things happening like the strange-shaped head (compared to the image) and really weird eyes because of the huge eye size on the AI-generated image compared to the mesh. Like I said though, we are going to use brute force to enlarge the mesh eyes and eyeball to cover up the eyes on the Headshot image.

TIP: If the remnants of the eye colors around the edges and the bottom of the eye bother you then take the diffuse image into something like Photoshop and clone over the lower two-thirds of the painted eye leaving only the top or you can clone over all of it if you want a clean look.
I then dressed the character in a top, jeans, and tennis shoes changing the original colors to a shade of pink where appropriate.

CLOSING
As I showed you in the first and second images, the scene itself is very simple. Using a prop for a desktop, add a microphone or whatever you want to place in the foreground. Add your AI-generated background image and the scene is set. All you need to do now is light the scene and that is personal preference, but I would keep it bright and airy for this type of scene.

MD McCallum – WarLord
Digital Artist MD “Mike” McCallum, aka WarLord, is a longtime iClone user. Having authored free tutorials for iClone in its early years and selected to write the iClone Beginners Guide from Packt Publishing in 2011, he was fortunate enough to meet and exchange tricks and tips with users from all over the world and loves to share this information with other users. He has authored hundreds of articles on iClone and digital art in general while reviewing some of the most popular software and hardware in the world. He has been published in many of the leading 3D online and print magazines while staying true to his biggest passion, 3D animation. For more information click here.