The new Crowd Sim tool in iClone 8.4 has some powerful features and can create a crowd in minutes or less but it is not the only timesaving, scene-enhancing tool that was recently released. I must admit to also putting this particular tool on the back burner until I could get more comfortable with the new features.
That was a mistake.
I had no idea just how much time custom ActorGroups can save while dragging, dropping, and randomizing them into a scene. The best part is, being custom groups, they fit your needs and over time we can create a library of custom Actor Groups for different situations like sporting events, concerts, street scenes, block parties, and military actions.
My first dive into Actor Groups was to watch Kai’s short and info-packed tutorial, Crowd Sim: Customizing Actor Groups, on creating custom groups. This video packs a lot of information into less than six minutes and covers how to create all three types of Actor Groups.
OPTIMIZE & DECIMATE CC4
When I first created a base, I was impressed with the process but wondered what I would do with it until I understood it is just what it says… a base. It’s a starting point that can be used to create Presets that can hold multiple bases (via a drop-down menu) in one preset. Since this is an item I intend to use many times in a scene I need to create variations of my soldier character.
Base Infantry Soldier variations via Character Creator 4 sliders before optimize and decimate.
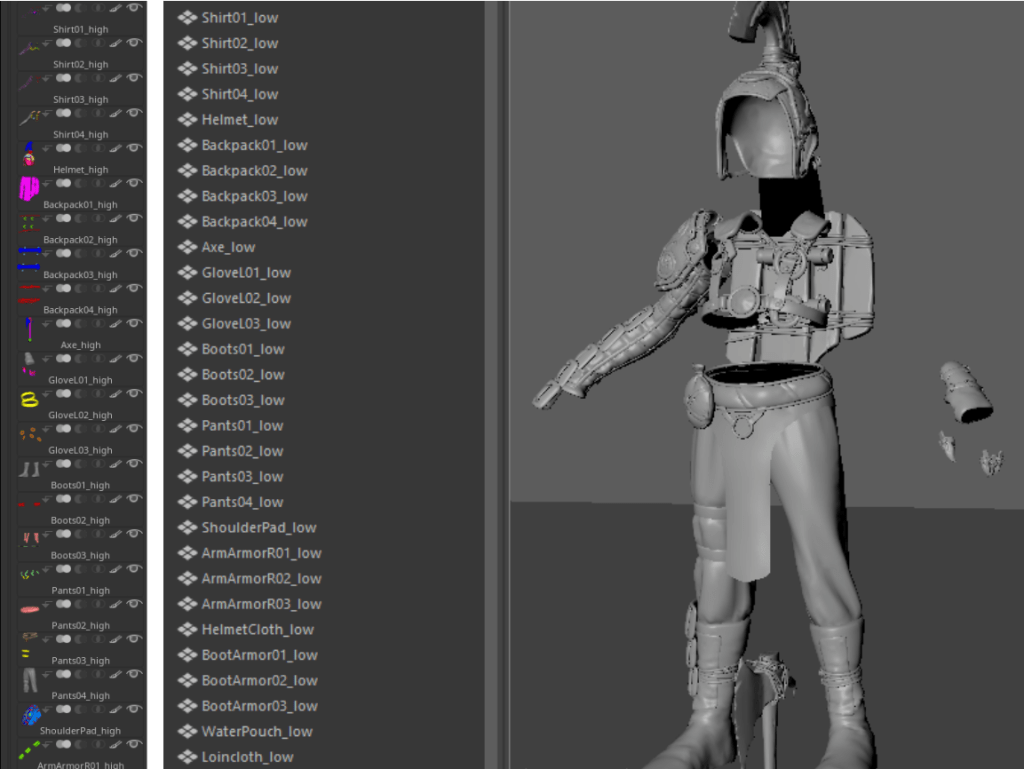
I used my infantry soldier from the Marketplace to create three Levels of Detail for use in crowd generation. The base soldier, stripped of equipment like harness, backpack and front pouches came in at just under 60K. I created five variations of the original 60K character that differed in face, height, weight, and ethnicity to give me more variation so the soldiers wouldn’t be the same size and have the same appearance.
I left the battle rifle attached to the character and sent it all through the OPTIMIZE AND DECIMATE menu choosing the 7K LOD 1 and 800 KB LOD 2 for the tests. This gives me the option of using the standard character up close to the camera, LOD 1 at the mid-range and LOD 2 in the distance. The battle rifle was optimized along with the characters.
CAUTION: THE BELOW EMBEDDED VIDEO HAS AUDIO
CREATING THE BASE
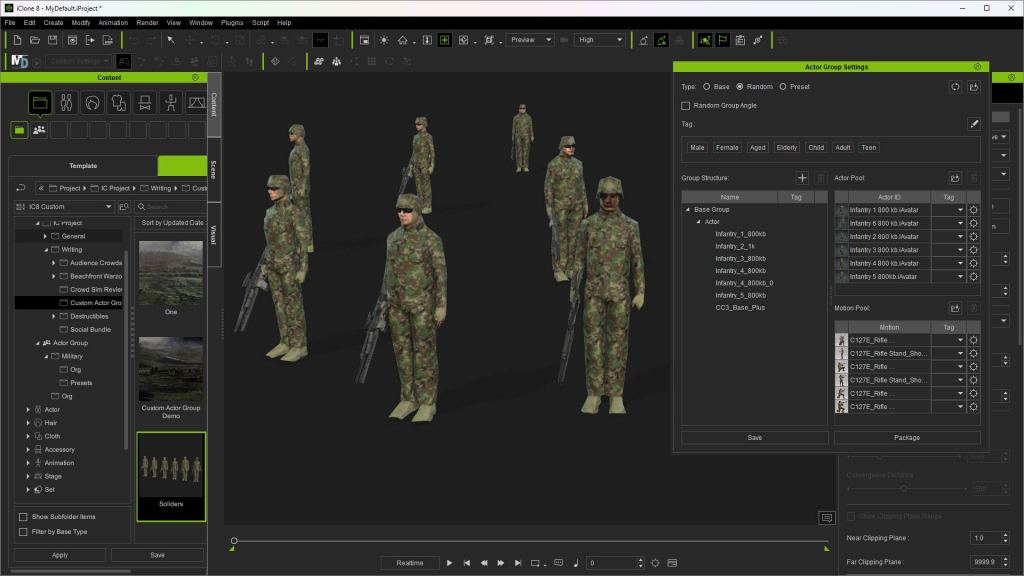
The actual process of creating a base is very simple. Under the CREATE menu, you will find the CREATE ACTOR GROUP down at the bottom. Select this to open the Actor Group Settings popup which is the interface to create or reopen a Base, Random, or Preset actor group. Under the BASE selection, this popup automatically populates with the actors, motions, and props you drag into the workspace.
TIP: Make sure the Actor Group Settings popup is open or you will find yourself creating a scene instead of an Actor Group and will have to start over.
I’m embarrassed to say that I created a group or two, or at least thought I was when I wasn’t because I had not opened the Actor Group Settings to record the group. After this little hiccup, I was creating gun crews, gun pits, and groups of soldiers.
All of them were saved as bases and then used in the creation of military genre Presets. The same can be done for sci-fi, fantasy, contemporary, and others that can, over time, build a huge library of drop-in crowds with control over their randomization.
NOTE: The video tutorial at the end of the article goes into detail about creating base, random, and preset genre-based groups.
Base Group
PRESET
This is where custom Actor Groups really show off their muscle. We can select previously created Actor Group Bases, including multiple bases as mentioned earlier, to deploy and randomize these custom groups. In my example, I have various Random groups and Base groups like a crewed Howitzer emplacement with security and manned sandbag barriers.
All that is required is to drop the preset into the workspace, select what you are deploying from the drop-down menu that pops up, and watch the magic happen. Below you will see the pop-up Actor Group Settings that create the Preset actor group by including the groups along with a pool of actors.
Preset using previously created Base Groups with an actor pool.
RANDOM
Great for random groupings of characters and props. The popup menu utilizes an Actor Pool and a Motion Pool to draw from when randomizing while deploying. The Group Structure is where you drag in characters and props.
Save the random group. It’s not all that flashy at this point because you must deploy the random group to the workspace before you see how it allows you to randomize items like characters and motions. When you deploy the actor group, iClone will provide a pop-up dialog for options.
Random Group
TUTORIAL
I have provided the following tutorial that goes into much more detail about how to create each group and how to modify existing groups to have variations for additional base actor groups. This can all be done very quickly too. Once you get all your base groups created it goes even faster. What you see in the tutorial is far from all the things you can do with Actor Groups so don’t limit using them to things like standing, talking crowds.
CLOSING
In closing, I can say that I have only scratched the surface of what we will be able to do with custom actor groups. I vastly underestimated them when I first viewed Kai’s tutorial, but it didn’t take me long to realize the powerful option of being able to include props in the mix, and accessories through the Character Creator 4 Optimize and Decimate tool.
With volume and NavMesh crowds, walkway crowds, and actor groups we can make crowds for almost any situation, and we can save the crowds and the actor groups for future use.
While I’ve used a military example in this article, the same can be done for science fiction, sports, and other purposes. If it’s winter you can create skaters and a frozen pond, or in summer a youth sports league team item like a baseball dugout with players and coaches.
It will be very interesting in the future to see what the talented iClone user base will do with Actor Groups and other new tools like the Crowd Sim and Distribute Props tool.
If you haven’t looked into customizing Actor Groups, then you are missing out on a versatile and time-saving tool that provides the needed assets large or small scale for your next masterpiece.
Digital Artist MD “Mike” McCallum, aka WarLord, is a longtime iClone user. Having authored free tutorials for iClone in its early years and selected to write the iClone Beginners Guide from Packt Publishing in 2011, he was fortunate enough to meet and exchange tricks and tips with users from all over the world and loves to share this information with other users. He has authored hundreds of articles on iClone and digital art in general while reviewing some of the most popular software and hardware in the world. He has been published in many of the leading 3D online and print magazines while staying true to his biggest passion, 3D animation. For more information click here.
Introduction- Final Steps for 3D Printing or Animating Your ZBrush Characters
We’ve discussed getting a fully adorned character into Character Creator, but what if you want to 3D print a pose of your ZBrush character, or control the poses and facial expressions / lip sync of your character? In this article we’ll cover both topics, giving you even more fun and easy options to fully utilize your character creations.
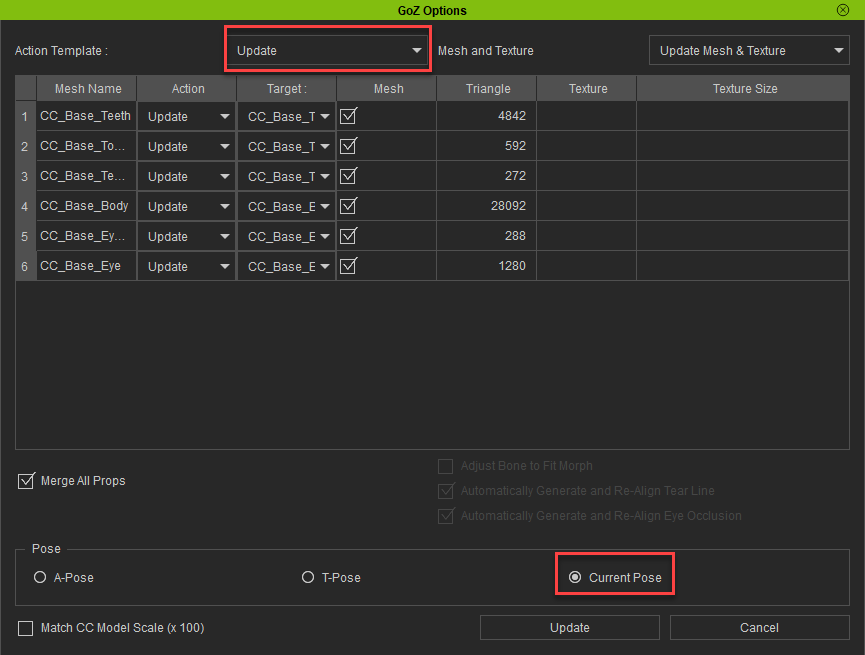
We’ve already set up a naked body file that we can GoZ back-and-forth between ZBrush and Character Creator. We’ll start from that point, so open your ZBrush project file (.zpr) and your corresponding Character Creator file (ccProject), then press the GoZ All button in ZBrush to relink your files. The dialog box in CC should default to Update, choose “Current Pose” and hit the Update button.
GoZ from CC to ZBrush to ReLink
Update Options for the ReLinked body in Character Creator
Setting Up Poseable Gear in ZBrush
Append your gear (clothing, accessories, weapons, etc…) as subtools to your body files in ZBrush. Make sure your gear subtools have a lower subdivision for each item. Remember, there’s a 300k poly / 600k tri limit in CC. Of course that doesn’t mean your ZBrush files have to be under 300k polys – for example, your helmet might be 10 million polygons, and that’s fine, as long as it’s 10 million polygons at SDiv 6 (for example), but a significantly lower polycount for SDiv 1. The reason for this is when we GoZ, it will send our Subdivision Level 1 asset to Character Creator, where we can skin and animate our meshes, and when we’re done, we can GoZ from Character Creator back to ZBrush, which will update our SDiv 1 subtool positions, but we’ll still have all the details from our SDiv 6 for those subtools still intact and available.
Body (green) and gear (red) subtools
GoZ Gear from ZBrush to Character Creator
Once you’ve got all your gear subtools set up, GoZ All from ZBrush to CC. In CC, the GoZ Options box will default to Custom, and will do some basic selections for you. For your synced body files, it’ll be set to Update, and for the other objects, Create Cloth will be selected by default. Just like the previous article covering game-res accessories and clothing, for assets that are influenced by multiple joints (cloth type items), you can keep the Action as Create Cloth. For more rigid accessories that can be attached to one joint, choose the Create Acc option. Don’t worry about getting this selection exactly right — you can always convert a clothing item to an accessory and vice versa in CC later if you need to.
Update Options for the ReLinked body and new gear from ZBrush in Character Creator
Setting up Clothing and Accessories
Again, we’ll utilize the same process we did with the game-res article. For accessories, select them, move them into place if necessary, attach it to the appropriate bone in the Attribute tab > Attach section, then set the pivot point. For clothing items, it already transferred the weights for us, so we can leave those alone. Also the same as the game-res process, if you have any clothing objects that need physics simulation, make sure they have UVs and a corresponding weight map to plug in, turn on rigid-body and soft-cloth simulation in the CC menu bar, turn on physics for that item, and finally modify any appropriate capsules for your character body that interact with the cloth asset. Remember to go to Edit > Project Settings and check on Bake Animation under the Simulation section, so you can scrub the animation timeline later and still have your cloth react naturally.
Setting up Accessory assets
Setting up Physics for clothing items that need it, like a loin cloth
Applying Animation
Select the “CC3_Base_Plus” group in the Scene tab, and double click any animation in your Content tab to apply that to your character. In our case, you can see we’ve applied the “Saloon Door” animation. Play the animation in the Animation Player all the way through, setting it from Realtime to By Frame to allow our cloth to simulate appropriately. When it gets to the end of the animation, you can then scrub in the timeline to the pose that you want.
Applying an animation to our character
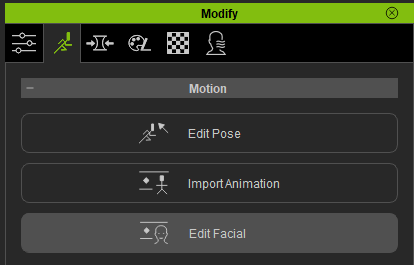
Modifying the Body Pose
While the pose from the animation is pretty good, we can fine-tune it to our exact needs. With your character selected, go to the Motion tab, and click on the Edit Pose button. There, you can use the dummy, in either IK or FK mode (see the tabs at the top of the Edit Pose dialog box) to move and rotate your joints as you see fit. Remember you can also navigate to the Poses and/or Gesture section of your Content tab and apply different body poses or hand positions to your character as well.
Edit Pose button
Edit Pose and Gestures
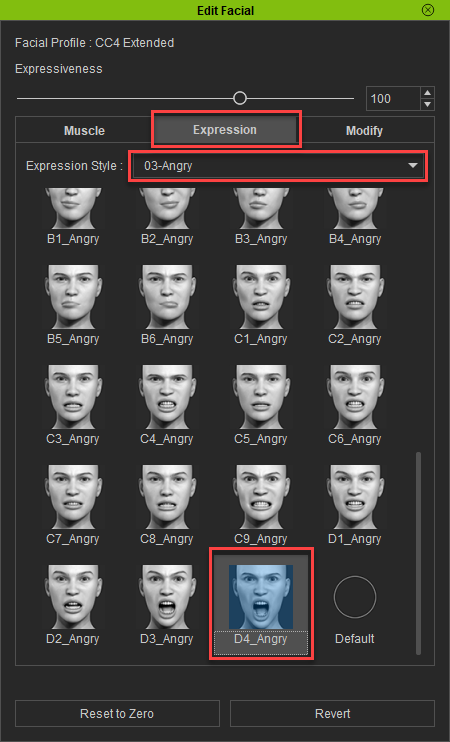
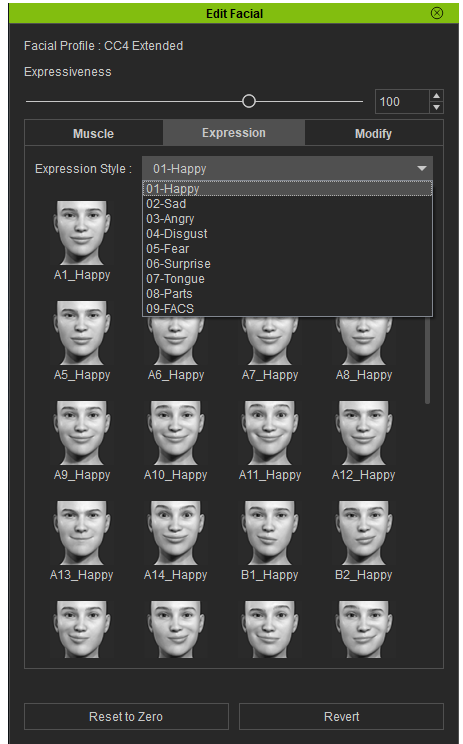
Modifying Facial Expressions
Let’s change the mood of our character! Close your Edit Pose window, and back in the Motion tab, click on the Edit Facial button. In the Muscle tab, you can click and drag on the different areas of the face to change your characters expression, in the Expressions tab, you can apply an expression from the list of dropdown options, and in the Modify tab, you can use sliders to make exact changes to your characters different face shapes. Use one or a combination of these to change your character’s face. When you’re done, simply close the Edit Facial window.
Edit Facial button
Edit Facial Muscle, Expression, and Modify tabs
D4_Angry facial expression applied to our character
Sending the Posed Assets Back to ZBrush
If you don’t need your pose applied to your subtools in ZBrush as layers (to toggle between different poses), simply select all the character assets you want to send back in the Scene tab, and hit the GoZ button in the Character Creator menu bar. The GoZ settings should default to Relink, and because our original mesh had the “Eyelash” and “Tear Ducts” separated from the base body — we’ll check those on. Make sure you choose Current Pose, then hit the GoZ button. This will update the SDiv1 vertex positions in ZBrush to match the CC assets, and your higher subdivision details will follow. To see all the highest subdivision levels, go to Tool > Subtool and click the All High button.
Select and GoZ
If you DO want to apply your pose as a layer, open the ZBrush Pose Tools plugin in ZBrush, click the Record New Pose button, then GoZ your character assets over from CC. When the changes have been updated in ZBrush, click Save New Record and name it. Do this as many times as you’d like, storing a library of poses as you go.
Note – if you didn’t separate out any Body meshes from our earlier step (eyelashes, tear ducts), you can use the Character Creator > Plugins > ZBrush Pose Link menu to send a pose over and have it recorded automatically on the ZBrush side!
For an in-depth explanation and examples of Pose Tools functionality, please visit this article!
Our high res model, posed in ZBrush!
Part 2. Turn Your ZBrush Character to Life with Facial, Body Animation & Mocap
Exporting a Character from CC4 to iClone
We’ll need to go into iClone in order for us to apply and modify mocap data. Getting our character from Character Creator to iClone is easy – simply go to File > Export > Send to iClone > All!
Sending our Character to iClone
Import Mocap Animation into iClone
I recorded some mocaps in Rokoko that contain body and hand motion capture data, including actions that needed to make contact with the body (belly, head, clapping). You could make your own mocap and import it into iClone, or download animation files from the internet as well. All you need to do to get it into iClone is to drag your mocap file onto your character (you should see a yellow bounding box show up on your character as you do this). Import settings should pop up — for Motion Profile choose Motionbuilder, and for Motion T-Pose, navigate to your mocap file and select it, choose 30 FPS, then hit Convert All. Now you can press play to playback the animation.
Motion Modifier
Editing Your Motion Capture – Global Corrections
With the character selected, in the timeline, right click on the animation (in the Motion row in the timeline), and choose Motion Modifier (or click the Motion Modifier button in the timeline menubar). Press the Preview button, then press the spacebar to play your animation. Tune the sliders to taste as you watch the effect on your character in real time. In my case, the mocap head was facing down the entire clip, so I added some “Head Back” offset to make the animation more natural. Hit OK to apply your changes.
Motion Modifier
Default animation vs Head Back Motion Modifier
Fixing Penetration Issues
Since my proportions aren’t the same as our virtual characters, my mocap might have issues, especially in scenarios where I need precise hand placement (since our arms are different relative lengths).
Goblin proportions vs human proportions
Edit Motion Layer
In the Modify panel, go to the Animation tab, and click on Edit Motion Layer.In the puppet window, select the IK controls you want to change to avoid interpenetration (like the hand position). Scrub a bit before the body part clips through the body and press the Set Key button. This will be the transition point from mocap data to our modified animation positions. Scrub to where the clipping occurs (where the hand is inside of the body for example). Move and rotate the hand control so there is no longer interpenetration, and hit Set Key to add a keyframe. Scrub the timeline to a bit after the clipping fix, and hit the Reset button; this will transition from our modified pose back to the original mocap data. Do this for all the problem areas of your animation.
Original pose
Modifi ed Motion Layer pose with no hand penetration
Installing and Launching AccuFACE
Although our Mocap file didn’t have facial animation, we can still add it. To get started, install the AccuFACE plugin for iClone 8 from the Reallusion Hub, then launch the AccuFace application. We’re going to use the camera workflow in this example, but you can also bring in video, and capture from that! In AccuFACE, select the CAMERA tab, and choose your camera in the Source dropdown menu. Since my camera is on a tripod, I’ll choose Static Cam for Tracking Mode.
Installing AccuFace
AccuFace Camera mode
Calibration
Click the Calibrate Facial Capture, and follow the directions to match your face to the expression descriptions – look at the camera with a neutral face, hit the Set Expression button, do a Brow Raise with your face, hit Set Expression, etc… until you’ve calibrated all four expressions. Close this window when you’re done.
Calibrating our face
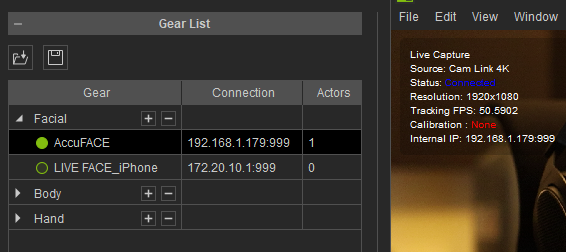
Connecting to Motion Live
In iClone,select your character model and go to Plugins > Motion Live > Motion Live. Under Gear List, click the + button in the ‘Facial’ row, and select AccuFACE.Type the IP address shown in your AccuFACE application into Motion LIVE > Gear List > Connection, and click the hollow green circle to activate AccuFACE, making the circle solid! Next, click on the hazard sign under Character List > Face and select AccuFace.
Selecting AccuFACE for our characters face
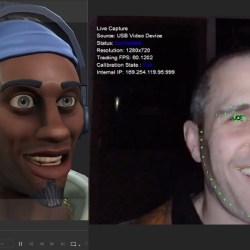
Click the Preview button and press the Spacebar to preview your own expressions on the virtual character, or click the Record button and press the Spacebar to start recording facial capture to your body motion capture!
Using our face to add facial animation to our virtual character!
John’s background and education are in the traditional visual effects pipeline, mainly as a Compositor. Over the years, he had worked at visual effects studios such as Rhythm & Hues, and game company Sony Playstation.
While he enjoyed those studio experiences, he found a greater love in passing along what he had learned. He has taught in the college education sector in Southern California for over 12 years, including the Academy of Art University.”
He has been entranced by their possibilities and integration with other tools, such as iClone and Character Creator ever since. John is also co-founder of the YouTube channel AsArt and also runs a tutorial-based channel, JohnnyHowTo. He would love for you to stop by and join him on his adventures!
My mocap workflow with iClone AccuFace
One great feature of AccuFaceis that it is integrated into iClone’s Motion LIVE system. This makes the interface intuitive and easy to use. Aside from wanting to spend some time understanding the considerations of video-based motion capture as a whole, everything felt like “business as usual”. Compared to other stand-alone capture systems I’ve used, this greatly simplifies the entire process to offer the type of creativity that brings the desired outcome in far less time.
Since iClone processes everything and applies it directly to the character, potentially incorporating face and body mocap simultaneously, you won’t encounter any of the pipeline concerns that might arise with other solutions. I used almost all the capture hardware I already had on hand: a webcam for video, an LED light to even out shadows, and a mini-tripod to keep the camera head-level. These items are relatively low-cost, so even if newly purchased, they won’t break the bank. However, there are some overall considerations, which I’ll share below.
Lighting matters
For AccuFace, I consistently used an LED light to ensure even lighting and minimize shadows, irrespective of the camera used — except when it comes to using something like Razer Kiyo, which has a built-in ring light. Shadows on the face can potentially impact tracking accuracy or consistency, so it’s essential to work toward eliminating them. Providing the best “source material” (i.e., capture environment) is crucial, and proper lighting setup is a simple step we can take.
Beyond lighting, you’ll want the camera to be aligned directly with the face so that it can capture everything at a natural angle. If the camera is positioned too high or too low, it may not accurately capture details such as mouth movements or eye blinks in their proper proportion. If I’m using a static camera, I would typically attach it to a mini-tripod to elevate it. I often find myself utilizing the Reduce Tracking Interference > Head option in AccuFace, as otherwise, my brow movements tend to affect the entire head movement.
AccuFace Panel
On the iClone end, there wasn’t much new to consider, as I had previously used the iPhone Motion LIVE profile, and the interfaces are quite similar. To use the module, you activate it within Motion LIVE, assign it to the character, and then access some tabs where you can filter the incoming data if needed. Before you start tweaking settings like Strength, Denoise, and Smooth, I recommend performing a sample capture to see how things look. If the lighting and angle in the video are solid, you might not need to adjust anything else – but rest assured, those tabs are there for you if the need arises.
Tips on live-capture mocap for AccuFace
Most of what I mentioned above will apply to both live and pre-recorded video capture, with a few caveats here and there. When dealing with live capture, it becomes crucial to ensure that everything is set up ideally because, well… it’s being live-captured! The easy solution here is to conduct some trial runs before you record “for real” and observe how everything looks when applied to the character.
I found myself adjusting the strength of morphs several times and making other miscellaneous tweaks to optimize results. Since it’s easy to use a webcam with AccuFace, many of us might prefer to just “leave it where it is” on the monitor, but typically that angle is too high. Having the angle and lighting locked down will save you from a lot of manual fixing later on — or having to start all over again — so it’s definitely worth the setup time.
I also found that accessing my webcam’s advanced settings was very useful, although the location of this option may vary depending on the webcam model. For me, unchecking the “low light compensation” setting improved video capture. While this setting enhances video clarity in low-light situations, it tends to make the footage appear more “smeared” in a way I typically associate with webcam footage. If the lighting is sufficient, this setting shouldn’t be necessary, which underscores the importance of using an LED light or a similar solution.
The Audio for Viseme option is tremendously helpful and, at least for me, is something I will always use with dialogue. This is because our capture is integrated with iClone AccuLips for lipsync animation. It provides more defined mouth movements for speech, and its effect on the animation can always be dialed down in iClone if you feel it’s too pronounced. It’s also important to take the time to perform the Calibrate Facial Capture poses: the enhanced results are more than worth the 10 to 30 seconds it will take you to go through them!
Tips on using pre-recorded video with AccuFace
I appreciate that we can use pre-recorded video in AccuFace, as it opens up plenty of options for us. In one aspect, it can be a little trickier to “lock down” the settings, as you might not know what the footage looks like until you view it on the PC after-the-fact. The tiny displays on many cameras can make it challenging to accurately assess how things look, and depending on the lighting in the shooting location, you might not even trust the preview display.
Phone-based video review works better since you have its larger screen, but ideally (in almost all cases), it would be useful to have something like a laptop on hand, where you can load some sample clips and see how they look on a larger display. This practice is pretty common for film shoots as well, so I don’t really consider it a limitation as much as a “best-practice” precaution.
As an example of checking settings: when I used a GoPro for helmet-mounted captures, I loaded a couple of sample clips onto the PC before committing to “real” takes. It was a bit of a pain since I had to maneuver the card out of the helmet rig, but it turned out to be worth the effort. The initial footage was a bit too dark and grainy/noisy, which might have worked fine but was less than ideal for feature tracking.
After making a few adjustments on the camera, things looked much better, and I could continue with a greater sense of confidence in the expected results. As a final but important consideration: don’t forget to record your poses for the Calibration step! It can be fairly easy to forget, but it’s worth doing before you start recording “for real”.
Helmet mocap comparison: Live Face vs AccuFace + GoPro
I’ve observed discussions among iClone users regarding their preferences between iPhone LIVE Face and AccuFace solutions. When it comes to helmet camera options, the choice depends on what you have access to. I personally use a relatively ancient GoPro Hero Silver, which, being ultra-lightweight, makes it an excellent candidate for a helmet-mounted camera. This camera is employed in various professional helmet setups.
An iPhone equipped with a TrueDepth sensor is also a viable option, as seen in the projects of companies like Epic Games. Both devices can deliver great results, but I find the “GoPro attached to a helmet” solution much more comfortable than having an iPhone strapped and suspended in front of my head. The weight of an iPhone becomes noticeable, and I found myself adjusting my performance to compensate — not ideal. Using a lightweight camera with AccuFace alleviates this issue and provides a significant advantage for AccuFace.
On the flip side, I see two main upsides to using iPhone Live Face over camera recording. At least in my scenario, one is synchronization. Unless you have a lightweight “action camera” that can serve as a wireless webcam, then you’re going to be stuck trying to figure out where the body mocap lines up with the face performance afterwards.
The other main consideration is lighting, and since TrueDepth-enabled iPhones use a depth sensor, they aren’t affected as much by lighting changes. The AccuFace solution here is a camera-mounted light, which is possible but requires extra effort to get implemented (and can add more weight). I hope what I’ve written above gives you some ideas and insights to enjoy the new tools!
Create Accessories in ZBrush for Your Animated Characters
Intro– Create Accessories in ZBrush for Your Animated Characters
We can’t leave our character naked, so let’s talk about accessories and clothing. Figure out what kinds of things your character needs — horns, loincloths, pants, boots, wraps, weapons, etc… and we’ll discuss in the following sections how to create them in ZBrush, texture them, get them into Character Creator, and attach them to your character.
The in-depth creation techniques for the clothing and accessories shown here go beyond the scope of this article. However, please watch this livestream for more information on how to create high-res assets in ZBrush for use in Character Creator.
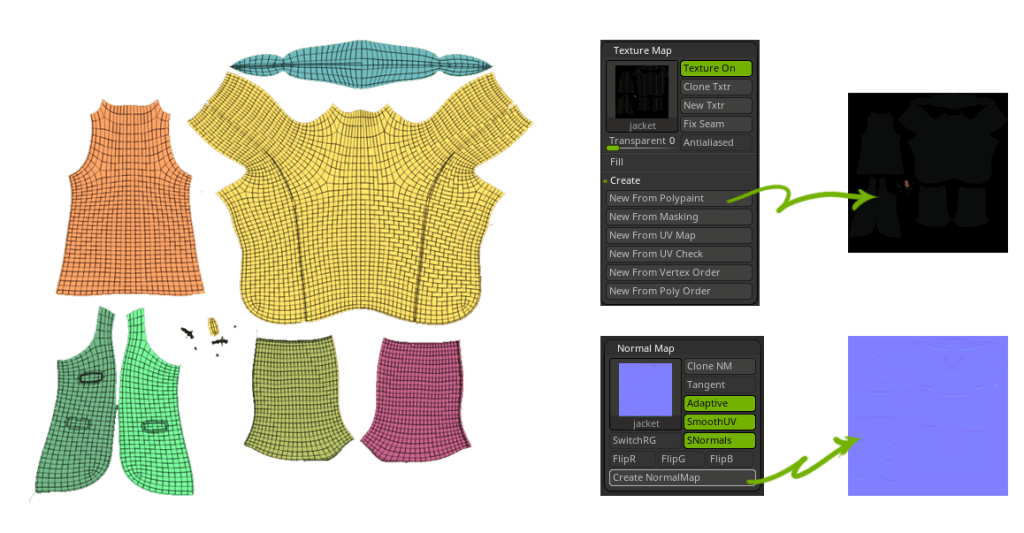
Export High & Low Meshes
Once you have your high-res meshes modeled, export them as an .fbx, with “<object_name>_high” as the subtool name, so you can bake later in Substance 3D Painter using namespaces. Create a corresponding low-res for each high-res asset, and again, export your low-res as an .fbx. Don’t forget to UV your assets, and name each object with “<object_name>_low” to match the naming of your high-res .fbx file. Keep in mind there’s a 300k quads (600k tris) limit per character in Character Creator — that’s a lot of triangles, so you shouldn’t have to go crazy with optimization, but optimize it enough to keep your character under that poly budget!
Corresponding _high and _low meshes
Part 2- Texturing Armor, Clothing, & Accessories in Substance Painter
Baking Accessories and Clothing
Just like we did with our body, we’ll launch Substance 3D Painter, go to File > New, select your “_low.fbx”, then go to the Texture Set Settings tab and click Bake Mesh Maps. Load up your high-res mesh, remember to change your Material ID to “Vertex Color” so we can bake our polypaint to selectable masks, and press the Bake selected textures button. When your objects are done baking, press Return to painting mode.
Baking _high to _low
Texturing Accessories and Clothes
Just like we did with our body, drag and drop materials from the material library, create your own materials using fill layers, mix and match and blend materials together using masks, add generators like dirt and edge wear to do some visual storytelling, splash on some blood splatter and mud, whatever you’d like in order to make your accessories and clothing look like they’re made of the correct type of material, and are worn and “lived in” to add some realism to convince your audience this is a real character.
Texturing our accessories and clothing
Exporting Textures
This is pretty simple — go to File > Export textures, choose “PBR Metallic Roughness” for your Output template, make your Output Directory wherever makes sense for your textures to be exported to, and hit the Export button.
Part 3- Importing Clothing & Accessories from ZBrush to CC
Importing Clothes & Accessories into Character Creator
Now that we have our clothing and accessories textured, let’s get them into Character Creator. In CC, go to Create > Accessory, and import your low-res file. When it asks you if you’d like to merge all, choose Cancel. You’ll see the accessories don’t fit the character perfectly; Select them all in the Scene tab, press W on your keyboard to bring up the gizmo, and move your accessories onto your character so they’re placed appropriately.
Moving imported accessories into place
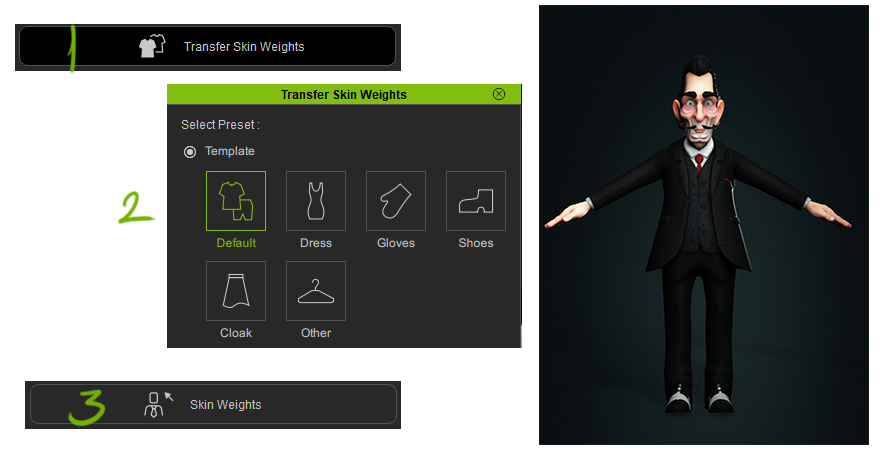
Converting Accessories into Clothing
We’re going to skip objects that could be bound to a single joint, like armor, pouches, backpacks, and weapons for now. Instead, select an accessory mesh that will bend with multiple joints across the body, for example: shirts, pants, or boots. Press the Transfer Skin Weights button in the Modify panel Attributes tab.
Transfer Skin Weights
Choosing the skin template
Choose the appropriate template for the type of asset. If it’s a shirt or pants, choose “Default”; if it’s gloves or boots, choose the appropriate template. Do this for the rest of your clothing type assets.
Binding Accessories to the Correct Joints
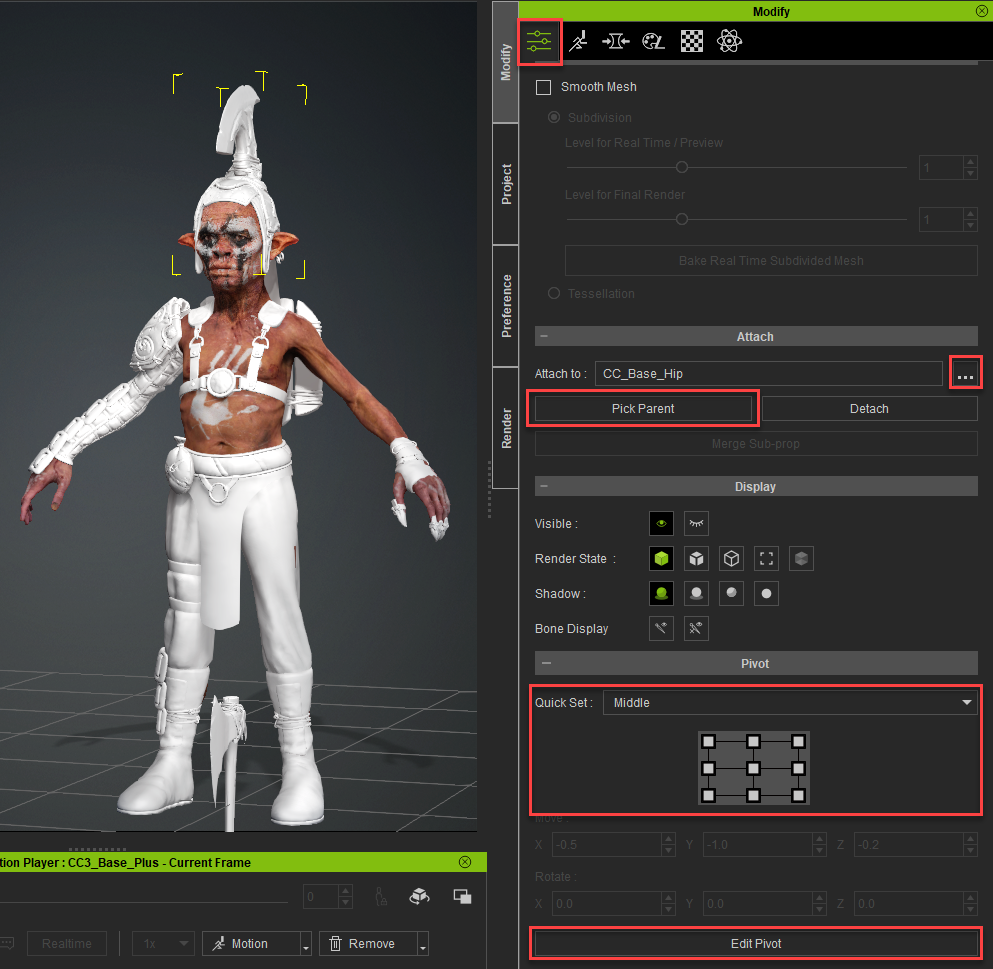
After we’ve converted the appropriate objects to clothing, all we have left are objects that can be “rigid bound”. In other words, objects like helmets or shoulder pads that can rotate along with a single joint, NOT deform across multiple joints. You don’t want your metal helmet bending and stretching when your character’s head moves. For the remaining accessories (again, objects attached to just one joint), select the one you want to modify, then scroll down toward the bottom of the Attributes tab and use Pick Parent and/or Attach to: to update the bones associated with your accessory.
Attaching Accessories to joints and setting pivots
Setting your Accessories Pivot Point
After attaching, continue scrolling down the Attributes tab and use the Quick Set panel to quickly set your accessories pivot, and/or use the Edit Pivot button to finetune pivot placement for your accessory.
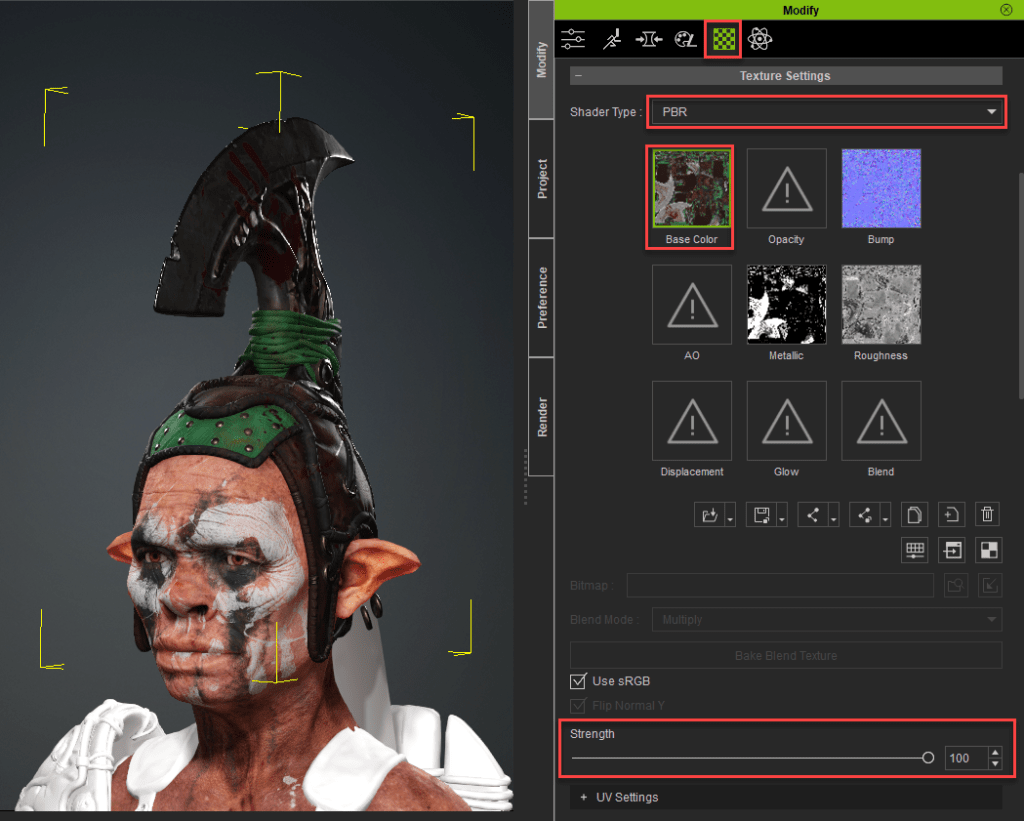
Materials
In Substance Painter, we exported our textures using the PBR metallic/roughness preset, giving us base color, metallic, normal, and roughness textures. In Character Creator, select an accessory, go to the Material tab, switch the Shader Type to PBR, and double click the preview swatches to load in all of your textures. For your base color, you may have to increase theStrength of the Base Color from 80 to 100, and for your normal map, you may have to Flip the Y channel to get it to appear correctly.
Plugging in textures to our materials
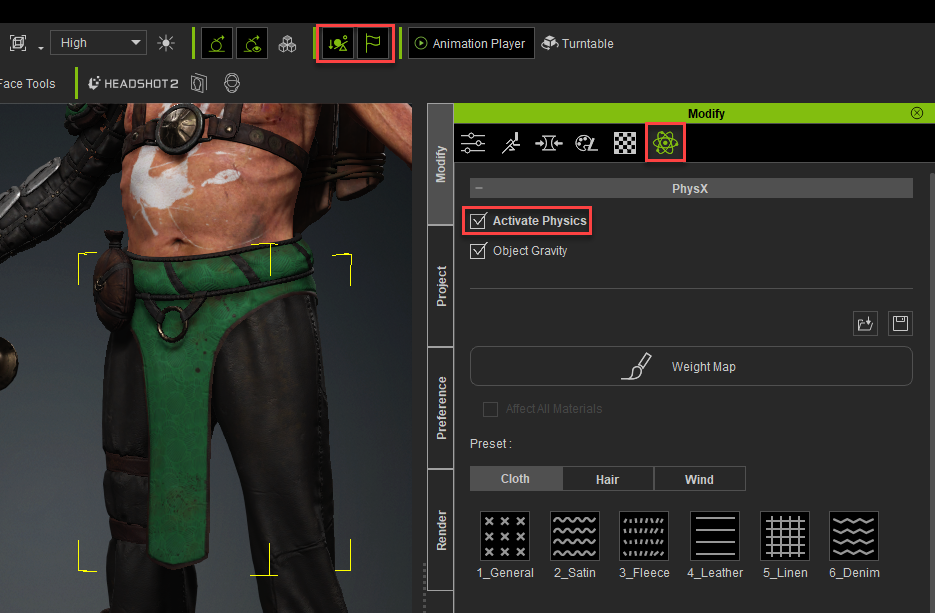
Cloth Simulation
If you have clothing that needs to swish and flip around while the character moves, we’ll need to do some extra steps. Select your cloth object, and in the Menu Bar, turn on Rigid Body Simulation and Soft Cloth Simulation. Then, go to the Physics tab, and turn on Activate Physics. While still in the Physics tab, plug in a weight map, where the black areas of the map are parts of your mesh you want skinned to the body weights, and the white areas are where you want physics to take over in regards to how your mesh reacts to movement.
Turning on Rigid Body and Soft Cloth simulation and activating physics for our loincloth
The black areas of your weight map are skinned, white are physics driven
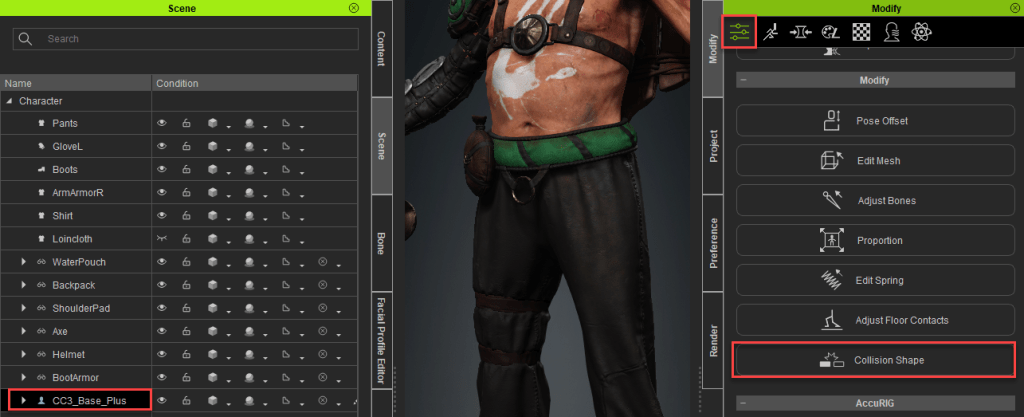
Collision Capsules
The physics-driven parts of our meshes won’t actually collide with the body, accessory, or clothing assets in Character Creator. Instead, they will collide with invisible capsules. To adjust these, turn off your cloth object, select your “CC3_Base_Plus” group in your Scene tab, and press the Collision Shape button. In the Character Collision Shape Editor, make sure Collision On is checked, then click on the various parts of the dummy to modify, delete, or add capsules to your character body.
In the case of the loincloth, you’ll see we only need capsules turned on for the thighs, so we just need to activate those capsules, and modify them so they’re representative of our character’s thigh volumes.
Accessing Collision Shapes
Deactivating capsules we don’t need, and modifying the ones we do
Testing Your Physics
In the Animation Player, click on the motion button and choose a walk or dance animation, where you can see your now physics-enhanced asset interacting realistically with your character. To ensure the cloth is being simulated correctly, you can switch the Animation Player from Realtime to By Frame.
Testing our cloth with an animation
Caching our cloth simulation
If you want to scrub the simulation, go to Edit > Project Settings, and enable Bake Animation. That way, when you do your initial playthrough of your character’s animation, it will cache the physics movement, allowing you to scrub your animation with the cloth behaving as expected.
Saving Clothing and Accessories
It’s often useful to re-use clothing and accessories for other characters. In CC, select the asset you want to save (shirt, shoes, etc…), navigate to the Custom tab in the Content browser, going to the folder you expect the asset to be located (Accessory > Head for example, or Cloth > Pants). Then simply hit the Save button. The resulting dialogue box might choose the correct asset type, but if not, simply choose it from the dropdown menu. Do this for all the clothing and accessories for your character that you might want to share later.
Saving our asset as a reusable custom asset
Naming and ensuring asset location
About The Author
Michael Pavlovich earned a Bachelor’s degree in Computer Animation from RSAD in 2005. Initially, he contributed to the development of environment and character art for popular video games such as Madden and NCAA Football. Later, he relocated to Austin to join Daybreak Games, where he worked on the creation of art assets for DC Universe Online.
Presently, Michael holds the position of Director of Character, Weapon, and Vehicle Art at Certain Affinity. His expertise lies in implementing iterative pipelines for Certain Affinity artists helping develop renowned video game franchises, including Halo, Call of Duty, and DOOM. To stay updated on his latest tutorial projects, you can visit Michael’s YouTube or ArtStation page.
Introduction- How ZBrush Artists Benefit from Character Creator
Utilizing the Character Creator (CC) base topology will allow ZBrush users to take advantage of an endless playground of flexibility and fidelity! Not only can we quickly and easily dial in the look and feel of our character using Reallusion’s robust morphs, but we’ll also gain skin weights, access to powerful rigging and facial animation systems that will give us a completely animated character from the first step. Additionally, we have the ability to quickly and easily UDIM texture our character in Substance 3D Painter!
While this will require us to work with a specific topology, there is a HUGE range of potential — from stylized to hyper-real to exaggeratedly cartoony, you’ll be amazed at what you’ll be able to create, and have it animate while you work.
Flexible base mesh – stylized to hyper real to cartoony!
Part 1- Start with CC Base Model Before ZBrush Sculpting
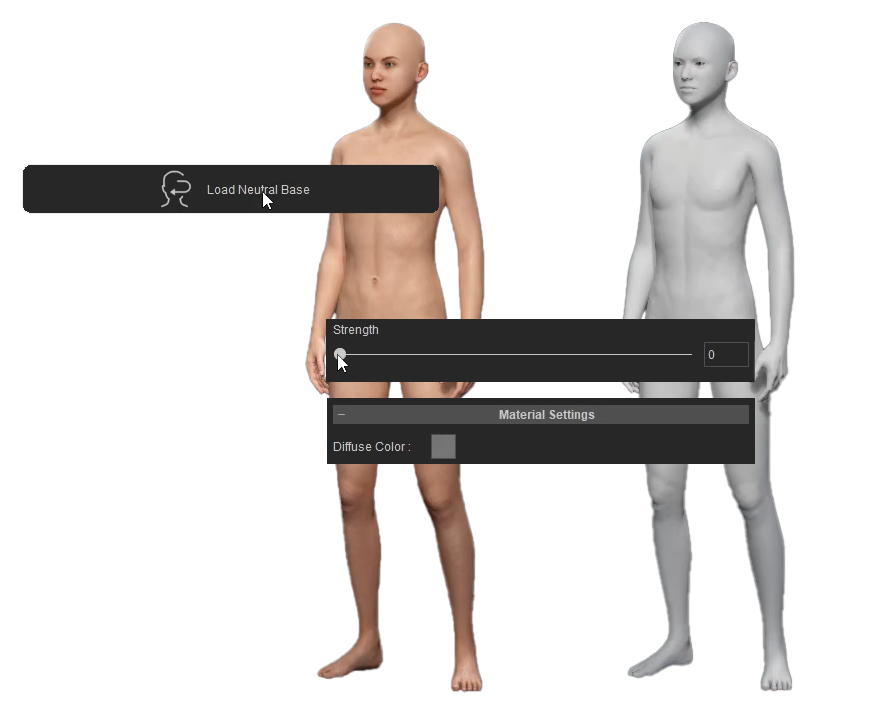
Neutral Base
We’ll need to load up a neutral CC3+ character to start with. Launch Character Creator by opening Reallusion Hub and Character Creator 4. Under Modify section > Attribute Tab, click the Load Neutral Base button.
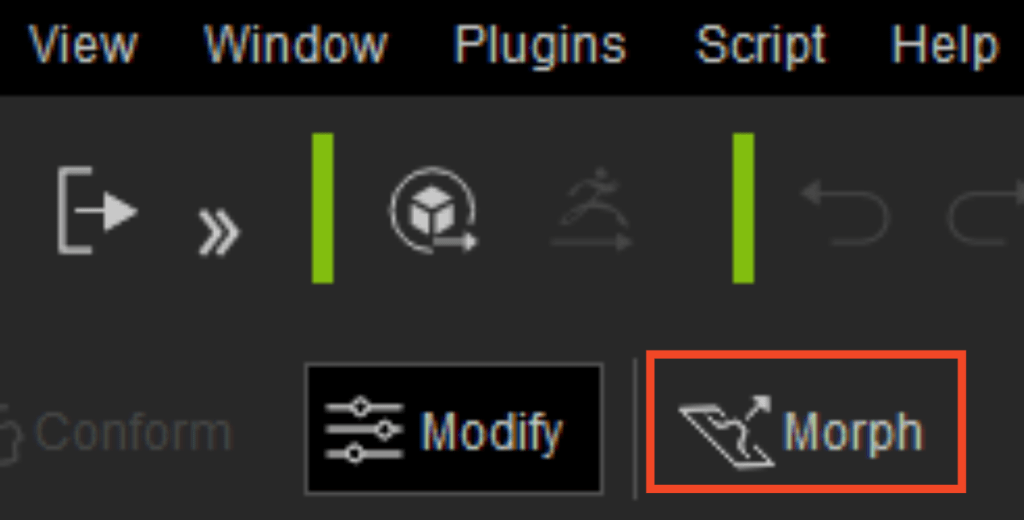
Morphs
Morph Button in Menu Bar
Now that we have a generic base human, lets dial in the look and feel of our character. Hop into the Morph tab and begin working your way down the list, from large changes, to more specific detailed morphs to dial in your base body and head shapes. You can also type terms into the search bar to narrow your selection — for example, type in “scale” to access just the scale options for any particular body part.
In addition to sliders, you can also turn on the Morph option in your menubar to unlock viewport morphing. With this option enabled, you can simply click and drag portions of your character to change the shapes.
Relaxed A-Pose
Before we send our character over to ZBrush for more refinement, go to the Animation Player > Motion dropdown, and choose Pose > A-Pose, so we can sculpt our character in a relaxed, symmetrical pose.
Animation Player > Motion Dropdown
Neutral Base body and morphed result
Part 2 -Character Creator to ZBrush and Back Again
GoZ from Character Creator to ZBrush
Now is the time to refine our character in ZBrush using their sculpting tools. In order to send our Character to ZBrush, go to your Scene tab, shift select all character assets, then click the GoZ button in the menu bar. In the GoZ Settings panel, make sure the Template is set to “Create”.
Shift select and GoZ
Enable eyelashes and tear ducts under the Body Parts section to split them off into their own meshes, and choose Current Pose in the Pose section. I like separating eyelashes and tear ducts, so I only have the “skin” of my character as a subtool while I work.
Refining your Characters Shapes in ZBrush
Now that we have our character in ZBrush, select the “CC_Base_Body” subtool, and begin refining your character. Use your favorite brushes in ZBrush to sculpt and refine your body and face shapes. Also, feel free to press the Divide button to subdivide your mesh and work on the details that we’ll bake to a normal map later on in the series.
Subtool selection, subdivide, and brushes
Testing Animations and Utilizing Morphs
Once you’ve refined your mesh, you can send it back to Character Creator to see how your new shapes work with animation, as well as utilize CC’s morph system to make further changes. Simply press the GoZ All button in the Tool menu, and that will automatically drop your body subtool to “SDiv 1”, and send your mesh back to Character Creator. The GoZ option box in CC should default to Update, and choose Current Pose. Your CC model will now match the changes you made in ZBrush. Feel free to test animations from the Content tab or Animation Player, as well as continue using the morph system to make further changes. You can GoZ back and forth between CC and ZBrush as many times as you’d like, while you refine your character.
Relaxed A- Pose to ZBrush
Sending a T- Pose so we can make proportional changes in ZBrush
Telling Character Creator to move the bones to adjust to the proportional changes we made in ZBrush
Proportional Changes (Joint Positioning)
If you’re using the CC morph system to make proportional changes to your character, such as making the arms longer, hands bigger, etc., your character should always animate as expected. However, if you’re planning on making changes in ZBrush that will change proportions that affect joint positions, you’ll want to select the T- Pose option instead of A-Pose or Current Pose. Once your character is in a T- Pose in ZBrush, feel free to make as many proportional changes in ZBrush as you’d like.
When you’re done, GoZ all your meshes back to Character Creator, and make sure you check on the import option to allow mesh changes to update joint positions when GoZ-ing back to CC. Remember you can also GoZ back to CC and use their morph system to make proportional changes to joint positions as well, then GoZ those updates back to ZBrush, and continue detailing.
Part 3 – Character Detailing and File Saving in ZBrush
Detailed Body Sculpt in ZBrush
Now that we can bounce back and forth between Character Creator and ZBrush, utilizing morphs and ZBrush sculpting, continue subdividing, sculpting, and polypainting until you have a detailed, unique, awesome character base mesh.
While you can go to pore-level detail in ZBrush, keep in mind you can take your sculpt to “tertiary volumes” and allow SkinGen in CC to provide the pore level details, which is much less destructive and more flexible!
Our goblin character sculpted and polypainted
Saving Files
In ZBrush, go to File > Save to save a ZProject(.zpr) file. GoZ All to update your Character Creator file, and in CC, File > Save As .ccProject file. Do this whenever you want to end a session and pick up where you left off. All you’ll have to do is open them both up in their respective programs, and GoZ from CC to ZBrush, choosing the ReLink option.
Part 4 – Texturing with ZBrush & Substance Painter Bridge
In order to export our textures from Substance Painter so that Character Creator can quickly and easily import the texture files, download this preset file:
And move the file to “C:\Users\ (UserName)\Documents\Adobe\Adobe Substance 3D Painter\assets\export- presets”.
Texture Baking and Substance 3D Painter Workflow
Right now, we have a detailed polypainted mesh in ZBrush, but our CC mesh is only the low res mesh — we need to bake those details to that low res mesh, so our character looks as detailed in Character Creator as it does in ZBrush. Before we get too far, make sure you GoZ over the final geometry changes from your ZBrush file back to Character Creator.
Opening the Mouth for Baking
In Character Creator with your character selected, go to the Motion tab, and choose Edit Facial. In the Edit Facial settings, go to the Modify tab, choose Jaw from the list, and change the value for “Jaw_Open” to 50 , then GoZ back to ZBrush to open your high-res ZBrush mouth file.
Motion Tab > Edit Facial
Modify tab > Jaw Open
Exporting the Low- and High-Res Meshes
In Character Creator with your character selected, use the Substance Painter button dropdown in CC to export an obj file of your character.
Painter drop- down menu
FBX export options
Save this file in an easy to find folder. This is your low-res file we’re going to bake our details to. Toggle back to ZBrush, and with your “CC_Base_Body” subtool selected, make sure you’re at the highest subdivision level with all your details. With your polypaint enabled, click the Export button in the Tool menu. Choose FBX from the file type options, and in the FBX options, turn on Selected, so we just export our high-res body.
Substance 3D Painter Baking
Open Substance 3D Painter, and choose File > New. Press the Select button to import your obj file from Character Creator into Painter, with Use UV Tile checked on.
New Painter File
Texture > Bake Mesh Maps
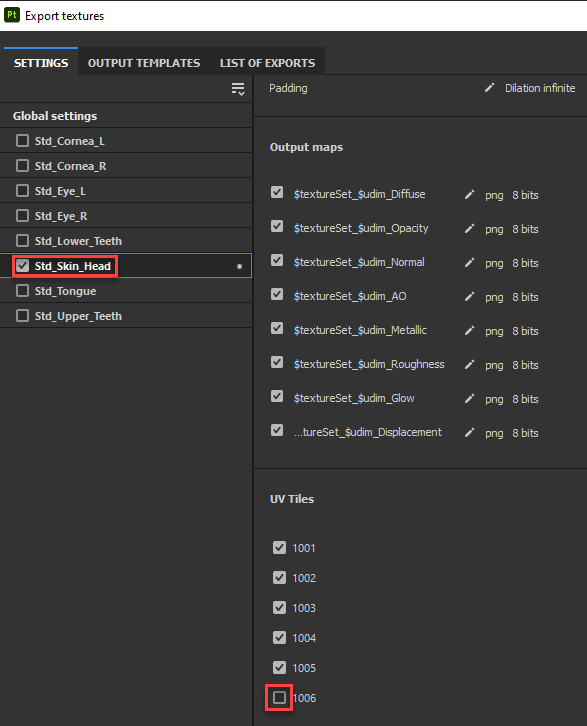
Once your low-res character is loaded into Painter, go to the Texture tab and scroll down until you can click the Bake Mesh Maps button. Uncheck all the objects except for “Std_Skin_head”, and in the UV Tiles dropdown, you can uncheck the box for “1006”, which is our eyelashes — we don’t need to bake that mesh! If you have a polypaint in ZBrush to bake, make sure to select Material ID and change Color Source from Material Color to Vertex Color. Click Bake selected textures, and when it’s done, click Return to painting mode.
Texture Set selection, Material ID location, Output Size, and High Res loading
Texturing
Using paint layers, fill layers, masks, generators, filters, and any number of powerful Substance Painter texturing options, texture your character however you’d like. Remember, you can load in your Color Map that was baked from your Material ID into a fill layer to use your ZBrush polypaint as a base for your textures.
Texturing the character
Exporting Textures
Now we need to get our textures back into Character Creator. In Substance Painter, go to File > Export Textures, and select the sets that you want to export textures for. In our case, we’ll turn off everything but “Std_Skin_Head” in Global Settings; and with “Std_Skin_Head” selected, we’ll also turn off “UDIM 1006”, which is eyelashes. For the Output Template, choose the “Character_Creator” option we copied into our export-presets folder. Set Size to “2048”, and finally, Output directory should be the root folder of where you imported your .obj file — for example, “C:\Users\mpavlovich\Desktop\GoblinDemoSubstance” is the folder my .obj mesh is in.
Speaking of the root directory, I’ve found it useful to navigate to that directory in Windows Explorer, go into the “Std_Skin_Head” texture folder Character Creator made for me (in my case, “C:\Users\mpavlovich\Desktop\GoblinDemoSubstance\GoblinDemoBody\Std_Skin_Head”), and delete all the “Std_Skin_Head” textures for UDIMs 1001 to 1005, leaving just the eyelash textures behind. This way, I know when I export my textures from Painter, there won’t be any duplicate files or conflicts. When you just have “_1006” textures in that folder, hit the Export button in Substance Painter, and you’ll see this directory populated with all of your new, updated skin textures.
Importing Textures
Back in Character Creator, select the character, then choose the Update Textures from Painter option from the Substance Painter dropdown menu. This will bring up a windows explorer window. This time, we’ll go into the folder containing the organized folders. Press Select Folder, and Character Creator will automatically update all your body part materials to your new textures.
When importing textures into CC, you should be in this organized folder
Diff erent textures loaded onto the same body in Character Creator from the Substance Painter bridge
Expression Wrinkles
Expression wrinkles are a great way to add life and believability to your characters. We can quickly and easily add the neutral expression wrinkle set by selecting your “CC3_Base_Plus” group in the Scene tab, then in the Expression Wrinkles tab in the Modify panel, turn on Activate Expression Wrinkles and Check with Expressions. This will apply a neutral expression wrinkle pack to your character. Click on the different regions on the face map to see wrinkles update on the character’s face, as well as adding enhancing wrinkles when playing the “Dramatic_Male” face animation. We’ll dive deeper into expression wrinkles, how they work, and make our own, in the “Face Tools” series.
Expression Wrinkles tab
Dramatic_Male face animation applied to our character
About The Author
Michael Pavlovich earned a Bachelor’s degree in Computer Animation from RSAD in 2005. Initially, he contributed to the development of environment and character art for popular video games such as Madden and NCAA Football. Later, he relocated to Austin to join Daybreak Games, where he worked on the creation of art assets for DC Universe Online.
Presently, Michael holds the position of Director of Character, Weapon, and Vehicle Art at Certain Affinity. His expertise lies in implementing iterative pipelines for Certain Affinity artists helping develop renowned video game franchises, including Halo, Call of Duty, and DOOM. To stay updated on his latest tutorial projects, you can visit Michael’s YouTube or ArtStation page.
The recently released Social Group Bundle for the new iClone 8.4 Crowd Sim tool is a combination of professionally created characters, accessories, props, and motions that work with the new Crowd Sim tool to create a high-quality crowd. These assets come with features not found in most Character Creator or iClone characters like multiple clothing materials for a more varied crowd and handheld devices for related motions.
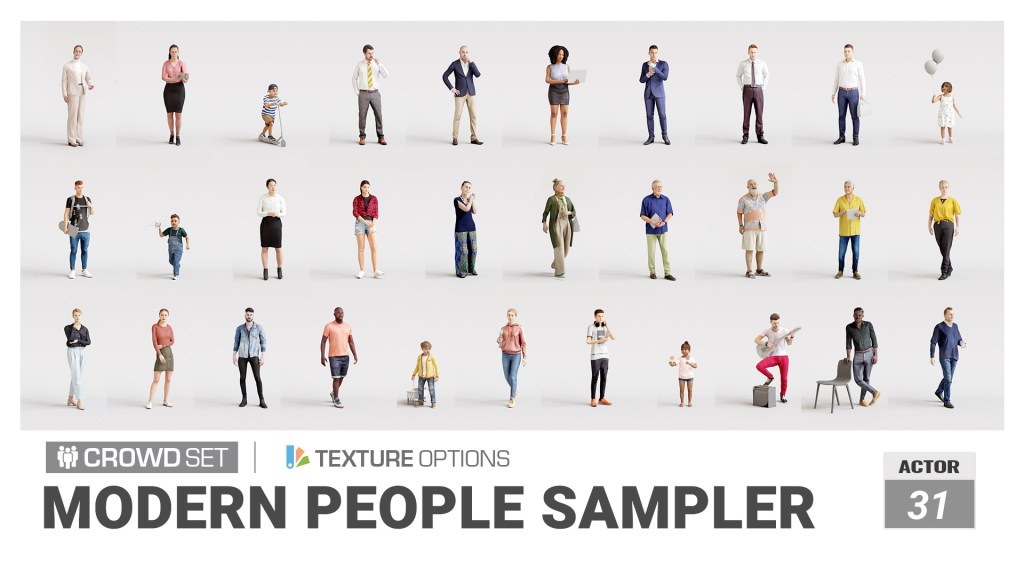
The Social Group Bundle is comprised of two products, the Modern People Sampler, and the Social Actions motion pack. Both packs are full of great drag-and-drop 3D assets that can bring a scene to life by quickly adding background characters in various motions and tasks. Let’s take a look at what the packs contain.
Inserting bench-sitting crowds with Actor Groups and the Social Group Bundle
The types of characters in this pack can make a contemporary crowd for many different occasions from old to young, business, formal, or casual. It can work for a bustling downtown crowd to a more suburban mall or even a street party.
This “people pack” provides 31 drop-in characters with five texture variations each that the new Crowd Sim tool can use to pump out a randomized crowd in minutes or less. Whether it’s a harried businessman or a street performer this pack has the character. It includes grandma and grandpa too with the Senior characters along with the grandchildren in the kid’s pack.
One positive thing about crowds is the ability to liven up a scene and add a little more realism. One bad thing about crowds is the repetitive use of characters. This is nothing new as crowds require a lot of resources to operate so duplicating characters is one way of dealing with the problem. Over at ActorCore, they solved this with multi-texture options for diversity in crowd generation.
Each multi-textured character, such as the characters in the Modern People Sampler, has five color variations available to the Crowd Sim tool. This Is not something we have to keep up with as all we need to do is check a box for material variations when generating a crowd using these characters. Like camouflage, this helps break up the easily spotted pattern of repetitive characters with a crowd.
The varied age groups, body types, heights, and weights all combine to make a more believable crowd as the camera pans by or draws back to a wide shot. These characters look great from any distance and close to the camera.
Reallusion: Each character in this pack comes with color masks, allowing for easy apparel changes and character switching. This feature enhances flexibility and customization options, ensuring that you can achieve the desired look and feel for your crowd simulation projects.
Below you find a video about texture options for ActorCore characters which applies to these packs as well.
Another asset needed to create crowds are the appropriate motions both stationary and moving as crowds tend to be both. Reallusion has you covered here with the Social Actions motion pack for Actor Groups.
If you aren’t familiar with Actor Groups, I’ll be covering them in a later article but for now, you can get more information about what a time-saving tool they are, how to deploy them, and how to create your own Actor Groups from the following tutorial.
Social interactions are another very important but difficult group of motions to keyframe and are more suited to motion capture for a lot of animators. These seemingly uninteresting, common, everyday motions make up the fabric of life around us. Without them, we would be robots, waiting to move only when needed but thankfully, humans aren’t that way. We are fluid, always in motion, and Actor Groups add this type of visual fabric with drag-and-drop ease and simplicity.
A quick breakdown of the pack shows it contains: 90 Motion Plus groups, 8 Preset groups, 3 Random groups plus 8 Bonus props and accessories. This is a large pack with a lot of assets to help you create a diverse crowd.
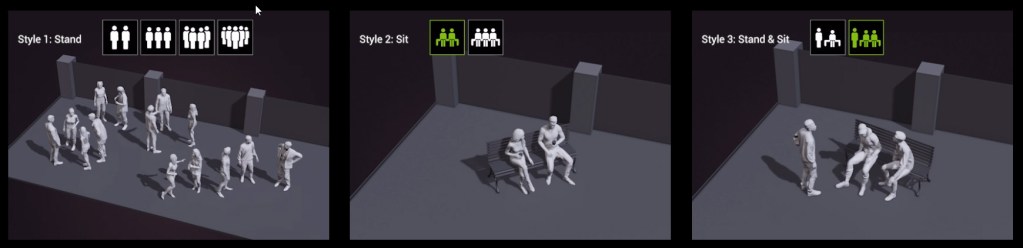
Walking crowds are great but many crowds consist of smaller stationary groups often made of random groupings of people participating in conversations, interacting with their phones, or just relaxing. While you can easily create crowd clusters, those types of crowds are not as common as you might think and are not part of the mix for a street or similar crowd unless it is a live event or something similar.
Below you see a brief description and images in each section that demonstrate some of the versatile spawning techniques along with the menu that pops up when you load Actor Groups into the workspace. This is shown in more detail on the Social Actions Content Store page.
RANDOMIZE ACTORS
Actor Group strengths really shine here. With drag and drop ease you can load in a bench with actors in conversation already seated. It can also randomize Actor Groups with different actors and materials.
RANDOMIZE MATERIALS
It’s not just actors that are randomized. You can select from Materials Only to get different clothing colors, or you can randomize the actors and the materials for even more options.
PROPS & ACCESSORIES
Props and accessories are needed for some motions like sitting or interacting with a device and Actor Groups help with providing those items when needed to complete an Actors Group.
ORIENTATION
Orientation provides a change in position for each Actor Group, so they are not identical and not look like clones of each other. This allows for the general orientation of each group to differ and to be controlled by the user.
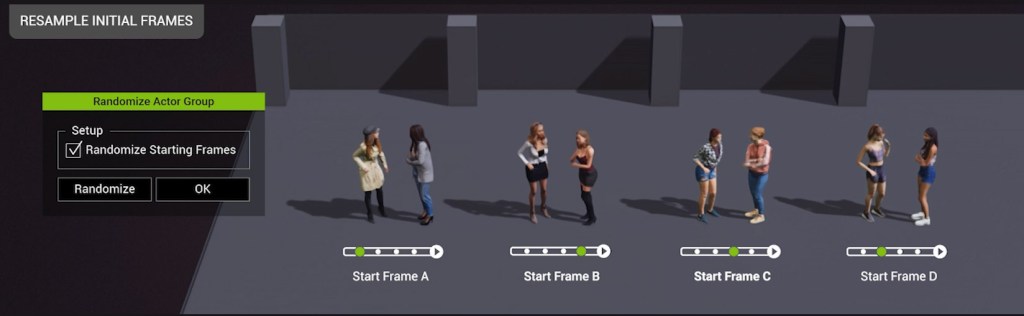
MOTION OFFSET
This option gives us a different starting frame for each group so they will not be doing the same motion at the same time. While these Actor Groups would not normally be this close to each other it does provide some additional protection against having the same motions running at the same time if this does occur.
Below is an image from the product webpage demonstrating the different types of standing, sitting, and mixed Actor Groups that can be dragged and dropped into the workspace. Load a five-actor standing preset along with a few two and three-actor mixed sitting and standing groups and you have a quick start on a crowd that will fill just about any medium to close camera shot.
Add more Actor Groups using the popup menu to randomize each group and you can build a larger and larger crowd before you even think about implementing NavMesh or Volume crowds.
ROSTER EXPANSION & CUSTOMIZATION
USER-DEFINED ACTORS
Tailoring actors within Actor Groups is a breeze. By accessing the Actor Group settings, you can find a preset, swap out the actor pool with your customized lineup, and ensure compatibility with corresponding gender and age tags. Once a new iActor Group is made, all subsequent spawns will feature distinct appearances.
ActorCore BRIDGE
At the heart of Actor Group lies the ability to randomly spawn actors featuring customized animations. Beyond your personally curated actor list, source from all available ActorCore characters to pair matching animations for males, females, children, and elderly. Expanding your ActorCore collection will also broaden the diversity within your cast of characters.
CUSTOMIZATION
Once satisfied with the spawned formation and the actors’ behaviors, you can effortlessly drag and replace any actor or adjust their material colors according to your preferences.
Add standing stationary crowds with Actor Groups from the Social Group Bundle.
SUMMARY
In my opinion, the product demonstrates how much planning and effort have been put into these characters and motions and how important tools like Actor Groups are to creating a crowd in as little time as possible. This combo pack provides high-quality characters and studio-quality motions to create a crowd effortlessly and quickly.
Now let’s look at what we all want to know… does it really work this easy? Yes. It is that easy. Add in some path-driven walkway crowds and you have a complex and compelling crowd with a few clicks of your mouse.
Over the years I’ve dealt with a lot of crowd simulators/generators including manual crowd creation and I found the Actor Groups to dramatically decrease the time it takes to populate a scene with more than just a randomly generated NavMesh or Volume crowd. While those can be great crowds on their own, the Actor Groups add a specific flavor or type of crowd that can blend in or stand out… like a street utility crew hard at work or a gun crew manning a weapon. Improve your scenes without adding a lot to your already busy workday with the Social Group Bundle from Reallusion.
A crowd (except walking characters) created with characters and motions from the Social Group Bundle.
Digital Artist MD “Mike” McCallum, aka WarLord, is a longtime iClone user. Having authored free tutorials for iClone in its early years and selected to write the iClone Beginners Guide from Packt Publishing in 2011, he was fortunate enough to meet and exchange tricks and tips with users from all over the world and loves to share this information with other users. He has authored hundreds of articles on iClone and digital art in general while reviewing some of the most popular software and hardware in the world. He has been published in many of the leading 3D online and print magazines while staying true to his biggest passion, 3D animation. For more information click here.
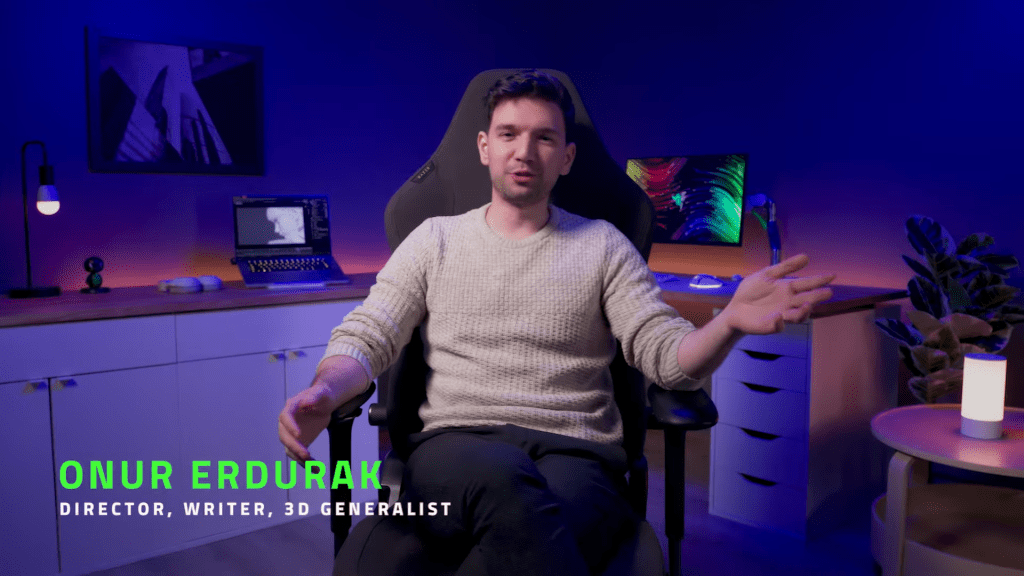
ONUR ERDURAK, a Turkish director, writer, and 3D artist, is passionate about storytelling. He debuted with “STRANDED,” showcased at Cannes, and now pursues an MFA at Loyola Marymount University as a Fulbright grantee. He shares his creations through “Blendreams,” where he has amassed over 100,000 followers on Instagram.
In this video Onur shares how he utilizes Razer Blade laptops, equipped with @NVIDIA-Studio GeForce RTX 4080 graphics, for seamless integration with Character Creator (CC), iClone, and Blender, crafting immersive worlds and characters.
“Character Creator (CC) is my go-to software for creating the actors of my 3D worlds. iClone, Character Creator, and Blender all work great with my Razer Blade Studio laptop with Nvidia Studio drivers, allowing me to seamlessly generate production-quality renders with hardware accelerated motion blur and optix denoising, while being fully portable for any stage or scenario.”
Onur Erdurak – Director / Write / 3D Generalist
Creating 3D game characters with Character Creator on Razer Blade Studio laptops
Onur first ventured into testing Character Creator 4 (CC4) for his short animation project, “The Apple Thief.” The remarkable outcome of his work caught the attention of Reallusion, leading to explore the potential of further using Character Creator with iClone 3D character animations.
Leveraging these innovative tools, Onur later combined Character Creator with a scan of his own head, seamlessly integrating it into the digital realm as a medieval warrior within Blender. The results were nothing short of astonishing, fulfilling a childhood dream of starring in his very own action movie.
Using Character Creator ZBrush Face Tools for Fully Expressive 3D Facial Animation
Using Character Creator ZBrush Face Tools for Stylized ZBrush Expressions
Embark on a sculpting journey with Óscar Fernández, a digital sculptor specializing in 3D printing and collectibles. Join him as he unveils a groundbreaking workflow for effortlessly crafting expressive facial expressions for his Salvador Dalí with ZBrush with Character Creator.
Discover professional results without the complexity of traditional approaches, thanks to the revolutionary Character Creator ZBrush Face Tools. Elevate your artistic process and unleash your creativity with Óscar’s innovative techniques to dive into the world of digital sculpting like never before!
DIGITAL 3D SCULPTOR ÓSCAR FERNÁNDEZ
Hi artists! My name is Óscar Fernández, I am a digital sculptor. My work usually centers on figures for 3D printing or collectibles. I’d like to demonstrate a workflow for creating Stylized ZBrush Expressions, achieving professional results without complex technical processes. This method avoids starting from scratch or using traditional approaches.
For ZBrush enthusiasts like us, the system presented below is revolutionary. We only need to focus on the artistic process because the Character Creator ZBrush Face Tools handle everything else seamlessly.
INITIAL IDEA / REFERENCES / SKETCHES
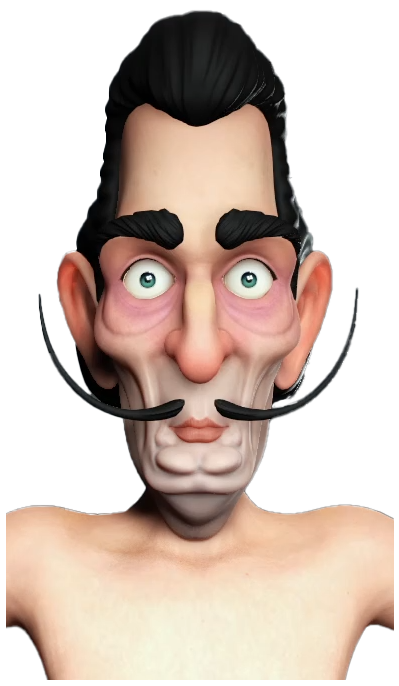
This time, we are going to take an icon of universal art: Salvador Dalí.
To try to push the capabilities of Face Tools to the limit. I will make a caricature of the character, so the first thing is to start with a graphic documentation. I will start by doing a search for real Dalí photos. Since I am not a very good draftsman, I have also looked for references to some caricatures to analyze. I’m looking for the most representative face deformations and thus make my own version.
To try to push the capabilities of Face Tools to the limit. To create a caricature of the character, I begin with graphic documentation, searching for real Dalí photos. As I’m not a proficient draftsman, I also seek references from caricatures. Analyzing representative face deformations guides me in crafting my unique version.
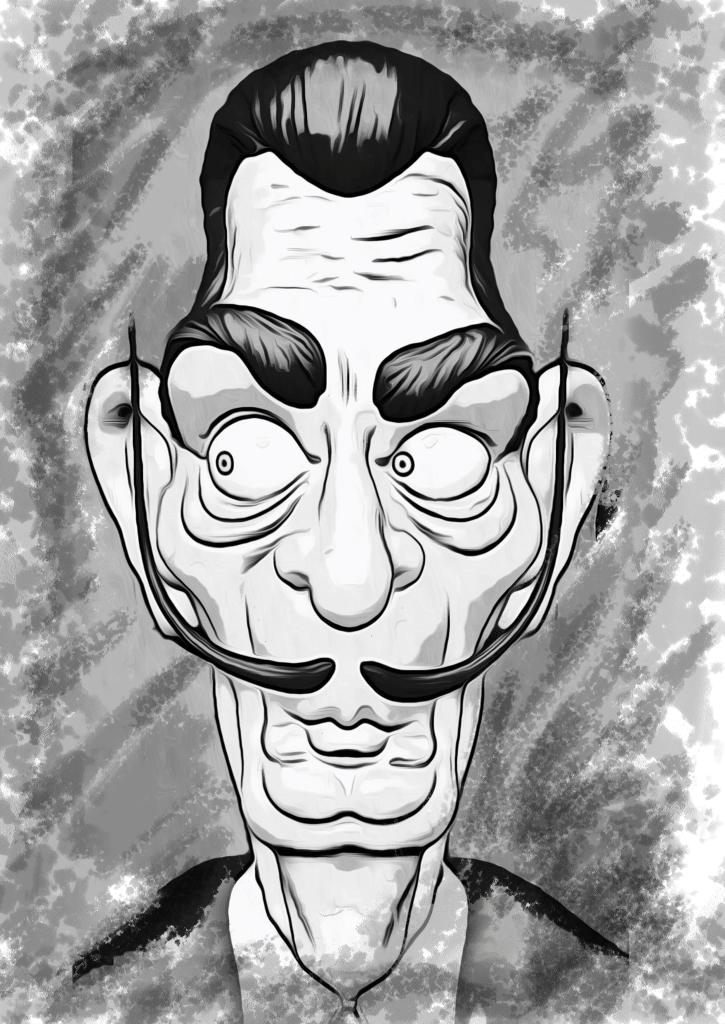
Searching for real Salvador Dalí photos to analyze representative face deformations for crafting my unique stylized version.
Salvador Dali sketch by Oscar Fernandez
I know, I know… it’s not wonderful, but at least I now have a direction to start working on my model.
Round eyes with small pupils to emphasize the painter’s eccentric point. I think about well-defined lips and his characteristic mustache be to make the character perfectly recognizable and also likeable.
If all goes well, the 3D version will improve throughout the process.
DESIGNING THE BASE FROM CHARACTER CREATOR
Our project will start by using a base model of Character Creator (CC4). The mesh of this model provides us with a universal topology, perfect for animation and of course for sculpture.
Once the model is loaded, we can go to the Materials tab. There we will lower the intensity of the textures to zero and focus only on the volumes.
Loading Character Creator model to and lowering texture intensity
I am going to continue creating the base of our character from the “morphs” tab. We will use the combination of two CC4 characters to give a cartoon appearance to the body of our model. I will also load some eyes and teeth in accordance with the style. Lastly, I will load the neutral wrinkle set. Everything ready, we’re going to ZBrush!!
Using Character Creator morphs to quickly reach cartoonish appearance
TRANSFER THE MODEL TO ZBRUSH
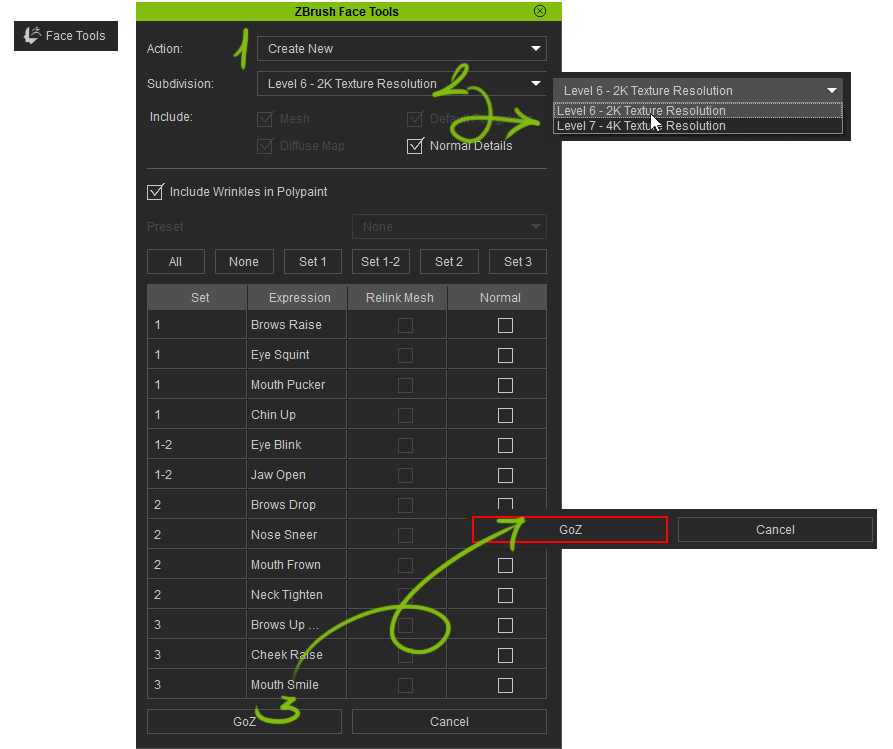
Once the base of our model is configured in Character Creator (CC), we will use the ZBrush Face Tools button. This is to transfer the character to ZBrush. We will open the first window of the tool and we begin the configuration:
Using the ZBrush Face Tools inside Character Creator
This is the first time we send the character to ZBrush, we will select “Create New” in the Action field.
The next field corresponds to the number of subdivision levels in ZBrush. When the Normal, Diffuse and Cavity maps are subsequently created. The level 6 will correspond to a 2K resolution and level 7 to a 4K resolution. In my case, 6 levels will be enough… We check the “Normal Details” box and finally “GoZ” to send the character to ZBrush.
Once the model has been loaded we will only see the head. Since this tool is focused on the character’s face work. We go to Zplugin and open ZBrush Face Tools.
Before starting to work I am going to configure my project: the background color, the canvas size, some rendering parameters. I will save my file as a project in both ZBrush and Character Creator.
HEAD MODELING IN ZBRUSH
In the plug-in panel we can activate the “Range” option to load a texture. This will enable us to see both the topology of the mesh and the regions that will be affected by the different expressions.
Using CC to observe the mesh topology regions that will be affected by different expressions
Mesh topology regions that will be affected by facial expressions
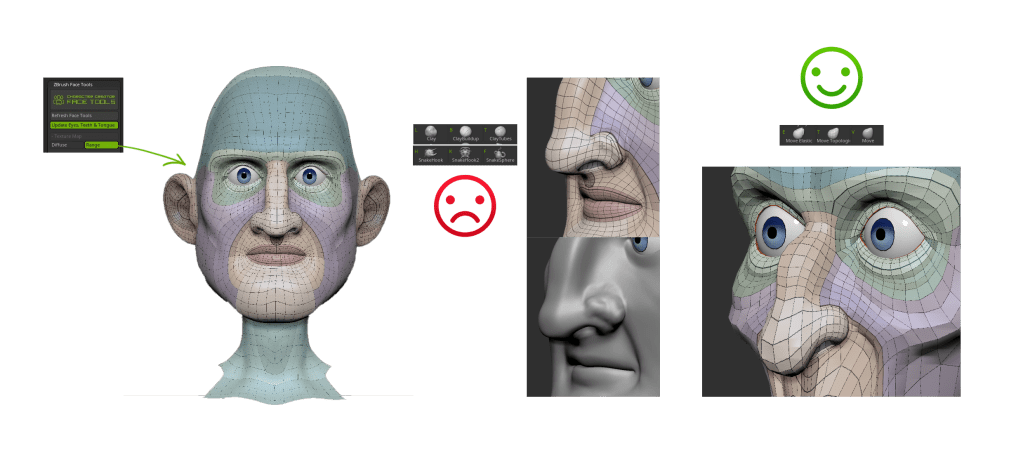
If you are a “traditional” digital sculptor you must keep in mind that we are already starting from a perfect topology. So it is very important to try to respect directions of the loops to obtain optimal results. We are going to avoid using brushes that “add material”. Brushes like all the Clay variants or those that deform the topology too much like Pinch, Snake Hook, etc…
The idea is to work at subdivision level 1 to achieve the basic shape. And work with brushes like Move or DamStandard. These are to deform the mesh little by little. While always looking for smooth lines in those loops that we mentioned.
If the low poly mesh works, then the high poly will generate very smooth and continuous lines that will work perfectly when deformed in the expressions.
FINISHING THE FACE: HAIR / EYEBROWS / MUSTACHE
For the hair and eyebrows, I simply made a mask in the corresponding area, I used Extract to generate the mesh and, after making the basic shape, I used ZRemesher to have a neat mesh in which I can subdivide a couple of times and add some detail with the “Slash 2” brush.
Once this is done, I only have to adjust the position of the teeth and tongue and I have everything ready to send the character back to CC4 and check how it behaves. To carry out this process, just click on “Update to Character Creator”
BACK TO CHARACTER CREATOR
Selecting CC3+ Base model
** Before updating your ZBrush model back to CC, make sure the CC3+ model is selected in CC. Selecting any other mesh or props will trigger a pop-up in CC and cancel the update process.
Updating from ZBrush to Character Creator
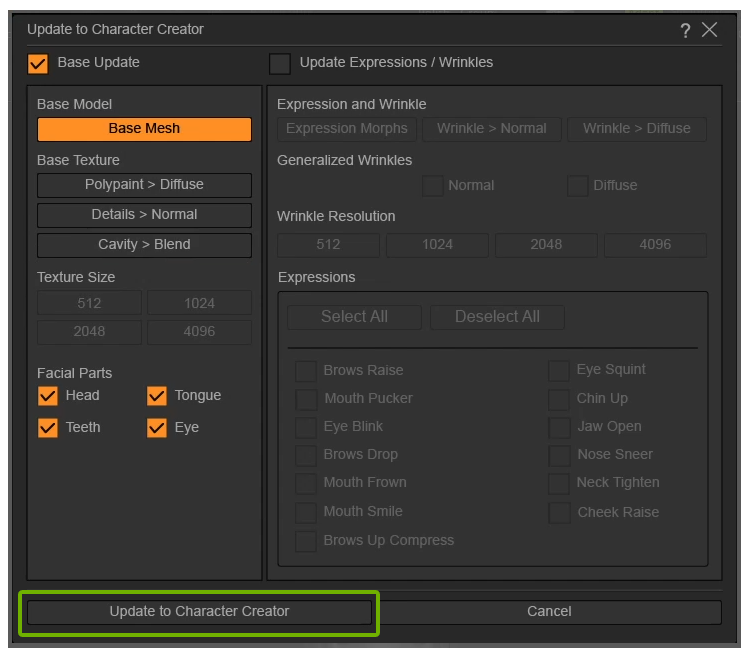
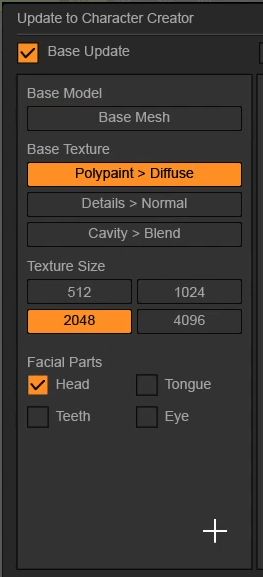
When you press the “Update to Character Creator” button, a window will open that may be a little scary at first, but now we will see that it is incredibly easy to understand.
So far we have only worked on the base of our character, so we are going to deactivate the entire section corresponding to expressions… well, this is much simpler!
For now, we have only worked on the base, so it is the only button that we are going to keep active and within the base we have modified the head, tongue, teeth and eyes, so we activate them as well.
GENERATE NORMAL MAP
With this configuration, what we are going to send to Character Creator is the information corresponding to subdivision level 1, but as we have sculpted using higher levels to achieve the final result, we are also going to activate “Details>Normal”: this will generate the normal Map we mentioned before, this way we will have all the details in our model and we can also adjust its intensity in Character Creator. We will not activate “Cavity>Blend” since it would generate a cavity map that is not necessary in our case but works great for realistic models.
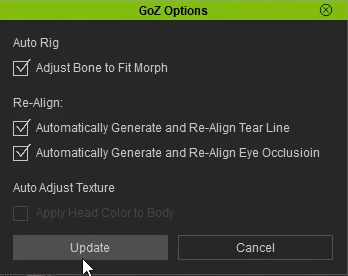
GoZ options in Character Creator
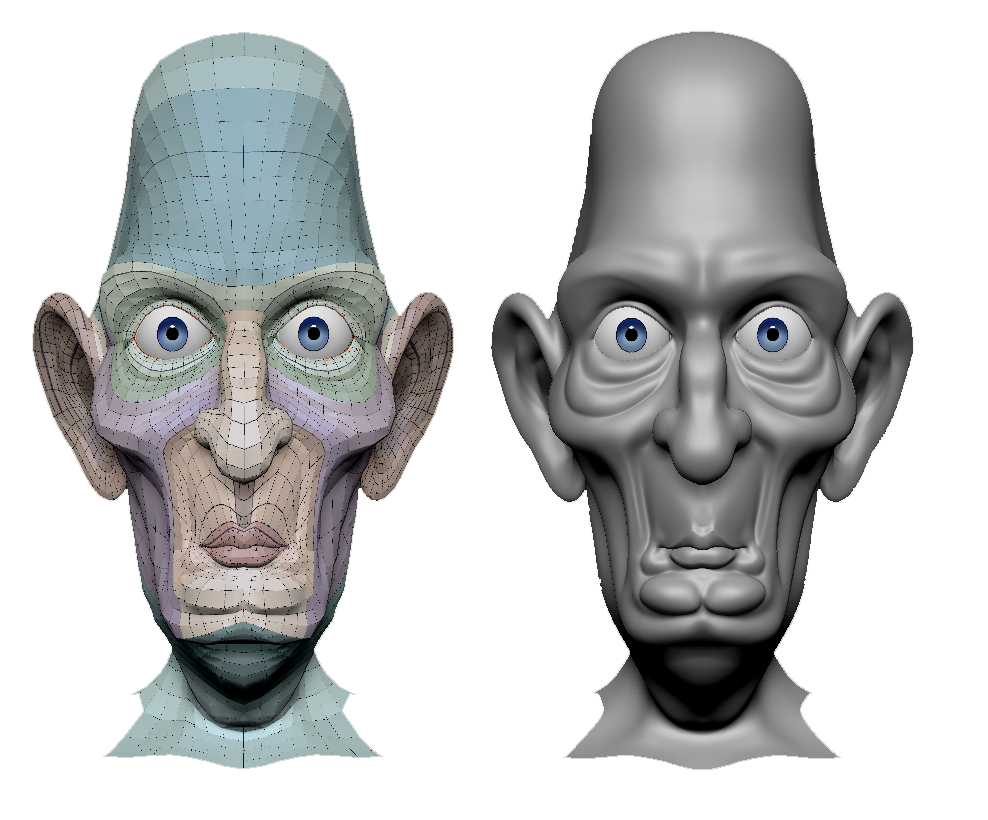
Comparing base character to stylized one
ZBrush begins to send all the information to Character Creator and when finished we can return to CC, where, once again, we do not have to worry about anything; We press “Update” and the automatic process continues.
Here we can see the original base mesh and the modified model in ZBrush.
SEND HAIR, EYEBROWS, MUSTACHE
Select Visible option in ZBrush
Create Accessory
Now we are also going to send the hair, eyebrows and mustache. To do this we just have to hide all the subtools by clicking on the little eye icon and press “Visible” to send them to Character Creator.
In Character Creator, we configure these parts as Accessories and click Update. Maybe we need to make some adjustments to the position.
Attribute panel to click Hair, Eyebrows, Beard
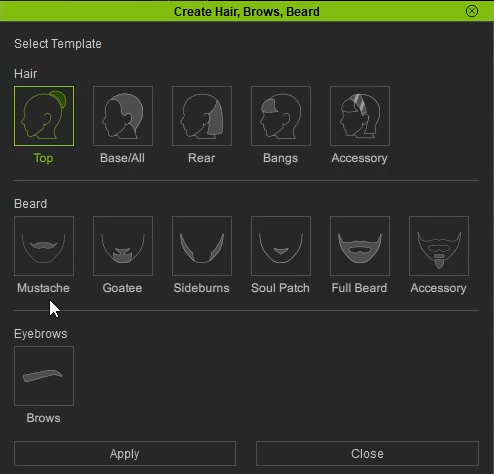
In order for each of these accessories to become a real part of our character’s face, we just have to go to the attributes panel, click Create Hair, Eyebrows, Beard and select the type of behavior for each of them.
Verify that each facial feature behaves as expected
Once configured, in the facial editor, we can verify that each of them already behaves as we would expect.
If we want to modify this behavior we can go to “Assign Conformable Regions” in the case of hair or “Facial Hair Vertex Assignment” in the case of mustache and define the vertices that will influence each of these elements and thus have absolute control of the deformation of both when modifying the expressions.
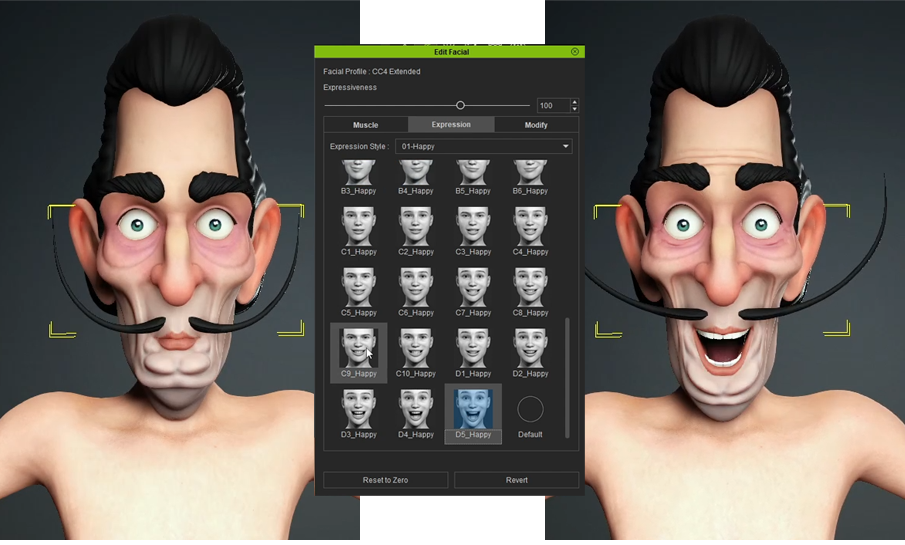
Testing the facial expressions with Character Creator Edit Facial Panel
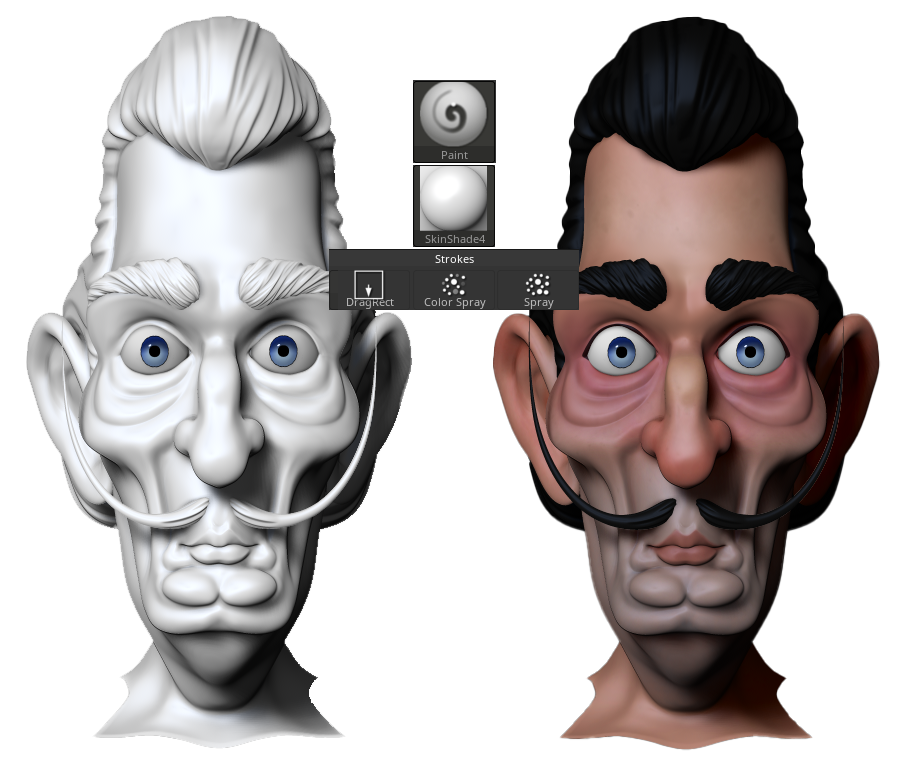
TEXTURING SKIN WITH POLYPAINT
We continue with the customization of our character, in this case we are going to texture the skin using Polypaint. We are simply going to apply the colors on the SkinShade material progressively until we get the appearance we want and finally we send it back to Character Creator using “Update to Character Creator”
Select “Polypaint>Diffuse” in the Base Texture options
Going to texture the skin using Polypaint
Once again, logic will guide our decisions, so if we have only changed the Polypaint.
We will only select “Polypaint>Diffuse” in the Base Texture options and since we have only changed the Polypaint of the head, we will only select “head” in the Base Texture options to send to Character Creator.
By sending the color information to Character Creator, it gives us the option of also applying those values to the body so, despite having painted only the face, the coherence between one and the other is perfect. After adjusting the scene’s lighting parameters a bit, everything now looks perfect so it’s time to go back to ZBrush and start the really important part of this workflow.
Auto Adjust Texture in GoZBrush Dialog
Creating a Stylized Salvador Dali
ADJUSTING EXPRESSIONS IN CHARACTER CREATOR
Actually, what FACE TOOLS does automatically is create a series of layers that will produce different deformations in the mesh to generate the expressions. The goal is that we can create personalized wrinkles for each of our characters in an individual and creative way and thus provide them with a unique personality.
In the expressions section of the plugin we see that we have 13 base expressions that we can work on. Subsequently, these expressions will be combined in Character Creator and gradually merged creating infinite results as we will see later.
At the beginning, we have loaded the “Neutral Wrinkles” pack in our model, so when you press each of the buttons, in addition to the deformation of the mesh corresponding to each expression, certain wrinkles also appear that already add personality to our model. We can use these wrinkles as a guide or smooth the mesh at each of the subdivision levels so that they disappear completely and do our work from scratch. To have a reference of how the eyebrows are going to behave, I am going to paint them directly on the skin.
I’ll start with the “Eyebrow Raise” expression. As we already saw when creating the base of our character, it is best to work on the lowest subdivision level while looking for the shapes and increasing to define details, although always trying to follow the direction of the topology when generating the wrinkles.
UPDATE TO CHARACTER CREATOR
Update to Character Creator window to only select the updates
In the “Update to Character Creator” window we will only mark the update of the expressions/wrinkles, and activate the buttons to generate the corresponding morph and the normal map for the wrinkles.
Since we are going to generate our own custom wrinkles by Sculpting in ZBrush, we will deactivate the “Normal” box since this option is focused on controlling the generic wrinkle packs.
We could make all the wrinkles and finally export again to Character Creator but in my case I am going to do it one by one and we will see the difference. Every time I update, I will select the corresponding wrinkle.
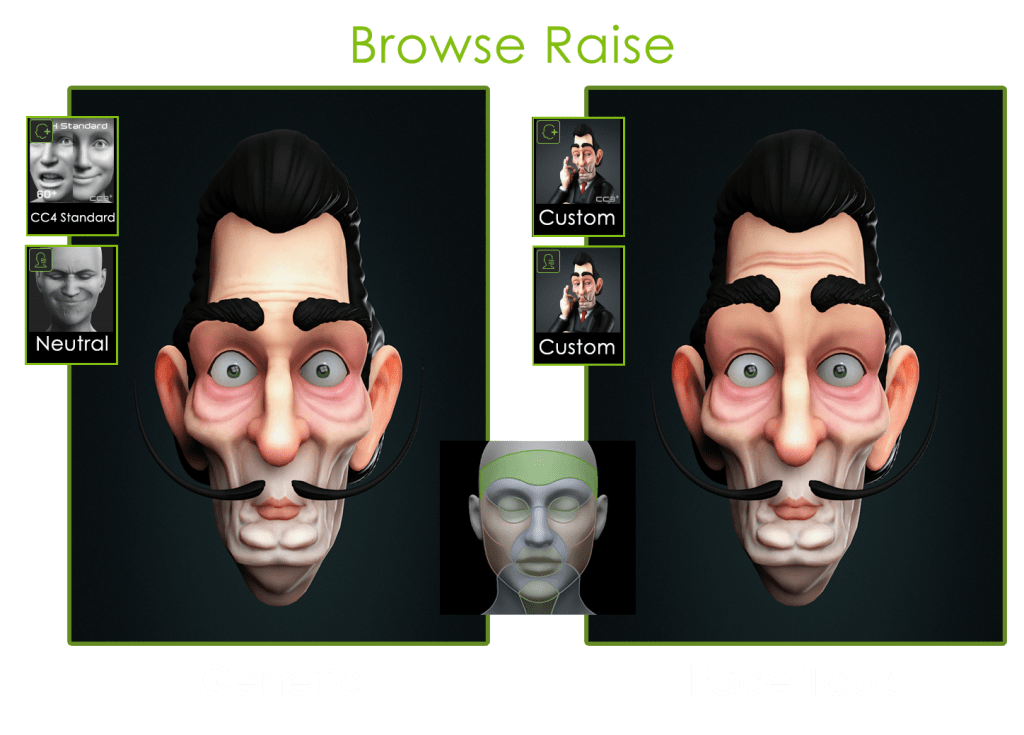
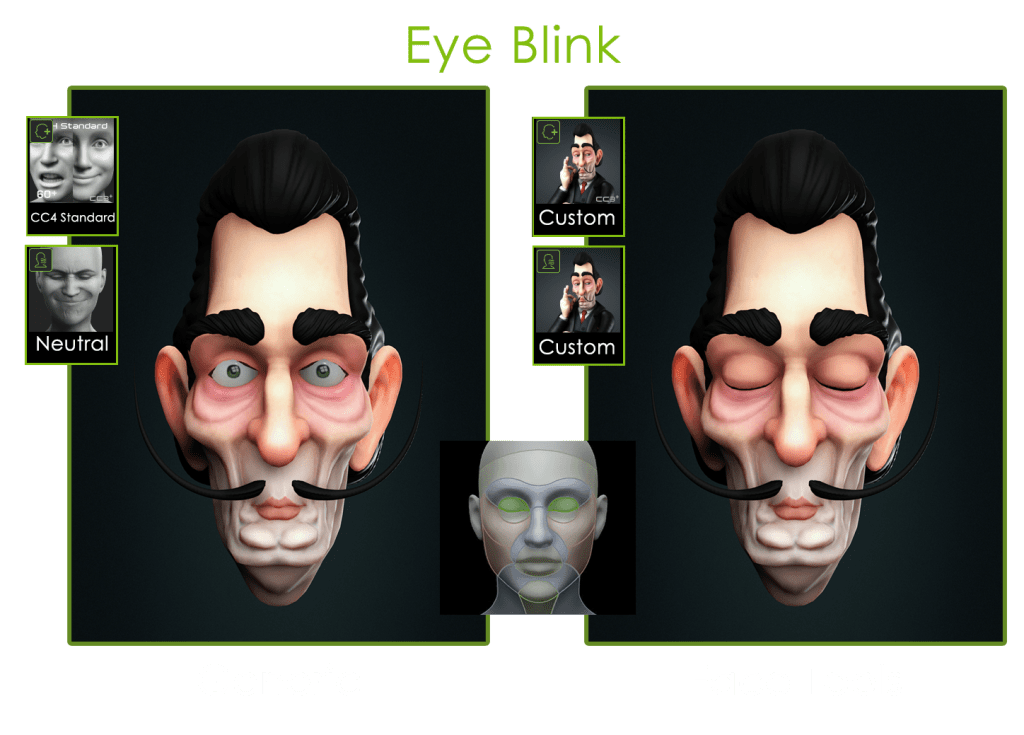
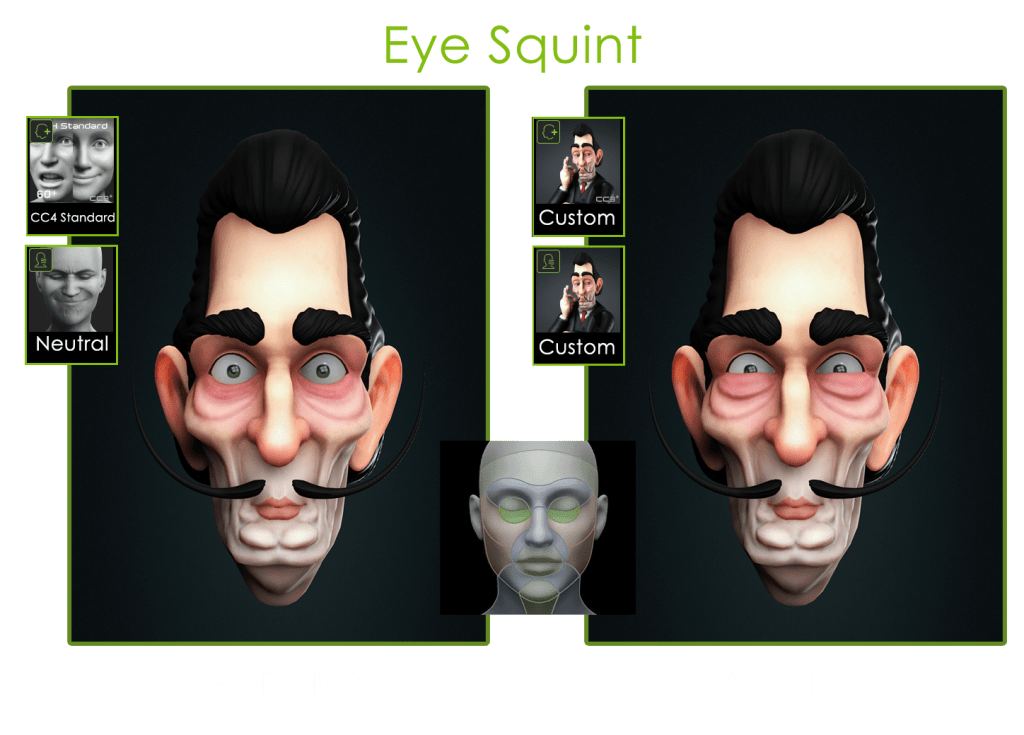
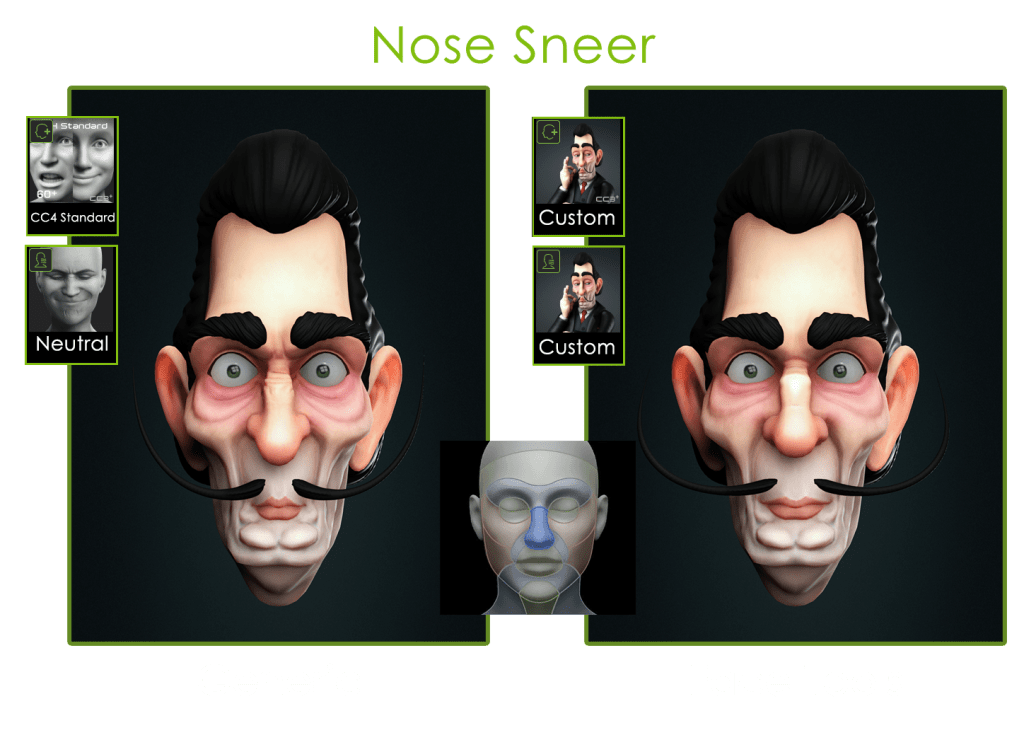
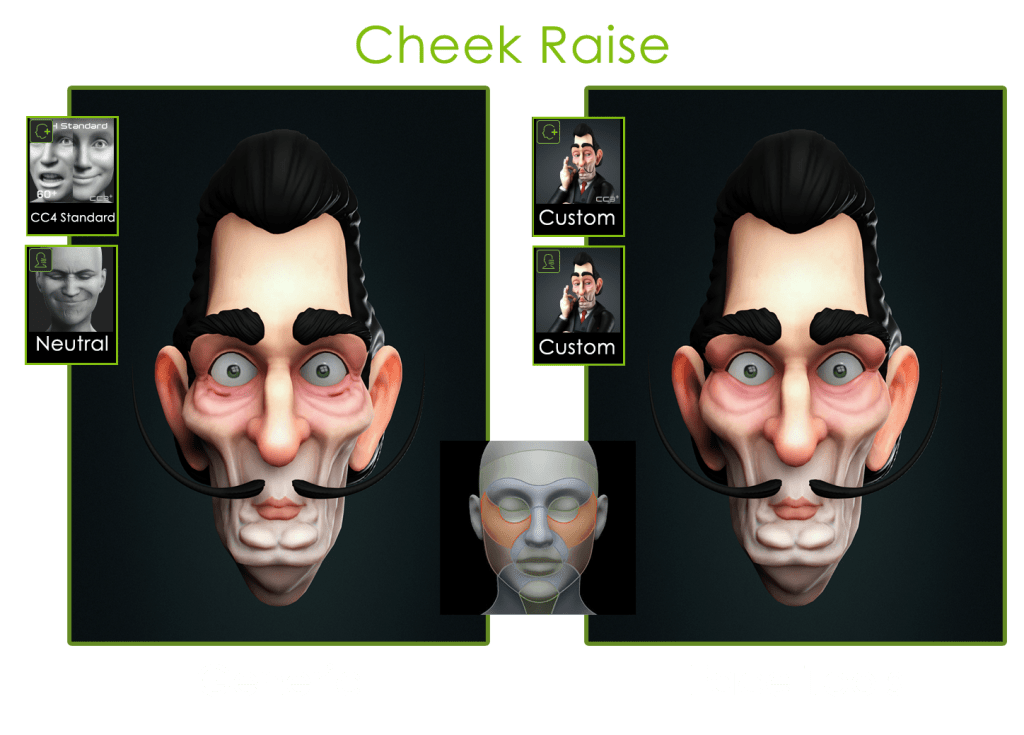
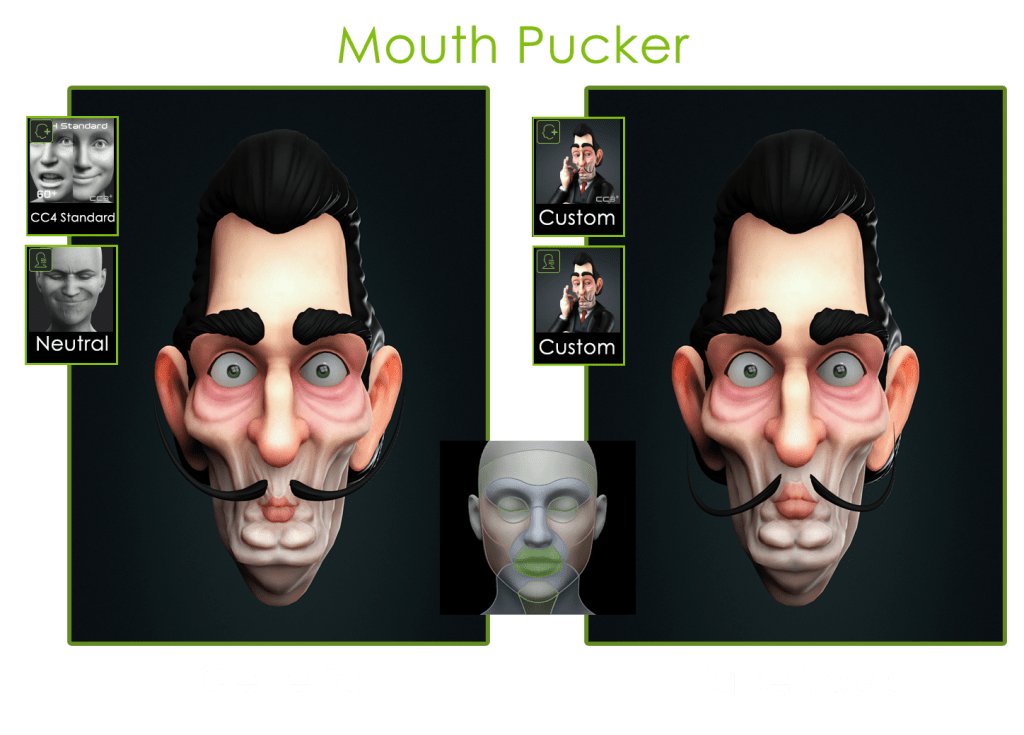
13 BASE EXPRESSIONS
Here we can see the ZBrush expressions version after having modeled the wrinkles. In addition to sculpting the expressions, we can also apply a different Polypaint to each of them to highlight areas or apply some type of color variation.
Testing the 13 Base Expressions with Character Creator
Those 13 expressions that we modeled in ZBrush correspond to the 13 regions of influence that we see in the CC Wrinkles Panel, so now we are going to see the difference between the generic version and the customized version based precisely on those 13 regions.
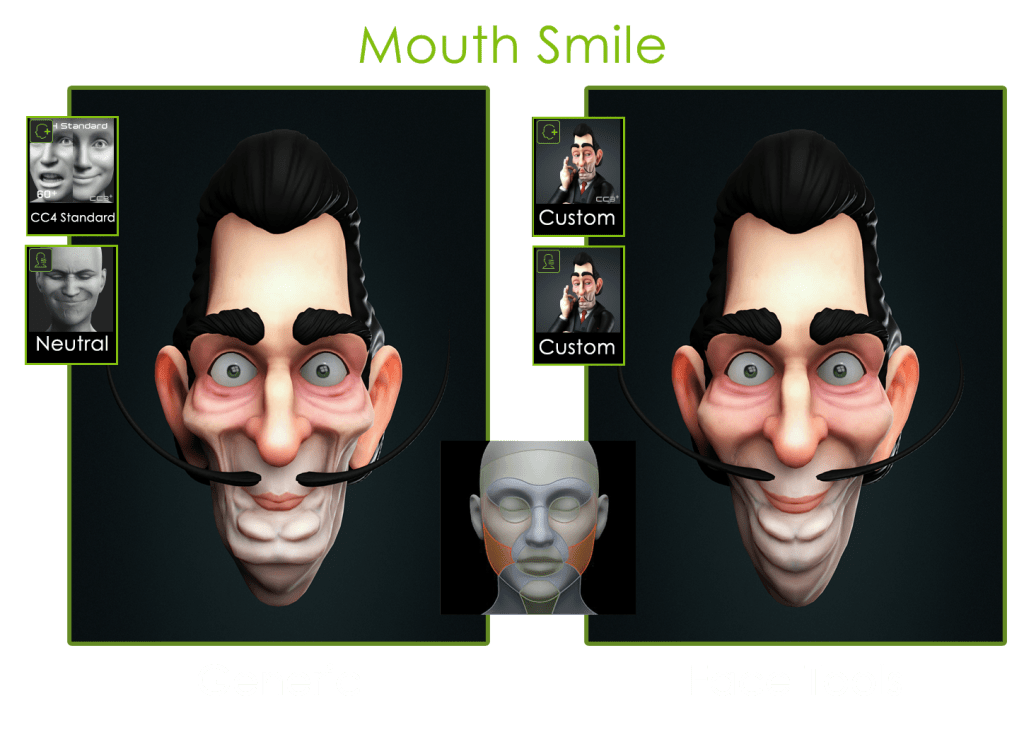
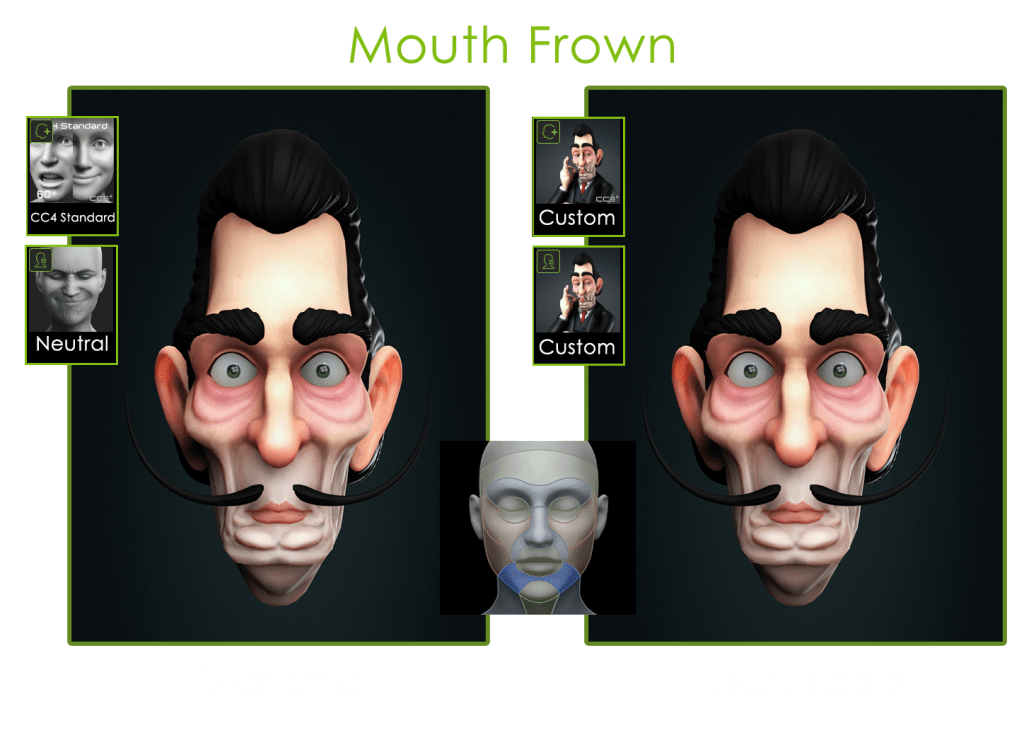
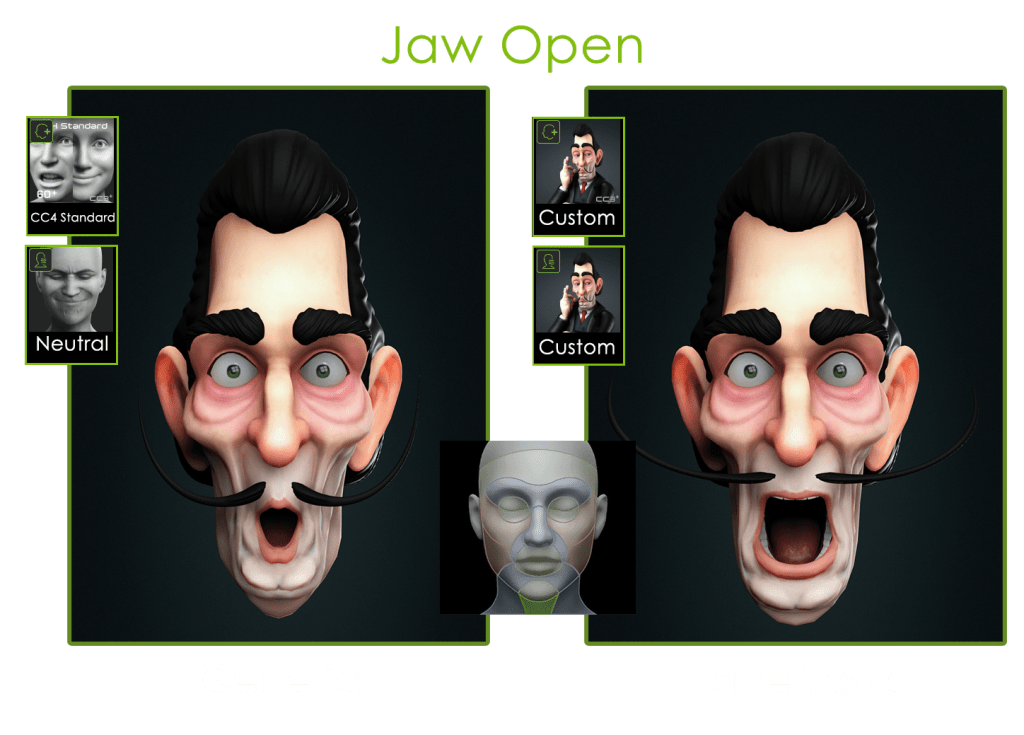
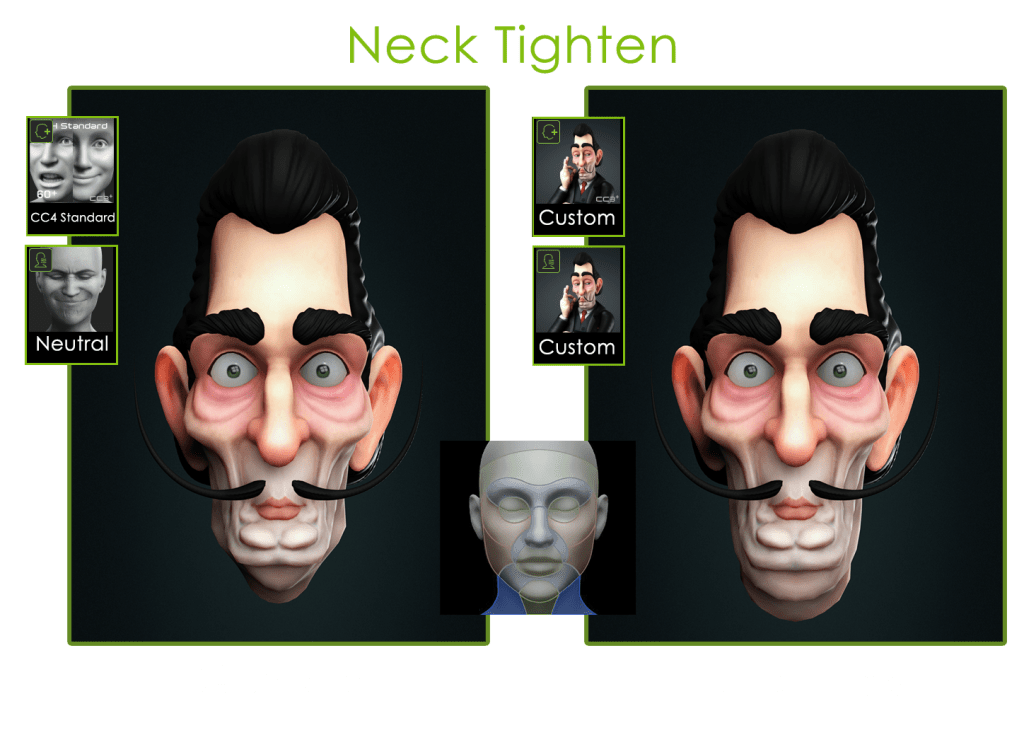
Brow Raise Expression with Character CreatorBrow Drop Expression with Character CreatorEye Blink Expression with Character CreatorEye Squint Expression with Character CreatorNose Sneer Expression with Character CreatorCheek Raise Expression with Character CreatorMouth Frown Expression with Character CreatorChin Up Expression with Character CreatorJaw Open Expression with Character CreatorNeck Tighten Expression with Character Creator
COMPLETING CHARACTER AND CLOTHING
I couldn’t resist doing the full character, since if we combine facial expressions with body language, we will gain a lot of expressiveness.
I created the garments in ZBrush quickly, creating the UV’s and painting or texturing directly in this software.
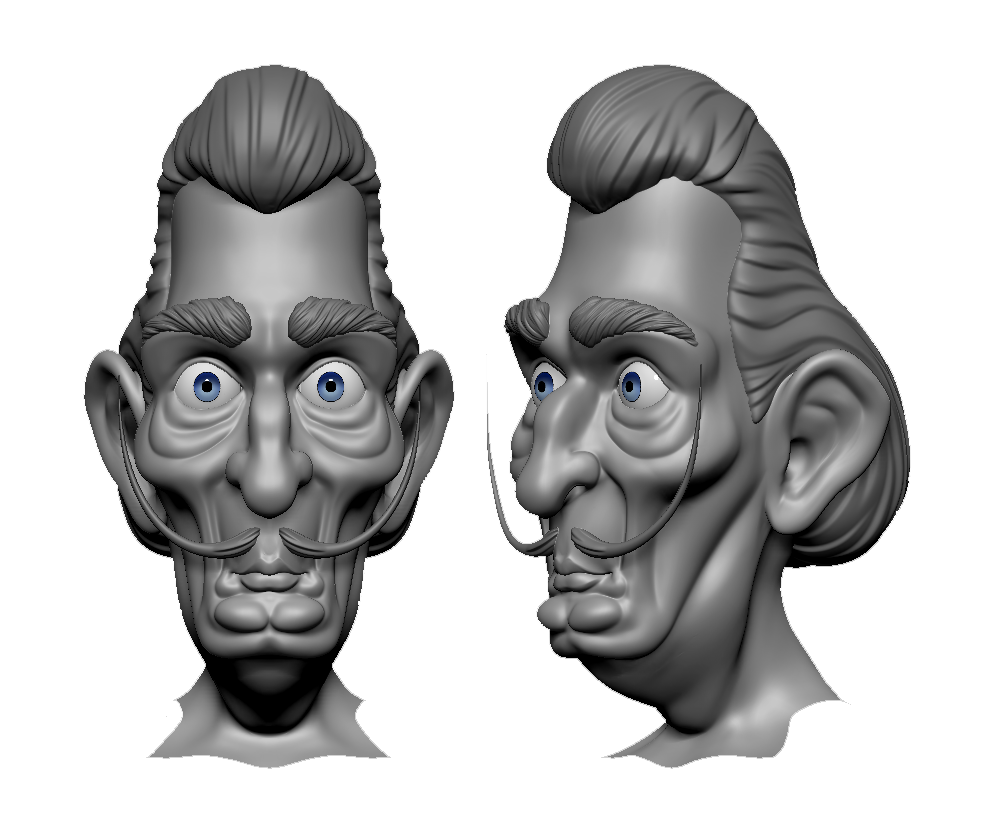
Completing Salvador Dalí Character and Clothing
By having the UV’s we only have to generate normal and diffuse maps so that it is applied directly in CC and we see it textured.
Generate Normal and Diffuse maps
By pressing “Visible” button we will send it to Character Creator.
Once in CC, only select the garment, press the transfer weights button, choose the corresponding template and make any subsequent adjustments to the weights if necessary. Our Character is now complete!!
Transfer Skin Weights
CREATING OUR CUSTOM EXPRESSIONS
As you have seen, everything we have done so far has been artistic processes since the entire technical part is completely automated by the tool… we have left behind all the repetitive, boring actions that are far from the creative process.
Character Creator Modify Panel
The next thing will be even more fun, we are going to create unique expressions for our character.
We go to “Edit Facial” within the “Motion Pose” panel and we can start defining our expressions.
When creating expressions we have 3 options:
The first option is “Muscles”, a super intuitive editor in which we will select a region and just move the mouse in the desired direction for it to deform. In this editor, in addition to modifying the regions of the face, we can be even more precise by accessing the eyes, mouth or tongue panel.
Adjusting Facial Profile
CHOOSING PREDEFINED EXPRESSIONS
The second method would consist of choosing one of the predefined expressions from the “Expressions” option. The list is huge and we would have our expression in just one click.
Testing Facial Profile
Adjusting Facial Profile
The expressions are divided into 6 categories and some extra that Character Creator provides us:
Happiness
Sadness
Anger
Disgust
Fear
Surprise
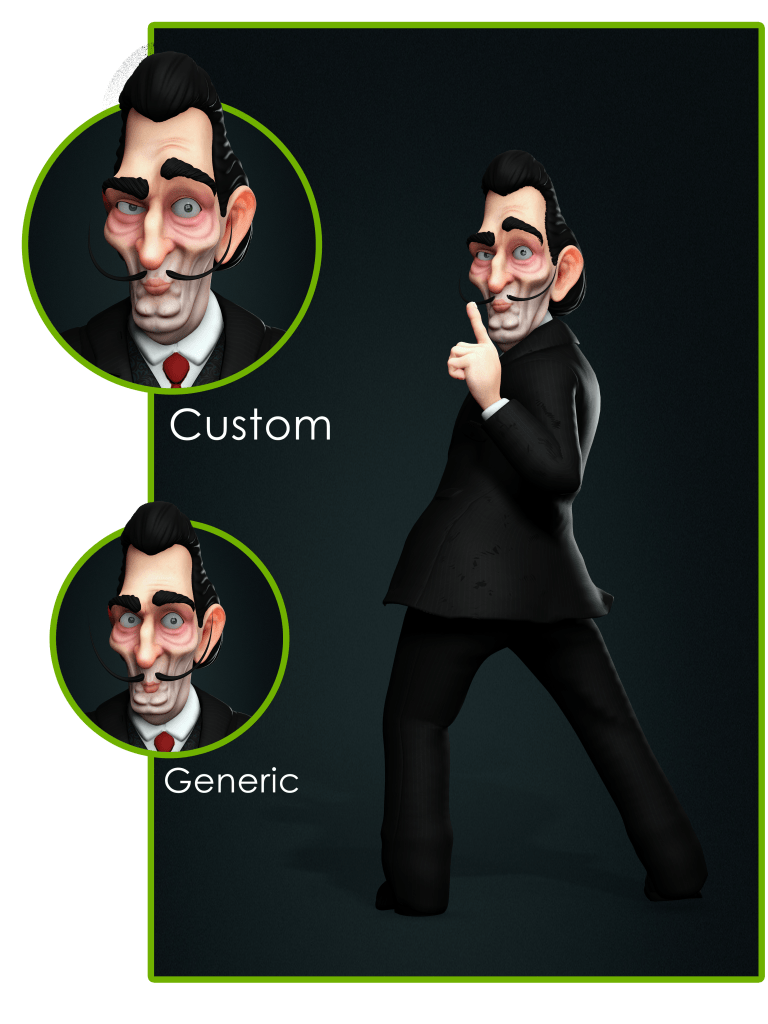
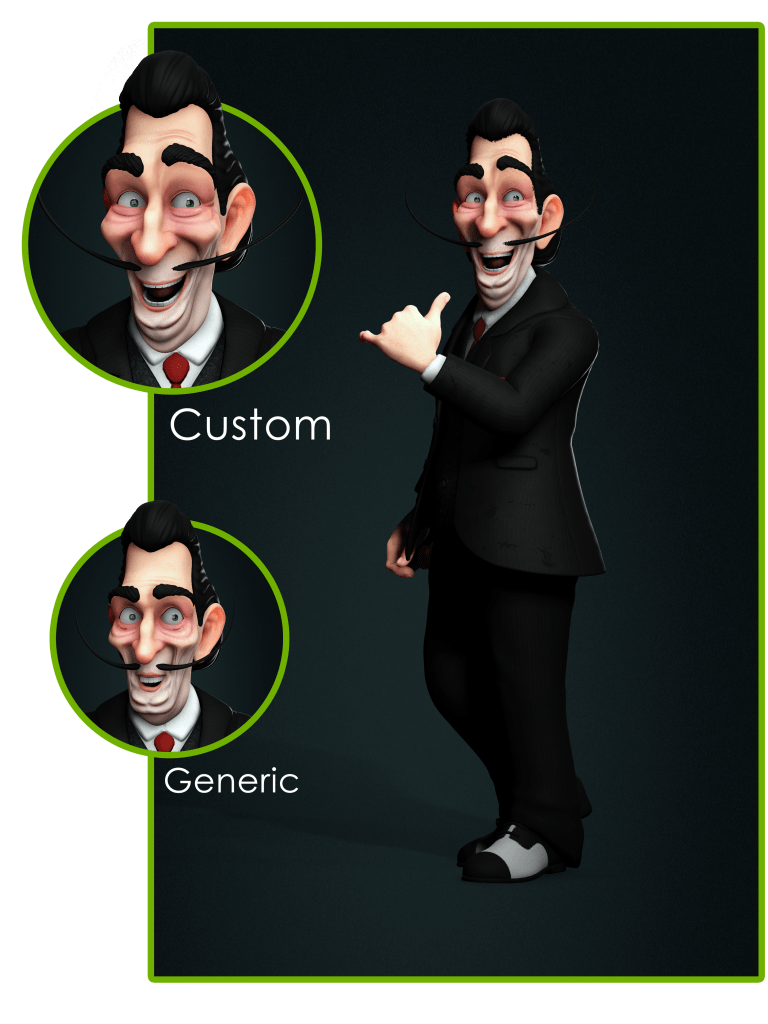
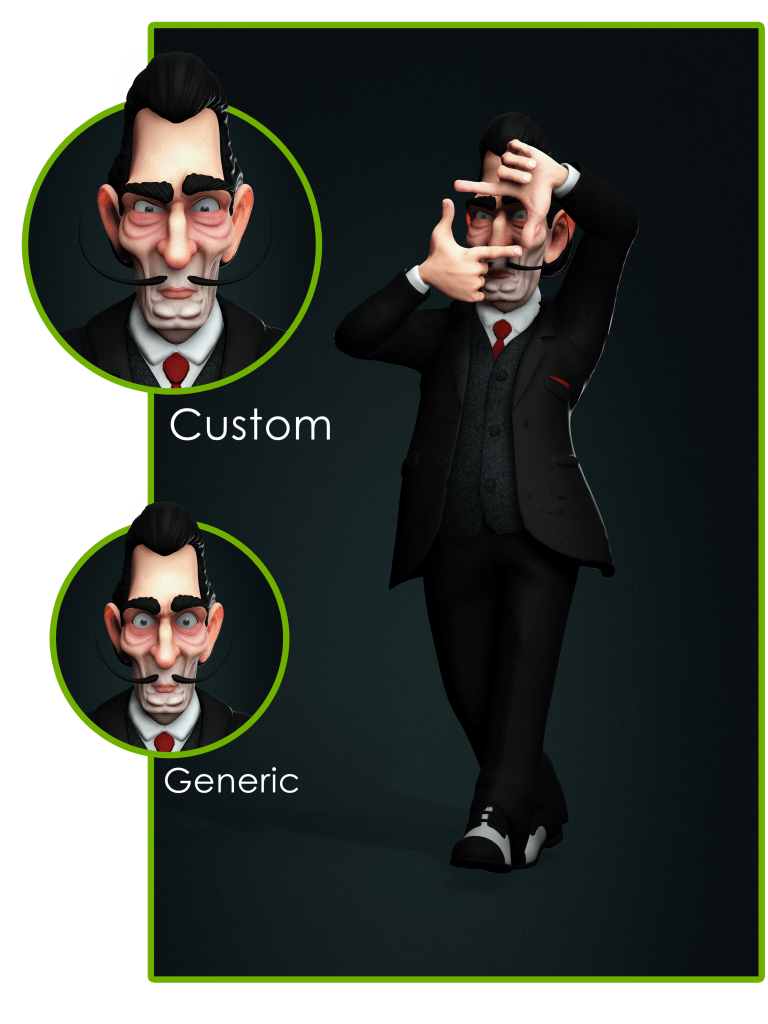
Finally, we will have the option to modify each region using sliders with total precision.
The best of all is we can combine these 3 systems to create our expression.
For example, we can start with a predefined expression. Then select and modify the position of a muscle group and finally make some fine adjustments using the sliders.
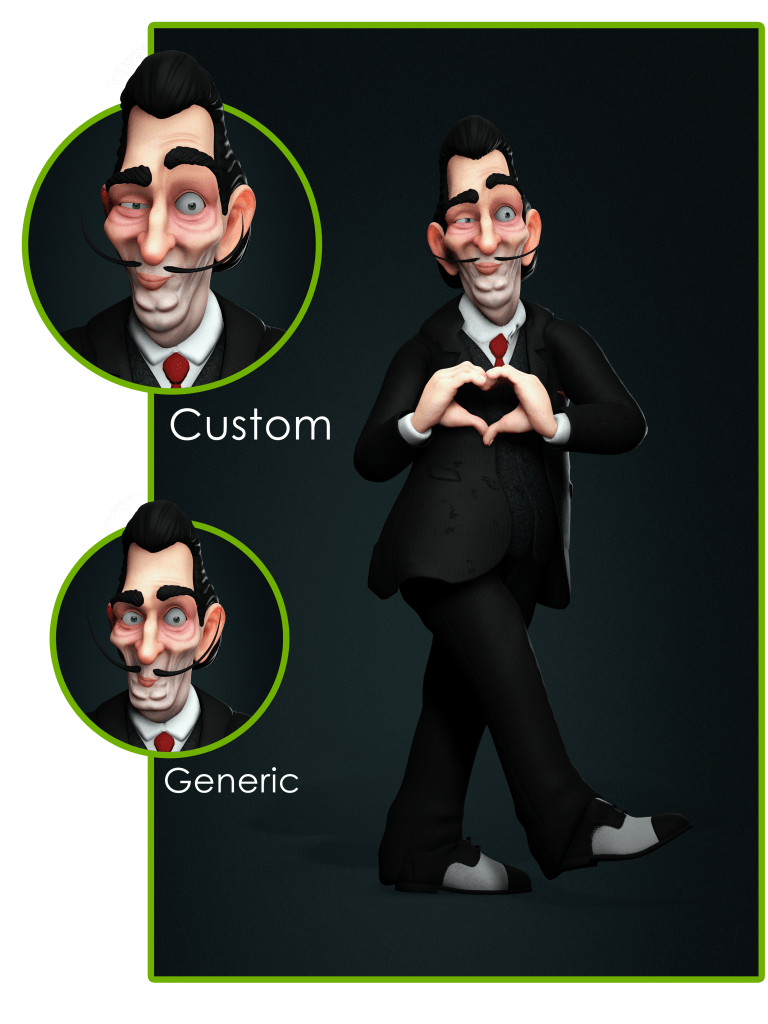
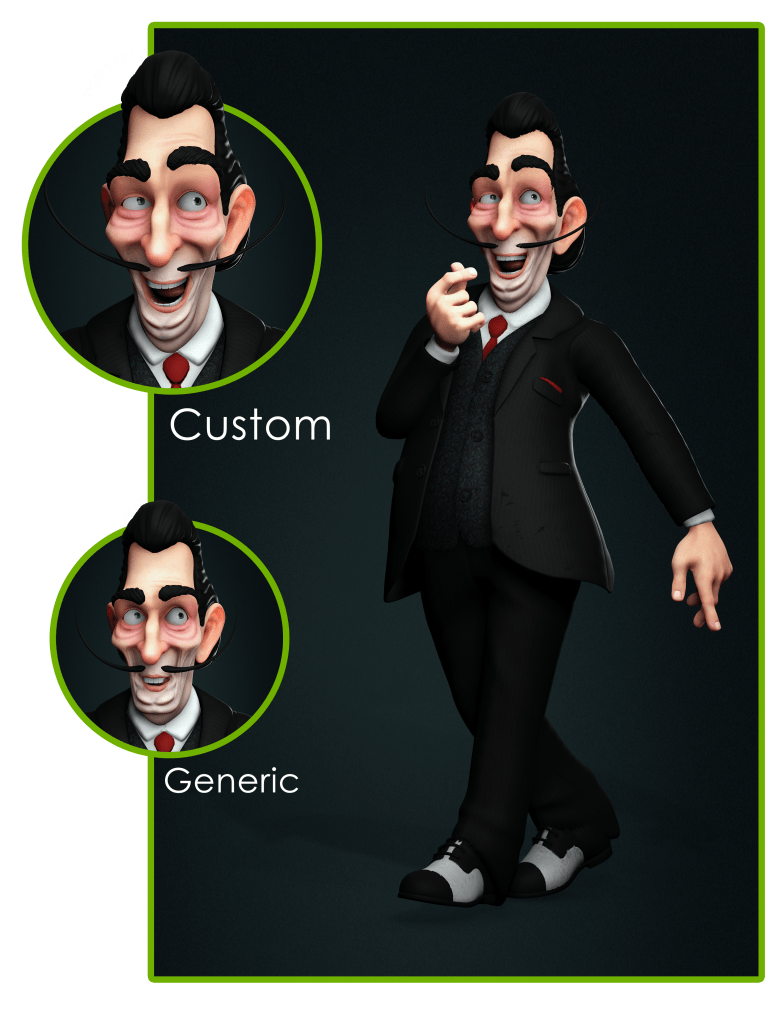
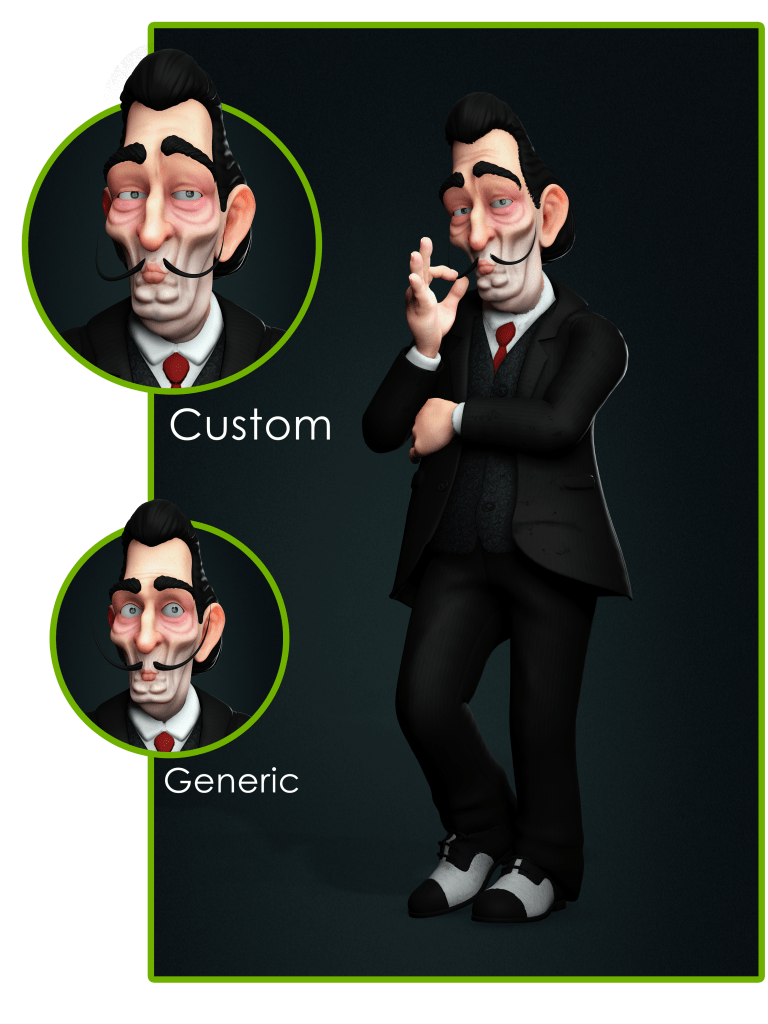
Below, I show you the expressions I created along with the body pose.
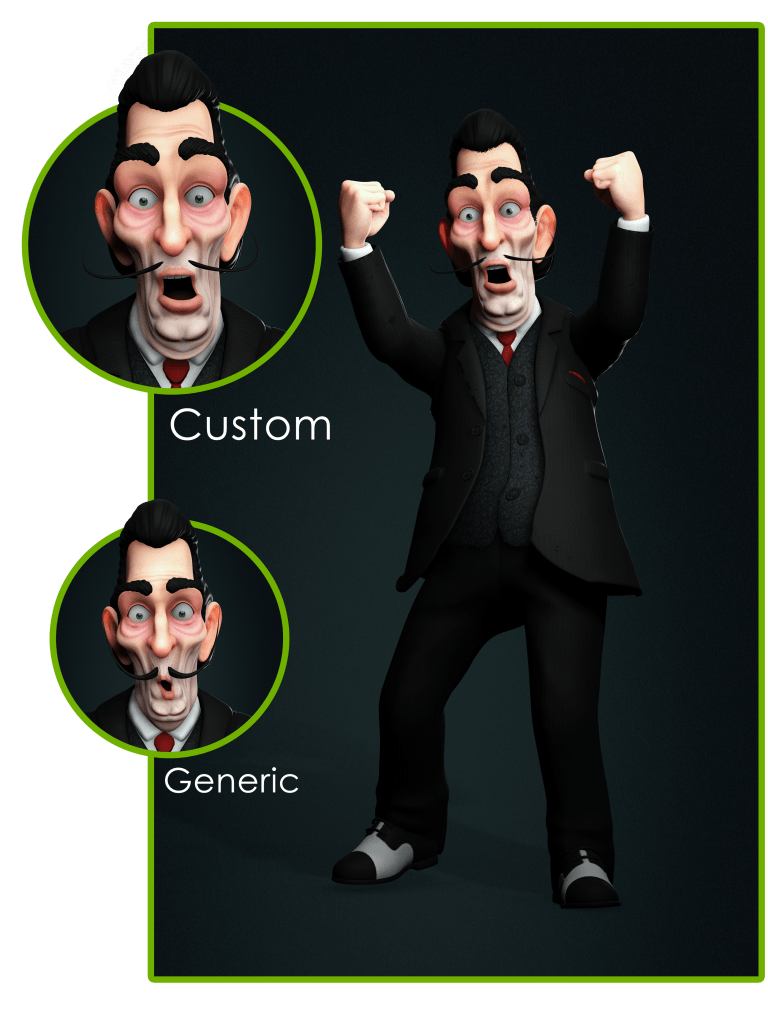
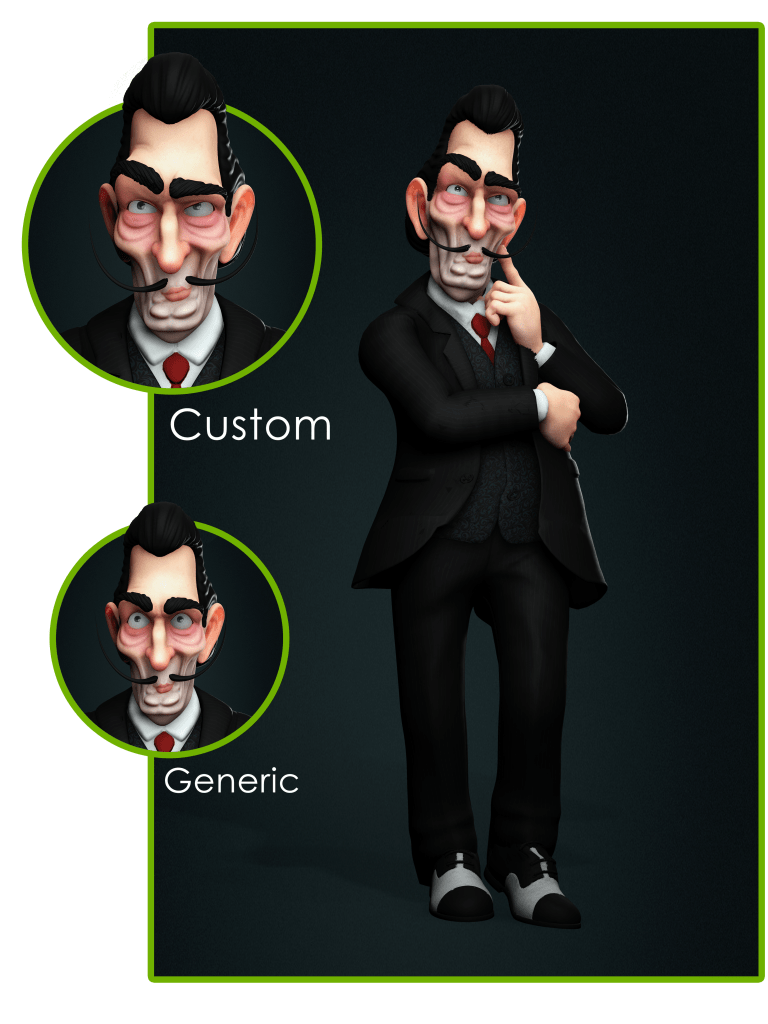
Generic vs. Custom Expression
MY CONCLUSIONS
I think that throughout this year Reallusion has clearly been on the side of the artists. They are giving us tools so that creative people can invest their time in. Allowing us to create and not waste effort in technical, boring and repetitive processes.
When it comes to posing characters, the introduction of the Character Creator Pose Tools seems like a real revolution. As we can create them completely from scratch and take them to Character Creator. To make dynamic poses in a super natural, intuitive and even fun way.
Now, with the introduction of CC Face Tools, it is true that we depend on a base mesh. But they have a perfect topology, and we can push it to the limit and it still performs great.
We can give each of our characters a unique personality through the 13 customizable expressions in ZBrush. And then take advantage of the power of CC’s expression tools to have absolute precision in facial gestures.
In addition to increasing productivity. I think I could summarize the use of these tools as something that we were all looking forward to!
The new crowd simulator in iClone is one of the most exciting additions to an application that is already packed with exciting tools and features. Open the tool, drag-and-drop some necessary assets from the Content Manager or an Explore window, generate one-click placement over and over until you like what you see then Deploy Actors and you have a crowd.
As a freelancer, I have worked with several crowd generators and while most of them did a decent job, all of them fell short in one way or another. One was too restrictive in features. Another was like a cyber wrestling match trying to get custom assets imported. You never knew who was going to win that match either.
Other simulators were very complicated and time-consuming or involved prohibitive pricing models affordable only in some cases to high revenue-earning animators. Small shops, a lot of freelancers, and hobbyists were on the outside looking in, wishing they could get their hands on such tools when Reallusion introduced their 8.4 upgrade to iClone with the Crowd Sim tool in the free update.
The Crowd Sim is, like most iClone tools, easy to use with a small learning curve. No nodes, just assets, computer-aided placement, and orientation of those assets with paths, terrains, props, or volumes.
A clear view of the Boxing Match crowd used in the main article graphic. 3D characters upfront with 3D stadium seating and 2D photographic crowd.
Generating multiple, animation-driven characters is a snap with this tool. CC4 can optimize and decimate characters down to as little as 800K for use in the distant background while optimizing mid-range characters at around 7000K.
And yes, you can easily use your custom content. If the content was created outside of the iClone/CC4 environment you can use the auto-rigging features of CC4 to make it compatible with iClone motions and editing.
SEATED AUDIENCE CROWD
For a lot of events like sports, theatre, or movie screenings the audience would be primarily a sitting crowd. Creating a sitting audience is simple but requires a little tweaking depending on the dimensions of the bleachers or seats in use. If, like the one in my example below are not tall enough you can still tweak the position, camera angle or scale of the bleachers if necessary. Not all props like this are created to character scale so you adapt as best you can by tweaking the positioning of the actors after placement or using camera angle to conceal any problems.
STANDING AUDIENCE CROWDS
Standing crowds, particularly at sporting events or concerts can be rowdy crowds at times so I used motions from the Emotes Pack along with characters from the Casual section of the Modern People Sampler in generating the standing crowd. This pack also has multiple material options for more character variations. This produced a lively crowd very quickly. I have found these two packs to be very useful for generating realistic crowds.
You can use custom assets to make a crowd that fits your needs like a futuristic cyberpunk crowd or a period of time like the Victorian age.
SITTING AND STANDING CROWDS
Mixed audiences, standing, and seating, is another crowd type that may require a little tweaking to get the results you want. I started with the sitting crowd made earlier and replaced the sitting motions with standing motions in the popup dialog while using the spacing slider to position the added characters. This can take a little patience until you get something usable and then you can tweak it after the fact if needed.
I tried a NavMesh, but it couldn’t produce one that was usable on that type of bleacher mesh. The NavMesh seems more suited towards solid props without the pipe framing as it could only pick up bits and pieces of the seating surfaces. A solid mesh, blocky bleacher works better. Rescaled stairs can work in a pinch.
ACTOR GROUPS FOR AUDIENCES
Actor Groups are more powerful than you may think. They are a fantastic addition in that you can create your own groups as a Base group and use that base group in creating a Preset with a large actor pool that you can fill with other actors for more variations when you drag in the custom group.
CUSTOM BASE ACTOR GROUP
A custom base group will contain the same character makeup each time we load it which is why it is a base. It can be used in creating a preset that randomizes the group of actors each time it is loaded. Below is loading a simple base group I created for a test.
CUSTOM PRESET ACTOR GROUP
Dragging in or loading a custom Preset Actor Group will trigger a popup menu that allows for control over the randomization of the group actors. As shown in the video below you have the option of using the preset as it is when you drag it in or randomizing the actors even though they will be random each time they are loaded.
LOADING A BASE ACTOR GROUP FOR EDITING
An Actor Group is a project file, and you can build the group over time while saving it to test, use, or come back to later just like a project file. In my test, I created a bleacher-based crowd of random sitting characters. Then I saved the custom Actor Group as described in Kai’s video later down in this article. This is simply pressing the save button in the Actor Group Settings popup used when creating the group.
Loading an Actor Group for editing is different. You do not drag and drop the original Preset group into the workspace. Instead, you load the Actor Group via the Actor Group Setting dialog. This will repopulate the scene with actors and props. Don’t be confused, this is the same file that you can drag and drop but you need to load it with the Actor Group Settings popup for editing.
TIP: For Editing purposes load the file you saved using the Actor Group Setting popup menu. Loading the original present Actor Group into the workspace will only load the saved group with no popup window or editing. This is demonstrated in the video below.
Kai has a great tutorial on creating the different custom Actor Groups. This covers how to create a base group and presets and random Actor Groups.
With Actor Groups I can fill a scene quickly. Especially the immediate area in front of the camera. Depending on the type of group the characters will be different each time I load or drag and drop the custom Actor Group into the scene. Being able to add props like benches and accessories like phones or purses makes for fast deployments of multiple Actor Groups that can breathe life into an otherwise empty scene.
Actor Groups are a powerful addition to iClone that can be as simple as drag and drop or when tweaked they can include custom characters and motions. We can even use Motion Director motions when the need arises.
SUMMARY
Audience-type crowds, sitting, standing, or mixed are simple examples of how to get started with the Crowd Sim tool. They also represent just a small selection of the types of crowds we can now create with this new tool. An audience is as varied as any crowd and the more variation we can throw in the better the crowd will look but, unless it’s Lord of the Rings, it’s not all about how many characters we can stuff into a scene.
It’s really about the proper use of characters in a given area, within the view of the camera. Sell the immediate area to the viewer and the midrange to background elements will fall into place as the viewer’s mind will fill in a lot of information, more implied than seen if properly done.
Animation doesn’t need to mimic real life, but it does need filler. Empty scenes have long been a problem in animation from the early days of cell-animated cartoons to current 3D projects. With iClone’s Crowd Sim tool, those empty scenes can be a thing of the past.
Digital Artist MD “Mike” McCallum, aka WarLord, is a longtime iClone user. Having authored free tutorials for iClone in its early years and selected to write the iClone Beginners Guide from Packt Publishing in 2011, he was fortunate enough to meet and exchange tricks and tips with users from all over the world and loves to share this information with other users. He has authored hundreds of articles on iClone and digital art in general while reviewing some of the most popular software and hardware in the world. He has been published in many of the leading 3D online and print magazines while staying true to his biggest passion, 3D animation. For more information click here.