The original article was written by Ronen Bekerman, and featured on Ronen Bekerman Archviz Hub.
Introduction
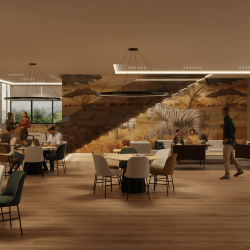
The offering of quality 3D people for crowd simulation is somewhat limited in the Architectural Visualization segment, and I can see that we reuse the same assets repeatedly. When it comes to 3D people, you can get away with having the same 3D actor in the scene if only you have more motions to apply. ActorCore comes at the right time to offer high-quality 3D asset libraries for mocap motions and animated 3D people for crowd rendering. I find the introduction of thousands of 3D motion options designed for ARCHVIZ projects most interesting.
Behind the Scenes
Paco Barruguer is a 3D Architectural Visualization artist using Blender as his main application. In the video, you’ll see the entire process starting in ActorCore, setting up character and 3D motion, exporting it, installing the ActorCore add-on for Blender, and getting the data into it for the 3D animation.
With the help from the free Blender Auto Setup Tools, it’s never been easier to auto import ActorCore characters with full material setting, making Blender a powerful tool for ActorCore character blendshape design. Add-on tools also include Blender Auto-Rig Pro preset and RIGIMAP tool, saving time from complicated and routine procedures.
ActorCore + iClone bridges that gap for you, and you don’t need extensive knowledge about character creation or animation. This software makes it very easy to create animations and unique motions.
Paco Barruguer – Freelancer 3D Artist. Archviz. Design
To know more about Paco’s process using ActorCore, iClone and Blender to create an archviz project, read the complete article on Ronen Bekerman architecture visualization hub. or visit the dedicated Guide for using ActorCore with Blender. Experience the accelerated 3D animation pipeline and get inspiration for ArchViz, game development, film production, and more.
The Reallusion team is saddened to announce the death of our great colleague, Mike Sherwood, (3Dtest) who passed away on June 19, 2022, at the age of 56 in his residence due to heart disease. Mike joined Reallusion in 2017 and participated in the development of major features in Reallusion software including CC3 new base, iClone facial expression system, lip-sync, and facial mo-cap profiles. Whether it’s product development, content design, or tutorial videos, Mike always gave his all to empower and improve user experience. Steadfast and persistent in his ideals, one could always count on Mike for giving deep discussions, fresh ideas, persuasive arguments, and encouragement to fellow teammates. Ultimately, driven as he was, he had become the engine that pushed us courageously forward.
Mike had always desired to become a developer and finally, he was able to realize his dream by working with us from across the globe. His bereaved family has also expressed their gratitude to us for having allowed Mike to work a fulfilling job; likewise, it had been a pleasure for us all along.
See some of Mike Sherwood’s greatest contributions to the 3D industry by watching the following videos and clicking on the image links:
In May 2022, Mike made some video tutorials demonstrating iClone 8’s extended facial controls for Face Edit and Face Puppet. The design of which was mostly led by Mike as he worked closely with Taipei R&D team members until all features were thoroughly polished prior to release.
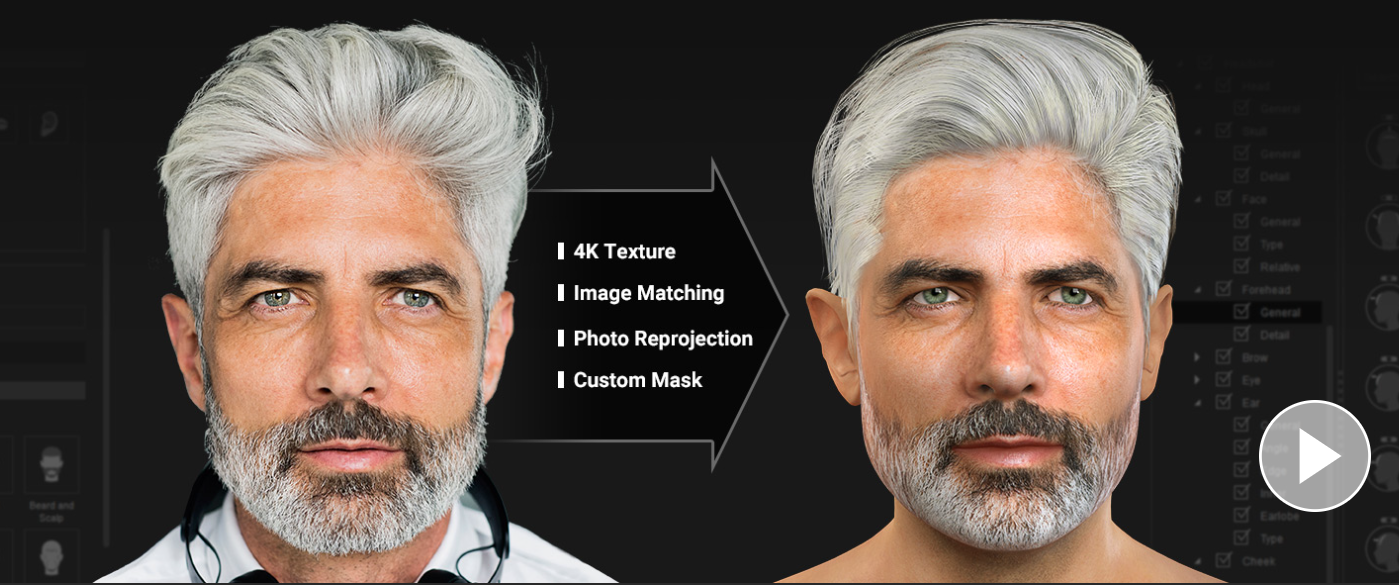
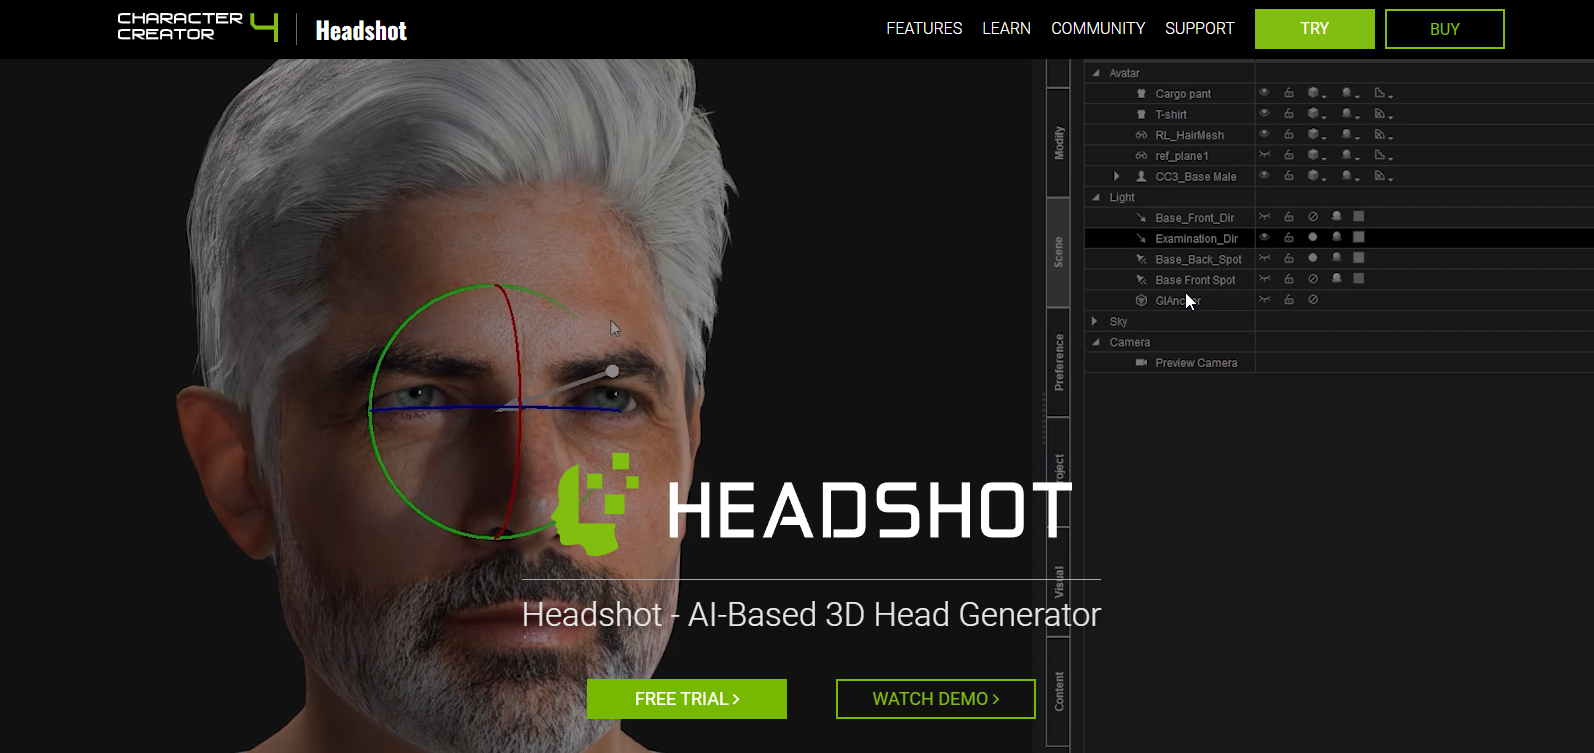
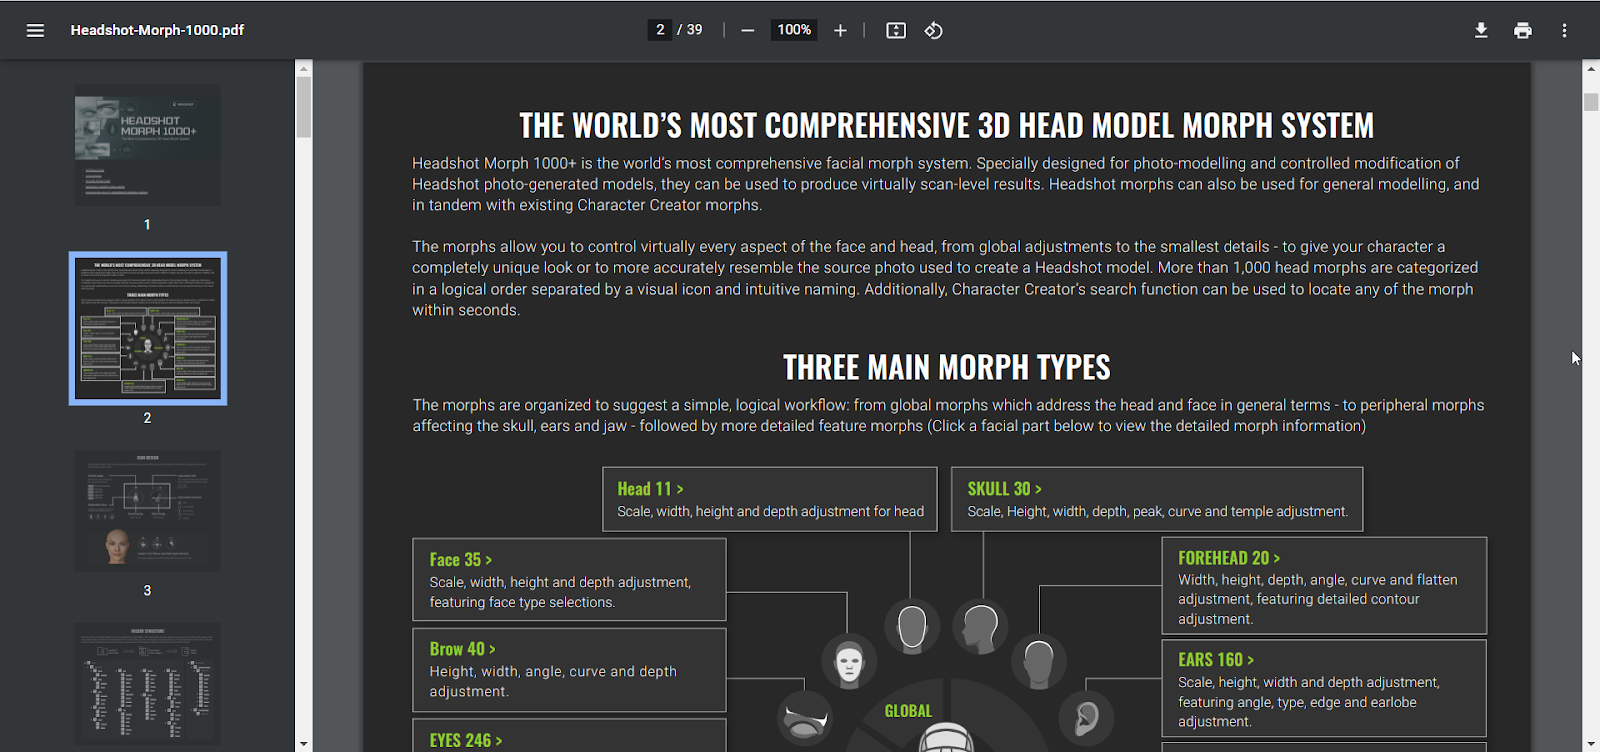
In 2019, Mike innovated on Headshot, which is a best-selling, AI-based, photo to 3D head creation plugin for Character Creator. Apart from designing this product, he also created iconic visuals to exemplify its full potential.
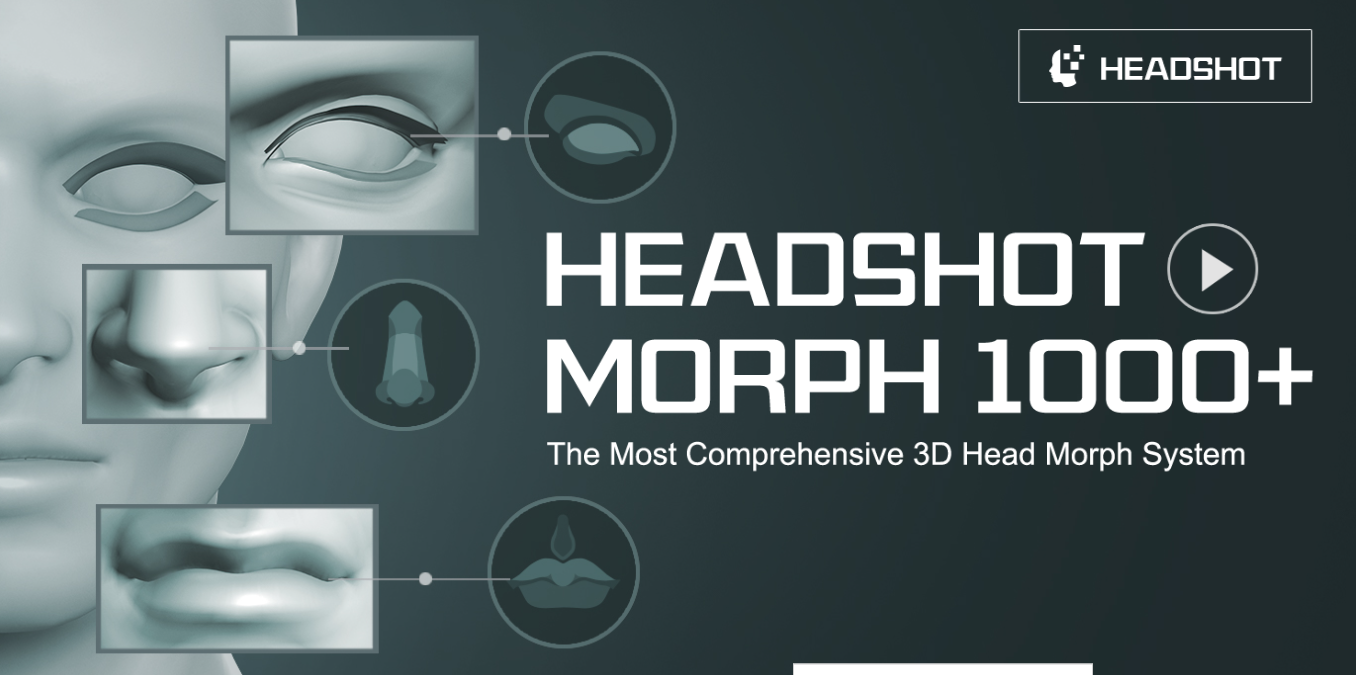
In addition to Headshot, Mike had also personally crafted incredible facial morph systems with the ability to approximate any resemblance using over a thousand morph sliders.
See how Mike turned the art of facial creation into science by referencing true-to-life facial anatomy.
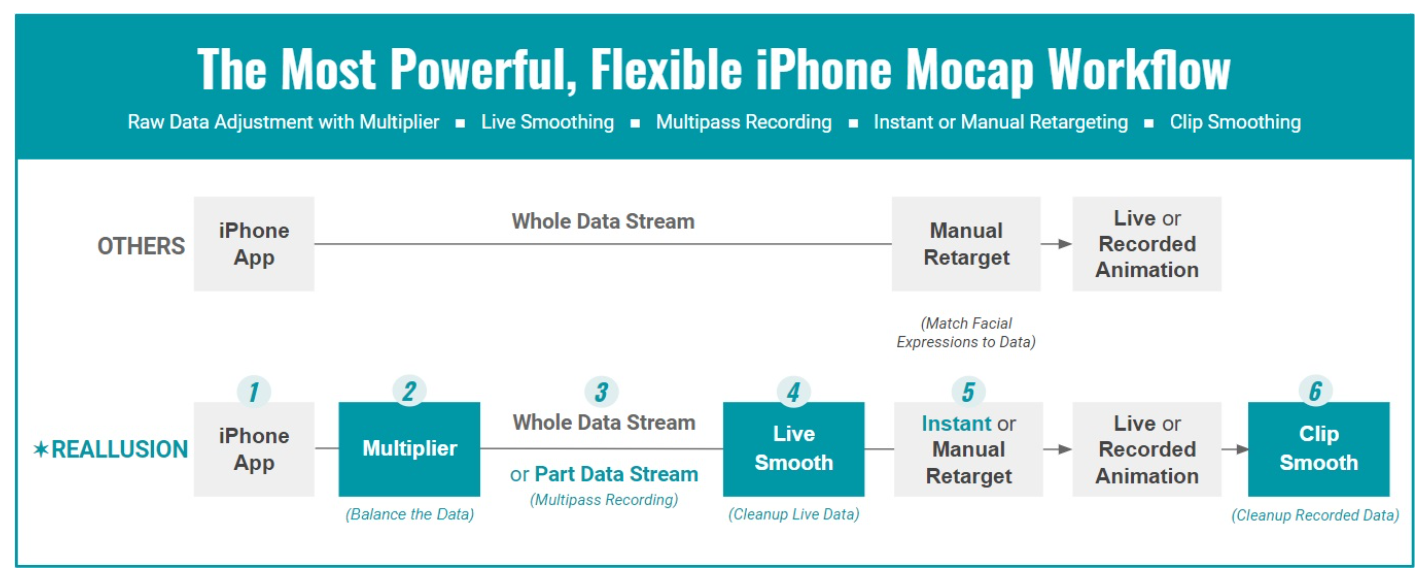
Mike volunteered to design an advanced facial mocap process with the addition of multiplier and smooth passes. In turn, making the facial capture workflow manageable and equipt to producing quality animation data.
Mike was the absolute best facial performer Reallusion had ever worked with. So much so that we often refer to him as a living FACS machine due to his ability to activate any muscle group in his face beyond the ability of most people. His theatrical abilities were especially handy in the demonstration of the iPhone facial tracking system.
This was the first webinar that Mike hosted for Reallusion in 2017, after the debut of Reallusion’s Motion LIVE facial capture technology.
Mike Sherwood will be dearly missed by his family at Reallusion, however, his spirit of innovation will live on, and we will continue to chart new and exciting courses for Reallusion products.
Condolences from the Taipei office
No one could compare to Mike Sherwood when it came to his passion for Reallusion and drive to bring 3D characters to life. His depth of knowledge, logical thinking, artistic skill, hands-on expertise, and tireless encouragement won the respect of the entire team. His inspiring spirit and dogmatic insistence had transformed our routine Wednesday meetings into a “Cult of Creativity” which elevated all members who were fortunate enough to be on the same adventure.
Charles Chen, CEO
No one will ever be like Mike to Reallusion. Without Mike, Reallusion won’t be the same as we are today. A true, genuine friend. His integrity, his passions, and the nonstop demand for perfection were revealed in our product design to overwhelming market applause. We have been so fortunate to have Mike over the last five years unselfishly sharing his great vision with us and delivering great results—Mike was a true Reallusioner. We all felt so honored to co-work with him, a great team member from the UK, so close to the team here in Taipei and so familiar, and yet, never having met him in person. It’s our great loss and I believe Mike will carry on his next journey to the wonderland. Mike, rest in peace, and a salute to you!
Jackie, Sales Director
Even though Mike wasn’t acquainted with me, I have learned so much from him ever since Headshot plugin and Character Creator v3.3 and the latest v4.0. Especially the way he strove for greatness and set up the highest verification standards for the RL team. I even told my colleagues that Mike was my invisible mentor because I was able to spot critical issues that would affect the quality of our applications with his help. I was shocked to hear about this bad news, but Mike’s legacy will remain and his spirit will stay with Reallusion. I hope he has a good time on the other side and continue to make the impossible possible with his infinite creativity!
Calvin, QA Team
I wish Mike all the best in heaven. He may be long gone now, but his spirit will be with us forever. This has been an amazing journey ever since 2016, when the team at Reallusion was really lucky to have Mike as a close teammate and supervisor. He would always share his knowledge, logical analysis, and clear methodology for every research project. Furthermore, I regarded him as our spiritual mentor, always inspiring us to face the challenges while keeping faith in difficult times. His continuous dedication brought new meaning to Reallusion products.
Benjamin Sokomba Dazhi – Professional iClone Animator
Hi, I’m Benjamin Sokomba Dazhi and I want to welcome you to this iClone 8 (iC8) tutorial. As you all know I am an animator and my major 3D tool is iClone. I’m so excited to bring you this tutorial, as we all know that iClone 8 was just launched and it came with a lot of features that we are going to explore.
So for today’s tutorial, we are going to see how we can enhance the visuals in our iC8 projects. We are going to start with the volumetric lighting, which is nice and really good for enhancing any scene, making it look more organic and atmospheric.
Let’s get started.
I have a scene that I already prepared with no 3D lighting. It’s just dark. So we are going to light it up and see how the volumetric lighting will make it look more visually appealing. The first thing we are going to do is make sure that we turn on Global illumination. (Fig 1.0) We check it, and make sure it’s on. Usually, at the default setting, everything works well.
Fig 1.0
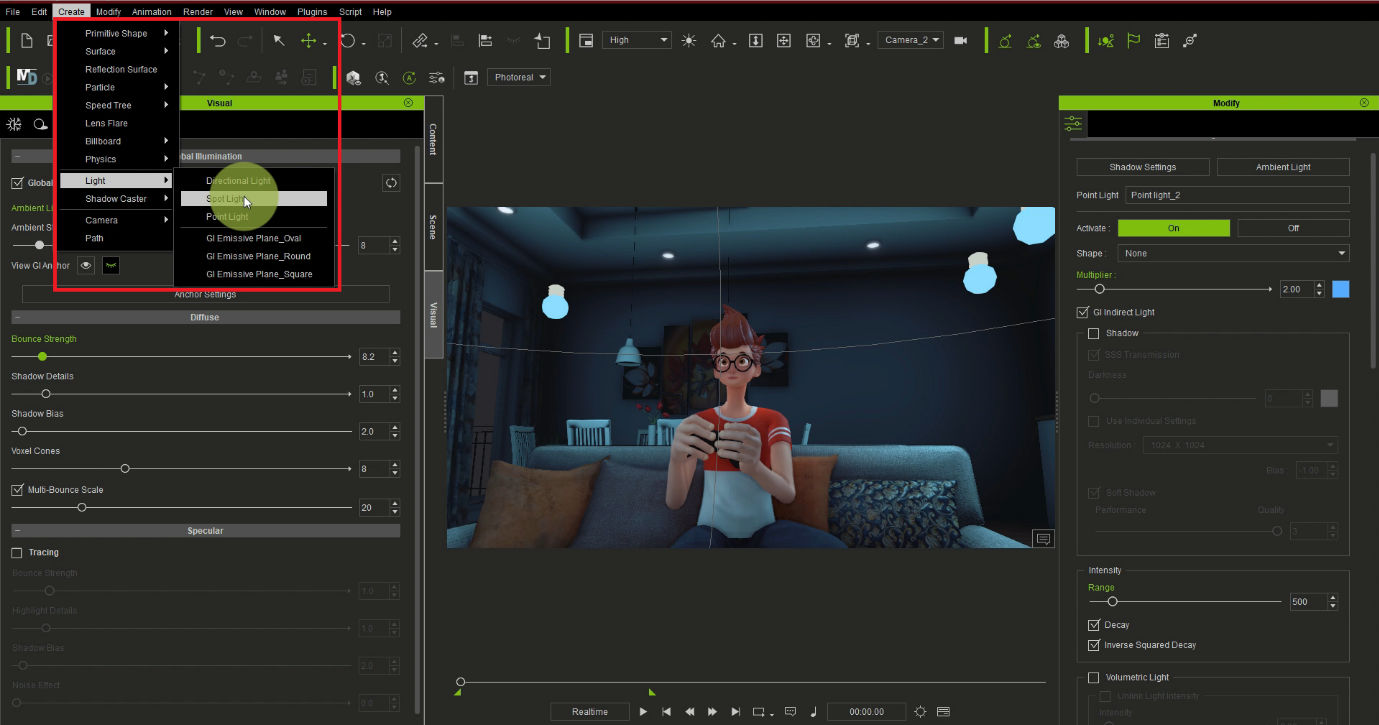
The next thing we are going to do is create our Point Light.
Fig 2.0
What we are going to do here is to give a subtle ambiance to the 3D scene. (Fig 2.1)
Fig 2.1
Fig 2.2
Now let’s choose a Color for this 3D lighting. (Fig 3.0) Use something cool like blue or you may opt for anything bluish.
Fig 3.0
Then we are going to strategically place the 3D lighting in the scene. To achieve this, we are going to click on Edit and then duplicate as shown below. (Fig 4.0) We are going to duplicate more of the lights.
Don’t forget that we are using Point Light in this 3D scene. The point light here is casting very hard shadows and this is not really good for this type of project.
Fig 4.0
So when the point light is causing a lot of hard shadows, you come to Modify and you switch off the Shadow as shown in Fig 5.0.
And now, you only see the light source.
Fig 5.0
Keep duplicating as shown below. The control for duplicating is Ctrl+Shift+D. (Fig 6.0)
Fig 6.0
We continue to duplicate.
Fig 6.2
Our purpose here is to try and lighten up the scene with all the ambiance, in order to give it a nice subtle look as shown in the scene below. (Fig 6.3)
Fig 6.3
So that’s it for the ambiance. Now, we are going to the main thing which is creating Volumetric Lighting.
We are trying to get the Volumetric Lighting from the window in the 3D scene. To achieve that, we are first going to create a Spot Light, not a pointlight. (Fig 7.0)
Fig 7.0
We carefully place the light here. We love it at that position close to the window as shown in Fig 8.0 below. That is where we want to bring in our volumetric effect.
Fig 8.0
Next, you come to the Modify panel and enable Volumetric Light. (Fig 9.0)
Fig 9.0
Switch it on. You can see it’s already showing here below.
Fig 10.0
Play with the parameters, especially the medium density multiplier which is what we are going to work with. (Fig 11.0)
Fig 11.0
When you move the slider forward you can see that it could be too harsh, or it could be subtle.(Fig 12.0)
Fig 12.0
It just depends on what you’re trying to achieve.
Fig 12.1
So you can carefully place it here as shown below in Fig 13.0.
Fig 13.0
Next let’s change the color. (Fig 14.0) It is called scatter color and I changed it to blue.
Fig 14.0
Or you can simply go to the light source multiplier and change the color there as well. (Fig 15.0)
Fig 15.0
Let’s choose a cool color like blue as shown below.
Fig 16.0
You can now see how subtle it is and how it’s giving the scene more depth. (Fig 17.0)
Fig 17.0
The next thing we’re going to do is to create a light source here and bring this volumetric light here too as shown below.
Fig 18.0
Now we are going to create another spotlight and place it directly under this lamp shown in Fig 19.0
Fig 19.0
We’ve now placed our spotlight inside the lamp.
Fig 20.0
A side note: The models that are used in this scene are from the Reallusion Content Store. They have beautiful and well-modeled props and assets that you can use for your projects and this is one of them. The content store or the Marketplace.
Now let’s change the color to a warmer color.
Fig 21.0
Let’s use this Golden Yellow color.
Fig 22.0
Scroll down under modify and go to the volumetric light to activate it. (Fig 23.0)
Fig 23.0
You can play with the medium-density multiplier. And you can see the light is now more obvious as shown below.
Fig 24.0
See that the spotlight beam is going out of place. We can modify it as shown in Fig 25.0.
Fig 25.0
If you don’t want the angle to be out of place, you can also realign it, let’s say to the arrowed direction a little.
Fig 26.0
We can scroll to view from different angles to ensure that everything is properly aligned. Just click on the beam and take it a little lower to the point as shown in Fig 27.0. It is important to note that when aligning what really matters is the angle from which the camera is capturing the scene.
Fig 27.0
If in some cases you see that the light beam is too narrow at the top and you want it to fill, you click on modify then you click on start. You can just increase the number by say two places up. This is shown in Fig 28.0.
Fig 28.0
This is how to get the light beam to become less narrow.
Fig 29.0
You can raise the beam and re-align it as many times as you would want. So let’s say this looks good for now (Fig 30.0) but you can keep playing around with it till you get exactly what you’re looking for.
Fig 30.0
Next, let’s duplicate the light again.
Fig 31.0
We place the duplicated light here as shown below.
Fig 32.0
Make sure the light is placed inside the lamp and not on top of the lamp.
Fig 33.0
You can take your time and re-adjust the volumetric light until you get what you are looking for. You can keep tweaking it if you have a lot of time and patience to get the desired result.
Fig 34.0
You can also work on the angle. (Fig. 35.0)
Fig 35.0
Keep aligning it until you get the desired result you’re looking for. You can also add the volumetric lighting here too.
Fig 36.0
Now let’s look at it from the frame so you can see that the volumetric lighting is there and it’s subtle. (Fig 37.0)
Fig 37.0
Always remember that it depends on the angle of your camera. It may not look well placed from the preview camera but that doesn’t matter. What matters is the final frame you’re trying to capture.
Fig 38.0
So to give this place more atmosphere, showing that light source,
Fig 39.0
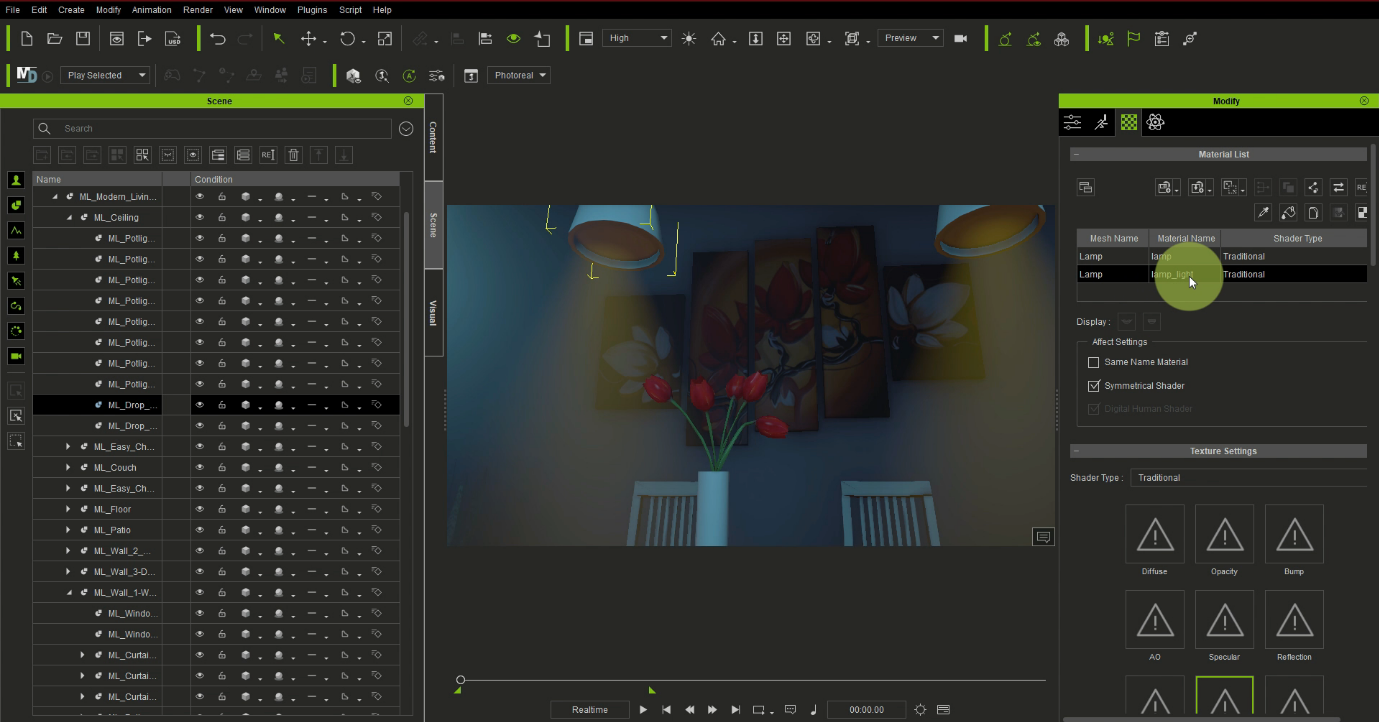
We click on the material name ‘lamp_light’ under the Material list under Modify.
Fig 40.0
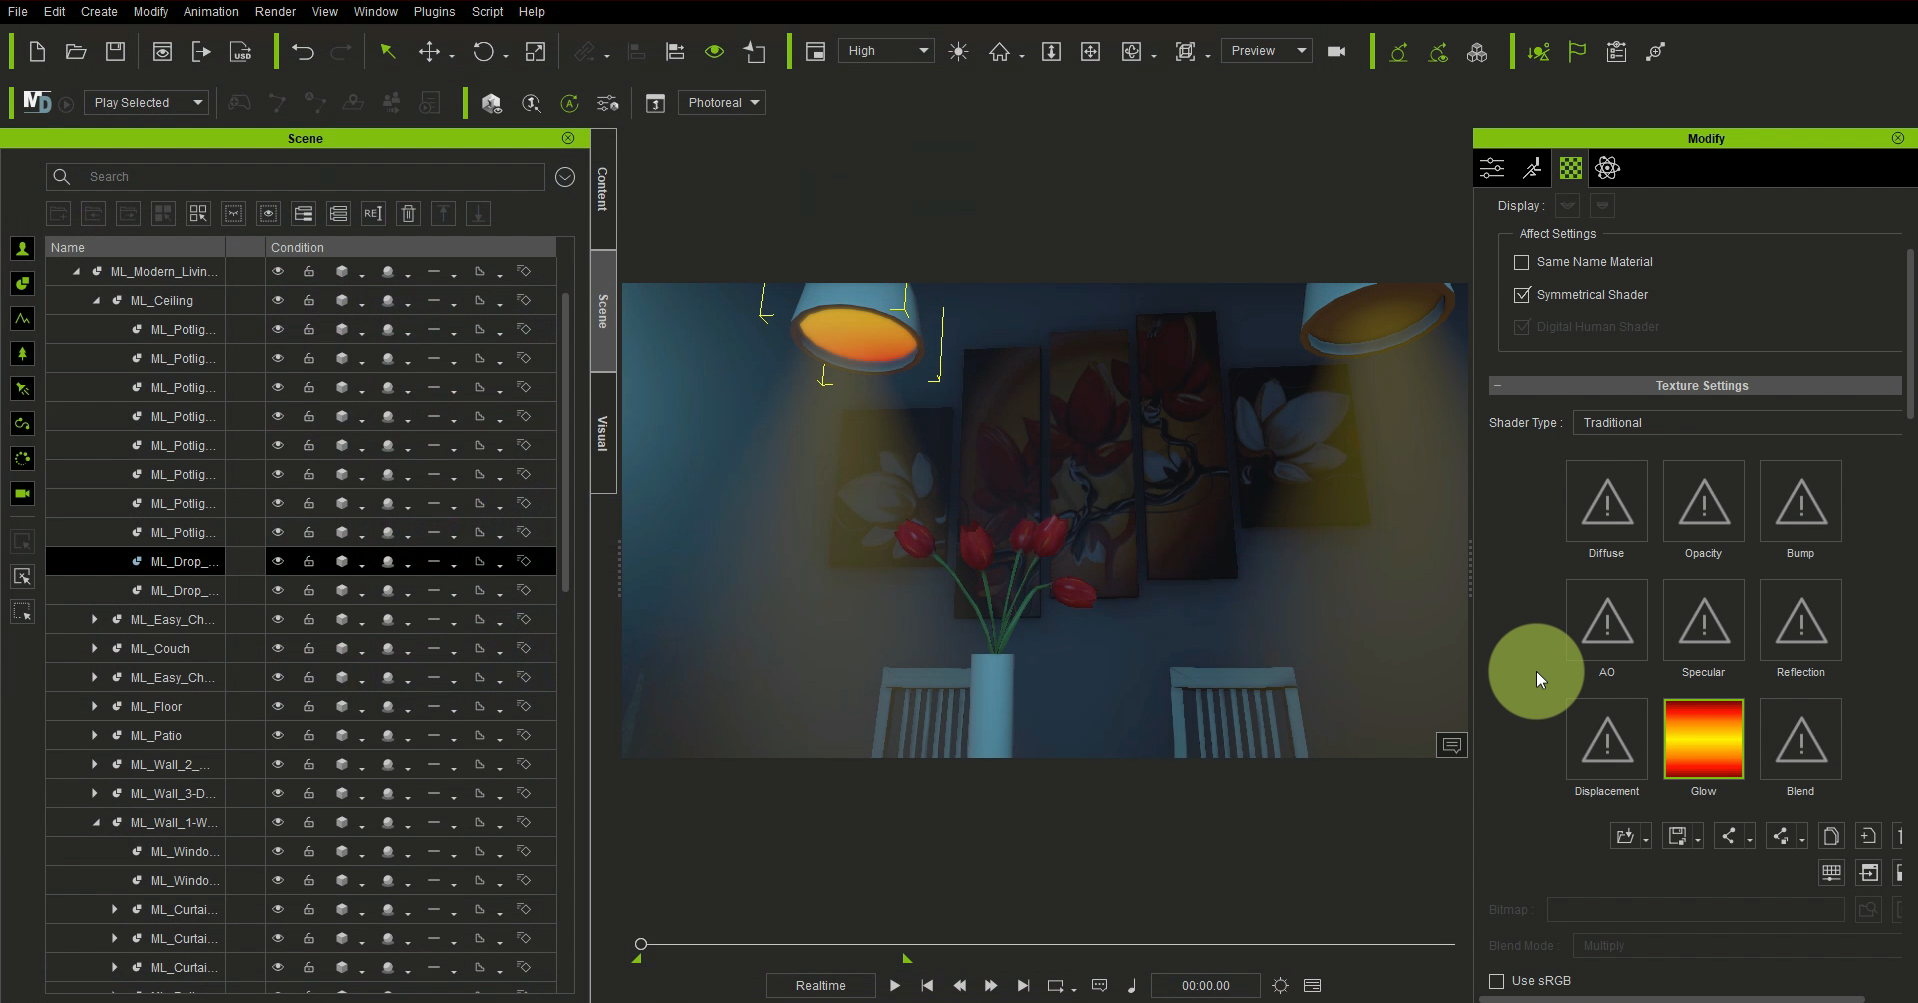
Next, we click on Glow under Texture settings.
Fig 41.0
This gives it a nice warm effect.
Fig 42.0
You may have your own custom textures but this is just what I’m working with now. Do the same process for the other lamp light. Apply a glow texture to it as well. Again you can use or create your own textures and work with them. I’m only working with what is available right now.
Fig 43.0
Now we still have other places we want to put our volumetric lighting.
Let’s duplicate.
Fig 44.0
Let’s click and drag to move it around.
Fig 45.0
You can decide to put it at the door, as that will be cool too. It just depends on the look you’re trying to achieve. But for this, let’s just place it at this window as shown below so that we can have the volumetric effect at the window too. (Fig 46.0)
Fig 46.0
Like what I said earlier it depends on the angle of your capture. Where you’re trying to capture is what will determine your light placement, not the angle from the preview camera.
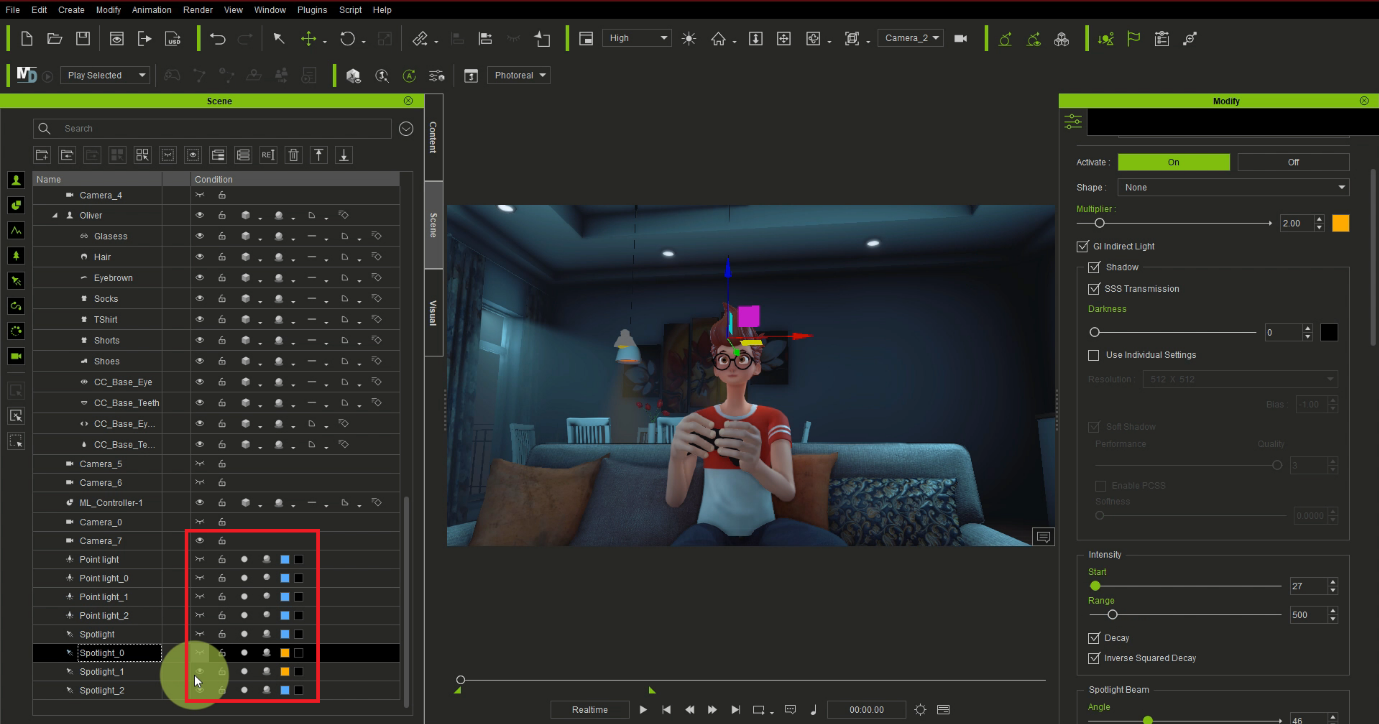
Now, I’m trying to realign the added light. First you can switch off all the light in the scene if you want to so that you can see the scene really well without any obstructions. How to do this is shown below.
Fig 47.0
We can see the volumetric light from this window and from this selected lamp in the scene .
Fig 48.0
There’s something I want to do. I noticed that this wall shown in the scene is looking very boring. I need it to have depth and be more interesting.
So let’s create a point light. (Fig 49.0)
Fig 49.0
Let’s place it here as shown below.
Fig 50.0
Note that the light I am putting here isn’t volumetric light but it’s just part of things I do, tips or techniques that you can use to give a scene a nicer look and depth.
Fig 50.1
So I’m going to go to the modify panel under this point light and put a texture. (Fig 51.0)
Fig 51.0
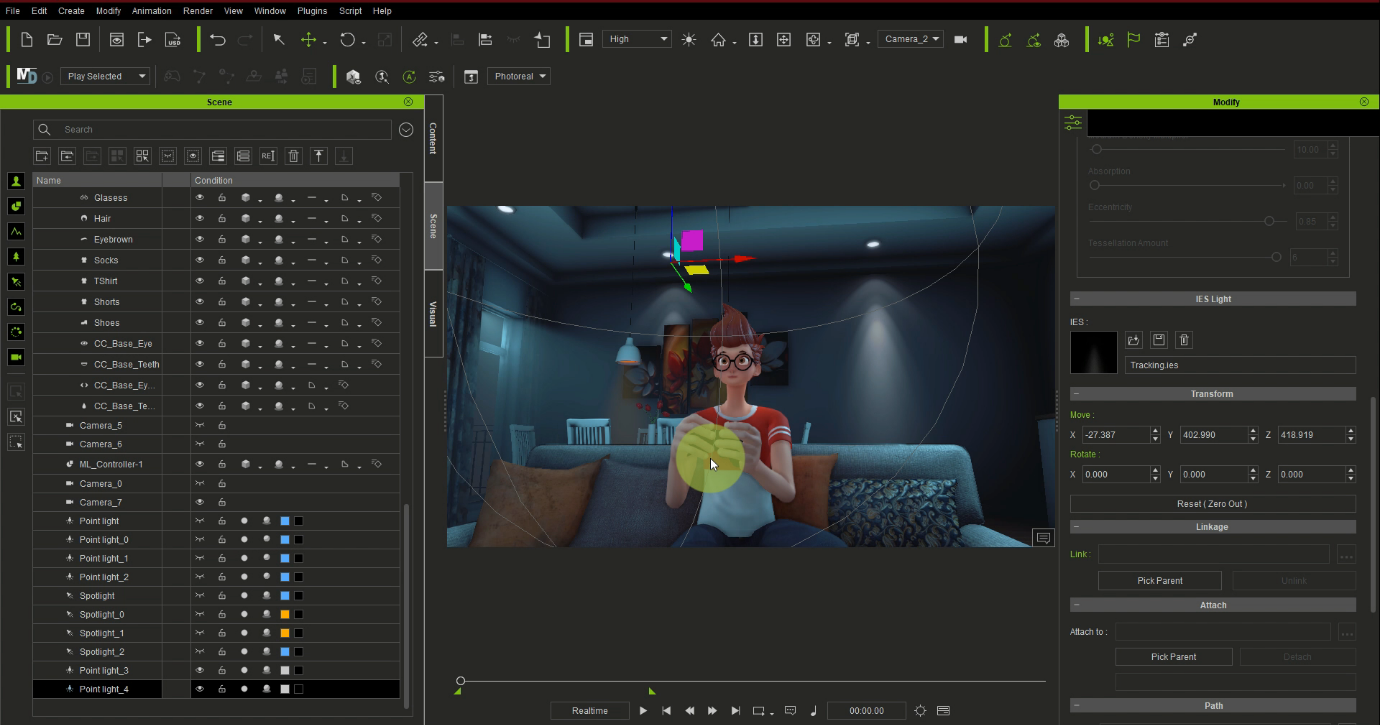
This is the IES. There are a lot of textures here.
Fig 52.0
Let’s go with tracking.
Fig 53.0
So what I’m trying to do here is to make it look like this spot light is illuminating this part of the wall.
Fig 54.0
Next, let’s duplicate it and put in the other light from the ceiling as seen in Fig 55.0
Fig 55.0
You can see how it’s giving the scene a nice and interesting feel, instead of just a boring plain wall without anything happening.
Fig. 55.1
Let’s try it for a different angle. I’m still going to use the same techniques. I feel this wall is too plain. Let’s create a point light here also and give it that same texture. (Fig 56.0)
Fig 56.0
To do this, like before, click on modify and then IES.
Fig 57.0
Let’s go with tracking as well. Don’t forget that there are lots of textures that you can use, but I’m just working with the tracking effect for this one. (Fig 58.0)
Fig 58.0
Mind you, the effect will not show until the light is close to and casting on a surface. It just depends on how you want to show it.
Fig 59.0
So now, let us duplicate this also and put one here as seen below. You can see how nice it makes the wall look.
Fig 60.0
And so here you have it ! 😊
This is how you can enhance your visual scene in iClone 8 using the volumetriceffect, lights and different textures on the light for more depth. This makes your scenes more interesting and takes them from plain and boring to something superb.
Fig 61.0
I hope you have enjoyed this tutorial and I hope you start making wonderful projects with the new iClone 8 and while exploring these new features to enhance your projects.
Ed Konyha – Cartoonist, 2D Animator, Comedian, Writer
Ed Konyha
Like many talented cartoonists, Ed Konyha also had a passion to bring his creations to life via 2D animation.
The chance to give motion and voices to his characters led him on the path to Cartoon Animator, a journey which would eventually see his animated short “Aussie Tale” selected in the AniMate Australian Film Festival.
.
” Making cartoons is my passion, alongside my other passion which is stand-up comedy. I like working alone for the bulk of the creative process and Cartoon Animator allows me to do just that. “
My name is Alessandro Cucinotta. I am from Italy but based in Switzerland now. My career began in Turin at a service company at IBM Group. Since then, I’ve always been passionate about motorsport and aviation. Eventually, I started developing graphics and software for flight simulation as a hobby.
In 2004 I left IBM to embark on a professional adventure in the flight simulation sector, developing airports and airplanes in 3D. I collaborated with Microsoft on developing the 3D Virtual Cockpit of the military Jet F18.
To easily populate our worlds we have been using Reallusion’s ActorCore characters and motions, along with iClone to make our airports more immersive with fantastic results.
Q: Hello Alessandro, and welcome to the Reallusion Magazine! Kindly tell us about your story at Simultech.
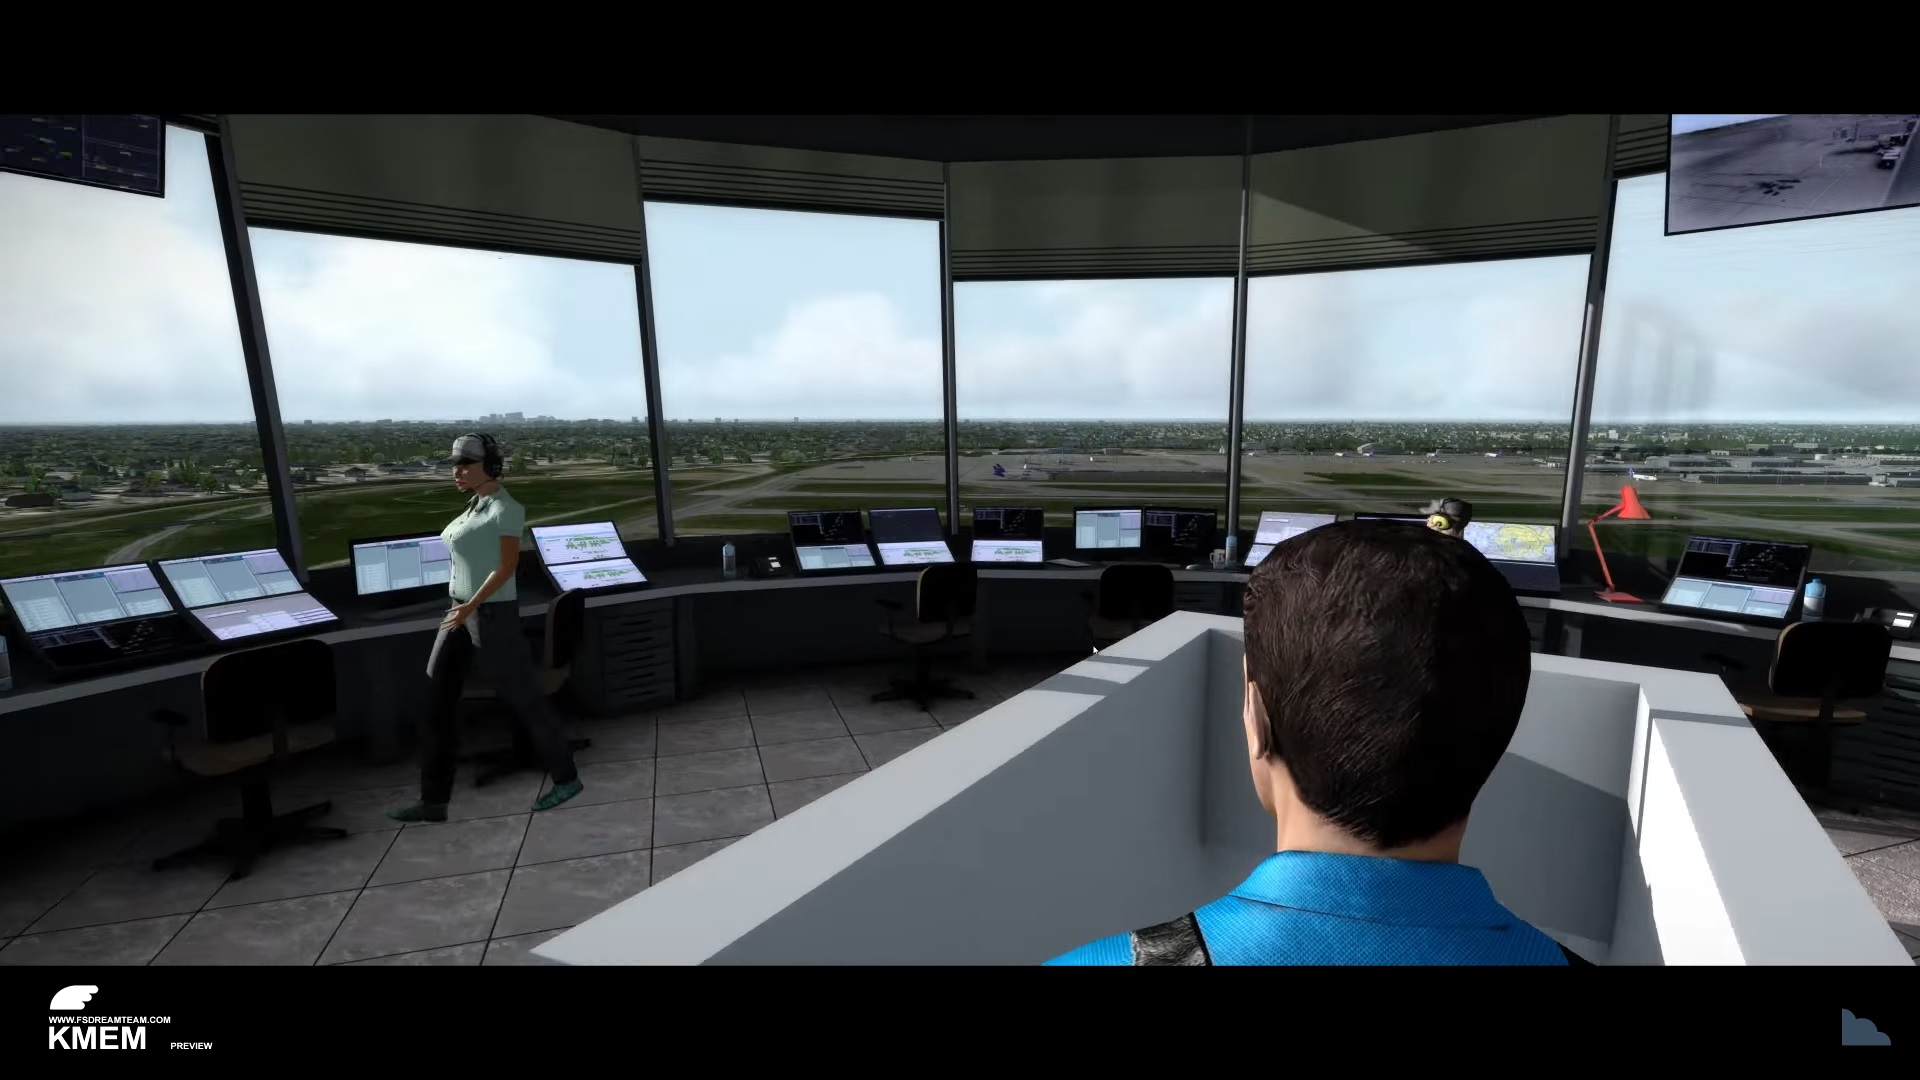
In 2016, I moved to Lugano, Switzerland. There I founded my first company, Simultech. At that time, I released my first video and simulation of the Memphis International Airport (KMEM). Not only did I simulate the airport apron, but I also imported several ground control avatars inside my other renders to give the audience a realistic walkthrough experience at the airport tower. Our company specializes in add-on production for the renowned Microsoft Flight Simulator. Simultech cooperates with FSDreamTeam since its foundation, and its popular packs include airport packs such as JFK or LAX or the last Kord V2, or even GSX level 2.
Today, we develop airports and software products for Flight Simulator 2020 with a few collaborators. We are among the first ones to include animating human characters in the world of flight simulation, making the ground environments more alive and immersive.
Q: How long did it take for you to familiarize yourself with iClone, Character Creator, and ActorCore? Any suggestions for beginners?
I started using iClone and Character Creator about one year ago. I was looking for a product that could help me create characters optimized for a real-time in-flight simulation world. After some quick comparison, I discovered that Character Creator was the best tool for me. The possibility to vary morphology and characters’ accessories with tools for the reduction of polygons makes this software a must for time optimization.
In my workflow, iClone represents the main actor. With it, we create 3D animation cycles utilized in real-time in the simulator. The ease of creating 3D animations and the possibility of exporting on my platform, allowed me to realize my ideas with efficiency and in a reasonable amount of time, without relying on expensive motion-capture tools.
Finally, ActorCore just gave developers like me the freedom to preview the final result on the cloud, and I can quickly save tons of time by purchasing the right motion content. Surely I suggest Reallusion’s suite to beginners: they will find everything they need to be immediately productive.
Q: What matters the most when selecting 3D content for simulation games? And what value did you find in Reallusion content and mocap animation?
In the flight simulation industry, it is important to maintain high frame rates, and the ActorCore actors are created with this in mind. The animated human characters are the right balance between performance and graphics fidelity, perfect for real-time applications. For my company, ActorCore represents an impressive time-saving solution for creating characters.
“Luckily with the launch of Reallusion’s ActorCore line, we now have a library of actors developed specifically dedicated for real-time simulations that are incredibly realistic with optimized textures.”
Alessandro Cucinotta – CEO at Simultech Sagl
Q: We love the way you utilize ActorCore and Character Creator in your Flight Simulation add-ons. Would you tell us a bit about what will be expected in 2022?
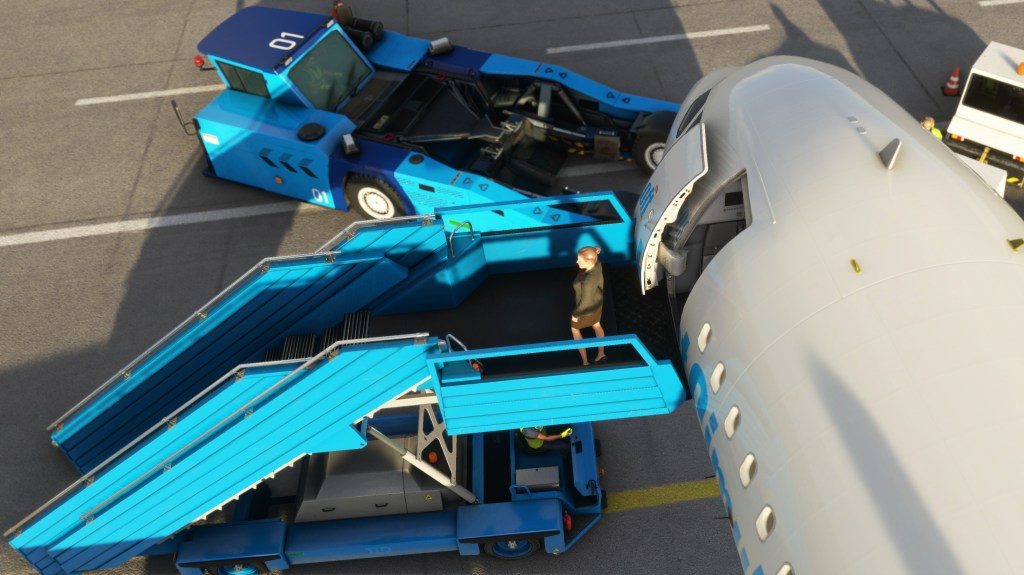
The success of the Microsoft Flight Simulator has attracted many new content companies, raising the level of content. Our studio put a lot into the graphic representation of characters to make more credible and real the interaction between the pilot and his surroundings. With our latest Replacement Assistance Trucks add-on, we used a lot of characters intended to carry out normal ground operations, which took place at the departure and arrival of the aircraft.
For the next couple of months, we are planning to develop boarding and deboarding of passengers. We plan to use ActorCore heavily, so we can simulate a deboarding of 500 passengers in real-time from a 747!
Greetings, my name is Peter Alexander. I’m a 3D generalist who specializes in utilizing Character Creator with Blender character creation pipelines. I’ve had the privilege of working on character projects to demo the new features coming to Character Creator 4 (CC4).
As someone who has worked with 3DXchange for both Character Creator 3 and ActorCore avatar optimization, I was immediately blown away by how much of an improvement the CC4 facial profile pipeline is. Previously, the 3DXchange pipeline was geared more toward marketplace optimization. Character Creator 4 has features that speed up the process at least ten-fold, and makes it more accessible for the average user.
Unique Personality v.s Generic Expressions
Having been developing more than 100 character products for the past few years, I always look for interesting ways to express my characters’ stories. The general facial expressions can be easily done by any artist, however, to make your own character stand out, it’s essential to give them unique personalities, especially when you plan to animate them after the 3D modeling.
After trying out CC4’s new features, I selected two characters from my previous work: a Stylized Vampire and a Hunchback. My initial impulse was to optimize the expression presets for the rigged character, which has been a standard optimization requirement. As I dug into the tools, I realized that I could exaggerate every aspect of a character’s expression, and thus breathe personalities into characters beyond the standard set of expressions.
The vampire character was fun to work on, as he was the most stylized of the original characters in this demo. I drew a little inspiration from Hotel Transylvania for the expressions and personality of the character, and maybe a bit of Fright Night, though the character design was more of an original experiment.
The personality I crafted for the vampire was that of a suave aristocrat, with an over-the-top sinister – but goofy – quality to his character. I focused heavily on his brow, jaw, and teeth – with many of the expressions exaggerating his fanged smile. Of all the characters, this one probably has the most personality, as the style I chose welcomed cartoonish exaggeration.
CC4 simplifies the way of shaping personalities
In my past experience dealing with large-eyed characters, I have often had to rely on using the Correct Eyeblink feature to adjust the eyelids for blink animations. If this isn’t enough to correct the eyes, however, then I can still use Character Creator 4’s expression morph sliders along with the Mesh Edit tool to quickly overcome this obstacle by adjusting the source morph target shapes.
Apart from this, cartoon characters tend to have more exaggerated proportions to make them visually appealing, like this vampire character with a long face and large mouth for example. However, characters such as these usually need to be adjusted to support exaggerated expressions and performances. Due to the slender face of the vampire, the teeth and fangs have a tendency to penetrate the face, and morph sliders would need to be relied upon to reposition and resize the teeth to fix the flaws in animation.
In an effort to enhance the flexibility of the expressions and performances, I’ve prepared quite a few custom morph sliders on the side. Users are welcome to mix and match these CC4 morphs to arrive at unique character expressions which they can truly call their own.
CC pipelines Create Animated Personalities⎯ZBrush, Blender, and more
The character Luffy from One Piece was interesting to experiment with because of his elastic, over-the-top expressions. As the GoZ pipeline became more refined, I was able to exaggerate the teeth and mouth, allowing for most of Luffy’s classic anime expressions.
The CC4 facial expression pipelines offer amazing convenience for manipulating expressions to create unique personalities for any imaginable character. Luffy’s personality was already established, so it was more a matter of utilizing Zbrush to approximate those expressions of his personality.
CC4 custom expression sculpting with GoZ pipeline.
As I continued to use the new tools, I wanted to experiment with a cuter character, so I introduced this cartoon girl to the mix, which I enjoyed working on. I don’t exactly recall the inspiration for this character; I frequently browse stylized designs on Pinterest, and may have picked up some elements from the Boondocks series. I exaggerated her teeth and cheeks to give her a chipmunk-like cuteness. I envisioned her to be cute but rebellious and prone to challenging authority.
I want to emphasize that my facial expression manipulating experience prior to CC4 was limited to adjusting eye blinks and the expression pipeline is extremely easy to use. Those who are familiar with dialing in and baking morphs will find that there’s not much difference, especially if they use GoZ (Zbrush) or the Blender character creation pipeline to make character adjustments. Once you’ve made your adjustments using expression sliders, and the internal mesh editing tools (including the new amazing Delta Mush feature), you can bake your work as a component of the character’s expression profile. In cases involving symmetrical adjustments, you will have the option to ‘mirror’ your work over to the other side of the model.
Having finished the eye animations for one side of the face, I use the Mirror feature to apply the same slider settings to the other eye.
If you’ve worked on models using 3DXchange, you’ll probably understand how time-consuming and tedious it can be to adjust a character profile, especially things like Eye Occlusion and Tearline. The new pipeline doesn’t just save you hours of work, it literally saves you days. Beyond fixing CC3+ characters, you can take a custom-rigged character from Blender or another 3D application and add an entire personality within hours.
This is game-changing stuff. It makes establishing a character’s personality a pleasure and brings this aspect of 3D development to a level much more comfortable and desirable for the average creator. The CC4 tools are not just fun to use, they also empower artists to bring their character design potential to the next level. If you’re already on the next level, CC4 will take you even higher.
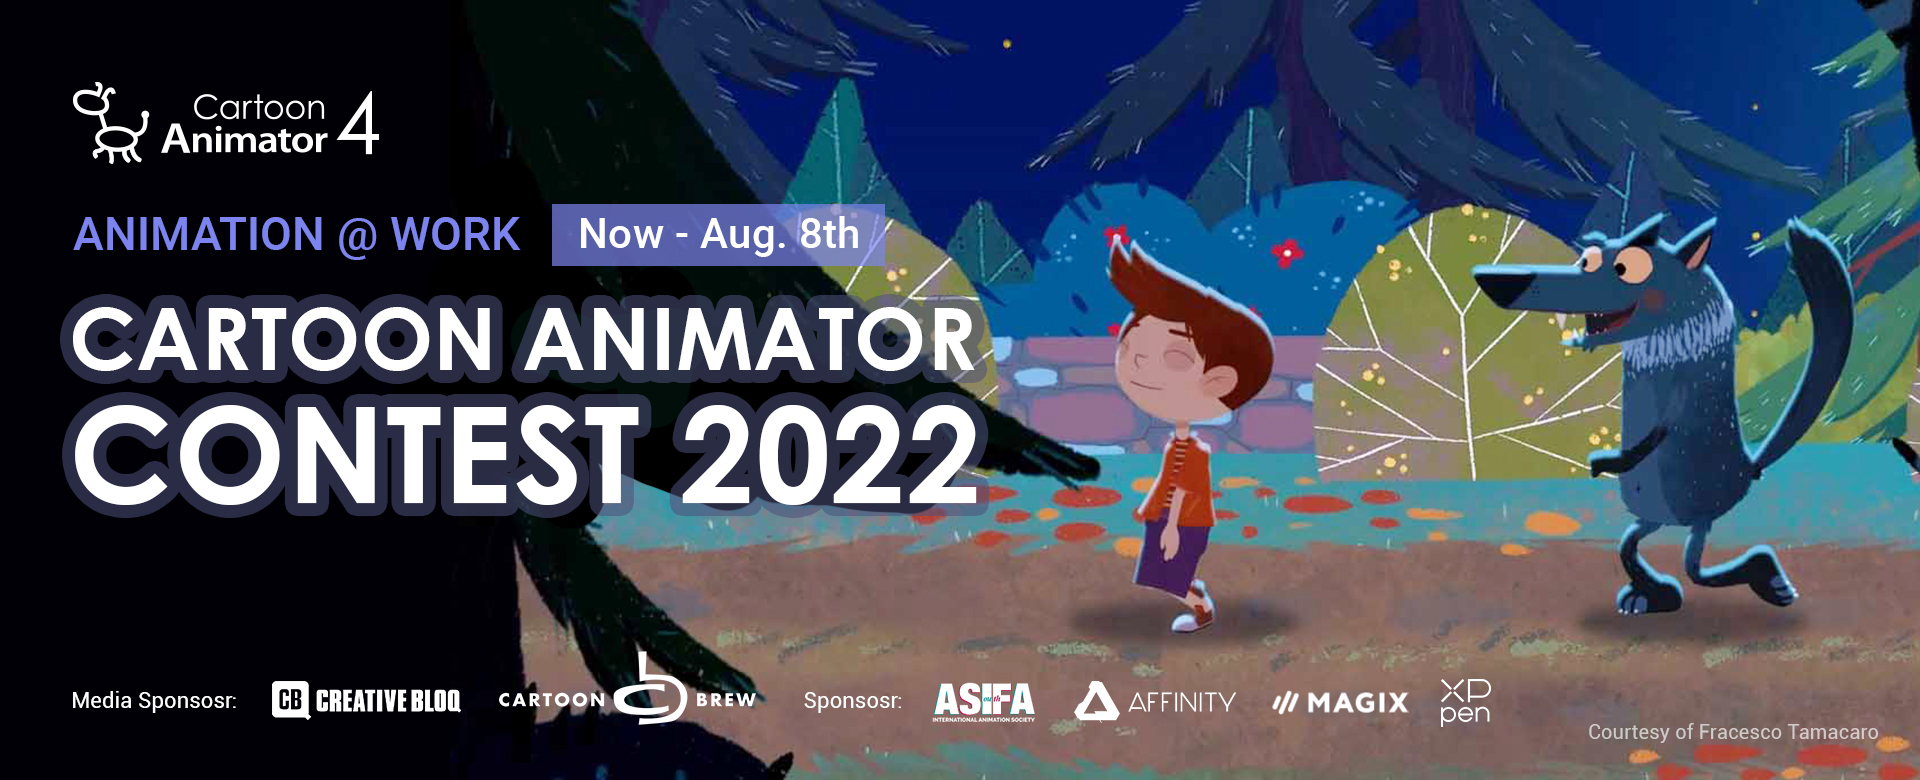
Reallusion is hosting its annual 2D competition Animation At Work from now until August 8th, 2022. Participants are encouraged to utilize Cartoon Animator 4’s real-time character-creation and 2D motion-capture technology to create entries in categories including business & commercial, comic & art, and educational. The total prize pool is over USD 15,000 for worldwide 2D artists, with multiple sponsored prizes from XP-Pen, Magix, and Affinity.
Five categories; 12 winning spots, and more!
The Reallusion Animation At Work contest invites participants to animate real-life projects for business promotions, educational/training materials, animated comics, YouTube videos, and more.
Business & Commercial: Use an animated video as a commercial to promote a realistic or fictional idea, product, or service.
Comic & Art: Here we encourage graphic art designers who can turn original static drawings, illustrative art, or comic images into an animation.
Education: Using animated videos for educational purposes such as storytelling, songs for kids, or learning videos.
Vertical Shorts: Create a mobile-friendly vertical 2D short and upload it to Youtube, Instagram, and TikTok. Video length must be 15 seconds above.
VLOG & Vtube: Use Cartoon Animator in your VLOG and Vtuber projects. The animated 2D characters should blend well with the video contents, and help illustrate a story.
Students and Teachers: Reallusion welcomes students and faculty to show your talents and turn your ideas into animation!
The best chance for aspiring artists to enter the contest
Reallusion welcomes worldwide 2D artists to leverage a 2-month free software and free educational resources to participate in this event.
2-month free software: Do not have Cartoon Animator to compete with? Share the contest webpage on your social media, and email us your social share screenshot to event@reallusion.com, you will be entitled to a 2-month free software of Cartoon Animator.
Free webinars: Hosted by Mark Diaz, The founder of 2D Animation 101, TED Talk speaker, and Reallusion’s certified trainer. Mark will guide you on how to get started with Cartoon Animator and master the key skills for the contest. There will be one webinar in June for making business animations, and another one in July for making comic-style animations.
The Reallusion Animation At Work Contest is an event that invites EVERYONE to use their imagination to animate real-life projects like business promotions, educational / training materials, how-to videos, animated comics, YouTube news videos, and more. Would-be participants can freely enter any of the four categories to compete with the 2D animation community.
Cartoon Animator is a 2D animation software designed for both abilities of entry and productivity. You can turn images into animated characters, control characters with your expressions, generate lip-sync animation from audio, accomplish 3D parallax scenes, produce 2D visual effects, access content resources, and wield a comprehensive photoshop pipeline to rapidly customize characters and create content.
The “2020 Animation At Work” contest was a runaway success that consisted of 25 winning submissions, with more creativity and skill in a single contest than we have ever witnessed. Winners not only walked away with big prizes but also got the chance to be featured on the web page and become featured developers on Reallusion content stores.
Reallusion Launches Impactful Character Pipeline – Redefine Design to 3D Animation
Reallusion is again evolving Character Creator and iClone, the most user-friendly and dynamic character animation platform, with a monolithic leap in ability and creativity. The tandem release of iClone 8 (iC8) and Character Creator 4 (CC4) delivers an array of accessible 3d character tools for generating and animating scalable digital humans or humanoids. CC4 and iC8 aim to provide creators with a unified and dramatically simplified solution for character setup and 3D animation.
The evolution supports custom IP and imported models, benefitting users from studios to artists with an illustrious toolset that now can be applied to any character. CC4 and iC8 open the door to more storytellers and interactive designers with a system to provide professional tools blended with ease of access and ultimate power. Take any character or animation to the platform of choice, from AR, VR, or metaverse to games, films, and content for new emerging media.
Apart from a plethora of professional animation editing features, iClone 8 further innovates animation design with a next-level Play2Animate philosophy. One of the elite new tools in iC8 is Motion Director, revolutionizing character animation with a gameplay style of 3D animation and control interface utilizing gamepads, devices, and keyboard controls for characters, cameras, and UI operation allowing ultimate interactivity.
Seamless Integrated Workflow
Massive innovation inside iClone 8 and Character Creator 4 is helmed with the inclusion of new complete integration of 3DXchange that now seamlessly incorporates character setup and animation with drag and drop import, instant or custom retargeting, and a whole new Smart Content management system for fluid workflow.
Smart Content Manager – users can directly download free resources or purchased assets within the content manager. The CC4/iClone8 shared folder design allows the same assets accessible from both programs, keyword searching and custom tagging for quick data access, Content Workgroup for team assets sharing, and the flexibility of central server access or multiple drive storage.
3DXchange seamlessly merges into CC and iClone, importing characters, motion, props, and more with drag and drop FBX or OBJ, characterizing and exporting to all platforms straight from CC4 or iC8.
iClone 8 – Curve Editor, MotionLIVE are now standard features
Total integration of CC4 character updates between CC and iClone
ELEVATE CHARACTER DESIGNS (CC4)
Character Creator 4 goes deeper into character development with bilateral features for a new version of CC4 digital humans and imported humanoids that support all the animation setup tools associated with CC4 native characters. The broader compatibility with any character to become a CC4 character and take advantage of the iC8 animation system is a big change to CC4 that opens the door to 3D artists allowing them to create and set up their characters to come to life through the real-time animation tools of iC8.
CC4 characters have the most customization for animation setup with custom blendshape import and assignment that unlocks the iC8 facial animation and lip-sync for any character model.
Extended Character Realism
The CC4 native character is upgraded with 140 blendshapes from 4D scanning for refined motion capture, face puppeteering, and lip-sync with iC8 AccuLips.
Create a custom face expression blendshape or morph setup from the Expression Profile Editor. Character artists have the freedom to create a unique personality for their own iconic character.
Enliven Any Character Rig
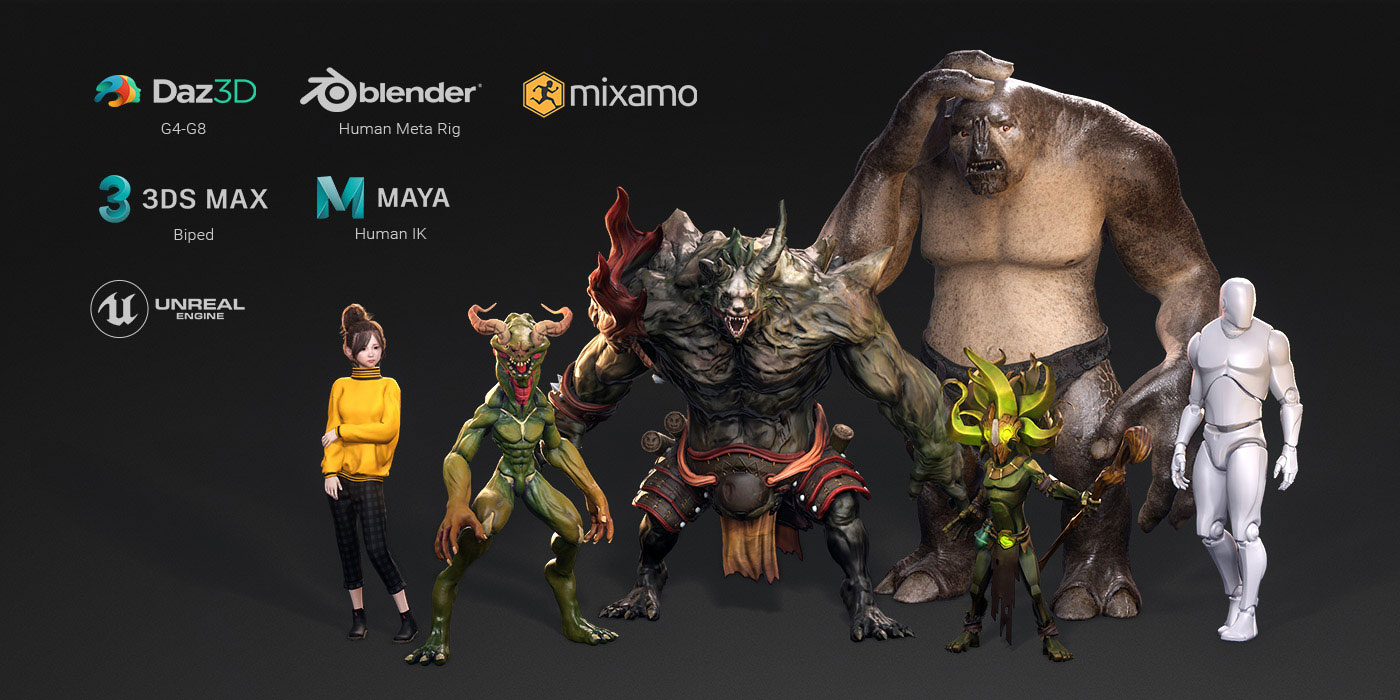
Whether humans, creatures, or props, creativity is no longer limited by the existing CC character base. Any rigged biped models can be imported, characterized, and facial rigged in Character Creator. New features now make any character compatible with thousands of motion assets, ready for natural lip-sync, motion capture, and animation controls in iClone. CC characters can also be optimized for low-poly, high-performance crowd simulation, AR, VR, and Metaverse.
Auto Import From Popular Character Types
Character Creator can auto-detect the imported character type when dragging in an FBX file made by popular vendors. Supported character standards include Maya HumanIK, 3ds Max Biped, Blender Meta-rig, Mixamo characters and motions, and Daz3D G3/G8 characters and motions.
Showcase Full-Motion Characters
The CC Animation Features let character designers see living characters inside Character Creator, helping to check imported character rigs, enhancing cloth skin weight and physics, and testing facial expression and lipsync assignment right after customization.
Character designers can use the turntable to real-time review character art or render it as video. Adjust settings for turn speed, cycles, and turn items. Free 3D turntable bases are included with customizable logo textures.
Glamorous realtime render with a library of realistic lighting, and lens flare effects optimized for the digital human shader.
DRAMATICALLY SIMPLIFY CHARACTER ANIMATION (iC8)
iClone 8 animation delivers a pro editing result with autonomous animation creativity. The Reallusion Play2Animate philosophy and Device LIVE features demystify the traditional animation complexities. Experience the balance of deeply refined editing controls blended with a new intuitive approach to animation. Mixing the best of both worlds between gameplay interactivity and professional animation, access editing tools to layout and lens scenes with devices for camera controls, and animate characters with ultimate interactive and hands-on direction using gamepads, 3d mouse, and assignable hotkeys.
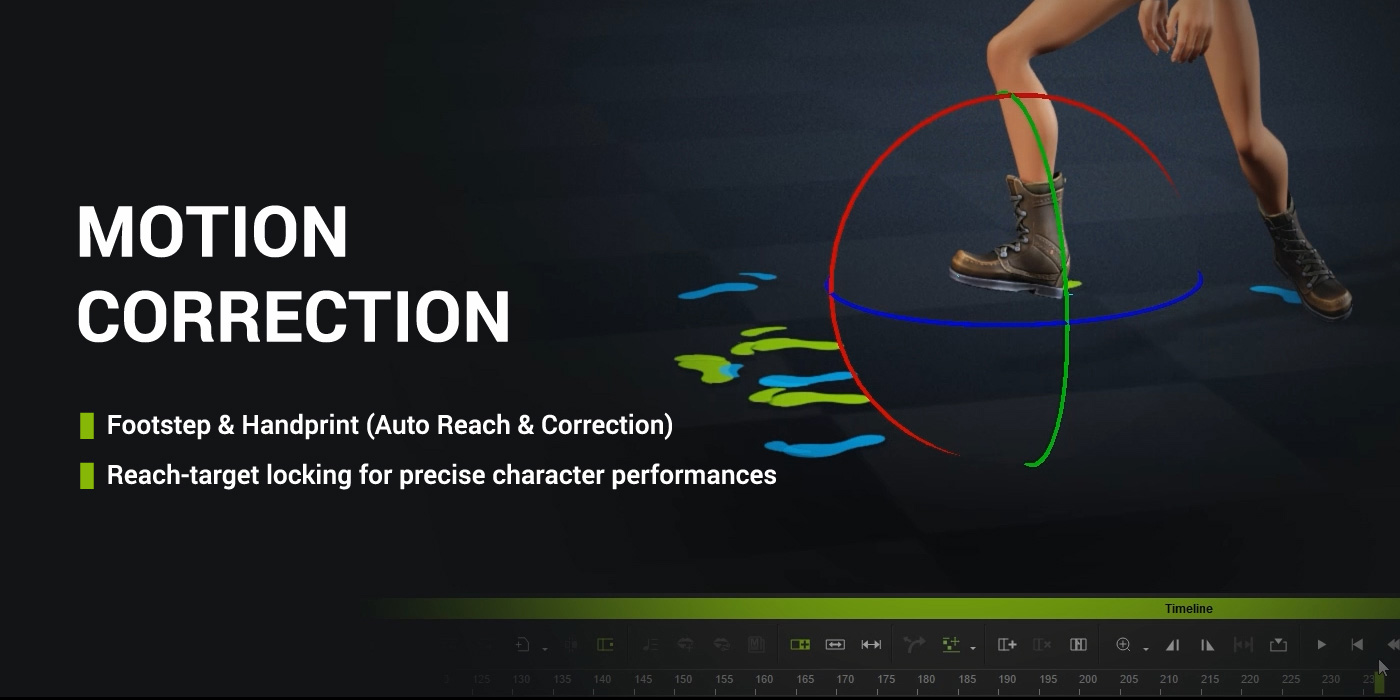
Motion capture and animation editing in iClone 8 are refined with smart controls that assist in footstep/handprint reach-target locking for precise character performances with scenes and surroundings, character-to-object, or character-to-character animation.
Professional Motion Controls
iClone provides powerful Motion Editing Innovations while keeping the process simple and intuitive. Whether users are new to the 3D industry or a veteran of professional tools like Maya or MotionBuilder, iClone’s motion editing features and unparalleled simplicity can out-perform most animators’ expectations.
Automatic root motion alignment between mocap clips
Smooth Bidirectional Blending, and Directional Control over motion clips
Optimal HIK Controls for accurate pose-to-pose editing and IK/FK blending
Multiple Motion Layer Editing, a non-destructive workflow for adding blended motion options
Character-centric Timeline, with switchable track numbers: body part level, body bone level, facial feature level, facial morph level, and IK/FK blend track
Pro-level Curve Editing for professional cartoon performance and blendshape follow-through animation.
Facial Animation Editing
Whether humanizing realistic digital doubles or dramatizing toon/stylized characters; iClone provides time-saving Facial Expression Editing tools that can help anyone direct their 3D actors’ facial performances to the highest productivity.
Works with various facial profiles, Traditional, CC4 Basic 60+, CC4 Extended 140+
Enhanced Face Puppet and Muscle Edit with secondary-level facial feature options
Facial curve editing for facial bones and blendshape animation
Facial-centric timeline-track editing down to Feature Level (63 tracks), and Morph Level (60-150 tracks)
AccuLips lipsync animation works for both standard CC3+ characters and imported Humanoid characters with CC4 facial setup.
Mocap Motion Correction
Motion capture and animation editing in iClone 8 are refined with smart controls that assist in footstep and handprint systems
Reach-target locking for precise character performances with scenes and surroundings, character-to-object, or character-to-character animation.
Motion key sampling, smooth filter, key reduction, and curve editing
Motion Director
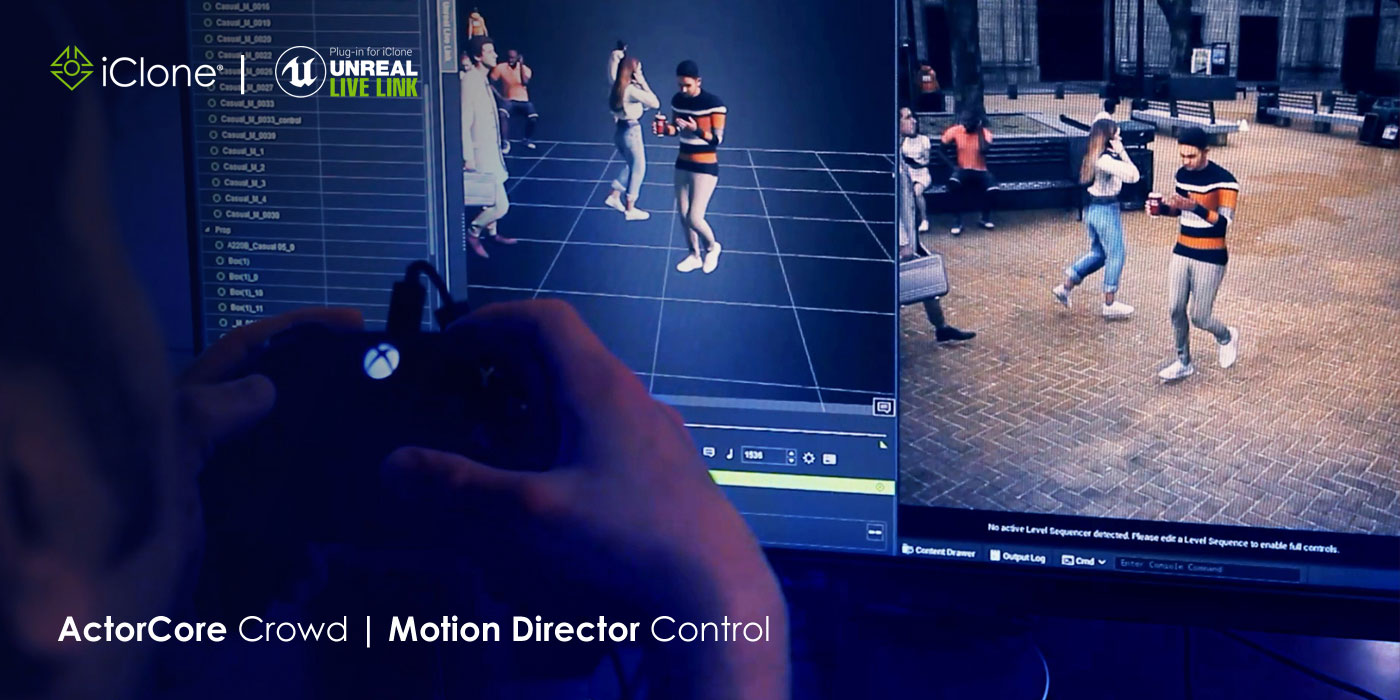
The Motion Director system debuts gameplay controls to drive characters and applies motion triggers and dynamic cameras to direct scenes in real-time. Implemented with motion matching technology, the new feature provides smooth speed change, turns, and seamless motion transitions.
Game-like Actor Control – steer characters with a regular game controller, mouse-click waypoints, or conventional WASD keys.
NPC AI Animation – give autonomous idle, walk animation on the path, in the zone, or follow an animated object
Camera Switch – be able to switch up to nine camera views when steering the actor
Macro Recorder and Sequencer – record device input events and replay in user-defined sequence, or bake to timeline
Behavior Expansion – allow adding new behavior to actors
Custom Hotkeys & Device LIVE
Intuitively engage in directing and editing with Live Switching, Trigger Effects, Slider fader, Jog Dial timeline scrubbing, Drone Camera navigation, and so much more. Almost all functions in iClone can map to custom hotkeys for assigning devices that interact as physical interfaces for ultimate scene control. Users from Maya, Max, or Blender can also choose their preferred mouse-keyboard convention for viewport control.
Camera Switch & Navigation
Motion & Timeline Editing
3D Object Transformation
Lighting & Perform Triggers
Directing features above can be triggered by regular XBOX or PS game controllers, 3DConnexion SpaceMouse, MIDI slider, Monogram Creative Console, Tourbox, Stream Deck, and other Windows compatible devices.
Other New Features
There are hundreds of requested features being answered in CC4 and iClone8, here are some other noticeable highlights.
Flexible frame rate systems, allow frame-accurate timeline editing and video composting
Enhanced performance and new productivity design, new scene manager with modular Collection design, be able to toggle collection visibility, make group transformation, material and mesh instancing, and project merge.
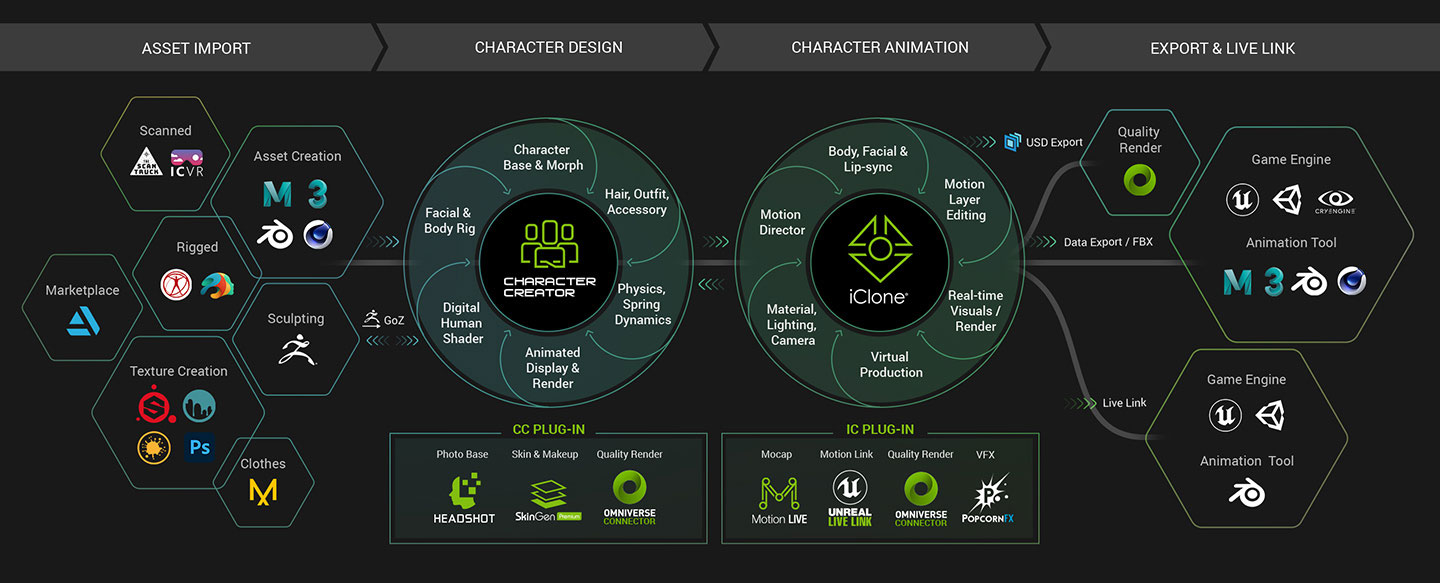
Now there is more power than ever to the Reallusion pipeline from both CC4 and iC8 including features enabling creators to generate and export characters and animation in FBX or USD for the most popular platforms. Export CC4 and iC8 scene assets and characters for path-traced rendering in Omniverse, game output and virtual production in Unreal and Unity, roundtrip editing with 3D digital creation tools, and making next-level metaverse avatars.
iClone and CC seamlessly work together as one big design-to-animation character platform and greatly ease the in-and-out productivity with many other 3D applications.
Instantly inject believable souls to your digital actors, a total of 25 minutes long, 146 facial sequences meticulously produced at different conscious levels and emotional states.
Quickly enliven a crowd simulation scene with 14 automatic walking styles, and 11 idle motion styles. Supports both player control mode and ai-control mode with Motion Director.
Andrew Macdonald – Executive Creative Producer at Cream Productions
Andrew Macdonald
A serial innovator throughout his filmmaking career, Andrew has always been the first to bring a new camera or technology to set. This led him to co-found Cream Productions’ digital department with Cream CEO David Brady in 2015. This venture has grown from one person incubator to an award-winning full XR production department.
Andrew has become well versed in concept definition, interactive UX design, directing motion capture, game development, and innovation of XR production workflows. He is currently directing an applied research machine learning project on digital humans at Sheridan’s Screen Industries Research and Technology (SIRT) centre.
Cream Productions is a Toronto-based Producer of documentary television, specials, and digital media that has created over 20 pieces of original XR content including 360 3D series, AR apps, and interactive volumetric VR, for networks, studios, agencies, and brands all over the world. They also developed SurvivormanVR a single-player interactive VR game for Quest and PCVR that challenges players to survive dynamic, sophisticated, real-world life-or-death experiences in remote, wild, natural locations, under the watchful guidance of real-world expert and TV celebrity Les Stroud.
For SurvivormanVR, the team at Cream Productions contacted SIRT Centre for the best pipeline to create digital doubles which led them to the Dynamic Digital Human system (DDH) that is employing Reallusion’s Character Creator (CC) software.
“Reallusion software is affordable, gives you multiple output options, and because its procedural it allows creators to iterate quickly.”
Andrew Macdonald – Executive Creative Producer at Cream Productions