首頁 » Page 41

Creating Simple Audiences with Crowd Sim

The new crowd simulator in iClone is one of the most exciting additions to an application that is already packed with exciting tools and features. Open the tool, drag-and-drop some necessary assets from the Content Manager or an Explore window, generate one-click placement over and over until you like what you see then Deploy Actors and you have a crowd.

As a freelancer, I have worked with several crowd generators and while most of them did a decent job, all of them fell short in one way or another. One was too restrictive in features. Another was like a cyber wrestling match trying to get custom assets imported. You never knew who was going to win that match either.

Other simulators were very complicated and time-consuming or involved prohibitive pricing models affordable only in some cases to high revenue-earning animators. Small shops, a lot of freelancers, and hobbyists were on the outside looking in, wishing they could get their hands on such tools when Reallusion introduced their 8.4 upgrade to iClone with the Crowd Sim tool in the free update.

The Crowd Sim is, like most iClone tools, easy to use with a small learning curve. No nodes, just assets, computer-aided placement, and orientation of those assets with paths, terrains, props, or volumes.

A clear view of the Boxing Match crowd used in the main article graphic. 3D characters upfront with 3D stadium seating and 2D photographic crowd.

Generating multiple, animation-driven characters is a snap with this tool. CC4 can optimize and decimate characters down to as little as 800K for use in the distant background while optimizing mid-range characters at around 7000K.

And yes, you can easily use your custom content. If the content was created outside of the iClone/CC4 environment you can use the auto-rigging features of CC4 to make it compatible with iClone motions and editing.

SEATED AUDIENCE CROWD

For a lot of events like sports, theatre, or movie screenings the audience would be primarily a sitting crowd. Creating a sitting audience is simple but requires a little tweaking depending on the dimensions of the bleachers or seats in use. If, like the one in my example below are not tall enough you can still tweak the position, camera angle or scale of the bleachers if necessary. Not all props like this are created to character scale so you adapt as best you can by tweaking the positioning of the actors after placement or using camera angle to conceal any problems.

STANDING AUDIENCE CROWDS

Standing crowds, particularly at sporting events or concerts can be rowdy crowds at times so I used motions from the Emotes Pack along with characters from the Casual section of the Modern People Sampler in generating the standing crowd. This pack also has multiple material options for more character variations. This produced a lively crowd very quickly. I have found these two packs to be very useful for generating realistic crowds.

You can use custom assets to make a crowd that fits your needs like a futuristic cyberpunk crowd or a period of time like the Victorian age.  

SITTING AND STANDING CROWDS

Mixed audiences, standing, and seating, is another crowd type that may require a little tweaking to get the results you want. I started with the sitting crowd made earlier and replaced the sitting motions with standing motions in the popup dialog while using the spacing slider to position the added characters. This can take a little patience until you get something usable and then you can tweak it after the fact if needed.

I tried a NavMesh, but it couldn’t produce one that was usable on that type of bleacher mesh. The NavMesh seems more suited towards solid props without the pipe framing as it could only pick up bits and pieces of the seating surfaces. A solid mesh, blocky bleacher works better. Rescaled stairs can work in a pinch.

ACTOR GROUPS FOR AUDIENCES

Actor Groups are more powerful than you may think. They are a fantastic addition in that you can create your own groups as a Base group and use that base group in creating a Preset with a large actor pool that you can fill with other actors for more variations when you drag in the custom group.  

CUSTOM BASE ACTOR GROUP

A custom base group will contain the same character makeup each time we load it which is why it is a base. It can be used in creating a preset that randomizes the group of actors each time it is loaded. Below is loading a simple base group I created for a test.

CUSTOM PRESET ACTOR GROUP

Dragging in or loading a custom Preset Actor Group will trigger a popup menu that allows for control over the randomization of the group actors. As shown in the video below you have the option of using the preset as it is when you drag it in or randomizing the actors even though they will be random each time they are loaded.

LOADING A BASE ACTOR GROUP FOR EDITING

An Actor Group is a project file, and you can build the group over time while saving it to test, use, or come back to later just like a project file.  In my test, I created a bleacher-based crowd of random sitting characters.  Then I saved the custom Actor Group as described in Kai’s video later down in this article. This is simply pressing the save button in the Actor Group Settings popup used when creating the group.

Loading an Actor Group for editing is different. You do not drag and drop the original Preset group into the workspace. Instead, you load the Actor Group via the Actor Group Setting dialog. This will repopulate the scene with actors and props. Don’t be confused, this is the same file that you can drag and drop but you need to load it with the Actor Group Settings popup for editing.

TIP: For Editing purposes load the file you saved using the Actor Group Setting popup menu. Loading the original present Actor Group into the workspace will only load the saved group with no popup window or editing. This is demonstrated in the video below.

Kai has a great tutorial on creating the different custom Actor Groups. This covers how to create a base group and presets and random Actor Groups.

With Actor Groups I can fill a scene quickly. Especially the immediate area in front of the camera.  Depending on the type of group the characters will be different each time I load or drag and drop the custom Actor Group into the scene. Being able to add props like benches and accessories like phones or purses makes for fast deployments of multiple Actor Groups that can breathe life into an otherwise empty scene.

Actor Groups are a powerful addition to iClone that can be as simple as drag and drop or when tweaked they can include custom characters and motions. We can even use Motion Director motions when the need arises.

SUMMARY

Audience-type crowds, sitting, standing, or mixed are simple examples of how to get started with the Crowd Sim tool. They also represent just a small selection of the types of crowds we can now create with this new tool. An audience is as varied as any crowd and the more variation we can throw in the better the crowd will look but, unless it’s Lord of the Rings, it’s not all about how many characters we can stuff into a scene.

It’s really about the proper use of characters in a given area, within the view of the camera. Sell the immediate area to the viewer and the midrange to background elements will fall into place as the viewer’s mind will fill in a lot of information, more implied than seen if properly done.

Animation doesn’t need to mimic real life, but it does need filler. Empty scenes have long been a problem in animation from the early days of cell-animated cartoons to current 3D projects. With iClone’s Crowd Sim tool, those empty scenes can be a thing of the past.

MD McCallum - WarLord

MD McCallum – WarLord

Digital Artist MD “Mike” McCallum, aka WarLord, is a longtime iClone user. Having authored free tutorials for iClone in its early years and selected to write the iClone Beginners Guide from Packt Publishing in 2011, he was fortunate enough to meet and exchange tricks and tips with users from all over the world and loves to share this information with other users. He has authored hundreds of articles on iClone and digital art in general while reviewing some of the most popular software and hardware in the world. He has been published in many of the leading 3D online and print magazines while staying true to his biggest passion, 3D animation. For more information click here.
Headshot 2 plugin walkthrough

Cloning myself with a 3D head generator: Headshot 2 plugin walkthrough

Erik Larson (Libertas)

Born in Chicago, Libertas started out with a passion for filmmaking at an early age. Ever since he fell in love with the AAA game Assassin’s Creed, he started making videos about it. You can find more of those videos on his channel Libertas Video. He also creates a series of Assassin’s Creed-inspired micro-short films, like “Modern Assasin Training Session.”

Libertas admits to always dreaming bigger than his shoestring budget could afford. Even still, he loves creating characters and their costumes to see them come alive, especially in his YouTube short films. Outside of his day job as the Director 3D of a creative company. And his is also a sole 3D generalist at his company, Libertas Video. He spends his free time dreaming crafting new characters, costumes, and props for his digital actors.

Challenges I Had To Face Prior to Headshot 2

I am no stranger to creating short films. Whether that involves writing scripts, developing costumes, stepping into characters, or bringing it all together. However, many of my productions were always limited — whether it was the number of people I had access to or the locations where I could shoot. It was disappointing to have an idea of what I wanted to create but be limited by what was available. Now that I have modernized my arsenal of tools, these challenges have become a relic of the past.

My 3D workflow using Headshot 2

3D scanning my own head

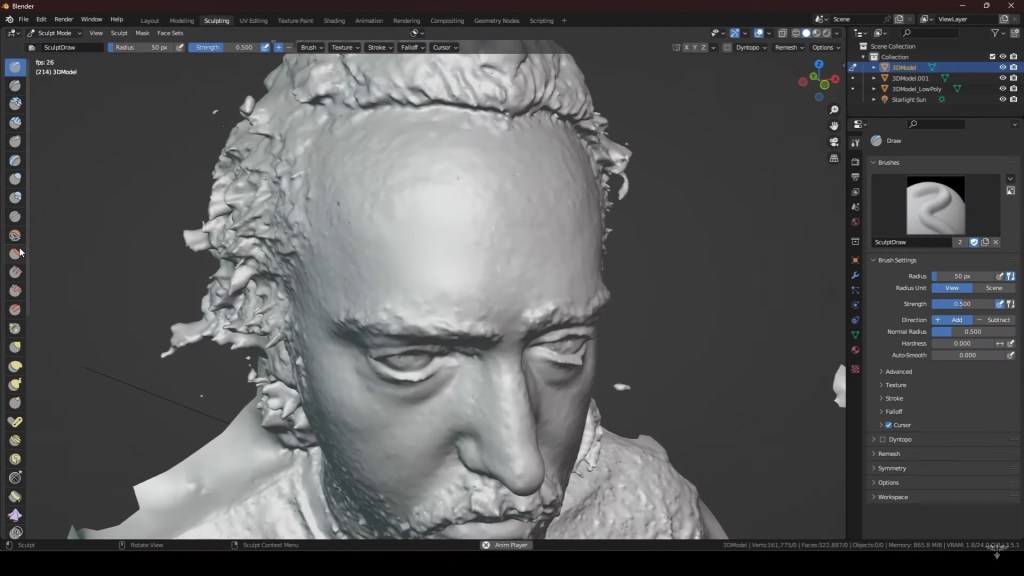
The first thing I did was scan my face using the Kiri Engine. I took about 30 photos of myself. They were uploaded and stitched together to create a highly detailed representation of my face. After downloading the high-resolution file created from the scans, I imported it into Blender.

Refining the sculpt in Blender

I had to do some cleanup on this file, so I merged the overlapping vertices and entered “Sculpt Mode”. I primarily used the “Smooth Brush” to remove any odd jagged edges, many of which were caused by the stubbles of my unshaven face. The cleaner we can make this model at this stage, the easier it will be for us later on. After cleaning up the head model, I scaled it down to life-size and exported it as an FBX file.

Importing FBX into Character Creator

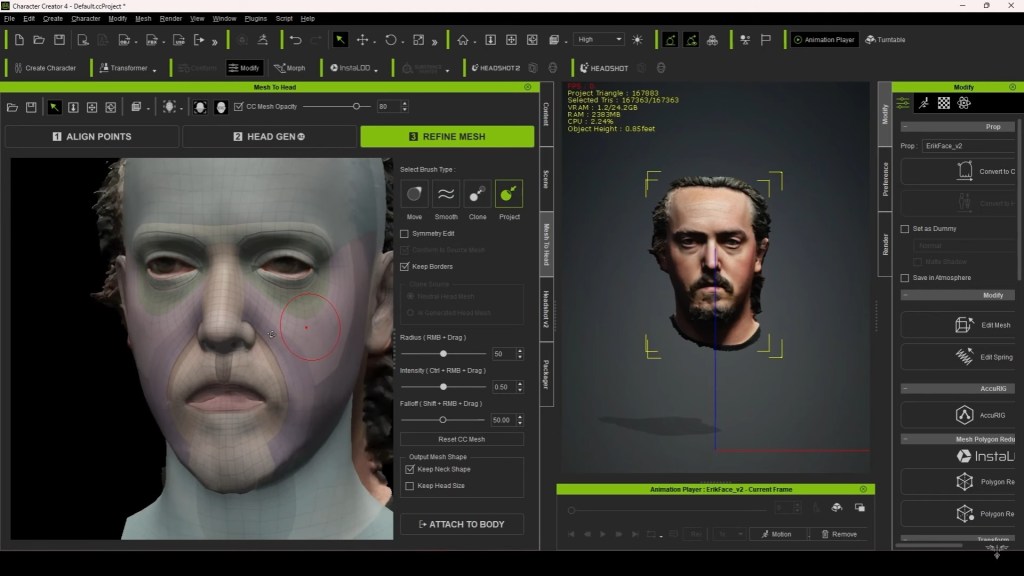
I imported the FBX head into Character Creator (CC), ensuring that everything was properly oriented, and linked the diffuse map to the model. Then, I began using Headshot 2. The plugin includes a mesh functionality that requires you to match up predefined points in sequential order on your model, as seen on the Character Creator forehead. You can also add additional points to achieve even more accuracy — to the hairline, for instance. Once this process is complete, I can generate the head and start refining the mesh.

I usually find that the base is good, but when using the “Sculpt” brush, I often need to project or smooth the mesh a little more to increase its accuracy. I also had to work more cautiously on my head sculpt due to some additional challenges stemming from my own face. In particular, the facial hair doesn’t convert well, so I had to use the “Clone” brush to essentially recreate the mouth and the chin. This process took some finesse, but eventually, I achieved something workable. Besides that, the refining phase can take as long or as little time as you want; it all depends on how accurate you want the final result to be. In just a few short minutes, we have a head that is strikingly similar to what was scanned.

Using Headshot 2 and aligning the head morphs

From there, I have a lot of creative control over the face. I like to make a few further refinements using the thousand-plus morphs included with the plugin. Things like fixing my lips and my chin may seem minor, but when it comes to faces, sometimes the smallest details are the most important aspects in achieving a realistic likeness. I then take it a step further by adding hair from the “Hair Builder” content pack, enabling the inclusion of facial hair. Additionally, I enhance the normal maps with the SkinGen Premium plugin for more intricate details. Realistic wrinkle maps from the Dynamic Wrinkles and Wrinkle Essentials extension packs further contribute to lifelike features.

“If you find yourself on the fence as to whether or not you want to buy this plugin I would say go for it — especially if you’re going to be able to utilize that mesh functionality.”

Erik Larson, CEO of Libertas Video

While these are all additional plugins, I find that they significantly enhance your character, taking it to the next level. Personally, I create my own hair in Blender and design the bandana in Marvelous Designer, importing them back into Character Creator 4. The end results are uncanny: It’s enjoyable to witness my family and friends react to the resemblance, which, I believe, opens up numerous opportunities for individuals in the gaming or film industry.

You can add yourself, your spouse, or your friends into a world that you’ve created. For those working on fan projects, odds are there are sculpts of your favorite characters available for import and utilization in Character Creator and iClone. For films, a digital double can perform incredible stunts, and with Headshot, it can all be achieved rapidly.

Fixing the head mesh

After several head scans and testing out this plug-in, you can then attach it to one of the standard Character Creator 4 bodies, or a body already present in your scene. I highly recommend unticking the checkbox for keeping the neck shape, unless you’re working on a more stylized character where the neck’s appearance is crucial. I’ve found that transferring the neck shape can lead to unintended consequences, and it’s relatively easy to reconfigure using morph sliders. Once you’ve selected the body you want, after a short while, you’ll have a complete character. During the process, Character Creator 4 bakes the diffuse map and normal map for use with your character, attempting to match the skin tones as best as it can.

However, based on my experience with the plugin, I discovered that additional refinements are necessary with morph sliders after the creation process. The sculpt on my head created a few issues I’ll delve into shortly. Typically, I’ve noticed that the eyes tend to start a bit small and occasionally at odd angles. It’s also crucial to pay particular attention to how the neck translates. While it may appear fine by itself, in my initial models, I noticed that the neck geometry affected the clothing on the character. For instance, scanned hoodies seemed distorted, giving the impression of a shrunken neck, even if it appeared fine in the viewport.

After I stopped using the option to maintain the neck shape, I haven’t experienced any of these issues. Other than that, the way my face was scanned caused a few problems for this stage of the process. I didn’t scan my face in optimal lighting. All was done in my kitchen at night, resulting in harsh lighting that affected my diffuse map. Additionally, the scan didn’t accurately capture my facial hair, impacting how the normal map was baked. Consequently, I had to rectify these textures in Photoshop by reducing highlights and shadows for a smoother, more even appearance. I also had to smooth out the normal map to diminish the bumpiness on my chin.

Conclusion: My Experience with Headshot 2

After turning myself into a digital avatar, I can fight a ninja. I can be the captain of a pirate ship, or parkour over the rooftops of a medieval city. And all that can be possible with the use of Headshot 2 in Character Creator.

I absolutely recommend this plugin. The original headshot was already a staple asset, but using Headshot 2 takes it to the next level. What would have taken me hours before now only takes minutes. It’s incredible to see those basic models come together so quickly, allowing for a smoother transition to the next step and enabling me to be more creative.

The real treat is taking the models and harnessing all the power that Character Creator 4 offers, from extended facial profiles to dynamic wrinkles. Utilizing SkinGen to add even more details like tattoos or scars gives you an incredible amount of control at your fingertips. So, if you find yourself on the fence as to whether or not you want to buy this plugin I would say go for it — especially if you’re going to be able to utilize that mesh functionality. It will save you a significant amount of time and effort, ultimately leading to better results overall in 3D scanning my head.

12 Reasons why Character Creator is the Best 3D Character Maker

Creating a 3D character used to be and still can be a tedious, difficult, time-consuming effort. Particularly when you must create everything from clothing to accessories, texturing, UV mapping and then there are the bones.

From big bones to little finger and toe digits, they all must be rigged to near perfection to avoid distortion in the character or its movements.

I have always held good character modelers in high esteem as their creations are the most likely to be front and center of any animation or game. It takes skill, boatloads of it, and experience, something we don’t all have the luxury of possessing. By the time we get good enough at all the skills needed… that creative spark might have long died.

If all you want to do is tell a story, then a unique 3D character that will not appear in other people’s productions can be a problem. The good thing is it’s a problem that Character Creator 4 (CC4) can solve. It has the base meshes and performs skinning, as well as other aspects of 3D character creation for use in animation and still image rendering.

Let’s explore the reasons why Character Creator 4 allows you to spend more time to being creative while eliminating the frustration of being hung up in the technical aspects and problems of creating unique 3D characters.

EASE OF USE

CC4, like its cousin iClone, is a drag-and-drop interface with multiple ways of bringing in 3D assets such as your own character meshes, custom clothing, and accessories including hair and beards. Everything about Character Creator 4, like iClone, revolves around the concept of visual and practical simplicity. You can drag and drop from an Explorer window or from the Content Manager. You can also double-click items in the Content Manager to load them into the workspace. We are given the choice for more flexibility.

Drag & drop contents easily in Character Creator 4

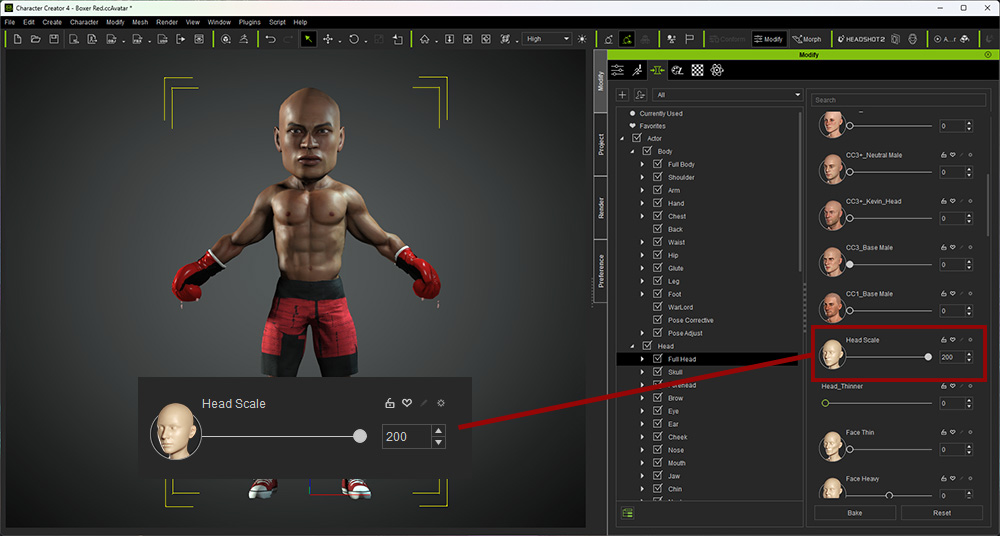
While mesh editing is available it is not necessary as CC4 has multitudes of sliders to control the look and form of different body parts. There are sliders for the Body, Head, Actor Parts, and CC Teeth. Each of these sections has subsections of sliders available. One great feature of these sliders is that they are not locked at zero or 100 percent. You can input numbers directly into the input box if you wish to exceed those amounts. Mesh distortion will occur if you push it too far but at least Reallusion gives us the choice to override the slider stops.

You can see in the above image that I have overridden the Head Scale Slider by manually inputting the number into the box.

With the sliders, you can add body mass like muscle or make the body thinner, arms longer, legs shorter as well as scale. And keep in mind that you can blend all of these sliders, including Male and Female on the same character for further modification. Even the CC Teeth have a lot of morph sliders including even more if you have the Headshot plugin. You can also make your own custom sliders for more flexibility.

In my experience, the Character Creator 4 sliders are much more complex and functional than any of the other sliders I have used in other applications. For my use, there is no match for the sheer amount of sliders and control that CC4 gives us.

QUAD TOPOLOGY OPTIMIZED FOR MORPH AND ANIMATION

Good, clean topology is a must for any 3D character to perform without vertex or rigging distortions. In the early days triangles (tris) were the only game in town but now the industry practices have changed to a smoother, more quad-based topology. Triangles are still necessary in certain parts of the mesh but the spacing of quads makes for a more workable mesh as the reduced number of triangles leaves fewer edges to collide or collapse on each other during a movement.

Retopology itself became a skill, almost an art form, to smooth base meshes and clean up any unsightly mishmash of vertices. It eventually became a part of most pipelines with allotted time and budgets that could make expenses rise.

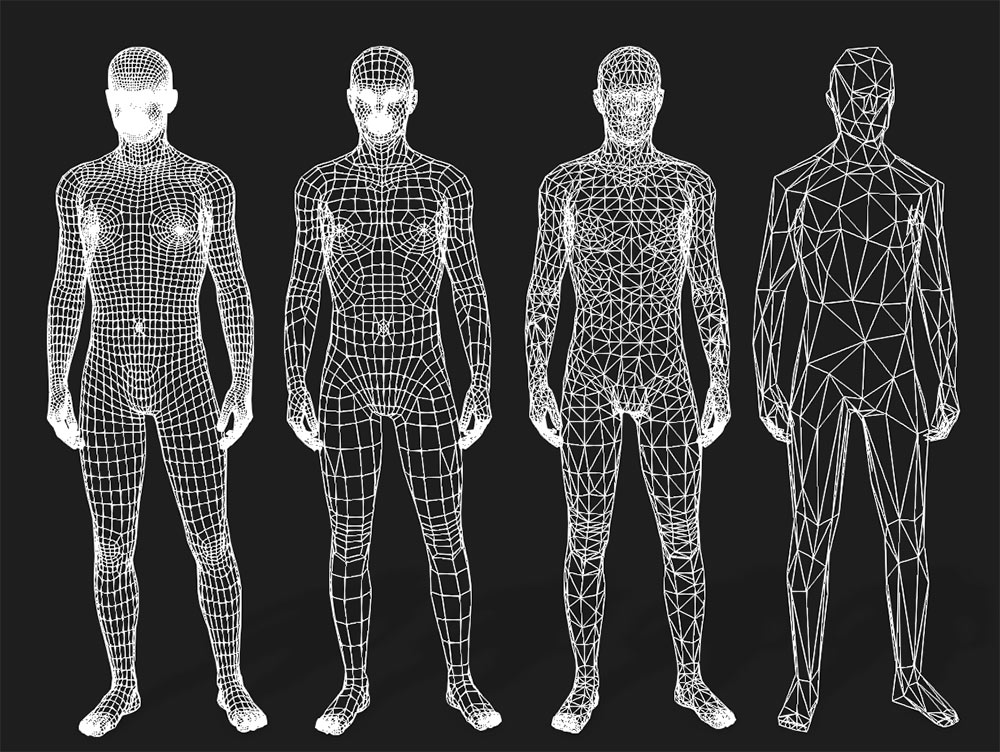
CC4 has taken care of that by providing a smooth, quad-based mesh that can retain flexibility at lower poly counts. Below is an image of the base mesh 35K down to a highly decimated and optimized mesh of 800 tris. You must have good topology in the original mesh for good optimization in decimated meshes.

Learn more: CC3+ Base Model

From Left: Original Male Base CC4 Mesh 35K, ActorCore 17K, LOD1 7K, LOD2 800 Tris

AUTO-RIGGING FOR ANY HUMANOID 3D MODELS

When importing a custom mesh that is already skinned, CC4 gives us the option to use AccuRIG for a new skeleton or to match bones in a characterization process until enough bones become available to create a functional 3D character. If we import a mesh only then AccuRIG will put the bones in based on the initial location of markers placed early in the process.

AccuRIG has a short learning curve. It provides symmetrical placement of markers and bone hierarchy selection to move items like markers one time for each side (arms, legs, hands) or entire rows of fingers (knuckle markers).

It’s a great tool for creating crowd-simulation characters too. Combined with the Optimize and Decimate tool you can create very low poly crowd characters for use as filler or background characters. It can create characters from 17K ActorCore specs to midrange characters around 7K (LOD 1) and distant characters at 800 tris (LOD2) as mentioned earlier. Plus, you have a custom option to create your own optimization settings.

AccuRIG by itself is a major tool that saves time, frustration, and headaches allowing you to concentrate on being creative instead of technical.

Learn more: AccuRIG Advanced

Non-CC4 Character Rigged with AccuRIG to accept iClone Motions

CREATE ANIMATED 3D CHARACTERS FROM FACIAL PHOTOS AND 3D MODELS

Headshot was an extremely powerful image-to-face tool in its debut with features that allowed us to not only use images but also have sculpting tools for fine-tuning if needed. It even provided a hair mesh in the auto version or more direct control in the Pro version depending on which button you pushed as you entered the plug-in. In a world of AI image generators, this plug-in is a great addition to the toolbox.

Headshot 2 has now arrived and allows us to import a head mesh to a fully rigged CC4 body. This includes openings for the eyes, nose, and mouth. It’s a very easy way to anthropomorphize animals to a bipedal character with access to iClone motions, poses, and facial features. It’s also an easy way to create stylized 3D characters.

ONE MESH TRANSFORM TO ALL POSSIBLE 3D CHARACTER SHAPES

Ah morphs… the thing that evens the playing field for all of us mere mortals against those super talented character artists. With the mere movement of a slider, we can alter the details of a 3D character. Use enough sliders and you have created a character unique from the base mesh. Add in your own custom morphs for even more unique 3D characters and create your own custom morph sliders.

Learn more: Morph for Modeling

ULTRA-REALISTIC HUMAN SKIN SYNTHESIS

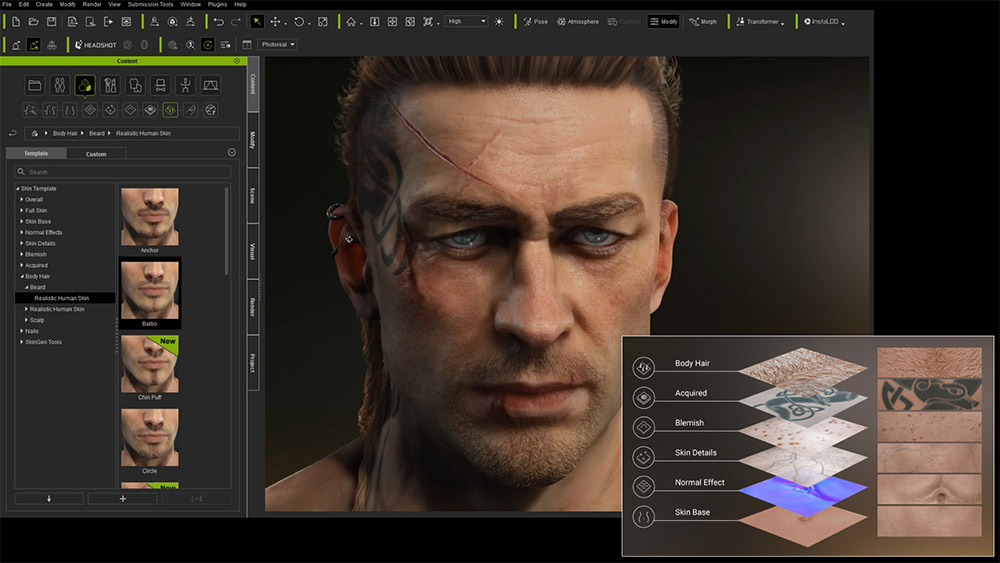
These two features have brought the level of realism to new heights. Using mapping like normal and height, Skin Gen adds a lot of detail from big scars to small skin details without hogging resources or slowing down your device. Unlike mesh-level detail which requires a lot of computing resources, Skin Gen relies on the mapping channels to add a high level of detail that makes your CC4-created characters more lifelike but nimble.

The most recent feature, Dynamic Wrinkles allows your character’s face to use wrinkles in the proper areas with user control for how much or how little. Need a furrowed brow or an intense frown? You’ll get that along with wrinkles that appear and move with the skin in a natural manner. While we have long had the ability to add intense expressions, they did not involve wrinkles that move dynamically with the face until now.

At its basic level, you do not have to do much except enable the wrinkles for the character. While you can do much more including custom wrinkle maps you can still do quite a lot with just basic features.

Learn more: Dynamic Wrinkle System

CUSTOM EXPRESSION MORPHS WITH EASE

Located within the Facial Profile Editor is the Edit Expressions button which activates the panel of morph sliders to enhance a character’s expression. CC4 provides standard and extended facial profiles. The Edit Expressions editor allows the use of individual morph sliders to increase or decrease the amount of expression like lift in the eyebrows.

Outside of the morph sliders, there are several expression tools available including Edit Mesh, Open Modify Morph, GoZ (expressions), and the Proportion editor.

Learn more: Facial Expression Morph

ULTRA-REALISTIC REAL-TIME HUMAN RENDERING

With CC4 you have a choice of Physical Based Rendering (PBR) or Digital Human Shader that can improve the realism of your characters. You can even mix shaders within a character such as the skin being Digital Human Shader while the clothing can be PBR or Traditional shaders or any combination as CC4 gives you versatility.

Learn more: Digital Human Shader

ROBUST ZBRUSH INTEGRATION (GoZ, Face Tools, and Pose Tools)

ZBrush is one of the most innovative and powerful mesh creation tools on the planet. For pure creative purposes, this high-powered digital sculpting software ranks at the top and is a must-have tool for many 3D digital artists. ZBrush has industry-leading tools that allow for the creation of complex meshes and the optimization of those meshes to make them practical in a 3D environment.

CC4 has been a part of GoZ integration for some time now and it has an even more robust GoZ function for its new Face Tools plug-in. It is very easy to move back and forth between a CC4 character and ZBrush with a lot of included preset morphs to alter the look of your 3D character.

There is also the free ZBrush Pose tools to use CC4 to effortlessly pose your ZBrush character creations.

Learn more: ZBrush Pipeline

MODULAR ASSET SYSTEM & SMART GALLERY

CC4 takes advantage of the same modular asset system in iClone such as hair, clothing, and accessories for your 3D character. These items are interchangeable within the iClone/CC4 pipeline and are available to other CC4 characters.

The Smart Gallery helps you to keep up with all your new characters and stock or purchased assets by providing a visual, searchable database of your 3D assets that work with CC4 or iClone. You can add custom locations for 3D assets stored outside of your CC4 installation too. Of course, you can also just drag and drop any CC4 assets directly into the workspace from an explorer window.  

Learn more: Smart Content Management

PROFESSIONAL PRODUCTION PIPELINE

Don’t let the subtitle scare you. While it can turn out professional-level work, you don’t have to be a professional to use it. Nor do you have to be a pro to benefit from its powerful tools and pipeline-friendly direct and indirect export features.

As mentioned earlier CC4 is already tied into the ZBrush pipeline. Its industry-standard FBX, USD, and OBJ exporting allow for easy interaction with other 3D software.

OBJ for modern and legacy applications. USD for hassle-free import into the Nvidia Omniverse pipeline including their machinima tool for high-level rendering. BVH for motion files and the industry-standard FBX for import into just about any 3D application. You can even upload your creations to Sketchfab with little effort.

Learn more: Pipeline

REALTIME FEEDBACK

Being a close cousin of iClone, CC4 provides realtime visuals as you work. You don’t have to stop and render out a still image or part of a video to see what you are working on. While other applications can provide some level of realtime visualization they are generally in a more muted, simplified manner without revealing the true look of your work. The final render then fills in the blanks but with CC4, like iClone, you get instant visual feedback to guide you through the creation process.

Also, like iClone, with CC4, what you see is what you get. You will see what you are working on as it happens.

SUMMATION

When it comes down to the bottom line, Character Creator 4 offers a wide array of powerful tools to morph, shape, and blend a character that can fit your needs as an animator whether you are a beginner or a pro.

MD McCallum - WarLord

MD McCallum – WarLord

Digital Artist MD “Mike” McCallum, aka WarLord, is a longtime iClone user. Having authored free tutorials for iClone in its early years and selected to write the iClone Beginners Guide from Packt Publishing in 2011, he was fortunate enough to meet and exchange tricks and tips with users from all over the world and loves to share this information with other users. He has authored hundreds of articles on iClone and digital art in general while reviewing some of the most popular software and hardware in the world. He has been published in many of the leading 3D online and print magazines while staying true to his biggest passion, 3D animation. For more information click here.

The Preferred 2D Animation Software for Solo Animators

1 1920x700 top banner ad for blog template.jpg

Using Cartoon Animator 2D Animation for Music Videos, Live Streaming, and More

“The fact that Cartoon Animator integrates smoothly with Clip Studio Paint, my drawing software of choice, really allows me to have great looking artwork for my animations, and the motions really saves me a lot of time. I use the walking motions all the time! Why spend hours to make your character walk if you can simply drag and drop premade motions and make your character walk within seconds.”

Eon de Bruin – 2D Animator and Developer

2D Animator Eon de Bruin

Eon de Bruin is an animator and developer, who has been working for a number of years with Cartoon Animator (CTA). Consequently, Eon chose CTA as his preferred 2D animation software because it streamlines his work process as a solo animator, and it also speeds up his production time without reducing the quality of his output. In his recent interview with Reallusion, Eon talks about his passion for his work and what he loves most about Cartoon Animator as it can be used by just about anyone.

Tell us about your work with Cartoon Animator 2D Software

I have my own streaming platform called Tween Xstream, and I use Cartoon Animator for all my 2D animation work. So far I have numerous animated TV shows that I have created, as well as one music video. 

Why choose Cartoon Animator as platform to create your 2D content?

Since I have a streaming platform, I need to release new videos regularly. That means that I need software that is easy to use, and has the ability to create animations fast without compromising on quality. The fact that Cartoon Animator integrates smoothly with Clip Studio Paint, my drawing software of choice, really allows me to have great looking artwork for my animations, and the motions really saves me a lot of time. I use the walking motions all the time! Why spend hours to make your character walk if you can simply drag and drop premade motions and make your character walk within seconds.

Favorite Genre or Theme to work with 2D Animation

I am old school, so artwork that I love is your classic Disney look, but genres I enjoy is cartoon I grew up with like Looney Tunes, Animaniacs, etc. I love the humour of these shows. For my streaming platform, I try to bring in these styles and humour. My show “The Greatest Story” was inspired by the Disney look, and my show “Don’t be A Fool” was inspired by Looney Tunes humour. 

Cartoon Animator software is easy and enjoyable

I find Cartoon Animator very easy and enjoyable! The fact that I can open up Cartoon Animator with a press of a button and create, or adjust characters again is such a time saver and very convenient. 

Favorite Cartoon Animator Tools and Features

There are many features, but for me to create animations fast for my streaming platform, I need a few things from an animation software. It should have a very neat user interface that is easy to understand, and easy to find functions when you need them. A well organised interface plays a big part in working fast. You don’t want the interface be a stumbling block when your creative juices flow. You just want to work. Other tools that I love about Cartoon Animator is the motions. And if I need something, I can easily go to the Reallusion Marketplace. To animate water ripple effects for me will take hours or days. But a quick purchase and dropping it in my projects again saves me so much time. 

Advice for Aspiring developers considering to sell their art in the 2D Marketplace

It is important to know that there are three types of animators:

  • The first animator is the one that creates everything themselves. From characters, scenes, props and FX.
  • The second animator is the one that loves telling stories through animations, but can’t draw.
  • The third animator is someone who can draw, but doesn’t have the time to sit down and create characters, backdrops

If you can create content for the marketplace, then you are of GREAT help for those animators who can’t draw, or don’t have the time to create their own characters or scenes.

What drew your attention to Cartoon Animator?

I found that Cartoon Animator was easy to use and it saves so much time without compromising on production quality. 

Future plans with Cartoon Animator and Current Projects

So far I have created TV shows and music videos with Cartoon Animator and will continue to do so, but I also have a shortfilm in the pipeline.

My recent show was “Godly Princess” where I actually combined live actors inside a cartoon world. This was really challenging but also great fun. It again shows what you can do with cartoon Animator.

Follow Eon de Bruin

Website:
https://www,startanimating.com/

YouTube:
http://www.youtube.com/@startanimating695

Tween XStream Streaming platform
https://www.za.tweenxstream.com/

iClone Physics for Beginners

Physics. A bland subject for a lot of us mere mortals but an exciting addition to 3D animation. If you watch just about any action movie then you’ve seen 3D-based physics at work. Physics provides a simulation of what could happen from toppling skyscrapers in a metro area to huge rockslides and any kind of destruction that would be dangerous or impossible to recreate in live action. Another giveaway is the associated tons of debris that fly everywhere causing even more destruction and debris.

Back in the old days, they used to blow things up when needed and still do in many instances. However, if, like a lot of indie productions there is a tight budget then physics can add that extra punch that is impossible to keyframe on a major scale like a disaster. The first time I saw physics I didn’t realize that was what I was seeing. I was blown away by the incredible animation, the sheer number of moving parts, and how could it have been keyframed manually.

Note that only some of the center fractured pieces have been selected for the simulation. You can select any or all pieces of a fractured prop.

It didn’t take long to discover it was physics. It was new and the first time I saw a sphere bounce like a ball on the floor and do so naturally with no manual keyframing, I was hooked. I’m not saying physics produces a perfect simulation every time. In fact, you may be doing yourself a dis-service if you don’t run several simulations, keeping the versions you liked. Running a simulation is easy, the trick is in setting it up. Getting it to mimic real-life events as closely as possible is the key.

The thing about physics is you don’t have to be an Einstein to use it. You don’t have to know how it works any more than you do your air conditioning or appliances. You can just use it once you understand a few concepts and terms.

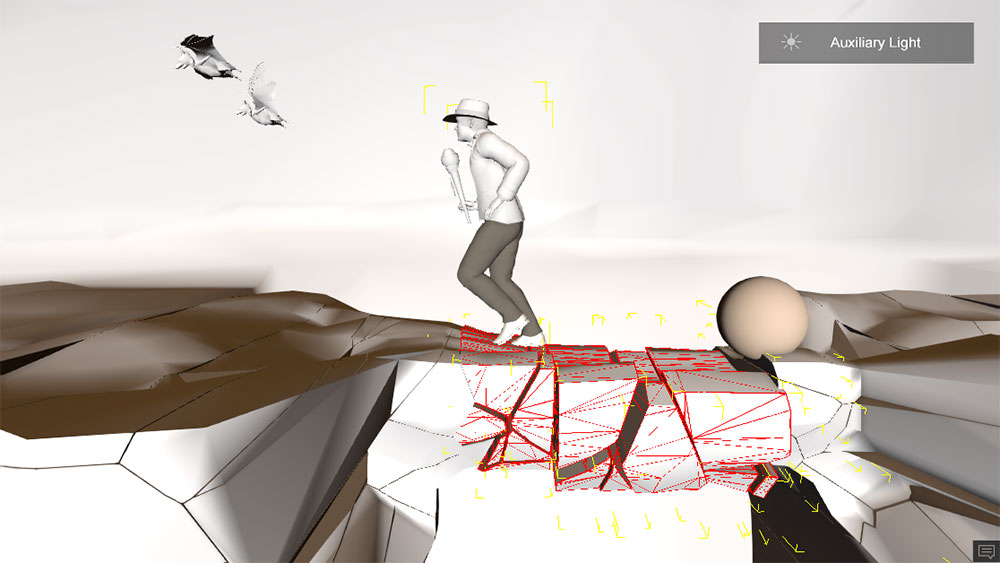
In this instance, a dummy prop (ball) was used to trigger the bridge collapse as the timing was off using the character as the trigger.

3D iClone Physics Basics

Dynamic: Always active. Will drop, roll, bounce, and collide with other physics objects. If you burst through a wall, then the object going through the wall will be dynamic (unless it has transform animation) with Bounding meshes to detect collisions with other physics-enabled objects. These bounding meshes can be simple primitives or complex self-meshes depending on the selection.

Frozen: Objects will remain in place until impacted by a dynamic object.

Kinematic: Animated objects will retain their transform animations during the simulation to allow for things like animating a rock through a window.

Static: Objects will remain in place but will be part of the simulation so that pieces won’t penetrate them during the simulation.

PHYSICS PROPERTIES OF OBJECTS

Mass: The “weight” given to an object to differentiate between an object made of glass versus one made of concrete. While these terms are not used in iClone there is a slider to give or take weight from this attribute.

Friction: Not what you experience with your mother-in-law. That’s tension… which is more associated with a good story instead of physics. Friction in this case is another way of keeping things under control so objects don’t slide around like they are on ice or greased surface. According to the manual, it is “the resistance forces of a surface. An object with higher friction can move slower or a ball can start rolling”.

Damping: Just what it says. It dampens or slows down the simulation to keep things from running away or the simulation being too unrealistic. A little bit of slider goes a long way here.

Elasticity: The bouncing force of an object.

BOUNDING MESHES

Without bounding meshes collision wouldn’t be possible. In early physics, we used simple dummies like a rectangular block attached to a vehicle but invisible to the render. As physics matured, we can now select the object itself as the bounding mesh with a Self-Mesh attribute that mimics the object’s shape. If you experience computational power problems, you can choose a simple bounding mesh like a block from a menu choice or you can always use the old-fashioned dummies which may provide better visual queues in some instances.

Bounding types available are Box, Sphere, Capsule, Convex or Self meshes. Convex is similar to a self-mesh that saves on computational overhead.

CONSTRAINTS

Another must-have tool for certain simulations. They do just as they describe, they constrain or tie two physics-enabled objects together.

All the above are part of Rigid Body simulations versus Softcloth simulations like clothing which we’ll not get into here as that would take an entire article by itself.

BOUNCING BALL

This is sort of the “hello world” equivalent of programming or scripting. It is a simple simulation of bouncing a physics-enabled spherical object on a physics-enabled plane (floor). It’s an effective demonstration of what can be done versus trying to keyframe the same motion. It’s not even a contest at this point. Keyframing is not feasible in this situation or cost-effective versus physics.


FALLING CANS

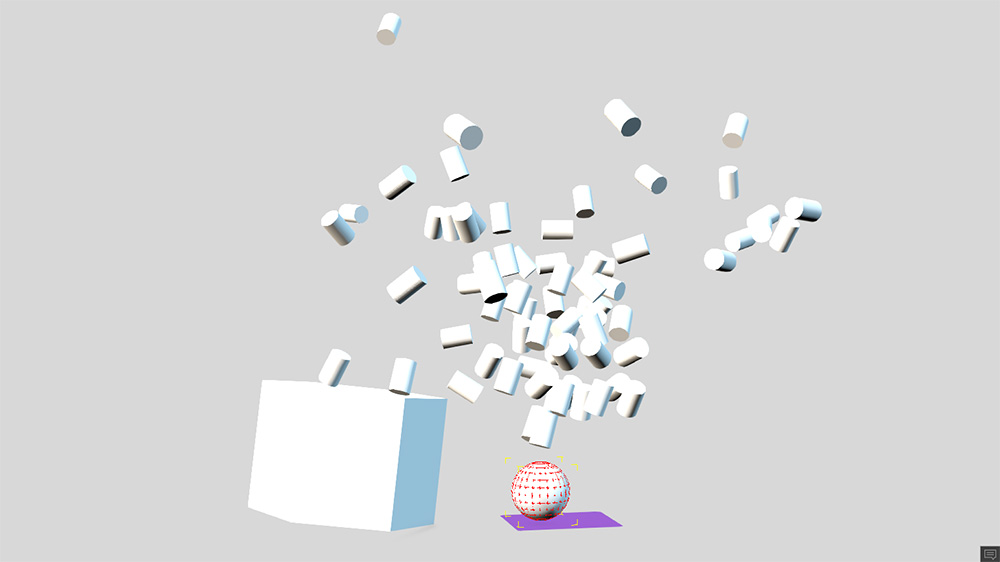
In this example the can props are set to Frozen along with the base prop the cans are sitting on. This will force the items to interact with the physics dummy that will collide with the base triggering the explosion of cans. We can use dampening and differing mass settings to control how the simulation reacts from the explosion of cans to falling in a more controlled manner. The ball dummy had a transform animation that would make it collide with the base the cans sit on. I set this dummy to Kinematic to retain the transform animation while providing physics interaction as a rigid body.


TRUCK CRASHING THROUGH WALL

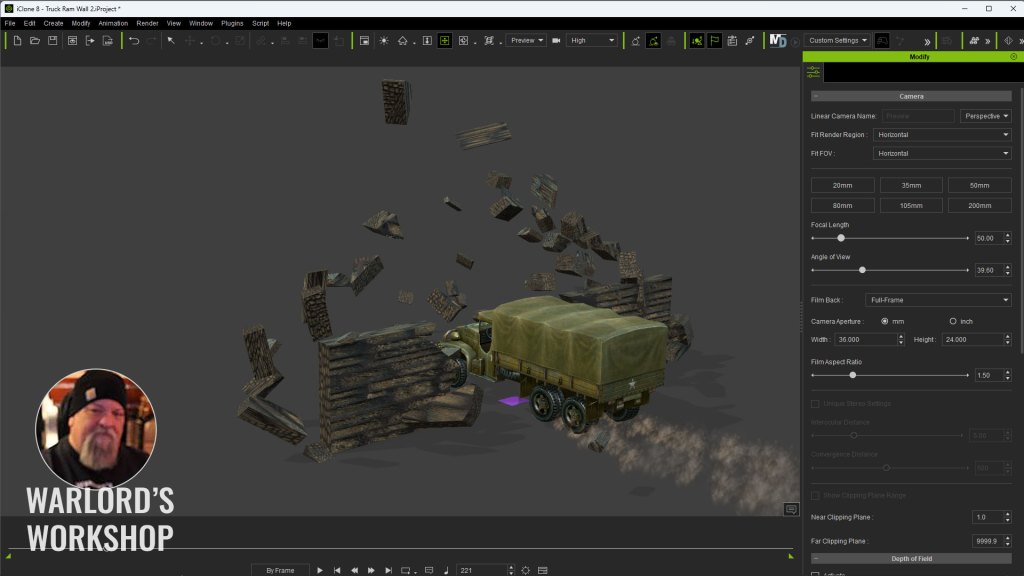
In this demonstration, you can see how the entire wall has been cell fractured but I have only selected some of the pieces in the middle to apply physics too. This is a simple method of controlling the area of interaction without using the static setting on the remaining pieces. This does run the risk of physics-enabled pieces penetrating non-physics pieces.


COLLAPSING ROCK BRIDGE

Below only the rock bridge itself is physics-enabled. The rock bridge is also a separate prop from the rest of the cave. I did run into one problem in that as soon as the Character touched the first part of the bridge it all started to collapse and the character was running on air midway across the bridge. To solve this problem I added a physics-enabled ball prop and animated it to move across the bridge and trigger the collapse after the character was partway across the bridge. A little timing work and it looks like the bridge was collapsing from under him.


Below is a look at the physics dummy that triggered the bridge collapse for better timing.

TIP: Be sure to TEXTURE your props BEFORE you fracture them while the prop is in one piece.

BLENDER CELL FRACTURE

This will show you how to fracture if you have never done it before but keep in mind that I am not a Blender expert and I highly recommend this older but to-the-point fracture tutorial from Mr. Cheebs. In my demo above I used subdivision but Mr. Cheebs shows you how to really do some fracturing with all the available techniques including the Annotation Pencil that allows us to draw where we want things to shatter.


A BIT OF DESTRUCTIBLE PROPS HISTORY

Around 14 years ago I introduced destructible props to iClone. At the time I was working with my long-time 3D tool, 3DS Max, in fracturing objects and using the Havoc physics engine to simulate the destruction and dispersal of debris. It became somewhat of an obsession, and I became proficient at 3D physics-based destruction.

iClone didn’t have physics at the time so I never gave much thought to bringing my other 3D work to iClone. After all, it was a 32-bit, low-poly application back then. While working with the Rayfire plugin I noticed something that had escaped me in earlier work and that was when I finished the simulation 3DS Max had created keyframes in the timeline.

If anything generated keyframes there was a chance of getting it into iClone and working with the baked-in physics which did work as expected but it also crashed iClone often. Reallusion saw the demo and reached out to me for a project file. Soon after an update made destructible props run smoother without crashing. That taught me how much Reallusion pays attention to what other users are doing with their software.

CLOSING

For some users Rigid Body physics is not as sexy as Soft Body physics like clothing or hair. It is, however, a powerful animation tool that opens the door to a world of new opportunities to better showcase your work. Rigid body physics is overlooked in iClone as an easy tool to add a touch of eye candy to an animated scene. In the future, there will be more articles and tutorials on using physics in iClone.

MD McCallum - WarLord

MD McCallum – WarLord

Digital Artist MD “Mike” McCallum, aka WarLord, is a longtime iClone user. Having authored free tutorials for iClone in its early years and selected to write the iClone Beginners Guide from Packt Publishing in 2011, he was fortunate enough to meet and exchange tricks and tips with users from all over the world and loves to share this information with other users. He has authored hundreds of articles on iClone and digital art in general while reviewing some of the most popular software and hardware in the world. He has been published in many of the leading 3D online and print magazines while staying true to his biggest passion, 3D animation. For more information click here.

YouTuber Reimagines New Level of Realism for Game with iClone

Popular YouTuber FairTX uses iClone to reimagine Escape from Tarkov game

Introduction

Self-taught 3D artist and video producer – FairTX (Dimitri) is a dynamic content creator and gaming enthusiast whose YouTube channel has become a thriving hub for over 222,000 subscribers eager to embark on the adrenaline-fueled journey of Escape from Tarkov. With a captivating storytelling approach, FairTX goes beyond the typical gaming experience, weaving narratives that elevate his videos into immersive storytelling adventures.

Undoubtedly, what sets FairTX apart is not just his mastery of the game; rather, it is his ability to transport his audience into the heart of the action, creating a connection that goes beyond the pixels on the screen. As a dedicated storyteller, Dimitri transforms each video into a chapter of his creative journey, inviting subscribers to join him in the captivating world of Escape from Tarkov. With a keen eye for strategy, precision, and an unwavering passion for the gaming experience, FairTX provides a unique blend of entertainment and expertise.

Using iClone to generate idle motions for game characters

Using iClone to reimagine game

Driven by a passion for authenticity and a desire to elevate the gaming experience, Dimitri embarked on a groundbreaking endeavor within the realm of Escape from Tarkov. Frustrated by the unnatural, robotic movements of AI characters in the game, he took matters into his own hands. Armed with the powerful character animation tools from iClone, he undertook the ambitious task of redesigning every aspect of the AI characters’ animations.

From crafting intricate idle patrols to realistic consumption animations, seamless transitions between actions, and dynamic combat stances, Dimitri meticulously redefined the movements with iClone 3D animation software to bring a new level of realism to the virtual battlefield.

Adjusting game character facial expressions with iClone
iClone Edit Motion Layer for correcting game character transitions

iClone for Game Developers

In a captivating video, he shares his creative process, taking the audience on a mesmerizing journey through the production. This innovative approach not only showcases Dimitri’s dedication to authenticity but also empowers fellow gamers. Furthermore, it encourages them to reimagine their own gaming experiences through the power of iClone character animation for gaming. https://www.reallusion.com/iclone/game/

Escape from Tarkov game reimagined with iClone 8

Reimagine your games by learning to characterize your own avatars with iClone. Moreover, you can also employ Character Creator, and your favorite 3D engines like Blender.

Characterize game avatars with Character Creator for use in Blender

Follow FairTX

YouTube:
https://www.youtube.com/c/fairTX

Patreon:
https://www.patreon.com/fairTX

Instagram:
https://www.instagram.com/fairtx_

Simplifying Props with Extract Mesh in CC4

We are going to take a look at an easy-to-miss feature of Character Creator 4, the Extract Mesh tool. This tool is in CC4 instead of iClone which might keep it off the radar for some new users. Extract Mesh allows us to do several things from extracting bodysuits and armor to reworking props for animation purposes including being able to rotate the wheels of a car prop that was one piece upon download.

One of the biggest obstacles for beginners, especially on a budget as so many of us are these days, is the lack of props to use in production or learning. There are plenty of free props available and we’ll use one today from Sketchfab, but you need to understand that when you download free props and other free 3D assets from the internet they might not be licensed for commercial use or your intended use.  

These free props are great to learn with or demo with, but it would be a real disaster to create a viral hit that could not be monetized due to copyright infringement because of improper licensing. Even using Sketchfab content you need to be aware and knowledgeable of the type of Creative Commons licenses appropriate for the situation.

To be safe for a final, commercial, widely distributed project you might want to stick to 3d assets of your creation or assets purchased from a reputable marketplace with clear licensing policies like the Reallusion Content store or Marketplace. It’s best to learn of these things now because they can lead to real problems with real consequences for your project.

With that said, I rely on free assets for tutorials so anyone who wants to follow along can do so but I would not include these assets in a commercial project without proper licensing and very good reason to do so.

THE SKETCHFAB MODEL

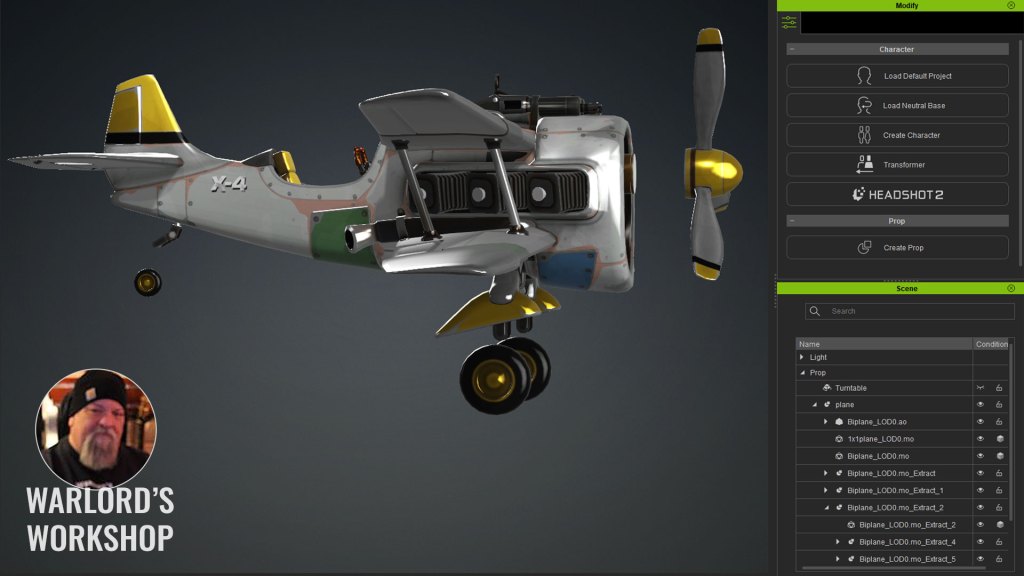
In this case, we are using a Fortnight plane, biplane Fortnite vehicle” by that kid is licensed under Creative Commons Attribution, which has an internal skeleton but you’ll soon see why it can be a bit difficult to use. With this in mind, I will extract the propeller and wheels as separate objects so we can easily animate (spin)them.

This is an excellent model that weighs in at a little over 25K triangle count in Character Creator 4. It is lightweight, nicely textured and has an internal skeleton that can be used for animation. The problem is that there are so many bones, some seemingly going to no mesh, that it is a visual mess.

You can drill down using the search function but even then, you have to play around with different parts to find out which one actually moves the part in question. I would guess there were a lot of dummies used in the making of this model and they didn’t import well into FBX format or CC4.

As you can see from the above image (CC4) the rigging is an absolute nightmare. A convoluted hot mess that may hurt the eyes with prolonged exposure! Seriously though, this happens with models, particularly those with a lot of moving parts for animation. Where this all went wrong is anyone’s guess but probably in the export phase. Or it may be the way CC4 sees it after import, but it can make life difficult, and animation has enough of these difficult moments without creating more of them.

So, what we are going to do is forget about all those bones and simply extract the meshes we want to animate, in this case, the tires and propeller.

THERE IS A SHORT VIDEO TUTORIAL AT THE END OF THIS OVERVIEW.

EXTRACTION

The first step is to select the plane mesh and then select Edit Mesh from the CC4 Modify menu. From there select the Element tab (which allows us to select entire sections of a model depending on how it was built) and click on the propeller Nose Cone.

As mentioned in the video tutorial for this article, this plane has a strange problem that makes it difficult to center the prop blades as the one-click matrix on the pivot menu panel will not bring the pivot to the true center.  For anything to rotate properly, the pivot must be at its true center otherwise it will wobble around instead of spin. For this reason, I am extracting the nose cone first then the blades.

Press the Extract Mesh button to extract the propeller nose cone from the rest of the mesh. The nose cone has a properly centered pivot so it will rotate easily. We will use this later to connect the blades, which will then rotate properly around the center pivot. Close Edit Mesh, then select the extracted mesh in the Scene Manager and press the Convert to Sub-item button on the modify menu.

Next up select the mesh and go to Element again then select one of the prop blades the extract that selection.

HIERARCHY – THE PROCESS OF ATTACHING

Next, we need to DETACH the nose cone from the plane mesh. Select the nose cone and press the DETACH button on the Modify menu. Do the same for the propeller blades, DETACH them from the plane. If we did not detach the nose cone first then we could not have parented the blades to it because any item attached will not show up in an attachment panel, only the bones will show up.

By attaching the BLADES to the NOSE CONE in the next step we have parented the blades to the nose cone which means the blades inherit the characteristics of the nose cone like the properly centered pivot for smooth rotation. Now we attach the NOSE CONE to the plane, and you have just established a simple hierarchy of two objects with the cone being the parent. There is more about this in the video tutorial.

Demonstration of Attachment Hierarchy


THE WHEELS – TWO EXTRACTIONS

The front wheels need to be extracted in one step while the tail dragger wheel is extracted in another step. The main front wheels have a proper pivot centered between both wheels so we do not need to extract each wheel individually as we can rotate them as one object. The tail wheel will be extracted separately using the same method as the nose cone or blades above.  Select the mesh, extract the mesh, and Convert to Sub-item just like in the earlier steps.

FINAL RESULTS

By now you should have the blades and nose cone as one prop, the main landing gear as one prop and the tail dragger as one prop. These can be easily animated on the timeline rotating the propeller or wheels between two keyframes. As I wrote earlier, see the accompanying video tutorial for a more in-depth step-by-step guide.

Click for more information on Prop Editing in Character Creator 4
MD McCallum - WarLord

MD McCallum – WarLord

Digital Artist MD “Mike” McCallum, aka WarLord, is a longtime iClone user. Having authored free tutorials for iClone in its early years and selected to write the iClone Beginners Guide from Packt Publishing in 2011, he was fortunate enough to meet and exchange tricks and tips with users from all over the world and loves to share this information with other users. He has authored hundreds of articles on iClone and digital art in general while reviewing some of the most popular software and hardware in the world. He has been published in many of the leading 3D online and print magazines while staying true to his biggest passion, 3D animation. For more information click here.
Prop Distributor – New Scatter Tool

One of the best things to come along in 3D work was the scatter script. It didn’t matter what tool you were using as long as it could read a script of some sort because somewhere out there someone was going to create that script, share it, and make our 3D life a lot easier.  In time these scripts became tools that were incorporated into many leading and very expensive 3D applications like Maya and 3DS Max.

Before the scatter tool became a thing everything was done manually. Back in the early days even duplicating a prop might not have been possible depending on the software application you were using. In that case, props and particularly characters had to be imported one at a time and then placed in the scene.  Direct drag-and-drop was another major improvement.

As iClone and computational power have improved, we are able to add a lot more 3D items into a scene, but we were back to spending a lot of time building and less time animating.  The more our computational power could handle the more we piled in. How many of us have NOT locked up a computer? No matter how much tech improves, we will always push it past its point of no return. It’s what we do.

Now Reallusion has introduced the Prop Distributor tool released with the crowd sim which is a major addition by itself. This is basically a scatter tool with the ability to drag and drop items directly to the pop-up window to populate the scene. Make some choices, push some buttons and you are done. This is the main point of any scatter tool. Populate a scene with items and do so very quickly with as many options as possible.  

Demonstration of the Prop Distributor. Items can be dragged and dropped from the Content Manager or an Explorer Window.


Over the years I have used a lot of crowd simulators and scatter tools. Being a grunt in the animation trenches means you find ways to cut down on repetitive tasks and the Prop Distributor is Reallusion’s way of giving us a time-saving and powerful scatter tool.

The tool is straightforward and easy to use like most tools Reallusion provides and it has the very small learning curve that we’ve come to expect from iClone. Like a lot of users, I dive in first and then read the manual. Or I watch a tutorial as I’m diving in then go to the manual to find all the things that weren’t covered in the tutorial.

This is a big change for me as I used to not even know a manual existed.  iClone has matured far beyond that stage so reading up on new features makes sure I don’t miss anything or do something the hard way when iClone has a shortcut for it.  That’s right… read the manual. You’ll be glad you spent those extra minutes being educated on new features. It’s hard to cover everything in a video tutorial anyway.

REALMS (RANGE OPTIONS)

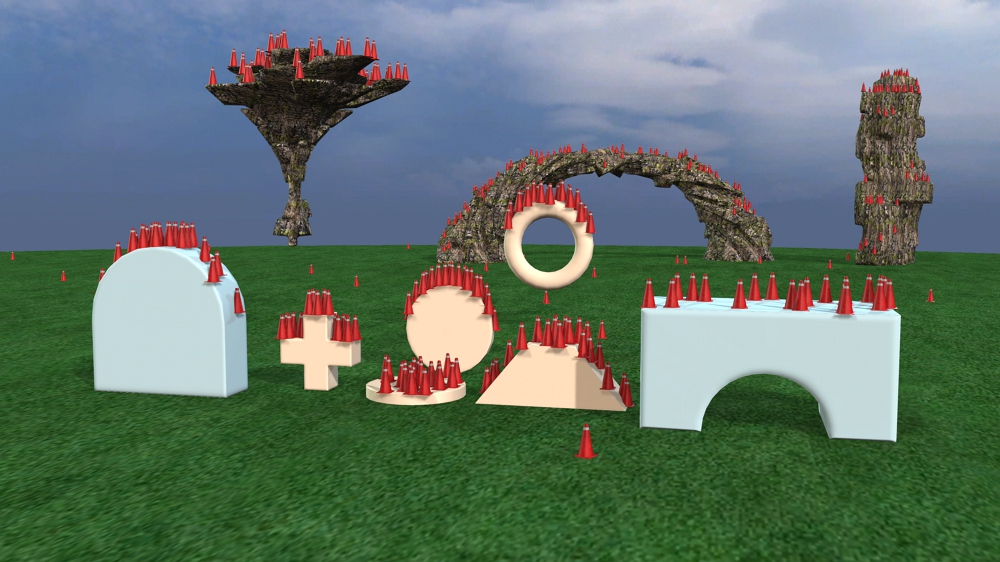
Not just landscapes or terrain but realms. These are objects (props) you pick to use the scatter tool on (my apology for referring to the Prop Distributor as the scatter tool. I’ve been trained on that word for ages and, more importantly, I can type it easier. It’s more like a scatter tool on steroids). Upward-facing surfaces will serve as the distribution areas. Height map terrains do NOT work with this tool.

So just about anything with an upward-facing flat surface can be populated with the scatter tool. You can orient the props to other angles, and it will populate the upward-facing surfaces according to the angle. The distribution will follow surfaces like rolling terrains but keep in mind that a terrain must be selected from the Scene Manager. You will need to select it in the Scene Manager with the scatter tool range option.

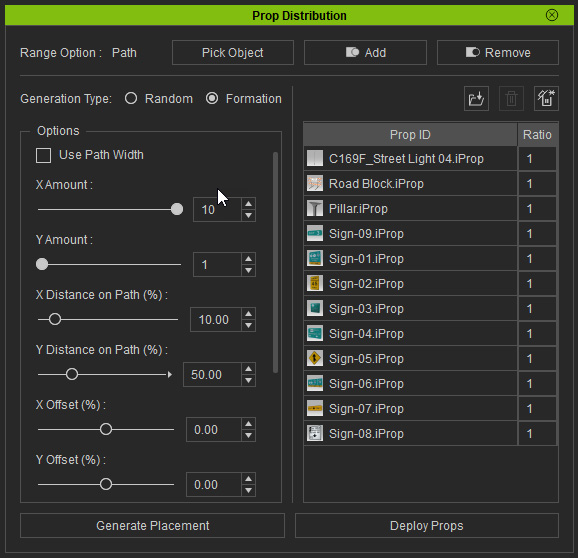
You can have “floating” props that aren’t attached to anything that will populate with the scatter tool in a few clicks. There is an option for Random or Formation placement. Controls include Amount, Spacing, Orientation, Random Orientation, and Scale.

DISTRIBUTION POOL

This is where we drag and drop the assets we want to scatter. There are Add Props, Delete Selected Props, Reset, and Ratio. Most of it is self-explanatory with the Ratio for each prop (default is 1) set to a number like 5 meaning there will be one of those props scattered for every five of the props set to 1. It’s hard to explain here but you’ll quickly grasp it when you try it out.

SCATTERING PROPS ON A NAVMESH

What is a NavMesh? From the manual:

iClone provide NavMesh feature for you to distribute propsdeploy actors or animate actors within the NavMesh with the Motion Director feature. You can trim a NavMesh’s shape with props by different NavMesh setups, including Static, Dynamic, Passable and Impassable. Furthermore, you can split pedestrian flows with Avoidance and Barrier volumes.

This is another method of placement that, with some thought, can be used in many circumstances including tabletops and pedestals. A NavMesh is generated by iClone, so prop placement becomes critical as it takes props into consideration when creating the NavMesh from the scene.

SCATTER ON NAVMESH

Below you see an image on the left showing the blue NavMesh and the impassable box props used for the borders. You set props to one of four states in the Scene Manager with static, dynamic, impassable, and passable options.

SCATTER ON PATH OR WALKWAY

We can also use a path or walkway to scatter props. In the example below I used two paths, one for each lane to place the traffic cones. I used a path but widened it out after the fact so we could see it in the example image.

I used the formation setting with equal spacing and it was done in a snap. This will also be great on curving walkways or streets as it will adapt to the curve. The example below demonstrates using a path to place streetlights down the center of a curving road.

USING PARTICLES WITH PROP DISTRIBUTOR

The Prop Distributor will work with particles but there is a caveat that the particle MUST be attached to a dummy like a low poly cube and saved out as a prop. The Prop Distributor can then see the dummies with the attached particle. You can also attach multiple particles to a dummy. Both legacy and Popcorn FX particles worked with this simple method. By attaching and saving out particles to dummies as you need them, you will have them to use in future projects.

As shown below, you can get a great start on a scene in a matter of minutes with the scatter tool.

How to Attach a Particle to a Dummy. Items can be dragged and dropped from the Content Manager or an Explorer Window.


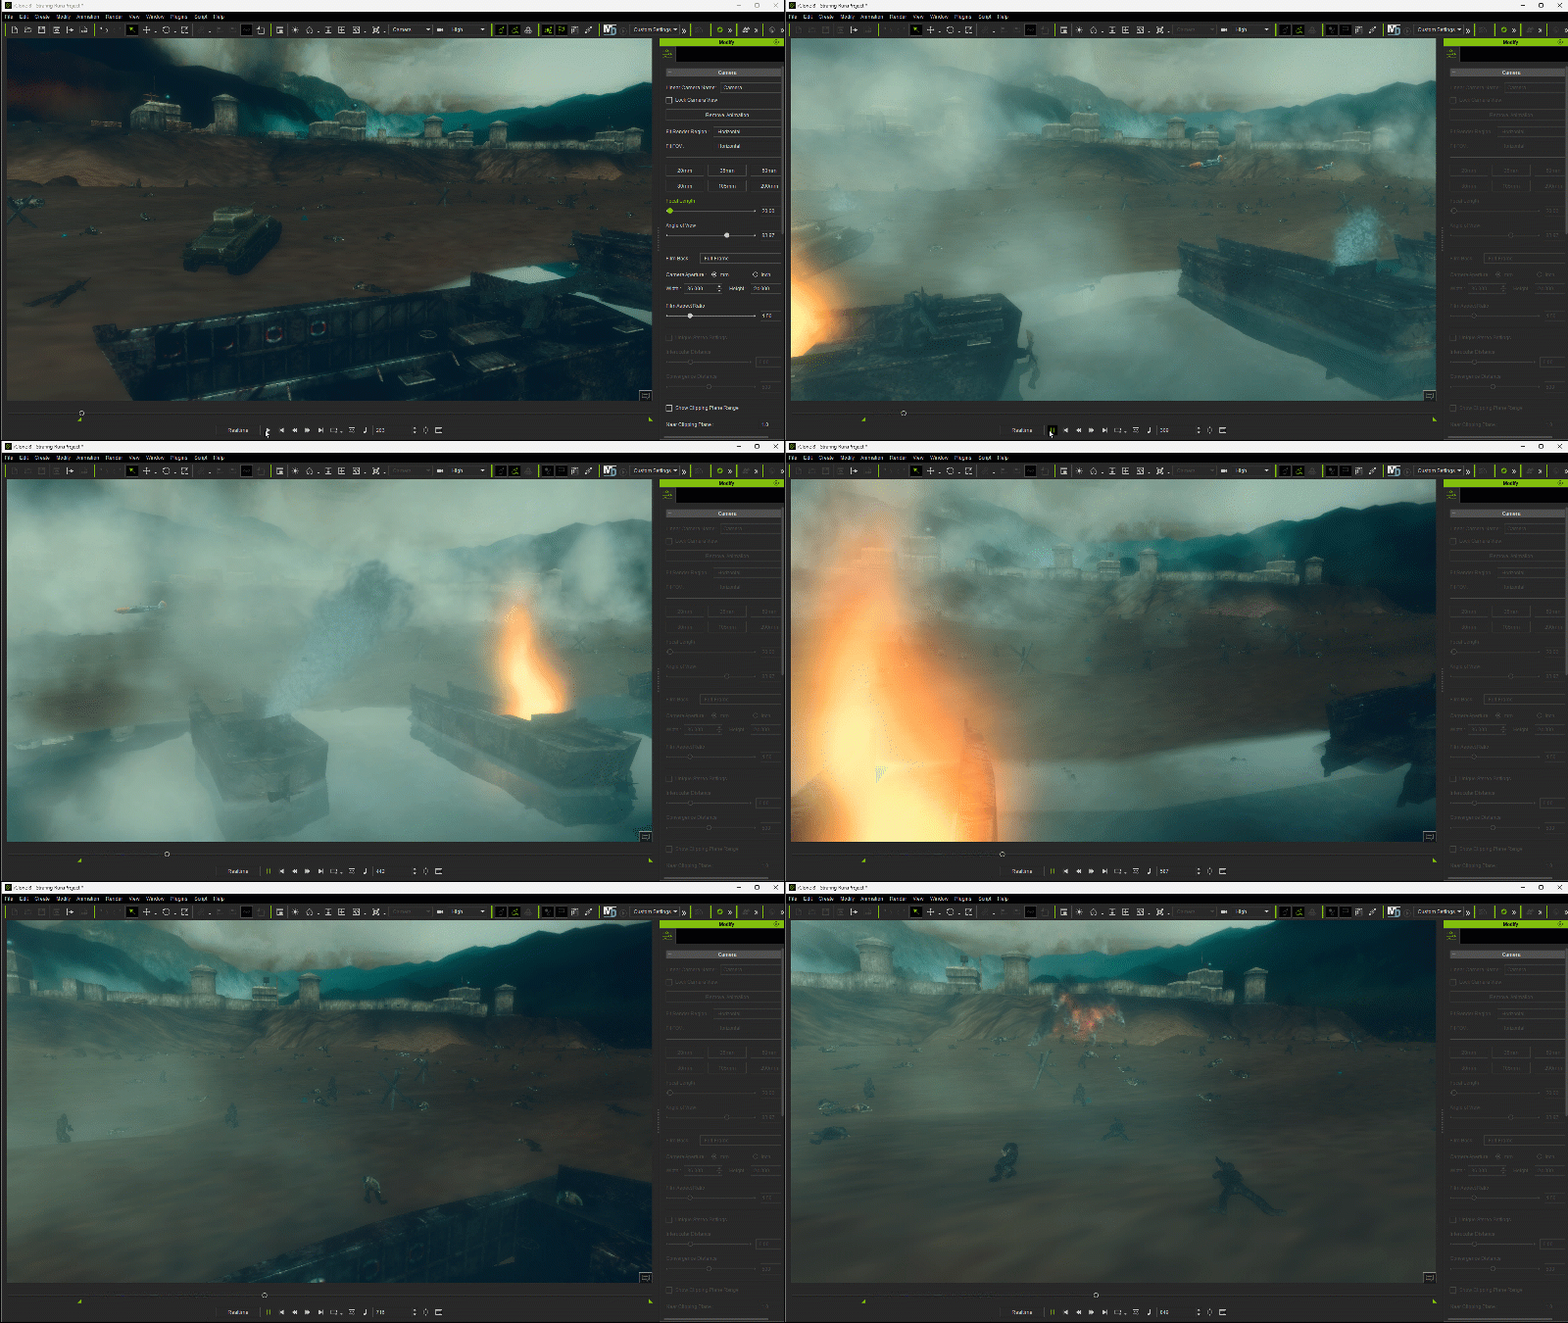
Here is another look at a battlefield scene populated with the Distribute Props tool and Crowd tool. The scene size is massive as you can tell by the distance between objects and not cinematic but just imagine what can be done with more time as this was thrown together as a test.

The Distribute Props tool is quick to learn, easy to use, and makes fast work out of placing items either randomly or in formation. Adding street props will be a matter of minutes if not seconds depending on the complexity of the scene.

And speaking of complexity, this tool will easily allow us to overload a scene both aesthetically and in practical terms. Just like any other tool, we don’t want to overuse it as a large, busy crowd could easily distract from the main action of the scene. We want a full scene, but not so full we can’t easily spot the main characters at any given time.

Once again Reallusion has provided a major update with lots of new features and the Distribute Props feature is just one of them. Combine this with the new Crowd Sim feature and we can say goodbye to sparse or empty iClone scenes.

MD McCallum - WarLord

MD McCallum – WarLord

Digital Artist MD “Mike” McCallum, aka WarLord, is a longtime iClone user. Having authored free tutorials for iClone in its early years and selected to write the iClone Beginners Guide from Packt Publishing in 2011, he was fortunate enough to meet and exchange tricks and tips with users from all over the world and loves to share this information with other users. He has authored hundreds of articles on iClone and digital art in general while reviewing some of the most popular software and hardware in the world. He has been published in many of the leading 3D online and print magazines while staying true to his biggest passion, 3D animation. For more information click here.
Former Disney Character Artist Adopts Reallusion’s New Character Creator Toon Base

This article is featured on 80 Level

Summary

Shane Olson, a ZBrush guru for his invaluable years at Disney has transitioned into a full-time online instructor, specializing in teaching the creation of stylized characters through his dedicated course. Shane has sculpted a myriad of characters during his live streams, often focusing on detailed busts due to time constraints. Despite the challenge of rigging characters or adding bodies and clothes, a recent discovery with Character Creator integrated with ZBrush has captivated Shane. With Character Creator’s latest Toon Base and ZBrush Pose Link Plugin, ZBrush artists can give their sculpted stylized characters a fully animatable body and facial rig, and effortlessly bring them to the game engine or 3D printing.

Shane Olson

Hi there, my name is Shane Olson, and I’ve been in the video game and toy industry for over twenty-five years. Ten of those years were spent at Disney, and I am the Lead Character Artist for the renowned Disney Infinity Game Franchise. After I left Disney, I decided to pass down my ZBrush knowledge to more users, and I formed an online ZBrush course called 3D Character Workshop. The course has been a running success and now I am also moving myself to a private ZBrush training course.

I’ve also worked at studios like Sony, Acclaim, and a few others. I specialize in bringing stylized characters from 2D concepts to life in 3D. I also do Live Streams on the Pixologic YouTube channel every Monday at 11 AM Pacific.

Why I chose Reallusion Character Creator for my new workflow

Many of the characters that I have done in the past were posed using ZBrush. While I’ve achieved success after investing considerable time, and effort, and overcoming frustrations, there’s now an impressive third-party software available to help with this task: Character Creator 4. I recently stumbled upon it, and its capabilities blew me away. Had Character Creator been available during my time working on projects like Disney Infinity, I would have undoubtedly used it instead of the original workflow.

Just to clarify, creating a character from scratch in ZBrush is feasible, but it does present challenges when we need to make live demos and animate them for commercialization pitches. I will demonstrate how you can seamlessly leverage the CC Toon Base from Character Creator, using GoZ to map your ZBrush projects, and then reintegrate them back to Character Creator for detailed customization. Furthermore, you can save this character for future use, making the entire process much more efficient.

How I did it with my Character Creator Project: A Stylized Girl

To test Character Creator, I wanted to take one of the busts I typically do during my live streams, give them a body, and a rig, and make it move in record time. With Character Creator, this is very easy to do. It feels like cheating. It’s so exhilarating to see your creations come to life. Usually, it takes a lot of time to get to the point of animation, but with Character Creator, you can have your character moving in hours, not days.

Steps with Key Visuals in ZBrush and Character Creator

CC Base Intro, prepping GoZ

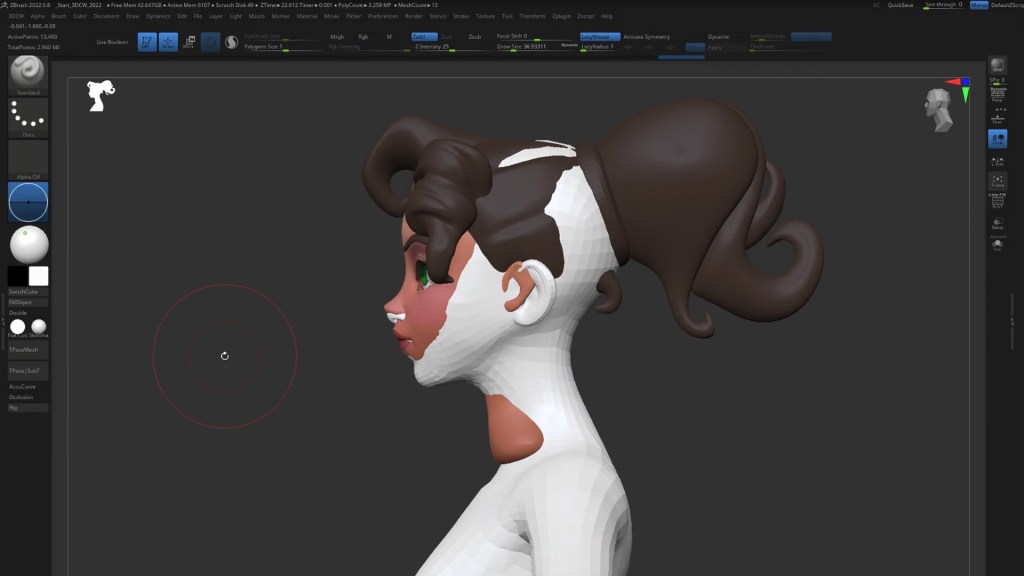
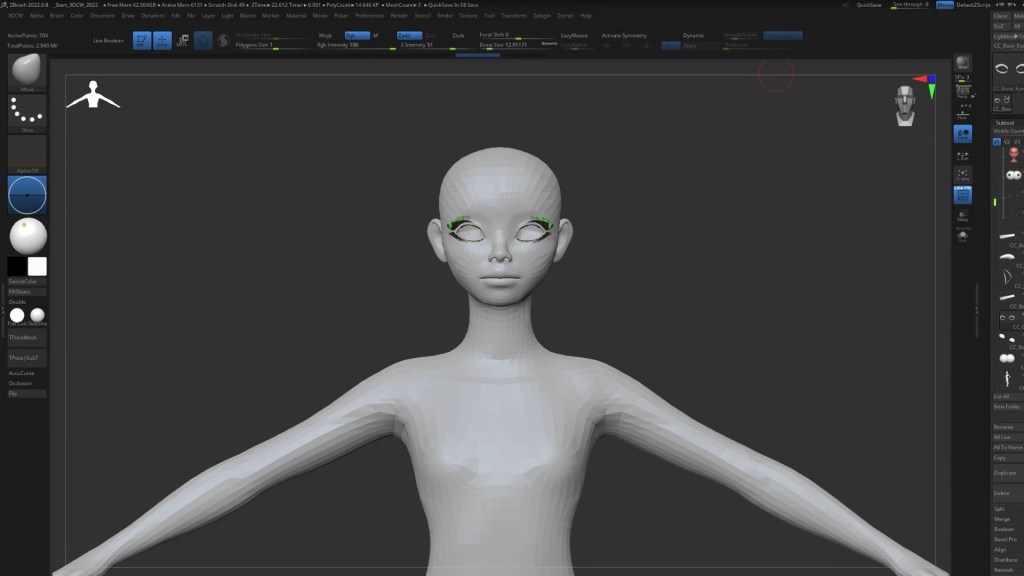
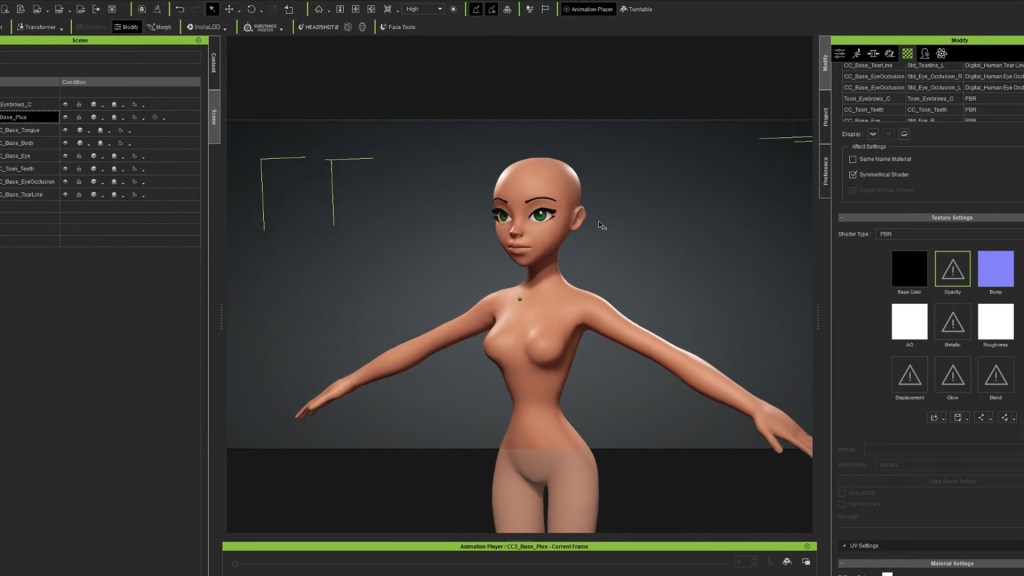
I started with a bust of a female head that I created during one of my ZBrush Live streams. The concept was designed by the highly skilled concept artist, Joshua Black. The regular base model in Character Creator is quite realistic, so I worked closely with the Reallusion team to create a new Stylized Toon Base Model. This Toon Base is now available, and you can access the forum page and download it to your Character Creator.

Use Shane’s Ruler for scaling

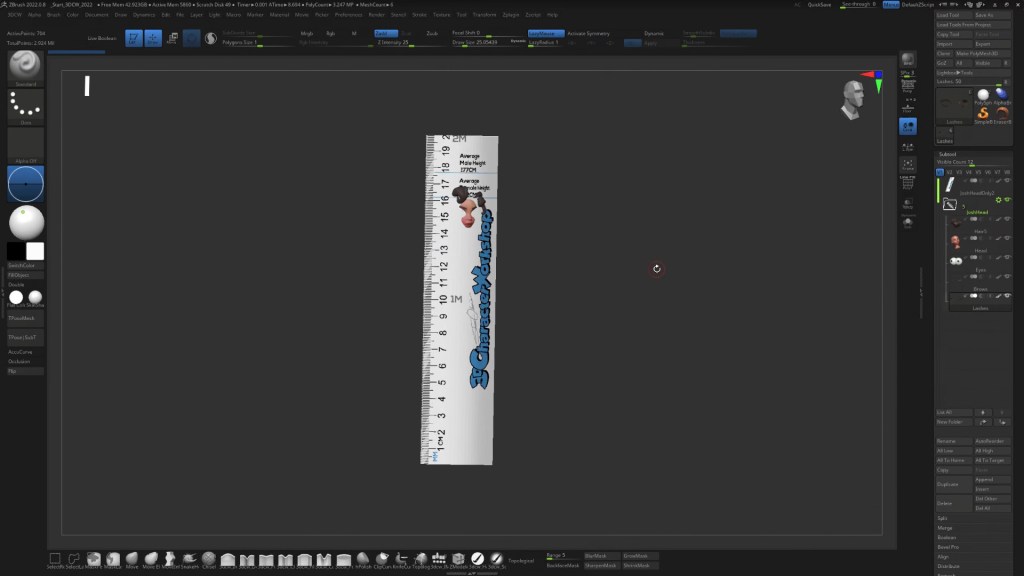
To help with the scene scale between Character Creator and ZBrush we can use a ruler that I made a while back while working on Disney Infinity. The ruler is metric, so you can use it for a variety of measurements. In this case, we want it to represent Meters since the CC4 world scale is in Meters. You can get this ruler for free from my website www.3dcharacterworkshop.com

Before we get started, we will need to install two free plugins. You can get these from the Reallusion Hub. Open up Character Creator and make sure you have the Pose Link Plugin installed. Next, after both plugins are installed, open up my ruler project file (or a file with the ruler in it) in ZBrush. My female head already had the ruler in it, with the head scaled to the ruler (don’t ever scale the ruler).

Select the ruler SubTool, then, over in the Pose Tools Plugin, change the height to 200. This tells ZBrush that the height of the ruler is 200 cm, which is 2 meters. Then press the Resize button. The dialog box should ask you to change the size to 200. If it doesn’t, hit cancel, select the ruler, and try again. Sometimes it will select a different subtool. After the scene is resized, you can check it by going to Tool>Export>Scale. It should now say 100. Before bringing in our base mesh from Character Creator, we need to do two things with GoZ. First, we need to select the “Import As Subtool” button. This is very important because we want to add the base mesh to our current Tool. 

Start GoZ and send data

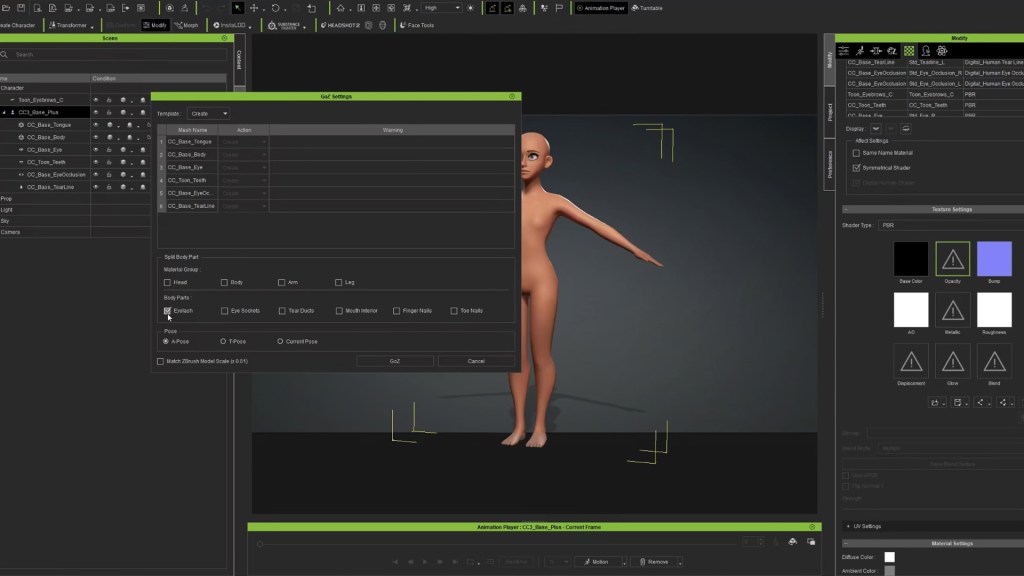
Next, we want to press the Clear cache files button to clear out any data. Now, over in Character Creator, we can load in our Stylized base mesh. If you so choose, you can select the Eyelash checkbox which will separate the lashes into a separate subtool in ZBrush which will allow you to edit it a bit easier. Just remember that you have to remember to select that box every time you go back and forth. 

NOTE: Since we set our scene scale over in ZBrush, you don’t have to check the Match Model Scale box. Then hit GoZ. The Neutral Base should be sent over to ZBrush, and appended into your current Tool It should look like this. If you need to scale your character or the Base mesh, you can use the Transpose All Selected Subtools option on the Gizmo. Then using Shift + Ctrl you can select the subtools you want to move and scale.

Map the characters (head and body)

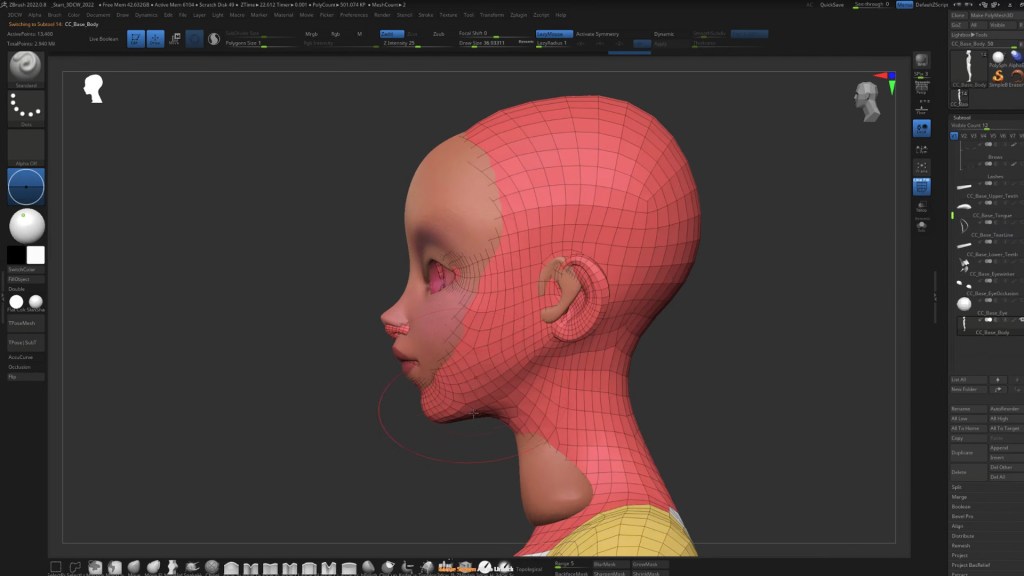
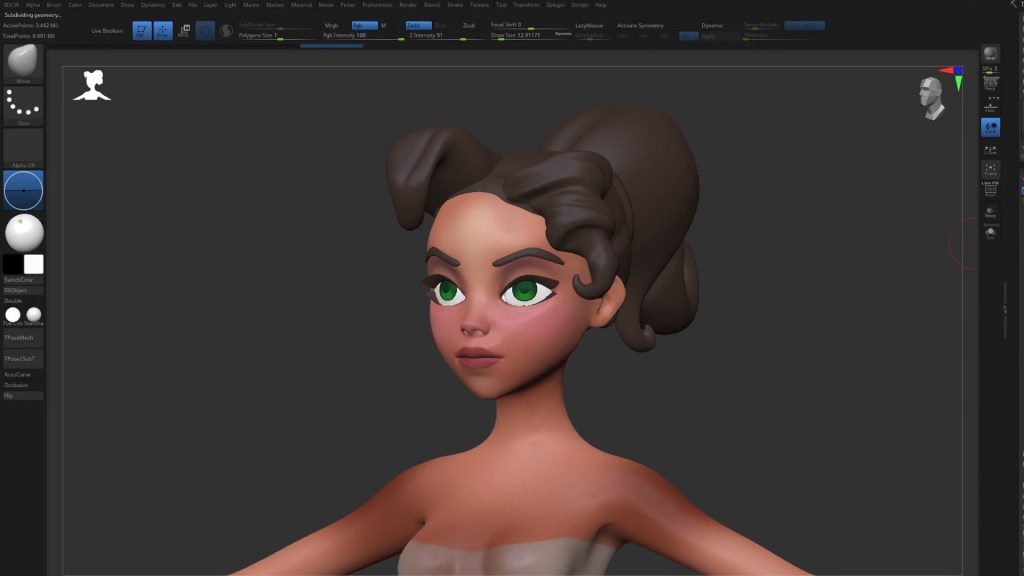
After our reference mesh is in place, adjust all of the SubTools of the neutral Toon Base mesh to match. I usually start by adjusting the head first. We can use a wonderful plugin to speed up this process called HeadShot 2 Plugin, but if we don’t have the plugin, we can move it by hand. Then when we are all done, we can selectively mask and project areas to get a closer match. We can also take some time to adust and re-sculpt the proportions of the body at this time. We can also add subdivision levels to the meshes and paint them with PolyPaint. Later on, we can export the polypaint out as textures and apply them over in CC4.

Adjusting Facials (eyes, eyelashes)

When the head is complete, we may now move the eyes, lashes, brows, teeth, and tongue to match your reference. You don’t have to match the eye occlusion or tearline. Those will be re-adjusted automatically when you send the mesh back to CC4. The eyeballs are essential, and you will need to nudge this all into place to match your mesh underneath. it’s intuitive, and it doesn’t take that long to complete when you turn on the symmetry button and align the eyes. Vice versa, the same method also applies to the eyelashes. A tip for you is to use 3D mouse and it will be faster. After this process is complete, the character will look like this.

GoZ back to Character Creator

This is where the magic happens! Once everything is matched and adjusted how we like it, we can send the neutral base mesh back to CC4 by hitting GoZ Visible inside ZBrush. I recommend hiding everything except for the base pieces that start with Character Creator. I like to get the base body working first. If we have clothing and accessories, we can send them over later.

This is the beauty of Character Creator: this is fully rigged it’s it’s got UVs and got skin weight, and it has a whole bone system. This base mesh is built on full-body FK/ IK rig, so you get the benefit of using that rig in other software, such as pushing this to Unreal, Unity, Blender, or Maya. It’s really smart!

Skin Weighting tools

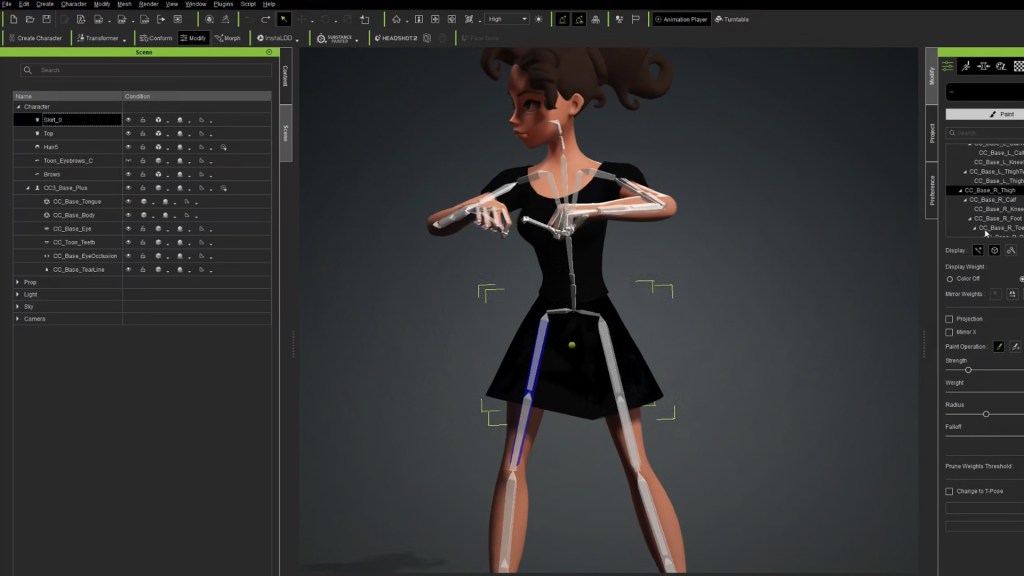
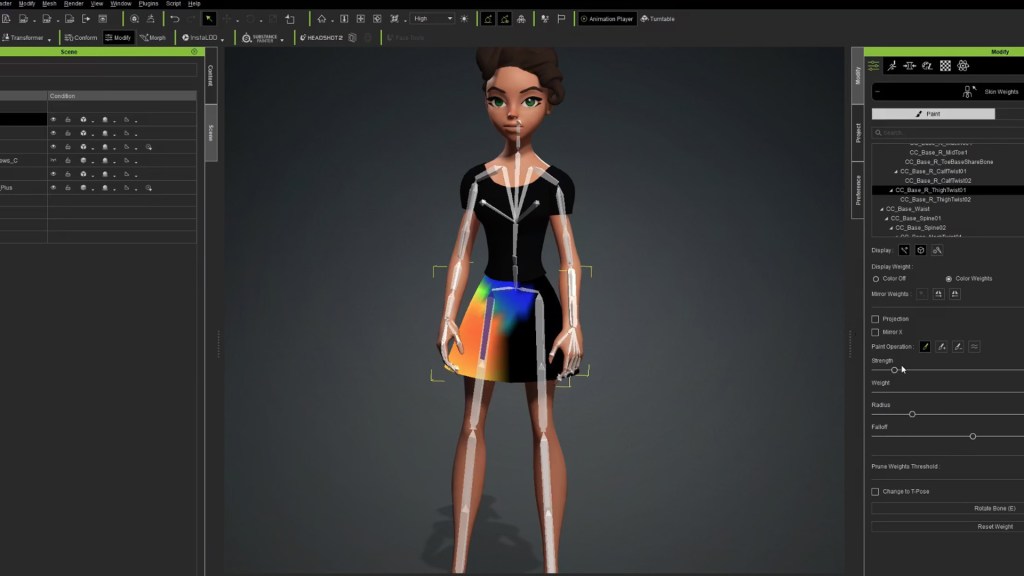
While we are sending the character data, some objects may not adopt good skin weighting. In this case, the skirt wasn’t weighted well. We can go in and adjust the weights so it behaves better. Simply click the Attributes>Skin Weights button. We will now see a skeleton which will let us know that you are in skin-weight mode. Click the skirt and click on “modify attributes”, and there’s the skin weights tab just click on that and this is a lot like doing skin weights, you’ll see there are these twist bones and these leg bones.

If you right-click on a Twist bone you should see it show up in the weighting. If you right-click on the bone, you can see it’s like has skin weighting, and you can also select the bones, and you can use the paint brushes and then just do some paint weights, or just the strength.

Baking Textures in ZBrush to import into CC4

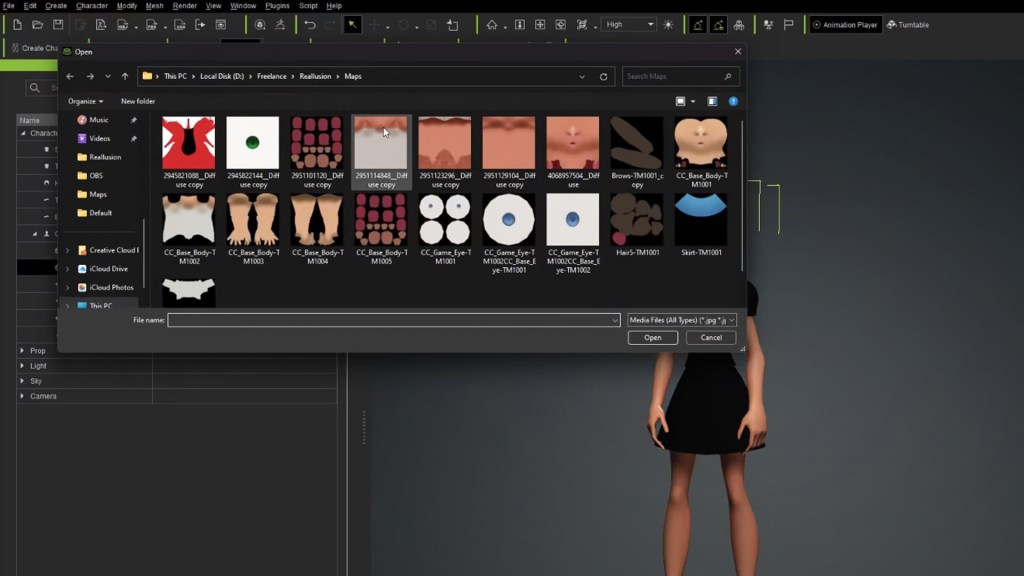
To get the textures out of ZBrush, select the object in ZBrush that you want to export the materials from. Character Creators base mesh comes with UDIM, and they’re just like a bunch of different UV Maps, so its multiple UV sets are what it uses. Select the texture from poly paint right here, click on Create All Maps, and remember where you saved it and we’ll go back to character creator. When you push your character from ZBrush to CC4, it will take on the original texture that was on the Base Toon Avatar. The Base Mesh already has UVs so all you need to do is generate the textures from the Polypaint in ZBrush, then load them into CC4. 

Applying Content Library

Another beautiful thing about Character Creator is that it comes with a library of assets. Like clothes, shoes, and all sorts of things that you can just drag and drop onto your character. You can also purchase even more content from Reallusion’s Content Store! I chose to add some red high-heeled shoes to my character. If you use the base mesh Avatar from Character Creator, then you can utilize all of those assets. Though most of them are realistic character assets, that’s okay. You can load them you can push them over to ZBrush make them stylized, change the textures, and then send them back to CC and use them on your CC characters.

Post editing: Facial adjusting in CC4

This section is about fine-tuning your characters. You can very easily apply animation to preview and check your facial and body rig. You can also adjust the materials and make her lips more glossy, by going into the roughness map and and painting in the roughness so her lips and eyeballs are shiny.

Light Settings

There are also lights that you can add. What is really nice about this, is it’s a realtime PBR renderer. You can render them and adjust the lights, and the subsurface scattering. To modify them, go to the Scene Tab, select the lights section, and you find a bunch of customization buttons to adjust the settings. These include the colors, light direction, rim light, shadows, and more. You can also add more than one light on the character and mix them up to make your character even pop out.
Final Thoughts

I LOVE this workflow. After doing a few characters this way I want to go through and do this same thing to a whole bunch of my characters. It’s such a joy to give your characters an actual full body with full rigging including facial movements. Once you get to that point, you’re hooked. Then the next phase is to add a nice environment and some nice lights. Then you can start to look into other plugins like Face Tools, that allow you to hand-sculpt the facial morphs. You can also look into adding more motions with iClone or driving the character’s face with your face using AccuFace. It’s So much fun!!

Learn More

Character Creator Home Page

Character Creator Base Page

Make ZBrush Character Poses Page

Shane Olson’s 3D Character Workshop Page

———————————————————————————————————————————————————

The original article is written by Shane Olson and also featured on 80 Level.