
首頁 » Page 42

Former Disney Character Artist Adopts Reallusion’s New Character Creator Toon Base

This article is featured on 80 Level

Summary

Shane Olson, a ZBrush guru for his invaluable years at Disney has transitioned into a full-time online instructor, specializing in teaching the creation of stylized characters through his dedicated course. Shane has sculpted a myriad of characters during his live streams, often focusing on detailed busts due to time constraints. Despite the challenge of rigging characters or adding bodies and clothes, a recent discovery with Character Creator integrated with ZBrush has captivated Shane. With Character Creator’s latest Toon Base and ZBrush Pose Link Plugin, ZBrush artists can give their sculpted stylized characters a fully animatable body and facial rig, and effortlessly bring them to the game engine or 3D printing.

Shane Olson

Hi there, my name is Shane Olson, and I’ve been in the video game and toy industry for over twenty-five years. Ten of those years were spent at Disney, and I am the Lead Character Artist for the renowned Disney Infinity Game Franchise. After I left Disney, I decided to pass down my ZBrush knowledge to more users, and I formed an online ZBrush course called 3D Character Workshop. The course has been a running success and now I am also moving myself to a private ZBrush training course.

I’ve also worked at studios like Sony, Acclaim, and a few others. I specialize in bringing stylized characters from 2D concepts to life in 3D. I also do Live Streams on the Pixologic YouTube channel every Monday at 11 AM Pacific.

Why I chose Reallusion Character Creator for my new workflow

Many of the characters that I have done in the past were posed using ZBrush. While I’ve achieved success after investing considerable time, and effort, and overcoming frustrations, there’s now an impressive third-party software available to help with this task: Character Creator 4. I recently stumbled upon it, and its capabilities blew me away. Had Character Creator been available during my time working on projects like Disney Infinity, I would have undoubtedly used it instead of the original workflow.

Just to clarify, creating a character from scratch in ZBrush is feasible, but it does present challenges when we need to make live demos and animate them for commercialization pitches. I will demonstrate how you can seamlessly leverage the CC Toon Base from Character Creator, using GoZ to map your ZBrush projects, and then reintegrate them back to Character Creator for detailed customization. Furthermore, you can save this character for future use, making the entire process much more efficient.

How I did it with my Character Creator Project: A Stylized Girl

To test Character Creator, I wanted to take one of the busts I typically do during my live streams, give them a body, and a rig, and make it move in record time. With Character Creator, this is very easy to do. It feels like cheating. It’s so exhilarating to see your creations come to life. Usually, it takes a lot of time to get to the point of animation, but with Character Creator, you can have your character moving in hours, not days.

Steps with Key Visuals in ZBrush and Character Creator

CC Base Intro, prepping GoZ

I started with a bust of a female head that I created during one of my ZBrush Live streams. The concept was designed by the highly skilled concept artist, Joshua Black. The regular base model in Character Creator is quite realistic, so I worked closely with the Reallusion team to create a new Stylized Toon Base Model. This Toon Base is now available, and you can access the forum page and download it to your Character Creator.

Use Shane’s Ruler for scaling

To help with the scene scale between Character Creator and ZBrush we can use a ruler that I made a while back while working on Disney Infinity. The ruler is metric, so you can use it for a variety of measurements. In this case, we want it to represent Meters since the CC4 world scale is in Meters. You can get this ruler for free from my website www.3dcharacterworkshop.com
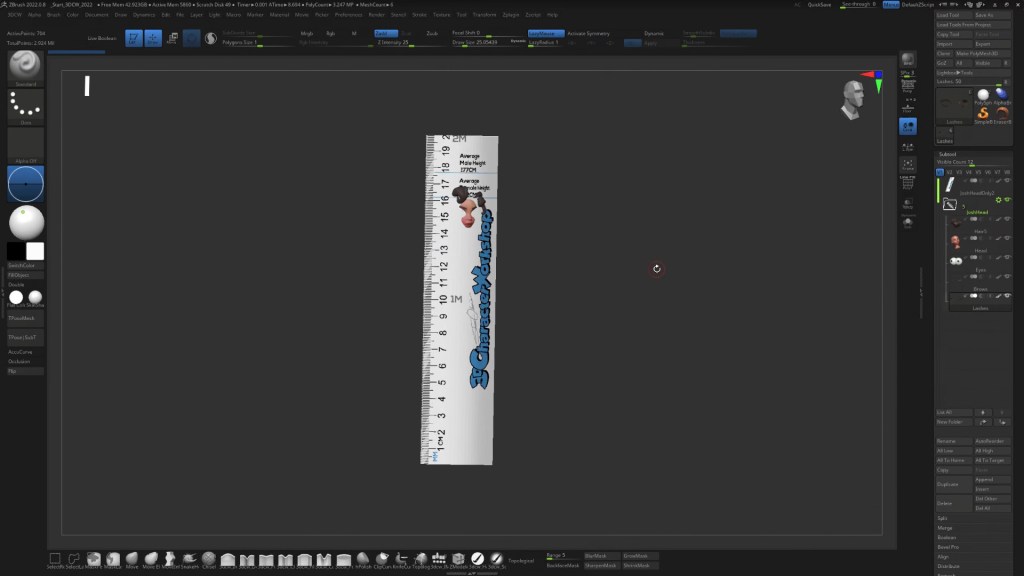
Before we get started, we will need to install two free plugins. You can get these from the Reallusion Hub. Open up Character Creator and make sure you have the Pose Link Plugin installed. Next, after both plugins are installed, open up my ruler project file (or a file with the ruler in it) in ZBrush. My female head already had the ruler in it, with the head scaled to the ruler (don’t ever scale the ruler).

Select the ruler SubTool, then, over in the Pose Tools Plugin, change the height to 200. This tells ZBrush that the height of the ruler is 200 cm, which is 2 meters. Then press the Resize button. The dialog box should ask you to change the size to 200. If it doesn’t, hit cancel, select the ruler, and try again. Sometimes it will select a different subtool. After the scene is resized, you can check it by going to Tool>Export>Scale. It should now say 100. Before bringing in our base mesh from Character Creator, we need to do two things with GoZ. First, we need to select the “Import As Subtool” button. This is very important because we want to add the base mesh to our current Tool. 

Start GoZ and send data

Next, we want to press the Clear cache files button to clear out any data. Now, over in Character Creator, we can load in our Stylized base mesh. If you so choose, you can select the Eyelash checkbox which will separate the lashes into a separate subtool in ZBrush which will allow you to edit it a bit easier. Just remember that you have to remember to select that box every time you go back and forth. 

NOTE: Since we set our scene scale over in ZBrush, you don’t have to check the Match Model Scale box. Then hit GoZ. The Neutral Base should be sent over to ZBrush, and appended into your current Tool It should look like this. If you need to scale your character or the Base mesh, you can use the Transpose All Selected Subtools option on the Gizmo. Then using Shift + Ctrl you can select the subtools you want to move and scale.
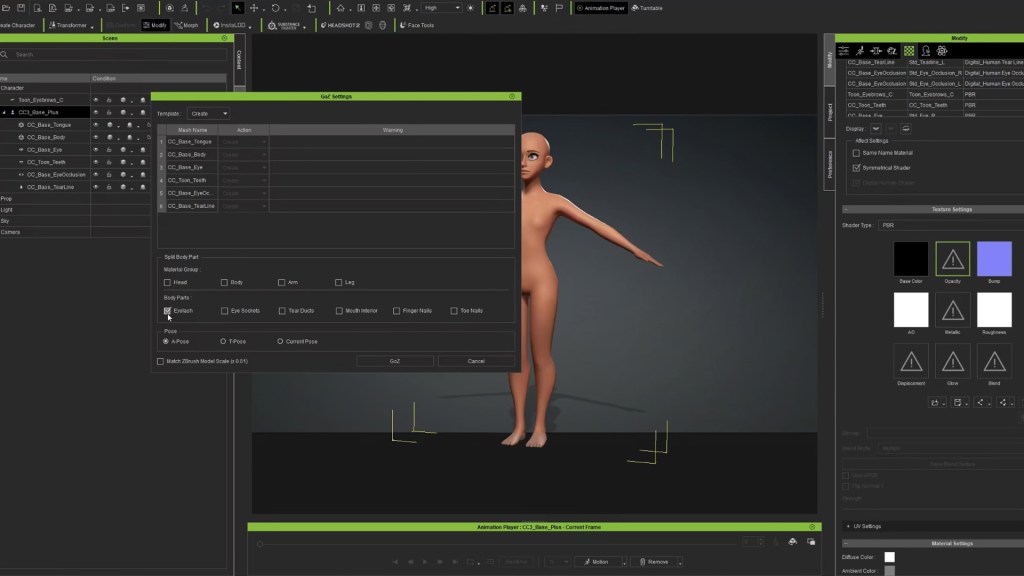
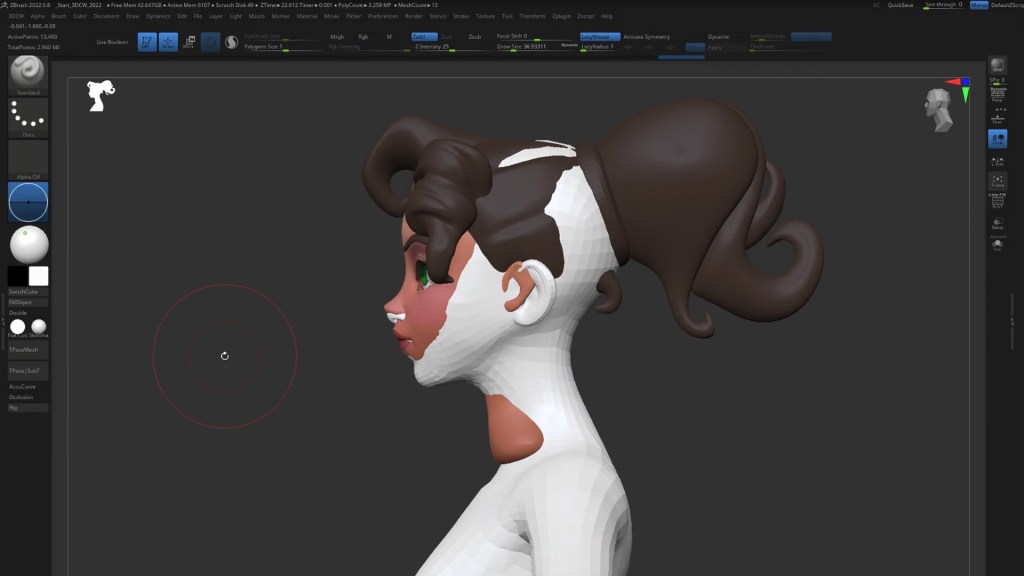
Map the characters (head and body)

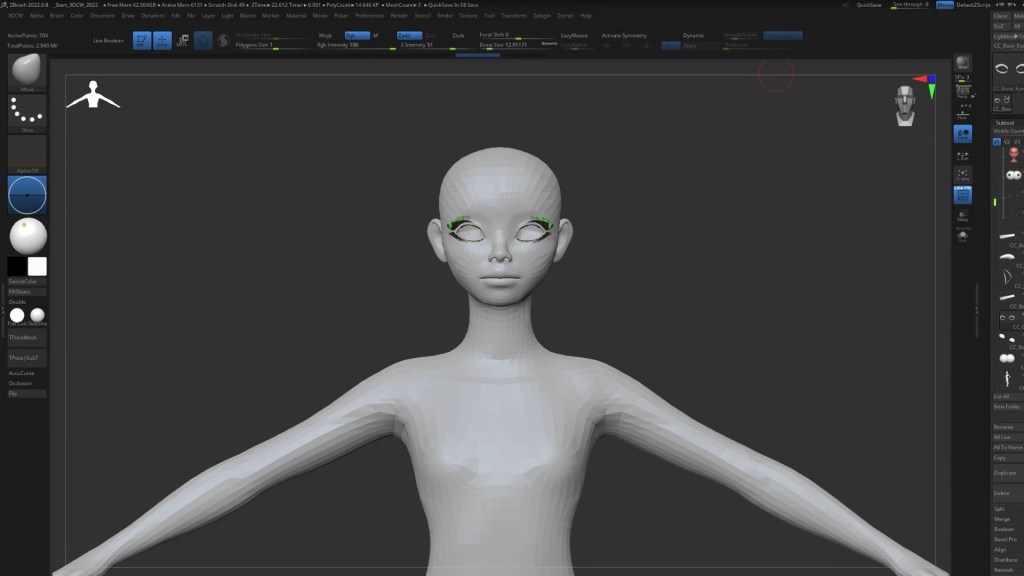
After our reference mesh is in place, adjust all of the SubTools of the neutral Toon Base mesh to match. I usually start by adjusting the head first. We can use a wonderful plugin to speed up this process called HeadShot 2 Plugin, but if we don’t have the plugin, we can move it by hand. Then when we are all done, we can selectively mask and project areas to get a closer match. We can also take some time to adust and re-sculpt the proportions of the body at this time. We can also add subdivision levels to the meshes and paint them with PolyPaint. Later on, we can export the polypaint out as textures and apply them over in CC4.
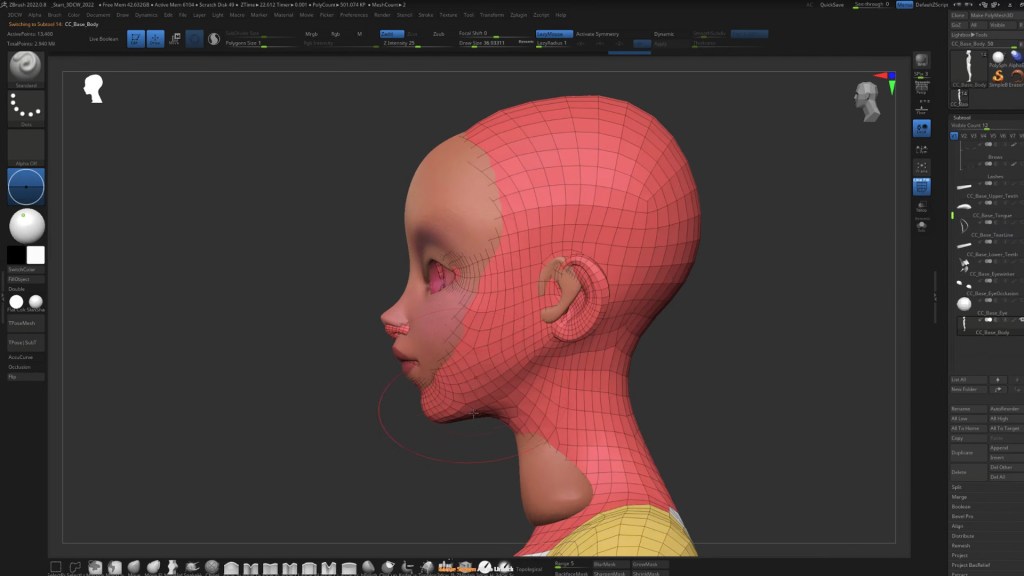
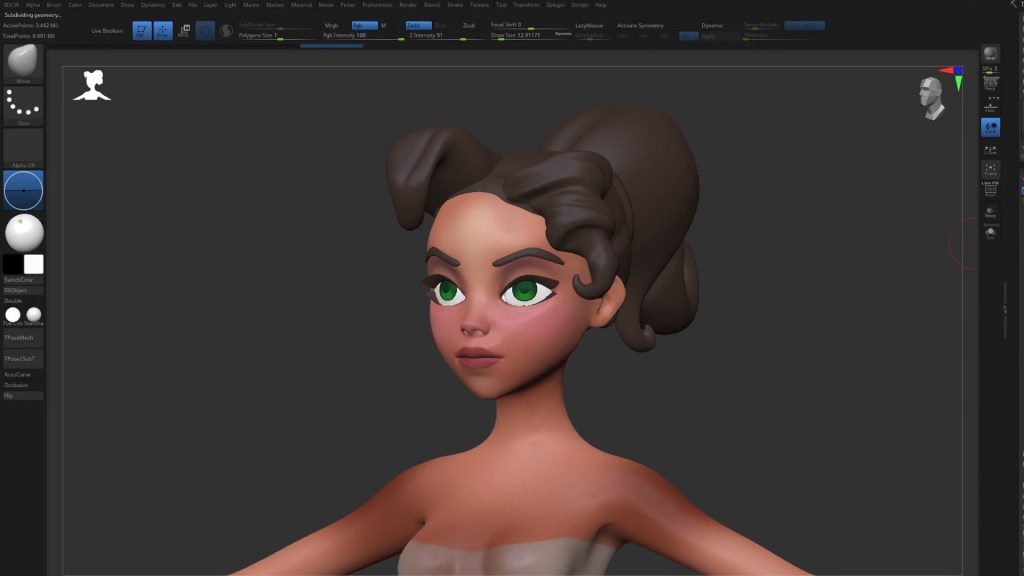
Adjusting Facials (eyes, eyelashes)

When the head is complete, we may now move the eyes, lashes, brows, teeth, and tongue to match your reference. You don’t have to match the eye occlusion or tearline. Those will be re-adjusted automatically when you send the mesh back to CC4. The eyeballs are essential, and you will need to nudge this all into place to match your mesh underneath. it’s intuitive, and it doesn’t take that long to complete when you turn on the symmetry button and align the eyes. Vice versa, the same method also applies to the eyelashes. A tip for you is to use 3D mouse and it will be faster. After this process is complete, the character will look like this.

GoZ back to Character Creator

This is where the magic happens! Once everything is matched and adjusted how we like it, we can send the neutral base mesh back to CC4 by hitting GoZ Visible inside ZBrush. I recommend hiding everything except for the base pieces that start with Character Creator. I like to get the base body working first. If we have clothing and accessories, we can send them over later.
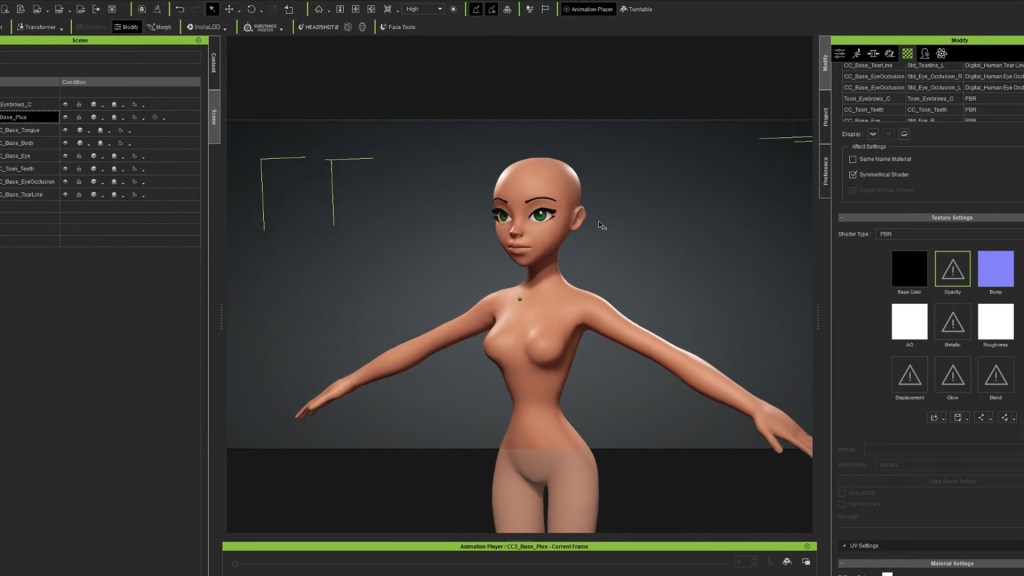
This is the beauty of Character Creator: this is fully rigged it’s it’s got UVs and got skin weight, and it has a whole bone system. This base mesh is built on full-body FK/ IK rig, so you get the benefit of using that rig in other software, such as pushing this to Unreal, Unity, Blender, or Maya. It’s really smart!

Skin Weighting tools

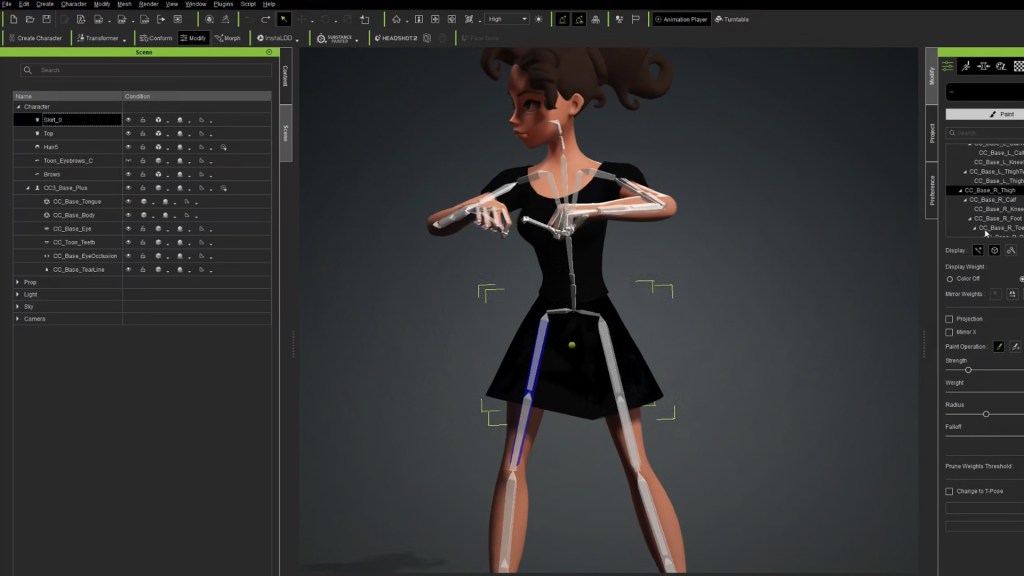
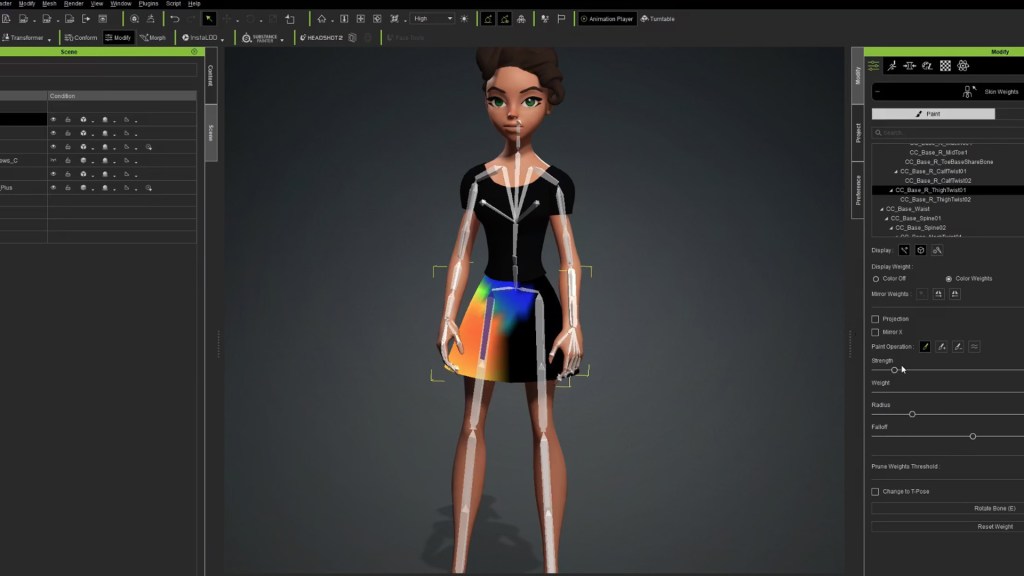
While we are sending the character data, some objects may not adopt good skin weighting. In this case, the skirt wasn’t weighted well. We can go in and adjust the weights so it behaves better. Simply click the Attributes>Skin Weights button. We will now see a skeleton which will let us know that you are in skin-weight mode. Click the skirt and click on “modify attributes”, and there’s the skin weights tab just click on that and this is a lot like doing skin weights, you’ll see there are these twist bones and these leg bones.

If you right-click on a Twist bone you should see it show up in the weighting. If you right-click on the bone, you can see it’s like has skin weighting, and you can also select the bones, and you can use the paint brushes and then just do some paint weights, or just the strength.
Baking Textures in ZBrush to import into CC4

To get the textures out of ZBrush, select the object in ZBrush that you want to export the materials from. Character Creators base mesh comes with UDIM, and they’re just like a bunch of different UV Maps, so its multiple UV sets are what it uses. Select the texture from poly paint right here, click on Create All Maps, and remember where you saved it and we’ll go back to character creator. When you push your character from ZBrush to CC4, it will take on the original texture that was on the Base Toon Avatar. The Base Mesh already has UVs so all you need to do is generate the textures from the Polypaint in ZBrush, then load them into CC4. 

Applying Content Library

Another beautiful thing about Character Creator is that it comes with a library of assets. Like clothes, shoes, and all sorts of things that you can just drag and drop onto your character. You can also purchase even more content from Reallusion’s Content Store! I chose to add some red high-heeled shoes to my character. If you use the base mesh Avatar from Character Creator, then you can utilize all of those assets. Though most of them are realistic character assets, that’s okay. You can load them you can push them over to ZBrush make them stylized, change the textures, and then send them back to CC and use them on your CC characters.

Post editing: Facial adjusting in CC4

This section is about fine-tuning your characters. You can very easily apply animation to preview and check your facial and body rig. You can also adjust the materials and make her lips more glossy, by going into the roughness map and and painting in the roughness so her lips and eyeballs are shiny.

Light Settings

There are also lights that you can add. What is really nice about this, is it’s a realtime PBR renderer. You can render them and adjust the lights, and the subsurface scattering. To modify them, go to the Scene Tab, select the lights section, and you find a bunch of customization buttons to adjust the settings. These include the colors, light direction, rim light, shadows, and more. You can also add more than one light on the character and mix them up to make your character even pop out.

Final Thoughts

I LOVE this workflow. After doing a few characters this way I want to go through and do this same thing to a whole bunch of my characters. It’s such a joy to give your characters an actual full body with full rigging including facial movements. Once you get to that point, you’re hooked. Then the next phase is to add a nice environment and some nice lights. Then you can start to look into other plugins like Face Tools, that allow you to hand-sculpt the facial morphs. You can also look into adding more motions with iClone or driving the character’s face with your face using AccuFace. It’s So much fun!!

Learn More

Character Creator Home Page

Character Creator Base Page

Make ZBrush Character Poses Page

Shane Olson’s 3D Character Workshop Page

———————————————————————————————————————————————————

The original article is written by Shane Olson and also featured on 80 Level.

Film School 101: Anatomy of a Video Short

It doesn’t take long for new animators to realize that no particular piece of 3D-related software can do it all.  From concept to animation and on to production there are a few more tools needed to produce an animated short.

If you are new to this, don’t let this discourage you from learning 3D animation whether it be for fun or profit. It just requires a little more than animation to produce a short. By short, I mean a complete story with a beginning and ending at the very least. Not a demo or a test clip either.

A WORD OF WISDOM

Before we start, I’d like to give you a little jewel of experience from Tom Jantol, an early machinima pioneer and a power user of Reallusion products who is one of the most creative directors/Animators I know. He has a way of getting to the point. When I posted on Facebook about having to trim this article down in word count (it’s not easy putting all this into one article) he passed along this advice which I hope every beginner who struggles will take to heart:

Directing is, essentially, just distribution of attention. One of the tricks is to imagine your short story as a full-length movie.

Then make a trailer for it. THAT is your short movie.

Tom Jantol – November, 2023

SCENE OR TAKE DURATION

Don’t fall into the trap that a lot of us did when we first started. Trying to do it all in one scene or in iClone’s case, one project file. I used iClone for many years before I read that there was a limit to the number of frames available. I had never run into this because my iClone scenes tend to be short in duration. Sometimes just a minute or two but usually a few minutes at most.

There is a reason most professional productions have short scenes. It’s easier to manage, easier to control the production cost, and easier to change in POST or the editing process.

STORYBOARDING – DO I HAVE TO?

No, you do not have to storyboard, and many casual animators and home directors do not storyboard at all. The purpose of a storyboard is to lay out a coherent plot or story that can be followed by the audience while highlighting key elements of the story.

You don’t have to be an artist to create a storyboard. You can use stick figures on toilet paper if you have to or you slide into iClone with some basic characters and primitives like blocks for furniture and make a more coherent storyboard.

Sure you can create a very intricate storyboard in iClone if you so desire but then you would be creating a comic as well as a video production so add that to your schedule or stick to a simple storyboard of primitives and stock characters, even scribbles and scratches as long as you can interpret it.

CREATING A SHOT LIST

This is like a storyboard and in fact, is generally influenced by the storyboard. This is where you lay out the principal photography, i.e., the camera positions that will frame each shot in the storyboard or in your mind’s eye.

No, you don’t have to create a shot list either. In the case of a tech or product demo, this might not be necessary. It is, however, considered a “best practices” concept and really should be incorporated into any story with a plotline or a product to sell. It helps maintain focus and tells you where you are in the production process as you check off completed scenes. This alone can motivate you to continue as you track progress.

AUDIO – THE GOOD, THE BAD & THE WTF?

Not all of us are natural-born audio wizards, we find out soon enough that we have yet another set of skills to learn. Audio is a horrible weakness of mine as anyone who has heard some of my tutorials will attest to. I’m not talking about soundtracks, but recorded dialog created for the project. Unless I got in good quality it had to be cleaned up.

There are good things like USB microphones or USB Mic to computer interfaces.

There are bad things like USB microphones or USB Mic to computer interfaces!

You really must do your homework here and find out the best solution for your equipment setup. What works for your friend, or a podcaster might not work for you.

As to my own audio, I think I’ve finally gotten it worked out but then, every once in a while, that WTF aspect of something pops up like a crackle or hiss.

Removing breaths, spectral cleaning and denoising of audio might become new terms in your vocabulary along with not-so-nice terms depending on how frustrating the experience is.

Not everyone struggles with audio. This is just a heads-up that it could be possible.

TIP: Shock mount your microphone if possible. This will eliminate a lot of noise, knocks, and clatter from mouse movements on the desktop if your mic is on the same desktop.  

WHAT IS POST?

POST is a term from the film world. It generally means AFTER principal photography has been completed. Any work done to alter, edit, or add after this is called POST for being POST production. Editing, sound design, visual effects, Credits, Sound Mixing, and Color Grading are all POST processes.

There are times you might find yourself spending as much time or more in POST than you did in creating the animations for the movie.

VISUAL SPECIAL EFFECTS (VFX)

If you are new to this, then I’d recommend not worrying about VFX right now. You have enough to keep up with just to get a watchable, coherent first video put together. VFX and POST are not the same. VFX is a part of the POST process so don’t confuse the two.

If you must have VFX then I’d recommend planning a scene that uses some of the iClone stock particle effects like rain or dust or better yet, Popcorn FX if you have the plug-in. There is much more to VFX than particles, but these are a drag-and-drop starting point.

YOUR FIRST DEMO

I just spent some time telling you how important your first real video will be so now I’ll let you breathe a little easier because you can show any number of small demos anytime you need feedback as long as you let your audience know that it is a demo or test render. I wouldn’t recommend going overboard with this, but it can be useful in early scenes to have 3D community feedback to shape the look and feel of your production.

VIDEO EDITING – PUTTING IT ALL TOGETHER

Most of us will use the video editing phase to put all this together including audio, animation, VFX, and other POST tasks. We might fire up the video editor sooner to cut together segments of different takes to create the best scene possible, but this phase of the process is where we put it all together.

And it is a make-or-break part of the process. Good video editing can save a bad story and bad video editing can torpedo a good story.

CHATGPT:

Idea and Concept:
Define the purpose and message of your animation.Create a storyboard or a rough sketch to outline key scenes.

Scripting:
Write a script that aligns with your storyboard, detailing dialogues, actions, and key events.

Pre-Production:
Gather or create the necessary assets, including 3D models, textures, and audio files.Plan the camera movements and lighting for each scene.

Modeling:
Create or import 3D models of characters, objects, and environments.Pay attention to details, ensuring that the models are suitable for animation.

Texturing:
Apply textures to your 3D models to give them realistic surfaces.Adjust materials and shaders to achieve the desired look.

Rigging:
Rig characters by creating skeletons and defining how they move.Set up controls for the animator to manipulate the characters easily.

Animation:
Animate your scenes based on the storyboard and script.Use keyframes to define important poses and movements.
Refine the animation by adjusting timing and easing.

Lighting:
Set up the lighting for each scene to create the desired mood and atmosphere.Experiment with different light sources and their intensities.

Rendering:
Configure rendering settings, including resolution and frame rate.Render each frame or sequence to create the final animation.

Sound Design:
Add background music, sound effects, and dialogues.Ensure that the audio elements complement the visual storytelling.

Editing:
Arrange the scenes in the correct order.Trim, cut, and adjust timing to enhance the flow of the animation.

Final Export:
Export the final animation in the desired format and resolution.Consider compression settings if the file size needs to be optimized for distribution.

My Commentary:

It can be an immaculately crafted, handwritten tome or scratched out on a napkin at lunch but a good story needs a reason to exist.


Storyboarding is optional. It does help to keep the video coherent with a clear message.


The script is optional but highly recommended for serious production. For fun, well… just have fun.

A necessary step for all of us from novice to pro. We all must gather up assets from the web or create them. Plus, many late nights creating what you can. There is a lot of midnight oil burned creating assets for production. Especially if you have a full-time job other than animation. Character Creator has your back for the characters.

Software like Adobe’s Substance Painter is an excellent choice for this. Character Creator will take care of skin, eye, and teeth colors and many clothing color alterations.

Character Creator does all this for you (unless you want to spend months learning to set up and rig characters with expensive software).


iClone has you covered here. Packed with tools and features that help animators from first-timers to pros.


iClone has many different types of lighting that can be used in combination to light your scene. There is IBL, Global Illumination, and standard point, spotlight, and directional lights.

iClone makes rendering easy with its choice of video, image, or image sequence rendering or you offload the rendering to Omniverse or Unreal Engine.


This will require different software including free and open source Audacity. I’m not an expert on audio so I’ll send you over to TechRadar for their view of the top ten free audio applications.

Da Vinci Resolve (free and paid versions) are a leading choice here and you can take a look at what CreativeBlog thinks are the top free editors.


This is the final production generally rendered from a video editor or software like After Effects. The above from CreativeBlog applies here as well.

It is possible that I have left out as much or more than I have written about, but it is close to impossible to list everything you might need in producing a short. What I have listed here is more of a practical guide to getting started. Pay attention to a few rules, have continuity in your production process whether it be for drama, fiction, or children’s stories, and never lose sight of the fact that the story is what matters.

I’d also like to leave you with one more comment that was left on the Facebook conversation I referenced earlier. This one is from my former editor over at Renderosity, Ricky Grove, another person with uncompromising standards for cinematic work. He can also give one heck of a professional critique that can improve your work.

What he wrote was, like Tom Jantol, short and to the point:

I am always impressed when anyone completes a video short. Finishing it is the first goal, IMO.

Richard Grove – November, 2023

I can’t put it any better than that. You do not have to follow any of the principles laid out in this article to produce a short, but you DO have to finish it. While that may seem to be a firm grasp of the obvious to some, few animation projects for a completed short come to fruition. Don’t fall into that trap.

MD McCallum - WarLord

MD McCallum – WarLord

Digital Artist MD “Mike” McCallum, aka WarLord, is a longtime iClone user. Having authored free tutorials for iClone in its early years and selected to write the iClone Beginners Guide from Packt Publishing in 2011, he was fortunate enough to meet and exchange tricks and tips with users from all over the world and loves to share this information with other users. He has authored hundreds of articles on iClone and digital art in general while reviewing some of the most popular software and hardware in the world. He has been published in many of the leading 3D online and print magazines while staying true to his biggest passion, 3D animation. For more information click here.

Seasoned VFX Creative embarks on Short Film with Character Creator and iClone

Soumyadipta Roy

In the multifaceted role of a Trainer across diverse creative domains like 3DDMP, Concept Art, SpeedTree, etc., within Technicolor Creative Studios, Soumyadipta Roy draws upon a wealth of experience spanning 15 years. His expertise extends to the development of VFX, Games, Episodics, and Animation teams, involving recruitment efforts across national and international territories, with a successful track record of hiring hundreds of artists for the studio.

With a portfolio that includes contributing to iconic projects like Harry Potter, Wrath of the Titans, Superman, X-Men, and other significant franchises, Soumyadipta brings forth 14+ years of seasoned experience and a confident skill set.

His professional aspirations center around fostering a healthy work-life balance within these creative disciplines and evolving in tandem with the artist community. He is dedicated to cultivating an ecosystem that empowers every participant towards a more promising future, especially in the burgeoning era of content within the Metaverse Market.

Looking ahead, Soumyadipta’s ambitions include spearheading a CG project designed to seamlessly transition into games, movies, and episodics. His vision involves collaborative development with the artistic community, emphasizing collective empowerment. Soumyadipta Roy extends an invitation to join him on YouTube, where he share insights and creative processes in one of his initial projects, titled “Winter Child.”

“Real-time software like Unreal Engine, Reallusion’s Character Creator and iClone can now give artists the ability to take their vision to life in hours if spent right. The results are fantastic and allow us to work with the final render quality on the viewport. It gives up the ability to check and edit the final results while the work is in progress. We are just a thought away. This is why I feel confident about Realtime software.”

Soumyadipta Roy – Professional VFX Artist

Q: Hello Soumyadipta! Welcome and thank you for being part of our feature stories. Kindly introduce yourself and tell us more about the many movie projects you have worked on.

My name is Soumyadipta Roy, but out of love, people call me Roy. I have been an artist in the industry for about a decade and a half, creating over 300 hours of content in film, games, and the education sector. I’ve had the privilege of working on notable movies such as Harry Potter, Disney’s John Carter, Stan Lee’s Chakra the Invincible, and Educational Videos for Byjus the Learning App. You can explore my professional journey on my website – https://www.artistroy.com and currently working as a Trainer in Technicolor Creative Studios, Bangalore.

Outside of my professional commitments, my wife and I engage in a personal weekend CGI project named “Winter Child”. This project draws inspiration from mythological forecasts found in Hindu and other scriptures, exploring a scientific connection within them. The project is called “Winter Child” and the name plays a significant role near the climax of the story. We started this project in 2018 as a couple-project which is why it is very personal to me. Little did we know the campaign would find so much love from the community. But as we could not raise enough funds at the time, and due to the lack of knowledge and experience, we kept it for later. So we work on it from time to time on the weekends and holidays as a couple of thing.

I thank Reallusion for the wonderful tools and support they are doing for the community. I hope to bring this world to the metaverse and I look for your support. If I can build a social media community through, YouTube, Instagram, Facebook, Twitter, and other platforms, then I can connect with audiences and will be happy to develop this metaverse world together. Please join me on my YouTube channel to kick-start this project.

Q: As a VFX Artist you have decided to embark on your own project the WINTER CHILD. What made you decide to create your own film? And why did you decide to use real-time animation software, instead of the traditional animation tools?

At some point of every person’s life, they feel like creating a project of their own. I too want to do that, a project of our own with fantastic views from our cultural and mythological side in the Hollywood sci-fi approach to things. This, in turn, will make room for jobs against the crisis in the industry, but also allow us to remember our essence of Dharma, a way of living in India, back into the views of our generation, which makes it a product not only for children but for an age group ranging to the elderly who are well versed with the codes of Dharma from the ancient mythologies.

It’s neither an easy nor a cheap task to do, which is why real-time animation software enables us to quickly render out results which was not possible in the earlier days. This ability now allows artists to able to make movies at home. Real-time software like Unreal Engine, Reallusion’s Character Creator and iClone can now give artists the ability to take their vision to life in hours if spent right. The results are fantastic and allow us to work with the final render quality on the viewport. It gives up the ability to check and edit the final results while the work is in progress. We are just a thought away. This is why I feel confident about Realtime software.

Q: You mention bringing grand visions to life, using the perfect tools. As a VFX artist, how did you discover Character Creator and iClone? And what are your comments on these tools?

In my journey within the industry, interacting with diverse people and navigating different management styles across films, games, and education, I’ve encountered various problem-solving scenarios. One significant challenge was organizing high-quality characters and their props for animators to bring to life. The process of conceptualizing characters, along with their props, facial blend shapes, rigging, and skinning, is time-consuming and usually takes weeks for just one successful character.

The remarkable part is how, with the help of Reallusion softwares, I was able to streamline this complex process into a matter of days. iClone’s capacity to manage high-quality content is truly impressive. As an artist, I’ve successfully crafted characters of varying ages, ready for animation and expression. I could easily dress them according to the “Winter Child” world, even adapting outfits to different body types, allowing us to create an army from a single designed soldier! The real-time results displayed on the viewport facilitate quality checks on the fly.

In my role as a content creator and talent trainer, handling character packages in iClone has been exceptionally smooth, saving valuable time in file administration.

Q: Character Creator enabled you to create all your characters for your film. Typically what is your creative process, starting from the script, and how long does it take you to create one character?

Normally, for any project, I would read the script from the client, where the core of the concept lay. I read the script multiple times and often discuss the designs, the finish, the mechanism, and manageability. This process is not only helpful for the artist’s side but also for the client’s side because it brings more perspective to the concept. That’s why I ensure I write a satisfying script before heading into production.

Being an English Major, my background helps me write something my wife and I find exciting to show to the world. Every detail of the character, such as the palm mark on a character’s chest or the little blinking lights on the character’s suit, serves a function or has a story behind it. These characters inhabit an ice apocalypse, and they need rich background physical world mechanisms to survive.

Crafting characters used to be a time-consuming process—weeks for one character! Thanks to Character Creator, it now takes hours. My wife and I were able to design and test the final look simultaneously. As an artist, I can develop characters of various ages, animation-ready, and expression-ready. We can modify and enrich the concept even better because we can see how minor changes would look at the final stage. Dressing them for the “Winter Child” universe is a breeze, and the real-time viewport feature allows for quality checks on the go.

Q: For animation you employed iClone and its tools. What would you say are the most impressive advantages of using iClone, and what advice would you give to other artists who are on the fence about using Reallusion tools?

Handling character packages in iClone was a breeze, saving me valuable hours in file administration. The animation tools and packs in iClone are nothing short of wonderful. Once I imported the pack, it was a delight to work with the tools for body animation layers, facial lip sync, and expression editing. This smooth workflow allowed me to focus more on storytelling and less on getting tangled in technical troubleshooting with iClone‘s layout. Both Character Creator and iClone have proven to be indispensable tools for my wife and me in crafting our CGI project in the Metaverse.

“Handling character packages in iClone was a breeze, saving me valuable hours in file administration. The animation tools and packs in iClone are nothing short of wonderful. Once I imported the pack, it was a delight to work with the tools for body animation layers, facial lip sync, and expression editing. This smooth workflow allowed me to focus more on storytelling and less on getting tangled in technical troubleshooting with iClone’s layout. Both Character Creator and iClone have proven to be indispensable tools for my wife and me in crafting our CGI project in the Metaverse.”

Soumyadipta Roy – Professional VFX Artist

Advice for fellow artists who haven’t tried Reallusion tools yet: Embrace the simplicity and efficiency these tools bring to your creative process. The seamless handling of character packages, coupled with the powerful animation features, can truly elevate your storytelling game. Get your hands into the Reallusion universe, and you might just discover a perfect alley for your creative endeavors. The real-time benefits and user-friendly interface could be the game-changer you’ve been looking for. Give it a try, and you might find yourself wondering how you ever created without it!

Follow Soumyadipta Roy:

YouTube:
https://www.youtube.com/@artistroy

Instagram:
https://www.instagram.com/artistroy

ArtStation:
https://www.artstation.com/soumyadiptaroy

Website:
https://www.artistroy.com/

Flying Solo with Vector Graphic Animation and Motion Pilot

This article is featured on AWN

Daniel Pojda

Hi, I’m Daniel hailing from Poland. I’m a designer who dabbles in digital content creation for e-learning, animations, instructional videos, and interactive graphics. No matter what kind of work I do, animation remains my favorite hobby that gives me great satisfaction.

Spaceships and Cosmic Voyages, but Why?

Since childhood, I’ve been fascinated by space travel. I loved watching movies like 2001: A Space Odyssey, Star Wars, and Blade Runner. When I learned about the new features in the Cartoon Animator 5.2 update, I immediately envisioned an animation of a spaceship flying in outer space, with its hull reacting to flight direction and speed.
How to Start Creating 2D Animation

To begin with, I didn’t plan on making an entire animation, instead, I just wanted to create a spaceship in a graphics program. Afterwards, I considered which parts would need to be animated using Spring Bones and which parts would need to use the Sprite Editor.

Thanks to new features like Motion Pilot and Motion Path, my standard animation workflow has improved significantly. Now, I can focus more time on the details, including secondary animations for the rocket’s spinning fan, blinking light, and rocket engine.

Testing the movement of the spaceship with Motion Pilot inspired me to tell a more complex story. Thus, “Paper Dreams” was born, depicting a little boy’s dream of a journey through space and time.

Animating a Story using Motion Pilot and Path Animation

The story is acted out in two settings: the present, depicted as the peaceful life of a little boy in the countryside; and the future, in an imaginary cosmic space. The new animation function in Cartoon Animator 5.2 gave me the ability to fill in many details. For example, the present scene is filled with dozens of animated objects that contribute to the ambiance. By combining Motion Pilot and Spring Bone functionality, I was able to very quickly create animated flowers and grass. The time saved allowed me to add a spinning windmill, a moving tractor on the farm field, farmhands, and even a crowing rooster!

With Motion Path Animation, I quickly animated the paper airplane along a flight path. The ability to use different objects on the same path allowed me to effectively transition from one timeline to another.

Customizing Ready-Made Characters

Considerable thought went into the creation and animation of 2D characters since I needed to portray the same person at different ages. It was important to maintain similar features between the two versions of the same character.

The library of ready-made characters in Cartoon Animator made it easier to alter individual elements on the characters. I could mix and match various visual elements by using whatever was available in the Content Manager or by creating new projects if needed. Because I aimed to display my characters from various angles, I managed to create the front and back sides of my characters by swiftly adjusting the layer order in Composer mode. This feature alone makes Cartoon Animator an exceptional 2D character creation program.

Putting Lip-Sync Animation onto 2D Characters

Utilizing and modifying characters already available in Cartoon Animator 5 has another advantage: they are ready for lip-sync. I simply added a premade sound file to the timeline to perfectly synchronize the character’s lip movements with the voice. This enjoyable process required minimal adjustments 

Adjustable Colors for Vector Graphics

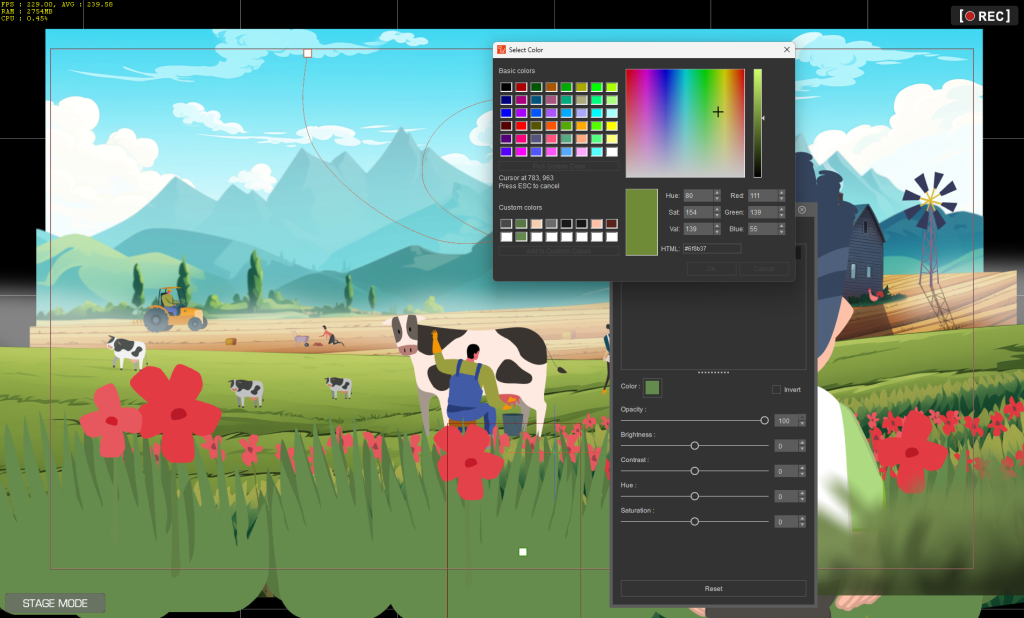
While animating, I always pay attention to consistency, especially when it comes to visuals. By using vector graphics, I was able to add objects and color them in real-time. This way, I could perfectly match the colors of the moving elements like grass or meteors to the backgrounds.

Cartoon Animator Streamlines the Workflow

Cartoon Animator 5 has significantly enhanced my experience and efficiency as an animator. The new intuitive features, such as Motion Pilot and Motion Path, have streamlined my animation process. By reducing the time and effort required for the technical aspects of 2D animation, Cartoon Animator 5 has enabled me to devote more time to creativity, focusing more on the finer details and storytelling. 

The software’s versatility in handling various aspects of animation — from creating characters and synchronizing lip movements to editing vector graphics on the fly — allows me to experiment with diverse styles and techniques. This flexibility is invaluable, helping to keep my work fresh and innovative, which is crucial in the rapidly evolving field of digital content creation. 

Related Posts

———————————————————————————————————————————————————————————————————

The original article is written by Daniel Pojda and also featured on AWN.

Realtime Animation Made Easy with ActorCore and iClone Omniverse Live Sync

3D crowd generation workflow for a cinematic night scene

This article is featured on AWN

About Pekka Varis

Hi, I’m Pekka Varis, a 3D animator hailing from Finland and the CEO of Cineshare, a company centered around NVIDIA Omniverse technology. I proudly hold the title of NVIDIA Omniverse Ambassador, with expertise in utilizing Reallusion’s iClone, Character Creator and ActorCore within NVIDIA Omniverse Composer. My focus lies in crafting realtime animations and delivering top-notch rendering for various projects.

In this tutorial, I’ve demonstrated techniques for breathing life into expansive outdoor environments by populating a 3D scene with animated individuals. I utilized iClone Live Sync to Omniverse, integrating ActorCore 3D characters and mocap animations to create a dynamic and engaging experience.

What is iClone Omniverse Live Sync?

Building on the foundation of a full 3D animation system integrated into NVIDIA Omniverse™, the iClone Omniverse Connector brings even greater productivity with its new Live Sync feature, offering real-time animation preview and a seamless two-way workflow. The powerful combination of iClone and Omniverse empowers individuals and design teams to effortlessly create, animate, and deploy 3D characters for digital twins and business simulations, all while fostering seamless collaboration within the Omniverse platform.

Live Sync shows realtime previews between iClone and Omniverse.

Benefits of live sync are huge! As you can see, I get instant feedback inside Composer with high frame rates. I have no limits in my creations, building larger than life stories inside city streets – such an easy task with ActorCore stock assets.

Pekka Varis, CEO, Cineshare

ActorCore + iClone for Realistic Crowd Animation

In the ActorCore 3D asset store, I have the ability to swiftly download characters tailored to my specific style and effortlessly apply movements. Creating bustling crowds to populate my streets is a rapid process, and if necessary, I can easily generate manual, high-quality close-up animations with just a few clicks. The synergy between ActorCore characters and iClone Motion Director empowers me to execute exceptional camerawork for inspiration.

ActorCore library offers a variety of 3D people.
Powerful motion editing tool in iClone.

Camera Animation and Rendering inside Omniverse

In Omniverse Composer, I animated my cameras and integrated various free props available in NVIDIA’s extensive asset store. Utilizing the latest RTX real-time rendering engine, along with the new DLLS 3.5 and Composer’s exceptional camera tools, I successfully concluded this project, achieving stunning and beautiful results.

Use Omniverse Composer for advanced camera movement and high quality rendering.

Conclusion

Leveraging iClone Live Sync for Omniverse greatly enhances the efficiency and productivity of deploying digital humans in virtual productions. It provides a robust, rapid, and intuitive method for creating expansive outdoor renders, enabling advanced character animation tailored for simulation purposes.

For free ActorCore 3D characters and mocap animations, visit here.

For a free trial version of iClone , visit here

For more info about Pekka Varis and Cineshare, visit here.

Related Posts

———————————————————————————————————————————————————————————————————

The original article is written by Pekka Varis and also featured on AWN.

Winning 2D Animation Contest by Making Animated Series with Own Characters

The Winner Tips & Interview series covers practical workflows and techniques shared by winners from the “2023 Animation At Work Contest”. To let users see the full spectrum of the Cartoon Animator pipeline, we are introducing projects that received attention and credit from the community. Let’s now take a look at “A A Gourmet’s Gospel” to see how Noel Yu worked her magic with Reallusion Cartoon Animator (CTA).

Noel Yu

I am an illustrator from Hong Kong with a pen name called Momofish, currently working on promoting my IP characters, “Little Flame” and “Little Ocean”. Although I would call myself an illustrator, I am in fact a hobbyist with no professional background.

Like many people, I have no formal training in animation, and my sole foundation lies in the passion for drawing that I’ve nurtured since childhood. Despite being a novice in this field, I hold a small dream close to my heart. I aspire to see the characters I create evolve into a unique IP, potentially becoming my legacy for future generations. Presently, I am dedicated to developing my IP character, Little Flame, and regularly updating the latest stories and Cartoon Animator tutorials on my YouTube channel.

How I Discovered My 2D Animation Software: Cartoon Animator

To make my own IP character more alive, I find it necessary to learn how to make animation. With the character performing on screen, my drawing is much more eye-catching. When I looked up on YouTube for animation software, I was determined to find something that could start immediately, while also cutting the production time. While searching, I found Cartoon Animator 5. With the online courses offered by Reallusion and Basic courses from 2D Animation 101, in addition to the experience gained through the production of each animation, now I can make my own animated story series for my characters.

Why I chose this topic?

I’ve been a fan of manga and a gamer since I was a kid. Therefore, I accumulated a lot of stories in my head and they’re a major source of inspiration for me. These stories mix together in my head. When combined with my own imagination and experiences from my daily life, without realizing it, my own story is born.

Little Flame is my original IP character and he has many different looks and identities to fit different scenes. In the Asian Lunar Calendar, the year 2023 is “the Year of the Rabbit”, so I designed this bunny costume for him a long time ago. No matter what Little Flame looks like, his characterization is that of an agile gourmet, a boy who will go to any place for delicious food. If I’m going to make an animation based on the premise of “selling a product” with a promo starring Little Flame, it must be something related to food. At first, I wanted to take on the “Comics and Arts” category. After thinking for a while, I realized that IP characters should know how to integrate themselves into the product, so I decided to switch categories and dive into the “Business and Commercial” category.

My 2D Character Creation Process

Step 1 – Create G3 Actor

Create a unique G3 Actor for your character first. If you’re not sure how to start, you can use the default character in CTA5 as a reference.

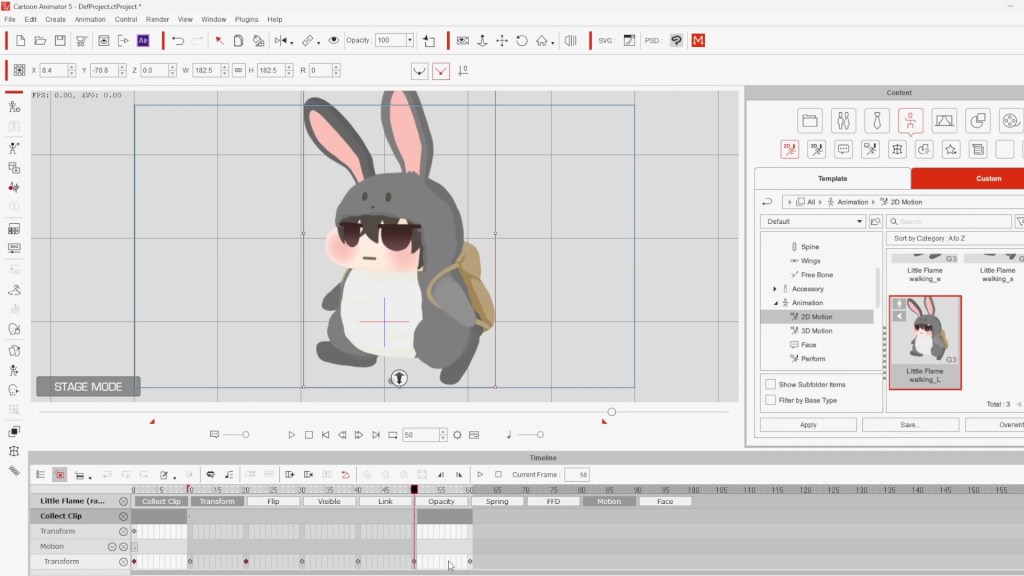
Step 2 – Create G3 Actor’s own animation by using rigging and collect clip

Create repetitive actions such as walking and jumping for your character by rigging bones. Then use ‘Collet Clip’ to record it. It’s very convenient and time-saving because you don’t have to recreate this kind of action when you need to use it in the future.

Step 3 – Scene Creation

Pay attention to the Z-axis of each object. The front and back positions are very important.

Step 4 – Insert script’s WAV file and adjust lip sync

After inserting the WAV file, CTA will automatically detect the vocabulary and change the mouth shape for G3 Actor, but you still need to check it once and change it to a more suitable mouth shape.

Step 5 – Camera Movement

In order to have a better sense of presence and to make the audience more engaged in the scene, the Camera needs to be used in a timely manner to change where the focus needs to be.

Interview with Noel Yu

Q: What do you think makes a winning entry to competitions like this? How does someone make their entry stand out in the crowd and really grab the judge’s attention?

A: I think the most important thing is originality and uniqueness, having your own character makes an impression and makes you look different.

Q: You are quite new to Cartoon Animator. As a novice of Cartoon Animator, what surprised you most about working with this 2D animation software?

A: As a newcomer to CTA, I think the most amazing thing about it is how much time it saves. If you use frame-by-frame animation, it is very likely that a few seconds of animation will take hours to create. But if you use CTA, you can probably do it in just a few tens of minutes.

Q: Did you find the process of creating characters and content for your entry easy and enjoyable? And how did you find the experience of animating your project with Cartoon Animator? Were there any specific challenges you had to overcome? And if so, how did you overcome them?

A: As long as you understand what each function can do and what it can achieve, I think making this animated content is enjoyable, especially when you’re done! Using CTA allowed me to create my own animation quickly, which not only gave me a sense of accomplishment but also allowed me to see how much I’ve grown in animation production in a short period of time. I think the challenge is learning new features of CTA, or should I say, it’s always hard to learn new things. In fact, this is my first time creating a G3 Actor. When you’re starting from zero, you always worry about whether you can really do it. But after learning from Reallusion’s online tutorials and going into it with the idea that “it’s okay to make mistakes”, I slowly corrected any mistakes I might have made. Finally, I succeeded in making my first G3 Actor!

Q: As a Cartoon Animator user, if you had to choose only one tool or feature of CTA that is your absolute favorite, what would it be?

A: Must be Bone Editor. I use it for almost every animation, and it is time-saving with high productivity.

Q: What is your best piece of advice to other Cartoon Animator users who might be considering entering contests like this in the future?

A: I would like to begin with three questions and answer them.

  1. Am I a graduate of an arts-related program? No. 
  2. Have I ever learned how to make animations? Never.
  3. Am I good at using new computer software? Of course not!

It’s better to try out more features of CTA to make the animation better. Even if you don’t win the award, you’ll learn a lot of new techniques in the process. But the most important point is, “ believe that you can do it”. It would be too expensive to go back to school and I would have to study for several years so it’s obviously not for me.

Q: Now that this year’s contest is finalized, what does the year ahead hold for your work? Are there specific projects you are working on? How does Cartoon Animator fit into your future plans?

A: I will continue to use CTA to create stories about Little Flame and his friends and put them on my IG and YT channels. Also, since I can draw in the Japanese anime style, I will try to apply CTA to it in the future. Discovering more about myself and the possibilities of CTA seems to be one of the joys of my life.

Follow Noel Yu

Instagram | http://www.instagram.com/momofish_illust

YouTube | https://www.youtube.com/channel/UCWd9NGzW_eIsHt7cXk4DXMQ

Learn More

Know more about Cartoon Animator | https://www.reallusion.com/cartoon-animator/default.html

FREE for 30 days, and get 1,700+ ready-made content | https://www.reallusion.com/cartoon-animator/download.html

The Making of Miles Morales | Transforming 2D concept into 3D model with Character Creator ZBrush Pose Tools

Gerard Martínez Sánchez

I’m Gerard Martínez, a character 3D Artist and Instructor residing in Parets del Vallès, a town near Barcelona.

Presently, I teach at various universities, notably in Barcelona and Latin America. This year, I’ve had the opportunity to collaborate with XP-Pen Spain, enabling me to bring art and technology closer to a broader audience and share my passion for both worlds.

Introduction

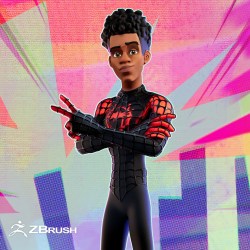
Welcome to this 3D tutorial, where I wish to start by expressing my gratitude to the Reallusion team for inviting me to share the details of the creation process behind one of my latest characters: the Miles Morales fan art which was featured in Spanish magazine Renderout! in their issue #41 – for December 2023. It’s an honor to take part in this experience!

In this making of, I’ll walk you through my process of transforming a 2D concept into a 3D model, capturing the essence and exploring the best techniques and key elements that will bring the character to life using some of the tools from Character Creator (CC).

Software Used:

  • PureRef: An application for gathering and visualizing references.
  • Photoshop: Post-production.
  • Blender: For polygonal modeling.
  • Maya: Retopology, UV mapping, and rendering.
  • Arnold Renderer: For the final rendering.
  • ZBrush: For digital sculpting.
  • Adobe Substance 3D Painter: For baking and 3D texturing.
  • Character Creator 4: Rigging with AccuRIG and posing the character.
  • ZBrush Pose Tools: Poses Management

A Pixar Touch

My main goal right from the start was to give the character a Pixar touch, as if it had dropped directly into their animated “universe.”

Before sculpting, I dedicated time to a thorough analysis of the original concept art from the movie “Spider-Man: Across the Spider-Verse,” created by Wendell Dalit. Exploring the details in the concept art provided me with a solid foundation for the project, allowing me to capture the essence and key elements that would contribute to the final result.

Next, I sought reference images for the body, suit, and clothing to start building a visual board in PureRef, which is a program that serves as a tool to efficiently organize and visualize visual references.

To search for references, I primarily use Pinterest because of how easy it is to find a variety of inspiring content that I can use as a reference. I also find inspiration on social media platforms like Instagram, Twitter, ArtStation, etc.

©Sony Pictures Animation

Starting the Sculpting Process

Typically, I start with a Polysphere or a low-polygon density sphere to perform the Blocking. I prefer using the “Reference Views” function to place my reference behind my model, which makes it easy and quick to compare with the concept.

Next, I’ll share the various stages I follow to sculpt a character in ZBrush:

Blocking

What is blocking? Blocking is the initial phase in creating a sculpture or character. It involves using basic shapes such as spheres or cylinders to establish its main structure.

It is crucial because it lays the groundwork and structure before adding details. It helps ensure correct proportions and a solid anatomy, serving as the foundation for adding more details later. The goal is to create a solid foundation to work on subsequently, ensuring that the final sculpture looks coherent and well-constructed.

For instance, I represent each muscle using different spheres. To create these initial shapes, I used various spheres and cylinders with the “IMM Primitives” brush.

Anatomical Blocking

Benefits of performing blocking

  • Quickly establish the basic proportions and volume of the final appearance of your model.
  • Prevent issues throughout your creation process.
  • Ensure that all parts fit together correctly before committing to the detailing stage.

Refinement and Detailing

Once the basic shapes of the character have been defined in the Blocking phase, I move on to the detailing stage. In this phase, it’s essential to merge all parts and increase polygon density for better definition. To achieve this, I use Dynamesh and simply smooth with Shift, refining volumes and beginning to add details.

I spent quite a bit of time perfecting the face to achieve that moment where, upon seeing it, you can immediately say, “Hey, that’s Miles Morales!”

When working with a concept, it’s crucial to ensure that facial features maintain the proper proportions in relation to the overall shape of the head and body. For instance, achieving the right position between the eyes, nose, and mouth makes it easier to capture the character’s likeness accurately.

Next, the following step involves capturing the secondary details of the face, such as eye shape, mouth thickness, nose shape, eyebrows, among others. Once I have the head more resolved, I paint the iris of the eyes to give it more vitality and expressiveness, providing greater inspiration for sculpting.

In the Geometry menu, we can find the Claypolish tool. I use this option quite a lot to achieve a more defined and polished appearance, especially recommending it for cartoon or stylized characters.

For this style, the most important aspect is perfecting the volumes and refining the shapes.

From Blocking to Detailing

Suit and Webbing

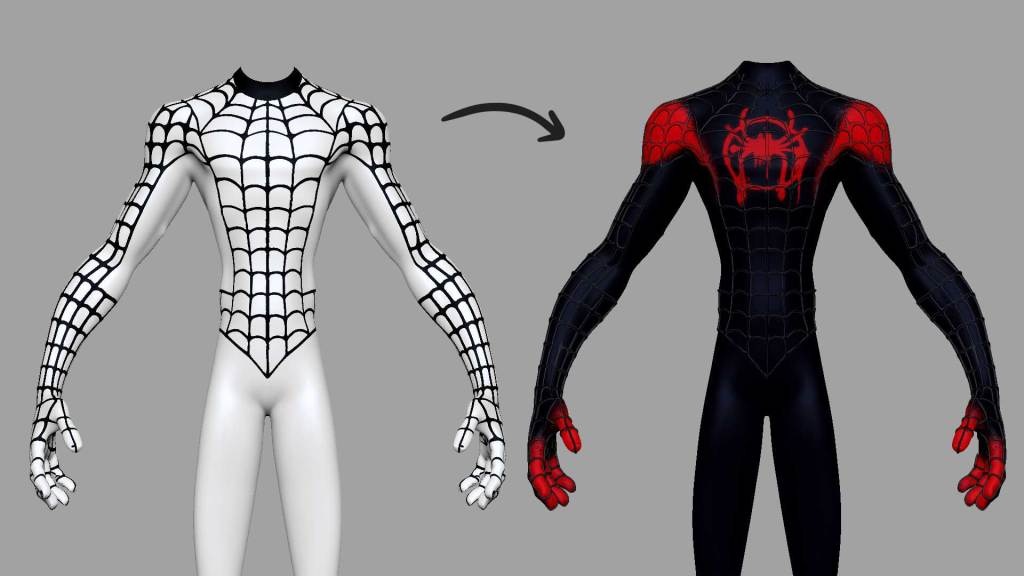
Once I had detailed the face and body, I proceeded to work on Miles Morales’ suit from the first movie. Although I could have opted for the suit from the second movie, I felt a special connection with the more “handcrafted” and urban design of the first one. Since the first time I saw it, I was fascinated by the design, and it has been a sort of homage for me.

Additionally, I decided to merge elements from the suit worn by Tobey Maguire in the trilogy directed by Sam Raimi. My goal was to achieve a version of Miles Morales’ standard suit with more realistic textures, incorporating raised web lines and a metallic touch instead of them being sewn into the fabric.

To achieve this, the first step was to draw the entire suit’s silhouette and then perform an “Extract”. Subsequently, I sculpted some details to emphasize certain muscles and began drawing the entire web pattern using Vertex Paint. I opted for the Lazy Mouse option for greater precision in tracing.

Later, I turned the masked stroke into a polygroup (Polygroups/From Polypaint), duplicated the body, and removed everything except the web mesh. Then, I cleaned up the geometry and finally extruded it to add volume.

Steps for creating clothing

Hair

From the start, I knew Miles’ hair was crucial as it’s distinctive and easily recognizable.

In ‘Across the Spider-Verse,’ Miles Morales has a haircut known as a ‘taper blowout,’ which means it has volume backward, lifts, and features a fairly defined fringe.

Firstly, I searched for more images of this haircut to gather inspiration. Then, I made an approximate blocking of the hairstyle and sculpted each curl individually. I used the Clay Buildup tool for shaping and the Move tool to position the curls in the desired direction

High version

Retopology

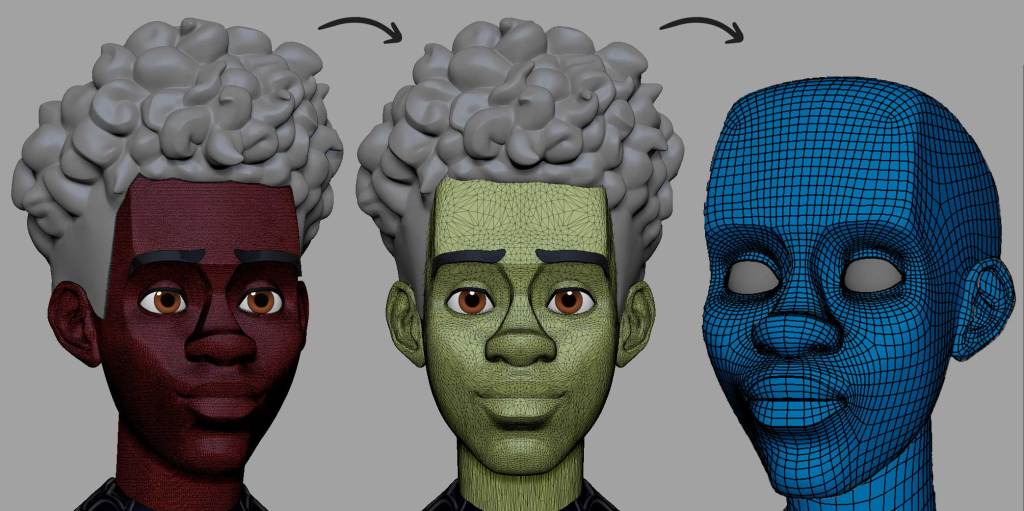
Retopology is the art of remodeling a high-resolution model polygon by polygon, simplifying it, and making it more manageable for subsequent stages.

Retopology is an essential process that facilitates subsequent processes such as UV mapping or rigging.

Retopology

In my case, I prefer to perform this stage in Autodesk Maya, which I find very practical and intuitive.

Before importing the character, I optimize it a bit in ZBrush using the Zplugin “Decimation Master” to prevent Maya from freezing due to the number of polygons. This tool not only allows us to reduce the geometry amount but also maintains all the detailing we have sculpted. However, it’s essential not to repeat the process too many times as doing so can lead to loss of detail.

Once imported into Autodesk Maya, I use the Quad Draw tool to perform polygon-by-polygon retopology, ensuring that the polygons have similar sizes and correct topology.

Retopology Process

UV Mapping

The UV Mapping serves as the bridge between modeling and texturing in a 3D model. It essentially involves unwrapping the surface of the 3D object to represent it in a two-dimensional space. Though explaining this process might seem complicated, let me explain it with a simple example for better understanding.

Have you ever tried origami? It’s a creative art form that involves folding paper to create various figures and shapes. In other words, you transform something two-dimensional, like paper, into something three-dimensional using this technique.

With my students, on the first day I explain UV mapping, I always bring a cube for origami. I choose a cube because it’s a quick and easy object to build. This way, we observe the mechanics that when we have it flat, we can draw or paint as we like, and then we assemble it to create the cube. Understanding this mechanic, I explain that UV mapping is the same but in reverse. That is, we have the three-dimensional object, and we need to transform it into 2D to texture it.

Another example I often use, especially during this holiday season, is chocolates wrapped in the shape of Santa Claus.

When performing UV mapping, each model has its own rules, but there are critical points to consider:

  • Hide cuts in inconspicuous areas.
  • Ensure each part of the object is the correct size, similar to a puzzle.
  • Fill all available space, leaving nothing empty.
  • Avoid overlapping or crossing parts.
  • Leave a small space between parts.
  • Cut enough so that nothing looks odd.

It’s also essential to consider Texel Density, ensuring consistent sizes among UV parts. In programs like Maya, you can set a Texel Density as a reference and then adjust each one to be the same size. This prevents having different resolutions for each area when applying textures, achieving uniform resolution across the entire model.

For the Miles Morales character, I had a specific pose in mind, so I made cuts on the back to avoid issues. However, if your character is for animation and will be seen from different angles, it’s advisable to clean from all perspectives, not omitting any, as you don’t know where or when the model will be displayed.

In this character, I organized my UVs as follows: the head, eyes, and body divided into the suit and the webbing.

 UV Mapping – Head

Texturing

It’s time to give color to Miles in Substance Painter, and this is one of the stages I enjoy the most!

Before starting with texturing, I perform the bake of all the details from the high-resolution version and transfer them to the low-resolution version we created during the retopology stage.

Skin

I began the texturing of Miles Morales’ face by using the ‘Skin Face’ smart material as a starting point, then made some adjustments based on my preferences. The fascinating aspect of using Smart Materials is their versatility, making customization easier.

Initially, I adjusted the Base Skin layer to a tone more similar to Miles’. Then, I duplicated the ‘Skin Pores’ layer, adjusted the pore size using the tilling value, and strategically distributed them according to facial areas. All these adjustments were made using layer masks.

Later, I created a new folder named ‘Skin Shade’. Within it, I added several fill layers to introduce more skin tones. Next, I moved to what I call ‘Breaking Up.’ At this stage, the colors on the face seemed too smooth and unnatural for my liking.

To address this, I added a fill layer, applied a black mask, and used a procedural map with the ‘Add generator.’ I chose ‘Tri-planar Advanced’ and applied ‘BnW Spots 1’ to alter the color mask. As a result, the skin gained a more realistic and detailed appearance.

Skin Texturing

Eyes

The eyes were simply created by designing a texture in Photoshop and then projecting it onto Substance Painter with a roughness value set to 0.

Suit

Finally, for Miles Morales’ suit, I started by adding a black fill layer for the entire suit. Then, I projected the spider symbol that I easily found on the internet.

To add an artistic touch, I used a predefined brush in Substance called ‘Paint Spray,’ creating a spray-painted effect.

Lastly, I applied the smart material named ‘Fabric Super Hero’ to add texture to the suit using its height map

Suit Texturing

Exporting

Once I had all the textures for the character, I began the export process. The setup I used was for Arnold (Ai Standard), in PNG format with a resolution of 4096.

Posing

Now it’s time to bring the character to life and give it expressiveness. I was sure that the pose I wanted for Miles would have a youthful vibe.

In the past, when I was more junior, I didn’t enjoy this stage much; sometimes, I left the character in a T-pose and rendered it as is. But over time, I’ve realized how crucial posing characters is. My advice: dedicate time and care to the pose.

I used to use ZBrush to pose my characters with the Transpose Master tool.

However, since I had the opportunity to try Character Creator‘s AccuRIG and ZBrush Pose Tools, I now always use this workflow for posing. I highly recommend experimenting with the integration of ZBrush, AccuRIG, and Character Creator (CC).

Character Creator 4 – AccuRIG

To pose Miles, I prepared him before exporting to Character Creator.

It’s crucial to keep in mind that the ideal polygon count for models sent to AccuRIG should be under 300,000. Therefore, if you need to sculpt details that require high polygon counts, use ZBrush’s subdivision functions or other optimization techniques.

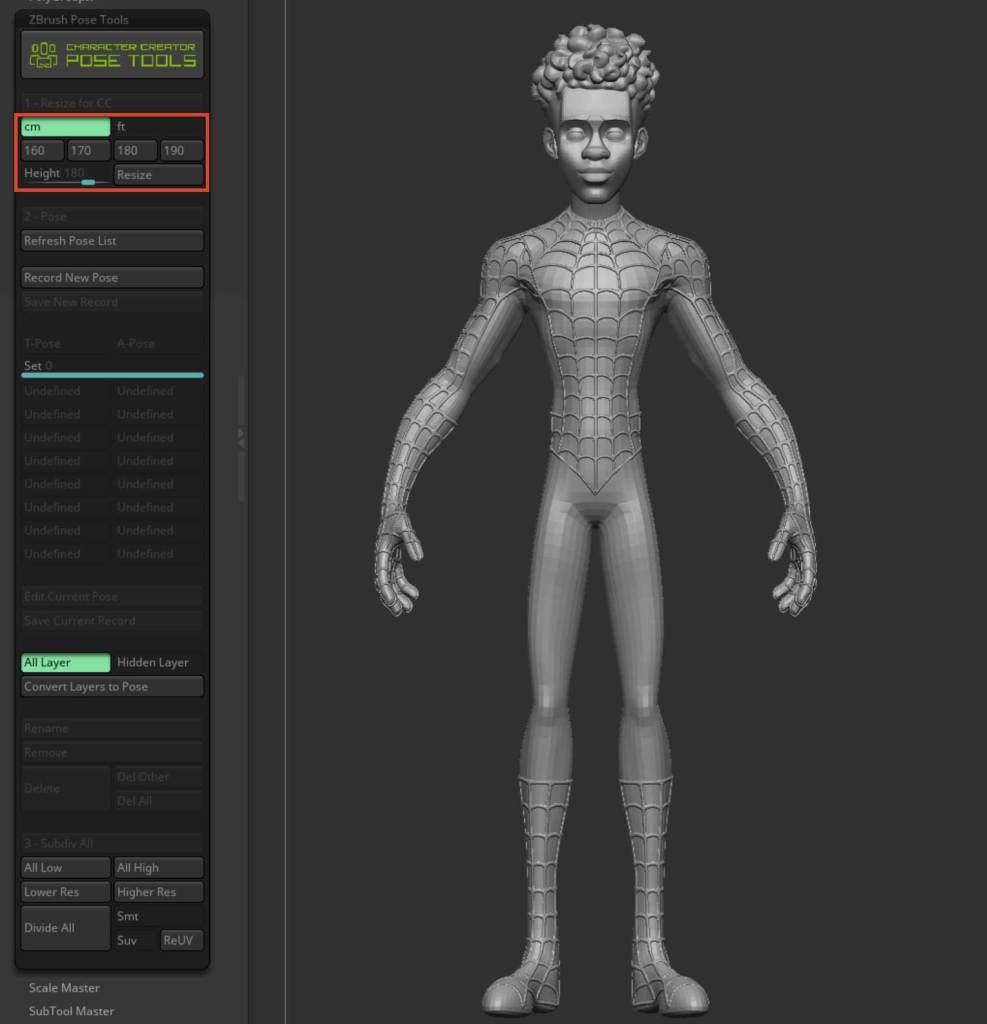
It’s also important to ensure that your model’s physical size aligns with Character Creator. You’ll find size unit parameters at the top of the free Pose Tools plugin. There are some preset height adjustments for metric or imperial measurements, or you can use the slider to set it manually. If your character has layers, be sure to merge them first to ensure a uniform size change.

Once the scale is set correctly, click the Resize button and confirm the model’s size. After this step, we can send the model to CC using GoZ, which will send the currently selected subtool. Once in CC, we’ll use AccuRIG to automatically link a skeleton to this character.

ZBrush Pose Tools – Resize

Once imported into Character Creator, the first step is to automatically detect the character’s joint positions. This is done by clicking the “Create Guides” button. After clicking “Create Guides”, the character’s joint markers will be generated. You can choose different display settings, including Wireframe over Shaded mode, for more precise placement if desired.

AccuRIG – Create Guides

Next, we’ll set the number of fingers for our character and click “Generate Skeleton” to produce our skeleton.

Here, we can adjust the bone color for better visibility and refine the position of the generated bones.

AccuRIG – Generate Skeleton

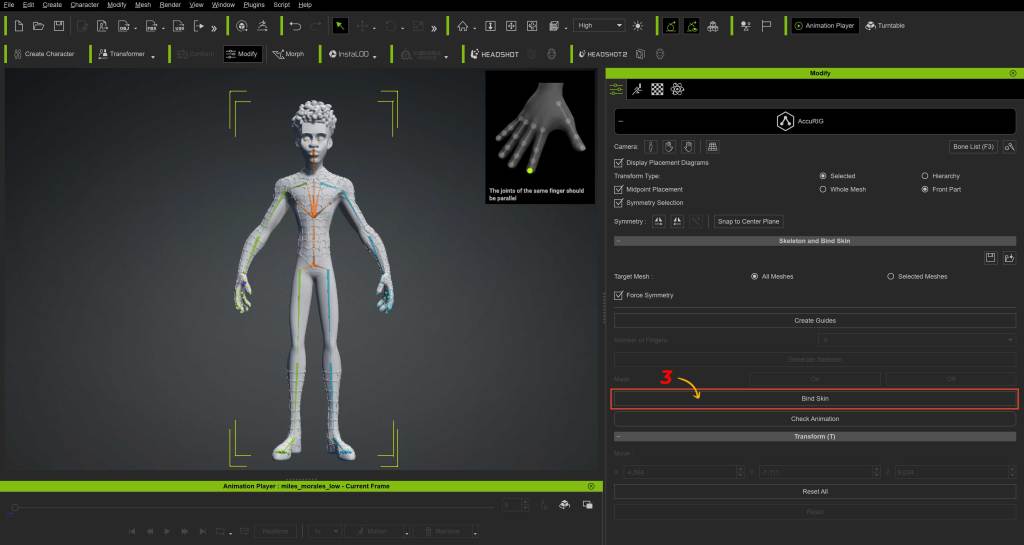
Once the skeleton is linked, skin weights are assigned to meshes related to body parts and clothing. This ensures realistic movement and separates solid accessories that should not be attached to the body.

AccuRIG – Bind Skin

Processing time may vary based on your character’s complexity and your computer’s speed. When the linking process completes, the skeleton’s color changes, and solid objects not previously selected are now categorized as separate accessories.

The most interesting aspect is that we can manually adjust all the bone weights provided automatically by AccuRIG. To do this, we’ll click on the “Skin Weights” button and then be able to manually paint the skin weights for each bone, allowing us to improve the entire skinning process.

Skin Weights

In “Edit Pose” is an essential tool to bring your character models to life. It enables easy creation and adjustment of custom poses, providing the ability to express emotions, dynamic movements, and subtle details. With intuitive controls, this editor enhances creativity by offering a wide range of options to refine the posture and attitude of your characters with precision and realism.

Edit Pose

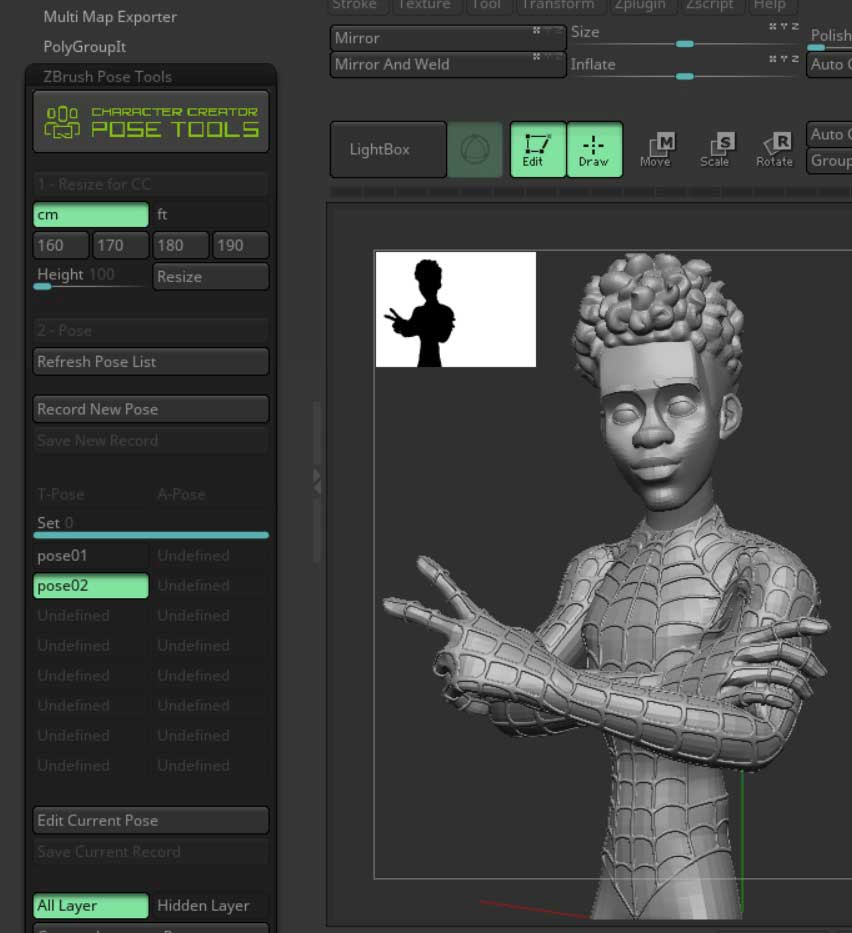
After adjusting the pose in Character Creator, we send the current pose to ZBrush using the Pose Link plugin. Renaming poses immediately is essential for organization.

Editing in ZBrush is crucial for refining the pose and accessories. 

ZBrush Pose Tools

Furthermore, model subdivision allows for adding details like skin wrinkles or muscle definition.

Once editing is complete, save the file. It’s essential to save in both ZBrush and Character Creator to ensure continuity. CC’s pose management easily updates when loading the project, allowing a smooth transition between programs.

Definitely, there are several reasons to consider using this combined program (Character Creator and ZBrush) for character creation and editing:

  • Seamless creation of custom poses: The integration between Character Creator and ZBrush makes it easy to create and edit custom poses for your character models. This allows you to breathe life into your creations with unique and realistic movements.
  • Workflow optimization: The Pose Tools and Pose Link plugins streamline the process of transferring poses between programs, saving you time and avoiding technical complications.
  • Compatibility and versatility: The AccuRIG tool simplifies skeleton linking and skin weight assignment, ensuring characters are compatible with a wide range of movements and accessories.
  • Detail and realism: The ability to make manual adjustments in ZBrush allows for enhancing anatomy and clothing details, achieving more realistic and detailed visual results.
  • Extensive motion library: Character Creator offers a vast library of built-in motions, with the option to access more motions and poses through online marketplaces, providing an unlimited spectrum of possibilities for your characters.

Overall, using these programs together provides an efficient workflow, powerful tools for pose customization, and the ability to create characters with exceptional levels of detail and realism.

Shading and Lighting

For the final render of Miles Morales, I aimed for a blend between the film’s style and a look closer to cartoon animation, while still maintaining my personal style. During this stage, my usual approach involves applying maps within the Arnold aiStandardSurface material. I apply the Base Color texture to both the base color node and the Subsurface Color. Additionally, I connect the roughness map, the metalness map, and finally, the normal map.

Skin Shading

The shading for the webbing was opted for a completely black tone with a subtle shine.

For the lighting, I used a setup called the “three-point light” scheme. This scheme is primarily used in 3D productions and virtual settings to illuminate objects or characters in a 3D environment, achieving depth and realism. To achieve this, I incorporated an HDRI with low intensity as the primary light source to capture some reflections.

Next, I added a Key Light (Primary Light) using an Area Light type, illuminating the character from a specific angle to simulate a primary source. I adjusted the intensity, color, and temperature according to the mood and style I desired. I positioned the Fill Light on the opposite side of the primary light to soften the shadows and balance the illumination. The Rim Light was placed behind and above Miles to create a “glow” around him and add more depth.

Finally, in the finishing adjustments, I added backlights to illuminate the environment and adjusted the light intensities to achieve the desired effect. I experimented with shadows and reflections to achieve the desired result.

Lighting

Once rendered, I had the collaboration of my friend and neighbor Eliant Elias (Concept Artist), who helped me design the background to achieve the movie’s style. Thanks, Elias!

Finally, I want to express my gratitude again for this opportunity to explain the process behind one of my characters. It has been an absolute pleasure to collaborate with a company like Reallusion! Thank you!

I hope you’ve enjoyed this behind-the-scenes look. Until next time!

Follow Gerard Martínez Sánchez

Instagram:
https://www.instagram.com/gms.3dart/

LinkedIn:
https://www.linkedin.com/in/gms3dart/

Website:
https://gms3dart.com/

Multiple Cameras & the Camera Switch (Switcher)

Most of us start out with single camera shots since not all of us are even aware of the camera switch or what it does when we first start using iClone. While there are times you might want to use a single camera, it can make animation harder since that camera has to be carefully used to not have to animate things in a scene when it isn’t necessary. 

Multiple cameras give you a lot more flexibility. I usually cite walking up to a door, opening the door, and going through it versus using multiple cameras to show the approach to the door, the door opening, movement through the door, and so forth. Putting enough onscreen to “sell” that walk through the door is the name of the game. 

It can be very tempting to use a single camera and, in a 3D asset, tutorial or tech demo that could be appropriate. For a cinematic endeavor, multiple cameras are the tool of many creatives. Multiple cameras make the dull and mundane more interesting when used with a carefully framed camera angle. It can add life to an otherwise dull scene by adding well-timed camera cuts that quickly switch from one camera to another providing a visual narrative for the viewer. 

You may have seen the commercials where people are partying it up on the beach and all the camera cuts make it look like a large party when in fact there are less than a dozen people shown from many different angles and situations to mimic a small crowd or large party. 

Animation is not so much recreating everything but more of getting the viewer to believe nothing was left out by judicious use of camera angles, camera cuts, assets and timing. 

Again, a single camera has its place in many different situations but research using multiple cameras and you’ll quickly find out it’s a preferred method for live events, sports and drama. 

THE SWITCH AND THE TIMELINE 

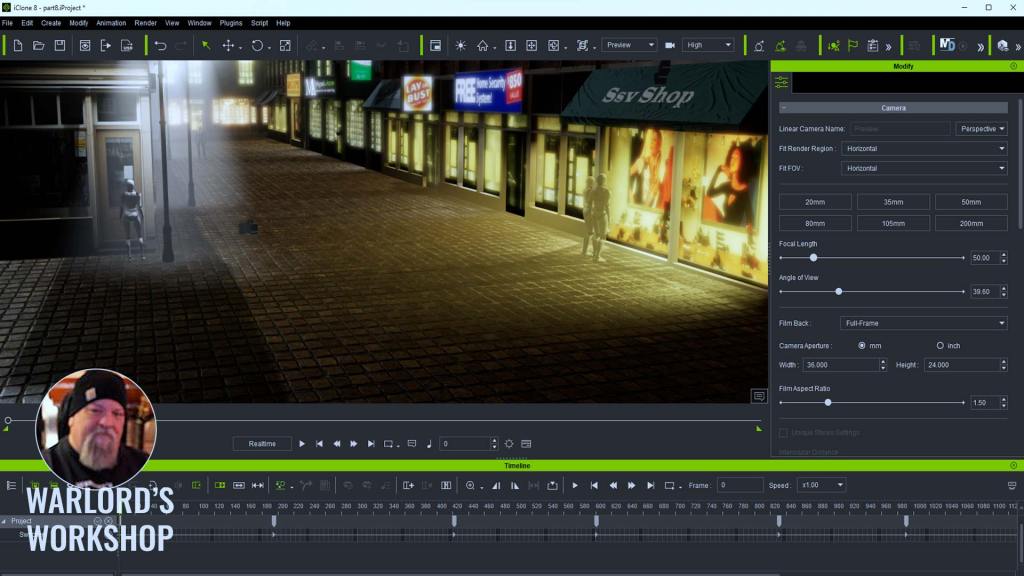
The Switch or camera switch is just that. It changes from one camera to another depending on its location on the timeline. You can find the switch on the timeline under the Project subsection. If you do not see the Project section, click on the square button in the upper left corner of the timeline to open the Project section.  

The camera Switcher or switch is located in the Project section of the timeline.

You can see the Switcher line within the Project section. You may have more lines showing on your timeline than in this example as that depends on settings. The Switcher is where everything happens as far as camera cuts go.  

It’s very easy to use. You start by right-clicking at the beginning but within the Switcher line and select a camera from the list. This list is populated by the cameras you have created in your project. From here you move down the timeline right clicking and choosing whichever camera you want to switch to. This is the timeline in its most basic usage. 

The Switcher in action. Notice the camera shot change as it clears each keyframe in the timeline.

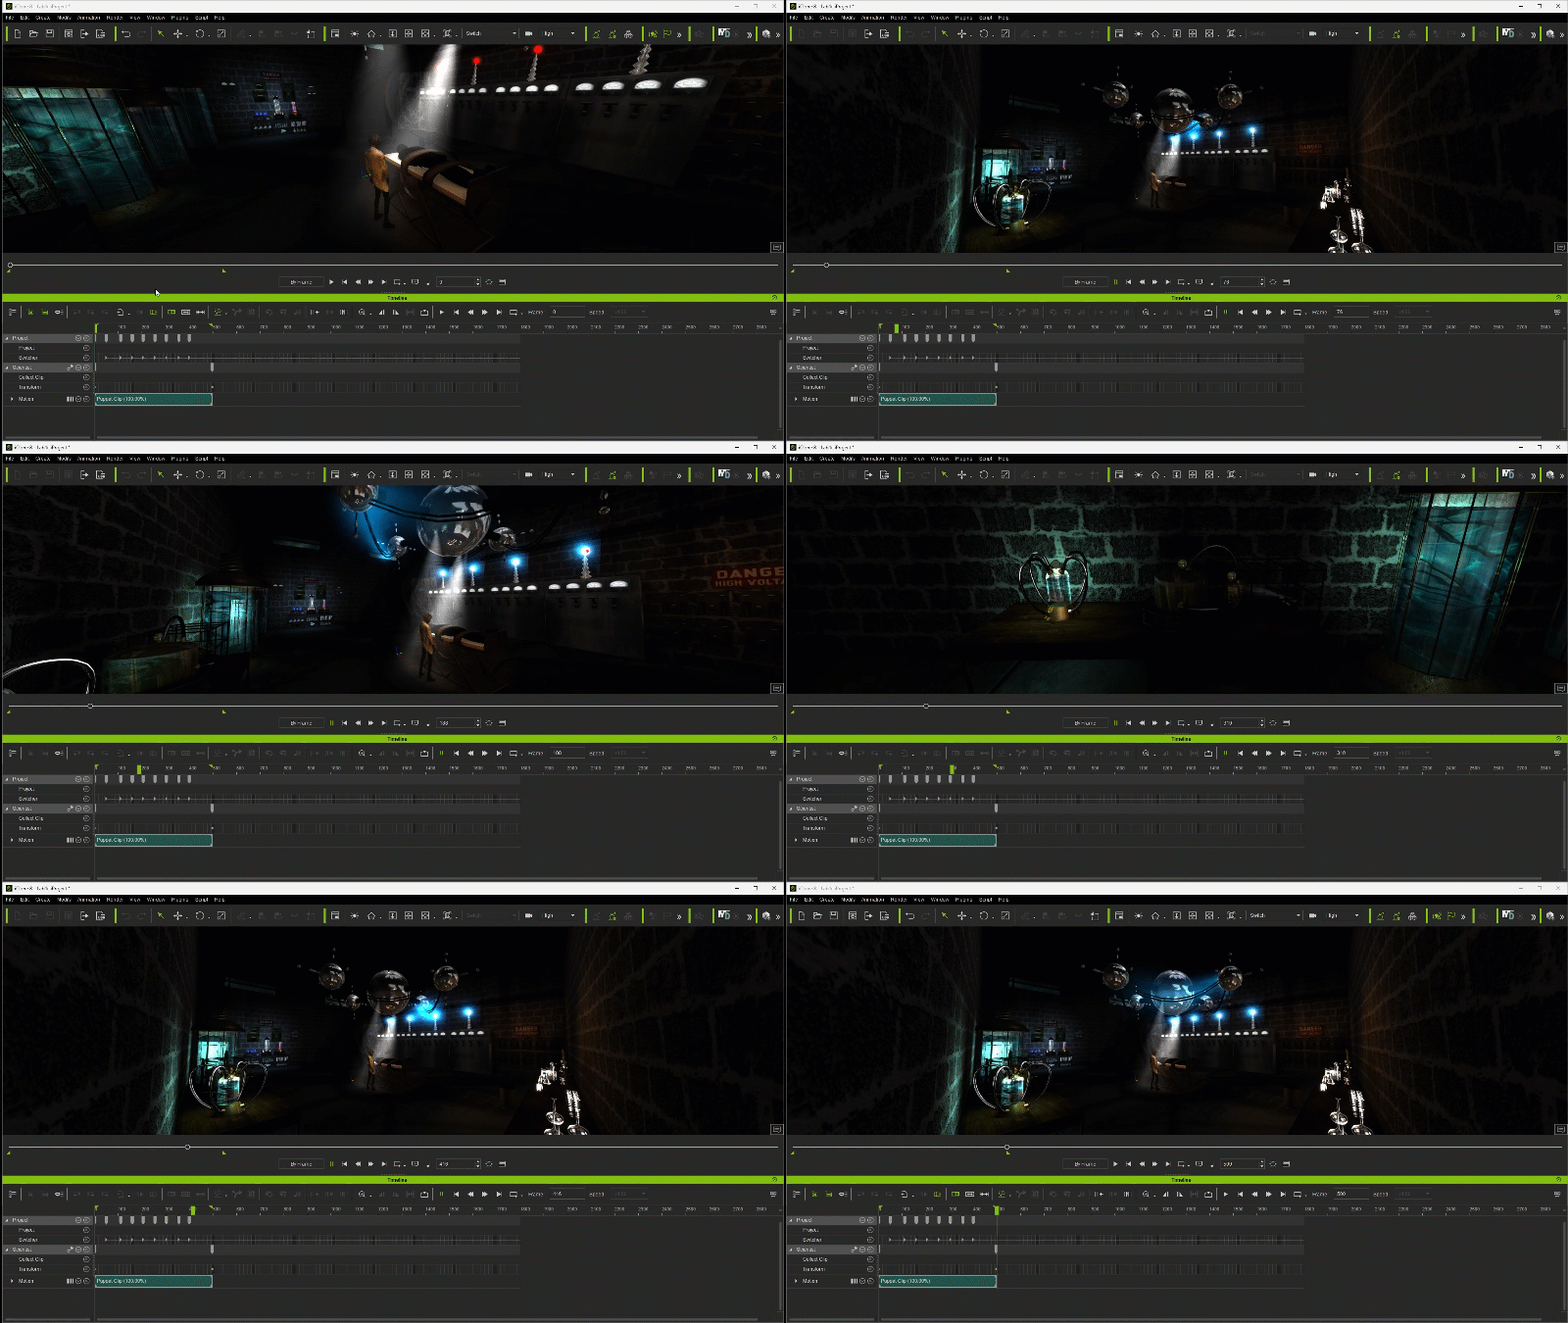
The above GIF shows the timeline Switcher with individual keyframes for each time the camera changes. As the play head moves down the timeline you can see each camera change as its keyframe is passed. That camera will stay active until the next keyframe. 

CAMERA POSITIONS

The camera positions and their approximate angles in the above Laboratory example.

The Switcher is deceptively simple to use. You’ll spend more time thinking out the shot angles than you will setting them up in the Switcher.  

Unless you are being very dramatic or extremely comedic, I would recommend you have enough space between camera shots to seem natural when showing an environment like the outdoors or indoors. Dialog and other shots can dictate the placement of cameras to a large degree but in general filler or transitional scenes you don’t want to linger too long as the shot can get boring or go too fast and some of the viewers could miss important plot points. 

TUTORIAL EXAMPLE 

In the video tutorial, I used the Volumetric Lights & Lens Flare project in Visual Effects in IC Project. I have set the textures to smooth so we can see what is going on. I also added some Male and Female Motion Dummies with some simple drag-and-drop motions. These will be our points of interest when creating and switching between cameras. 

The plan is to create a camera for the female motion dummy at the door of a building. Create another camera for the couple window shopping and then one more camera for the male motion dummy taking a walk down the street. None of these cameras will be linked or attached to anything but the camera for the walking character will use its look-at feature to follow the character. 

CREATING THE CAMERAS 

This is a very simple task: 

  • Create a Camera 
  • Set the View to the newly created camera 
  • Select the female motion dummy at the door 
  • Press the Home key to move the view to that character 
  • Set the camera angle (or animate a moving shot)

Repeat the process by selecting one of the motion dummies of the couple. Create a new camera and home in. Repeat the process one more time for the walking motion dummy and with that new camera selected locate and use the look at feature in the Modify Menu to force the camera to always look at the character while it walks by, towards, or away from the camera.  

Each keyframe in the Switcher line represents one the cameras and changes as the play head progresses down the timeline.

See the video tutorial below for more information and detailed instructions. 

CLOSING 

In today’s world, the audience is a very spoiled bunch, and rightly so, particularly if they are shelling out hard-earned money to see content. The persistent inflation, nagging economic doubts, corporate layoffs, and any other number of negatives, mean the viewer wants a break from all that madness. And they have a right to be picky about the content they consume. 

With this in mind, it’s very important to experiment but also to be consistent where consistency is required or desired by the viewer. If they cannot keep up with a conversation between characters, they might not be open to second chances. 

Why multicam is possibly the best way to shoot drama (Redshark News): https://www.redsharknews.com/production/item/5284-why-multicam-is-possibly-the-best-way-to-shoot-drama

MD McCallum - WarLord

MD McCallum – WarLord

Digital Artist MD “Mike” McCallum, aka WarLord, is a longtime iClone user. Having authored free tutorials for iClone in its early years and selected to write the iClone Beginners Guide from Packt Publishing in 2011, he was fortunate enough to meet and exchange tricks and tips with users from all over the world and loves to share this information with other users. He has authored hundreds of articles on iClone and digital art in general while reviewing some of the most popular software and hardware in the world. He has been published in many of the leading 3D online and print magazines while staying true to his biggest passion, 3D animation. For more information click here

CC Content Development Guide for Reallusion Stores, ActorCore & Marketplace

Hello! I’m Luis Duarte, a Digital Artist. Currently, I am immersed in the exciting world of 3D modeling, and I want to share with you my enthusiasm for the Reallusion ecosystem, which provides us with a wide range of services, including iClone and Character Creator.

Today, I have the honor of talking to you about an additional benefit that all users can access. If you are passionate about the 3D world, eager to bring your creative ideas to life, and wish to acquire new techniques, you have everything you need to maximize your designs and become a content developer for Reallusion.

Being a content developer will provide you with numerous benefits, including:

  1. Learning new techniques that will enrich your workflow.
  2. Creating 3D assets and character designs more efficiently.
  3. Selling your designs for other users to use.
  4. Building a community of passionate followers.

With Reallusion’s Content Developer Program, you can generate income using your own designs, manage your time your way, and work comfortably from home. If you aspire to a more professional level and seek excellence, you can take your ambitions a step further by building your own brand for sale in the market and exponentially increasing your income.

Make the most of the advantages of building characters using the Character Creator system. This system allows you to create characters more efficiently by applying deformations directly to the animatable mesh without affecting the UVs and improving quality with high-resolution textures.

HOW TO START

In this tutorial mini-series, you will learn to build a cartoon-style character using the Character Creator’s base anatomy template. You can add natural features with the morph sliders system and add details by exporting the character to modeling software. You will also create fully functional clothing components and accessories for animation, building your library of reusable assets for other characters.

I will teach you how to design eyebrows and hair and integrate them into the expression setup system. Finally, you will learn to organize and package your components easily for publishing and marketing on the Reallusion Marketplace.

Don’t miss the opportunity to be part of the vibrant Reallusion content developer community. I assure you that you won’t want to miss this experience!

PART 1 – Character Creator Workflow with ZBrush

PART 2 – Creating Clothing & Accessories with Character Creator and ZBrush

PART 3 – Hair Creation for CC Characters with ZBrush

PART 4 – 3D Asset Packaging for CC Characters