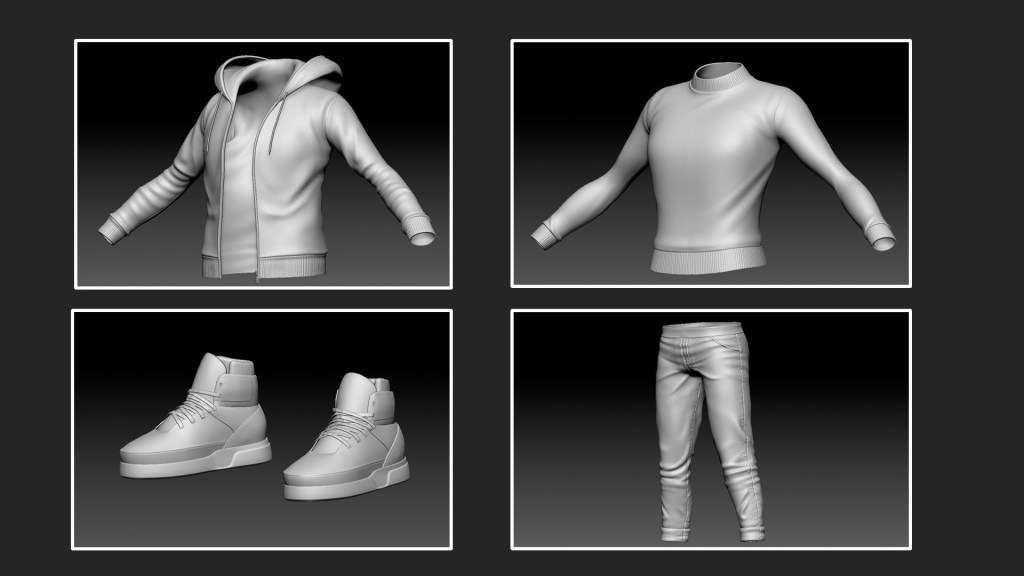
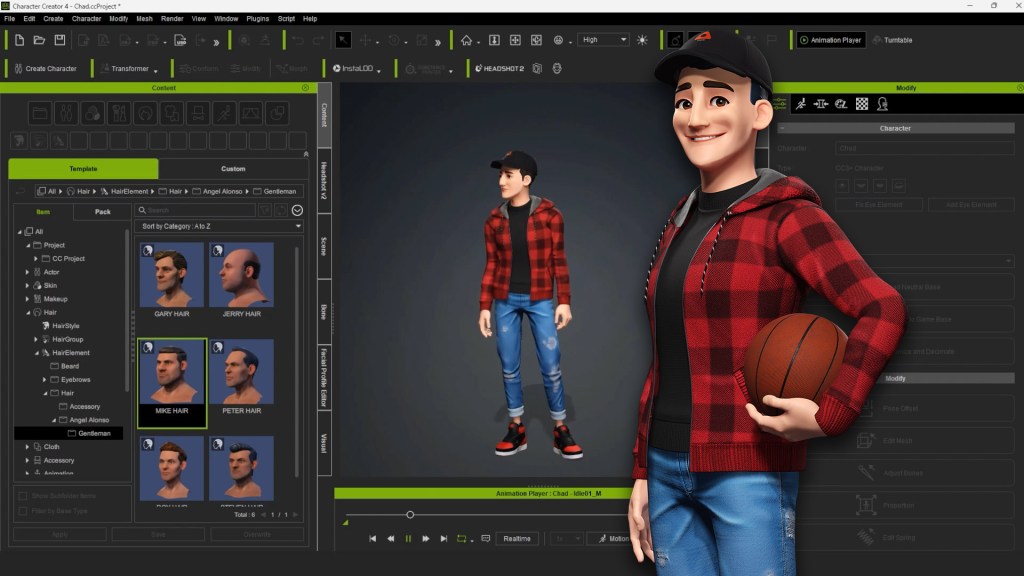
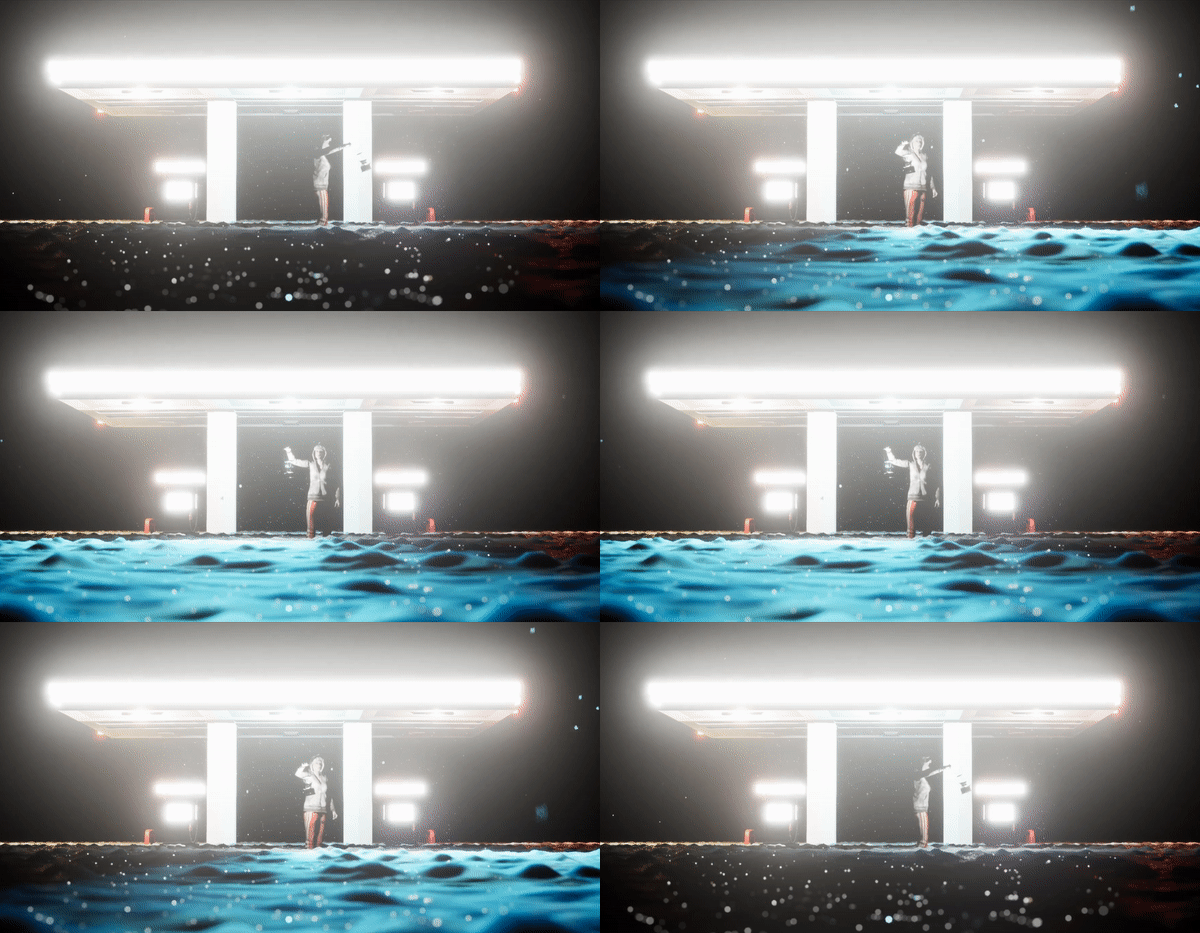
In this 2 tutorial, we will explore how to create 3D clothing and accessories as assets in Character Creator (CC). We will summarize the process of creating clothing for our character, Chad, who is a character designed for a Character Creator content package that you can find in the Reallusion Content Store, under La Family Members Vol. 2 category.
Let’s start by opening Character Creator and selecting our Chad model. Make sure to have the eyebrows selected as well. Then, activate the “Goz” button. In the pop-up window, keep the “Current Pose” and “Maintain Scales Relative to Model in ZBrush” options selected. The idea of having the model in this pose is to facilitate clothing material creation.
Now, we can begin modeling the different pieces, using the body as a reference. You can duplicate the body and hide unnecessary parts. I also recommend using good references to achieve a realistic look without exaggeration. Chad has four pieces of clothing: a sweater, a coat, pants, and shoes.
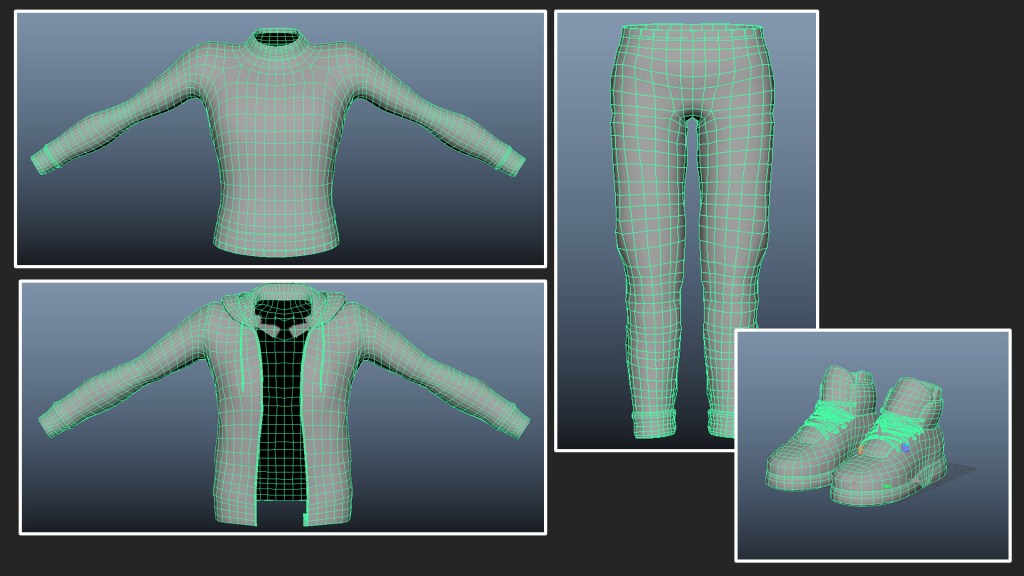
Once all the pieces are ready, export each piece separately and perform retopology using modeling software. This will generate new geometry with fewer polygons for animation.
You will also create UVs for each object independently, meaning each piece of clothing will have its own set of UVs. This optimizes textures. Before applying textures, use Substance Painter to transfer details from the high-resolution mesh to the low-resolution one through the Bake process.
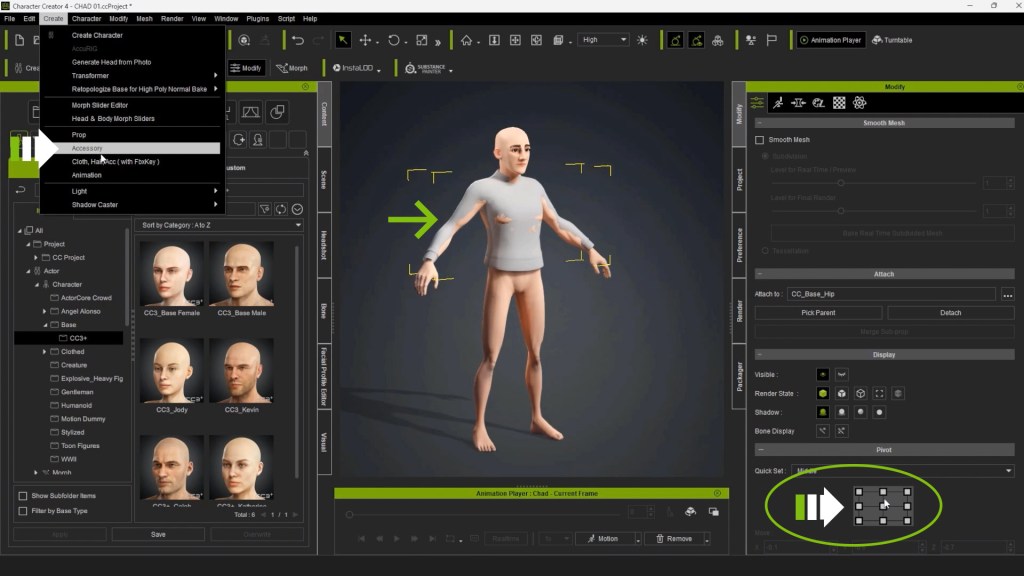
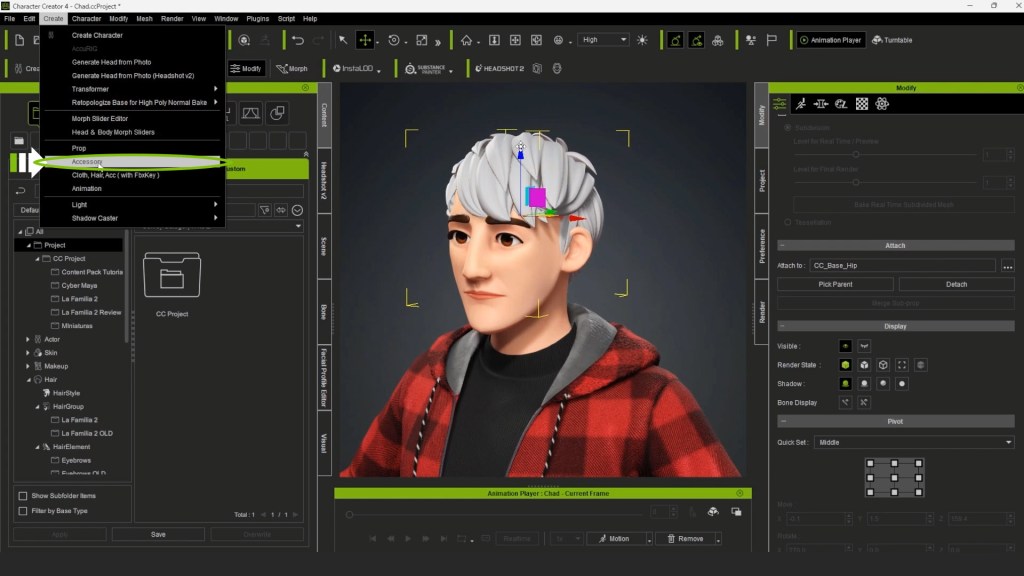
Now, let’s return to Character Creator. Import our pieces one by one from the “Create” menu and activate the “Accessory” option. Make sure to center the pivot for each piece for proper placement.
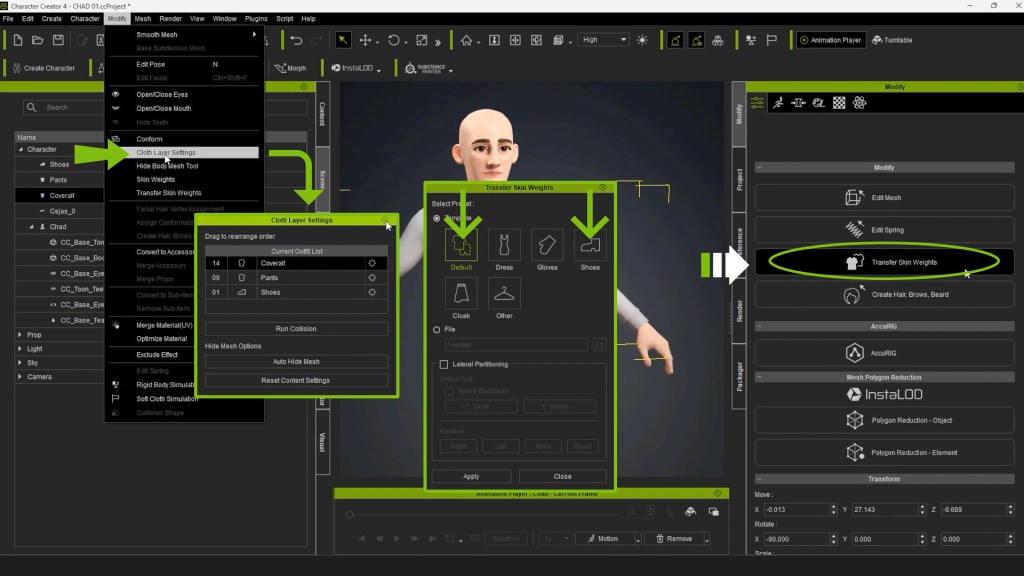
Then, select each geometry and use the “Transfer Skin Weights” option in the “Modify” panel. This will allow the pieces to follow the character’s movements. Before proceeding, let’s organize the different clothing layers. Select the sweater geometry and go to theTop Menu “Modify.” It’s essential to assign each garment to a different layer. This helps the program identify geometries based on their location on the avatar. For example, the sweater will be in layer 14, pants in layer 9, and shoes always in layer 1.
Next, insert texture maps into each material. To do this, select each piece of clothing and go to the “Modify” panel, then to the materials section. In the texture settings, you can insert up to nine different textures, each serving a specific purpose.
To correct skin weights on the clothing items, let’s start with the inner sweater. Select the piece and go to the “Modify” panel, then select the “Skin Weights” option. Vertices will be highlighted, and you can see irregularities in the geometry, especially near the joints. To correct this, right-click on the corresponding bone and adjust the vertex influence using the quick selection tool. The quick selection panel allows you to adjust vertex influence on a scale from 0 to 1, with 0 being the least influence and 1 being the greatest influence
Now, let’s eliminate overlapping geometries. Select the shoes from the Scene Panel. Then, activate the “High Body Tool” from the “Modify” panel. This tool allows you to remove internal geometries. Activate symmetry and select the parts you want to hide, such as those on the foot. Do the same with the pants, making sure to keep symmetry active while selecting overlapping areas.
Now that we have all clothing assets ready, the next step is to include them in our library. Ensure that the asset is centered in the scene and go to the content panel in the clothing section. Select the appropriate category, customize the asset, and then press the “Save” button. Assign a name and apply the changes
Create a new project and select an avatar, like Eddie, removing all accessories and leaving only the body. Add the clothing assets one by one in real-time and check how they behave on the new body structure.
To include accessories, the preliminary steps involve modeling and texturing the object, which applies to all types of accessories. Let’s take a cap as an example. Go to the top menu “Create” and choose the “Accessories” option. Reposition the cap by centering the pivot and adjusting its size as needed. Use the “Attach” option and search for the head bone in the search bar to link the cap to that bone. Apply the changes and check how the cap behaves by moving the head with the pose editor.
And that concludes our tutorial on creating 3D clothing and accessories with ZBrush and Character Creator. I hope you’ve learned a lot, and I hope this information is useful for your 3D animation and design projects.
In this 3rd PART, we will show you how to create hair in Character Creator! In this tutorial, you will learn how to breathe life into characters with different hair styles using tools like Blender or ZBrush.
The first step is to export the character. We’ll use Blender for this example. Go to the “File” menu, select “Export,” and enable the “Nude Character in Bind Pose” option. Then, choose the export location and click OK.
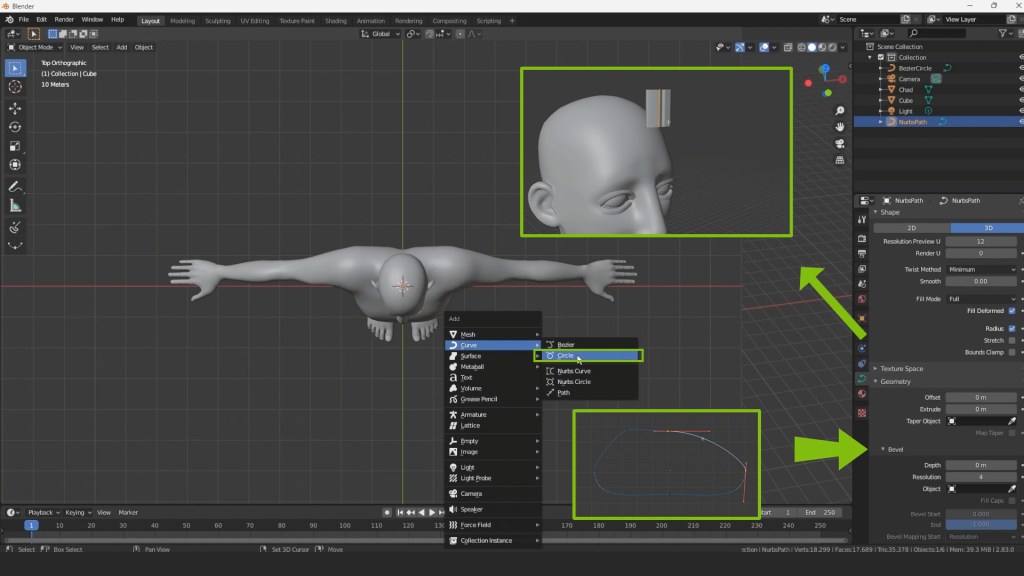
Once in Blender, import Chad’s body model. Next, insert a curve next to the character and shape it using handles. With Ctrl, you can add new nodes to create more complex shapes. Using the “Bevel” tool, turn the curve into a tube, allowing you to project hair strands.
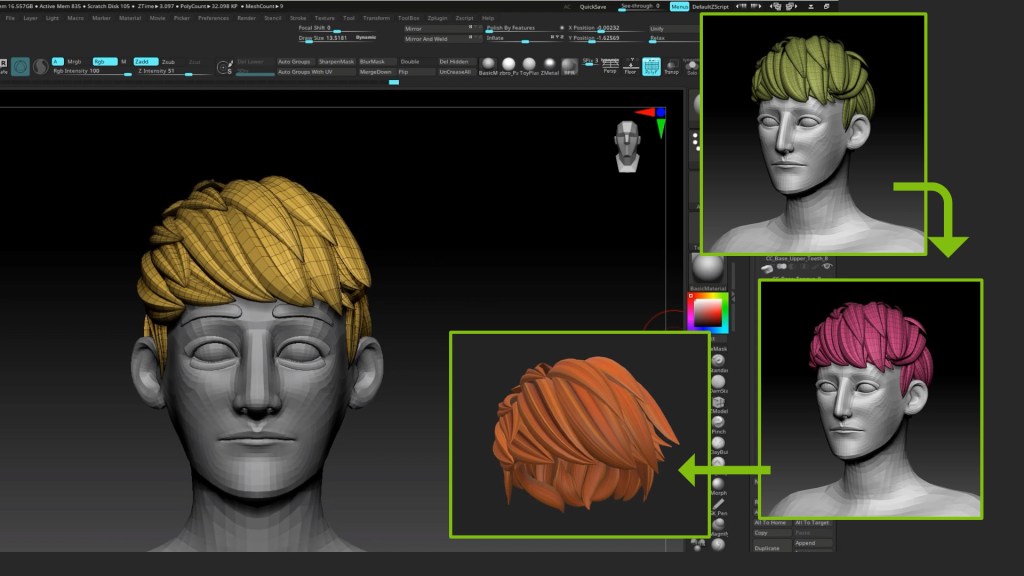
Duplicate the first strand with Shift+D and adjust as desired. Continue creating new shapes from the node lines until you achieve the desired look.
If you prefer to use ZBrush, select Chad’s body in the content menu and activate the “Goz” button in the popup window. Then, regardless of whether you used Blender or ZBrush, clean up the geometry to optimize and adjust the polygon count. Afterwards, transfer the high-resolution details to the low-resolution mesh and take everything to a texturing program, such as Substance Painter.
Back in Character Creator, import the object from the “Create” menu, enabling the “Accessories” option. Make sure the hair loads correctly in the scene and adjust it if necessary.
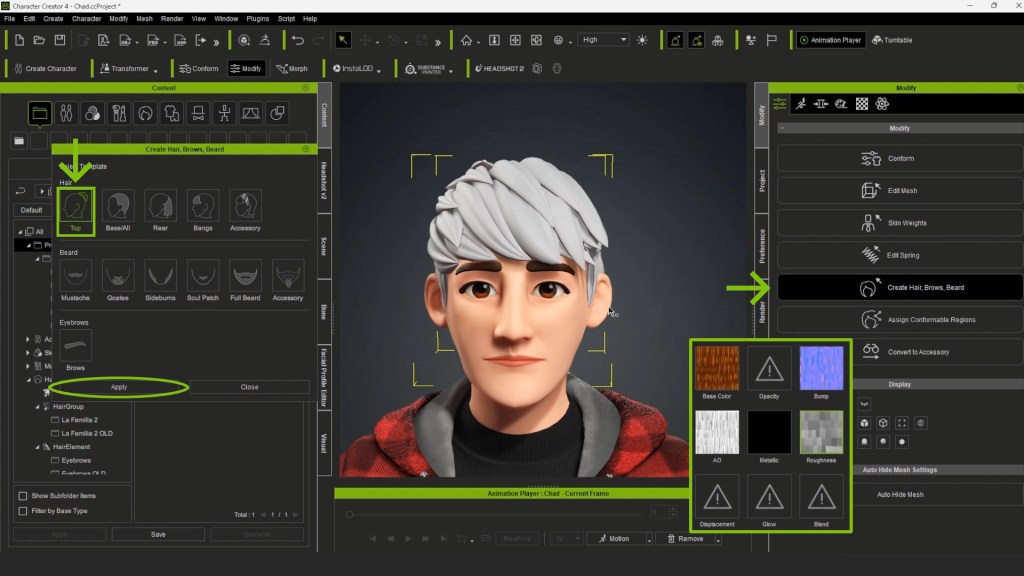
Then, go to the “Modify” panel and activate the hair creator assistant. Select the appropriate profile and apply the changes. Build the hair material by adding pre-colored textures.
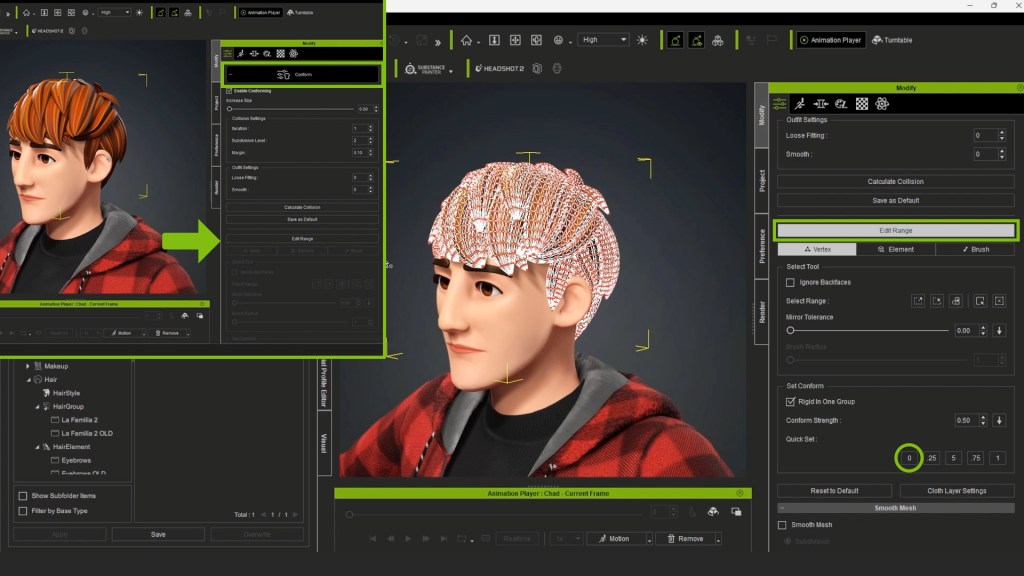
Select the mesh and go to the “Modify” panel, enable the “Edit Range” option, and select all vertices. Press “Zero” to adjust the geometry.
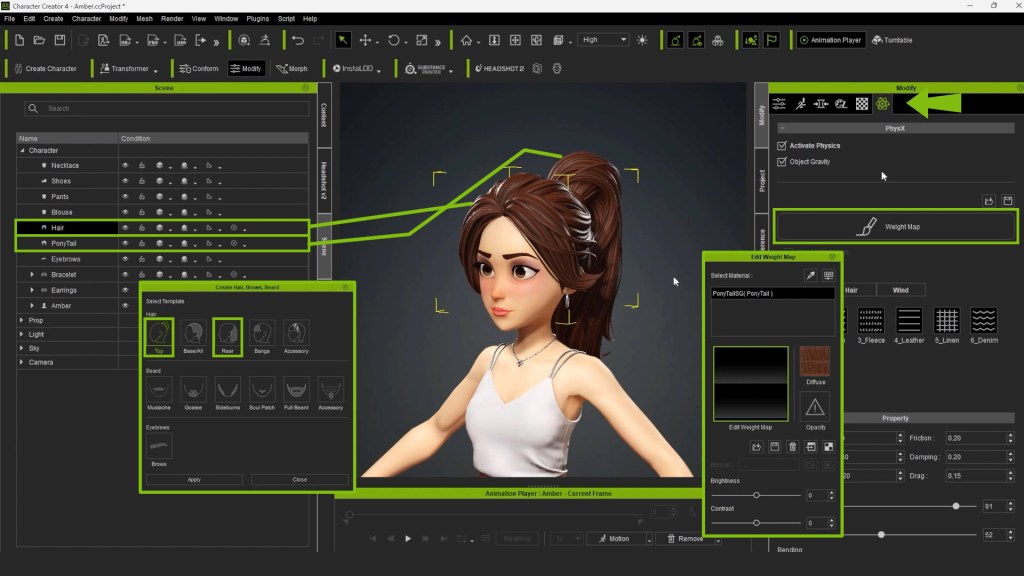
To include hair like Amber’s, which consists of two geometries, you can apply them to the model following the appropriate steps. To enhance the hair, activate the material physics editor and apply a weight map to simulate natural movement.
Customize the colors to your liking. Right-click and enable the color editor option. You can modify different parameters related to brightness, contrast, hue, and saturation.
To check the created hair, create a new project in Character Creator, select an avatar, and apply the hair assets. You can also adjust other aspects of the character and add clothing for a complete result. And there you have it! Creating hair in Character Creator is simpler than it may seem.
In this 4th and last tutorial, we will guide you through the process of packaging and publishing your design in Character Creator for the Reallusion Marketplace! This strategy will enable you to monetize your projects and become a Reallusion content developer.
To illustrate this process, we will use “Chad” as our example character.
Make sure that all the pieces of your character’s outfit are included in the Content Panel. Organize each piece into its corresponding category, such as shoes, sweaters, pants, eyebrows, and hair. I recommend recording the complete avatar under the “actor” category.
Open the packaging panel by going to the top Windows menu and activating the “Packager” option. Right-click on an empty space and select “Create Pack” and assign a name.
Double-click on the package file and start including all the elements one by one.
Organize hair, clothing, and accessories into categories. Create a folder next to the character and name it according to your brand or username. This way, all assets will be organized in the user’s content library who purchases the products
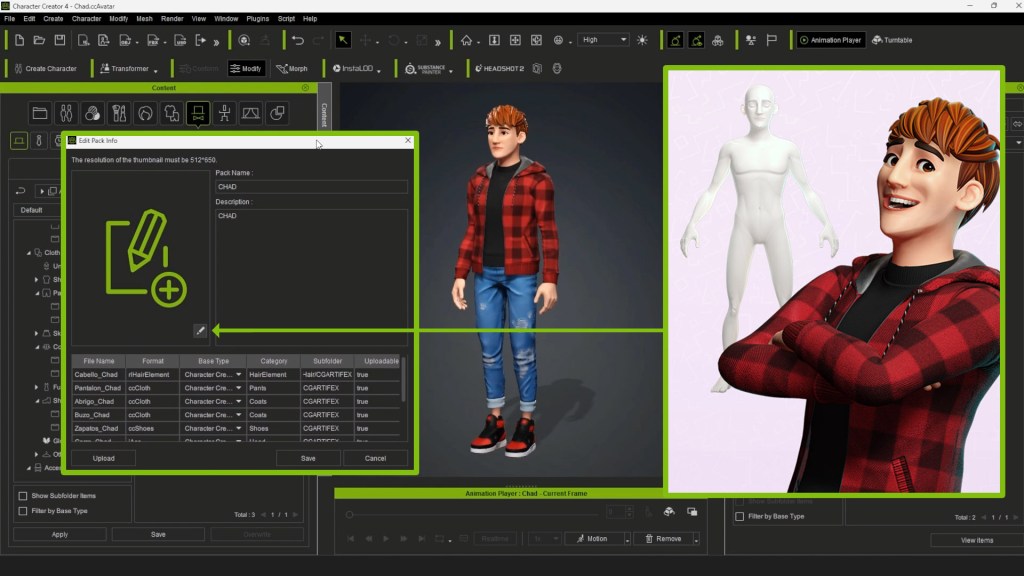
Once you have organized all the elements, go to the main folder of the package file, right-click on it, and select “Edit Package Info.” In the popup window, you can modify the name and description of the asset. Make sure all files are in “True” status so they can be uploaded to the server
You can also add a thumbnail to the package. Activate the editing option and search for an image on your computer. The thumbnail image should have a resolution of 512 × 650 pixels. I recommend creating different types of renders in Character Creator to showcase your character attractively.
To get an appealing image, generate an eye-catching pose using the pose editor, use the facial editor to create captivating expressions. From the Render panel, change the format to PNG and increase the quality by setting the samples to 3X. You can create several images to showcase the full avatar, different hair angles, full-body morph from different angles, accessories, clothing, and various expressions
Go to the package window and right-click on the “Upload Pack” option. In the pop-up window, verify that the avatar is loaded without errors and then select “Upload.”
Head to the Content panel and activate the dropdown menu next to the search bar. Select “Reallusion Marketplace.” This will take you to the Reallusion website linked to your account. Make sure you are logged into your Reallusion profile.
Click on your profile and select “Manage Backend.” This interface will allow you to add information about your content. Activate the editing option, then select the package entries, type, category, version (actor), and project. Add more categories to classify your character, indicate if it is compatible with iClone, and assign the gender.
Assign the package name and make sure all assets are present. Then, assign a point value to your character (I recommend reviewing the points conversion policies according to the guidelines published on the website, developer.reallusion.com.) Add a description that includes keywords and mentions compatibility with other projects in the store. Add all the images you created earlier at the bottom. Select the compatibility version of the project and save the changes.
Finally, click on the package thumbnail. You will now see your product published in the Reallusion Marketplace. For more information, go to the product marketing section, where you can download the marketing guide and marketing templates to enhance the look of your assets. With these simple steps, you have published your content on the Reallusion Marketplace and can start benefiting while still having fun creating new content
Crowd simulation continues to be a cornerstone of films, games, architectural visualization, traffic analysis, construction, and engineering. Its significance extends further into AI training, driving simulations, and the advancements of digital twin development, elevating the discipline as an increasingly valuable component of cutting-edge industries.
In response to the soaring demand for crowd simulation, iClone 8.4 has undergone a monumental transformation, now boasting an integrated crowd simulation engine available as a free upgrade. This remarkable leap forward democratizes access, empowering small to mid-sized studios to harness its power affordably. The fruition of two years of relentless development, this update brings forth streamlined functionalities and flawless asset integration. The Crowd Sim technology marks Reallusion’s pioneering step into the world of simulations, with upcoming releases in 2024 set to elevate the experience further with a focus on environment interaction and motion planning.
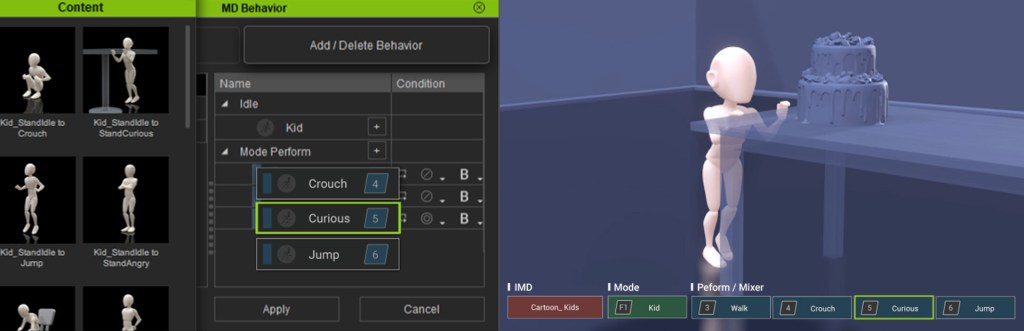
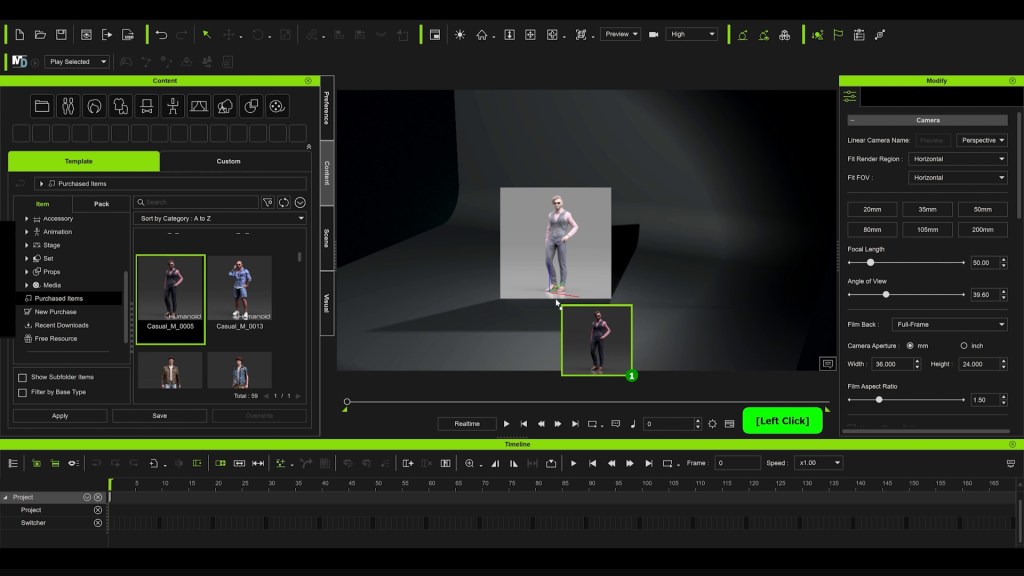
Last but not least, this update introduces the Motion Director (MD) Editor, providing an infinite range of options to customize and interact with MD toolsets. This allows you to precisely steer characters around the scene and trigger motion sequences precisely as desired.
Most existing crowd simulation solutions are composed of plugins for off-the-shelf software such as 3ds Max or Maya. This fragmentation commonly lacks readily available assets for immediate production and is frequently priced beyond the means of smaller studios. In contrast, Reallusion has developed a comprehensive character production and crowd simulation toolchain that is both practical and affordable for real-time simulation. This toolchain includes a spectrum of tools ranging from 3D character creation (Character Creator) and character animation (iClone) to an extensive library of motion and character assets (Actorcore), complemented by an asset developer ecosystem comprising the Content Store and Marketplace. The integrated suite empowers users to design custom characters tailored to specific thematic needs and seamlessly integrate personalized animations, including complex crowd behavior.
Environment Setup
Designating the traversable area on an imported 3D environment is mostly automatic. Your scene can comprise multiple elevations connected by ramps and stairs. iClone seamlessly detects accessible areas and promptly updates the NavMesh whenever new objects are introduced. It integrates navigable inclines and distinguishes between passable and obstructed zones. Live NavMesh updates can dynamically adjust to changes, such as the movement of automatic sliding doors. Learn more about NavMesh: Tutorial | Manual.
Walkway for Foot Traffic
Establish footpaths with simple mouse clicks, modify road curvature and width by dragging control points, and automatically identify surfaces conducive for movement. Seamlessly close paths to create continuous loops, connect individual paths to craft passages or intersections, and fine-tune the probability of selecting specific routes. Learn more about WalkWay: Tutorial | Manual.
Flexible Character Spawning
Choose the target location for spawning actors, whether it’s a 3D model, a user-defined volume, a walkway, or the entire NavMesh. Have the flexibility to specify the crowd size, formation, density, facing direction, and observe their actions upon placement in the scene. Male, female, elderly, or child actors can automatically adopt appropriate animation styles, with adjustable probability ratios among idle, walking, jogging, and other performances. Learn more about Spawning Actors: Tutorial | Manual.
Smart Avoidance and Flocking
Incorporating natural crowd dynamics, this iClone crowd simulation lets characters maintain distancing and formations while circumnavigating obstacles, irrespective of their movement styles and speeds. Through the use of agent radius, detection times, and wait-and-move cadences, the simulation can minimize backtracking and unravel pedestrian bottlenecks. Learn more about Avoidance Tutorial >
Directable Characters
Easily generate realistic characters with intricate facial expressions, various accessories, and diverse animation styles, ideal for populating crowd scenes at any distance. Users have the flexibility to manage characters collectively or individually, employing keyboards, game controllers, or mouse-click waypoints to direct their locomotion. Learn more about Crowd Generation Tutorial >
Ambient Animation with ActorGroups
ActorGroups are equipped with pre-defined, loopable animations for standing, sitting, and talking, enriched by an array of accessories, facial expressions, and genuine social interactions. They enhance scenes by introducing randomized actors, materials, and motions, or by crafting bespoke ActorGroups, further enlivening the overall experience. Learn more about ActorGroup: Applying Preset Actor Group – Tutorial | Manual. Applying Random Actor Group – Tutorial | Manual.
Alternate Performance and Versatility
Enjoy the flexibility of converting characters into Lite actors when system resources are constrained or when optimizing for heavy crowd simulations. Choose to revert Lite actors back to Edit mode for precise control over their movements using Motion Director along with a diverse range of input controllers.
Motion Director Editor
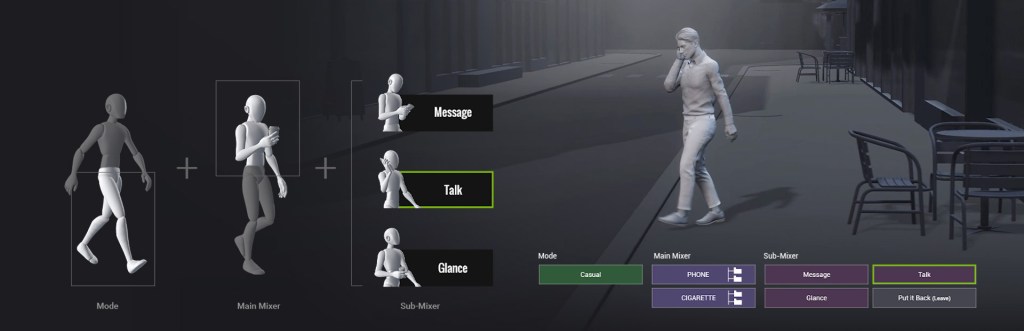
Motion Matching has been integrated for smooth navigation control, enabling easy addition of new idle and perform triggers to Motion Director via drag-and-drop interface. Motion Mixer lets users direct upper-body motions while the legs are controlled by standing, walking, or jogging iMD states. Moreover, the Mixer features specific sub-mixer actions, enabling actors to perform tasks like making a call, sending a message, or simply glancing at a handheld device. Know more about Motion Director Official Page | Tutorial | Manual
Customization and Expansion
Access the ActorCore roster to enlist scanned actors and their matching mocap loops. Use Character Creator to design modular actors, decimate the mesh for massive crowd simulations, or auto-rig with AccuRIG. Spawned crowds can be randomized based on user-defined actor and motion lists that match them with predefined accessories and material options.
Pipeline and Render
Effortlessly export animated characters to your preferred 3D tool or game engine. Native Auto Setup plugins are available at no cost, offering pre-configured model and material setups for Blender, Unreal Engine, and Unity. Moreover, Live Link supports synchronization with the Unreal Engine and NVIDIA Omniverse, enabling a two-way workflow. Upcoming support is also in the works for 3ds Max and Maya.
Startup Assets
iClone includes 8 crowd characters, each featuring 5 texture options. To enhance your crowd simulation experience, consider obtaining the two essential packs for additional crowd extras. For a broader selection of 3D actors offering loopable ambient motions created from authentic mocap data, explore the vast offerings available in ActorCore.
Modern People Sampler
31 scanned actors are available with full-body rigging, encompassing various genders and ages. These individuals offer a rich array of animation possibilities using Crowd Generation and the dynamic spawning features of ActorGroups. Each character is equipped with 5 texture options, allowing for both random and specific visual variations, enhancing the diversity and realism within your animations. Know more about Modern People Sampler >
Social Actions
“Social Actions” is an ambient crowd animation pack designed to utilize the dynamic spawning system for ActorGroups. Effortlessly bring scenes to life with individuals standing, sitting, engaging in conversation, or naturally interacting with close ones. Comprising 90 mocap animation loops for endless background animation, each detailed with authentic facial expressions and digitized in MotionPlus format, this pack is compatible with any project. Know more about Social Actions >
This Christmas, like many that came before, will be the first Christmas for many new iClone/Character Creator users to make special something for the holiday season. Whether it be for family and friends, a business, or the web in general Reallusion and Character Creator 4 have made it easy to create characters like an animated snowman, or rather I should say a snowman you can animate, to spread some Christmas cheer and extend your skills at the same time.
The best part is we will use primitives that come with CC4 to create the snowman. What we will be doing specifically:
Drag, drop, rescale, and place primitives, balls (spheres), and cylinders to create a simple snowman.
Merge the various props into one prop.
Use AccuRig to rig the snowman for animation (and mask out bones we don’t need).
Test the Snowman character in iClone.
GETTING STARTED
This exercise is a great starting point for new animators and an easy, quick solution for seasoned pros. AccuRig can take a mesh that is similar to human form and give it humanoid movement. It can be anthropomorphic animals or any group of props that AccuRig can read and skin as a character. This also opens up iClone’s entire motion library for easy animation.
As shown below, drag and drop the prop, primitive Ball_000, found in Props-> 3D Blocks, then duplicate the ball and move it on the upward axis till it is in the approximate range of the torso. With the newly created torso still selected duplicate it, and bring it up to the area of the head while rescaling it down to the size of the head you need.
The start of our snowman. Three basic balls (Spheres) for the body.
Now search for a cylinder in the same 3D Blocks folder. In this case, I used Cylinder_004. Rotate it to 90 degrees and place it where you think the arms would be.
A cylinder was added for the arms and runs through the body mesh.
PLEASE NOTE: There is a video tutorial at the end of this overview.
MERGING THE PROPS
Now we are ready to Merge all the primitives into one object. This is done to prepare the mesh to work with AccuRig.
If you are concerned about no face at this point, there is simply no reason to include those added props to the skinning process as they will function as accessories that are attached. It’s just a simple process of adding more balls (spheres) textured black for eyes and mouth while adding a cone of your choice for the nose with the appropriate color texturing.
USING ACCURIG TO BRING IT TO LIFE
Now comes the easy part… using AccuRig to turn our pile of props in a snowman character we can animate. While we are in AccuRig we will also use masking to turn off the bones from the waist down since this snowman doesn’t have legs.
With the newly merged mesh selected press the AccuRig button to take us into rigging. We’ll move around some of the markers but that is a simple enough task to complete.
Once in AccuRig press the “Create Guides” button and let it do its magic.
Arranging the Guides (dots) with the mesh.
After arranging the guides accordingly, we set the Number of Fingers to zero since our snowman has no fingers. You could add two more fingers with scaled cylinders and skin as three fingered but we’re keeping this simple for the purpose of this tutorial.
Click Generate Skeleton to continue.
Set the number fingers and Generate Skeleton
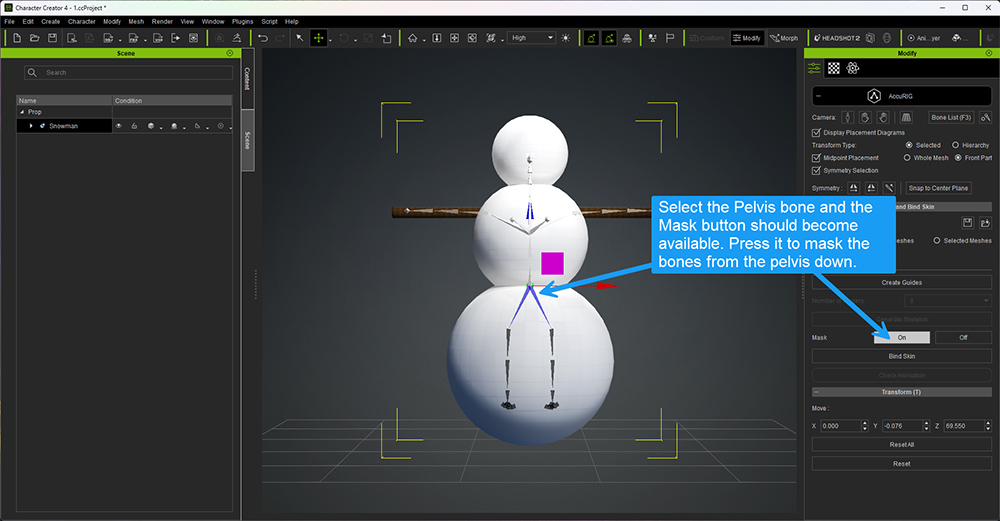
Once the skeleton appears, select the Pelvis bone and it should turn blue when selected. Next, turn the Mask by clicking the On button in the mask section. This will mask out the pelvis and the bones below it, so they do not twist or distort the bottom of the snowman when motions are applied.
This is a very powerful and useful feature of AccuRig making it possible to skin many different types of characters that may not have the standard number of limbs or lost a limb.
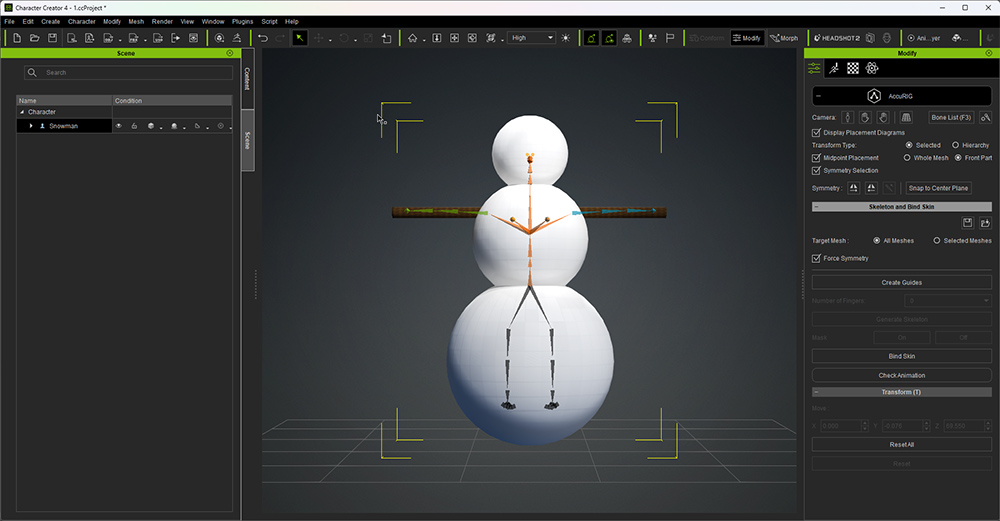
Click the Bind Skin button and the skinning process will begin. It may take a while to work on some models but generally, it skins it in less than a minute in my experience. Once it’s finished you will see a multi-colored skeleton indicating the skinning process is complete. From here you close AccuRig and the newly skinned snowman character will be in the Character Creator 4 workspace.
The multi-colored bones show that the character is rigged with bottom bones masked out.
Below you will see the snowman character after transfer to iClone. As referenced in the image you can see where the arm and shoulder bend away from each other with little deformation to the body. This is due to placement of the marker on the upper arm and another marker straddling the edge of the body mesh and arm.
A QUICK CHECK IN ICLONE
The rigged character in iClone 8.
What you see above is the snowman mesh using the same Ball (sphere) primitives we used for the body parts, scaled down and textured black for the eyes and mouth. I then duplicated one of the eyes and scaled it down to use for the mouth. From here I duplicated and placed the stones in a smiling mouth but it could be a neutral or frowning mouth just as easily.
In fact, you could animate the mouth by creating a neutral or frown with the mouth primitives then moving down the timeline and arranging the mouth primitives into a smile. While that is beyond the scope of this tutorial it is not that difficult. Experimentation is highly encouraged.
The nose is a cone primitive scaled to long and narrow. The top hat is three cylinders scaled to the various shapes of the brim, hat, and headband.
WHAT COULD GO WRONG
There is a possibility that the skinning might miss a few vertices in the back of the bottom sphere as that is a long way from the bone. This did happen to me at least once during testing.
Occasionally a bone will be weighed improperly, particularly in extreme situations like this large round body sphere.
If this happens you may have to go into Skin Weights and adjust the CC Base Hip with the smooth tool. While this isn’t the best way, it’s the easiest for beginners until you grasp more of what skinning is.
Using the smooth tool in skin weights to smooth out the mesh deformation.
You can also just hide this portion of the snowman from the camera view when any deformation occurs. This is due to the mapping of the CC Base Hip and is another area that I highly recommend you save a copy and experiment with correcting this error should it happen to you.
While our snowman isn’t a sophisticated character by any means, it is a great starting point if you have no idea what Character Creator 4 can do outside of human characters. For a school project, it can be pencils for arms and legs, an eraser for the body, and so forth. Want a rock golem? Find some rock props and put them into a humanoid, bipedal shape so AccuRig can skin it for you.
Just keep in mind that your characters are NOT limited to the base meshes you find in Character Creator. You are only limited by the objects you have on hand and your imagination.
Merry Christmas!!!
MD McCallum – WarLord
Digital Artist MD “Mike” McCallum, aka WarLord, is a longtime iClone user. Having authored free tutorials for iClone in its early years and selected to write the iClone Beginners Guide from Packt Publishing in 2011, he was fortunate enough to meet and exchange tricks and tips with users from all over the world and loves to share this information with other users. He has authored hundreds of articles on iClone and digital art in general while reviewing some of the most popular software and hardware in the world. He has been published in many of the leading 3D online and print magazines while staying true to his biggest passion, 3D animation. For more information click here.
To showcase the new iClone mocap profile AccuFACE’s role within a real production environment and stress test its capabilities before release, Reallusion has proudly invited seasoned performers Lucas Gilbertson and Carol Anne to rigorously explore the AccuFACE facial mocap technology.
Both Lucas and Carol-Anne boast over two decades of experience as professional voice actors. Lucas has made his mark on renowned franchises like the Mega Man series and Sonic the Hedgehog. Carol-Anne Day is recognized for her extensive voice acting for anime and video games produced by Viz Media, Bandai Entertainment, Capcom, Geneon, and Bandai-Namco. Since 2020, they have ventured into game and animation creation, utilizing iClone, Character Creator, and Unreal Engine. Their first-hand experiences have helped them foster leading expertise in the field of facial capture technology.
In a bid to unravel the full potential of AccuFACE, they set about portraying cartoon characters, orc monsters, and lifelike digital humans. Their experiments involve testing scripts of varying inflections — ranging from subtle to intense — to gauge AccuFACE’s ability to deliver dramatic, natural, and nuanced performances.
Here is the timeline for a quick overview of the AccuFACE test: 00:00 Project background 00:53 How we plan to test it (with beard and nose ring) 01:16 Quick test without calibration 01:52 After calibration 02:00 Impersonate a vicious orc or cartoon character 02:29 Combining facial editing for stylized details 03:00 Tongue twister and dialog test 04:00 Comparing to iPhone facial tracking 04:42 Individual brow tracking with AccuFACE 05:22 Proper lighting requirements for AccuFACE 05:36 An extreme performance test (with good eyeball and nose tracking)
ActorCore & iClone integrated with EEVEE real-time in Blender
In the burgeoning realm of metaverses and the emergence of virtual events on these platforms, we find ourselves delving into immersive experiences, surrounded by avatars who are interconnected through virtual reality. However, the key to designing successful events lies in the integration of genuine human connections within these virtual spaces, necessitating a sturdy and lifelike framework to deliver impactful virtual content. This is precisely where ActorCore comes into play—an indispensable resource for procuring top-tier 3D assets, including lifelike human models, animations, motion capture capabilities, and real-time rendering, all conveniently accessible via the web.
It’s the boundless prospects offered by this remarkable tool that has captured my attention. Coupled with iClone 8, it provides unparalleled flexibility and simplicity in seamlessly incorporating crowd animations and staging for the web metaverse.
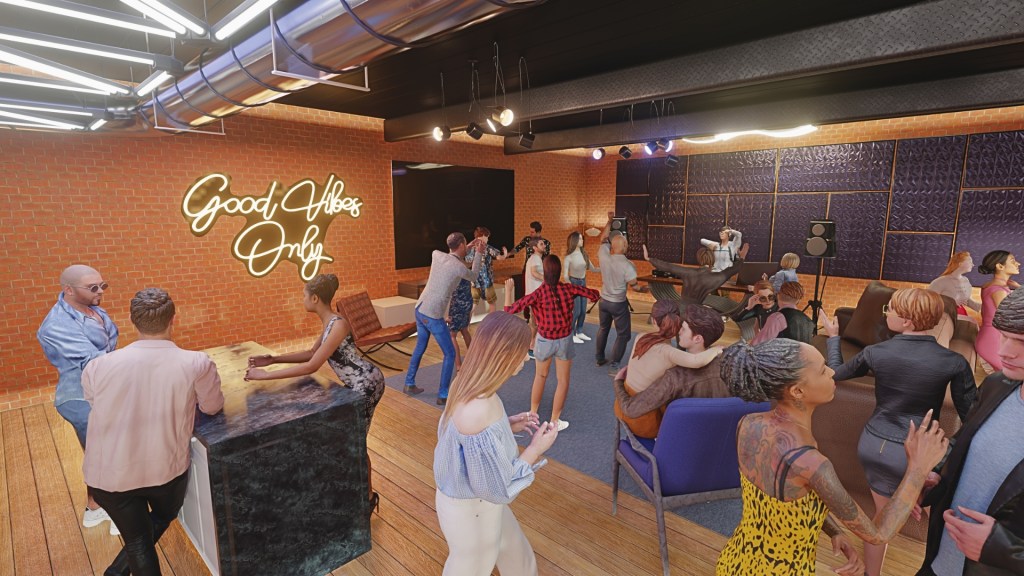
In the following sections, I will share my endeavors in Blender, where I’ve worked on integrating realistic individuals into a 3D environment simulating a party, achieving exceptional levels of visualization and detail.
So, let’s embark on this journey and delve into the process!
About the Artist
I am José Ripalda, a Video Game Designer, and Metaverse Artist, serving as the Co-Director of Marco Virtual MX. Our dedicated creative team focuses on delivering top-notch experiences within virtual events and the metaverse. Leveraging Blender as my primary tool, I craft diverse thematic environments tailored for web performance.
At Marco Virtual MX, our business model revolves around providing premium digital services for advertising purposes. Among our offerings are comprehensive 3D environment designs for the metaverse, video games, and various visual media. Moreover, our specialization lies in seamlessly integrating 3D content into the web using WebGL. We also excel in developing bespoke interactive systems for clients seeking personalized digital spaces. Furthermore, our expertise extends to crafting digital replicas of individuals, achieved through scanning or meticulous modeling. These services collectively define our role as a creative team dedicated to harnessing 3D technology.
Behind the Scenes
This tutorial will cover the entire process, commencing with ActorCore. It will elucidate the diverse possibilities of visualizing actors or 3D assets directly on the web, showcasing their animations and accessories. Subsequently, we’ll proceed to acquire these assets, integrating them seamlessly into our library within iClone 8. This integration marks the pivotal step in assembling multiple actors within a virtual space, which could be perceived as a stage or a setting where the events will unfold.
Throughout our exploration of iClone 8, we’ll delve into various tools, including Motion Layer, a comprehensive system designed to facilitate seamless actor control. Additionally, we’ll discover the functionality of the Timeline, which enables the amalgamation of motions, along with other remarkable features tailored to animate with meticulous attention to detail.
Moreover, as part of our supplementary learning, we’ll delve into theCC Auto Setup for Blender. This tool significantly streamlines the process of importing animated actors from iClone to Blender, enhancing the efficiency of our workflow.
ActorCore Animated 3D Characters
Initially, my aim in orchestrating virtual events revolved around sourcing lifelike performances from ActorCore’s expansive repertoire. First, I seek actors in the midst of skillful dancing or lively conversation, followed by a DJ responsible for overseeing the DJ booth. Lastly, I enlist waitstaff to curate a personalized and intimate ambiance for the event.
Following this introduction, a comprehensive breakdown of the ActorCore interface showcases the array of options available for discovering and previewing actors. This interface allows users to manipulate various visual elements, including lighting and selected animations.
Through this web interface, we have the capability to designate selected actors as “FAVORITES” for the party. Leveraging ActorCore’s extensive library, I effortlessly located all necessary components characterized by their realistic appearance, PBR shading, and readiness for animation through the Motion Animation library. This vast selection ensured that everything I required was readily available.
After preparing our selected actors, the next step involves downloading them for integration with Character Creator or iClone. This seamless integration capability enables us to effortlessly incorporate these actors into various Reallusion systems, game engines, and 3D applications—specifically, Blender.
An important aspect to emphasize here is the actors’ optimization for seamless integration into the metaverse. Each actor is tailored with an intermediate polygon count ranging between 15K-20K, flexibly accommodating events hosting multiple actors without significantly impacting performance. Furthermore, iClone 8 offers a streamlined method to import these actors directly from ActorCore. Its robust and efficient system ensures a swift and solid process, requiring just a few clicks for acquisition and integration.
iClone Advanced Motion Editing
Incorporating animations is as effortless as a simple drag-and-drop action onto the desired avatar, offering a visual interface that expedites the process without the need for extensive, time-consuming steps. This intuitive system not only enables users to seamlessly adjust the position and orientation of the actor but also ensures steady foot-and-floor contact. Initiating the animation setup with an established position facilitates better control, allowing users to define precisely where the actor will commence the animation sequence from the outset.
After grasping the process of integrating actors into iClone 8, the subsequent crucial step for our event is to incorporate the apartment stage. I highly suggest utilizing FBX files (including textures) to ensure seamless importation into iClone 8 without encountering any issues.
Once the stage is set, the process becomes straightforward—simply select and drag our actors to designated areas, such as the DJ section, which is prepped with mixing equipment. This setup allows us to effortlessly test out the Motion Layer tool for smooth execution.
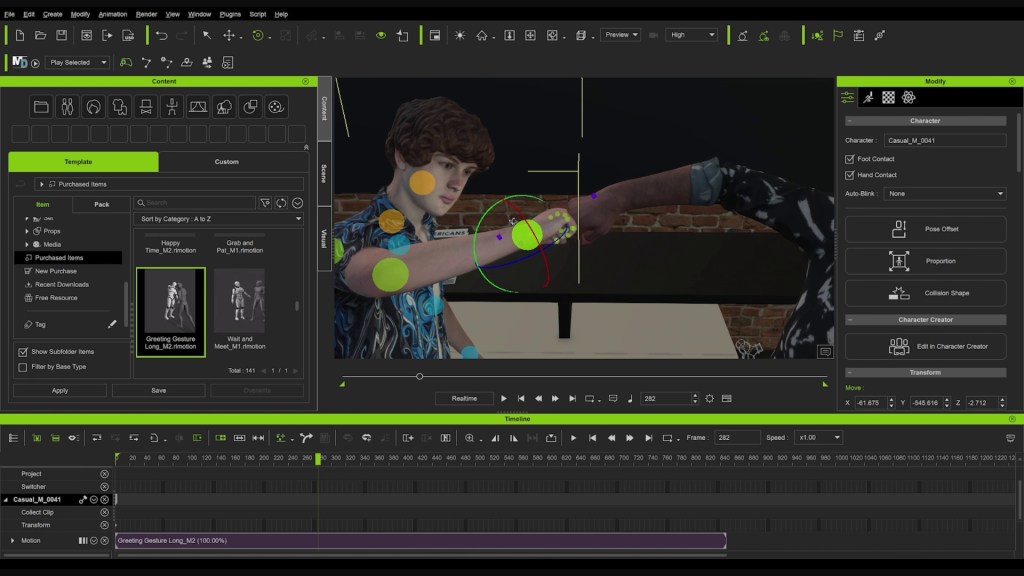
The Motion Layer represents an innovative system seamlessly integrated into iClone 8, offering meticulous control over every aspect of our actor’s performance. This includes configuring individual finger movements, manipulating hand gestures such as opening and closing, editing various body parts, transitioning between IK and FK seamlessly, and accessing a comprehensive panel for selecting specialized gizmos.
In addition to working with the DJ, I managed to implement specific modifications for two guests engaging in a handshake. Motion Layer makes it easy to adjust hand positions. Moreover, within this tool, we explore a practical method enabling actors to maintain eye contact while conversing. Under the ‘LOOK AT’ menu, options like Look at Camera or Pick Target can significantly enhance the realism of our scenes by facilitating natural gaze and interaction between characters.
Furthermore, beyond the guest actors, it’s important to integrate featured actors. In a recent scenario where I required waiters, I found ActorCore particularly useful. Specifically, the “CATERING SERVICE STAFF” set offers a diverse range of actor types ideally suited to serve as waitstaff for our virtual party.
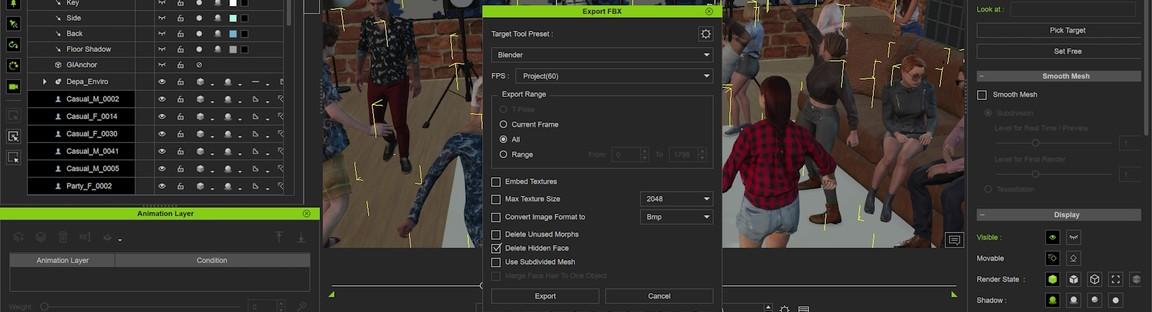
Once all our actors are prepared and animated using the tools showcased in the video, a crucial step involves transferring the actors and animations to Blender (the program chosen for creating this virtual scene). In iClone 8, I opted to export all avatars in FBX format, selecting the “BLENDER” preset and configuring a comprehensive array of animation and other parameters as depicted in the following image.
Stunning Rendering Results in Blender
In under 5 minutes, I efficiently grouped each avatar, seamlessly integrated textures, animations, and more. While this process is undeniably efficient, I’d like to delve into some aesthetic nuances I implemented during the creation of the apartment in Blender.
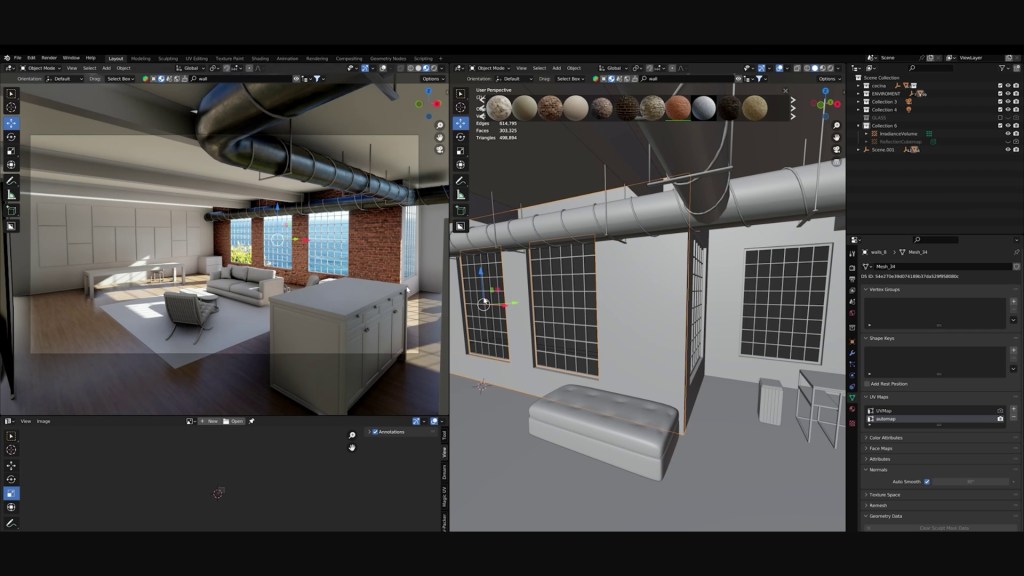
Blender offers unparalleled flexibility and practicality in crafting virtual environments, allowing for effortless texturing, lighting manipulation, and the creation of an extensive camera system with easy control. In my case, aiming for a realistic yet swiftly generated rendering, I utilized techniques like “Irradiance Volume” and “Reflection Cubemap,” both highly effective within EEVEE. These, combined with effects such as bloom and ambient occlusion, strike a fine balance between achieving good quality visuals and optimizing the overall realism of the scene.
Once our actors are primed, the Blender add-on called CC Auto Setup for Blender comes into play. This add-on allows for direct selection of the FBX files exported from iClone 8, simplifying the import process into Blender. Once imported, each avatar will be neatly separated with its corresponding ARMATURE and integrated animation. This practical feature significantly hastens various processes involved in animating the party scene.
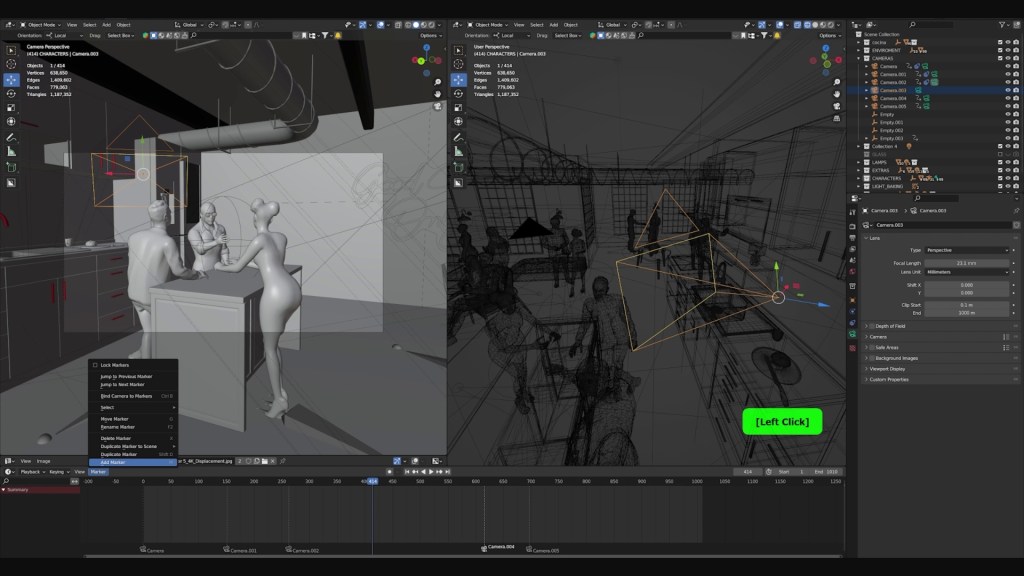
The camera system integrated within Blender offers remarkable flexibility in capturing stunning shots that vividly depict the virtual event, providing a clear preview of its appearance within the metaverse. Regarding the equipment used for this work, it comprised a single workstation equipped with an i9 12900KF processor and an RTX 3080 graphics card. I’m delighted to have explored these fantastic tools offered by Reallusion, and I eagerly anticipate continuing to share and learn from experiences with such excellent and practical platforms. Thank you for joining in this exploration of innovative possibilities!
Conclusion
ActorCore and iClone complement each other perfectly, offering a seamless integration of animations and lifelike characters ideal for virtual events or VR metaverse settings. The addition of CC Auto Setup for Blender further enhances this workflow, swiftly importing renderable, animated characters into Blender, eliminating the complexities of additional material settings. This intuitive process doesn’t require specialized technical expertise, making it accessible for all. I wholeheartedly endorse this workflow for anyone looking to create immersive VR metaverse productions, as it simplifies the process while ensuring impressive results.
In this installment of the Beginners Guide, I am going to demonstrate how easy it is to incorporate AI tools into your workflow so you can leverage both the timesaving aspect of AI and the creative tools of iClone and Character Creator 4 (CC4) to make a simple but effective scene.
I’ll be focusing on iClone and CC4 while making use of the free-tier AI services relevant to this type of work.
Specifically, I’ll use:
– Leonardo AI (free tier) to generate a headshot image.
– Bing Create (free) for the Headshot 2 image.
– ChatGPT 3 (free tier) for dialog and scene-setting ideas.
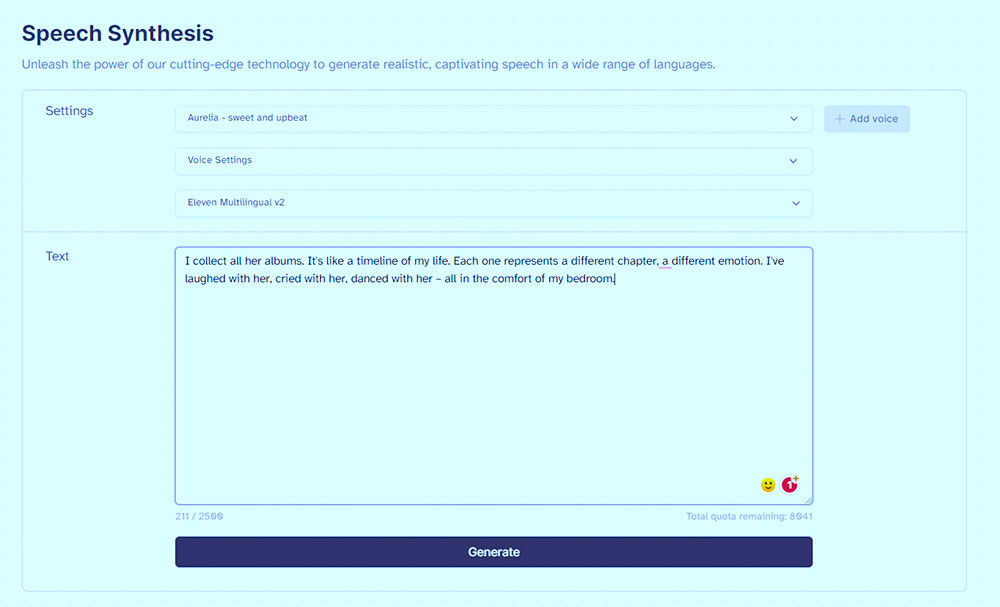
– Eleven Labs (free tier) AI-powered voice generation for the character.
Below is an image of what we will end up with. A pleasant and hopefully somewhat charming female host in a 3D cartoon environment of a bedroom doing a podcast. The headshot, (the AI-generated image) and voice are important to adding any factor like charm to a character. I picked Eleven Labs for their ability to make a voice emote instead of a monotone or rhythmic recitation. Leonardo AI is an excellent image generator for my tastes. There are many of these AI tools to choose from.
VIDEO TUTORIALS: I have created two short YouTube tutorials that are near the end of this article that cover both character creation and scene creation along with using AI-generated dialog. It also shows how to enlarge the mesh for big cartoon-type eyes in Character Creator 4.
Below is the setup view with the background turned off.
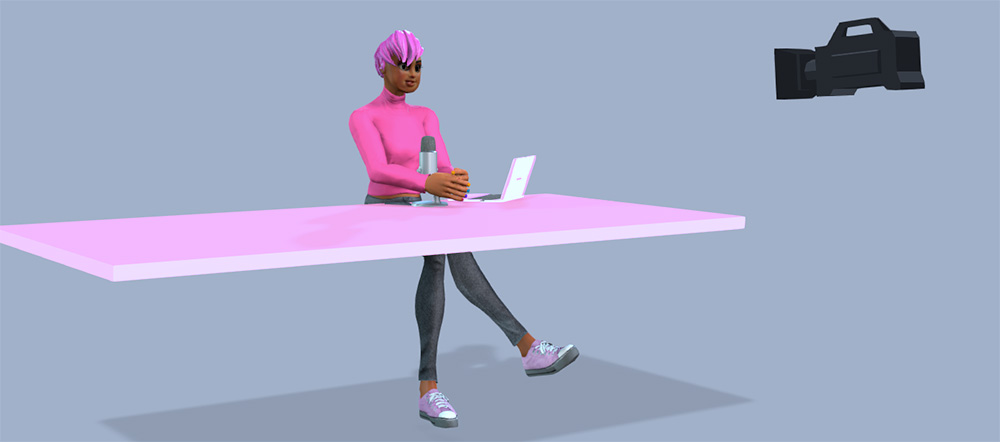
As you can see in the image above the scene is extremely simple when you leave out the AI-generated background image. The “desk” is the Door prop that comes with iClone and I didn’t bother with a chair either. It would be simple enough to add one if you desire to do so. You could also dress up the desktop a little more with other objects as I did in a later render with the headshot image on the desk.
You could also put a plant prop in the foreground at the side of the desk to add more 3D depth to the scene as it goes into the 2D background. A proper combination of image in the background and props in the foreground or intermediate space can help to blend the 2D background image into the scene eliminating some of the contrast between the flat image and the 3D objects.
CHATGPT 3
The first thing I did was go over to ChatGPT 3 at chat.openai.com at ask it to write a dialog for “a fan talking to the camera about how much she loves Taylor Swift”. I received the following response:
INT. BEDROOM - NIGHT
A young woman, LILY (early 20s), sits comfortably in her bedroom, surrounded by Taylor Swift posters and memorabilia. She adjusts the camera in front of her, excitement evident in her eyes.

LILY (looking at the camera) Hey, Swifties! It's Lily, and I just need to talk about the queen herself, Taylor Swift. I mean, where do I even begin?

(leans in closer to the camera) I remember the first time I heard Taylor's music. It was like she reached into my soul and put my feelings into words. I instantly felt this connection, you know? Like, she was telling my own story.

(points to a poster on the wall) And can we talk about her lyrics? They're like poetry. I can't tell you how many times I've been sitting in my room, listening to a song, and thinking, "Taylor gets me."

(grins) And the way she's evolved over the years! From country sweetheart to pop sensation to folklore and evermore vibes. It's like she's a musical chameleon, always surprising us and keeping things fresh.

(picks up a Taylor Swift album) I collect all her albums. It's like a timeline of my life. Each one represents a different chapter, a different emotion. I've laughed with her, cried with her, danced with her – all in the comfort of my bedroom.

(sincerely) And the way she connects with her fans, it's incredible. Whether it's through social media or secret sessions, Taylor makes us feel like we're part of this massive, glittery family.

(leans back) I've been to her concerts, and let me tell you, it's a spiritual experience. The lights, the confetti, the energy in the crowd – it's like a Taylor Swift-themed Disneyland. You can't help but feel alive.

(smiles) So, yeah, I might be a little obsessed, but who wouldn't be? Taylor Swift isn't just a singer; she's a storyteller, a friend, a confidante. And to every Swiftie out there, keep on rocking because we're all in this together.

(blows a kiss to the camera) Love you, Taylor! You're the best.
I didn’t follow the script at all in terms of direction because that wasn’t the creative direction I was looking for. I wanted to keep this a simple scene with a simple character, so I used the Podcast concept from the bedroom. The dialog was all I was interested in.
ELEVEN LABS – VOICE GENERATION
For this, I went over to ElevenLabs.io and used the free tier (requires signup) to create the dialog. Like most tasks of this nature, it took longer to decide on a voice from the voice library than it did to copy and paste the text into the dialog box, process, and download the audio file.
At first, I did a sentence or two of dialog with the voice I had selected to find out how it interprets the text and how pauses and other formatting worked. It was much easier than expected. Commas and the “…” created different timing and pauses in the audio. Using two blank lines between paragraphs seemed to work to keep the paragraphs from running together when spoken.
Now, of course, this Is where I pushed the envelope too far in terms of how much of the script dialog I sent into the speech generator at a time. After a couple of small tests with just a line or two at a time, I proceeded to dump all of the remaining text into the voice generator.
It worked but had some pronunciation errors that would require correcting and running through the AI again. This burns up credits in an extremely wasteful manner as you get 10,000 characters on the free tier. Not words, characters. If I had done it a sentence or two at a time, I wouldn’t have burned so many credits.
In this case, it didn’t matter as I wasn’t going to use it all anyway in the final render. I just needed enough to do a good demonstration.
Creating the dialog from Eleven Labs to iClone was easy. It was only a matter of minutes to copy, paste, process, download, import into iClone, and have the entire script’s audio lip-synched and loaded into the character. I also copied the dialog into the clipboard so I could paste it into AccuLips to go along with the audio file for near-perfect lip-synching with no intervention on my part. I’m not doing anything advanced, and I think you’ll be surprised at the final product.
TIP: When generating audio from text think about how to write out the text. If you want a character to say iClone then write it out as “eye Clone”. “AI” is another stumper for generated speech. If you leave them as AI, you’ll probably get an “aye” so write it out as A I with a space in the middle. You may have to phonetically spell some words to get the desired results.
LEONARDO AI
I couldn’t get the face image I wanted out of Leonardo, but it was a snap getting the background image of the bedroom. Feel free to use the image in your own project but it is low resolution for the purpose of this article to not take up too many resources.
BING CREATE
I used Bing Create to generate the character head image to use with Headshot 2 (or Headshot 1). I tried Leonardo and got some great-looking images but few that faced forward like I needed. So, I cruised over to Bing Create and used the prompt:
Portrait of a bald, Pacific Islander cartoon girl with no hair, facing the camera, white background
I got several good images from Bing and was actually very pleased with the outcome. I had already spent a frustrating time with Leonardo without the desired results so when Bing Create immediately started returning usable results, I was surprised, to say the least.
Bing Creator generated Head Image. In Windows right-click and “Save Image As” it to download.
It didn’t take me long to choose a good headshot image and I was off to CC4 to create the character. I already knew there was going to be a problem with the large eyes in the image, but I decided to “brute force” my way through that by pushing the eye and eyeball sliders way past the intended maximum. I love this feature about the slider. If you go to the end and it doesn’t do enough… just type in a number in the input box and press enter. If 100 or –100 isn’t enough, then type in 200 or –200.
TIP: The input boxes do not stop at the end of the slider. You can manually enter 200 (or any number) in the input box if the slider only goes to 100. This can be a very powerful feature pushing intended use past the boundaries and experienced users know how helpful it can be.
CHARACTER CREATOR 4
The AI work was very enjoyable, and I looked forward to putting it all together but I still had to make the character and it needed some personality. The Bing Create image certainly helped in that department.
I needed a stylized female body to further enhance the cartoon effect. You could load the free Alika character that comes with iClone and CC4, but I chose to load a neutral base and then use the Alika slider in the slider section to morph the body to a more cartoonish shape. I also used the Alika head morph.
HEADSHOT 2
Next up was jumping over Headshot 2 to wrap the head to the character. Since I’m talking basics here I will only use the Image, Auto feature, and a little bit of sculpting around the eyes. Since I used the Auto feature it also created some hair which I discarded so I could use the Alika cartoonish hair instead.
Now we see some freaky things happening like the strange-shaped head (compared to the image) and really weird eyes because of the huge eye size on the AI-generated image compared to the mesh. Like I said though, we are going to use brute force to enlarge the mesh eyes and eyeball to cover up the eyes on the Headshot image.
TIP: If the remnants of the eye colors around the edges and the bottom of the eye bother you then take the diffuse image into something like Photoshop and clone over the lower two-thirds of the painted eye leaving only the top or you can clone over all of it if you want a clean look.
I then dressed the character in a top, jeans, and tennis shoes changing the original colors to a shade of pink where appropriate.
CLOSING
As I showed you in the first and second images, the scene itself is very simple. Using a prop for a desktop, add a microphone or whatever you want to place in the foreground. Add your AI-generated background image and the scene is set. All you need to do now is light the scene and that is personal preference, but I would keep it bright and airy for this type of scene.
Creating a Toon Girl Character in Character Creator 4
Creating the scene, animating the character including using AI-generated dialog.
Digital Artist MD “Mike” McCallum, aka WarLord, is a longtime iClone user. Having authored free tutorials for iClone in its early years and selected to write the iClone Beginners Guide from Packt Publishing in 2011, he was fortunate enough to meet and exchange tricks and tips with users from all over the world and loves to share this information with other users. He has authored hundreds of articles on iClone and digital art in general while reviewing some of the most popular software and hardware in the world. He has been published in many of the leading 3D online and print magazines while staying true to his biggest passion, 3D animation. For more information click here.
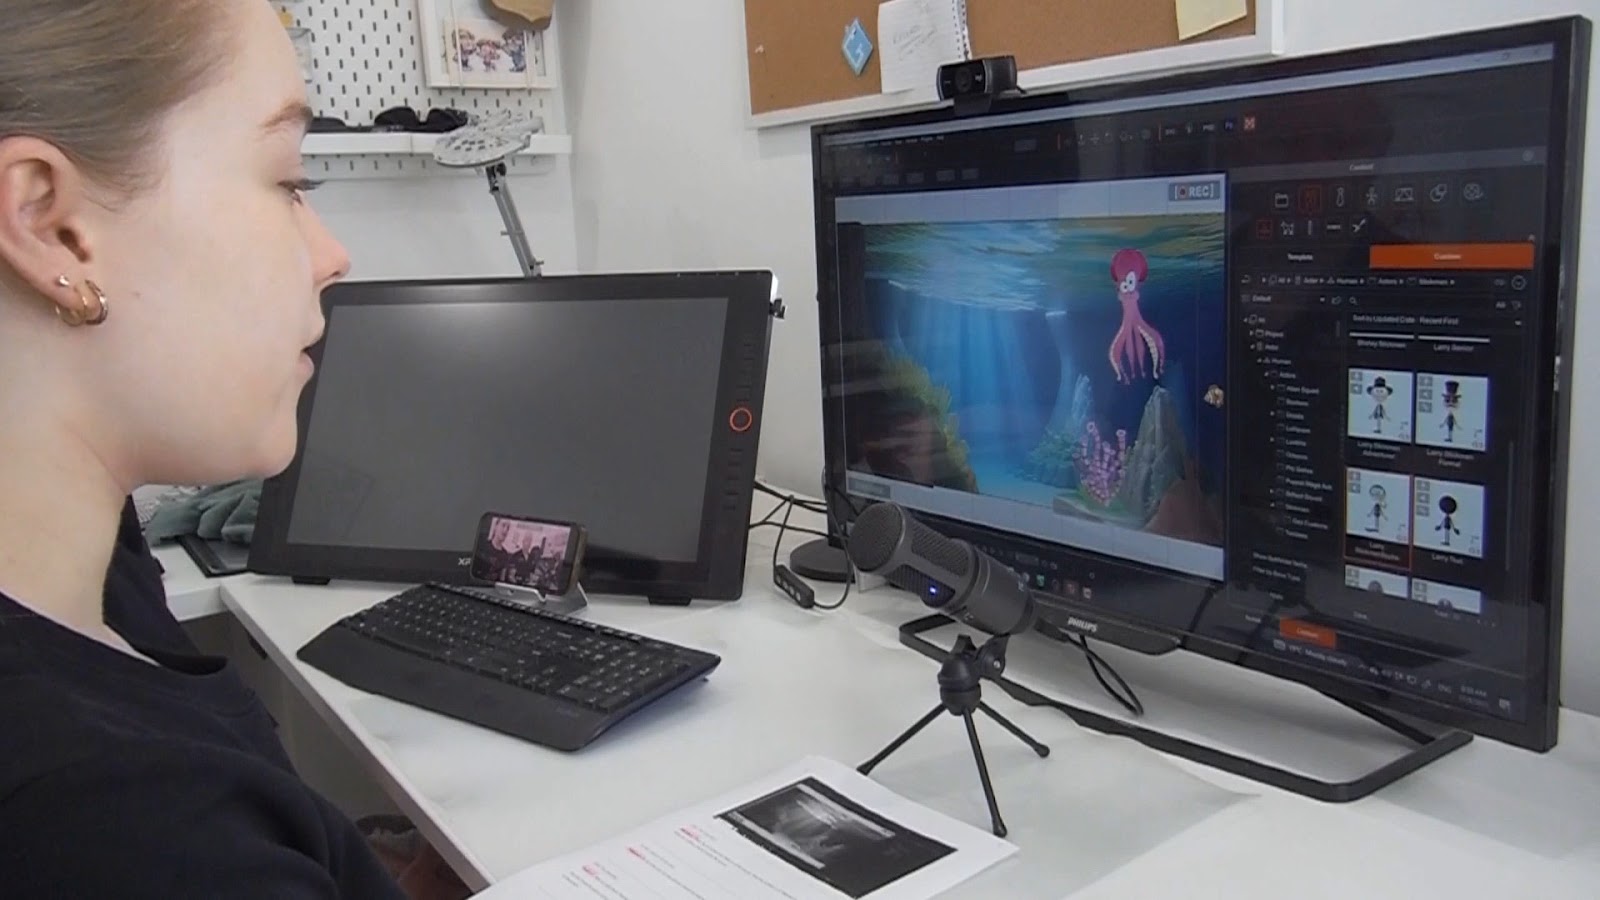
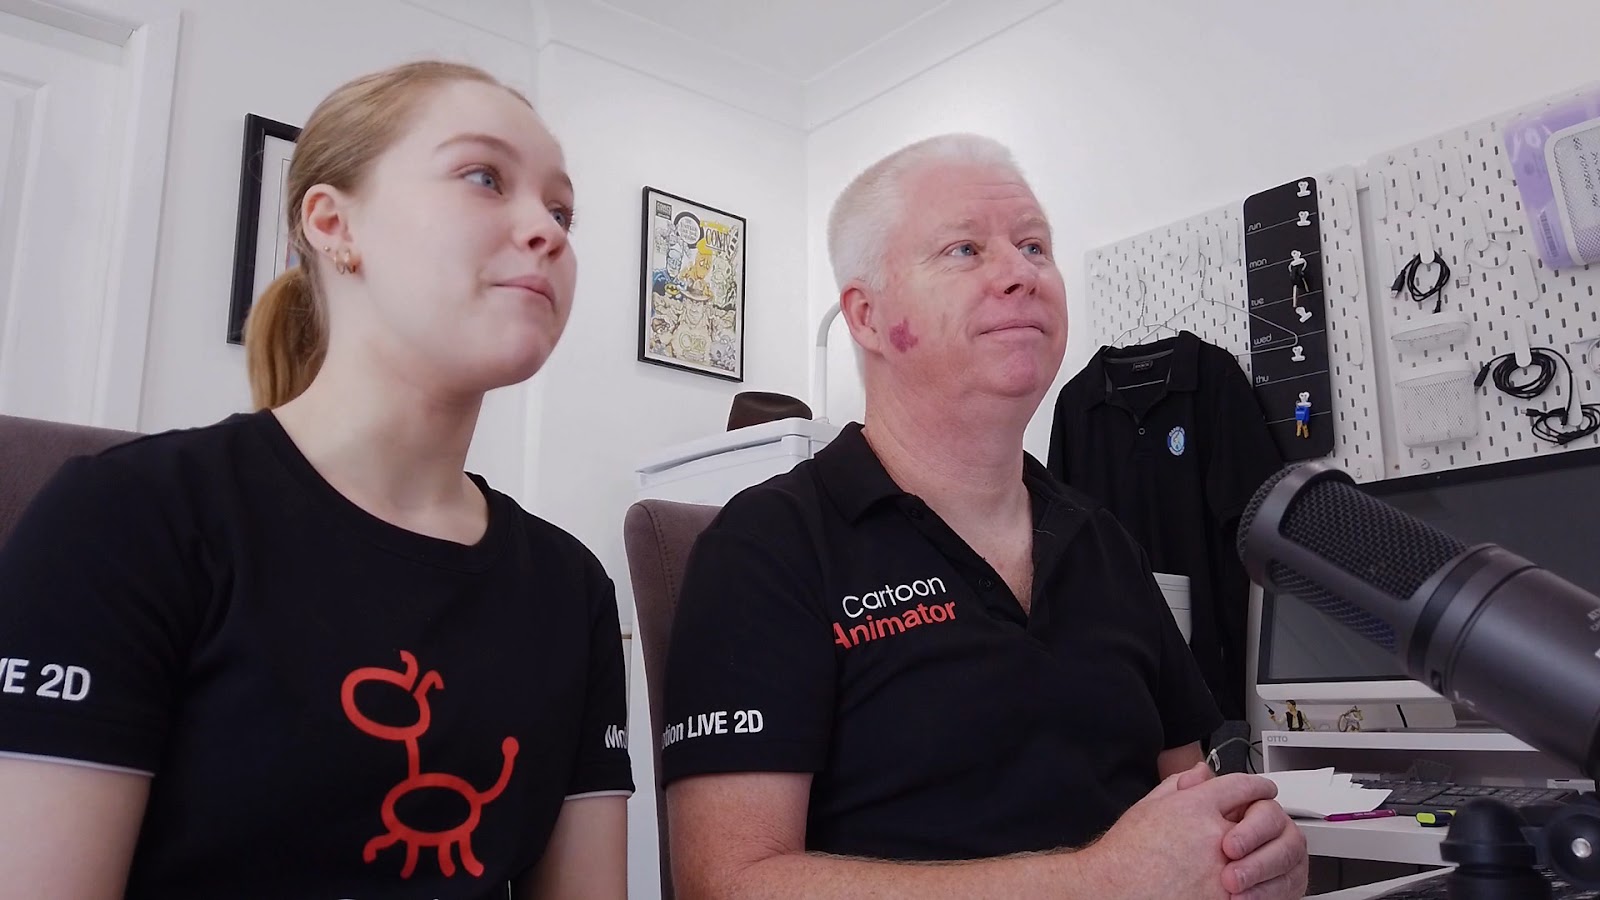
Veteran Cartoon Animator user and developer Garry Pye has been working with Cartoon Animator (CTA) for over a decade and has made the journey from casual animator to the role of 2D Community Manager for Reallusion. Now working alongside his 15 year old daughter Maddison, together they sat down to showcase just how easy the new Cartoon Animator 5.2 Motion Pilot makes 2D animation.
With a layered scene setup in Stage Mode, Garry and Maddison demonstrate the tools and features of Motion Pilot and how anyone can now produce real time smooth, professional results in minutes.
Cartoon Animator has long been the easiest and fastest way to create 2D animation. With Cartoon Animator you can produce quality projects in no time, regardless of your skill level in animation. Cartoon Animator makes animating easy for everyone, and today we’re going to show you how.
With the latest update to Cartoon Animator 5.2, we see the introduction of Motion Pilot, which gives you total control over the movement of your actors and props, controlled in real time using mouse movements, with variable parameters set by you.
Motion Pilot gets rid of the need for hours of keyframing your animation, because now you can control your characters like puppets using your mouse, while you record the motion. Motion Pilot is more like acting than animating. It makes everything easier and faster, but more importantly it makes animating so much fun for people of all ages and skill levels. Without any previous knowledge or experience of 2D animation, anyone can use Motion Pilot to create smooth results in minutes.
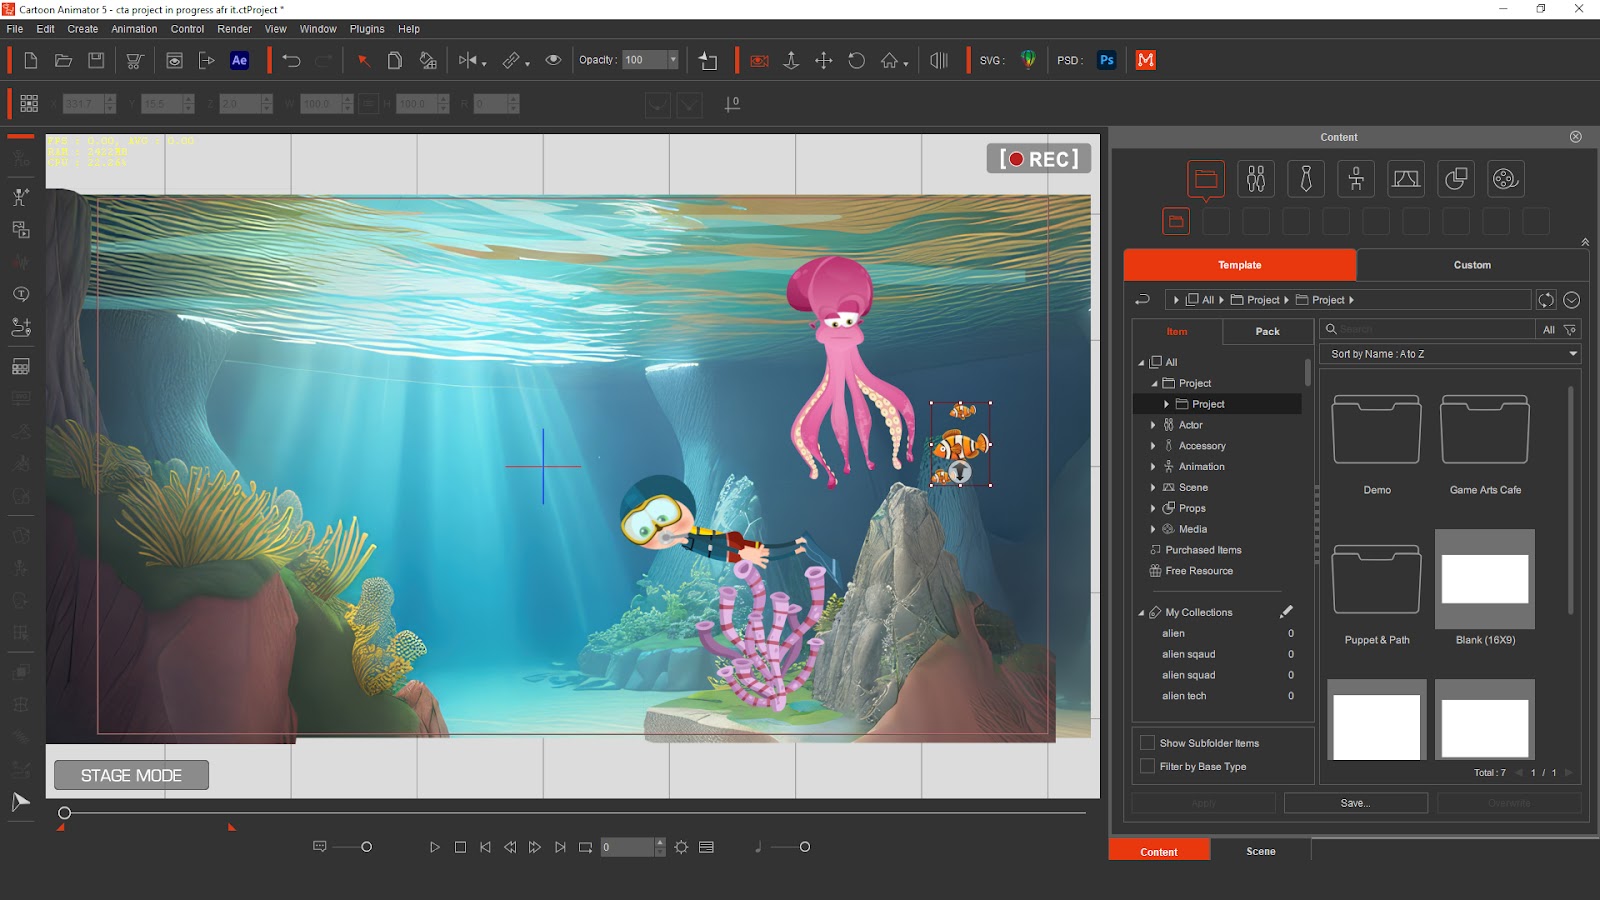
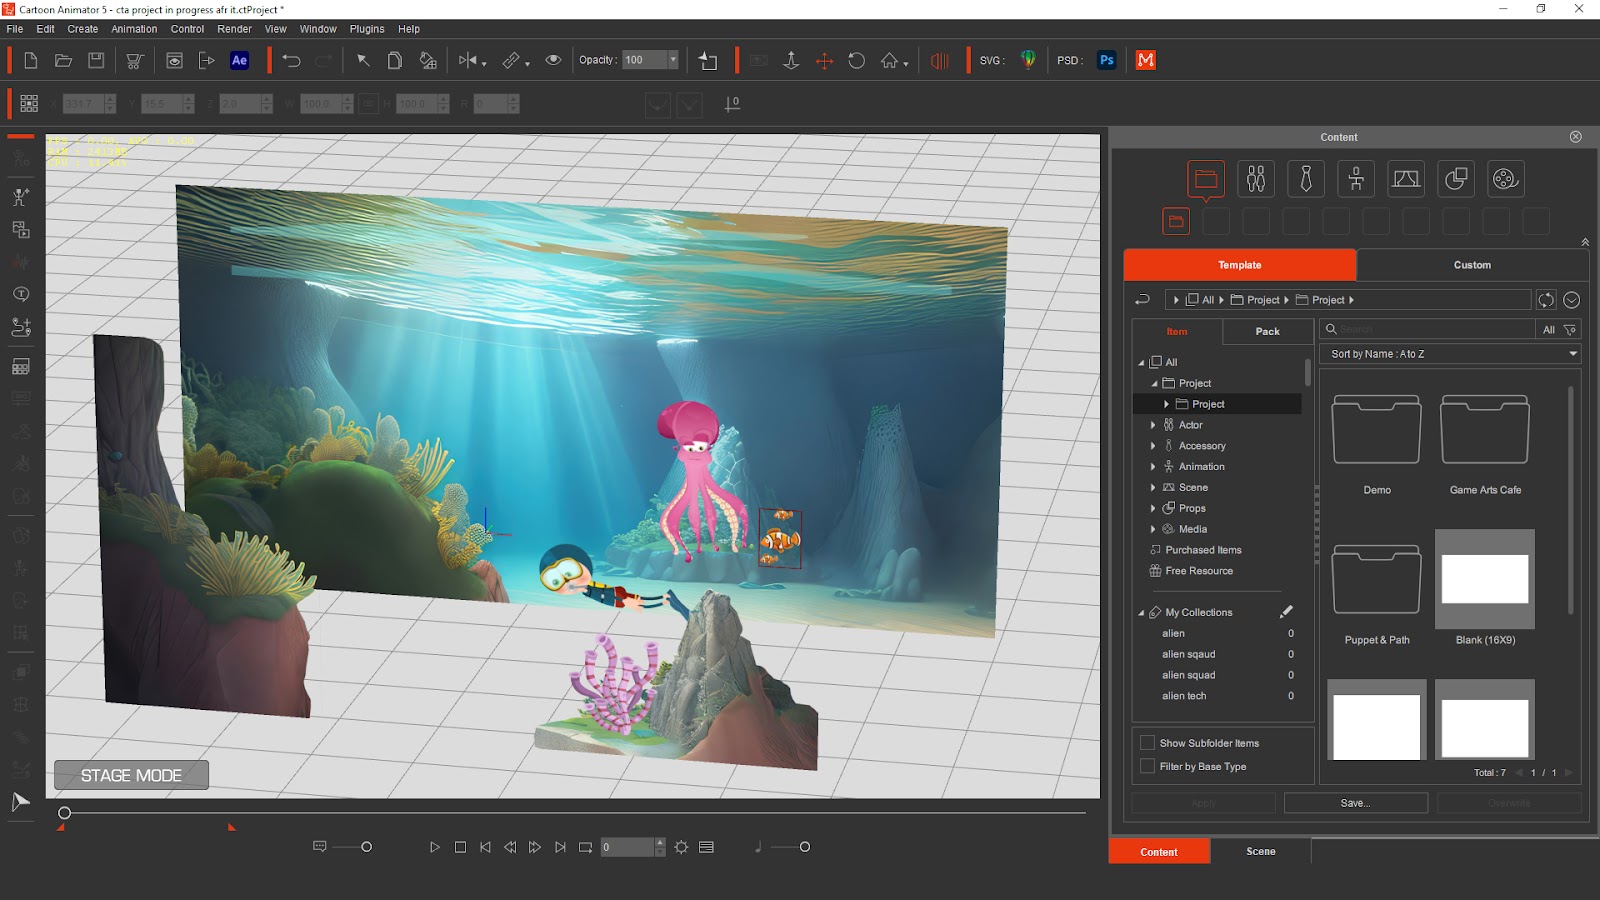
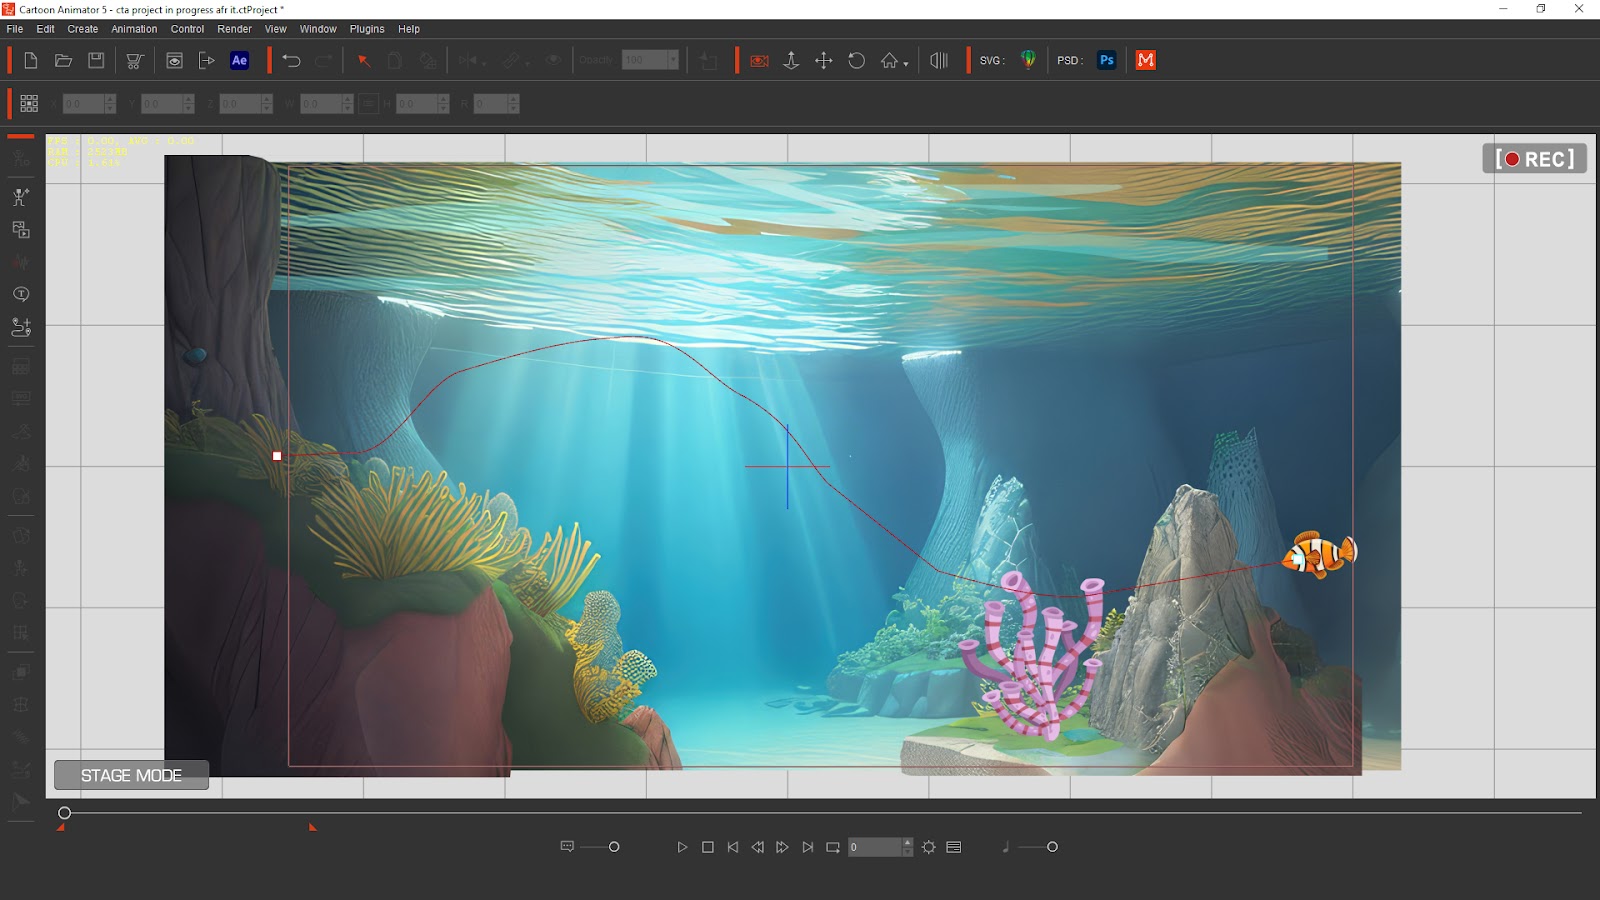
In the screenshot above we have a scene set up in Stage Mode. This scene was bought in as a Photoshop PSD file, maintaining its layers so we can move our actors around inside the scene, both in front of and behind objects and then move our camera about to create a sense of depth to our scene.
You can instantly switch to 3D view to see where all your characters and prop elements sit on the stage, as shown below.
To introduce an actor to your scene, you can simply drag and drop them from your Content Manager. By adding any one of the hundreds of premade motions to your actor, we could have our scuba diver swim instantly, without the need to keyframe his movement or draw individual frames. Cartoon Animator‘s premade motions do all the hard work and give perfect results every time.
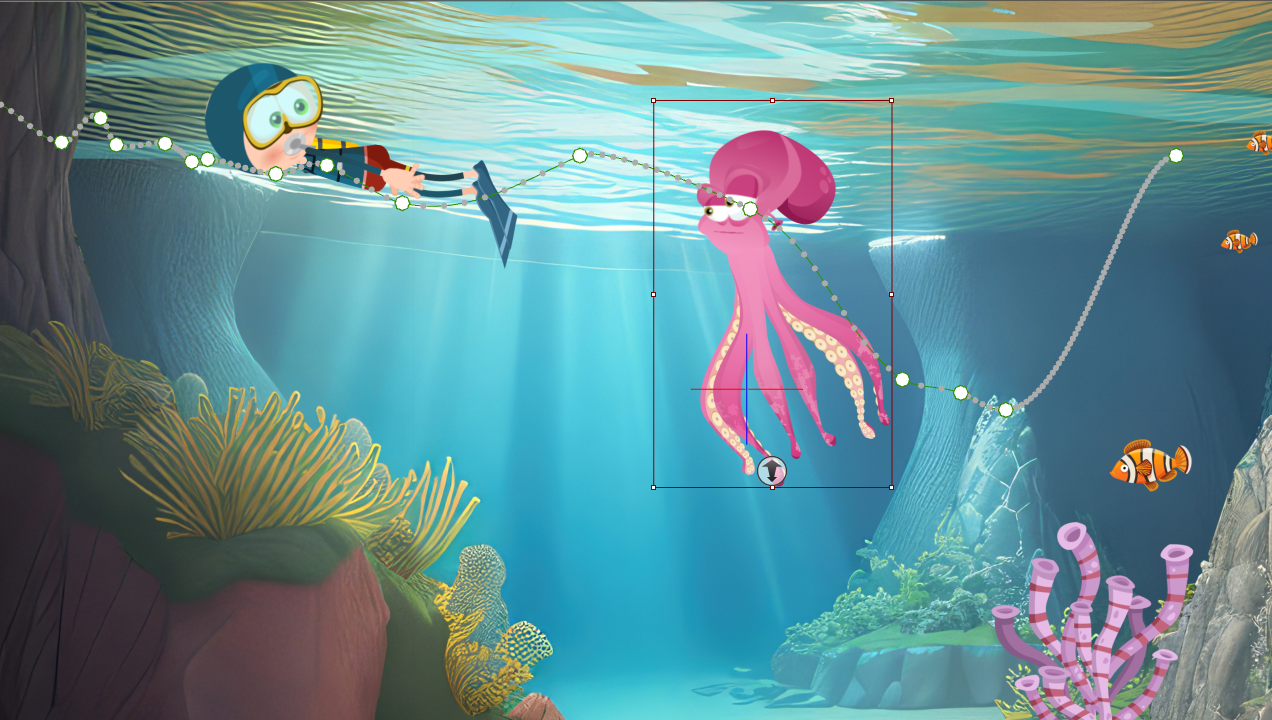
With Motion Pilot, you can now make the scuba diver automatically swim as you pilot him around the screen using your mouse. In Motion Pilot, there is a section called Motion. Check the Blend Motion box, then drag and drop your swim motion onto the text box. If you only want him to swim forwards, scroll up to Face Cursor, and turn that off so he doesn’t flip direction as he swims.
Position your scuba diver to where he will begin in your animation and then before recording the screen you can select practice so you can rehearse you motion. Once you click Preview, move your mouse over the scuba diver and hit the space bar and watch him come to life and swim, following your mouse movement in real time.
You can change the speed at which an actor moves using the Speed slider.
Once you have rehearsed your animation, do the same again, only this time hit Record, to capture all of your characters animation in real time. Moving your character around feels more like playing than animating, as you become the actor and put your performance into their motions.
From frame zero, hit Play on the timeline and watch your new animation playback. What would have taken hours of tedious keyframing and animation skills has been completed in mere seconds thanks to Motion Pilot and has produced the smoothes result possible.
Even after you have completed many frames of animation, Cartoon Animator allows you to rewind through your project and add new animation or even alter the animation you have created so far.
The octopus actor in our project has Spring Bones built into his body rig, which you can apply yourself to any CTA actor. Spring Bones allow character parts like limbs, hair and accessories to wobble and bounce about in real time automatically, with no need for keyframing from the animator. Spring Bones dramatically reduce the amount of time it takes to produce 2D animation and at the same time provide realistic and smooth motion results.
Instead of adding a motion to the octopus like we did with the scuba diver, this time we were able to be the puppeteer and move him about while we record his movements in real time. After recording the motion of the octopus, we could playback our animation to see your octopus and scuba diver swimming together.
Animation has never been so easy or fun! You can control any character or prop using Pilot Motion. Moving them about like a puppet and just recording it to make an animation in real time.
We were able to pilot the fish in our scene using the same real time puppetry applied to the octopus. In addition, using a Motion Pilot feature called Flock Settings, we could make duplicates of the fish and have them follow the leader. Flock Settings give the option to select multiple items as the children, following the parents with preset time delays and in various patterns. This is the ideal way to create animations of groups like swarming insects or random swirling leaves blowing about in the wind. Again, the type of animation that would otherwise require a high degree of skill and a large volume of time to execute, can be done in seconds.
Even though Motion Pilot makes animation fast, fun and easy, it is still an incredibly powerful tool that gives you total control over your animation. For instance, we saw that Maddison and I could animate the Octopus in real time just by moving the mouse around. But even after the motion is recorded, we can still go back and add more character animation to our actors.
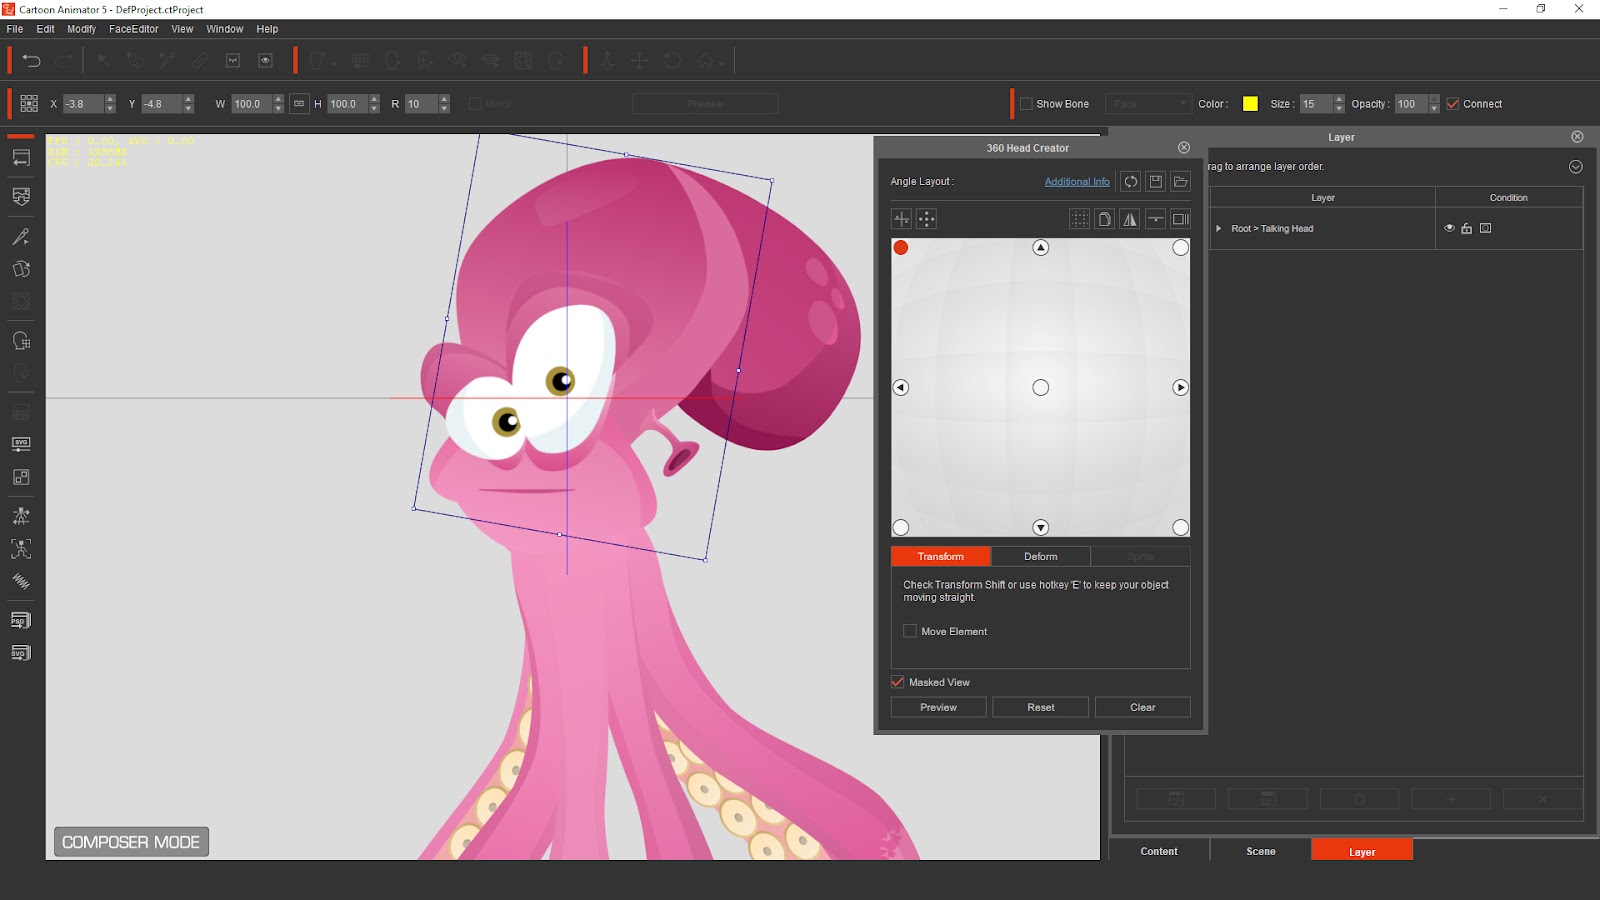
Using Cartoon Animator‘s 360 Head function, we were able to make the octopus turn its head in the direction it’s swimming. We could keyframe the rotation of the actors head and even add in facial animation like blinking and lip syncing to voiceover tracks.
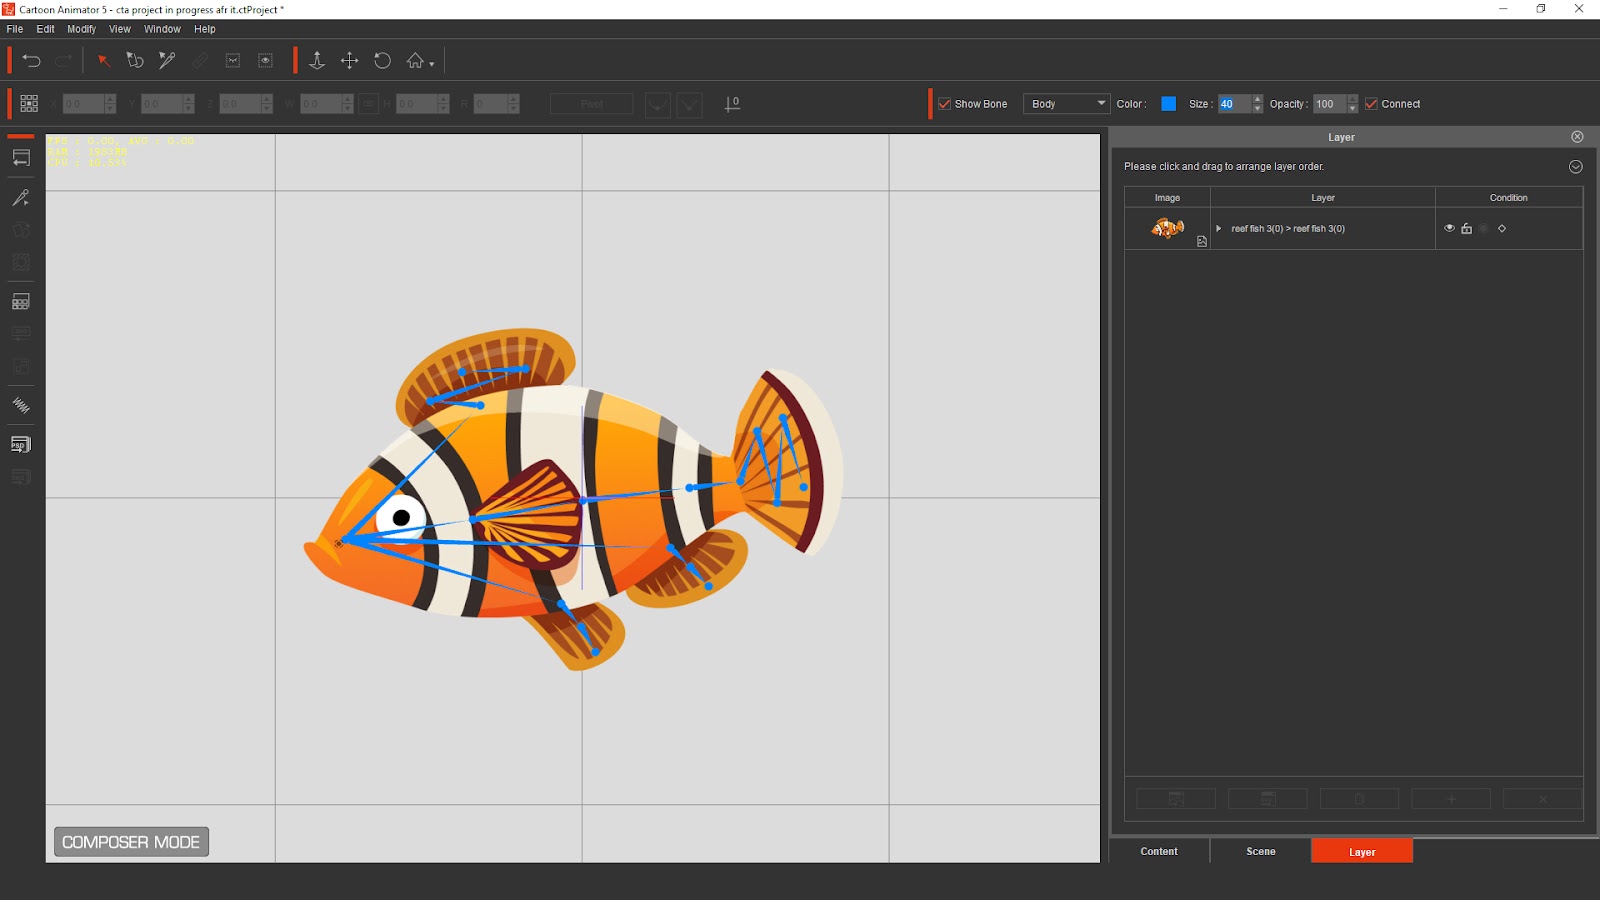
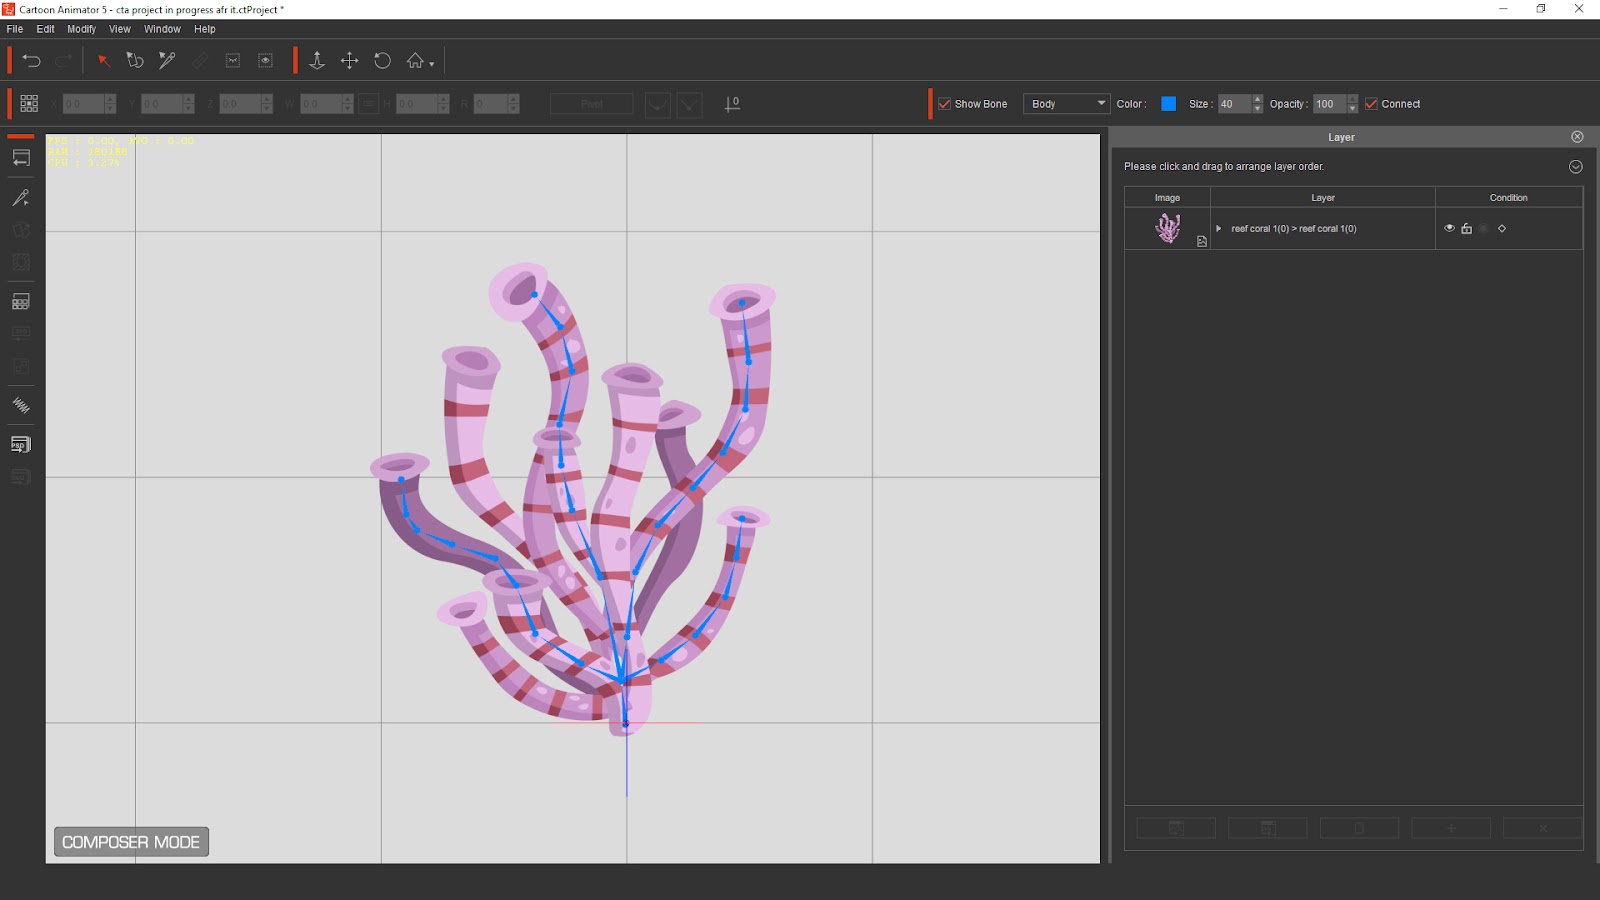
Spring Bones were easily added to the flat PNG fish props to make them move in a more dynamic way, as shown in the image below. Then, using the Wave function of Motion Pilot, we were able to have the fish move automatically, controlled by parameters we set. For instance, by adjusting the Y-axis of the Move Amplitude, the fish will now bob up and down in the water on its own. And changing the Loop Duration determines how fast or slow this motion is. You can even tell Cartoon Animator whether you want the fishes movement to be constant or random.
As well as puppeting your actors in real time, you can create a specific path that your actors can follow, so you have total control over their movement. After plotting a path with mouse clicks, you can link your actor to the path, which it will follow as the animation plays, and you can determine how long it takes for the actor to progress along that path. In the image below, the red line is the path that has been manually drawn for the fish to follow.
Your actors don’t have to just move side to side and up and down either. In Cartoon Animator you can build your scenes so they have camera depth. All of the elements in your scene are layered, from close to camera, to all the way off in the distance. This means you can have your actors move in front of and behind objects and control this during live recording with Motion Pilot by adjusting the Z-axis. We were even able to use the Scale function to make actors become larger as they move closer to camera, and smaller as they move further away.
There are lots of different ways you can control your actors with Motion Pilot, and changing the parameters for how they move is fast and easy, and give instant results that you can preview before recording your final movie.
Finally, you can decide whether you want your actor to move in time with your mouse or using the Lazy Mouse function, you can have the actor follow along at a slower, smoother pace.
You are not limited to just the actors in your scene being controlled by Motion Pilot. You can control other scene elements as well, to help bring your scene to life in a dynamic way. When we set up our scene and added the sponge as a static prop, we were able to add our own custom bones to the sponge to give it a simple skeleton. Then we turned some of those bones into Spring Bones, giving them flexibility. Using Motion Pilot, we were able to set the rotation on the prop so it gently moves side to side, as if affected by the water current, and it does this automatically as our scene plays.
By making the Tween frames Random, the motion looks more natural, and then we can set the Loop duration to make the sponge gently sway about during our scene, while the rest of the action takes place around it.
You can apply this style of automated motion to any item in your scene, meaning everything can move in its own unique way. We could even apply the wave motion to the water current prop at the top, creating the illusion of the water constantly moving. By applying Spring Bones to this prop, it appears to flex and wobble about when we applied a simple Wave motion to it, helping to bring our scene to life.
Getting the exact look you want is as easy as changing the values in the menu, for instant results. You can make them as realistic or as exaggerated as you want!
Maddison and I had so much fun working together on this Motion Pilot project. Anyone of any animation skill level, advanced, amateur or even zero experience, can be producing quality animation instantly with CTA5 now. You don’t have to do anything but have fun, because Cartoon Animator and Motion Pilot do all the work for you, making the process feel more like playing than animating.