Faster, smoother, and more versatile – the latest upgrade of Unreal Live Link 1.3 for iClone is here, now supporting the latest Unreal 5.3 and addressing industry pain points head-on. A notable improvement is overhauling the Live Link transfer process to support masses of characters with speed and stability.
Moreover, our latest upgrade addresses challenges encountered during animation recording in the Unreal Engine Sequencer. This ensures improved performance across diverse scenarios, even when handling multiple full-body rigs at once. Additional streamlining of the manual data setup process necessary for transferring motion to Unreal Engine projects will also improve efficiency — particularly for interdisciplinary collaborations between team members and individual contributors. By offering these improvements for free, Reallusion hopes to provide a smoother and more enjoyable user experience.
Improved Transfer
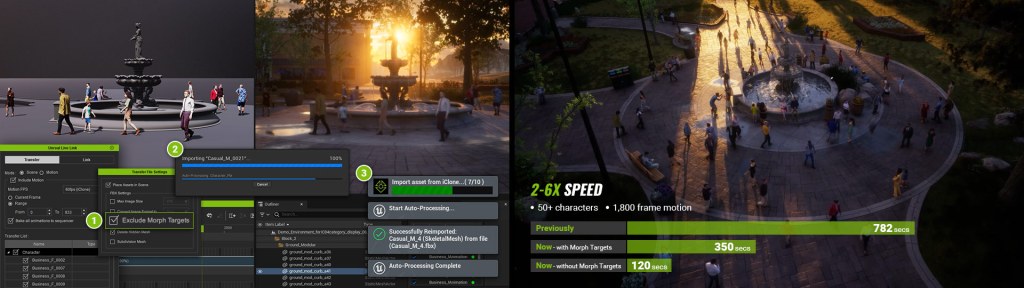
Live Link 1.3 brings swift parallel processing for iClone FBX to Unreal exchange, guaranteeing seamless editing within iClone and expedited transfer speeds. Direct import within the Unreal Editor provides transparent and informative updates on the transfer process.
Automated Sequencer Construction
Live Link 1.3 enables the effortless utilization of multi-pass exports from iClone scene group manager. Furthermore, camera data can seamlessly transfer and switch from iClone to Unreal, accelerating the entire animation workflow.
Refined Sequencer Positioning
Both static and dynamic objects can be attached to an iClone origin and repositioned independently within Unreal with ease. Whether fine-tuning the placement of key elements or orchestrating dynamic movements, this upgrade transcends complications. Grouped animations from iClone can also be independently transferred and positioned in Unreal, giving artists the final say in scene and shot composition.
The Live Link enhancements feature parallel processing for both iClone FBX export and Unreal FBX import, guaranteeing uninterrupted editing in iClone while transfers seamlessly proceed.
For the Unreal Engine Editor, the transfer progress bar has been enhanced to provide detailed real-time updates regarding import statuses.
For handling extensive crowd scenes, a new option called “Exclude Morph Targets” is available to accelerate transfers by excluding expression data.
Sequencer Creation & Crowd Sim Pipeline Unreal 5 | Unreal Live Link 1.3 Tutorial
Users now have the ability to opt for the “Create Sequencer” feature while performing motion transfer, seamlessly consolidating characters, props, and cameras into Sequencer objects within Unreal, streamlining the process of cinematic animation rendering.
Multi-pass export
Utilizing iClone’s scene group management, individual passes can be merged under the master sequencer as sub-sequencers for added convenience in Unreal.
Effortless Camera Handling
Cameras, along with their motion, can be imported with a single click during the Sequencer creation process. Additionally, iClone’s camera switching data seamlessly transitions to the “Camera Cut” track in the Sequencer.
Flexible Repositioning
The place of action for Sequencer objects can be defined by attaching them to the iClone origin, which enables manual positioning in Unreal. This feature goes beyond static objects to include dynamic bodies such as moving vehicles. Unreal Engine objects can now influence iClone animations during runtime, allowing for the polishing of character animations within iClone.
Positioning with iClone Origin in UE5 | Unreal Live Link 1.3 Tutorial
Installation Guide
To fully install iClone Unreal Live Link, please make sure to prepare the latest version of the following software.
iClone 8.4 (8.4.2505.1) – install from Reallusion HUB
Unreal Live Link Plug-in for iClone 1.3 (1.3.2530.1) – Install from Reallusion HUB. If you have a previous version installed, make sure to update it by selecting “Updates” in the HUB.
iClone Live Link plugin for Unreal 1.6 – Download and install from Unreal Marketplace / Unreal Launcher
Auto Setup for Unreal 1.33 (1.33.6129.1) – Download and manually copy folders to the Unreal project. Refer to the provided guide for instructions.
For a comprehensive installation guide, refer to the manual and tutorials listed below:
The new Crowd Sim in iClone 8.4 has been enthusiastically received by the iClone community since its release. It is now easier than ever to add crowd filler to indoor and outdoor scenes to give more movement, more action, and more life to a scene. While I haven’t yet released my full review of the crowd sim (still experimenting with certain aspects of it) I have been more than pleasantly surprised with its ability generate mesh-based crowds in little time.
From a handful of pedestrians and seated characters to armies running into the hundreds, I have had few problems and practically no learning curve (my favorite thing about Reallusion products) as I have tested many different scenarios involving different-sized crowds. A lot of those scenes have used anywhere from a dozen or fewer actors to over 700 mixed LOD 1 (7K) and LOD 2 (800 KB) characters decimated and optimized in Character Creator 4. iClone handled these crowds just fine but when switching to Edit mode on a few hundred characters be prepared to wait a minute or so.
Yes, I know. A minute or so can seem like forever but I am talking about changing hundreds of Lite meshes to edit to make changes or duplicate. These edits can be slow due to the sheer computational load placed on the computer. Once switched back to Lite mode iClone is back to normal.
One thing to keep in mind is that while the new Crowd Sim can create filler crowds it is not designed to create massive crowds like armies or stadium crowds in the thousands or tens of thousands. As usual with new 3D tools, you give us an inch and we’ll want a mile because we always want more. So let’s take a look at the difference between these massive high-end crowd generators versus the Crowd Sim.
HIGH-END CROWD GENERATORS
When you look at crowd solutions like Massive for Maya priced at $3500, $500 for monthly rental, uCrowd at €1,600 per month, Golaem (an incredible crowd tool) comes in at €7,000 per year while Goaem Lite can be rented for €1000 per year you can see the major problem. None of these are what we might call “budget-friendly” unless you are using them commercially to support the cost.
Simulating huge crowds is hard to justify for the average amateur or home animator and is out of the reach of a lot of freelancers who would love to work at this level of crowd creation. I can spend way too much time playing around… err… experimenting with these types of crowd generators instead of getting the work done but the budget for these tools just isn’t there unless it is baked into a contract or provided by your employer.
Most of these heavyweight and high-price tools rely on a variety of ways to bring down the poly count like basing the crowd on a particle system with lower computational overhead. Crowd agents, proxies, and other means are used to produce mixed crowds that are not generally one hundred percent mesh based as are crowd sims like iClone.
One of the reasons 3D crowds in triple AAA productions seem to flow is because they do. In some cases, the particle simulation is almost like flowing water with the crowd being deflected by large objects while moving others smaller objects with their flow. Anyone that worked with fluid simulations can recognize that flowing movement and yes it looks great in the right situation… with the right budget or a rich grandmother who throws money at you.
How did Reallusion work on the crowd problem to give us what we have? Knowing this company and its leadership, I would bet this was long ago baked into a roadmap of future research and development because we needed some other tools like Optimize and Decimate along with the powerful Motion Director tool to get the system we have today. I would be very surprised if the Crowd Sim “just happened” because few things at Reallusion just happen without planning but it could also be the natural evolution of the prior tools and Reallusion adapted the roadmap for it. Either way, we’ve wanted a crowd sim and now we’ve got a crowd sim.
LITE MODE
Lite Mode, to me, answered my question of how they pulled this off. Many of us have tried other solutions like the crowd generator in 3DS Max (too limited) and Anima Crowd (a bit clunky and can be a hassle to get characters and assets into). We always ran into a wall as to how many characters iClone could handle as it was easy to create the crowd, but it could bring iClone to a crawl if it had too many characters.
It didn’t seem to matter so much about the poly count as it did the number of characters we were trying to use. Past a certain point… usually somewhere between 50 to 100 characters, iClone would start protesting and staging a work slowdown until you gave it something less resource-intensive or just grind on through the process. Lite mode solves this problem as explained below.
EDIT MODE VS. LITE MODE
Whenever you can’t edit a group of characters created with the Crowd Sim that is due to the new modes and this is where these modes come into play. The Lite mode flattens everything but the transform animation to reduce the computational overhead to provide a smoother real-time playback and working experience.
When in Lite mode, the only feature left for the characters is the Transform settings.
All the character’s animation-related settings or effects will be temporarily flattened and inaccessible in the Lite mode.
You can only see the Transform track in the timeline.
If the character animations utilize constraints, such as Reach or Link, then perform Flatten All Motions with Constraint before converting the character to Lite mode.
Now don’t panic. When it says it flattened the animation-related settings, making them inaccessible, it doesn’t mean you’ve lost all that animation information. Just select the character or characters and press the Edit Mode button to get all that back in editable form.
This is a lot easier than you may think. While working with a 735-character Roman Legion army I created groups of 49 (7 X 7 rows and columns) evenly spaced which is very easily done in the Crowd Sim. I needed to make some changes including duplicating the groups instead of generating them every time. I could easily select a group or groups and press the Edit mode button giving me back control to make extensive edits.
Just don’t forget to change them back to Lite mode when finished.
TIP – Don’t panic. If you can’t control or edit a crowd-generated character or characters you need to select that character or characters and change them to Edit mode. Lite mode only allows for the transform to be available. Everything else is flattened unless you go into Edit mode.
WALKERS & STORMTROOPERS
One of my early attempts was a Star Wars-themed crowd with Stormtroopers and bipedal Walkers. Out of necessity, I altered the knees to go forward instead of backward as they were originally. This was so the walkers could access iClone motions including the same motion as the Stormtroopers.
I rigged the AT-ST/A Walker with AccuRIG in Character Creator 4 and masked out the bones from the pelvis upward. You could leave those bones active and possibly rotate the weapons on each side, but time was short, so I used masking to eliminate unforeseen problems with “ghost bones” that are not being used.
I created a custom Actor Group with a Walker and several Stormtroopers so I could drag and drop the Actor Group, with randomization options, onto the battlefield in a skirmish line with forward elements. I used three groups that totaled three Walkers and around 100 Stormtroopers which gave iClone absolutely no problems. It ran the scene as it would any without a sign of trouble. A very pleasant surprise.
As you can see from the image above right, I have only used the legs (white bones) and masked out all the bones from there up to the head (black bones) to quash unneeded movement from human walking motions which opens the iClone motions library for use with the Walker.
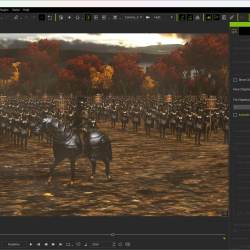
After this, I went back in time a bit to create a Roman Legion from Xurge 3D’s excellent Julius Ceasar outfit in the Marketplace. I created 5 variations of Roman soldiers at 7K and 800 KB. This allowed the army to have one 49-man 7K unit close to the camera and the other 800 KB units around and behind that main unit as the camera pulled back.
I added a higher quality character closer to the camera riding horseback, inspecting the Legionnaires. The horse is an older iClone prop, Warhorse, with built-in animations. The 736-character scene (including the main character) gave iClone no problems until I added the old, inefficient, physic-enabled banners. That slowed real-time playback and added hours to the render. With the banners set to smooth it rendered in about half an hour. In fairness, those banners were ancient, from the old Bullet physics engine, and were way too heavy in polycount.
WARNING: VIDEO BELOW CONTAINS AUDIO
A 735-character army may not seem huge but 735 people in a street scene would be extremely busy so keep all this in context. A lot of scenes are not going to require thousands or even hundreds of characters as you don’t want to make a scene so busy it’s hard to keep up with the characters and the story they weave.
I haven’t finished stress testing the Crowd Sim yet, but I also haven’t come into a scenario where iClone couldn’t handle a crowd once it was all in Lite mode. Edit mode can be slow if you open 400 hundred characters at once in Edit but iClone never crashed. I could move them, duplicate them, and work with them, it just took some time, but I was trying this in the extreme for testing.
The new Crowd Sim is just what we needed without having to shell out big bucks for an extensive crowd system that probably wouldn’t be blessed with iClone’s well-known simplicity. For those that want Lord of the Rings-size armies, you can always create them in iClone and use the multi-take recording in Unreal Engine.
Digital Artist MD “Mike” McCallum, aka WarLord, is a longtime iClone user. Having authored free tutorials for iClone in its early years and selected to write the iClone Beginners Guide from Packt Publishing in 2011, he was fortunate enough to meet and exchange tricks and tips with users from all over the world and loves to share this information with other users. He has authored hundreds of articles on iClone and digital art in general while reviewing some of the most popular software and hardware in the world. He has been published in many of the leading 3D online and print magazines while staying true to his biggest passion, 3D animation. For more information click here.
Dom began his career in the television advertising industry, directing commercials using new production’s digital and 3D tools. Over the past 20 years, he has also worked on music videos and documentaries, catering to a global clientele.
Since his childhood, Dom has been a martial artist, mastering various disciplines such as Taekwondo, Aikido, and Kung-Fu. His exceptional skills in Taekwondo, particularly at the Olympic and spectacular levels, have highlighted his talent for stunt work and acrobatics from a young age.
In 2007, Dom established his own company, DOM ANIMATION STUDIO, specializing in product and post-production. With a unique touch, he incorporates 3D characters into real environments, integrates special effects (SFX), and creates martial arts and acrobatics action sequences for commercials.
In 2010, Dom directed a short action film utilizing camera tracking, motion capture, and 3D compositing techniques. Two years later, he produced and directed his first independent short films, which received several awards in Los Angeles, Texas, Las Vegas, and New York for Best Action Sequences, Best Action Director, and Best Short Film.
Introduction: Unveiling the Vision
“KIHA,” a captivating science fiction short film, stands as a testament to the boundless creativity and technical prowess of director and Maya 3D animator Dom Fred. In this quick behind the scenes, the magic unfolds through the seamless integration of iClone, where every detail comes to life with precision and finesse.
Character Creation: From Concept to Reality
The journey of “KIHA” begins with the intricate design of its characters, meticulously crafted using the powerful tools within Character Creator. Here, Dom Fred finds a canvas to breathe life into his vision, ensuring that each character embodies the essence of the story with unparalleled detail and authenticity.
Motion Capture: Breathing Life into the Narrative
Enter ActorCore, a treasure trove of high quality 3D animations that infuse “KIHA” with a sense of realism and authenticity. With a diverse array of motion captures at his disposal, Dom Fred navigates the nuances of performance, seamlessly integrating them into the fabric of his narrative to evoke emotions and captivate audiences.
Mastering Animation: The Power of iClone 8
Central to the fluidity and technical precision of “KIHA” lies the formidable power of iClone. Dom Fred harnesses the powerful iClone 3D motion editing tools at his disposal to imbue his characters with lifelike movements and reactions, ensuring that every frame resonates with depth and emotion. With precise control over animation keys, Dom navigates the intricacies of action scenes with finesse, sculpting moments of tension and intrigue that keep audiences on the edge of their seats.
Real-Time Production: Bridging the Gap with Unreal Engine
As the narrative of “KIHA” unfolds, the seamless integration of iClone and Unreal Engine emerges as a pivotal asset in the director’s arsenal. Through iClone to Unreal LIVE LINK, Dom Fred navigates the dynamic landscape of real-time production, fine-tuning the placement of characters, settings, and camera movements with unparalleled precision. This synergy between iClone and Unreal Engine empowers the director to sculpt his vision with unrivaled flexibility, ensuring that every frame resonates with cinematic brilliance.
The Grand Finale: Lighting, Composition, and Rendering
As the pieces of “KIHA” fall into place, the stage is set for the grand finale on Unreal Engine. Here, Dom Fred meticulously orchestrates the composition, lighting, and rendering, elevating the visual splendor of his creation to new heights. With Adobe Premiere Pro 2024 serving as the final canvas for post-production, Dom Fred weaves together the threads of his narrative with precision and finesse, culminating in a cinematic masterpiece that transcends boundaries and captivates the imagination.
Conclusion: A Vision Transformed
In the realm of digital filmmaking, “KIHA” stands as a beacon of innovation and creativity, a testament to the limitless possibilities of technology and imagination. Through the collaborative synergy of iClone, Character Creator, and Unreal Engine, director Dom Fred breathes life into his vision, transforming dreams into reality with every frame. As “KIHA” takes flight, it invites audiences on a mesmerizing journey through the depths of the human experience, where the lines between reality and fantasy blur, and the essence of storytelling shines bright.
Mesh topology. Probably the most important yet least utilized and discussed topic among those new to 3D modeling and animation. Why? Because it can be hard to master and implement for many users. This is one of those skills most of us can learn but not all of us will be good at it. Many will go about their 3D journey without considering good topology and its effect on the movement of the mesh.
Clean, good topology means the underlying mesh of the model is evenly distributed with consideration given to areas that bend a lot like the eyes, shoulders, and elbows. In some cases, these areas will consist of denser mesh such as armpits or near the mouth.
Even though I have been in 3D for decades, topology was one of those areas that I knew about from a working perspective but had to research to be able to explain it better. This article depends heavily on that research to explain some facts about mesh topology that you may not have considered before.
Exploring Good Topology: Understanding Different Types of Topology
TRIANGLES (TRIS)
In a 3D mesh, triangles are the fundamental building blocks that make up the surface of a 3D object. A 3D mesh is a collection of vertices, edges, and faces that define the shape of an object in three-dimensional space. Triangles are the simplest type of polygon, consisting of three vertices and three edges.
Triangles make up many models, particularly legacy models. While tris can make just about anything they can also collide and collapse causing the mesh to buckle in an unnatural way or stretching of vertices that is noticeable due to the texture stretching with it.
Key points about triangles in meshes.
Basic Unit: A triangle is the smallest unit of a 3D mesh. It is defined by three vertices and three edges.
Rendering Primitives: Triangles are commonly used to render primitives in graphics pipelines. Many rendering engines and hardware are optimized for processing and rasterizing triangles.
Simplicity and Efficiency: Triangles are computationally efficient and simple to work with, both in terms of mathematical calculations and rendering algorithms.
Interpolation: Triangles allow for easy interpolation of attributes such as color, texture coordinates, and Normals across their surfaces. This is crucial for achieving smooth shading and realistic rendering effects.
Deformation and Animation: Triangles play a key role in character animation and deformation. They define how the surface of a 3D model deforms as it moves, providing flexibility for realistic animations.
Smoothing and Normals: Normals (vectors perpendicular to the surface) are often calculated at each vertex of a triangle to achieve smooth shading. This helps simulate lighting effects and create a more realistic appearance.
Triangles (Tris) based game character.
QUADS
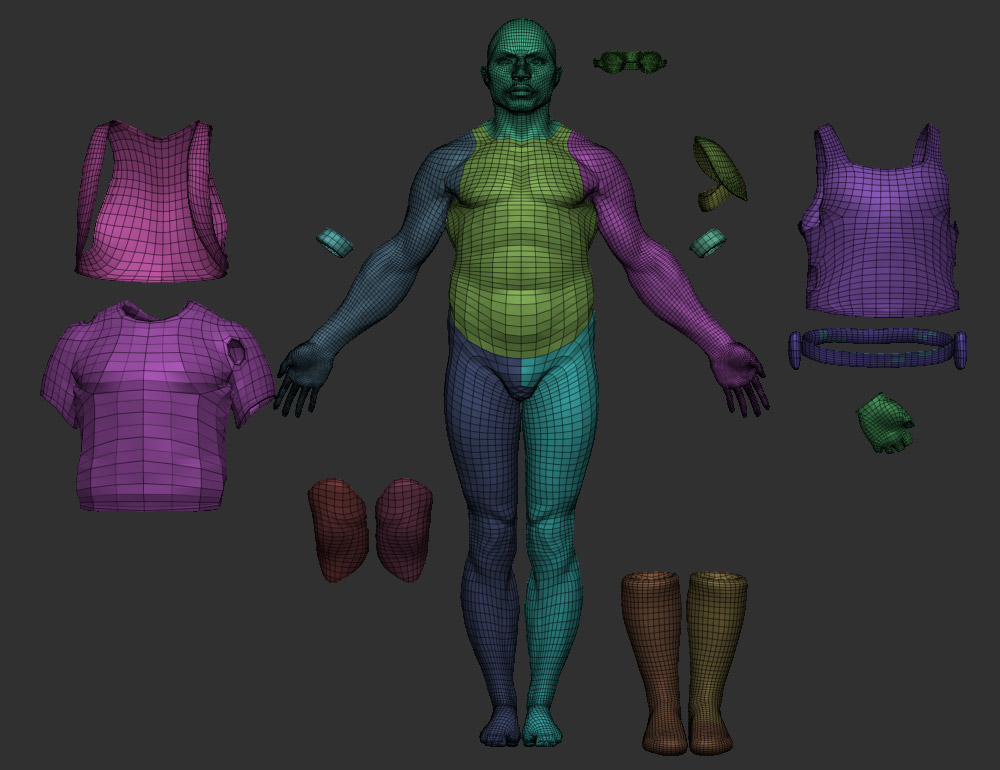
A quad is a polygon with four sides (edges) and four vertices. Quads are often used in 3D meshes to represent planar surfaces or faces of 3D objects. They are an alternative to triangles. Quads have some advantages and are commonly used in certain modeling scenarios.
Key points about quads in 3D meshes:
Planar Surfaces: Quads are well-suited for representing planar surfaces, as they form a flat, four-sided shape.
Modeling Convenience: During the modeling process, especially when creating surfaces that align with a grid or require a regular structure, quads can be more convenient and easier to work with than triangles.
Edge Loops: Quads are often used to create smooth edge loops in character modeling. Edge loops are sequences of connected edges that follow the natural contours of a character, helping with deformation during animation.
Deformation and Animation: Quads can deform more predictably than triangles in certain situations, especially when modeling characters or objects that need to bend or deform smoothly.
Subdivision Surfaces: Quads are commonly used in subdivision surface modeling. Subdivision surfaces involve iteratively subdividing the faces of a mesh to create smoother surfaces, and quads play a key role in this process.
Smoother Shading: In some cases, quads can contribute to smoother shading when rendering, especially if the geometry is planar and the lighting conditions are appropriate.
UV Mapping: Quads can simplify UV mapping, the process of applying 2D textures to 3D surfaces. UV mapping is often easier with quads compared to triangles.
Quad Topology ZBrush Demo Soldier
DECIMATED (OPTIMIZED) MESH
Decimation involves reducing the number of polygons in a 3D model while attempting to preserve its overall shape and appearance. The goal is to simplify the geometry by removing unnecessary detail, which can be useful for optimizing the model’s performance in terms of rendering, animation, or real-time applications.
The process of decimation typically involves the following steps:
Polygon Reduction: Decimation algorithms analyze the geometry of the mesh and selectively remove vertices, edges, and faces while attempting to retain the essential features of the model.
Preservation of Important Details: Advanced decimation algorithms aim to preserve critical details and features of the original model, such as edges, contours, and surface characteristics, to maintain the model’s visual fidelity as much as possible.
Simplification for Performance: The primary motivation for decimating a mesh is often to improve performance in real-time applications or when dealing with large and complex scenes. By reducing the polygon count, the model becomes less computationally intensive to render or animate.
UV Mapping Considerations: Some decimation tools take into account the UV mapping of the original model to ensure that texture coordinates are preserved, minimizing the need for retexturing after decimation.
Adjustable Parameters: Decimation tools often provide adjustable parameters that allow the user to control the level of simplification, balancing between reducing polygon count and preserving details.
RE-MESHING VERSUS RE-TOPOLOGY
The primary goal of re-meshing is to alter the overall geometry and structure of a mesh, often by changing the distribution of polygons or altering the topology. Re-topology involves creating a new surface for an existing 3D model, often with the goal of improving the topology for better deformation, animation, or UV mapping.
WHY DO WE SAY CHARACTER CREATOR 4 HAS GOOD TOPOLOGY?
Clean and Efficient Geometry: Character Creator 4 mesh topology has clean, and efficient geometry with as few polygons as necessary to accurately represent the character shape avoiding unnecessary details in areas that don’t require it.
Evenly Distributed Geometry: Character Creator 4 mesh also relies heavily on evenly distributed geometry that maintains a consistent polygon density across the model to ensure smooth deformations during animation.
Consistent Normals The consistent Normals of the CC4 character mesh avoid shading problems and other issues.
Quads (Four-sided polygons): Character Creator’s four-sided quad topology allows for more predictable deformations than triangles and is generally easier to work with during the modeling process.
Topology for Animation: The CC4 mesh also takes into consideration the intended use of the model which in this case is smooth bipedal animation. CC4 topology deforms well during rigging and movement. Joints and areas of deformation have sufficient geometry to bend naturally without buckling or collapsing.
Edge Flow: CC4 character meshes also maintain a logical and consistent flow of edges that follows the natural contours of the object. Good edge flow is also essential for animation and deformation.
UV Mapping Considerations: The UV Mapping in Character Creator 4 meshes prevents seams from showing up in highly visible areas of the character. Normal maps are used for finer details to optimize performance.
Efficient Use of Detail: CC4 mesh focuses on adding detail where it matters most, such as the face or areas that will be prominently featured.
Character Creator 4 mesh topology checks off all the important points regarding quality character meshes so you can create a character with the confidence it can withstand the intense scrutiny of a camera closeup.
Before I close, I want to also point out that using tris does not, by itself, mean bad topology. If they don’t collide or bunch up tris are fine. So are less than optimal models that may not have perfect quads and contain mixed tris if they are distributed evenly enough to provide good vertex manipulation for animation and posing.
I repeat… whatever topology you use, even distribution is key. We are not seeking perfection but a workable mesh that won’t twist, collapse, or distort allowing the animator to pay more attention to the details of animation and less time on problematic mesh.
And… as usual, Character Creator has your back when it comes to characters. CC4 takes care of topology by providing clean base meshes and industry-standard optimization and decimation. From smooth, front-line characters to highly decimated background crowd actors, CC4 does the work, while you do the storytelling.
MD McCallum – WarLord
Digital Artist MD “Mike” McCallum, aka WarLord, is a longtime iClone user. Having authored free tutorials for iClone in its early years and selected to write the iClone Beginners Guide from Packt Publishing in 2011, he was fortunate enough to meet and exchange tricks and tips with users from all over the world and loves to share this information with other users. He has authored hundreds of articles on iClone and digital art in general while reviewing some of the most popular software and hardware in the world. He has been published in many of the leading 3D online and print magazines while staying true to his biggest passion, 3D animation. For more information click here.
Peter Haynes is a filmmaker based in New Zealand and a prior winner of the Epic MegaGrants award. He takes time out of his busy schedule to generously provide a quick tutorial on his process for enhancing lip-sync animation using Reallusion iClone. This article demonstrates his mastery of iClone AccuLIPS in the creation of expert lip-sync animation.
Effective ways to make stylized lip-sync
I believe that my mini-guide will prove useful, as existing resources focus on AccuLIPS and Face Puppet separately without much integration. I aim to emphasize the effective combination of these tools to achieve a more dynamic and dramatic character performance, moving beyond simple lip-syncing techniques.
iClone is just really simple. The pipeline between Character Creator 4, iClone 8, and Unreal is pretty seamless once you’ve done it a few times.
My workflow for lip-sync animation
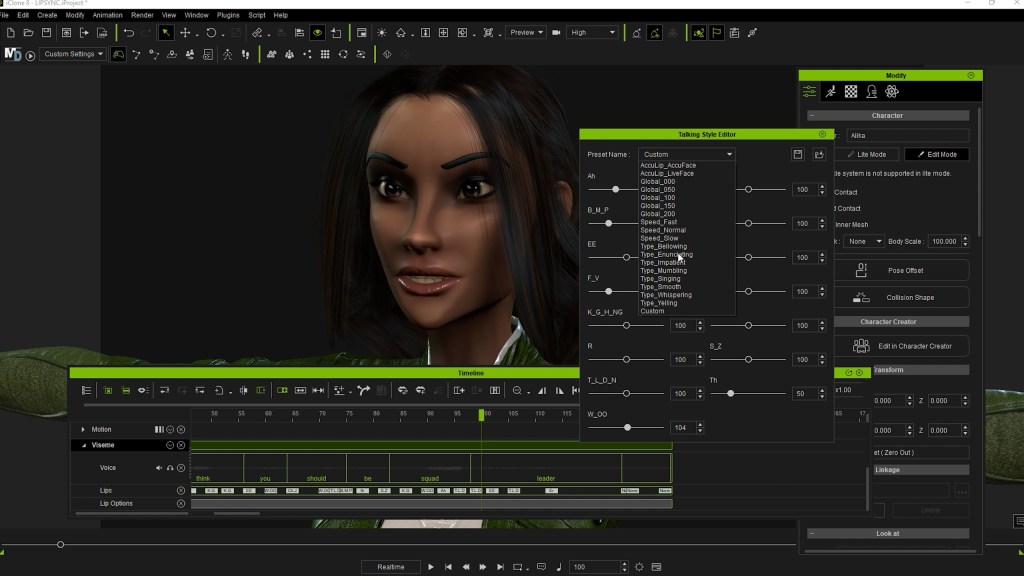
1. Before I do anything else I like to enhance the AccuLIPS clip by going into the lip options and setting the smoothness to 1 and the strength to 1.2. I find this just tends to make the movements look a bit more natural.
Setting the smoothness and the strength for lipsync animationSetting the talking style for lipsync animation
2. I then like to set what I call my “base emotion” for the clip, which can be done with an animation from the Digital Soul pack of pre-animated facial expressions, or by capturing my own expression from my iPhone via Motion LIVE for facial mocap.
3. After that, I make another pass, often with face keys, to enhance and finetune particular moments in the dialogue.
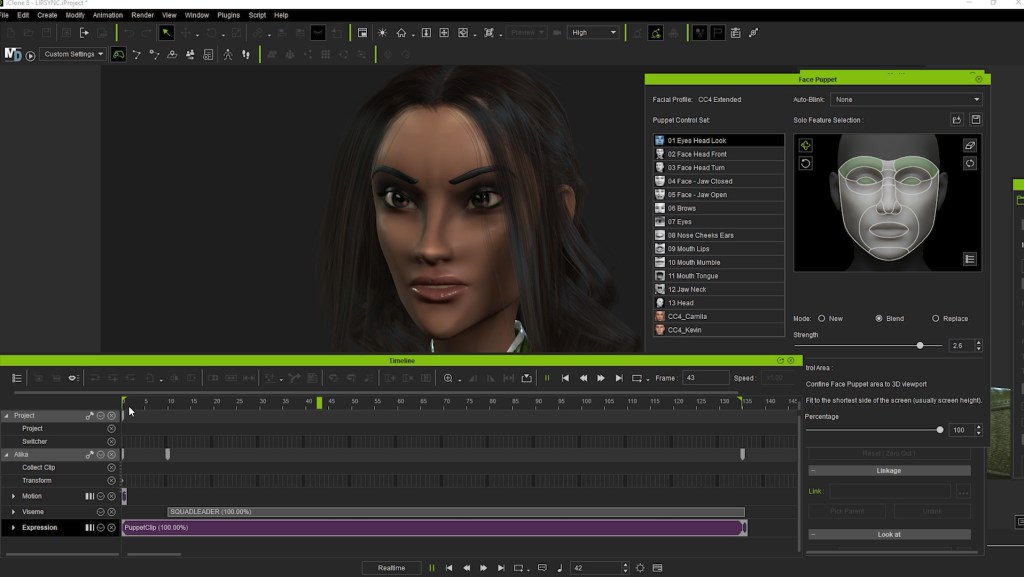
4. Then I’ll make another number of passes with Face Puppet, adding more emotion at key points and generally moving the mouth in a more expressive way.
5. Finally, I add some head motion with Face Puppet, and then whatever body motion the character requires for the scene.
Hollywood-caliber mocap at the fingertips: ActorCore blazes the stage for mass protest productions
Orlando-based Monkey Chow Animation Studios presents Riot, released on ActorCore, the leading online 3D content store. As a highly anticipated theme, Riot is a motion capture content pack for drama and action scenes where crowds express anger, take part in disorderly conduct and intense confrontations.
Riot Puts a Spotlight on a Gripping Discourse
Embodying the spirit of Selma, Born on the 4th of July, The Hunger Games, and recent global flare-ups marked by widespread social and political unrest, Riot is a dynamic motion capture pack comprising 61 tumultuous sequences. Tipping the intensity scale are depictions of public protests and clashes with authorities, ranging from peaceful marches with placards to confrontations with law enforcement clad in riot gear.
Riot encompasses a spectrum of actions, including hoisting signs, police presence, and engaging in physical altercations such as shoving and throwing debris. This diverse array of 3D motions enables crowds of characters to chaotically convey outrage, offering a level of speed and convenience that minimizes production time and costs compared to live-action shoots featuring a crowd of extras within an on-site set-piece.
Get Behind the Scenes to Witness the Dedication
Monkey Chow Animation Studios is a leading motion capture company headquartered in Orlando, Florida, with a catalog of notable motion packs, including Run for Your Life and Bank Heist. Each animation within these packs is meticulously captured by skilled stunt performers in state-of-the-art facilities, showcasing a combination of expertise and creativity. Explore the behind-the-scenes footage to witness the dedication and innovation that goes into each production.
Monkey Chow Motion Capture Pulls Out All the Stops
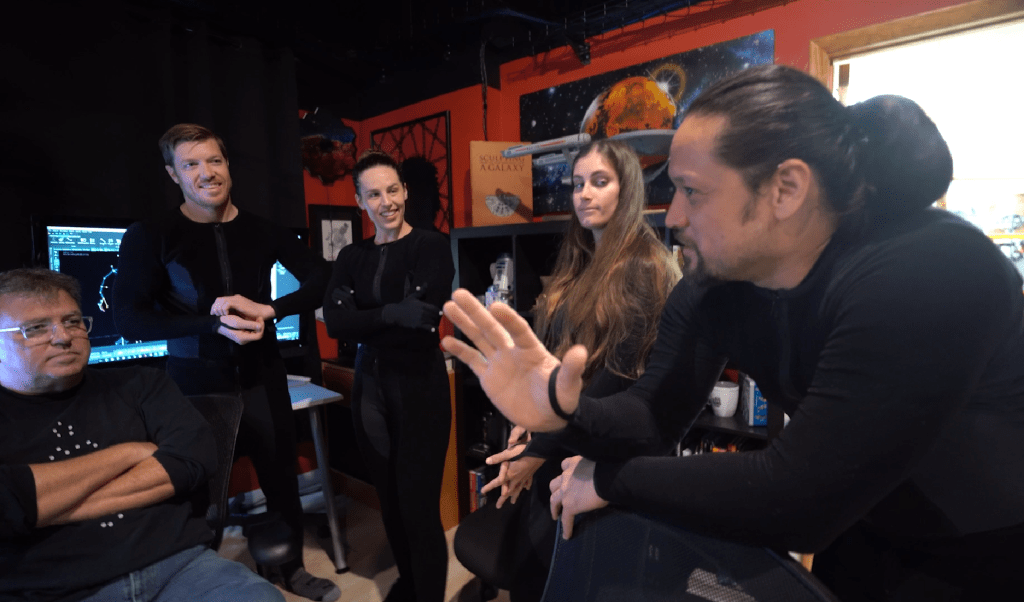
In motion capture, it is crucial for cameras to capture as many of the performer’s bodysuit markers as possible. Consequently, the production team had to create specialized props for mocap animation to minimize occlusion. In one instance, a stand-in shield was crafted to replicate a police shield, featuring only the contact points required by the actors. This puts the emphasis on the performers’ imagination, as rendered objects may appear larger than they do on stage.
Riot needs to cover all the moves, from a peaceful protest to an all-out street war between demonstrators and police. We put together a team of experienced stunt professionals, and they helped us block out a lot of the fight scenes.
Jeff Scheetz, Monkey Chow Animation Studios
Fast Crowd Generation Presented by ActorCore and iClone
Select from a diverse collection of over 400 fully-rigged, animatable 3D characters available in the ActorCore asset store to build an extensive crowd as ambient extras. Alternatively, users can easily “clone” their animated bystanders within iClone, forming a surge of angry citizens marching, waving, and shouting.
This pack is ideal for generating seamless crowd scenarios, as all walking motions are loopable. When integrated with iClone 8 Crowd Simulation, users can effortlessly spawn characters with diverse protester animations, rapidly assembling a sizable public demonstration scene. Merge motions, such as those found in Run for Your Life, to create chaotic moments, facilitating the swift creation of a dramatic riot scene for use in games and films.
iClone Advances Motion Editing
The Riot motion pack encompasses a range of intense interactions, including throwing, pushing, fighting, making arrests, and using police shields to disperse crowds. Each of these actions demands adept handling of objects or involves human-to-human interactions made possible with iClone, the user-friendly software for easy editing and refining of animations. For enthusiasts, Reallusion offers complimentary mocap animation editing courses to assist users in mastering the creation of realistic interactions.
Immediate Riot Motions on Demand
Users have the flexibility to utilize these 61 motions independently or seamlessly integrate them with other motions using iClone’s advanced motion editing features. All motions come with a 100% royalty-free license and can be exported in FBX or BVH formats for integration into real-time game engines such as Unity, Unreal, CryEngine, Game Maker, and more. Why wait? Explore Riot motion pack now in the ActorCore 3D Store!
Welcome to Neriverso, where the captivating world of video games meets the expertise of Neri Neto, a seasoned technology journalist and skilled game programmer. Through Neriverso, Neri shares his profound insights and boundless passion for everything he adores.
As a dedicated game programmer, Neri has lent his talents to numerous indie projects, crafting engaging mechanics and contributing to the development of captivating titles. Embrace the Neriverse and embark on a journey fueled by Neri Neto’s unwavering enthusiasm and commitment to his craft and community.
In his latest video, Neri reviews Character Creator’s ai plugin Headshot 2.0 for game developers to create advanced 3D real-time game characters from photos and 3D models.
With Auto and Pro modes, Headshot offers precise model fitting, texture baking, and full body animation capabilities thanks to one-click generation of low-res virtual heads with 3D hair, as well as high-resolution texture processing with extensive morph options and advanced tools for refinement.
The new Crowd Sim tool in iClone 8.4 has some powerful features and can create a crowd in minutes or less but it is not the only timesaving, scene-enhancing tool that was recently released. I must admit to also putting this particular tool on the back burner until I could get more comfortable with the new features.
That was a mistake.
I had no idea just how much time custom ActorGroups can save while dragging, dropping, and randomizing them into a scene. The best part is, being custom groups, they fit your needs and over time we can create a library of custom Actor Groups for different situations like sporting events, concerts, street scenes, block parties, and military actions.
My first dive into Actor Groups was to watch Kai’s short and info-packed tutorial, Crowd Sim: Customizing Actor Groups, on creating custom groups. This video packs a lot of information into less than six minutes and covers how to create all three types of Actor Groups.
OPTIMIZE & DECIMATE CC4
When I first created a base, I was impressed with the process but wondered what I would do with it until I understood it is just what it says… a base. It’s a starting point that can be used to create Presets that can hold multiple bases (via a drop-down menu) in one preset. Since this is an item I intend to use many times in a scene I need to create variations of my soldier character.
Base Infantry Soldier variations via Character Creator 4 sliders before optimize and decimate.
I used my infantry soldier from the Marketplace to create three Levels of Detail for use in crowd generation. The base soldier, stripped of equipment like harness, backpack and front pouches came in at just under 60K. I created five variations of the original 60K character that differed in face, height, weight, and ethnicity to give me more variation so the soldiers wouldn’t be the same size and have the same appearance.
I left the battle rifle attached to the character and sent it all through the OPTIMIZE AND DECIMATE menu choosing the 7K LOD 1 and 800 KB LOD 2 for the tests. This gives me the option of using the standard character up close to the camera, LOD 1 at the mid-range and LOD 2 in the distance. The battle rifle was optimized along with the characters.
CAUTION: THE BELOW EMBEDDED VIDEO HAS AUDIO
CREATING THE BASE
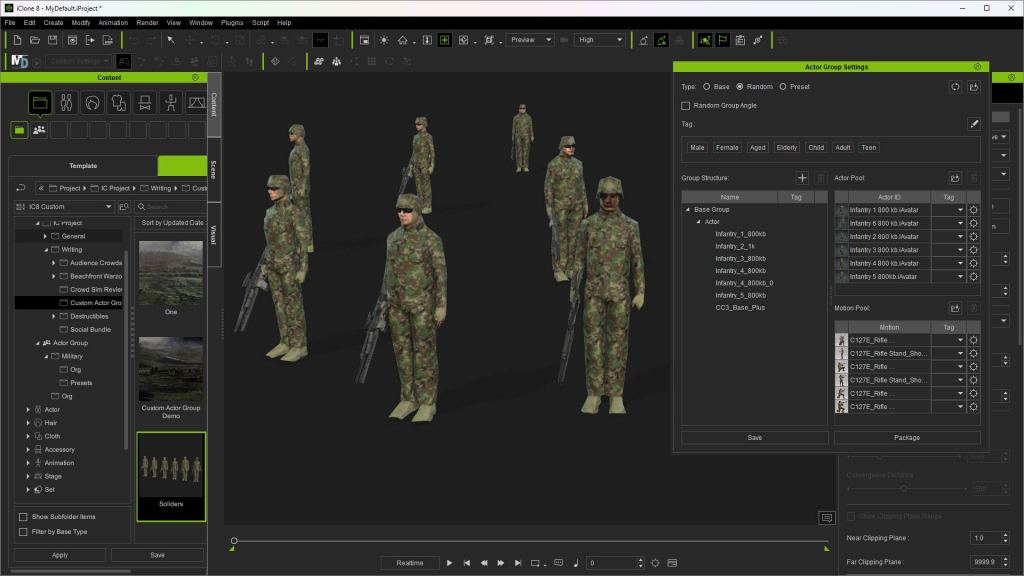
The actual process of creating a base is very simple. Under the CREATE menu, you will find the CREATE ACTOR GROUP down at the bottom. Select this to open the Actor Group Settings popup which is the interface to create or reopen a Base, Random, or Preset actor group. Under the BASE selection, this popup automatically populates with the actors, motions, and props you drag into the workspace.
TIP: Make sure the Actor Group Settings popup is open or you will find yourself creating a scene instead of an Actor Group and will have to start over.
I’m embarrassed to say that I created a group or two, or at least thought I was when I wasn’t because I had not opened the Actor Group Settings to record the group. After this little hiccup, I was creating gun crews, gun pits, and groups of soldiers.
All of them were saved as bases and then used in the creation of military genre Presets. The same can be done for sci-fi, fantasy, contemporary, and others that can, over time, build a huge library of drop-in crowds with control over their randomization.
NOTE: The video tutorial at the end of the article goes into detail about creating base, random, and preset genre-based groups.
Base Group
PRESET
This is where custom Actor Groups really show off their muscle. We can select previously created Actor Group Bases, including multiple bases as mentioned earlier, to deploy and randomize these custom groups. In my example, I have various Random groups and Base groups like a crewed Howitzer emplacement with security and manned sandbag barriers.
All that is required is to drop the preset into the workspace, select what you are deploying from the drop-down menu that pops up, and watch the magic happen. Below you will see the pop-up Actor Group Settings that create the Preset actor group by including the groups along with a pool of actors.
Preset using previously created Base Groups with an actor pool.
RANDOM
Great for random groupings of characters and props. The popup menu utilizes an Actor Pool and a Motion Pool to draw from when randomizing while deploying. The Group Structure is where you drag in characters and props.
Save the random group. It’s not all that flashy at this point because you must deploy the random group to the workspace before you see how it allows you to randomize items like characters and motions. When you deploy the actor group, iClone will provide a pop-up dialog for options.
Random Group
TUTORIAL
I have provided the following tutorial that goes into much more detail about how to create each group and how to modify existing groups to have variations for additional base actor groups. This can all be done very quickly too. Once you get all your base groups created it goes even faster. What you see in the tutorial is far from all the things you can do with Actor Groups so don’t limit using them to things like standing, talking crowds.
CLOSING
In closing, I can say that I have only scratched the surface of what we will be able to do with custom actor groups. I vastly underestimated them when I first viewed Kai’s tutorial, but it didn’t take me long to realize the powerful option of being able to include props in the mix, and accessories through the Character Creator 4 Optimize and Decimate tool.
With volume and NavMesh crowds, walkway crowds, and actor groups we can make crowds for almost any situation, and we can save the crowds and the actor groups for future use.
While I’ve used a military example in this article, the same can be done for science fiction, sports, and other purposes. If it’s winter you can create skaters and a frozen pond, or in summer a youth sports league team item like a baseball dugout with players and coaches.
It will be very interesting in the future to see what the talented iClone user base will do with Actor Groups and other new tools like the Crowd Sim and Distribute Props tool.
If you haven’t looked into customizing Actor Groups, then you are missing out on a versatile and time-saving tool that provides the needed assets large or small scale for your next masterpiece.
Digital Artist MD “Mike” McCallum, aka WarLord, is a longtime iClone user. Having authored free tutorials for iClone in its early years and selected to write the iClone Beginners Guide from Packt Publishing in 2011, he was fortunate enough to meet and exchange tricks and tips with users from all over the world and loves to share this information with other users. He has authored hundreds of articles on iClone and digital art in general while reviewing some of the most popular software and hardware in the world. He has been published in many of the leading 3D online and print magazines while staying true to his biggest passion, 3D animation. For more information click here.
Introduction- Final Steps for 3D Printing or Animating Your ZBrush Characters
We’ve discussed getting a fully adorned character into Character Creator, but what if you want to 3D print a pose of your ZBrush character, or control the poses and facial expressions / lip sync of your character? In this article we’ll cover both topics, giving you even more fun and easy options to fully utilize your character creations.
We’ve already set up a naked body file that we can GoZ back-and-forth between ZBrush and Character Creator. We’ll start from that point, so open your ZBrush project file (.zpr) and your corresponding Character Creator file (ccProject), then press the GoZ All button in ZBrush to relink your files. The dialog box in CC should default to Update, choose “Current Pose” and hit the Update button.
GoZ from CC to ZBrush to ReLink
Update Options for the ReLinked body in Character Creator
Setting Up Poseable Gear in ZBrush
Append your gear (clothing, accessories, weapons, etc…) as subtools to your body files in ZBrush. Make sure your gear subtools have a lower subdivision for each item. Remember, there’s a 300k poly / 600k tri limit in CC. Of course that doesn’t mean your ZBrush files have to be under 300k polys – for example, your helmet might be 10 million polygons, and that’s fine, as long as it’s 10 million polygons at SDiv 6 (for example), but a significantly lower polycount for SDiv 1. The reason for this is when we GoZ, it will send our Subdivision Level 1 asset to Character Creator, where we can skin and animate our meshes, and when we’re done, we can GoZ from Character Creator back to ZBrush, which will update our SDiv 1 subtool positions, but we’ll still have all the details from our SDiv 6 for those subtools still intact and available.
Body (green) and gear (red) subtools
GoZ Gear from ZBrush to Character Creator
Once you’ve got all your gear subtools set up, GoZ All from ZBrush to CC. In CC, the GoZ Options box will default to Custom, and will do some basic selections for you. For your synced body files, it’ll be set to Update, and for the other objects, Create Cloth will be selected by default. Just like the previous article covering game-res accessories and clothing, for assets that are influenced by multiple joints (cloth type items), you can keep the Action as Create Cloth. For more rigid accessories that can be attached to one joint, choose the Create Acc option. Don’t worry about getting this selection exactly right — you can always convert a clothing item to an accessory and vice versa in CC later if you need to.
Update Options for the ReLinked body and new gear from ZBrush in Character Creator
Setting up Clothing and Accessories
Again, we’ll utilize the same process we did with the game-res article. For accessories, select them, move them into place if necessary, attach it to the appropriate bone in the Attribute tab > Attach section, then set the pivot point. For clothing items, it already transferred the weights for us, so we can leave those alone. Also the same as the game-res process, if you have any clothing objects that need physics simulation, make sure they have UVs and a corresponding weight map to plug in, turn on rigid-body and soft-cloth simulation in the CC menu bar, turn on physics for that item, and finally modify any appropriate capsules for your character body that interact with the cloth asset. Remember to go to Edit > Project Settings and check on Bake Animation under the Simulation section, so you can scrub the animation timeline later and still have your cloth react naturally.
Setting up Accessory assets
Setting up Physics for clothing items that need it, like a loin cloth
Applying Animation
Select the “CC3_Base_Plus” group in the Scene tab, and double click any animation in your Content tab to apply that to your character. In our case, you can see we’ve applied the “Saloon Door” animation. Play the animation in the Animation Player all the way through, setting it from Realtime to By Frame to allow our cloth to simulate appropriately. When it gets to the end of the animation, you can then scrub in the timeline to the pose that you want.
Applying an animation to our character
Modifying the Body Pose
While the pose from the animation is pretty good, we can fine-tune it to our exact needs. With your character selected, go to the Motion tab, and click on the Edit Pose button. There, you can use the dummy, in either IK or FK mode (see the tabs at the top of the Edit Pose dialog box) to move and rotate your joints as you see fit. Remember you can also navigate to the Poses and/or Gesture section of your Content tab and apply different body poses or hand positions to your character as well.
Edit Pose button
Edit Pose and Gestures
Modifying Facial Expressions
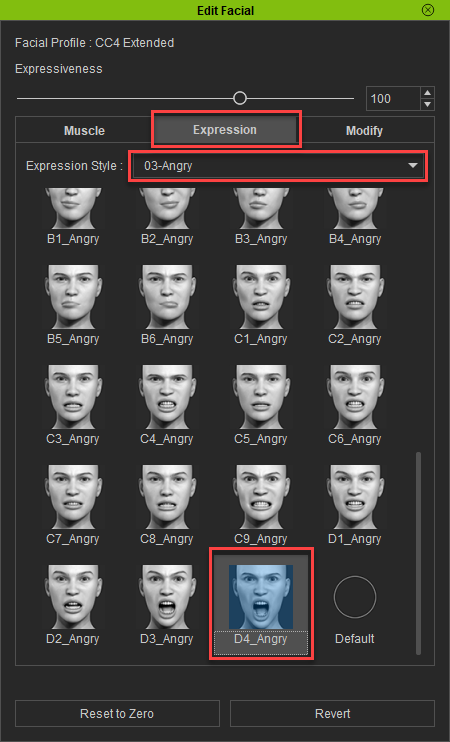
Let’s change the mood of our character! Close your Edit Pose window, and back in the Motion tab, click on the Edit Facial button. In the Muscle tab, you can click and drag on the different areas of the face to change your characters expression, in the Expressions tab, you can apply an expression from the list of dropdown options, and in the Modify tab, you can use sliders to make exact changes to your characters different face shapes. Use one or a combination of these to change your character’s face. When you’re done, simply close the Edit Facial window.
Edit Facial button
Edit Facial Muscle, Expression, and Modify tabs
D4_Angry facial expression applied to our character
Sending the Posed Assets Back to ZBrush
If you don’t need your pose applied to your subtools in ZBrush as layers (to toggle between different poses), simply select all the character assets you want to send back in the Scene tab, and hit the GoZ button in the Character Creator menu bar. The GoZ settings should default to Relink, and because our original mesh had the “Eyelash” and “Tear Ducts” separated from the base body — we’ll check those on. Make sure you choose Current Pose, then hit the GoZ button. This will update the SDiv1 vertex positions in ZBrush to match the CC assets, and your higher subdivision details will follow. To see all the highest subdivision levels, go to Tool > Subtool and click the All High button.
Select and GoZ
If you DO want to apply your pose as a layer, open the ZBrush Pose Tools plugin in ZBrush, click the Record New Pose button, then GoZ your character assets over from CC. When the changes have been updated in ZBrush, click Save New Record and name it. Do this as many times as you’d like, storing a library of poses as you go.
Note – if you didn’t separate out any Body meshes from our earlier step (eyelashes, tear ducts), you can use the Character Creator > Plugins > ZBrush Pose Link menu to send a pose over and have it recorded automatically on the ZBrush side!
For an in-depth explanation and examples of Pose Tools functionality, please visit this article!
Our high res model, posed in ZBrush!
Part 2. Turn Your ZBrush Character to Life with Facial, Body Animation & Mocap
Exporting a Character from CC4 to iClone
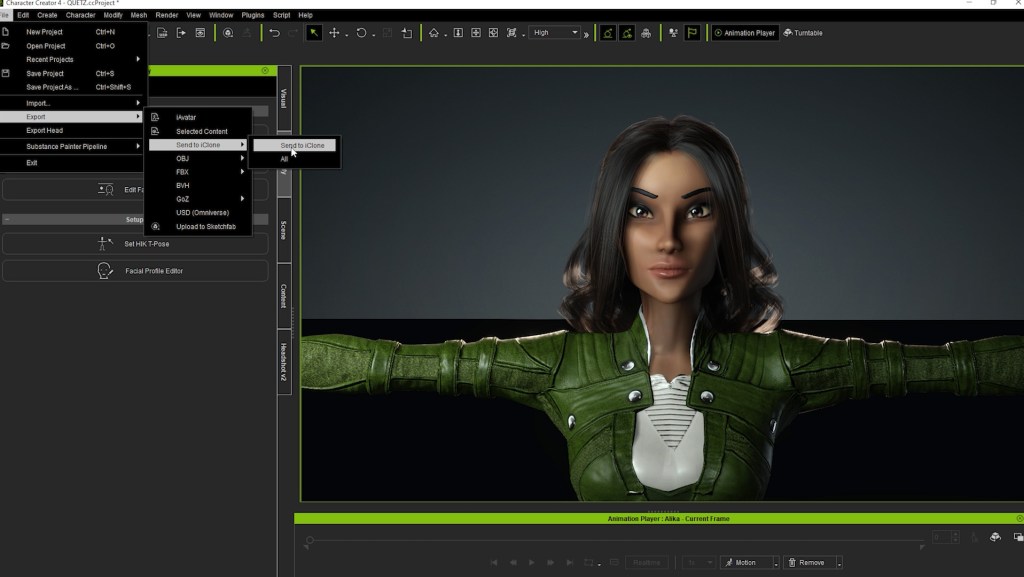
We’ll need to go into iClone in order for us to apply and modify mocap data. Getting our character from Character Creator to iClone is easy – simply go to File > Export > Send to iClone > All!
Sending our Character to iClone
Import Mocap Animation into iClone
I recorded some mocaps in Rokoko that contain body and hand motion capture data, including actions that needed to make contact with the body (belly, head, clapping). You could make your own mocap and import it into iClone, or download animation files from the internet as well. All you need to do to get it into iClone is to drag your mocap file onto your character (you should see a yellow bounding box show up on your character as you do this). Import settings should pop up — for Motion Profile choose Motionbuilder, and for Motion T-Pose, navigate to your mocap file and select it, choose 30 FPS, then hit Convert All. Now you can press play to playback the animation.
Motion Modifier
Editing Your Motion Capture – Global Corrections
With the character selected, in the timeline, right click on the animation (in the Motion row in the timeline), and choose Motion Modifier (or click the Motion Modifier button in the timeline menubar). Press the Preview button, then press the spacebar to play your animation. Tune the sliders to taste as you watch the effect on your character in real time. In my case, the mocap head was facing down the entire clip, so I added some “Head Back” offset to make the animation more natural. Hit OK to apply your changes.
Motion Modifier
Default animation vs Head Back Motion Modifier
Fixing Penetration Issues
Since my proportions aren’t the same as our virtual characters, my mocap might have issues, especially in scenarios where I need precise hand placement (since our arms are different relative lengths).
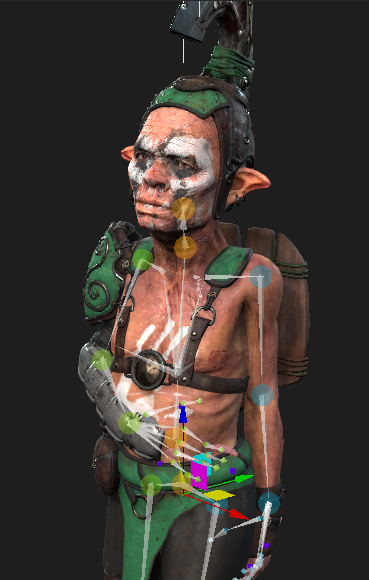
Goblin proportions vs human proportions
Edit Motion Layer
In the Modify panel, go to the Animation tab, and click on Edit Motion Layer.In the puppet window, select the IK controls you want to change to avoid interpenetration (like the hand position). Scrub a bit before the body part clips through the body and press the Set Key button. This will be the transition point from mocap data to our modified animation positions. Scrub to where the clipping occurs (where the hand is inside of the body for example). Move and rotate the hand control so there is no longer interpenetration, and hit Set Key to add a keyframe. Scrub the timeline to a bit after the clipping fix, and hit the Reset button; this will transition from our modified pose back to the original mocap data. Do this for all the problem areas of your animation.
Original pose
Modifi ed Motion Layer pose with no hand penetration
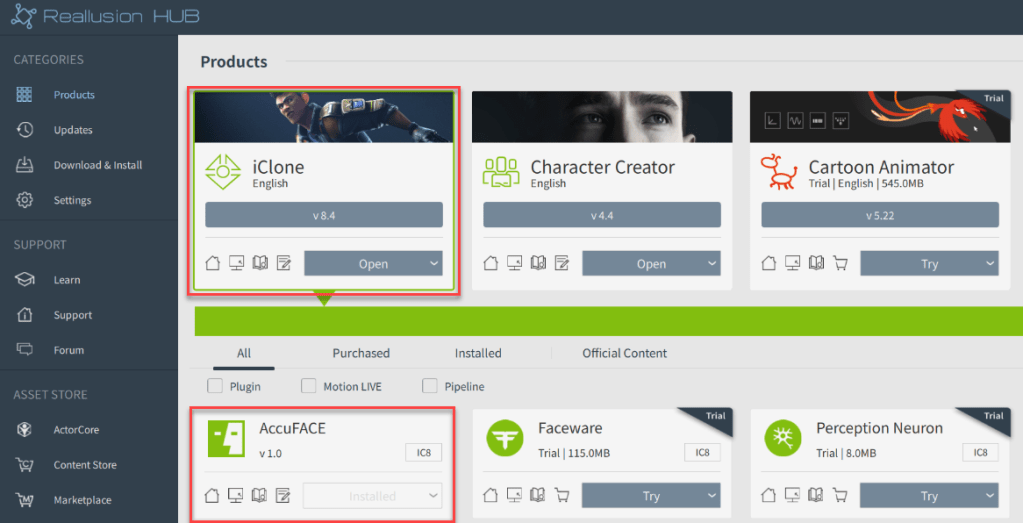
Installing and Launching AccuFACE
Although our Mocap file didn’t have facial animation, we can still add it. To get started, install the AccuFACE plugin for iClone 8 from the Reallusion Hub, then launch the AccuFace application. We’re going to use the camera workflow in this example, but you can also bring in video, and capture from that! In AccuFACE, select the CAMERA tab, and choose your camera in the Source dropdown menu. Since my camera is on a tripod, I’ll choose Static Cam for Tracking Mode.
Installing AccuFace
AccuFace Camera mode
Calibration
Click the Calibrate Facial Capture, and follow the directions to match your face to the expression descriptions – look at the camera with a neutral face, hit the Set Expression button, do a Brow Raise with your face, hit Set Expression, etc… until you’ve calibrated all four expressions. Close this window when you’re done.
Calibrating our face
Connecting to Motion Live
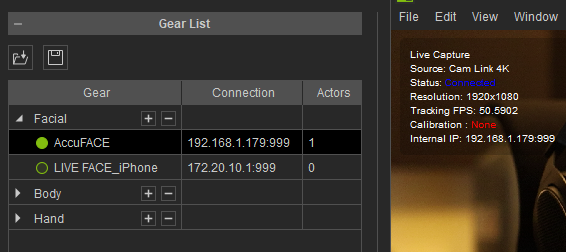
In iClone,select your character model and go to Plugins > Motion Live > Motion Live. Under Gear List, click the + button in the ‘Facial’ row, and select AccuFACE.Type the IP address shown in your AccuFACE application into Motion LIVE > Gear List > Connection, and click the hollow green circle to activate AccuFACE, making the circle solid! Next, click on the hazard sign under Character List > Face and select AccuFace.
Selecting AccuFACE for our characters face
Click the Preview button and press the Spacebar to preview your own expressions on the virtual character, or click the Record button and press the Spacebar to start recording facial capture to your body motion capture!
Using our face to add facial animation to our virtual character!