Global illumination (GI) and mesh-based lighting is an underrated and easy to use lighting source for beginners. Most quickly grasp the main lighting tools like the Directional light, Spotlight and Point light. Mesh lighting has similar qualities but requires Global Illumination (GI) to be enabled before they cast any light.
Global Illumination is not a replacement for standard lighting but rather a companion to it in most cases. While we can light a scene with only GI, its main usage would fall into the hybrid category of complimenting or otherwise working with standard lighting. This is not always the case as it just depends on your needs.
Let’s take a look at some of the stock projects that come with iClone and how they work. We’ll also look at some custom projects to see how mesh-based lighting works in general.
Videos as Light Source
Project 3. Self-illumination TV
If you do not see this project in the Content Manager, you need to go to the Pack tab and search for the Project Part 3 pack and install the pack.
Videos can generally be dragged and dropped onto almost any surface. I say generally, because some surfaces aren’t mapped properly, and wont display the video in the right manner even though you can drop it onto it. In a lot of cases, flat surfaces are mapped right and provide a great place to put videos to add more motion or lighting to your scene.
With Global Illumination turned on and some glow or self-illumination added, any video can project light just like your television or monitor does. The light will dance on the walls and other objects, flicker, go on and off, fade in and out depending on the video source and project the effects of the video on the surrounding environment.
This is a very simple but important method for beginners to level up on their production quality leveraging iClone’s ability to do most of the work while making the us and our production look good at the same time.
As in most tasks involving Global Illumination, there are very few things to do and only a slider to adjust the intensity. Placement is critical for good lighting and so is common sense to check out as many placement positions as possible but in some cases like the scenario below… it’s easy to home in on the TV as a single light source.
There is only one intensity slider since it is associated with the video simplifying the process.
Particle Effect as Light Source
Project 4. Particle_02
If you do not see this project in the Content Manager, you need to go to the Pack tab and search for the Project Part 3 pack and install the pack.
This project demonstrates lighting the entire scene with a particle effect (Torch Fire in the Scene Manager) and the Illumination intensity strength slider located in the GI Settings section of the Modify tab. These two items combine to create the effect of the torch fire particle giving off light.
With Global Illumination off the scene goes black but when turned on the particle lights the room to varying degrees depending on the setting of the Illumination intensity slider. There are no other lights in the scene except the flickering torch particle.
Props as Lights
Custom Project. Props as Lights
Any prop in iClone can become a light source with Global Illumination. Just like videos the prop needs to be UV mapped properly or the entire light mesh like a lamp will glow instead of just the area of illumination where a bulb or candle would be. A lot of modern props are broken down into different texture maps that include a Glow map. This map only shows the section of the texture that would be used to generate light versus the entire prop.
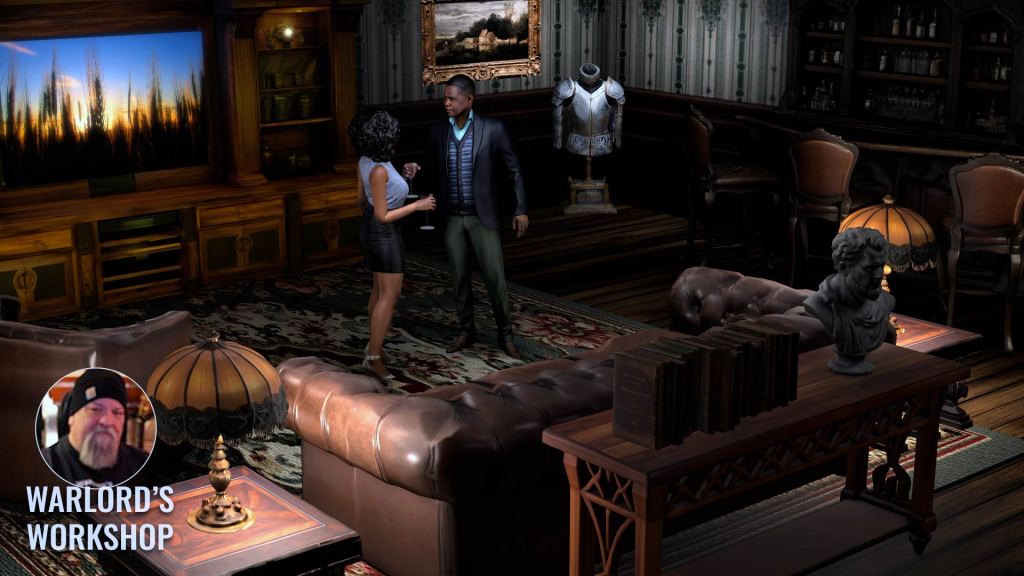
In the example below I used several different methods of Global Illumination using mesh-based props. The table lamps were Meshy AI generated and had horrible UV maps making it impossible to use them for glow maps so I added a sphere primitive under the lamp shade using Global Illumination to turn the spheres into “lightbulbs” which I could then control via the texture illumination slider under GI Settings.
The entertainment center at the back uses a glow map for the lamp glows on both sides and Self Illumination for the lighting. The flat screen television is actually a wall prop fit into the screen area of the entertainment center and mapped with a video to project light. The light intensity is controlled by the wall prop’s texture Self Illumination slider in this case. As is the case with GI props you can use the GI Intensity slider too.
The standing lamp uses only the Self Illumination with GI to project the light under and around the lamp. These props combine to light the scene without any physical lights or IBL lighting. The Tone Map is in use, but the white slider is toned down to where the effect darkens instead of lightens the entire scene.
Take a look at the video below for more information on this process. Keep in mind that we can use the Self Illumination slider or the GI Illumination sliders to mimic light or actually cast light. The tutorial uses both methods.
Passive Lighting
Project 3. Self-illumination
If you do not see this project in the Content Manager, you need to go to the Pack tab and search for the Project Part 3 pack and install the pack.
Passive lighting is another form for using props, but they are usually hidden from the main view and provide basic lighting for the scene. It does not involve using things like lamp props for lamps but rather focuses on using props like floors or walls to passively light a scene.
This can be a main source of lighting or complement other lighting. Sometimes it can take a little time to drill down to the proper light source in scenes merged into one prop but it is possible as shown below using the texture channels and associated light settings.
Ready to Use Stock Mesh-Based Lights
Not only can any prop be used as a light source, iClone also provides three basic GI mesh props already set up as lights. GI Emissive Plane Oval, GI Emissive Plane Round and GI Emissive Plane Square are located in the Create -> Light submenu. See the video below for more details.
Be sure to set them as dummies or keep them out of sight of the camera as you don’t want these lighting props to show up in the render. Think of these props as just what they are… an alternative lighting system to the standard lights and a system that compliment standard lighting in the same scene. It is not unusual, and in fact is common, to use both of these lighting methods in the same scene.
NOTE: Setting these props to dummies only works for these particular stock props.
These mesh light props make it simple to add more lighting without wasting a lot of time as they can be deployed directly from the menu to the scene via clicking the item in the Create->Lights submenu. All we need to do after that is set the color and intensity.
Just make sure to have Global Illumination turned on to see the lighting effect. It’s easy for beginners to forget this when first using the props. If you see nothing happening, then check to make sure GI is on.
Attaching Mesh Lights
There comes a time when we need a light to follow along with a character or prop. Just like the standard lights we can attach mesh-based light props to these objects but even better we can attach the light to the camera, so it moves with the camera.
By attaching the mesh light to the camera, we don’t have to set up as many lights and we get the effect of the light moving in and out of the darkness as in the case of a flashlight or torch. Attaching can also be used to keep a certain highlighted or shadowed look to a character as it moves along.
Keeping the range of the light to a minimum will help facilitate this effect so the extra “hidden” light won’t show up on other objects. I also encourage you to experiment with attaching lights to the camera. This particularly works well when mapping out a project or quick proof of concept.
Try This – Turn Off ALL Lighting
This is a simple enough thing to do when starting but often overlooked. Once your scene is laid out and you know where things are…TURN OFF ALL THE LIGHTS in the scene. Especially if you are still in iClone default lighting as it is set up more for seeing the workspace then cinematic lighting.
Now start lighting by loading one light, global illumination mesh-based or standard and see how it affects the area it’s in and the immediate vicinity around it. This is not something you have to do but how can you really know how lights will affect a scene if you don’t start from scratch or at least do some tests first? This eliminates any confusion or accidentally leaving behind any of the default iClone lighting.
No… don’t delete the existing lights to do this! Just turn them off and try a few tests or start lighting from darkness then delete the pre-existing lights after you are satisfied with the results. You can keep these lights, if you wish, to help you light the scene more CLEARLY for working on or replacing something, but do not forget to turn them OFF when finished.
Summary
There can never be enough said about lighting… of any kind. Lighting will make or break a scene or project if not given careful consideration and given enough time to experiment and try out different ways of lighting that scene. Don’t be timid here. Experiment!
This is particularly true of mesh-based lighting that, like standard lighting, can stand on its own or be a hybrid use of both lighting types which is more common. There are about as many ways to light a scene as there are animators so you can only pick one that works for you or your client.
There is one thing to keep in mind about mesh-based lighting before we close this out and that is the fact that you have to be creative to use it because the light’s itself will render out. Unlike the stock GI props discussed earlier, if you set them as dummies the light will turn off. It’s not nearly as bad as it sounds though.
After a short time working with them you become adept at hiding them out of camera site or integrating them into the environment in ways that mask their presence while still emitting the light you. You have seen some of that in action in the short tutorials embedded into this article.
So, let’s not get in a hurry when it comes to lighting. Patience is key and experience builds with every new scene we light.

MD McCallum – WarLord
Digital Artist MD “Mike” McCallum, aka WarLord, is a longtime iClone user. Having authored free tutorials for iClone in its early years and selected to write the iClone Beginners Guide from Packt Publishing in 2011, he was fortunate enough to meet and exchange tricks and tips with users from all over the world and loves to share this information with other users. He has authored hundreds of articles on iClone and digital art in general while reviewing some of the most popular software and hardware in the world. He has been published in many of the leading 3D online and print magazines while staying true to his biggest passion, 3D animation. For more information click here.