首頁 » Page 42

The Making of Miles Morales | Transforming 2D concept into 3D model with Character Creator ZBrush Pose Tools

Gerard Martínez Sánchez

I’m Gerard Martínez, a character 3D Artist and Instructor residing in Parets del Vallès, a town near Barcelona.

Presently, I teach at various universities, notably in Barcelona and Latin America. This year, I’ve had the opportunity to collaborate with XP-Pen Spain, enabling me to bring art and technology closer to a broader audience and share my passion for both worlds.

Introduction

Welcome to this 3D tutorial, where I wish to start by expressing my gratitude to the Reallusion team for inviting me to share the details of the creation process behind one of my latest characters: the Miles Morales fan art which was featured in Spanish magazine Renderout! in their issue #41 – for December 2023. It’s an honor to take part in this experience!

In this making of, I’ll walk you through my process of transforming a 2D concept into a 3D model, capturing the essence and exploring the best techniques and key elements that will bring the character to life using some of the tools from Character Creator (CC).

Software Used:

  • PureRef: An application for gathering and visualizing references.
  • Photoshop: Post-production.
  • Blender: For polygonal modeling.
  • Maya: Retopology, UV mapping, and rendering.
  • Arnold Renderer: For the final rendering.
  • ZBrush: For digital sculpting.
  • Adobe Substance 3D Painter: For baking and 3D texturing.
  • Character Creator 4: Rigging with AccuRIG and posing the character.
  • ZBrush Pose Tools: Poses Management

A Pixar Touch

My main goal right from the start was to give the character a Pixar touch, as if it had dropped directly into their animated “universe.”

Before sculpting, I dedicated time to a thorough analysis of the original concept art from the movie “Spider-Man: Across the Spider-Verse,” created by Wendell Dalit. Exploring the details in the concept art provided me with a solid foundation for the project, allowing me to capture the essence and key elements that would contribute to the final result.

Next, I sought reference images for the body, suit, and clothing to start building a visual board in PureRef, which is a program that serves as a tool to efficiently organize and visualize visual references.

To search for references, I primarily use Pinterest because of how easy it is to find a variety of inspiring content that I can use as a reference. I also find inspiration on social media platforms like Instagram, Twitter, ArtStation, etc.

©Sony Pictures Animation

Starting the Sculpting Process

Typically, I start with a Polysphere or a low-polygon density sphere to perform the Blocking. I prefer using the “Reference Views” function to place my reference behind my model, which makes it easy and quick to compare with the concept.

Next, I’ll share the various stages I follow to sculpt a character in ZBrush:

Blocking

What is blocking? Blocking is the initial phase in creating a sculpture or character. It involves using basic shapes such as spheres or cylinders to establish its main structure.

It is crucial because it lays the groundwork and structure before adding details. It helps ensure correct proportions and a solid anatomy, serving as the foundation for adding more details later. The goal is to create a solid foundation to work on subsequently, ensuring that the final sculpture looks coherent and well-constructed.

For instance, I represent each muscle using different spheres. To create these initial shapes, I used various spheres and cylinders with the “IMM Primitives” brush.

Anatomical Blocking

Benefits of performing blocking

  • Quickly establish the basic proportions and volume of the final appearance of your model.
  • Prevent issues throughout your creation process.
  • Ensure that all parts fit together correctly before committing to the detailing stage.

Refinement and Detailing

Once the basic shapes of the character have been defined in the Blocking phase, I move on to the detailing stage. In this phase, it’s essential to merge all parts and increase polygon density for better definition. To achieve this, I use Dynamesh and simply smooth with Shift, refining volumes and beginning to add details.

I spent quite a bit of time perfecting the face to achieve that moment where, upon seeing it, you can immediately say, “Hey, that’s Miles Morales!”

When working with a concept, it’s crucial to ensure that facial features maintain the proper proportions in relation to the overall shape of the head and body. For instance, achieving the right position between the eyes, nose, and mouth makes it easier to capture the character’s likeness accurately.

Next, the following step involves capturing the secondary details of the face, such as eye shape, mouth thickness, nose shape, eyebrows, among others. Once I have the head more resolved, I paint the iris of the eyes to give it more vitality and expressiveness, providing greater inspiration for sculpting.

In the Geometry menu, we can find the Claypolish tool. I use this option quite a lot to achieve a more defined and polished appearance, especially recommending it for cartoon or stylized characters.

For this style, the most important aspect is perfecting the volumes and refining the shapes.

From Blocking to Detailing

Suit and Webbing

Once I had detailed the face and body, I proceeded to work on Miles Morales’ suit from the first movie. Although I could have opted for the suit from the second movie, I felt a special connection with the more “handcrafted” and urban design of the first one. Since the first time I saw it, I was fascinated by the design, and it has been a sort of homage for me.

Additionally, I decided to merge elements from the suit worn by Tobey Maguire in the trilogy directed by Sam Raimi. My goal was to achieve a version of Miles Morales’ standard suit with more realistic textures, incorporating raised web lines and a metallic touch instead of them being sewn into the fabric.

To achieve this, the first step was to draw the entire suit’s silhouette and then perform an “Extract”. Subsequently, I sculpted some details to emphasize certain muscles and began drawing the entire web pattern using Vertex Paint. I opted for the Lazy Mouse option for greater precision in tracing.

Later, I turned the masked stroke into a polygroup (Polygroups/From Polypaint), duplicated the body, and removed everything except the web mesh. Then, I cleaned up the geometry and finally extruded it to add volume.
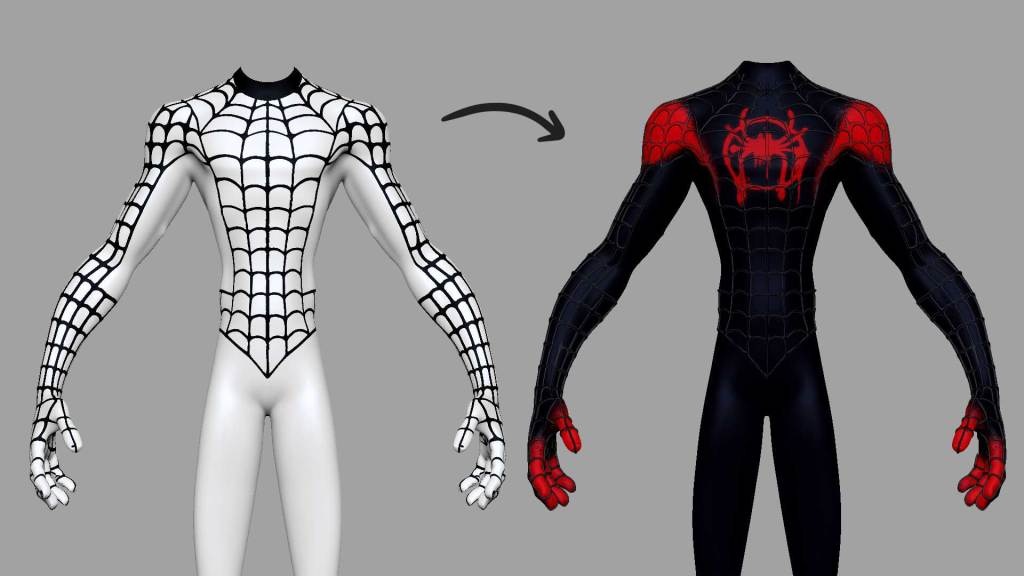
Steps for creating clothing

Hair

From the start, I knew Miles’ hair was crucial as it’s distinctive and easily recognizable.

In ‘Across the Spider-Verse,’ Miles Morales has a haircut known as a ‘taper blowout,’ which means it has volume backward, lifts, and features a fairly defined fringe.

Firstly, I searched for more images of this haircut to gather inspiration. Then, I made an approximate blocking of the hairstyle and sculpted each curl individually. I used the Clay Buildup tool for shaping and the Move tool to position the curls in the desired direction

High version

Retopology

Retopology is the art of remodeling a high-resolution model polygon by polygon, simplifying it, and making it more manageable for subsequent stages.

Retopology is an essential process that facilitates subsequent processes such as UV mapping or rigging.

Retopology

In my case, I prefer to perform this stage in Autodesk Maya, which I find very practical and intuitive.

Before importing the character, I optimize it a bit in ZBrush using the Zplugin “Decimation Master” to prevent Maya from freezing due to the number of polygons. This tool not only allows us to reduce the geometry amount but also maintains all the detailing we have sculpted. However, it’s essential not to repeat the process too many times as doing so can lead to loss of detail.

Once imported into Autodesk Maya, I use the Quad Draw tool to perform polygon-by-polygon retopology, ensuring that the polygons have similar sizes and correct topology.
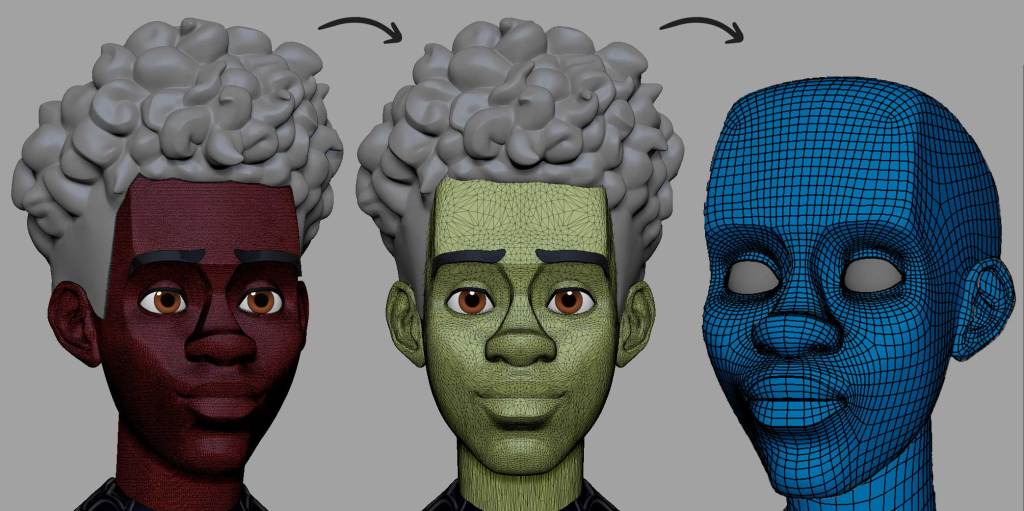
Retopology Process

UV Mapping

The UV Mapping serves as the bridge between modeling and texturing in a 3D model. It essentially involves unwrapping the surface of the 3D object to represent it in a two-dimensional space. Though explaining this process might seem complicated, let me explain it with a simple example for better understanding.

Have you ever tried origami? It’s a creative art form that involves folding paper to create various figures and shapes. In other words, you transform something two-dimensional, like paper, into something three-dimensional using this technique.

With my students, on the first day I explain UV mapping, I always bring a cube for origami. I choose a cube because it’s a quick and easy object to build. This way, we observe the mechanics that when we have it flat, we can draw or paint as we like, and then we assemble it to create the cube. Understanding this mechanic, I explain that UV mapping is the same but in reverse. That is, we have the three-dimensional object, and we need to transform it into 2D to texture it.

Another example I often use, especially during this holiday season, is chocolates wrapped in the shape of Santa Claus.

When performing UV mapping, each model has its own rules, but there are critical points to consider:

  • Hide cuts in inconspicuous areas.
  • Ensure each part of the object is the correct size, similar to a puzzle.
  • Fill all available space, leaving nothing empty.
  • Avoid overlapping or crossing parts.
  • Leave a small space between parts.
  • Cut enough so that nothing looks odd.

It’s also essential to consider Texel Density, ensuring consistent sizes among UV parts. In programs like Maya, you can set a Texel Density as a reference and then adjust each one to be the same size. This prevents having different resolutions for each area when applying textures, achieving uniform resolution across the entire model.

For the Miles Morales character, I had a specific pose in mind, so I made cuts on the back to avoid issues. However, if your character is for animation and will be seen from different angles, it’s advisable to clean from all perspectives, not omitting any, as you don’t know where or when the model will be displayed.

In this character, I organized my UVs as follows: the head, eyes, and body divided into the suit and the webbing.

 UV Mapping – Head

Texturing

It’s time to give color to Miles in Substance Painter, and this is one of the stages I enjoy the most!

Before starting with texturing, I perform the bake of all the details from the high-resolution version and transfer them to the low-resolution version we created during the retopology stage.

Skin

I began the texturing of Miles Morales’ face by using the ‘Skin Face’ smart material as a starting point, then made some adjustments based on my preferences. The fascinating aspect of using Smart Materials is their versatility, making customization easier.

Initially, I adjusted the Base Skin layer to a tone more similar to Miles’. Then, I duplicated the ‘Skin Pores’ layer, adjusted the pore size using the tilling value, and strategically distributed them according to facial areas. All these adjustments were made using layer masks.

Later, I created a new folder named ‘Skin Shade’. Within it, I added several fill layers to introduce more skin tones. Next, I moved to what I call ‘Breaking Up.’ At this stage, the colors on the face seemed too smooth and unnatural for my liking.

To address this, I added a fill layer, applied a black mask, and used a procedural map with the ‘Add generator.’ I chose ‘Tri-planar Advanced’ and applied ‘BnW Spots 1’ to alter the color mask. As a result, the skin gained a more realistic and detailed appearance.

Skin Texturing

Eyes

The eyes were simply created by designing a texture in Photoshop and then projecting it onto Substance Painter with a roughness value set to 0.

Suit

Finally, for Miles Morales’ suit, I started by adding a black fill layer for the entire suit. Then, I projected the spider symbol that I easily found on the internet.

To add an artistic touch, I used a predefined brush in Substance called ‘Paint Spray,’ creating a spray-painted effect.

Lastly, I applied the smart material named ‘Fabric Super Hero’ to add texture to the suit using its height map

Suit Texturing

Exporting

Once I had all the textures for the character, I began the export process. The setup I used was for Arnold (Ai Standard), in PNG format with a resolution of 4096.

Posing

Now it’s time to bring the character to life and give it expressiveness. I was sure that the pose I wanted for Miles would have a youthful vibe.

In the past, when I was more junior, I didn’t enjoy this stage much; sometimes, I left the character in a T-pose and rendered it as is. But over time, I’ve realized how crucial posing characters is. My advice: dedicate time and care to the pose.

I used to use ZBrush to pose my characters with the Transpose Master tool.

However, since I had the opportunity to try Character Creator‘s AccuRIG and ZBrush Pose Tools, I now always use this workflow for posing. I highly recommend experimenting with the integration of ZBrush, AccuRIG, and Character Creator (CC).
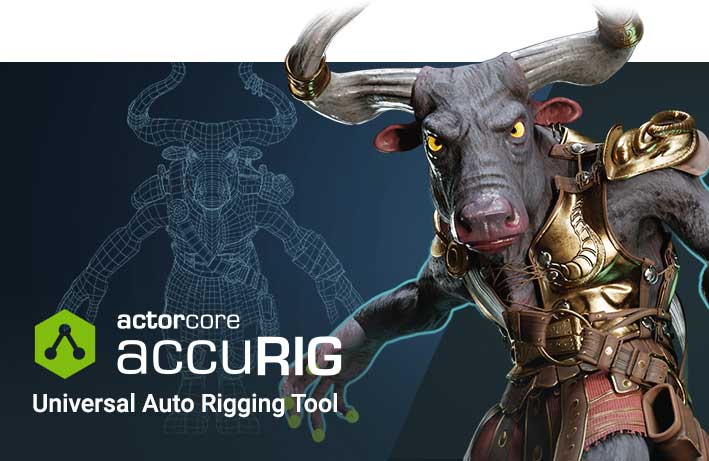
Character Creator 4 – AccuRIG

To pose Miles, I prepared him before exporting to Character Creator.

It’s crucial to keep in mind that the ideal polygon count for models sent to AccuRIG should be under 300,000. Therefore, if you need to sculpt details that require high polygon counts, use ZBrush’s subdivision functions or other optimization techniques.

It’s also important to ensure that your model’s physical size aligns with Character Creator. You’ll find size unit parameters at the top of the free Pose Tools plugin. There are some preset height adjustments for metric or imperial measurements, or you can use the slider to set it manually. If your character has layers, be sure to merge them first to ensure a uniform size change.

Once the scale is set correctly, click the Resize button and confirm the model’s size. After this step, we can send the model to CC using GoZ, which will send the currently selected subtool. Once in CC, we’ll use AccuRIG to automatically link a skeleton to this character.
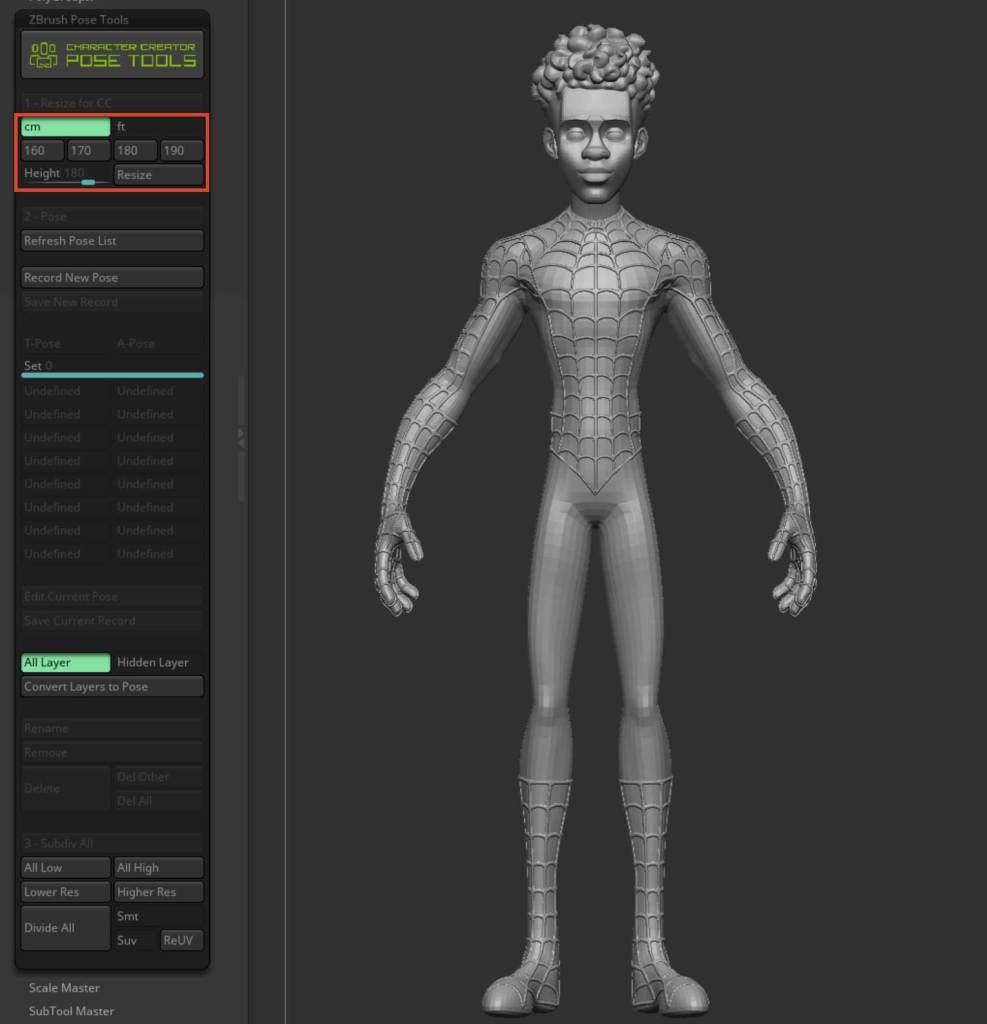
ZBrush Pose Tools – Resize

Once imported into Character Creator, the first step is to automatically detect the character’s joint positions. This is done by clicking the “Create Guides” button. After clicking “Create Guides”, the character’s joint markers will be generated. You can choose different display settings, including Wireframe over Shaded mode, for more precise placement if desired.

AccuRIG – Create Guides

Next, we’ll set the number of fingers for our character and click “Generate Skeleton” to produce our skeleton.

Here, we can adjust the bone color for better visibility and refine the position of the generated bones.

AccuRIG – Generate Skeleton

Once the skeleton is linked, skin weights are assigned to meshes related to body parts and clothing. This ensures realistic movement and separates solid accessories that should not be attached to the body.
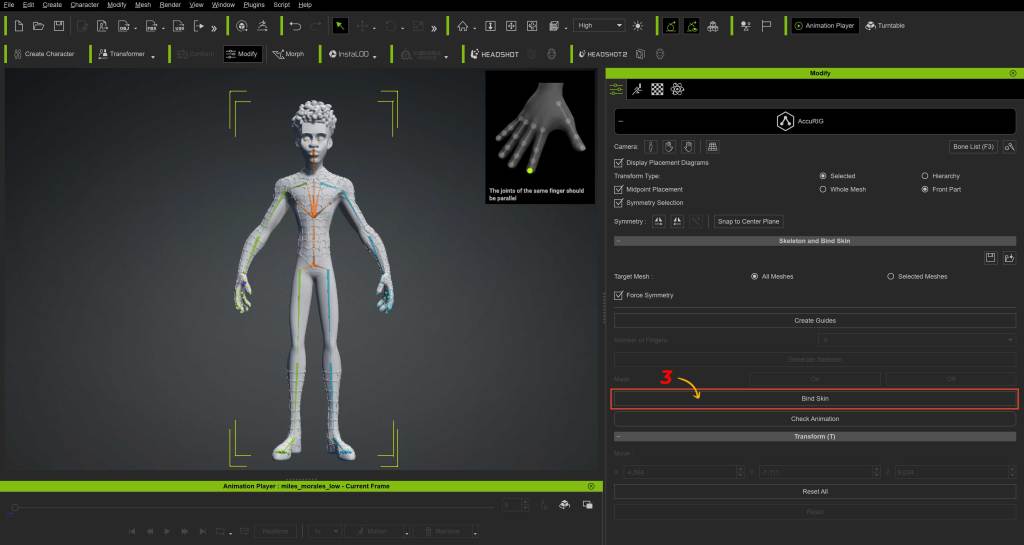
AccuRIG – Bind Skin

Processing time may vary based on your character’s complexity and your computer’s speed. When the linking process completes, the skeleton’s color changes, and solid objects not previously selected are now categorized as separate accessories.

The most interesting aspect is that we can manually adjust all the bone weights provided automatically by AccuRIG. To do this, we’ll click on the “Skin Weights” button and then be able to manually paint the skin weights for each bone, allowing us to improve the entire skinning process.

Skin Weights

In “Edit Pose” is an essential tool to bring your character models to life. It enables easy creation and adjustment of custom poses, providing the ability to express emotions, dynamic movements, and subtle details. With intuitive controls, this editor enhances creativity by offering a wide range of options to refine the posture and attitude of your characters with precision and realism.

Edit Pose

After adjusting the pose in Character Creator, we send the current pose to ZBrush using the Pose Link plugin. Renaming poses immediately is essential for organization.

Editing in ZBrush is crucial for refining the pose and accessories. 
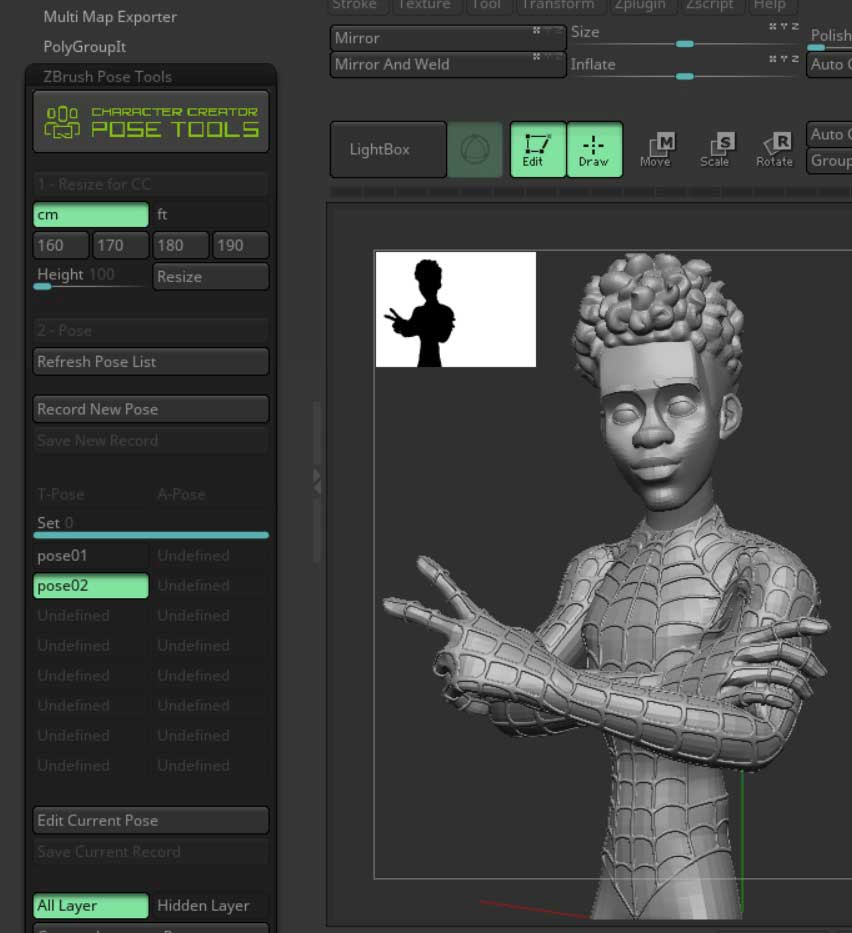
ZBrush Pose Tools

Furthermore, model subdivision allows for adding details like skin wrinkles or muscle definition.

Once editing is complete, save the file. It’s essential to save in both ZBrush and Character Creator to ensure continuity. CC’s pose management easily updates when loading the project, allowing a smooth transition between programs.

Definitely, there are several reasons to consider using this combined program (Character Creator and ZBrush) for character creation and editing:

  • Seamless creation of custom poses: The integration between Character Creator and ZBrush makes it easy to create and edit custom poses for your character models. This allows you to breathe life into your creations with unique and realistic movements.
  • Workflow optimization: The Pose Tools and Pose Link plugins streamline the process of transferring poses between programs, saving you time and avoiding technical complications.
  • Compatibility and versatility: The AccuRIG tool simplifies skeleton linking and skin weight assignment, ensuring characters are compatible with a wide range of movements and accessories.
  • Detail and realism: The ability to make manual adjustments in ZBrush allows for enhancing anatomy and clothing details, achieving more realistic and detailed visual results.
  • Extensive motion library: Character Creator offers a vast library of built-in motions, with the option to access more motions and poses through online marketplaces, providing an unlimited spectrum of possibilities for your characters.

Overall, using these programs together provides an efficient workflow, powerful tools for pose customization, and the ability to create characters with exceptional levels of detail and realism.

Shading and Lighting

For the final render of Miles Morales, I aimed for a blend between the film’s style and a look closer to cartoon animation, while still maintaining my personal style. During this stage, my usual approach involves applying maps within the Arnold aiStandardSurface material. I apply the Base Color texture to both the base color node and the Subsurface Color. Additionally, I connect the roughness map, the metalness map, and finally, the normal map.

Skin Shading

The shading for the webbing was opted for a completely black tone with a subtle shine.

For the lighting, I used a setup called the “three-point light” scheme. This scheme is primarily used in 3D productions and virtual settings to illuminate objects or characters in a 3D environment, achieving depth and realism. To achieve this, I incorporated an HDRI with low intensity as the primary light source to capture some reflections.

Next, I added a Key Light (Primary Light) using an Area Light type, illuminating the character from a specific angle to simulate a primary source. I adjusted the intensity, color, and temperature according to the mood and style I desired. I positioned the Fill Light on the opposite side of the primary light to soften the shadows and balance the illumination. The Rim Light was placed behind and above Miles to create a “glow” around him and add more depth.

Finally, in the finishing adjustments, I added backlights to illuminate the environment and adjusted the light intensities to achieve the desired effect. I experimented with shadows and reflections to achieve the desired result.

Lighting

Once rendered, I had the collaboration of my friend and neighbor Eliant Elias (Concept Artist), who helped me design the background to achieve the movie’s style. Thanks, Elias!

Finally, I want to express my gratitude again for this opportunity to explain the process behind one of my characters. It has been an absolute pleasure to collaborate with a company like Reallusion! Thank you!

I hope you’ve enjoyed this behind-the-scenes look. Until next time!

Follow Gerard Martínez Sánchez

Instagram:
https://www.instagram.com/gms.3dart/

LinkedIn:
https://www.linkedin.com/in/gms3dart/

Website:
https://gms3dart.com/

Multiple Cameras & the Camera Switch (Switcher)

Most of us start out with single camera shots since not all of us are even aware of the camera switch or what it does when we first start using iClone. While there are times you might want to use a single camera, it can make animation harder since that camera has to be carefully used to not have to animate things in a scene when it isn’t necessary. 

Multiple cameras give you a lot more flexibility. I usually cite walking up to a door, opening the door, and going through it versus using multiple cameras to show the approach to the door, the door opening, movement through the door, and so forth. Putting enough onscreen to “sell” that walk through the door is the name of the game. 

It can be very tempting to use a single camera and, in a 3D asset, tutorial or tech demo that could be appropriate. For a cinematic endeavor, multiple cameras are the tool of many creatives. Multiple cameras make the dull and mundane more interesting when used with a carefully framed camera angle. It can add life to an otherwise dull scene by adding well-timed camera cuts that quickly switch from one camera to another providing a visual narrative for the viewer. 

You may have seen the commercials where people are partying it up on the beach and all the camera cuts make it look like a large party when in fact there are less than a dozen people shown from many different angles and situations to mimic a small crowd or large party. 

Animation is not so much recreating everything but more of getting the viewer to believe nothing was left out by judicious use of camera angles, camera cuts, assets and timing. 

Again, a single camera has its place in many different situations but research using multiple cameras and you’ll quickly find out it’s a preferred method for live events, sports and drama. 

THE SWITCH AND THE TIMELINE 

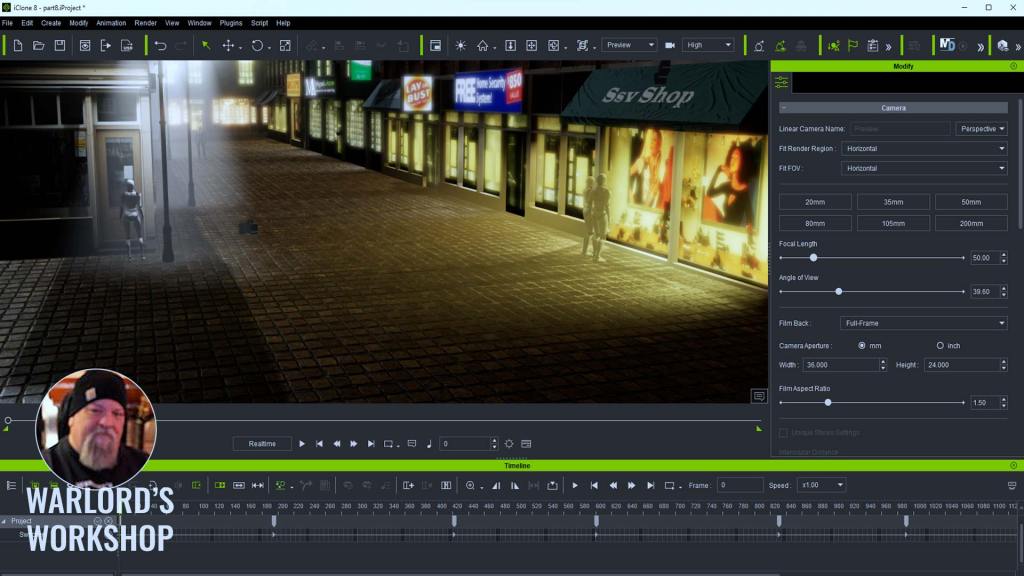
The Switch or camera switch is just that. It changes from one camera to another depending on its location on the timeline. You can find the switch on the timeline under the Project subsection. If you do not see the Project section, click on the square button in the upper left corner of the timeline to open the Project section.  

The camera Switcher or switch is located in the Project section of the timeline.

You can see the Switcher line within the Project section. You may have more lines showing on your timeline than in this example as that depends on settings. The Switcher is where everything happens as far as camera cuts go.  

It’s very easy to use. You start by right-clicking at the beginning but within the Switcher line and select a camera from the list. This list is populated by the cameras you have created in your project. From here you move down the timeline right clicking and choosing whichever camera you want to switch to. This is the timeline in its most basic usage. 

The Switcher in action. Notice the camera shot change as it clears each keyframe in the timeline.

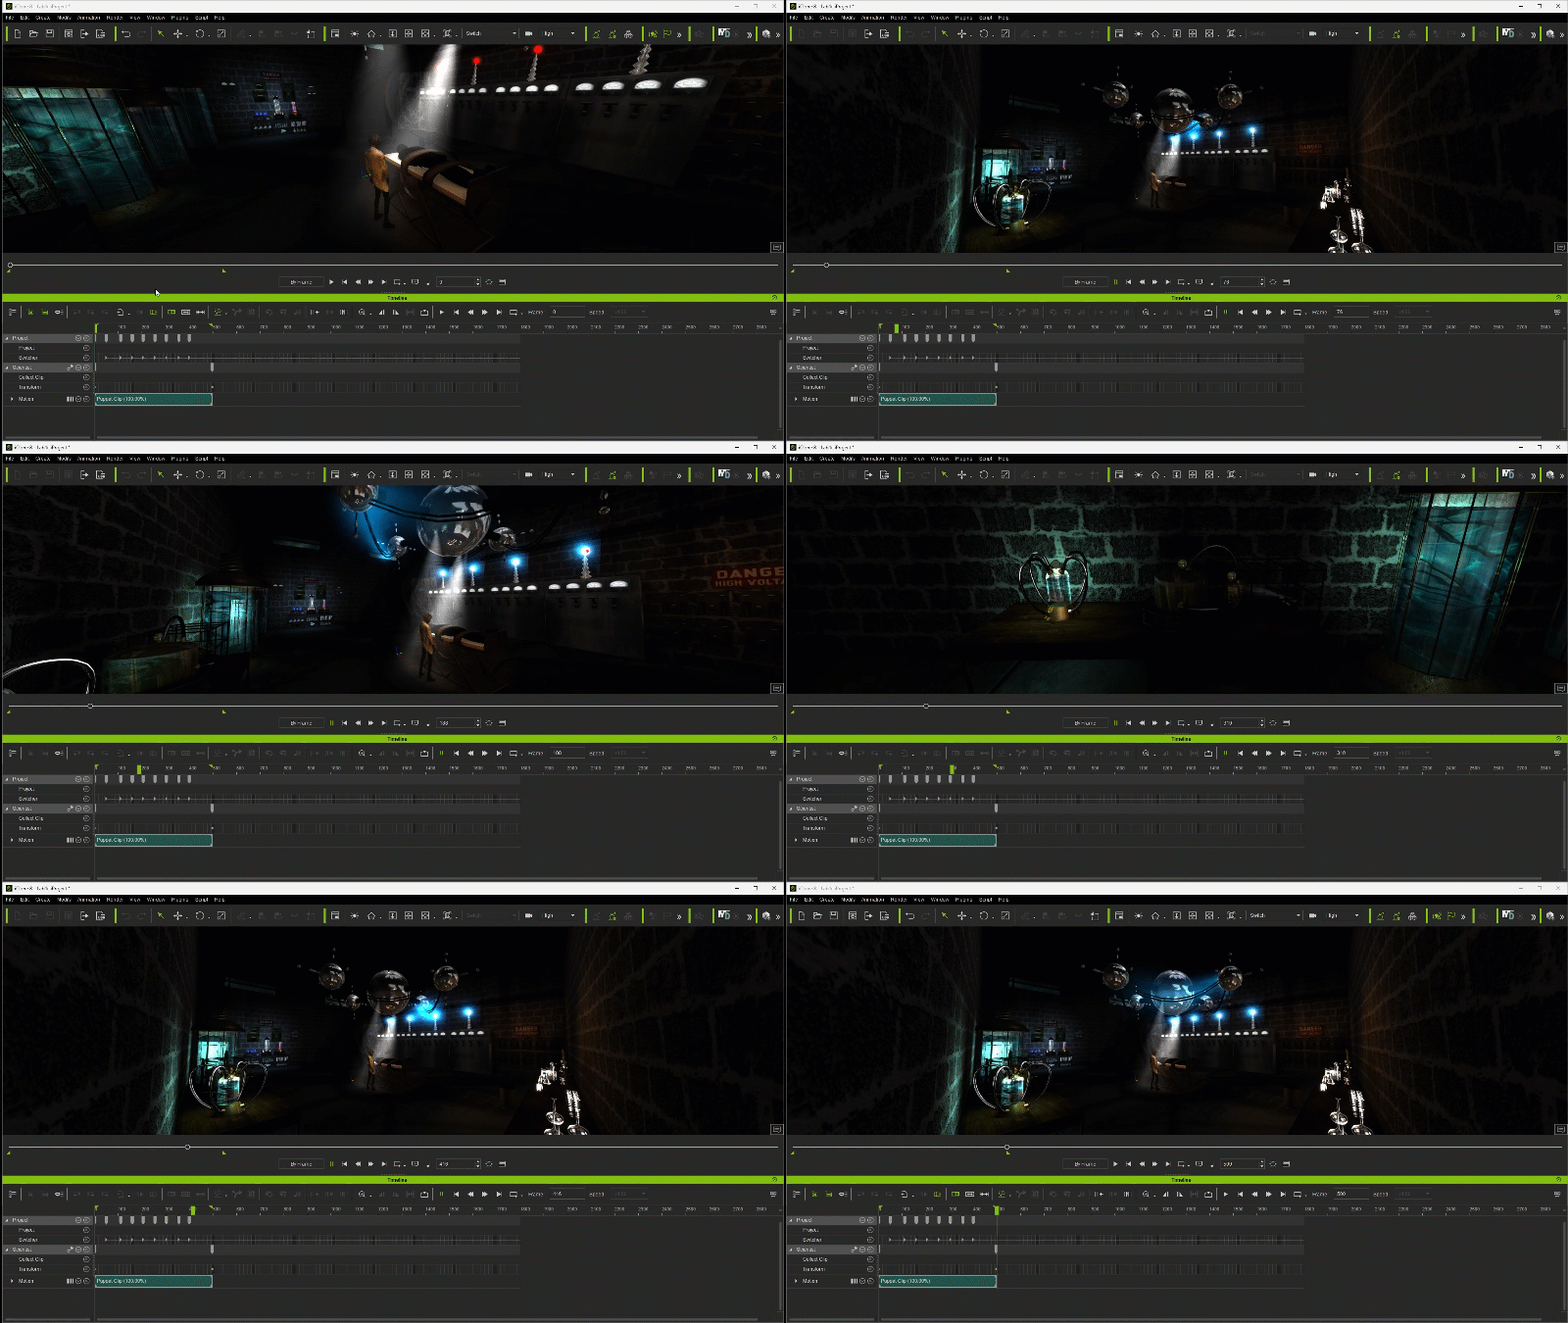
The above GIF shows the timeline Switcher with individual keyframes for each time the camera changes. As the play head moves down the timeline you can see each camera change as its keyframe is passed. That camera will stay active until the next keyframe. 

CAMERA POSITIONS

The camera positions and their approximate angles in the above Laboratory example.

The Switcher is deceptively simple to use. You’ll spend more time thinking out the shot angles than you will setting them up in the Switcher.  

Unless you are being very dramatic or extremely comedic, I would recommend you have enough space between camera shots to seem natural when showing an environment like the outdoors or indoors. Dialog and other shots can dictate the placement of cameras to a large degree but in general filler or transitional scenes you don’t want to linger too long as the shot can get boring or go too fast and some of the viewers could miss important plot points. 

TUTORIAL EXAMPLE 

In the video tutorial, I used the Volumetric Lights & Lens Flare project in Visual Effects in IC Project. I have set the textures to smooth so we can see what is going on. I also added some Male and Female Motion Dummies with some simple drag-and-drop motions. These will be our points of interest when creating and switching between cameras. 

The plan is to create a camera for the female motion dummy at the door of a building. Create another camera for the couple window shopping and then one more camera for the male motion dummy taking a walk down the street. None of these cameras will be linked or attached to anything but the camera for the walking character will use its look-at feature to follow the character. 

CREATING THE CAMERAS 

This is a very simple task: 

  • Create a Camera 
  • Set the View to the newly created camera 
  • Select the female motion dummy at the door 
  • Press the Home key to move the view to that character 
  • Set the camera angle (or animate a moving shot)

Repeat the process by selecting one of the motion dummies of the couple. Create a new camera and home in. Repeat the process one more time for the walking motion dummy and with that new camera selected locate and use the look at feature in the Modify Menu to force the camera to always look at the character while it walks by, towards, or away from the camera.  

Each keyframe in the Switcher line represents one the cameras and changes as the play head progresses down the timeline.

See the video tutorial below for more information and detailed instructions. 

CLOSING 

In today’s world, the audience is a very spoiled bunch, and rightly so, particularly if they are shelling out hard-earned money to see content. The persistent inflation, nagging economic doubts, corporate layoffs, and any other number of negatives, mean the viewer wants a break from all that madness. And they have a right to be picky about the content they consume. 

With this in mind, it’s very important to experiment but also to be consistent where consistency is required or desired by the viewer. If they cannot keep up with a conversation between characters, they might not be open to second chances. 

Why multicam is possibly the best way to shoot drama (Redshark News): https://www.redsharknews.com/production/item/5284-why-multicam-is-possibly-the-best-way-to-shoot-drama

MD McCallum - WarLord

MD McCallum – WarLord

Digital Artist MD “Mike” McCallum, aka WarLord, is a longtime iClone user. Having authored free tutorials for iClone in its early years and selected to write the iClone Beginners Guide from Packt Publishing in 2011, he was fortunate enough to meet and exchange tricks and tips with users from all over the world and loves to share this information with other users. He has authored hundreds of articles on iClone and digital art in general while reviewing some of the most popular software and hardware in the world. He has been published in many of the leading 3D online and print magazines while staying true to his biggest passion, 3D animation. For more information click here

CC Content Development Guide for Reallusion Stores, ActorCore & Marketplace

Hello! I’m Luis Duarte, a Digital Artist. Currently, I am immersed in the exciting world of 3D modeling, and I want to share with you my enthusiasm for the Reallusion ecosystem, which provides us with a wide range of services, including iClone and Character Creator.

Today, I have the honor of talking to you about an additional benefit that all users can access. If you are passionate about the 3D world, eager to bring your creative ideas to life, and wish to acquire new techniques, you have everything you need to maximize your designs and become a content developer for Reallusion.

Being a content developer will provide you with numerous benefits, including:

  1. Learning new techniques that will enrich your workflow.
  2. Creating 3D assets and character designs more efficiently.
  3. Selling your designs for other users to use.
  4. Building a community of passionate followers.

With Reallusion’s Content Developer Program, you can generate income using your own designs, manage your time your way, and work comfortably from home. If you aspire to a more professional level and seek excellence, you can take your ambitions a step further by building your own brand for sale in the market and exponentially increasing your income.

Make the most of the advantages of building characters using the Character Creator system. This system allows you to create characters more efficiently by applying deformations directly to the animatable mesh without affecting the UVs and improving quality with high-resolution textures.

HOW TO START

In this tutorial mini-series, you will learn to build a cartoon-style character using the Character Creator’s base anatomy template. You can add natural features with the morph sliders system and add details by exporting the character to modeling software. You will also create fully functional clothing components and accessories for animation, building your library of reusable assets for other characters.

I will teach you how to design eyebrows and hair and integrate them into the expression setup system. Finally, you will learn to organize and package your components easily for publishing and marketing on the Reallusion Marketplace.

Don’t miss the opportunity to be part of the vibrant Reallusion content developer community. I assure you that you won’t want to miss this experience!

PART 1 – Character Creator Workflow with ZBrush

PART 2 – Creating Clothing & Accessories with Character Creator and ZBrush

PART 3 – Hair Creation for CC Characters with ZBrush

PART 4 – 3D Asset Packaging for CC Characters

Character Creator Workflow with ZBrush – PART 1 | CC Content Development Guide

Welcome to this 4-Part mini series on how to develop content for Reallusion Stores, ActorCore, and Marketplace.

In this FIRST, step-by-step tutorial we will show you how to design a character with all the head and body morphs in Character Creator (CC4)! In this first article, I will provide you with an overview of the complete process, allowing you to create custom characters in no time

  1. The first step is to export the character. We’ll use Blender for this example. Go to the “File” menu, select “Export,” and enable the “Nude Character in Bind Pose” option. Then, choose the export location and click OK.
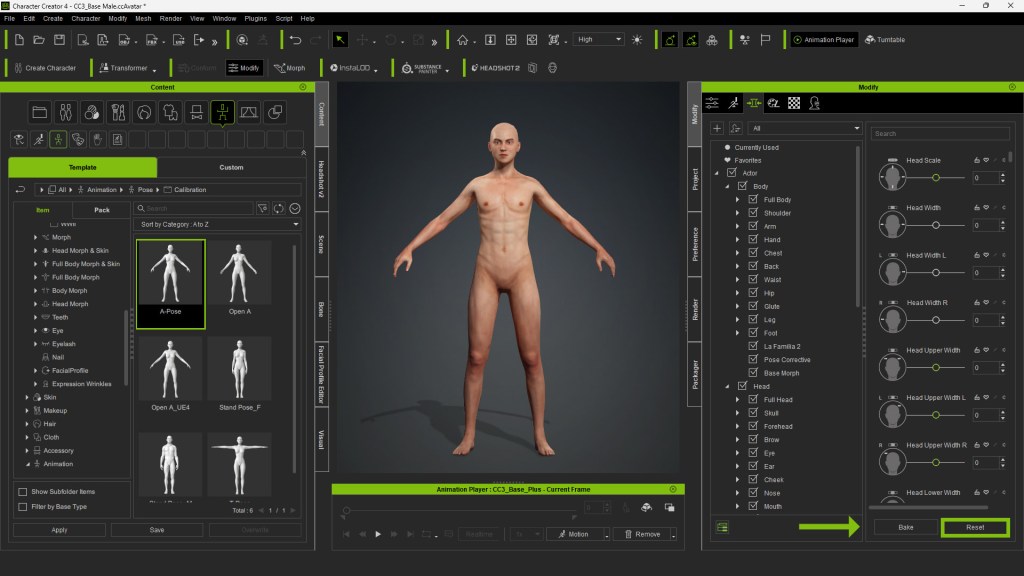
  1. Next, go to the Modify panel and select the model. Press the “Reset” button at the bottom right to reset the model to its initial state.
  1. Now, you’re ready to start modifying the character. Begin by adjusting the overall scale and making specific modifications to different body parts using the sliders. Make use of the library of morphs categorized by body parts, such as the head, shoulders, arms, hands, eyes, and more. All modifications are applied in real-time
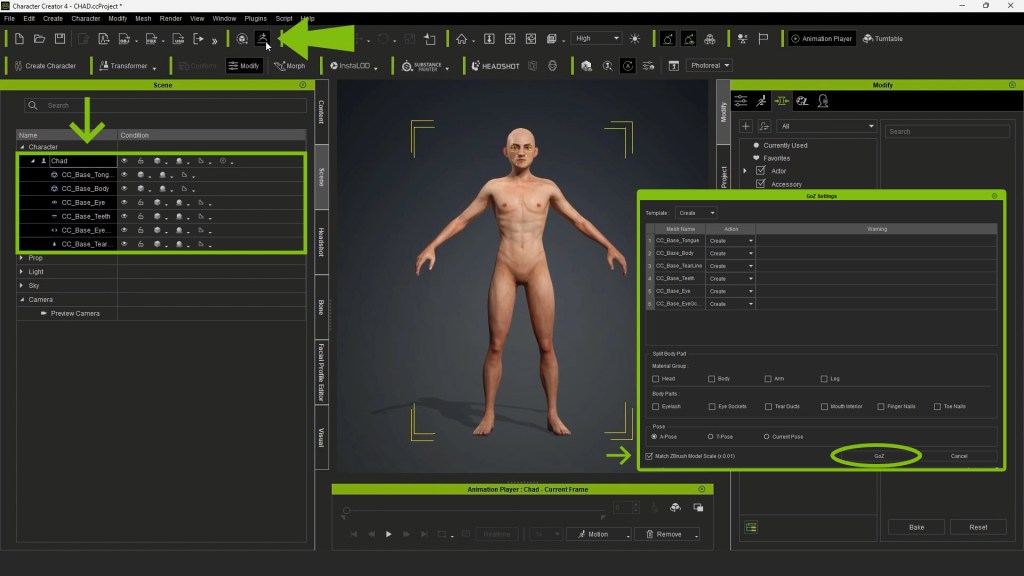
  1. When you’re satisfied with the modifications, go to the Scene Panel, give your character a name, and select all objects. Activate the “GoZ” option to transfer the model to ZBrush and continue customizing it.
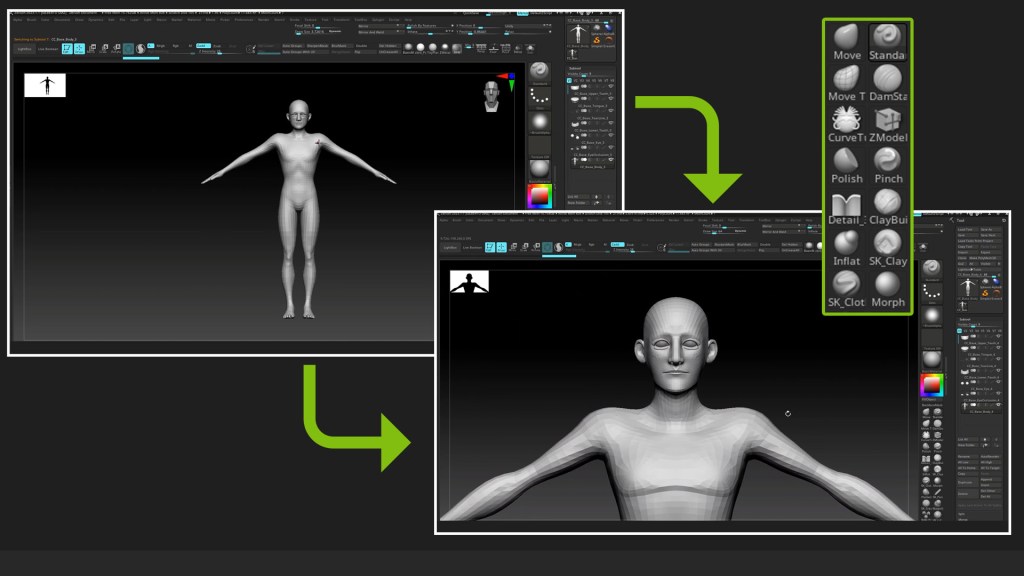
  1. Inside ZBrush, make specific modifications to the body Subtool using the Move brush and sculpting tools until you achieve the desired result.
  1. After making modifications in ZBrush, go to the Tool panel at the top and press the “All” button to synchronize and return the model to CC4 with the applied changes.
  1. In the Modify panel, you’ll notice that the model is divided into various materials. Add color textures and normal maps to each of these materials.
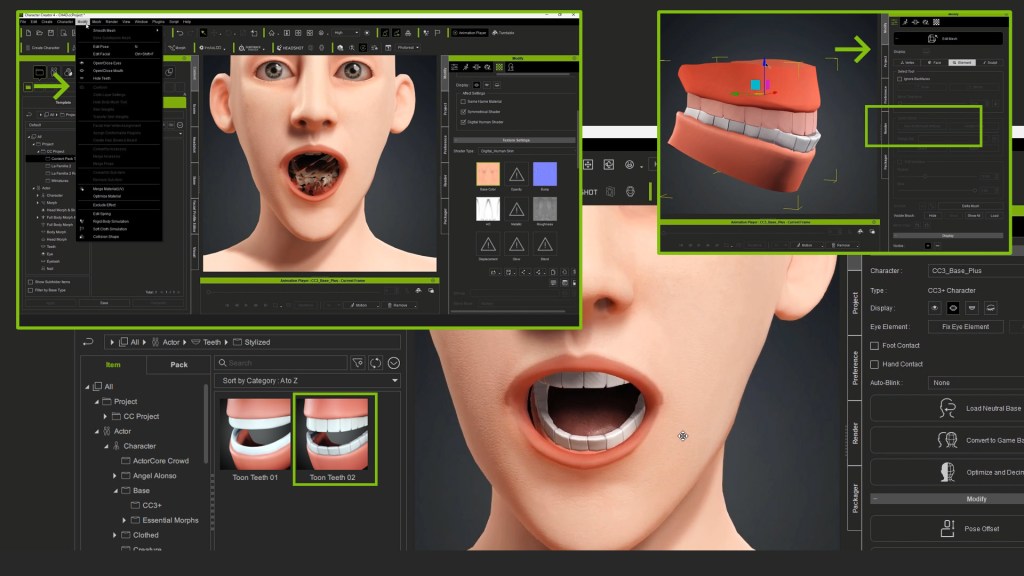
  1. Enhance the inside of the mouth by adding stylized teeth from the library. For greater precision of objects within the mesh, use the Edit Mesh tool from the Modify panel.
  1. Include a basic eye texture in the corresponding fields to emphasize the character’s cartoon style. Replicate the same texture on the 4 present UVs (Eyes and Corneas).
  1. You can further customize your character by adding elements like eyebrows. Model the eyebrows in Zbrush and adjust them in Character Creator.
  1. Finally, refine facial expressions using the expression editor. Increase the values of the sliders to extend the range of geometry. Ensure that the eyelids behave correctly both individually and collectively. Adjust the expressions to your preferences.

Ready for Action!

With these simple steps, you can create unique and customized characters in Character Creator. I hope this tutorial has been helpful to you!

See you in the next article below.

Next in this tutorial series, we go to PART 2 – Creating Clothing & Accessories with Character Creator and ZBrush

Creating Clothing & Accessories with Character Creator and ZBrush – PART 2 | CC Content Development Guide

Welcome to this 4-Part mini series on how to develop content for Reallusion Stores, ActorCore, and Marketplace.

In this 2 tutorial, we will explore how to create 3D clothing and accessories as assets in Character Creator (CC). We will summarize the process of creating
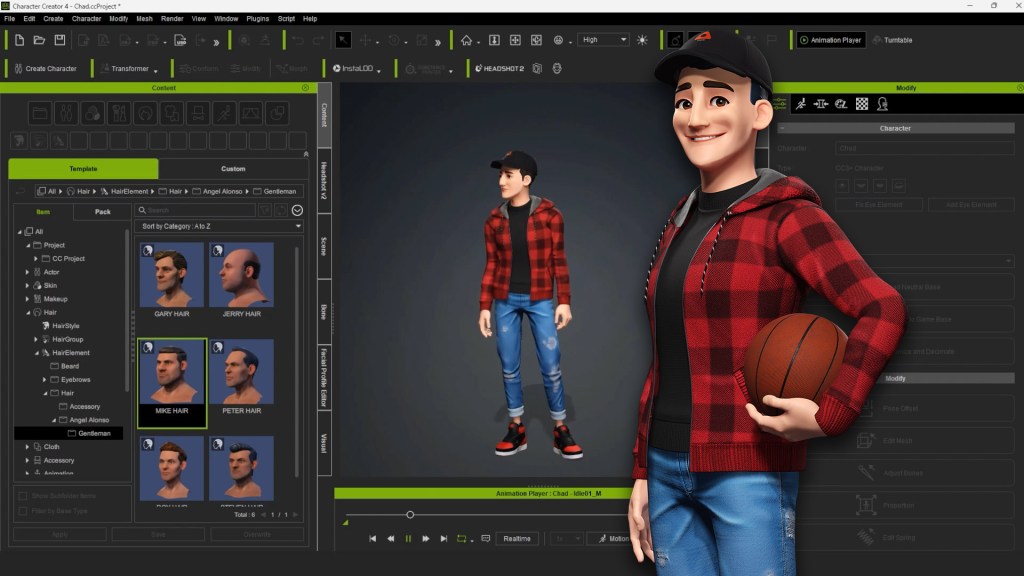
clothing for our character, Chad, who is a character designed for a Character Creator content package that you can find in the Reallusion Content Store, under La Family Members Vol. 2 category.

  1. Let’s start by opening Character Creator and selecting our Chad model. Make sure to have the eyebrows selected as well. Then, activate the “Goz” button. In the pop-up window, keep the “Current Pose” and “Maintain Scales Relative to Model in ZBrush” options selected. The idea of having the model in this pose is to facilitate clothing material creation.
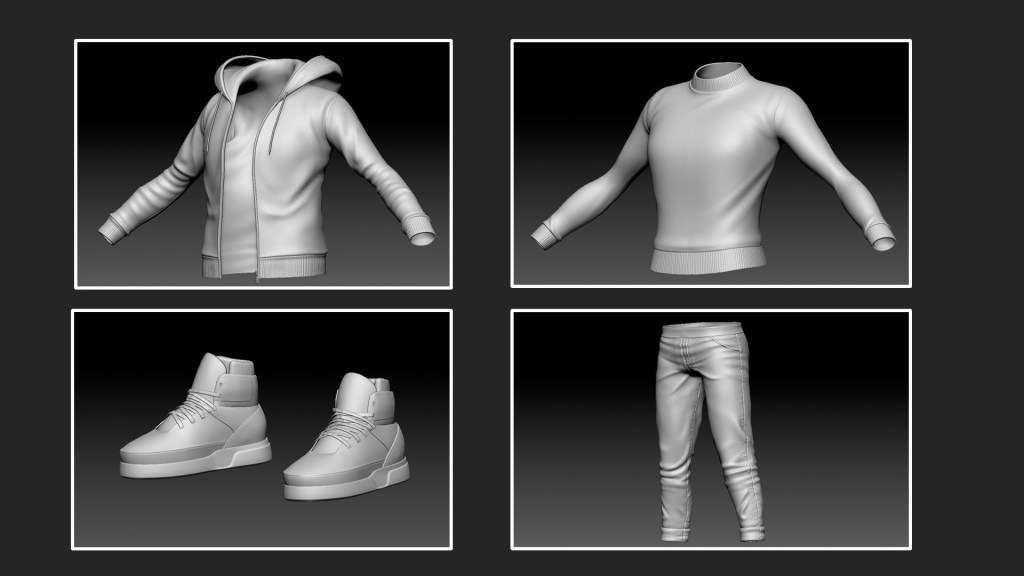
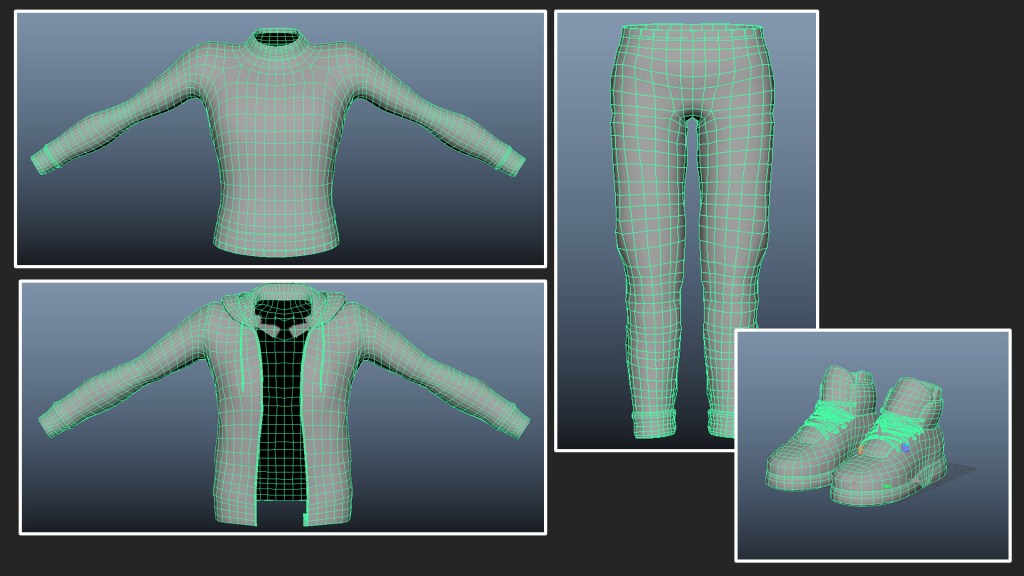
  1. Now, we can begin modeling the different pieces, using the body as a reference. You can duplicate the body and hide unnecessary parts. I also recommend using good references to achieve a realistic look without exaggeration. Chad has four pieces of clothing: a sweater, a coat, pants, and shoes.
  1. Once all the pieces are ready, export each piece separately and perform retopology using modeling software. This will generate new geometry with fewer polygons for animation.
  1. You will also create UVs for each object independently, meaning each piece of clothing will have its own set of UVs. This optimizes textures. Before applying textures, use Substance Painter to transfer details from the high-resolution mesh to the low-resolution one through the Bake process.
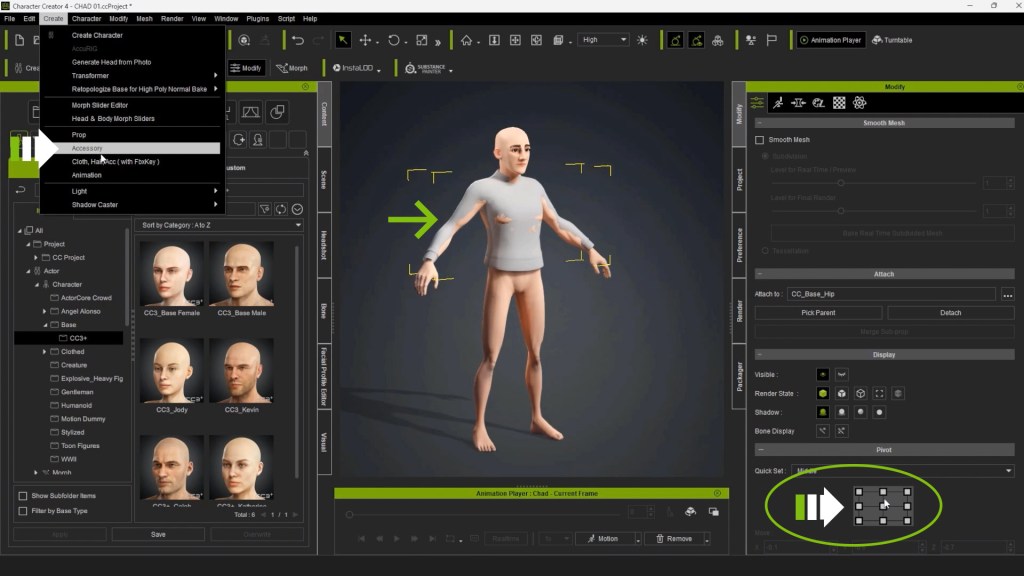
  1. Now, let’s return to Character Creator. Import our pieces one by one from the “Create” menu and activate the “Accessory” option. Make sure to center the pivot for each piece for proper placement.
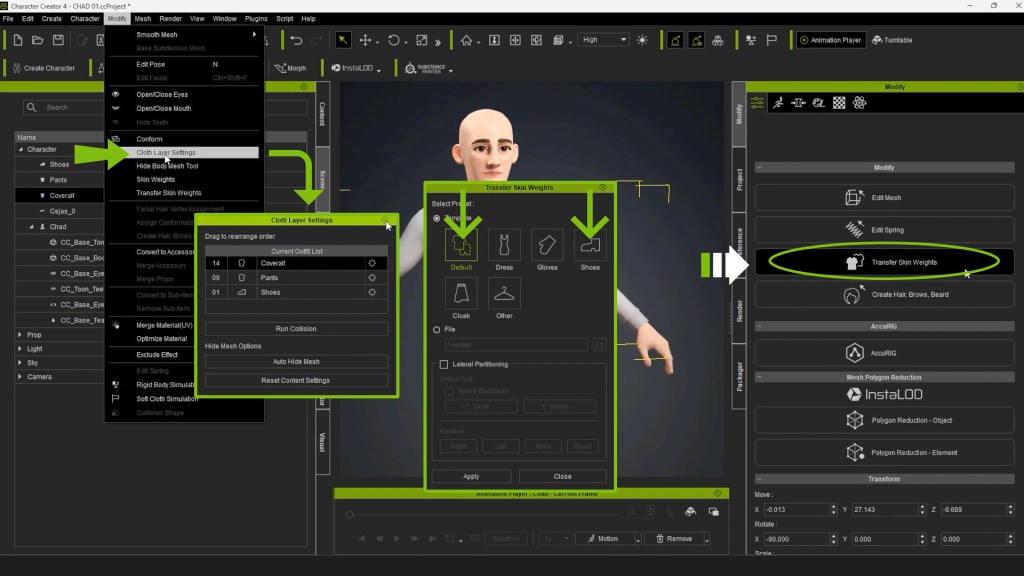
  1. Then, select each geometry and use the “Transfer Skin Weights” option in the “Modify” panel. This will allow the pieces to follow the character’s movements. Before proceeding, let’s organize the different clothing layers. Select the sweater geometry and go to theTop Menu “Modify.” It’s essential to assign each garment to a different layer. This helps the program identify geometries based on their location on the avatar. For example, the sweater will be in layer 14, pants in layer 9, and shoes always in layer 1.
  1. Next, insert texture maps into each material. To do this, select each piece of clothing and go to the “Modify” panel, then to the materials section. In the texture settings, you can insert up to nine different textures, each serving a specific purpose.
  1. To correct skin weights on the clothing items, let’s start with the inner sweater. Select the piece and go to the “Modify” panel, then select the “Skin Weights” option. Vertices will be highlighted, and you can see irregularities in the geometry, especially near the joints. To correct this, right-click on the corresponding bone and adjust the vertex influence using the quick selection tool. The quick selection panel allows you to adjust vertex influence on a scale from 0 to 1, with 0 being the least influence and 1 being the greatest influence
  1. Now, let’s eliminate overlapping geometries. Select the shoes from the Scene Panel. Then, activate the “High Body Tool” from the “Modify” panel. This tool allows you to remove internal geometries. Activate symmetry and select the parts you want to hide, such as those on the foot. Do the same with the pants, making sure to keep symmetry active while selecting overlapping areas.
  1. Now that we have all clothing assets ready, the next step is to include them in our library. Ensure that the asset is centered in the scene and go to the content panel in the clothing section. Select the appropriate category, customize the asset, and then press the “Save” button. Assign a name and apply the changes
  1. Create a new project and select an avatar, like Eddie, removing all accessories and leaving only the body. Add the clothing assets one by one in real-time and check how they behave on the new body structure.
  1. To include accessories, the preliminary steps involve modeling and texturing the object, which applies to all types of accessories. Let’s take a cap as an example. Go to the top menu “Create” and choose the “Accessories” option. Reposition the cap by centering the pivot and adjusting its size as needed. Use the “Attach” option and search for the head bone in the search bar to link the cap to that bone. Apply the changes and check how the cap behaves by moving the head with the pose editor.

And that concludes our tutorial on creating 3D clothing and accessories with ZBrush and Character Creator. I hope you’ve learned a lot, and I hope this information is useful for your 3D animation and design projects.

Continuing with this tutorial series, we go to PART 3 – Hair Creation for CC Characters with Blender or ZBrush

Hair Creation for CC Characters with Blender or ZBrush – PART 3 | CC Content Development Guide

Welcome to this 4-Part mini series on how to develop content for Reallusion Stores, ActorCore, and Marketplace.

In this 3rd PART, we will show you how to create hair in Character Creator! In this tutorial, you will learn how to breathe life into characters with different hair styles using tools like Blender or ZBrush.

  1. The first step is to export the character. We’ll use Blender for this example. Go to the “File” menu, select “Export,” and enable the “Nude Character in Bind Pose” option. Then, choose the export location and click OK.
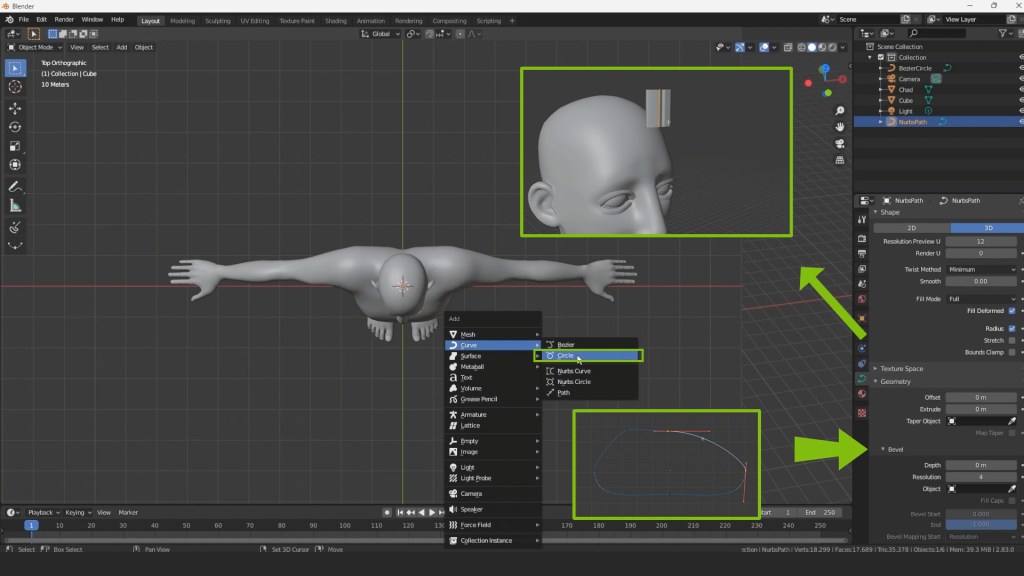
  1. Once in Blender, import Chad’s body model. Next, insert a curve next to the character and shape it using handles. With Ctrl, you can add new nodes to create more complex shapes. Using the “Bevel” tool, turn the curve into a tube, allowing you to project hair strands.
  1. Duplicate the first strand with Shift+D and adjust as desired. Continue creating new shapes from the node lines until you achieve the desired look.
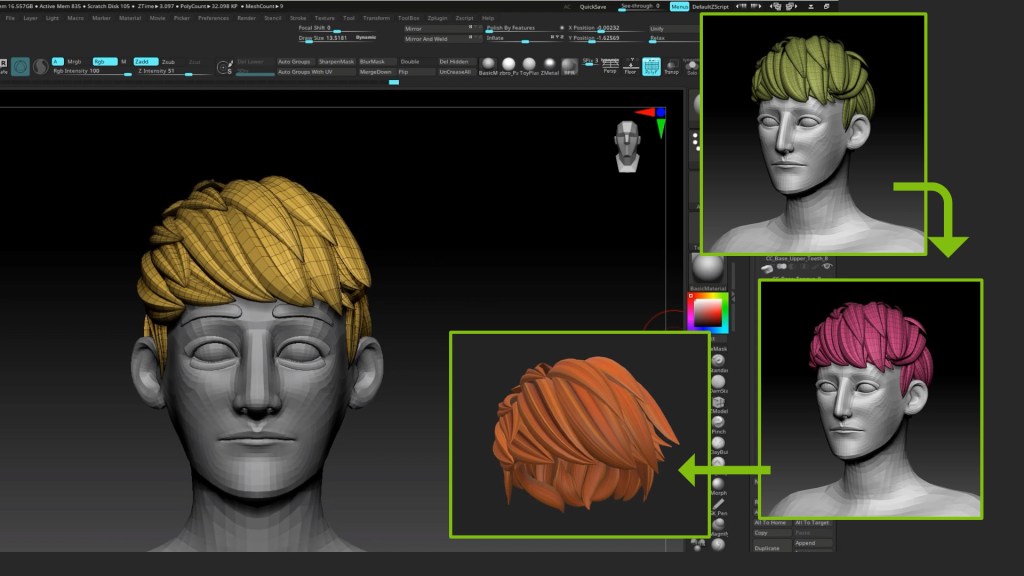
  1. If you prefer to use ZBrush, select Chad’s body in the content menu and activate the “Goz” button in the popup window. Then, regardless of whether you used Blender or ZBrush, clean up the geometry to optimize and adjust the polygon count. Afterwards, transfer the high-resolution details to the low-resolution mesh and take everything to a texturing program, such as Substance Painter.
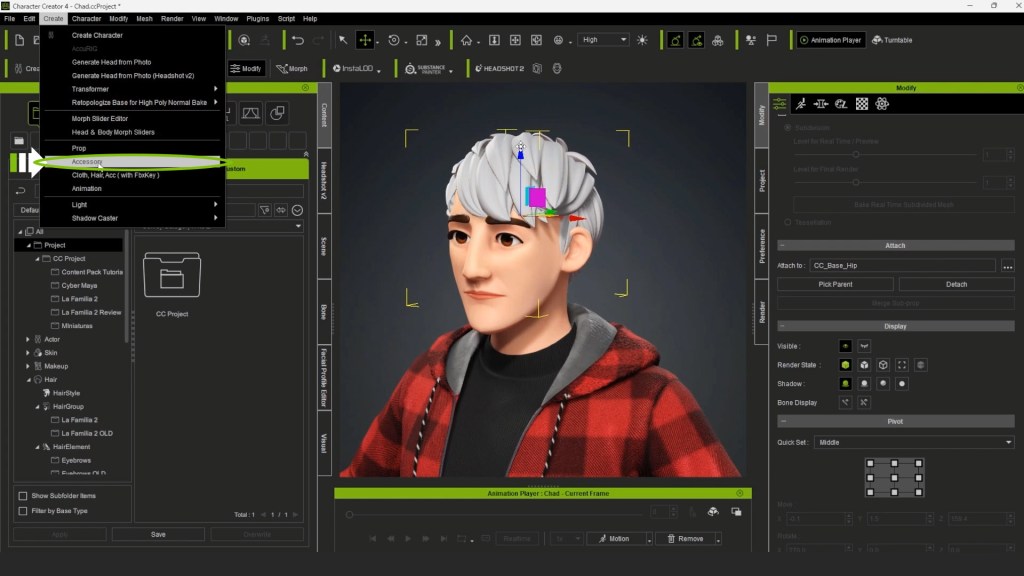
  1. Back in Character Creator, import the object from the “Create” menu, enabling the “Accessories” option. Make sure the hair loads correctly in the scene and adjust it if necessary.
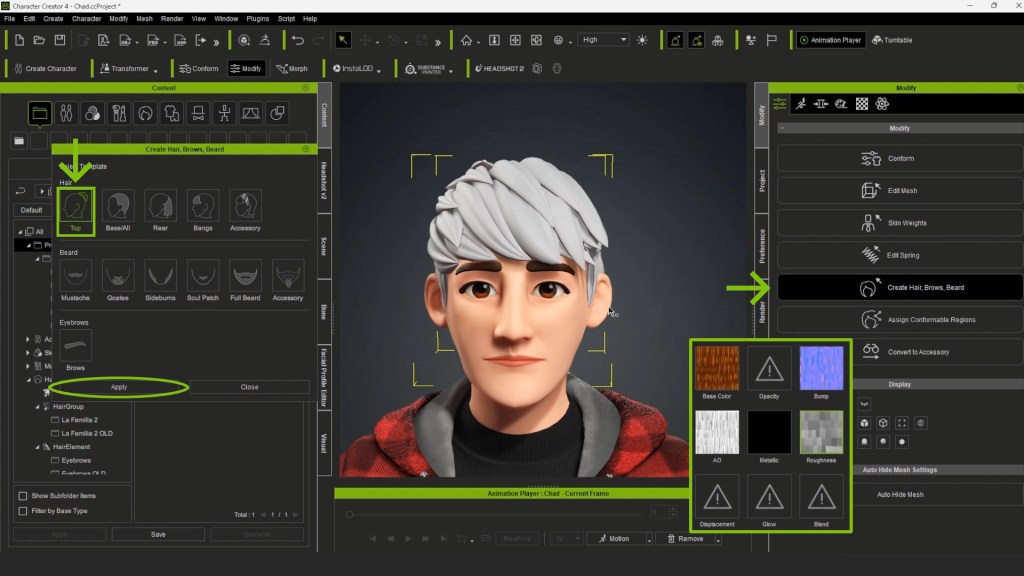
  1. Then, go to the “Modify” panel and activate the hair creator assistant. Select the appropriate profile and apply the changes. Build the hair material by adding pre-colored textures.
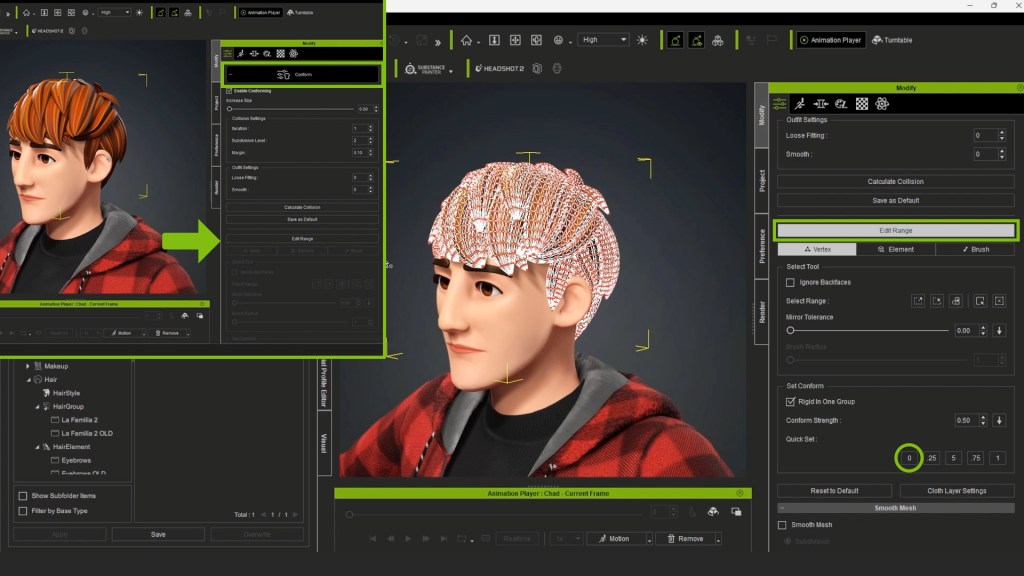
  1. Select the mesh and go to the “Modify” panel, enable the “Edit Range” option, and select all vertices. Press “Zero” to adjust the geometry.
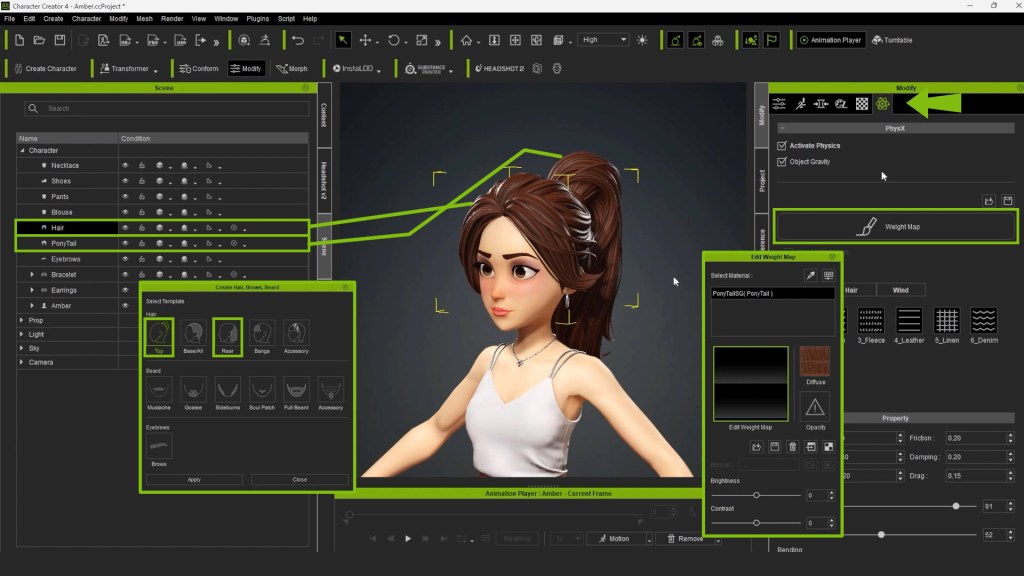
  1. To include hair like Amber’s, which consists of two geometries, you can apply them to the model following the appropriate steps. To enhance the hair, activate the material physics editor and apply a weight map to simulate natural movement.
  1. Customize the colors to your liking. Right-click and enable the color editor option. You can modify different parameters related to brightness, contrast, hue, and saturation.
  1. To check the created hair, create a new project in Character Creator, select an avatar, and apply the hair assets. You can also adjust other aspects of the character and add clothing for a complete result. And there you have it! Creating hair in Character Creator is simpler than it may seem.

Finally, let’s go to the last part of this tutorial series – PART 4 -3D Asset Packaging for CC Characters

3D Asset Packaging for CC Characters – PART 4 | CC Content Development Guide

Welcome to this 4-Part mini series on how to develop content for Reallusion Stores, ActorCore, and Marketplace.

In this 4th and last tutorial, we will guide you through the process of packaging and publishing your design in Character Creator for the Reallusion Marketplace! This strategy will enable you to monetize your projects and become a Reallusion content developer.

To illustrate this process, we will use “Chad” as our example character.

  1. Make sure that all the pieces of your character’s outfit are included in the Content Panel. Organize each piece into its corresponding category, such as shoes, sweaters, pants, eyebrows, and hair. I recommend recording the complete avatar under the “actor” category.
  1. Open the packaging panel by going to the top Windows menu and activating the “Packager” option. Right-click on an empty space and select “Create Pack” and assign a name.
  1. Double-click on the package file and start including all the elements one by one.
  1. Organize hair, clothing, and accessories into categories. Create a folder next to the character and name it according to your brand or username. This way, all assets will be organized in the user’s content library who purchases the products
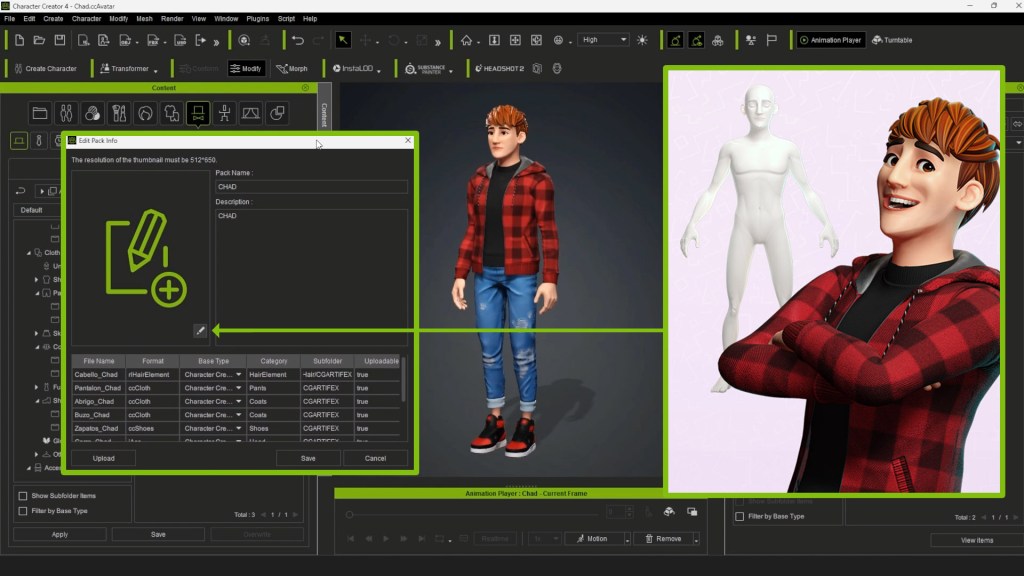
    1. Once you have organized all the elements, go to the main folder of the package file, right-click on it, and select “Edit Package Info.” In the popup window, you can modify the name and description of the asset. Make sure all files are in “True” status so they can be uploaded to the server
    1. You can also add a thumbnail to the package. Activate the editing option and search for an image on your computer. The thumbnail image should have a resolution of 512 × 650 pixels. I recommend creating different types of renders in Character Creator to showcase your character attractively.
    1. To get an appealing image, generate an eye-catching pose using the pose editor, use the facial editor to create captivating expressions. From the Render panel, change the format to PNG and increase the quality by setting the samples to 3X. You can create several images to showcase the full avatar, different hair angles, full-body morph from different angles, accessories, clothing, and various expressions
    1. Go to the package window and right-click on the “Upload Pack” option. In the pop-up window, verify that the avatar is loaded without errors and then select “Upload.”
    1. Head to the Content panel and activate the dropdown menu next to the search bar. Select “Reallusion Marketplace.” This will take you to the Reallusion website linked to your account. Make sure you are logged into your Reallusion profile.
    1. Click on your profile and select “Manage Backend.” This interface will allow you to add information about your content. Activate the editing option, then select the package entries, type, category, version (actor), and project. Add more categories to classify your character, indicate if it is compatible with iClone, and assign the gender.
    1. Assign the package name and make sure all assets are present. Then, assign a point value to your character (I recommend reviewing the points conversion policies according to the guidelines published on the website, developer.reallusion.com.) Add a description that includes keywords and mentions compatibility with other projects in the store. Add all the images you created earlier at the bottom. Select the compatibility version of the project and save the changes.
    1. Finally, click on the package thumbnail. You will now see your product published in the Reallusion Marketplace. For more information, go to the product marketing section, where you can download the marketing guide and marketing templates to enhance the look of your assets. With these simple steps, you have published your content on the Reallusion Marketplace and can start benefiting while still having fun creating new content

    Crowd Sim and Motion Director Editor for iClone 8.4 Launch as Free Upgrades

    Crowd simulation continues to be a cornerstone of films, games, architectural visualization, traffic analysis, construction, and engineering. Its significance extends further into AI training, driving simulations, and the advancements of digital twin development, elevating the discipline as an increasingly valuable component of cutting-edge industries.

    In response to the soaring demand for crowd simulation, iClone 8.4 has undergone a monumental transformation, now boasting an integrated crowd simulation engine available as a free upgrade. This remarkable leap forward democratizes access, empowering small to mid-sized studios to harness its power affordably. The fruition of two years of relentless development, this update brings forth streamlined functionalities and flawless asset integration. The Crowd Sim technology marks Reallusion’s pioneering step into the world of simulations, with upcoming releases in 2024 set to elevate the experience further with a focus on environment interaction and motion planning.

    Know more: iClone Crowd Sim Official Page | Getting Started Tutorials

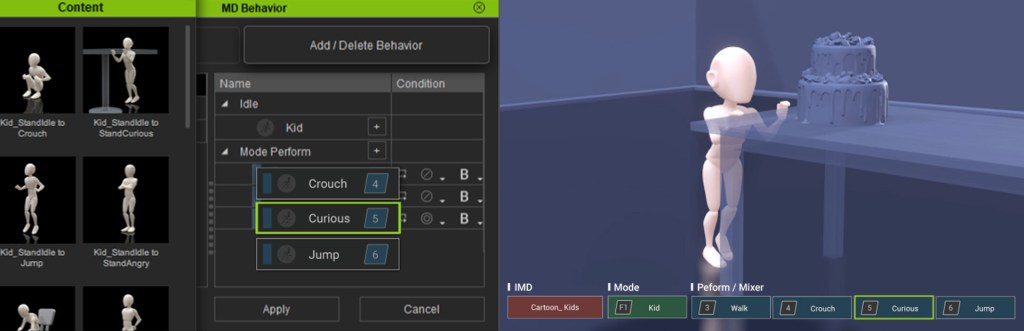
    Last but not least, this update introduces the Motion Director (MD) Editor, providing an infinite range of options to customize and interact with MD toolsets. This allows you to precisely steer characters around the scene and trigger motion sequences precisely as desired.

    Know more: Motion Director Official Page | MD Editor Tutorials

    Feature Highlights

    Complete Toolchain

    Most existing crowd simulation solutions are composed of plugins for off-the-shelf software such as 3ds Max or Maya. This fragmentation commonly lacks readily available assets for immediate production and is frequently priced beyond the means of smaller studios. In contrast, Reallusion has developed a comprehensive character production and crowd simulation toolchain that is both practical and affordable for real-time simulation. 
    This toolchain includes a spectrum of tools ranging from 3D character creation (Character Creator) and character animation (iClone) to an extensive library of motion and character assets (Actorcore), complemented by an asset developer ecosystem comprising the Content Store and Marketplace. The integrated suite empowers users to design custom characters tailored to specific thematic needs and seamlessly integrate personalized animations, including complex crowd behavior.

    Environment Setup

    Designating the traversable area on an imported 3D environment is mostly automatic. Your scene can comprise multiple elevations connected by ramps and stairs. iClone seamlessly detects accessible areas and promptly updates the NavMesh whenever new objects are introduced. It integrates navigable inclines and distinguishes between passable and obstructed zones. Live NavMesh updates can dynamically adjust to changes, such as the movement of automatic sliding doors. Learn more about NavMesh: Tutorial | Manual.

    Walkway for Foot Traffic

    Establish footpaths with simple mouse clicks, modify road curvature and width by dragging control points, and automatically identify surfaces conducive for movement. Seamlessly close paths to create continuous loops, connect individual paths to craft passages or intersections, and fine-tune the probability of selecting specific routes. Learn more about WalkWay: Tutorial | Manual.

    Flexible Character Spawning

    Choose the target location for spawning actors, whether it’s a 3D model, a user-defined volume, a walkway, or the entire NavMesh. Have the flexibility to specify the crowd size, formation, density, facing direction, and observe their actions upon placement in the scene. Male, female, elderly, or child actors can automatically adopt appropriate animation styles, with adjustable probability ratios among idle, walking, jogging, and other performances. Learn more about Spawning Actors: Tutorial | Manual.

    Smart Avoidance and Flocking

    Incorporating natural crowd dynamics, this iClone crowd simulation lets characters maintain distancing and formations while circumnavigating obstacles, irrespective of their movement styles and speeds. Through the use of agent radius, detection times, and wait-and-move cadences, the simulation can minimize backtracking and unravel pedestrian bottlenecks. Learn more about Avoidance Tutorial >

    Directable Characters 

    Easily generate realistic characters with intricate facial expressions, various accessories, and diverse animation styles, ideal for populating crowd scenes at any distance. Users have the flexibility to manage characters collectively or individually, employing keyboards, game controllers, or mouse-click waypoints to direct their locomotion. Learn more about Crowd Generation Tutorial >

    Ambient Animation with ActorGroups

    ActorGroups are equipped with pre-defined, loopable animations for standing, sitting, and talking, enriched by an array of accessories, facial expressions, and genuine social interactions. They enhance scenes by introducing randomized actors, materials, and motions, or by crafting bespoke ActorGroups, further enlivening the overall experience. Learn more about ActorGroup: Applying Preset Actor Group – Tutorial | Manual. Applying Random Actor Group – Tutorial | Manual.

    Alternate Performance and Versatility

    Enjoy the flexibility of converting characters into Lite actors when system resources are constrained or when optimizing for heavy crowd simulations. Choose to revert Lite actors back to Edit mode for precise control over their movements using Motion Director along with a diverse range of input controllers.

    Motion Director Editor

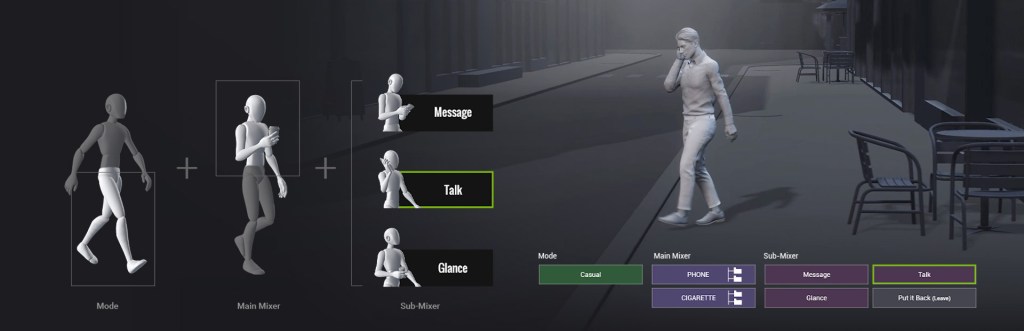
    Motion Matching has been integrated for smooth navigation control, enabling easy addition of new idle and perform triggers to Motion Director via drag-and-drop interface. Motion Mixer lets users direct upper-body motions while the legs are controlled by standing, walking, or jogging iMD states. Moreover, the Mixer features specific sub-mixer actions, enabling actors to perform tasks like making a call, sending a message, or simply glancing at a handheld device. Know more about Motion Director Official Page | Tutorial | Manual

    Customization and Expansion 

    Access the ActorCore roster to enlist scanned actors and their matching mocap loops. Use Character Creator to design modular actors, decimate the mesh for massive crowd simulations, or auto-rig with AccuRIG. Spawned crowds can be randomized based on user-defined actor and motion lists that match them with predefined accessories and material options. 

    Pipeline and Render

    Effortlessly export animated characters to your preferred 3D tool or game engine. Native Auto Setup plugins are available at no cost, offering pre-configured model and material setups for Blender, Unreal Engine, and Unity. Moreover, Live Link supports synchronization with the Unreal Engine and NVIDIA Omniverse, enabling a two-way workflow. Upcoming support is also in the works for 3ds Max and Maya.

    Startup Assets

    iClone includes 8 crowd characters, each featuring 5 texture options. To enhance your crowd simulation experience, consider obtaining the two essential packs for additional crowd extras. For a broader selection of 3D actors offering loopable ambient motions created from authentic mocap data, explore the vast offerings available in ActorCore.

    Modern People Sampler

    31 scanned actors are available with full-body rigging, encompassing various genders and ages. These individuals offer a rich array of animation possibilities using Crowd Generation and the dynamic spawning features of ActorGroups. Each character is equipped with 5 texture options, allowing for both random and specific visual variations, enhancing the diversity and realism within your animations. Know more about Modern People Sampler >

    Social Actions

    “Social Actions” is an ambient crowd animation pack designed to utilize the dynamic spawning system for ActorGroups. Effortlessly bring scenes to life with individuals standing, sitting, engaging in conversation, or naturally interacting with close ones. Comprising 90 mocap animation loops for endless background animation, each detailed with authentic facial expressions and digitized in MotionPlus format, this pack is compatible with any project. Know more about Social Actions >

    Know more about iClone Crowd Sim related features:

    WarLord’s Workshop – Beginners Guide: Creating a Snowman in CC4 with Primitives

    This Christmas, like many that came before, will be the first Christmas for many new iClone/Character Creator users to make special something for the holiday season. Whether it be for family and friends, a business, or the web in general Reallusion and Character Creator 4 have made it easy to create characters like an animated snowman, or rather I should say a snowman you can animate, to spread some Christmas cheer and extend your skills at the same time.

    The best part is we will use primitives that come with CC4 to create the snowman. What we will be doing specifically:

    • Drag, drop, rescale, and place primitives, balls (spheres), and cylinders to create a simple snowman.
    • Merge the various props into one prop.
    • Use AccuRig to rig the snowman for animation (and mask out bones we don’t need).
    • Test the Snowman character in iClone.

    GETTING STARTED

    This exercise is a great starting point for new animators and an easy, quick solution for seasoned pros. AccuRig can take a mesh that is similar to human form and give it humanoid movement. It can be anthropomorphic animals or any group of props that AccuRig can read and skin as a character. This also opens up iClone’s entire motion library for easy animation.

    As shown below, drag and drop the prop, primitive Ball_000, found in Props-> 3D Blocks, then duplicate the ball and move it on the upward axis till it is in the approximate range of the torso. With the newly created torso still selected duplicate it, and bring it up to the area of the head while rescaling it down to the size of the head you need.

    The start of our snowman. Three basic balls (Spheres) for the body.

    Now search for a cylinder in the same 3D Blocks folder. In this case, I used Cylinder_004. Rotate it to 90 degrees and place it where you think the arms would be.

    A cylinder was added for the arms and runs through the body mesh.

    PLEASE NOTE: There is a video tutorial at the end of this overview.

    MERGING THE PROPS

    Now we are ready to Merge all the primitives into one object. This is done to prepare the mesh to work with AccuRig.

    If you are concerned about no face at this point, there is simply no reason to include those added props to the skinning process as they will function as accessories that are attached. It’s just a simple process of adding more balls (spheres) textured black for eyes and mouth while adding a cone of your choice for the nose with the appropriate color texturing.

    USING ACCURIG TO BRING IT TO LIFE

    Now comes the easy part… using AccuRig to turn our pile of props in a snowman character we can animate. While we are in AccuRig we will also use masking to turn off the bones from the waist down since this snowman doesn’t have legs.

    With the newly merged mesh selected press the AccuRig button to take us into rigging. We’ll move around some of the markers but that is a simple enough task to complete.

    Once in AccuRig press the “Create Guides” button and let it do its magic.

    Arranging the Guides (dots) with the mesh.

    After arranging the guides accordingly, we set the Number of Fingers to zero since our snowman has no fingers. You could add two more fingers with scaled cylinders and skin as three fingered but we’re keeping this simple for the purpose of this tutorial.

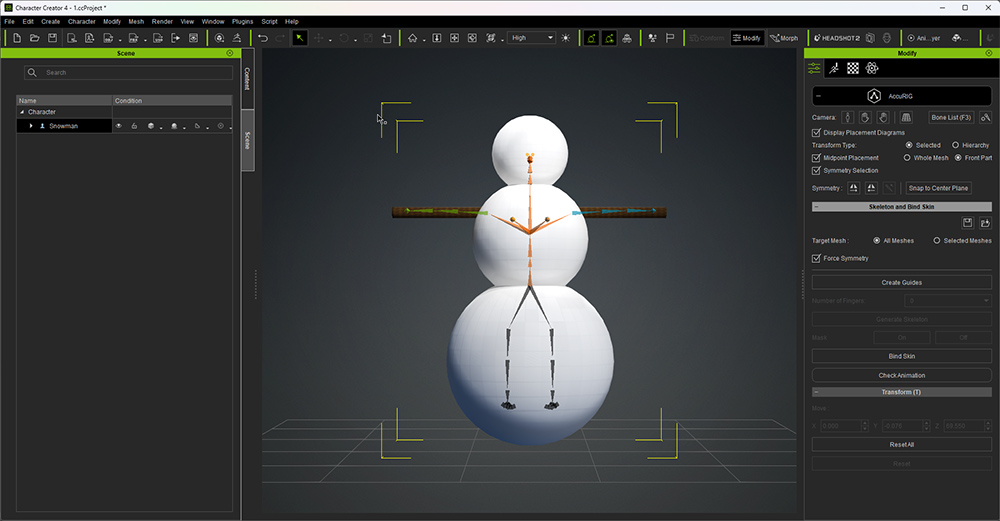
    Click Generate Skeleton to continue.

    Set the number fingers and Generate Skeleton

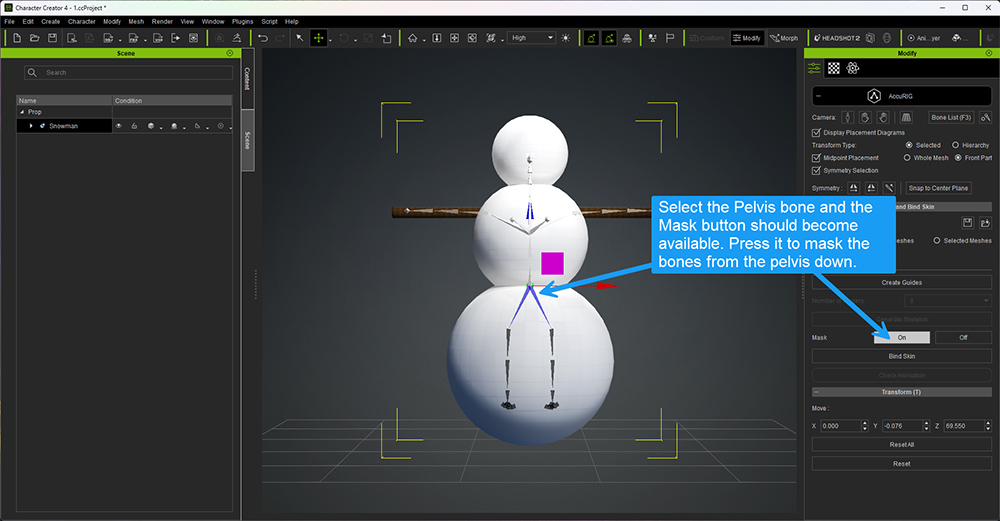
    Once the skeleton appears, select the Pelvis bone and it should turn blue when selected. Next, turn the Mask by clicking the On button in the mask section. This will mask out the pelvis and the bones below it, so they do not twist or distort the bottom of the snowman when motions are applied.

    This is a very powerful and useful feature of AccuRig making it possible to skin many different types of characters that may not have the standard number of limbs or lost a limb.

    Click the Bind Skin button and the skinning process will begin. It may take a while to work on some models but generally, it skins it in less than a minute in my experience. Once it’s finished you will see a multi-colored skeleton indicating the skinning process is complete. From here you close AccuRig and the newly skinned snowman character will be in the Character Creator 4 workspace.

    The multi-colored bones show that the character is rigged with bottom bones masked out.

    Below you will see the snowman character after transfer to iClone. As referenced in the image you can see where the arm and shoulder bend away from each other with little deformation to the body. This is due to placement of the marker on the upper arm and another marker straddling the edge of the body mesh and arm.

    A QUICK CHECK IN ICLONE

    The rigged character in iClone 8.

    What you see above is the snowman mesh using the same Ball (sphere) primitives we used for the body parts, scaled down and textured black for the eyes and mouth. I then duplicated one of the eyes and scaled it down to use for the mouth. From here I duplicated and placed the stones in a smiling mouth but it could be a neutral or frowning mouth just as easily.

    In fact, you could animate the mouth by creating a neutral or frown with the mouth primitives then moving down the timeline and arranging the mouth primitives into a smile. While that is beyond the scope of this tutorial it is not that difficult. Experimentation is highly encouraged.

    The nose is a cone primitive scaled to long and narrow. The top hat is three cylinders scaled to the various shapes of the brim, hat, and headband.

    WHAT COULD GO WRONG

    There is a possibility that the skinning might miss a few vertices in the back of the bottom sphere as that is a long way from the bone. This did happen to me at least once during testing.

    Occasionally a bone will be weighed improperly, particularly in extreme situations like this large round body sphere.

    If this happens you may have to go into Skin Weights and adjust the CC Base Hip with the smooth tool. While this isn’t the best way, it’s the easiest for beginners until you grasp more of what skinning is.

    Using the smooth tool in skin weights to smooth out the mesh deformation.

    You can also just hide this portion of the snowman from the camera view when any deformation occurs. This is due to the mapping of the CC Base Hip and is another area that I highly recommend you save a copy and experiment with correcting this error should it happen to you.

    While our snowman isn’t a sophisticated character by any means, it is a great starting point if you have no idea what Character Creator 4 can do outside of human characters. For a school project, it can be pencils for arms and legs, an eraser for the body, and so forth. Want a rock golem? Find some rock props and put them into a humanoid, bipedal shape so AccuRig can skin it for you.

    Just keep in mind that your characters are NOT limited to the base meshes you find in Character Creator. You are only limited by the objects you have on hand and your imagination.

    Merry Christmas!!!

    MD McCallum - WarLord

    MD McCallum – WarLord

    Digital Artist MD “Mike” McCallum, aka WarLord, is a longtime iClone user. Having authored free tutorials for iClone in its early years and selected to write the iClone Beginners Guide from Packt Publishing in 2011, he was fortunate enough to meet and exchange tricks and tips with users from all over the world and loves to share this information with other users. He has authored hundreds of articles on iClone and digital art in general while reviewing some of the most popular software and hardware in the world. He has been published in many of the leading 3D online and print magazines while staying true to his biggest passion, 3D animation. For more information click here.