Jeet Shah shares his creative journey with Character Creator 4 (CC4), crafting a stunning 3D character while discovering the efficiency and creative freedom that advanced tools provide. His success in the 2024 Reallusion Character Contest highlights both his dedication and CC4’s capabilities as a powerful tool for 3D artists.
Jeet Shah, From IT to 3D career
Jeet Shah’s story is one of passion and determination. Hailing from Rajkot in India, Despite Jeet’s IT academic background, his heart was set on an entirely different path — 3D art.
“I’ve always been fascinated by the CG effects in movies and games”, Jeet shares. After completing his degree, he took a year off to teach himself 3D art and honed his skills using software like 3ds Max, Maya, and later ZBrush.
His efforts paid off, landing him his first job at a VR and mobile game company in 2016. Since then, Jeet has advanced through various roles. Once a team leader, and now as a technical artist, he combines love for character art with a deep appreciation for the technical aspects of rigging and animation.
Jeet’s interest in Character Creator was sparked by the 2024 Reallusion 3D Character Contest, where he secured 3rd place in the realistic character category. Despite being a newcomer to the platform, he was impressed by its intuitive controls and non-destructive character creation process.
“Character Creator 4 introduced a refreshing approach to 3D character creation with hundreds of sliders for full-body modifications”, Jeet explains. “I could easily experiment with new proportions and ideas without worrying about losing the original version. This flexibility was a game-changer.”
“If you’re making large changes to body parts like the eyes or limbs, it’s best to do it within CC4, as it preserves the skeleton hierarchy better than ZBrush”. He continues to emphasize that the built-in GoZ pipeline for fine-tuning, combined with the strengths of both platforms, enabled intricate detailing.
CC GoZ for detailing
Notable was the integration of ZBrush with the GoZ pipeline, which allowed him to send models back and forth between Character Creator 4 and ZBrush, leveraging the unique strengths of each tool.
“I must have transferred the model between ZBrush and CC4 at least 10 to 15 times”, he says. “CC4’s built-in facial and body rigging enabled me to refine the primary shapes quickly, while ZBrush helped me achieve the detailed sculpting that CC4’s sliders couldn’t”.
Jeet found the roundtrip process fast and effortless, as he also utilized CC4’s powerful facial rigging and morphs for detailed expressions. He would further refine these expressions in Maya for precise control over the final look.
AccuRigging armor and clothing
For his Reallusion contest entry, Jeet transformed a concept by George Redry into a lifelike 3D character. Starting with Marvelous Designer, he crafted the base clothing before moving the model to ZBrush to add burnt, battle-worn details. For the arm, he sculpted individual pieces using DynaMesh.
Jeet then rigged the character’s clothing and armor with AccuRig, CC4’s automatic rigging plugin. “It was incredible how quickly AccuRig rigged my character. What would normally take me a few days of manual skin weight painting was done in just a few seconds”, he recalls. As stated, the tool provided a “90%” usable rig, which he refined in Maya, adding custom bones and adjusting skin weights for complex areas like the shoulder pads and skirt.
A great learning opportunity
Participating in the 2024 Reallusion 3D Character Contest provided Jeet with an opportunity to learn new tools and techniques. “After the competition, I feel like my art skills have leveled up,” Jeet reflects. “CC4 was an eye-opener for me, and I’m excited to include it in my skill set moving forward.”
He is grateful to Reallusion for organizing the contest and for making advanced tools like CC4 accessible through trial subscriptions, which allowed him to explore its full potential. “It was a fantastic opportunity, and I encourage other artists to take part in such contests. It’s a great way to push yourself, expand your portfolio, and grow as an artist”.
Experience Prop-Paired Animations and Motion with Facial Expressions, Exclusively on ActorCore.
ActorCore, the premium online content store for 3D productions, releases new types of mocap animations: Prop-Paired Animations and Motions with Facial Expressions. With over 3,600 professional motion assets, many of which stand out in the market, such as Hollywood action sequences and hand-keyed cartoon animations, ActorCore’s latest offerings demonstrate its strength in delivering unique content. This expansion continues to simplify workflows and boost productivity for game, film, simulation, and visualization productions.
World’s First: Prop-Paired Animations & Motion with Facial Expressions
ActorCore is renowned for its expertise in 3D motion, offering a vast array of high-quality assets that cover a wide range of themes, all while leveraging advanced technology in the digital content market. The latest release includes:
Prop-Paired Animations
This mocap animation synchronizes human motion with animated props, enhancing visual fidelity and simplifying data handling. It allows characters to interact seamlessly with props without the need for separate loading, animation, or manual alignment. Users can experience this firsthand with the Skateboard motion pack, which features professional skateboarding moves that automatically synchronize the skateboard with the character’s animations. Additional motion packs featuring animated props, such as biking, will be released in 2025.
Motion with Facial Expressions
ActorCore provides motions that incorporate facial expressions, enhancing interactions by maintaining eye contact during conversations, expressing excitement while watching sports, and conveying situational awareness. This type of motion adds depth and authenticity to scenes, bringing them to life with expressive, lifelike movements. Explore how digital actors are enhanced with natural facial and body motions in the Group Sit & Chat, Group Stand & Chat, and Idle Sit and Stand motion packs.
Evolving 3D Motion Technology
From the outset, ActorCore has provided high-quality mocap motion while offering professional hand-keyed motion. Initially focused on single-character performances, ActorCore also delivers dual and multi-character interactions, further enriched with facial expression and animated prop integration. The solid advancement in motion technology is designed to simplify 3D production for users while enhancing precision and realism in their projects.
In addition to Prop-Paired Animations and Motion with Facial Expressions, special content can be found in the ActorCore 3D motion store:
Hollywood-caliber Mocap Animation: Collaborating with top stunt actors and leading mocap studios to deliver incredible performances, ActorCore provides top-notch mocap animations in a wide range of themes for action-film productions, game design, and scene simulations.
Handkey Animation: Tailored hand-keyed animations breathe life into diverse 3D cartoon characters, showcasing unique body types and vibrant personalities. Existing projects can be elevated with dynamic, fluid movements that capture the essence of each character.
Group Animation: Paired motions for two or more characters illustrate interpersonal relationships or communication, such as those between a parent and child, friends, lovers, and co-workers.
Perfectly Matched Motions and Props
Virtual actors no longer perform empty-handed! Hundreds of 3D props and accessories are now available on ActorCore. With the Related Content feature, it is easy to locate the most suitable props to complement selected motions, or vice versa, and preview them alongside the actor. This intelligent matching process allows for convenient access to relevant content, saving significant time on searching and verification.
Additionally, Related Content allows for the application of different props to either hand. Furthermore, the same or different props can be applied to each hand of a group of characters, effortlessly creating variety for crowd scenes, such as street protestors, concert audiences, and sports spectators.
Custom Download
In addition to downloading individual content, it is possible to combine the selected character, motion, and prop from the inventory to create a single FBX file. This allows the character to directly interact with the needed prop in motion after importing to different platforms, eliminating the hassle of manually combining assets in 3D animation software.
Easy Crowd Simulation Facilitated by iClone
With a large bank of lightweight characters, 3D motions, and props from ActorCore, crowd simulations can be easily achieved by implementing the powerful crowd generation features of iClone.
Dynamic crowds of any size can be effortlessly generated, engaged in a range of activities such as sitting, standing, conversing, walking, or jogging, all animated to reflect appropriate styles for different genders and age groups.
ActorCore motions and props are accessible directly inside iClone, allowing for the pairing of accessories through motions or vice versa, using ActorCore’s Related Content feature.
Motions are auto-loaded with animated props, such as a skateboarding motion that includes the skateboard inside iClone.
Motion and prop animations can be exported from iClone to all major 3D production tools.
Find Any Motion in ActorCore
ActorCore currently offers over 3,600 motions, all compatible with major 3D programs including Unreal Engine, Unity, Maya, MotionBuilder, Blender, 3ds Max, Cinema 4D, Omniverse, and iClone. Step-by-step guides and tutorials are available for each program, along with optimized Auto Setup plugins and Import Presets to streamline workflow. Visit ActorCore today to access a large selection of premium 3D motions.
The 2024 Reallusion 3D Character Contest was a major success, attracting 267 creative and skillful submissions. The contest featured three main categories with Artist Konrad Hetko securing first place in the “Character Design” category with his submission called “The Last Entry”. Just what inspired his intriguing character concept and what gave him the edge in this competition? Take a deep dive into his masterpiece and discover how he leveraged Character Creator, GoZ, and ZBrush Face Tools to win the contest.
Character Artist – Konrad Hetko
Hailing from Poland, Konrad Hetko is a character artist who has spent over 15 years working with different areas of digital art — from photo bashing and painting to video editing and animation. While he originally set out to become an animator, a university project sparked his love for 3D character design, completely shifting his focus. Now, he is putting his skills to work at Teyon, a Polish game studio, where he was part of major projects like Robocop: Rogue City.
Driven by his passion for both the craft and cutting-edge tech, Konrad constantly pushes boundaries, experimenting with new workflows and tools like Character Creator 4 (CC4). Lately, he’s been hooked on the GoZ pipeline, which seamlessly connects CC4 with ZBrush, allowing him to bring characters to life faster than ever.
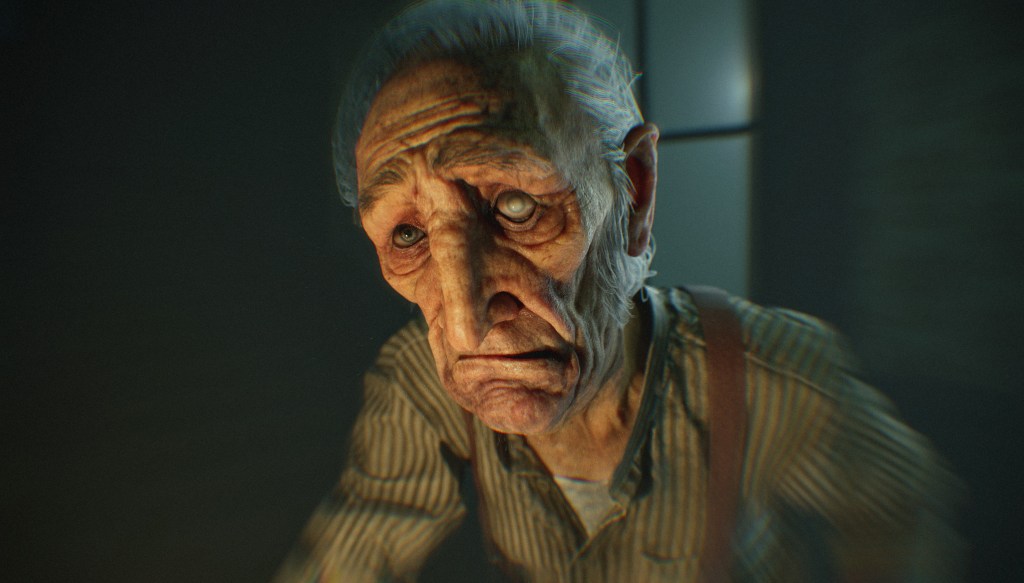
Konrad’s entry, “The Last Entry”, for the 2024 Reallusion 3D Contest drew inspiration from H.P. Lovecraft. His character, an old investigator, has uncovered terrifying truths about ancient, mythical creatures — knowledge that slowly drives him mad. He documents these horrors in a journal marked with the Elder Sign, a mystical symbol meant to shield his writings from the lurking dangers of the unknown.
H.P. Lovecraft.
Konrad intentionally moved away from realism in this piece, explaining “I wanted to focus on a more intriguing stylization”. His inspiration for this shift came from the “Bad Travelling” episode of Love, Death & Robots; Fascinated by the stylized character designs, he sought to evoke a similar feel, blending the dark, psychological atmosphere of Lovecraft with a distinctive and captivating visual style.
Benefits of Character Creator x ZBrush GoZ pipeline
A key part of Konrad’s workflow was the smooth integration between Character Creator 4 and ZBrush, thanks to the GoZ feature. This made it easy for him to transfer his character model back and forth between the two programs for ongoing refinement.
Body sculpture progressHand progression
“Reallusion’s tools were a game changer, especially the ease of switching between Character Creator and ZBrush using GoZ,” he explains. With GoZ, he sculpted intricate details in ZBrush and could instantly bring them back into Character Creator for further tweaks. This seamless interaction allowed him to efficiently achieve the stylization he envisioned while maintaining detail and precision.
For “The Last Entry”, Konrad dedicated most of his effort to designing the character’s face and expressions. This entailed creating several variations, with each iteration bringing him closer to the visuals he envisioned.
Face Concepts
Mix of number 1 and 4 gave me the final base.
All the versions were stored in layers, allowing him to mix and match different elements to refine the face. Once satisfied with the results, he transferred the head back into ZBrush and used Face Tools to sculpt the necessary expressions and dynamic wrinkles.
All of the sculpted expression layers
“That’s probably my favorite tool in Character Creator,” Konrad stated, “Face Tools handle the most tedious aspects of working with morphs and dynamic normals by automating everything with just one click,” he shared during the creation process of expression morphs and conducting dynamic wrinkles tests in CC.
Instead of manually creating and baking wrinkles, Face Tools streamlined the process, giving Konrad more time to focus on the creative aspects of the project. Then he was able to refine the expressions and overall look, enhancing both its depth and realism.
Personal Aspirations
Konrad’s journey doesn’t end with the contest. He’s eager to explore more of what Reallusion’s suite of tools, including iClone and Unreal Engine, has to offer. “I’m already planning a personal project where I’ll integrate the best aspects of Character Creator with MetaHuman in Unreal Engine,” Konrad reveals. Though he remains tight-lipped about the details, his passion to push the boundaries of 3D character creation is palpable.
Skeletal mesh imported to UE5Unreal Engine scene
Final Thoughts
Konrad’s thoughtful approach to character design, combined with his mastery of tools like Character Creator 4 and ZBrush, earned him first place in the realistic character category of the 2024 Reallusion 3D Character Contest. His ability to merge Lovecraftian themes with stylized art, while utilizing cutting-edge technology, made his entry truly stand out.
Reflecting on the contest, Konrad notes how it helped him grow as an artist. “I’m really happy I participated”, he says. “The contest motivated me to finish a project, learn new tools, and push my artistic boundaries”. Konrad’s work shows how Reallusion’s tools enable artists to create immersive characters while streamlining the technical side. With new projects ahead, we look forward to seeing more impressive creations from this talented artist.
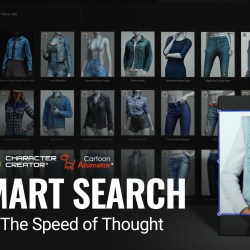
Introducing AI Smart Search, the latest in AI-powered features added to iClone, Character Creator, and Cartoon Animator. It’s a new way to find the perfect gems among countless models and motions on offer in the Reallusion Content Store, Marketplace, and ActorCore.
Simply use natural language or input images to prompt the search model and discover ideal scenes, props, characters, or effects. It’s also an excellent tool for exploring content while supporting the discovery of up-and-coming developers from around the world.
With seamless in-app integration and access to both official and independent content across the Reallusion platform, Smart Search is an efficient, versatile gateway to choose, sample, and purchase the perfect content to bring your projects to life.
New Feature Highlights
DEEP SEARCH
Deep Search is crafted for ease of use, offering intuitive search functions with category-based filtering. Drag in images, describe what you’re seeking in natural language, or retrieve similar items — all powered by an AI model trained to catalog countless digital assets in the Reallusion ecosystem to deliver highly relevant, visually matching results.
Text Input
Natural language support lets you type in a brief description like “historical figure” or “modern high heels” and get precise results in seconds. Deep Search also understands more than a hundred different languages, so foreign language queries work just as well as their English counterparts!
Natural Language Support
100+ Languages
Image Input
Drag in or paste images from the clipboard to find visually matching results. It’s an easy way to find content that is relevant to pictures and graphics of props, characters, and backgrounds.
Drag and Drop
Copy and Paste
Find Similar Content
Deep Search allows for the quick discovery of closely related assets. It’s easier than ever to find alternatives that align with existing collections and projects, ensuring consistency for your workflow and organization.
By Search Results
From the Scene
Via Content Manager
Filter by Category
Filter search results by categories like cloth, hair, character, or motion. By narrowing the search results, you can find ideal matching assets with accuracy and speed. Refine your search results by using the “Exclude” feature to filter out any items that don’t meet your preferences.
Filter by Category
Exclude Unwanted Results
KEYWORD SEARCH
Other than Deep Search, Keyword Search is still available as a straightforward way to find reliable results. Just input text to match assets by name, description, tag, or author.
Name, Tag, or Description
Match by Author
Search Motions
How to Access AI Smart Search
Starting from November 4, AI Smart Search will be included with the latest software updates. Simply greenlight pending updates in Reallusion Hub to access the new Deep Search features from the toolbar or the plugin menu.
Upcoming Features
We are excited to announce more upcoming features, including:
Deep Search For Custom Assets Locate your custom assets with the same intuitive Deep Search functionality.
Deep Search For Motion Files Find motions by using natural language, pose references, or motion samples.
Easy Purchase and Instant Download Acquire assets effortlessly across stores, with fast, convenient download.
Help Us to Make It Better
We invite you to share feedback on AI SMART SEARCH to help us enhance this beta tool. Your insights are key to refining features that better serve creators and developers. Click the link to share your thoughts!
Empowering Developers with Greater Content Visibility
The Embedded Smart Search Engine provides an efficient pathway to address user needs throughout the creative process. Discover how content developers like you can gain exposure and remain competitive by following the best practices outlined in the Developer Guidelines.
Animating Ancient Fantasy: ALHIQ ‘The Dragon Shield’ with Character Creator, iClone, and ActorCore
Dom Fred – Director / Producer / Editor / 3D Animator
Dom Fred – 3D Maya Animator
Dom Fred has established a remarkable career in the television advertising industry. He has made significant strides in digital and 3D production tools using tools like Autodesk Maya.
Over the past two decades, he has expanded his expertise to include music videos. He also creates documentaries, catering to a global clientele. In 2007, Dom founded his own company, DOM ANIMATION STUDIO. He specializes in product and post-production. He seamlessly integrates 3D characters into real environments and special effects (SFX). He also creates martial arts and acrobatics action sequences for commercials.
The ALHIQ “The Dragon Shield” project is an ambitious animation endeavor set in a world of magic and fantasy. It blends ancient stories with modern cinematic techniques.
This project is led by the visionary Director, Producer, and Action Director Dom Fred. It aims to achieve a level of cinematographic quality that rivals high-end 3D animation productions. The team behind ALHIQ leveraged cutting-edge tools provided by Reallusion, including Character Creator, iClone 8, ActorCore, and Unreal Engine, to bring this fantasy to life with stunning detail and realism.
The Vision Behind ALHIQ “The Dragon Shield”
The ALHIQ project is deeply rooted in storytelling, taking inspiration from ancient tales of magic and mythical creatures. This world-building was carefully crafted to immerse viewers in an epic fantasy realm. Dom Fred’s goal was to create an animated film that not only entertains but also evokes emotional depth through powerful character performances and realistic environments. According to Fred, “Our vision was clear from the start—ALHIQ needed to be an epic project that pushes the boundaries of what independent 3D animation can achieve with the right tools and talent.”
Character Creation: The Power of Reallusion’s Character Creator
A critical aspect of ALHIQ’s production lies in the creation of characters that breathe life into the story. Using Character Creator, the team was able to design detailed and expressive 3D models that capture the essence of each character. The tool allowed them to customize facial expressions, body proportions, and clothing with impressive accuracy.
The characters were crafted using Dawyne Scan Reality, a high-fidelity model that served as the foundation for the entire cast. Dom Fred emphasized the importance of this tool, stating, “Thanks to Character Creator, our characters came to life with unparalleled detail, especially in facial expressions. It exceeded our expectations and allowed us to convey the depth of each character’s emotions.”
Character Creator not only streamlined the design process but also gave the team the ability to focus on storytelling, as they could easily tweak and modify the characters as the story evolved.
Animation Control with iClone 8
Once the characters were created, the focus shifted to animation. iClone 8 played a pivotal role in controlling and refining every movement and expression. This real-time 3D animation software allowed Dom Fred and his team to animate the characters while staying true to the dramatic narrative. Fred explained, “iClone 8 gave us the precision to retouch animations and faithfully respect the story. It allowed us to control every detail, from subtle movements to intense action scenes.”
One of the standout features of iClone 8 is its ability to create detailed facial expressions and body language through motion capture, allowing animators to bring out the emotional depth in characters. This fine-tuning was essential in ensuring that the fantasy world felt immersive and the characters resonated with audiences.
Enhancing Realism with ActorCore Motion Capture
The use of ActorCore provided the ALHIQ project with access to a vast library of high-quality motion capture animations. This tool became invaluable for adding realism to the characters’ movements, particularly when depicting dramatic or intense emotional moments. ActorCore’s extensive collection of animations allowed the team to focus on performance and save both time and money during production.
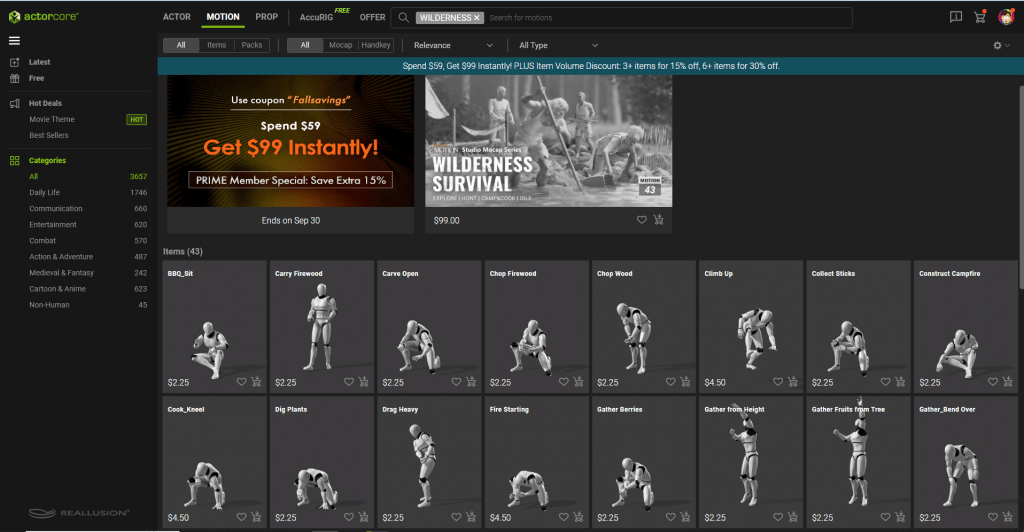
One such pack was Reallusion’s Wilderness Survival pack from its Studio Mocap series. This professionally capture motion capture pack features 43 dynamic motions meticulously crafted for crafting survival scenarios in the wild. The pack equips artists with motions for traversing rugged terrains like steep hills, rivers, and dense bushes. It also enables them to hunt crucial resources such as animals, fruit, and water.
ActorCore’s animations were integrated seamlessly into iClone and then transferred to Unreal Engine, allowing the team to preview scenes in real time and make quick adjustments as needed.
“The range of motion capture performances ActorCore provided was key to adding realism to our scenes. We could choose from pre-built animations like those found in the Wilderness Survival pack, which saved us hours of manual animation work while still giving us a cinematic level of quality.”
Dom Fred – Director / Producer / Editor / 3D Animator
Real-time rendering is a crucial part of ALHIQ’s production process, allowing the team to make rapid iterations on their animations and preview scenes in Unreal Engine before the final render. The iClone 8 to Unreal Engine Live Link played a significant role in ensuring that scenes could be reviewed in real-time, streamlining the overall workflow.
This real-time feedback loop enabled the production team to remain agile and responsive to changes, ensuring that the project stayed on schedule while maintaining high-quality output. Fred described the importance of this system, noting, “The Live Link between iClone 8 and Unreal Engine was instrumental in speeding up our workflow. It allowed us to monitor the progress of scenes in real-time, which is essential for a project of this scale.”
The ALHIQ Pipeline: A Proven Production Workflow
One of the key takeaways from the ALHIQ project is the solid pipeline established by Dom Fred and his team. By leveraging Reallusion’s suite of tools, including Character Creator, iClone 8, and ActorCore, they were able to create a comprehensive production workflow that met the project’s technical demands while remaining flexible enough for creative exploration.
Fred commented, “This epic animation project validated the production pipeline we’ve built. We now have a robust workflow that not only meets our technical needs but also allows us to tell the story we want to tell.”
The combination of real-time rendering, high-quality motion capture, and powerful character creation tools enabled the team to create a film that feels dynamic, immersive, and cinematically rich.
Saving Time and Money with Reallusion Tools
Studios and independent artists can take inspiration from ALHIQ’s use of Reallusion’s tools. They can maximize efficiency and quality in their animation projects. The integration of ActorCore’s motion capture animations allows teams to reduce the time spent on manual animation. Teams can still deliver high-quality results. Examples include those found in the Wilderness Survival pack.
Dom Fred emphasized how this approach benefits production teams, “By using high-quality motion capture from ActorCore, we were able to save a lot of time and resources. The quality of the animations gave us a cinematic feel without the need for expensive, time-consuming manual work.”
Conclusion
The ALHIQ “The Dragon Shield” project stands as a testament to what can be achieved when cutting-edge technology and creative vision come together. Through the use of Reallusion’s Character Creator, iClone 8, and ActorCore, Dom Fred and his team were able to bring an ancient fantasy world to life with incredible detail and realism. The project’s success highlights the importance of a solid production pipeline and the value of real-time rendering, motion capture, and character creation tools in modern animation.
For studios and artists seeking to produce high-quality content while saving time and resources, the ALHIQ project serves as a powerful example of how Reallusion’s tools can streamline the animation process and elevate storytelling.
Sometimes some of the hardest things to animate are the everyday motions of life that we go through like taking a drink, sitting down or even opening a door. As mundane as these tasks are they are just as important as the main and supporting character animations as they will stand out if they are not animated well.
It has always been my opinion that these everyday motions are part of what makes a great animated story. A strong storyline can suffer terribly from bad or weak animation as it can be distracting which takes the viewer’s focus off the story and puts it on the questionable animation.
Transversely great animation can, to some extent, uplift a poor story by providing good visuals to keep the audience involved enough to maybe even enjoy the video in the long run.
Bad animation is just that… bad animation. There is no way to sugarcoat this as it can stay with a project, producer, director or animator for a long time, maybe even for life.
We don’t want to be known as THAT kind of animator. And I have to wonder how many of us have been tagged at least once in our life as sloppy animators due to paying too much attention to main characters and not enough to the background characters that make up a crowd, or a scene.
Now what does all of this have to do with the recent release of the Motion Director Props (MD Props) from Reallusion for iClone? Simple… Reallusion is doing the animation for us so we can move on with production and not have to sweat all the little details like using a vending machine or a simple thing such as using a trash can.
MD Props
(Scroll through the above images to learn more about Prop Interaction)
The animations are embedded in the MD system for fast and easy production. You don’t have to keyframe them or animate them… just click on an available choice and the motion will be loaded into the character then triggered.
MD Props are a feature in Reallusion’s iClone that allows users to create interactions between virtual actors and MD-enabled props. MD Props were introduced in version 8.5 and are extensions of the Motion Director system.
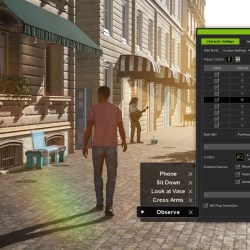
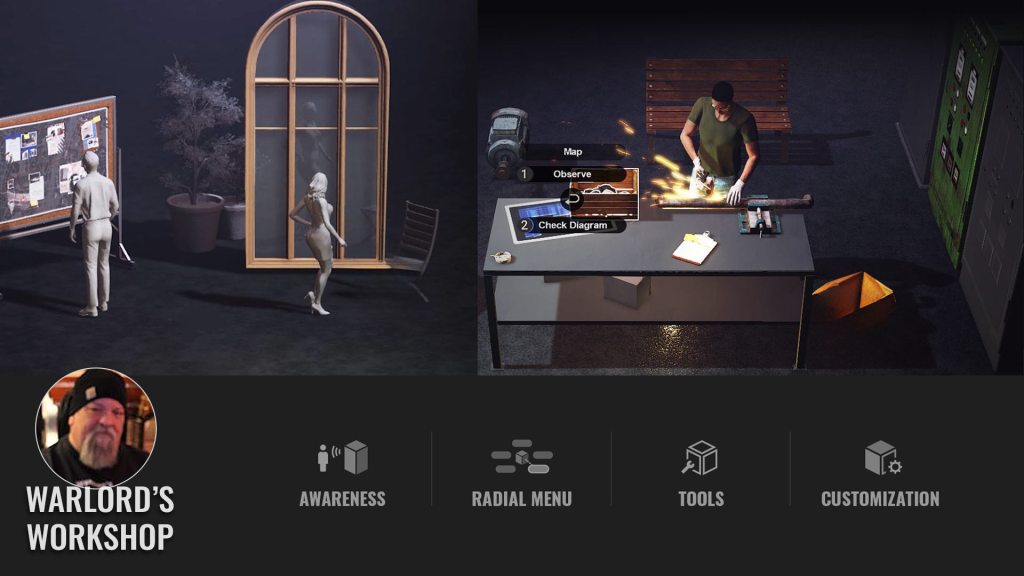
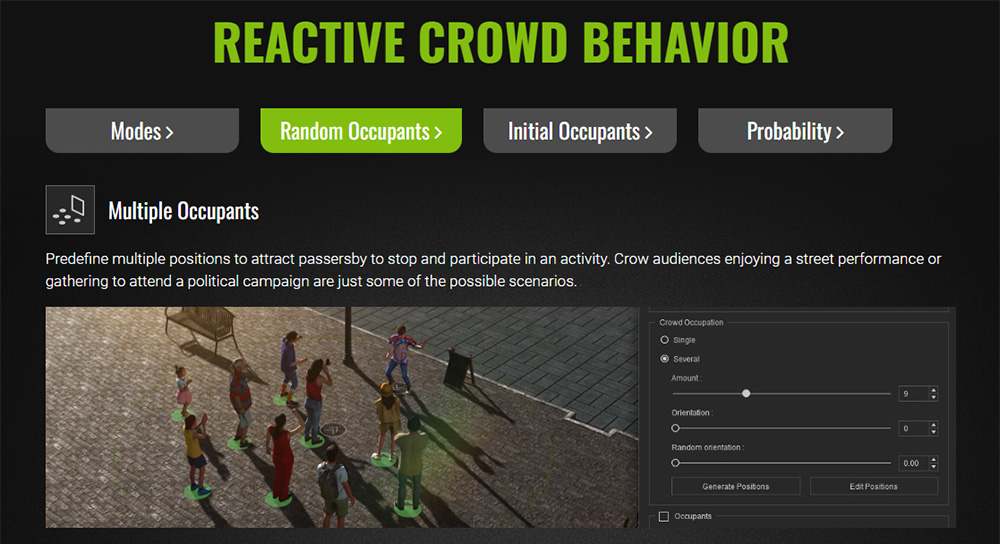
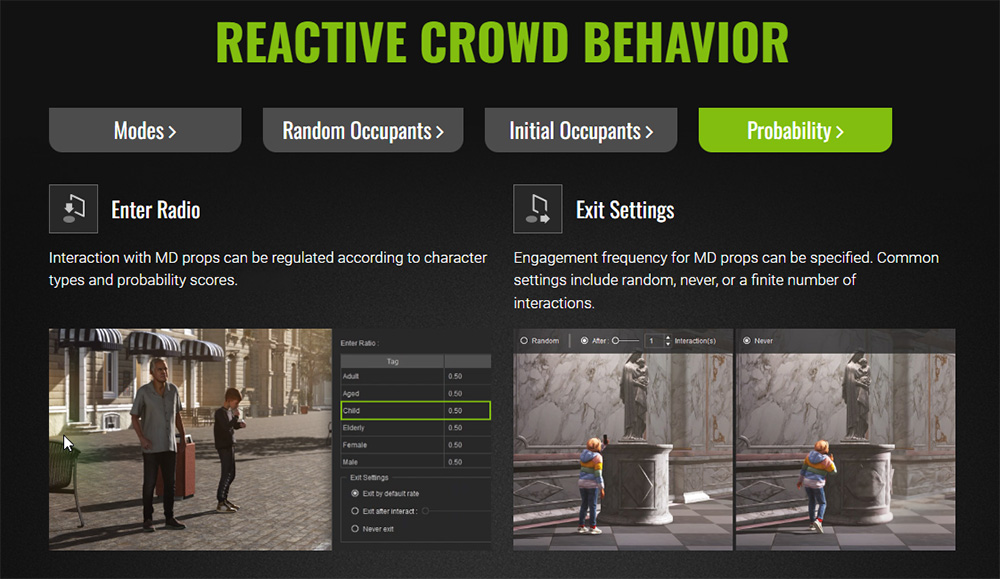
It isn’t just for background characters either as these same motions bring a more realistic look to camera-centric characters as well. We don’t want our background characters to be animated better than our main characters and MD Props takes care of this with an almost game-like interface that pops up over MD driven props for us to trigger a certain motion like sitting down. These motions are handled by Motion Director and can be real time savers as well provide consistently good animation.
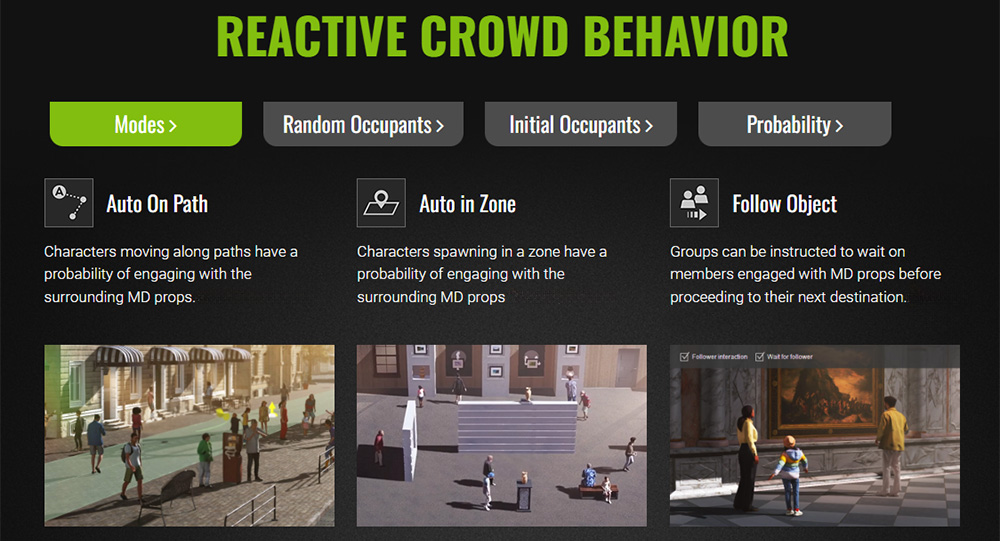
Adding a simple motion of taking a drink can enhance a scene with more activity. Activity is a word animators need to keep in mind. Some of you know of my dislike of near empty scenes, particularly in metro areas where empty streets and sidewalks are anything but normal. Motion Director solved this problem initially by allowing us to add motion to and control multiple characters at once instead of having to individually load or keyframe those movements.
With Motion Director we can have a lively street scene, a block party or just a busy downtown metro area. Now with MD Props we can add everyday motions to those crowd members beyond just moving around.
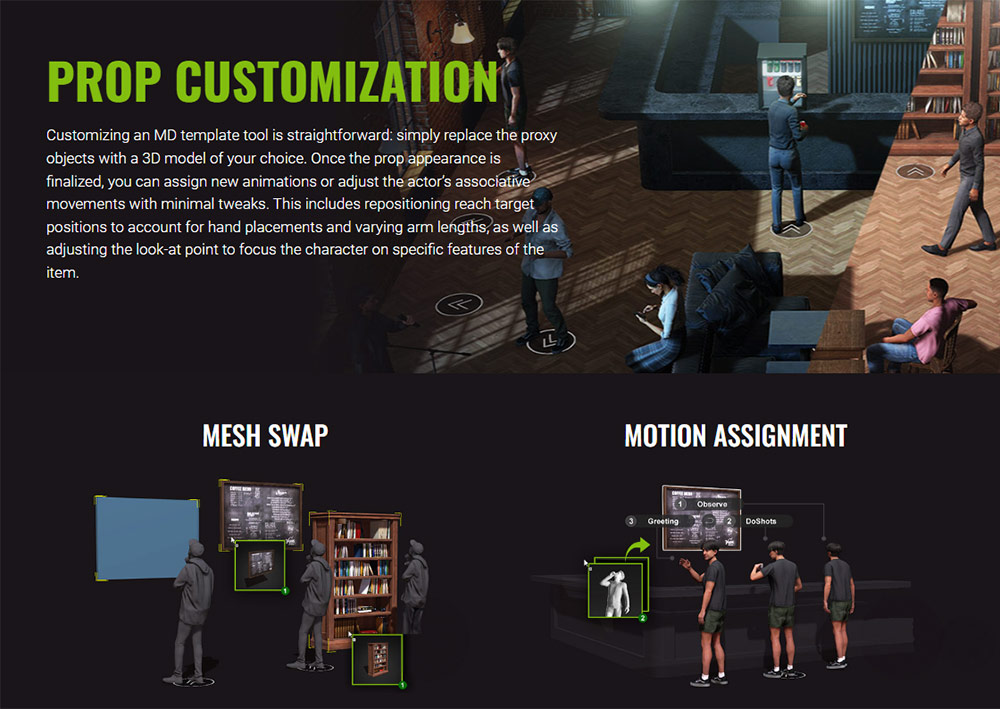
MD Templates for Customizing Interactive Props
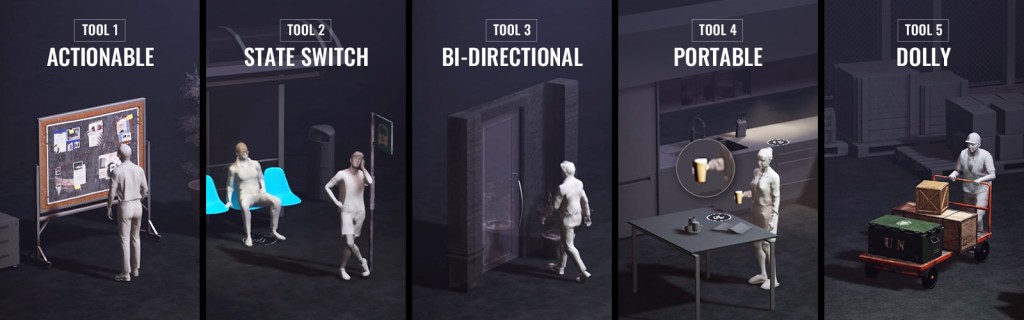
ACTIONABLE | Tool 1
As the most prevalent template tool, an ACTIONABLE prop can be approached by any actor to trigger predefined interactions. This interface can offer a variety of performances and even prompt a reaction from the prop itself.
STATE SWITCH | Tool 2
STATE SWITCH transforms an actor’s animation state from one to another. Each state includes its own idle loop and triggerable animations, such as standing, sitting on a chair, leaning against the wall, or indoor cycling.
BI-DIRECTIONAL | Tool 3
The BI-DIRECTION focuses on scenarios requiring two-point mobility. A common application is for characters to move between two designated locations, such as entering or exiting automatic sliding doors, or traversing a crosswalk.
PORTABLE | Tool 4
The PORTABLE template supports the movement of items from one placement point to another. This includes picking up an object, carrying it around while using it, and placing it back down in the same or different location. 3D actors can be commanded to stow items in hand or attached to the body and fetch them back as needed using a handy radial menu. For example, a hungry character can approach a plate of leftovers, heat it in the microwave, eat, and then place the empty dish in the sink.
DOLLY | Tool 5
The DOLLY template allows 3D actors to maneuver a dolly, cart, or similar wheeled object. Once activated, a designated character will approach the dolly prop, grasp its handles, and navigate it along a customized path. Throughout the process, the actor maintains the appropriate gait and posture to counter the heft and size of the cargo. Dolly operations can be easily adjusted or exited using a convenient radial menu.
A Quick Overview
While I will be providing a more detailed Beginners Guide article in the future, I can give you a quick overview of the process. As it is with most Reallusion tools you can just jump right in. You do need to be familiar with Motion Director as it drives the animations and interactions.
The process involves placing a dummy like the “Sit on Chair” MD Prop dummy in the same location and orientation of the actual chair or sofa prop you want the character to sit on. This dummy will give you a visual target as to its orientation and to click with its hover menu and will not show in the final render.
The MD Prop dummies that are included in the update are Sit on Chair, Use Vending Machine, Throw into Trash, Pass Automated Door, Observe, Watering Plants Target. While these are listed as specific use you will soon see that you can use them for other purposes and don’t forget the customization aspects listed earlier.
The short video below goes through the process including demonstrating how the radial menus work and how you can choose several motions in a row for a single character. You can also jump between characters to trigger motions in a specific timing if needed. It’s a very flexible and easy to use system with the typical short learning curve we’ve come to expect from Reallusion tools.
Smart Accessory
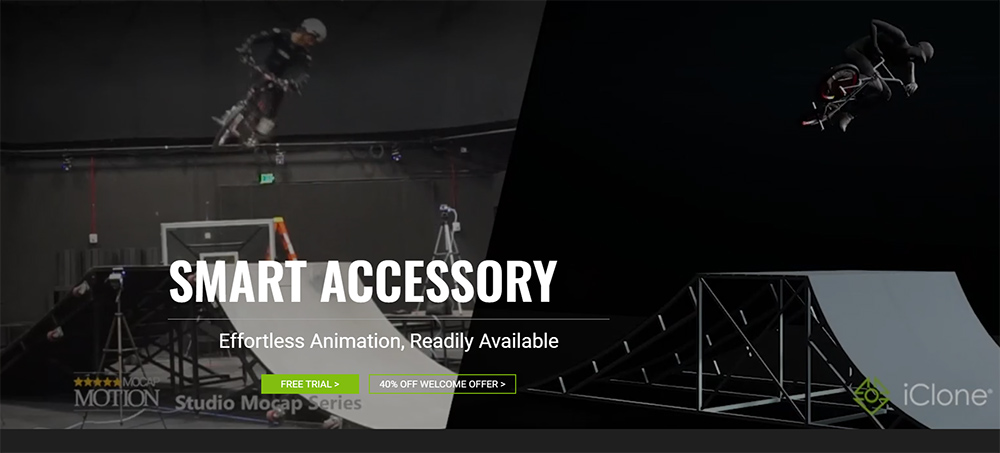
Before I close this out please keep in mind that this only covers the MD Props, there is also a new Smart Accessory feature that greatly simplifies the use of accessories like MD Props does for props. For more information see this article.
The iClone Smart Accessory system simplifies the entire process of editing motions and loading accessories. It is now possible to spawn a crowd of characters with unique accessories for each individual, automatically associate mocap motions with prop animations like skateboarding, or trigger MD performances for held objects.
Summary
Just because it may seem like it’s a complicated tool doesn’t mean it is as Reallusion has a reputation for creating user-friendly animation tools and this fits that mold. As usual Reallusion has provided lots of tutorials and I’ll be adding my own take for the Beginners Guide to get new iClone users up to speed quickly.
MD Props is another big leap towards that animation “easy button” we’d all love to have. It does the work while we have the fun. In fact, it almost feels like cheating because it accomplishes so much in such a short time with a small learning curve.
Digital Artist MD “Mike” McCallum, aka WarLord, is a longtime iClone user. Having authored free tutorials for iClone in its early years and selected to write the iClone Beginners Guide from Packt Publishing in 2011, he was fortunate enough to meet and exchange tricks and tips with users from all over the world and loves to share this information with other users. He has authored hundreds of articles on iClone and digital art in general while reviewing some of the most popular software and hardware in the world. He has been published in many of the leading 3D online and print magazines while staying true to his biggest passion, 3D animation. For more information click here.
Hi everyone, I’m Rafael Benedicto, a freelance 3D character artist. I’ve worked on indie game projects and small film productions, while also honing my skills through personal projects for my ArtStation portfolio. My passion for 3D art started in childhood and I began my career as a generalist, creating everything from props and vehicles to buildings and hard-surface models. Eventually, I found my niche in character creation, focusing on hyper-realistic portraits that often get mistaken for photographs. This led me to discover Character Creator and its potential in enhancing my workflow.
In 2020, I won first place in Reallusion’s Digital Human contest with my piece, “Scout Annie”, a pivotal moment that elevated my standing as a 3D character artist.
Currently, I’m working with a startup game studio, Knightly Works, designing Dark Souls-inspired characters for their upcoming indie game, Skars: Rise of the Last Keeper.
In this article, I’ll demonstrate how I used Reallusion’s Auto-Setup plugin for 3ds Max to quickly import and set up a CC4 character for rendering with V-Ray. I’ll be showcasing the Last Keeper, the main character from the Skars project for the entire process.
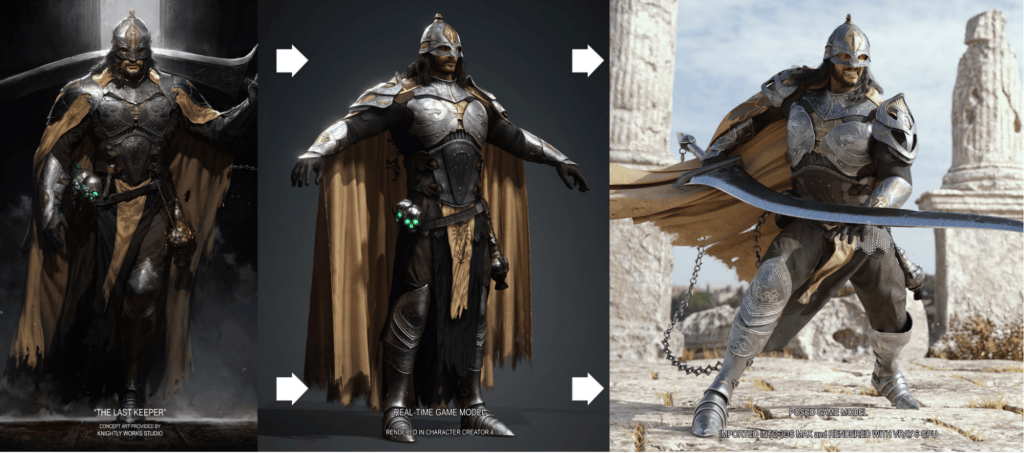
Before diving into Auto-Setup, I’ll start with a quick overview of how I brought this character to life — transforming a concept illustration into a fully-realized real-time character in CC4, and ultimately preparing it for stunning V-Ray renders in 3ds Max.
Character Creation
I began by creating the base model in Character Creator 4, designing his face and body to match the concept art.
Next, I used GoZ Plus in Character Creator 4 to easily transfer the character to ZBrush, where the armor and clothing was subsequently modeled.
After modeling each armor group, I used Topogun along with ZBrush’s ZRemesher feature to create low-poly versions of the parts. Then, I utilized RizomUV for unwrapping before importing them back to Topogun to bake the normal and ambient occlusion maps. These maps became integral to the texturing process in Substance 3D.
Once the texturing was complete, the armor was imported into Character Creator and fitted onto the base character as an accessory or clothing piece. Below is a simplified flow chart, using the helmet as an example, illustrating the process from ZBrush to the final piece in Character Creator 4.
The garment pieces like the pants, cape, and loincloth were made in Marvelous Designer, and were also textured in Substances Painter and imported into Character Creator to dress the character.
The hair I used was the “Long Curls” hair from a hair pack, but I altered it a bit so that the hair would fit into the helmet.
Finally, I transferred the skin weights from the body to the armor and clothing parts, ensuring they were skinned to the bones and could move in sync with the body.
After everything was prepared, I exported the entire character as an FBX file, and made sure that “3ds Max” was selected for “Target Tool Preset”.
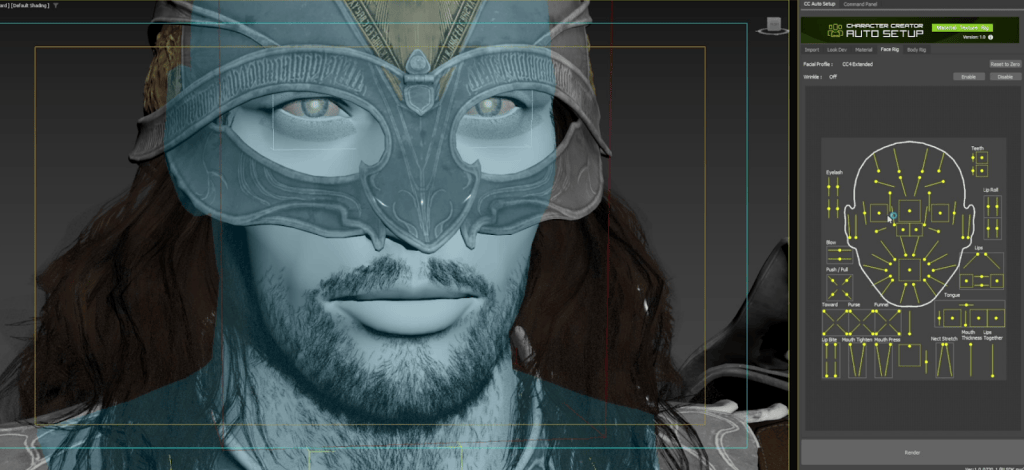
With the Auto-Setup plugin already installed in 3ds Max, the first thing I did was open the “CC Auto Setup” window and placed it alongside the “Command Panel” to the right. I then loaded the FBX file that was exported from Character Creator, selected “Vray GPU” as my renderer, and clicked on the import button.
After 2-3 minutes, the character was imported along with its skeleton rigging and skin weights from Character Creator 4. All the materials from Character Creator 4 were also converted into Vray materials. With the original rigging and materials transferred and intact, I was ready to set up for final rendering.
Effortless Lighting and Look Development
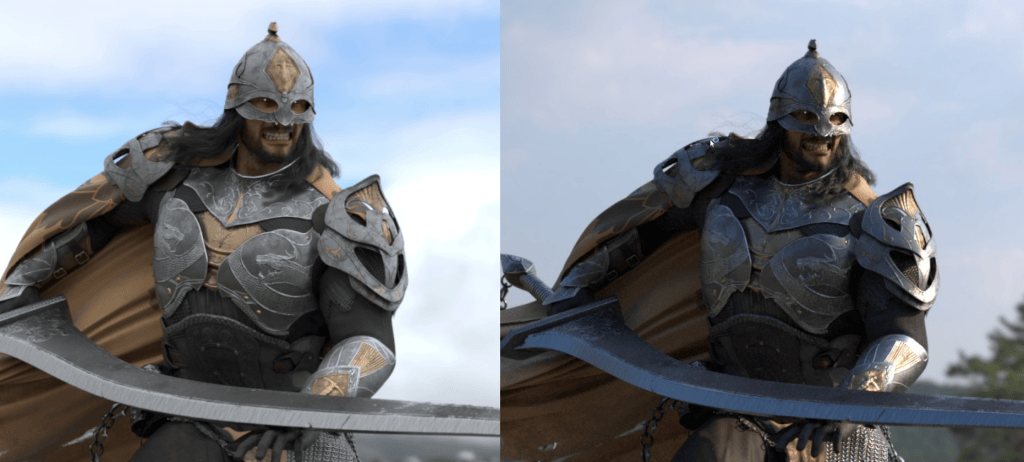
The first task is testing the Look Dev presets on the Auto-Setup panel’s first tab. This tab features 10 preset buttons that automatically generate comprehensive sets of lights, along with a camera and background for the scene. To enhance usability, a dummy helper object is included, enabling easy rotation of all the lights in the scene simultaneously.
I experimented with various light presets but ultimately chose the first one, as I prefer a more subtle approach for this particular character.
As shown in these initial test renders, the materials for the armor parts look excellent. The colors, reflectivity, roughness, metallicity, and normal bumps all appear just right.
I conducted another render, and the skin finally appears bumpy. While I resolved the issue with the normal maps, I had to disable the Auto-Setup wrinkle system that activates when I change his facial expressions, which is unfortunate. After that, I put his helmet back on and continued testing.
Simplified Material Adjustments
Then, I moved on to the next tab in the “CC Auto Setup” window. This interface allows me to conveniently adjust the properties of the materials without needing to access the Material Editor. For instance, there are handy sliders for modifying subsurface scattering (SSS) intensity, normal intensity, roughness, and more. When I click on the character’s hair, the sliders in the material tab change to display settings relevant to hair. Conversely, clicking on the head mesh switches the settings in the tab to skin properties, and the same applies to the eyes, teeth, and tongue.
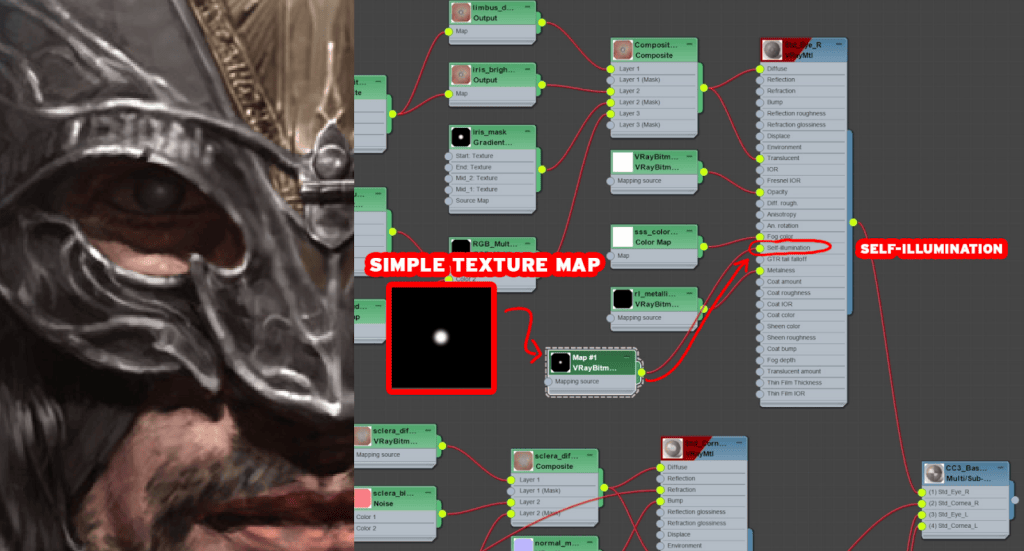
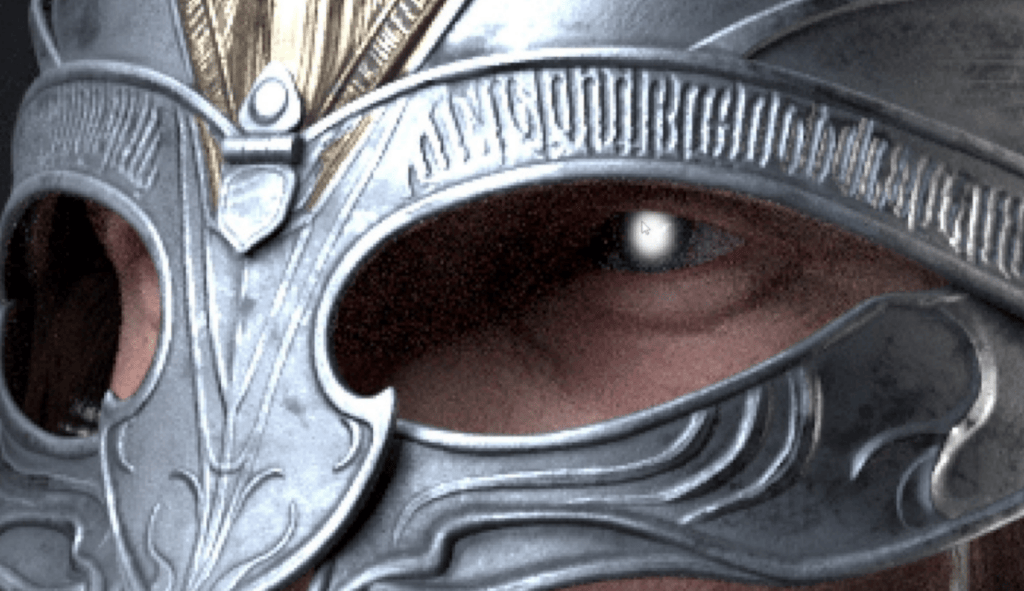
Unfortunately, not everything can be adjusted using the Auto Setup material sliders. For instance, there are no options for glowing pupils. As a simple workaround, I had to open the Material Editor and add a texture map to the self-illumination node for both eye materials to achieve the glowing effect.
Now, the hair materials needed adjustment to eliminate those overly bright streaks. Fortunately, it was an easy fix with a simple setting of the roughness value to around 1.00 in the materials tab. The same adjustment was made to the facial hair.
Flexible Rigging with CAT System
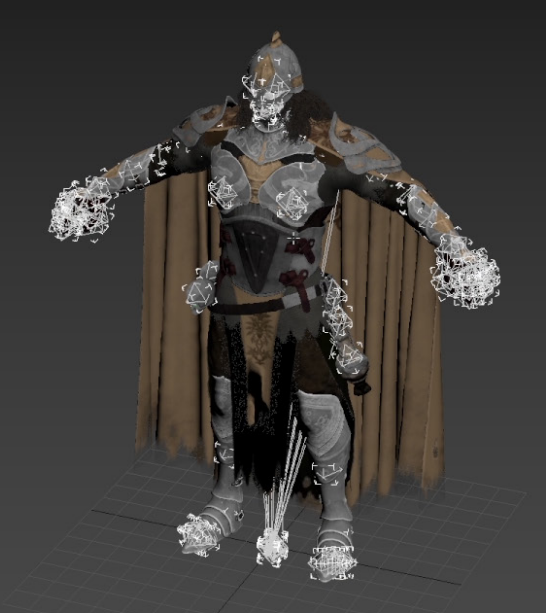
Next, I wanted to focus on his pose; and to do this, I first needed to examine the character’s rigging and skinning. Because the character was pre-rigged in Character Creator, all I had to do was unhide all the objects to view the bones.
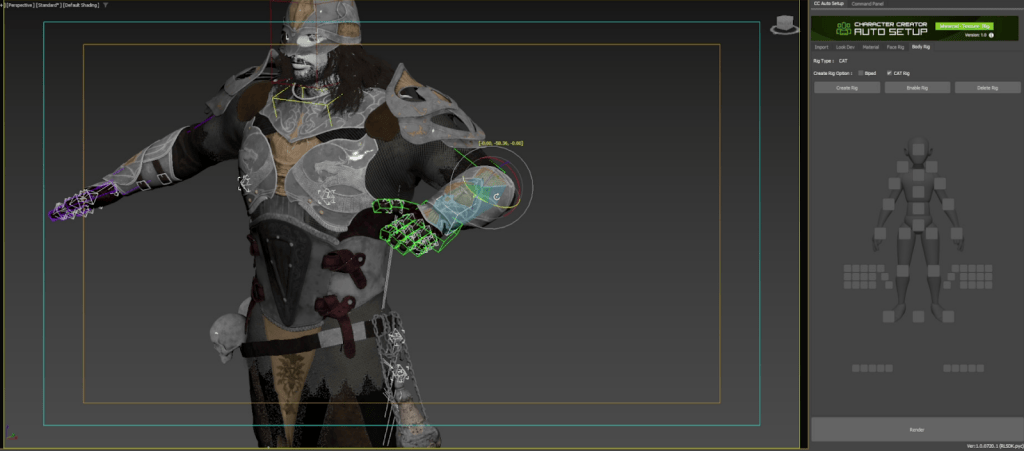
However, I prefer to use 3ds Max’s CAT rigging system for my workflow. In the Auto Setup window, I navigate to the “Body Rig” tab to create a CAT rig that overlays the existing bones.
The CAT bones do not replace the regular bones; instead, the regular bones are linked to the CAT bones created on top of them. This means that when I manipulate the CAT bones, the regular bones follow, and consequently, the skinned parts follow as well. I just need to remember that if I want to adjust the skinning, the model is still skinned to the regular bones, not the CAT bones.
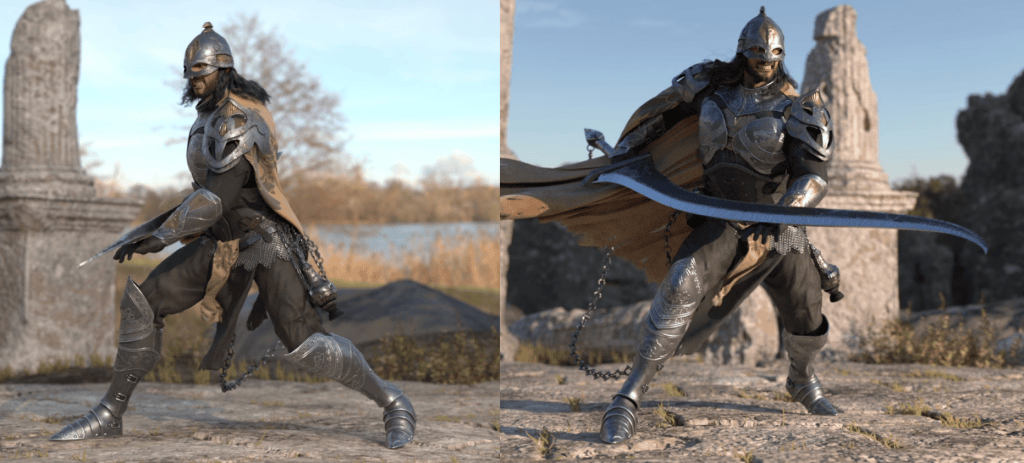
Here’s how I posed the character based on the game director’s input.
Facial Expressions Made Easy
Now that we have settled on a pose, the game director requested a facial expression. With the Auto Setup face rig controls, this process is straightforward. The import process for Auto Setup also includes all the facial morphs available in Character Creator. By navigating to the “Face Rig” tab, I can easily use the control panel to manipulate the individual regions of the character’s face and create the desired expression.
After conducting more test renders, I realized the hair quality was holding the entire piece back. Its awkward appearance was due to poor skinning, with excessive bending and various unappealing distortions. Afterall, there’s a limit to how realistic polygon-based hair can look in rendering.
When the skin looks this realistic, but the polygon-based hair cards don’t, it detracts from the overall realism of the rendered character. As much as I wanted to stick with the polygon-based hair cards to avoid extra work, I decided to replace them with Ornatrix hair for better results.
Finally, the cap and loincloth were remade with Marvelous Designer.
With the materials, pose, and expression finalized, I set up a dome light using HDRI lighting from PolyHaven.com. I also created the environment in 3ds Max and ZBrush, followed by additional test renders.
Once the game director approved the setup, I proceeded to render the final turntable and close-up shots.
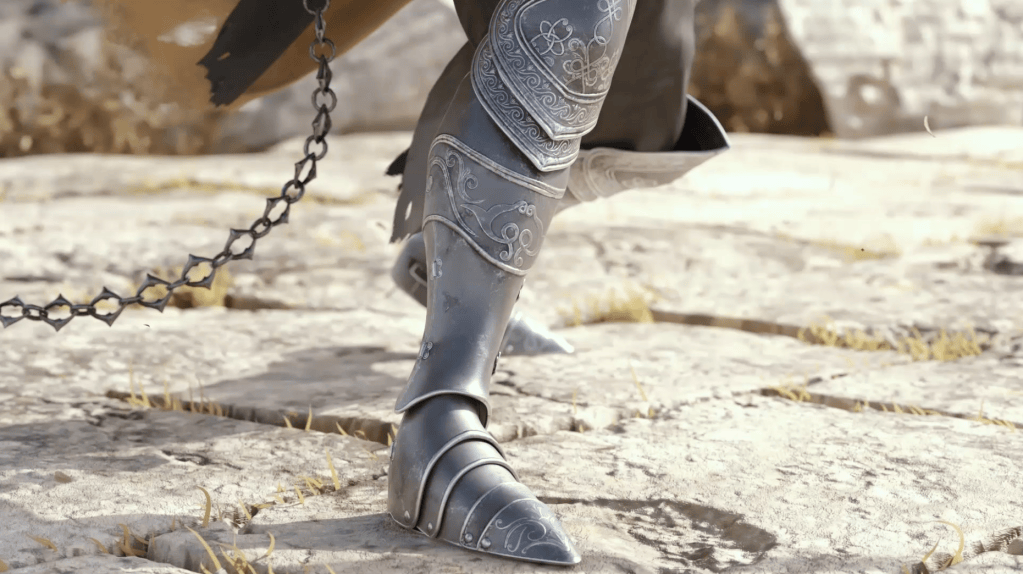
Here are the final shots.
Final Thoughts
The Auto-Setup plugin was a huge time-saver for this project. While it doesn’t make everything perfect automatically or act as a complete solution for importing from CC4, it significantly streamlined the process. I still had to adjust parts of the CAT rig, like adding twist functions to the arm and leg bones, and I spent time tweaking materials in the editor to improve their look. In short, there was still plenty of work to be done.
What Auto-Setup excels at is handling the initial setup — materials, rigging, and other technical details — in just a few clicks. It saved me days of work, allowing me to jump quickly into the creative phase, like posing the character, adjusting expressions, and fine-tuning skin and hair materials.
In terms of reliability, Auto-Setup was stable throughout the project. I didn’t encounter any crashes caused by the plugin, which made the process even smoother. If you haven’t tried Auto-Setup yet and you are in the situation of spending days setting up everything manually in 3ds Max before getting to the creative part — like me in the past — I highly recommend it. It’s a free plugin available for download on Reallusion’s website or through the Reallusion Hub.
Thanks for reading! I hope you found this article helpful. A big thanks to Reallusion for sponsoring my showcase, and special thanks to my client at Knightly Works for allowing me to use their character for demonstration.
While 3D is the lifeblood of many digital artists and animators, we also embrace the beauty of 2D with backgrounds, cutouts and camera placement to provide a world much more complex than we would be able to do using only 3D assets. As we all know, the problem with 3D assets, even those that are optimized, is that they can bring our computers to a crawl causing skipped frames and timing issues that can be missed until they show up in the final render needing more work to correct.
This is problematic for all 3D software applications as the amount of computational overhead for 3D objects is a common problem and has a direct impact on how smoothly our computer can handle the load and not start having hiccups.
Storytelling
Experienced animators know how to work with 2D assets, and a lot of that experience involves layout and camera placement. I’ve said many times that the camera is the animator’s friend in that it can be used to show or not show certain parts of an animation that may not be up to par or even necessary for the story to advance.
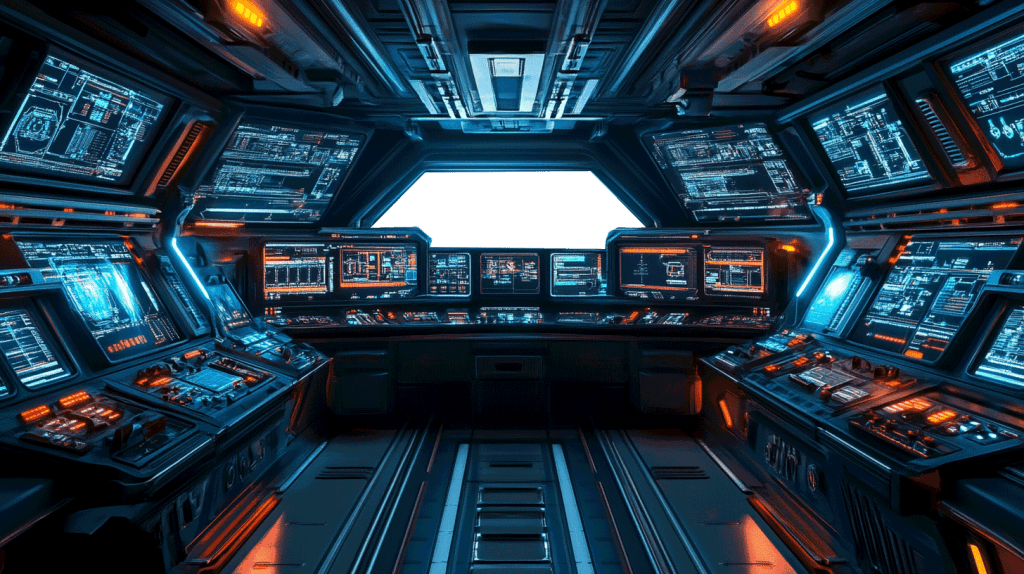
In science fiction, particularly space travel, the interiors of cockpits and spaceships of various sorts can be very simple in some cases, but most likely they are filled with eye candy to make the viewer go “Wow” for a few seconds when viewing a scene for the first time. This is a delicate balancing act between wowing the viewer while not distracting them from the story.
This is the point at which I naggingly remind everyone that advancing the story is the most important task in a production. From a one-person operation to a huge team, advancing and enhancing the story with visuals can make or break the production in the eyes of the viewer. Too much eye candy and the focus on the story can be lost but the right amount, at the right time, in the right scene will not only enhance the scene but also draw in the viewer to see all the cool stuff you have put together.
Easy First Scenario – Hallway or Corridor
For our first scenario we’ll look at a very simple use of an image with a character to create a compelling scene. This can involve dialog or another character but, in this instance, we are just going to walk down a 2D hallway with a 3D character.
This one is easy as you just dump a 2D image into the workspace as a background. iClone then provides the perspective or you can force the perspective with scaling to make the character appear to be walking down a hallway. This provides an opportunity for adding eye candy and giving the viewer a glimpse of your sci-fi world.
AI Prompt Focus
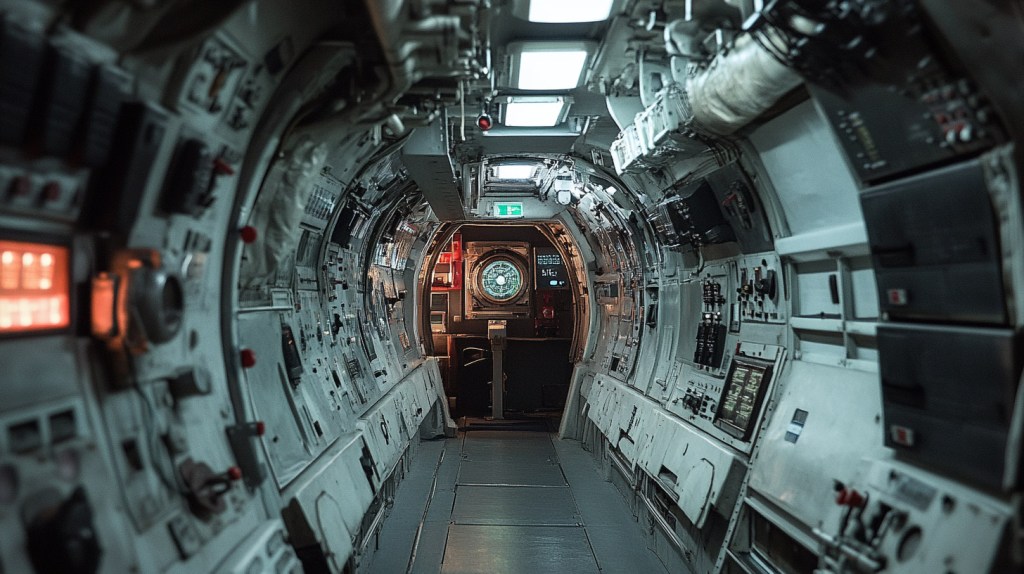
Midjourney Prompt: “frontal view of long bulkhead filled with Controls”
When generating the background corridor image, you will want to focus on a prompt that will show the corridor facing forward or at a slight angle. The more forward facing the better.
In this instance I used Midjourney with a very simple prompt of “frontal view of long bulkhead filled with Controls” as referenced above. You may have to experiment with the prompt, but you’ll notice I didn’t use corridor or hallway even though they would be just as appropriate so play around with prompt.
When you’ve used tools like Midjourney enough you should start to get a feel of how it reacts to certain prompts to achieve desired results. As you will see, I rarely use extensive prompts as I usually start with a simple prompt in most cases. There is nothing wrong with a verbose prompt except for those occasional times they start fouling up parts of the image.
Load your character and rotate it to where it faces the opposite direction then pull it back to where it fills most of the screen.
You can turn on the grid initially to get your bearings and line the character up in the walkway of the image if needed. It’s OK if you can’t see the character’s head or legs at this point. iClone will handle the perspective shift.
Just follow the tutorial below to see how simple integrating 2D and 3D can be for a stroll down an ornate hallway, factory catwalk or corridor.
Blending a solid color overlay with low opacity is a simply way to take the edge off of the difference in the lighting and appearance of the background versus the 3D assets and 3D lighting. Add an Image Overlay of a solid color that matches or enhances the scene in this case I used blue to blend and cool the scene. Cover the entire scene with Image Overlay until the overlay is all you can see then go into the texture tab and lower the opacity to “blend” the 3D assets with 2D assets. This is generally 40 percent down to as low as 10 percent, but experimentation is encouraged.
Second Scenario – Space Transit
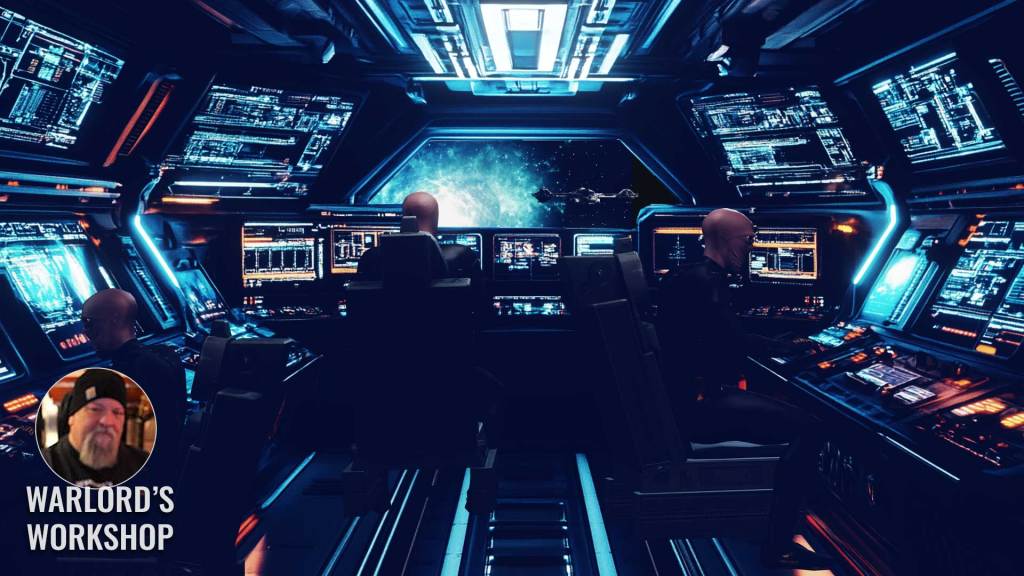
Midjourney Prompt: “command bridge of a futuristic starship with huge forward screens and brightly lit control panels”
TIP: Sometimes you may need to add “–no seats, benches” (and variations) to get a clean cockpit so you can use your own 3D seats.
Let’s take a look at a simple space transit scene that could serve as an establishing shot or the start of a scene. In this scenario, we will be looking at the inside of a starship cockpit with crew members at consoles while the ship speeds through space. We could make the cockpit simple enough to populate with 3D consoles and props but let’s say the script calls for an impactful image that shows off technology as we might expect on such a ship.
In this case there is no dialog so we can really dig in on the eye candy, using an ai-generated image instead of 3D consoles or a 3D cockpit. The only 3D assets in the scene are the characters, their seats and the particle FX.
The scene looks good, takes little time to set up and can be one of those scenes that sticks in the mind of the viewer due to your choice of image.
We are going to get a bit more ambitious with this scenario with it being a more complex scene using “layers” of AI imagery cut out from the original image. I use the term “layers” loosely here as iClone doesn’t have that type of layer, but we just load our cut-out images into the 3D workspace and re-create the original image with space between the cutout images.
The first two scenarios relied on a fixed background, but this one will rely on image planes and image overlays.
Quick Recap
For this you will need an image editor like Photoshop used in this example and an ai-image generator if one is not built into the editor. A main image is generated then we go into our image editor to mask or cut out the parts of the image we want to separate into layers. If you choose to cut out an object like a large rock or boulder because you want a character to hide behind that object you then need to fill that hole you cut out using a marquee and generative AI as shown in the following tutorial.
If we cut out the foreground of an image to have separation between foreground and background, we will need to fill that hole in the background too. Eventually we will have a background with foreground layers stacked in front of each other for spatial and visual separation. This will help to blend the 2D images with 3D assets.
Overview
Generate Image
Cutout Prominent Features
Use AI–generation to fill up those cut out holes in the background
Arrange the cut outs so they reproduce the original image with separation between them.
Add what 3D assets and VFX are necessary and animate!
If you are new to this, don’t panic. This is all demonstrated in the tutorial below. It’s another example of a technique that sounds hard but is in fact very simple to execute once you see what is going on.
Summary
AI-generated images are providing another avenue of visualization that many small studios and home animators have not had access to.
Camera work with 2D imagery can be very tricky for beginners. You soon find out that there is little you can do other than zoom in and then you have to be judicious with it. Camera and imagery can coexist once you understand the concept of using an image plane instead of the background with the camera attached to the image plane, so it moves with it.
That, however, is for another article at another time as we have already covered a lot of ground if you are just starting on your animation journey. Basically, for AI-generated cutouts you need to learn to use the marquee, lasso and related tools in your photo editor and as you saw with the above tutorial sometimes a photo editor can do a good job of separating elements from an image without a lot of interaction from the user.
MD McCallum – WarLord
Digital Artist MD “Mike” McCallum, aka WarLord, is a longtime iClone user. Having authored free tutorials for iClone in its early years and selected to write the iClone Beginners Guide from Packt Publishing in 2011, he was fortunate enough to meet and exchange tricks and tips with users from all over the world and loves to share this information with other users. He has authored hundreds of articles on iClone and digital art in general while reviewing some of the most popular software and hardware in the world. He has been published in many of the leading 3D online and print magazines while staying true to his biggest passion, 3D animation. For more information click here.
My name is Onur Erdurak, and I’m a director, writer, and 3D artist from Turkey with a passion for storytelling. I hold a bachelor’s degree in Cinema from Izmir University of Economics, where my love for filmmaking truly took shape. During my studies, I had the opportunity to participate in the Erasmus Student Exchange Program. I spent a year in Slovenia to further my cinematic education.
While still a student, I embarked on my first filmmaking endeavor—a no-budget short film titled STRANDED. With just one location and one actor—my talented uncle, Kemal Erdurak. He is a professional actor. I tested my skills in VFX, writing, and all aspects of production. Thanks to the dedication of a great team, STRANDED premiered at the Cannes Film Festival Short Film Corner in 2018. This marked my official debut as a filmmaker.
Currently, I am a Fulbright grantee pursuing an MFA at Loyola Marymount University in Los Angeles. I struggled for years to master Blender. I finally found my breakthrough during the COVID-19 pandemic. This was inspired by Ian Hubert’s “World Building in Blender” video. This led me to launch my passion project, Blendreams. I share my renders and animations on Instagram. I also offer tutorials on YouTube. Today, Blendreams has grown into a community of over 100,000 followers.
In this guide, I’ll walk you through how to use the free Blender Auto Setup plugin. This will help you create a seamless workflow between Character Creator (CC4), and Blender. We will cover everything from exporting characters and integrating motion capture data to refining animations and optimizing your project. Whether you’re just starting out. Or you are looking to enhance your existing skills. This guide will provide practical tips to ensure a smooth and efficient process.
“The CC/IC Auto Setup for Blender brings everything from Character Creator and iClone. It sets up everything correctly to ensure the best quality, providing a lot of customization options afterward.”
Onur Erdurak – Director / Write / 3D Generalist
How to Export Your Character from Character Creator to Blender: A Comprehensive Guide
Creating characters in Character Creator 4 (CC4) for film projects in Blender is an exciting and detailed process. Once your character is ready, exporting it to Blender can open up a world of possibilities for further animation and refinement. This guide will walk you through each step. This includes motion capture integration to final adjustments in Blender. It ensures your character transitions smoothly between these platforms.
Recording and Retargeting Motion Capture
Recording and Retargeting Rokoko Motion Capture to Character Creator or iClone
For my project, I used the Rokoko Smart Suit Pro II to record motion capture data. The process is straightforward and can be applied to any motion capture or animation file:
Drag and Drop: Simply drag and drop the FBX file onto your character in Character Creator.
Retarget the Animation: Click on the character, select the same file again to retarget the animation properly.
Reference Pose: Rokoko sets the first frame to a T-pose, which is crucial for accurate retargeting. If your animation lacks a reference frame or you’ve cropped the beginning, skip this step.
This process is also applicable in iClone. You can further clean up the animation. You can also export directly from Character Creator.
“I’ve been using Character Creator 4 (CC4) for over a year. As someone who focuses on telling human-centered stories through animation, its seamless integration with Blender has been invaluable. It’s intuitive workflow allows me to bring my characters to life effortlessly, helping me tell the stories I envision with clarity and precision.”
Onur Erdurak – Director / Write / 3D Generalist
Drag and drop the FBX file onto your character in Character Creator
Exporting the Character from Character Creator or iClone
There are two primary ways to export your character from Character Creator or iClone:
Method 1: Traditional Export
File Export: Go to File > Export > FBX > Clothed Character.
Select Blender: From the drop-down menu, choose Blender.
Texture Settings: Set Max Texture to 4K for the highest quality. Convert the image format to JPEG for smaller file sizes.
Animation Settings: If your character has animation, ensure you click “Current Animation.” Define the animation length and set the frame rate appropriately. In Character Creator, choose “All” for the animation length, which will automatically match the project length.
Note: In iClone, set in and out points manually if your project length is extensive, as exporting with “All” checked can be time-consuming.
Final Export: Click Export, and create a new folder for the characters to keep everything organized.
“iClone truly simplifies the character animation process! The ability to export fully rigged characters and convert them into a Rigify rig with IK controls in Blender with one click is incredibly useful. This feature makes the workflow much smoother and more efficient.”
Onur Erdurak – Director / Write / 3D Generalist
Go to File > Export > FBX > Clothed Character.From the drop-down menu, choose BlenderClick “Current Animation.” Define the animation length and set the frame rate appropriately.In Character Creator, choose “All” for the animation length
Method 2: Using the Blender Pipeline Plug-in
For a slightly faster workflow, the Blender pipeline plug-in is an excellent alternative. This plug-in allows for seamless export of characters between Blender, Character Creator, and iClone.
Installation Guide:
Follow this installation guide for downloading and installing both the free Blender Pipeline plugin, and the Blender Auto Setup tool.
To import your character into Blender, you’ll need the free CC Tools add-on (Blender Pipeline Plugin).
Download and Install CC Tools Add-on: Then in Blender, go to Edit > Preferences > Add-ons > Install. Install the add-on and enable the Rigify add-on as well.
Using CC Tools: The CC Tools add-on appears in the “N” panel, which you can toggle with the “N” key. If you have wrinkles enabled in iClone and facial animation, ensure the wrinkles option is checked.
Rigify Integration
Import Character: Click on Rigify, then import your character by navigating to your file.
Set Up Rigify Rig: This will bring in your character with the Rigify rig. It will set up a complex node system. It gives you flexibility over the materials. You can make adjustments to the wrinkles and other settings in the “N” panel under “Character Build Settings.
Animation Adjustment in Blender
Blender offers robust tools for fine-tuning your character’s animation.
Clean Up Keyframes: Open the Graph Editor. Select all bones in Pose Mode. Delete unnecessary keyframes, particularly those for scale.
Non-linear Animation: Use the Non-linear Animation panel to create an additive animation layer. Change the Blending option from “Replace” to “Combine” for easier animation adjustments.
Enable Auto IK: In Pose Mode, enable Auto IK for simple clean-ups. Regular IK can be enabled from the CC Tools add-on under the “Item” tab in the “N” panel.
Running Python Scripts
When reopening your project file, Blender may prompt you to run a Python script. This script powers the options in the “Item” tab, so ensure you trust the script’s source before executing it.
Transferring Characters Between Project Files
To transfer a character between project files:
Copy Character: Select the character’s rig, right-click, choose “Select Hierarchy,” then copy (Ctrl+C).
Paste into New Project: Paste the character (Ctrl+V) into the other project file.
Adjust Light Path Settings: Set the transparent light bounces manually under light path settings for proper rendering.
Transferring Facial Animation
If you need to transfer facial animation between characters:
Keyframe All Shape Keys: Use the following script in Blender’s scripting panel to keyframe all shape keys:
import bpy
def add_all_keyframe(obj, attr="value", frame=1):
 if obj.type != 'MESH': return
 blocks = obj.data.shape_keys.key_blocks
 if not blocks: return
 for k in blocks:
 k.keyframe_insert(attr, frame=frame)
add_all_keyframe(bpy.context.object)
bpy.context.scene.frame_set(bpy.context.scene.frame_current) #update ui
Run the Script: Click on the character without keyframes and run the script. Copy the keyframes from one character and paste them into the other.
Attaching Accessories in Blender
Attaching accessories is straightforward:
Reset Bone Positions: In Pose Mode, reset the rotation and position of all bones using Alt+R and Alt+G.
Attach Object: In Object Mode, position the accessory. Then Shift-click on the bone in Pose Mode. Parent the object to the bone (Ctrl+P > Bone).
Fixing Clothing Issues
If your character’s skin is peeking through their clothing:
Masking: Instead of deleting hidden faces during export, use Blender’s masking options to hide the protruding areas.
By following these steps, you can ensure that your characters created in Character Creator are imported into Blender with precision. They will be ready for further animation and refinement. Whether you use the traditional export method or the Blender pipeline plug-in, the process is streamlined and efficient.
Final Scene: You can check out the final scene created using this process. The characters were voiced by Jonny Cruz. Melis Caner (@melniverse) also lent her voice. The scene was constructed using KitBash3D Cargo and the Trashkit add-on.
For those interested, special discount codes are available:
Trashkit: Use code “blendreams10” for 10% off here.
KitBash3D: Use coupon code “Blendreams20” for 20% off here.