Welcome to Neriverso, where the captivating world of video games meets the expertise of Neri Neto, a seasoned technology journalist and skilled game programmer. Through Neriverso, Neri shares his profound insights and boundless passion for everything he adores, including video game development!
As a dedicated game programmer, Neri has lent his talents to numerous indie projects, crafting engaging mechanics and contributing to the development of captivating titles. Embrace the Neriverse and embark on a journey fueled by Neri Neto’s unwavering enthusiasm and commitment to his craft and community.
In his latest video, Neri talks about the powerful 3D crowd simulation feature in iClone, that enables animators, game developers, archviz creators and more to create realistic crowd scenes including how:
Creating crowds in 3D environments can be achieved using iClone Crowd 8 Simulation tool, a versatile software applicable in architecture, gaming, and virtual shows, offering robust crowd simulation capabilities.
Using software like iClone 8 can provide ready-to-use character libraries and animations, making it efficient for most projects, with the option to purchase additional characters and animations for more customization.
Using animation and real-time graphics, creator can seamlessly integrate characters into a scene, adjust animations, and create paths for character movement.
Using advanced character scanning technology to create realistic 3D characters for crowd simulation can enhance performance and visual quality in various projects.
A Step-by-Step Guide Using Character Creator 4, ZBrush, Substance Painter and Maya
Gerard Martínez Sánchez – Character Modeling Artist
Gerard Martínez Sánchez
I’m Gerard Martínez, a 3D artist from Barcelona specializing in cartoon-style characters. I am also a 3D instructor and teacher. I have the privilege of combining two of my greatest passions: 3D art and teaching.
Currently, I teach at Libel Academy, one of the most recognized online 3D training academies in Latin America, with students from various parts of the world. I also teach 3D arts classes at various universities in Spain.
This year, I also had the opportunity to collaborate with XP-Pen Spain, which allowed me to bring art and technology to a wider audience and share my passion for both worlds.
“Character Creator 4 not only simplifies the technical process but also enhances the artistic aspect, allowing artists to focus on creativity and design. I appreciate how the free Character Base with its optimized topology and full rig, integrates seamlessly with tools like ZBrush and Substance Painter. “
Gerard Martínez Sánchez, Character Modeling Artist
INTRODUCTION
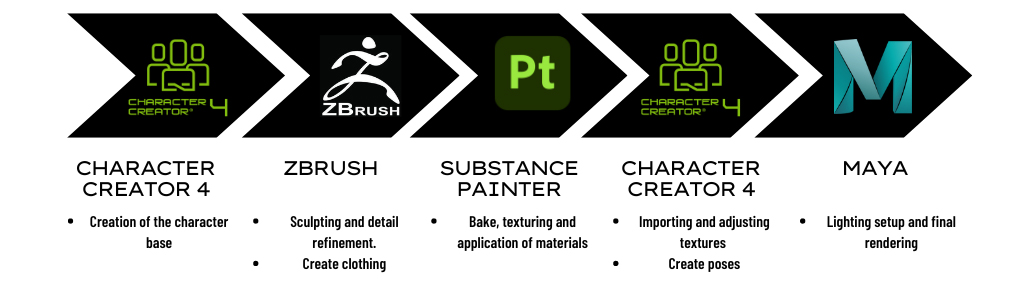
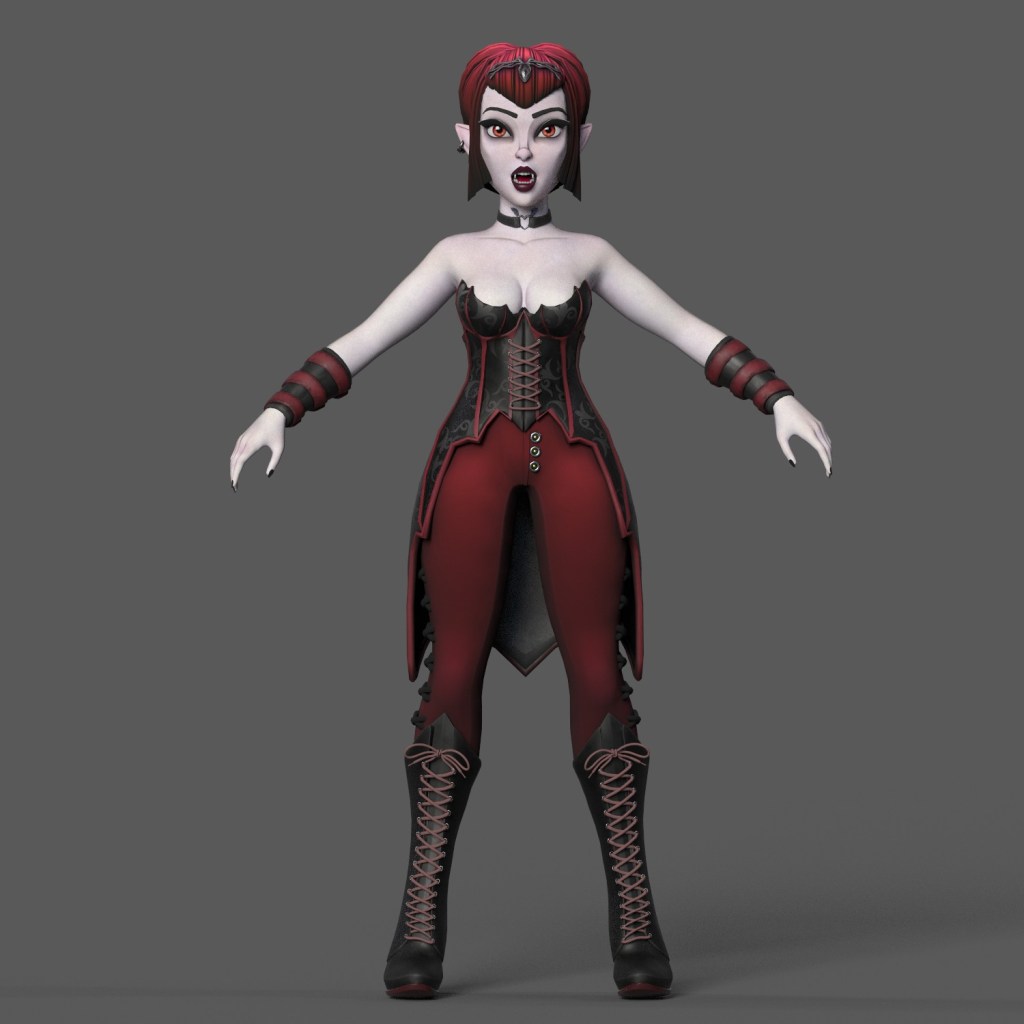
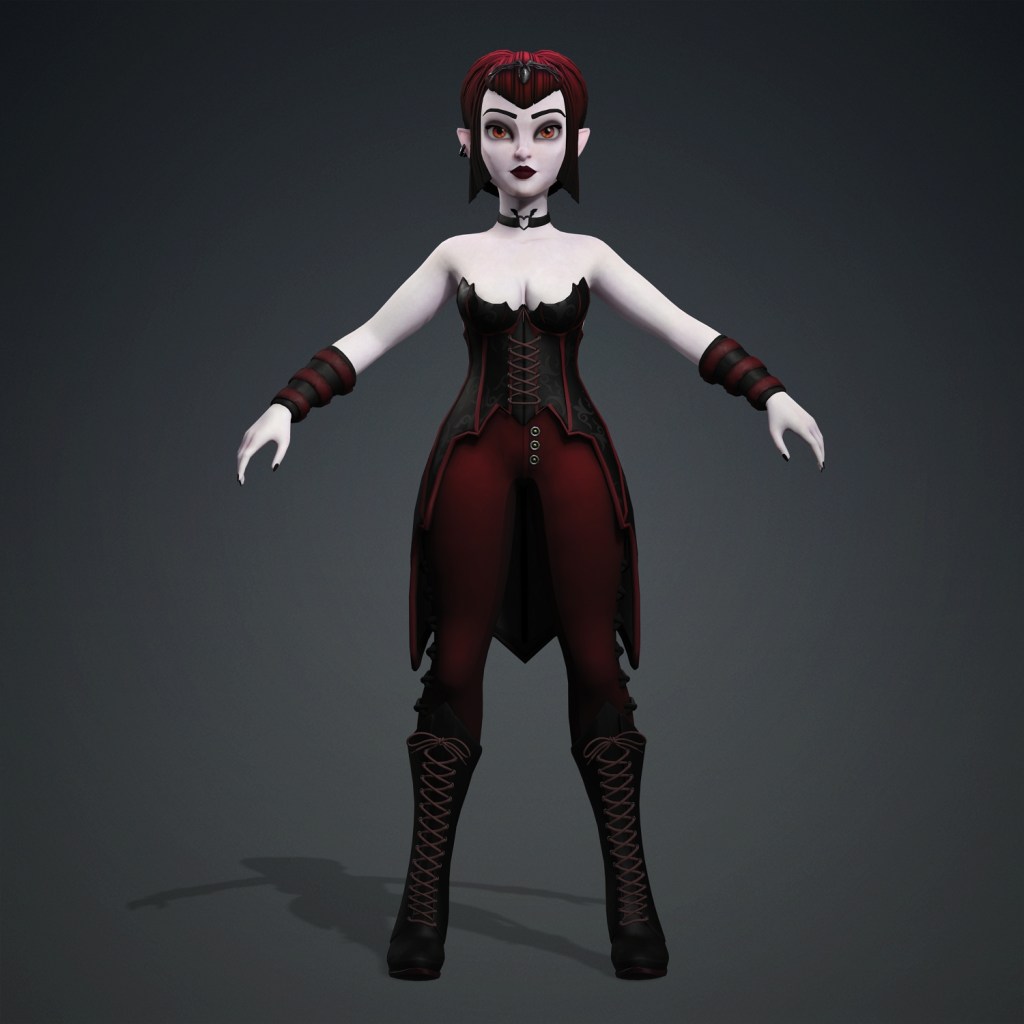
Welcome to the making of Ravenna, a stylized vampire created using tools like Character Creator 4, ZBrush, Substance Painter, and Maya. In this article, we will break down the entire process of creating this character, starting with one of the free bases from Character Creator 4.
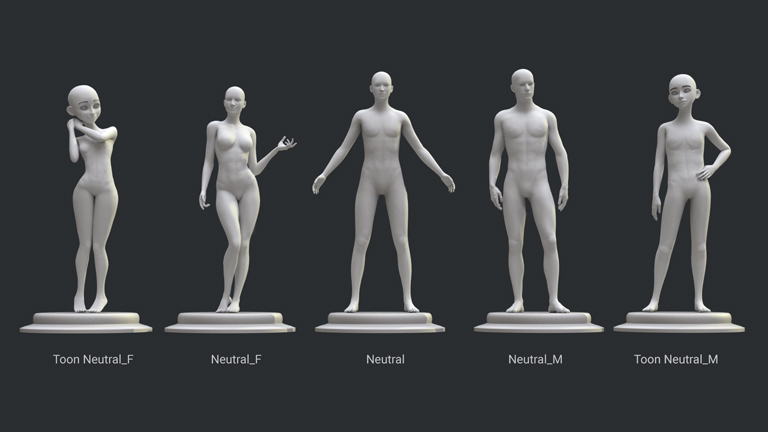
Character Creator Bases
This base provides us with optimal topology and the flexibility needed to sculpt in ZBrush, taking advantage of Reallusion’s excellent morphs and rigging systems to achieve a fully animated character from the start.
We will continue the process by applying stylized and hand-painted textures in Substance Painter, using UDIM texturing capabilities to add more detail and precision.
Next, we will import the textured model back into Character Creator 4, where we will adjust the accessories and create poses to bring Ravenna to life.
Finally, we will create a small environment and render the character in Maya using the Arnold rendering engine, ensuring that every detail and texture stands out on the character.
Character Creator Open Pipeline
Prepare to discover how a simple idea transforms into a 3D character for animation.
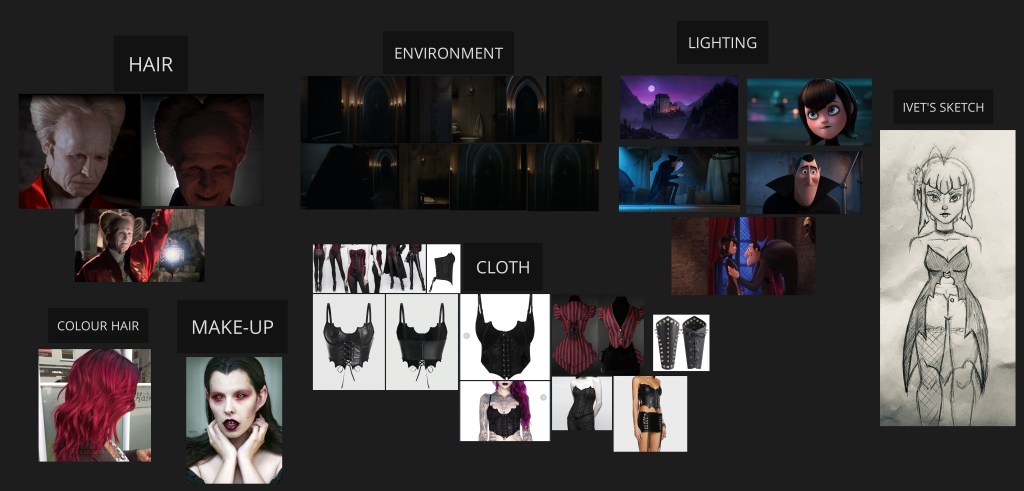
For the creation of Ravenna, having a solid foundation of visual references to guide each stage of the process was crucial. From the beginning, my main goal was to give Ravenna a stylized and animated movie-like touch, as if she had come straight out of a lost castle in Transylvania. I wanted Ravenna to capture the essence of a classic vampire while also having a modern, stylized look that would make her stand out in any visual context.
Here’s how I approached the search and use of references for this project:
Vampires in Art and Popular Culture: I started by looking for images of vampires in movies, TV series, and concept art. This helped me understand the different styles and common characteristics of vampires, such as pale skin, prominent fangs, and intense gazes.
Illustrations and Cartoons: I also searched for illustrations and cartoons of vampires to capture a variety of stylized looks, from cartoonish to darker, gothic interpretations.
Facial Structure and Expressions: To ensure Ravenna had believable anatomy, I researched photos of people with interesting facial features. I focused on images showing expressions that would help convey the character’s psychology.
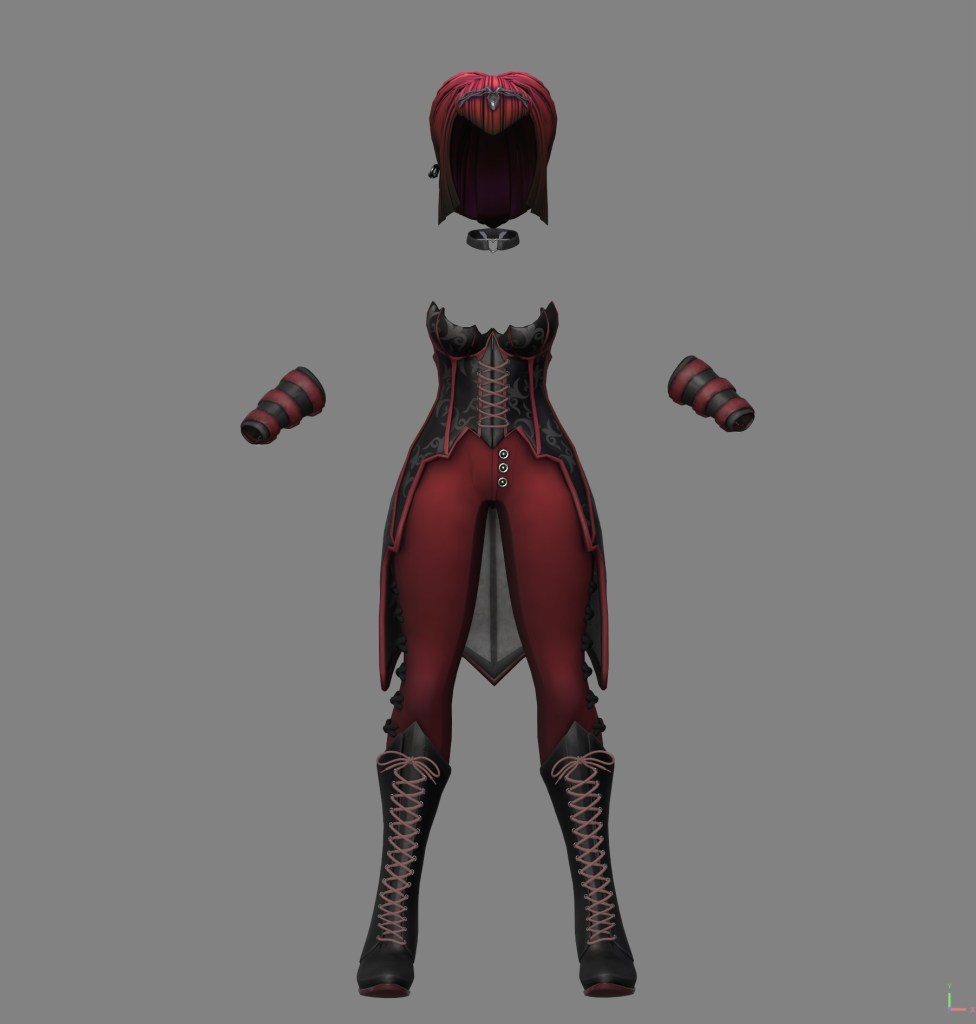
Gothic Clothing and Accessories: Clothing is crucial for Ravenna’s character. I looked for references of gothic clothing and accessories like corsets, capes, and jewelry to give her an authentic and fitting touch.
Once I had the images, I started building a visual board in PureRef. PureRef is a program that helps organize and visualize visual references efficiently.
Next, my partner, Ivet Macias, a 3D artist, helped me design a quick sketch of Ravenna’s look. This sketch was incredibly helpful in getting started with the modeling and having a clearer idea of the character.
Here are some of the reference images I used:
2. CHARACTER CREATOR
2.1 Begin with CC4 Base Model for Optimal Sculpting in ZBrush
First, I had to download the free bases. To download:
The file will automatically download to your computer.
Unzip the contents to your preferred location and let’s explore what we can do!
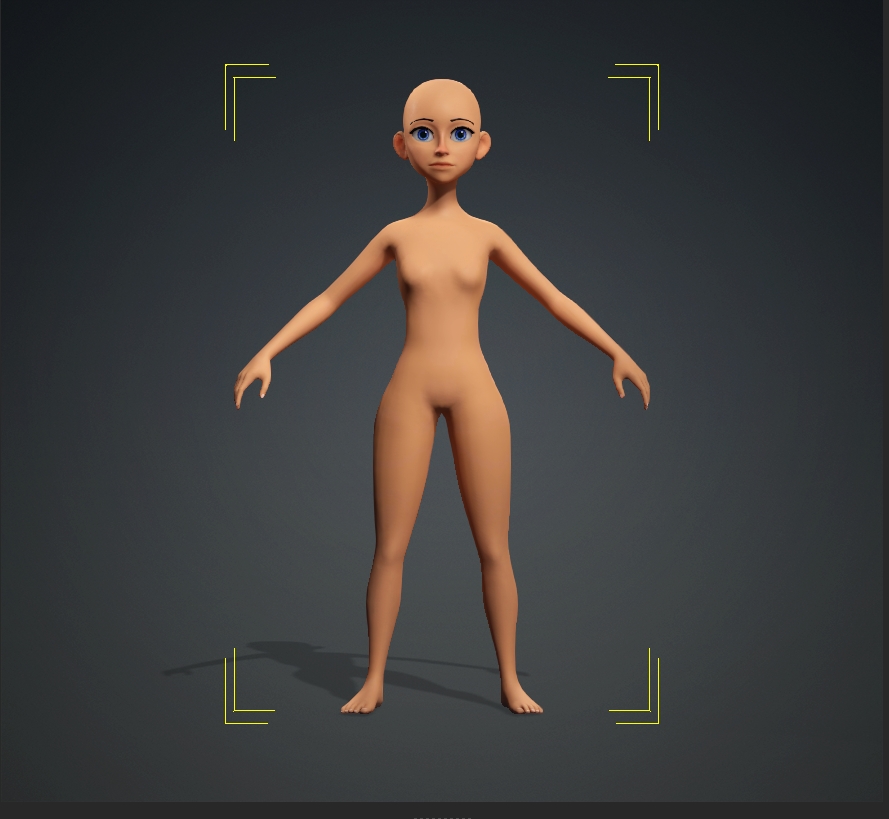
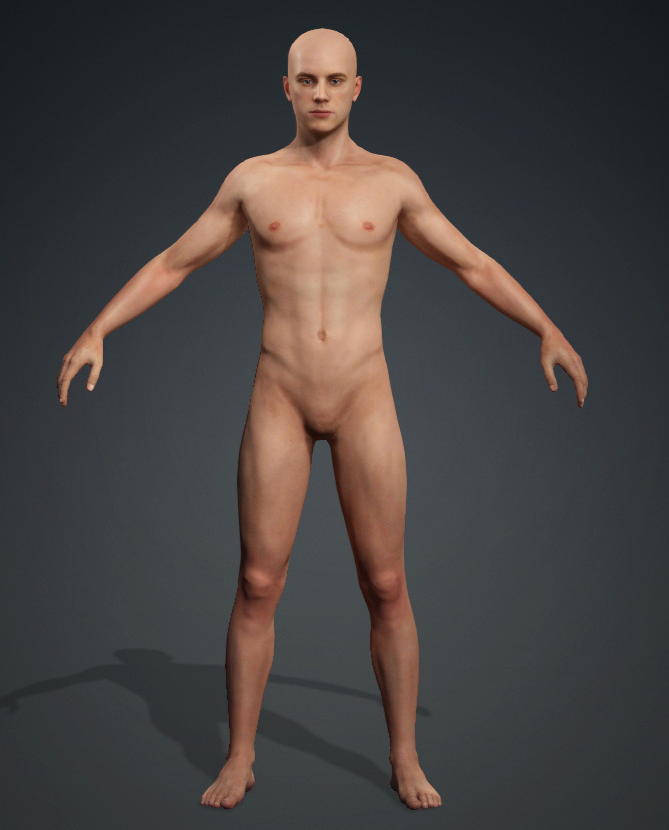
The mesh of this model provides a universal topology, perfect for animation and sculpting. This base is ideal for Ravenna, as its cartoon and versatile style will allow us to modify and sculpt the stylized and distinctive details we want for the character.
To start, we need to load the base. In this case, I imported version 04_Toon Neutral_F. Start Character Creator by opening Reallusion HUB and then Character Creator 4.
In the File/Import/Import section, or using the shortcut Control+I.
We will import the model from the folder named //CC Character Base\FBX\04_Toon Neutral_F.
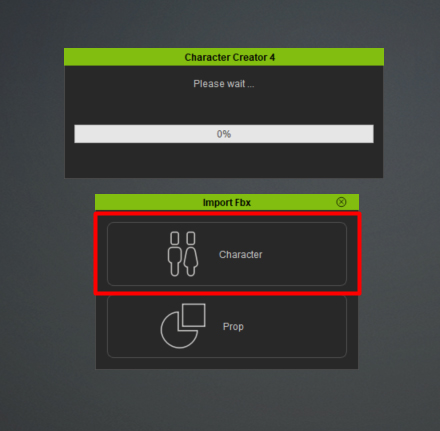
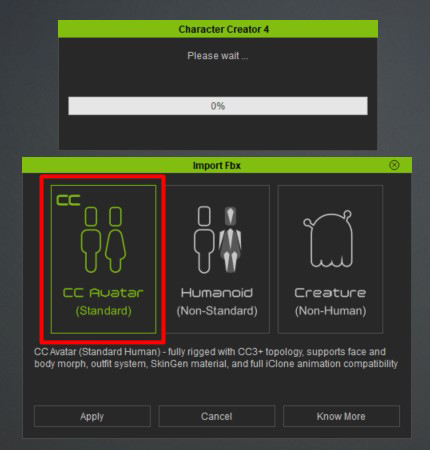
When clicking the import button, two pop-up windows will appear. The first will ask if it’s a character or an accessory. Select the Character option. The second window will allow us to choose the format for our character, with or without rigging. Select CC Avatar (Standard).
Once selected, the model will load into Character Creator 4, ready to be modified and adjusted according to our needs.
Import CC modelSelect the character import option
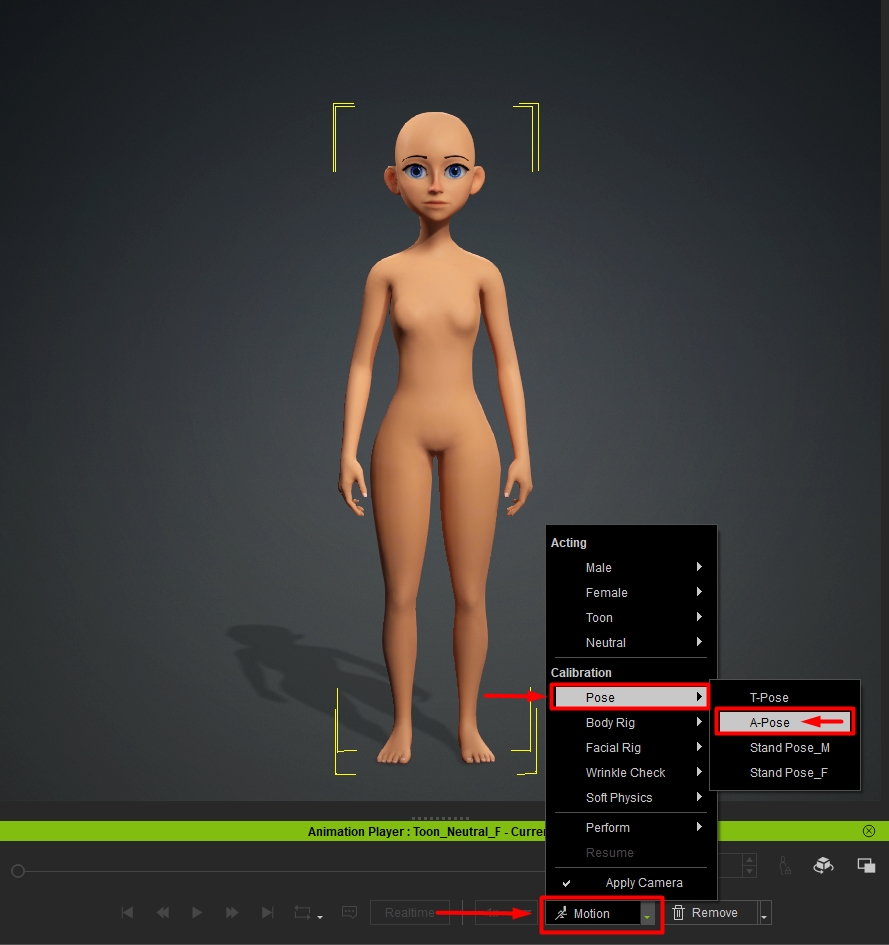
Once the model is loaded, we will place it in A-Pose or T-Pose to facilitate modifying the proportions.
In CC select the A-PoseIn Character Creator avatar is in A-Pose
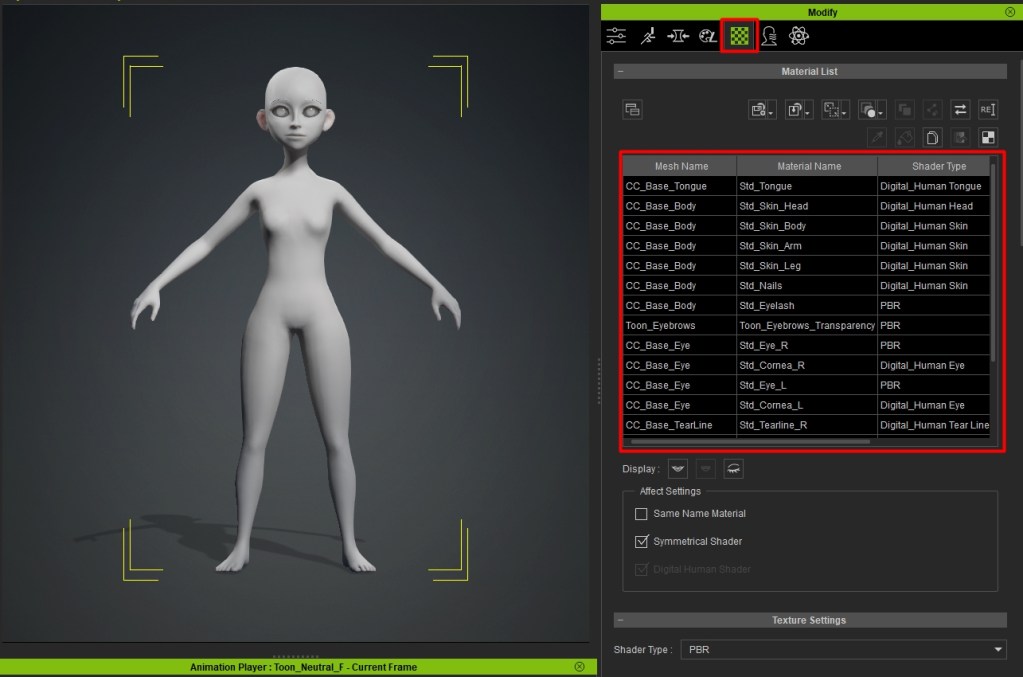
Now, we will select the entire model and go to the Materials tab.
Select all the materials listed in the Material List.
Select the character materials in Character Creator
There, we will reduce the texture intensity to zero to focus only on the volumes.
Finally, we will adjust the Diffuse Color to a dark gray to better visualize our character.
Adjust the character Diffuse Color
Now our character is ready for base modification.
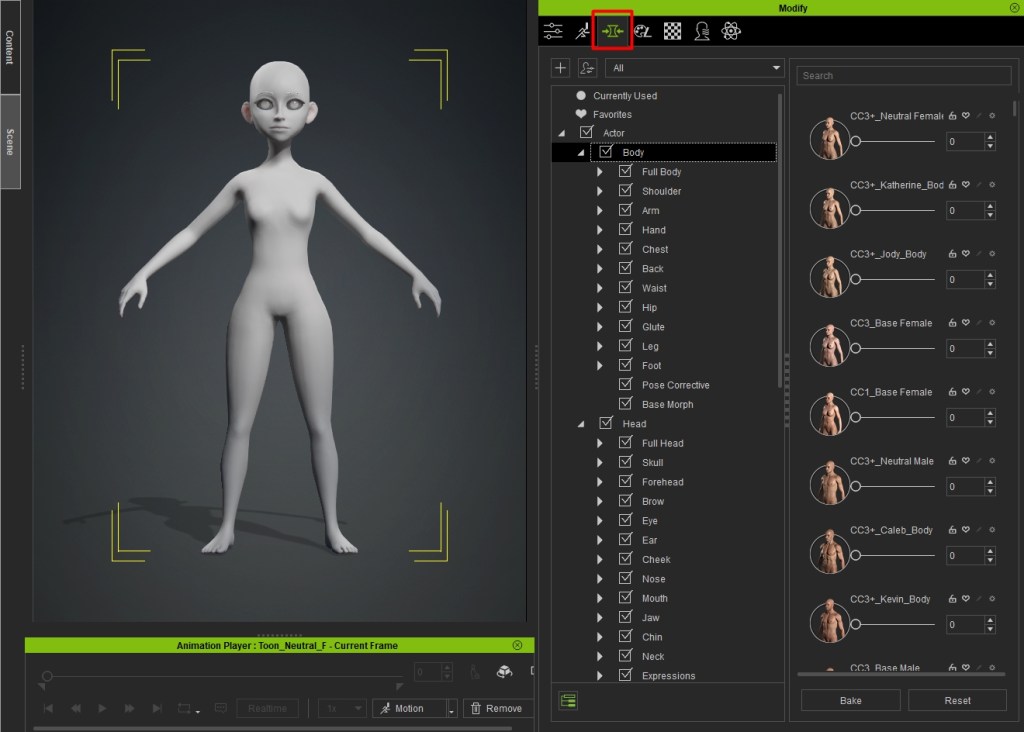
Go to the Morph tab and start working through the list, making large changes initially and then refining with more specific morphs to define the body and head shape.
Use the Character Creator Morph sliders to adjust your character
You can use the search bar to quickly find specific options; for example, type “scale” to access scale options for any body part.
In my case, I extensively used theUltimate Morphs pack, available on the Reallusion Store. The variety of morphs and the nearly infinite combinations allowed me to personalize every detail of Ravenna, from the body structure to facial features, providing total flexibility.
Save time with the Ultimate Morphs pack for Character Creator
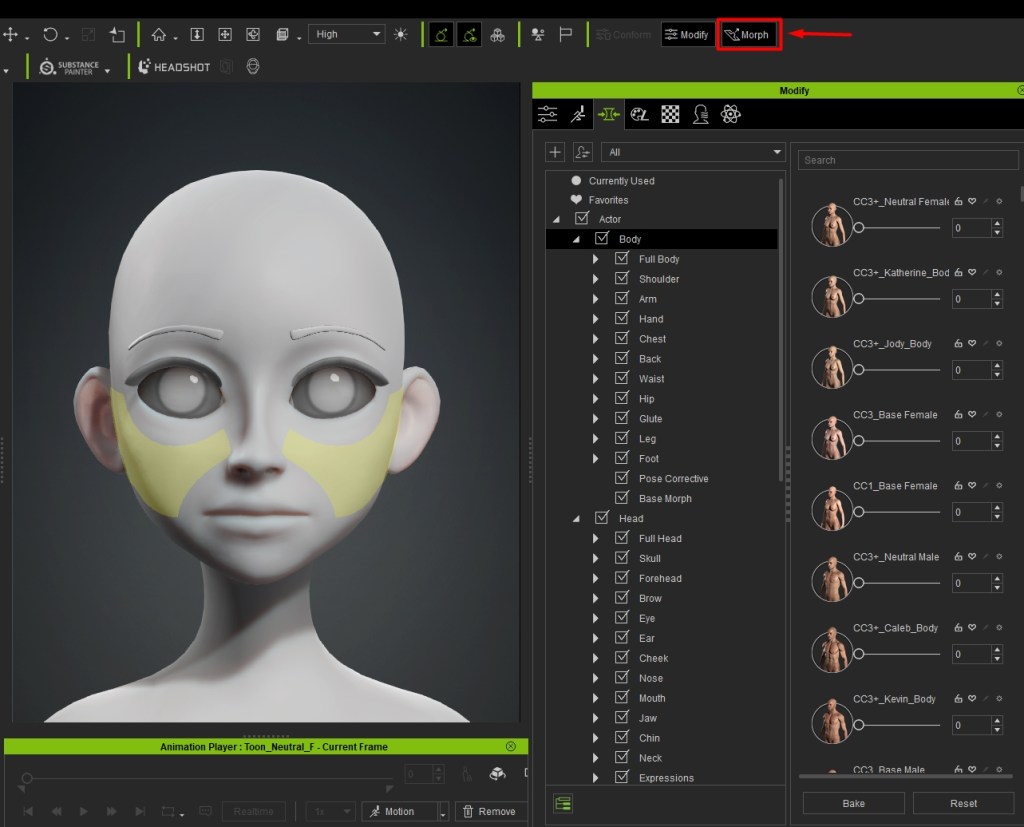
Additionally, you can enable the Morph option in the Menu Bar to unlock morphing in the Viewport. With this option enabled, simply click and drag parts of your character in the viewport to intuitively change the shapes.
Enable the Morph option in Character Creator
I thoroughly enjoyed this part because Character Creator offers immense versatility.
The ability to make numerous modifications allows for precise adjustments to every detail of the character. It felt like using a video game character editor due to its ease and intuitiveness, making the creative process a pleasure.
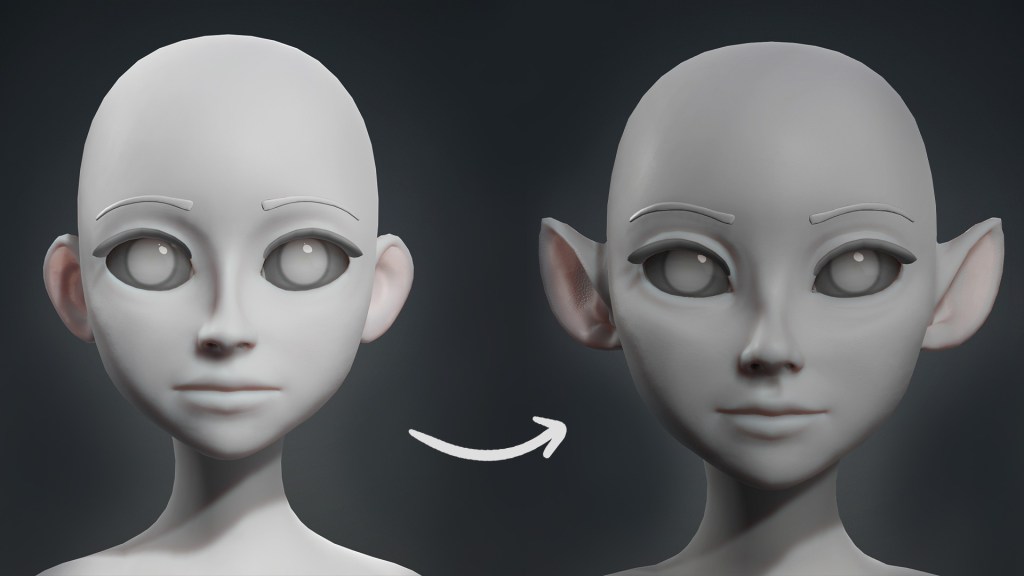
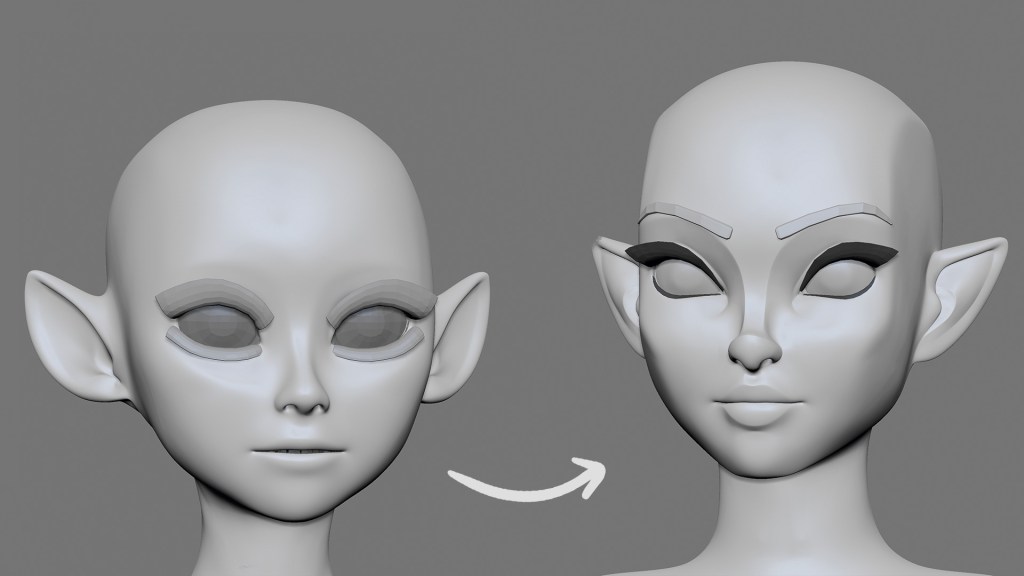
Now, I’ll share the before and after of the head and body starting from the 04_Toon Neutral_F base, using the CC4 sliders.
The visual comparison shows how morphs and adjustments can completely transform the character, highlighting significant changes in Ravenna’s facial and body structure.
See face morph comparisons in Character CreatorSee body morph comparisons in Character Creator
2.2 Exporting from Character Creator to ZBrush Using GoZ
One of the moments I enjoy most in my creative process is sculpting in ZBrush. Character Creator 4 (CC4) has an excellent and very flexible connection with ZBrush, making it easy to export characters or props between programs.
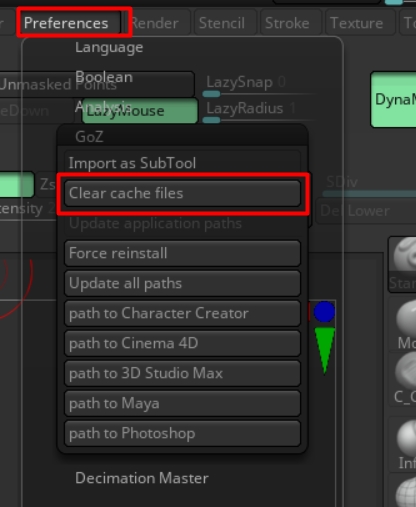
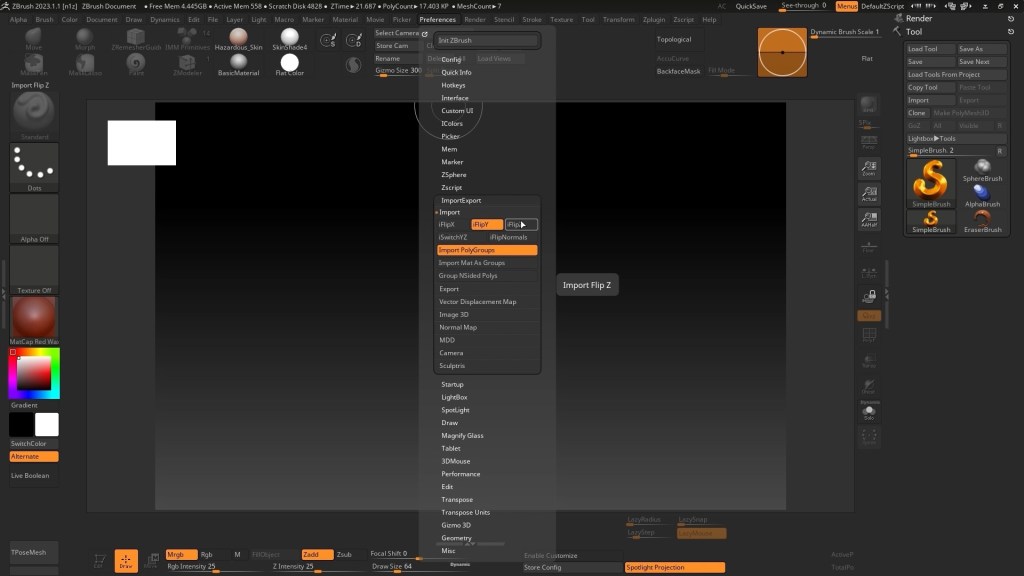
Before exporting, it’s important to create a new document in ZBrush and clear the GoZ cache. To do this, go to Preferences > GoZ > Clear Cache. This ensures a clean and smooth transfer between the programs.
Clear the GoZ cache
Now it’s time to detail our character in ZBrush using its sculpting tools.
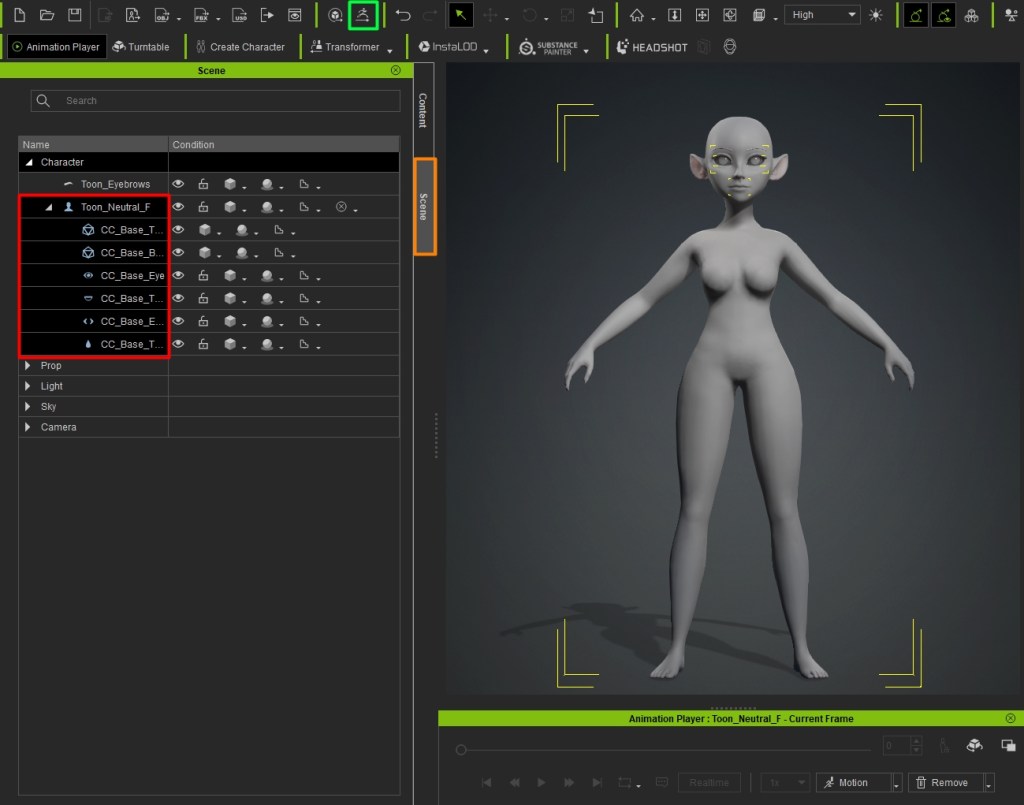
To send our character to ZBrush, follow these steps:
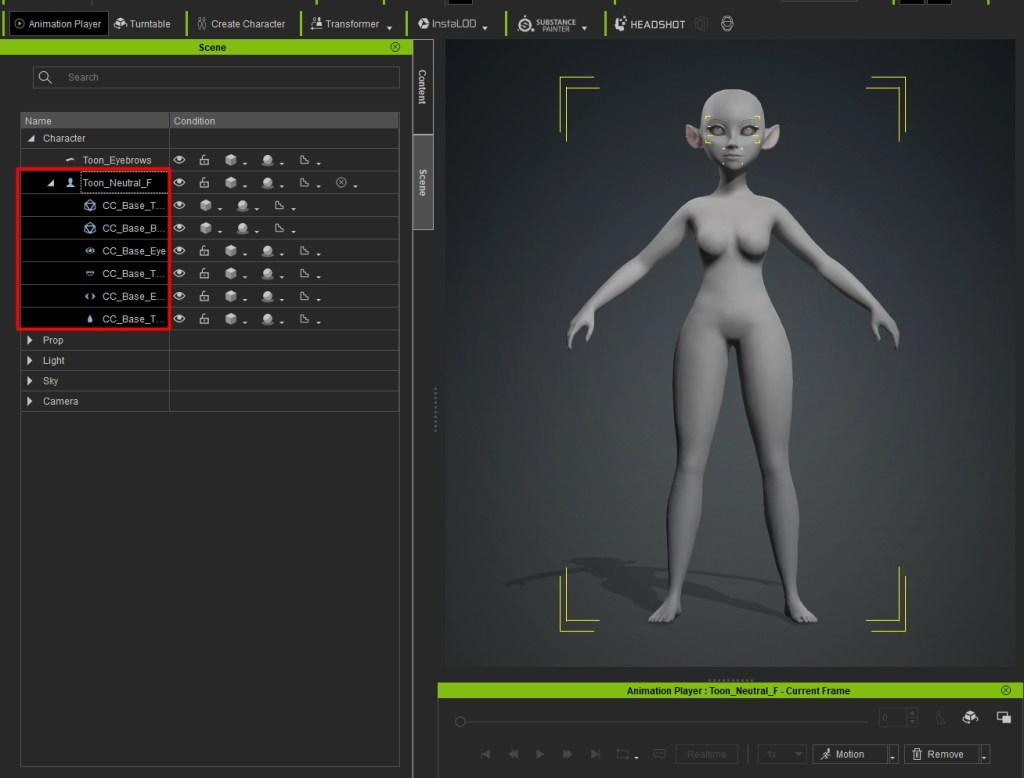
Go to the Scene tab.
Select all the character elements by holding down the Shift key.
Click the GoZ button in the menu bar.
This will transfer your character to ZBrush for detailed sculpting and refinement.
Select the character features
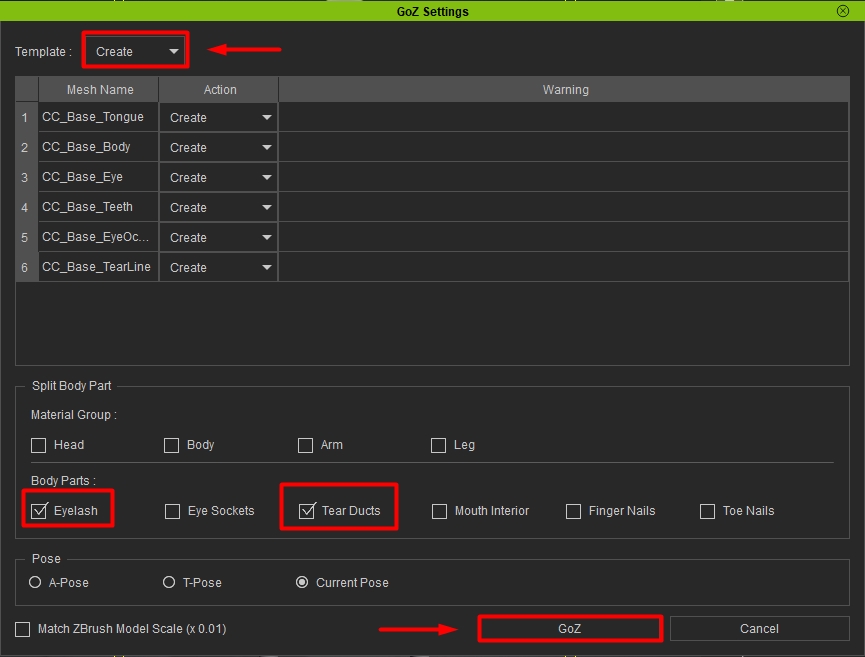
In the GoZ settings panel, ensure the template is set to Create.
I prefer separating the eyelashes and tear ducts to have only the “skin” of the character as a sub-tool while I work, as it makes modifying the face, especially the eyes, much more comfortable.
To do this, in the settings panel, activate the eyelashes and tear ducts in the Split Body Parts section to divide them into their own subtools.
Select Current Pose in the Pose section.
GoZ settings panel, ensure the template is set to Create
3. ZBRUSH
3.1 Shape Refinement in ZBrush
When I had my character in ZBrush, I selected the “CC_Base_Body” sub-tool and began refining it. I used my favorite brushes to sculpt and adjust the body and face shapes.
First, I worked at subdivision level 1 to achieve the basic shape, using brushes like Move and DamStandard. These brushes allowed me to deform the mesh gradually, always aiming for smooth lines in the topology loops.
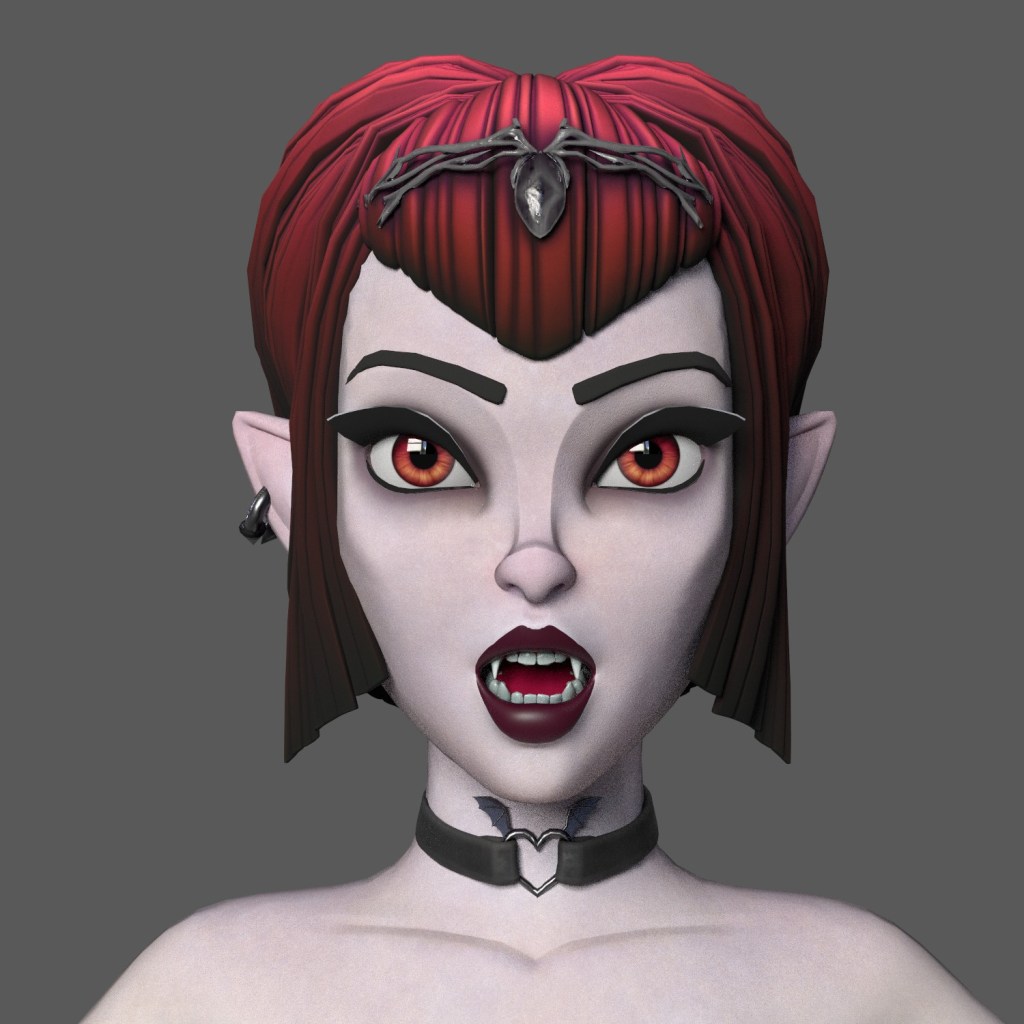
I spent a lot of time perfecting the face to ensure that when you see it, you can immediately say, “She’s a vampire!”
It’s crucial to ensure that facial features maintain proper proportions relative to the overall head and body shape. For example, achieving the correct position of the eyes, nose, and mouth helps capture the character’s essence accurately.
Next, the following step involves capturing secondary facial details such as the shape of the eyes, ears, mouth thickness, nose shape, eyebrows, and more.
Capturing secondary facial details
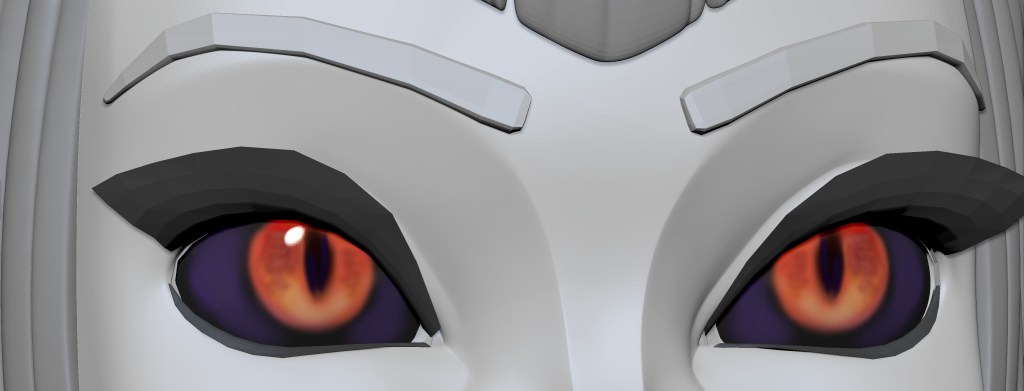
Once I have the head more defined, I paint the iris of the eyes to give it more vitality and expressiveness, providing greater inspiration for the sculpt. I apply the Toy Plastic material to the eyes.
Paint the iris of the eyes to give it more vitality
In the Geometry menu, we can find the ClayPolish tool. I use this option frequently to achieve a more defined and polished appearance, especially recommended for cartoon or stylized characters.
For this style, the most important aspect is perfecting the volumes and refining the shapes.
Referencing Dracula for my character
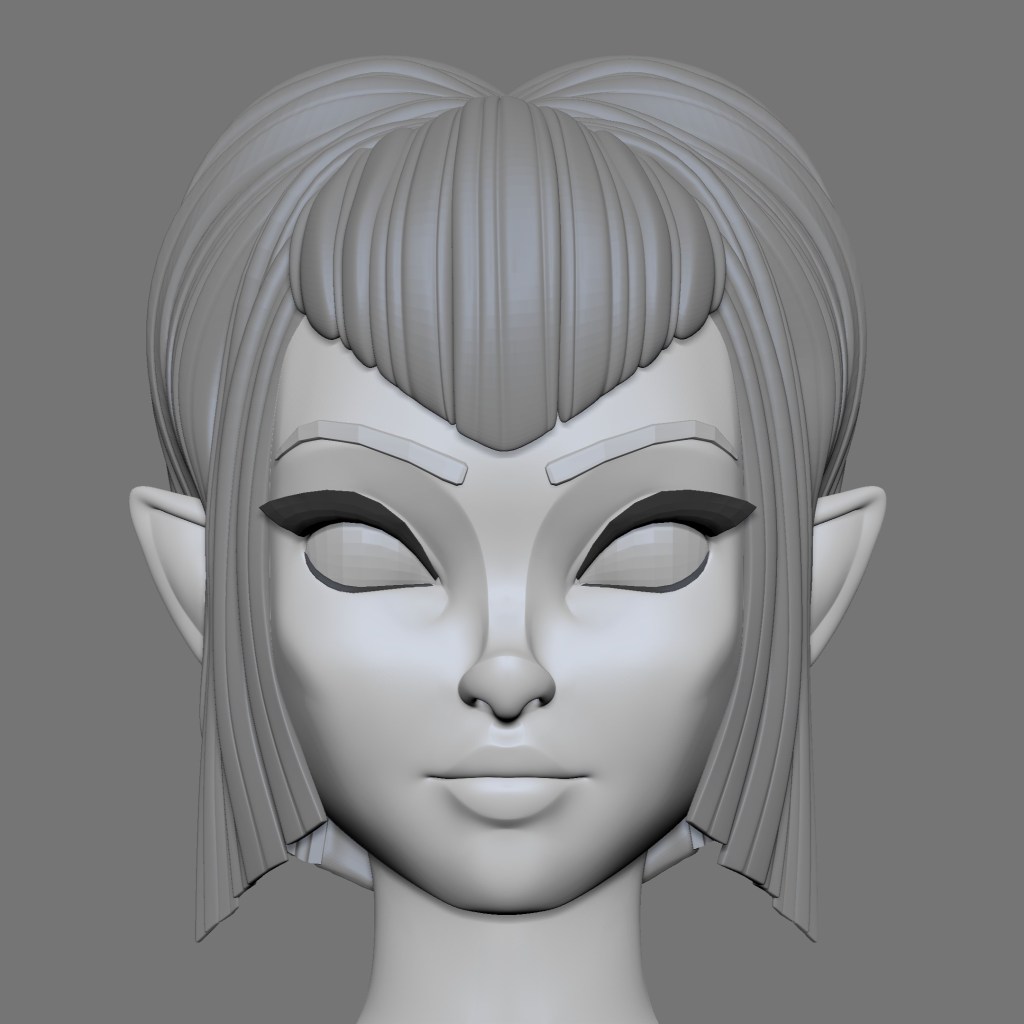
Then, I created an initial block of the hairstyle in ZBrush using a sphere to later place the hair strands and experiment with the shape and silhouette.
I used the most basic ZBrush brushes, such as Move, Smooth, Inflate, and Pinch, for this blockout. To add each hair strand, I utilized different brushes.
It is important to keep the geometry of each strand clean and organized.
To add each hair strand, I utilized different brushes.
Tips for Creating Hair
Rotate the Model: Constantly rotate the model, don’t focus on a single angle, and look for irregular or uneven areas.
Balance the Strands: Find a good balance in the number of strands you create. Too many can make the hair look messy, while too few can make it look simple or incomplete.
Check Shapes and Silhouettes: When adding strands, review the shapes and silhouettes to ensure they match the concept.
Add Variation: Working with symmetry is fine, but make sure to add some variation and asymmetry.
Avoid Duplicates: Don’t duplicate strands side by side, as it often looks fake and unconvincing. This is a common mistake.
Be Patient: Learning to create hair takes time.
3.3 Creating Stylized Cloth and Accessories
I follow a workflow that combines various tools and techniques to create clothing in ZBrush. Here’s how I do it:
Creating the Base with Extract:
I use the “Extract” tool in ZBrush. With the help of masks, I can define the areas of the base mesh that will become the clothing. This allows me to sculpt the basic shape of the garment.
After defining the shape, I perform a Z-Remesher to optimize the geometry.
After defining the shape, I perform a Z-Remesher to optimize the geometry
Adding Thickness and Defining Seams with Panel Loops
In ZBrush, I add thickness and define seams using the Panel Loops function. First, I assign Polygroups where I want to mark the seams.
Below are the values I apply in Panel Loops. In the EdgeLoop sub-palette of the Geometry menu, I set the following adjustments:
Loops: 3
Polish: 0
Bevel: 50
Elevation: 0
Define seams using the ZBrush Panel Loops function
When pressing the Panel Loops button, ZBrush adds thickness to the interior of the mesh, creating a clean loop between the inner and outer panels. Each element gets its own polygroups, which is very useful for organizing the mesh.
Adding Support Loops
To avoid deformations when subdividing the mesh, I add support loops:
Go to Geometry > Crease > Crease PG.
This ensures that the edges of the mesh parts remain defined during subdivision.
Complex or More Polygonal Garments
For more elaborate garments like a corset, I prefer modeling them with polygons in Blender. This approach gives me greater control over the topology and design.
Afterward, I import the model into ZBrush to create its high-resolution version and apply detailed sculpting.
These steps allow me to create stylized clothing in ZBrush, combining sculpting and polygonal modeling techniques to achieve the best possible results.
Create stylized clothing in ZBrush
Before exporting all changes to Character Creator 4 (CC4), we need to unwrap the UVs for accessories, clothing, and hair to avoid any complications during texturing.
3.4 Importing Character, Hair, Clothes & Accessories into Character Creator
3.4.1 Importing Character
To minimize errors, we will export the character in parts. First, import the character without hair or clothing. Next, import the hair and match it with the skin. Finally, import the clothing and assign its weights.
Before transferring the character from ZBrush to CC4, ensure the character is selected in CC4. If not selected, it will not update.
Transferring the character from ZBrush to Character Creator 4
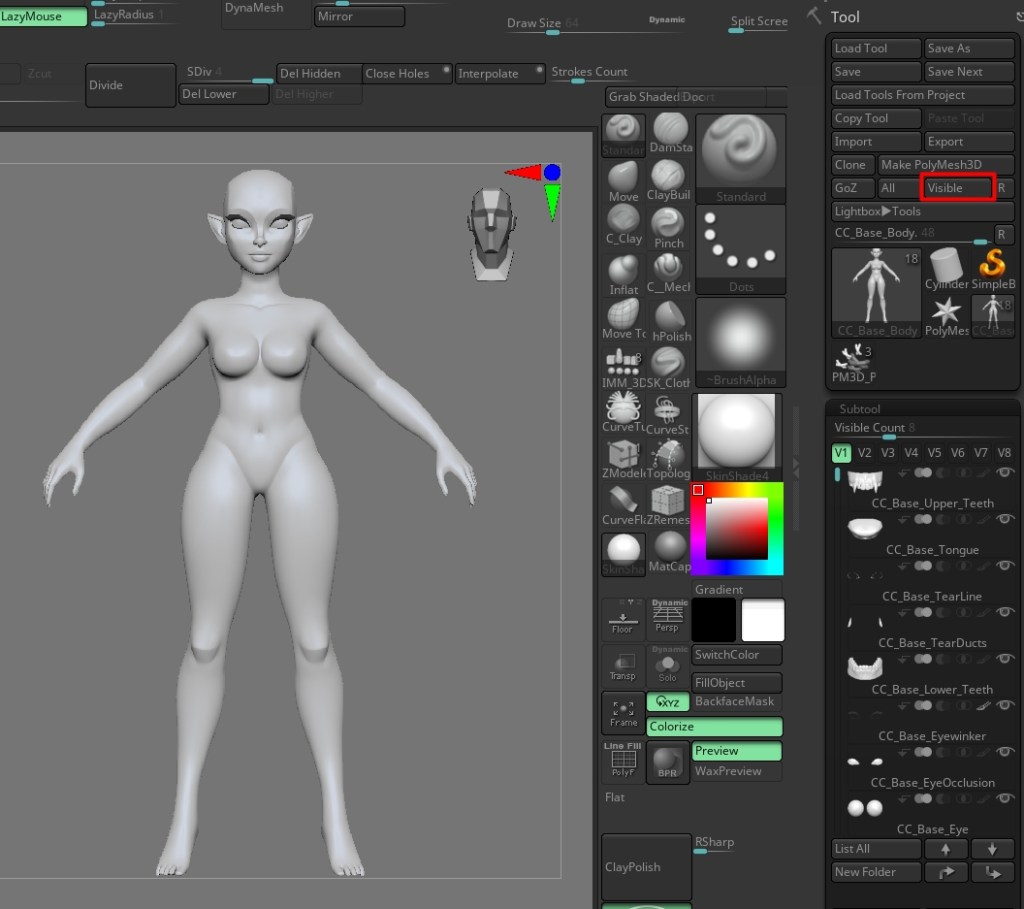
Then, we will hide the clothing and hair, and use GoZ, selecting the option to export only what is visible in the scene by pressing the “Visible” button.
This will automatically reduce your body subtool to SDiv 1 and send the mesh back to Character Creator.
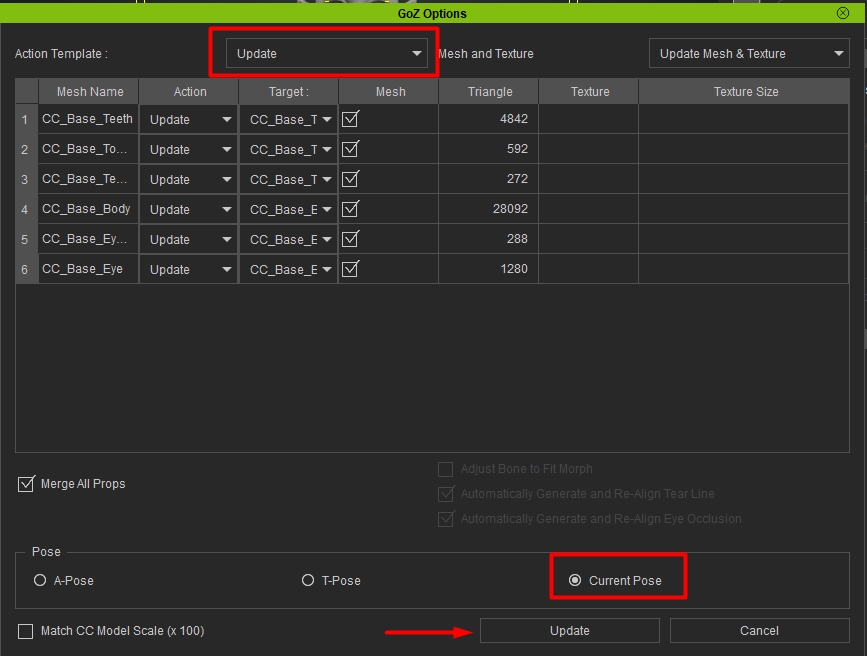
The GoZ options in CC should be set to Update, and we will select Current Pose.
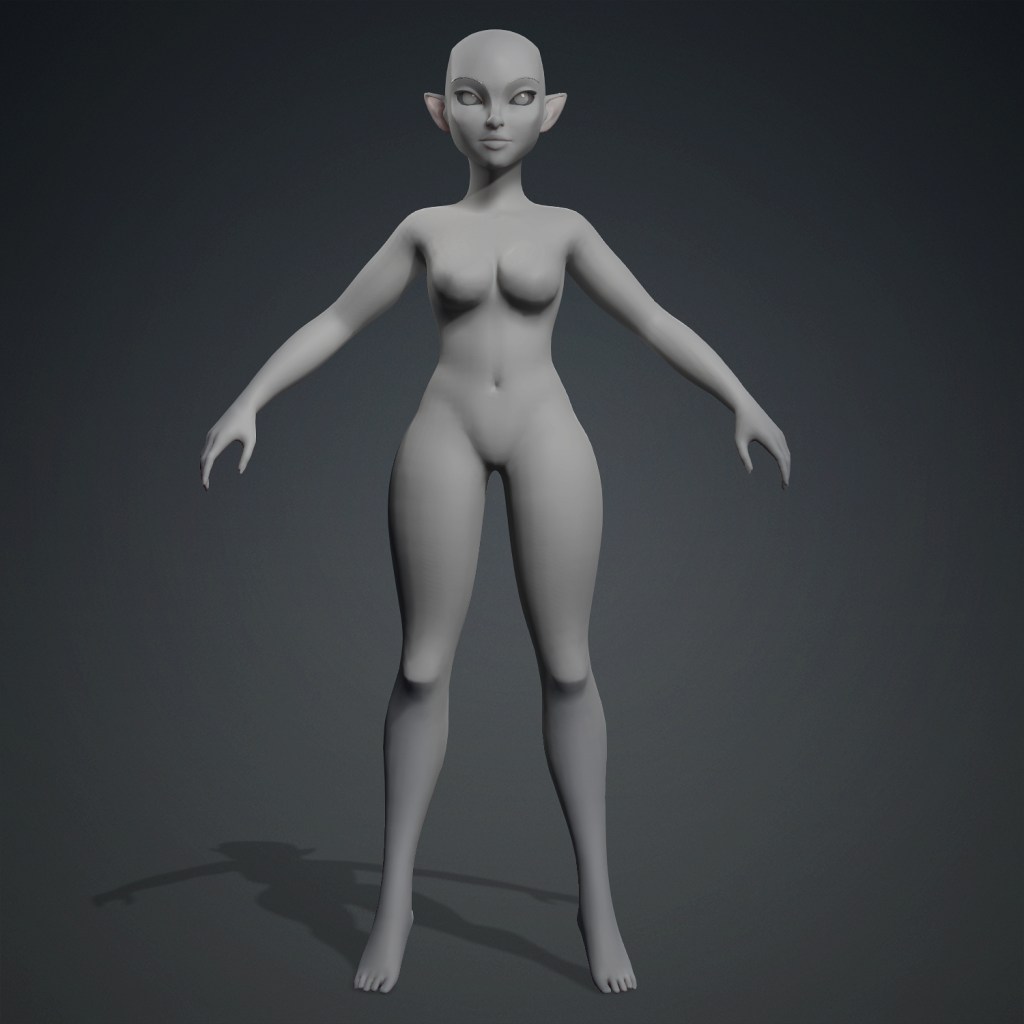
Once the model is in Character Creator, test the animations from the Content tab or Animation Player and use the morph system to make further adjustments. You can go back and forth between CC and ZBrush as many times as needed while perfecting your character.
3.4.2 Importing Hair
Next, we will send the hair and eyebrows to Character Creator. To do this, hide all the subtools by clicking on the eye icon and then press “Visible” to send them to Character Creator.
In Character Creator, set these parts as Accessories and click Update. You may need to make some position adjustments.
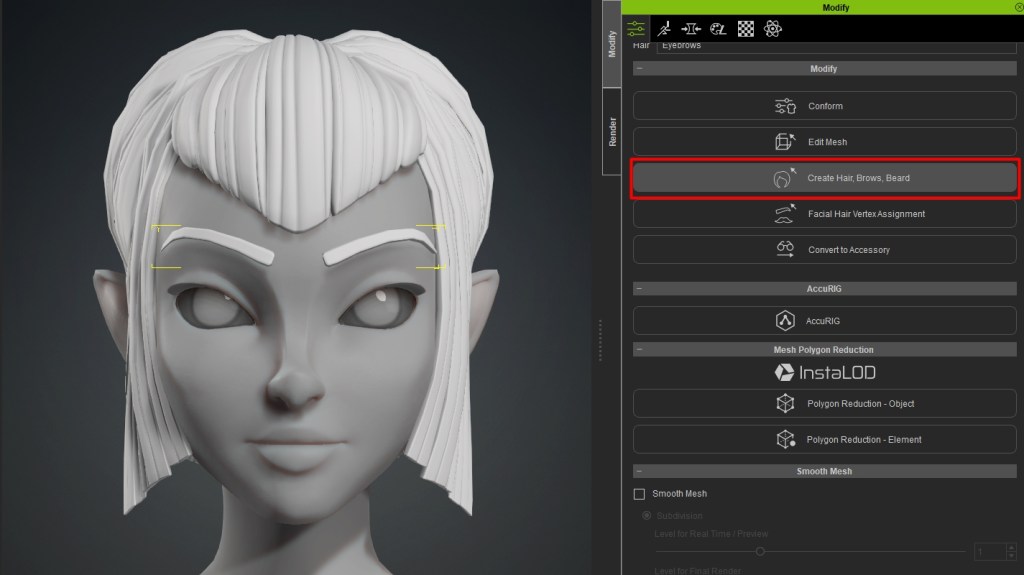
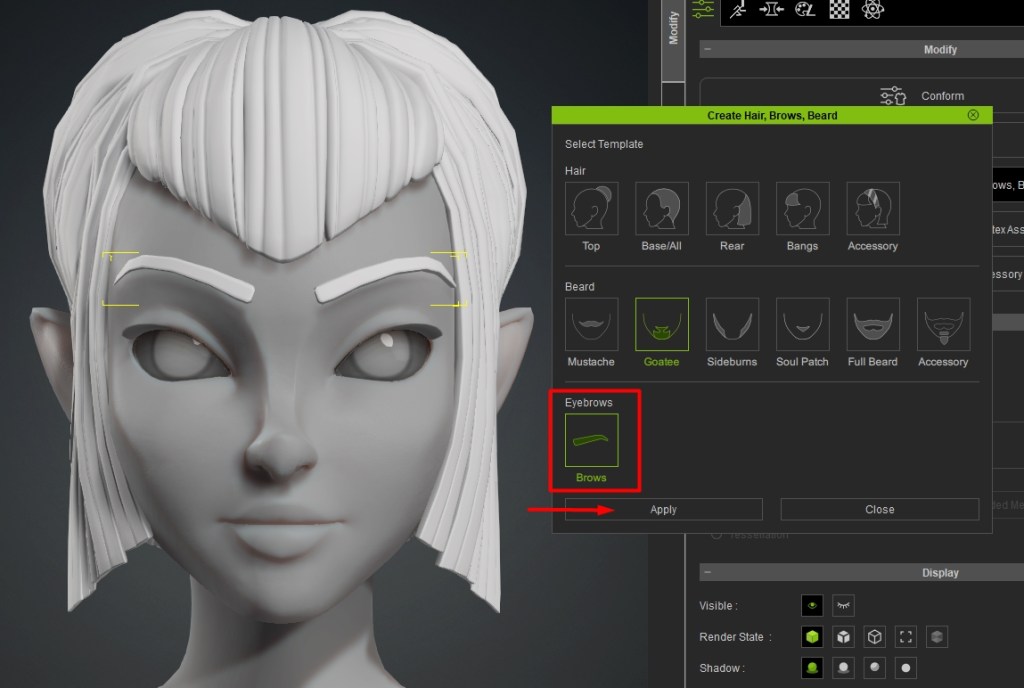
To integrate each of these accessories as part of the character’s face, go to the Attributes panel, click on Create Hair, Eyebrows, Beard, and select the appropriate behavior for each. In this case, select Eyebrows and apply it to Brows.
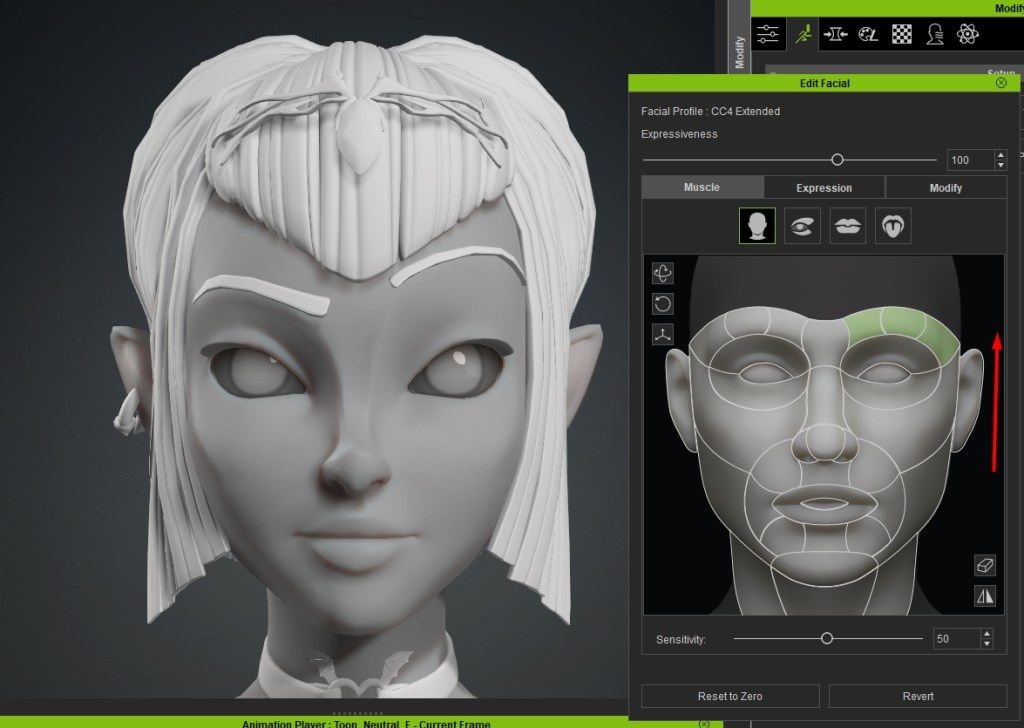
Once configured, we can verify in the Facial Editor that each element behaves as expected.
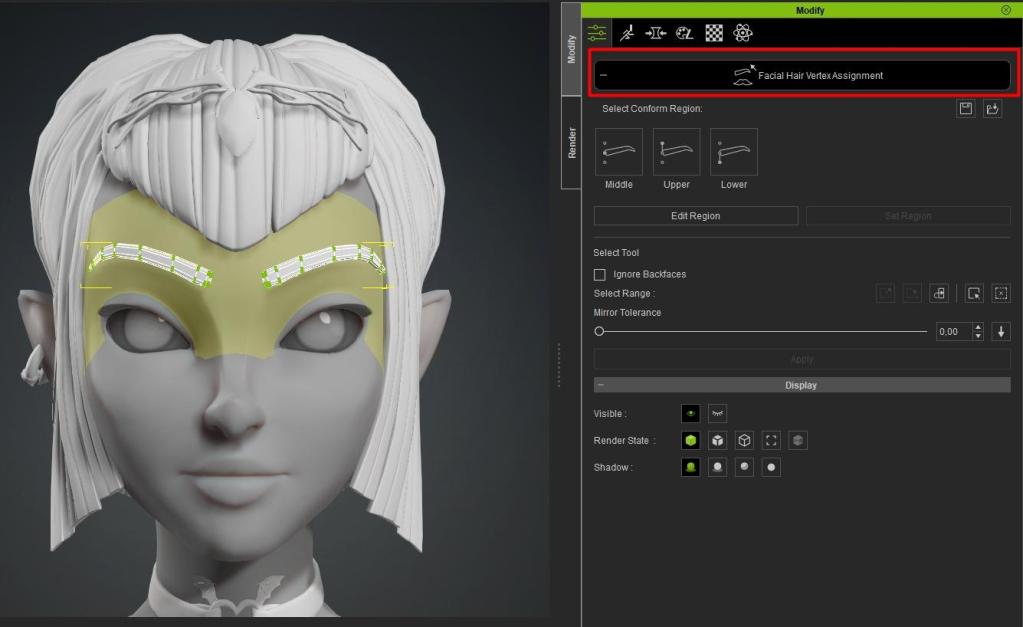
If we want to adjust the weights, we go to “Facial Hair Vertex Assignment.” Here, we define the vertices that will influence each of these elements, allowing us to have complete control over how they deform when modifying the character’s expressions.
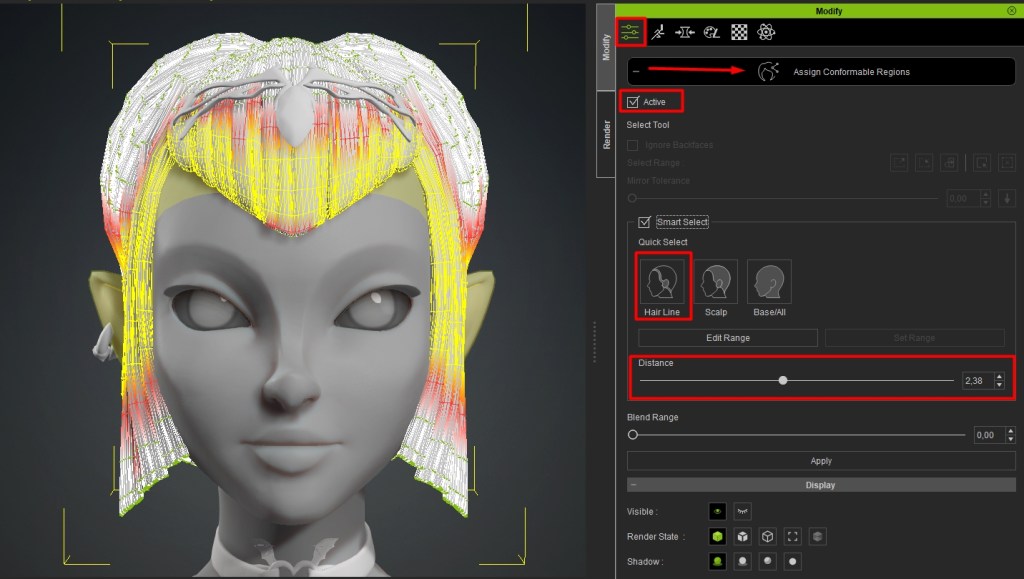
Now we will move on to the hair. For my hairstyle, the best template was Base/all.
Next, I tested the behavior of the hairstyle and had to adjust its weights in “Assign Conformable Regions.” This allowed me to precisely define how the hair deformed during the character’s animations and expressions.
3.4.3 Importing Clothes and Accessories
To import clothing into CC4, follow the same steps as with the hairstyle.
When importing clothing into CC4, import it as Cloth and accessories as Acc.
You may notice that the clothing doesn’t fit the character perfectly. Select all in the Scene tab, press W on your keyboard to activate the gizmo, and move the accessories over your character to position them correctly.
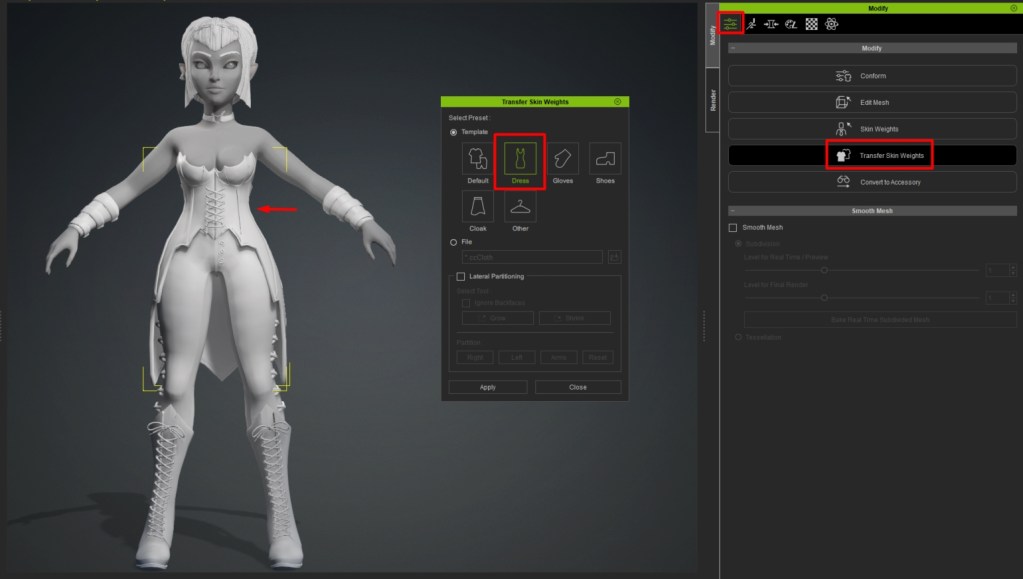
Select only the garment and press the Transfer Weights button. Choose the appropriate template and make any necessary adjustments to the weights. This will ensure that the clothing fits and moves correctly with the character.
Repeat this process for each clothing item.
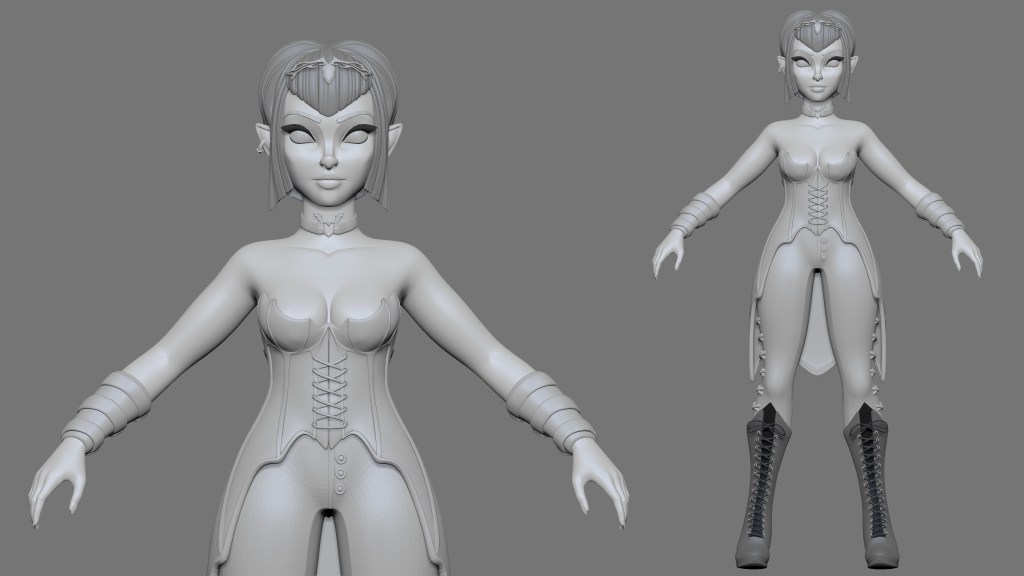
Our character is now complete and ready for animations and final adjustments. This process ensures that every element of the character, from the hairstyle to the clothing, is perfectly integrated and functions smoothly during deformations.
4. ADOBE SUBSTANCE PAINTER
4.1 Export to Substance Painter Low and High Version
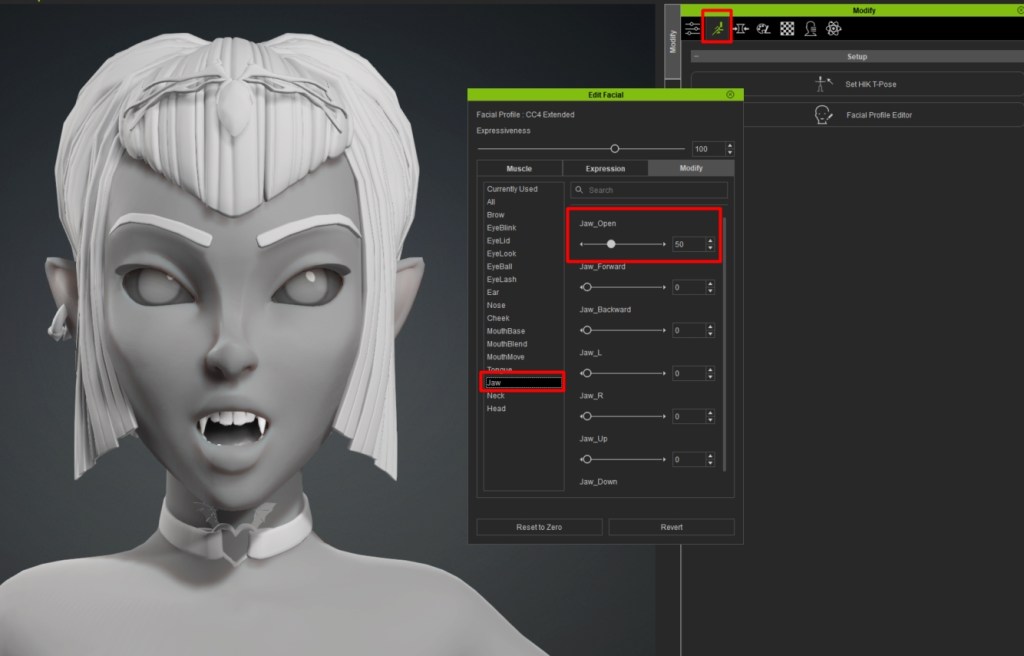
Before exporting to Substance Painter, I opened my character’s mouth to avoid errors during baking. To do this, follow these steps:
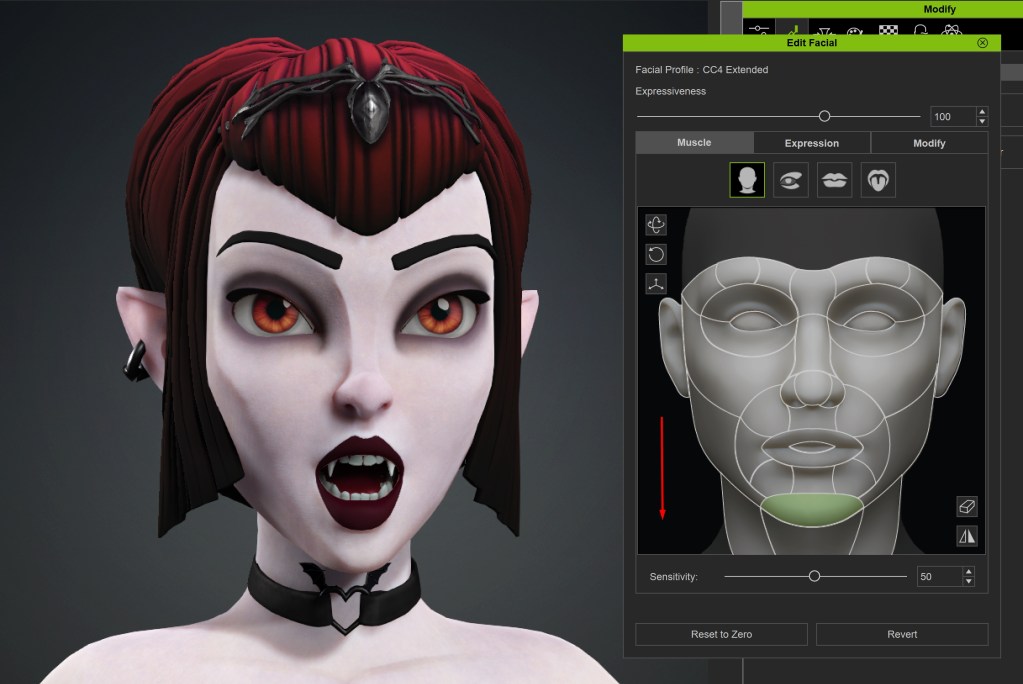
Go to Motion Pose > Edit Facial.
Then, go to Modify > Jaws.
Edit the facial expression Jaws and set the value to 50.
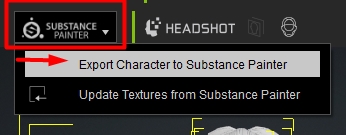
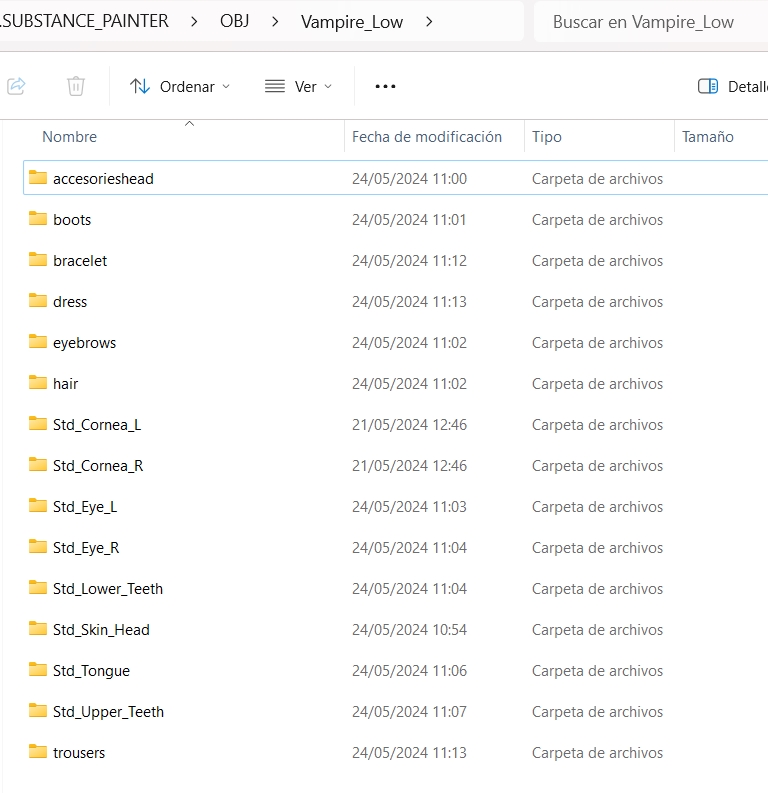
With the character selected in Character Creator, I used the export option to Substance Painter to save an OBJ file in a folder with its respective textures. This low-resolution file will be used later for baking the details.
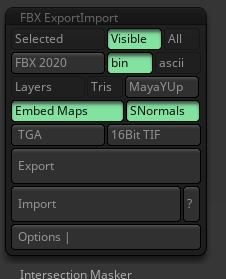
In ZBrush, with the subtools activated and at the highest subdivision level, I exported the high-resolution body as an FBX, making sure to activate the option to export only the visible elements.
4.2 Bake
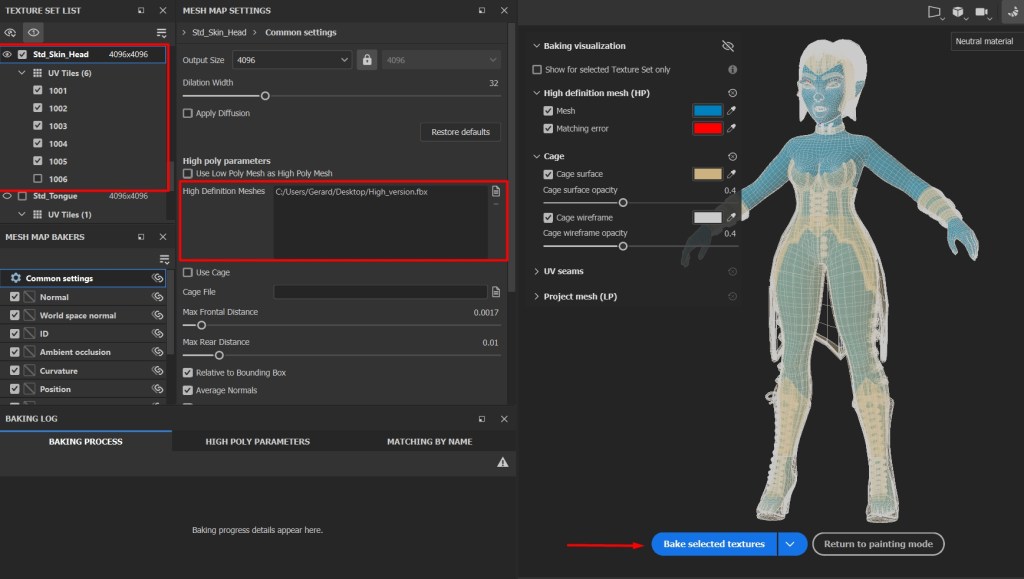
Open Substance 3D Painter and select File > New. Then, press the Select button to import your OBJ file from Character Creator. It is very important to activate the Use UV Tile option before continuing.
Once we have our low-resolution character loaded, go to the Texture tab and scroll down until you find the Bake Mesh Maps button.
Deactivate all objects except Std_Skin_head. In the UV Tiles dropdown menu, uncheck the box for 1006, which corresponds to the eyelashes and does not need to be baked.
4.3 Texturing Skin
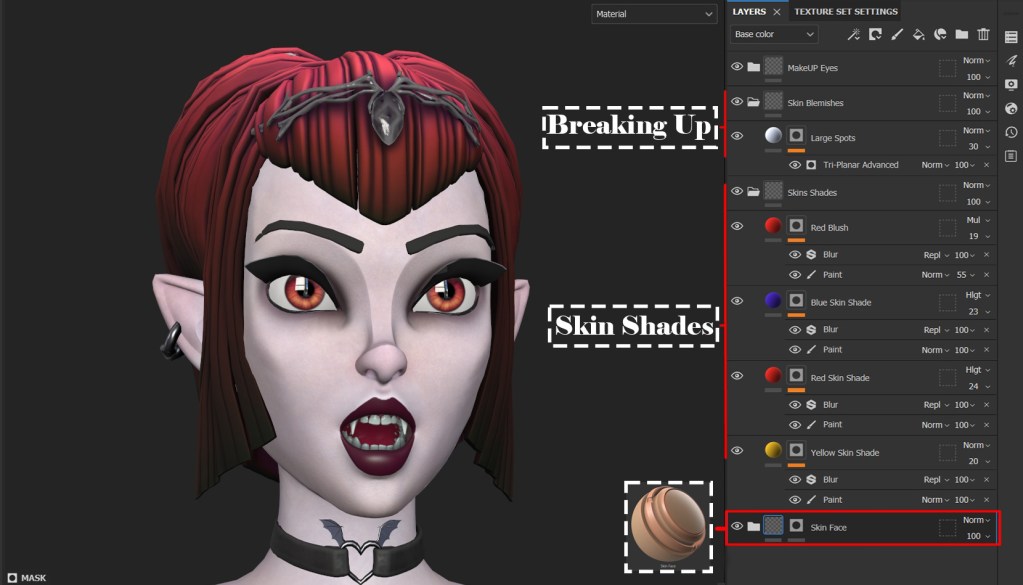
I began texturing Ravenna’s face using the “Skin Face” smart material as a base and made adjustments according to my preferences. The versatility of Smart Materials makes customization easy.
First, I adjusted the Base Skin layer to a paler tone for a vampiric look. Then, I duplicated the Skin Pores layer, modified the pore size using tiling, and strategically distributed them on specific areas of the face with layer masks.
Next, I created a new folder called Skin Shades and added several fill layers to introduce different skin tones. To break up the uniformity, I added a fill layer, applied a black mask, and used a procedural map with “Add Generator”. I chose “Tri-planar Advanced” and applied “BnW Spots 1” to alter the color mask, resulting in a more realistic and detailed skin texture.
4.4 Texturing Eyes
For the eyes, I created a texture in Photoshop and projected it in Substance Painter, setting the Roughness value to 0. This allowed the eyes to have a shiny and realistic appearance.
4.5 Texturing Cloth and Accessories
For the clothing and accessories, I used the Leather Stylized smart material, changing the base color and various layers.
For other accessories, I created stylized materials and added color layers for a more hand-painted finish.
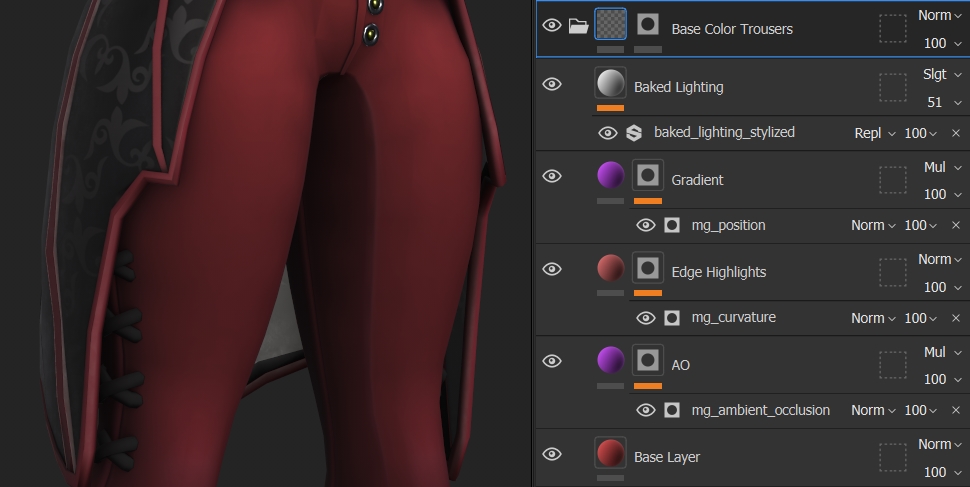
Creating a Stylized Material
Base Color Layer: ○ Start with a base color layer.
Ambient Occlusion Layer: ○ Add an “Ambient Occlusion” layer with a black mask and inverted generator. Use a dark color in multiply blend mode.
Edge Wear and Highlights: ○ Create an edge wear layer with a curvature generator, adjusting the color and settings.
Color Gradient: ○ Add a gradient layer with a black mask and position generator. Set the blend mode to multiply.
Baked Artificial Lighting: ○ Add a baked stylized lighting filter, adjusting the blend mode to soft light and the sun intensity. This process creates a solid and stylized base for materials, suitable for a more artistic and detailed finish.
For the hair texturing, I used color layers and details to achieve a stylized finish.
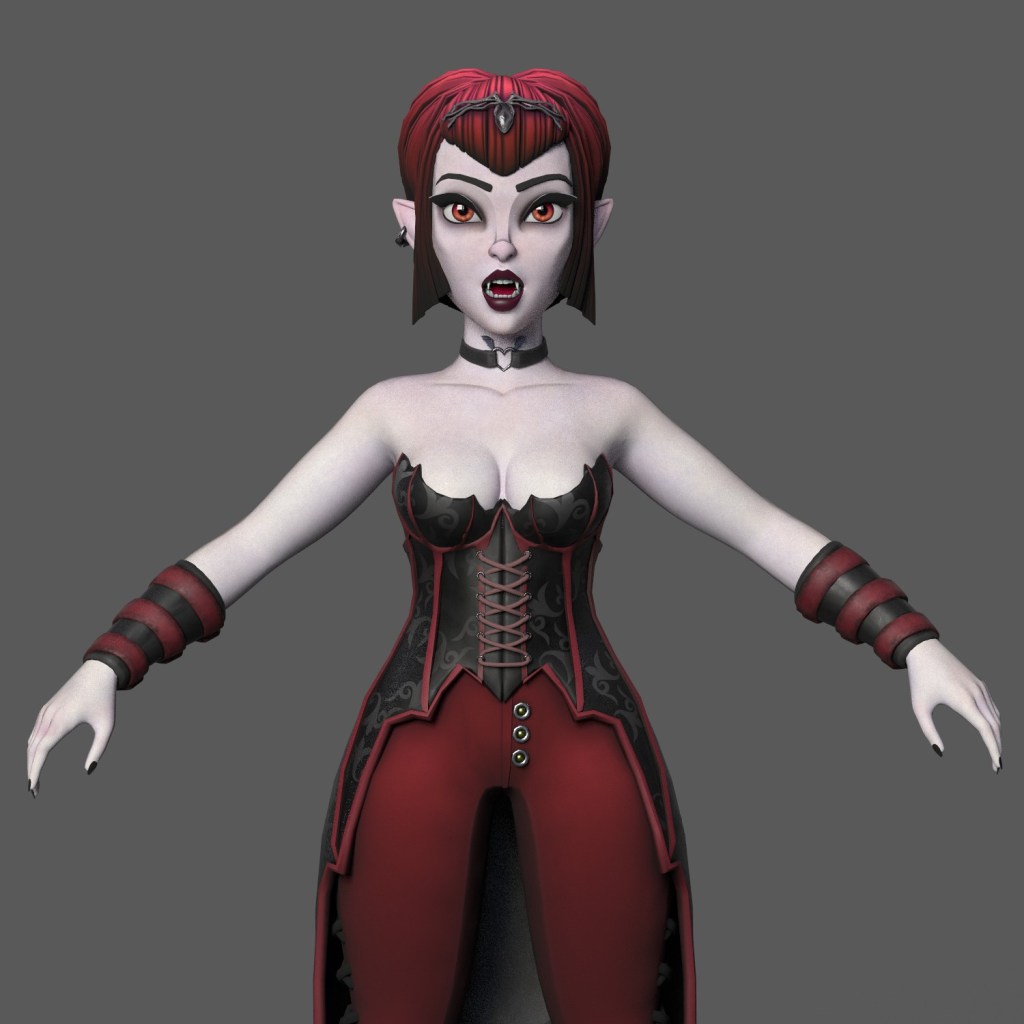
Now, I will share some renders made in Adobe Substance Painter with the finalized textures.
4.6 Export Textures to CC4 and Maya
Exporting for Maya with Arnold
Once I had all the textures for the character, I began the export process. I used the Arnold (Ai Standard) configuration in PNG format with a resolution of 4096.
Exporting for Character Creator 4
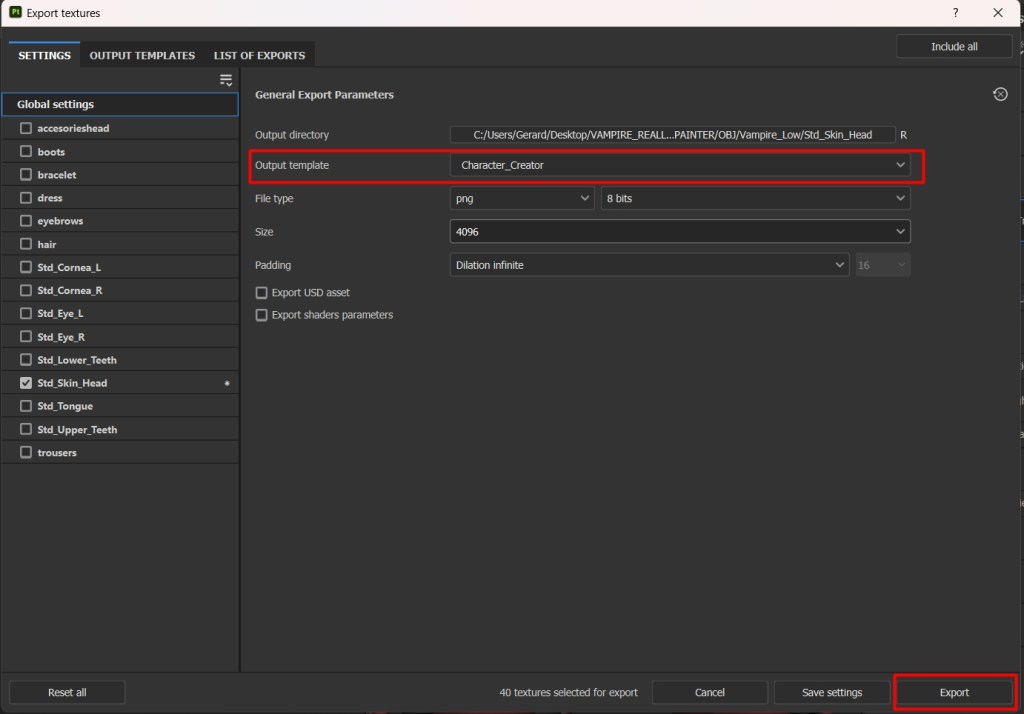
Download the Preset File: [Character_Creator.spexp](C:\Users(User Name)\Documents\Adobe\Adobe Substance 3D Painter\assets\export-presets) and place it in the export-presets directory of Substance Painter.
Configuration in Substance Painter: ○ In the Export Textures panel, select the materials and choose Character Creator as the output template. ○ The structure of the exported textures will match Character Creator’s texture folder.
Export Settings: ○ Output Directory: Set the output directory where you want to save the textures. I recommend using the organized folder containing the exported textures, where the low-resolution OBJ file is located. ○ Texture Set Selection: Ensure only the necessary texture sets (UDIMs) are selected for export. Uncheck any texture sets that do not need to be updated (e.g., corneas, teeth, tongue). ○ Output Template: Choose the export template that matches Character Creator’s requirements. Use the Character Creator preset file if available.
4.7 Import Textures to CC4
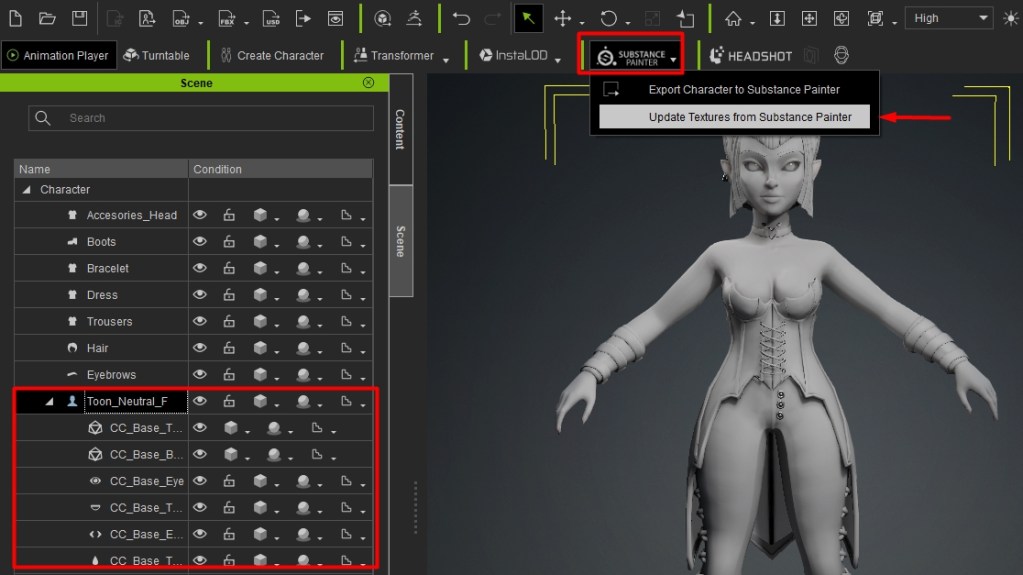
Back in Character Creator, select the character and then choose the Update Textures from Painter option in the Substance Painter dropdown menu.
This will open a file explorer window.
Navigate to the folder that contains the organized folders with your textures. Press Select Folder and Character Creator will automatically update all the body part and clothing materials with your new textures.
With the textures applied, I recommend posing your character in Character Creator 4 to ensure that the textures maintain their quality and detail in different poses.
Here is a screenshot of how the character looks with the textures applied in CC4:
5. ZBRUSH POSE TOOLS (CC4)
5.1 Introduction
Now that we’ve imported and applied the textures, it’s time to pose Ravenna in Character Creator 4. This step allows us to adjust her facial expressions and body postures for different scenarios.
I must say, bringing my character to life was incredibly fun—I felt like a kid and spent many hours on it. Not because it was complex, but because it’s very easy to pose characters, whether adjusting the body or adding expressions. The possibilities are endless. The only limitations are your creativity, as you can position the character in any way you imagine.
This process allowed me to explore all the ways Ravenna could express and move, making every moment worthwhile.
5.2 Posing and Adjusting the Character
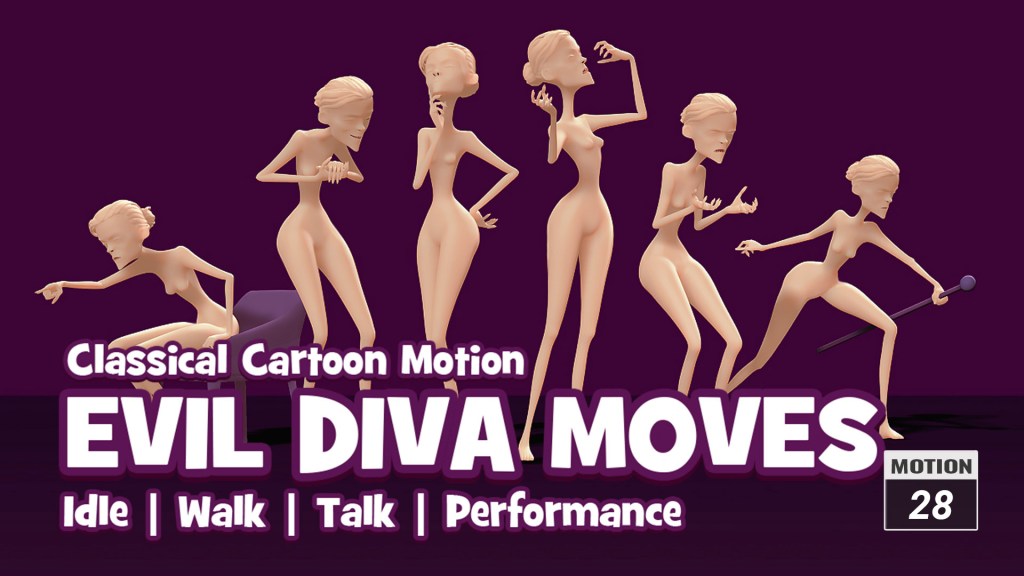
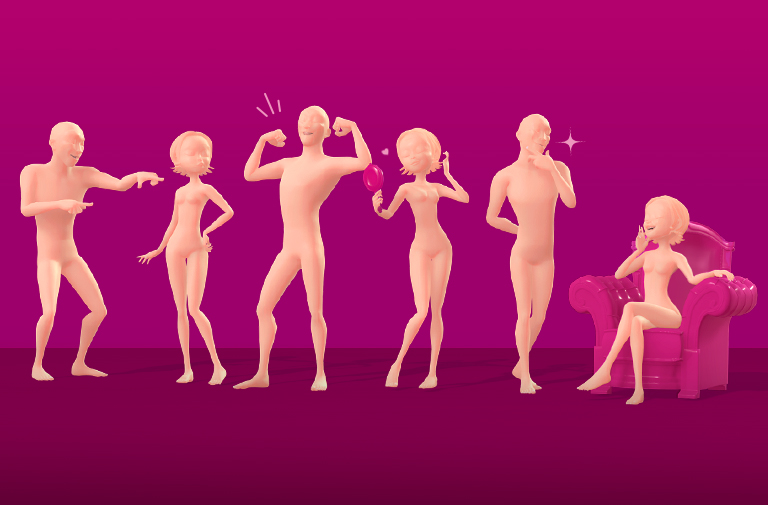
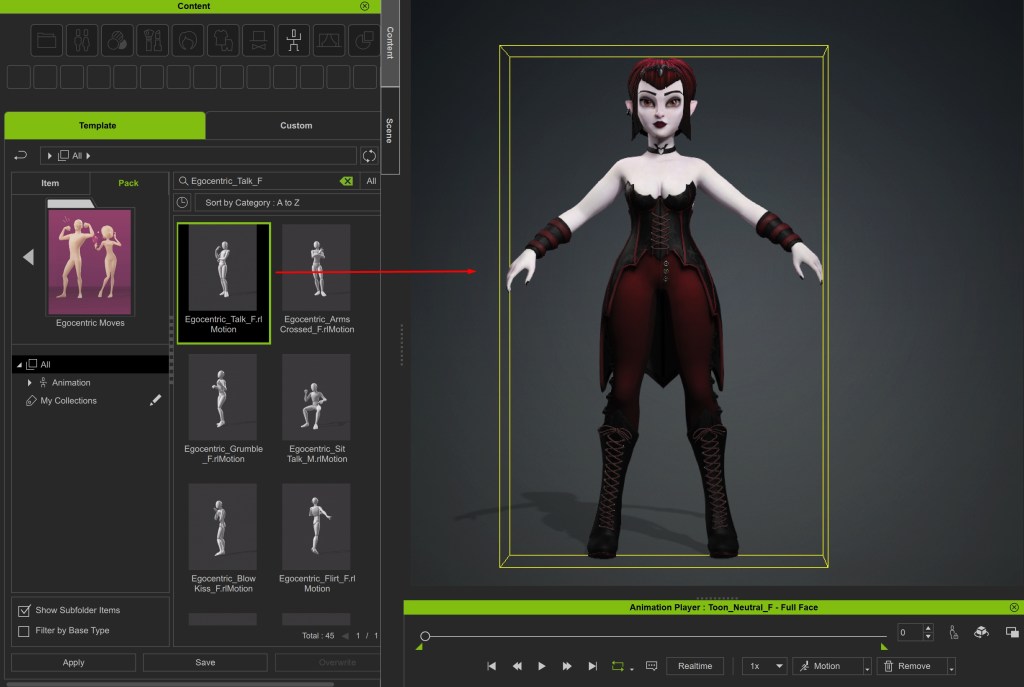
I started the posing process by trying different Motion Packs from the Reallusion Content Store. The ones that suited Ravenna best were “Evil Diva Moves” and “Egocentric Moves.”
These packs contain an extensive library of walk cycles, idle animations, and emotions, perfect for giving Ravenna the attitude I envisioned.
I applied the motion ‘Egocentric_Talk_F‘.”
Although the initial pose was quite good, I adjusted it to fit my specific needs.
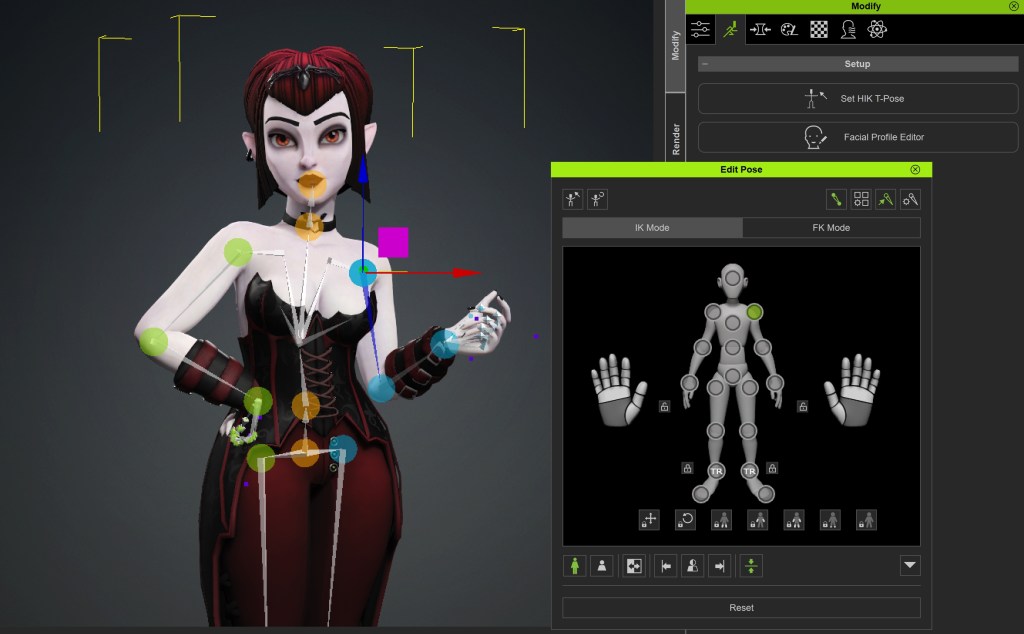
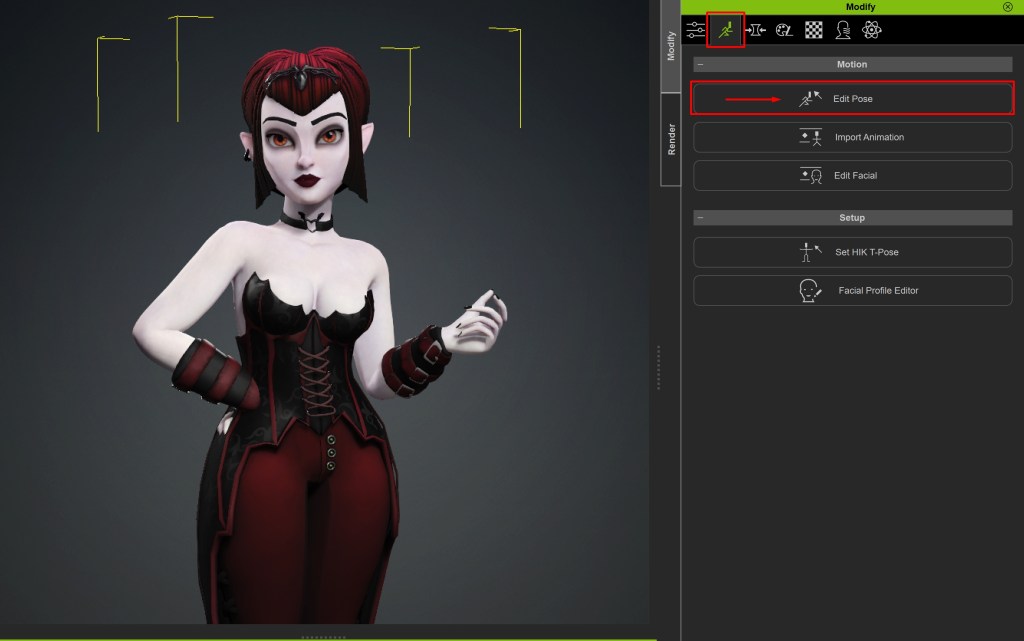
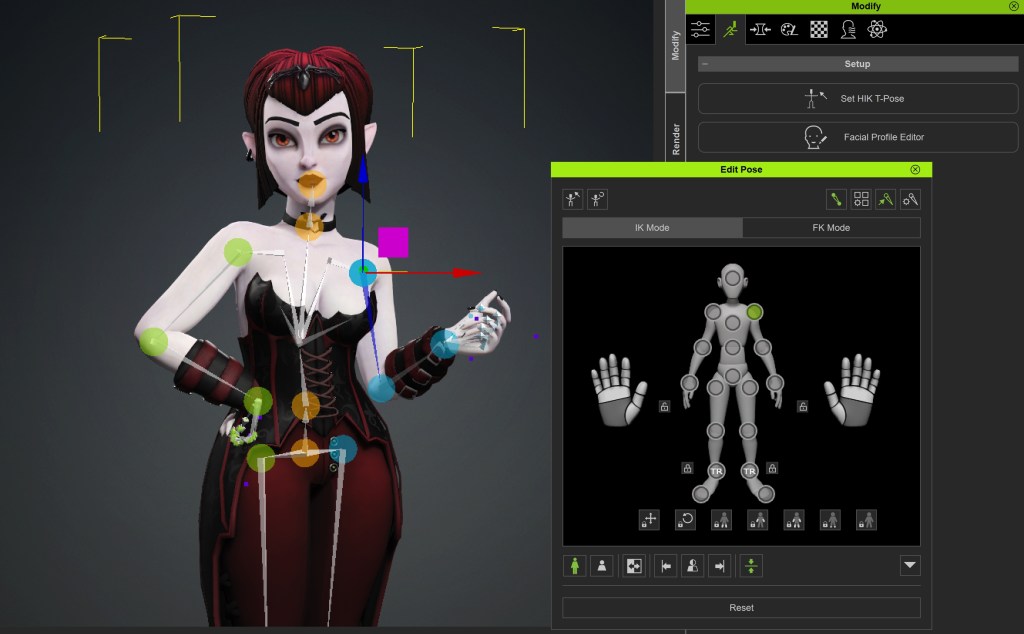
With the character selected, I went to the Motion tab and clicked on Edit Pose. I used the mannequin in IK or FK mode to move and rotate the joints according to my needs.
Additionally, you can also navigate to the Poses and/or Gesture section in the Content tab to apply different body poses or hand positions to your character, achieving a more precise and personalized adjustment.
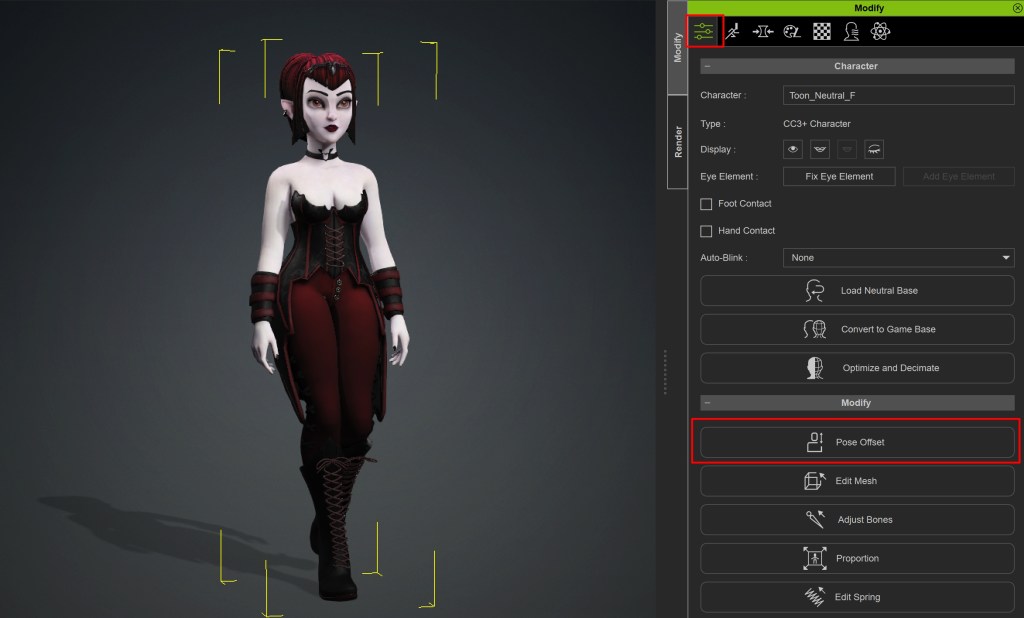
If you wish to modify an animation because some part of the character moves inward or is misplaced, you should go to Pose Offset. This tool will allow you to correct and adjust the movements, ensuring that the animation looks natural and meets your needs.
5.3 Adjusting Facial Expressions
For Ravenna’s facial expression, I aimed to achieve a flirtatious smile with a touch of mystery, intense and challenging gazes, and a confident, self-assured, somewhat arrogant attitude, but with a natural charm that attracts others.
Here are the steps I followed to edit the face:
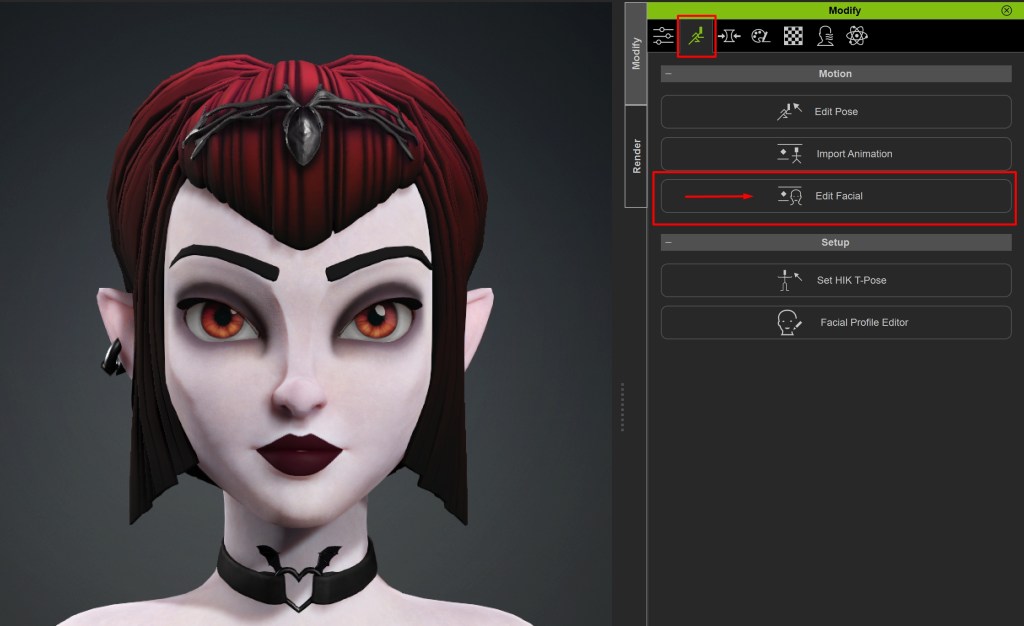
Edit Facial Expression: In the Motion tab, I clicked on Edit Facial.
Muscle Tab: I clicked and dragged on different areas of the face to modify the expression.
Expressions Tab: I applied an expression from the dropdown list of options.
Modify Tab: I used the sliders to make precise changes to the character’s facial shapes.
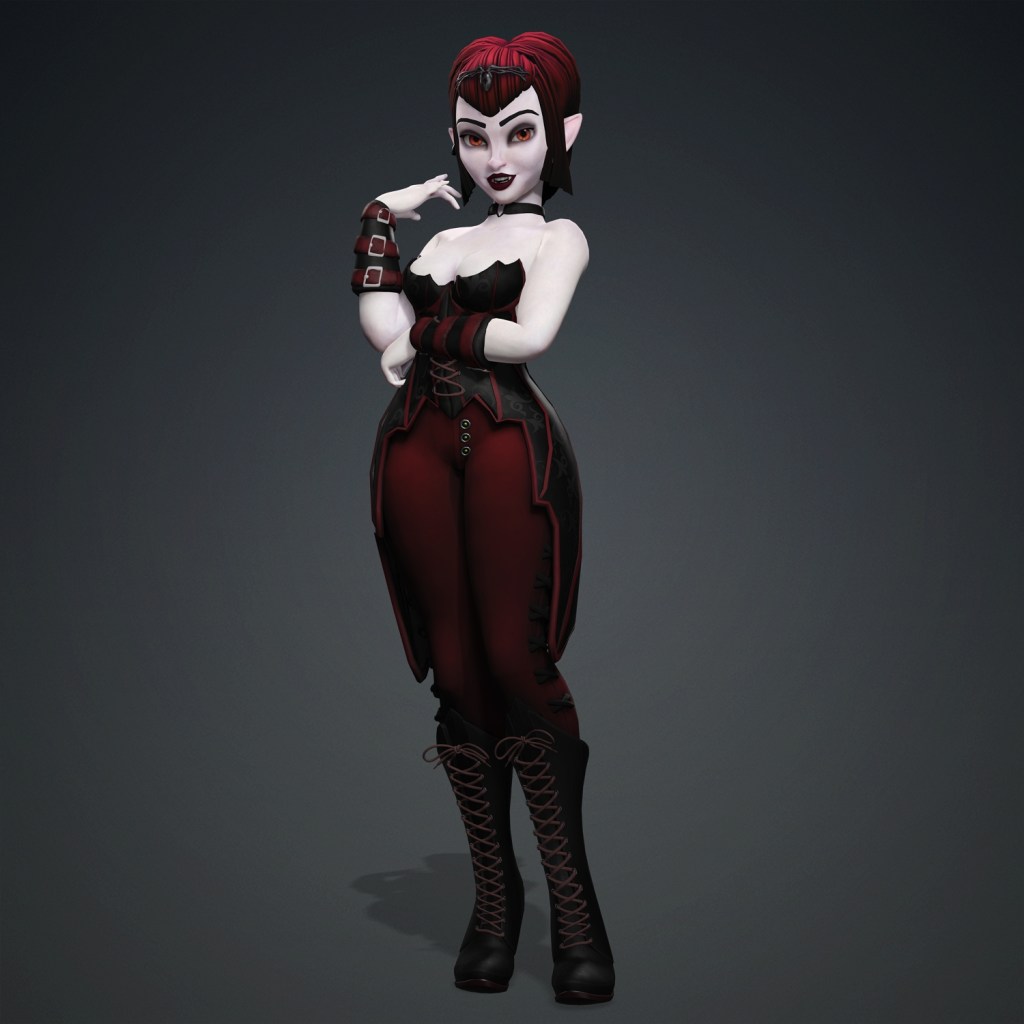
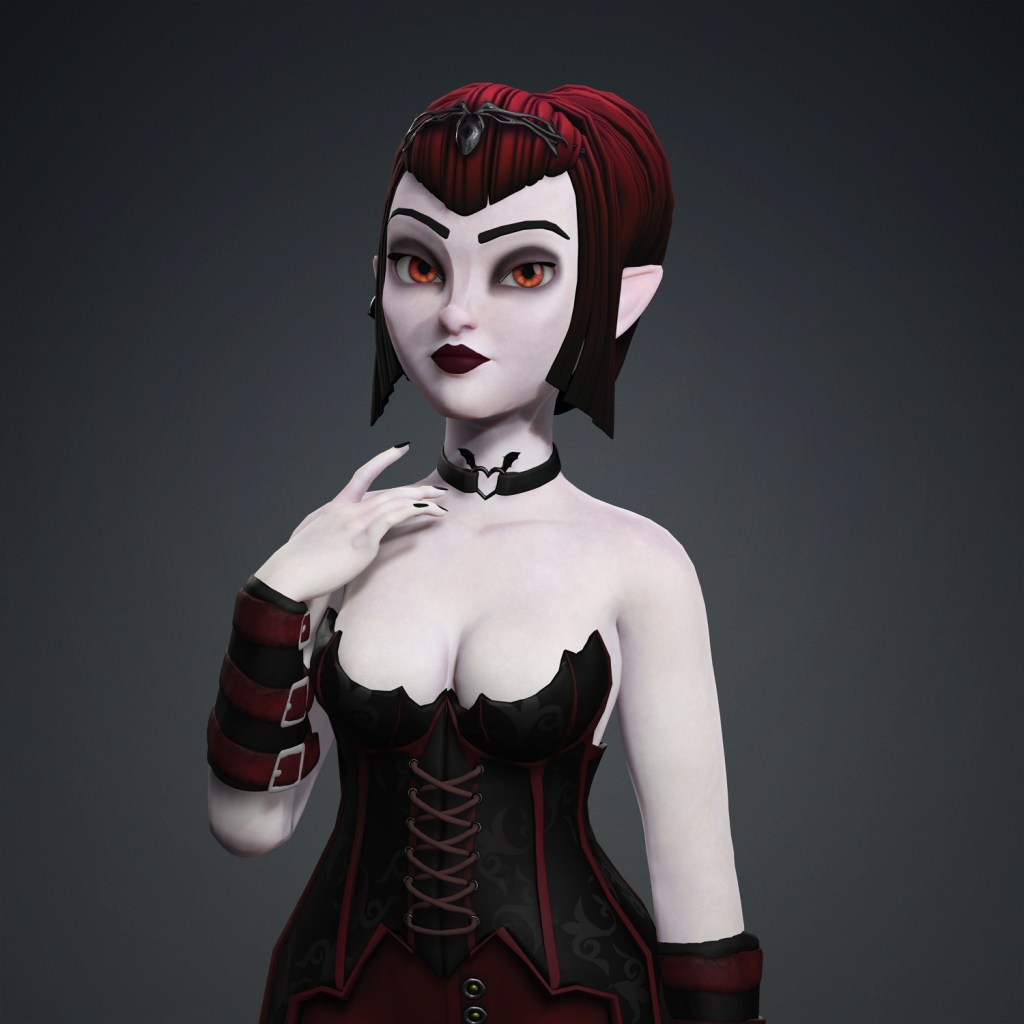
I’m sharing the two poses I finally chose to render later. Each of these poses highlights Ravenna’s personality and character, showcasing her confident and mysterious attitude.
Pose 1: Ravenna stands with a defiant posture, showcasing her confidence.
Pose 2: Ravenna has a more introspective expression, with a touch of mystery and a penetrating gaze.
These poses will serve as the foundation for the final renders, where I’ll add an environment to further enhance the character presentation.
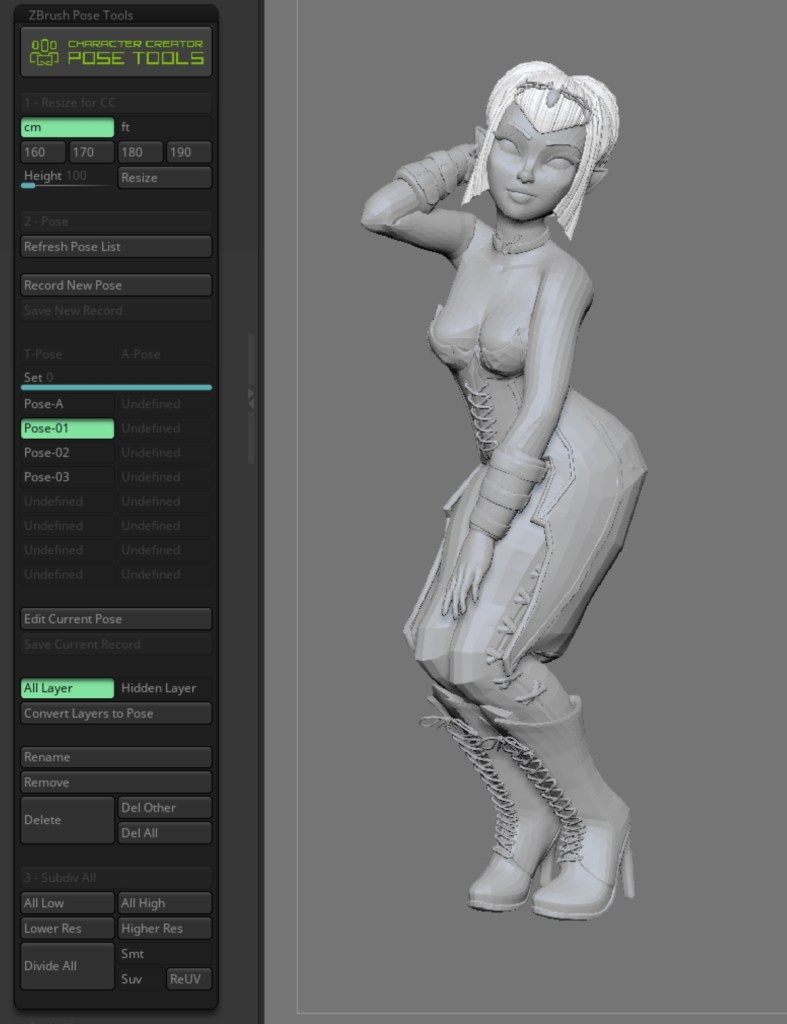
5.4 Transferring the Posed Character to ZBrush with Pose Tools
If you want to apply your pose as a layer, open the ZBrush Pose Tools plugin in ZBrush, click on the Record New Pose button, and then send the character elements from CC using GoZ. Once the changes are updated in ZBrush, click on Save New Record and give it a name. Repeat this process as many times as you like, building a library of poses as you progress.
Honestly, this plugin is amazing because it allows you to access all the poses with a simple click and it’s very organized.
5.5 Export to Maya
To export the character to Maya, follow these steps:
Select the Character: Make sure the character is selected.
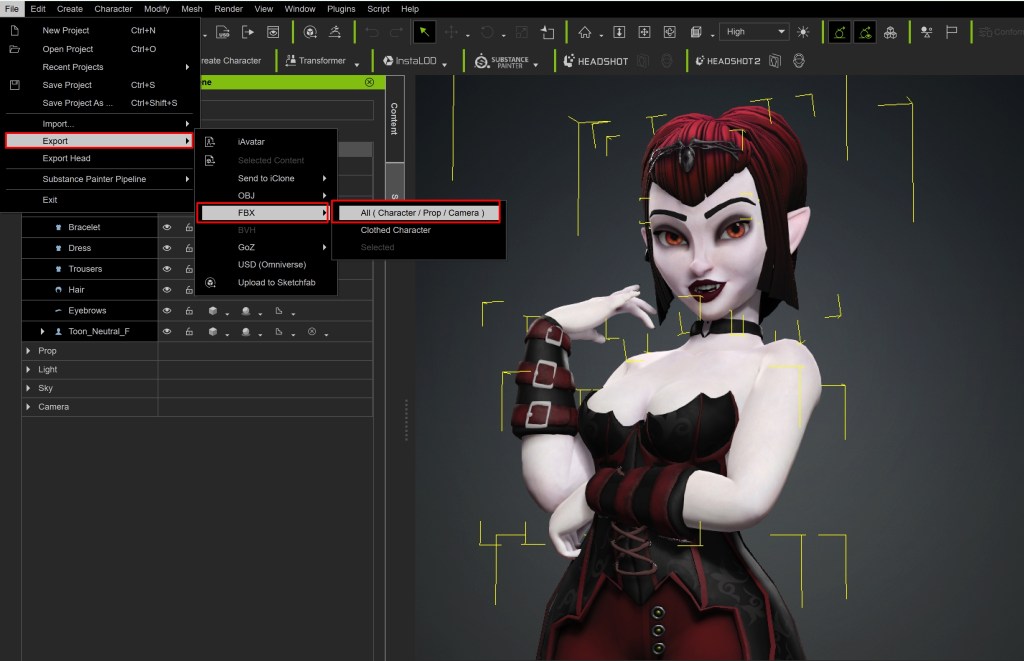
Export: Go to File > Export > FBX > All (Character/Prop/Camera).
Export Settings: In the popup window, set the Target Tool Preset to Maya.
This way, when we import the character into Maya, we can proceed with rigging and make any necessary adjustments.
Alternatively, we can also export the character as an OBJ (as we did before for Substance Painter), but this way we will lose the rig.
6. MAYA
6.1 Import Character to Maya
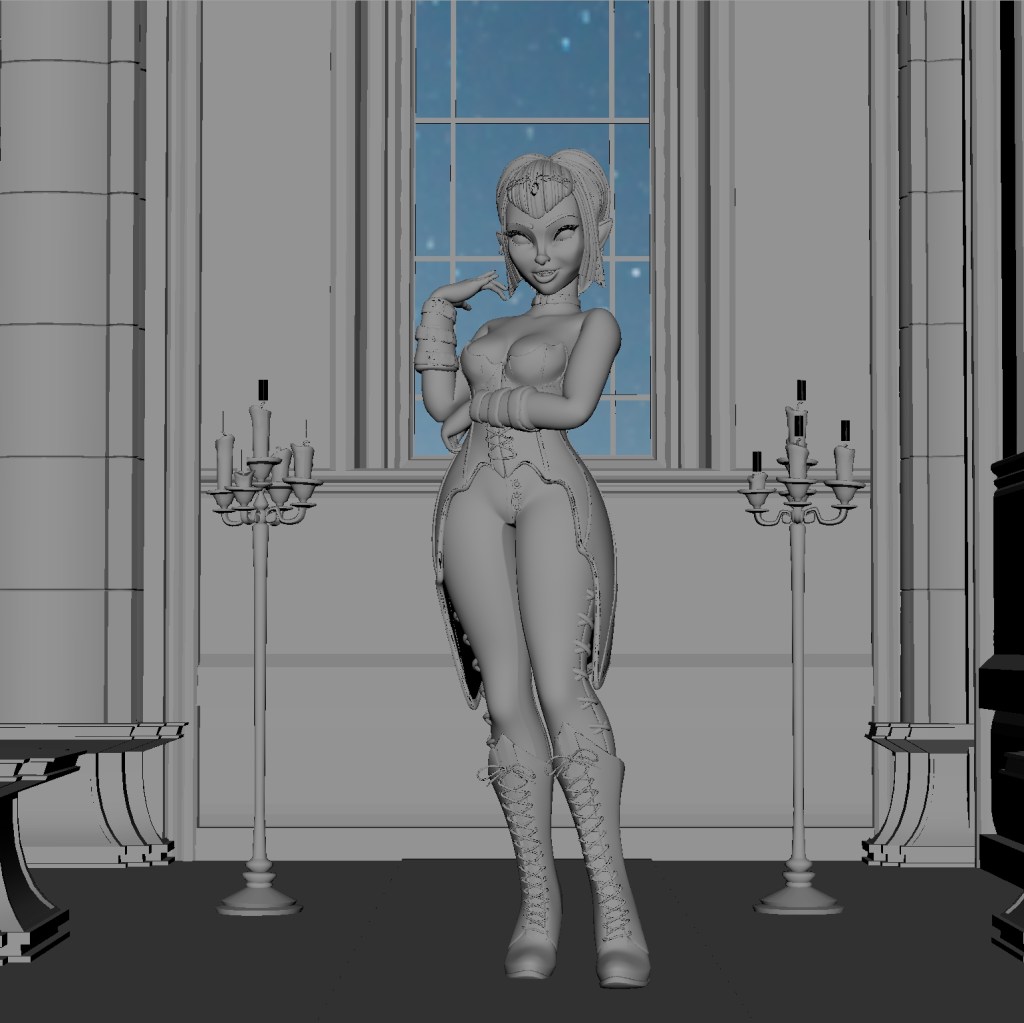
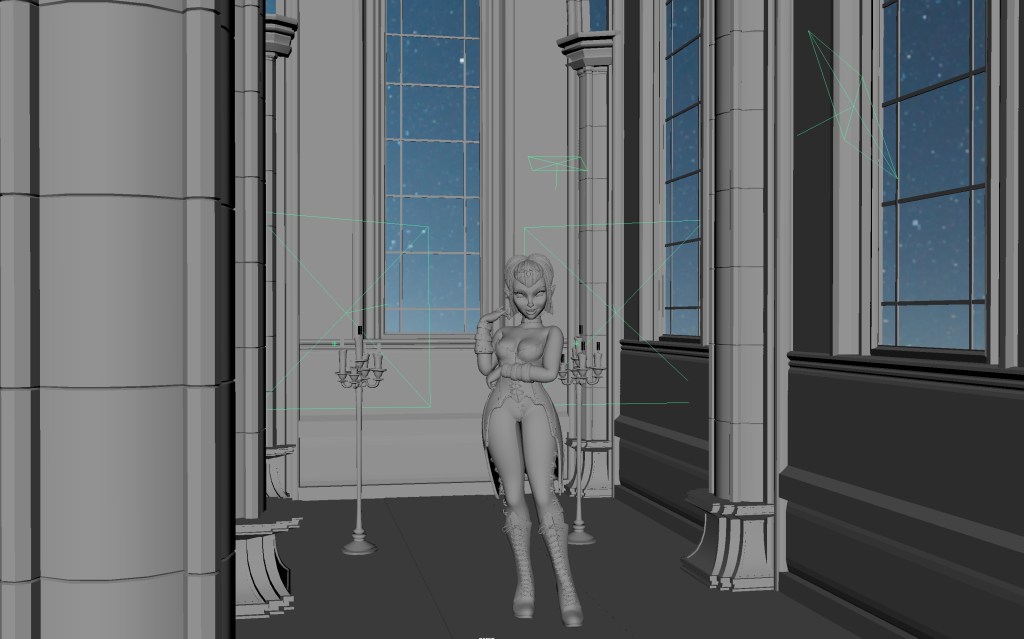
In my case, since I already liked my poses, I imported it as an OBJ to make it less heavy.
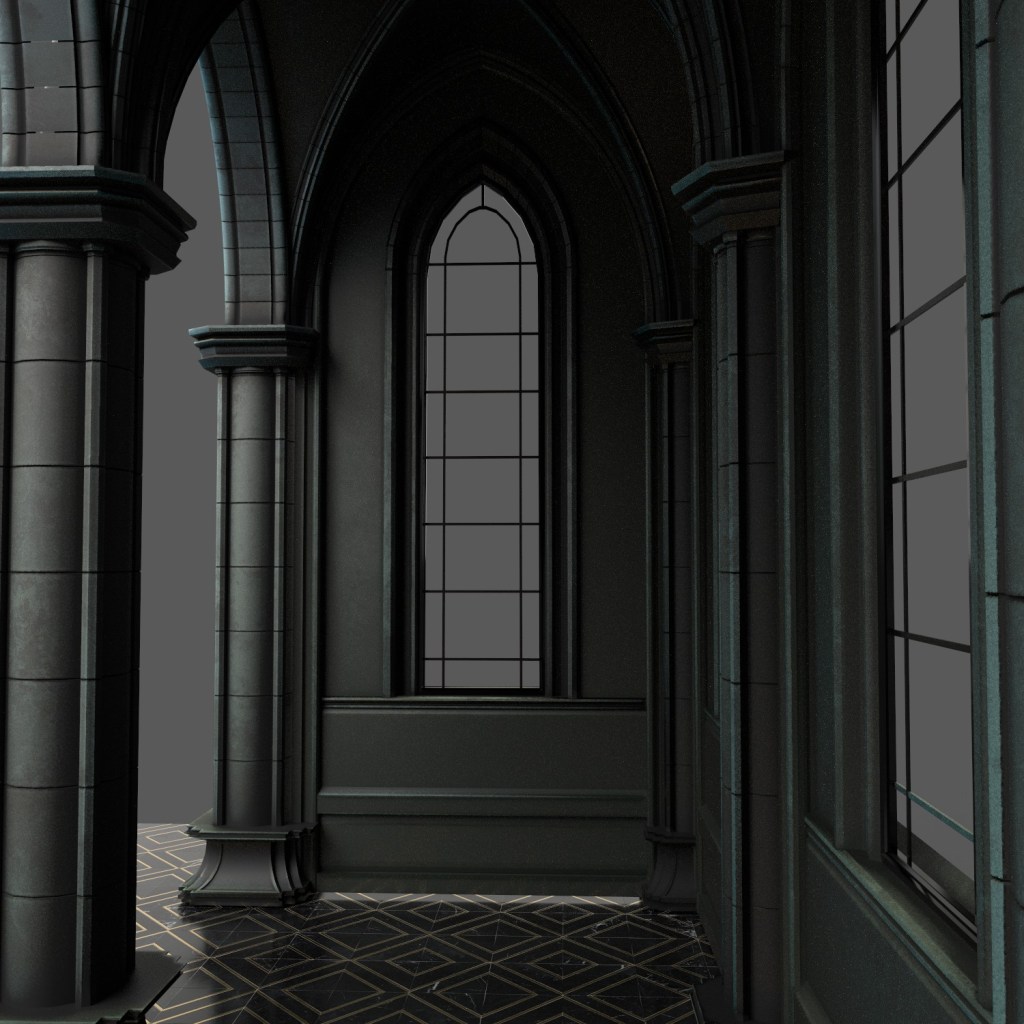
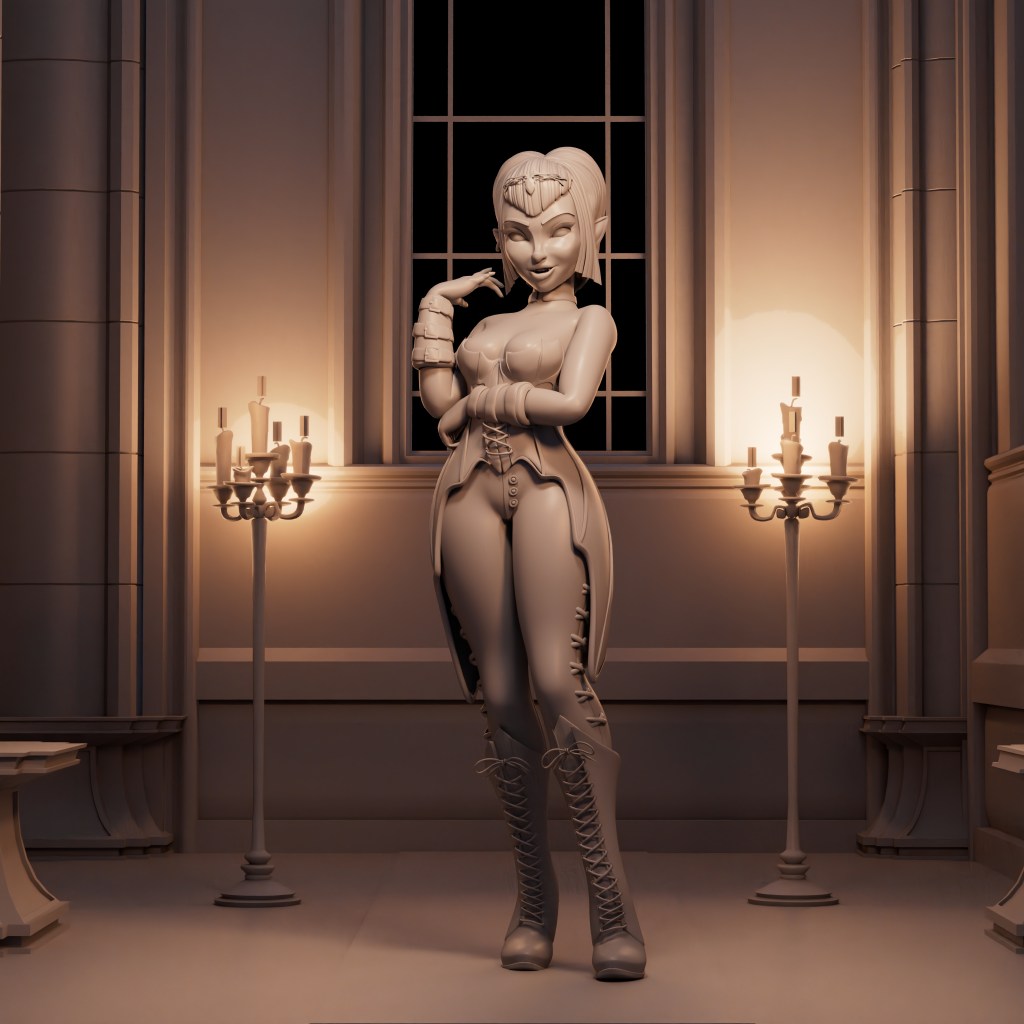
The first thing I did was remodel a small environment I had; I wanted to recreate a small hall in a gothic castle and various props to decorate the scene like chandeliers, a rug, etc.
I attach a render from Substance Painter to showcase the texture outcome.
6.2 Lighting
To create Ravenna’s lighting, I opted for a combination of warm and cool tones. I aimed to give her an enigmatic and dramatic appearance by using cool overhead lights to highlight her mystery and a warm light from below to balance the scene.
Villains often have sinister lighting, while good characters benefit from warmer, softer lighting. Proper lighting not only defines the character’s atmosphere but also helps emphasize their role in the narrative and establish an emotional connection with the viewer.
To create Ravenna’s lighting, I incorporated a low-intensity HDRI as the primary light source to achieve subtle reflections. I used HDRI from HDRI Haven.
Next, I added an Area Light as the Key Light to illuminate the character from a specific angle, adjusting the intensity, color, and temperature to achieve the desired mood.
I placed a Fill Light on the opposite side of the Key Light to soften the shadows and balance the lighting.
I added two Rim Lights behind and above Ravenna to create a “glow” around her and simulate candle lighting.
Finally, I used Bounce Light to simulate light bouncing off surfaces and back into the scene, creating a more natural and immersive effect.
6.3 Shading
For Ravenna’s shader, I wanted to give it a style similar to that of cartoon animation films, without straying too far from my own style.
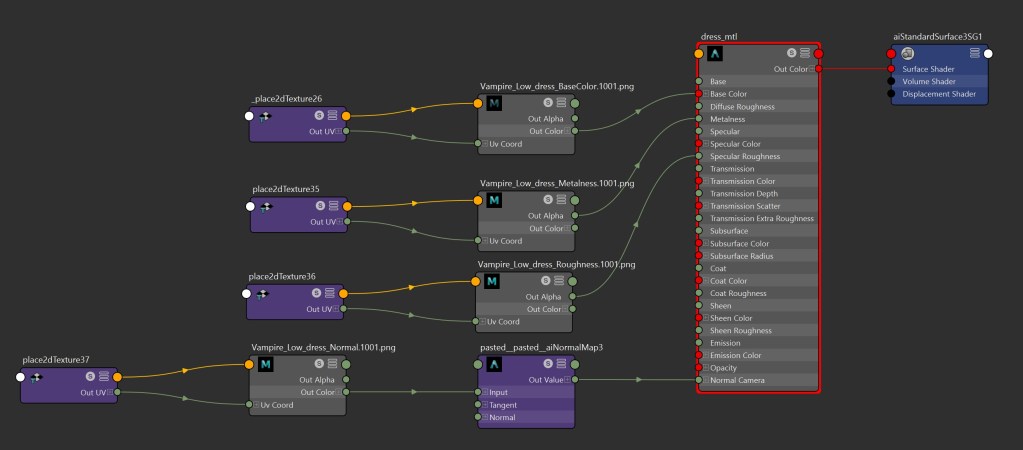
At this stage, I typically apply the maps in the aiStandardSurface material of Arnold.
Base Color: I apply the texture to the base color node and to the Subsurface Color.
Roughness: I connect the roughness map to control reflectivity.
Metalness: I apply the metalness map to define metallic properties.
Normal Map: I connect the normal map to add details and depth to the character’s surface.
This approach allows me to maintain Ravenna’s essence while achieving the desired look.
6.4 Post-production
Once I had the Maya render, I immediately moved to Photoshop to add the final details, such as the window background and a bit of mist.
This entire stage was made possible thanks to the help of my great friend Eliant Elias. Thanks to him, I could achieve such an incredible window with those ominous clouds and moon.
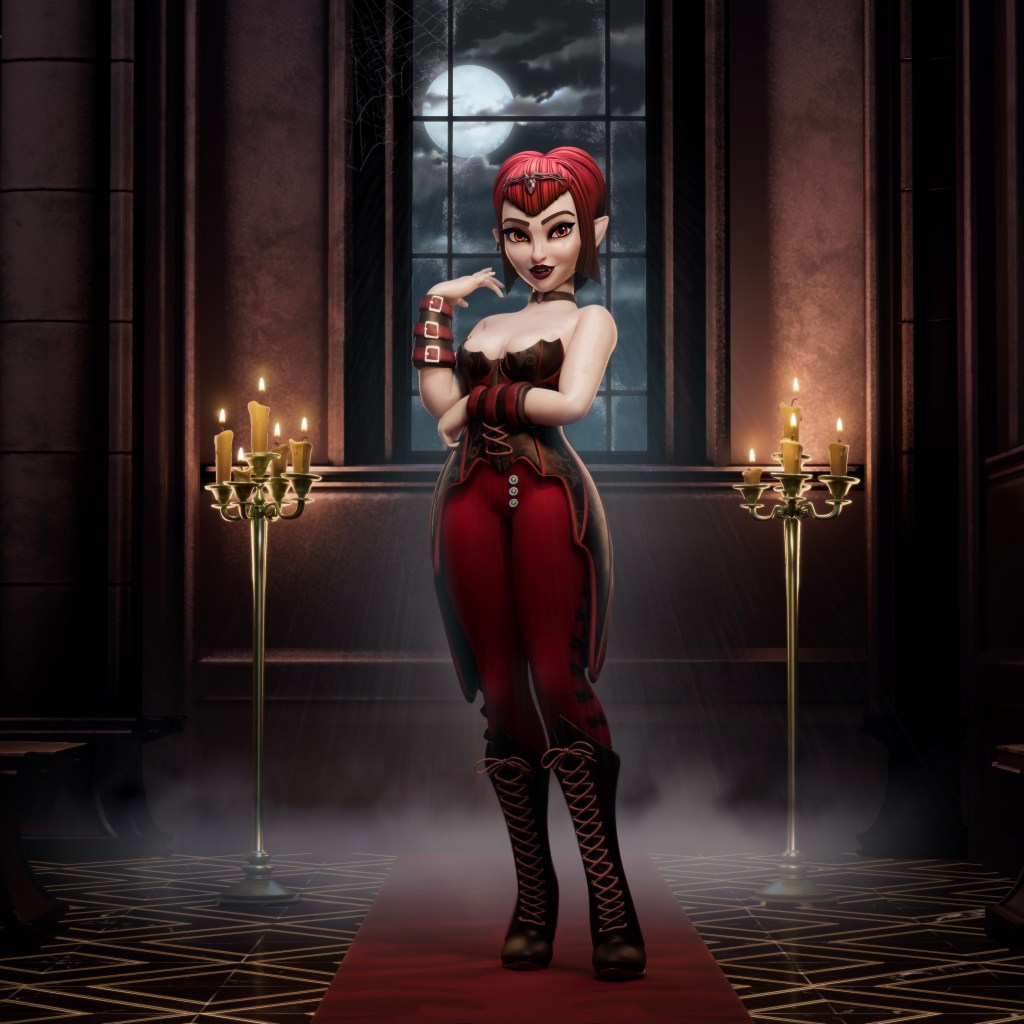
With his collaboration, we added elements that enriched the atmosphere of the final render, bringing Ravenna’s scene to life and achieving an impressive visual finish. And now I share with you the result of the render with the effects applied:
The render of the lighting from Maya.
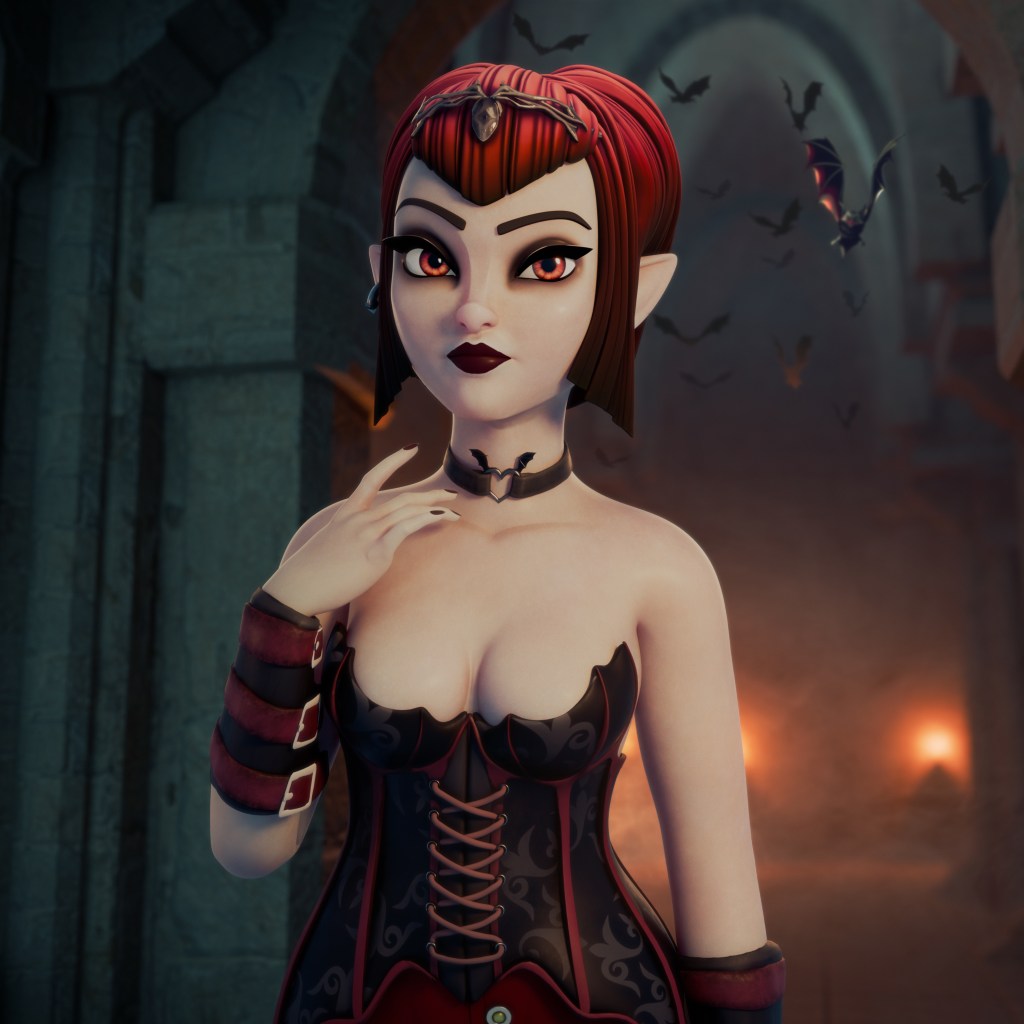
For the other pose, I made a variation in color for the lighting and background, and this is the result.
Elías also helped me here, ensuring that every detail of the background and tones perfectly complemented Ravenna’s pose and style.
7. CONCLUSIONS
This is the first time I’ve used this workflow to create characters in 3D, and I’m really impressed. I’ve always used Character Creator 4 to rig my characters and then pose them. But now that I’ve created a character from one of its bases, I’m fascinated by the speed and artistic result it provides, as it allows you to skip all the technical aspects like retopology, UV unwrapping, or rigging. The only technical thing I’ve done with this character is unwrap the UVs of the clothing, and that’s it!
Advantages I’ve Seen in Using Character Creator Bases:
Speed: Character Creator bases allow for quick and efficient character creation, saving time on technical processes.
Ease of Use: Intuitive tools and morphs make it easy to customize characters.
Versatility: You can create anything from stylized to realistic characters, leveraging the robust rigging and animation systems.
Integration: Character Creator seamlessly integrates with tools like ZBrush and Substance Painter, facilitating the workflow.
Quality: The bases are designed with optimized topology and precise anatomical details, providing an excellent foundation for sculpting and texturing.
Character Creator 4 not only simplifies the technical process but also enhances the artistic aspect, allowing artists to focus on creativity and design.
Acknowledgments:
I want to thank the entire team at Reallusion, especiallyEnoc Burgos, for giving me the opportunity to showcase my creative process and art.
Additionally, I want to thank my life partner, Ivet Macias, for helping me design Ravenna. Without her, it wouldn’t have turned out so incredible.
And lastly, to Eliant Elías for his magnificent touches in post-production. Without his help, the project wouldn’t have reached the level of quality it achieved.
Thank you all! I hope you enjoyed this making-of. Until next time!
3D characters are the cornerstone of creative productions, bringing life to movies, animated films, video games, and more. Reallusion is expanding this potential with synergistic solutions, and Character Creator together with iClone represents a significant leap in that direction. This powerful combination offers a seamless pipeline for digital content creation, transforming mere ideas into vivid, dynamic characters and animations.
Reallusion understands that seeing is believing. That’s why we are inviting everyone to experience these solutions firsthand by showcasing their talent and creativity in the 2024 Reallusion 3D Character Contest. It is where artists from around the globe are encouraged to submit their best works crafted with Character Creator and iClone. Winners will not only receive cash and sponsored prizes but also gain the prestigious opportunity to be featured on renowned 3D media platforms worldwide. Moreover, there’s a chance to become a sponsored partner or featured developer with Reallusion, allowing you to leverage a vast network and platform to monetize your skills.
To help you prepare for this contest, our esteemed judges, Pablo Munoz Gomez and Martin Klekner, will share their insights in this article. They’ll reveal what catches their eye, what makes a 3D character stand out, and what they value most in a submission. Near the end of the article, we’ll also highlight past contest winners who have secured exciting collaborations with us due to their standout entries.
Pablo Munoz Gomez on making a winning character
Pablo is an esteemed concept and character artist renowned for his work in both 3D and traditional media. As the founder of ZBrush Guides and 3D Concept Artist, he is steeped in visual development and sculpting. Pablo is also an instructor at The Extra Mile course and has curated numerous ZBrush training resources over the years. Plabo will be responsible for judging the 3D character qualities for the contest submissions. Here is a summary of his judging criteria:
Martin Klekner on making standout animations
Martin is a cinematic director and CG artist hailing from Prague, Czech Republic, bringing a wealth of expertise to the table. Specializing in Blender, Martin is a distinguished instructor at CGBoost.com. He also spearheads the ongoing project “Heroes of Bronze”, aiming to craft a narrative universe inspired by ancient Greece. Martin will be responsible for judging the 3D character animations for the contest submissions. Below is a summary of his tips:
Collaboration with past winners
The 2021 Lipsync Animation Contest held by Reallusion unearthed a remarkable group of talented 3D character artists and animators. Due to their exceptional skills and high-quality productions, many of them joined the Reallusion online stores as featured developers or have been invited to participate in marketing productions for Reallusion. These winners exemplify how the company fosters success by promoting the artists’ work and helping them achieve global recognition.
Loïc Bramoullé – Art Director & 2D/3D Concept Artist
Loïc Bramoullé is the 1st place winner of the Reallusion 2021 iClone Lip Sync Animation Contest. With his seasoned experience in games and films, Loïc completed Dream Harvest Games’ Nightmare Hunter short film with the use of the latest iClone 8 and Character Creator 4 features. In this video, Loïc navigates us through each key step and shares his tips on how to build a cinematic game trailer with Reallusion tools and Blender.
Erik Larson – Director of 3D, Animation & Video
Erik has won the Special Award from the Reallusion 2021 iClone Lip Sync Animation Contest. After the contest, he combined his knowledge of the Assassin’s Creed with 3D armory-building skills and launched his 3d props business. He also occasionally produces software and content reviews, helping Reallusion users to familiarize themselves with new tools and 3d content.
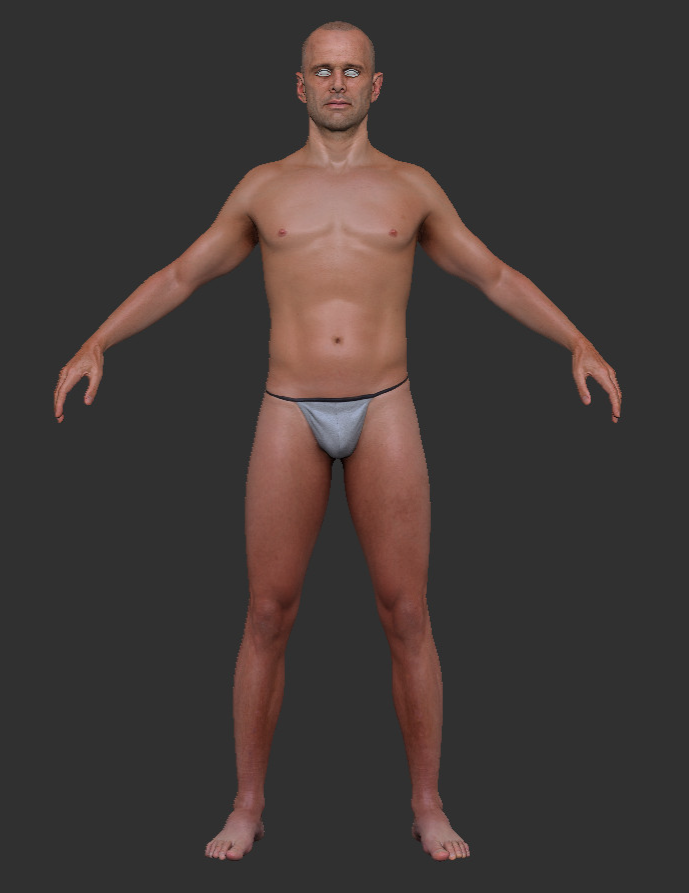
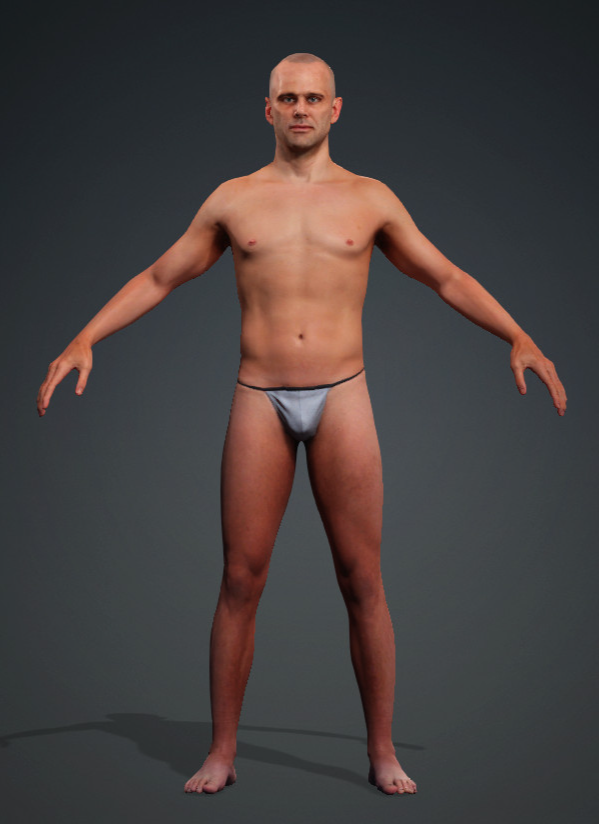
In the previous article, we sent a single accessory from Character Creator to ZBrush using CC GoZ Plus. In this article, we’ll use CC GoZ Plus to bake a detailed base body polypaint with UDIMs back to Character Creator, along with an entire clothing costume, complete with accessory attachments!
GoZ Base Body
I’m going to make Cooper from the Fallout TV show, so I’m going to start by loading up a neutral male base body from the “Content > Actor > Base” folder in Character Creator. For our initial setup, we’ll select our character in the “Scene” tab, then hit the “GoZ” button in the menu bar to send this mesh over to ZBrush. In the dialog box prompt, I’m going to uncheck “Enable GoZ Plus” — in this demo I’m not going to bake over the skin textures and pore detail, HOWEVER, if that would be useful as a starting point for the character you want to make, feel free to check this box on.
The last thing I’m going to do is check on “Eyelash” and “Tear Ducts” so they are separated out from the base body in ZBrush. This isn’t technically required… It is just how I like to work. Finally, select “Current Pose” and press the “GoZ” button; this will send over just the base topology meshes as a starting point for our character.
Now that we’re in ZBrush we can refine our character. To get more details, go to the “Tool > Geometry” menu and hit the “Divide” button. Continue to refine the sculpt and subdivide as needed, until you have your fully detailed sculpt complete.
For textures, turn on the paintbrush icon for your “CC_Base_Body” subtool to toggle colorize on, and start painting directly on the model (hit B, P, A on your keyboard to select the “Paint” brush, which is just the standard brush with RGB turned on, and Zadd turned off). If you’re wondering how I got such an accurate human skin polypaint, I’ll admit I just transferred the pore level details and color from scan data and modified it. However, feel free to paint from scratch using any ZBrush brush with RGB turned on.
If you want more information on a similar workflow, check out the Character Creator Pipeline Body article. There, we go through the process of:
Starting with a neutral body in Character Creator dialing in our specific character look with morphs.
GoZ that result into ZBrush.
Subdivide and refine the sculptural details.
Use the Substance 3D Painter bridge to texture the result.
How to download the free Character Creator base meshes that come in a variety of character body types, styles, and formats.
How to import or open those files into your 3D modeling program of choice.
How you can modify them into whatever crazy character you want — in this case, a Warhammer Ultramarine beefy boy!
CC GoZ Plus Base Body Bake
Let’s get our high-res sculpt and polypaint updates back to Character Creator. Go to the “ZPlugin > CC GoZ” menu, make sure the “Polypaint > Diffuse and Details > Normal” buttons are turned on, set your map size, and hit the “GoZ All” button. This will send over all the “CC_Base_Body” parts back to Character Creator.
Neutral CC Male Base BodyBase body detailed in ZBrushBase body updated from ZBrush to CC
GoZ Cooper Clothing and Accessories
Back in ZBrush, create any clothing and accessories you’d like to send over, appended as subtools to your base body ZTool. Just like the base body, any sculptural high-res detail for your clothing and accessory assets and polypaint applied to the object will be baked into a texture map for use in Character Creator.
Just remember, our base body was sent over with UVs from Character Creator; However, anything new you create will need to have UVs. If you’re in ZBrush, use the “ZPlugin > UV Master” and/or “UV Map > Create” (Unwrap). More information on creating a game-res mesh in ZBrush is in this video, and creating UVs in ZBrush can be found in this video.
Since we’ve already sent over and baked our body, we can hide all of the “CC_Base” subtools, and just have our suit and accessories visible. In the CC GoZ Plus ZPlugin menu, I’m going to choose the “4096” option to get a large texture size for the suit, but we’ll be able to reduce the texture size of the other objects in the next step. Press the Visible button in the CC GoZ Plugin to send your clothing and accessories over to Character Creator.
Back in Character Creator and inside the GoZ Options window, you can choose what texture size you want each asset to be, and you can also choose whether the object coming over will be a clothing, accessory, or prop. If your object will be affected by multiple joints during character movement (shirt, pants, boots, etc…), choose “Create Cloth”; for objects that can be bound to a single joint during movement (a hard surface item like the lapel pin), choose “Create Accessory”. Don’t worry if you pick the wrong option, you can convert an accessory to a clothing item and vice versa in Character Creator later. Dial in your settings and hit the “Update” button.
If you change your mind over what should be an accessory or clothing item, simply select the item and go to the “Attribute” tab. Choose “Convert to Accessory” to convert a previous clothing item to an accessory, or “Transfer Skin Weights” to convert an accessory to a clothing item that will inherit the body skin weights.
For any Accessory items you’ve created, there’s a few things we have to do. First, we’ll ensure that the accessory is in the right place — with the accessory object selected in your scene, hit the W key to enter move mode, and in the “Attribute” tab, scroll to the bottom to the “Pivot” section. I usually click the middle button to center the pivot on the object, but you can also use the “Edit Pivot” button at the bottom to fine-tune the pivot location. Then use the gizmo to reposition the asset.
We also need to make sure the accessory is bound to the correct joint; in the “Attach” section above the “Pivot” section, click the “Pick Parent” button, and click on your character to choose the correct bone for the object to be bound to (binding a helmet asset to “CC_Base_Head”, for example). If you can’t quite click the correct bone, use the 3 dots menu to select the exact bone you want.
Skin Weights
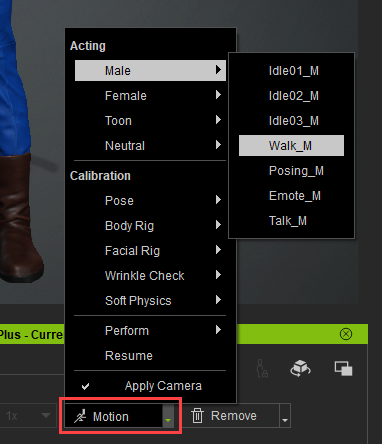
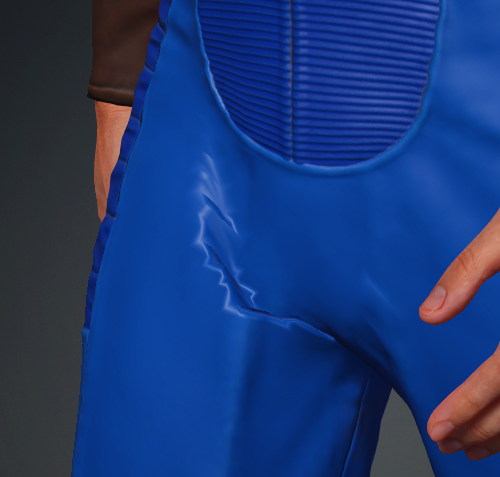
If we go to the “Motion” menu in the Animation Player and choose walk, we can see that some of our weights need to be slightly modified:
Applying a walk animation to our character“Crunchy” vertex weights
With the suit selected in the “Scene” tab, go to the “Attribute” tab and click the “Skin Weights” button. With “Paint” selected, right-click on the bone behind the problematic area, and choose the smooth brush. Paint the verts in this area to smooth the effect of the weights as the joints influence the mesh. In this case, the thigh weights need to be smoothed for both ThighTwist01 and 02. Click the “Skin Weights” button again to exit skin weights mode.
Materials – Metallic and Roughness
You might notice your metallic assets don’t look very metallic; With a metallic accessory selected, go to the “Material” tab, select the Metallic texture, and click the “Adjust Color” button. In the “Adjust Color” menu, you can pull the brightness to 100 in order to switch the texture from black (not metallic) to white (full metallic).
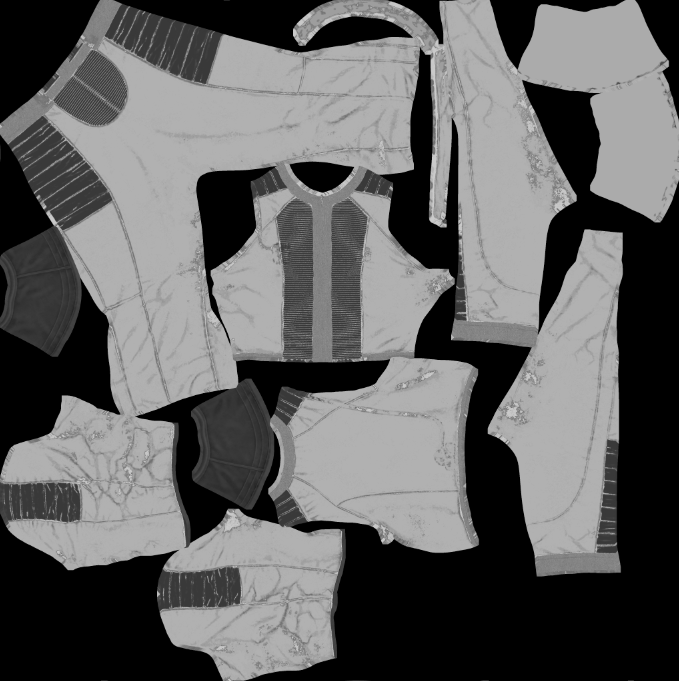
You can do the same thing for the suit roughness for example; If I select the suit, select the roughness texture, I can make the gray texture darker (shinier) or lighter (more matte). But what if I want to have the cloth areas more matte, and the rubber areas more shiny?
Instead of changing the brightness on the gray roughness texture, I’m going to select the Base Color texture, and click the “Launch” button. This will open the texture in an image editing program, and I can desaturate the image, create selections, change the levels, and/or fill/paint areas with different values to create rough or shiny areas of the suit.
Color Map from Launch buttonDesaturated and Adjusted Areas – darker is shiny, lighter areas are matte
Go to “File > Save As”, and save this roughness image somewhere on your computer (I saved it as SuitRoughness.png). Back in Character Creator, double-click the Roughness image in the “Material” tab, and select your newly created roughness map. Your suit will now have matte and shiny areas!
Hiding Body Parts
While wearing the boots and suit, we shouldn’t ever see the underlying human body polygons, so let’s hide them. With the suit selected in the “Scene” tab, go to the “Attribute” tab, and click on the “Hide Body Mesh” button. Use the mannequin to hide major sections of the body, and fine-tune with face selection. Do the same process for the boots. Now whenever the suit or boots are applied to a Character Creator mesh, it will always hide those underlying base body faces. Check out the previous CC GoZ article to see how to save clothing and accessories to your custom library to use on other characters.
Posing and Facial Expressions
Feel free to apply poses or animations to your character from the “Content Template” library. In this case, I’m going to apply the “Sporty_Pose01” pose to our character, and fine-tune it with the “Edit Pose” button in the “Motion Pose” tab:
We can change the facial expression as well: click the “Edit Facial” button in the “Motion Pose” tab:
Use the “Muscle”, “Expressions”, or “Modify” tabs to dial in an expression for your character.
Apply any other hair or accessories from your Character Creator library that you want to finish out your character.
Sending our Pose Back to ZBrush High-Res Source Assets
Let’s say we want to send this pose back to our ZBrush high-res so we can 3D print it. Select all of your character objects in your “Scene” tab, and hit the “GoZ” button in the menu bar:
In the GoZ Settings window, we’ll uncheck “Enable GoZ Plus” (we’re not baking any color or normal map info back to ZBrush, we’re just moving around SDiv 1 verts to match our posed assets). Check on “Relink Mesh Changes” in New Layer if you want your pose to be stored as a layer for all of the Asset subtools. We’ll also check on “Eyelash” and “Tear Ducts”, since we had previously separated those parts out of the base body earlier, and we want to match that.
Because our pose was saved out as a layer on all of our subtools, we can open the “ZPlugin > ZBrush Pose Tools” menu, hit “Refresh Pose List”, and a pose should be available in the selectable library. Select it and Rename it to something that makes sense. For more information about ZBrush Pose Tools functionality, check out this article.
Feel free to go back to Character Creator and create more poses / facial expressions. As long as you GoZ them over on a layer, you can keep adding them to your Pose Tools library for your character.
About The Author
Michael Pavlovich earned a Bachelor’s degree in Computer Animation from RSAD in 2005. Initially, he contributed to the development of environment and character art for popular video games such as Madden and NCAA Football. Later, he relocated to Austin to join Daybreak Games, where he worked on the creation of art assets for DC Universe Online.
Presently, Michael holds the position of Director of Character, Weapon, and Vehicle Art at Certain Affinity. His expertise lies in implementing iterative pipelines for Certain Affinity artists helping develop renowned video game franchises, including Halo, Call of Duty, and DOOM. To stay updated on his latest tutorial projects, you can visit Michael’s YouTube or ArtStation page.
In the previous article, we sent a prop from Character Creator to ZBrush, modified it, and sent it back again with new baked color and normal details, using CC GoZ Plus. In this article, we’ll use CC GoZ Plus to send an accessory we made in ZBrush to Character Creator, complete with color and normal maps. We’ll also discuss techniques to fine-tune your roughness and metallic maps to complete the look of your new PBR asset, and finally add it to our custom library so we can use the asset on different characters.
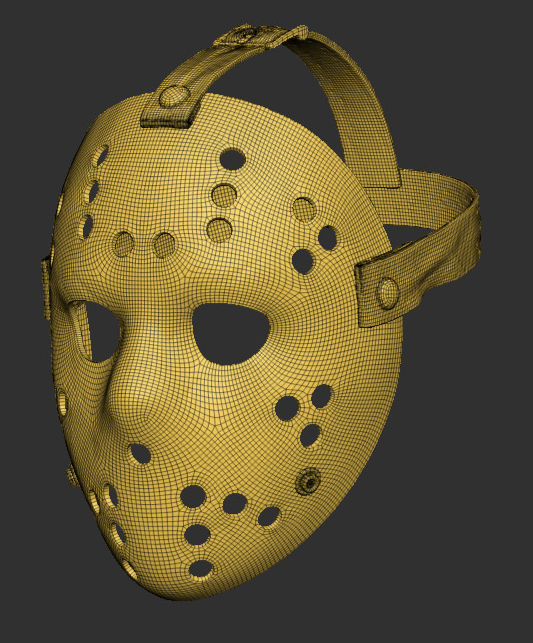
SDiv 1: 46 Thousand PolysSDiv 4: 3.17 Million PolysUVs
Requirements
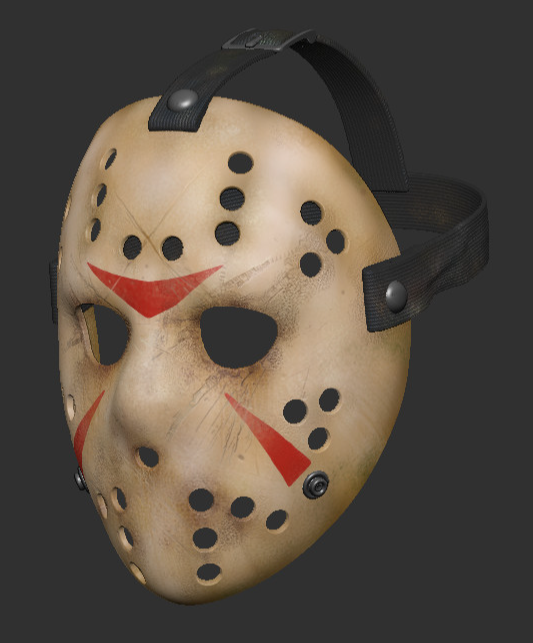
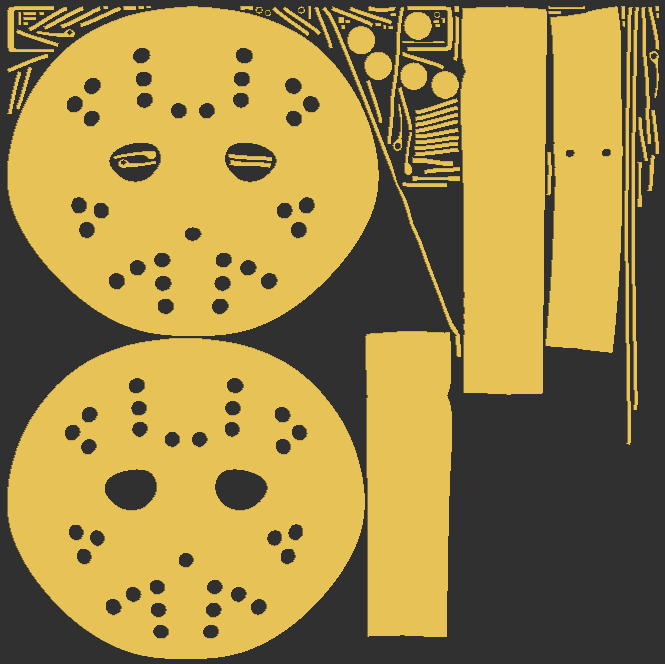
In order for this to work, there’s a few things our asset will need. First, you’ll need a low-res SDiv 1 for your asset. You can have as many subdivisions as you want past subdivision 1 that will hold all of your high-res sculptural and polypaint details, but your lowest subdivision level needs to be something reasonable to send over to Character Creator to attach to a character and animate. For example, SDiv 1 for the above mask is 46k polys — not exactly lightweight, but way better than the 3.17 million polygons that SDiv 4 has. For more information on how to make a quick game-res model and project your detail to it, you can watch this video here. Second, our asset needs UVs; UV Master and other UV techniques in ZBrush are covered in this video.
I’m also going to load up a character in Character Creator; This can be a character you previously made, one from the Reallusion content browser, or just a neutral base body — it doesn’t really matter, just something to put this mask onto when it gets to Character Creator.
CC GoZ Plugin
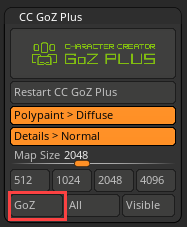
If your asset has subdivisions and UVs, you’re ready to send it over to Character Creator. Go to the ZPlugin menu and open the CC GoZ submenu. Because we have “Polypaint > Diffuse and Details > Normal” buttons on, it will bake out a Color Map texture and a Normal Map texture with our polypaint and sculpted high-res details, respectively. We’ll keep the map size at the default 2048, but feel free to choose 4096 for the most texture resolution (you can also change what size the incoming texture will be later in Character Creator). Since we’re only sending over one asset this time, we’ll press the “GoZ” button to send the SubD 1 mesh of the selected subtool to Character Creator to update our mesh, and send over the baked maps for our asset.
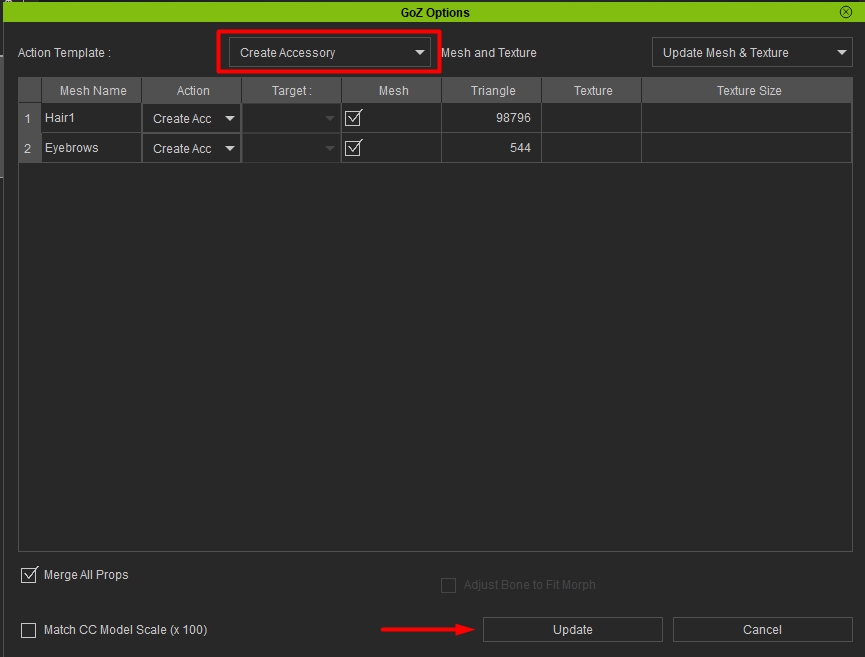
In the “GoZ Options” window back in Character Creator, choose the “Create Accessory” template along with “Update Mesh & Texture”. That will set the “Action” to “Create Accessory”, and check the “Mesh” and “Texture” checkboxes. If you’d like, you can change the action to create a clothing item or a prop, and you can uncheck mesh or texture if you want to skip a part of that import process. In our case, we’ll leave everything checked.
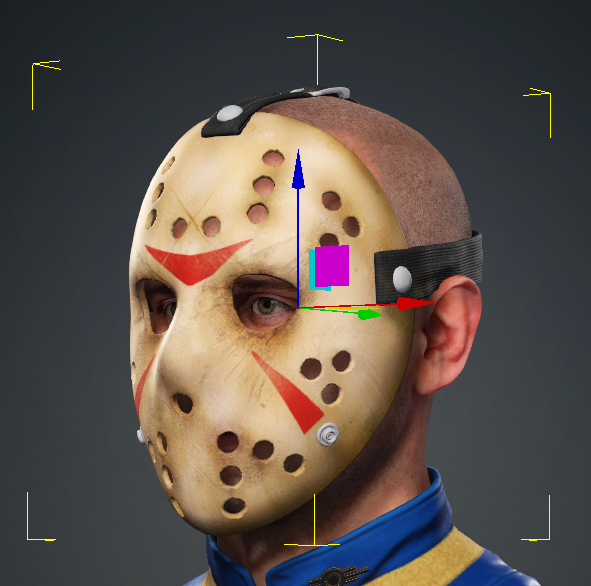
If you brought over an accessory, you’ll probably have to move it into place on the previously loaded character. First, set the pivot by scrolling down to the bottom of the “Attribute” tab, and clicking one of the “Quick Set” options. We’ll also choose a joint to attach to by using the “Pick Parent” button and clicking on your character, or using the 3 buttons menu to select the correct joint (in this example, it’s a face mask, so we’ll choose “CC_Base_Head”). Now just move the accessory into place on your character.
Materials and Textures
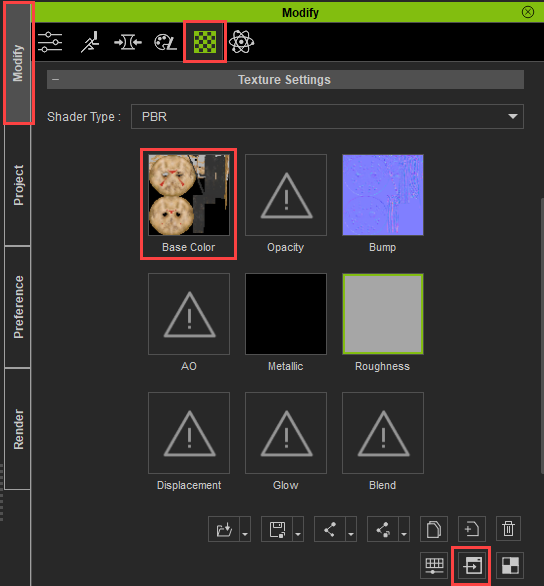
Our metal buttons aren’t looking very metallic — let’s create a custom Metallic map! Go to the “Material” tab with your asset selected, and you’ll see the Base Color and Bump (Normal) map from ZBrush is applied to this object. Select your Base Color map, and press the “Launch” button.
Metallic map black – no metallic partsWith Base Color selected, press the Launch Button
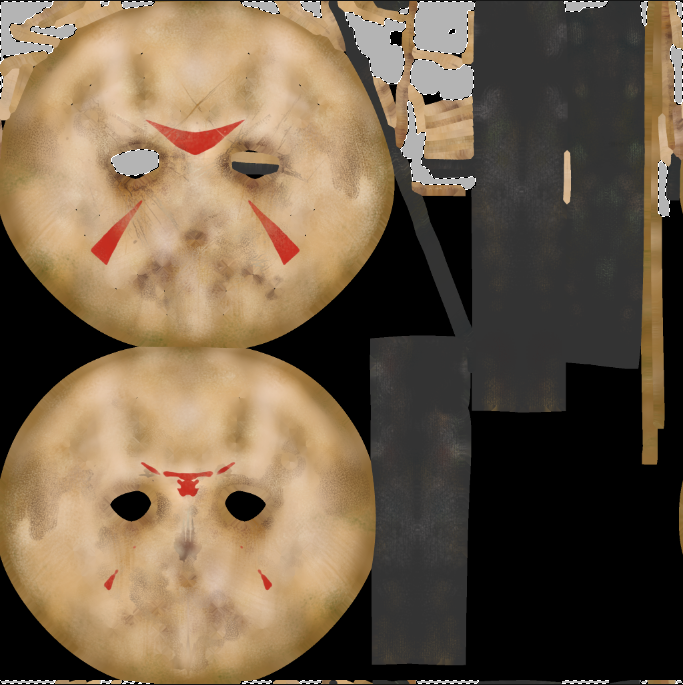
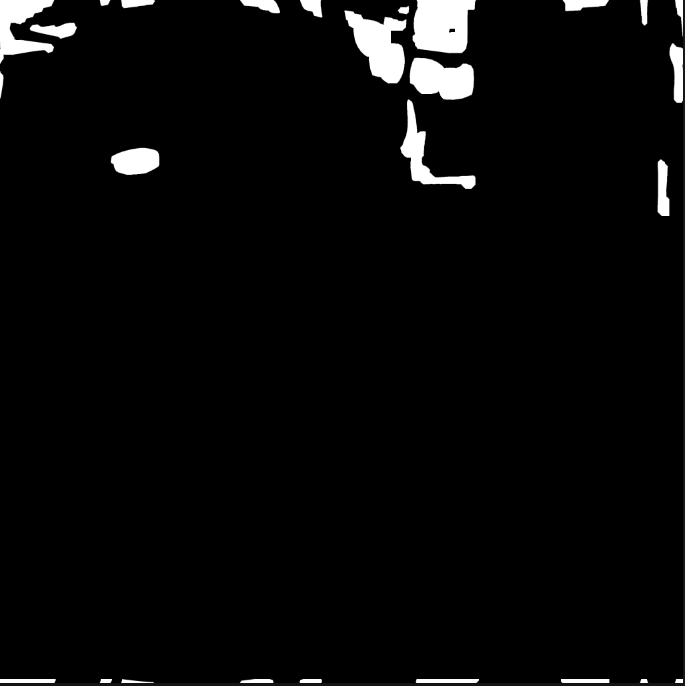
In your image editor, I’ll use the wand tool to select the gray section of the color map, which is what the metal parts are filled with. I’ll fill these areas with white, and the rest of the image with black — this will create a texture map where all the white parts that correspond to our metal button UVs will appear metallic, and all the black parts wont.
Base Color Map with gray selectionCustom Metallic map
If we were to save this now and close the window, it would update our Color Map to this black and white image intended for our Metallic map. Instead, go to “File > Save As”, and save the black and white image as “HockeyMask_Metallic.png” (or whatever makes sense) somewhere on your computer.
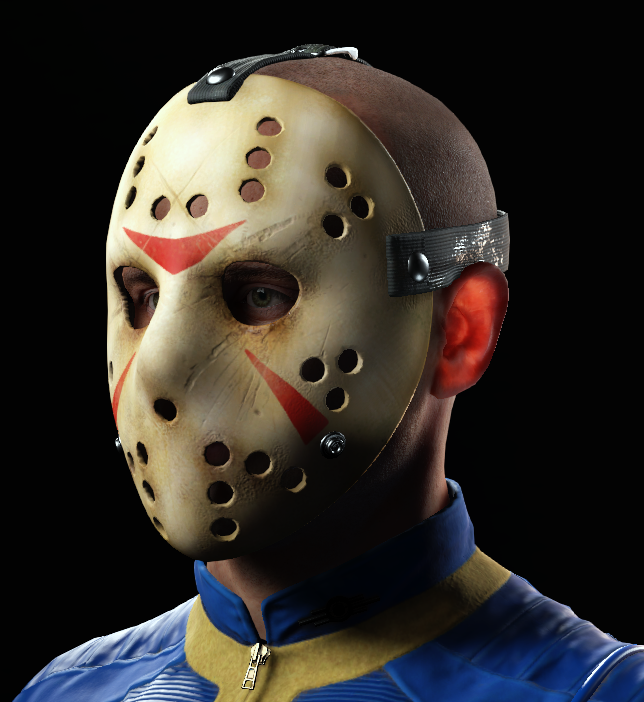
Back in Character Creator, double-click the Metallic map image, and load in your custom Metallic map texture. You’ll see your metal buttons are now metallic! For the Roughness, if we just want to change how shiny or matte the image is overall, we can click on the “Adjust Color” button with the Roughness map selected, and change the “Brightness” slider to choose a Roughness value (darker is shinier, lighter is more matte):
Making the Roughness map darker (shinier appearance)
Or just like the Metallic map, you can Launch the Base Color map, desaturate it, and adjust the image to make certain areas lighter or darker (matte or shiny):
Custom Roughness Map appliedDesaturated Base Color Map modified into a custom Roughness map
Saving a Clothing or Accessory Item
Let’s put this mask into our custom library so we can use it on other characters! Go to the “Scene” tab and make sure your asset is selected:
Next, choose the “Custom > Content” tab. Since this is a mask attached to the head joint, it makes sense to save this into the “Accessory > Head” directory. Navigate to that folder, and click the “Save” button. In the “Save Options” dialog box, give it a file name, and ensure the correct directory is chosen for the Asset Type (if not, you can manually navigate there through the down arrow menu). You now have a hockey mask saved in your “Custom” panel. Load up another character, then just double-click your new hockey mask and move it into place. It will animate along with the character’s head, with the object pivot where it should be, just like how it was set it up on your original character.
About The Author
Michael Pavlovich earned a Bachelor’s degree in Computer Animation from RSAD in 2005. Initially, he contributed to the development of environment and character art for popular video games such as Madden and NCAA Football. Later, he relocated to Austin to join Daybreak Games, where he worked on the creation of art assets for DC Universe Online.
Presently, Michael holds the position of Director of Character, Weapon, and Vehicle Art at Certain Affinity. His expertise lies in implementing iterative pipelines for Certain Affinity artists helping develop renowned video game franchises, including Halo, Call of Duty, and DOOM. To stay updated on his latest tutorial projects, you can visit Michael’s YouTube or ArtStation page.
In this article, we will discuss the CC GoZ Plus workflow that makes it easier for you to work with bodies, clothing, accessories, and props between Character Creator (CC) and ZBrush. Going from Character Creator to ZBrush, you can convert color and normal maps to polypaint and high-res details with just a click of a button. Similarly, you can transfer your polypaint and high-poly sculpt from ZBrush to Character Creator using the same button, creating color and normal maps for use in CC. Let’s begin!
CC GoZ Plus Installation
We can already natively GoZ assets from ZBrush to Character Creator and back again – but in order to send assets from ZBrush to Character Creator AND have it bake a base color and normal map, AND have it plug those textures into a material for us, we need the CC GoZ Plus plugin installed for ZBrush. In order to do that, we need to GoZ something from Character Creator to ZBrush — in this case, I’m going to grab the “Lion Head” asset from “Content > Props > PBR”:
With your object selected in the “Scene” tab, press the “GoZ” button in the menu bar:
When you see the “CC GoZ Plus” prompt, choose the correct version of ZBrush from the drop-down menu, and hit “OK”. This will install the plugin to the correct path (“C:\Program Files\Maxon ZBrush 2024\ZStartup\ZPlugs64”).
In the “GoZ Settings” dialog box, the “Template” setting should default to “Create”, and you can see we’ll be baking the color map to the ZBrush assets vertex color (polypaint), and the normal map in Character Creator will be baked to a “Detail Layer” in ZBrush! Let’s choose 5 in the dropdown menu for “Subdiv” — this will give us more than 6 million triangles, plenty of polygons to transfer our color map to our polypaint, as well as plenty of polygons to sculpt with! Hit the “GoZ” button at the bottom to send everything over to ZBrush.
As you can see, our subtool in ZBrush has 5 subdivisions, and the normal details are in a layer called “CC_Detail 1”. I want the details to be applied to my highest subdivision geometry, so I’m going to press the “Bake All” button in the layer palette.
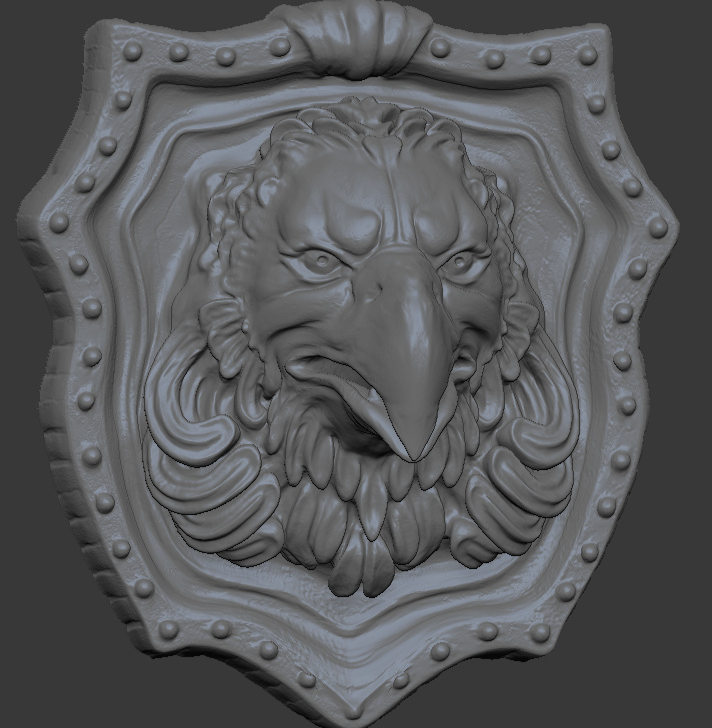
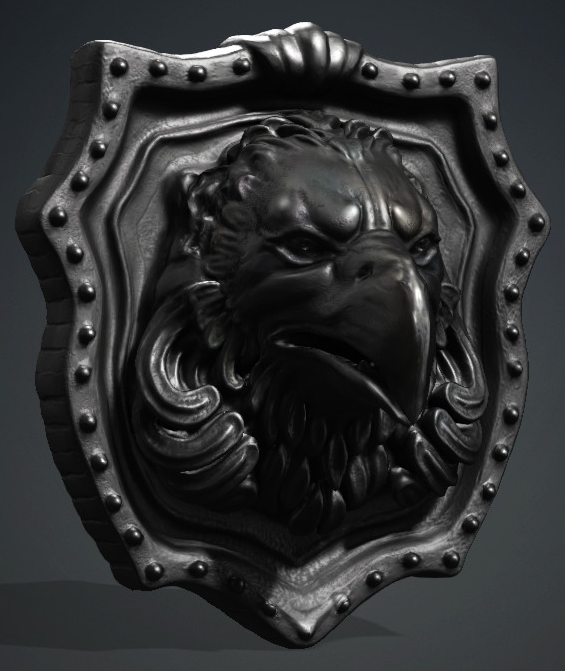
Let’s change this into a dark steel eagle head! Choose a gray color in the color palette, then go to “Color > FillObject”
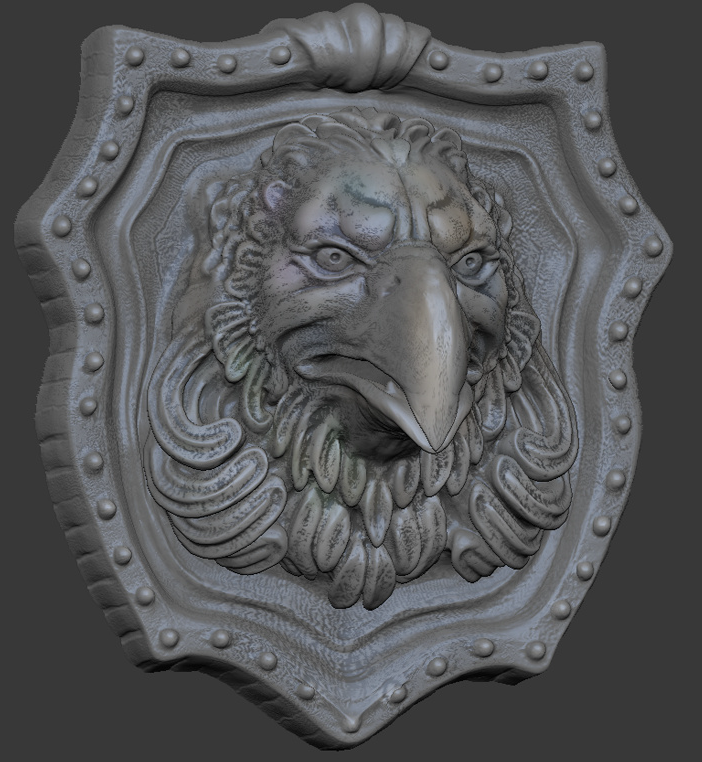
Use ZBrush sculpting brushes to change the lion into another animal — in this case, an eagle head. Feel free to polypaint on your asset as well to add color variation. Since this is a symmetrical object, I’ll hit X on my keyboard to turn on symmetry while I sculpt. Feel free to drop down to a lower subdivision in order to make broad changes, and step back up in subdivisions to dial in your details!
Lion sculpted into an eagle head
Polypaint color variation added
In the “ZPlugin > CC GoZ Plus” menu in ZBrush, press the GoZ button — with the default options, this will send the model back with the new low-res vertex positions, as well as bake your high-res sculpt detail to a normal map, and your polypaint to a base color map, with one button press!
Back in Character Creator, you’ll see that the GoZ Options have defaulted to the “Update Mesh & Texture” option, which will ensure that the “Mesh” and “Texture” boxes get checked, which means the mesh will update, and the new textures will be applied to our model after you click the Update button.
Textures and Materials
This particular asset has a displacement map applied; With your object selected, navigate to the material tab and select the displacement texture. Press the garbage can icon to delete it:
If your color map is too light or too dark, you can go back to ZBrush and adjust the polypaint, or you can click on the Base Color map, then click the “Adjust Color” button, and play with those sliders to get the exact look you want!
Right now the Metallic and Roughness textures are giving the asset a very grungy feel. If you want to modify those maps, you can double-click their map to load in your own custom texture, or press the “Launch” button to open the textures in an image editor. I’m going to go ahead and Launch the Metallic and Base Color textures!
I’ll fill the Metallic texture with white (I want the entire object to appear metallic in the shader), Ctrl+S to save, close the window, fill the Roughness map with a middle gray, save, close, and head back to Character Creator.
When we arrive back in Character Creator, you’ll see that your Metallic and Roughness maps have been updated. Feel free to use either the “Launch” or “Adjust Color” feature to tweak your asset’s appearance!
Original prop
Modified with CC GoZ Plus
About The Author
Michael Pavlovich earned a Bachelor’s degree in Computer Animation from RSAD in 2005. Initially, he contributed to the development of environment and character art for popular video games such as Madden and NCAA Football. Later, he relocated to Austin to join Daybreak Games, where he worked on the creation of art assets for DC Universe Online.
Presently, Michael holds the position of Director of Character, Weapon, and Vehicle Art at Certain Affinity. His expertise lies in implementing iterative pipelines for Certain Affinity artists helping develop renowned video game franchises, including Halo, Call of Duty, and DOOM. To stay updated on his latest tutorial projects, you can visit Michael’s YouTube or ArtStation page.
Arnoldo Atencio Vazquez is a seasoned graphic designer specializing in 3D modeling and art. Despite the challenges of growing up in a small town in Venezuela, Arnoldo pursued his dream of becoming a 3D artist.
After earning a degree in graphic design, Arnoldo seized the opportunity to work at one of the top advertising agencies in Venezuela. Driven by a desire to create innovative and unique designs, he drew inspiration from Disney movies and mastered various modeling and texturing tools, including those offered by Reallusion.
Arnoldo’s diverse portfolio includes designing custom maxillofacial prosthetics for 3D printing, collaborating on virtual and augmented reality experiences, and contributing to indie game development. His dedication and passion for 3D art have propelled him to excel in the industry, continually pushing the boundaries of his craft.
Gathering Reference
Before starting, I suggest gathering reference images of the original character in different moods or situations. This way, we can comprehend every relevant muscle detail for crafting its expressions.
CC Base Settings in Character Creator
I started with using the stylized CC base character “Eddy”, deleting the redundant elements, and only leaving the body.
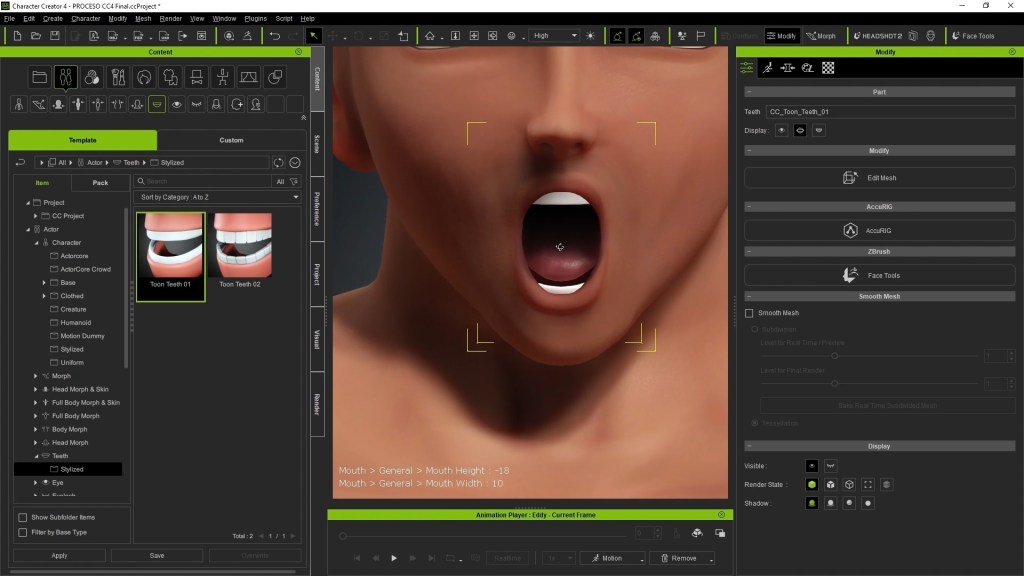
To further customize Eddy’s base model, some CC morph sliders were used to achieve the final look. To push the anime style, I also straightened out the teeth. Once completed, I initialized the Face Tools Plugin, left the default settings, and sent him off to Character Creator.
Once exported, we can find all of the pieces that make up the character in the “Subtools” panel, including the head, body, tongue, eyes, and teeth.
Head Base Sculpting & Eyes Setting
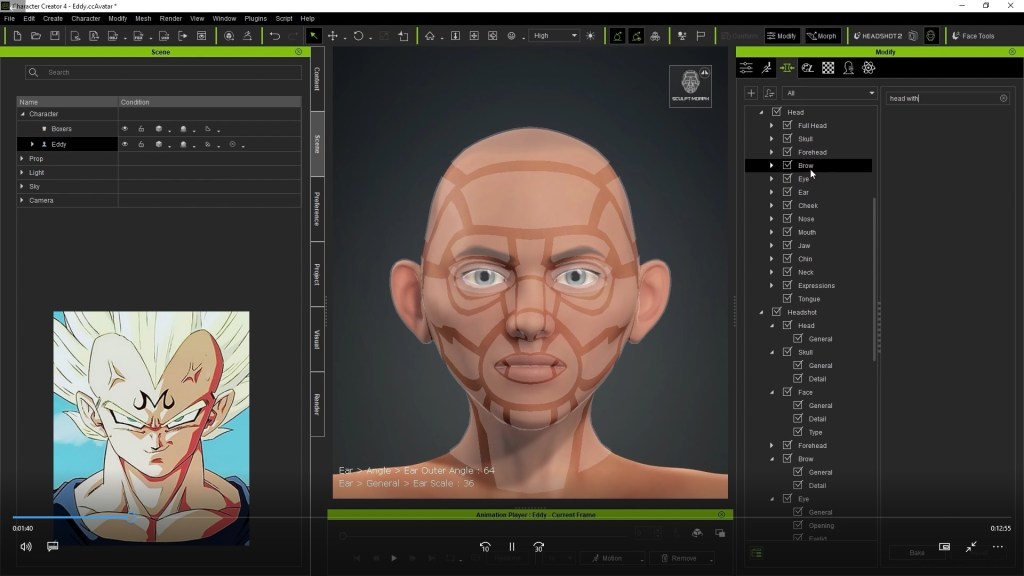
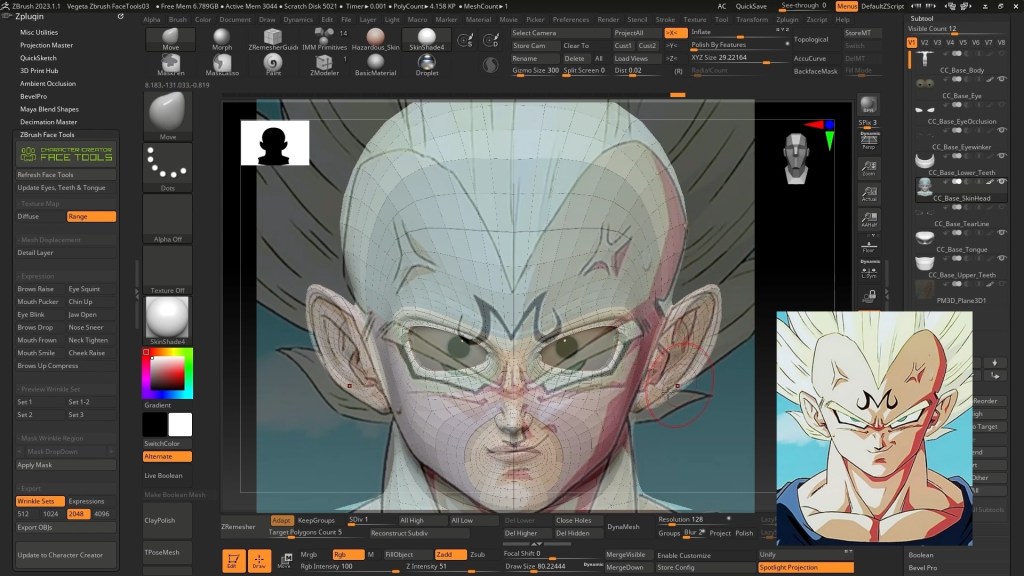
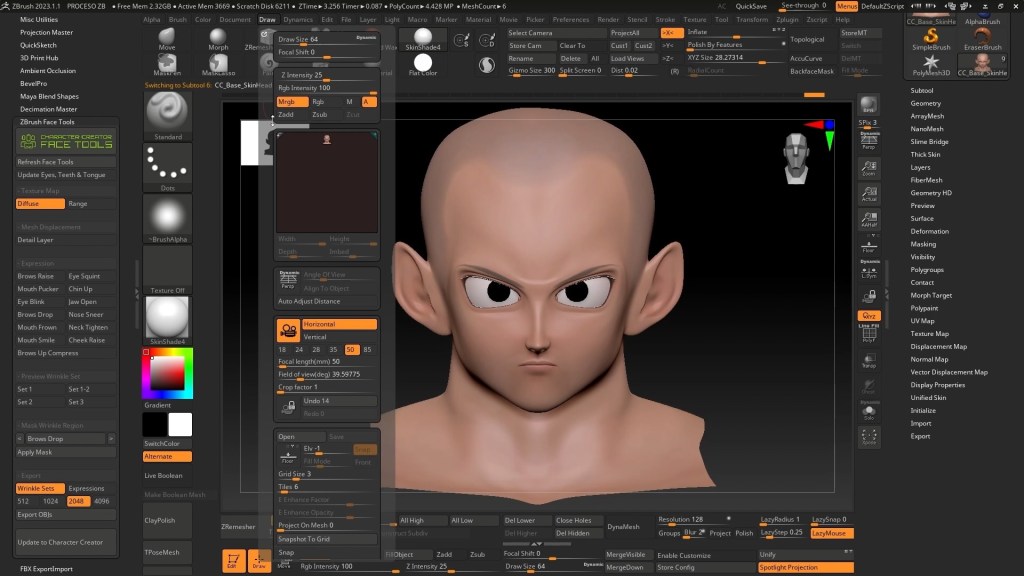
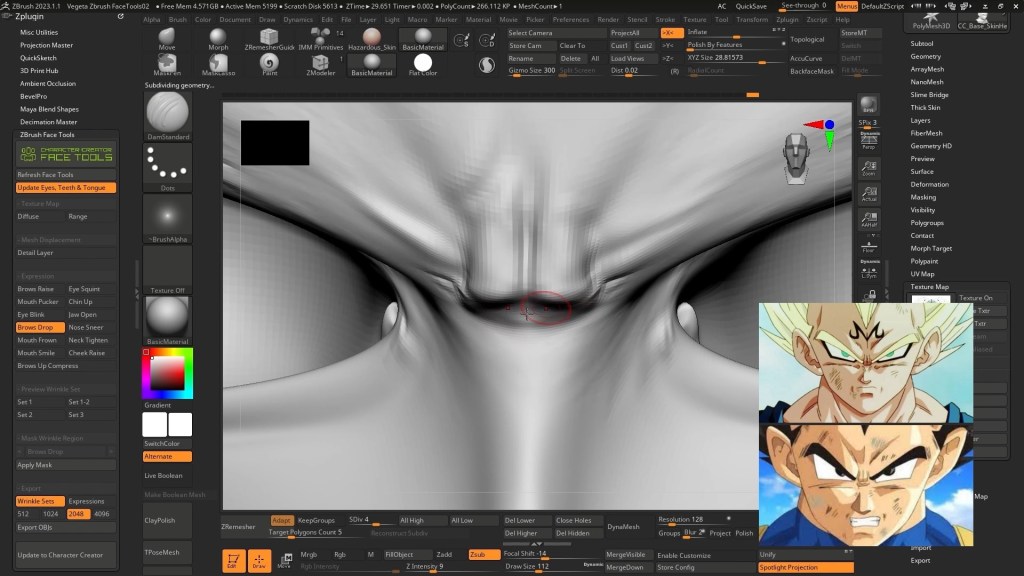
The Face Tools plugin provides 6 levels of subdivisions. Always select the lowest level for head base sculpting. The plugin also offers the option to visualize the boundaries of each muscle section. It allows me to take care of the boundaries of each section, and manipulate the topology correctly and according to the style of our character.
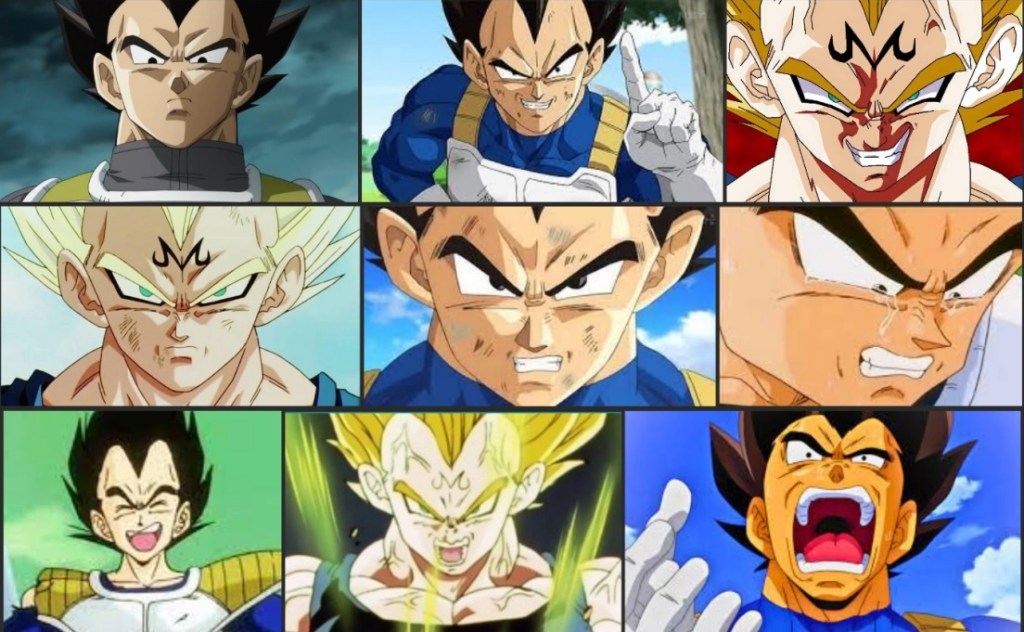
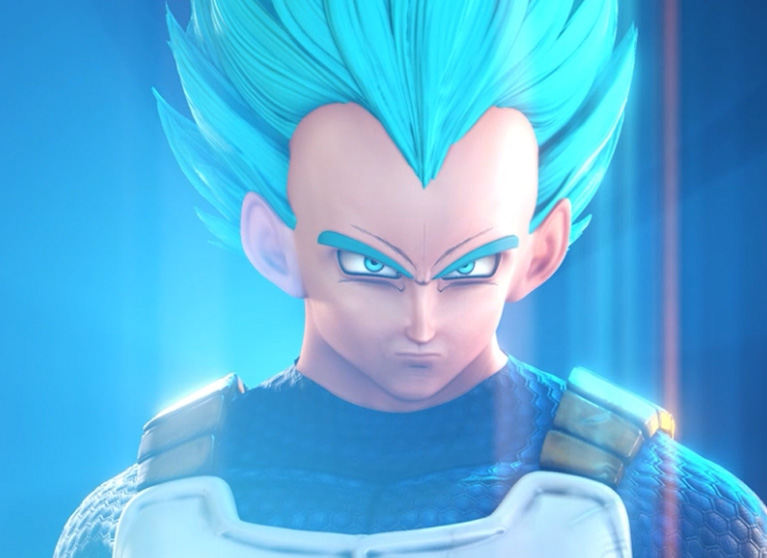
For example, Vegeta’s eyes have a very particular triangular shape, and with the “Range” visualizer, I can see where the eye begins or ends, its upper and lower parts, and thus maintain a good point of reference to achieve the proper expressions. I now place a plane in front of the head and insert a texture with the character’s face to precisely match its proportions.
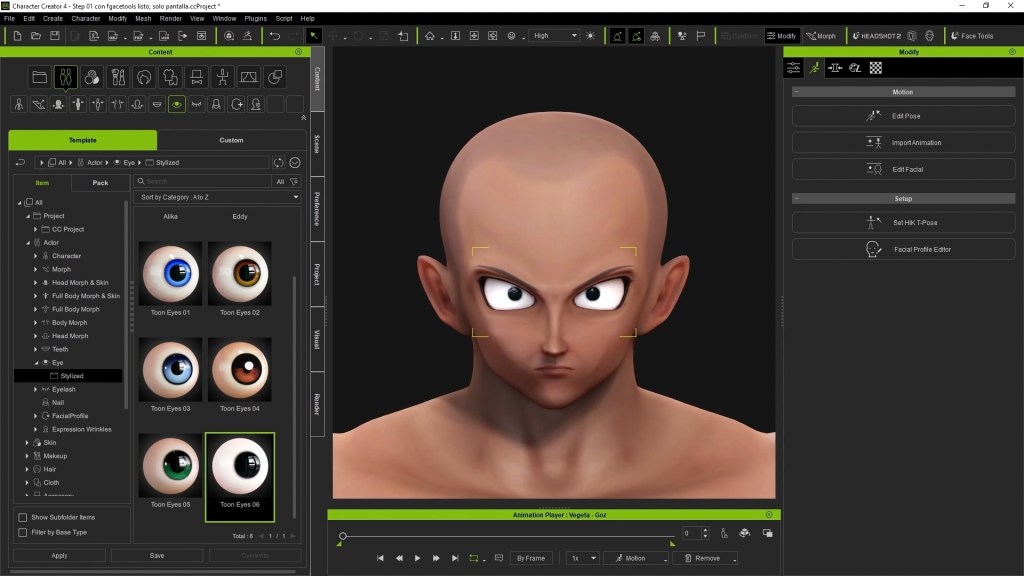
From the Content Manager, we’ll swap out the eyes for ones more in line with his style.
Polypaint
Since Vegeta is an anime-style character, I prefer to apply polypaint before sculpting the expression details; as this helps me visualize the modifications that are to follow.
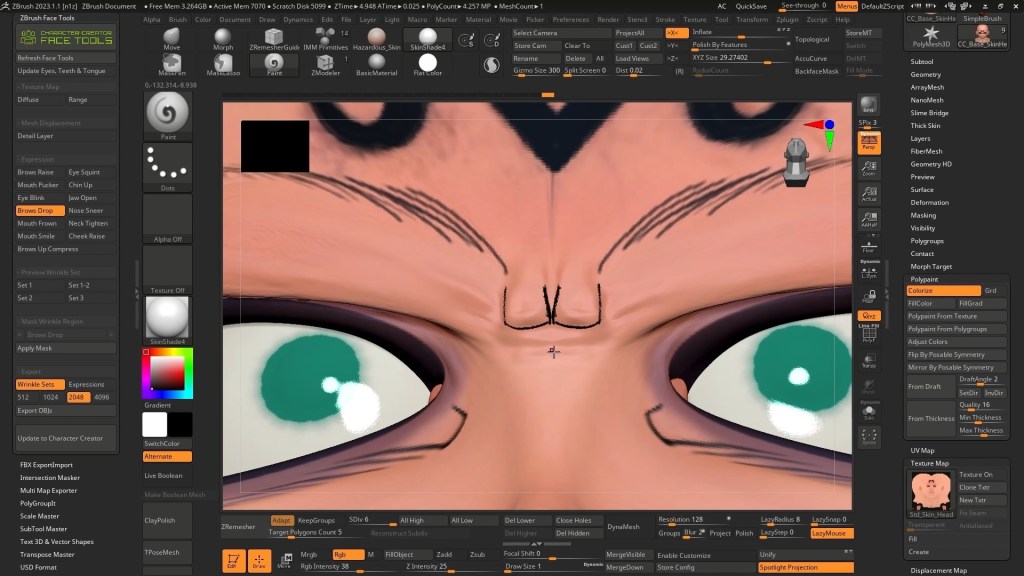
Click on the “Diffuse” button to show the diffuse map. To start painting, I will need to convert the existing texture to polypaint. Then activate the “MRGB Channel” button found in the “Draw” panel, and finally press the “Polypaint From Texture” button. After this, we can turn off the “diffuse” option and start painting Vegeta.
I leveraged the existing textures on Eddy, as they are already suitable for the stylized result we want. I then painted skin details in various areas of the face, such as the eyes, eyebrows, ears, nose, and scalp, to work in the resemblance to Vegeta.
After painting the character, I clicked “Update to Character Creator” again, this time, ensuring that the “Polypaint-Diffuse” option is selected in the export popup window.
Now, in the “Go-Z” popup window, you’ll see the option to apply the head color to the body. In the color update, you’ll see that the color we added to the head automatically matches that of the body.
Skin Details
Now that we have a good base ready and painted, it’s time to add the smallest details to our character’s skin. To start, we need to set the subdivisions of the model higher, in this case, we have 6 levels, so we set it to the maximum of 6 to have a more defined mesh.
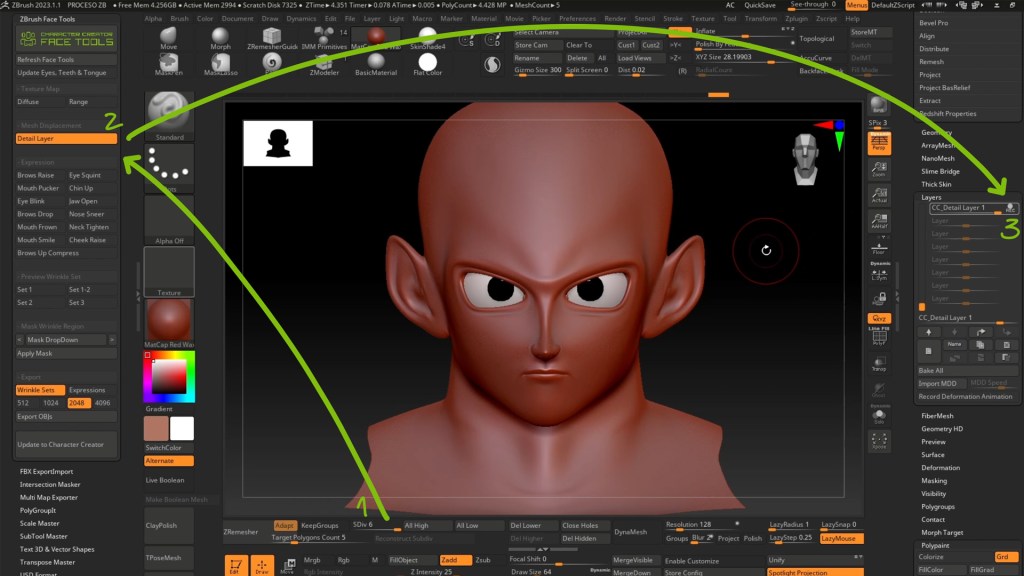
Then, activate the “Detail Layer” button to visualize the skin details; And to start editing, press the “Record” button in the “Layers” panel. This will allow us to record all the details we make on the skin while sculpting on it, and when exporting to CC4, it will be “Baked” onto the normal map.
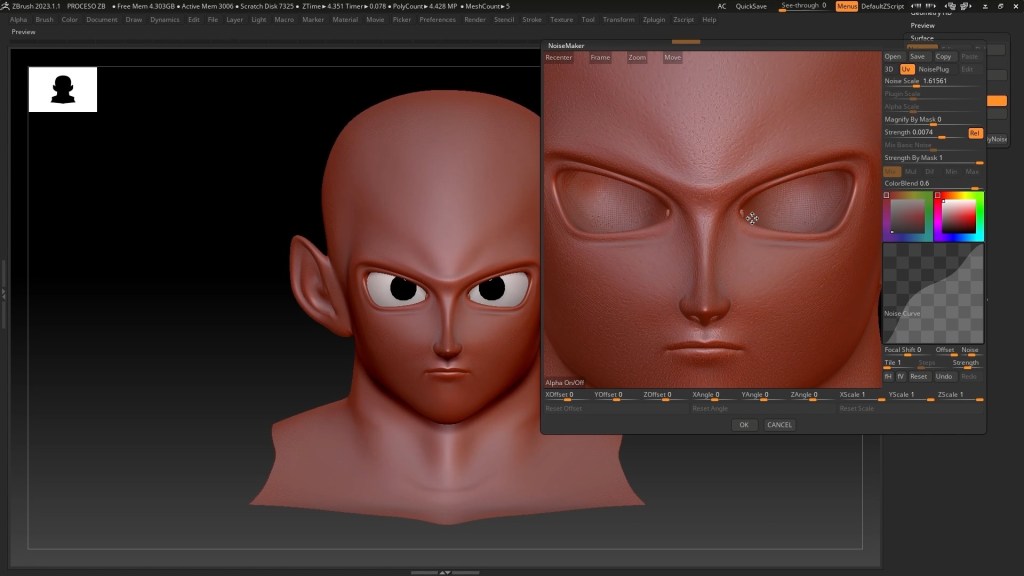
Now, I begin to add some base skin details using noise for certain parts of the surface. We can also utilize specific preset brushes in ZBrush to create finer details.
Again, when we finish the details, we update by pressing the “Update to Character Creator” button. This time, we only need to select the “Detail – Normal” option in the popup window.
As you can see, the normal map now possesses way more details than before; and, our model is looking better as well.
Accessories
Before we move on to the next stage, let me quickly show you the progress I’ve made on accessories like hair, clothing, gloves, and boots. This helps in getting the character closer to the original concept.
Custom Expressions – eyes, teeth, tongue, jaw
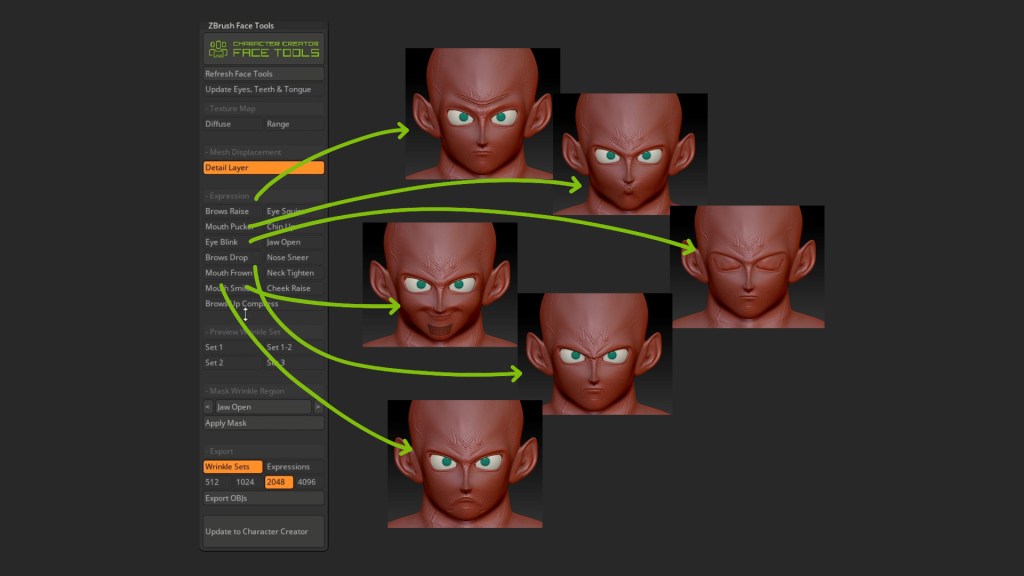
In this section, I will ensure the expressions are in line with the topology of each facial section and optimized. In the Face Tools “Expression” panel, there is a list of 13 sets of Facial Expressions that we can use to achieve the character’s original look.
You can notice how each of these expressions corresponds to each muscle group of the CC4 facial editor.
If we want to modify these expressions, we can deactivate the “Detail Layer” option to hide the details we worked on previously and go back to the lowest subdivision level.
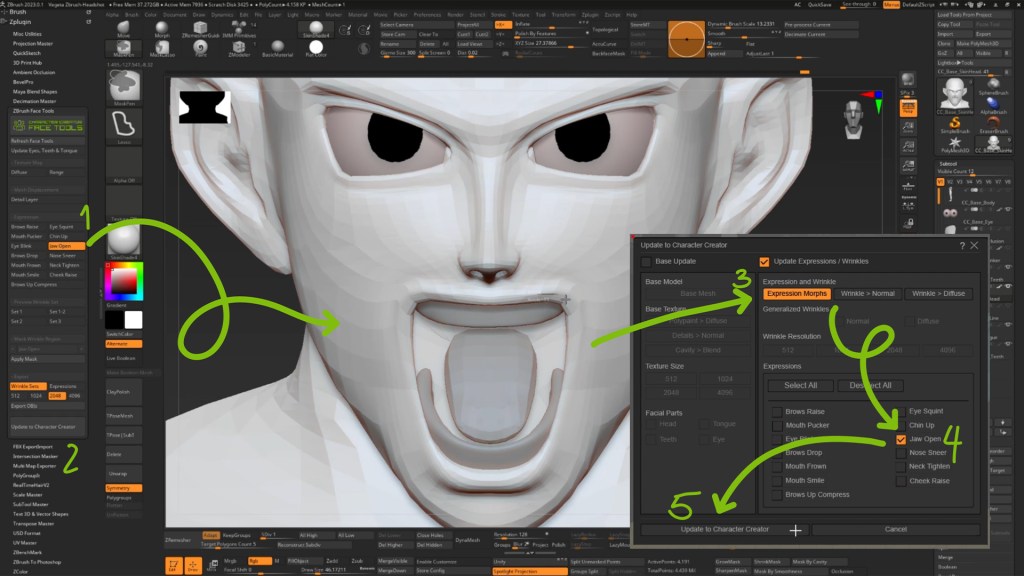
Pess the update button for the eyes, teeth, and tongue so that these objects are automatically updated and modified along with the expressions.
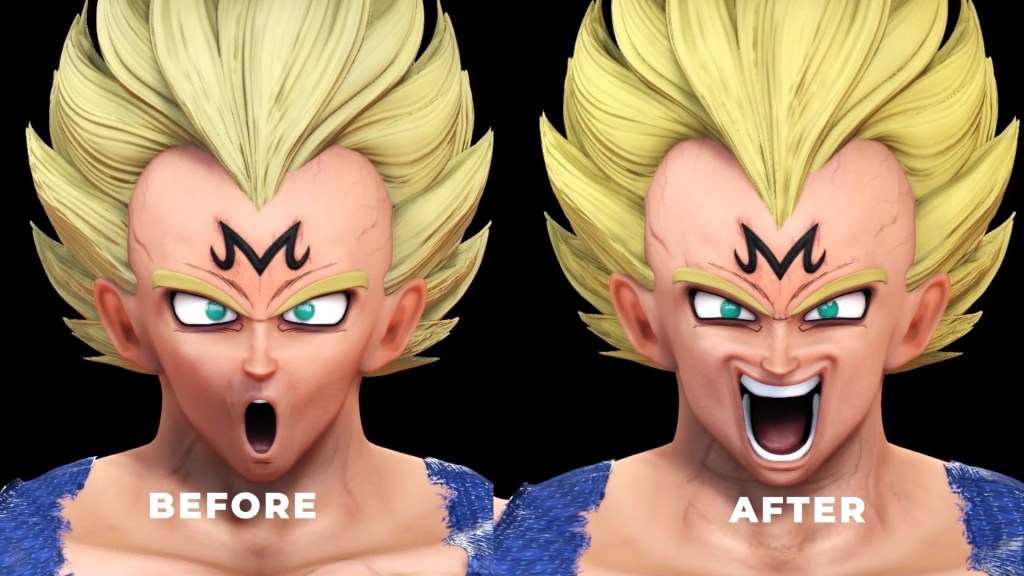
I’ll start by working on the “Jaw Open” morph as that is one of the most commonly used expressions throughout the Dragon Ball Z series; particularly when it comes to battle scenes.
While sculpting and modifying the expressions, it’s important to consider all three axes while doing so. By considering the X-, Y-, and Z-axis of the model, rather than working from one fixed point of view. Therefore, we aren’t misled into thinking in just two-dimensional terms of a 2D anime character.
Use the “Polygroups” view and isolate each of the groups offered by the plugin. This way, it’s much more comfortable and easier to edit the parts of the expressions that overlap each other. While adjusting this expression, I also tweaked the teeth and tongue to align with the expression.
Custom Expressions – facial expressions and brows
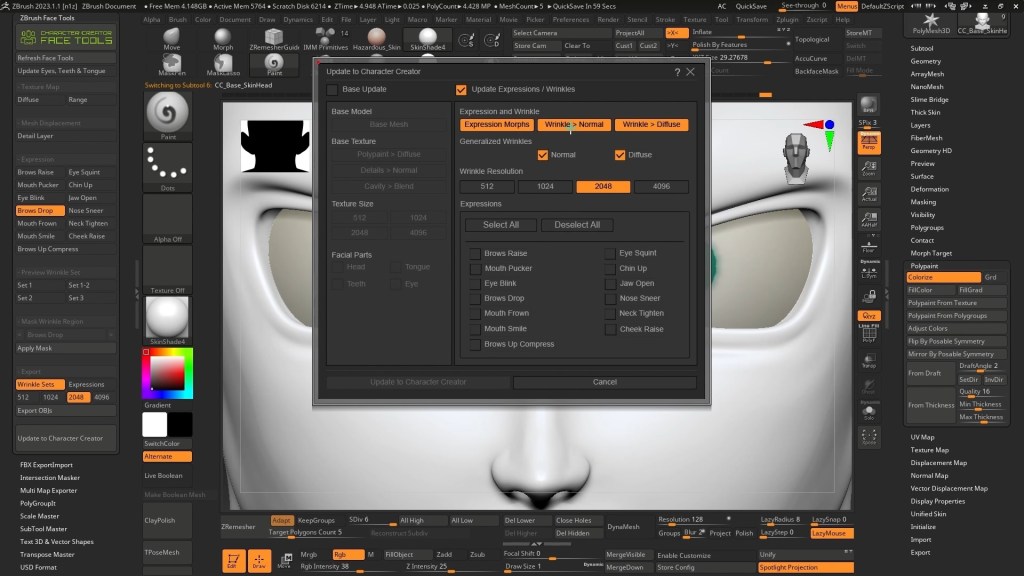
When we proceed to export to CC4, select the “Update Expressions / Wrinkles” option and “Expression Morphs”. Then, select the expression that we have created — in this case, the “Jaw Open” expression. Once I update the character in CC4, open the “Edit Facial” menu to discover the changes made to the custom expressions for the character’s face.
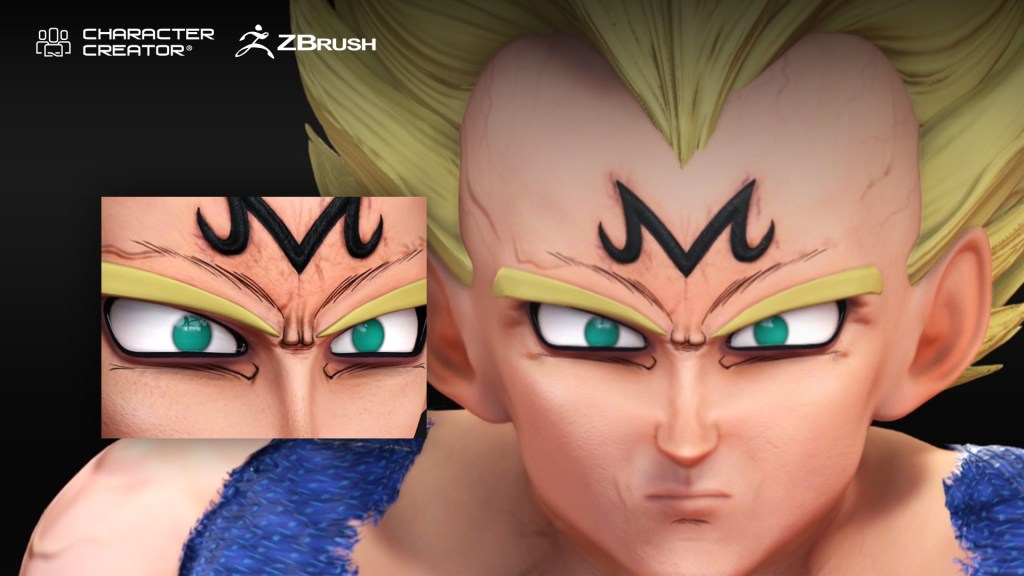
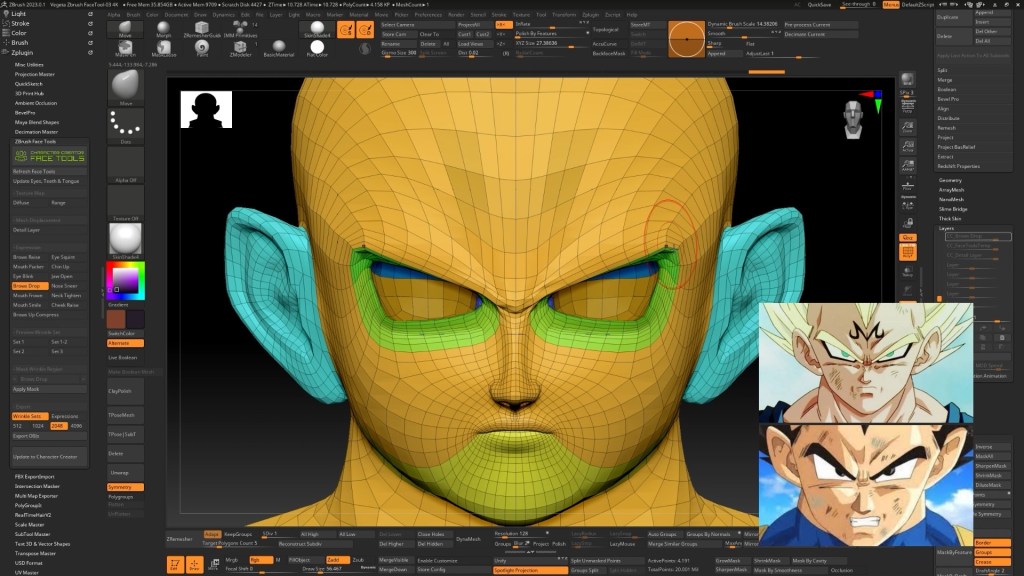
Now, let’s continue with one of the parts of the face that, for me, is more representative of Vegeta, his eyebrows. As you can see, no matter his mood, this character is always frowning. Select the “Brows Drop” expression in the “Face Tools” expressions panel. Repeat the same process as in the previous expression, and update to CC4 selecting with the same parameters in the export panel; except that we change to the current expression “Brows Drop”. Repeat the same process for the other expressions you need to modify from the list in the Face Tools panel.
Create Wrinkles
Now, let’s see how to adjust the wrinkles in the expressions. To start, we adjusted the subdivision level to the highest, in this case, we have 6 of them. Note that wrinkles are visible when we set one of the expressions activated. Once this is done, we start adding more details to the expression, hoping to get the expression closer to the reference images.
We will also use this process to mark the expression lines with polypaint and convert the texture to polypaint as we did before and add them.
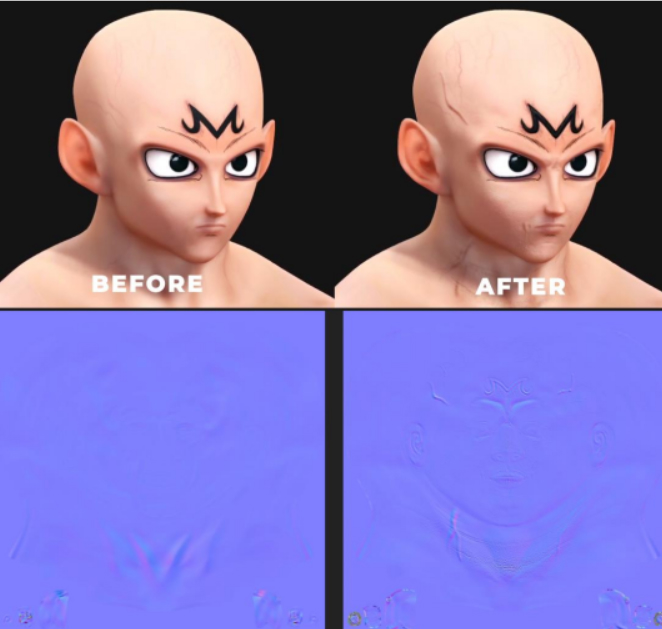
While working on this expression, I added veins that appear above the eyebrows when Vegeta furrows his brows. For the export to CC4, I activated the expression morph options “Wrinkle-Normal” to include the details in the normal map, and “Wrinkle-Diffuse” so that when the expression is used, the lines are heavily marked to have a greater impact on what the character is conveying.
Now we can see how the expression lines are marked in the center of the eyebrows. This way, we can play with and try each expression to achieve the desired results.
I hope you liked this tutorial on how to bring the expressions to life with this wonderful tool. You can generate other versions and transformations of Vegeta to take advantage of the versatility of this great software. Stay tuned for more lessons in the future. This is Arnoldo Atencio signing out, and I hope to see you next time!
Nathan Olsen is a character artist from Canada specializing in weapons, creatures and cool-looking characters. He has focused mainly on developing art for video games since 2019 and is keen on learning all methods required for this type of 3D art.
Best Tools for 3D Character Creation
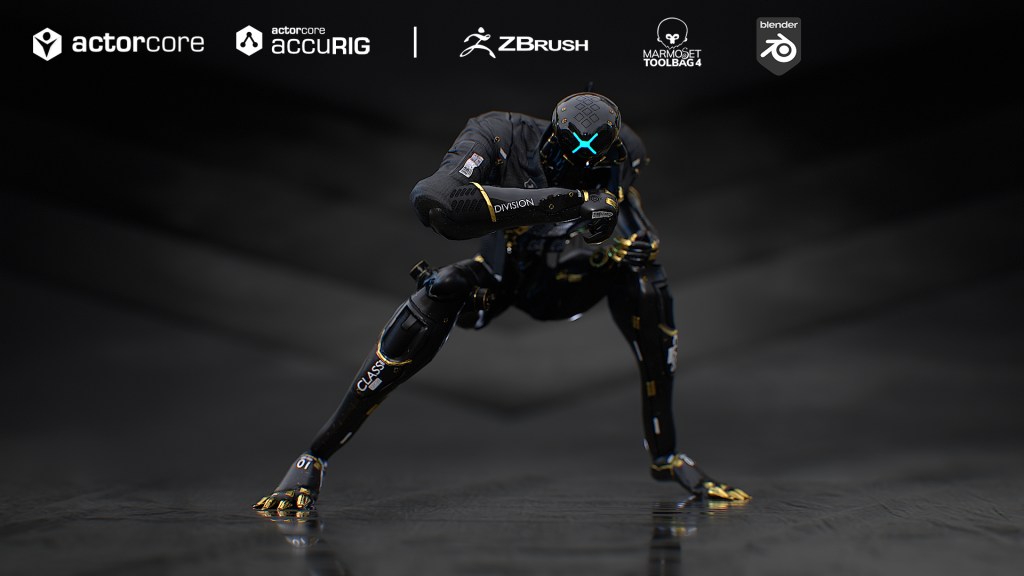
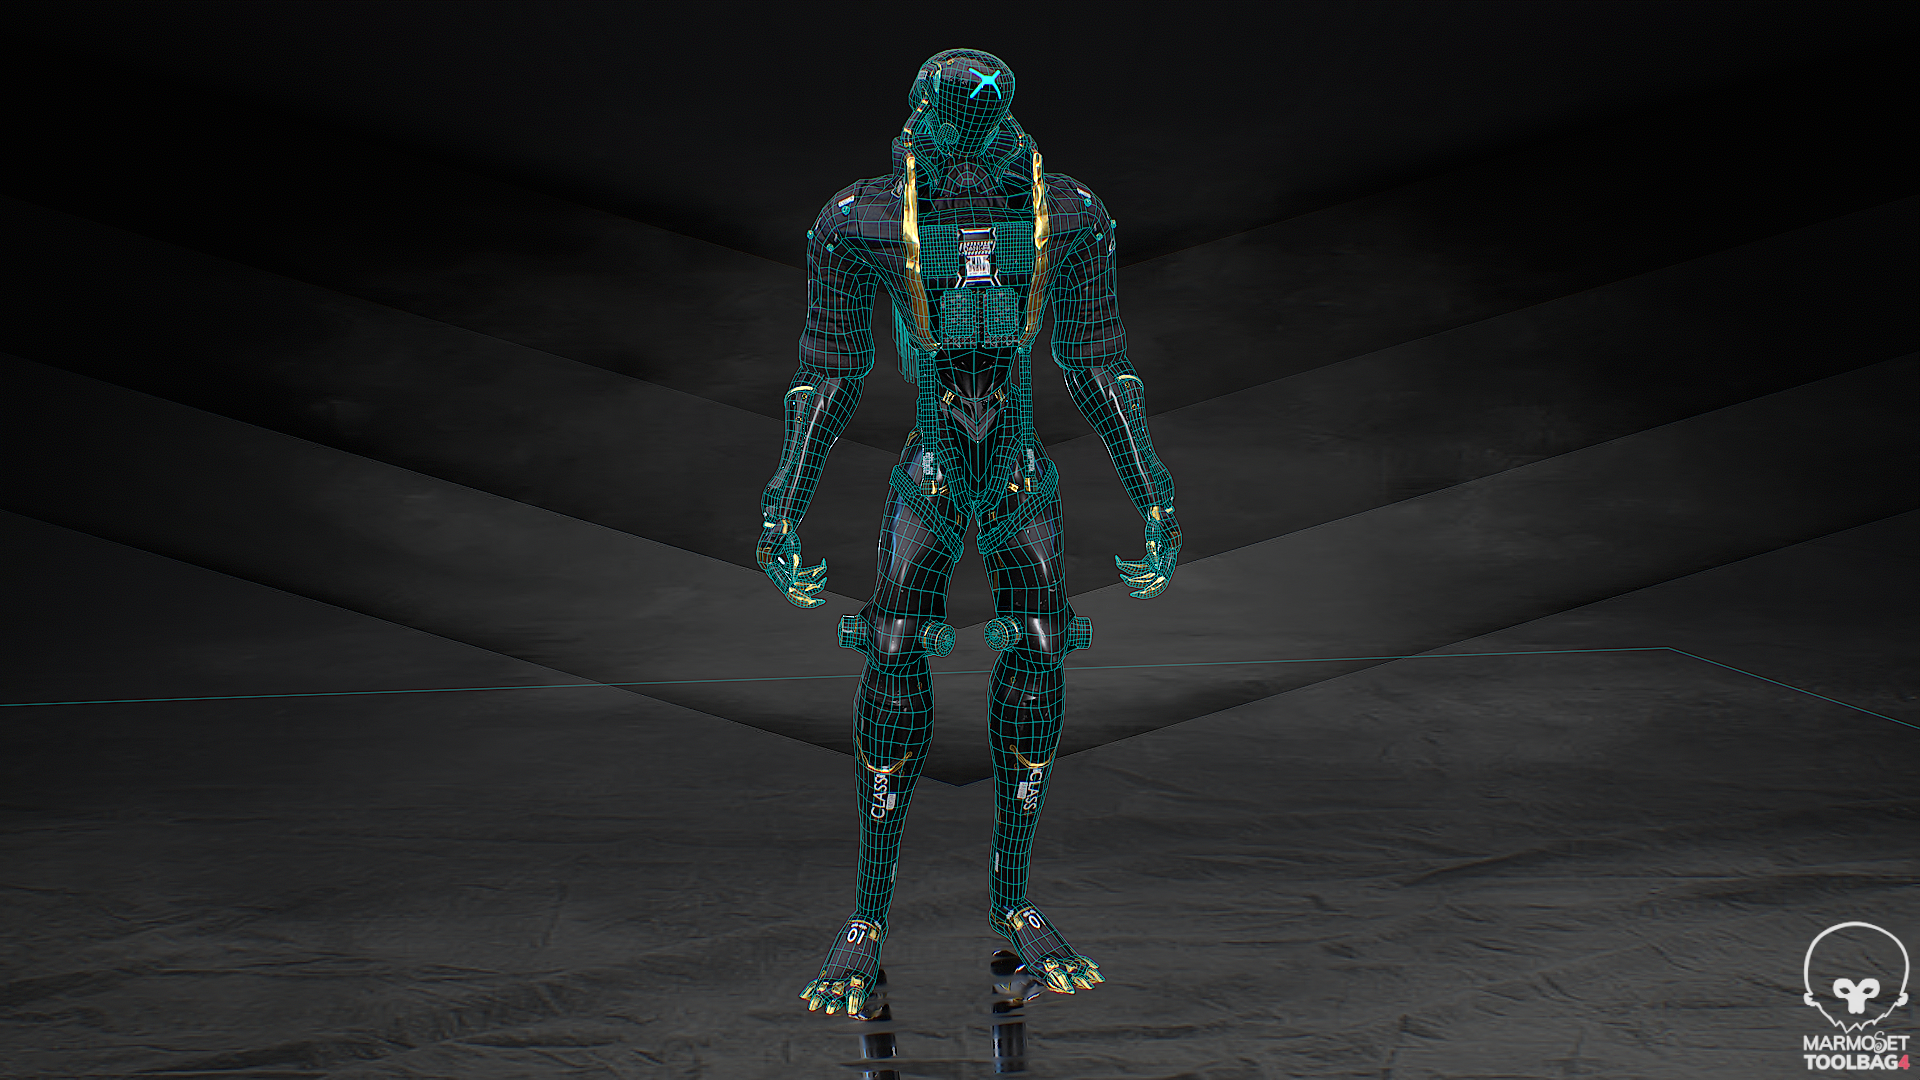
As with any job that one may undertake, it is always great to have the best tools available for the project at hand. In this project the desired tools happen to be AccuRIG, ActorCore 3D store, ZBrush, Blender and Marmoset Toolbag 4.
Let’s start by looking at the process that is involved with the creation of a fully-rigged and animated character and why this method works best for me.
ZBrush, Essential for Sculpting 3D Models
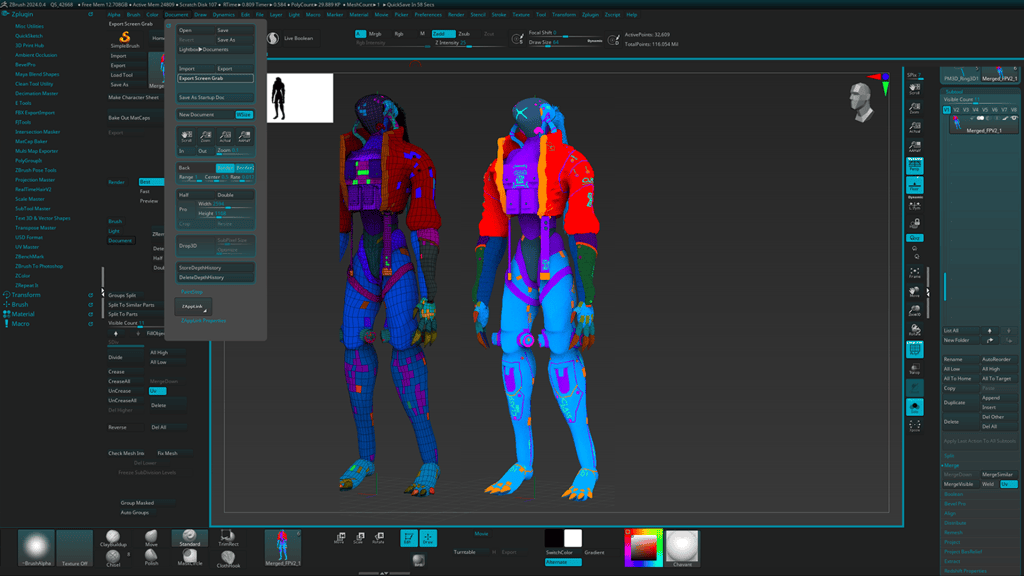
To begin you will need ZBrush for the creation of the high poly sculpt and the low poly, UVed mesh. The Matcap Baker plugin is great for getting ID maps out in the end stages.
Let us take a more in depth look at ZBrush and the Matcap Baker plugin, as it is the starting point for the workflow. After you have sculpted your character, unless you re-meshed it as you worked (this is what I suggest) then now is the time for a re-mesh and projection of the high-poly details back onto the re-meshed character. The reason we do this is to give a better topology for the UVs and animation deforms in AccuRIG.
Pro-tip 1
Try to avoid adding lots of parts around joints that will deform and model in a T- or A-Pose.
Pro-tip 2
Re-mesh all subtools before you combine or merge them into more manageable sub-tools. Try to keep in mind the texture size limits of your project when combining your sub-tools. You can always combine uv’s in a program like Blender and re-import to give your model new/updated uv maps if you have a very high poly model that requires many sub-tools to keep the sub-tool-poly-count down and export as a single FBX.
Pro-tip 3
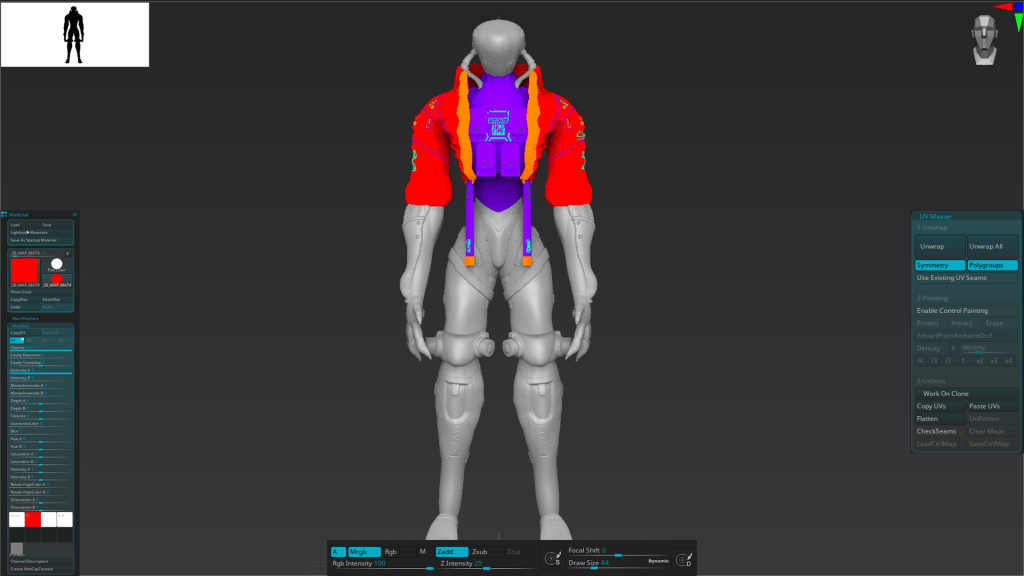
When sculpting your details, sculpting with MatCap color painting turned on is essential for your material ID maps for later texture generation. For every part of your model, you should use a different MatCap. At the end, make all matcaps a flat material with none being the same color. Use UVMaster plugin that ships with ZBrush with poly-groups turned on in the plugin.
AccuRIG, Auto-rigger with Fast & Accurate Results
Next, you will need AccuRIG free software available from the ActorCore website. This program allows seamless transfer of the rigged model from a posed static one.
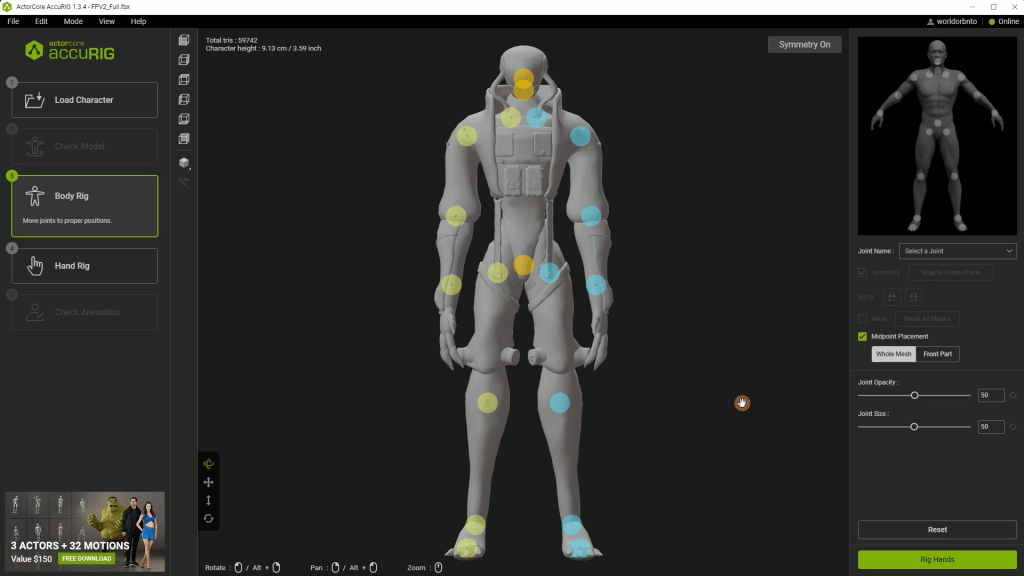
Open up AccuRIG auto-rigger, import your model that you exported from ZBrush and let the magic begin! AccuRIG auto-rigger is an amazing tool for getting your bipeds rigged fast, efficiently and most importantly, accurately. If your AccuRIG generated perfect guide placement on the first go, you’re all set. If not, move them (use the guides) around to the joint placement you would like. AccuRIG also does hands — and does it well — with the ability to rig up to five fingers, including the thumb.
ActorCore, 3000+ Professional Mocap Animations
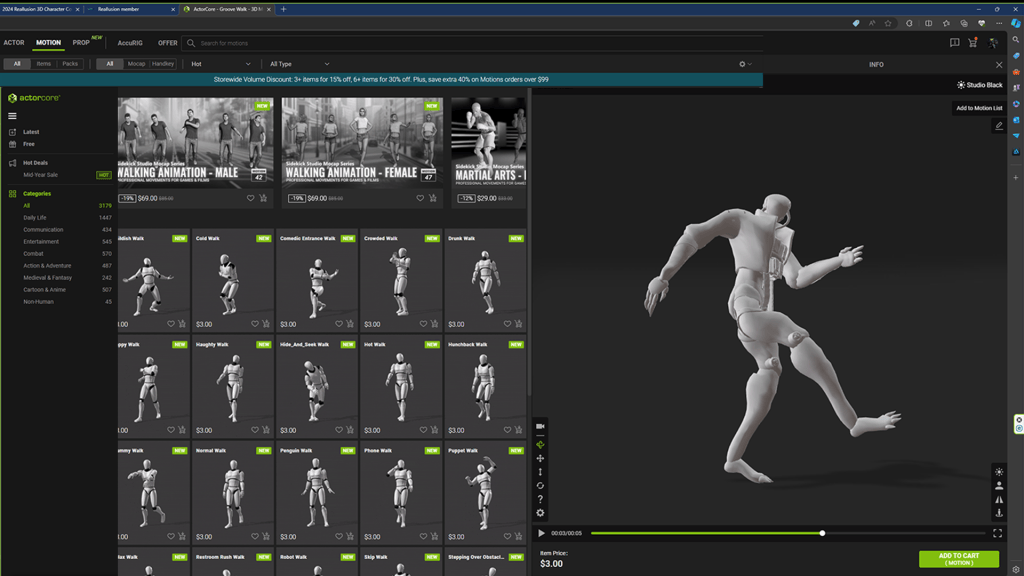
ActorCore 3D store makes it incredibly easy to pick something that will fit any flavor you could want. With a huge online library of 3D assets to choose from, you can find a subtle idle or an animation that empowers your character to do back flips. The possibilities are really endless, so have some fun!
Navigation in ActorCore has been streamlined for users, with a search bar that has a huge list of words it recognizes and a generalized nav bar with an expanding list on the left side that holds all the animations on the site. Along the way, if you find an animation that interests you, you can always favorite it by clicking the heart icon on the preview image to revisit later. After exploring the site, pick your animation and give it a double-click. It will appear on your character in the 3D preview window. Click the purchase button and go through the next screens to make the animation downloadable and have permanent access to it.
Blender, Free Character Animation Editing
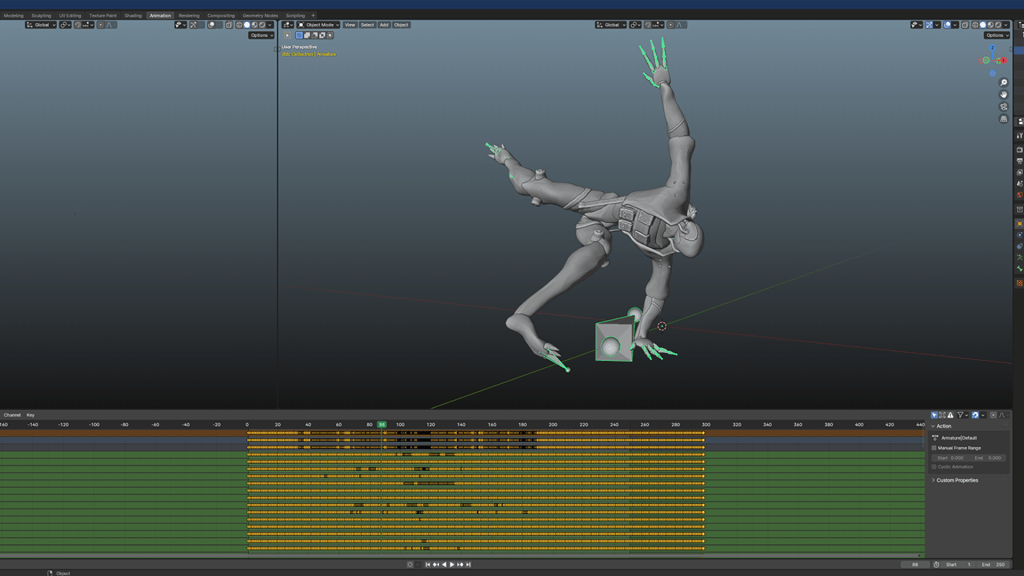
Blender is a great, free program you need for the combination of animation and model. It has been around for many years and undergone substantial changes from when I was young. With Blender, you can import many different files like FBX, with the rigs attached. Also skeleton files with keyframe data. It also allows us to import animation to our rigged character and export them as a single object.
Essentially, we will be attaching the animation to the fully-rigged and weighted model downloaded from ActorCore. Simply import your rigged actor and desired motion to Blender, then, with a few steps you can have the motions perfectly retargeted to the actor without any issues.
Pro-tip 4
Do not worry about deleting the original keyframes — the ones you are about to paste will occupy the same space and will overwrite the old ones.
Marmoset, Building Sophisticated Looks
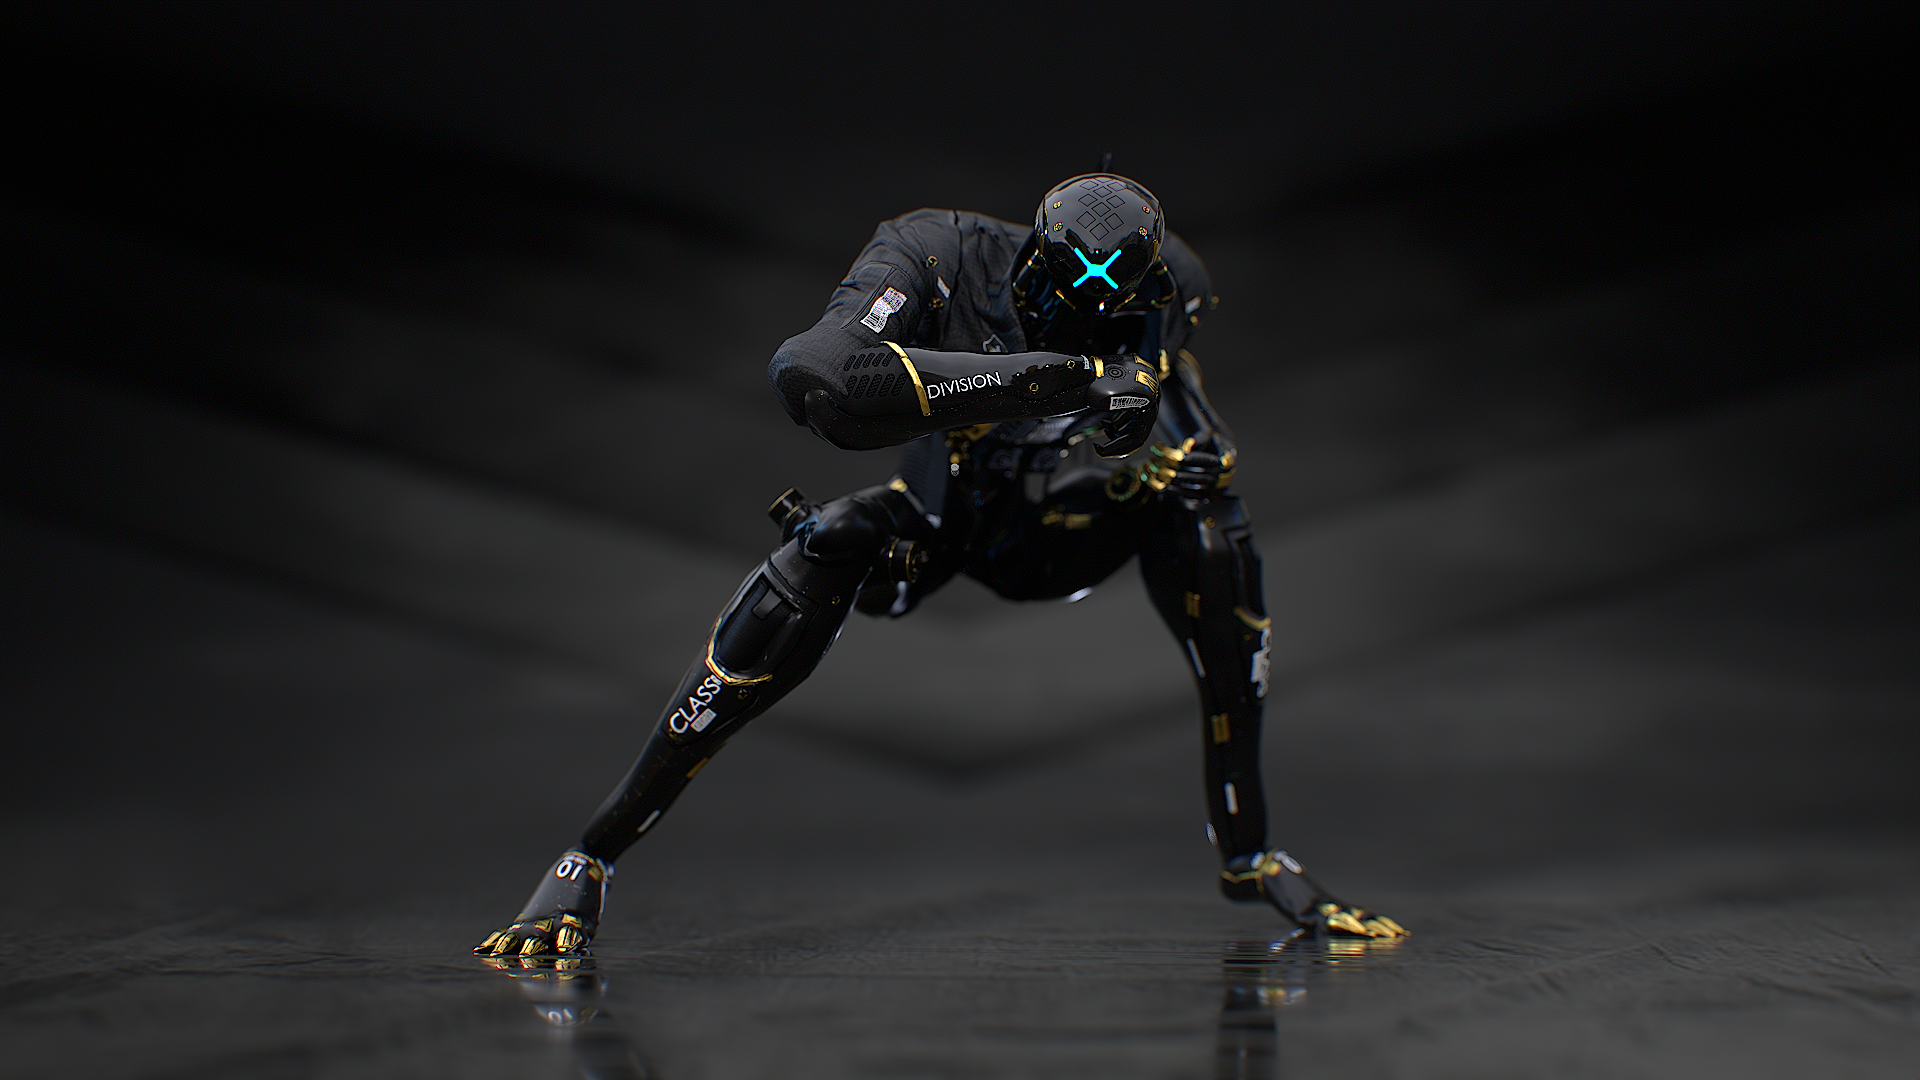
Lastly, we need Marmoset Toolbag 4 for the final renders of any poses and the fully animated sequences.
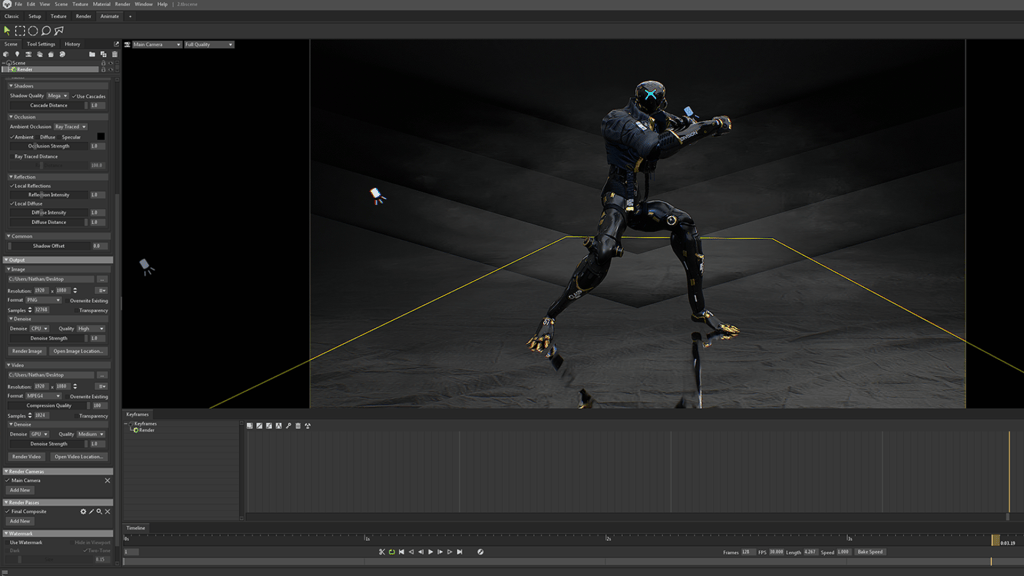
It is time to see your work in action! With Marmoset Toolbag 4 open and ready, apply any and all textures created in whatever program you decided to use (I like Marmoset Toolbag 4).
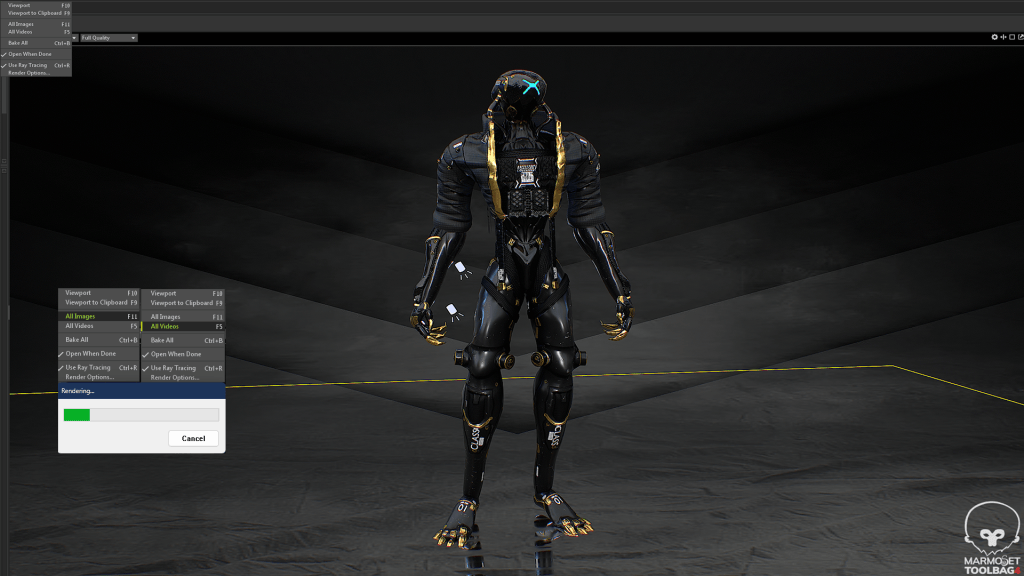
Tweak your render, camera, lights and sky so you can get the perfect animation capture possible. The animation tab and your timeline are important to match up with the loop you are trying to create. So, here we are just making sure that the full sequence is captured and there are no partial repeats of it during rendering. Adjusting the animation speed directly on your model by first selecting the root in its hierarchy can help a lot with fine-tuning the speed of how the animation plays out during render times.
Press F5 (animation) and F11 (keyframe render) on your keyboard after you have done all required modifications to the settings and have the best-looking environment for your character. Wait for your render to record and think about angles for some single-frame renders that will really help highlight your project.
Final Thoughts
The method outlined here is my favored approach for a complete rigged, animated and rendered character simply because it works! It is quick, efficient and yields accurate and pleasing results. Before we had such a powerful tool (AccuRIG) to add to our pipeline, this was all done painstakingly by hand… Now with a few clicks, you’re ready for action!
This workflow and AccuRIG auto-rigger are a must-have, for the budding 3d artist and seasoned vet alike. Not only will it save you time and frustration, it will help you focus your workflow into a sharper point with a great UI and straight-to-the-point flow. Try it yourself and have some fun!!!
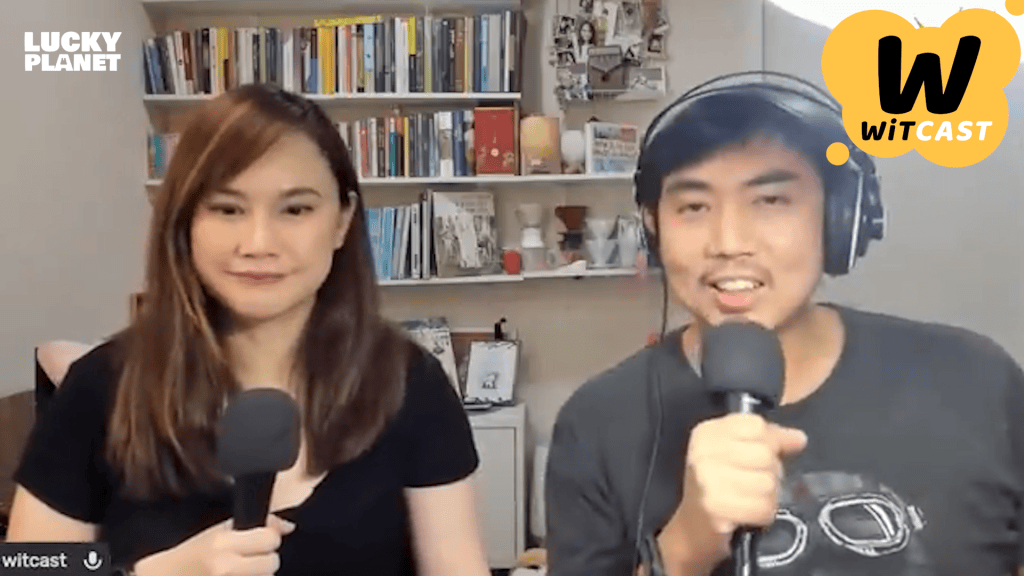
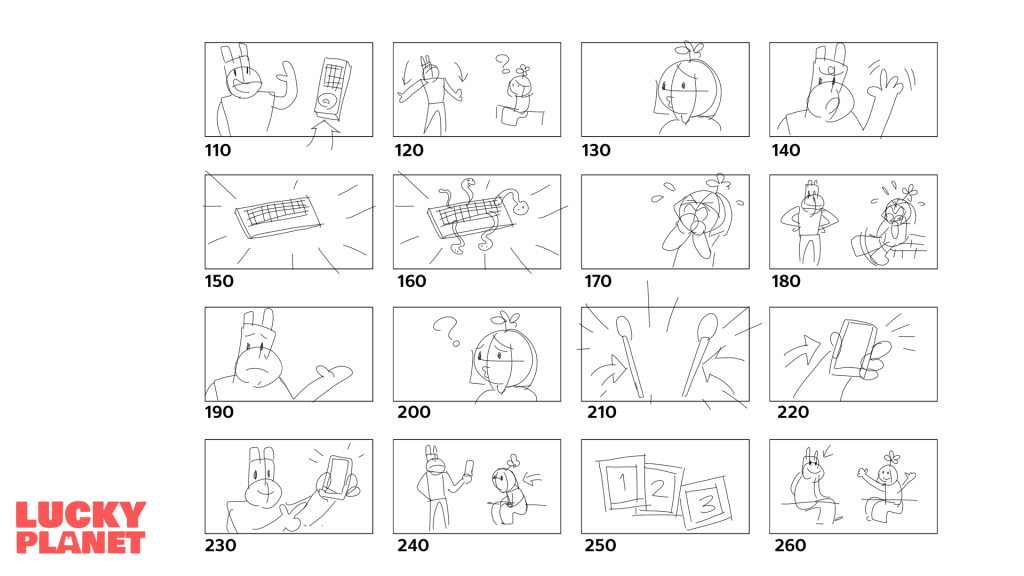
Hi, I’m Lucky Planet. I’ve been a huge fan of “WiTcast,” one of Thailand’s first science podcasts, since 2012. Their stories always spark my imagination, and I thought it would be amazing to visualize them. So, one day, I reached out to see if they’d be interested in turning their stories into animations. That’s how it all started. The idea was simple: take a 3-hour podcast episode, distill it down to its key message, and create a vibrant 3-minute animation. This project got its initial boost from the Thai government media fund, which supports great content for all ages — exactly what we’re doing here!
Designing the 2D character animations took some time. I sketched a lot until I found the perfect designs. To cut down on production time and costs, I gave the characters longer arms and legs, which made their gestures more articulate and expressive. And, since they mostly stood or sat during the show without much action, this approach was ultimately the right decision.
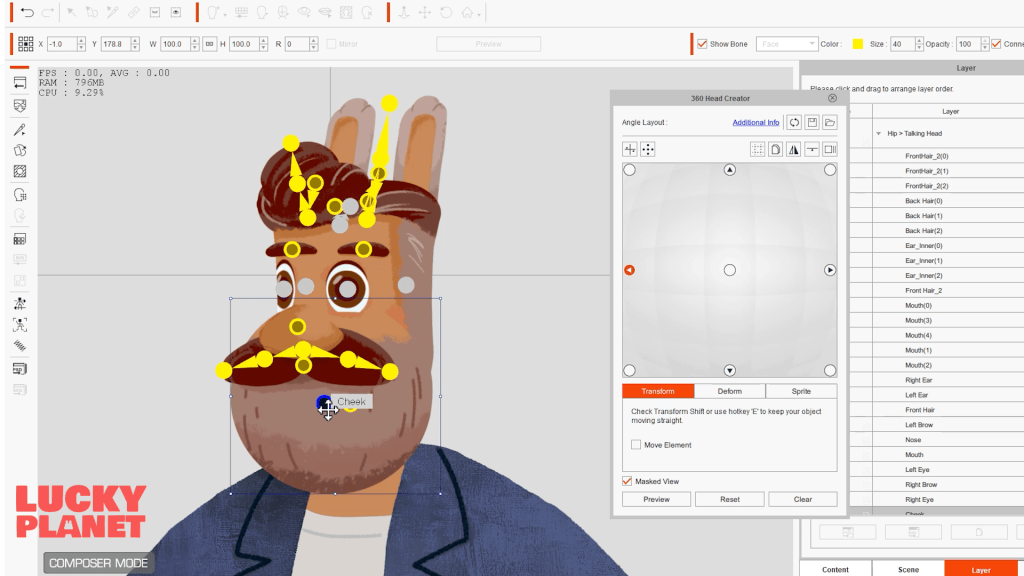
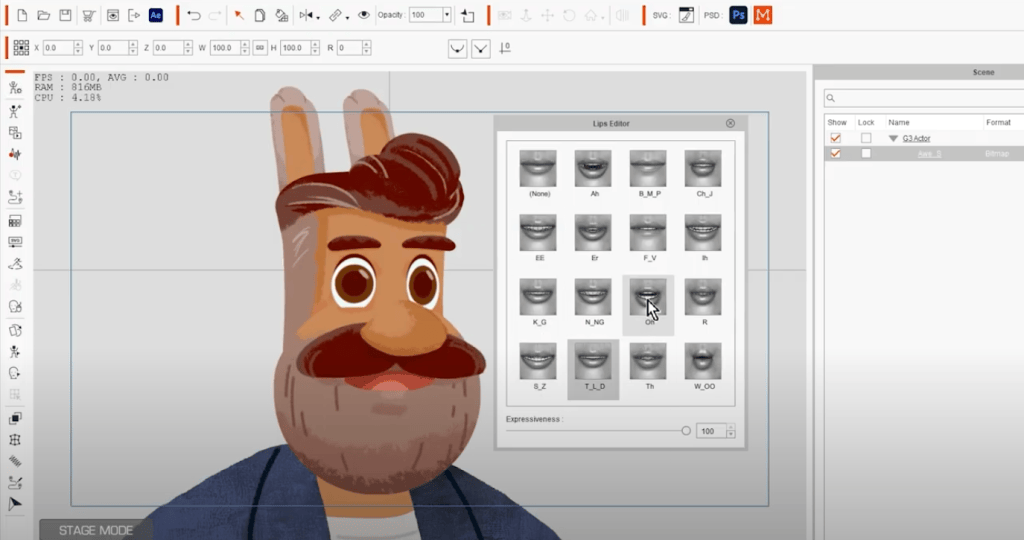
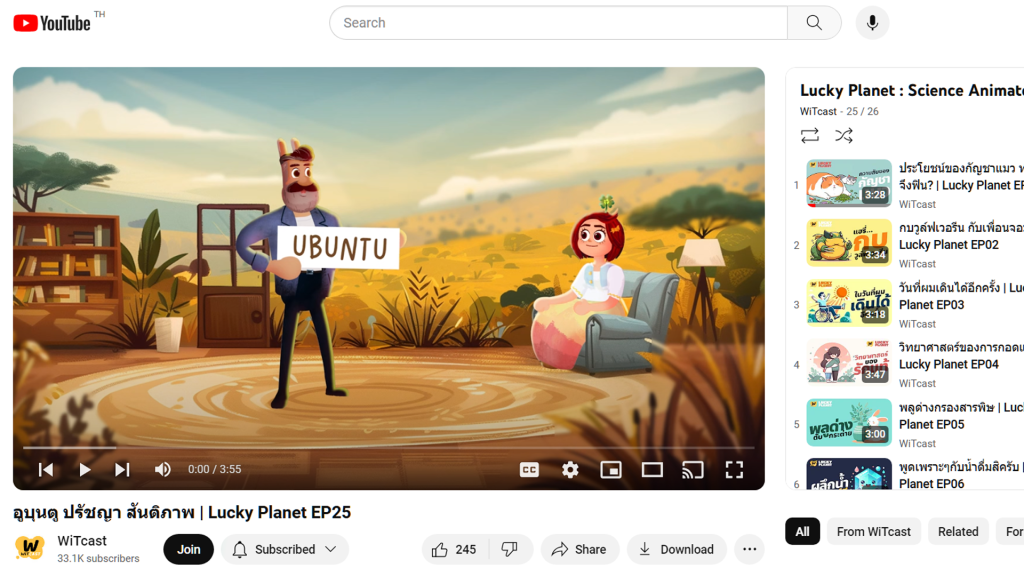
Meet Professor Almond, our main host. He’s an alien dedicated to unraveling the mysteries of our world as a science communicator and advocate. I drew inspiration for his appearance from renowned science figures like Neil deGrasse Tyson and Bill Nye. His facial features are simple, mostly circles and squares, with distinctive rabbit ears to highlight his non-human origin. With broad shoulders, Almond defies the typical scientist stereotype. His signature color is blue, reflecting his cosmic origins and evident in his choice of fashion.
Next is Cookie, Almond’s co-host. She has no background in science, but dreams of becoming a YouTuber. To pursue this ambition, she’s teamed up with the Professor. Cookie’s design contrasts Almond’s — her color is red, and she wears huge pants to make her lower half look bigger compared to Almond’s top-heavy frame. We’re not sure if Cookie is human, since she has a big lucky clover on top of her head — a mystery for another day.
The most important feature for both 2D characters are their big, expressive eyes with large white areas. This allows them to clearly connect with the audience as they guide us through the amazing world of science.
The audience will watch these two hosts’ faces for three minutes in every episode. In that timeframe, their facial expressions have to be interesting and relatable. Mostly, the characters would be talking directly to the camera or interacting with each other, keeping the 2D character animations dynamic. To achieve this, I used CTA’s “360 Head” feature, which allows for natural-looking and easily controlled head movements.
(3D Head Creator transforms 2D art into 3D styled characters with up to 360 degree of motion)
As expected, the voice actors really nailed it on their podcast. My only sole concern was to animate them as authentically as I could; and having known them for years definitely helps. I crafted approximately 10 mouth shape designs, and then let the software handle the lip-syncing automatically. However, it didn’t quite sync up perfectly with the Thai audio. With CTA version 4, I had to manually adjust about half of it. Interestingly, in version 5, I’ve noticed a significant improvement — it only requires about 30% manual editing now.
(Import a WAV file or capture your voice with an integrated recorder. A vast library of phoneme shapes is ready to be deployed on your images. )
“Spring bones” is a fresh addition in CTA version 5. It effortlessly applies dynamic movements onto stiff bones, as seen in elements like the rabbit’s long ears, hair, and the fluttering leaf. Once I animate the head and body, the rest simply falls into place, resulting in 2D character animations that are even more endearing.
The key lies in striking the perfect balance: Too many bones can bog things down, whereas too few can result in choppy movements. Cartoon Animator 5 offers a range of spring types to suit your needs, from highly elastic for exaggerated, cartoony motions to stiffer options for more nuanced or realistic movements.
Given that our 2D character animations steer clear of the exaggerated movements found in Looney Tunes, I prefer stiffer springs. This choice also helps keep the audience’s attention on the characters’ facial expressions. Setting up Almond’s ears posed a challenge, especially with the 360 Head feature in use. At certain angles, the inner and outer ear parts move independently. To manage this, I had to incorporate two separate bone sets for precise control.
Behind the scenes on character setup and storyboarding
With the character setup complete, it was time to dive into animation! I began by sketching out a basic storyboard to outline the timing and pacing. Given that it’s a talk show format, the animation remained fairly straightforward. I implemented a breathing motion clip as a default loop cycle and then layered on the arm and body movements. However, the main focus was on animating the facial expressions, as they’re crucial for engaging with the audience. It took me about a week to animate a single episode, followed by another week to create and integrate the illustrations into the storyline.
The show’s production kicked off in 2023, and we’ve now wrapped up the first season comprising 25 episodes. The response from Thai audiences has been phenomenal, with one episode even surpassing 3 million views on TikTok! This project initially received a boost from the Thai government media fund. However, I have grander aspirations — I aim to dub it in English and introduce it to a global audience. With this journey just starting, I’m in the process of securing funds and seeking out potential sponsors to make this vision a reality.
If you’re keen on helping this science show become a global sensation, feel free to reach out to me to discuss potential opportunities. Let’s collaborate and share the magic of podcasts with audiences worldwide!